MyHaas Bem-vindo,
!
Haas Tooling Histórico de encomendas do convidado MyHaas/HaasConnect Iniciar a sessão Registar Haas Tooling A minha conta Order History Return History MyHaas/HaasConnect Encerrar a sessão Bem-vindo, As minhas máquinas Última atividade Os meus orçamentos A minha conta Os meus utilizadores Encerrar a sessão
Encontrar o seu distribuidor
  1. Selecionar idioma
    1. English
    2. Deutsch
    3. Español - España
    4. Español - México
    5. Français
    6. Italiano
    7. Português
    8. Český
    9. Dansk
    10. Nederlands
    11. Magyar
    12. Polski
    13. Svenska
    14. Türkçe
    15. 中文
    16. Suomi
    17. Norsk
    18. الإنجليزية
    19. български
    20. Hrvatski
    21. Ελληνικά
    22. Română
    23. Slovenský
    24. Slovenščina
    25. 한국어
    26. 日本語
    27. Українська
  • máquinas Main Menu
    • Fresadoras Verticais Haas Fresadoras verticais
      Fresadoras verticais
      Fresadoras verticais View All
      • Fresadoras verticais
      • Série VF
      • Máquinas universais
      • Série VR
      • VP-5 prismático
      • VMC com troca de paletes
      • Mini fresadoras
      • Máquinas de moldagem
      • Centros de perfuração de alta velocidade
      • Série Perfurar/Roscar/Fresar
      • Fresadora Sala de Ferramentas
      • Fresadoras compactas
      • Série pórtico
      • Routers de chapa SR
      • VMC extragrande
      • Fresadoras de coluna dupla
      • Simulador de controlo
      • Fresadora com carregador de peças automático
      • Carregador de peças automático de carga lateral VMC/UMC
      • Carregador de peças automático compacto
    • Product Image Soluções multi-eixo
      Soluções multi-eixo
      Soluções multi-eixo View All
      • Soluções multi-eixo
      • Tornos de eixo Y
      • Fresadoras de 5 eixos
    • Tornos Haas Tornos
      Tornos
      Tornos View All
      • Tornos
      • Série ST
      • Spindle duplo
      • Série Box Way
      • Tornos de sala de ferramentas
      • Torno de Bucha
      • Alimentação de barra Haas V2
      • Torno com carregador de peças automático
    • Fresadoras horizontais Haas Fresadoras horizontais
      Fresadoras horizontais
      Fresadoras horizontais View All
      • Fresadoras horizontais
      • Cone ISO50
      • Cone ISO40
    • Produtos rotativos e indexadores Haas Rotativos e Indexadores
      Rotativos e Indexadores
      Rotativos e Indexadores View All
      • Rotativos e Indexadores
      • Mesas rotativas
      • Indexadores
      • Rotativos de 5 eixos
      • Rotativos extra-grandes
    • Product Image Sistemas de automatização
      Sistemas de automatização
      Sistemas de automatização View All
      • Sistemas de automatização
      • Automatização de fresadora
      • Automatização de tornos
      • Modelos de automação
    • Centros de perfuração Haas Máquinas Desktop
      Máquinas Desktop
      Máquinas Desktop View All
      • Máquinas Desktop
      • Fresadora Desktop
      • Torno Desktop
    • Equipamento de oficina Haas Comprar equipamento
      Comprar equipamento
      Comprar equipamento View All
      • Comprar equipamento
      • Serra
      • Fresadora de joelho
      • Esmeril de superfície, 2550
      • Máquina de corte a laser
    • LIGAÇÕES RÁPIDAS Série especial  Série especial 
      SÉRIE UE SÉRIE UE CONSTRUÇÃO E PREÇO | LISTA DE PREÇOS CONSTRUÇÃO E PREÇO | LISTA DE PREÇOS Máquinas em stock Máquinas em stock NOVIDADES NOVIDADES A SUA PRIMEIRA CNC A SUA PRIMEIRA CNC
      FERRAMENTAS DE COMPRAS
      • Construção e Preço de uma Haas
      • Lista de Preços
      • Inventário disponível
      • Financiamento CNCA
      QUER FALAR COM ALGUÉM?

      A Haas Factory Outlet (HFO) pode responder às suas perguntas e orientá-lo nas suas melhores opções.

      CONTACT YOUR DISTRIBUTOR >
  • Opções Main Menu
    • Product Image Spindles
      Spindles
      Spindles View All
      • Spindles
    • Product Image Trocadores da ferramenta
      Trocadores da ferramenta
      Trocadores da ferramenta View All
      • Trocadores da ferramenta
    • Product Image 4.º | 5.º eixo
      4.º | 5.º eixo
      4.º | 5.º eixo View All
      • 4.º | 5.º eixo
    • Product Image Torretas e ferramenta motorizada
      Torretas e ferramenta motorizada
      Torretas e ferramenta motorizada View All
      • Torretas e ferramenta motorizada
    • Product Image Sondagem
      Sondagem
      Sondagem View All
      • Sondagem
    • Gestão de limalha e líquido de refrigeração Haas Gestão da limalha e do líquido de refrigeração
      Gestão da limalha e do líquido de refrigeração
      Gestão da limalha e do líquido de refrigeração View All
      • Gestão da limalha e do líquido de refrigeração
    • O controlador Haas O controlador Haas
      O controlador Haas
      O controlador Haas View All
      • O controlador Haas
    • Product Image Opções de Produtos
      Opções de Produtos
      Opções de Produtos View All
      • Opções de Produtos
    • Product Image Ferramentas e Fixação
      Ferramentas e Fixação
      Ferramentas e Fixação View All
      • Ferramentas e Fixação
    • Product Image Dispositivo de aperto
      Dispositivo de aperto
      Dispositivo de aperto View All
      • Dispositivo de aperto
    • Product Image Soluções de 5 eixos
      Soluções de 5 eixos
      Soluções de 5 eixos View All
      • Soluções de 5 eixos
      • 5 Easy Steps to 5-Axis
    • Product Image AUTOMATIZAÇÃO
      AUTOMATIZAÇÃO
      AUTOMATIZAÇÃO View All
      • AUTOMATIZAÇÃO
    • LIGAÇÕES RÁPIDAS Série especial  Série especial 
      SÉRIE UE SÉRIE UE CONSTRUÇÃO E PREÇO | LISTA DE PREÇOS CONSTRUÇÃO E PREÇO | LISTA DE PREÇOS Máquinas em stock Máquinas em stock NOVIDADES NOVIDADES A SUA PRIMEIRA CNC A SUA PRIMEIRA CNC
      FERRAMENTAS DE COMPRAS
      • Construção e Preço de uma Haas
      • Lista de Preços
      • Inventário disponível
      • Financiamento CNCA
      QUER FALAR COM ALGUÉM?

      A Haas Factory Outlet (HFO) pode responder às suas perguntas e orientá-lo nas suas melhores opções.

      CONTACT YOUR DISTRIBUTOR >
  • Why Haas Main Menu
      Descubra a Diferença da Haas
    • Porquê a Haas?
    • MyHaas
    • Comunidade de formação
    • Indústria 4.0
    • Certificação Haas
    • Testemunhos de clientes
  • Assistência Main Menu
      Bem-vindo à Haas Service
      INÍCIO DA ASSISTÊNCIA Manuais do operador Procedimentos como fazer Manuais de Resolução de Problemas Manutenção preventiva Peças Haas Haas Tooling Vídeos
  • Vídeos Main Menu
×

Resultados da pesquisa

Web Pages

Images

    • <
    • 1
    • >
MyHaas Bem-vindo,
!
Haas Tooling Histórico de encomendas do convidado MyHaas/HaasConnect Iniciar a sessão Registar Haas Tooling A minha conta Order History Return History MyHaas/HaasConnect Encerrar a sessão Bem-vindo, As minhas máquinas Última atividade Os meus orçamentos A minha conta Os meus utilizadores Encerrar a sessão
Encontrar o seu distribuidor
  1. Selecionar idioma
    1. English
    2. Deutsch
    3. Español - España
    4. Español - México
    5. Français
    6. Italiano
    7. Português
    8. Český
    9. Dansk
    10. Nederlands
    11. Magyar
    12. Polski
    13. Svenska
    14. Türkçe
    15. 中文
    16. Suomi
    17. Norsk
    18. الإنجليزية
    19. български
    20. Hrvatski
    21. Ελληνικά
    22. Română
    23. Slovenský
    24. Slovenščina
    25. 한국어
    26. 日本語
    27. Українська
×

Resultados da pesquisa

Web Pages

Images

    • <
    • 1
    • >

UMC C-Axis Rotary Encoder Ring - Replacement - AD0497

Início da Assistência Procedimento como fazer Pesquisa de alarme: 9918 Anel codificador rotativo UMC eixo C - Substituição - AD0497

Anel codificador rotativo UMC eixo C - Substituição - AD0497

- Ir para secção - Back to Top

10.2 UMC ROTARY ENCODER RING - REPLACEMENT

Recently Updated Last updated: 06/13/2025

UMC C-Axis Rotary Encoder Ring - Replacement


AD0497

Revision A 06/2025

Introduction

This procedure details the replacement of the 3" C-Axis Encoder on all UMC machines and the 3" B-Axis Encoder on UMC -500/SS machines only.

Laser calibration is required to update the compensation table for the corresponding rotary axis following the encoder replacement. 

This document applies to the following Service Kits:

  • 93-3923  ENCDR NON-CONT KIT 3"ID SER HI-RES

Used on B & C-Axis:

  • UMC-500/SS

Used on C-Axis:

  • UMC-750/SS
  • UMC-1000/SS
  • UMC-1250/SS
  • UMC-1500-DUO/SS

Tools Required:

  • 99-2130 ANTI-OXIDANT COMPOUND ELECTRICAL
  • 99-2147 DIELECTRIC GREASE PACK SUPER LUBE
  • 0.008" Mylar Shim

C-Axis Encoder Ring Replacement

1

: Warning: Only certified service personnel should perform this procedure. Reorientation of Z-pulse or Trip-Flag will require laser calibration to populate rotary compensation tables with new, correct, values.

Zero-return all Axis.

Press [EMERGENCY STOP].

2

Handle jog B to +120°.

Remove the C-Axis bottom cover.

3

Press [SETTING].

Navigate to the Rotaty tab.

Un-Check the 4th Axis.

4

Press [DIAGNOSTIC].

Navigate to Parameters > Factory.

Set 7.083 C-Axis Linear Scale Enabled to "Scale Disabled".

Power off the machine.

5

Uninstall the encoder read-head [1] by disconnecting the encoder cable [2] and removing the bolts and washers.

6

Note the Z-Pulse orientation before removing the encoder ring hub.

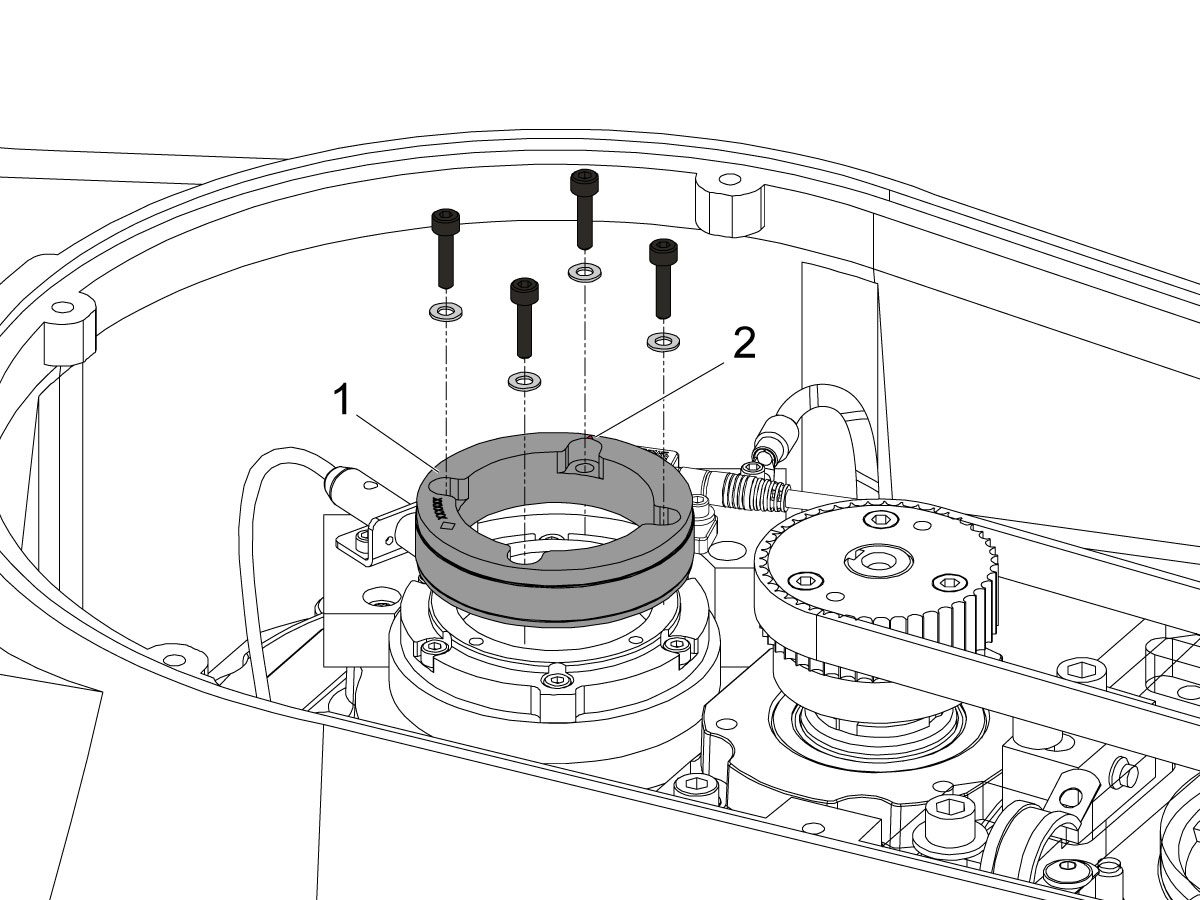
Uninstall the encoder ring hub [1] by removing the screws and washers mounting the encoder ring hub to the taper-lock. 

7

Mount and loosely install the encoder ring hub [1] from the service kit with the provided hardware, SHCS 10-32 X 3/4 (x4) and WASHER #10 FLAT (x4).

Verify the Z-Pulse is in the same location as the ring that was uninstalled. 

 Note: Do not torque mounting screws yet.

8

Turn on the machine.

Zero return all axis.

 Warning: Do not place the Mag Base anywhere near the Encoder.

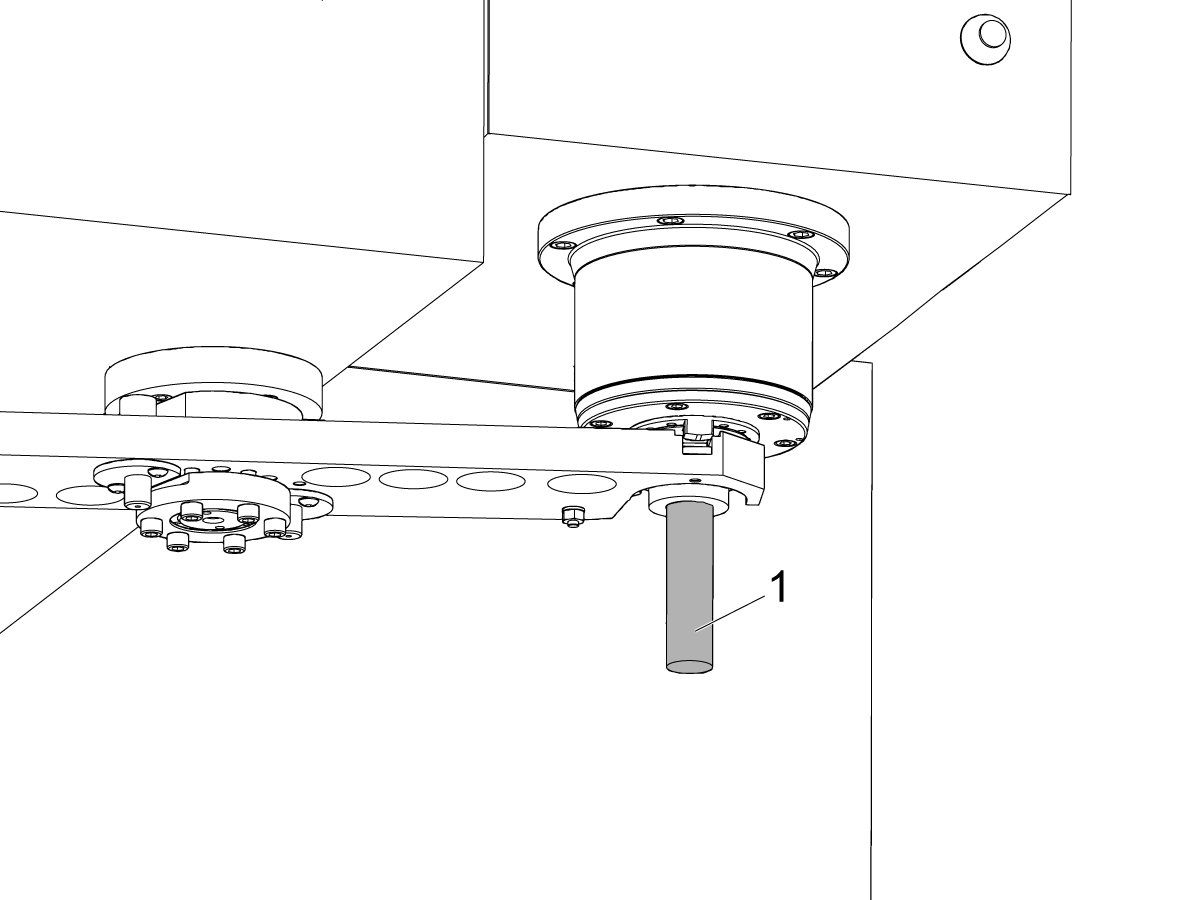
Check and document the runout on the OD of the scale encoder ring hub using the upper-most diameter, as shown.

Adjust as necessary. TIR must be 0.0005" or less.

Torque the 4 bolts of the encoder ring hub to 30 in-lbf in the star pattern.

After torquing, double check the runout to verify the ring hub has not shifted.

9

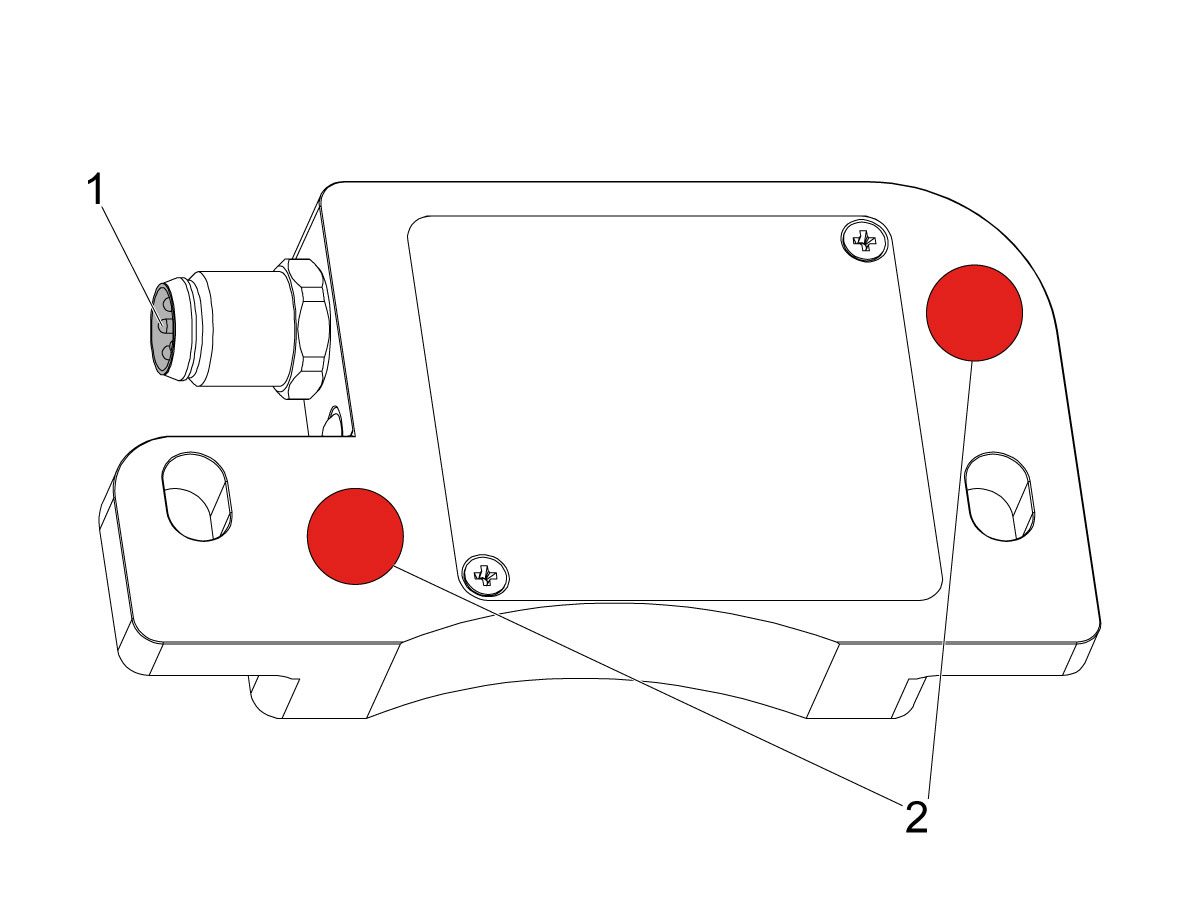
Clean the back surface of the encoder read-head and the mounting surface.

Add a small amount of silicone dielectric grease to encoder cable connection [1]. Grease should be a thin layer, but cover all the pins.

Apply two small drops of anti-oxidant (99-2130) to the mounting surface on the read head in the locations shown [2].

10

Connect the encoder cable [4] to the encoder read-head.

Insert cable by carefully lining up electrical pins with cable connector.

Install the encoder read-head [1] from the service kit with the provided hardware,  SHCS 8-32 x 1/2 bolts (x2) [2] and Washer .17ID x .4OD (2x) [3].

 Note: Do not torque mounting screws yet.

11

Set the gap between the scale ring and read-head as shown [1] using the appropriate mylar shim (0.008").

 Note: Do not use a metal shim.

Starting on the left side of the read-head [2], torque the two read-head mounting bolts to 20 in-lbf.

After torquing, double check the gap with the shim to verify the read-head has not shifted.

12

Reinstall the C-Axis bottom cover being sure no tools, shims, etc. have been left in the casting.

13

Press [SETTING].

Navigate to the Rotaty tab.

Check the 4th Axis.

Rotate the B-Axis back to zero when done.

14

Press [DIAGNOSTIC].

Navigate to Parameters > Configuration > Axis > B > Travel Limits.

Change: 6.108 B-Axis Positive Travel Limit from 180 to 110.

15

Press [DIAGNOSTIC].

Navigate to Parameters > Factory.

Set 7.083 C-Axis Linear Scale Enabled to "Scale Linear".

Power cycle the machine.

16

Zero-Return the C-Axis.

Zero-Return All Axis.

Set new Tool Change offset by following the UMC - X and Y Axes - Tool Change Offsets and the Side-Mount Tool Changer - Z-Axis Tool Change Offset - NGC procedures.

17

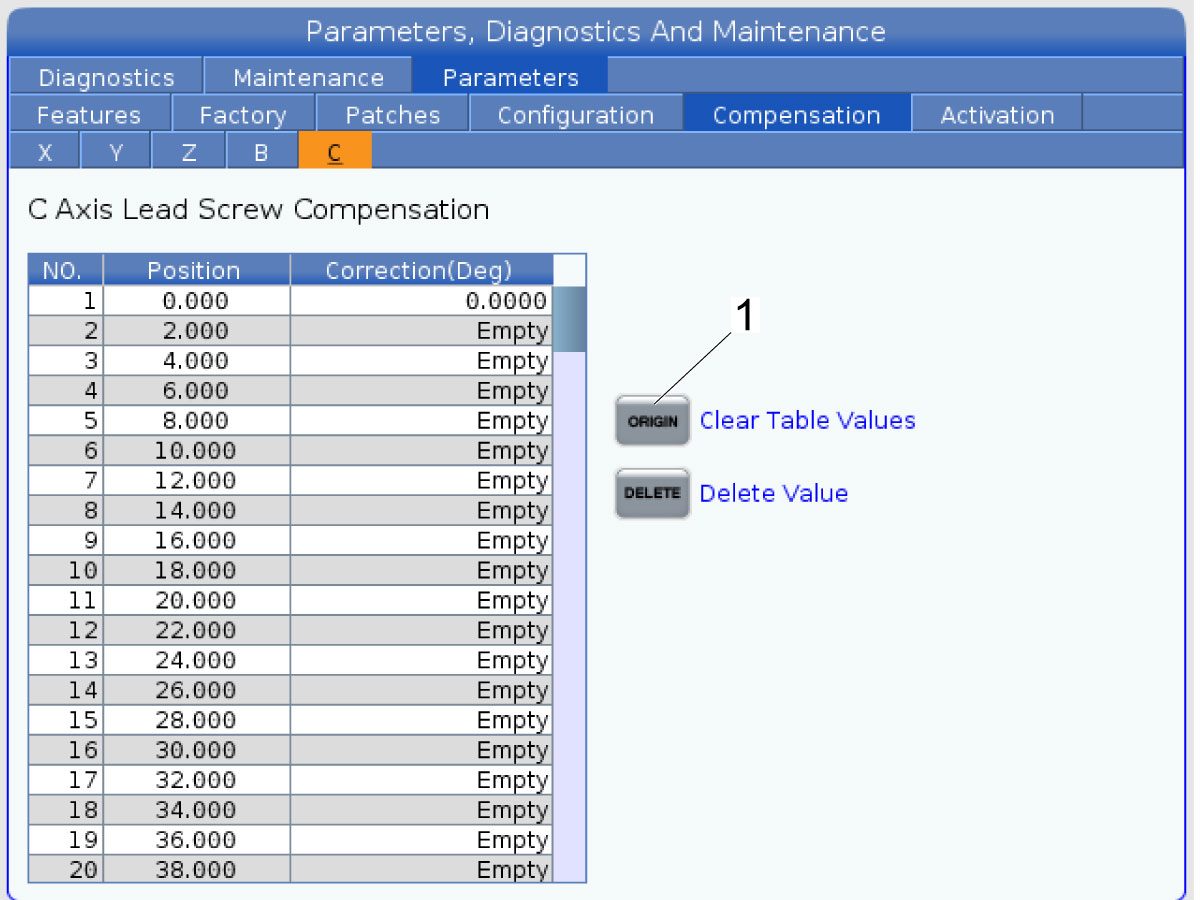
Clear the Compensation table for the C-Axis.

Press [DIAGNOSTIC].

Navigate to Parameters > Compensation > C.

Press [ORIGIN].

To update compensation table values for the C-Axis a laser calibration is required. The calculated compensation values will then be entered into the C-Axis Compensation Table.

B-Axis Encoder Ring Replacement

 Note: These step apply only to the UMC-500/SS B-Axis.

1

: Warning: Only certified service personnel should perform this procedure. Reorientation of Z-pulse or Trip-Flag will require laser calibration to populate rotary compensation tables with new, correct, values.

Zero-return all Axis.

Press [EMERGENCY STOP].

2

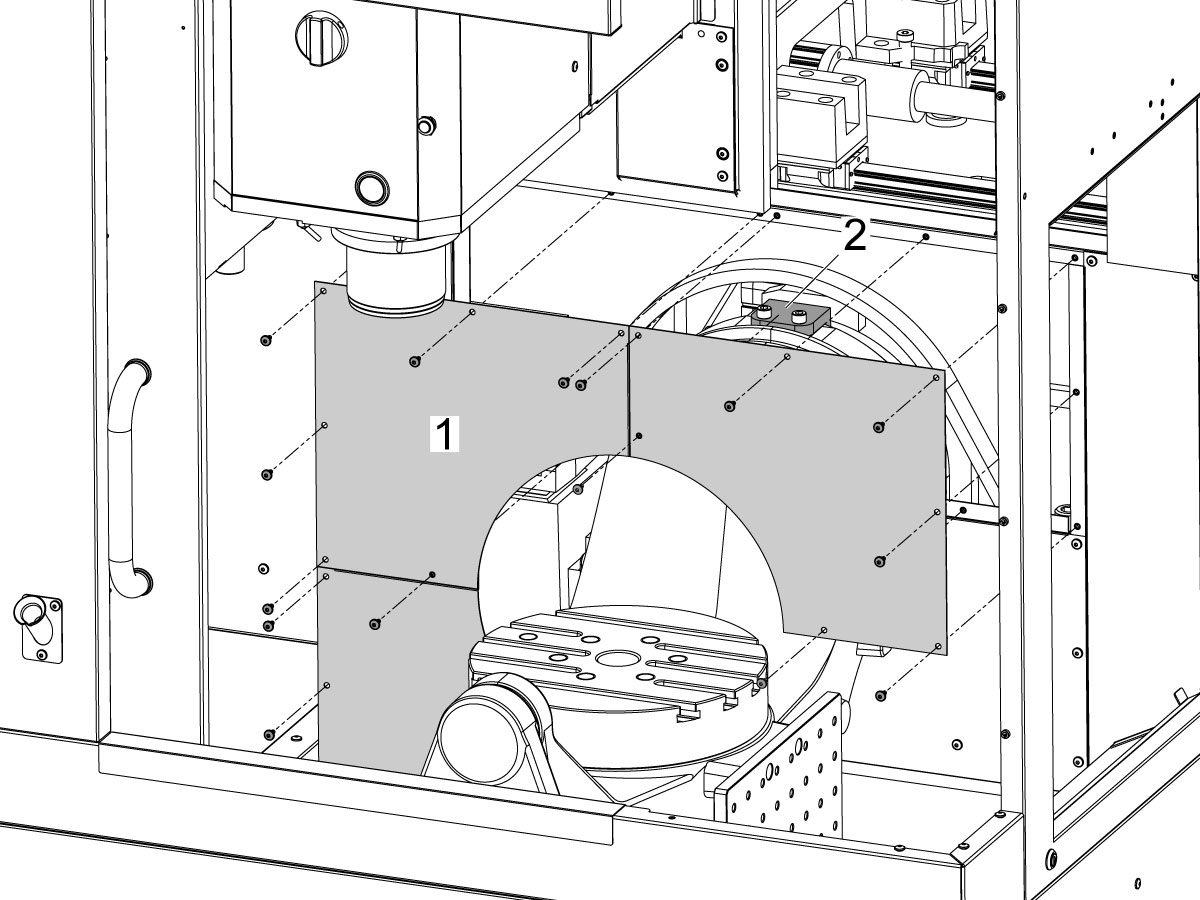
Remove the bulkhead sheet metal [1] to access the B-Axis hard stop [2]. 

3

Rotate the B-Axis approximately 100 degrees, or until there is enough room to access the hard stop [1].

Remove the B-Axis hard stop [1].

4

Remove the two rear sheet metal panels [1] to access the B-Axis components.

5

Insert a service key and enter service mode.

Press [DIAGNOSTIC].

Navigate to Parameters > Configuration > Axis > B > Travel Limits.

Change: 6.108 B-Axis Positive Travel Limit from 110 to 365.

6

Handle jog B to +180°.

Remove the C-Axis bottom cover.

7

Press [DIAGNOSTIC].

Navigate to Parameters > Factory.

Set 6.083 B-Axis Linear Scale Enabled to "Scale Disabled".

Power off the machine.

8

Disconnect all of the cables and hoses [1] running to the C-Axis through the B-Axis encoder ring. 

 Note: Mark the cables and hose to make reconnecting them easier later in this procedure. 

Remove the corrugated conduit [2].

9

Uninstall the encoder read-head [1] by disconnecting the encoder cable [2] and removing the bolts and washers.

10

Note the Z-Pulse orientation before removing the encoder ring hub.

Uninstall the encoder ring hub [1] by removing the screws and washers mounting the encoder ring hub to the taper-lock. 

11

Mount and loosely install the encoder ring hub [1] from the service kit with the provided hardware, SHCS 10-32 X 3/4 (x4) and WASHER #10 FLAT (x4).

Verify the Z-Pulse is in the same location as the ring that was uninstalled. 

 Note: If the Z-Pulse is in the wrong location the B-Axis will not zero return correctly and can damage the cables and hoses.

 Note: Do not torque mounting screws yet.

12

Route all of the cables and hoses [1] for the C-Axis through the corrugated conduit [2] and through the B-Axis encoder ring. 

Reconnect all of the cables and hoses to their original locations in the C-Axis.

13

Turn on the machine.

Zero return all axis.

 Note: The B-Axis should zero return in the Clockwise direction.

 Warning: Do not place the Mag Base anywhere near the Encoder.

Check and document the runout on the OD of the scale encoder ring hub using the upper-most diameter, as shown.

Adjust as necessary. TIR must be 0.0005" or less.

Torque the 4 bolts of the encoder ring hub to 30 in-lbf in the star pattern.

After torquing, double check the runout to verify the ring hub has not shifted.

14

Clean the back surface of the encoder read-head and the mounting surface.

Add a small amount of silicone dielectric grease to encoder cable connection [1]. Grease should be a thin layer, but cover all the pins.

Apply two small drops of anti-oxidant (99-2130) to the mounting surface on the read head in the locations shown [2].

15

Connect the encoder cable [1] to the encoder read-head.

Insert cable by carefully lining up electrical pins with cable connector.

Install the encoder read-head [2] from the service kit with the provided hardware,  SHCS 8-32 x 1/2 bolts (x2) [4] and Washer .17ID x .4OD (2x) [3].

 Note: Do not torque mounting screws yet.

16

Set the gap between the scale ring and read-head as shown [1] using the appropriate mylar shim (0.008").

 Note: Do not use a metal shim.

Starting on the left side of the read-head [2], torque the two read-head mounting bolts to 20 in-lbf.

After torquing, double check the gap with the shim to verify the read-head has not shifted.

17

Reinstall the C-Axis bottom cover being sure no tools, shims, etc. have been left in the casting.

 Note: You will have to set a new tool change offset and update compensation table values for the B-Axis. This will require laser calibration.

18

Rotate the B-Axis to the same position when the hard stop was removed. 

Install the B-Axis hard stop [1].

19

Press [DIAGNOSTIC].

Navigate to Parameters > Configuration > Axis > B > Travel Limits.

Change: 6.108 B-Axis Positive Travel Limit from 365 to 110.

Rotate the B-Axis back to zero when done.

20

Press [DIAGNOSTIC].

Navigate to Parameters > Factory.

Set 6.083 B-Axis Linear Scale Enabled to "Scale Linear".

Power cycle the machine.

21

Zero-Return the B-Axis.

Zero-Return All Axis.

Set new Tool Change offset by following the UMC - X and Y Axes - Tool Change Offsets and the Side-Mount Tool Changer - Z-Axis Tool Change Offset - NGC procedures.

22

Install the bulkhead sheet metal [1] once the B-Axis hard stop [2] has been installed. 

23

Install the two rear sheet metal panels [1].

24

Clear the Compensation table for the B-Axis.

Press [DIAGNOSTIC].

Navigate to Parameters > Compensation > B.

Press [ORIGIN].

To update compensation table values for the B-Axis a laser calibration is required. The calculated compensation values will then be entered into the B-Axis Compensation Table.

Recently Viewed Items

You Have No Recently Viewed Items Yet

Feedback
Haas Logo

美元价格不包括关税、报关费用、保险费、增值税及运费。
USD prices DO NOT include customs duty, customs fees, insurance, VAT, or freight.

人民币价格包含关税、报关费用、货运保险和增值税, 但不包括运费。
CNY prices include customs duty, customs fees, insurance, and VAT. DOES NOT include freight.

Preçário de entregas da Haas

Este preço inclui custo de envio, direitos de exportação e importação, seguro e quaisquer outras despesas incorridas durante o envio para um local em França acordado consigo na qualidade de comprador. Nenhum outro custo obrigatório pode ser acrescentado à entrega de um produto Haas CNC.

ACOMPANHE AS DICAS E TECNOLOGIA MAIS RECENTES DA HAAS…

Registe-se já!   

HAAS TOOLING ACCEPTS THE FOLLOWING:

  • Assistência e Suporte
  • Proprietários
  • Solicitar Serviço
  • Manuais do operador
  • Peças Haas
  • Pedido de reparação do rotativo
  • Guias de Pré-instalação
  • Ferramentas de compras
  • Construção e preço de uma máquina Haas nova
  • Inventário disponível
  • A lista de preços Haas
  • Financiamento CNCA
  • Sobre a Haas
  • Declaração DNSH
  • Carreiras
  • Certificações e segurança
  • Contacte-nos
  • Histórico
  • Termos e condições
  • Termos e condições de Haas Tooling
  • Privacidade
  • Garantia
  • Comunidade Haas
  • Programa Haas de Certificação
  • Haas Motorsports
  • Fundação Gene Haas
  • Comunidade de formação técnica Haas
  • Eventos
  • Junte-se à Conversa
  • Facebook
  • X
  • Flickr
  • YouTube
  • LinkedIn
  • Instagram
  • TikTok
© 2025 Haas Automation, Inc – Máquinas-Ferramenta CNC

This site is protected by reCAPTCHA and the Google Privacy Policy and Terms of Service apply.

2800 Sturgis Rd., Oxnard, CA 93030 / Toll Free: 800-331-6746
Phone: 805-278-1800 / Fax: 805-278-2255