MyHaas Добре дошли,
!
Haas Tooling История на поръчки на посетителите MyHaas/HaasConnect Вписване Регистрирайте се Haas Tooling Моя профил Order History Return History MyHaas/HaasConnect Изход Добре дошли, Моите машини Последна дейност Моите оферти Моя профил Моите потребители Изход
0
Намерете Вашия дистрибутор
  1. Избор на език
    1. English
    2. Deutsch
    3. Español - España
    4. Español - México
    5. Français
    6. Italiano
    7. Português
    8. Český
    9. Dansk
    10. Nederlands
    11. Magyar
    12. Polski
    13. Svenska
    14. Türkçe
    15. 中文
    16. Suomi
    17. Norsk
    18. الإنجليزية
    19. български
    20. Hrvatski
    21. Ελληνικά
    22. Română
    23. Slovenský
    24. Slovenščina
    25. 한국어
    26. 日本語
    27. Українська
  • Машини Main Menu
    • Вертикални фрези Haas Вертикални фрези
      Вертикални фрези
      Вертикални фрези View All
      • Вертикални фрези
      • Серията VF
      • Универсални машини
      • Серия VR
      • VP-5 призматичен
      • Вертикални центри с палетна станция
      • Мини Обработващи центри
      • Центри за инструментално производство
      • Високоскоростни пробивни центрове
      • Пробивно/Резбонарязващи/Фрезови центри
      • Центри серия Toolroom
      • Компактни фрези
      • Рутери за метал с ЦПУ
      • SR Рутер за листов материал
      • Супер дълги ВОЦ
      • Фреза с двойни рутери за метал с ЦПУ
      • Симулатор на управлението
      • Станция за автоматично зареждане на детайли за фреза
      • VMC/UMC станция за APL със странично зареждане
      • Компактна станция за автоматично зареждане на детайли
    • Product Image Решения с много оси
      Решения с много оси
      Решения с много оси View All
      • Решения с много оси
      • Стругове с Y-ос
      • Фрези с 5 оси
    • Стругове Haas Стругове
      Стругове
      Стругове View All
      • Стругове
      • Серия ST
      • Два шпиндела
      • Серия с кутиеобразен ход
      • Инструментални стругове
      • Патронен струг
      • Прътоподаващо устройство Haas V2
      • Станция за автоматично зареждане на детайли за струг
    • Хоризонтални фрези Haas Хоризонтални фрези
      Хоризонтални фрези
      Хоризонтални фрези View All
      • Хоризонтални фрези
      • Конус 50
      • Конус 40
    • Въртящи маси и делителни апарати Haas Въртящи маси и индексиращи апарати
      Въртящи маси и индексиращи апарати
      Въртящи маси и индексиращи апарати View All
      • Въртящи маси и индексиращи апарати
      • Въртящи маси
      • Делителни апарати
      • Въртящи маси с 5 оси
      • Едрогабаритни въртящи маси
    • Product Image Системи за автоматизация
      Системи за автоматизация
      Системи за автоматизация View All
      • Системи за автоматизация
      • Автоматизация на фреза
      • Автоматизация на струг
      • Модели за автоматизация
    • Пробивни центрове Haas Настолни машини
      Настолни машини
      Настолни машини View All
      • Настолни машини
      • Настолен обработващ център с ЦПУ
      • Настолен струг
    • Оборудване за цехове на Haas Оборудване за цехове
      Оборудване за цехове
      Оборудване за цехове View All
      • Оборудване за цехове
      • Лентов трион
      • Фреза за коляно
      • Повърхностна шлайфмашина, 2550
      • Режеща машина за лазер
    • View All
    • БЪРЗИ ВРЪЗКИ Специална серия  Специална серия 
      СЕРИЯТА ЕС СЕРИЯТА ЕС ИЗГРАЖДАНЕ И ЦЕНА | ЦЕНОРАЗПИС ИЗГРАЖДАНЕ И ЦЕНА | ЦЕНОРАЗПИС Машини на склад Машини на склад КАКВО НОВО КАКВО НОВО ВАШЕТО ПЪРВО ЦПУ ВАШЕТО ПЪРВО ЦПУ
      ИНСТРУМЕНТИ ЗА ПОКУПКА
      • Конфигуриране и ценообразуване на Haas
      • Ценова листа
      • Наличности на склад
      • CNCA финансиране
      ИСКАТЕ ЛИ ДА ГОВОРИТЕ С НЯКОЙ?

      Представителството на завода на Haas (HFO) може да отговори на Вашите въпроси и да Ви окаже съдействие да направите най-добрия избор.

      CONTACT YOUR DISTRIBUTOR >
  • Опции Main Menu
    • Product Image Шпиндели
      Шпиндели
      Шпиндели View All
      • Шпиндели
    • Product Image Инструментален магазин
      Инструментален магазин
      Инструментален магазин View All
      • Инструментален магазин
    • Product Image 4-та | 5-та ос
      4-та | 5-та ос
      4-та | 5-та ос View All
      • 4-та | 5-та ос
    • Product Image Револверни глави с фрезови инструменти
      Револверни глави с фрезови инструменти
      Револверни глави с фрезови инструменти View All
      • Револверни глави с фрезови инструменти
    • Product Image Измерване
      Измерване
      Измерване View All
      • Измерване
    • Управление на стружките и охлаждащата течност на Haas Управление на стружките и охлаждащата течност
      Управление на стружките и охлаждащата течност
      Управление на стружките и охлаждащата течност View All
      • Управление на стружките и охлаждащата течност
    • Управлението на Haas Управлението на Haas
      Управлението на Haas
      Управлението на Haas View All
      • Управлението на Haas
    • Product Image Продуктови опции
      Продуктови опции
      Продуктови опции View All
      • Продуктови опции
    • Product Image Инструменти и устройства за фиксиране
      Инструменти и устройства за фиксиране
      Инструменти и устройства за фиксиране View All
      • Инструменти и устройства за фиксиране
    • Product Image Закрепване на детайла
      Закрепване на детайла
      Закрепване на детайла View All
      • Закрепване на детайла
    • Product Image Решения с 5 оси
      Решения с 5 оси
      Решения с 5 оси View All
      • Решения с 5 оси
      • 5 Easy Steps to 5-Axis
    • Product Image Автоматизиране
      Автоматизиране
      Автоматизиране View All
      • Автоматизиране
    • БЪРЗИ ВРЪЗКИ Специална серия  Специална серия 
      СЕРИЯТА ЕС СЕРИЯТА ЕС ИЗГРАЖДАНЕ И ЦЕНА | ЦЕНОРАЗПИС ИЗГРАЖДАНЕ И ЦЕНА | ЦЕНОРАЗПИС Машини на склад Машини на склад КАКВО НОВО КАКВО НОВО ВАШЕТО ПЪРВО ЦПУ ВАШЕТО ПЪРВО ЦПУ
      ИНСТРУМЕНТИ ЗА ПОКУПКА
      • Конфигуриране и ценообразуване на Haas
      • Ценова листа
      • Наличности на склад
      • CNCA финансиране
      ИСКАТЕ ЛИ ДА ГОВОРИТЕ С НЯКОЙ?

      Представителството на завода на Haas (HFO) може да отговори на Вашите въпроси и да Ви окаже съдействие да направите най-добрия избор.

      CONTACT YOUR DISTRIBUTOR >
  • Why Haas Main Menu
      Открийте с какво Haas се различава
    • Защо Haas
    • MyHaas
    • Образователна общност
    • Индустрия 4.0
    • Сертификация от Haas
    • Отзиви на клиенти
  • Сервиз Main Menu
      Добре дошли в обслужване на Haas Service
      НАЧАЛО ОБСЛУЖВАНЕ Ръководства за оператора Процедури „Как да…“ Ръководства за отстраняване на неизправности Превантивна поддръжка на машини Части Haas Haas Tooling Видеоклипове
  • Видеоклипове Main Menu
×

Резултати от търсене

Web Pages

Images

    • <
    • 1
    • >
Use the up and down arrows to select a result. Press enter to go to the selected search result. Touch device users can use touch and swipe gestures.
MyHaas Добре дошли,
!
Haas Tooling История на поръчки на посетителите MyHaas/HaasConnect Вписване Регистрирайте се Haas Tooling Моя профил Order History Return History MyHaas/HaasConnect Изход Добре дошли, Моите машини Последна дейност Моите оферти Моя профил Моите потребители Изход
0
Намерете Вашия дистрибутор
  1. Избор на език
    1. English
    2. Deutsch
    3. Español - España
    4. Español - México
    5. Français
    6. Italiano
    7. Português
    8. Český
    9. Dansk
    10. Nederlands
    11. Magyar
    12. Polski
    13. Svenska
    14. Türkçe
    15. 中文
    16. Suomi
    17. Norsk
    18. الإنجليزية
    19. български
    20. Hrvatski
    21. Ελληνικά
    22. Română
    23. Slovenský
    24. Slovenščina
    25. 한국어
    26. 日本語
    27. Українська
×

Резултати от търсене

Web Pages

Images

    • <
    • 1
    • >

UMC C-Axis Rotary Encoder Ring - Replacement - AD0497

Начало обслужване Процедури „Как да…“ Търсене на аларма: 4.103 Пръстен на ротационен енкодер за ос C на UMC - замяна - AD0497

Пръстен на ротационен енкодер за ос C на UMC - замяна - AD0497

- Преминете на раздел - Back to Top

10.2 UMC ROTARY ENCODER RING - REPLACEMENT

Recently Updated Last updated: 06/13/2025

UMC C-Axis Rotary Encoder Ring - Replacement


AD0497

Revision A 06/2025

Introduction

This procedure details the replacement of the 3" C-Axis Encoder on all UMC machines and the 3" B-Axis Encoder on UMC -500/SS machines only.

Laser calibration is required to update the compensation table for the corresponding rotary axis following the encoder replacement. 

This document applies to the following Service Kits:

  • 93-3923  ENCDR NON-CONT KIT 3"ID SER HI-RES

Used on B & C-Axis:

  • UMC-500/SS

Used on C-Axis:

  • UMC-750/SS
  • UMC-1000/SS
  • UMC-1250/SS
  • UMC-1500-DUO/SS

Tools Required:

  • 99-2130 ANTI-OXIDANT COMPOUND ELECTRICAL
  • 99-2147 DIELECTRIC GREASE PACK SUPER LUBE
  • 0.008" Mylar Shim

C-Axis Encoder Ring Replacement

1

: Warning: Only certified service personnel should perform this procedure. Reorientation of Z-pulse or Trip-Flag will require laser calibration to populate rotary compensation tables with new, correct, values.

Zero-return all Axis.

Press [EMERGENCY STOP].

2

Handle jog B to +120°.

Remove the C-Axis bottom cover.

3

Press [SETTING].

Navigate to the Rotaty tab.

Un-Check the 4th Axis.

4

Press [DIAGNOSTIC].

Navigate to Parameters > Factory.

Set 7.083 C-Axis Linear Scale Enabled to "Scale Disabled".

Power off the machine.

5

Uninstall the encoder read-head [1] by disconnecting the encoder cable [2] and removing the bolts and washers.

6

Note the Z-Pulse orientation before removing the encoder ring hub.

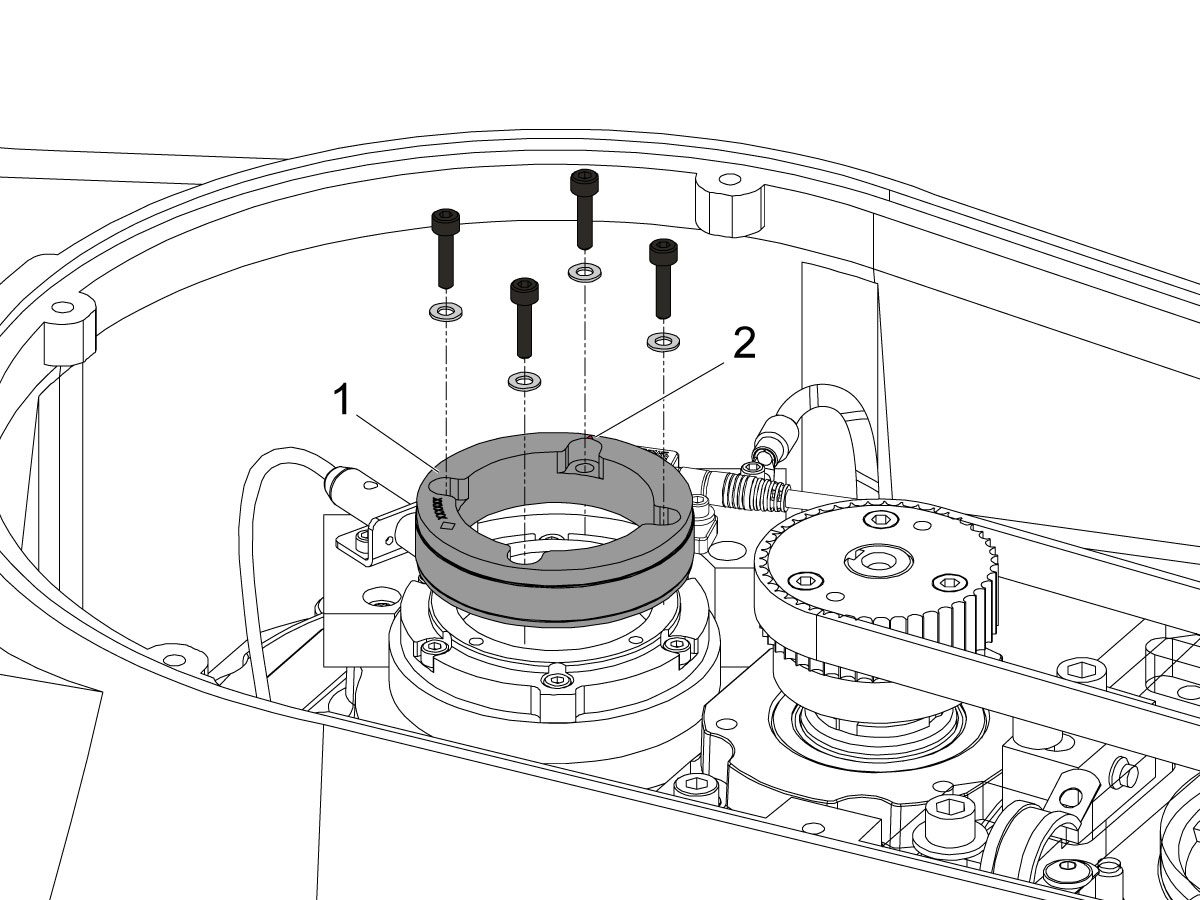
Uninstall the encoder ring hub [1] by removing the screws and washers mounting the encoder ring hub to the taper-lock. 

7

Mount and loosely install the encoder ring hub [1] from the service kit with the provided hardware, SHCS 10-32 X 3/4 (x4) and WASHER #10 FLAT (x4).

Verify the Z-Pulse is in the same location as the ring that was uninstalled. 

 Note: Do not torque mounting screws yet.

8

Turn on the machine.

Zero return all axis.

 Warning: Do not place the Mag Base anywhere near the Encoder.

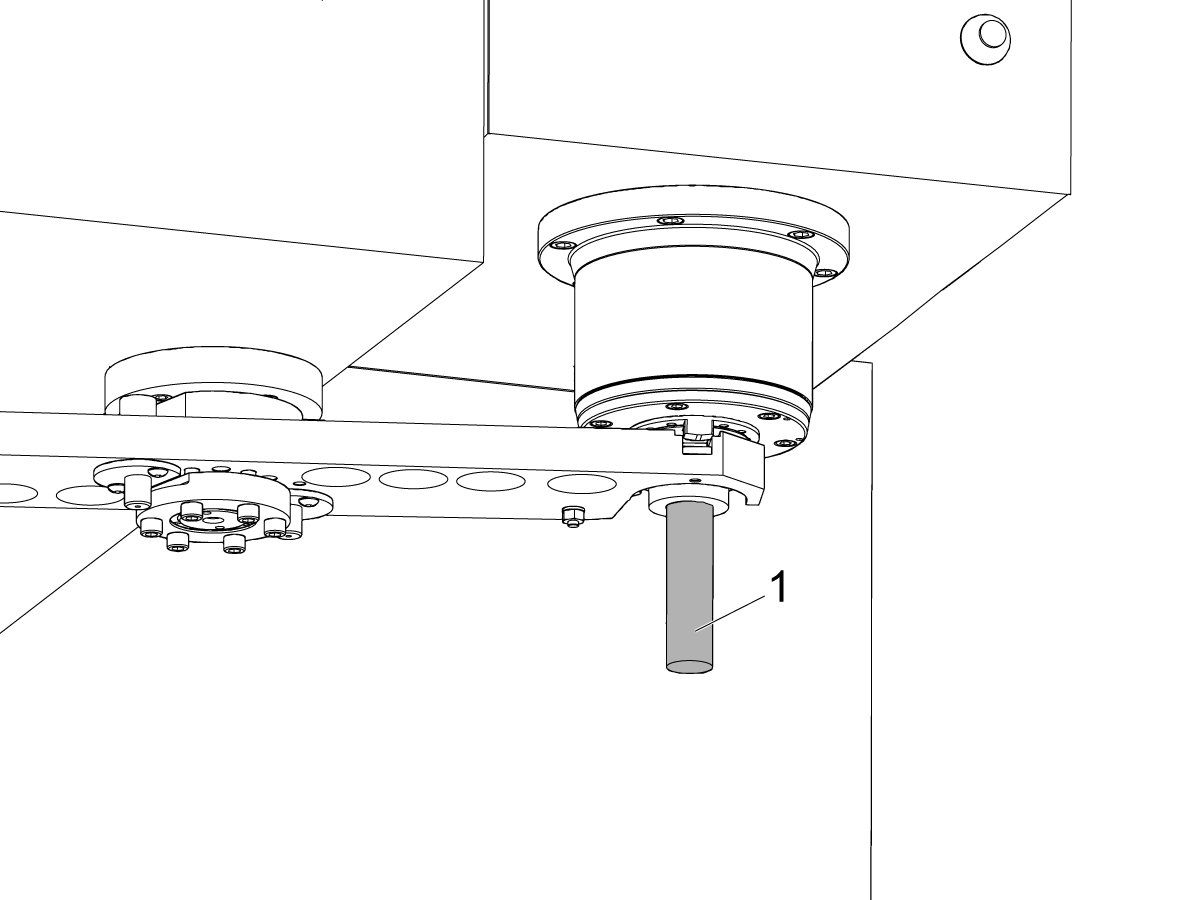
Check and document the runout on the OD of the scale encoder ring hub using the upper-most diameter, as shown.

Adjust as necessary. TIR must be 0.0005" or less.

Torque the 4 bolts of the encoder ring hub to 30 in-lbf in the star pattern.

After torquing, double check the runout to verify the ring hub has not shifted.

9

Clean the back surface of the encoder read-head and the mounting surface.

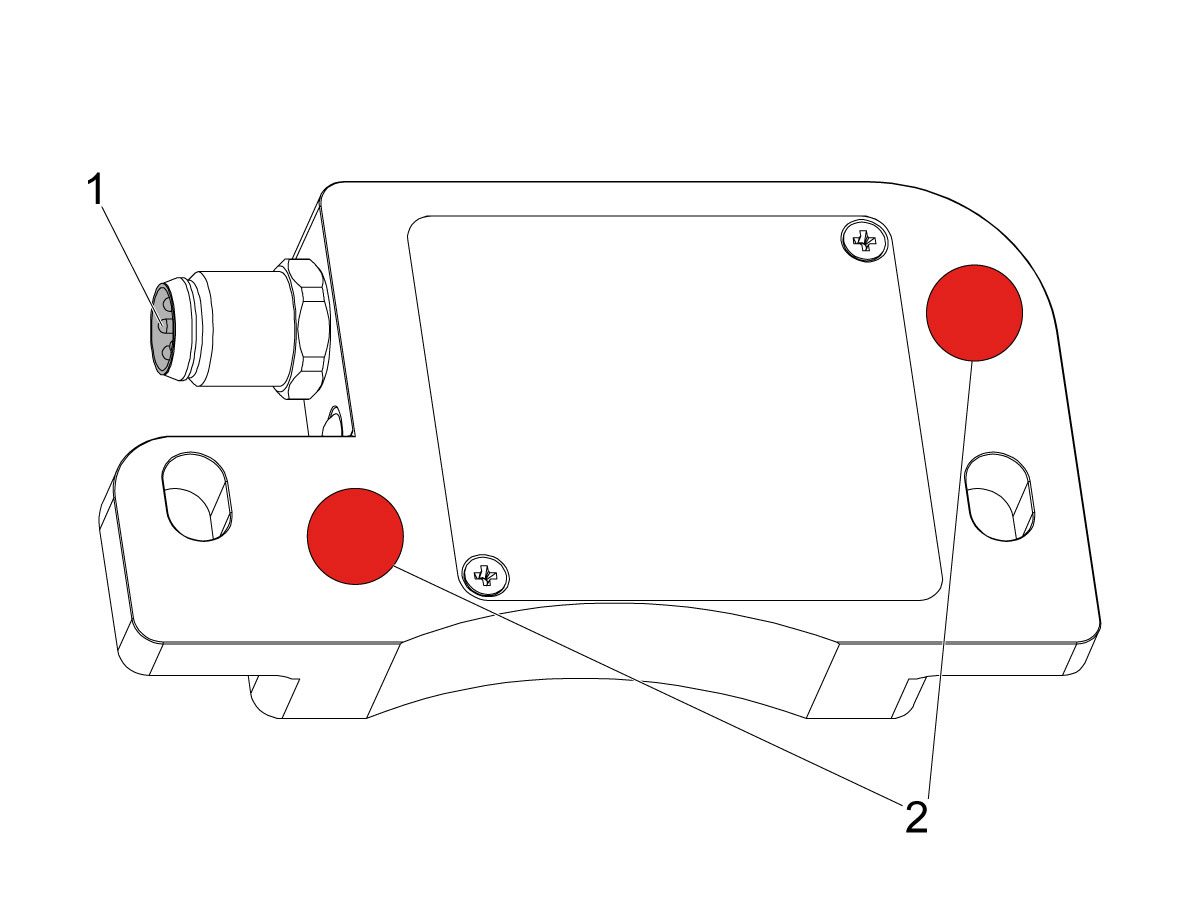
Add a small amount of silicone dielectric grease to encoder cable connection [1]. Grease should be a thin layer, but cover all the pins.

Apply two small drops of anti-oxidant (99-2130) to the mounting surface on the read head in the locations shown [2].

10

Connect the encoder cable [4] to the encoder read-head.

Insert cable by carefully lining up electrical pins with cable connector.

Install the encoder read-head [1] from the service kit with the provided hardware,  SHCS 8-32 x 1/2 bolts (x2) [2] and Washer .17ID x .4OD (2x) [3].

 Note: Do not torque mounting screws yet.

11

Set the gap between the scale ring and read-head as shown [1] using the appropriate mylar shim (0.008").

 Note: Do not use a metal shim.

Starting on the left side of the read-head [2], torque the two read-head mounting bolts to 20 in-lbf.

After torquing, double check the gap with the shim to verify the read-head has not shifted.

12

Reinstall the C-Axis bottom cover being sure no tools, shims, etc. have been left in the casting.

13

Press [SETTING].

Navigate to the Rotaty tab.

Check the 4th Axis.

Rotate the B-Axis back to zero when done.

14

Press [DIAGNOSTIC].

Navigate to Parameters > Configuration > Axis > B > Travel Limits.

Change: 6.108 B-Axis Positive Travel Limit from 180 to 110.

15

Press [DIAGNOSTIC].

Navigate to Parameters > Factory.

Set 7.083 C-Axis Linear Scale Enabled to "Scale Linear".

Power cycle the machine.

16

Zero-Return the C-Axis.

Zero-Return All Axis.

Set new Tool Change offset by following the UMC - X and Y Axes - Tool Change Offsets and the Side-Mount Tool Changer - Z-Axis Tool Change Offset - NGC procedures.

17

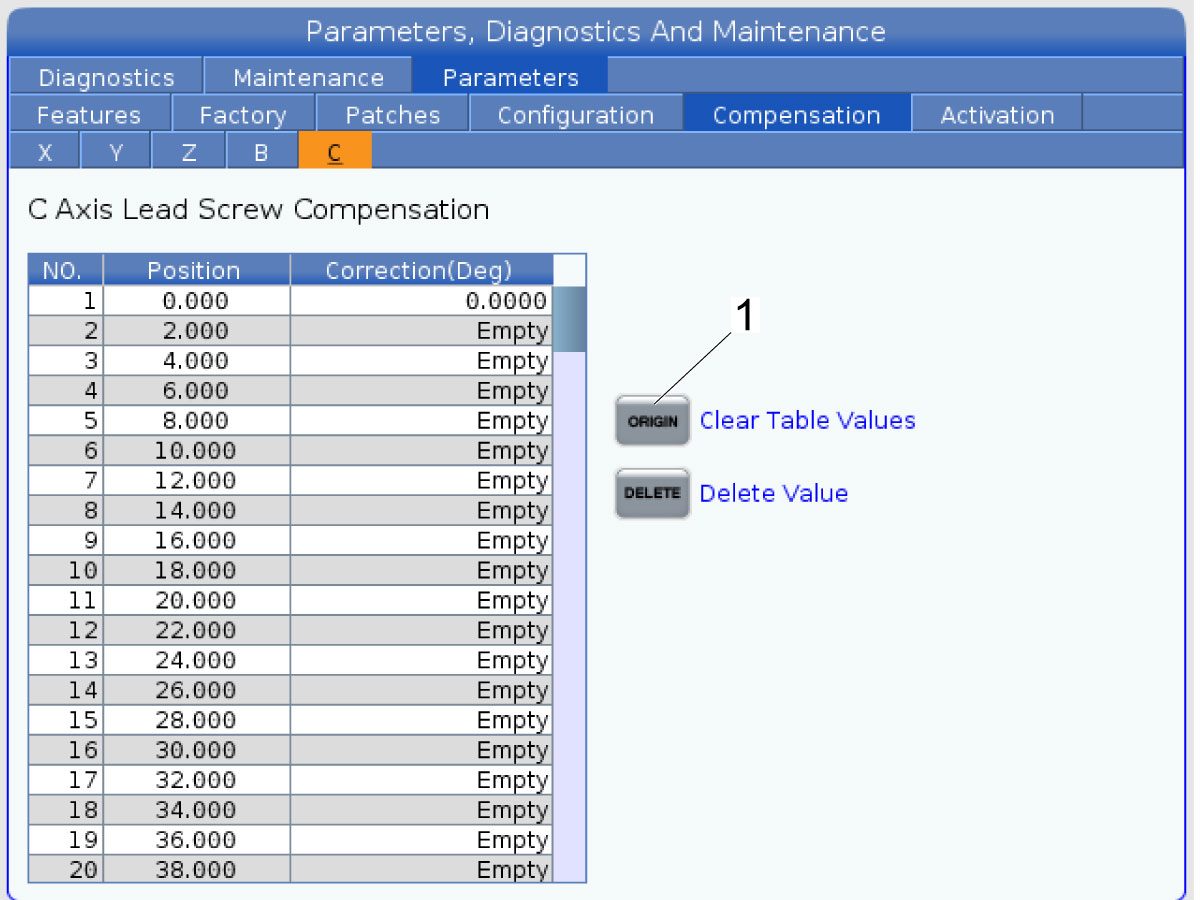
Clear the Compensation table for the C-Axis.

Press [DIAGNOSTIC].

Navigate to Parameters > Compensation > C.

Press [ORIGIN].

To update compensation table values for the C-Axis a laser calibration is required. The calculated compensation values will then be entered into the C-Axis Compensation Table.

B-Axis Encoder Ring Replacement

 Note: These step apply only to the UMC-500/SS B-Axis.

1

: Warning: Only certified service personnel should perform this procedure. Reorientation of Z-pulse or Trip-Flag will require laser calibration to populate rotary compensation tables with new, correct, values.

Zero-return all Axis.

Press [EMERGENCY STOP].

2

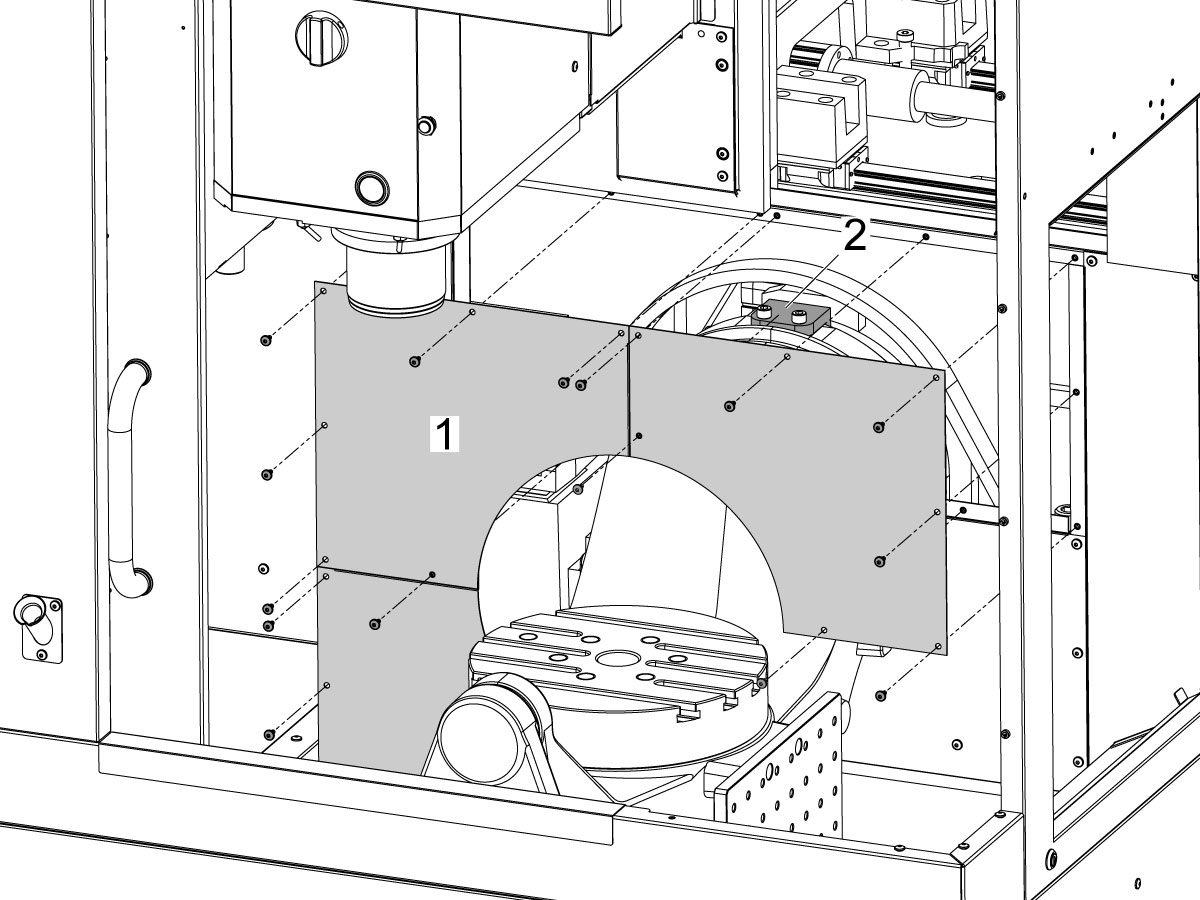
Remove the bulkhead sheet metal [1] to access the B-Axis hard stop [2]. 

3

Rotate the B-Axis approximately 100 degrees, or until there is enough room to access the hard stop [1].

Remove the B-Axis hard stop [1].

4

Remove the two rear sheet metal panels [1] to access the B-Axis components.

5

Insert a service key and enter service mode.

Press [DIAGNOSTIC].

Navigate to Parameters > Configuration > Axis > B > Travel Limits.

Change: 6.108 B-Axis Positive Travel Limit from 110 to 365.

6

Handle jog B to +180°.

Remove the C-Axis bottom cover.

7

Press [DIAGNOSTIC].

Navigate to Parameters > Factory.

Set 6.083 B-Axis Linear Scale Enabled to "Scale Disabled".

Power off the machine.

8

Disconnect all of the cables and hoses [1] running to the C-Axis through the B-Axis encoder ring. 

 Note: Mark the cables and hose to make reconnecting them easier later in this procedure. 

Remove the corrugated conduit [2].

9

Uninstall the encoder read-head [1] by disconnecting the encoder cable [2] and removing the bolts and washers.

10

Note the Z-Pulse orientation before removing the encoder ring hub.

Uninstall the encoder ring hub [1] by removing the screws and washers mounting the encoder ring hub to the taper-lock. 

11

Mount and loosely install the encoder ring hub [1] from the service kit with the provided hardware, SHCS 10-32 X 3/4 (x4) and WASHER #10 FLAT (x4).

Verify the Z-Pulse is in the same location as the ring that was uninstalled. 

 Note: If the Z-Pulse is in the wrong location the B-Axis will not zero return correctly and can damage the cables and hoses.

 Note: Do not torque mounting screws yet.

12

Route all of the cables and hoses [1] for the C-Axis through the corrugated conduit [2] and through the B-Axis encoder ring. 

Reconnect all of the cables and hoses to their original locations in the C-Axis.

13

Turn on the machine.

Zero return all axis.

 Note: The B-Axis should zero return in the Clockwise direction.

 Warning: Do not place the Mag Base anywhere near the Encoder.

Check and document the runout on the OD of the scale encoder ring hub using the upper-most diameter, as shown.

Adjust as necessary. TIR must be 0.0005" or less.

Torque the 4 bolts of the encoder ring hub to 30 in-lbf in the star pattern.

After torquing, double check the runout to verify the ring hub has not shifted.

14

Clean the back surface of the encoder read-head and the mounting surface.

Add a small amount of silicone dielectric grease to encoder cable connection [1]. Grease should be a thin layer, but cover all the pins.

Apply two small drops of anti-oxidant (99-2130) to the mounting surface on the read head in the locations shown [2].

15

Connect the encoder cable [1] to the encoder read-head.

Insert cable by carefully lining up electrical pins with cable connector.

Install the encoder read-head [2] from the service kit with the provided hardware,  SHCS 8-32 x 1/2 bolts (x2) [4] and Washer .17ID x .4OD (2x) [3].

 Note: Do not torque mounting screws yet.

16

Set the gap between the scale ring and read-head as shown [1] using the appropriate mylar shim (0.008").

 Note: Do not use a metal shim.

Starting on the left side of the read-head [2], torque the two read-head mounting bolts to 20 in-lbf.

After torquing, double check the gap with the shim to verify the read-head has not shifted.

17

Reinstall the C-Axis bottom cover being sure no tools, shims, etc. have been left in the casting.

 Note: You will have to set a new tool change offset and update compensation table values for the B-Axis. This will require laser calibration.

18

Rotate the B-Axis to the same position when the hard stop was removed. 

Install the B-Axis hard stop [1].

19

Press [DIAGNOSTIC].

Navigate to Parameters > Configuration > Axis > B > Travel Limits.

Change: 6.108 B-Axis Positive Travel Limit from 365 to 110.

Rotate the B-Axis back to zero when done.

20

Press [DIAGNOSTIC].

Navigate to Parameters > Factory.

Set 6.083 B-Axis Linear Scale Enabled to "Scale Linear".

Power cycle the machine.

21

Zero-Return the B-Axis.

Zero-Return All Axis.

Set new Tool Change offset by following the UMC - X and Y Axes - Tool Change Offsets and the Side-Mount Tool Changer - Z-Axis Tool Change Offset - NGC procedures.

22

Install the bulkhead sheet metal [1] once the B-Axis hard stop [2] has been installed. 

23

Install the two rear sheet metal panels [1].

24

Clear the Compensation table for the B-Axis.

Press [DIAGNOSTIC].

Navigate to Parameters > Compensation > B.

Press [ORIGIN].

To update compensation table values for the B-Axis a laser calibration is required. The calculated compensation values will then be entered into the B-Axis Compensation Table.

Recently Viewed Items

You Have No Recently Viewed Items Yet

Обратна връзка
Haas Logo

美元价格不包括关税、报关费用、保险费、增值税及运费。
USD prices DO NOT include customs duty, customs fees, insurance, VAT, or freight.

人民币价格包含关税、报关费用、货运保险和增值税, 但不包括运费。
CNY prices include customs duty, customs fees, insurance, and VAT. DOES NOT include freight.

Доставна цена за Haas

Тази цена включва разходите за доставка, мита за износ и внос, застраховка и всички други разходи, направени по време на доставката до място във Франция, договорени с Вас като купувач. Никакви други задължителни разходи не могат да се добавят към доставката на продукт с ЦПУ на Haas.

АБОНИРАЙТЕ СЕ ЗА НАЙ-НОВИТЕ СЪВЕТИ И ТЕХНОЛОГИИ НА HAAS…

Регистрирайте се сега!   

HAAS TOOLING ACCEPTS THE FOLLOWING:

  • Сервиз & Поддръжка
  • Клиенти
  • Заявка за сервизно обслужване
  • Ръководства за оператора
  • Части Haas
  • Заявка за ремонт на въртящи маси
  • Ръководства за предварителна инсталация
  • Покупка на инструменти
  • Конфигуриране и ценообразуване на нова машина Haas
  • Наличности на склад
  • Ценовата листа на Haas
  • CNCA финансиране
  • За Haas
  • Декларация за DNSH
  • Кариери
  • Сертифициране и безопасност
  • Свържете се с нас
  • История
  • Общи условия
  • Общи условия Haas Tooling
  • Поверителност
  • Гаранция
  • Общност Haas
  • Програма за сертификация от Haas
  • Моторни спортове Haas
  • Фондация Gene Haas
  • Общността за техническо образование Haas
  • Събития
  • Включете се в разговор
  • Facebook
  • X
  • Flickr
  • YouTube
  • LinkedIn
  • Instagram
  • TikTok
© 2025 Haas Automation, Inc – металообработващи машини с ЦПУ

This site is protected by reCAPTCHA and the Google Privacy Policy and Terms of Service apply.

2800 Sturgis Rd., Oxnard, CA 93030 / Toll Free: 800-331-6746
Phone: 805-278-1800 / Fax: 805-278-2255