MyHaas Üdvözöljük!
!
Haas Tooling Vendég korábbi megrendelései MyHaas/HaasConnect Bejelentkezés Regisztráció Haas Tooling Saját fiók Order History Return History MyHaas/HaasConnect Kijelentkezés Üdvözöljük! Saját gépek Legutolsó tevékenység Saját árajánlatok Saját fiók Saját felhasználók Kijelentkezés
Keresse meg forgalmazóját
  1. Válasszon nyelvet
    1. English
    2. Deutsch
    3. Español - España
    4. Español - México
    5. Français
    6. Italiano
    7. Português
    8. Český
    9. Dansk
    10. Nederlands
    11. Magyar
    12. Polski
    13. Svenska
    14. Türkçe
    15. 中文
    16. Suomi
    17. Norsk
    18. الإنجليزية
    19. български
    20. Hrvatski
    21. Ελληνικά
    22. Română
    23. Slovenský
    24. Slovenščina
    25. 한국어
    26. 日本語
    27. Українська
  • gépek Main Menu
    • Haas függőleges marók Függőleges marók
      Függőleges marók
      Függőleges marók View All
      • Függőleges marók
      • VF sorozat
      • Univerzális gépek
      • VR-sorozat
      • VP-5 Prismatic
      • Palettacserélős VMC-k
      • Minimaró
      • Formázógépek
      • Nagysebességű fúróközpontok
      • Fúró/menetfúró/maró sorozat
      • Szerszámmarók
      • Kompakt marók
      • Állványzat sorozatok
      • SR lapmarók
      • Extranagy VMC
      • Dupla oszlopos marók
      • Vezérlőszimulátor
      • Automata munkadarab-adagoló marógéphez
      • VMC/UMC oldalsó betöltésű APL
      • Kompakt automata munkadarab adagoló (APL)
    • Product Image Többtengelyes megoldások
      Többtengelyes megoldások
      Többtengelyes megoldások View All
      • Többtengelyes megoldások
      • Y-tengelyű esztergák
      • 5-tengelyes marók
    • Haas esztergák Esztergák
      Esztergák
      Esztergák View All
      • Esztergák
      • ST sorozat
      • Kettős orsó
      • Dobozos sorozat
      • Szerszámesztergák
      • Tokmányos eszterga
      • Haas rúdadagoló V2
      • Automata munkadarab-adagoló esztergához
    • Haas vízszintes marók Vízszintes marók
      Vízszintes marók
      Vízszintes marók View All
      • Vízszintes marók
      • SK-50
      • SK-40
    • Haas forgóasztalok és indexelők Teszt lábjegyzet szöveg
      Teszt lábjegyzet szöveg
      Teszt lábjegyzet szöveg View All
      • Teszt lábjegyzet szöveg
      • Forgóasztalok
      • Indexelők
      • 5-tengelyes forgóasztalok
      • Extra méretű forgóasztalok
    • Product Image Automatizálási rendszerek
      Automatizálási rendszerek
      Automatizálási rendszerek View All
      • Automatizálási rendszerek
      • Maró automatizálása
      • Eszterga automatizálása
      • Automatizálási modellek
    • Haas fúróközpontok Asztali gépek
      Asztali gépek
      Asztali gépek View All
      • Asztali gépek
      • Asztali maró
      • Asztali eszterga
    • Haas műhelyi berendezések Berendezések vásárlása
      Berendezések vásárlása
      Berendezések vásárlása View All
      • Berendezések vásárlása
      • Szalagfűrész
      • Térdmaró
      • Felületcsiszoló, 2550
      • Felületcsiszoló, 3063
      • Lézervágó gép
    • GYORSHIVATKOZÁSOK Speciális sorozat  Speciális sorozat 
      EU SOROZAT EU SOROZAT KIÉPÍTÉS ÉS ÁR | ÁRLISTA KIÉPÍTÉS ÉS ÁR | ÁRLISTA Készleten lévő gépek Készleten lévő gépek MIK AZ ÚJDONSÁGOK? MIK AZ ÚJDONSÁGOK? AZ ÖN ELSŐ CNC GÉPE AZ ÖN ELSŐ CNC GÉPE
      SZERSZÁMOK VÁSÁRLÁSA
      • Haas gép kiépítés és árazás
      • Árlista
      • Elérhető készlet
      • CNCA finanszírozás
      SZERETNE BESZÉLNI VALAKIVEL?

      A Haas gyárfiók (HFO) válaszol kérdéseire, és bemutatja a legjobb lehetőségeket.

      CONTACT YOUR DISTRIBUTOR >
  • Opciók Main Menu
    • Product Image Orsók
      Orsók
      Orsók View All
      • Orsók
    • Product Image Szerszámváltók
      Szerszámváltók
      Szerszámváltók View All
      • Szerszámváltók
    • Product Image 4. | 5. tengely
      4. | 5. tengely
      4. | 5. tengely View All
      • 4. | 5. tengely
    • Product Image Revolverek és hajtott szerszámozás
      Revolverek és hajtott szerszámozás
      Revolverek és hajtott szerszámozás View All
      • Revolverek és hajtott szerszámozás
    • Product Image Mérés mérőérintkezővel
      Mérés mérőérintkezővel
      Mérés mérőérintkezővel View All
      • Mérés mérőérintkezővel
    • Haas forgács- és hűtőközeg-kezelés Forgács- és hűtőközeg-kezelés
      Forgács- és hűtőközeg-kezelés
      Forgács- és hűtőközeg-kezelés View All
      • Forgács- és hűtőközeg-kezelés
    • A Haas-vezérlés A Haas-vezérlés
      A Haas-vezérlés
      A Haas-vezérlés View All
      • A Haas-vezérlés
    • Product Image Termékopciók
      Termékopciók
      Termékopciók View All
      • Termékopciók
    • Product Image Szerszámozás és befogás
      Szerszámozás és befogás
      Szerszámozás és befogás View All
      • Szerszámozás és befogás
    • Product Image Munkadarab befogó
      Munkadarab befogó
      Munkadarab befogó View All
      • Munkadarab befogó
    • Product Image 5-tengelyes megoldások
      5-tengelyes megoldások
      5-tengelyes megoldások View All
      • 5-tengelyes megoldások
      • 5 Easy Steps to 5-Axis
    • Product Image Automatizálás
      Automatizálás
      Automatizálás View All
      • Automatizálás
    • GYORSHIVATKOZÁSOK Speciális sorozat  Speciális sorozat 
      EU SOROZAT EU SOROZAT KIÉPÍTÉS ÉS ÁR | ÁRLISTA KIÉPÍTÉS ÉS ÁR | ÁRLISTA Készleten lévő gépek Készleten lévő gépek MIK AZ ÚJDONSÁGOK? MIK AZ ÚJDONSÁGOK? AZ ÖN ELSŐ CNC GÉPE AZ ÖN ELSŐ CNC GÉPE
      SZERSZÁMOK VÁSÁRLÁSA
      • Haas gép kiépítés és árazás
      • Árlista
      • Elérhető készlet
      • CNCA finanszírozás
      SZERETNE BESZÉLNI VALAKIVEL?

      A Haas gyárfiók (HFO) válaszol kérdéseire, és bemutatja a legjobb lehetőségeket.

      CONTACT YOUR DISTRIBUTOR >
  • Why Haas Main Menu
      Fedezze fel, hogy miben különbözik a Haas
    • Miért Haas?
    • MyHaas
    • Oktatóközösség
    • Ipar 4.0
    • Haas tanúsítás
    • Vásárlói élmények
  • Szerviz Main Menu
      A Haas Service üdvözli Önt
      SZERVIZ KEZDŐLAP Kezelői kézikönyvek Eljárási módok Hibaelhárítási útmutató Megelozo karbantartás Haas alkatrészek Haas Tooling Videók
  • Videók Main Menu
×

Keresési eredmények

Web Pages

Images

    • <
    • 1
    • >
MyHaas Üdvözöljük!
!
Haas Tooling Vendég korábbi megrendelései MyHaas/HaasConnect Bejelentkezés Regisztráció Haas Tooling Saját fiók Order History Return History MyHaas/HaasConnect Kijelentkezés Üdvözöljük! Saját gépek Legutolsó tevékenység Saját árajánlatok Saját fiók Saját felhasználók Kijelentkezés
Keresse meg forgalmazóját
  1. Válasszon nyelvet
    1. English
    2. Deutsch
    3. Español - España
    4. Español - México
    5. Français
    6. Italiano
    7. Português
    8. Český
    9. Dansk
    10. Nederlands
    11. Magyar
    12. Polski
    13. Svenska
    14. Türkçe
    15. 中文
    16. Suomi
    17. Norsk
    18. الإنجليزية
    19. български
    20. Hrvatski
    21. Ελληνικά
    22. Română
    23. Slovenský
    24. Slovenščina
    25. 한국어
    26. 日本語
    27. Українська
×

Keresési eredmények

Web Pages

Images

    • <
    • 1
    • >

UMC C-Axis Rotary Encoder Ring - Replacement - AD0497

Szerviz kezdőlap Eljárási mód UMC C-tengely forgóeszköz kódológyűrű - Csere - AD0497

UMC C-tengely forgóeszköz kódológyűrű - Csere - AD0497

- Ugrás a következő részhez - Back to Top

10.2 UMC ROTARY ENCODER RING - REPLACEMENT

Recently Updated Last updated: 06/13/2025

UMC C-Axis Rotary Encoder Ring - Replacement


AD0497

Revision A 06/2025

Introduction

This procedure details the replacement of the 3" C-Axis Encoder on all UMC machines and the 3" B-Axis Encoder on UMC -500/SS machines only.

Laser calibration is required to update the compensation table for the corresponding rotary axis following the encoder replacement. 

This document applies to the following Service Kits:

  • 93-3923  ENCDR NON-CONT KIT 3"ID SER HI-RES

Used on B & C-Axis:

  • UMC-500/SS

Used on C-Axis:

  • UMC-750/SS
  • UMC-1000/SS
  • UMC-1250/SS
  • UMC-1500-DUO/SS

Tools Required:

  • 99-2130 ANTI-OXIDANT COMPOUND ELECTRICAL
  • 99-2147 DIELECTRIC GREASE PACK SUPER LUBE
  • 0.008" Mylar Shim

C-Axis Encoder Ring Replacement

1

: Warning: Only certified service personnel should perform this procedure. Reorientation of Z-pulse or Trip-Flag will require laser calibration to populate rotary compensation tables with new, correct, values.

Zero-return all Axis.

Press [EMERGENCY STOP].

2

Handle jog B to +120°.

Remove the C-Axis bottom cover.

3

Press [SETTING].

Navigate to the Rotaty tab.

Un-Check the 4th Axis.

4

Press [DIAGNOSTIC].

Navigate to Parameters > Factory.

Set 7.083 C-Axis Linear Scale Enabled to "Scale Disabled".

Power off the machine.

5

Uninstall the encoder read-head [1] by disconnecting the encoder cable [2] and removing the bolts and washers.

6

Note the Z-Pulse orientation before removing the encoder ring hub.

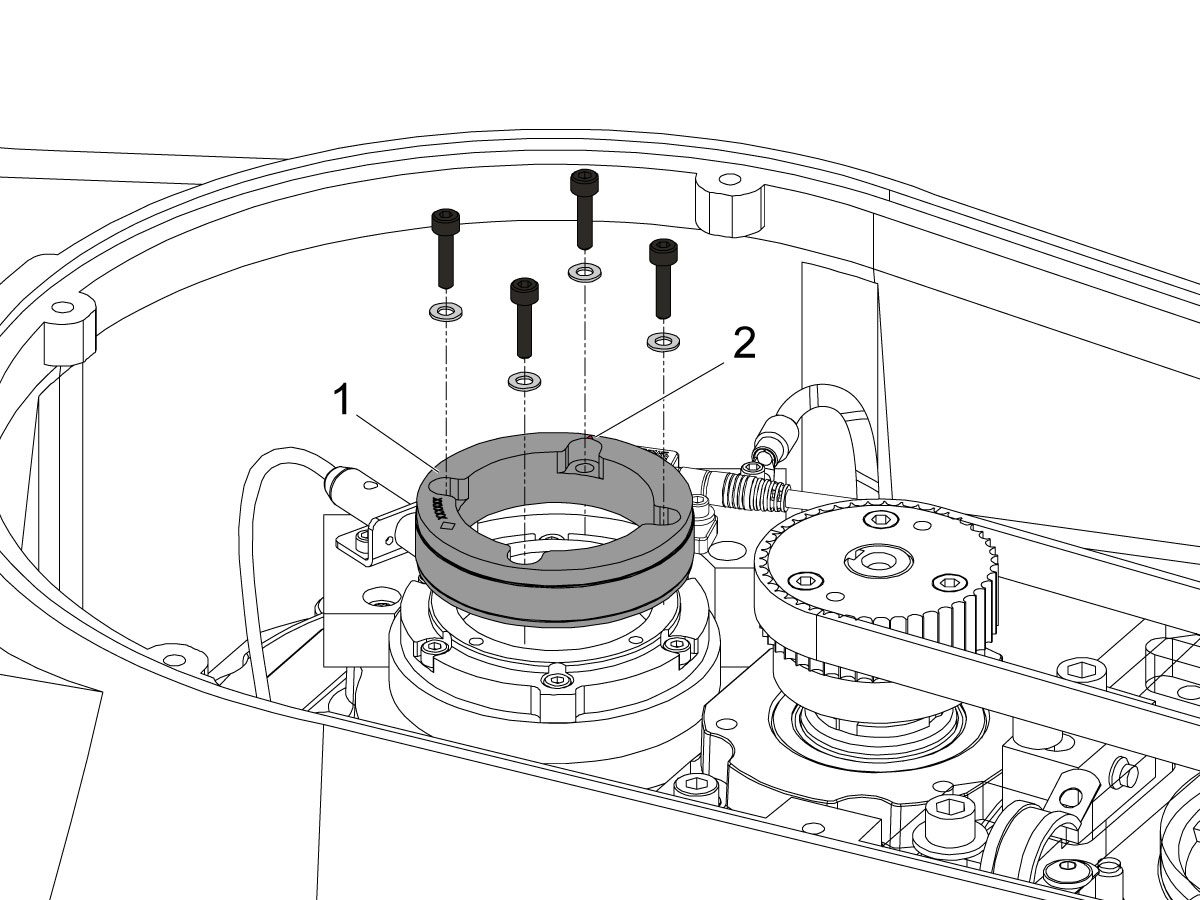
Uninstall the encoder ring hub [1] by removing the screws and washers mounting the encoder ring hub to the taper-lock. 

7

Mount and loosely install the encoder ring hub [1] from the service kit with the provided hardware, SHCS 10-32 X 3/4 (x4) and WASHER #10 FLAT (x4).

Verify the Z-Pulse is in the same location as the ring that was uninstalled. 

 Note: Do not torque mounting screws yet.

8

Turn on the machine.

Zero return all axis.

 Warning: Do not place the Mag Base anywhere near the Encoder.

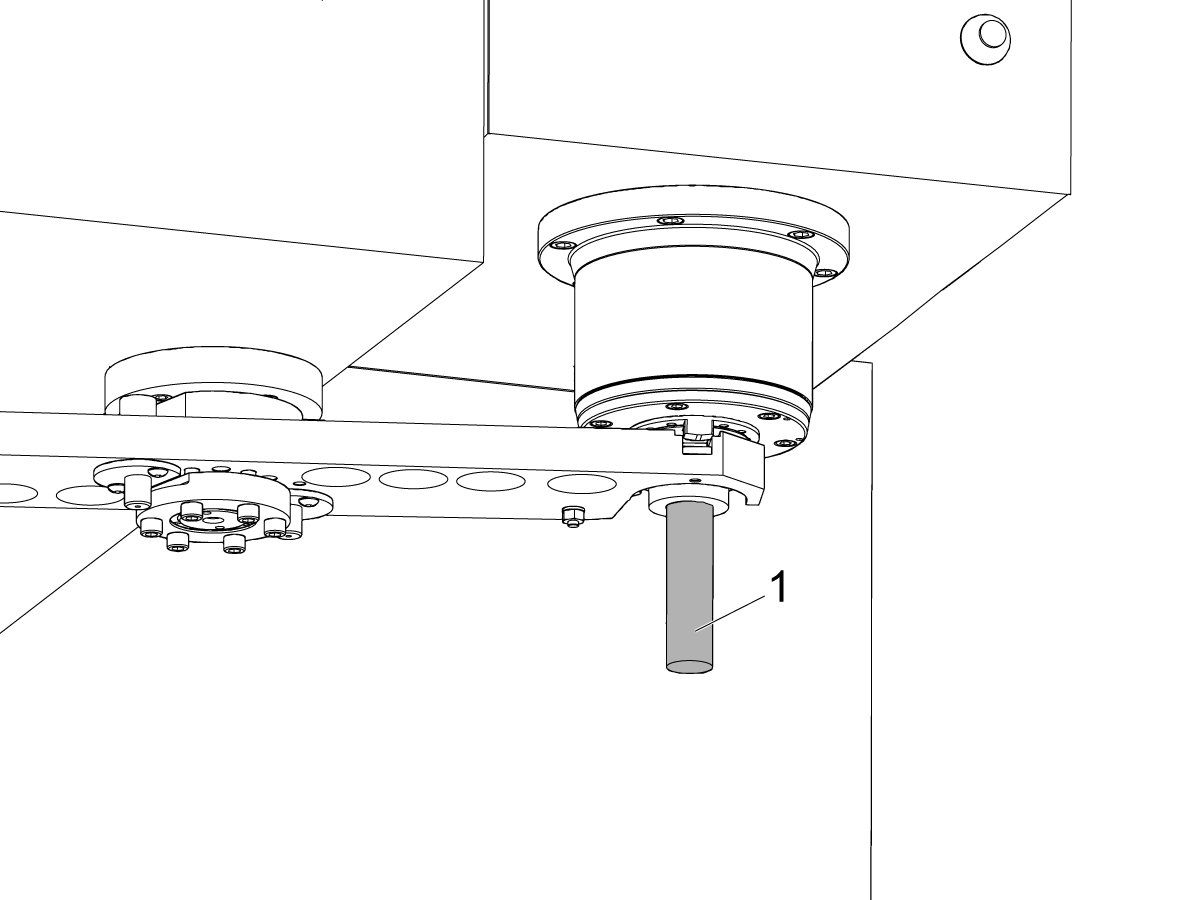
Check and document the runout on the OD of the scale encoder ring hub using the upper-most diameter, as shown.

Adjust as necessary. TIR must be 0.0005" or less.

Torque the 4 bolts of the encoder ring hub to 30 in-lbf in the star pattern.

After torquing, double check the runout to verify the ring hub has not shifted.

9

Clean the back surface of the encoder read-head and the mounting surface.

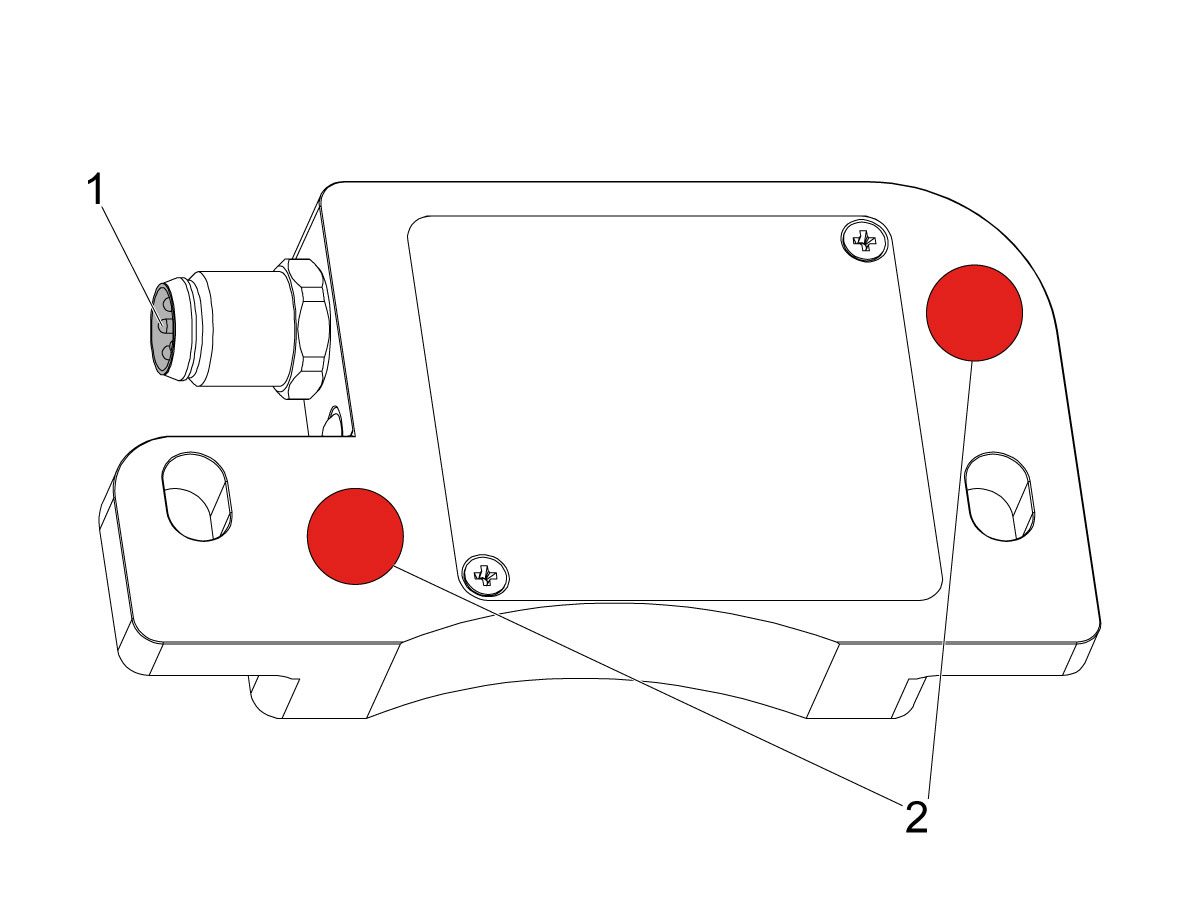
Add a small amount of silicone dielectric grease to encoder cable connection [1]. Grease should be a thin layer, but cover all the pins.

Apply two small drops of anti-oxidant (99-2130) to the mounting surface on the read head in the locations shown [2].

10

Connect the encoder cable [4] to the encoder read-head.

Insert cable by carefully lining up electrical pins with cable connector.

Install the encoder read-head [1] from the service kit with the provided hardware,  SHCS 8-32 x 1/2 bolts (x2) [2] and Washer .17ID x .4OD (2x) [3].

 Note: Do not torque mounting screws yet.

11

Set the gap between the scale ring and read-head as shown [1] using the appropriate mylar shim (0.008").

 Note: Do not use a metal shim.

Starting on the left side of the read-head [2], torque the two read-head mounting bolts to 20 in-lbf.

After torquing, double check the gap with the shim to verify the read-head has not shifted.

12

Reinstall the C-Axis bottom cover being sure no tools, shims, etc. have been left in the casting.

13

Press [SETTING].

Navigate to the Rotaty tab.

Check the 4th Axis.

Rotate the B-Axis back to zero when done.

14

Press [DIAGNOSTIC].

Navigate to Parameters > Configuration > Axis > B > Travel Limits.

Change: 6.108 B-Axis Positive Travel Limit from 180 to 110.

15

Press [DIAGNOSTIC].

Navigate to Parameters > Factory.

Set 7.083 C-Axis Linear Scale Enabled to "Scale Linear".

Power cycle the machine.

16

Zero-Return the C-Axis.

Zero-Return All Axis.

Set new Tool Change offset by following the UMC - X and Y Axes - Tool Change Offsets and the Side-Mount Tool Changer - Z-Axis Tool Change Offset - NGC procedures.

17

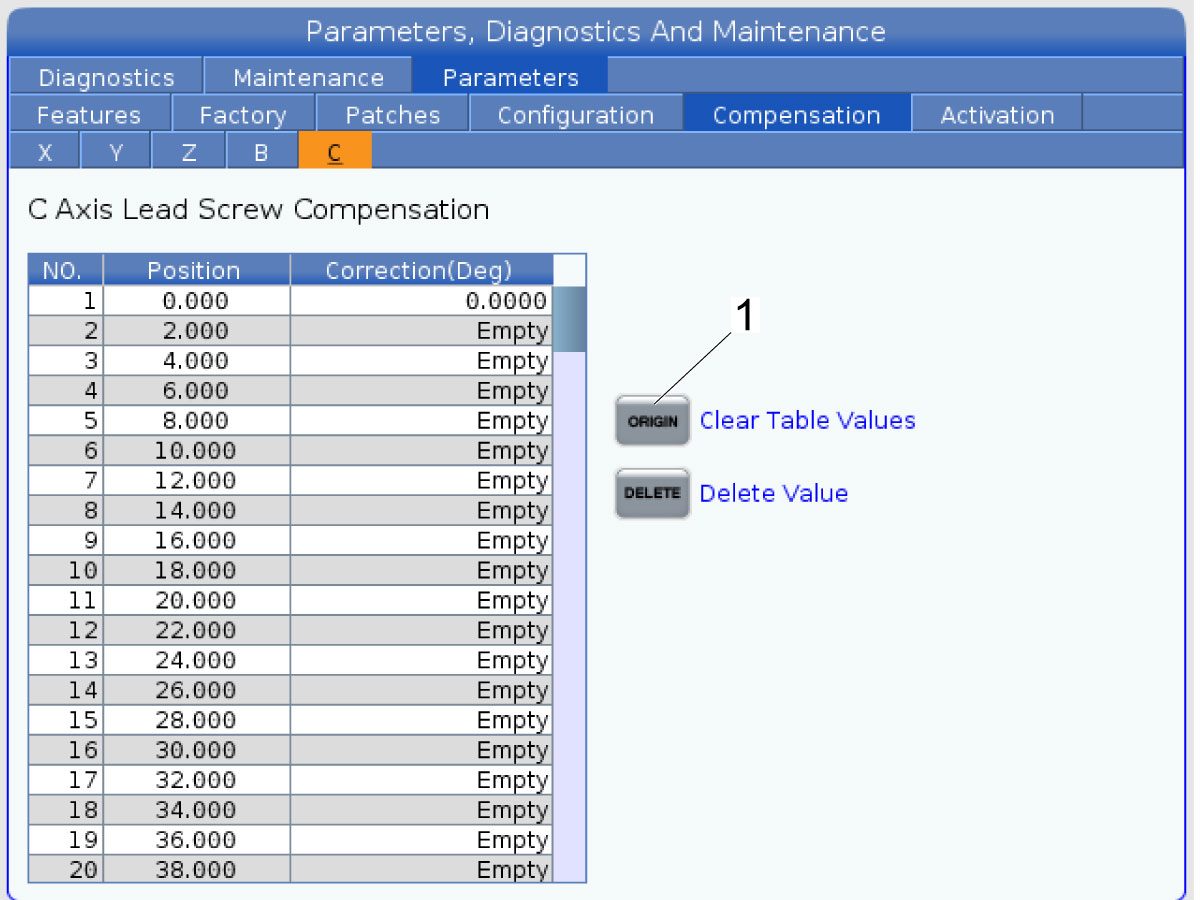
Clear the Compensation table for the C-Axis.

Press [DIAGNOSTIC].

Navigate to Parameters > Compensation > C.

Press [ORIGIN].

To update compensation table values for the C-Axis a laser calibration is required. The calculated compensation values will then be entered into the C-Axis Compensation Table.

B-Axis Encoder Ring Replacement

 Note: These step apply only to the UMC-500/SS B-Axis.

1

: Warning: Only certified service personnel should perform this procedure. Reorientation of Z-pulse or Trip-Flag will require laser calibration to populate rotary compensation tables with new, correct, values.

Zero-return all Axis.

Press [EMERGENCY STOP].

2

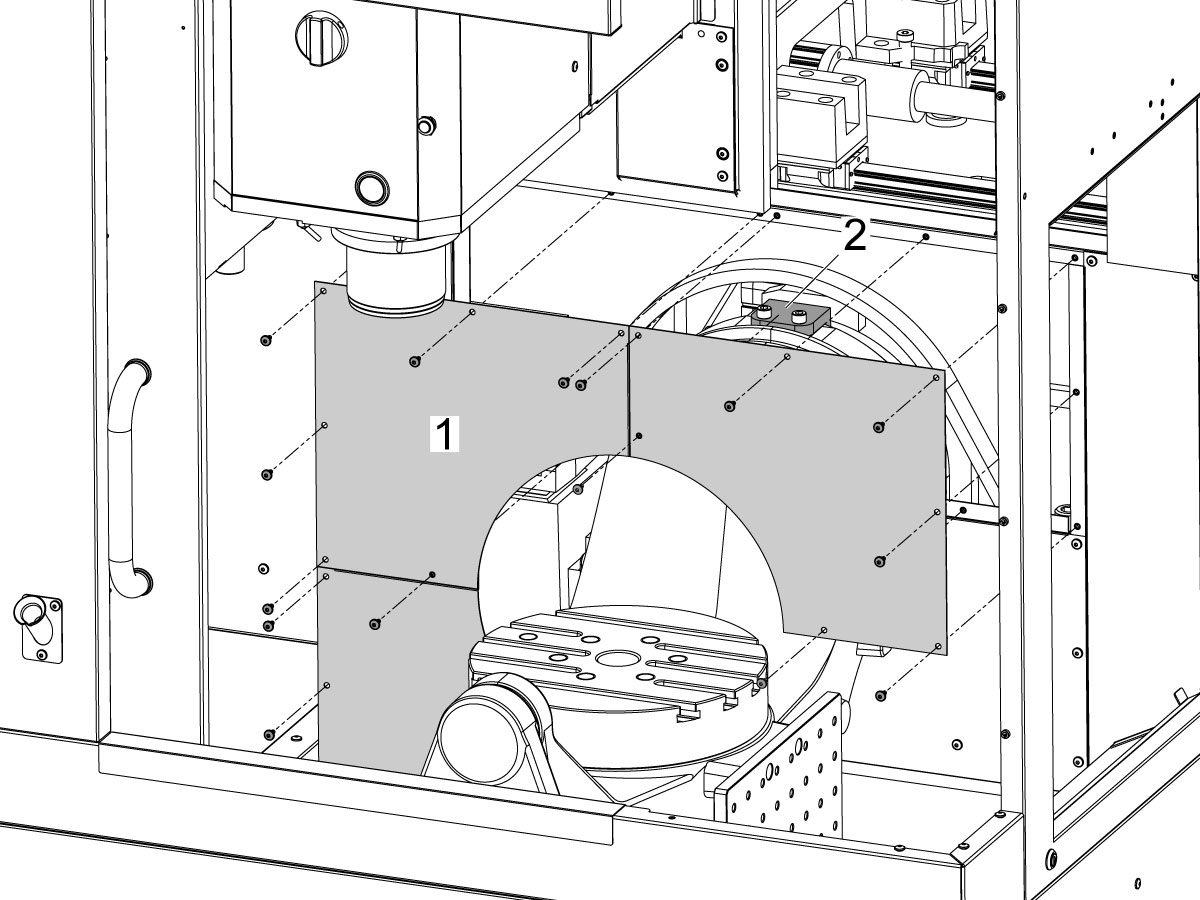
Remove the bulkhead sheet metal [1] to access the B-Axis hard stop [2]. 

3

Rotate the B-Axis approximately 100 degrees, or until there is enough room to access the hard stop [1].

Remove the B-Axis hard stop [1].

4

Remove the two rear sheet metal panels [1] to access the B-Axis components.

5

Insert a service key and enter service mode.

Press [DIAGNOSTIC].

Navigate to Parameters > Configuration > Axis > B > Travel Limits.

Change: 6.108 B-Axis Positive Travel Limit from 110 to 365.

6

Handle jog B to +180°.

Remove the C-Axis bottom cover.

7

Press [DIAGNOSTIC].

Navigate to Parameters > Factory.

Set 6.083 B-Axis Linear Scale Enabled to "Scale Disabled".

Power off the machine.

8

Disconnect all of the cables and hoses [1] running to the C-Axis through the B-Axis encoder ring. 

 Note: Mark the cables and hose to make reconnecting them easier later in this procedure. 

Remove the corrugated conduit [2].

9

Uninstall the encoder read-head [1] by disconnecting the encoder cable [2] and removing the bolts and washers.

10

Note the Z-Pulse orientation before removing the encoder ring hub.

Uninstall the encoder ring hub [1] by removing the screws and washers mounting the encoder ring hub to the taper-lock. 

11

Mount and loosely install the encoder ring hub [1] from the service kit with the provided hardware, SHCS 10-32 X 3/4 (x4) and WASHER #10 FLAT (x4).

Verify the Z-Pulse is in the same location as the ring that was uninstalled. 

 Note: If the Z-Pulse is in the wrong location the B-Axis will not zero return correctly and can damage the cables and hoses.

 Note: Do not torque mounting screws yet.

12

Route all of the cables and hoses [1] for the C-Axis through the corrugated conduit [2] and through the B-Axis encoder ring. 

Reconnect all of the cables and hoses to their original locations in the C-Axis.

13

Turn on the machine.

Zero return all axis.

 Note: The B-Axis should zero return in the Clockwise direction.

 Warning: Do not place the Mag Base anywhere near the Encoder.

Check and document the runout on the OD of the scale encoder ring hub using the upper-most diameter, as shown.

Adjust as necessary. TIR must be 0.0005" or less.

Torque the 4 bolts of the encoder ring hub to 30 in-lbf in the star pattern.

After torquing, double check the runout to verify the ring hub has not shifted.

14

Clean the back surface of the encoder read-head and the mounting surface.

Add a small amount of silicone dielectric grease to encoder cable connection [1]. Grease should be a thin layer, but cover all the pins.

Apply two small drops of anti-oxidant (99-2130) to the mounting surface on the read head in the locations shown [2].

15

Connect the encoder cable [1] to the encoder read-head.

Insert cable by carefully lining up electrical pins with cable connector.

Install the encoder read-head [2] from the service kit with the provided hardware,  SHCS 8-32 x 1/2 bolts (x2) [4] and Washer .17ID x .4OD (2x) [3].

 Note: Do not torque mounting screws yet.

16

Set the gap between the scale ring and read-head as shown [1] using the appropriate mylar shim (0.008").

 Note: Do not use a metal shim.

Starting on the left side of the read-head [2], torque the two read-head mounting bolts to 20 in-lbf.

After torquing, double check the gap with the shim to verify the read-head has not shifted.

17

Reinstall the C-Axis bottom cover being sure no tools, shims, etc. have been left in the casting.

 Note: You will have to set a new tool change offset and update compensation table values for the B-Axis. This will require laser calibration.

18

Rotate the B-Axis to the same position when the hard stop was removed. 

Install the B-Axis hard stop [1].

19

Press [DIAGNOSTIC].

Navigate to Parameters > Configuration > Axis > B > Travel Limits.

Change: 6.108 B-Axis Positive Travel Limit from 365 to 110.

Rotate the B-Axis back to zero when done.

20

Press [DIAGNOSTIC].

Navigate to Parameters > Factory.

Set 6.083 B-Axis Linear Scale Enabled to "Scale Linear".

Power cycle the machine.

21

Zero-Return the B-Axis.

Zero-Return All Axis.

Set new Tool Change offset by following the UMC - X and Y Axes - Tool Change Offsets and the Side-Mount Tool Changer - Z-Axis Tool Change Offset - NGC procedures.

22

Install the bulkhead sheet metal [1] once the B-Axis hard stop [2] has been installed. 

23

Install the two rear sheet metal panels [1].

24

Clear the Compensation table for the B-Axis.

Press [DIAGNOSTIC].

Navigate to Parameters > Compensation > B.

Press [ORIGIN].

To update compensation table values for the B-Axis a laser calibration is required. The calculated compensation values will then be entered into the B-Axis Compensation Table.

Recently Viewed Items

You Have No Recently Viewed Items Yet

Visszajelzés
Haas Logo

美元价格不包括关税、报关费用、保险费、增值税及运费。
USD prices DO NOT include customs duty, customs fees, insurance, VAT, or freight.

人民币价格包含关税、报关费用、货运保险和增值税, 但不包括运费。
CNY prices include customs duty, customs fees, insurance, and VAT. DOES NOT include freight.

A Haas szállította termékek árszabása

Ez az ár tartalmazza a szállítás költségeit, valamint az export- és importtevékenységekhez kapcsolódó vámterheket, a biztosítást és minden olyan további felmerülő költséget, amely egy franciaországi helyszínre történő kiszállítást terhel, melybe Ön mint vevő beleegyezett. A Haas CNC termékek szállítása nem járhat további kötelező költségekkel.

KÖVESSE A LEGÚJABB HAAS TIPPEKET ÉS TECHNOLÓGIÁT…

Regisztráljon most!   

HAAS TOOLING ACCEPTS THE FOLLOWING:

  • Szerviz és támogatás
  • Tulajdonosok
  • Szervizkérés
  • Kezelési utasítások
  • Haas alkatrészek
  • Forgóasztal javításkérés
  • Útmutatók előtelepítése
  • Szerszámok vásárlása
  • Új Haas kiépítés és ár
  • Elérhető készlet
  • Haas árlista
  • CNCA finanszírozás
  • A Haas cégről
  • DNSH nyilatkozat
  • Álláslehetőségek
  • Tanúsítványok és biztonság
  • Lépjen velünk kapcsolatba
  • Történet
  • Szerződési feltételek
  • Haas Tooling - Szerződési feltételek
  • Adatvédelem
  • Jótállás
  • Haas közösség
  • Haas tanúsítási program
  • Haas Motorsports
  • Gene Haas Foundation
  • Haas technikai oktató közösség
  • Események
  • Csatlakozzon a beszélgetéshez
  • Facebook
  • X
  • Flickr
  • YouTube
  • LinkedIn
  • Instagram
  • TikTok
© 2025 Haas Automation, Inc. - CNC szerszámgépek

This site is protected by reCAPTCHA and the Google Privacy Policy and Terms of Service apply.

2800 Sturgis Rd., Oxnard, CA 93030 / Toll Free: 800-331-6746
Phone: 805-278-1800 / Fax: 805-278-2255