MyHaas Dobrodošli,
!
Haas Tooling Zgodovina naročil gostov MyHaas/HaasConnect Vpis Registrirajte Haas Tooling Moj račun Order History Return History MyHaas/HaasConnect Izpis Dobrodošli, Moji stroji Zadnja dejavnost Moje ponudbe Moj račun Moji uporabniki Izpis
Poiščite distributerja
  1. Izberite jezik
    1. English
    2. Deutsch
    3. Español - España
    4. Español - México
    5. Français
    6. Italiano
    7. Português
    8. Český
    9. Dansk
    10. Nederlands
    11. Magyar
    12. Polski
    13. Svenska
    14. Türkçe
    15. 中文
    16. Suomi
    17. Norsk
    18. الإنجليزية
    19. български
    20. Hrvatski
    21. Ελληνικά
    22. Română
    23. Slovenský
    24. Slovenščina
    25. 한국어
    26. 日本語
    27. Українська
  • stroji Main Menu
    • Vertikalni rezkarji Haas Vertikalni rezkarji
      Vertikalni rezkarji
      Vertikalni rezkarji View All
      • Vertikalni rezkarji
      • VF Serija
      • Univerzalni stroji
      • Serija VF
      • VP-5 prizmatično
      • VMC z menjavo palet
      • Stroji Mini Mill
      • Kalupni stroji
      • Visokohitrostni vrtalni centri
      • Serija Drill/Tap/Mill
      • Rezkarji Toolroom Mill
      • Kompaktni rezkarji
      • Serija Gantry
      • SR usmerjevalniki pločevine
      • Izjemno velik vertikalni obdelovalni center (VMC)
      • Rezkarji z dvema stebroma
      • Simulator krmilja
      • AVTOMATSKI NALAGALNI SISTEM ZA REZKAR
      • VMC/UMC APL na strani
      • Kompaktni avtomatski nalagalni sistem
    • Product Image Večosne rešitve
      Večosne rešitve
      Večosne rešitve View All
      • Večosne rešitve
      • Stružnice z Y-osjo
      • 5-osni rezkarji
    • Stružnice Haas Stružnice
      Stružnice
      Stružnice View All
      • Stružnice
      • Serija ST
      • Dvojno-vreteno
      • Serija drsnih vodil
      • Stružnice Toolroom Lathe
      • Stružnica Chucker
      • Podajalec palic Haas V2
      • Avtomatski nalagalni sistem za stružnico
    • Horizontalni rezkarji Haas Horizontalni rezkarji
      Horizontalni rezkarji
      Horizontalni rezkarji View All
      • Horizontalni rezkarji
      • 50-konusni
      • 40-konusni
    • Vrtljive mize in indekserji Haas Rotacijske mize in indekserji
      Rotacijske mize in indekserji
      Rotacijske mize in indekserji View All
      • Rotacijske mize in indekserji
      • Vrtljive mize
      • Indekserji
      • 5-osne vrtljive mize
      • Zelo velike vrtljive mize
    • Product Image Avtomatizirani sistemi
      Avtomatizirani sistemi
      Avtomatizirani sistemi View All
      • Avtomatizirani sistemi
      • Avtomatizacija rezkarja
      • Avtomatizacija stružnice
      • Modeli avtomatizacije
    • Haas vrtalni centri Namizni stroji
      Namizni stroji
      Namizni stroji View All
      • Namizni stroji
      • Namizni rezkar
      • Namizna stružnica
    • Oprema za trgovine Haas Oprema za delavnice
      Oprema za delavnice
      Oprema za delavnice View All
      • Oprema za delavnice
      • Tračna žaga
      • Rezkar za koleno
      • Površinski brusilnik, 2550
      • Površinski brusilnik, 3063
      • Laserski rezalni stroj
    • HITRE POVEZAVE Posebna serija  Posebna serija 
      EU SERIJA EU SERIJA IZDELAVA IN CENA | CENIK IZDELAVA IN CENA | CENIK Stroji na zalogi Stroji na zalogi KAJ JE NOVEGA? KAJ JE NOVEGA? VAŠ PRVI CNC VAŠ PRVI CNC
      ORODJA ZA NAKUPOVANJE
      • Sestavi in preveri ceno Haas
      • Cenik
      • Razpoložljiv inventar
      • Financiranje CNCA
      SE ŽELITE S KOM POGOVORITI?

      Tovarniška izpostava Haas (HFO) lahko odgovori na vaša vprašanja in vam predstavi vaše najboljše možnosti.

      CONTACT YOUR DISTRIBUTOR >
  • Možnosti Main Menu
    • Product Image Vretena
      Vretena
      Vretena View All
      • Vretena
    • Product Image Menjalci orodja
      Menjalci orodja
      Menjalci orodja View All
      • Menjalci orodja
    • Product Image 4. | 5. os
      4. | 5. os
      4. | 5. os View All
      • 4. | 5. os
    • Product Image Revolverji in gnana orodja
      Revolverji in gnana orodja
      Revolverji in gnana orodja View All
      • Revolverji in gnana orodja
    • Product Image Merjenje s sondo
      Merjenje s sondo
      Merjenje s sondo View All
      • Merjenje s sondo
    • Obvladovanje odrezkov in emulzije Haas Obvladovanje odrezkov in emulzije
      Obvladovanje odrezkov in emulzije
      Obvladovanje odrezkov in emulzije View All
      • Obvladovanje odrezkov in emulzije
    • Krmilje Haas Krmilje Haas
      Krmilje Haas
      Krmilje Haas View All
      • Krmilje Haas
    • Product Image Opcije izdelka
      Opcije izdelka
      Opcije izdelka View All
      • Opcije izdelka
    • Product Image Orodje in vpenjanje
      Orodje in vpenjanje
      Orodje in vpenjanje View All
      • Orodje in vpenjanje
    • Product Image Vpenjanje obdelovanca
      Vpenjanje obdelovanca
      Vpenjanje obdelovanca View All
      • Vpenjanje obdelovanca
    • Product Image 5-osne rešitve
      5-osne rešitve
      5-osne rešitve View All
      • 5-osne rešitve
      • 5 Easy Steps to 5-Axis
    • Product Image Avtomatizacija
      Avtomatizacija
      Avtomatizacija View All
      • Avtomatizacija
    • HITRE POVEZAVE Posebna serija  Posebna serija 
      EU SERIJA EU SERIJA IZDELAVA IN CENA | CENIK IZDELAVA IN CENA | CENIK Stroji na zalogi Stroji na zalogi KAJ JE NOVEGA? KAJ JE NOVEGA? VAŠ PRVI CNC VAŠ PRVI CNC
      ORODJA ZA NAKUPOVANJE
      • Sestavi in preveri ceno Haas
      • Cenik
      • Razpoložljiv inventar
      • Financiranje CNCA
      SE ŽELITE S KOM POGOVORITI?

      Tovarniška izpostava Haas (HFO) lahko odgovori na vaša vprašanja in vam predstavi vaše najboljše možnosti.

      CONTACT YOUR DISTRIBUTOR >
  • Why Haas Main Menu
      Spoznajte Haasovo razliko
    • Zakaj Haas?
    • MyHaas
    • Skupnost za izobraževanje
    • Industrija 4.0
    • Certifikat Haas
    • Pričevanja strank
  • Servis Main Menu
      Dobrodošli v Haas Service
      DOMAČA STRAN ZA SERVIS Priročniki za operaterja Postopki z navodili Navodila za odpravljanje napak Preventivno vzdrževanje stroja Deli Haas Haas Tooling Videoposnetki
  • Videoposnetki Main Menu
×

Iskalni rezultati

Web Pages

Images

    • <
    • 1
    • >
MyHaas Dobrodošli,
!
Haas Tooling Zgodovina naročil gostov MyHaas/HaasConnect Vpis Registrirajte Haas Tooling Moj račun Order History Return History MyHaas/HaasConnect Izpis Dobrodošli, Moji stroji Zadnja dejavnost Moje ponudbe Moj račun Moji uporabniki Izpis
Poiščite distributerja
  1. Izberite jezik
    1. English
    2. Deutsch
    3. Español - España
    4. Español - México
    5. Français
    6. Italiano
    7. Português
    8. Český
    9. Dansk
    10. Nederlands
    11. Magyar
    12. Polski
    13. Svenska
    14. Türkçe
    15. 中文
    16. Suomi
    17. Norsk
    18. الإنجليزية
    19. български
    20. Hrvatski
    21. Ελληνικά
    22. Română
    23. Slovenský
    24. Slovenščina
    25. 한국어
    26. 日本語
    27. Українська
×

Iskalni rezultati

Web Pages

Images

    • <
    • 1
    • >

UMC C-Axis Rotary Encoder Ring - Replacement - AD0497

Servisna domača stran Kako poteka postopek Obroč rotacijskega dajalnika C-osi UMC – nadomestni – AD0497

Obroč rotacijskega dajalnika C-osi UMC – nadomestni – AD0497

- Skok na razdelek - Back to Top

10.2 UMC ROTARY ENCODER RING - REPLACEMENT

Recently Updated Last updated: 06/13/2025

UMC C-Axis Rotary Encoder Ring - Replacement


AD0497

Revision A 06/2025

Introduction

This procedure details the replacement of the 3" C-Axis Encoder on all UMC machines and the 3" B-Axis Encoder on UMC -500/SS machines only.

Laser calibration is required to update the compensation table for the corresponding rotary axis following the encoder replacement. 

This document applies to the following Service Kits:

  • 93-3923  ENCDR NON-CONT KIT 3"ID SER HI-RES

Used on B & C-Axis:

  • UMC-500/SS

Used on C-Axis:

  • UMC-750/SS
  • UMC-1000/SS
  • UMC-1250/SS
  • UMC-1500-DUO/SS

Tools Required:

  • 99-2130 ANTI-OXIDANT COMPOUND ELECTRICAL
  • 99-2147 DIELECTRIC GREASE PACK SUPER LUBE
  • 0.008" Mylar Shim

C-Axis Encoder Ring Replacement

1

: Warning: Only certified service personnel should perform this procedure. Reorientation of Z-pulse or Trip-Flag will require laser calibration to populate rotary compensation tables with new, correct, values.

Zero-return all Axis.

Press [EMERGENCY STOP].

2

Handle jog B to +120°.

Remove the C-Axis bottom cover.

3

Press [SETTING].

Navigate to the Rotaty tab.

Un-Check the 4th Axis.

4

Press [DIAGNOSTIC].

Navigate to Parameters > Factory.

Set 7.083 C-Axis Linear Scale Enabled to "Scale Disabled".

Power off the machine.

5

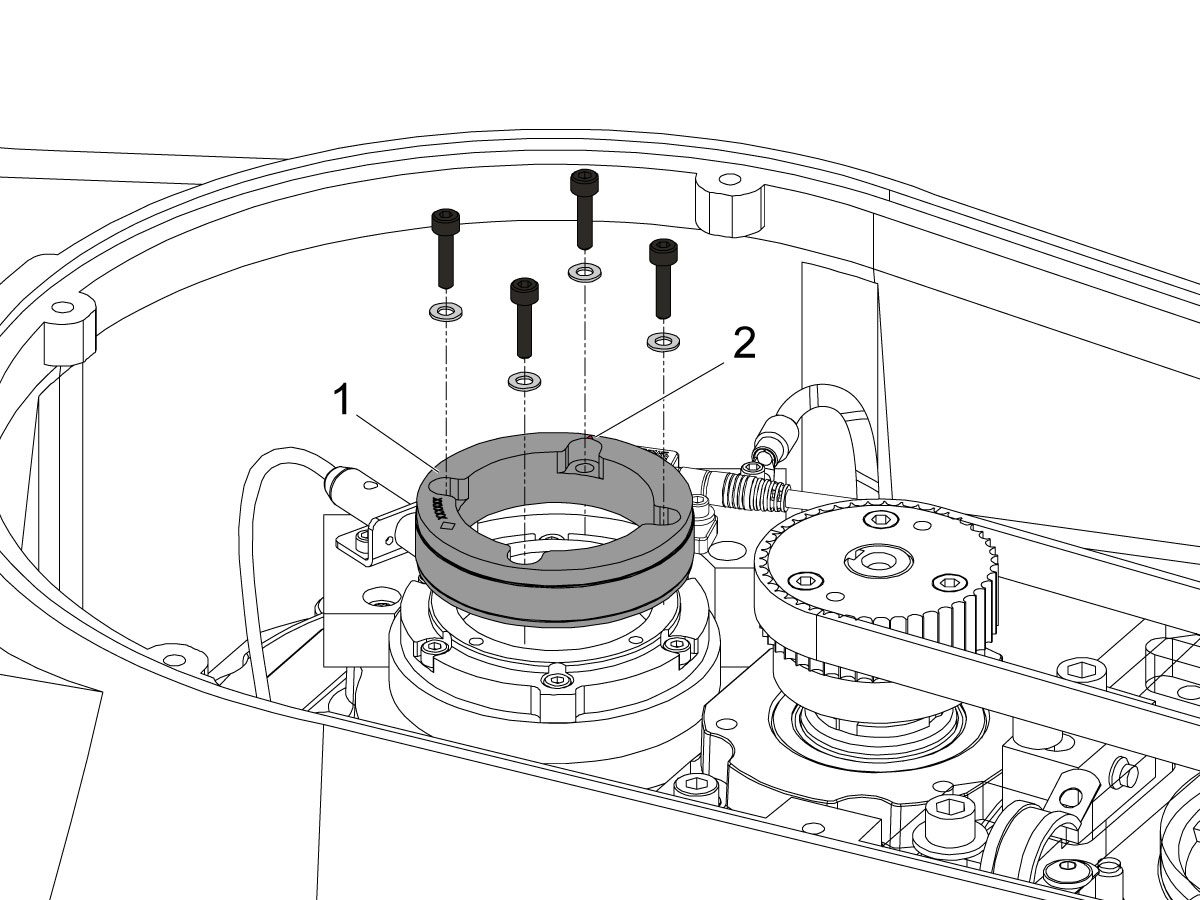
Uninstall the encoder read-head [1] by disconnecting the encoder cable [2] and removing the bolts and washers.

6

Note the Z-Pulse orientation before removing the encoder ring hub.

Uninstall the encoder ring hub [1] by removing the screws and washers mounting the encoder ring hub to the taper-lock. 

7

Mount and loosely install the encoder ring hub [1] from the service kit with the provided hardware, SHCS 10-32 X 3/4 (x4) and WASHER #10 FLAT (x4).

Verify the Z-Pulse is in the same location as the ring that was uninstalled. 

 Note: Do not torque mounting screws yet.

8

Turn on the machine.

Zero return all axis.

 Warning: Do not place the Mag Base anywhere near the Encoder.

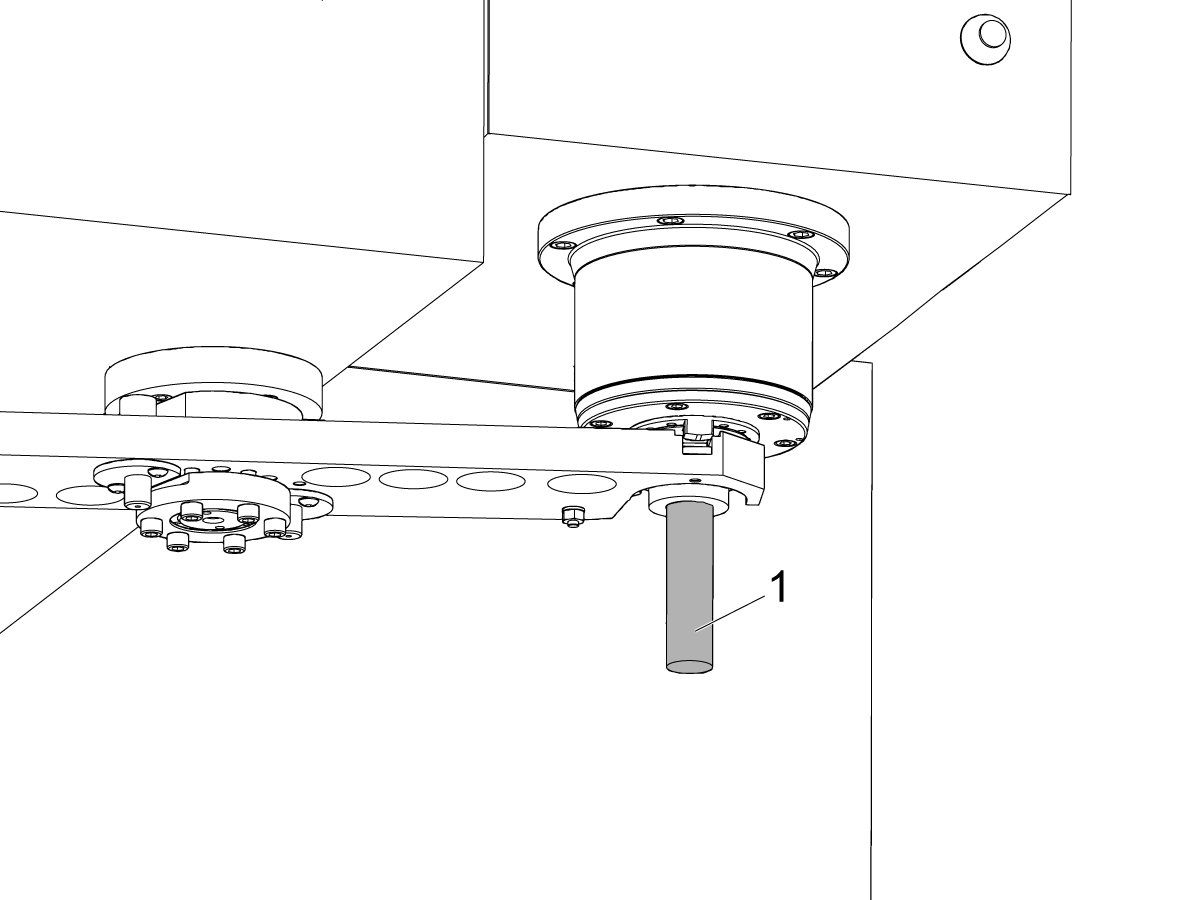
Check and document the runout on the OD of the scale encoder ring hub using the upper-most diameter, as shown.

Adjust as necessary. TIR must be 0.0005" or less.

Torque the 4 bolts of the encoder ring hub to 30 in-lbf in the star pattern.

After torquing, double check the runout to verify the ring hub has not shifted.

9

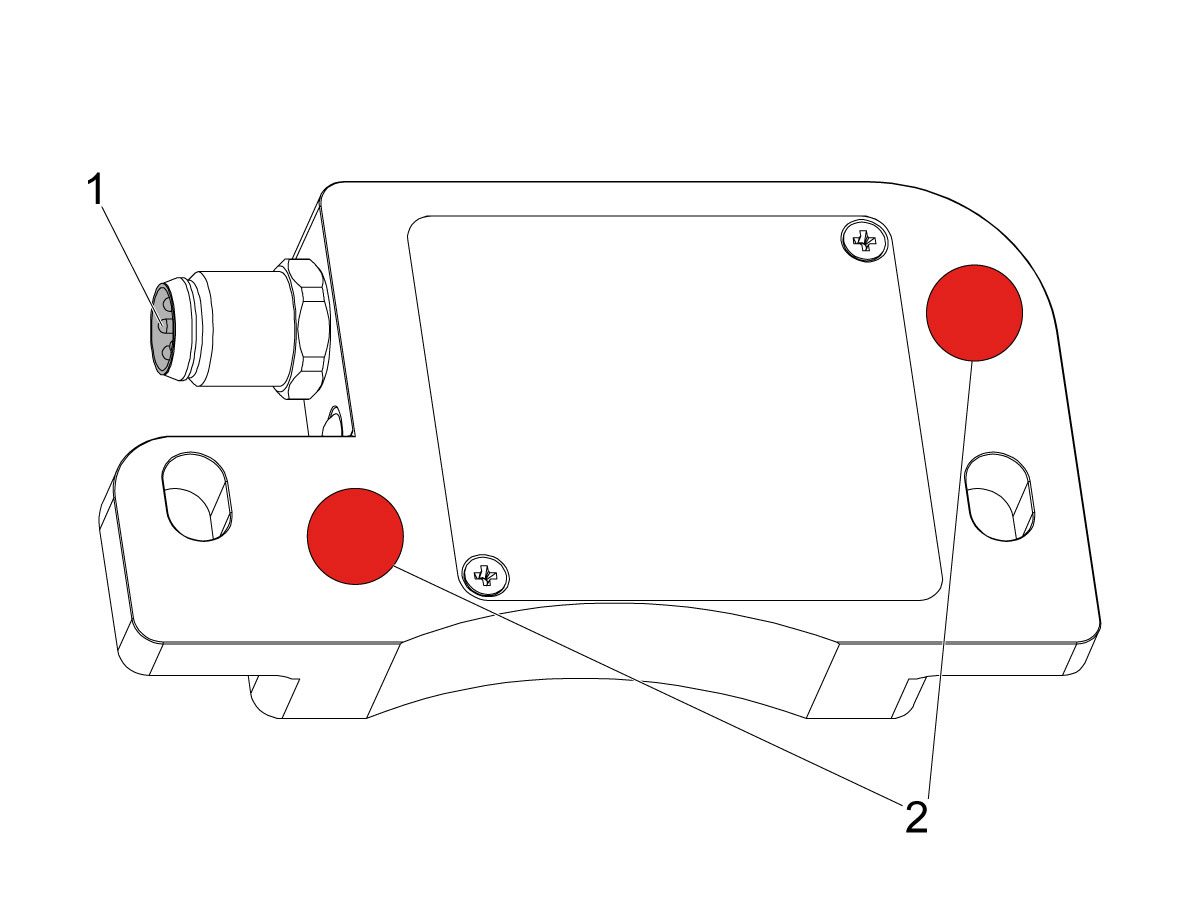
Clean the back surface of the encoder read-head and the mounting surface.

Add a small amount of silicone dielectric grease to encoder cable connection [1]. Grease should be a thin layer, but cover all the pins.

Apply two small drops of anti-oxidant (99-2130) to the mounting surface on the read head in the locations shown [2].

10

Connect the encoder cable [4] to the encoder read-head.

Insert cable by carefully lining up electrical pins with cable connector.

Install the encoder read-head [1] from the service kit with the provided hardware,  SHCS 8-32 x 1/2 bolts (x2) [2] and Washer .17ID x .4OD (2x) [3].

 Note: Do not torque mounting screws yet.

11

Set the gap between the scale ring and read-head as shown [1] using the appropriate mylar shim (0.008").

 Note: Do not use a metal shim.

Starting on the left side of the read-head [2], torque the two read-head mounting bolts to 20 in-lbf.

After torquing, double check the gap with the shim to verify the read-head has not shifted.

12

Reinstall the C-Axis bottom cover being sure no tools, shims, etc. have been left in the casting.

13

Press [SETTING].

Navigate to the Rotaty tab.

Check the 4th Axis.

Rotate the B-Axis back to zero when done.

14

Press [DIAGNOSTIC].

Navigate to Parameters > Configuration > Axis > B > Travel Limits.

Change: 6.108 B-Axis Positive Travel Limit from 180 to 110.

15

Press [DIAGNOSTIC].

Navigate to Parameters > Factory.

Set 7.083 C-Axis Linear Scale Enabled to "Scale Linear".

Power cycle the machine.

16

Zero-Return the C-Axis.

Zero-Return All Axis.

Set new Tool Change offset by following the UMC - X and Y Axes - Tool Change Offsets and the Side-Mount Tool Changer - Z-Axis Tool Change Offset - NGC procedures.

17

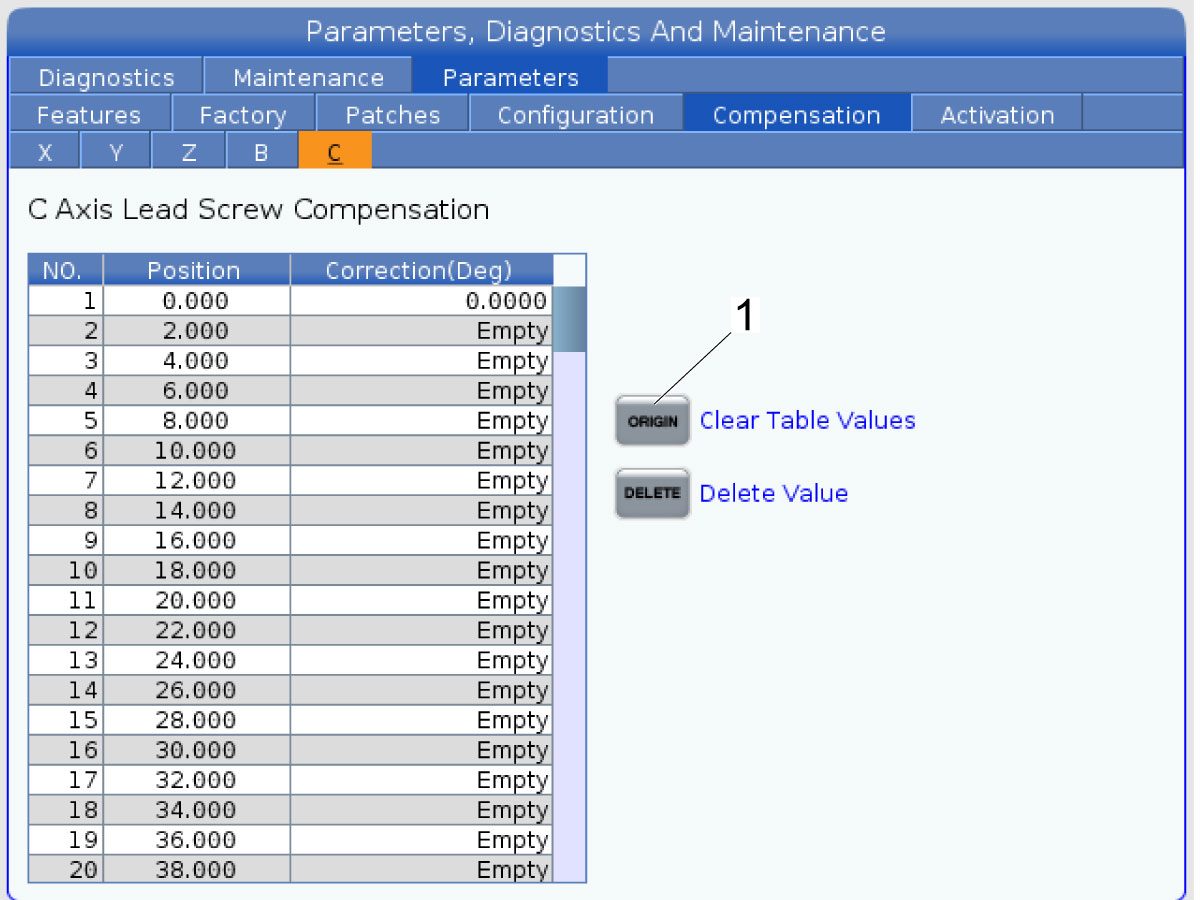
Clear the Compensation table for the C-Axis.

Press [DIAGNOSTIC].

Navigate to Parameters > Compensation > C.

Press [ORIGIN].

To update compensation table values for the C-Axis a laser calibration is required. The calculated compensation values will then be entered into the C-Axis Compensation Table.

B-Axis Encoder Ring Replacement

 Note: These step apply only to the UMC-500/SS B-Axis.

1

: Warning: Only certified service personnel should perform this procedure. Reorientation of Z-pulse or Trip-Flag will require laser calibration to populate rotary compensation tables with new, correct, values.

Zero-return all Axis.

Press [EMERGENCY STOP].

2

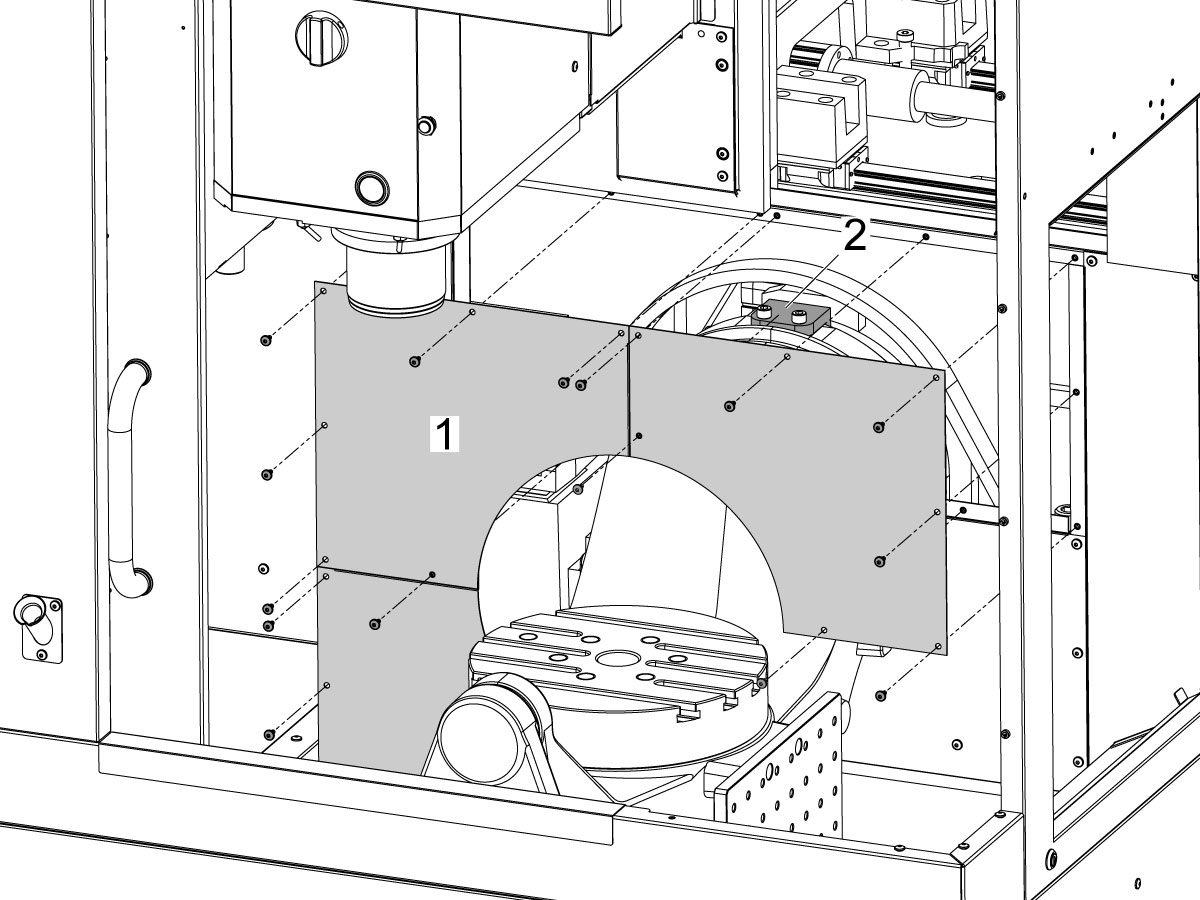
Remove the bulkhead sheet metal [1] to access the B-Axis hard stop [2]. 

3

Rotate the B-Axis approximately 100 degrees, or until there is enough room to access the hard stop [1].

Remove the B-Axis hard stop [1].

4

Remove the two rear sheet metal panels [1] to access the B-Axis components.

5

Insert a service key and enter service mode.

Press [DIAGNOSTIC].

Navigate to Parameters > Configuration > Axis > B > Travel Limits.

Change: 6.108 B-Axis Positive Travel Limit from 110 to 365.

6

Handle jog B to +180°.

Remove the C-Axis bottom cover.

7

Press [DIAGNOSTIC].

Navigate to Parameters > Factory.

Set 6.083 B-Axis Linear Scale Enabled to "Scale Disabled".

Power off the machine.

8

Disconnect all of the cables and hoses [1] running to the C-Axis through the B-Axis encoder ring. 

 Note: Mark the cables and hose to make reconnecting them easier later in this procedure. 

Remove the corrugated conduit [2].

9

Uninstall the encoder read-head [1] by disconnecting the encoder cable [2] and removing the bolts and washers.

10

Note the Z-Pulse orientation before removing the encoder ring hub.

Uninstall the encoder ring hub [1] by removing the screws and washers mounting the encoder ring hub to the taper-lock. 

11

Mount and loosely install the encoder ring hub [1] from the service kit with the provided hardware, SHCS 10-32 X 3/4 (x4) and WASHER #10 FLAT (x4).

Verify the Z-Pulse is in the same location as the ring that was uninstalled. 

 Note: If the Z-Pulse is in the wrong location the B-Axis will not zero return correctly and can damage the cables and hoses.

 Note: Do not torque mounting screws yet.

12

Route all of the cables and hoses [1] for the C-Axis through the corrugated conduit [2] and through the B-Axis encoder ring. 

Reconnect all of the cables and hoses to their original locations in the C-Axis.

13

Turn on the machine.

Zero return all axis.

 Note: The B-Axis should zero return in the Clockwise direction.

 Warning: Do not place the Mag Base anywhere near the Encoder.

Check and document the runout on the OD of the scale encoder ring hub using the upper-most diameter, as shown.

Adjust as necessary. TIR must be 0.0005" or less.

Torque the 4 bolts of the encoder ring hub to 30 in-lbf in the star pattern.

After torquing, double check the runout to verify the ring hub has not shifted.

14

Clean the back surface of the encoder read-head and the mounting surface.

Add a small amount of silicone dielectric grease to encoder cable connection [1]. Grease should be a thin layer, but cover all the pins.

Apply two small drops of anti-oxidant (99-2130) to the mounting surface on the read head in the locations shown [2].

15

Connect the encoder cable [1] to the encoder read-head.

Insert cable by carefully lining up electrical pins with cable connector.

Install the encoder read-head [2] from the service kit with the provided hardware,  SHCS 8-32 x 1/2 bolts (x2) [4] and Washer .17ID x .4OD (2x) [3].

 Note: Do not torque mounting screws yet.

16

Set the gap between the scale ring and read-head as shown [1] using the appropriate mylar shim (0.008").

 Note: Do not use a metal shim.

Starting on the left side of the read-head [2], torque the two read-head mounting bolts to 20 in-lbf.

After torquing, double check the gap with the shim to verify the read-head has not shifted.

17

Reinstall the C-Axis bottom cover being sure no tools, shims, etc. have been left in the casting.

 Note: You will have to set a new tool change offset and update compensation table values for the B-Axis. This will require laser calibration.

18

Rotate the B-Axis to the same position when the hard stop was removed. 

Install the B-Axis hard stop [1].

19

Press [DIAGNOSTIC].

Navigate to Parameters > Configuration > Axis > B > Travel Limits.

Change: 6.108 B-Axis Positive Travel Limit from 365 to 110.

Rotate the B-Axis back to zero when done.

20

Press [DIAGNOSTIC].

Navigate to Parameters > Factory.

Set 6.083 B-Axis Linear Scale Enabled to "Scale Linear".

Power cycle the machine.

21

Zero-Return the B-Axis.

Zero-Return All Axis.

Set new Tool Change offset by following the UMC - X and Y Axes - Tool Change Offsets and the Side-Mount Tool Changer - Z-Axis Tool Change Offset - NGC procedures.

22

Install the bulkhead sheet metal [1] once the B-Axis hard stop [2] has been installed. 

23

Install the two rear sheet metal panels [1].

24

Clear the Compensation table for the B-Axis.

Press [DIAGNOSTIC].

Navigate to Parameters > Compensation > B.

Press [ORIGIN].

To update compensation table values for the B-Axis a laser calibration is required. The calculated compensation values will then be entered into the B-Axis Compensation Table.

Recently Viewed Items

You Have No Recently Viewed Items Yet

Povratne informacije
Haas Logo

美元价格不包括关税、报关费用、保险费、增值税及运费。
USD prices DO NOT include customs duty, customs fees, insurance, VAT, or freight.

人民币价格包含关税、报关费用、货运保险和增值税, 但不包括运费。
CNY prices include customs duty, customs fees, insurance, and VAT. DOES NOT include freight.

HAAS dobavljena cena

Ta cena vključuje stroške pošiljanja, izvozne in uvozne dajatve ter vse druge stroške, ki nastanejo med pošiljanjem na lokacijo v Franciji, dogovorjeno z vami kot kupcem. Za dostavo CNC produkta Haas se ne sme zaračunati nobenih drugih obveznih stroškov.

BODITE OBVEŠČENI O NAJNOVEJŠIH NASVETIH IN TEHNOLOGIJI PODJETJA HAAS…

Prijavite se zdaj!   

HAAS TOOLING ACCEPTS THE FOLLOWING:

  • Servis in podpora
  • Lastniki
  • Zahteva za servis
  • Priročniki za operaterja
  • Deli Haas
  • Zahteva za popravilo delilnika
  • Navodila za prednamestitev
  • Orodja za nakupovanje
  • Sestavi in preveri ceno novega Haas
  • Razpoložljiv inventar
  • Cenik Haas
  • Financiranje CNCA
  • O podjetju Haas
  • Izjava DNSH
  • Zaposlitev
  • Certifikati in varnost
  • Kontaktirajte nas
  • Zgodovina
  • Pogoji in določbe
  • Pogoji in določbe Haas Tooling
  • Zasebnost
  • Garancija
  • Skupnost Haas
  • Certifikacijski program Haas
  • Motošport Haas
  • Fundacija Gena Haasa
  • Haas skupnost za tehnično izobraževanje
  • Dogodki
  • Pridružite se pogovoru
  • Facebook
  • x
  • Flickr
  • YouTube
  • LinkedIn
  • Instagram
  • TikTok
© 2025 Haas Automation, Inc – Orodja CNC stroja

This site is protected by reCAPTCHA and the Google Privacy Policy and Terms of Service apply.

2800 Sturgis Rd., Oxnard, CA 93030 / Toll Free: 800-331-6746
Phone: 805-278-1800 / Fax: 805-278-2255