MyHaas Добре дошли,
!
Haas Tooling История на поръчки на посетителите MyHaas/HaasConnect Вписване Регистрирайте се Haas Tooling Моя профил Order History Return History MyHaas/HaasConnect Изход Добре дошли, Моите машини Последна дейност Моите оферти Моя профил Моите потребители Изход
Намерете Вашия дистрибутор
  1. Избор на език
    1. English
    2. Deutsch
    3. Español - España
    4. Español - México
    5. Français
    6. Italiano
    7. Português
    8. Český
    9. Dansk
    10. Nederlands
    11. Magyar
    12. Polski
    13. Svenska
    14. Türkçe
    15. 中文
    16. Suomi
    17. Norsk
    18. الإنجليزية
    19. български
    20. Hrvatski
    21. Ελληνικά
    22. Română
    23. Slovenský
    24. Slovenščina
    25. 한국어
    26. 日本語
    27. Українська
  • Машини Main Menu
    • Вертикални фрези Haas Вертикални фрези
      Вертикални фрези
      Вертикални фрези View All
      • Вертикални фрези
      • Серията VF
      • Универсални машини
      • Серия VR
      • VP-5 призматичен
      • Вертикални центри с палетна станция
      • Мини Обработващи центри
      • Центри за инструментално производство
      • Високоскоростни пробивни центрове
      • Пробивно/Резбонарязващи/Фрезови центри
      • Центри серия Toolroom
      • Компактни фрези
      • Рутери за метал с ЦПУ
      • SR Рутер за листов материал
      • Супер дълги ВОЦ
      • Фреза с двойни рутери за метал с ЦПУ
      • Симулатор на управлението
      • Станция за автоматично зареждане на детайли за фреза
      • VMC/UMC станция за APL със странично зареждане
      • Компактна станция за автоматично зареждане на детайли
    • Product Image Решения с много оси
      Решения с много оси
      Решения с много оси View All
      • Решения с много оси
      • Стругове с Y-ос
      • Фрези с 5 оси
    • Стругове Haas Стругове
      Стругове
      Стругове View All
      • Стругове
      • Серия ST
      • Два шпиндела
      • Серия с кутиеобразен ход
      • Инструментални стругове
      • Патронен струг
      • Прътоподаващо устройство Haas V2
      • Станция за автоматично зареждане на детайли за струг
    • Хоризонтални фрези Haas Хоризонтални фрези
      Хоризонтални фрези
      Хоризонтални фрези View All
      • Хоризонтални фрези
      • Конус 50
      • Конус 40
    • Въртящи маси и делителни апарати Haas Въртящи маси и индексиращи апарати
      Въртящи маси и индексиращи апарати
      Въртящи маси и индексиращи апарати View All
      • Въртящи маси и индексиращи апарати
      • Въртящи маси
      • Делителни апарати
      • Въртящи маси с 5 оси
      • Едрогабаритни въртящи маси
    • Product Image Системи за автоматизация
      Системи за автоматизация
      Системи за автоматизация View All
      • Системи за автоматизация
      • Автоматизация на фреза
      • Автоматизация на струг
      • Модели за автоматизация
    • Пробивни центрове Haas Настолни машини
      Настолни машини
      Настолни машини View All
      • Настолни машини
      • Настолен обработващ център с ЦПУ
      • Настолен струг
    • Оборудване за цехове на Haas Оборудване за цехове
      Оборудване за цехове
      Оборудване за цехове View All
      • Оборудване за цехове
      • Лентов трион
      • Фреза за коляно
      • Повърхностна шлайфмашина, 2550
      • Повърхностна шлайфмашина, 3063
      • Режеща машина за лазер
    • БЪРЗИ ВРЪЗКИ Специална серия  Специална серия 
      СЕРИЯТА ЕС СЕРИЯТА ЕС ИЗГРАЖДАНЕ И ЦЕНА | ЦЕНОРАЗПИС ИЗГРАЖДАНЕ И ЦЕНА | ЦЕНОРАЗПИС Машини на склад Машини на склад КАКВО НОВО КАКВО НОВО ВАШЕТО ПЪРВО ЦПУ ВАШЕТО ПЪРВО ЦПУ
      ИНСТРУМЕНТИ ЗА ПОКУПКА
      • Конфигуриране и ценообразуване на Haas
      • Ценова листа
      • Наличности на склад
      • CNCA финансиране
      ИСКАТЕ ЛИ ДА ГОВОРИТЕ С НЯКОЙ?

      Представителството на завода на Haas (HFO) може да отговори на Вашите въпроси и да Ви окаже съдействие да направите най-добрия избор.

      CONTACT YOUR DISTRIBUTOR >
  • Опции Main Menu
    • Product Image Шпиндели
      Шпиндели
      Шпиндели View All
      • Шпиндели
    • Product Image Инструментален магазин
      Инструментален магазин
      Инструментален магазин View All
      • Инструментален магазин
    • Product Image 4-та | 5-та ос
      4-та | 5-та ос
      4-та | 5-та ос View All
      • 4-та | 5-та ос
    • Product Image Револверни глави с фрезови инструменти
      Револверни глави с фрезови инструменти
      Револверни глави с фрезови инструменти View All
      • Револверни глави с фрезови инструменти
    • Product Image Измерване
      Измерване
      Измерване View All
      • Измерване
    • Управление на стружките и охлаждащата течност на Haas Управление на стружките и охлаждащата течност
      Управление на стружките и охлаждащата течност
      Управление на стружките и охлаждащата течност View All
      • Управление на стружките и охлаждащата течност
    • Управлението на Haas Управлението на Haas
      Управлението на Haas
      Управлението на Haas View All
      • Управлението на Haas
    • Product Image Продуктови опции
      Продуктови опции
      Продуктови опции View All
      • Продуктови опции
    • Product Image Инструменти и устройства за фиксиране
      Инструменти и устройства за фиксиране
      Инструменти и устройства за фиксиране View All
      • Инструменти и устройства за фиксиране
    • Product Image Закрепване на детайла
      Закрепване на детайла
      Закрепване на детайла View All
      • Закрепване на детайла
    • View All
    • Product Image Решения с 5 оси
      Решения с 5 оси
      Решения с 5 оси View All
      • Решения с 5 оси
      • 5 Easy Steps to 5-Axis
    • Product Image Автоматизиране
      Автоматизиране
      Автоматизиране View All
      • Автоматизиране
    • БЪРЗИ ВРЪЗКИ Специална серия  Специална серия 
      СЕРИЯТА ЕС СЕРИЯТА ЕС ИЗГРАЖДАНЕ И ЦЕНА | ЦЕНОРАЗПИС ИЗГРАЖДАНЕ И ЦЕНА | ЦЕНОРАЗПИС Машини на склад Машини на склад КАКВО НОВО КАКВО НОВО ВАШЕТО ПЪРВО ЦПУ ВАШЕТО ПЪРВО ЦПУ
      ИНСТРУМЕНТИ ЗА ПОКУПКА
      • Конфигуриране и ценообразуване на Haas
      • Ценова листа
      • Наличности на склад
      • CNCA финансиране
      ИСКАТЕ ЛИ ДА ГОВОРИТЕ С НЯКОЙ?

      Представителството на завода на Haas (HFO) може да отговори на Вашите въпроси и да Ви окаже съдействие да направите най-добрия избор.

      CONTACT YOUR DISTRIBUTOR >
  • Why Haas Main Menu
      Открийте с какво Haas се различава
    • Защо Haas
    • MyHaas
    • Образователна общност
    • Индустрия 4.0
    • Сертификация от Haas
    • Отзиви на клиенти
  • Сервиз Main Menu
      Добре дошли в обслужване на Haas Service
      НАЧАЛО ОБСЛУЖВАНЕ Ръководства за оператора Процедури „Как да…“ Ръководства за отстраняване на неизправности Превантивна поддръжка на машини Части Haas Haas Tooling Видеоклипове
  • Видеоклипове Main Menu
×

Резултати от търсене

Web Pages

Images

    • <
    • 1
    • >
MyHaas Добре дошли,
!
Haas Tooling История на поръчки на посетителите MyHaas/HaasConnect Вписване Регистрирайте се Haas Tooling Моя профил Order History Return History MyHaas/HaasConnect Изход Добре дошли, Моите машини Последна дейност Моите оферти Моя профил Моите потребители Изход
Намерете Вашия дистрибутор
  1. Избор на език
    1. English
    2. Deutsch
    3. Español - España
    4. Español - México
    5. Français
    6. Italiano
    7. Português
    8. Český
    9. Dansk
    10. Nederlands
    11. Magyar
    12. Polski
    13. Svenska
    14. Türkçe
    15. 中文
    16. Suomi
    17. Norsk
    18. الإنجليزية
    19. български
    20. Hrvatski
    21. Ελληνικά
    22. Română
    23. Slovenský
    24. Slovenščina
    25. 한국어
    26. 日本語
    27. Українська
×

Резултати от търсене

Web Pages

Images

    • <
    • 1
    • >

Coolant Level Float Sensor - Troubleshooting Guide

Начало обслужване Сензор за поплавък на ниво на охлаждащата течност – Ръководство за отстраняване на неизправности

Сензор за поплавък на ниво на охлаждащата течност – Ръководство за отстраняване на неизправности

- Преминете на причина - Back to Top

16.2 Coolant Level Float Sensor - Troubleshooting Guide

Recently Updated Last updated: 04/25/2025

Coolant Float Sensor - Troubleshooting Guide


Revision A - 04/2025

Coolant Level Float Sensor Inspection Report

Download and fill out the Coolant Float Sensor Inspection Report Checklist below before replacing any parts.

Coolant Float Sensor Inspection Report

Introduction

The image shows the following components of the Coolant Float Sensor:

  1. Float [1]
  2. Potentiometer [2]
  3. Bracket [3]
  4. Power Cord [4]
  5. Potentiometer Cover (not shown for clarity)

Symptom Table

Symptom Possible Cause Corrective Action
The coolant level sensor displays an incorrect coolant level. The coolant float is installed incorrectly.  See Check Float Installation section below.
The float is blocked and cannot move.  Clear all chips from float and coolant tank. 
The factory settings 603 and 604 have the incorrect values.  Refer to Coolant Level Float Sensor - Installation for the correct parameter values.
The cable is damaged or unplugged.  Make sure that the cable is securely connected and is not damaged. 
The sensor is damaged. Check all of the wires and clear chips blocking the float. Inspect for any leaks. If issue persists, follow the Malfunctioning Sensor section below. 
Coolant level sensor displays 0% with no change when level sensor is moved up/down.  The coolant float is installed incorrectly.   See Check Float Installation section below.
The sensor is damaged or the float cannot move.  Check all of the wires and clear chips blocking the float. Inspect for any leaks. If issue persists, follow the Malfunctioning Sensor section below. 
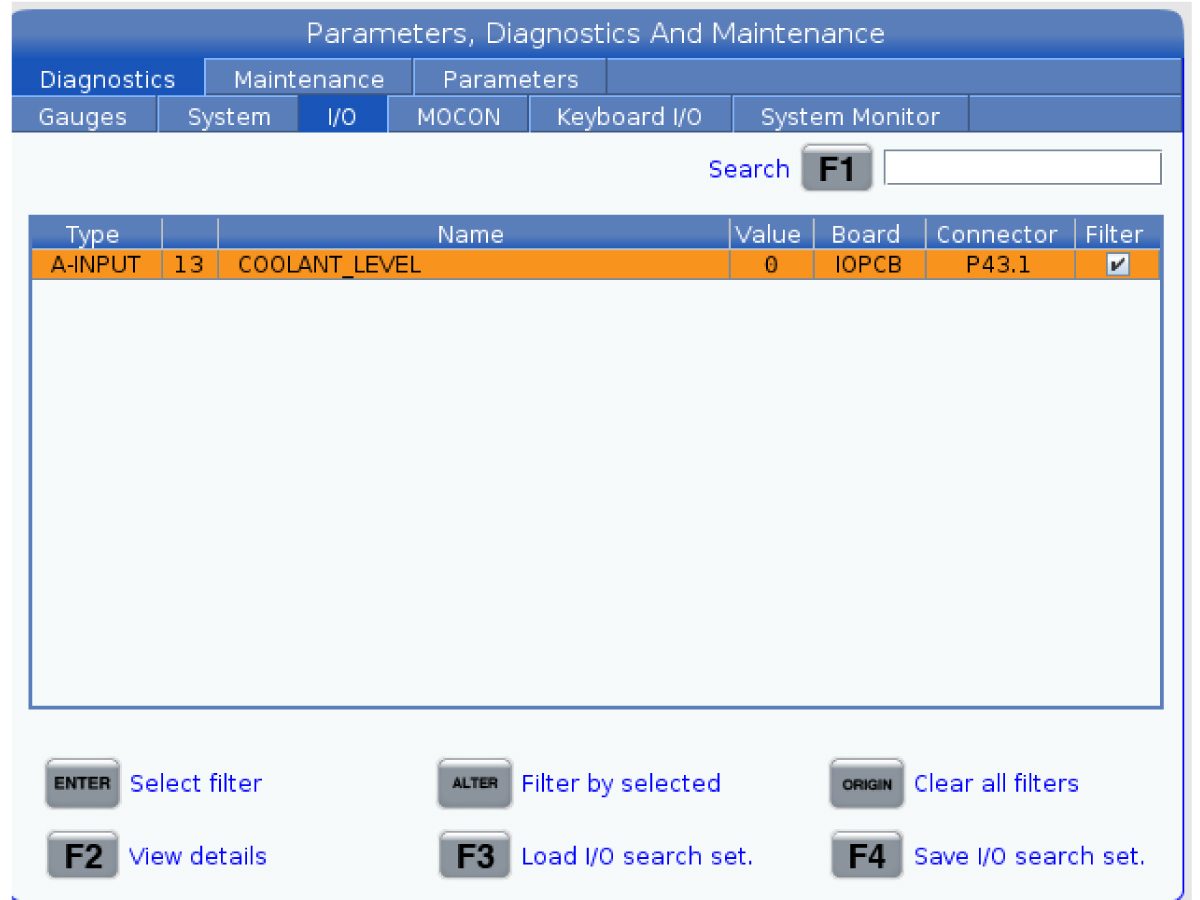
The I/O PCB isn't configured properly with the coolant level sensor.  Display analog input 13 while manually moving the coolant level float up/down. The input value should change from ~2500 to ~3150. If the input value remains the same, make sure that I/O configuration is correct. A-Input 13 should be mapped to P43.1. Refer to I/O Mapping section below. 

Low coolant alerts appearing and disappearing frequently while machine is idle.

20022 and 20023 notification occurences in Alarm History.

Coolant level is close to 50%.  Fill coolant tank until coolant touches chip filter. Ensure that coolant level is above 70% before starting any operation that requires coolant. Clear any chips and debris from coolant filter, tank and machine. If issue persists, follow the Malfunctioning Sensor section below. 

Low coolant alerts appearing and disappearing frequently while machine is cutting.

20022 and 20023 notification occurences in Alarm History.

Coolant is cycling through the machine during operations.  Fill coolant tank until coolant touches chip filter. Ensure that coolant level is above 70% before starting any operation that requires coolant. Clear any chips and debris from coolant filter, tank, and machine. If issue persists, follow the Malfunctioning Sensor section below. 

Check Float Installation

1

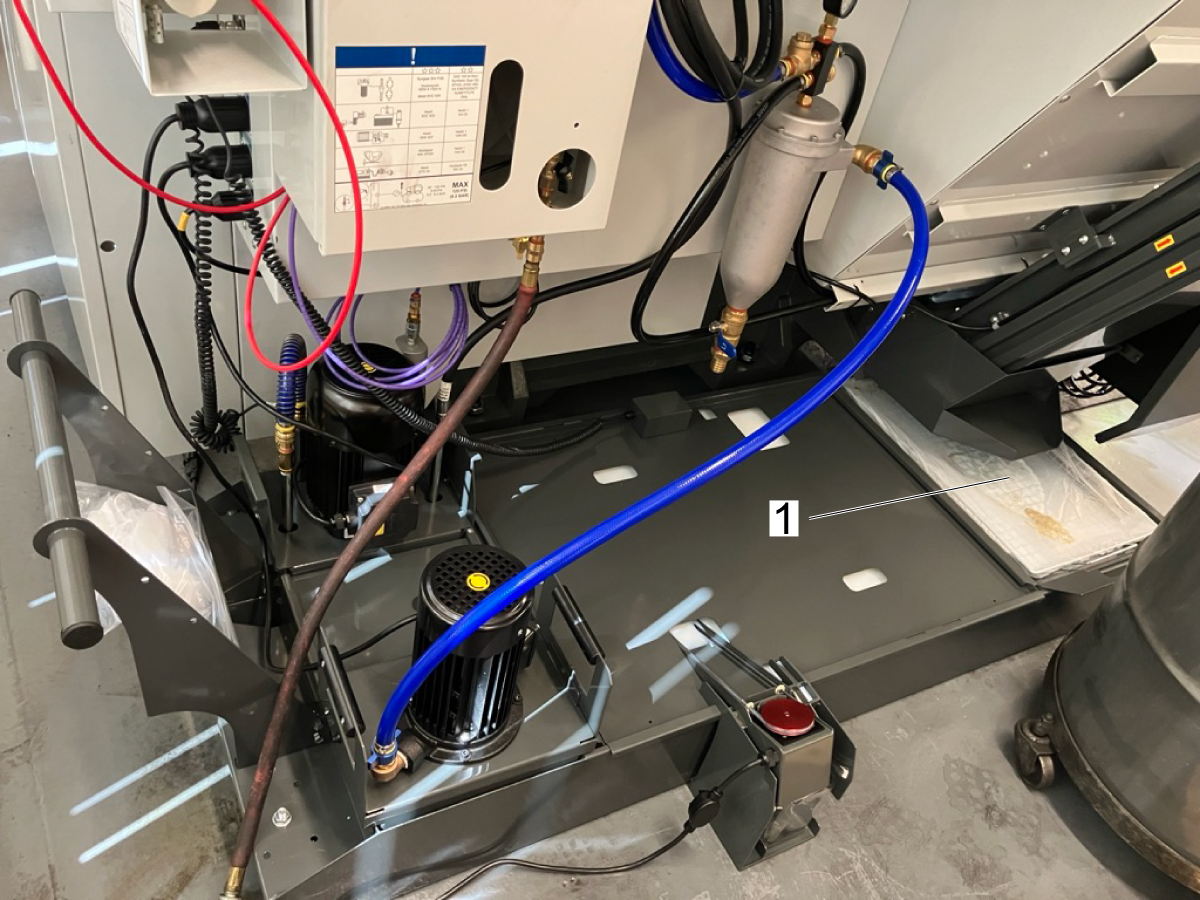
Check the orientation of the coolant tank lid. The cutout containing the coolant float [1] should be on the side of the coolant tank closest to the machine, as shown.

Ensure that the lid is sitting flat on top of the coolant tank. 

2

Check that the dimples on the coolant float are properly seated in the dimples on the coolant tank. Check that the coolant float is sitting flat on top of the lid. 

3

Re-fill coolant tank until coolant level touches the bottom of the chip filter [1]. 

Malfunctioning Sensor

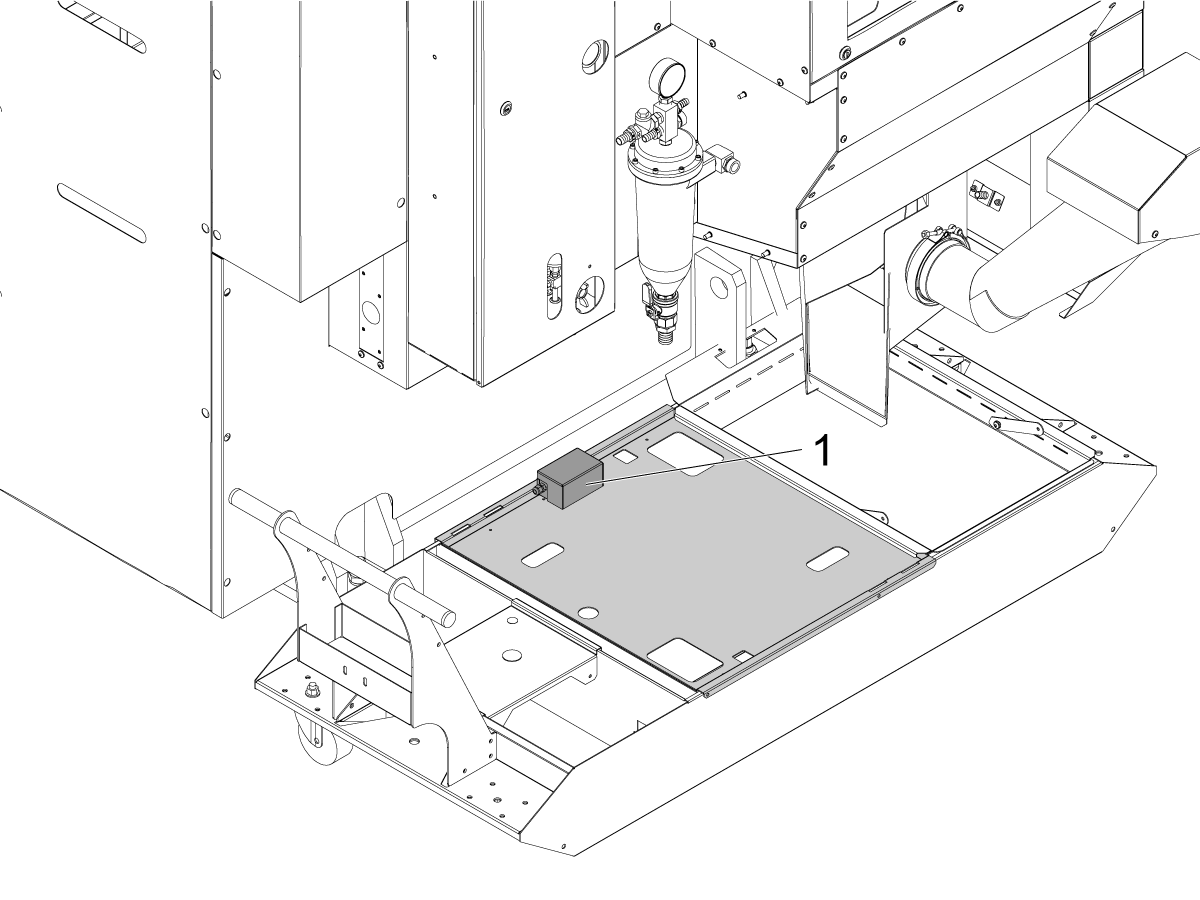
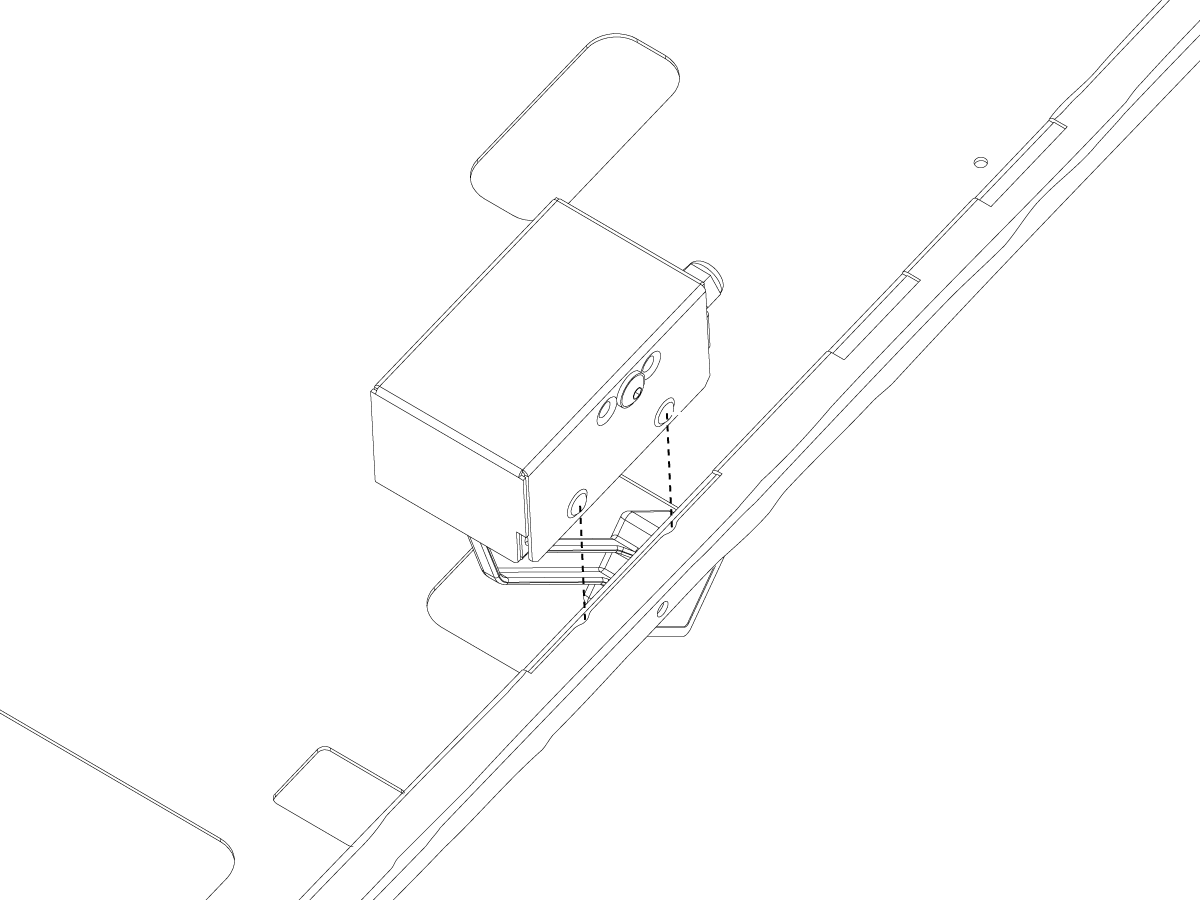
In the first image, you can see the location of the coolant level sensor on the coolant tank.

If your coolant level sensor does not display the correct level on the screen, look in the coolant tank to make sure a chip build-up does not block the float from moving freely. Also, inspect the float for any leaks to make sure no coolant has wept in. 

Corrective Action:

Make sure the coolant level sensor operates correctly:

  • Press [MEMORY]. The upper-right corner of the screen will show the coolant level.
  • Remove the coolant float sensor from the tank and manually move the float to max and min conditions.  The coolant level indicator on the screen should move at a slow pace. It takes approximately (1) minute to move from empty [2] to full [1] on the screen, but it starts to move immediately. Note the percentages that the coolant level indicator reports when the float is at min and max conditions. 
  • If the coolant level sensor does not operate correctly, unplug the coolant level sensor from the machine.


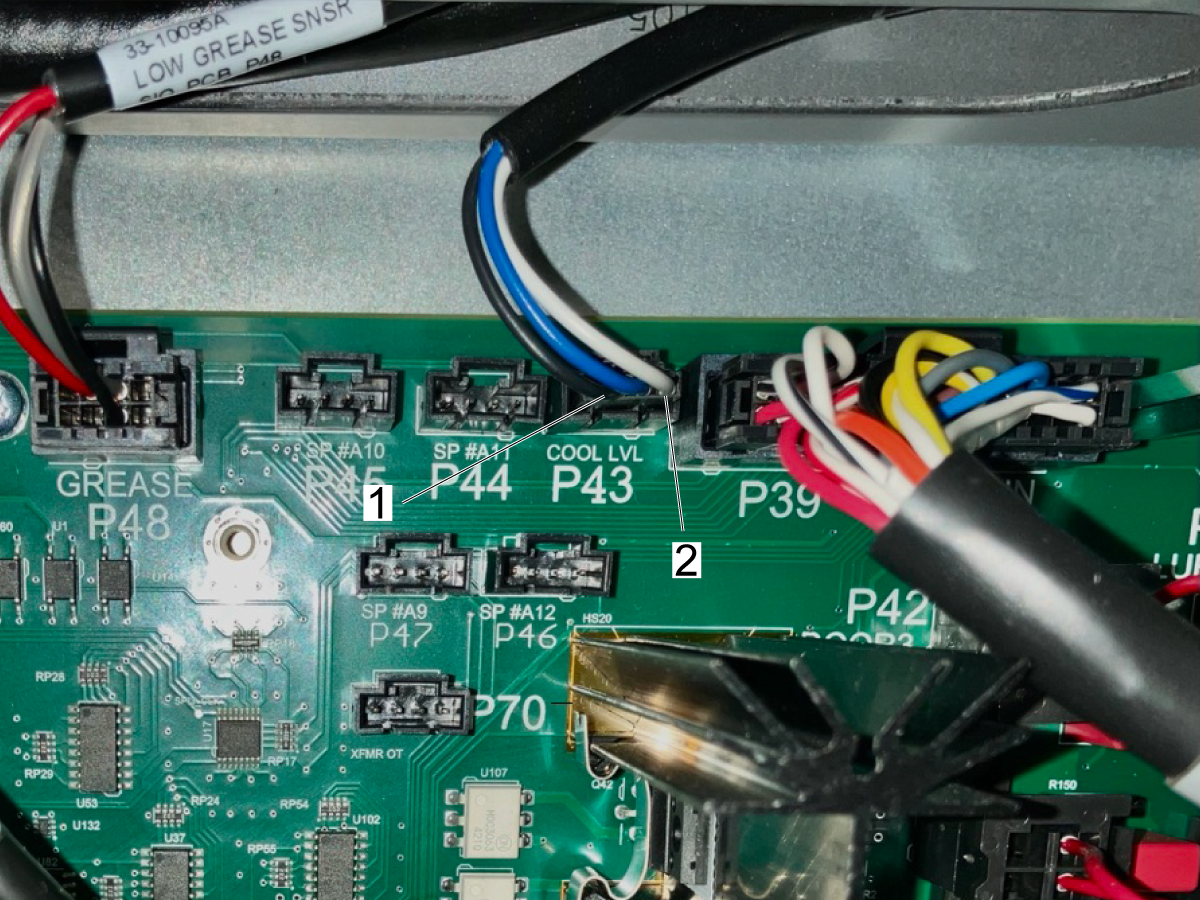
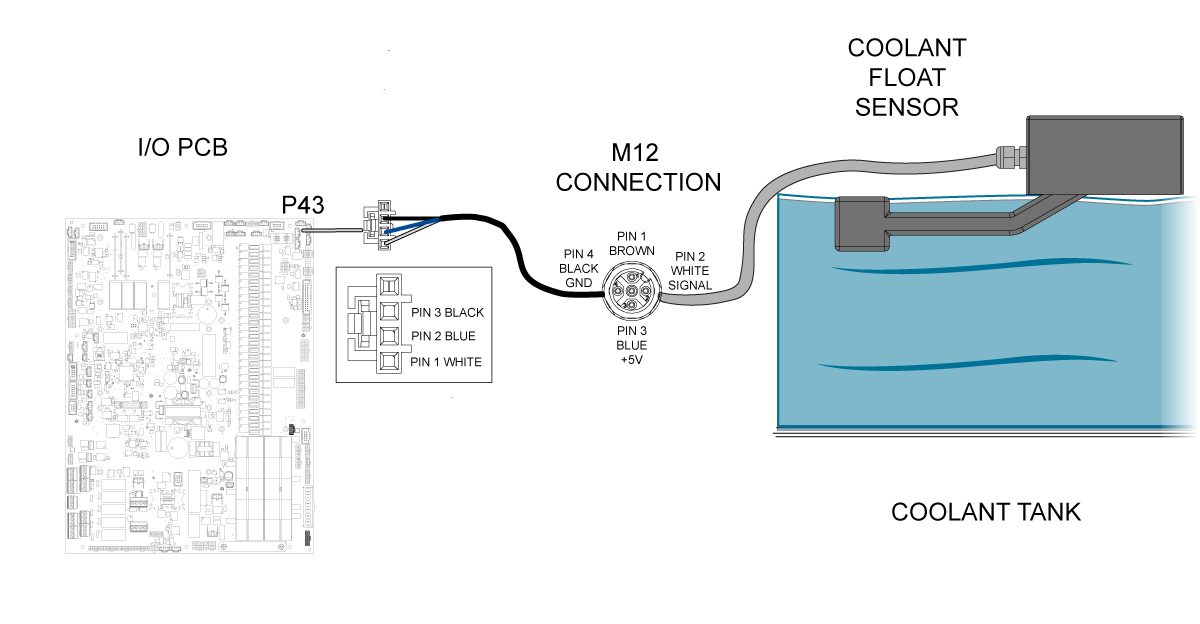
Measure the voltage across the black [1] and white [2] wires on P43 on the I/O board when the float is up and down. The voltage should be approximately 3.8V when the float is up and 2.6V when it is down.


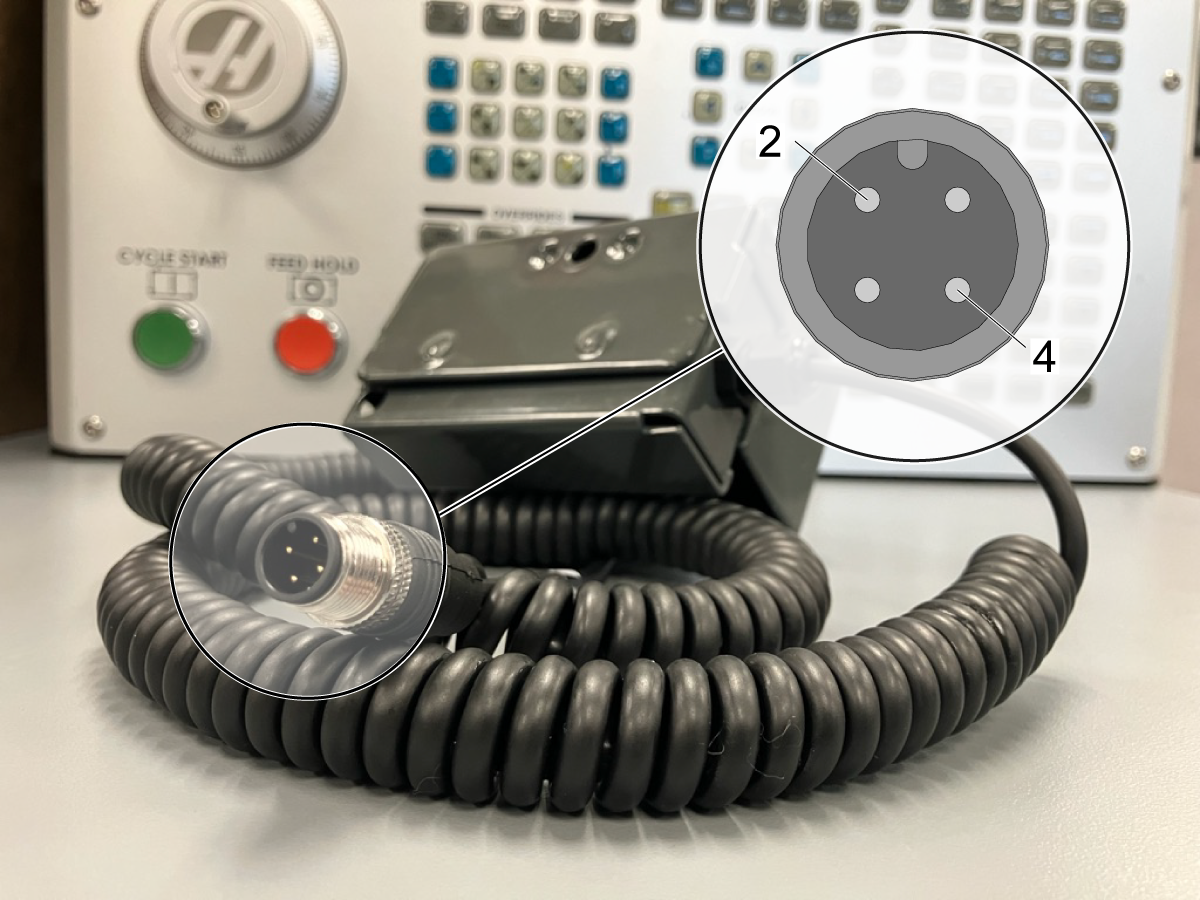
Measure the resistance at pins [2] and [4] on M12 connector when the float is up and down. The resistance should be approximately 371 Ohms when the float is up and 286 Ohms when it is down.

NOTE: Do not remove the coating around the wire, rather take the reading at the M12.


If another machine is present, test float on different machine. If the coolant level sensor continues to read incorrectly, and you have completed the troubleshooting instructions, replace the sensor.

 IMPORTANT: When returning the sensor, make sure to include an error report.

 IMPORTANT: When returning the sensor, please include the following information:

  • Machine state during malfunction (idle or cutting)
  • A video showing coolant level in the tank and on the pendant screen
  • Error Report
  • Resistance across black and white wires (see above)

I/O Mapping

The coolant level float sensor is controlled by analog input 13. The analog input uses an electronic counter to measure the input voltage signal. This input voltage signal is shown in the value section. For more information, refer to the Analog Sensors - Troubleshooting Guide. 

As the coolant lower in the tank, the less input voltage there should be. As the coolant raises in the tank, the more input voltage there should be. When moving the coolant level float, the voltage value should change from ~2500 to ~3150.

The coolant level float sensor is connected to the I/O board at pin 43 shown in the connector section. Check the end of the M12 cable that is plugged into the I/O board to make sure the voltage across pin 3 and 4. If the 5VDC is not present, then troubleshoot the I/O PCB refer to the I/O PCB - Troubleshooting Guide. 

Electrical Schematic

Recently Viewed Items

You Have No Recently Viewed Items Yet

Обратна връзка
Haas Logo

美元价格不包括关税、报关费用、保险费、增值税及运费。
USD prices DO NOT include customs duty, customs fees, insurance, VAT, or freight.

人民币价格包含关税、报关费用、货运保险和增值税, 但不包括运费。
CNY prices include customs duty, customs fees, insurance, and VAT. DOES NOT include freight.

Доставна цена за Haas

Тази цена включва разходите за доставка, мита за износ и внос, застраховка и всички други разходи, направени по време на доставката до място във Франция, договорени с Вас като купувач. Никакви други задължителни разходи не могат да се добавят към доставката на продукт с ЦПУ на Haas.

АБОНИРАЙТЕ СЕ ЗА НАЙ-НОВИТЕ СЪВЕТИ И ТЕХНОЛОГИИ НА HAAS…

Регистрирайте се сега!   

HAAS TOOLING ACCEPTS THE FOLLOWING:

  • Сервиз & Поддръжка
  • Клиенти
  • Заявка за сервизно обслужване
  • Ръководства за оператора
  • Части Haas
  • Заявка за ремонт на въртящи маси
  • Ръководства за предварителна инсталация
  • Покупка на инструменти
  • Конфигуриране и ценообразуване на нова машина Haas
  • Наличности на склад
  • Ценовата листа на Haas
  • CNCA финансиране
  • За Haas
  • Декларация за DNSH
  • Кариери
  • Сертифициране и безопасност
  • Свържете се с нас
  • История
  • Общи условия
  • Общи условия Haas Tooling
  • Поверителност
  • Гаранция
  • Общност Haas
  • Програма за сертификация от Haas
  • Моторни спортове Haas
  • Фондация Gene Haas
  • Общността за техническо образование Haas
  • Събития
  • Включете се в разговор
  • Facebook
  • X
  • Flickr
  • YouTube
  • LinkedIn
  • Instagram
  • TikTok
© 2025 Haas Automation, Inc – металообработващи машини с ЦПУ

This site is protected by reCAPTCHA and the Google Privacy Policy and Terms of Service apply.

2800 Sturgis Rd., Oxnard, CA 93030 / Toll Free: 800-331-6746
Phone: 805-278-1800 / Fax: 805-278-2255