

 主轴
主轴
 刀库
刀库
 第 4 轴 |第 5 轴
 刀塔和动力刀
 探测
探测
 切屑和冷却液管理
 Haas 控制系统
 产品选项
产品选项
 刀具和夹具
刀具和夹具
 工件夹具
工件夹具
 5 轴解决方案
 自动化
自动化

Your document is ready for download, please click below to download your document.
Download DocumentError processing this document, please try again or 联系我们.
Please wait while your document is being loaded.

Your document is ready for download, please click below to download your document.
Download DocumentError processing this document, please try again or 联系我们.
Please wait while your document is being loaded.
TG0054
版本 A - 2025 年 4 月
在更换任何零件之前,请先下载并填写下面的冷却液浮子传感器检查报告清单。

下图显示了冷却液浮子传感器的以下组件:
| 症状 | 可能的原因 | 纠正措施 |
| 冷却液液位传感器显示冷却液液位不正确。 | 冷却液浮子安装不正确。 | 请参阅下面的检查浮子安装部分。 |
| 浮子被卡住,无法移动。 | 清除浮子和冷却液箱中的所有切屑。 | |
| 出厂设置 603 和 604 的值不正确。 | 请参阅冷却液液位浮子传感器 - 安装,以查看正确的参数值。 | |
| 电缆已损坏或已拔下。 | 确保电缆未损坏且连接牢固。 | |
| 传感器损坏。 | 检查阻塞浮子的所有导线并清除切屑。检查是否有任何泄漏。如果问题仍然存在,请按照以下 故障传感器 部分操作。 | |
| 当液位传感器向上/向下移动时,冷却液液位传感器显示 0%,且无变化。 | 冷却液浮子安装不正确。 | 请参阅下面的 检查浮子安装 部分。 |
| 传感器损坏,或浮子无法移动。 | 检查阻塞浮子的所有导线并清除切屑。检查是否有任何泄漏。如果问题仍然存在,请按照以下 故障传感器 部分操作。 | |
| I/O PCB 未正确配置冷却液液位传感器。 | 手动向上/向下移动冷却液液位时,显示模拟输入 13。输入值应从约 2500 更改为约 3150。如果输入值保持不变,请确保 I/O 配置正确。A 输入 13 应映射至 P43.1。请参阅 下面的 I/O 映射 部分。 | |
机床空闲时,冷却液液位低警报经常出现和消失。 报警历史记录中发生的20022 和 20023 通知。 |
冷却液液位接近 50%。 | 向冷却液箱中加注冷却液,直至冷却液接触到切屑过滤器。在开始任何需要冷却液的操作之前,请确保冷却液液位高于 70%。清除冷却液过滤器、箱和机床中的任何切屑和碎屑。如果问题仍然存在,请按照以下故障传感器部分中的说明进行操作。 |
机床切削时,冷却液低警报经常出现和消失。 报警历史记录中发生的20022 和 20023 通知。 |
在加工过程中,冷却液在机床中循环。 | 向冷却液箱中加注冷却液,直至冷却液接触到切屑过滤器。在开始任何需要冷却液的操作之前,请确保冷却液液位高于 70%。清除冷却液过滤器、箱和机床中的任何切屑和碎屑。如果问题仍然存在,请按照以下故障传感器部分中的说明进行操作。 |

检查冷却液箱盖的方向。包含冷却液浮子 [1] 的切口应位于最靠近机床的冷却液箱的一侧,如图所示。
确保冷却液箱的箱盖平放在箱顶上。
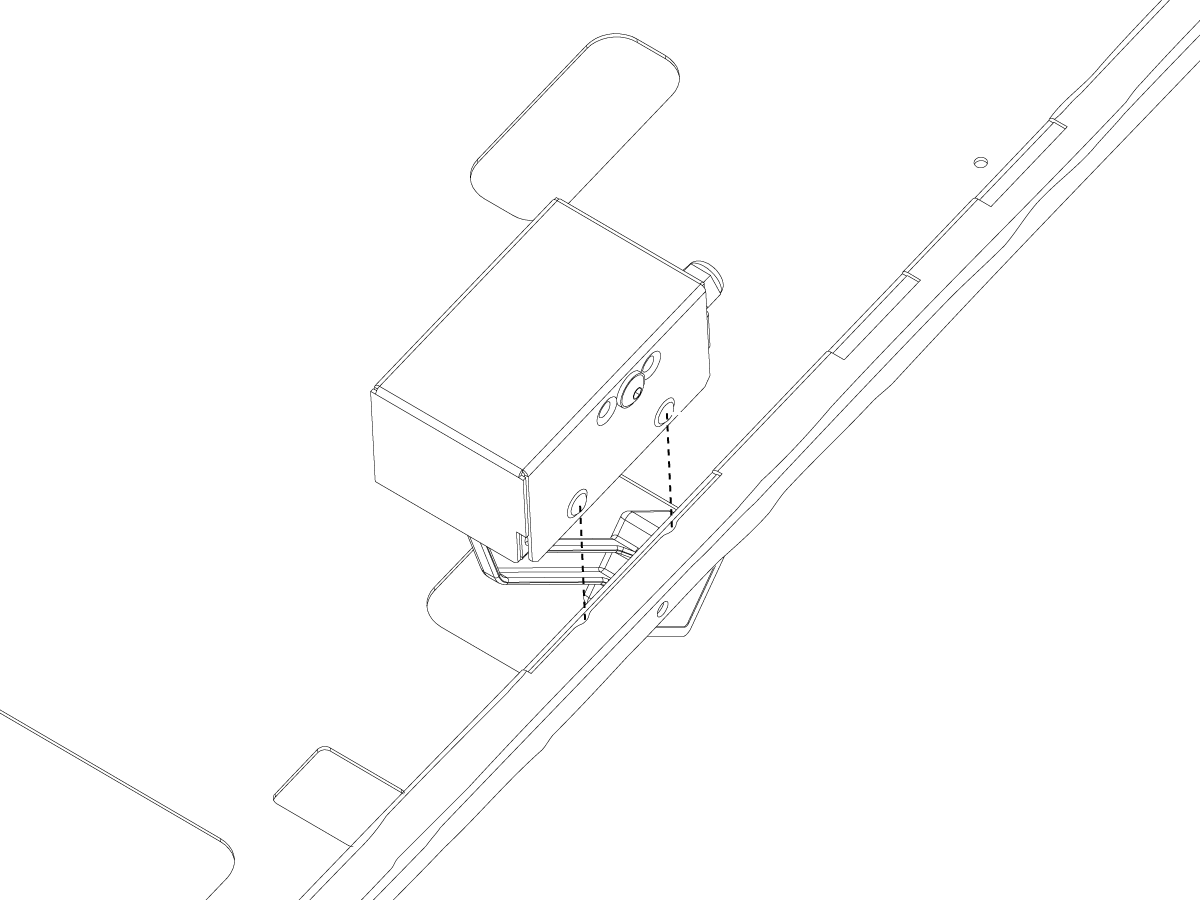
检查冷却液浮子上的凹痕是否正确卡入冷却液箱上的凹痕中。检查冷却液浮子是否平放在箱盖顶部。
向冷却液箱中加注冷却液,直至冷却液液位到达切屑过滤器 [1] 底部。
-coolant---system---troubleshooting-guide/TG_Coolant_Level_Intro.jpg)
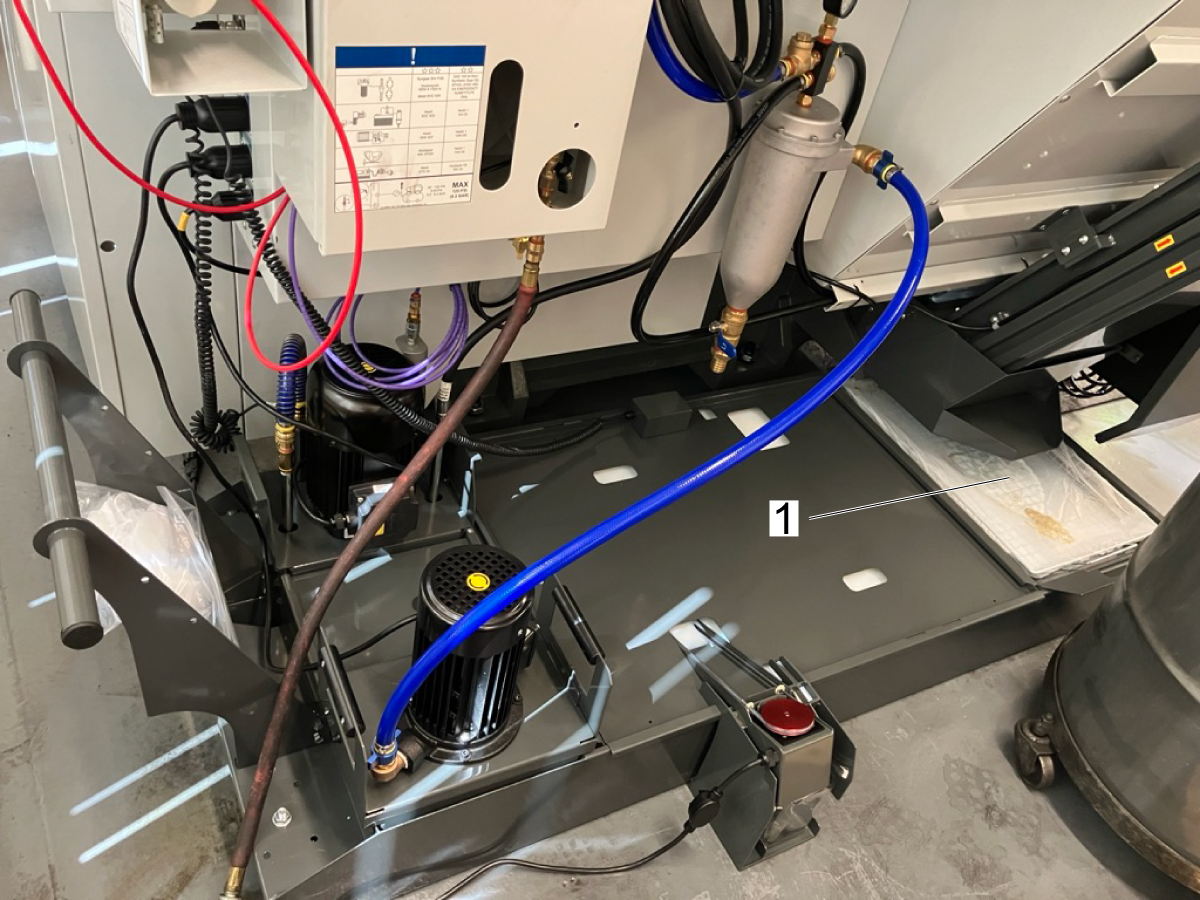
在第一张图片中,您可以看到冷却液液位传感器在冷却液箱上的位置。
如果冷却液液位传感器未在屏幕上显示正确的液位,请查看冷却液箱,确保切屑堆积不会阻止浮点自由移动。此外,请检查浮子是否有任何泄漏,以确保没有冷却液渗入。
-coolant---system---troubleshooting-guide/TG_Coolant_Level_Up_and_Down.png)
纠正措施:
确保冷却液液位传感器工作正常。
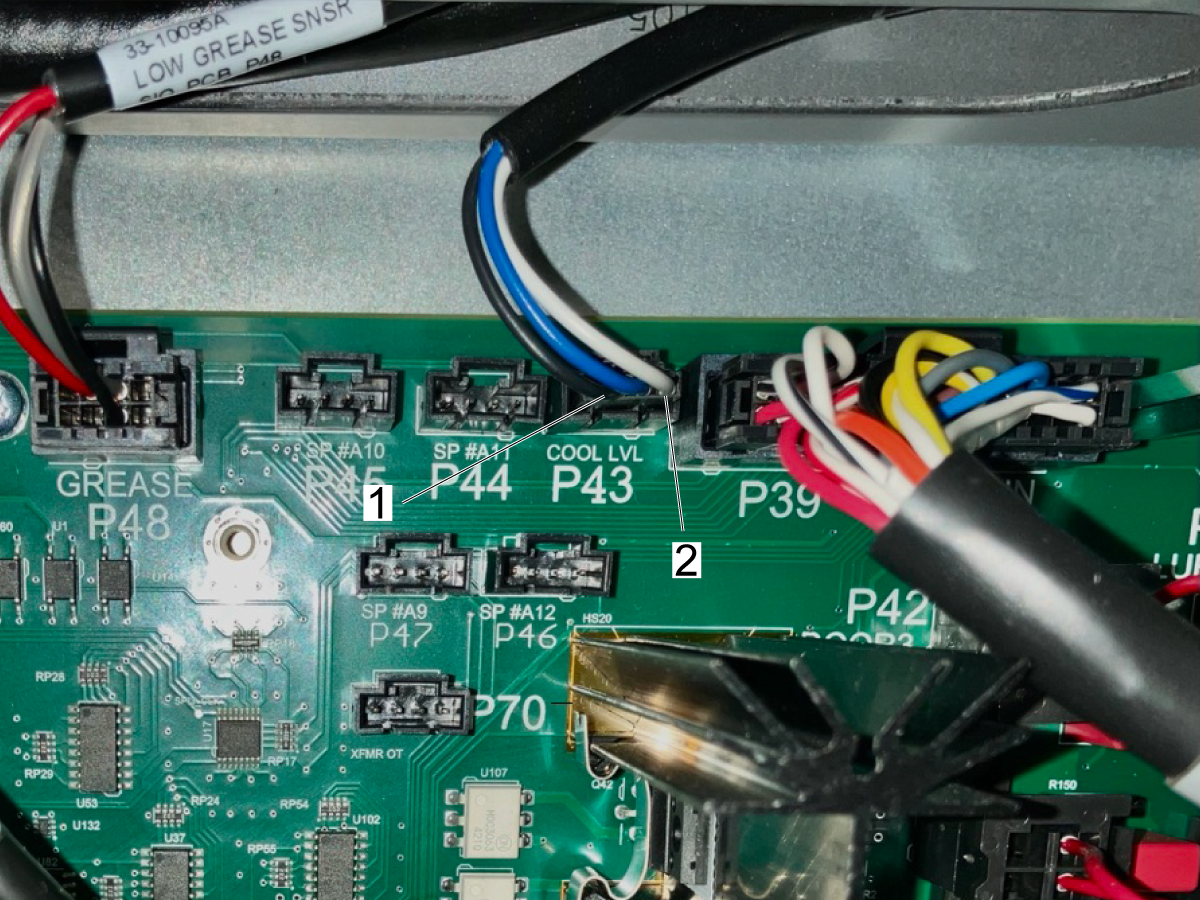
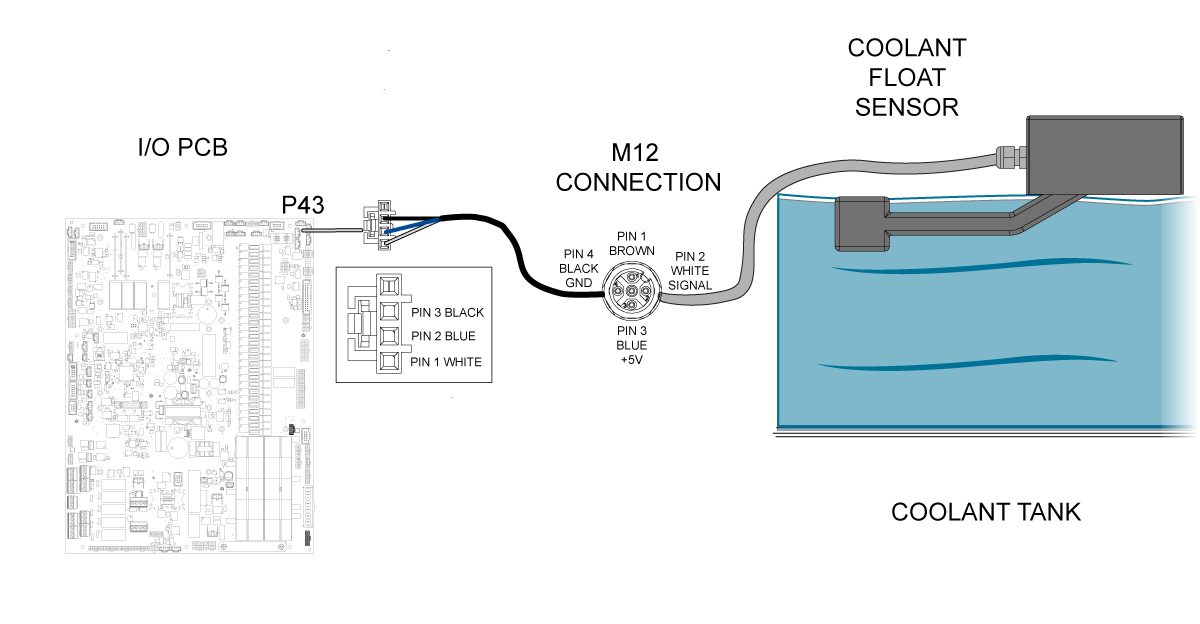
当浮子上下移动时,测量 I/O 板上 P43 处黑色导线 [1] 和白色导线 [2] 之间的电压。当浮子上升时,电压应约为 3.8V,当浮子下降时,电压应约为 2.6V。
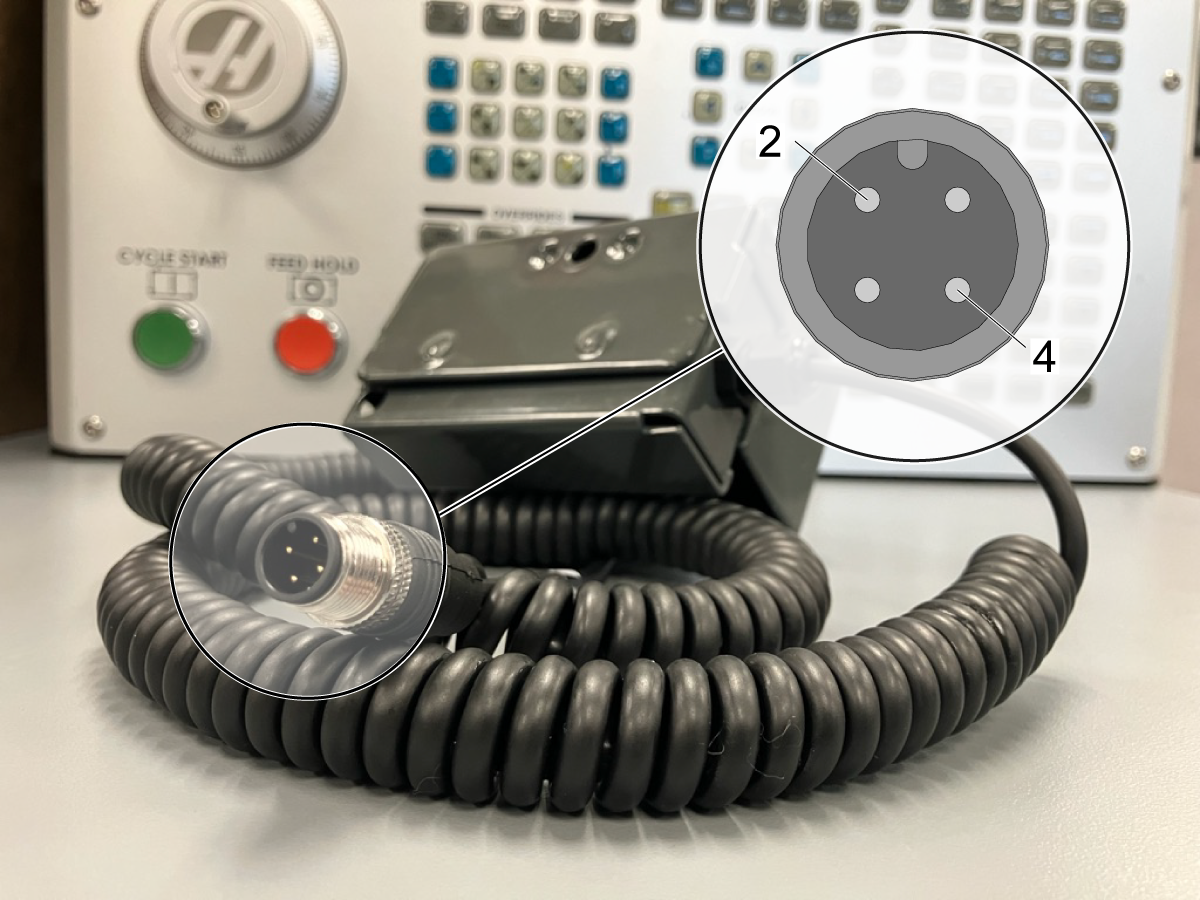
当浮子上下移动时,测量 M12 连接器上引脚 [2] 和 [4] 处的电阻。当浮子向上时,阻力应约为 371 欧姆,而当浮子下降时,阻力应为 286 欧姆。
注意::请勿去除接线周围的涂层,而是在 M12 处读取读数。
如果有另一台机床,在不同的机床上测试浮子。如果冷却液液位传感器继续读数不正确,并且已完成故障排除操作,请更换传感器。
重要提示:返回传感器 时,请确保包含错误报告。
重要提示:返回传感器 时,请提供以下信息:

冷却液液位浮子传感器受模拟输入 13 控制。模拟输入通过电子计数器测量输入电压信号。此输入电压信号在值读数部分显示。 欲知更多信息,请参阅 模拟传感器 - 故障排除指南。
箱内的冷却液越低,输入电压就越小。箱内的冷却液越高,输入电压就越大。移动冷却液液位浮子时,电压值应从约 2500 更改为约 3150。
冷却液液位浮子传感器通过引脚 43 连接至 I/O 板,如连接器部分所示。检查插入 I/O 板的 M12 电缆的末端,以确保引脚 3 和 4 上的电压正常。如果电压非 5VDC,则对 I/O PCB 进行故障排除,请参阅 I/O PCB - 故障排除指南 。
Recently Viewed Items
You Have No Recently Viewed Items Yet

此价格包含运费、出口和进口关税、保险费以及任何在运送至与您(买家)商定的位于法国的某一地点的过程中产生的其他费用。在 Haas 数控产品的交付中不会添加任何其他强制性费用。
随时掌握 HAAS 最新提示和技术……
HAAS TOOLING 接受以下条件:


This site is protected by reCAPTCHA and the Google Privacy Policy and Terms of Service apply.

2800 Sturgis Rd., Oxnard, CA 93030 / Toll Free: 800-331-6746
Phone: 805-278-1800 / Fax: 805-278-2255


