MyHaas Hoş Geldiniz,
!
Haas Tooling Misafir Sipariş Geçmişi MyHaas/HaasConnect Oturum Aç Kaydol Haas Tooling Hesabım Order History Return History MyHaas/HaasConnect Oturumu Kapat Hoş Geldiniz, Makinelerim Son Etkinlik Fiyat Tekliflerim Hesabım Kullanıcılarım Oturumu Kapat
Distribütörünüzü Bulun
  1. Dil Seçenekleri
    1. Deutsch
    2. Español - España
    3. Español - México
    4. Français
    5. Italiano
    6. Português
    7. Český
    8. Dansk
    9. Nederlands
    10. Magyar
    11. Polski
    12. Svenska
    13. Türkçe
    14. 中文
    15. Suomi
    16. Norsk
    17. الإنجليزية
    18. български
    19. Hrvatski
    20. Ελληνικά
    21. Română
    22. Slovenský
    23. Slovenščina
    24. 한국어
    25. 日本語
  • tezgahlar Main Menu
    • Haas Dik Frezeler Dik Frezeler
      Dik Frezeler
      Dik Frezeler View All
      • Dik Frezeler
      • VF Serisi
      • Üniversal Makineler
      • VR Serisi
      • VP-5 Prizmatik
      • Palet Değiştiricili VMC’ler
      • Mini Frezeler
      • Kalıp Makineleri
      • Yüksek Hızlı Delme Merkezleri
      • Delme/Kılavuz Çekme/Freze Serisi
      • Takımhane Frezesi
      • Kompakt Frezeler
      • Gantry Serisi
      • SR Tabaka Yönlendiricileri
      • Ekstra Büyük VMC
      • Çift Kolonlu Frezeler
      • Kontrol Simülatörü
      • Freze Otomatik Parça Yükleyici
      • VMC/UMC Yandan Yüklemeli Otomatik Parça Yükleyici
      • Kompakt Otomatik Parça Yükleyici
    • Product Image Çok Eksenli Çözümler
      Çok Eksenli Çözümler
      Çok Eksenli Çözümler View All
      • Çok Eksenli Çözümler
      • Y Eksenli Tornalar
      • 5-Eksenli Frezeler
    • Haas Tornalar Tornalar
      Tornalar
      Tornalar View All
      • Tornalar
      • ST Serisi
      • Çift İş Mili
      • Kutu Kızak Serisi
      • Takımhane Tornası
      • Aynalı Torna
      • Haas Çubuk Sürücü V2
      • Torna Otomatik Parça Yükleyici
    • Haas Yatay Frezeler Yatay Frezeler
      Yatay Frezeler
      Yatay Frezeler View All
      • Yatay Frezeler
      • 50 Konikli
      • 40 Konikli
    • Haas Döner Tablalar ve İndeksleyiciler Döner ve İndeksleyici
      Döner ve İndeksleyici
      Döner ve İndeksleyici View All
      • Döner ve İndeksleyici
      • Döner Tablalar
      • İndeksleyiciler
      • 5 Eksen Döner Tablalar
      • Çok Büyük Döner Tablalar
    • Product Image Otomasyon Sistemleri
      Otomasyon Sistemleri
      Otomasyon Sistemleri View All
      • Otomasyon Sistemleri
      • Freze Otomasyonu
      • Torna Otomasyonu
      • Otomasyon Modelleri
    • Haas Delme Merkezleri Masaüstü Makineler
      Masaüstü Makineler
      Masaüstü Makineler View All
      • Masaüstü Makineler
      • Masaüstü Freze
      • Masaüstü Torna
    • Haas Atölye Ekipmanı Atölye Ekipmanı
      Atölye Ekipmanı
      Atölye Ekipmanı View All
      • Atölye Ekipmanı
      • Şerit Testere
      • Mafsallı Freze
      • Yüzey Taşlayıcı, 2550
      • Yüzey Taşlayıcı, 3063
      • Lazer Kesme Makinesi
    • HIZLI BAĞLANTILAR Özel Seri  Özel Seri 
      AB SERİSİ AB SERİSİ OLUŞTURMA VE FİYATLANDIRMA | FİYAT LİSTESİ OLUŞTURMA VE FİYATLANDIRMA | FİYAT LİSTESİ Stoktaki Makineler Stoktaki Makineler YENİLİKLER YENİLİKLER İLK CNC’NİZ İLK CNC’NİZ
      ALIŞVERİŞ ARAÇLARI
      • Bir Haas Oluştur ve Fiyatlandır
      • Fiyat Listesi
      • Mevcut Stok
      • CNCA Taksit Seçenekleri
      BİR YETKİLİYLE Mİ GÖRÜŞMEK İSTİYORSUNUZ?

      Bir Haas Fabrika Satış Mağazası (HFO) sorularınızı cevaplayabilir ve en iyi seçenekler konusunda size yardımcı olabilir.

      CONTACT YOUR DISTRIBUTOR >
  • Seçenekler Main Menu
    • Product Image İş Milleri
      İş Milleri
      İş Milleri View All
      • İş Milleri
    • Product Image Takım Değiştiriciler
      Takım Değiştiriciler
      Takım Değiştiriciler View All
      • Takım Değiştiriciler
    • Product Image 4. | 5. Eksen
      4. | 5. Eksen
      4. | 5. Eksen View All
      • 4. | 5. Eksen
    • Product Image Taretleri ve Tahrik Takımı
      Taretleri ve Tahrik Takımı
      Taretleri ve Tahrik Takımı View All
      • Taretleri ve Tahrik Takımı
    • Product Image Problama
      Problama
      Problama View All
      • Problama
    • Haas Talaş ve Soğutma Sıvısı Yönetimi Talaş ve Soğutma Sıvısı Yönetimi
      Talaş ve Soğutma Sıvısı Yönetimi
      Talaş ve Soğutma Sıvısı Yönetimi View All
      • Talaş ve Soğutma Sıvısı Yönetimi
    • Haas Kontrol Ünitesi Haas Kontrol Ünitesi
      Haas Kontrol Ünitesi
      Haas Kontrol Ünitesi View All
      • Haas Kontrol Ünitesi
    • Product Image Ürün Seçenekleri
      Ürün Seçenekleri
      Ürün Seçenekleri View All
      • Ürün Seçenekleri
    • Product Image Takımlar ve Fikstürleme
      Takımlar ve Fikstürleme
      Takımlar ve Fikstürleme View All
      • Takımlar ve Fikstürleme
    • Product Image İş Parçası Bağlama
      İş Parçası Bağlama
      İş Parçası Bağlama View All
      • İş Parçası Bağlama
    • View All
    • Product Image 5 Eksen Çözümler
      5 Eksen Çözümler
      5 Eksen Çözümler View All
      • 5 Eksen Çözümler
      • 5 Easy Steps to 5-Axis
    • Product Image Otomasyon
      Otomasyon
      Otomasyon View All
      • Otomasyon
    • HIZLI BAĞLANTILAR Özel Seri  Özel Seri 
      AB SERİSİ AB SERİSİ OLUŞTURMA VE FİYATLANDIRMA | FİYAT LİSTESİ OLUŞTURMA VE FİYATLANDIRMA | FİYAT LİSTESİ Stoktaki Makineler Stoktaki Makineler YENİLİKLER YENİLİKLER İLK CNC’NİZ İLK CNC’NİZ
      ALIŞVERİŞ ARAÇLARI
      • Bir Haas Oluştur ve Fiyatlandır
      • Fiyat Listesi
      • Mevcut Stok
      • CNCA Taksit Seçenekleri
      BİR YETKİLİYLE Mİ GÖRÜŞMEK İSTİYORSUNUZ?

      Bir Haas Fabrika Satış Mağazası (HFO) sorularınızı cevaplayabilir ve en iyi seçenekler konusunda size yardımcı olabilir.

      CONTACT YOUR DISTRIBUTOR >
  • Why Haas Main Menu
      Haas Farkını Keşfedin
    • Neden Haas
    • MyHaas
    • Eğitim Topluluğu
    • Endüstri 4.0
    • Haas Belgesi
    • Müşteri Görüşleri
  • Servis Main Menu
      Haas Service Hoş Geldiniz
      SERVİS ANA SAYFA Operatör El Kitapları Nasıl Yapılır Prosedürleri Sorun Giderme Kılavuzları Önleyici Bakım Haas Parçaları Haas Tooling Videolar
  • Videolar Main Menu
×

Arama Sonuçları

Web Pages

Images

    • <
    • 1
    • >
MyHaas Hoş Geldiniz,
!
Haas Tooling Misafir Sipariş Geçmişi MyHaas/HaasConnect Oturum Aç Kaydol Haas Tooling Hesabım Order History Return History MyHaas/HaasConnect Oturumu Kapat Hoş Geldiniz, Makinelerim Son Etkinlik Fiyat Tekliflerim Hesabım Kullanıcılarım Oturumu Kapat
Distribütörünüzü Bulun
  1. Dil Seçenekleri
    1. Deutsch
    2. Español - España
    3. Español - México
    4. Français
    5. Italiano
    6. Português
    7. Český
    8. Dansk
    9. Nederlands
    10. Magyar
    11. Polski
    12. Svenska
    13. Türkçe
    14. 中文
    15. Suomi
    16. Norsk
    17. الإنجليزية
    18. български
    19. Hrvatski
    20. Ελληνικά
    21. Română
    22. Slovenský
    23. Slovenščina
    24. 한국어
    25. 日本語
×

Arama Sonuçları

Web Pages

Images

    • <
    • 1
    • >

Spindle - Replacement - DM-1 - DT-1

Servis Ana Sayfa Nasıl Prosedürü DT/DM - Örümcek Kaplin Sürücüsü - İş Mili - Değiştirme
Recently Updated Last updated: 12/15/2022

DT/DM - Örümcek Kaplin Sürücüsü - İş Mili - Değiştirme


DT/DM - Örümcek Kaplin Sürücüsü - İş Mili - Değiştirme

- Bölüme Geç - 1. Giriş 2. Spindle Removal (4 adımlar) 3. Spindle Installation Preparation (2 adımlar) 4. Spindle Installation (10 adımlar) 5. Mil kaldırma (4 adımlar) Back to Top

Giriş

Bu yordamı bir DM-1 veya DT-1 için gerçekleştirin. Bu prosedür, milin nasıl değiştirileceğini bildirir. 2014 Ocak' tan sonra inşa edilen makineler orta nokta yağlama (MPO) mili kullanır. Mili değiştirdiğinizde bir MPO mili kullanacaksınız.

Spindle Removal

1

Jog the Z Axis to the bottom of travel.

Press [EMERGENCY STOP].

Remove the spindle fan assembly.

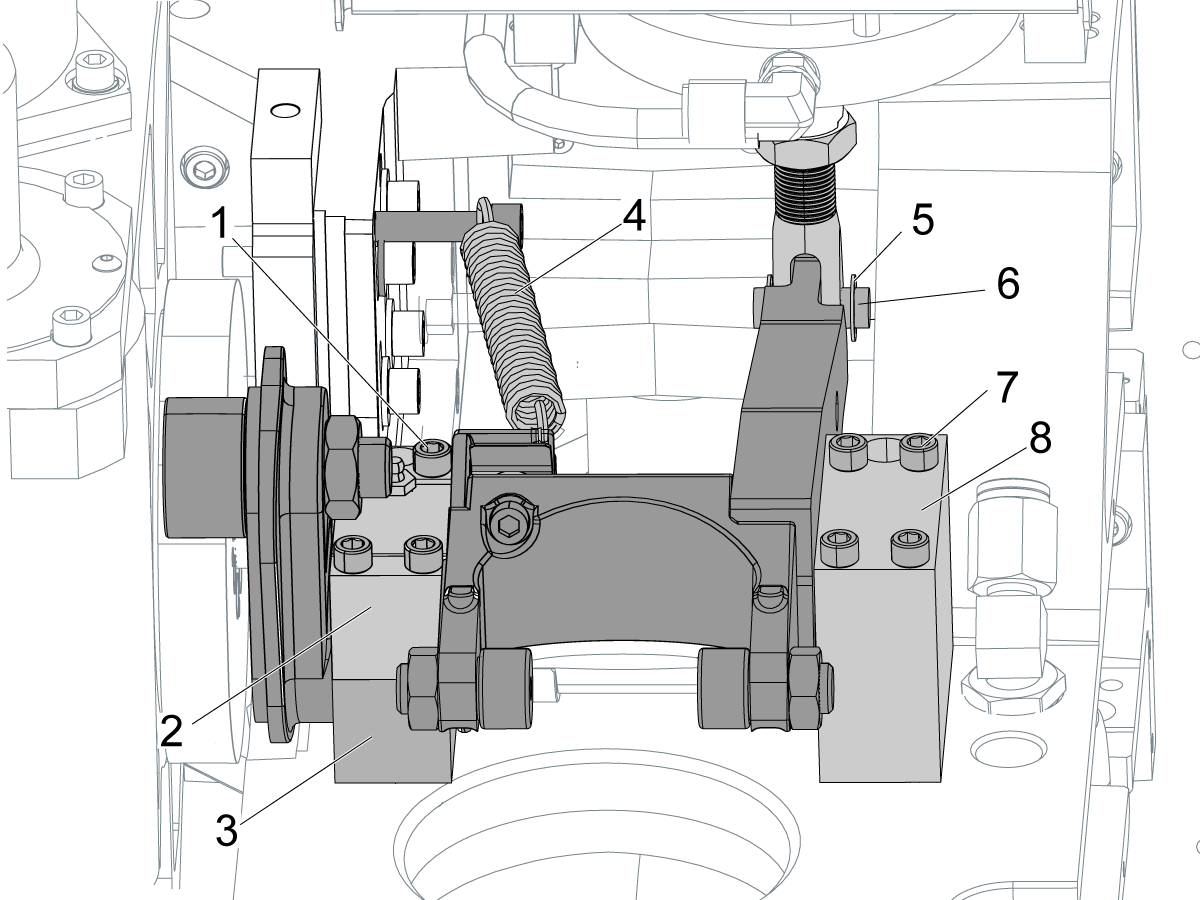
Remove the rocker arm assembly. Follow these steps:

  • Remove the C-clip [5] from the clevis pin [6]. Push the clevis pin to remove it.
  • Disconnect the spring [4] from the striker block.
  • Loosen the (4) screws [1] from the inside bearing block [2].
  • Loosen the (4) screws [7] from the outside bearing block [8].
  • Remove the rocker arm assembly from the machine.
  • Do not remove the bottom half [3] of the inside bearing block.
  • Remove the dowel pins from the bearing blocks.

 Note: The illustration does not show the spindle and spindle motor.

2

Jog the X and Y Axes until the table is directly under the spindle.

Press [EMERGENCY STOP].

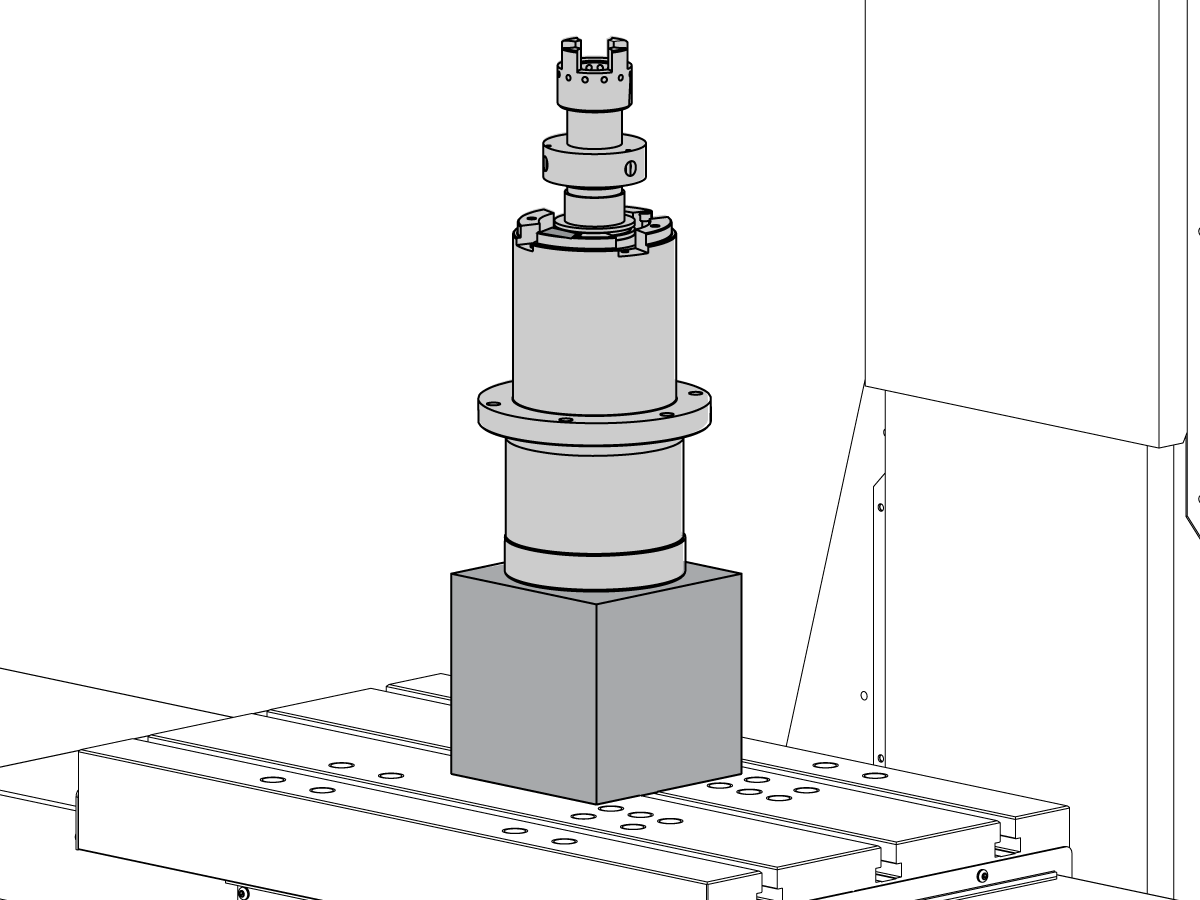
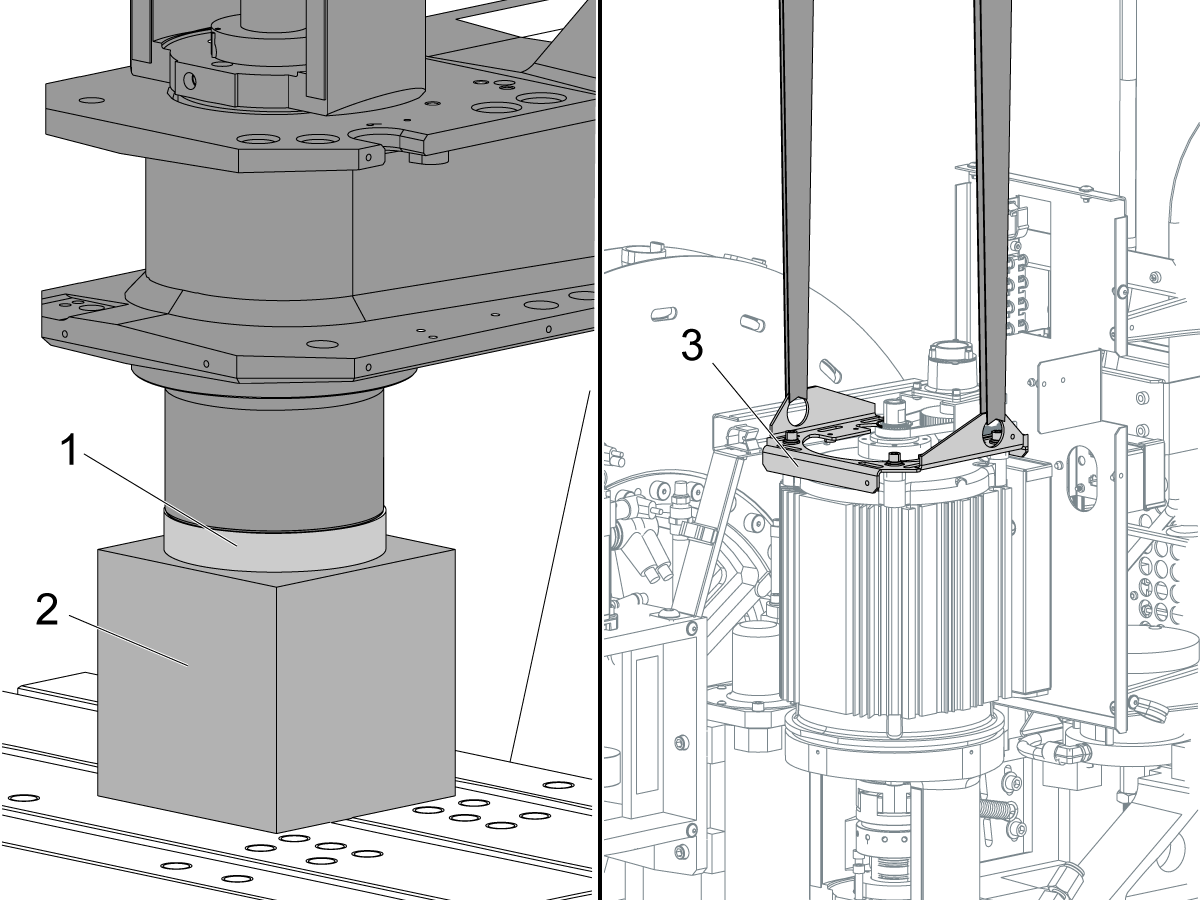
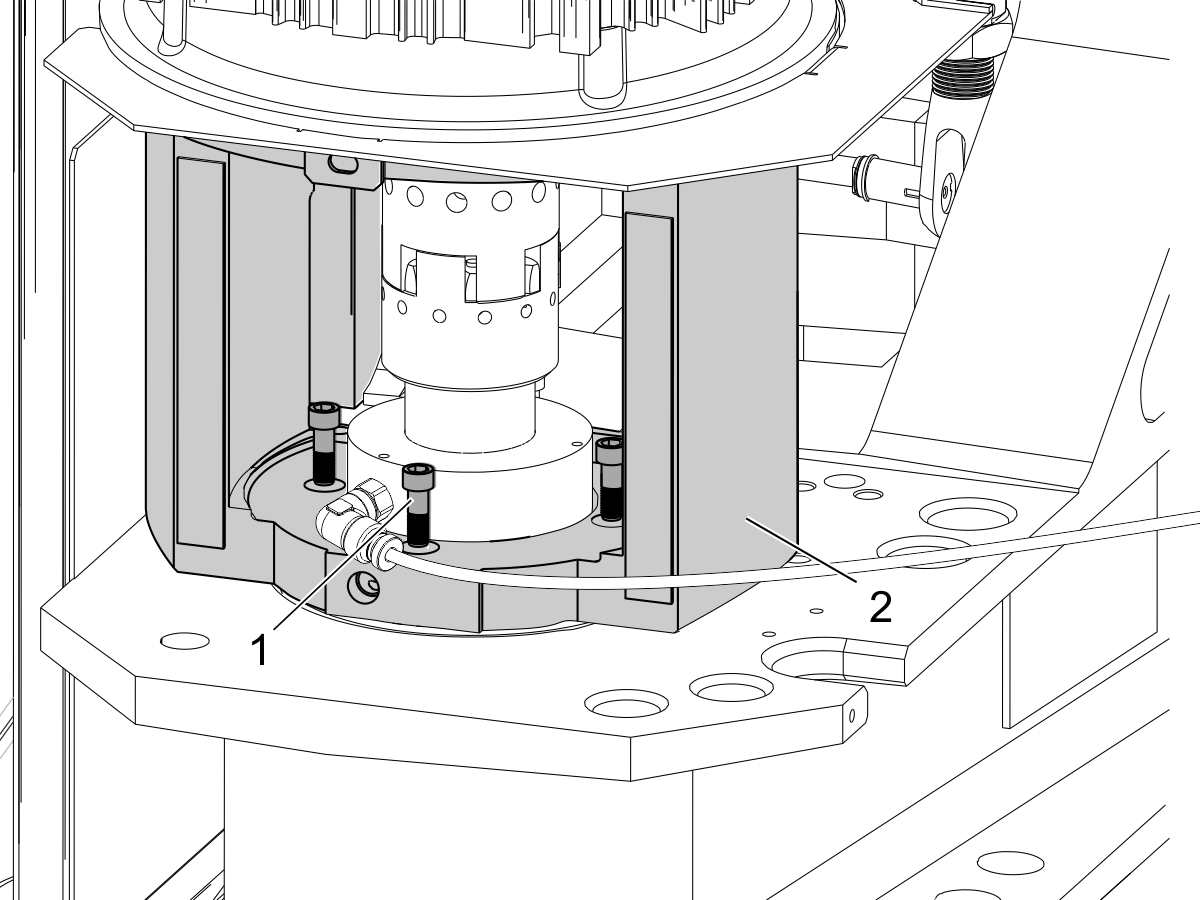
Put a 6" x 6" x 6" (152 mm x 152 mm x 152 mm) wood or aluminum block [2] on the table.

Attach the protective cap [1] onto the spindle installed in the machine.

Release the [EMERGENCY STOP].

Press [RESET] to clear each alarm.

Jog the Z Axis in the negative (-) direction until the spindle rests on the block.

Press [EMERGENCY STOP].

Attach a lift to the bracket [3] for the encoder.

 Caution: When the spindle is separated from the motor adapter, the motor assembly must be supported by the lift.

3

Disconnect the oil supply tube.

Remove the oil supply fitting.

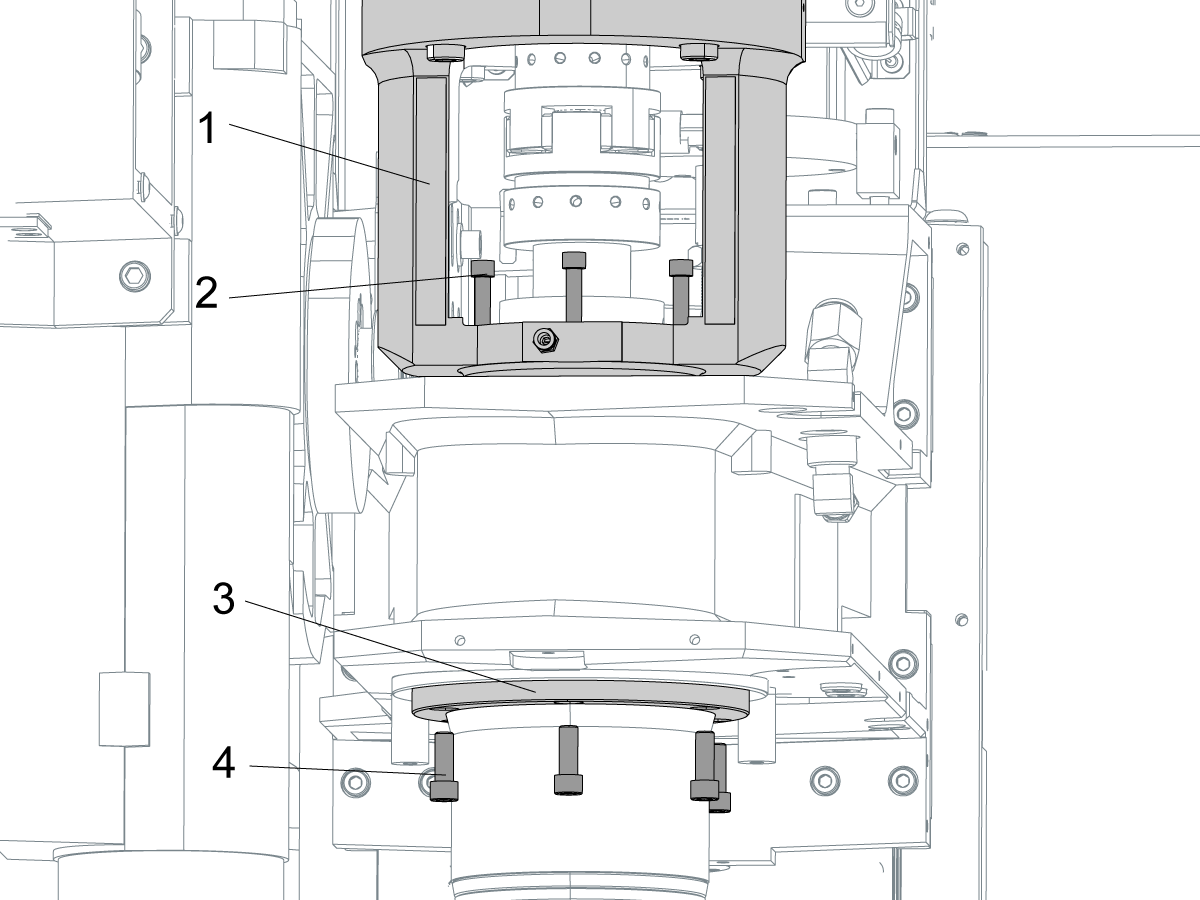
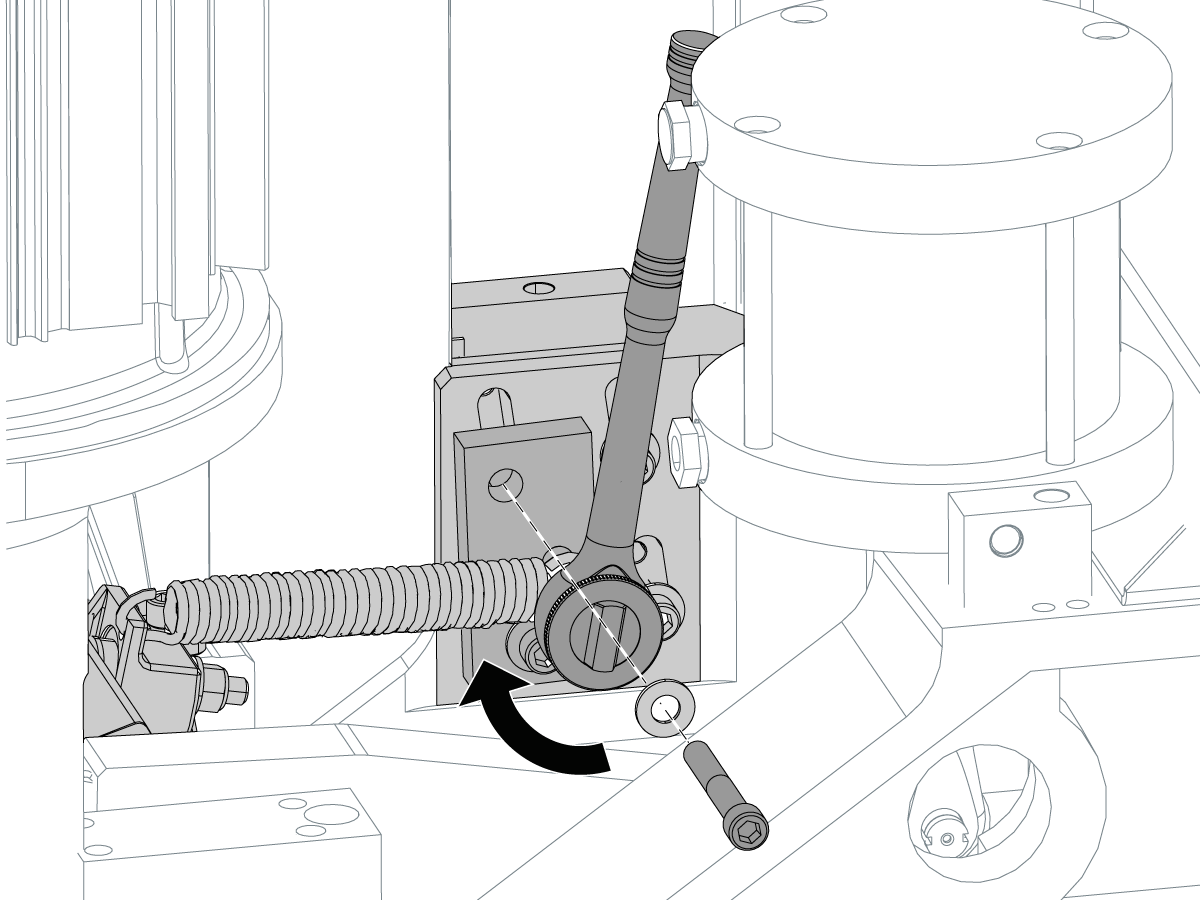
Remove the (4) screws [2] that attach the motor adapter [1] to the spindle.

Remove the (6) retainer screws [4] for the spindle flange [3].

4

Release the [EMERGENCY STOP].

Press [RESET] to clear each alarm.

Slowly jog the Z Axis in 0.001" increments in the positive (+) direction to a distance of 0.04" (1 mm).

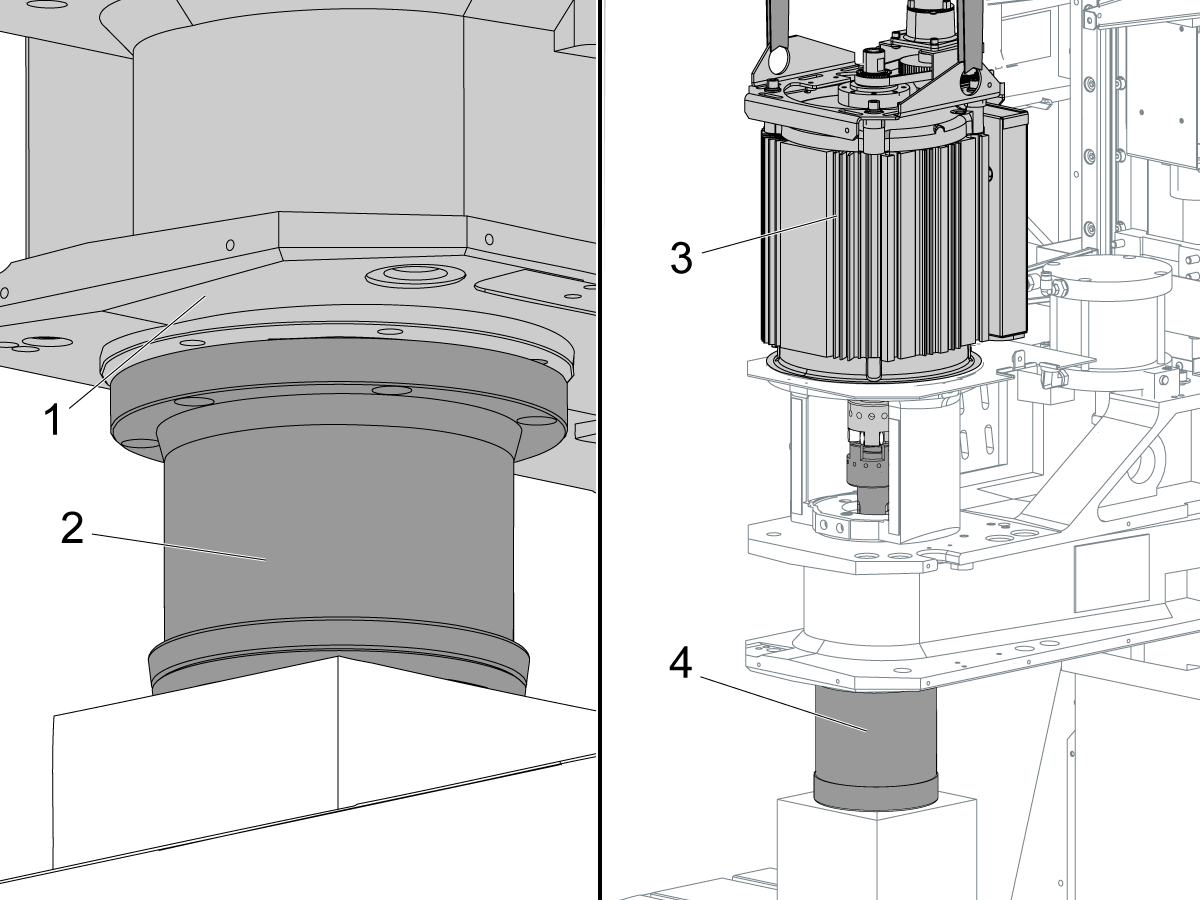
 Note: The spindle [2] drops 1/32" (1 mm) from the spindle casting [1].

If the spindle does not drop, use a strap wrench to turn the spindle 1/4 turn clockwise to loosen it.

Use the hoist to raise the motor assembly [3] at the same time you jog the Z Axis.

Jog the Z Axis in the positive (+) direction until you can remove the spindle [4].

Spindle Installation Preparation

1

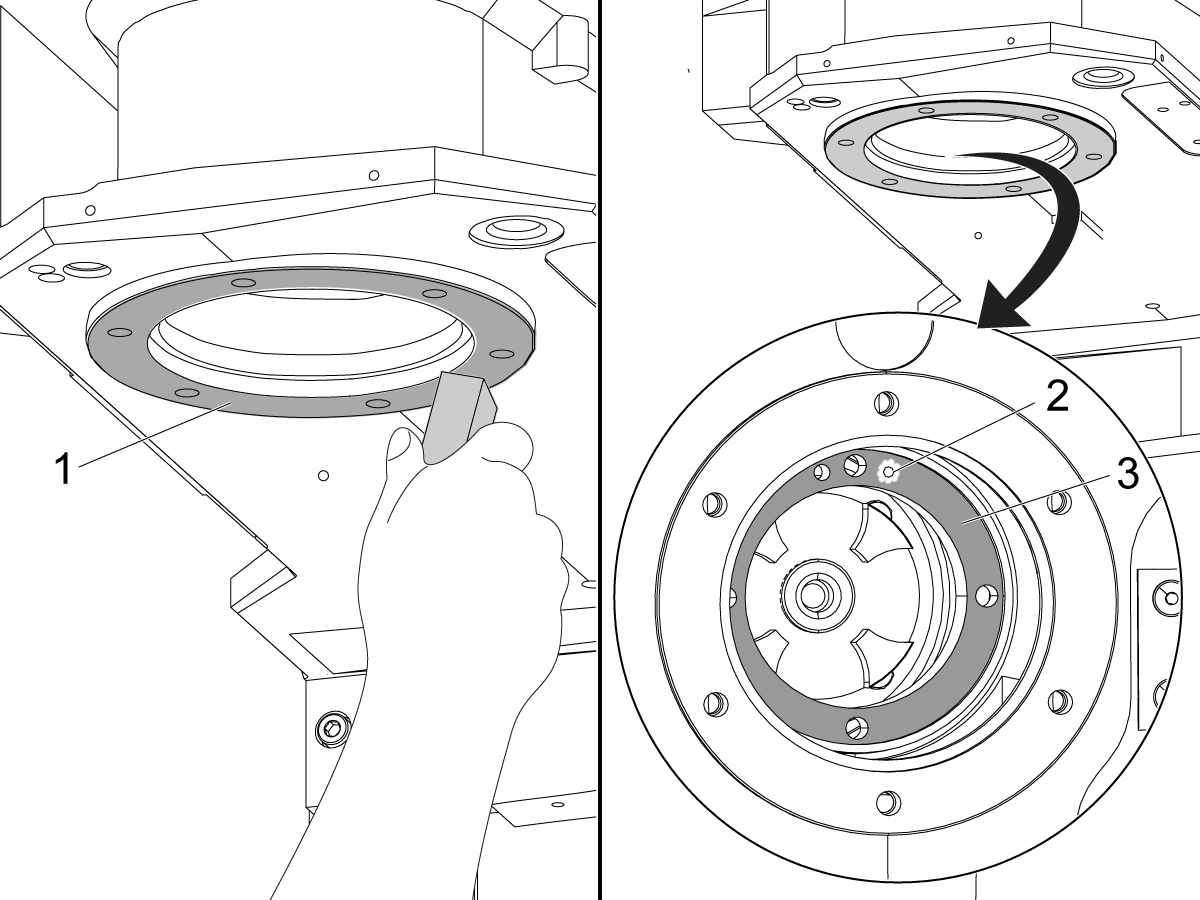
Clean the spindle head bore.

Stone the mating surface [1] on the spindle head casting.

Clean the motor adapter where it touches the spindle [3].

Do not stone the spindle lubrication port [2]. Keep all contamination out of the port.

2

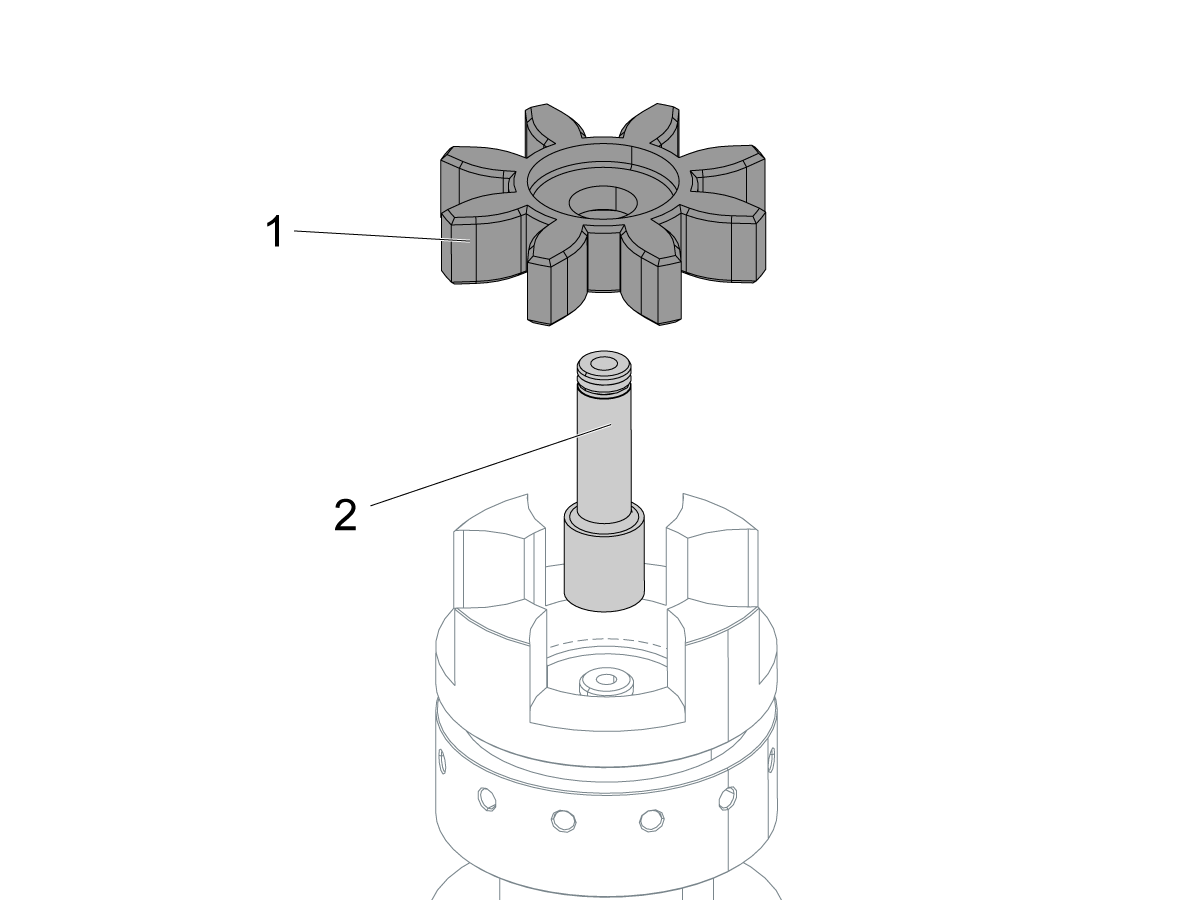
Replace the spider coupling [1] if it is worn or damaged.

Replace the transfer tube [2] if it is worn or damaged.

Spindle Installation

Do not remove the tape from the lubrication port.

Use a lift to support the motor until the spindle is attached.


1

Attach the red protective cap [2] to the bottom of the MPO spindle.

Put a 6" x 6" x 6" (152 mm x 152 mm x 152 mm) wood or aluminum block [3] on the table.

Put the spindle on the block.

Make sure that the spindle lubrication port [1] is in the front.

Put a long 5/16"-18 screw [4] through the rear hole on the motor adapter. This screw helps you align the motor adapter to the spindle.

2

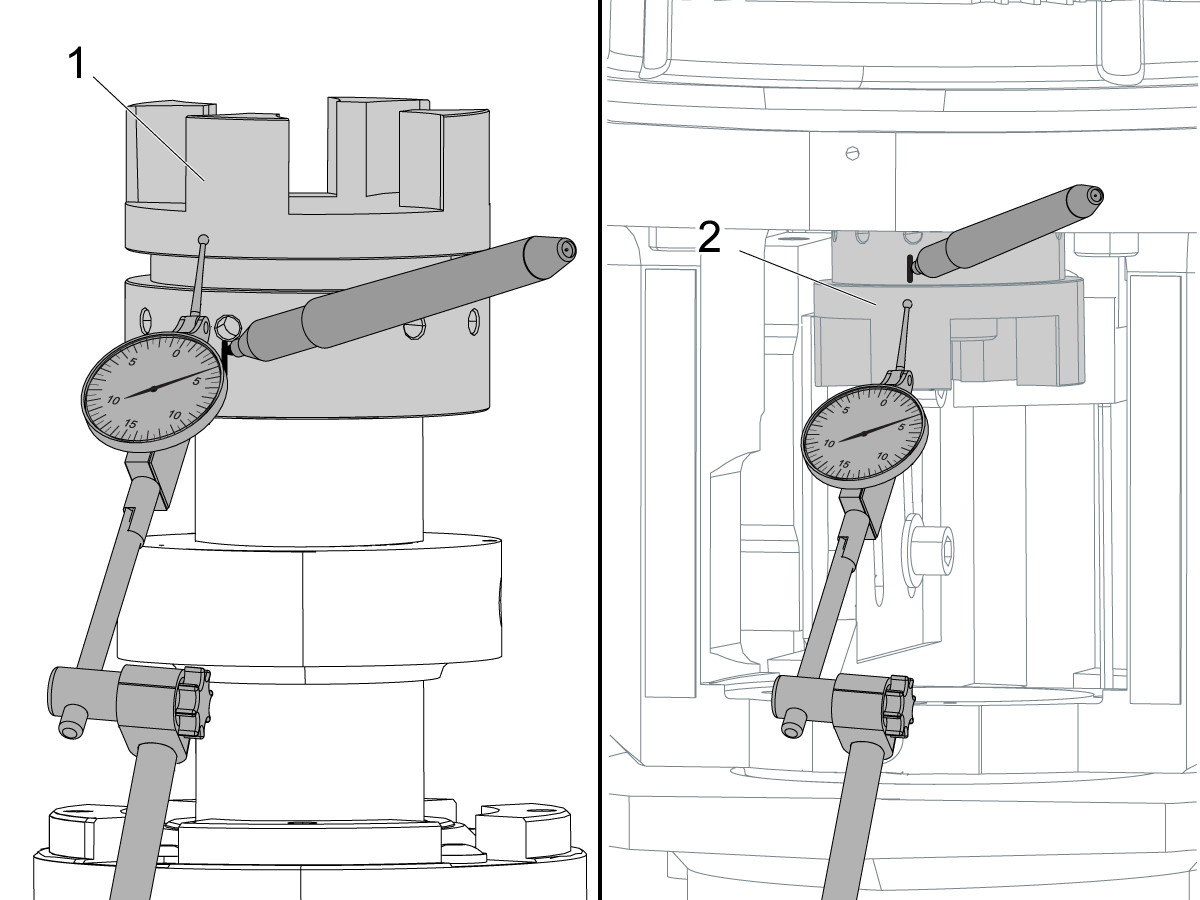
Put an indicator against the spindle coupler [1]. Zero the indicator.

Slowly turn the spindle with your hand to find the highest point on the coupler.

Put a mark on the point with a permanent marker.

Examine the coupler on the motor [2].

If the motor coupler has a mark, proceed to step 3.

If the motor coupler does not have a mark:

  • Put an indicator against the motor coupler [2]. Zero the indicator.
  • Slowly turn the motor by hand to find the highest point.
  • Use a permanent marker to mark the point.

3

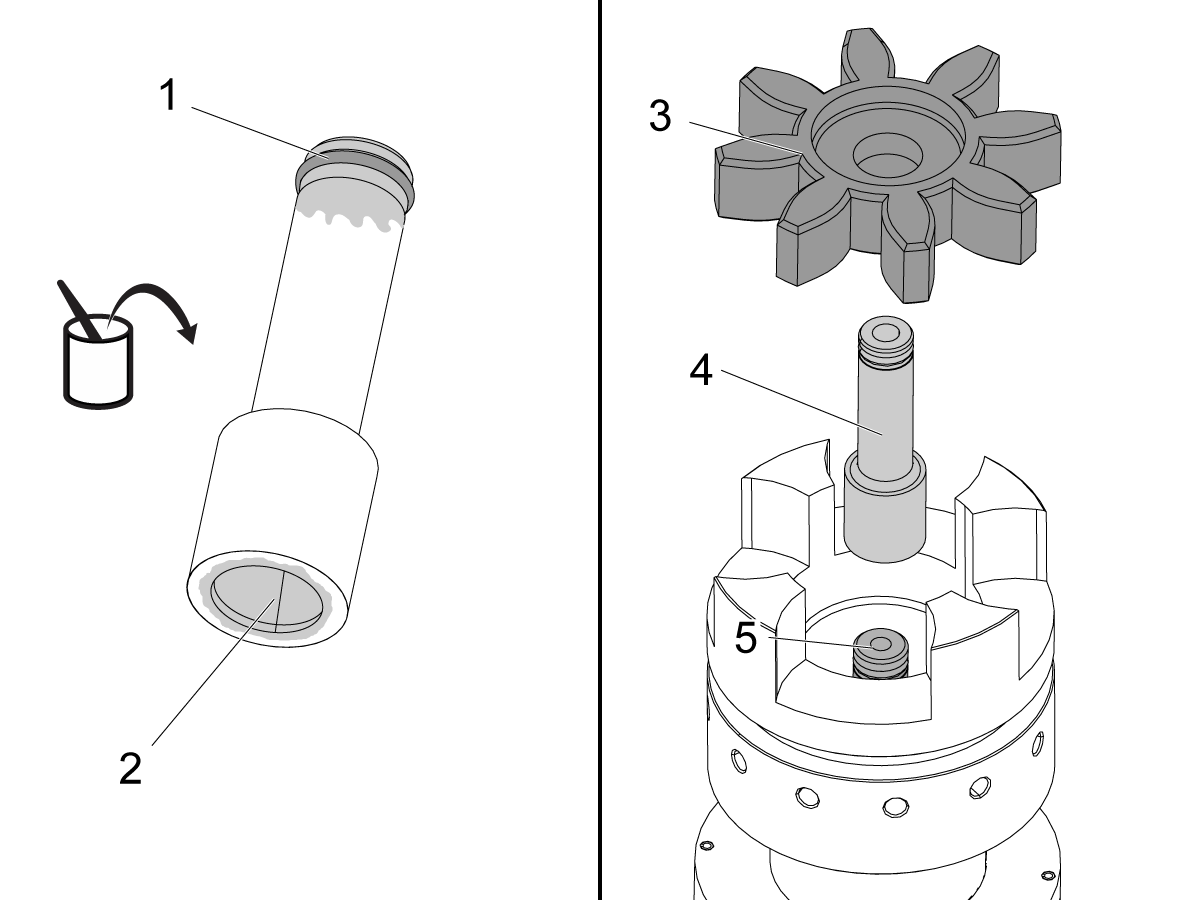
Apply grease to the transfer tube at these locations:

  • the o-ring [1] at the top
  • the socket [2] for the o-ring on the draw bar.

Push the transfer tube [4] onto the top of the draw bar [5].

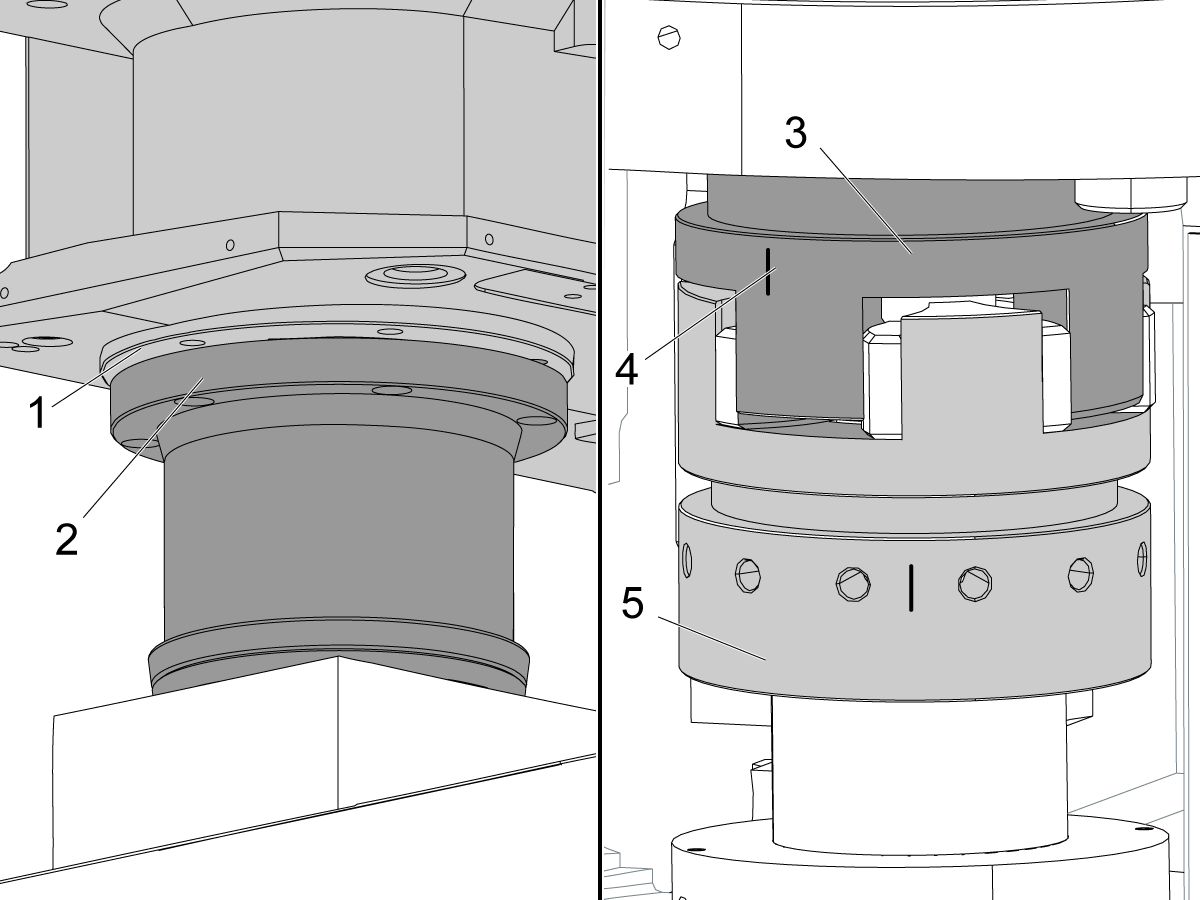
Install the spider coupler [3].

4

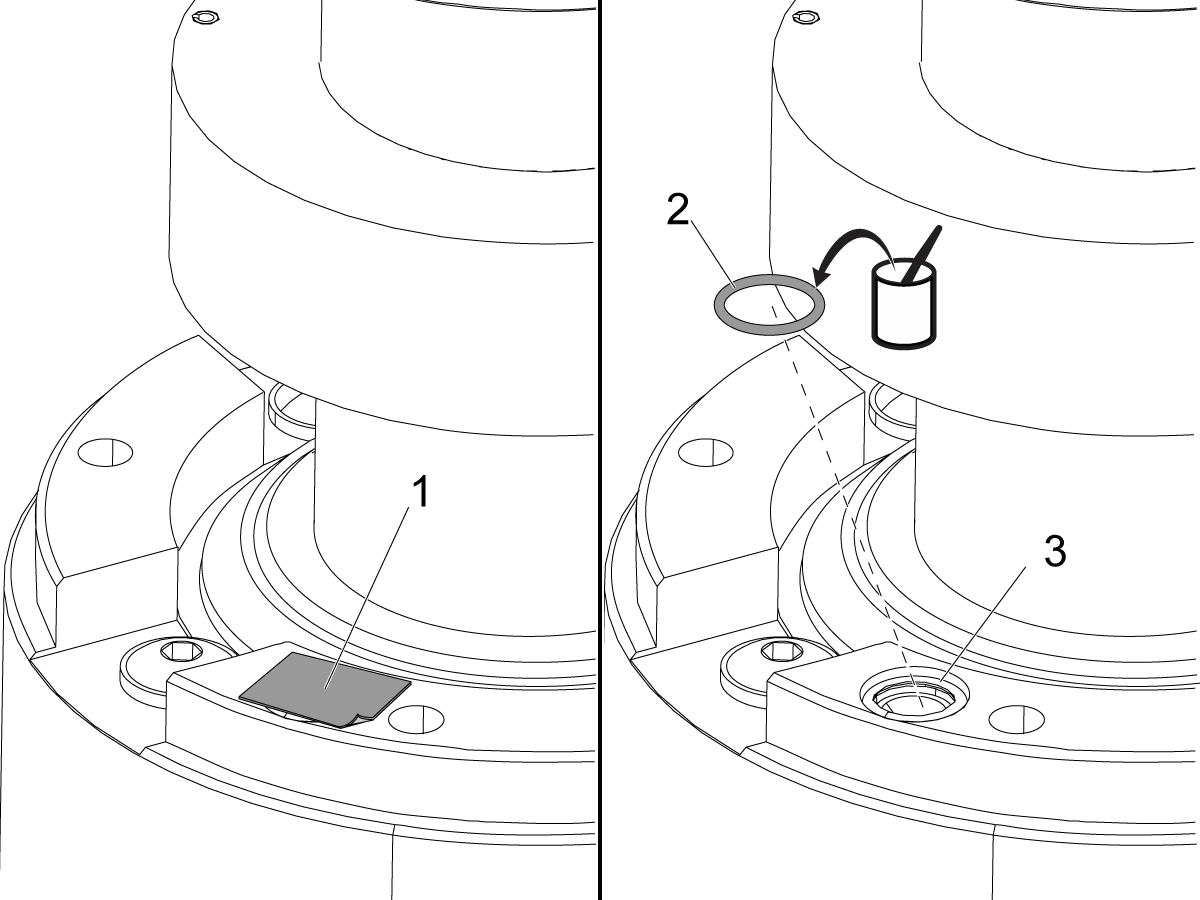
Remove the tape [1] from the spindle lubrication port.

Apply a small quantity of grease to the spindle seal o-ring [2].

Insert the o-ring into the lubrication port [3].

Put the tape over the lubrication port of the spindle that was removed.

5

Slowly jog the Z Axis in the negative (-) direction until the head mount [1] is 0.5" (13 mm) above the spindle flange [2].

Use your hand to slowly turn the spindle coupler [5] until the mark on the spindle coupler aligns with the mark [4] on the motor coupler [3]. Align the (2) marks as closely as possible.

Slowly jog the Z Axis in the negative (-) direction.

 Caution: Lower the lift as you jog the Z Axis. The motor must be supported by the lift until the spindle is connected to the motor adapter.

Make sure the spindle is centered in the spindle bore.

Make sure the couplers engage smoothly.

6

Remove the temporary screw you used in step 1.

Install (4) motor mount screws [1] into the motor mount adapter [2].

Torque the screws. Refer to Haas Fastener Torque Specifications.

Remove the motor support lift.

Attach the oil supply fitting.

Connect the oil supply tube.

7

Place the indicator touching the spindle shaft [1]. Rotate the shaft until the coupling's high spot faces out.

Jog spindle head to measure the Y-axis offset between the two couplings.

Then, rotate spindle shaft CCW 90 degrees until the coupling's high spots faces out.  

Jog spindle head to measure the X-axis offset between the two couplings.

Torque the screws. Refer to HAAS FASTENER TORQUE SPECIFICATIONS.

 NOTE: If coupling offsets exceed tolerance, break all 4 upper motor mount screws loose and tap the motor into place until offset is within tolerance. 

8

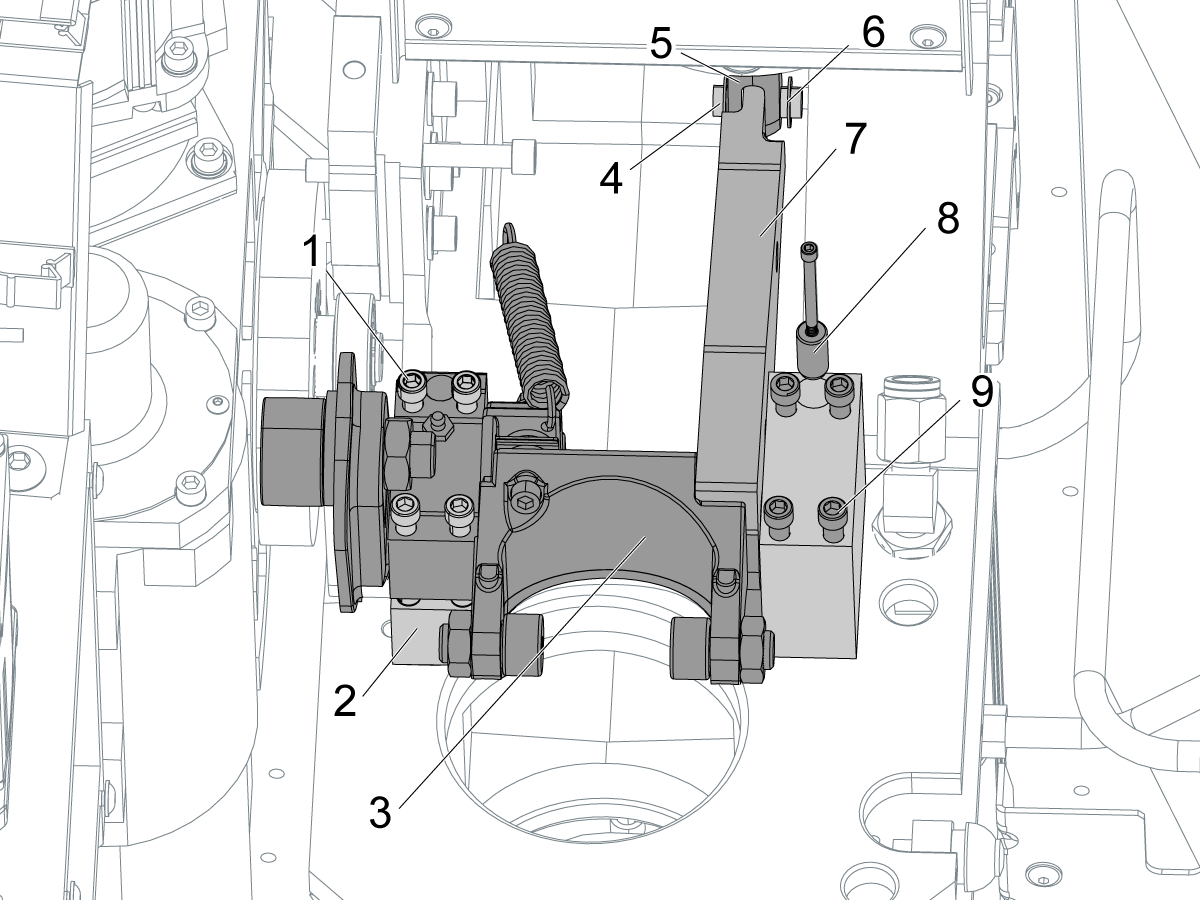
Put (4) screws [1] into the upper inside bearing block of the rocker assembly.

Put (4) screws [9] into the outer bearing block.

Put the rocker assembly [3] onto the spindle casting. Use the lower bearing block [2] on the inside as a guide.

Use a dowel pin [8] to align the outside bearing block.

Put the rocker arm [7] through the yoke [5] on shaft from the air cylinder.

Push the clevis pin [4] through the arm and the yoke.

Put the C-clip [6] onto the clevis pin.

Torque all of the screws. Refer to the Haas Fastener Torque Specifications.

Make sure the rocker assembly is correctly adjusted.

 Note: The illustration does not show the spindle and spindle motor.

9

Use the spring installation tool to attach the spring to the striker block.

Refer to DT-1 - Spindle Rocker Arm - Spring Installation Tool - Instructions.

Install the fan assembly onto the top of the spindle head.

Install the spindle head covers.

10

Refer ro the VMC - Spindle - Alignment ("Spindle Sweep") procedure.

Mil kaldırma

1

Z ekseni seyahat altına jog.

[EMERGENCY STOP] düğmesine basın.

İş mili fanı aksamını çıkarın.

Rocker ARM montajı çıkarın. Aşağıdaki adımları izleyin:

  • C-klibi [5] çatal pimini [6] çıkarın. Kaldırmak için çatal pin itin.
  • Yay [4]' i forvet bloğundan çıkarın.
  • (4) vidayı [1] iç rulman bloğundan gevşetin [2].
  • (4) vidayı [7] dış rulman bloğundan gevşetin [8].
  • Rocker ARM aksamını makineden çıkarın.
  • İç rulman bloğunun alt yarısını [3] kaldırmayın.
  • Yatak bloklarından dübel pimlerini çıkarın.

 Not: Bu resimde İş Mili ve İş Mili motoru gösterilmiyor.

2

Tablo doğrudan iş mili altında olana kadar X ve Y eksenlerini jog.

Basın [EMERGENCY STOP].

6 koyun" x 6" x 6" (152 mm x 152 mm x 152 mm) ahşap veya alüminyum blok [2] masada.

Koruyucu kapağı [1] makineye takılı olan iş mili üzerine takın.

Serbest bırakma [EMERGENCY STOP].

Alarmları silmek için [RESET] düğmesine basın.

Mil blokta oturana kadar Z eksenini negatif (-) yönde jog.

[EMERGENCY STOP] düğmesine basın.

Enkoder için [3] braketini Lift takın.

 Dikkat: Mil motor adaptörden ayrıldığı zaman, motor montajı Asansör tarafından desteklenmelidir.

3

Yağ besleme borusunun bağlantısını kesin.

Yağ besleme elemanını çıkarın.

Motor adaptörünü [1] miline iliştiren (4) vidayı [2] çıkarın.

Mil flanşı için (6) tutucu vidaları [4] çıkarın [3].

4

Serbest bırakma [EMERGENCY STOP].

Alarmları silmek için [RESET] düğmesine basın.

0,001 in Z eksenini yavaşça jog" 0,04 mesafesine pozitif (+) yönde artışlarla" (1 mm).

 Not: Mil [2] damla 1/32" (1 mm), mil döküm [1].

Mil düşmezse, mil 1/4 açmak için bir kayış anahtarı kullanın, onu gevşetmek için saat yönünde döndürün.

Motor tertibatını yükseltmek için vinç kullanın [3] Z ekseni jog aynı anda.

Mil [4] kaldırıncaya kadar Z ekseni pozitif (+) yönde jog.

Recently Viewed Items

You Have No Recently Viewed Items Yet

Geribildirim
Haas Logo

美元价格不包括关税、报关费用、保险费、增值税及运费。
USD prices DO NOT include customs duty, customs fees, insurance, VAT, or freight.

人民币价格包含关税、报关费用、货运保险和增值税, 但不包括运费。
CNY prices include customs duty, customs fees, insurance, and VAT. DOES NOT include freight.

Haas Teslim Fiyatı

Bu fiyat, sevkiyat bedeli, ihracat ve ithalat vergileri, sigorta ve Fransa’da alıcı olarak sizinle birlikte kararlaştırılan bir yere yapılan sevkiyat sırasında oluşan diğer masrafları içerir. Haas CNC Ürününün teslimine başka hiçbir zorunlu maliyet eklenmez.

EN YENİ HAAS İPUCU VE TEKNOLOJİLERİNDEN HABERDAR OLUN…

Şimdi kaydolun!   

HAAS TOOLING ACCEPTS THE FOLLOWING:

  • Servis ve Destek
  • Sahipler
  • Servis İste
  • Operatör El Kitapları
  • Haas Parçaları
  • Döner Tabla Onarım Talebi
  • Kurulum Öncesi Kılavuzları
  • Alışveriş Araçları
  • Yeni Bir Haas Oluştur ve Fiyatlandır
  • Mevcut Stok
  • Haas Fiyat Listesi
  • CNCA Taksit Seçenekleri
  • Haas Hakkında
  • DNSH Beyanı
  • Kariyer
  • Sertifikalar ve Güvenlik
  • İletişim
  • Geçmiş
  • Hüküm ve Koşullar
  • Haas Tooling Hüküm ve Koşulları
  • Gizlilik
  • Garanti
  • Haas Topluluğu
  • Haas Sertifikasyon Programı
  • Haas Motor Sporları
  • Gene Haas Vakfı
  • Haas Teknik Eğitim Topluluğu
  • Etkinlikler
  • Sohbete Katılın
  • Facebook
  • X
  • Flickr
  • YouTube
  • LinkedIn
  • Instagram
  • TikTok
© 2025 Haas Automation, Inc – CNC Takım Tezgahları

This site is protected by reCAPTCHA and the Google Privacy Policy and Terms of Service apply.

2800 Sturgis Rd., Oxnard, CA 93030 / Toll Free: 800-331-6746
Phone: 805-278-1800 / Fax: 805-278-2255