MyHaas 환영합니다,
!
Haas Tooling 게스트 주문 이력 MyHaas/HaasConnect 로그인 등록 Haas Tooling 내 계정 Order History Return History MyHaas/HaasConnect 로그아웃 환영합니다, 내 기계 최근 활동 내 견적 내 계정 내 사용자 로그아웃
담당 대리점 찾기
  1. 언어 선택
    1. Deutsch
    2. Español - España
    3. Español - México
    4. Français
    5. Italiano
    6. Português
    7. Český
    8. Dansk
    9. Nederlands
    10. Magyar
    11. Polski
    12. Svenska
    13. Türkçe
    14. 中文
    15. Suomi
    16. Norsk
    17. الإنجليزية
    18. български
    19. Hrvatski
    20. Ελληνικά
    21. Română
    22. Slovenský
    23. Slovenščina
    24. 한국어
    25. 日本語
  • 기계 Main Menu
    • Haas 수직 밀 수직 밀
      수직 밀
      수직 밀 View All
      • 수직 밀
      • VF 시리즈
      • 유니버설 기계
      • VR 시리즈
      • VP-5 프리즈매틱
      • 팔레트 교환 VMC
      • 미니밀
      • 몰드 기계
      • 고속 드릴 센터
      • 드릴/탭/밀 시리즈
      • 툴룸 밀
      • 컴팩트 밀
      • 갠트리 시리즈
      • SR 시트 라우터
      • 초대형 VMC
      • 이중 컬럼 밀
      • 제어 시뮬레이터
      • 밀 자동 공작물 적재장치
      • VMC/UMC 측면 적재 자동 공작물 적재장치
      • 컴팩트한 자동 공작물 적재장치
    • Product Image 멀티 축 솔루션
      멀티 축 솔루션
      멀티 축 솔루션 View All
      • 멀티 축 솔루션
      • Y축 선반
      • 5축 밀
    • Haas 선반 선반
      선반
      선반 View All
      • 선반
      • ST 시리즈
      • 이중 스핀들
      • 박스 웨이 시리즈
      • 툴룸 선반
      • 척커 선반
      • HAAS 봉재 이송장치 V2
      • 선반 자동 공작물 적재장치
    • Haas 수평 밀 수평 밀
      수평 밀
      수평 밀 View All
      • 수평 밀
      • 50-테이퍼
      • 40-테이퍼
    • Haas 로터리 및 인덱서 로터리 및 인덱서
      로터리 및 인덱서
      로터리 및 인덱서 View All
      • 로터리 및 인덱서
      • 회전 테이블
      • 인덱서
      • 5축 로터리
      • 초대형 로터리
    • Product Image 자동화 시스템
      자동화 시스템
      자동화 시스템 View All
      • 자동화 시스템
      • 밀 자동화
      • 선반 자동화
      • 자동화 모델
    • Haas 드릴 센터 데스크톱 기계
      데스크톱 기계
      데스크톱 기계 View All
      • 데스크톱 기계
      • 데스크톱 밀
      • 데스크톱 선반
    • Haas 공장 장비 공장 장비
      공장 장비
      공장 장비 View All
      • 공장 장비
      • 밴드쏘
      • 니형 밀
      • 표면 연마기, 2550
      • 표면 연마기, 3063
      • 레이저 절삭 기계
    • 빠른 링크 특별 시리즈  특별 시리즈 
      EU 시리즈 EU 시리즈 제작 및 가격 | 가격 목록 제작 및 가격 | 가격 목록 재고품 기계 재고품 기계 신제품 신제품 첫 CNC 첫 CNC
      공구 쇼핑
      • Haas 제품 제작 및 가격
      • 가격 목록
      • 사용 가능한 재고
      • CNCA 파이낸싱
      상담을 받고 싶으신가요?

      Haas Factory Outlet (HFO)은 고객님의 질문에 답변을 드리며 가장 좋은 선택지를 안내해 드립니다.

      CONTACT YOUR DISTRIBUTOR >
  • 옵션 Main Menu
    • Product Image 스핀들
      스핀들
      스핀들 View All
      • 스핀들
    • Product Image 공구 교환장치
      공구 교환장치
      공구 교환장치 View All
      • 공구 교환장치
    • Product Image 4 | 5축
      4 | 5축
      4 | 5축 View All
      • 4 | 5축
    • Product Image 터렛 및 라이브 툴링
      터렛 및 라이브 툴링
      터렛 및 라이브 툴링 View All
      • 터렛 및 라이브 툴링
    • Product Image 검사
      검사
      검사 View All
      • 검사
    • Haas 칩 및 절삭유 관리 칩 및 절삭유 관리
      칩 및 절삭유 관리
      칩 및 절삭유 관리 View All
      • 칩 및 절삭유 관리
    • Haas Control Haas Control
      Haas Control
      Haas Control View All
      • Haas Control
    • Product Image 제품 선택 사항
      제품 선택 사항
      제품 선택 사항 View All
      • 제품 선택 사항
    • Product Image 툴링 및 픽스처링
      툴링 및 픽스처링
      툴링 및 픽스처링 View All
      • 툴링 및 픽스처링
    • Product Image 워크홀딩
      워크홀딩
      워크홀딩 View All
      • 워크홀딩
    • View All
    • Product Image 5축 솔루션
      5축 솔루션
      5축 솔루션 View All
      • 5축 솔루션
      • 5 Easy Steps to 5-Axis
    • Product Image 자동화
      자동화
      자동화 View All
      • 자동화
    • 빠른 링크 특별 시리즈  특별 시리즈 
      EU 시리즈 EU 시리즈 제작 및 가격 | 가격 목록 제작 및 가격 | 가격 목록 재고품 기계 재고품 기계 신제품 신제품 첫 CNC 첫 CNC
      공구 쇼핑
      • Haas 제품 제작 및 가격
      • 가격 목록
      • 사용 가능한 재고
      • CNCA 파이낸싱
      상담을 받고 싶으신가요?

      Haas Factory Outlet (HFO)은 고객님의 질문에 답변을 드리며 가장 좋은 선택지를 안내해 드립니다.

      CONTACT YOUR DISTRIBUTOR >
  • Why Haas Main Menu
      Haas의 차이를 알아보세요
    • Haas여야만 하는 이유
    • MyHaas
    • 교육 커뮤니티
    • Industry 4.0
    • Haas 인증
    • 고객 사용후기
  • 서비스 Main Menu
      Haas Service 에 오신 것을 환영합니다
      서비스 홈 조작자 설명서 방법 절차 문제해결 가이드 예방적 유지관리 Haas 부품 Haas Tooling 동영상
  • 동영상 Main Menu
×

검색 결과

Web Pages

Images

    • <
    • 1
    • >
MyHaas 환영합니다,
!
Haas Tooling 게스트 주문 이력 MyHaas/HaasConnect 로그인 등록 Haas Tooling 내 계정 Order History Return History MyHaas/HaasConnect 로그아웃 환영합니다, 내 기계 최근 활동 내 견적 내 계정 내 사용자 로그아웃
담당 대리점 찾기
  1. 언어 선택
    1. Deutsch
    2. Español - España
    3. Español - México
    4. Français
    5. Italiano
    6. Português
    7. Český
    8. Dansk
    9. Nederlands
    10. Magyar
    11. Polski
    12. Svenska
    13. Türkçe
    14. 中文
    15. Suomi
    16. Norsk
    17. الإنجليزية
    18. български
    19. Hrvatski
    20. Ελληνικά
    21. Română
    22. Slovenský
    23. Slovenščina
    24. 한국어
    25. 日本語
×

검색 결과

Web Pages

Images

    • <
    • 1
    • >

Spindle - Replacement - DM-1 - DT-1

서비스 홈 방법 절차 DT/DM - 스파이더 커플링 드라이브 - 스핀들 - 교체
Recently Updated Last updated: 12/14/2022

DT/DM - 스파이더 커플링 드라이브 - 스핀들 - 교체


DT/DM - 스파이더 커플링 드라이브 - 스핀들 - 교체

- 섹션으로 건너뛰기 - 1. 개요 2. Spindle Installation Preparation (2 단계) 3. Mid-Point Oiling (MPO) Spindle - Installation (9 단계) 4. 스핀들 제거 (4 단계) Back to Top

개요

DM-1 또는 DT-1에 대해 이 절차를 수행하십시오. 이 절차를 통해 스핀들 교체 방법에 대해 설명합니다. 2014년 1월 이후에 제작된 기계는 중간 점 오일링(MPO) 스핀들을 사용합니다. 스핀들을 교체할 때 MPO 스핀들을 사용합니다.

Spindle Installation Preparation

1

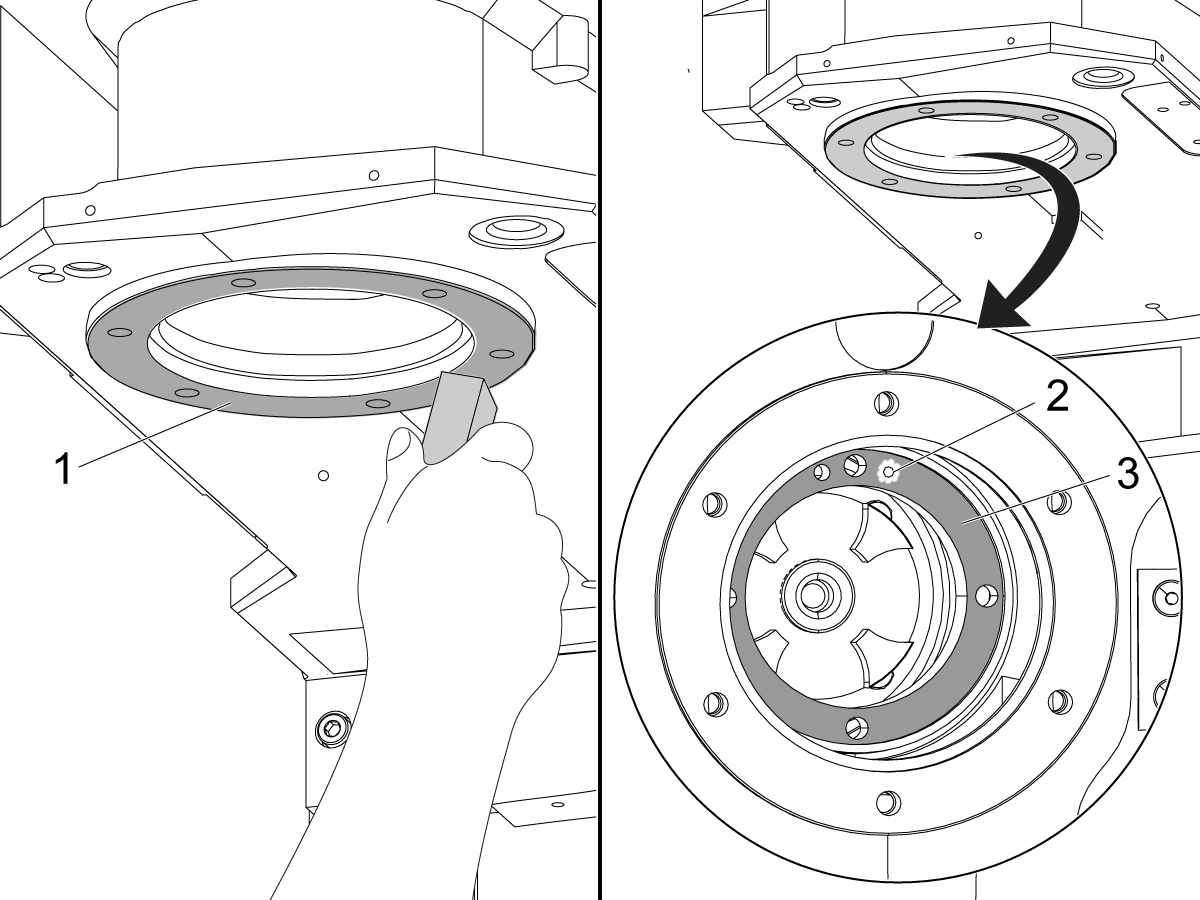
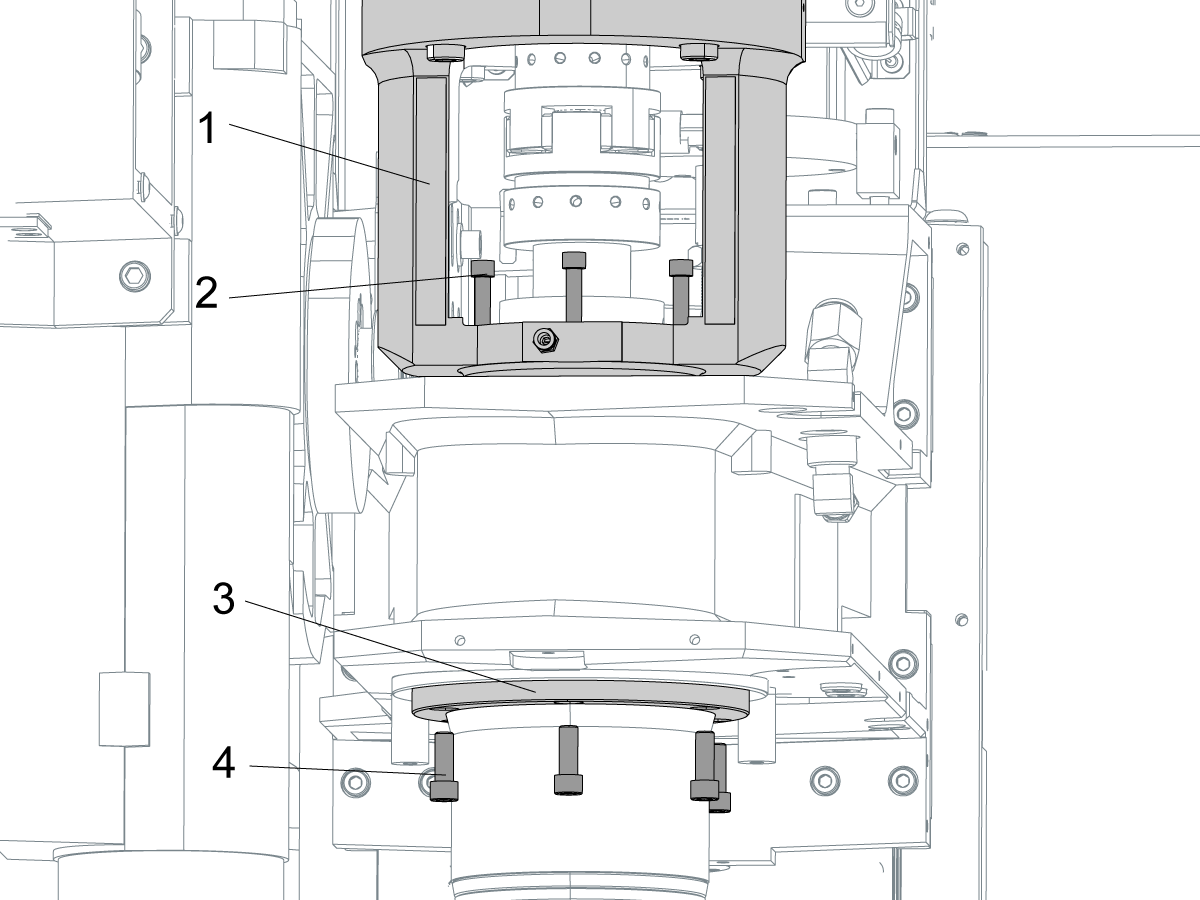
Clean the spindle head bore.

Stone the mating surface [1] on the spindle head casting.

Clean the motor adapter where it touches the spindle [3].

Do not stone the spindle lubrication port [2]. Keep all contamination out of the port.

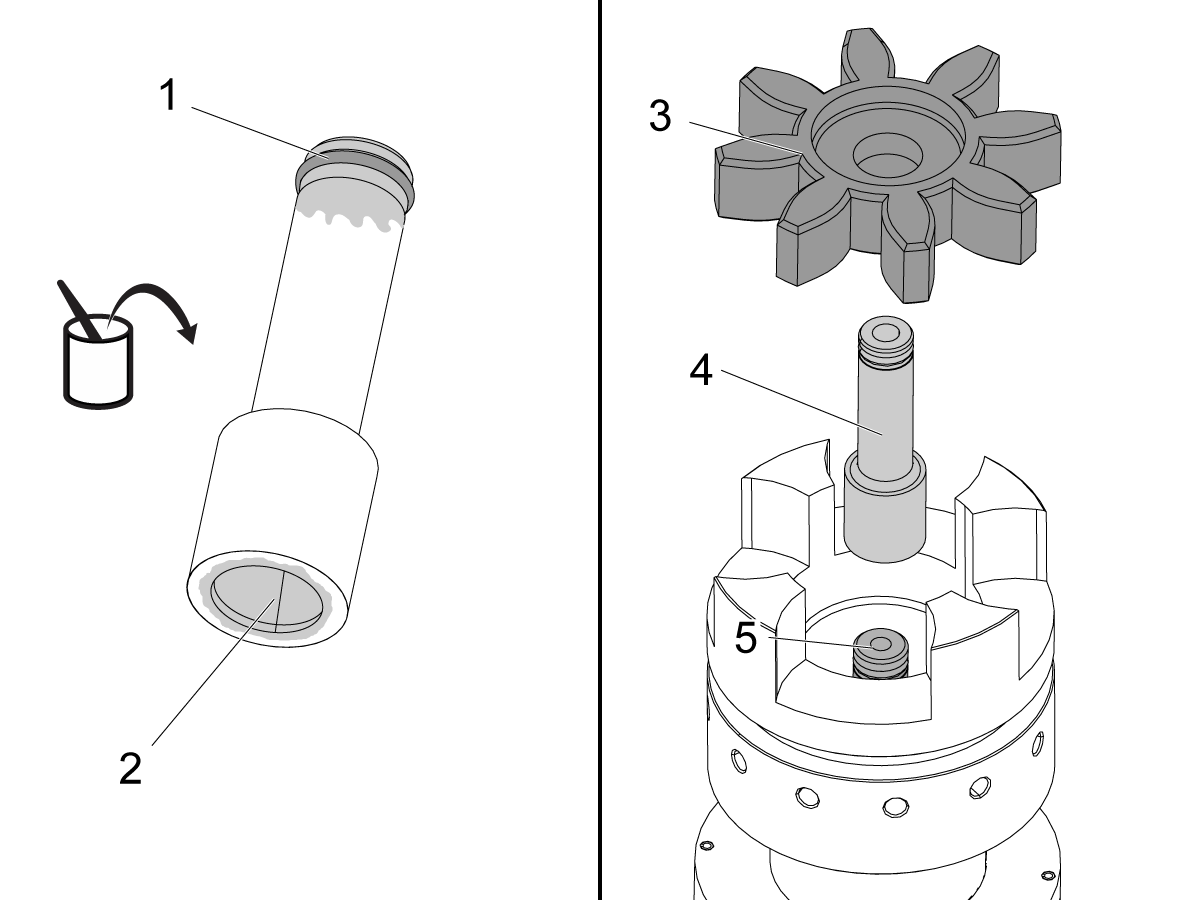
2

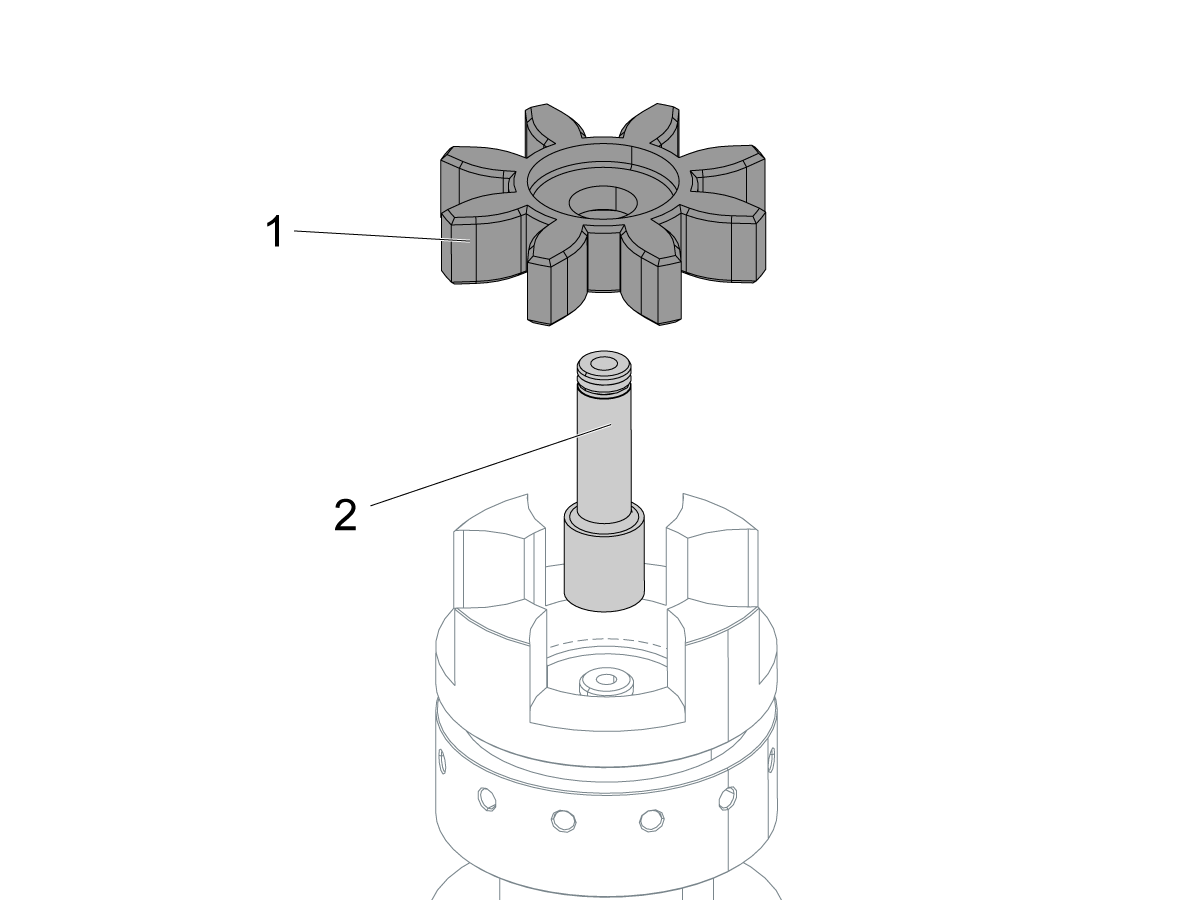
Replace the spider coupling [1] if it is worn or damaged.

Replace the transfer tube [2] if it is worn or damaged.

Mid-Point Oiling (MPO) Spindle - Installation

Do not remove the tape from the lubrication port.

Use a lift to support the motor until the spindle is attached.

 Important: Refer to the DT-1 - Mid-Point Oiling (MPO) - Spindle - Minimum Lubrication - Oil Pump Modification procedure.

1

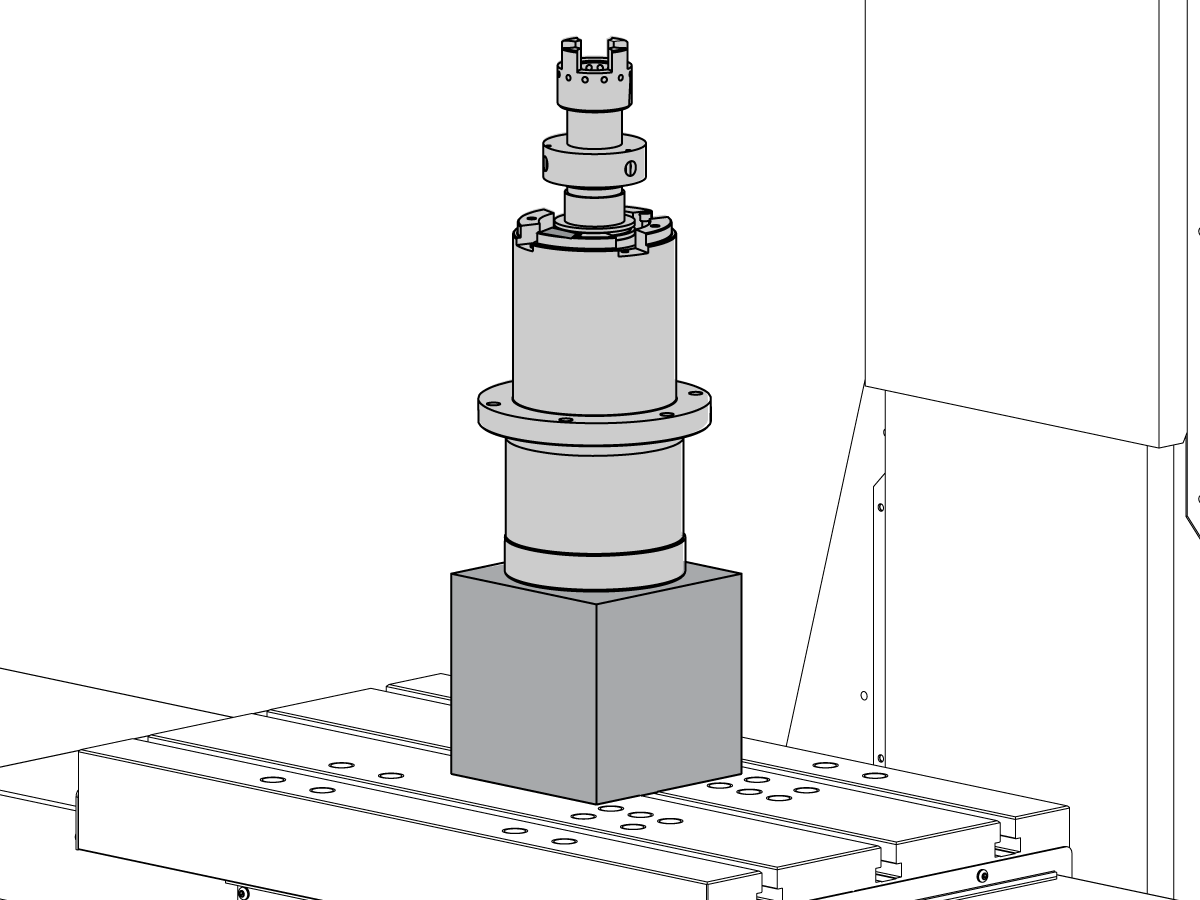
Attach the red protective cap [2] to the bottom of the MPO spindle.

Put a 6" x 6" x 6" (152 mm x 152 mm x 152 mm) wood or aluminum block [3] on the table.

Put the MPO spindle on the block.

Make sure that the spindle lubrication port [1] is in the front.

Put a long 5/16"-18 screw [4] through the rear hole on the motor adapter. This screw helps you align the motor adapter to the spindle.

2

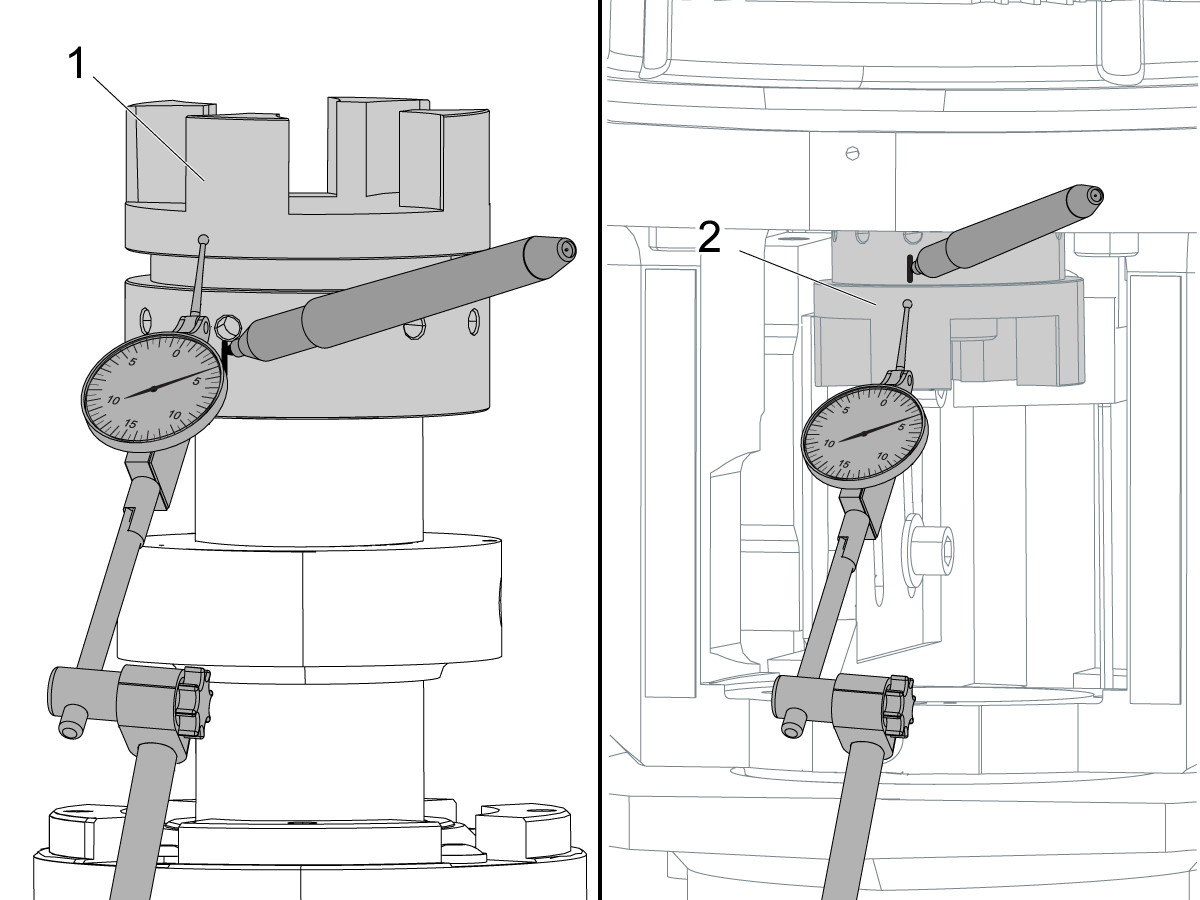
Put an indicator against the spindle coupler [1]. Zero the indicator.

Slowly turn the spindle with your hand to find the highest point on the coupler.

Put a mark on the point with a permanent marker.

Examine the coupler on the motor [2].

If the motor coupler has a mark, proceed to step 3.

If the motor coupler does not have a mark:

  • Put an indicator against the motor coupler [2]. Zero the indicator.
  • Slowly turn the motor by hand to find the highest point.
  • Use a permanent marker to mark the point.

3

Apply grease to the transfer tube at these locations:

  • the o-ring [1] at the top
  • the socket [2] for the o-ring on the draw bar.

Push the transfer tube [4] onto the top of the draw bar [5].

Install the spider coupler [3].

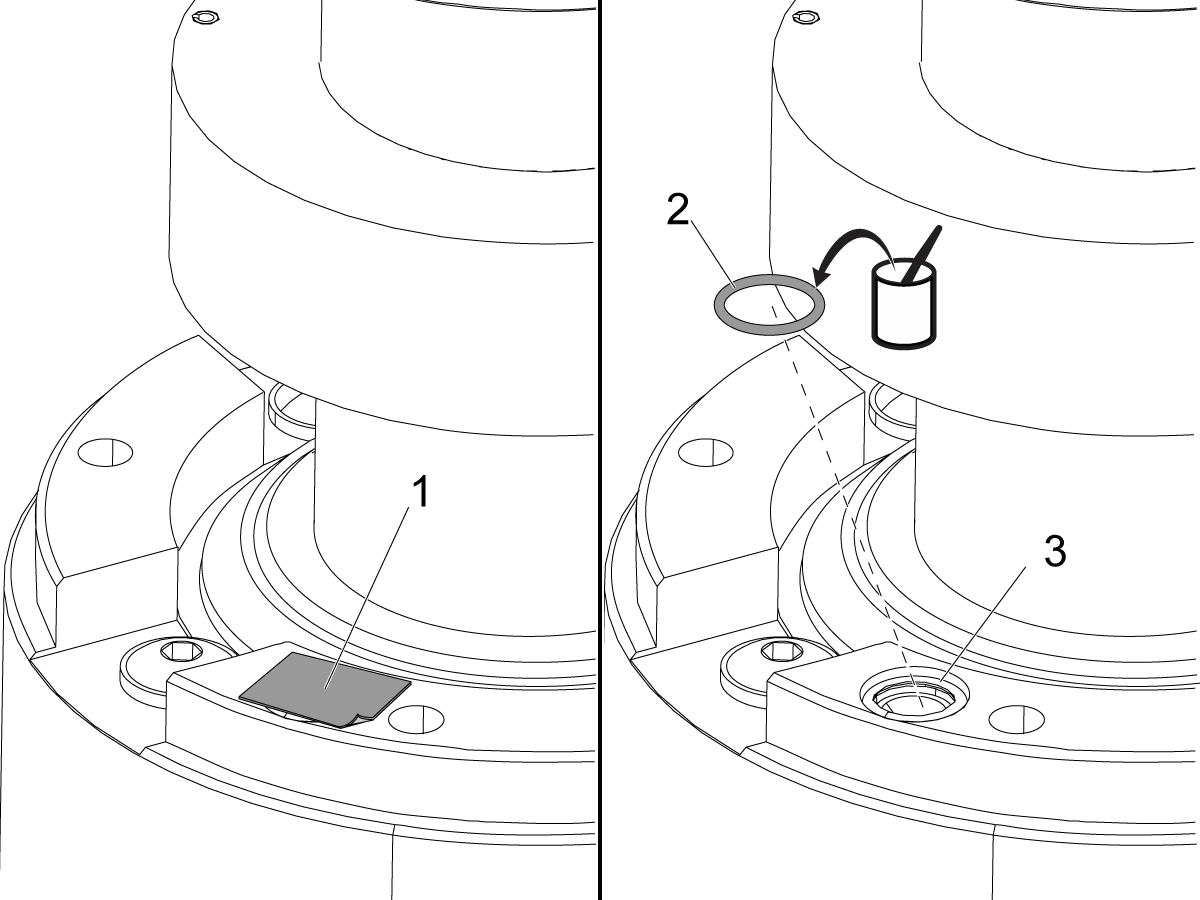
4

Remove the tape [1] from the spindle lubrication port.

Apply a small quantity of grease to the spindle seal o-ring [2].

Insert the o-ring into the lubrication port [3].

Put the tape over the lubrication port of the spindle that was removed.

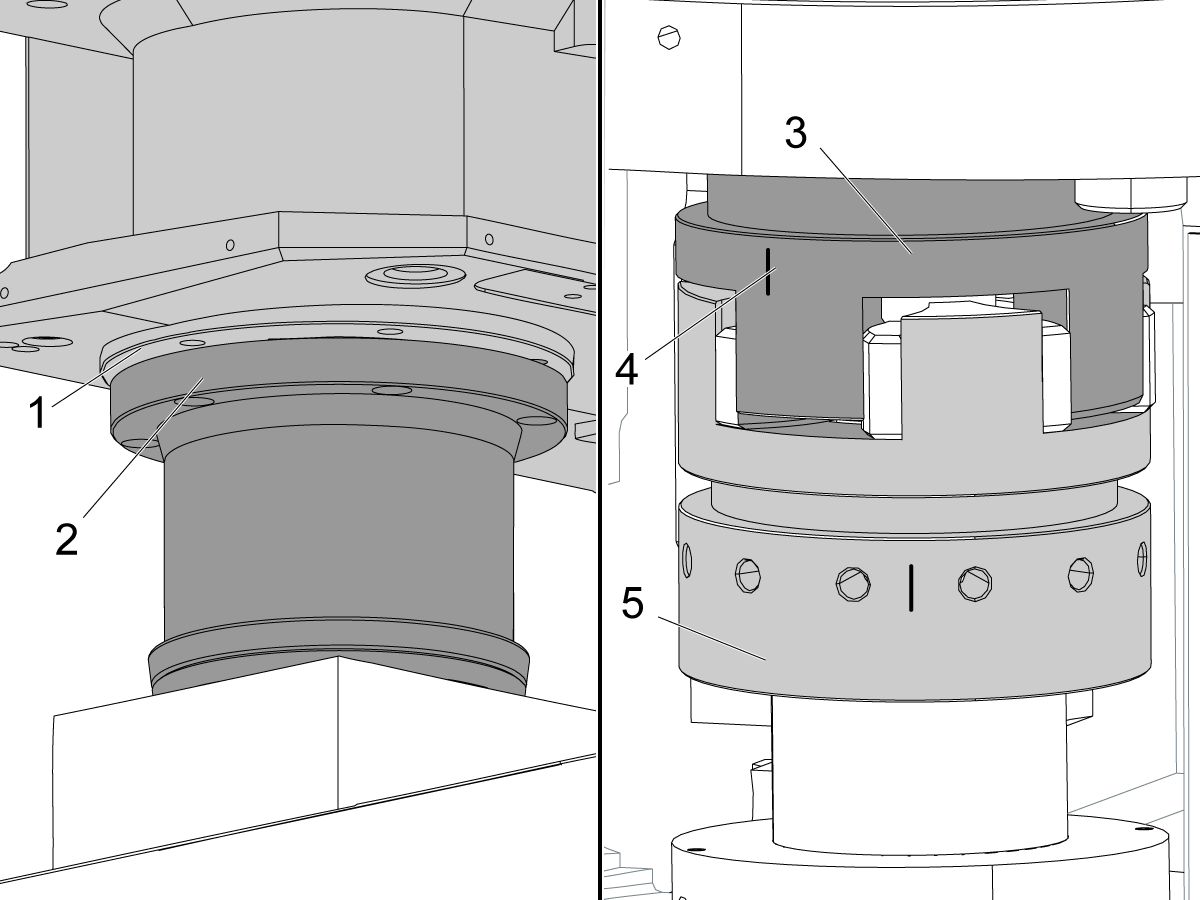
5

Slowly jog the Z Axis in the negative (-) direction until the head mount [1] is 0.5" (13 mm) above the spindle flange [2].

Use your hand to slowly turn the spindle coupler [5] until the mark on the spindle coupler aligns with the mark [4] on the motor coupler [3]. Align the (2) marks as closely as possible.

Slowly jog the Z Axis in the negative (-) direction.

 Caution: Lower the lift as you jog the Z Axis. The motor must be supported by the lift until the spindle is connected to the motor adapter.

Make sure the spindle is centered in the spindle bore.

Make sure the couplers engage smoothly.

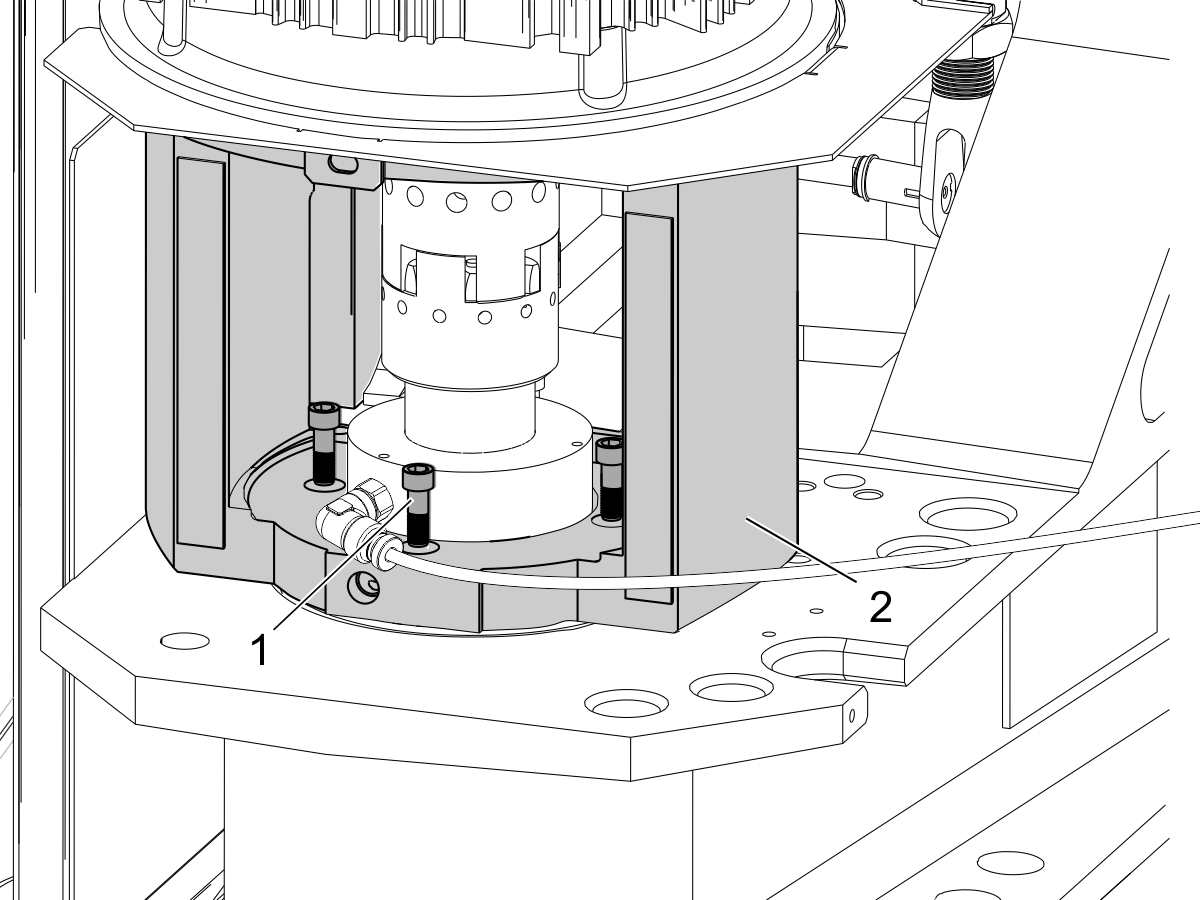
6

Remove the temporary screw you used in step 1.

Install (4) motor mount screws [1] into the motor mount adapter [2].

Torque the screws. Refer to Haas Fastener Torque Specifications.

Remove the motor support lift.

Attach the oil supply fitting.

Connect the oil supply tube.

7

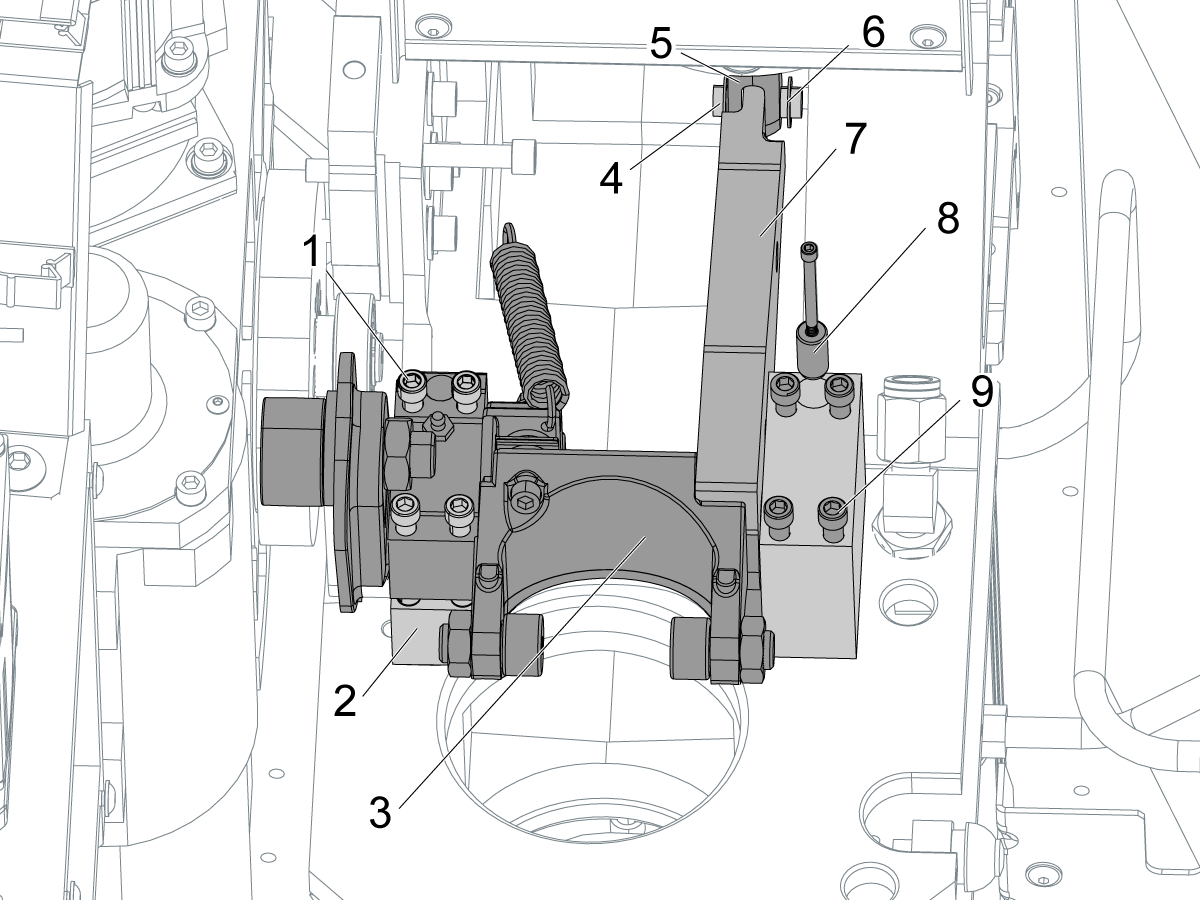
Put (4) screws [1] into the upper inside bearing block of the rocker assembly.

Put (4) screws [9] into the outer bearing block.

Put the rocker assembly [3] onto the spindle casting. Use the lower bearing block [2] on the inside as a guide.

Use a dowel pin [8] to align the outside bearing block.

Put the rocker arm [7] through the yoke [5] on shaft from the air cylinder.

Push the clevis pin [4] through the arm and the yoke.

Put the C-clip [6] onto the clevis pin.

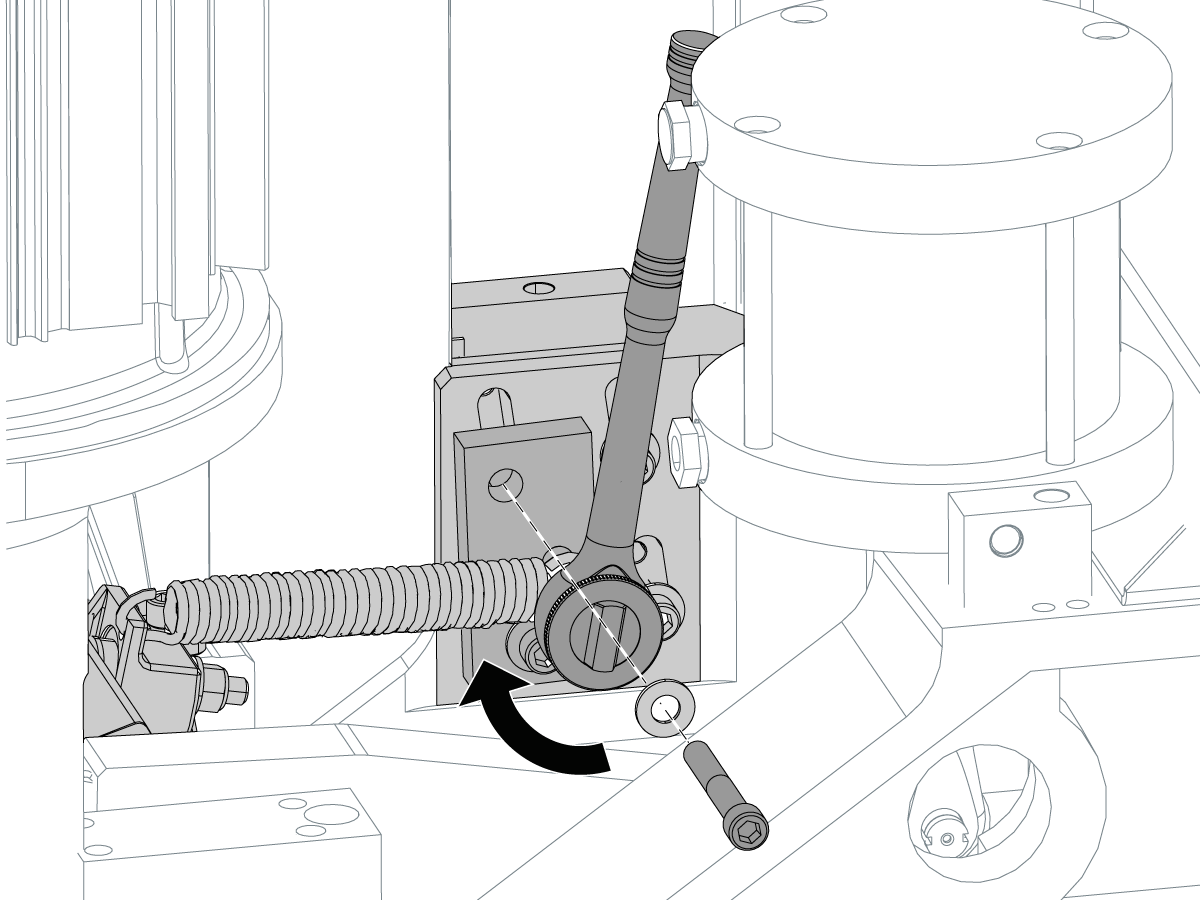
Torque all of the screws. Refer to the Haas Fastener Torque Specifications.

Make sure the rocker assembly is correctly adjusted.

 Note: The illustration does not show the spindle and spindle motor.

8

Use the spring installation tool to attach the spring to the striker block.

Refer to DT-1 - Spindle Rocker Arm - Spring Installation Tool - Instructions.

Install the fan assembly onto the top of the spindle head.

Install the spindle head covers.

9

Refer ro the VMC - Spindle - Alignment ("Spindle Sweep") procedure.

스핀들 제거

1

Z축을 이동거리 하단으로 조그합니다.

[EMERGENCY STOP]을 누르십시오.

스핀들 팬 어셈블리를 제거하십시오.

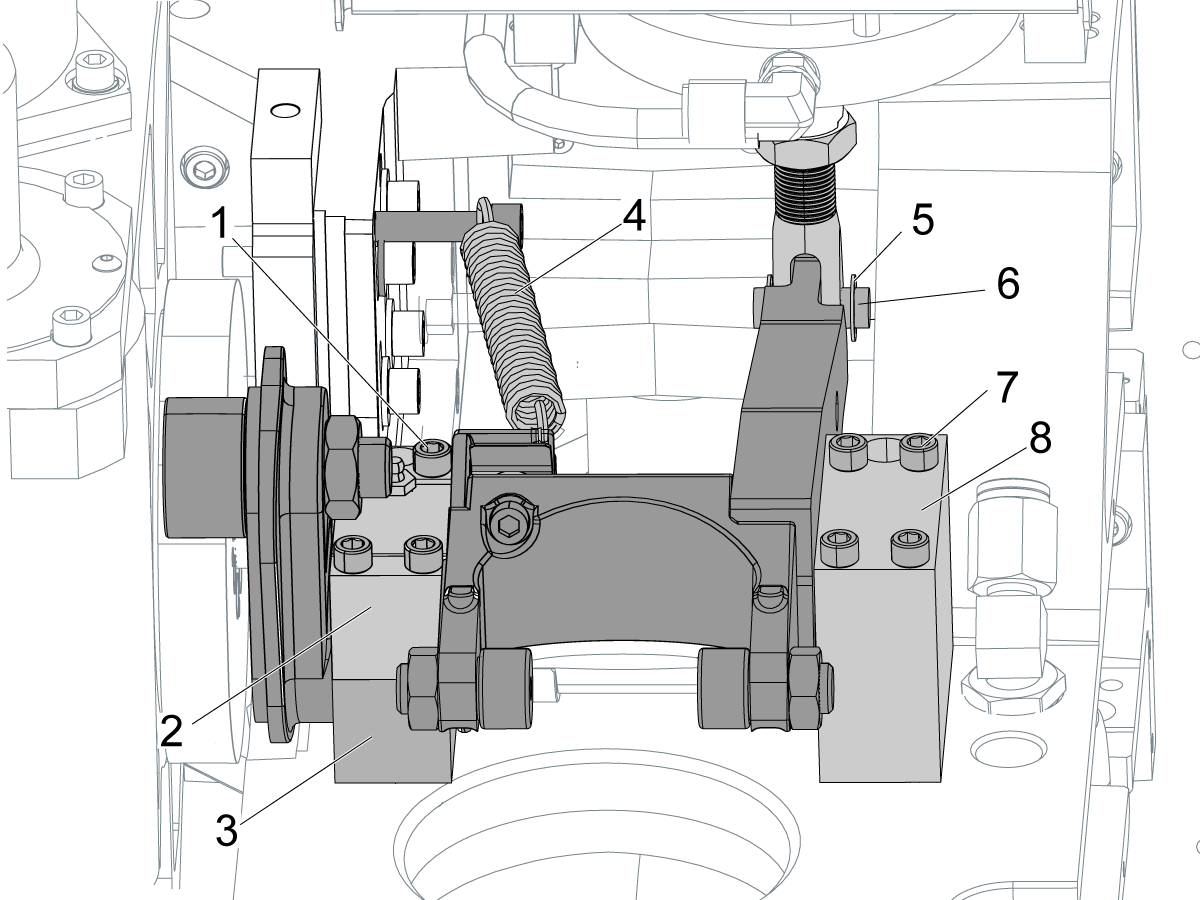
로커 암 어셈블리를 제거하십시오. 다음 단계를 따르십시오:

  • 클레비스 핀 [6]에서 C- 클립 [5]을 제거하십시오. 클레비스 핀을 밀어 제거하십시오.
  • 스트라이커 블록에서 스프링 [4]을 분리하십시오.
  • 안쪽 베어링 블록 [2]에서 4개의 스크류 [1]를 풉니다.
  • 외부 베어링 블록 [8]에서 4개의 스크류 [7]를 풉니다.
  • 기계에서 로커 암 어셈블리를 제거하십시오.
  • 내부 베어링 블록의 하단 절반 [3]을 제거하지 마십시오.
  • 베어링 블록에서 다우얼 핀을 제거하십시오.

 참고: 그림에는 스핀들과 스핀들 모터가 나와 있지 않습니다.

2

테이블이 스핀들 바로 아래에 올 때까지 X축 및 Y축을 조정하십시오.

[EMERGENCY STOP]을 누르십시오.

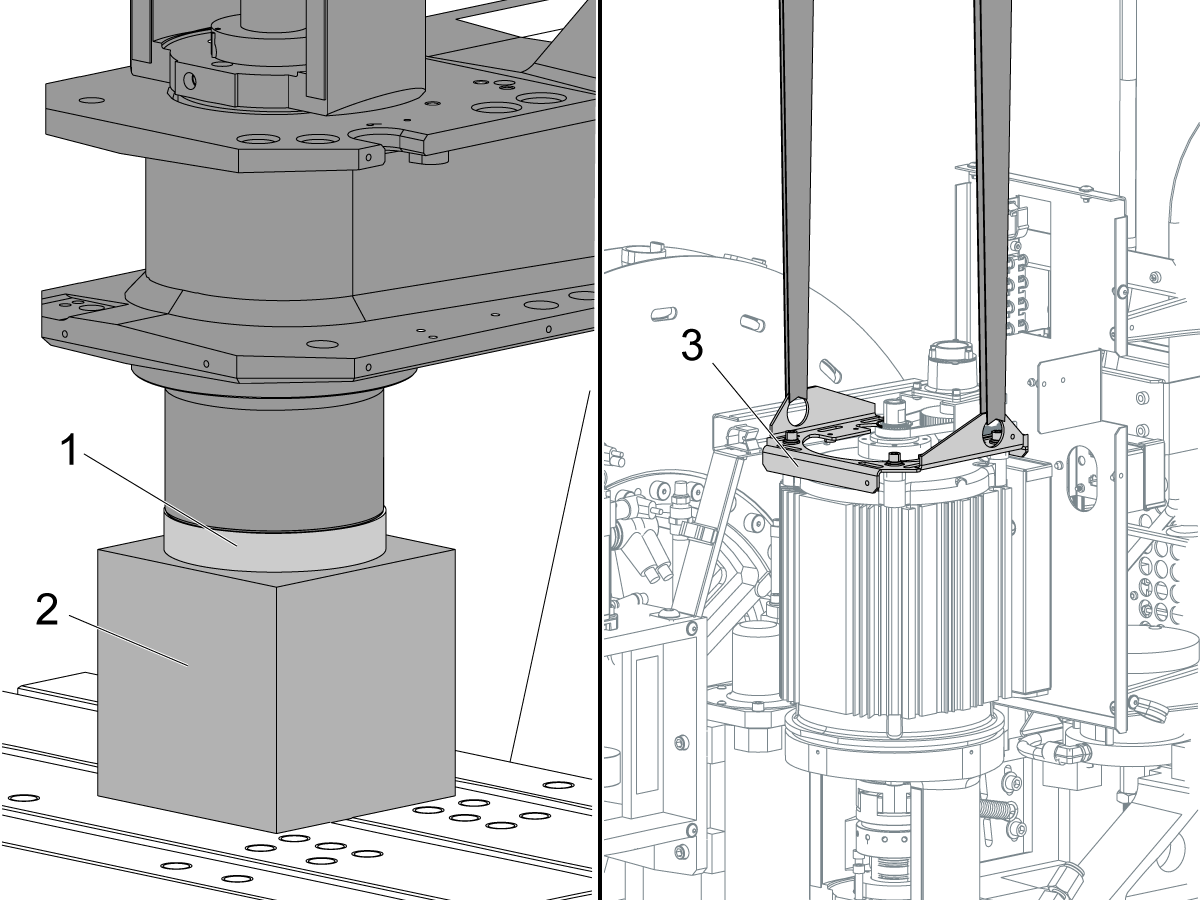
6" x 6" x 6"(152mm x 152mm x 152mm) 나무 또는 알루미늄 블록 [2]을 테이블에 올려 놓습니다.

기계에 설치된 스핀들에 보호 캡 [1]을 부착하십시오.

[EMERGENCY STOP]을(를) 릴리스합니다.

각 알람을 소거하려면 [RESET]을 누르십시오.

스핀들이 블록에 놓일 때까지 Z축을 음(-)의 방향으로 조정하십시오.

[EMERGENCY STOP]을 누르십시오.

인코더용 브래킷 [3]에 리프트를 부착하십시오.

 주의: 스핀들이 모터 어댑터에서 분리되면 리프트로 모터 어셈블리를 지지해야 합니다.

3

오일 공급 튜브를 분리하십시오.

오일 공급 피팅을 제거하십시오.

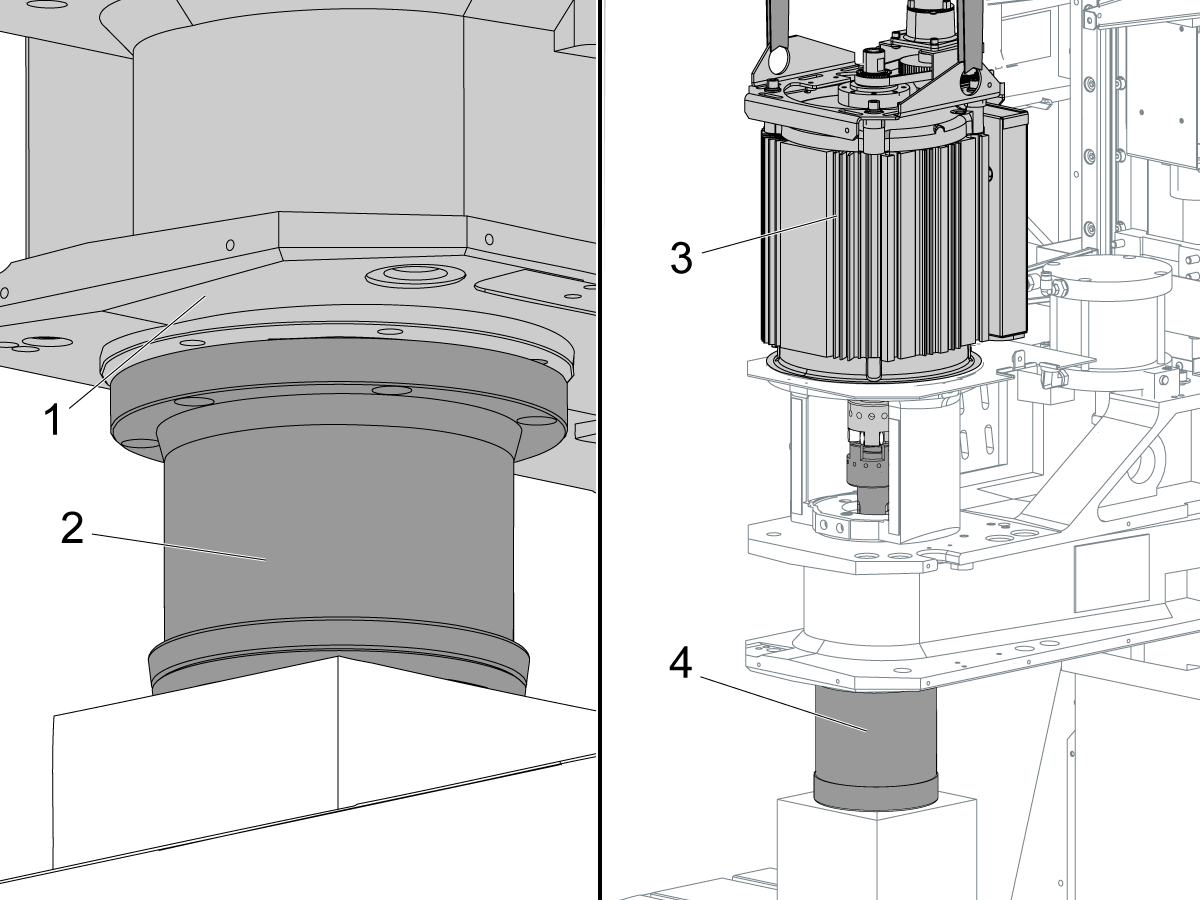
모터 어댑터 [1]를 스핀들에 부착하는 4개의 스크류 [2]를 제거하십시오.

스핀들 플랜지용 [3] 리테이너 스크류 [4] 6개를 제거하십시오.

4

[EMERGENCY STOP]을 해제합니다.

각 알람을 소거하려면 [RESET] 을 누르십시오.

Z축을 0.001"씩 천천히 양(+)의 방향으로 이동하여 0.04"(1mm) 거리까지 조정합니다.

 참고: 스핀들 [2]를 스핀들 캐스팅 [1]에서 1/32"(1 mm) 떨어지게 합니다.

스핀들이 떨어지지 않으면 스트랩 렌치를 사용하여 스핀들을 시계 방향으로 1/4 바퀴 돌려 느슨하게 하십시오.

Z축을 조정하는 동시에 호이스트를 사용하여 모터 어셈블리 [3]를 올립니다.

스핀들 [4]을 제거 할 수 있을 때까지 Z축을 양(+)의 방향으로 조정하십시오.

Recently Viewed Items

You Have No Recently Viewed Items Yet

피드백
Haas Logo

美元价格不包括关税、报关费用、保险费、增值税及运费。
USD prices DO NOT include customs duty, customs fees, insurance, VAT, or freight.

人民币价格包含关税、报关费用、货运保险和增值税, 但不包括运费。
CNY prices include customs duty, customs fees, insurance, and VAT. DOES NOT include freight.

Haas 납품 가격

이 가격에는 구매자인 귀사와 합의된 프랑스 국내 지역으로 배송 중에 발생하는 배송 비용, 수출 및 수입 관세, 보험료 및 그 외 모든 비용이 포함됩니다. Haas CNC 제품의 납품에는 그 외 의무 비용이 추가되지 않습니다.

최신 HAAS 팁 및 기술을 확인해 보세요…

지금 가입하기!   

HAAS TOOLING ACCEPTS THE FOLLOWING:

  • 서비스 및 지원
  • 소유자
  • 서비스 요청
  • 조작자 설명서
  • Haas 부품
  • 로터리 수리 요청
  • 사전 설치 가이드
  • 공구 쇼핑
  • Haas 신규 제품 제작 및 가격
  • 사용 가능한 재고
  • Haas 가격 목록
  • CNCA 파이낸싱
  • Haas 소개
  • DNSH 문
  • 채용
  • 인증 및 안전
  • 연락처
  • 이력
  • 이용약관
  • Haas Tooling 이용 약관
  • 개인정보 보호
  • 보증
  • Haas 커뮤니티
  • Haas 인증 프로그램
  • Haas Motorsports
  • Gene Haas 재단
  • Haas 기술 교육 커뮤니티
  • 이벤트
  • SNS 참여
  • Facebook
  • X
  • Flickr
  • YouTube
  • LinkedIn
  • Instagram
  • TikTok
© 2025 Haas Automation Inc. - CNC 공작 기계

This site is protected by reCAPTCHA and the Google Privacy Policy and Terms of Service apply.

2800 Sturgis Rd., Oxnard, CA 93030 / Toll Free: 800-331-6746
Phone: 805-278-1800 / Fax: 805-278-2255