MyHaas Välkommen
!
Haas Tooling Gästorderhistorik MyHaas/HaasConnect Logga in Registrera Haas Tooling Mitt konto Order History Return History MyHaas/HaasConnect Logga ut Välkommen Mina maskiner Senaste aktivitet Mina offerter Mitt konto Mina användare Logga ut
Hitta din återförsäljare
  1. Välj språk
    1. English
    2. Deutsch
    3. Español - España
    4. Español - México
    5. Français
    6. Italiano
    7. Português
    8. Český
    9. Dansk
    10. Nederlands
    11. Magyar
    12. Polski
    13. Svenska
    14. Постсоветский
    15. Türkçe
    16. 中文
    17. Suomi
    18. Norsk
    19. الإنجليزية
    20. български
    21. Hrvatski
    22. Ελληνικά
    23. Română
    24. Slovenský
    25. Slovenščina
    26. 한국어
    27. 日本語
Search
  • maskiner Main Menu
    • Haas VMT-serien VMT-serien
      VMT-serien
      VMT-serien View All
      • VMT-serien
      • VF-serien
      • UMC-serien
      • VR-serien
      • VMC med palettväxlare
      • Minimill
      • VM-serien
      • Drill/Tap/Mill-serien
      • Toolroom-serien
      • Compact Mill
      • Portalfräsar
      • VS-serien
      • Desktop Mill
      • Styrsimulator
      • Portalrobot för fräs
      • Kompakt portalrobot
    • Product Image Fleraxlade lösningar
      Fleraxlade lösningar
      Fleraxlade lösningar View All
      • Fleraxlade lösningar
      • Svarvar med Y-axel
      • 5-axlig fräs
    • Haas-svarvar Svarvar
      Svarvar
      Svarvar View All
      • Svarvar
      • ST-serien
      • Dubbla spindlar
      • Toolroom-svarvar
      • CL-serien
      • Haas stångmagasin V2
      • Portalrobot för svarv
    • Haas horisontalfräsar Horisontalfräsar
      Horisontalfräsar
      Horisontalfräsar View All
      • Horisontalfräsar
      • Horisontella fleroperationsmaskiner/ 50-kona
      • Horisontella fleroperationsmaskiner/ 40-kona
    • Haas rundmatningsbord och indexerare Rundmatningsbord och indexerare
      Rundmatningsbord och indexerare
      Rundmatningsbord och indexerare View All
      • Rundmatningsbord och indexerare
      • Rundmatningsbord
      • Indexerare
      • 5-axliga rundmatande produkter
      • Extra stora rundmatningsbord
    • Product Image Automatiseringssystem
      Automatiseringssystem
      Automatiseringssystem View All
      • Automatiseringssystem
      • Robotpaket
      • portalrobot för CNC-fräs
      • Palettpool
      • Haas stångmagasin
      • Models
    • SNABBLÄNKAR Specialserie  Specialserie 
      HAAS KARRIÄRMÖJLIGHETER HAAS KARRIÄRMÖJLIGHETER Bygg och prissätt BYGG-OCH-SE PRIS PRISLISTA PRISLISTA NYHETER NYHETER DIN FÖRSTA CNC-MASKIN DIN FÖRSTA CNC-MASKIN HAAS SIX PACK HAAS SIX PACK
      KÖPA VERKTYG
      • Bygg och prissätt en Haas
      • Prislista
      • Finns i lager
      • CNCA-finansiering
      VILL DU KOMMA I KONTAKT MED OSS?

      Din Haas-leverantör (HFO) kan besvara alla dina frågor och diskutera vilka lösningar som är bäst för dig.

      CONTACT YOUR DISTRIBUTOR >
  • Alternativ Main Menu
    • Product Image Spindlar
      Spindlar
      Spindlar View All
      • Spindlar
    • Product Image Verktygsväxlare
      Verktygsväxlare
      Verktygsväxlare View All
      • Verktygsväxlare
    • Product Image 4:e | 5:e-axlade
      4:e | 5:e-axlade
      4:e | 5:e-axlade View All
      • 4:e | 5:e-axlade
    • Product Image Revolvrar och roterande verktyg
      Revolvrar och roterande verktyg
      Revolvrar och roterande verktyg View All
      • Revolvrar och roterande verktyg
    • Product Image Sondering
      Sondering
      Sondering View All
      • Sondering
    • Haas – Hantering av spån och kylmedel Hantering av spån och kylmedel
      Hantering av spån och kylmedel
      Hantering av spån och kylmedel View All
      • Hantering av spån och kylmedel
    • Haas styrsystem Haas styrsystem
      Haas styrsystem
      Haas styrsystem View All
      • Haas styrsystem
    • Product Image Produktalternativ
      Produktalternativ
      Produktalternativ View All
      • Produktalternativ
    • Product Image Verktyg och fixturtillbehör
      Verktyg och fixturtillbehör
      Verktyg och fixturtillbehör View All
      • Verktyg och fixturtillbehör
    • Product Image Uppspänningsanordning
      Uppspänningsanordning
      Uppspänningsanordning View All
      • Uppspänningsanordning
    • Product Image 5-axliga lösningar
      5-axliga lösningar
      5-axliga lösningar View All
      • 5-axliga lösningar
      • 5 Easy Steps to 5-Axis
    • Product Image Automatisering
      Automatisering
      Automatisering View All
      • Automatisering
    • SNABBLÄNKAR Specialserie  Specialserie 
      HAAS KARRIÄRMÖJLIGHETER HAAS KARRIÄRMÖJLIGHETER Bygg och prissätt BYGG-OCH-SE PRIS PRISLISTA PRISLISTA NYHETER NYHETER DIN FÖRSTA CNC-MASKIN DIN FÖRSTA CNC-MASKIN HAAS SIX PACK HAAS SIX PACK
      KÖPA VERKTYG
      • Bygg och prissätt en Haas
      • Prislista
      • Finns i lager
      • CNCA-finansiering
      VILL DU KOMMA I KONTAKT MED OSS?

      Din Haas-leverantör (HFO) kan besvara alla dina frågor och diskutera vilka lösningar som är bäst för dig.

      CONTACT YOUR DISTRIBUTOR >
  • Why Haas Main Menu
      Upptäck skillnaden med Haas
    • Varför Haas
    • MyHaas
    • Utbildningsgrupp
    • Industri 4.0
    • Haas-certifiering
    • Kundreferenser
  • Service Main Menu
      Välkommen till Haas Service
      SERVICEHEMSIDA Bruksanvisningar Så här går det till Felsökningsguider Förebyggande underhåll Haas-detaljer Haas-verktyg Video
  • Videor Main Menu
  • Kontakta oss

×

Sökresultat

Web Pages

Images

    • <
    • 1
    • >
MyHaas Välkommen
!
Haas Tooling Gästorderhistorik MyHaas/HaasConnect Logga in Registrera Haas Tooling Mitt konto Order History Return History MyHaas/HaasConnect Logga ut Välkommen Mina maskiner Senaste aktivitet Mina offerter Mitt konto Mina användare Logga ut
Hitta din återförsäljare
  1. Välj språk
    1. English
    2. Deutsch
    3. Español - España
    4. Español - México
    5. Français
    6. Italiano
    7. Português
    8. Český
    9. Dansk
    10. Nederlands
    11. Magyar
    12. Polski
    13. Svenska
    14. Постсоветский
    15. Türkçe
    16. 中文
    17. Suomi
    18. Norsk
    19. الإنجليزية
    20. български
    21. Hrvatski
    22. Ελληνικά
    23. Română
    24. Slovenský
    25. Slovenščina
    26. 한국어
    27. 日本語
Search
×

Sökresultat

Web Pages

Images

    • <
    • 1
    • >

UMC - Pallet Pool - Installation

Service startsida Instruktioner UMC - Pallet Pool - Installation

UMC - Pallet Pool - Installation

- Hoppa till avsnitt - Back to Top

3.4 UMC-1000 PP Version 1

Recently Updated Last updated: 08/04/2022

UMC-1000 Pallet Pool - Version 1 - Installation


Introduction

The following procedure will show you how to install a Pallet Pool on a UMC-1000 machine.

The Next Generation software on the machine must be version 100.19.000.1110 or higher.

The Pallet Pool option is currently not field installable.

Important: To ensure that the Pallet Pool does not become mis-aligned, it is recommended that the machine and Pallet Pool be anchored. Refer to the following link: Anchoring Instructions.

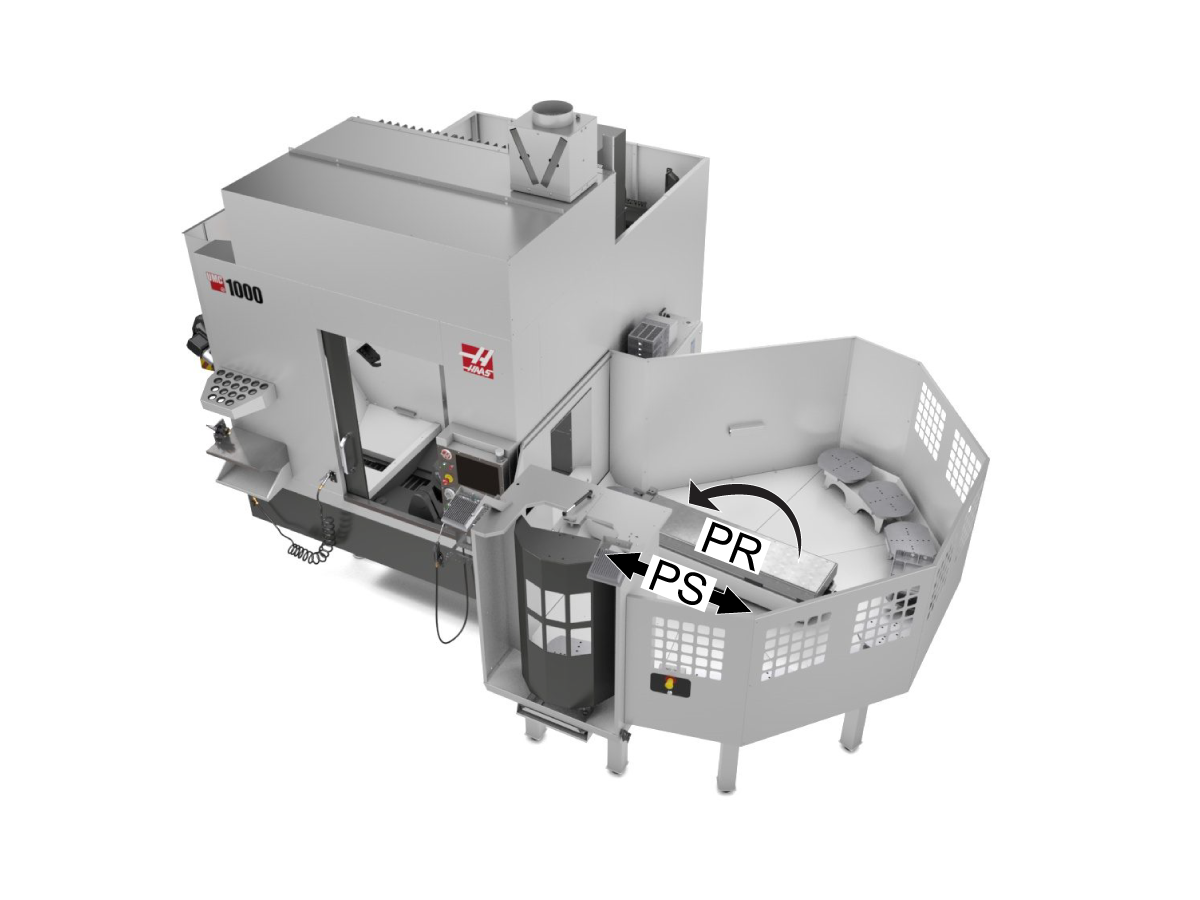
The Pallet Pool option has 8 pallet stations plus 1 pallet in the machine. A maximum of 9 pallets can be installed on a UMC-1000 with the Pallet Pool option.

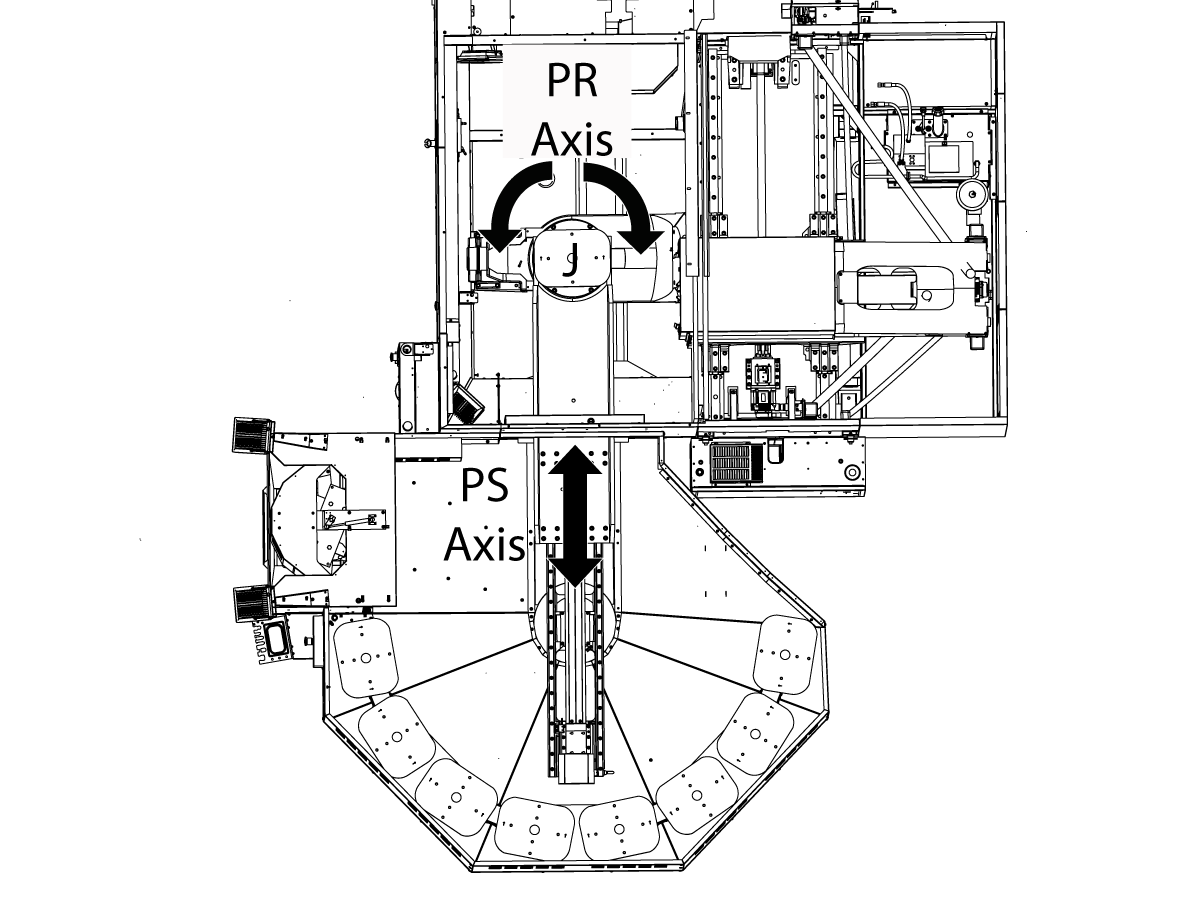
The Pallet Pool has 2 servo axes. The PR axis rotates the Pallet Pool ram and the PS axis extends and retracts the Pallet Pool ram to load/unload the pallets.

The UMC-1000 must be level before the Pallet Pool can be installed. Refer to the UMC-1000 Installation procedure.

To level the machine without the Pallet Pool connected to the machine, do the following: 

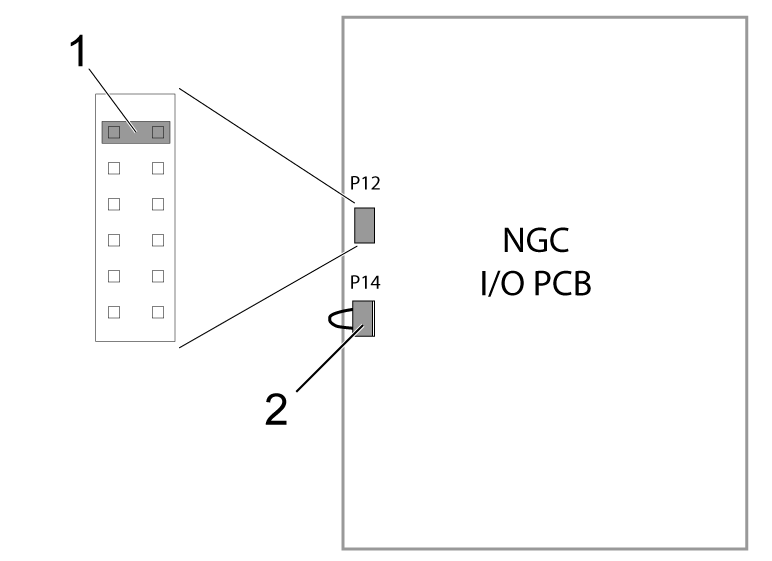
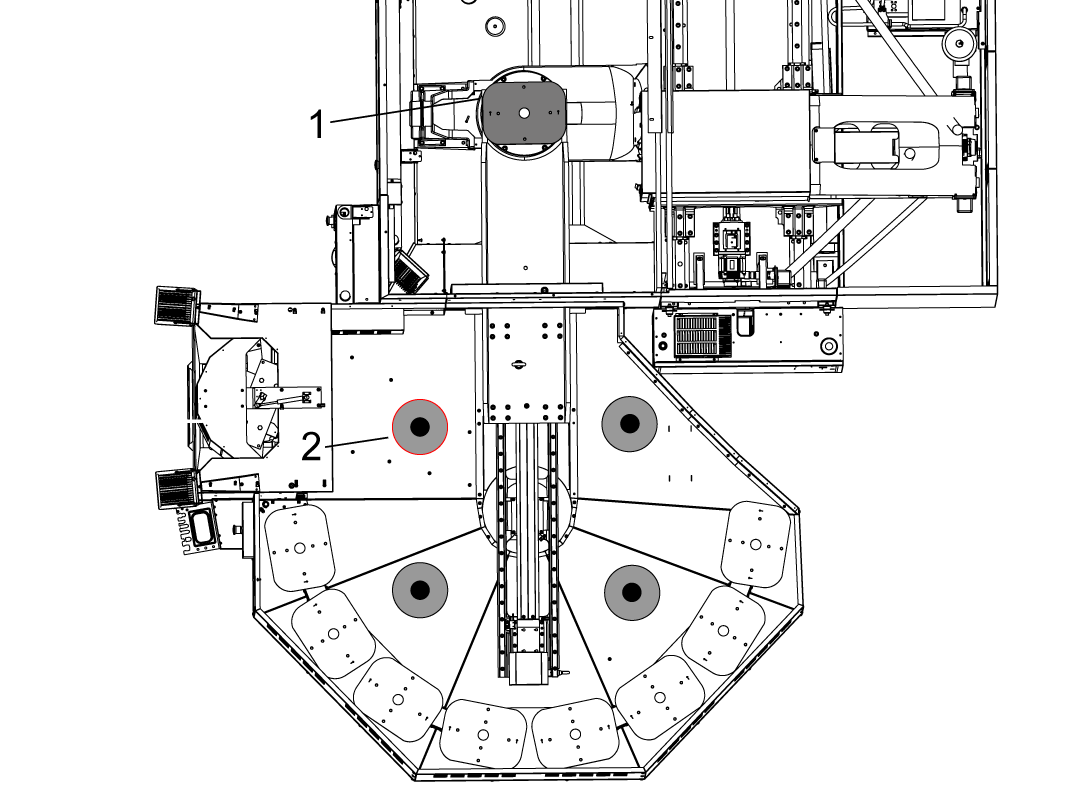
Make sure that there is a shorting block [1] installed on the top two pins of the P12 connector on the I/O PCB 

Make sure there is a jumper (P/N 33-0527) [2] connected to I/O PCB at P14.
 Note: These jumpers are needed to operate the machine without the Pallet Pool.

Disable the pallet pool, change setting 382 Disable Pallet Changer to Pallet Pool.


Note: The above step will disabled the Pallet Pool to allow you to zero return the machine so it can be leveled.

Refer to the UMC-1000 Installation procedure.

Leveling Screws Hardware

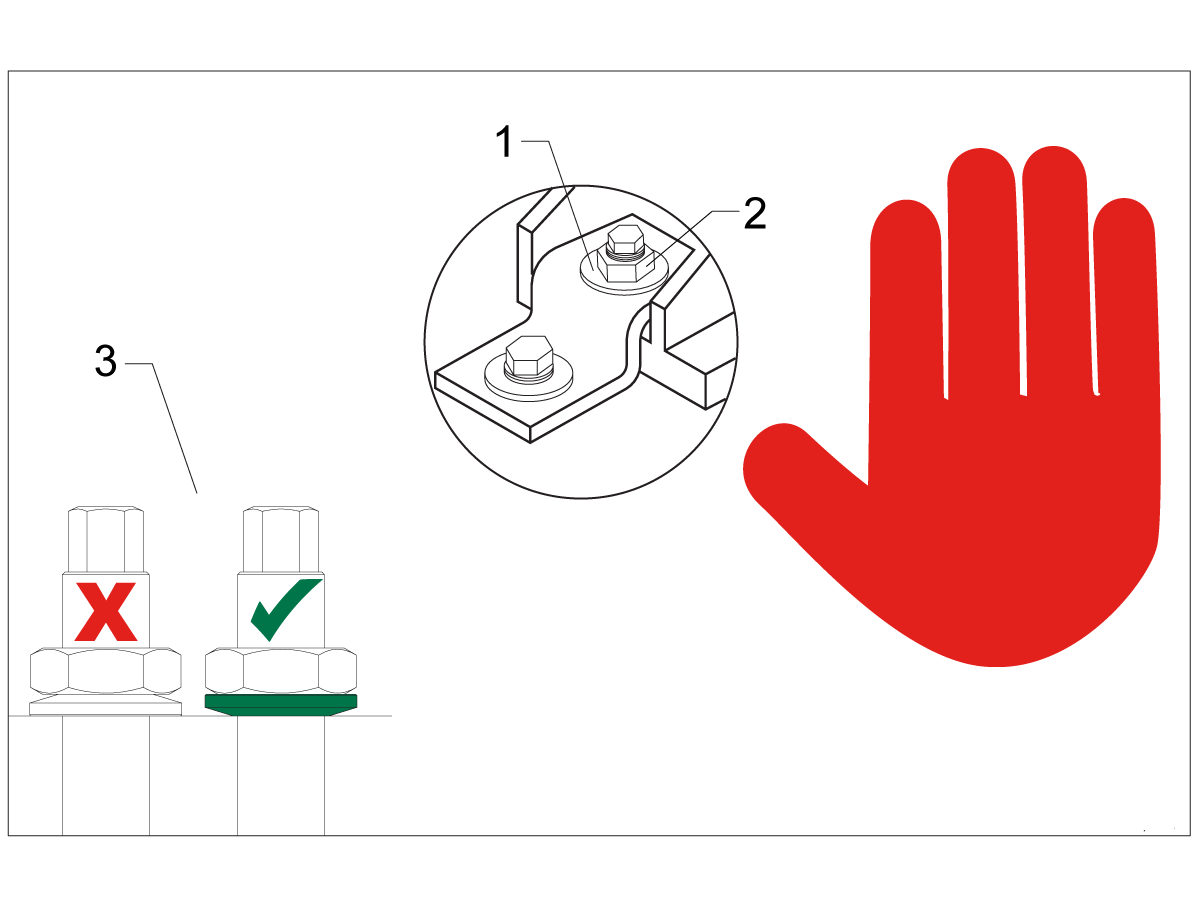
Note: The washers [1] and nuts [2] are installed during shipping and should be saved for installation and not be discarded.

Note: The washer orientation [3] is important.  The conical part of the washer should be against the casting,  see illustration.

Pallet Pool - Remove Shipping Brackets


1

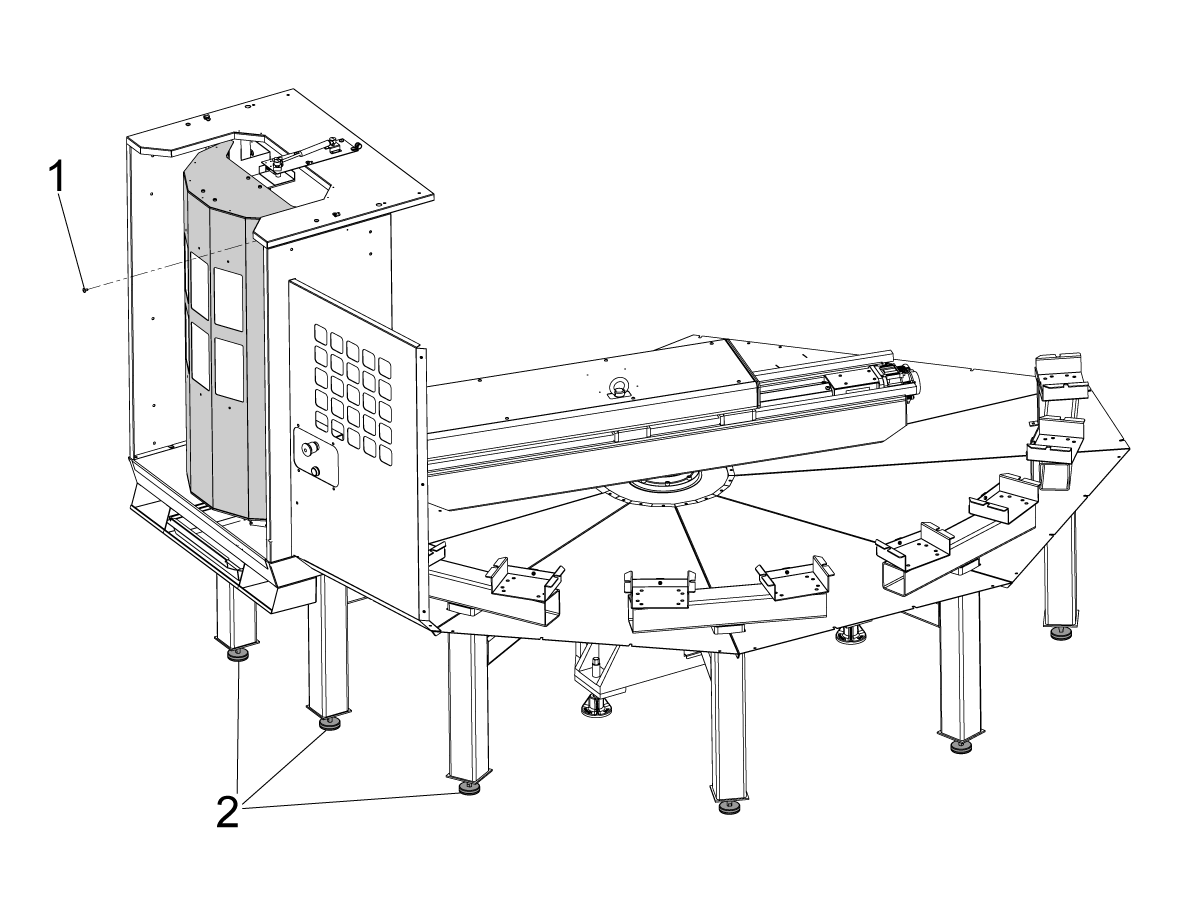
Remove the loading station door blocking bolt [1].

Make sure to raise all of the pallet shelf supporting screws [2] before placing the pallet pool on the floor. 

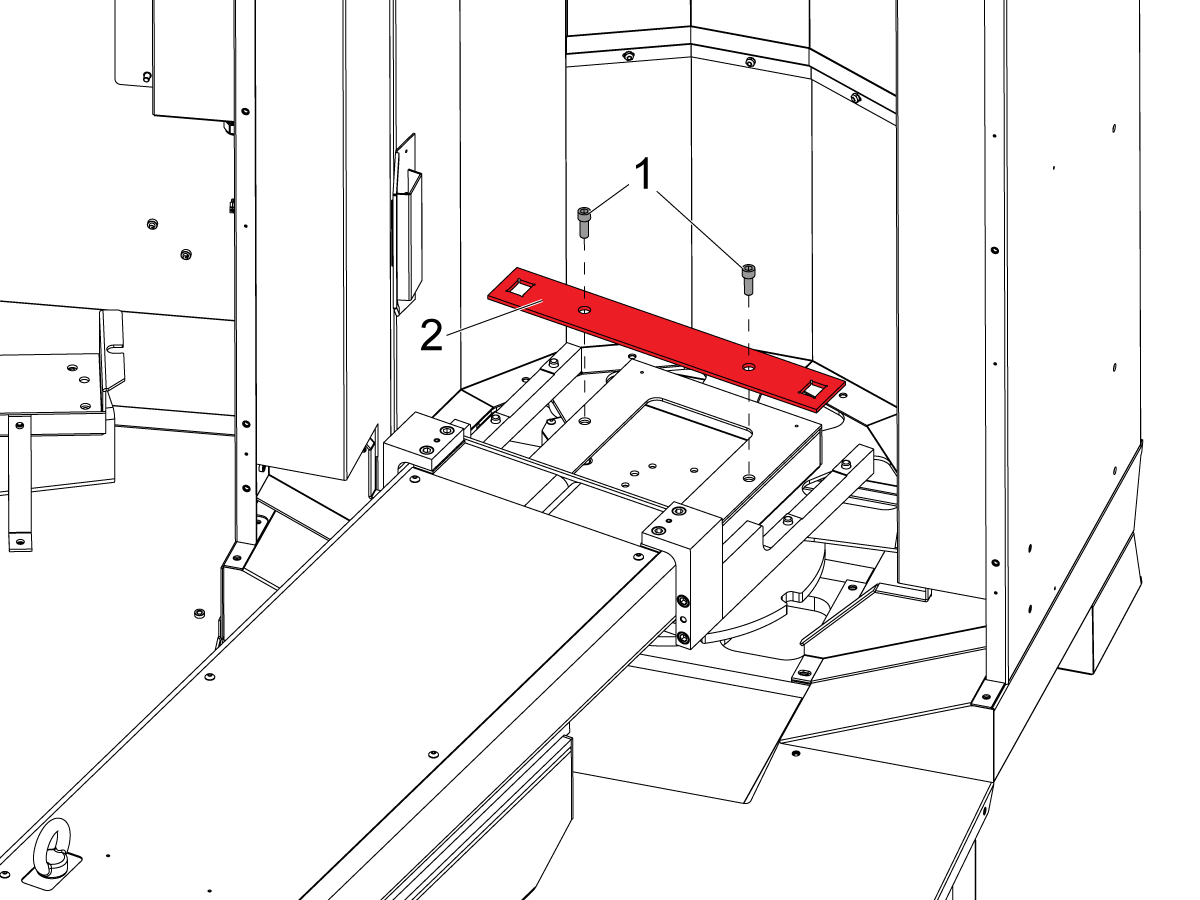
2

Remove the bolts [1] that secure the Pallet Pool shipping bracket [2].

Remove the shipping bracket [2].


Pallet Pool - Placement

1

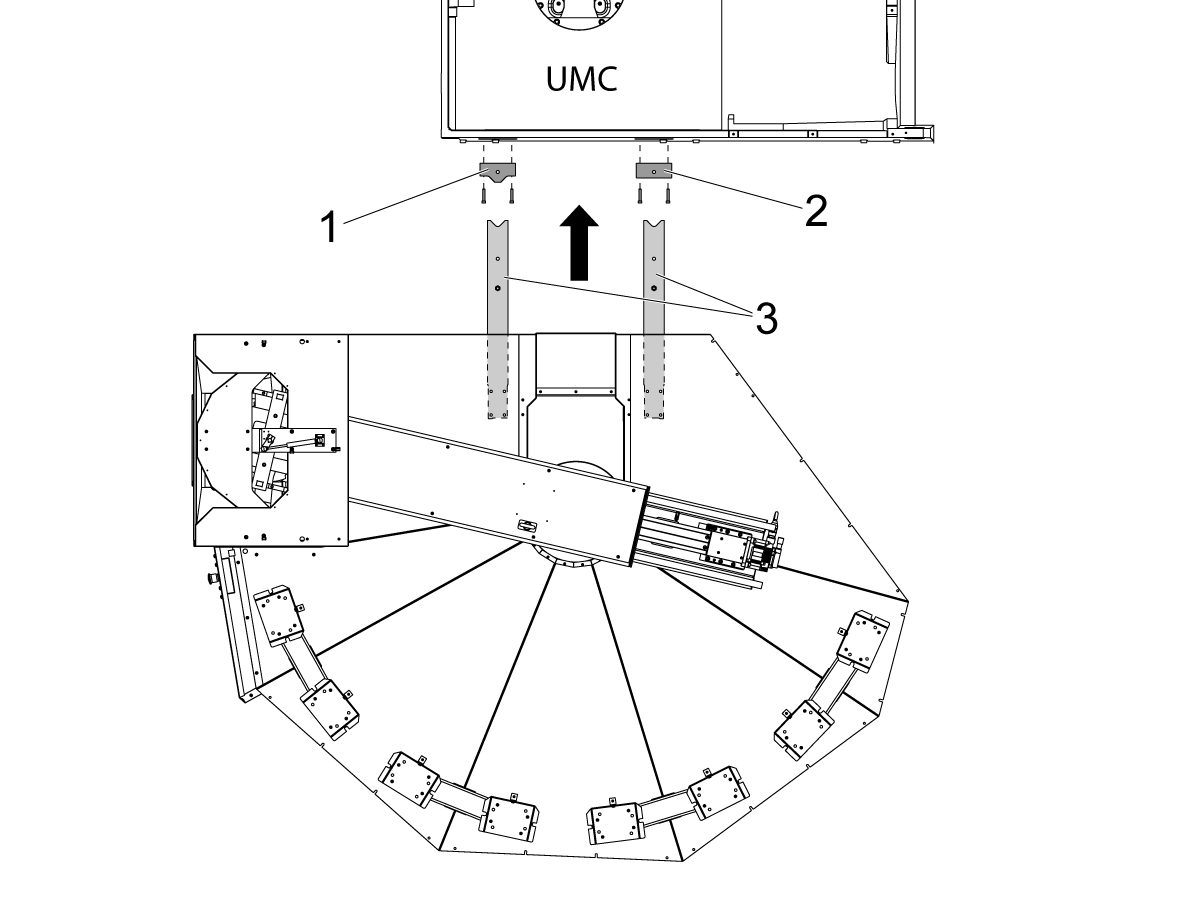
Install the Pallet Pool alignment blocks onto the host machine's base.

Note: The alignment block with the radius [1] must be installed towards the front of the UMC and the alignment block with the flat side [2] must be installed towards the rear of the machine.

Install the alignment bars [3] onto the pallet pool base.

Use the forklift or the pallet jack to place the pallet pool on the right side of the host machine.

Move the pallet pool assembly so the alignment arms are 3 - 6” (76 - 152 mm) away from the alignment blocks. 

Install the leveling pads under the pallet pool and lower the pallet pool. 

2

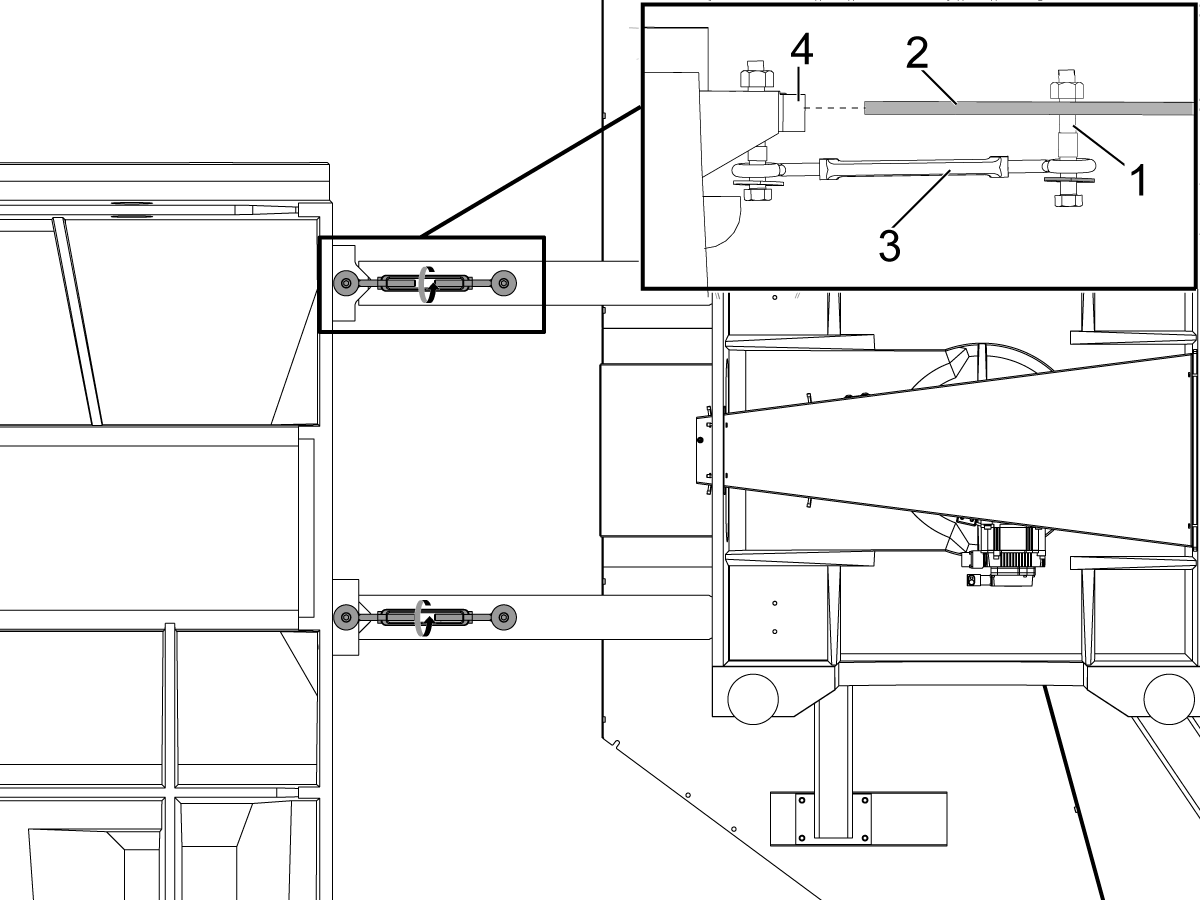
Install the turnbuckles [3] with the provided hardware (SHCS, washer, and bushings [1]) onto the alignment arms [2] and the base casting [4].

Evenly tighten the turnbuckles until the alignment arms mate with the alignment blocks.

UMC - Version 1 Pallet Pool HPU - Installation

1

If the pallet pool has the HPU located under the pallet pool itself, skip to the UMC- Version 2 Pallet Pool HPU - Installation section.

2

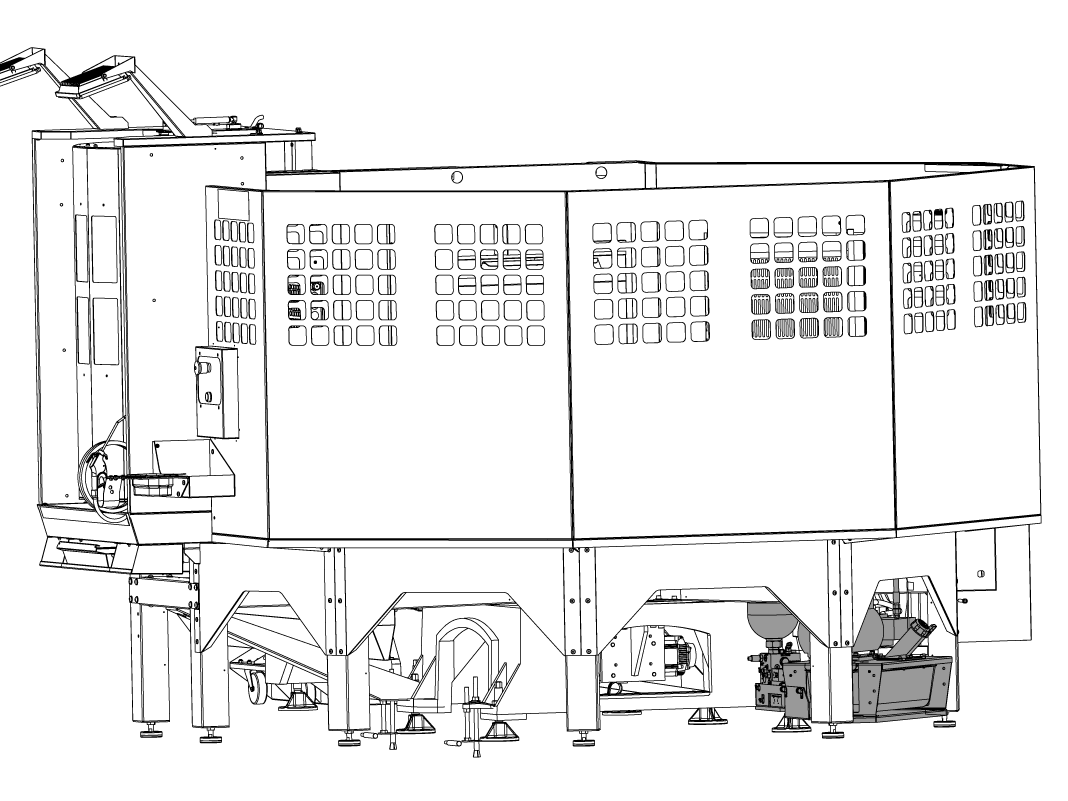
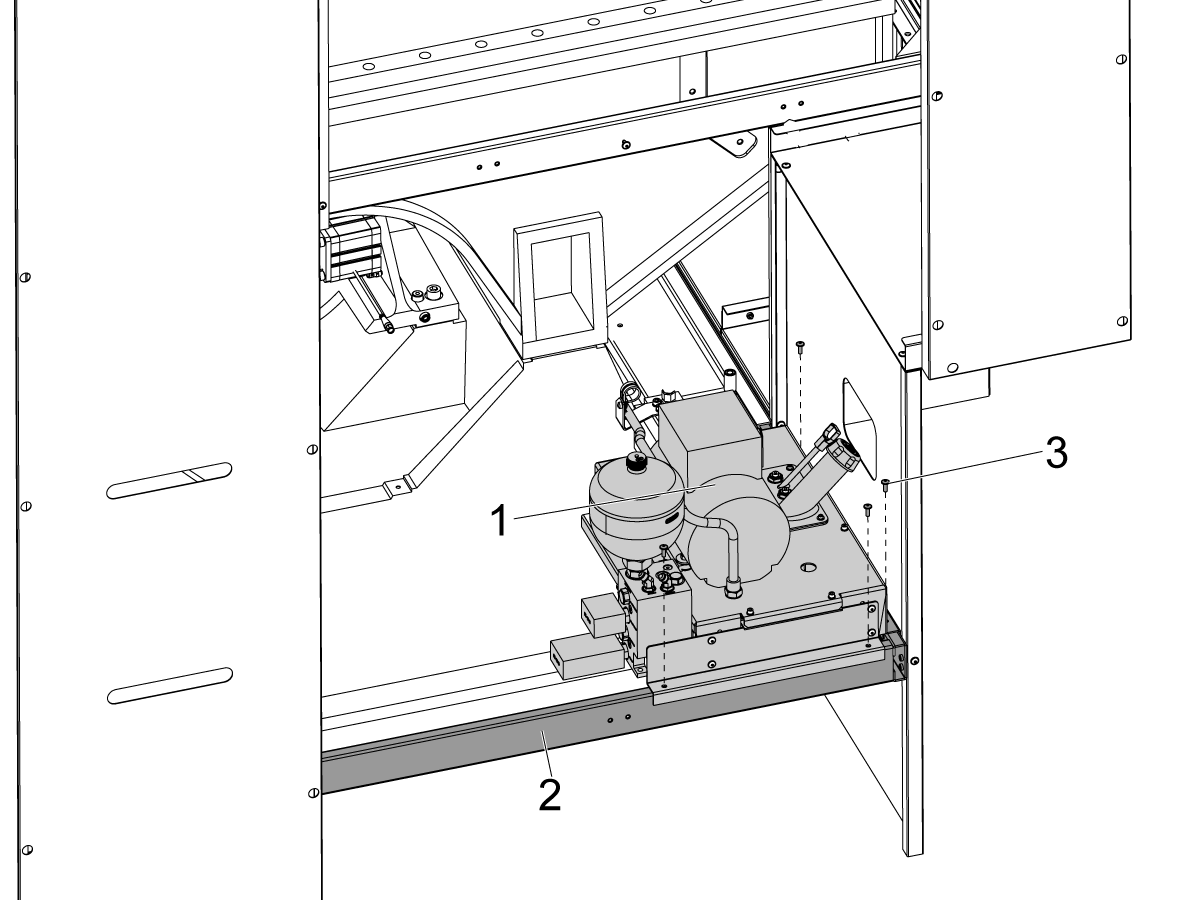
Install the HPU assembly [1] on top of the rear enclosure frame [2].

Install the HPU mounting bolts [3].

3

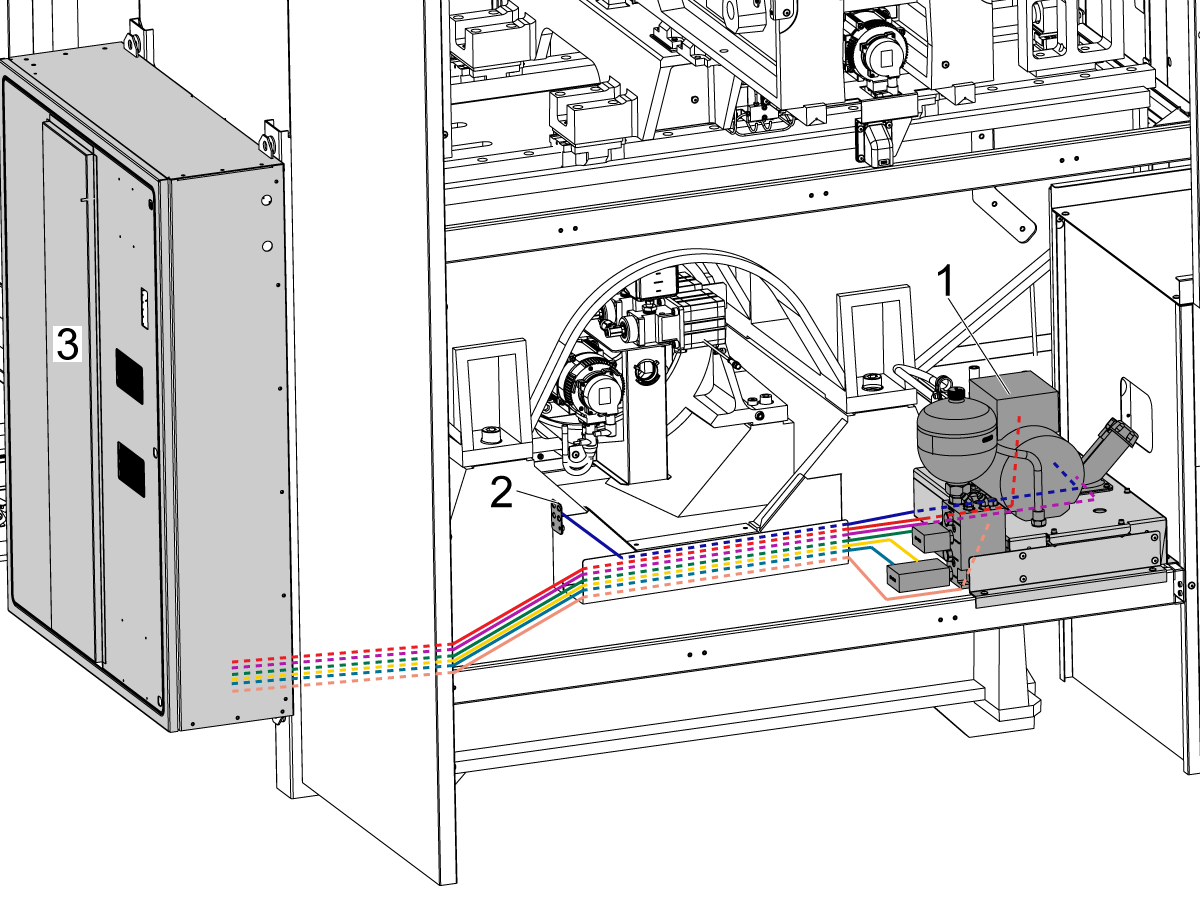
Wire the HPU.

  • Route the hydraulic pressure sensor cable from the control cabinet to the HPU and connect the hydraulic pressure sensor on the back of the HPU manifold.
  • Route the Pallet Pool lift and lower solenoid cables from the control cabinet to the HPU and connect it to the coils on the Pallet Pool Lift/Lower solenoid that is located on the side of the HPU manifold. Note: Connect the Pallet Pool Lift cable to the outer coil and the Pallet Pool Lower cable to the inner coil.
  • Route the Pallet Clamp solenoid cable from the control cabinet to the HPU and connect it to the coil on the Pallet Clamp/Unclamp solenoid. 
  • Route the HPU power cable from the HPU to the control cabinet and connect it to the P1 on the TMD PCB.
  • Route the HPU Oil Temperature sensor cable from the HPU to the control cabinet and connect it to the P46 on the SIO PCB.
  • Route the HPU Oil Level Sensor cable from the HPU to the connector bracket [2] and connect it to the HPU Oil Level sensor plug.  

4

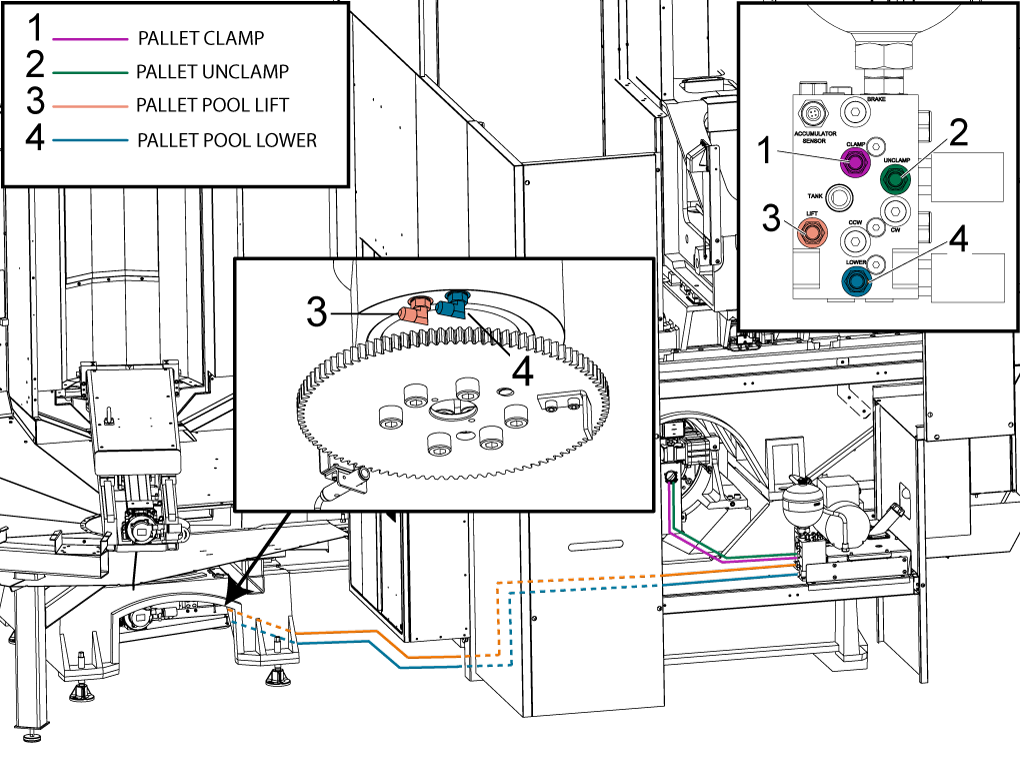
Route the Pallet Clamp [1] and the Pallet Unclamp [2] hydraulic lines from the back of the B anc C axes assembly to the HPU manifold and connect to the corresponding ports.

Route the Pallet Pool Lift [3] and Pallet Pool Lower [4] hydraulic lines from the pallet pool to the HPU manifold and connect to the corresponding ports. 

NOTE: The lower port is the hole closes to the edge of the lift/lower cylinder.  

UMC - Pallet Pool - Electrical Connections

1

The following procedure will show you how to connect the electrical connections to the UMC-1000.


 Note: The PR (Pallet Rotate) and PS (Pallet Slide) amps are already installed at the factory.

Turn [OFF] the main circuit breaker and wait until the Vector Drive High-Voltage light turns off.

Knock out the pre-cut access panel [1].
Route the pallet pool cables [2] into the control cabinet as shown in the illustration.
Connect the PR motor encoder cable to Maincon PCB channel 15
Connect the PS motor encoder cable to Maincon PCB channel 16.
Connect the PR motor power cable to the amplifier labeled PR. Install the ferrite filter bead on the motor power cable.

Connect the PS motor power cable to the amplifier labeled PS. Install the ferrite filter bead on the motor power cable.

2

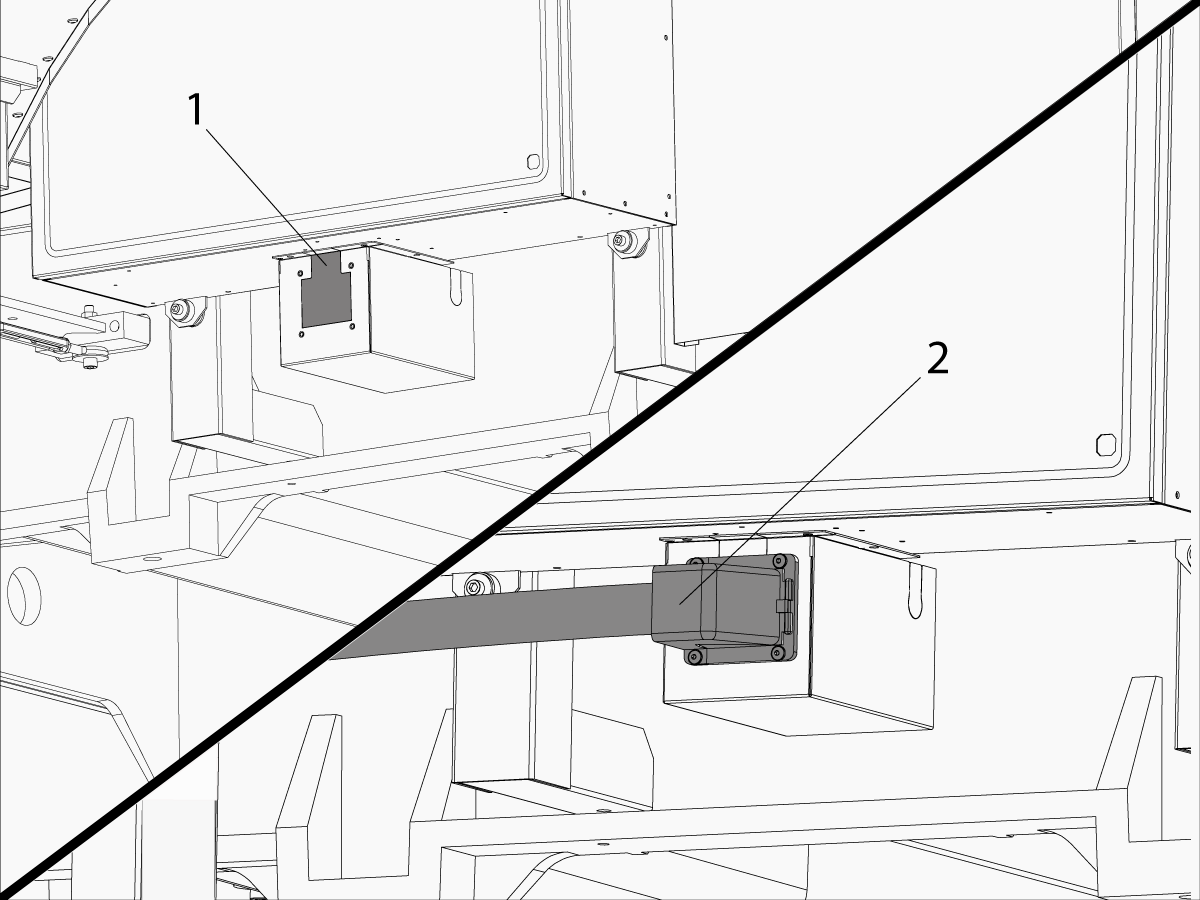
Remove the shorting block from the P12 connector on the I/O PCB.

Route the aux front panel cable (P/N 33-0424A) [1] from the Pallet Pool and connect it to the P12 on the I/O PCB.

Remove jumper (P/N 33-0527) [2] from I/O PCB at P14. Route the Pallet Pool status cable (P/N 33-0427) from the Pallet Pool and connect it to the I/O PCB at P14 [3].

Connect pallet alarm cable [4] (P/N 33-0482) to the I/O PCB at P50.
Make sure all the Pallet Pool status bracket connectors are plugged into the correct location.

 NOTE: Store the Pallet Pool jumpers in a safe location, these will be used by the service personnel to move or service the machine.

Enable Pallet Pool

Do the following to enable the pallet pool option on a UMC-1000.  

Important:  You will need to do this step if you perform a option 5 clean install option on a UMC-1000 with a pallet pool.

Set setting 382 Disable Pallet Changer to None.

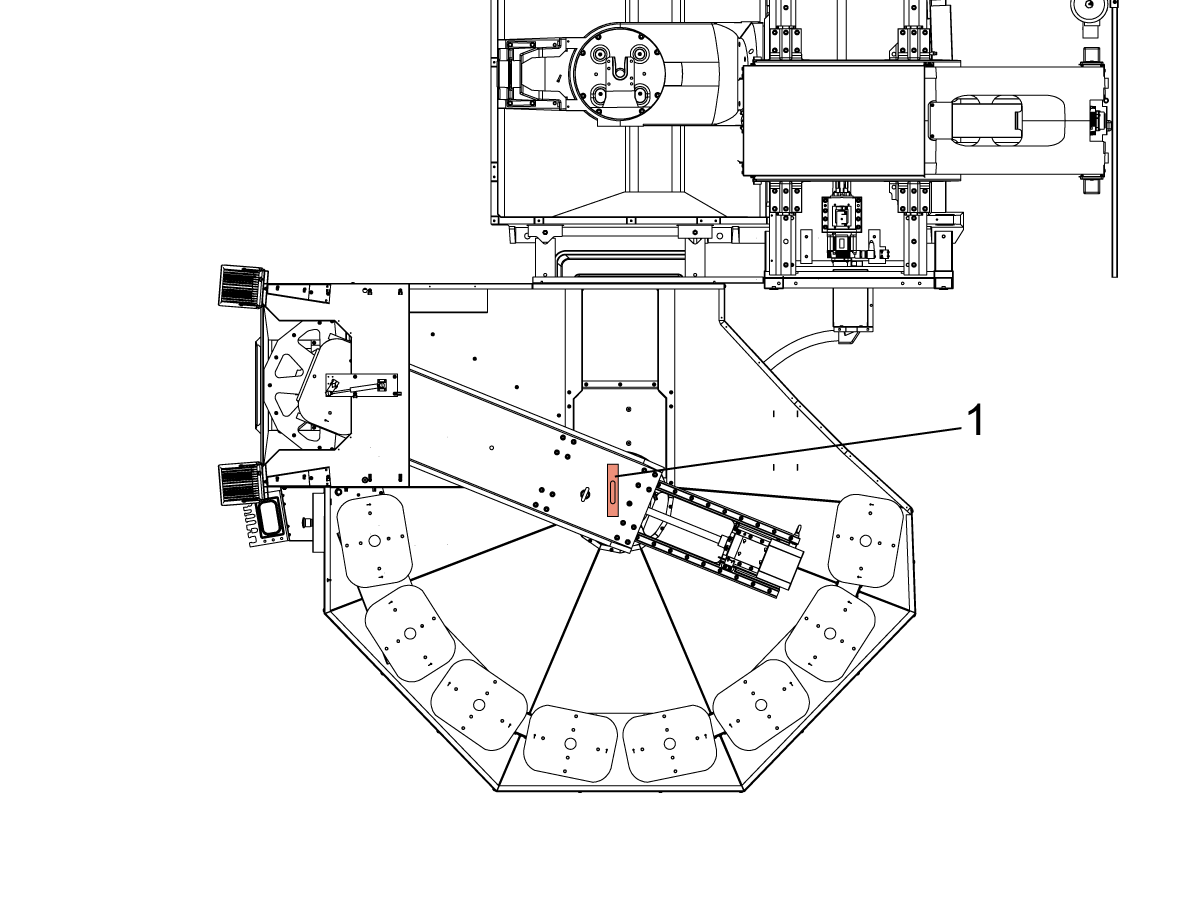
Find the Haas Pallet Pool Parameters decal on the E-Stop on the Pallet Pool machine.  Write down the values.

Use the USB Service key to go into Service Mode.

Press [DIAGNOSTIC] Go to the PARAMETERS> Factory setting tab.

Set the following factory settings values:

  • 15.004 [:] PR-Axis Disable = False
  • 16.004 [16:3] PS-Axis Disabled = False
  • 16.078 PS-Axis Tool Change Offset = Use the decal value.
  • 15.078 PR-Axis Tool Change Offset = Use the decal value.15.140 PR-Axis Grid Offset = Use the decal value.
  • 16.140 PS-Axis Grid Offset = Use the decal value.
    • Zero Return after the grid offset is adjusted
  • 2128 [:] Pallet Pool Type = HPU Lift

Assigning Missing Pallets on Scheduler

1

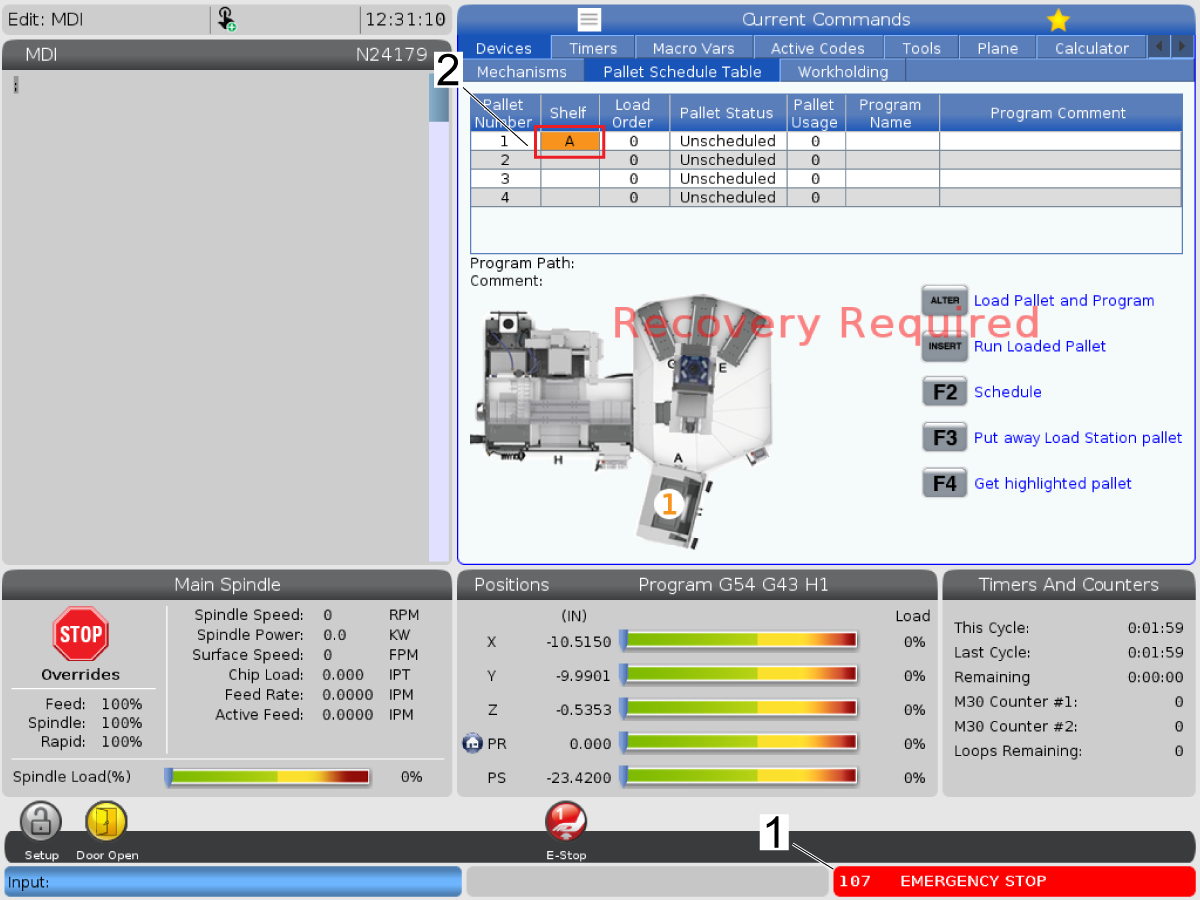
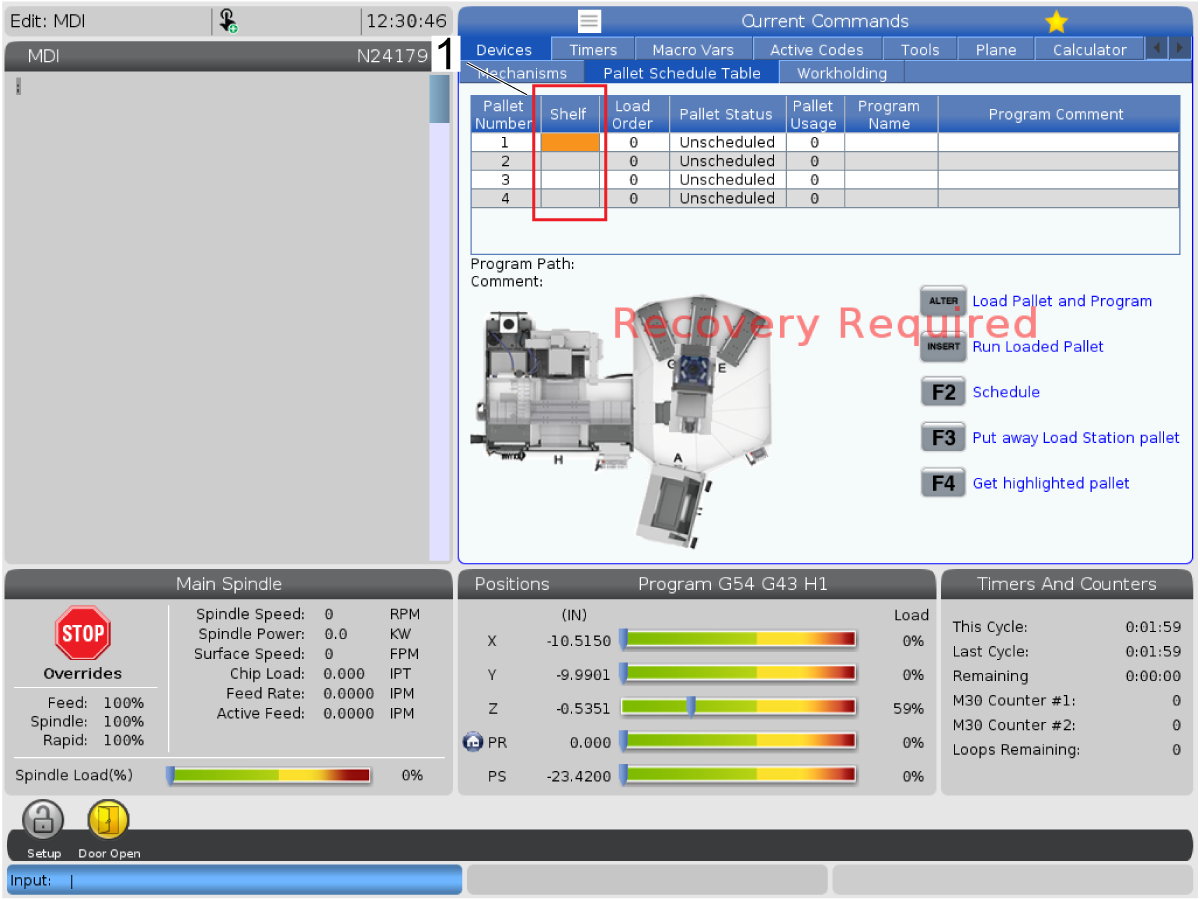
It is a possible to enter a condition where the shelves in the pallet scheduling page are not assigned [1]. This will not allow the PR and PS to zero return or recover the machine. 

This section will explain how to assign the missing shelves, if your machine is not in this condition please skip to the next section. 

First, press [CURRENT COMMANDS] and navigate to the Pallet Schedule Table tab.

NOTE: The VF-2SSYT 3 Station Pallet Pool was used to create the images, but the same process will apply for all pallet pool machines. 

2

Press [EMERGENCY STOP] [1] and highlight the shelf tab on pallet number one.

With [EMERGENCY STOP] pressed, type the letter A and press [ENTER]. This will assign shelf A to pallet number 1 [2].

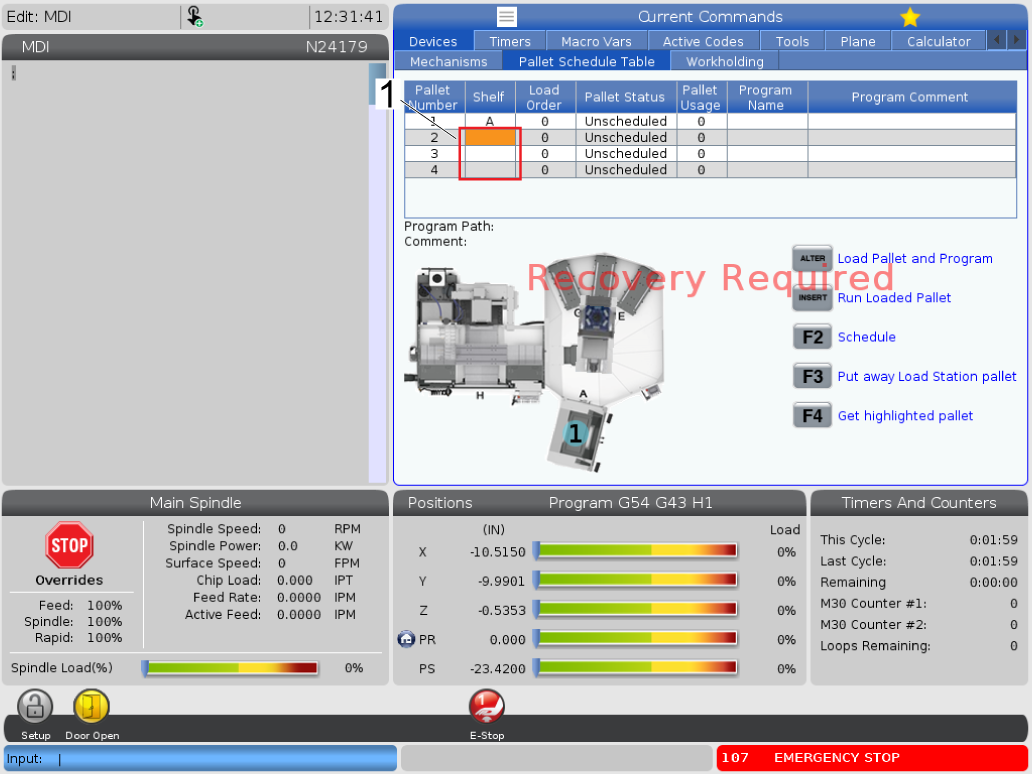
3

Repeat the previous step for the remaining pallet numbers in alphabetical number [1].

NOTE: The shelves can be re-assigned at any point  however the user chooses by repeating the same process (e.g. pallet number 3 can be assigned shelf B).


UMC - Pallet Pool - Leveling and Alignment

1

Use a bubble level [1] to roughly level the pallet pool before making any pallet changes. Steps 5 and 6 cover leveling in more detail.

2

Insert the Service Key USB and put the machine in Service Mode.

Make sure there are no obstructions inside the machine or inside the pallet pool area. Pull out all the [E-STOPS] and [RESET] the alarms.

Type [PS], press [ZERO RETURN] and press [SINGLE]. The machine will zero return PS-axis.

Type [PR], press [ZERO RETURN], and press [SINGLE]. The machine will zero return PR-axis.

Press [ZERO RETURN] and then press [ALL]. The machine will zero return all the axes.

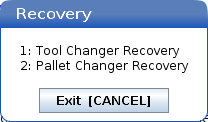
Once all the axis are zero returned press [RECOVER]. A pop up box will appear, select [2] for Pallet Changer Recovery.

3

The Pallet Changer Recovery screen shows the Pallet Pool Status. Make sure the Pallet Lifter is Down [1]. If not press [ALTER] to bring the Pallet Lifter down.

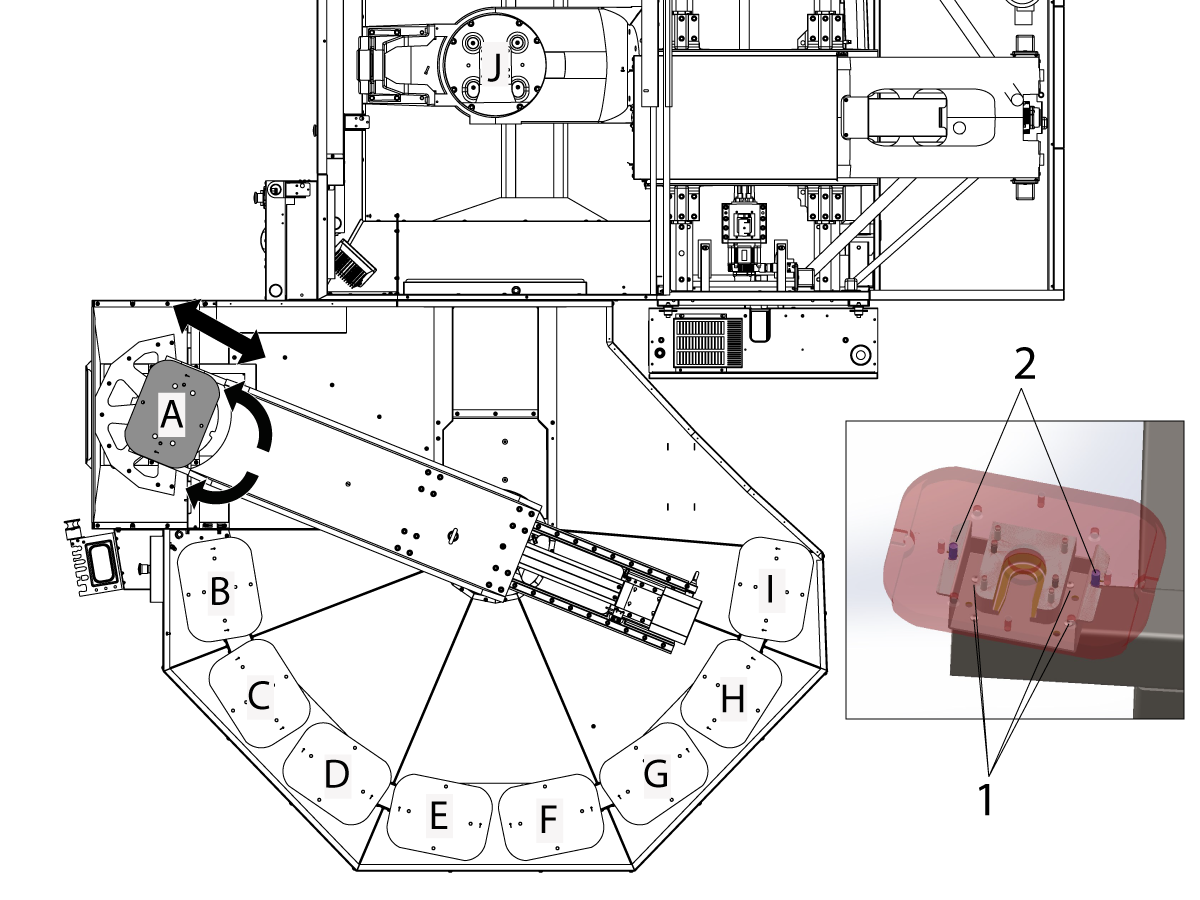
Press [J] and then the [DELETE] button. This will rotate the pallet lifter towards station J.


4

Adjust the pallet pool slider by jogging the PS or PR axis so the forks align correctly underneath the pallet. This can be done by pressing [+Z] for Pallet Slide Axis and pressing [-Z] for Pallet Rotate Axis on the pallet recovery page.

With the RAM extended and the pallet over the Pallet Receiver adjust the C axis so the pins on the receiver line up with the holes on the pallet. Raise and lower the pallet using the [ALTER] on the Pallet Recovery Page until the pallet falls smoothly onto the dowels on the receiver. Record the C-axis position in Parameter 7.310.

NOTE: This is the position that the C-axis will rotate to during a pallet change operation.

Go to Factory Settings 2136 [:] Shelf J Slide Offset and 2146 [:] Shelf J Rotary Offset, and make sure the values match the PS and PR axis position, if they do not update the values.

NOTE: You can use the provided gap gauge 25-14354 as a straight edge to verify the side is flush with the end of the pallet. 

5

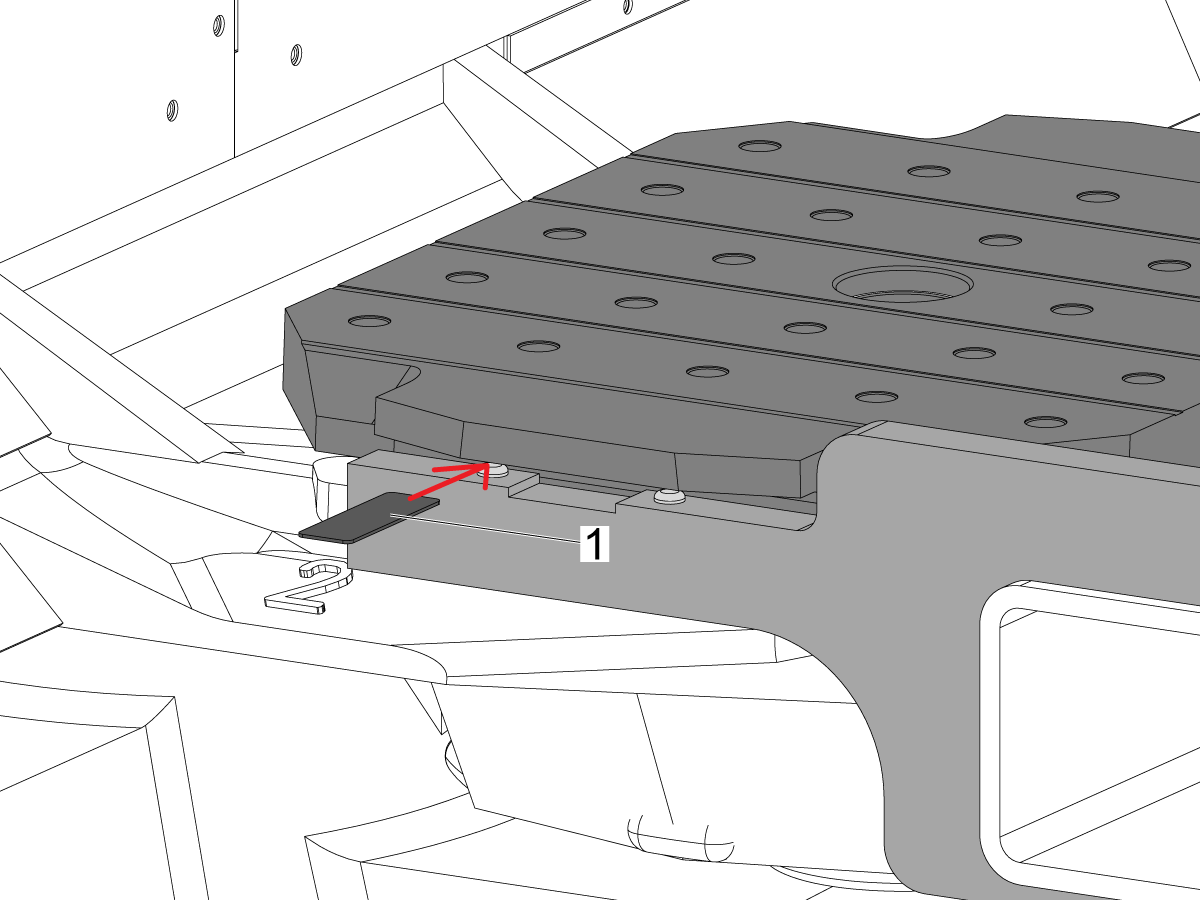
With the Pallet Pool in the down position, use the Gap Gauge [1] 25-14354 to set the gap by adjusting the height of the Pallet Pool.  See step 6 for more details on how to adjust the height. 

The Distance between the pins on the forks and the bottom of the Pallet surface should be the thickness of the Gap Gauge (.054") at all 4 pins, to set the gap the leveling screws will need to be adjusted.  See step 6 for more details on how to adjust the gap. 

6

The gap gauge must be touching the pins and the bottom of the pallet [1].

To do so adjust the leveling screws [2] that correlated to the pin in the same position.

For example when setting the gap of the top left pin (using the same image orientation) adjust the top left leveling screw. Continue adjusting the leveling screws in the same fashion to adjust the gap for each pin.

7

Lower the support feet until they touch the ground. 

The pallet lifter should be raised. 

Press the [INSERT] button to return the slide home.

Press the letter [A] and then [DELETE] button. This will rotate the pallet lifter to the A station.

Select the pallet slide axis use the RJH slowly jog the PS axis towards the A station.

Verify that the Pallet Pool will pick up and drop off the pallet at the A station.

Test the pick up / drop off operation on the remaining stations by using the pallet pool recovery functions. 

NOTE: If the station tray has been adjusted and it sounds like the pallet is sliding into the pin holes, adjust the feet to make sure it falls into place smoothly

Install the anchors.

Install the Pallet Pool guard panels.

Go to the Pallet Schedule Table and press [F3] to put away the pallet from the load station. 

Load the remaining pallets using the load station.

8

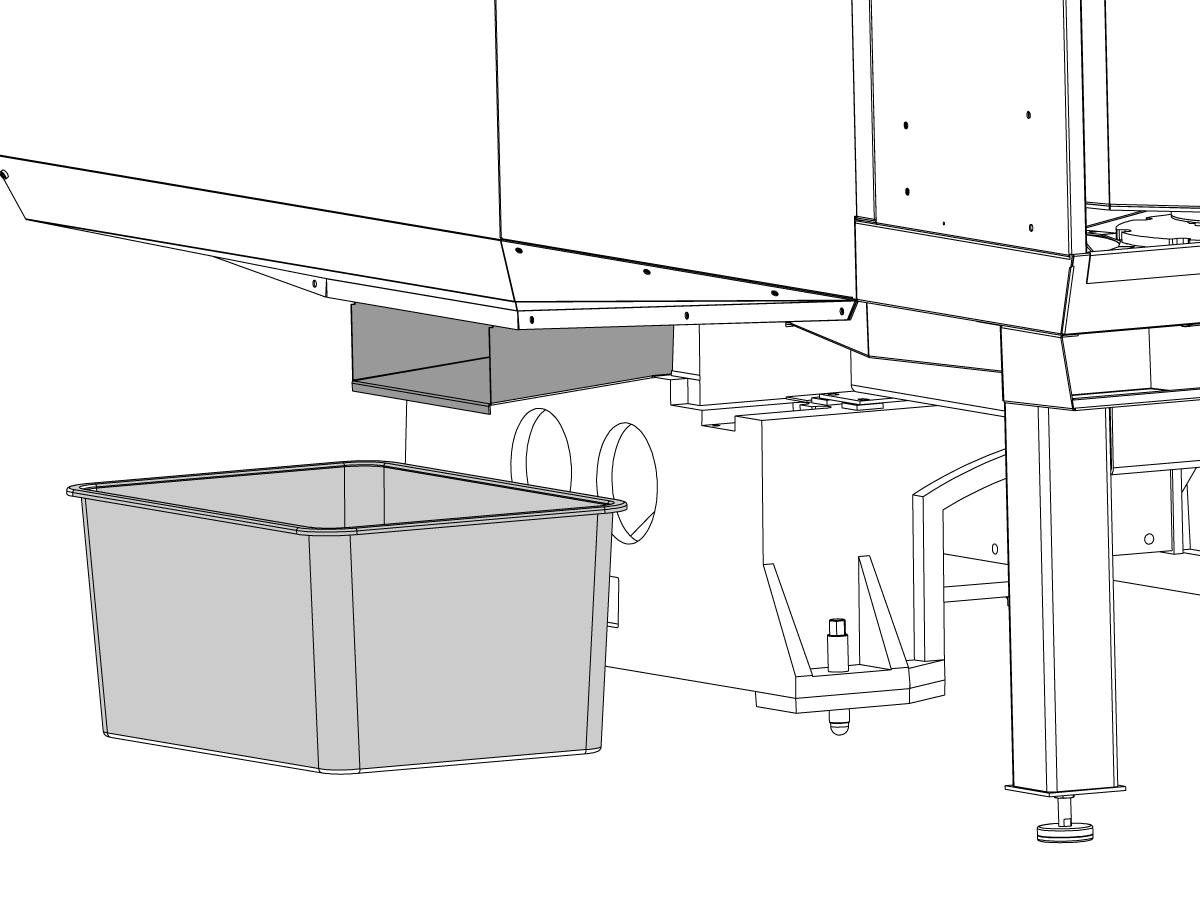
Place the provided tote under the Pallet Pool coolant discharge tray to catch the coolant that drains from the pallets.

Empty the tote as needed. 

HITTA EN ÅTERFÖRSÄLJARE
Feedback
Haas Logo

美元价格不包括关税、报关费用、保险费、增值税及运费。
USD prices DO NOT include customs duty, customs fees, insurance, VAT, or freight.

人民币价格包含关税、报关费用、货运保险和增值税, 但不包括运费。
CNY prices include customs duty, customs fees, insurance, and VAT. DOES NOT include freight.

Haas pris inkl. frakt

I detta pris ingår frakt, export- och tullavgifter, försäkring och övriga kostnader som uppstår för leverans till överenskommen plats. Inga övriga obligatoriska kostnader kan läggas till för leverans av Haas CNC-produkt.

HÅLL DIG UPPDATERAD OM TIPS OCH TEKNIK FRÅN HAAS ...

Anmäl dig nu!   

HAAS TOOLING ACCEPTS THE FOLLOWING:

  • Service och support
  • Ägare
  • Serviceförfrågan
  • Bruksanvisning
  • Haas-detaljer
  • Reparationsförfrågan, rundmatningsbord
  • Förinstallationsguider
  • Hitta rätt verktyg
  • Bygg och prissätt en ny Haas
  • Finns i lager
  • Haas prislista
  • CNCA-finansiering
  • Om Haas
  • Karriär
  • Certifieringar och säkerhet
  • Kontakta oss
  • Historik
  • Villkor och bestämmelser
  • Villkor och bestämmelser för Haas verktyg
  • Integritet
  • Garanti
  • Haas nätverk
  • Haas certifieringsprogram
  • Haas Motorsports
  • Gene Haas Foundation
  • Haas gemenskap för teknisk utbildning
  • Evenemang
  • Delta i samtalet
  • Facebook
  • Twitter
  • Flickr
  • YouTube
  • LinkedIn
  • Instagram
  • TikTok
© 2023 Haas Automation, Inc – CNC-verktygsmaskiner

This site is protected by reCAPTCHA and the Google Privacy Policy and Terms of Service apply.


2800 Sturgis Rd., Oxnard, CA 93030 / Toll Free: 800-331-6746
Phone: 805-278-1800 / Fax: 805-278-2255

Meddelande om kakor

Vi använder webbkakor för att förbättra webbplatsens funktionalitet för dig. Vårt meddelande om webbkakor beskriver vilka kakor vi använder, varför vi använder dem och hur du hittar mer information om dem. Vänligen bekräfta ditt medgivande av att vi använder analyskakor. Om du inte medger det kan du fortfarande använda webbplatsen men med begränsad funktionalitet.

Hantera inställningar

Meddelande om kakor

Vi använder webbkakor för att förbättra webbplatsens funktionalitet för dig. Vårt meddelande om webbkakor beskriver vilka kakor vi använder, varför vi använder dem och hur du hittar mer information om dem. Vänligen bekräfta ditt medgivande av att vi använder analyskakor. Om du inte medger det kan du fortfarande använda webbplatsen men med begränsad funktionalitet.

Functional Cookies

Analytics Cookies