MyHaas Witaj,
!
Haas Tooling Historia zamówienia jako gość MyHaas/HaasConnect Zarejestruj się Zarejestruj się Haas Tooling Moje konto Order History Return History MyHaas/HaasConnect Wyloguj się Witaj, Moje maszyny Ostatnia aktywność Moje wyceny Moje konto Moi użytkownicy Wyloguj się
Znajdź swojego dystrybutora
  1. Wybierz język
    1. English
    2. Deutsch
    3. Español - España
    4. Español - Méjico
    5. Français
    6. Italiano
    7. Português
    8. Český
    9. Dansk
    10. Nederlands
    11. Magyar
    12. Polski
    13. Svenska
    14. пост-советский
    15. Türkçe
    16. 中文
    17. Suomi
    18. Norsk
    19. الإنجليزية
    20. български
    21. Hrvatski
    22. Ελληνικά
    23. Română
    24. Slovenský
    25. Slovenščina
    26. 한국어
    27. 日本語
Search
  • maszyny Main Menu
    • Frezarki pionowe Haas Frezarki pionowe
      Frezarki pionowe
      Frezarki pionowe View All
      • Frezarki pionowe
      • Seria VF
      • Maszyny uniwersalne
      • VR Series
      • Maszyny VMC z funkcją zmiany palet
      • Frezarki Mini Mill
      • Maszyny do form
      • Seria Drill/Tap/Mill
      • Frezarki narzędziowe
      • Frezarki kompaktowe
      • Seria Gantry
      • Bardzo duże centra VMC
      • Frezarka stołowa
      • Automatyczny podajnik detali do frezarki
      • Kompaktowy automatyczny podajnik detali
    • Product Image Rozwiązania wieloosiowe
      Rozwiązania wieloosiowe
      Rozwiązania wieloosiowe View All
      • Rozwiązania wieloosiowe
      • Tokarki z osią Y
      • Frezarki 5-osiowe
    • Tokarki Haas Tokarki
      Tokarki
      Tokarki View All
      • Tokarki
      • ST Series
      • Dwuwrzecionowe
      • Tokarki narzędziowe
      • Tokarka uchwytowa
      • Podajnik prętów Haas V2
      • Automatyczny podajnik detali do tokarki
    • Frezarki poziome Haas Frezarki poziome
      Frezarki poziome
      Frezarki poziome View All
      • Frezarki poziome
      • Stożek 50
      • Stożek 40
    • Stoły obrotowe i aparaty podziałowe Haas Stoły obrotowe i aparaty podziałowe
      Stoły obrotowe i aparaty podziałowe
      Stoły obrotowe i aparaty podziałowe View All
      • Stoły obrotowe i aparaty podziałowe
      • Stoły obrotowe
      • Aparaty podziałowe
      • Stoły obrotowe osi 5-osiowe
      • Stoły obrotowe XL
    • Product Image Automation Systems
      Automation Systems
      Automation Systems View All
      • Automation Systems
      • Pakiety Robot Package
      • Automatyczny podajnik detali
      • Systemy zesp. palet
      • Podajnik pręta Haas
      • Models
    • SZYBKIE ŁĄCZA Seria specjalna  Seria specjalna 
      PRACA W HAAS PRACA W HAAS ZBUDUJ I WYCEŃ ZBUDUJ & WYCEŃ CENNIK CENNIK CO NOWEGO? CO NOWEGO? TWOJA PIERWSZA OBRABIARKA CNC TWOJA PIERWSZA OBRABIARKA CNC HAAS SIX PACK HAAS SIX PACK
      NARZĘDZIA ZAKUPOWE
      • Zbuduj i Wyceń maszynę Haas
      • Cennik
      • Dostępne produkty
      • Finansowanie CNCA
      CZY CHCESZ Z KIMŚ POROZMAWIAĆ?

      W punkcie sprzedaży fabrycznej Haas (HFO) znajdziesz odpowiedź na wszystkie pytania i poznasz optymalne rozwiązania.

      CONTACT YOUR DISTRIBUTOR >
  • Opcje Main Menu
    • Product Image Wrzeciona
      Wrzeciona
      Wrzeciona View All
      • Wrzeciona
    • Product Image Magazyny narzędzi
      Magazyny narzędzi
      Magazyny narzędzi View All
      • Magazyny narzędzi
    • Product Image 4. | 5. oś
      4. | 5. oś
      4. | 5. oś View All
      • 4. | 5. oś
    • Product Image Głowice i narzędzia napędzane
      Głowice i narzędzia napędzane
      Głowice i narzędzia napędzane View All
      • Głowice i narzędzia napędzane
    • Product Image Pomiary sondą
      Pomiary sondą
      Pomiary sondą View All
      • Pomiary sondą
    • Zarządzanie wiórami i chłodziwem Haas Zarządzanie wiórami i chłodziwem
      Zarządzanie wiórami i chłodziwem
      Zarządzanie wiórami i chłodziwem View All
      • Zarządzanie wiórami i chłodziwem
    • Sterownik Haas Sterownik Haas
      Sterownik Haas
      Sterownik Haas View All
      • Sterownik Haas
    • Product Image Opcje produktu
      Opcje produktu
      Opcje produktu View All
      • Opcje produktu
    • Product Image Narzędzia i mocowanie
      Narzędzia i mocowanie
      Narzędzia i mocowanie View All
      • Narzędzia i mocowanie
    • Product Image Uchwyt roboczy
      Uchwyt roboczy
      Uchwyt roboczy View All
      • Uchwyt roboczy
    • Product Image Rozwiązania 5-osiowe
      Rozwiązania 5-osiowe
      Rozwiązania 5-osiowe View All
      • Rozwiązania 5-osiowe
      • 5 Easy Steps to 5-Axis
    • Product Image Automatyka
      Automatyka
      Automatyka View All
      • Automatyka
    • SZYBKIE ŁĄCZA Seria specjalna  Seria specjalna 
      PRACA W HAAS PRACA W HAAS ZBUDUJ I WYCEŃ ZBUDUJ & WYCEŃ CENNIK CENNIK CO NOWEGO? CO NOWEGO? TWOJA PIERWSZA OBRABIARKA CNC TWOJA PIERWSZA OBRABIARKA CNC HAAS SIX PACK HAAS SIX PACK
      NARZĘDZIA ZAKUPOWE
      • Zbuduj i Wyceń maszynę Haas
      • Cennik
      • Dostępne produkty
      • Finansowanie CNCA
      CZY CHCESZ Z KIMŚ POROZMAWIAĆ?

      W punkcie sprzedaży fabrycznej Haas (HFO) znajdziesz odpowiedź na wszystkie pytania i poznasz optymalne rozwiązania.

      CONTACT YOUR DISTRIBUTOR >
  • Why Haas Main Menu
      Odkryj różnicę kreowaną przez Haas
    • Dlaczego właśnie Haas
    • MyHaas
    • Społeczność edukacyjna
    • Przemysł 4.0
    • Certyfikat Haas
    • Referencje klientów
  • Serwis Main Menu
      Witamy w Serwisie Haas.
      SERWIS – STRONA GŁÓWNA Podręczniki operatora Procedury postępowania Podręczniki rozwiązywania problemów Profilaktyczna konserwacja Części Haas Oprzyrządowanie Haas Filmy
  • Filmy Main Menu
  • Haas Tooling Main Menu
      Oprawki narzędziowe do frezarek Mill Workholding Frezowanie Obróbka tokarką Oprawki narzędziowe do tokarek Uchwyty robocze dla tokarek Tulejki zaciskowe i uchwyty ER Wykonywanie otworów Gwintowanie Przeciąganie Wymiana narzędzi Oprzyrządowanie do obróbki Materiały ścierne Zestawy pakietów Ubrania i akcesoria Składowanie i przewożenie Pomiary i przeglądy
    • Haas Tooling
    • Oprawki narzędziowe do frezarek
      Oprawki narzędziowe do frezarek Shop All
      • Uchwyty do frezowania końcowego
      • Uchwyty frezów czołowych
      • Oprawki z pasowaniem skurczowym
      • Uchwyty na tuleje zaciskowe ER
      • Uchwyty do frezów i tuleje zaciskowe
      • Uchwyty wiertarskie
      • Śruby dwustronne
      • Zestawy oprawek narzędziowych do frezarek
      • Hydrauliczne uchwyty i tuleje zaciskowe do frezowania
    • Uchwyt roboczy frezarki
      Uchwyt roboczy frezarki Shop All
      • Imadła z nieruchomą szczęką
      • Imadła samocentrujące
      • Płyty pośredniczące
      • Szczęki imadła frezarskiego
      • Akcesoria do uchwytów roboczych
      • Zestawy imadeł
      • Podkładki równoległe do szczęk imadeł
      • Uchwyty HA5C
      • Zestawy imadeł do stołów obrotowych
    • Frezowanie
      Frezowanie Shop All
      • Korpusy frezów czołowych
      • Wkładki do frezowania
      • Frezy walcowo-czołowe
      • Frezy i wkładki do fazowania
      • Korpusy indeksowalnych frezów końcowych
      • Kulowe frezy końcowe
      • Frezy końcowe do fazowania
      • Frezy końcowe do obróbki zgrubnej
      • Indeksowalne kulowe frezy końcowe i wkładki
      • Zestawy frezów czołowych
      • Zestawy do frezowania z fazowaniem
      • Zestawy indeksowanych frezów końcowych
      • Frezy na jaskółczy ogon
      • Frezy na jaskółczy ogon z indeksowaniem
      • Frezy końcowe do grawerowania
      • Zadziory
      • Frezy końcowe do naroży
    • Oprzyrządowanie tokarskie
      Oprzyrządowanie tokarskie Shop All
      • Przecinak
      • Zestaw narzędzi do odcinania
      • Wkładki do toczenia
      • Narzędzia do rowkowania
      • Narzędzia do rowkowania i gwintowania małej średnicy wewnętrznej
      • Wkładki gwintowe
      • Oprawki narzędziowe do gwintowania
      • Oprawki narzędziowe do obróbki powierzchni wewnętrznych
      • Oprawki narzędziowe do obróbki powierzchni zewnętrznych
      • Wkładki cermetowe do toczenia
      • Wkładki do toczenia CBN
      • Wkładki do rowków wciętych i gwintowania Haas
      • Oprawki narzędziowe do rowków wciętych i gwintowania Haas
    • Oprawki narzędziowe do tokarek
      Oprawki narzędziowe do tokarek Shop All
      • Oprawki narzędziowe TL i CL
      • Oprawka narzędziowa BOT
      • Oprawka narzędziowa BMT
      • Ruchome oprawki narzędziowe
      • Tuleje redukcyjne
      • Oprawki narzędziowe VDI
    • Uchwyt roboczy do tokarki
      Uchwyt roboczy do tokarki Shop All
      • Kły obrotowe
      • Tuleje dopasowujące do obróbki prętów
      • Tuleje zaciskowe do szybkiej zmiany
      • Uchwyty na tulejki zaciskowe do tokarek
      • Tuleje zaciskowe 5C
      • Zestawy tulei zaciskowych 5C
      • Pierścienie do wytaczania do tokarek
      • Szczęki tokarki
    • Tuleje zaciskowe i uchwyty ER
      Tuleje zaciskowe i uchwyty ER Shop All
      • ER Collets
      • Uszczelniane tuleje zaciskowe ER
      • Tuleje gwintowane ER
      • Zestawy i akcesoria tulei zaciskowych ER
      • Uchwyty na tuleje zaciskowe ER
      • Uchwyty tulei zaciskowych ER z prostym trzonkiem
      • Uchwyty wiertarskie bez klucza z prostym chwytem
    • Wykonywanie otworów
      Wykonywanie otworów Shop All
      • Wiertła węglikowe
      • Korpusy wierteł z indeksowaniem
      • Wkładki wiertarskie z indeksowaniem
      • Modułowe korpusy wierteł
      • Modułowe głowice wierteł
      • Wiertła kobaltowe, zestawy
      • Wiertła do nakiełków
      • Rozwiertaki
      • Zestawy do wiercenia z indeksowaniem
      • Wiertła precyzyjne
    • Gwintowanie
      Gwintowanie Shop All
      • Gwintowniki
      • Wkładki gwintowe
      • Oprawki narzędziowe do gwintowania
      • Frezy do gwintów
      • Gwintowniki do rur
      • Zestawy do wiercenia z gwintowaniem
    • Przeciąganie
      Przeciąganie Shop All
      • Oprawki narzędziowe do przeciągania
      • Wkładki do przeciągania
    • Zarządzanie narzędziami
      Zarządzanie narzędziami Shop All
      • Maszyny do wstępnego nastawiania narzędzi
      • Maszyny do oprawek narzędziowych z pasowaniem skurczowym
    • Oprzyrządowanie do obróbki
      Oprzyrządowanie do obróbki Shop All
      • Przyrząd do czyszczenia stożka wrzeciona
      • Podnośnik warsztatowy Haas
      • Mocowania oprawek narzędziowych
      • Ściernice do gratowania
      • Wentylatory do usuwania wiórów
    • Materiały ścierne
      Materiały ścierne Shop All
      • Nakładki ścierne
      • Narzędzia do gratowania
      • Ściernice do gratowania
    • Zestawy pakietów
      Zestawy pakietów Shop All
      • Zestawy wentylatorów do usuwania wiórów
      • Zestawy narzędzi tnących
      • Zestawy indeksowanych frezów końcowych
      • Zestaw narzędzi do odcinania
      • Zestawy do wiercenia z gwintowaniem
      • Zestawy do wiercenia z indeksowaniem
      • Zestawy frezów czołowych
      • Zestawy do frezowania z fazowaniem
      • Zestawy oprawek narzędziowych do frezarek
      • 08-1769
      • 08-1766
      • 08-1767
      • 08-1768
      • 08-1787
      • 08-1788
      • 08-1789
      • 08-1784
      • 08-1785
      • Zestawy uchwytów roboczych
      • Zestawy imadeł do stołów obrotowych
      • Zestawy imadeł
    • Składowanie i przewożenie
      Składowanie i przewożenie Shop All
      • Wózki narzędziowe
    • Pomiary i przeglądy
      Pomiary i przeglądy Shop All

      • 7-częściowy zestaw pomiarowy
      • Zestaw czujników 3D, calowych, CT40
      • Zestaw czujników 3D, metrycznych, SK40/DIN
      • Zestaw czujników 3D, metrycznych, BT40
      • Zestaw czujników 3D, calowych, HSK63A
      • Zestaw czujników 3D, metrycznych, HSK63A
      • Czujnik 3D, calowy
      • Czujnik 3D, metryczny
      • Rylec WIPS, opakowanie 3 szt.
      • Zamienny rylec WIPS
      • Pręt testowy wrzeciona
      • Refraktometr do chłodziwa
      • Miernik siły zacisku
    • Odzież i akcesoria
      Odzież i akcesoria Shop All
      • Akcesoria
      • Odzież
    • OPRZYRZĄDOWANIE HAAS – SZYBKIE ŁĄCZA
      NOWE PRODUKTY NOWE PRODUKTY
      NAJPOPULARNIEJSZE NAJPOPULARNIEJSZE
      OPRZYRZĄDOWANIE – PROMOCJE OPRZYRZĄDOWANIE – PROMOCJE
      FINANSOWANIE I ELASTYCZNE WARUNKI FINANSOWANIE I ELASTYCZNE WARUNKI
      Często zadawane pytania Często zadawane pytania
      ZESTAWY STWORZONE DLA CIEBIE ZESTAWY STWORZONE DLA CIEBIE
  • Main Menu
    • HFO Polska
      HFO Polska
      HFO Polska View All
      • HFO Polska
      • O nas
      • Serwis
      • Szkolenia
      • Finansowanie
      • Wydarzenia
      • Wyposażenie salonu
      • Kontakt
    • SZYBKIE ŁĄCZA Seria specjalna  Seria specjalna 
      PRACA W HAAS PRACA W HAAS ZBUDUJ I WYCEŃ ZBUDUJ & WYCEŃ CENNIK CENNIK CO NOWEGO? CO NOWEGO? TWOJA PIERWSZA OBRABIARKA CNC TWOJA PIERWSZA OBRABIARKA CNC HAAS SIX PACK HAAS SIX PACK
      NARZĘDZIA ZAKUPOWE
      • Zbuduj i Wyceń maszynę Haas
      • Cennik
      • Dostępne produkty
      • Finansowanie CNCA
      CZY CHCESZ Z KIMŚ POROZMAWIAĆ?

      W punkcie sprzedaży fabrycznej Haas (HFO) znajdziesz odpowiedź na wszystkie pytania i poznasz optymalne rozwiązania.

      CONTACT YOUR DISTRIBUTOR >
  • Skontaktuj się z nami

×

Wyniki wyszukiwania

Web Pages

Images

    • <
    • 1
    • >
MyHaas Witaj,
!
Haas Tooling Historia zamówienia jako gość MyHaas/HaasConnect Zarejestruj się Zarejestruj się Haas Tooling Moje konto Order History Return History MyHaas/HaasConnect Wyloguj się Witaj, Moje maszyny Ostatnia aktywność Moje wyceny Moje konto Moi użytkownicy Wyloguj się
Znajdź swojego dystrybutora
  1. Wybierz język
    1. English
    2. Deutsch
    3. Español - España
    4. Español - Méjico
    5. Français
    6. Italiano
    7. Português
    8. Český
    9. Dansk
    10. Nederlands
    11. Magyar
    12. Polski
    13. Svenska
    14. пост-советский
    15. Türkçe
    16. 中文
    17. Suomi
    18. Norsk
    19. الإنجليزية
    20. български
    21. Hrvatski
    22. Ελληνικά
    23. Română
    24. Slovenský
    25. Slovenščina
    26. 한국어
    27. 日本語
Search
×

Wyniki wyszukiwania

Web Pages

Images

    • <
    • 1
    • >

UMC - Pallet Pool - Installation

Strona główna serwisu Procedura postępowania UMC - Pallet Pool - Installation

UMC - Pallet Pool - Installation

- Przejdź do sekcji - Back to Top

3.4 UMC-1000 PP Version 1

Recently Updated Last updated: 08/04/2022

UMC-1000 Pallet Pool - Version 1 - Installation


Introduction

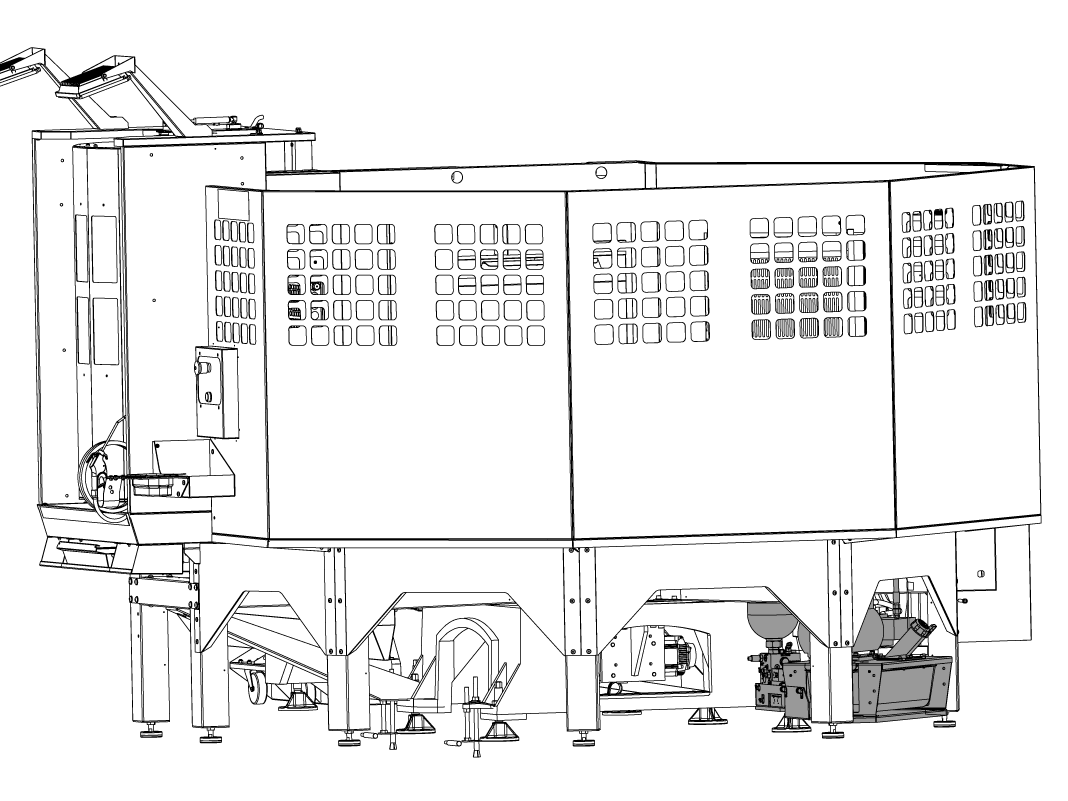
The following procedure will show you how to install a Pallet Pool on a UMC-1000 machine.

The Next Generation software on the machine must be version 100.19.000.1110 or higher.

The Pallet Pool option is currently not field installable.

Important: To ensure that the Pallet Pool does not become mis-aligned, it is recommended that the machine and Pallet Pool be anchored. Refer to the following link: Anchoring Instructions.

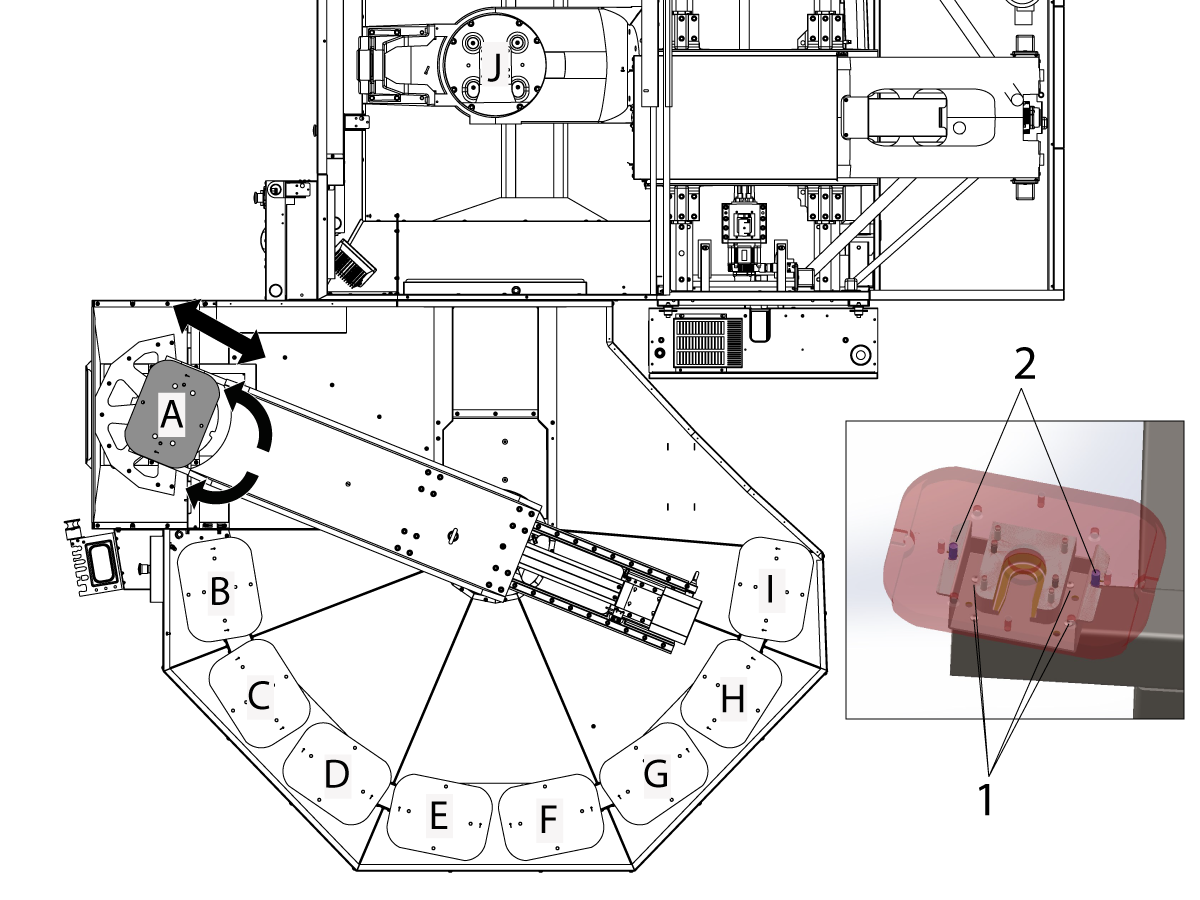
The Pallet Pool option has 8 pallet stations plus 1 pallet in the machine. A maximum of 9 pallets can be installed on a UMC-1000 with the Pallet Pool option.

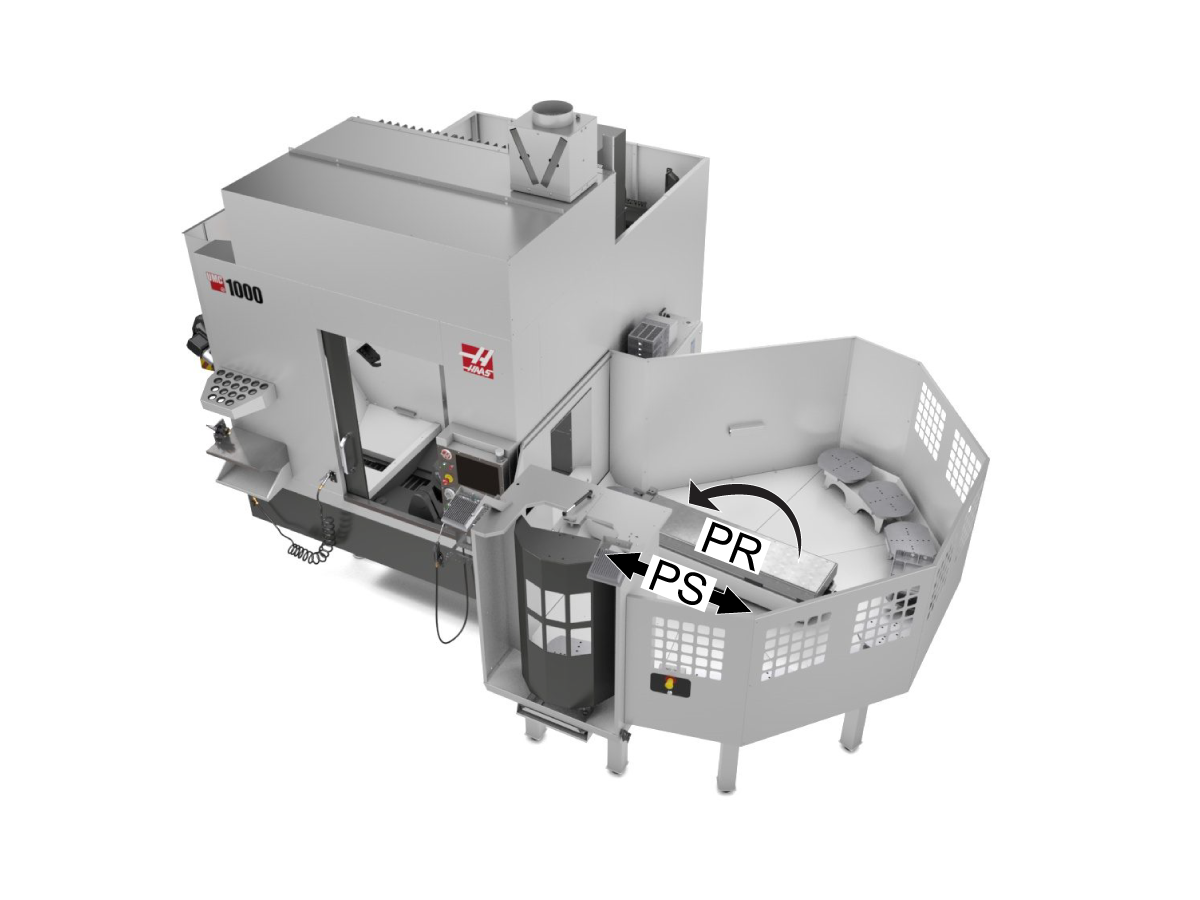
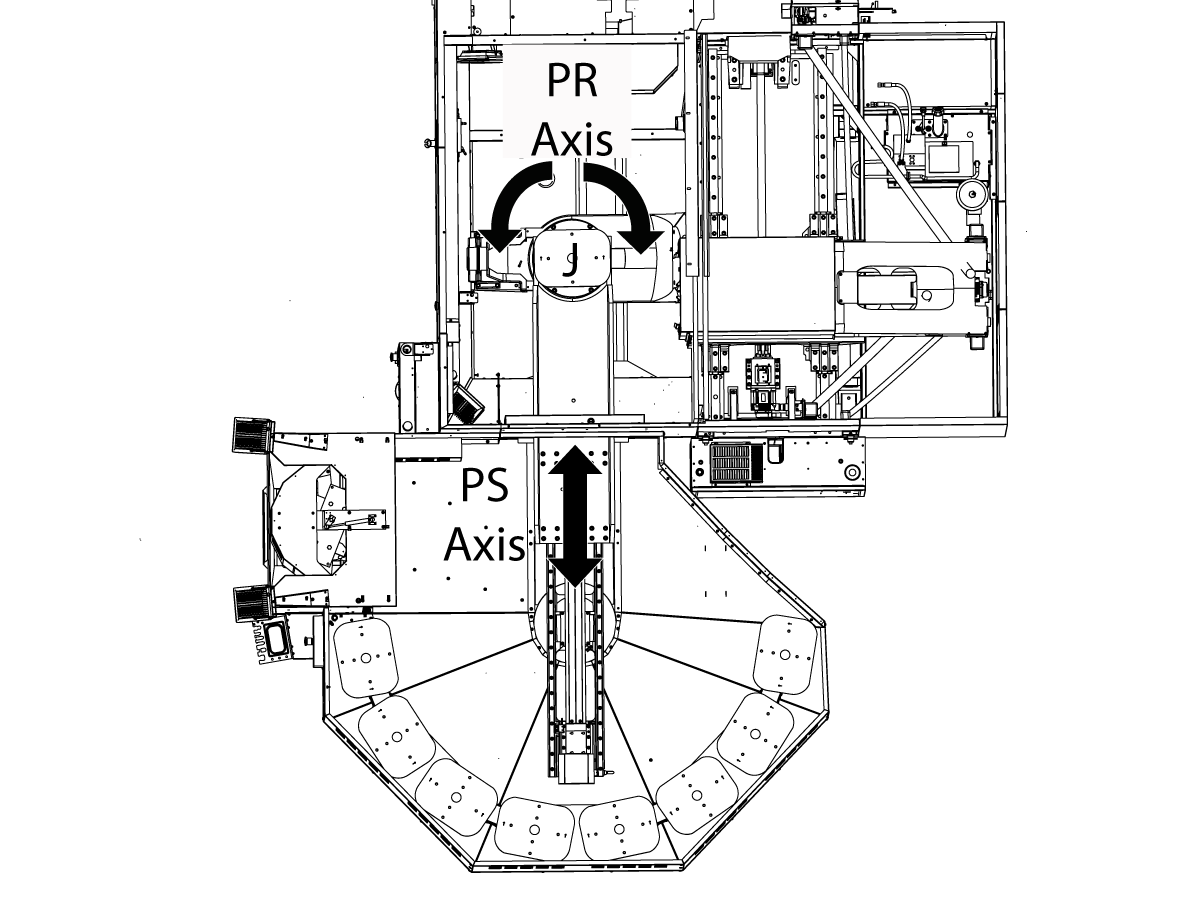
The Pallet Pool has 2 servo axes. The PR axis rotates the Pallet Pool ram and the PS axis extends and retracts the Pallet Pool ram to load/unload the pallets.

The UMC-1000 must be level before the Pallet Pool can be installed. Refer to the UMC-1000 Installation procedure.

To level the machine without the Pallet Pool connected to the machine, do the following: 

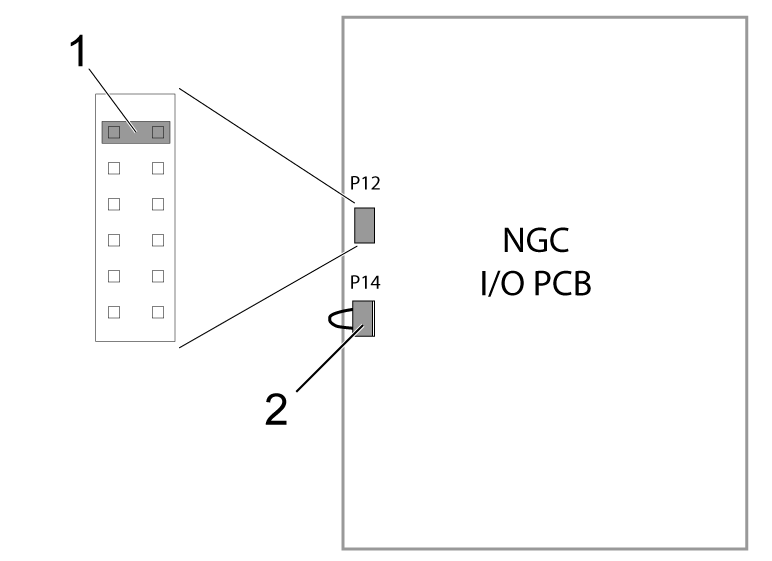
Make sure that there is a shorting block [1] installed on the top two pins of the P12 connector on the I/O PCB 

Make sure there is a jumper (P/N 33-0527) [2] connected to I/O PCB at P14.
 Note: These jumpers are needed to operate the machine without the Pallet Pool.

Disable the pallet pool, change setting 382 Disable Pallet Changer to Pallet Pool.


Note: The above step will disabled the Pallet Pool to allow you to zero return the machine so it can be leveled.

Refer to the UMC-1000 Installation procedure.

Leveling Screws Hardware

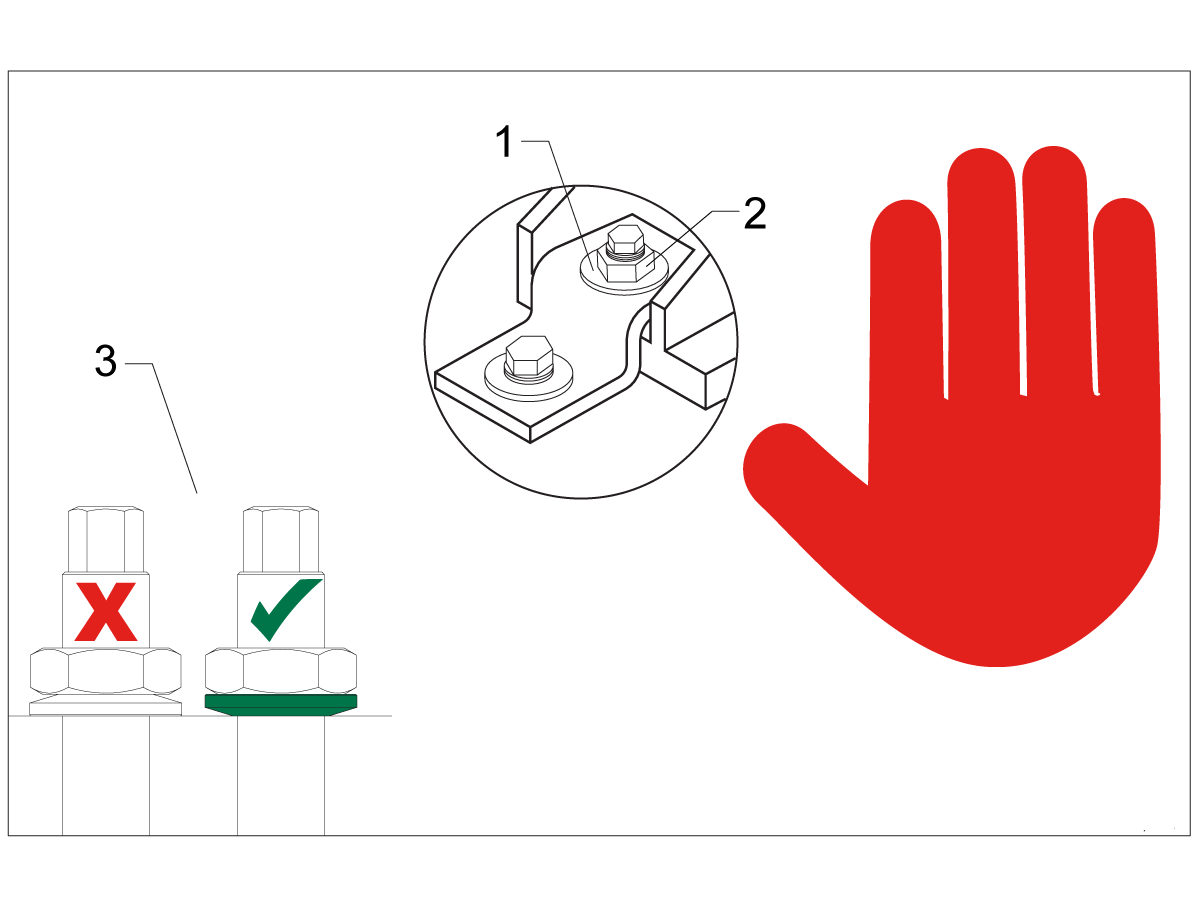
Note: The washers [1] and nuts [2] are installed during shipping and should be saved for installation and not be discarded.

Note: The washer orientation [3] is important.  The conical part of the washer should be against the casting,  see illustration.

Pallet Pool - Remove Shipping Brackets


1

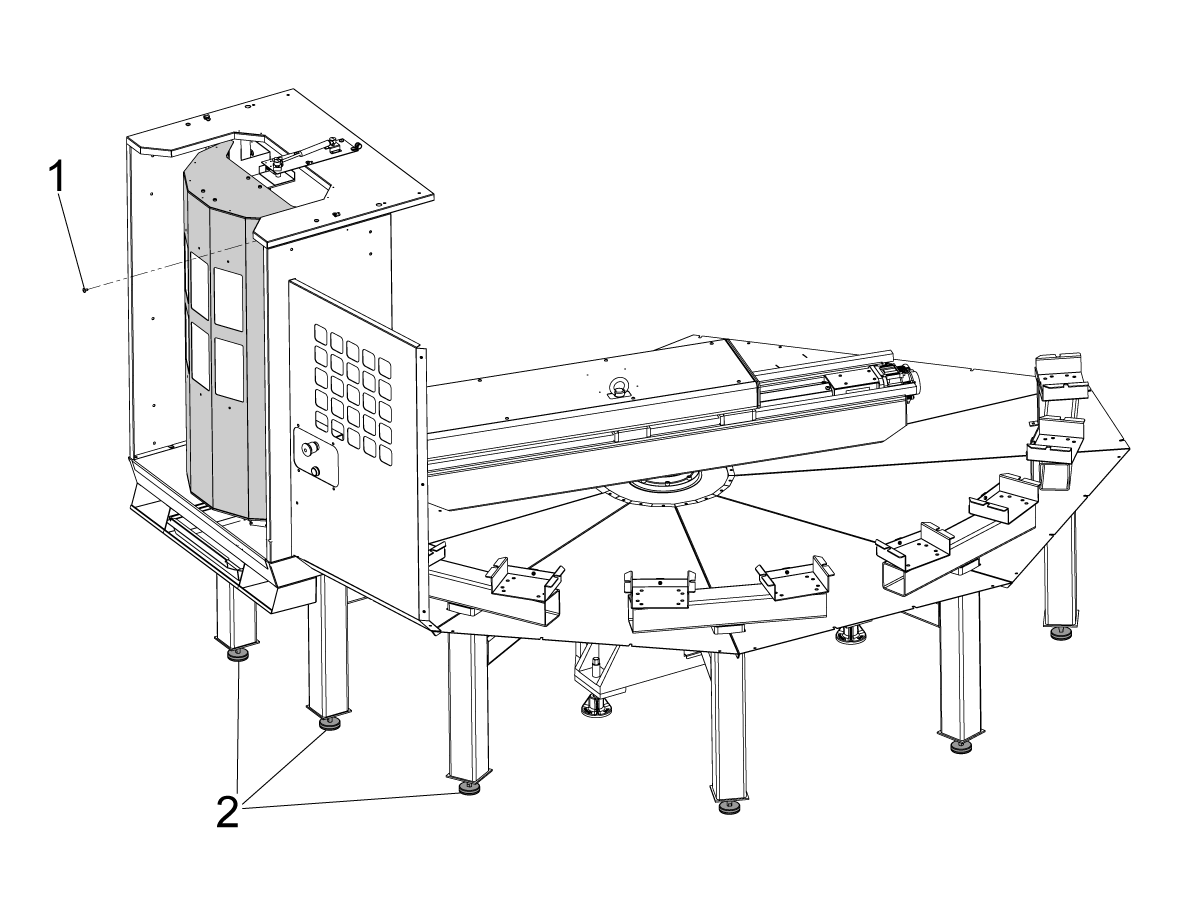
Remove the loading station door blocking bolt [1].

Make sure to raise all of the pallet shelf supporting screws [2] before placing the pallet pool on the floor. 

2

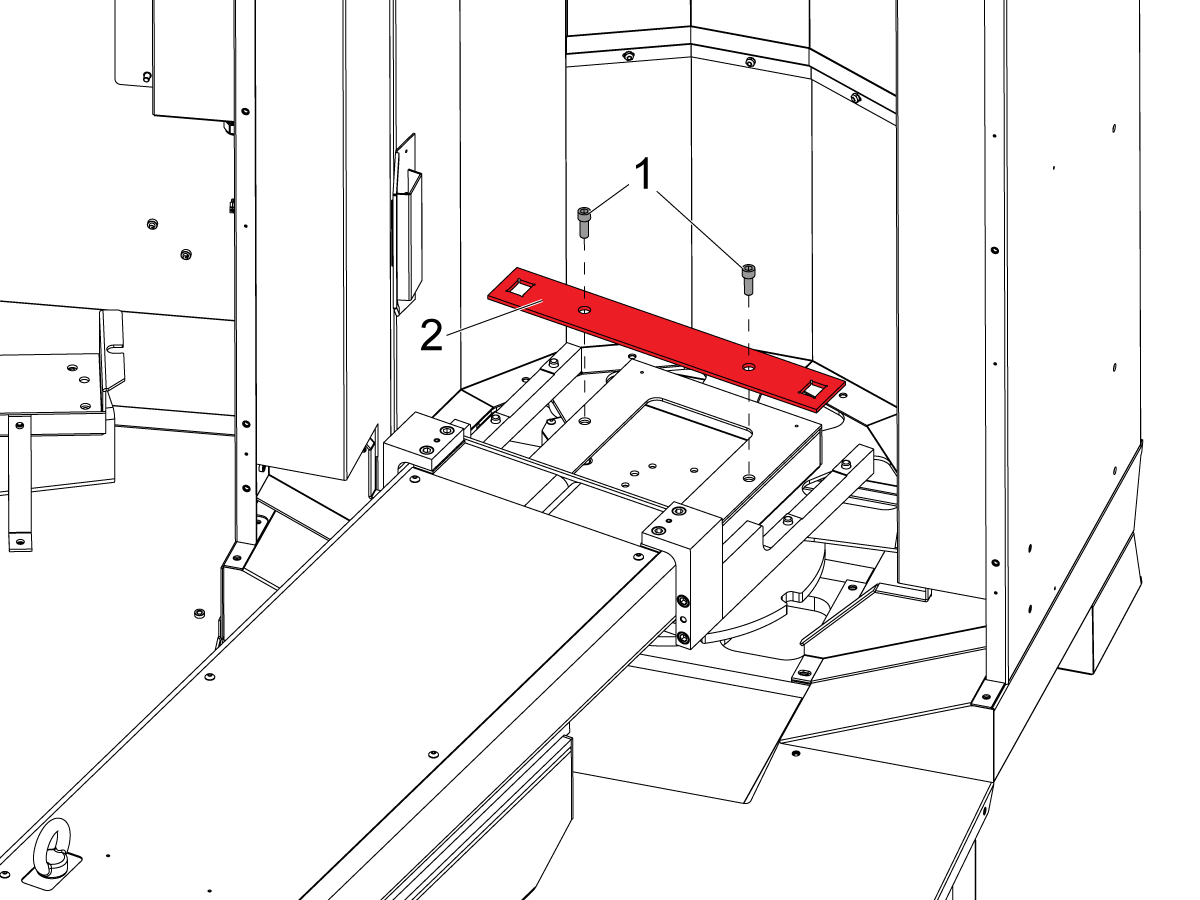
Remove the bolts [1] that secure the Pallet Pool shipping bracket [2].

Remove the shipping bracket [2].


Pallet Pool - Placement

1

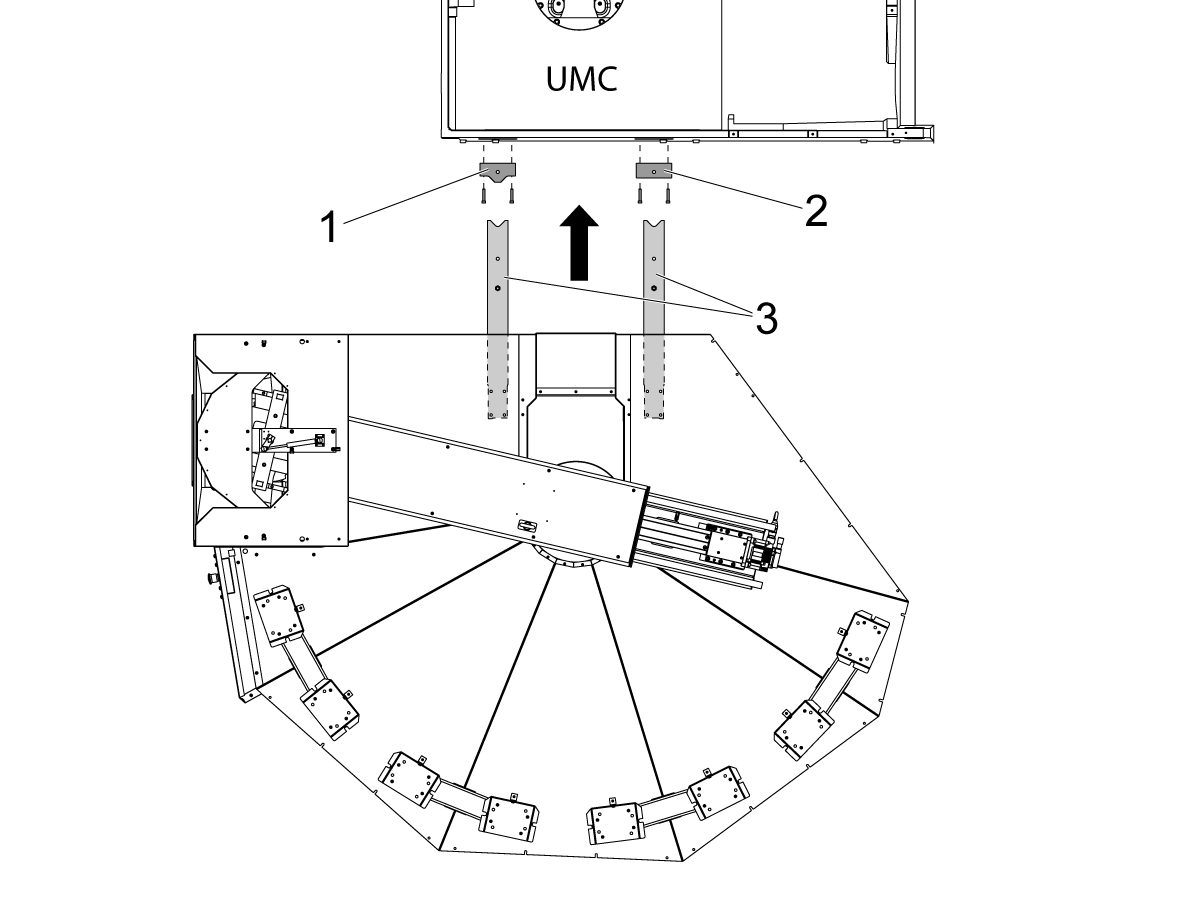
Install the Pallet Pool alignment blocks onto the host machine's base.

Note: The alignment block with the radius [1] must be installed towards the front of the UMC and the alignment block with the flat side [2] must be installed towards the rear of the machine.

Install the alignment bars [3] onto the pallet pool base.

Use the forklift or the pallet jack to place the pallet pool on the right side of the host machine.

Move the pallet pool assembly so the alignment arms are 3 - 6” (76 - 152 mm) away from the alignment blocks. 

Install the leveling pads under the pallet pool and lower the pallet pool. 

2

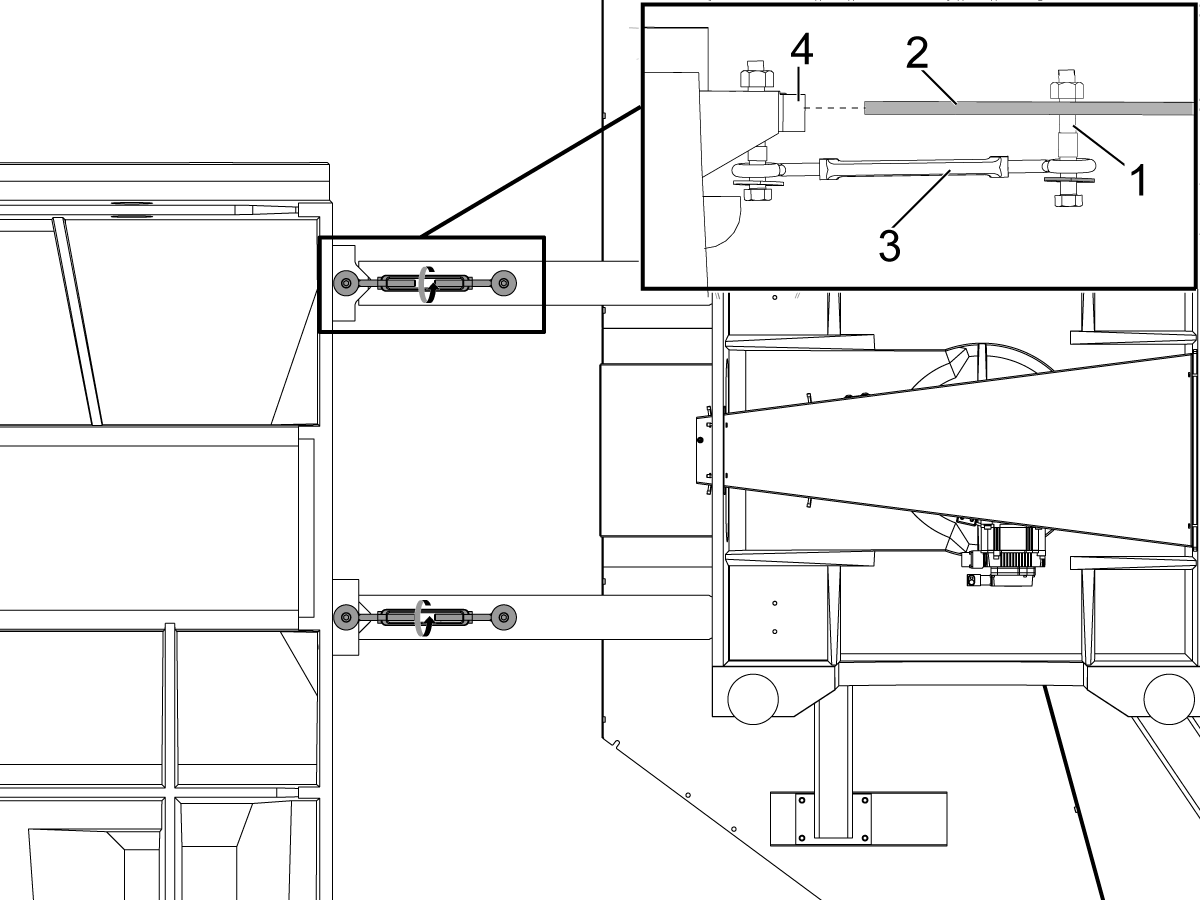
Install the turnbuckles [3] with the provided hardware (SHCS, washer, and bushings [1]) onto the alignment arms [2] and the base casting [4].

Evenly tighten the turnbuckles until the alignment arms mate with the alignment blocks.

UMC - Version 1 Pallet Pool HPU - Installation

1

If the pallet pool has the HPU located under the pallet pool itself, skip to the UMC- Version 2 Pallet Pool HPU - Installation section.

2

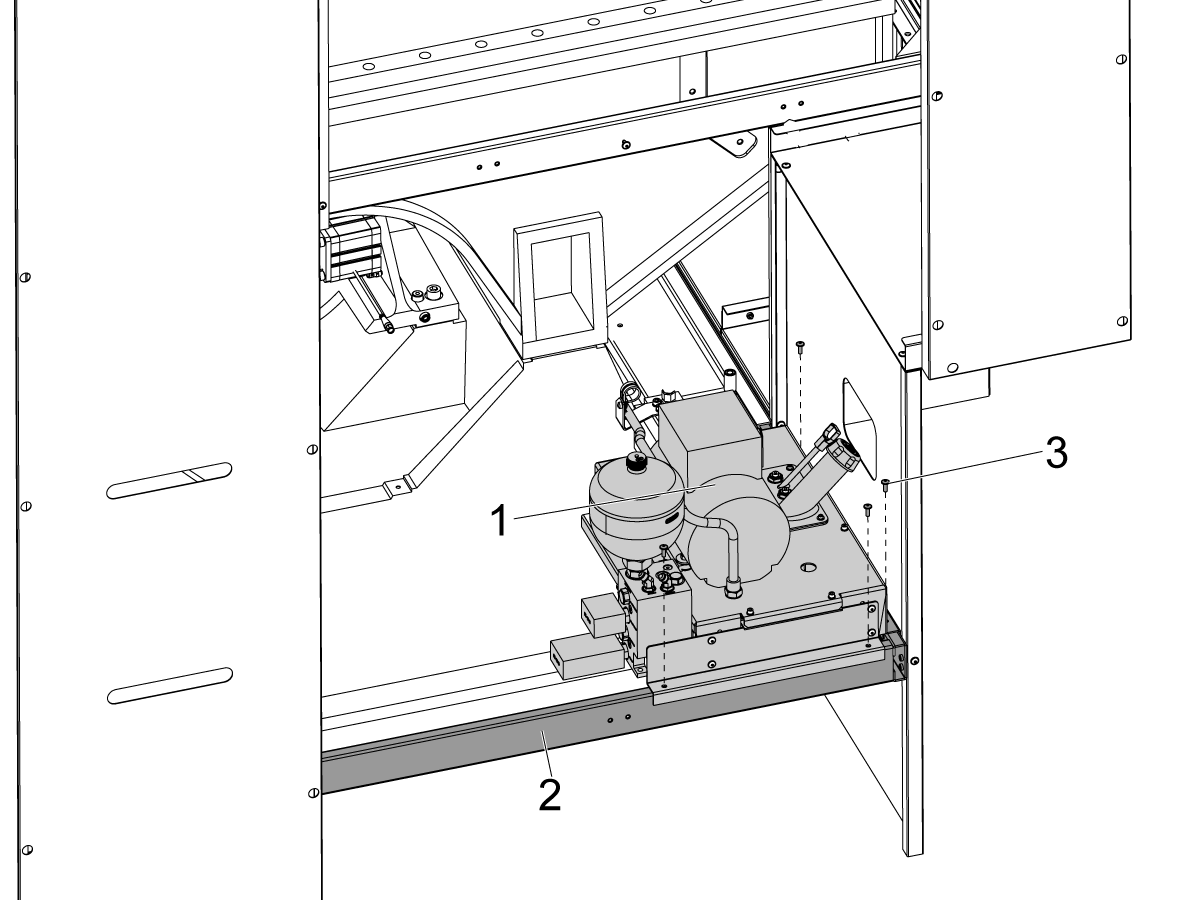
Install the HPU assembly [1] on top of the rear enclosure frame [2].

Install the HPU mounting bolts [3].

3

Wire the HPU.

  • Route the hydraulic pressure sensor cable from the control cabinet to the HPU and connect the hydraulic pressure sensor on the back of the HPU manifold.
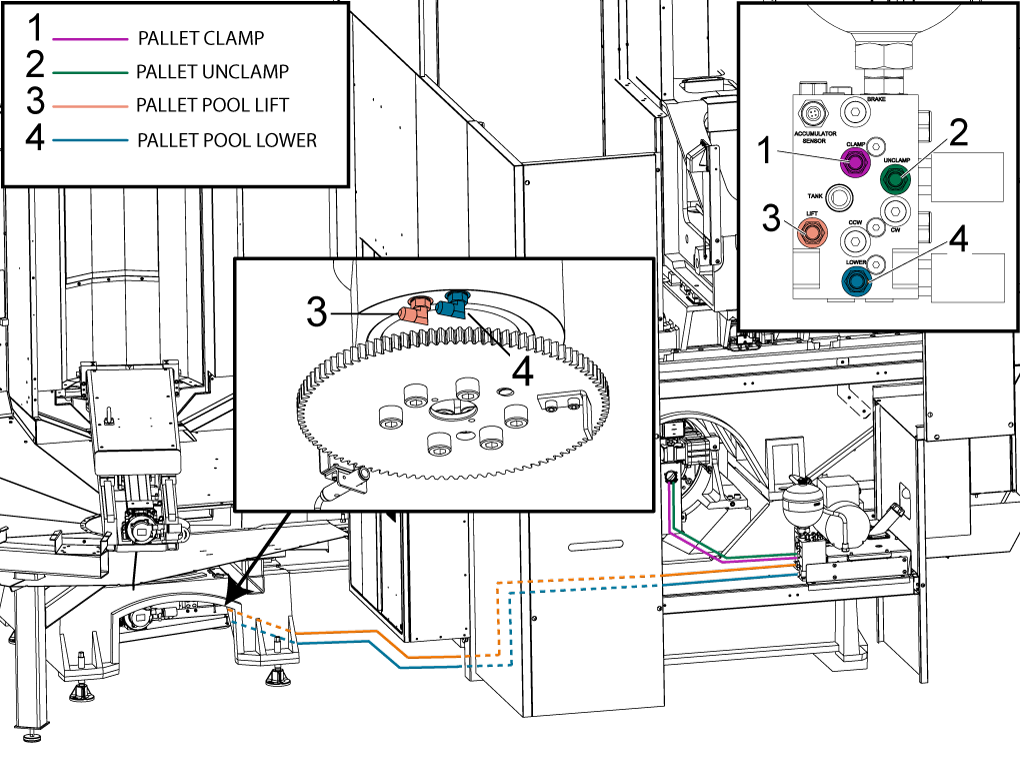
  • Route the Pallet Pool lift and lower solenoid cables from the control cabinet to the HPU and connect it to the coils on the Pallet Pool Lift/Lower solenoid that is located on the side of the HPU manifold. Note: Connect the Pallet Pool Lift cable to the outer coil and the Pallet Pool Lower cable to the inner coil.
  • Route the Pallet Clamp solenoid cable from the control cabinet to the HPU and connect it to the coil on the Pallet Clamp/Unclamp solenoid. 
  • Route the HPU power cable from the HPU to the control cabinet and connect it to the P1 on the TMD PCB.
  • Route the HPU Oil Temperature sensor cable from the HPU to the control cabinet and connect it to the P46 on the SIO PCB.
  • Route the HPU Oil Level Sensor cable from the HPU to the connector bracket [2] and connect it to the HPU Oil Level sensor plug.  

4

Route the Pallet Clamp [1] and the Pallet Unclamp [2] hydraulic lines from the back of the B anc C axes assembly to the HPU manifold and connect to the corresponding ports.

Route the Pallet Pool Lift [3] and Pallet Pool Lower [4] hydraulic lines from the pallet pool to the HPU manifold and connect to the corresponding ports. 

NOTE: The lower port is the hole closes to the edge of the lift/lower cylinder.  

UMC - Pallet Pool - Electrical Connections

1

The following procedure will show you how to connect the electrical connections to the UMC-1000.


 Note: The PR (Pallet Rotate) and PS (Pallet Slide) amps are already installed at the factory.

Turn [OFF] the main circuit breaker and wait until the Vector Drive High-Voltage light turns off.

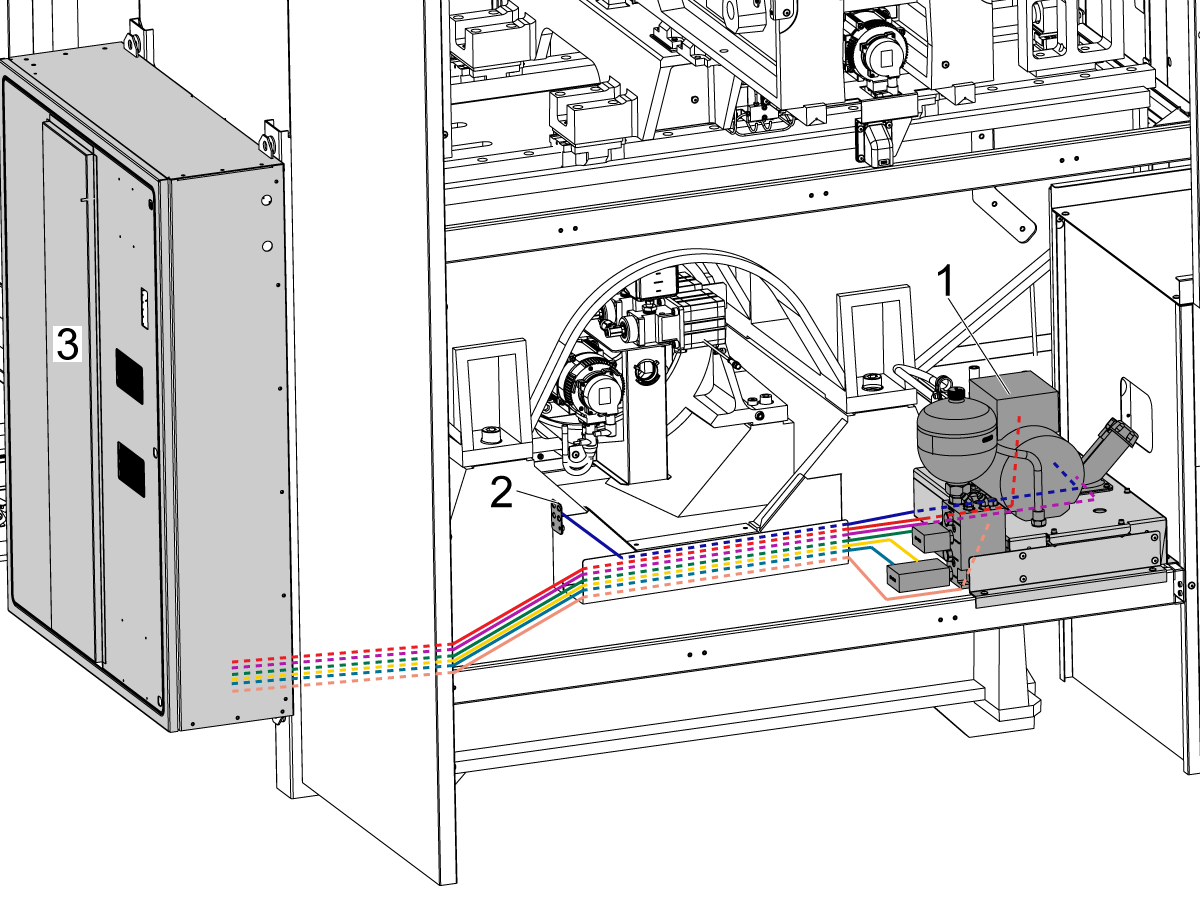
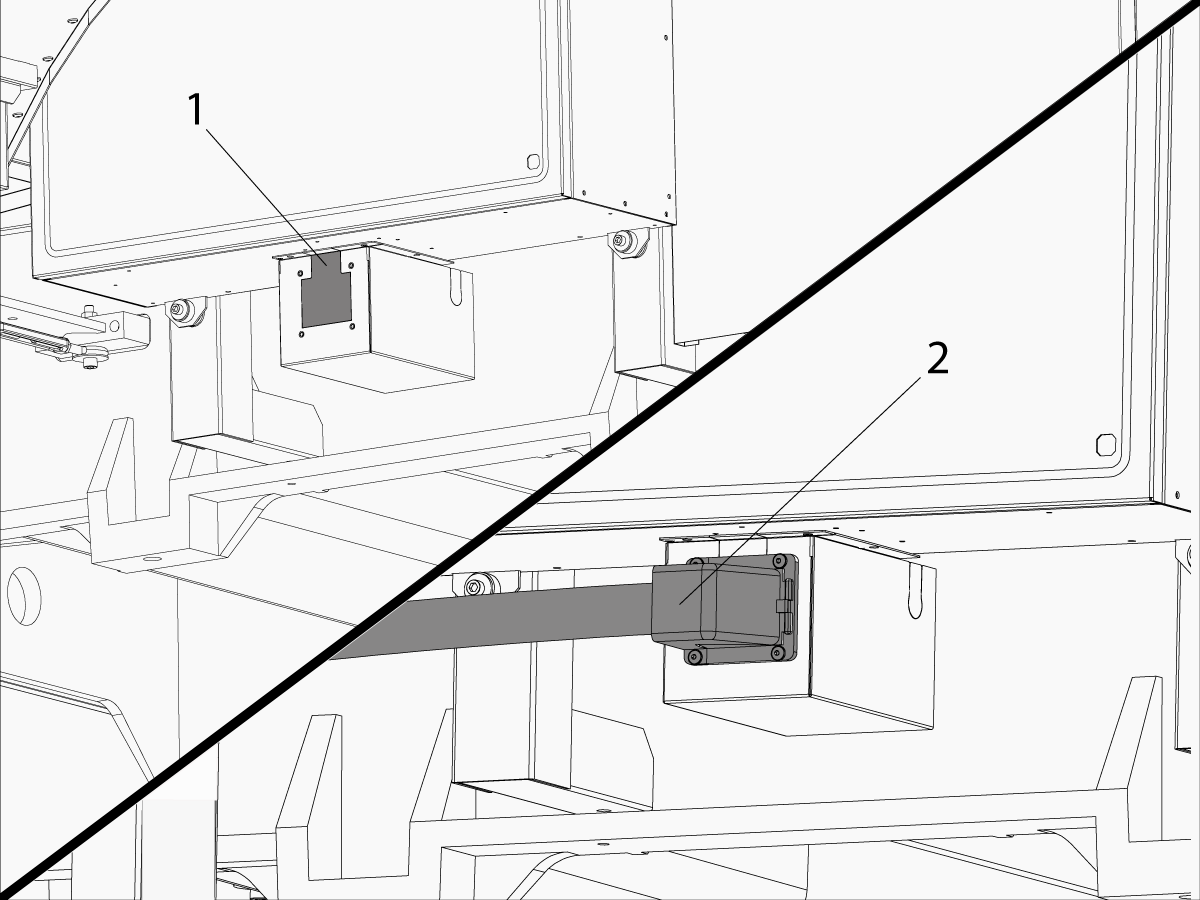
Knock out the pre-cut access panel [1].
Route the pallet pool cables [2] into the control cabinet as shown in the illustration.
Connect the PR motor encoder cable to Maincon PCB channel 15
Connect the PS motor encoder cable to Maincon PCB channel 16.
Connect the PR motor power cable to the amplifier labeled PR. Install the ferrite filter bead on the motor power cable.

Connect the PS motor power cable to the amplifier labeled PS. Install the ferrite filter bead on the motor power cable.

2

Remove the shorting block from the P12 connector on the I/O PCB.

Route the aux front panel cable (P/N 33-0424A) [1] from the Pallet Pool and connect it to the P12 on the I/O PCB.

Remove jumper (P/N 33-0527) [2] from I/O PCB at P14. Route the Pallet Pool status cable (P/N 33-0427) from the Pallet Pool and connect it to the I/O PCB at P14 [3].

Connect pallet alarm cable [4] (P/N 33-0482) to the I/O PCB at P50.
Make sure all the Pallet Pool status bracket connectors are plugged into the correct location.

 NOTE: Store the Pallet Pool jumpers in a safe location, these will be used by the service personnel to move or service the machine.

Enable Pallet Pool

Do the following to enable the pallet pool option on a UMC-1000.  

Important:  You will need to do this step if you perform a option 5 clean install option on a UMC-1000 with a pallet pool.

Set setting 382 Disable Pallet Changer to None.

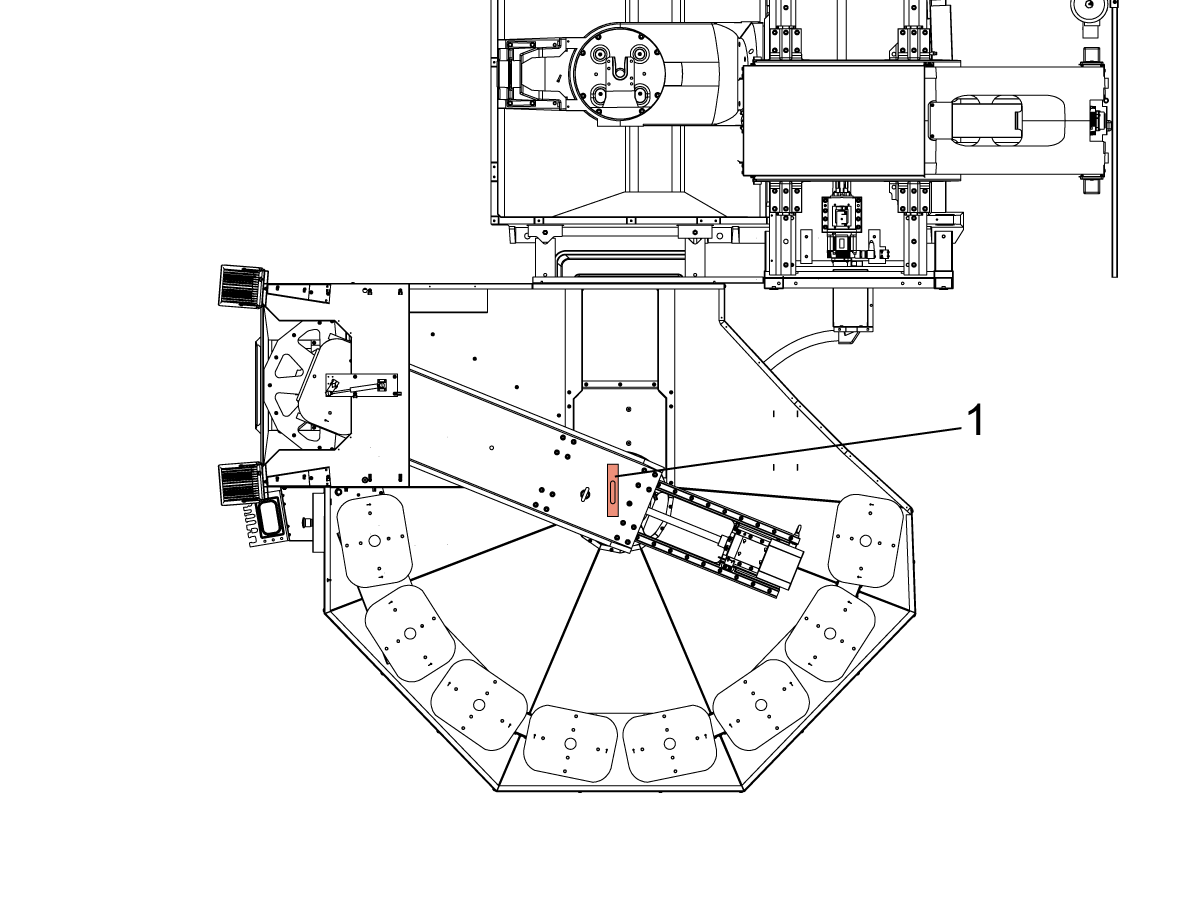
Find the Haas Pallet Pool Parameters decal on the E-Stop on the Pallet Pool machine.  Write down the values.

Use the USB Service key to go into Service Mode.

Press [DIAGNOSTIC] Go to the PARAMETERS> Factory setting tab.

Set the following factory settings values:

  • 15.004 [:] PR-Axis Disable = False
  • 16.004 [16:3] PS-Axis Disabled = False
  • 16.078 PS-Axis Tool Change Offset = Use the decal value.
  • 15.078 PR-Axis Tool Change Offset = Use the decal value.15.140 PR-Axis Grid Offset = Use the decal value.
  • 16.140 PS-Axis Grid Offset = Use the decal value.
    • Zero Return after the grid offset is adjusted
  • 2128 [:] Pallet Pool Type = HPU Lift

Assigning Missing Pallets on Scheduler

1

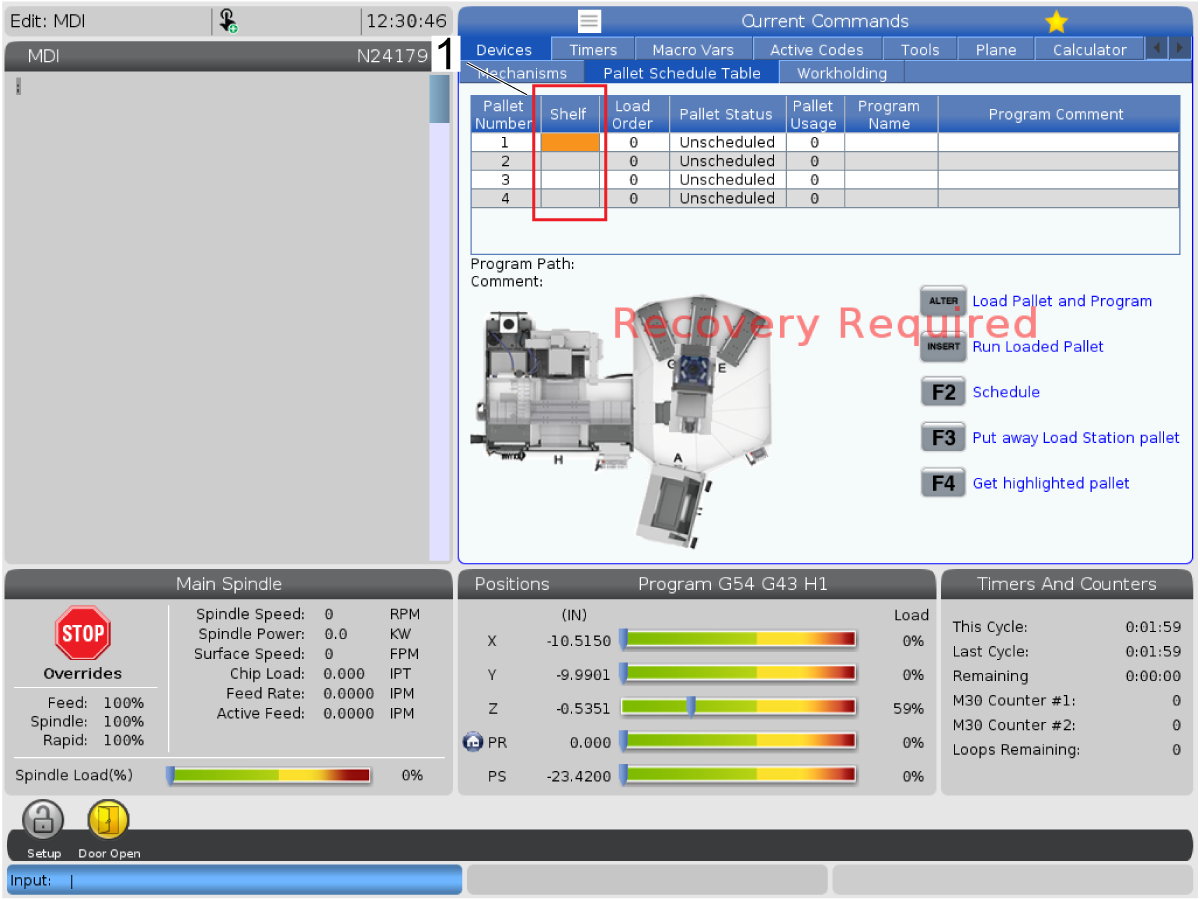
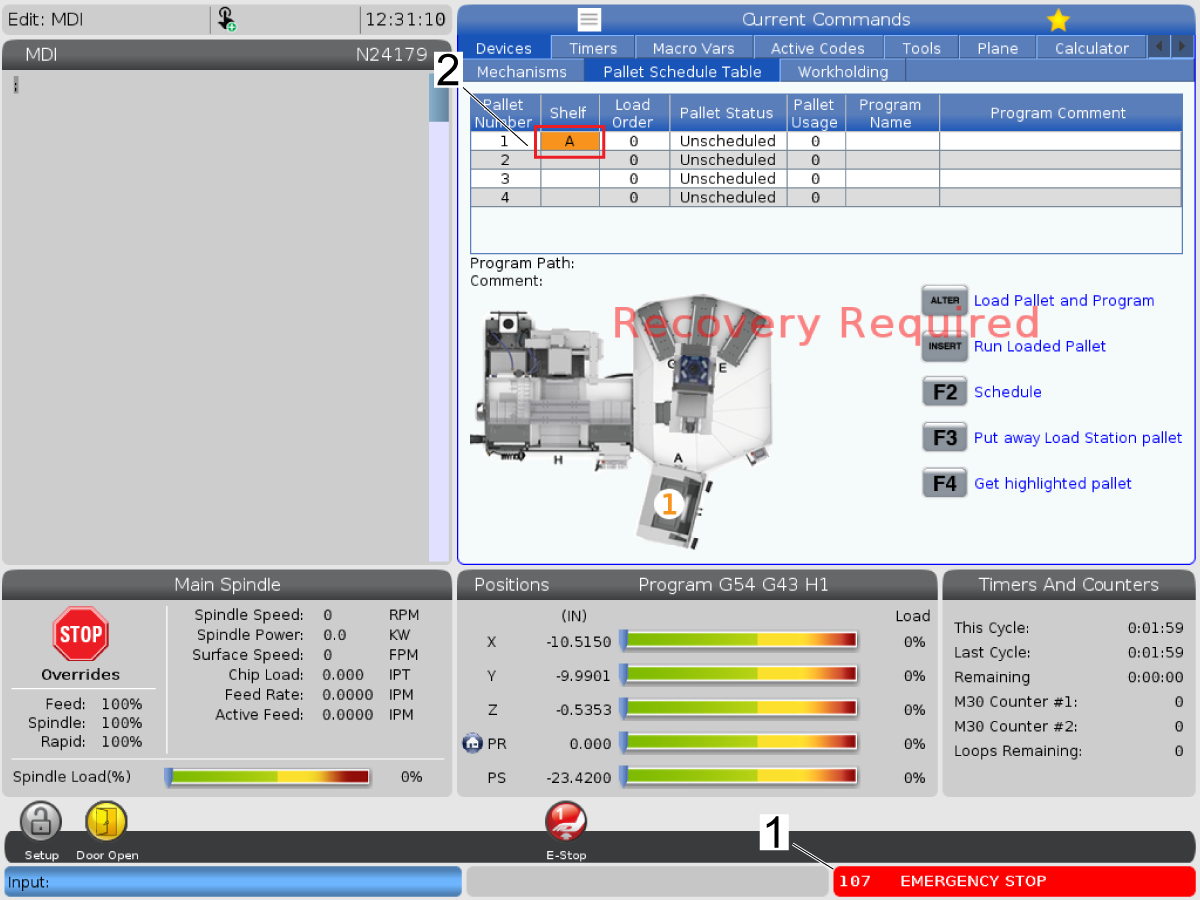
It is a possible to enter a condition where the shelves in the pallet scheduling page are not assigned [1]. This will not allow the PR and PS to zero return or recover the machine. 

This section will explain how to assign the missing shelves, if your machine is not in this condition please skip to the next section. 

First, press [CURRENT COMMANDS] and navigate to the Pallet Schedule Table tab.

NOTE: The VF-2SSYT 3 Station Pallet Pool was used to create the images, but the same process will apply for all pallet pool machines. 

2

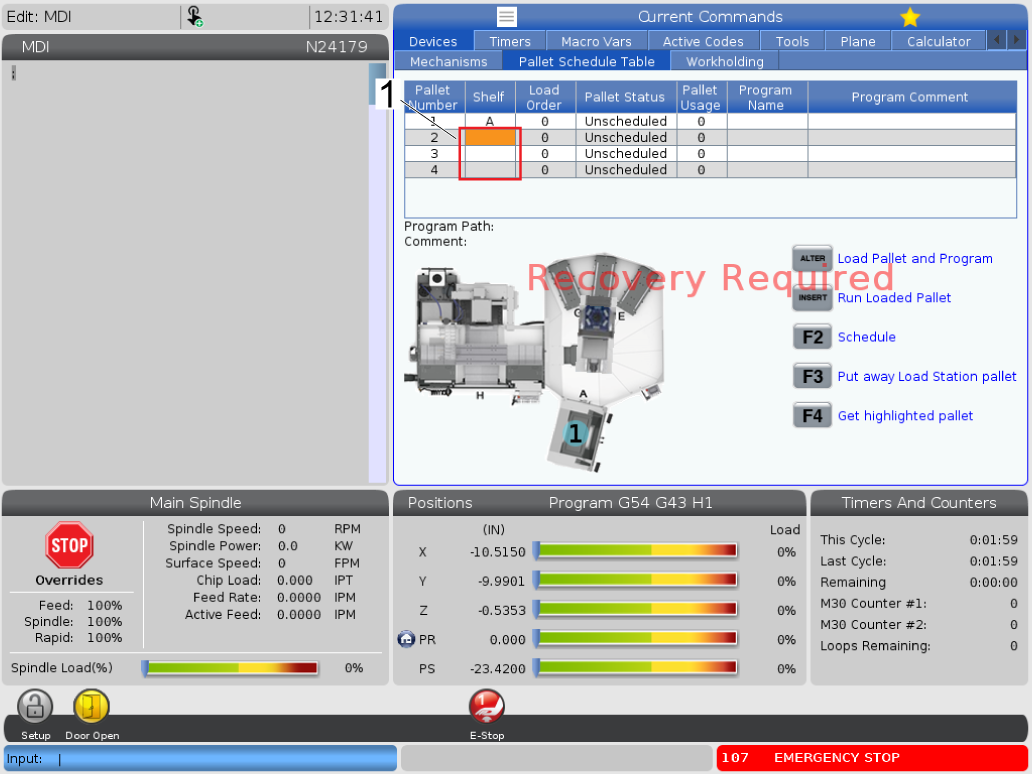
Press [EMERGENCY STOP] [1] and highlight the shelf tab on pallet number one.

With [EMERGENCY STOP] pressed, type the letter A and press [ENTER]. This will assign shelf A to pallet number 1 [2].

3

Repeat the previous step for the remaining pallet numbers in alphabetical number [1].

NOTE: The shelves can be re-assigned at any point  however the user chooses by repeating the same process (e.g. pallet number 3 can be assigned shelf B).


UMC - Pallet Pool - Leveling and Alignment

1

Use a bubble level [1] to roughly level the pallet pool before making any pallet changes. Steps 5 and 6 cover leveling in more detail.

2

Insert the Service Key USB and put the machine in Service Mode.

Make sure there are no obstructions inside the machine or inside the pallet pool area. Pull out all the [E-STOPS] and [RESET] the alarms.

Type [PS], press [ZERO RETURN] and press [SINGLE]. The machine will zero return PS-axis.

Type [PR], press [ZERO RETURN], and press [SINGLE]. The machine will zero return PR-axis.

Press [ZERO RETURN] and then press [ALL]. The machine will zero return all the axes.

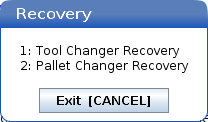
Once all the axis are zero returned press [RECOVER]. A pop up box will appear, select [2] for Pallet Changer Recovery.

3

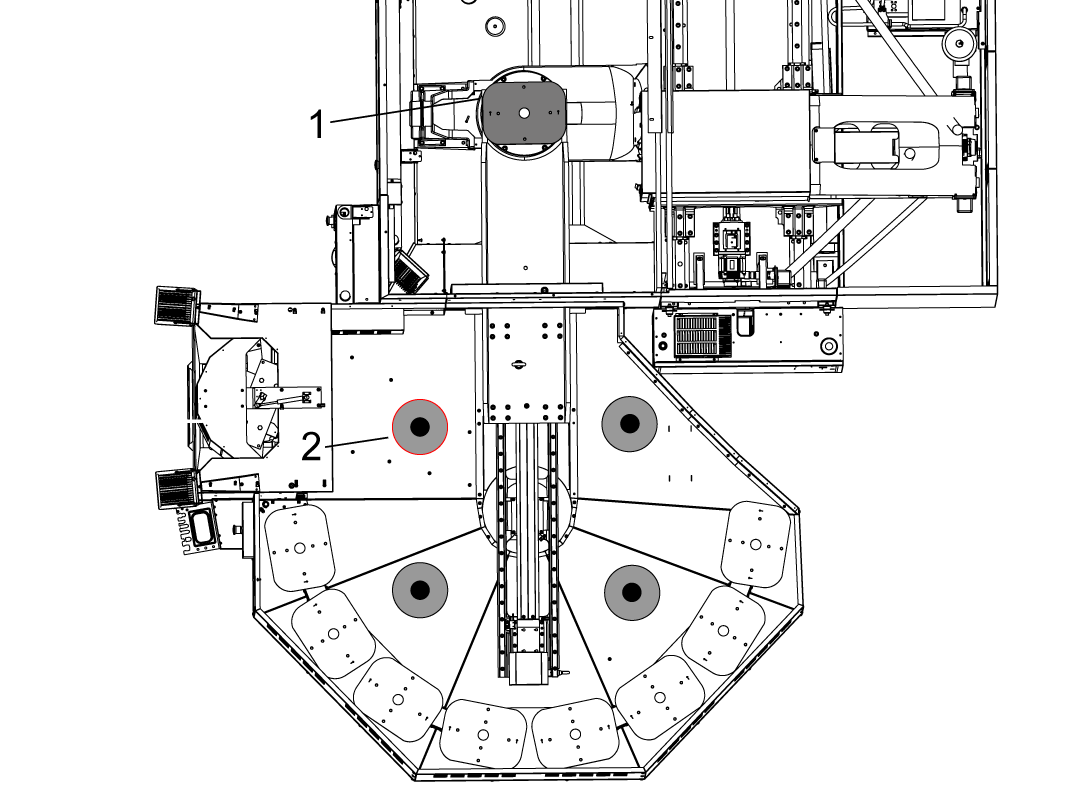
The Pallet Changer Recovery screen shows the Pallet Pool Status. Make sure the Pallet Lifter is Down [1]. If not press [ALTER] to bring the Pallet Lifter down.

Press [J] and then the [DELETE] button. This will rotate the pallet lifter towards station J.


4

Adjust the pallet pool slider by jogging the PS or PR axis so the forks align correctly underneath the pallet. This can be done by pressing [+Z] for Pallet Slide Axis and pressing [-Z] for Pallet Rotate Axis on the pallet recovery page.

With the RAM extended and the pallet over the Pallet Receiver adjust the C axis so the pins on the receiver line up with the holes on the pallet. Raise and lower the pallet using the [ALTER] on the Pallet Recovery Page until the pallet falls smoothly onto the dowels on the receiver. Record the C-axis position in Parameter 7.310.

NOTE: This is the position that the C-axis will rotate to during a pallet change operation.

Go to Factory Settings 2136 [:] Shelf J Slide Offset and 2146 [:] Shelf J Rotary Offset, and make sure the values match the PS and PR axis position, if they do not update the values.

NOTE: You can use the provided gap gauge 25-14354 as a straight edge to verify the side is flush with the end of the pallet. 

5

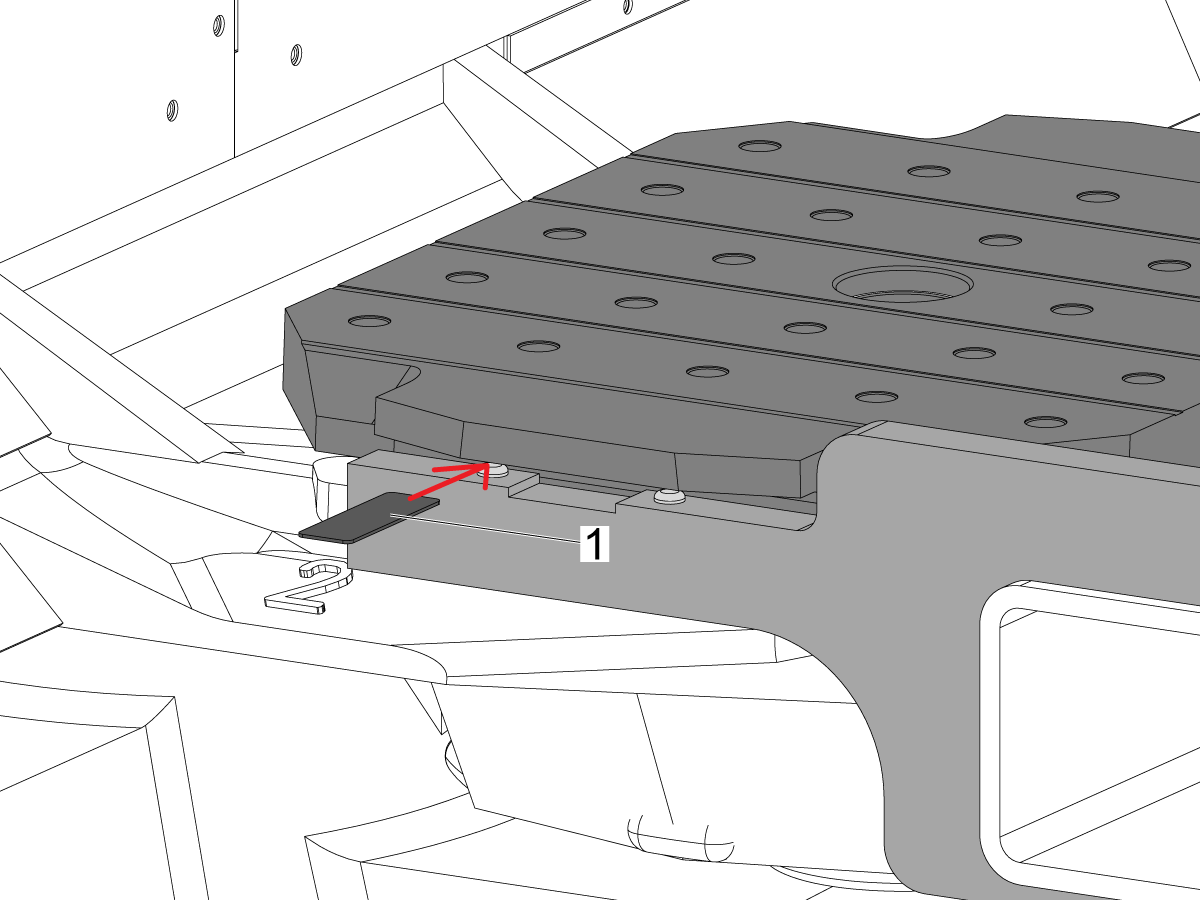
With the Pallet Pool in the down position, use the Gap Gauge [1] 25-14354 to set the gap by adjusting the height of the Pallet Pool.  See step 6 for more details on how to adjust the height. 

The Distance between the pins on the forks and the bottom of the Pallet surface should be the thickness of the Gap Gauge (.054") at all 4 pins, to set the gap the leveling screws will need to be adjusted.  See step 6 for more details on how to adjust the gap. 

6

The gap gauge must be touching the pins and the bottom of the pallet [1].

To do so adjust the leveling screws [2] that correlated to the pin in the same position.

For example when setting the gap of the top left pin (using the same image orientation) adjust the top left leveling screw. Continue adjusting the leveling screws in the same fashion to adjust the gap for each pin.

7

Lower the support feet until they touch the ground. 

The pallet lifter should be raised. 

Press the [INSERT] button to return the slide home.

Press the letter [A] and then [DELETE] button. This will rotate the pallet lifter to the A station.

Select the pallet slide axis use the RJH slowly jog the PS axis towards the A station.

Verify that the Pallet Pool will pick up and drop off the pallet at the A station.

Test the pick up / drop off operation on the remaining stations by using the pallet pool recovery functions. 

NOTE: If the station tray has been adjusted and it sounds like the pallet is sliding into the pin holes, adjust the feet to make sure it falls into place smoothly

Install the anchors.

Install the Pallet Pool guard panels.

Go to the Pallet Schedule Table and press [F3] to put away the pallet from the load station. 

Load the remaining pallets using the load station.

8

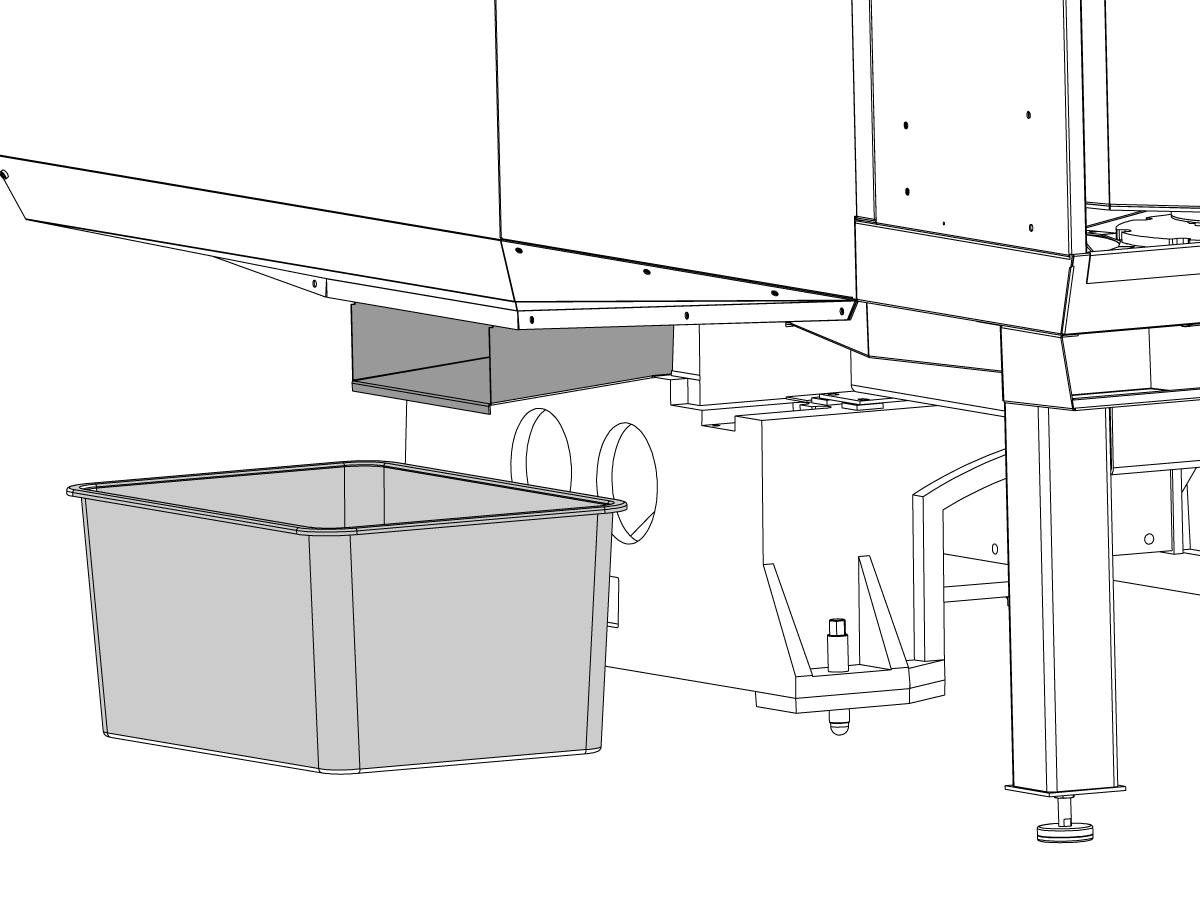
Place the provided tote under the Pallet Pool coolant discharge tray to catch the coolant that drains from the pallets.

Empty the tote as needed. 

ZNAJDŹ DYSTRYBUTORA
Uwagi
Haas Logo

美元价格不包括关税、报关费用、保险费、增值税及运费。
USD prices DO NOT include customs duty, customs fees, insurance, VAT, or freight.

人民币价格包含关税、报关费用、货运保险和增值税, 但不包括运费。
CNY prices include customs duty, customs fees, insurance, and VAT. DOES NOT include freight.

Cena dostawy Haas

Cena ta obejmuje koszt wysyłki, cła eksportowe i importowe, ubezpieczenie oraz wszelkie inne wydatki poniesione podczas wysyłki do miejsca docelowego we Francji uzgodnionego z kupującym. Do dostawy Produktu CNC firmy Haas nie zostaną doliczone żadne inne obowiązkowe koszty.

BĄDŹ NA BIEŻĄCO Z NAJNOWSZYMI WSKAZÓWKAMI I TECHNOLOGIĄ HAAS...

Zapisz się już dziś!   

HAAS TOOLING ACCEPTS THE FOLLOWING:

  • Serwis i wsparcie
  • Właściciele
  • Zgłoszenie serwisowe
  • Instrukcje obsługi
  • Części Haas
  • Zgłoszenie naprawy stołu obrotowego
  • Wskazówki dotyczące instalacji
  • Narzędzia zakupowe
  • Zbuduj & Wyceń nową maszynę Haas
  • Dostępne produkty
  • Cennik Haas
  • Finansowanie CNCA
  • O firmie Haas
  • Oferty pracy
  • Certyfikaty i bezpieczeństwo
  • Skontaktuj się z nami
  • Historia
  • Regulamin
  • Regulamin dotyczący oprzyrządowania firmy Haas
  • Poufność
  • Gwarancja
  • Społeczność Haas
  • Program Certyfikacji Haas
  • Haas Motorsports
  • Fundacja Gene'a Haas
  • Społeczność Edukacji Technicznej Haas
  • Wydarzenia
  • Dołącz do rozmowy
  • Facebook
  • Twitter
  • Flickr
  • YouTube
  • LinkedIn
  • Instagram
  • TikTok
© 2023 Haas Automation, Inc — maszyny CNC

This site is protected by reCAPTCHA and the Google Privacy Policy and Terms of Service apply.


2800 Sturgis Rd., Oxnard, CA 93030 / Toll Free: 800-331-6746
Phone: 805-278-1800 / Fax: 805-278-2255

Powiadomienie o plikach cookie

Używamy plików cookie, aby poprawiać środowisko użytkownika. Nasze powiadomienie o plikach cookie opisuje, których plików cookie używamy, dlaczego ich używamy oraz jak możesz uzyskać więcej informacji o plikach cookie. Potwierdź zgodę na użycie analitycznych plików cookie. Jeśli nie wyrazisz zgody, możesz nadal korzystać z naszej witryny internetowej, ale środowisko użytkownika może być pogorszone.

Zarządzaj ustawieniami

Powiadomienie o plikach cookie

Używamy plików cookie, aby poprawiać środowisko użytkownika. Nasze powiadomienie o plikach cookie opisuje, których plików cookie używamy, dlaczego ich używamy oraz jak możesz uzyskać więcej informacji o plikach cookie. Potwierdź zgodę na użycie analitycznych plików cookie. Jeśli nie wyrazisz zgody, możesz nadal korzystać z naszej witryny internetowej, ale środowisko użytkownika może być pogorszone.

Functional Cookies

Analytics Cookies