MyHaas Bienvenido:
!
Haas Tooling Guest Order History MyHaas/HaasConnect Sign In Register Haas Tooling Mi cuenta Order History Return History MyHaas/HaasConnect Sign Out Bienvenido: Mis maquinas Última actividad Mis presupuestos Mi cuenta Mis usuarios Sign Out
Encuentre su distribuidor
  1. Select Language
    1. Deutsch
    2. Español - España
    3. Español - México
    4. Français
    5. Italiano
    6. Português
    7. Český
    8. Dansk
    9. Nederlands
    10. Magyar
    11. Polski
    12. Svenska
    13. Türkçe
    14. 中文
    15. Suomi
    16. Norsk
    17. الإنجليزية
    18. български
    19. Hrvatski
    20. Ελληνικά
    21. Română
    22. Slovenský
    23. Slovenščina
    24. 한국어
    25. 日本語
  • máquinas Main Menu
    • Fresadoras verticales de Haas Fresadoras verticales
      Fresadoras verticales
      Fresadoras verticales View All
      • Fresadoras verticales
      • Serie VF
      • Máquinas universales
      • Series VR
      • VP-5 prismático
      • CMV con cambio de paletas
      • Mini Mills
      • Máquinas de moldeo
      • Centros de taladrado de alta velocidad
      • Serie de taladrado/roscado/fresado
      • Fresadoras tipo Toolroom
      • Fresadoras compactas
      • Serie de puentes
      • Router de láminas
      • CMV de gran tamaño
      • Fresadoras de doble columna
      • Simulador del control
      • Cargador automático de piezas para fresadora
      • Cargador automático de piezas de carga lateral CMV/UMC
      • Cargador de piezas automático compacto
    • Product Image Soluciones multieje
      Soluciones multieje
      Soluciones multieje View All
      • Soluciones multieje
      • Tornos con eje Y
      • Fresadoras de 5 ejes
    • Tornos Haas Tornos
      Tornos
      Tornos View All
      • Tornos
      • Serie ST
      • Doble husillo
      • Serie Box Way
      • Tornos tipo Toolroom
      • Torno con chuck
      • Alimentador de barras Haas
      • Alimentador de barras de Haas V2
      • Cargador automático de piezas para torno
    • Fresadoras horizontales Haas Fresadoras horizontales
      Fresadoras horizontales
      Fresadoras horizontales View All
      • Fresadoras horizontales
      • Cono 50
      • Cono 40
    • Mesas rotativas y divisores Haas Cuartos ejes y divisores
      Cuartos ejes y divisores
      Cuartos ejes y divisores View All
      • Cuartos ejes y divisores
      • Mesas giratorias
      • Divisores
      • Equipos rotativos de 5 ejes
      • Equipos rotativos extragrandes
    • Product Image Sistemas de automatización
      Sistemas de automatización
      Sistemas de automatización View All
      • Sistemas de automatización
      • Automatización de fresadora
      • Automatización del torno
      • Modelos de automatización
    • Centros de taladrado Haas Máquinas de sobremesa
      Máquinas de sobremesa
      Máquinas de sobremesa View All
      • Máquinas de sobremesa
      • Fresadora de sobremesa
      • Torno de sobremesa
    • Equipo de taller Haas Equipo de taller
      Equipo de taller
      Equipo de taller View All
      • Equipo de taller
      • Sierra de banda
      • Fresadora de rodilla
      • Esmeriladora de superficies, 2550
      • Esmeriladora de superficies, 3063
      • Máquina de corte láser
    • ENLACES RÁPIDOS Special Series  Special Series 
      SERIE EU SERIE EU CONFIGURACIONES Y PRECIO | LISTA DE PRECIOS CONFIGURACIONES Y PRECIO | LISTA DE PRECIOS Las máquinas en stock Las máquinas en stock NOVEDADES NOVEDADES SU PRIMER CNC SU PRIMER CNC
      HERRAMIENTAS DE COMPRAS
      • Configure y obtenga el precio de su máquina Haas
      • Lista de precios
      • Inventario disponible
      • Financiación CNCA
      ¿QUIERE HABLAR CON ALGUIEN?

      En su Haas Factory Outlet (HFO) pueden resolver sus dudas y orientarle sobre las mejores opciones.

      CONTACT YOUR DISTRIBUTOR >
  • Opciones Main Menu
    • Product Image Husillos
      Husillos
      Husillos View All
      • Husillos
    • Product Image Cambiadores de herramientas
      Cambiadores de herramientas
      Cambiadores de herramientas View All
      • Cambiadores de herramientas
    • Product Image 4.º | 5.º eje
      4.º | 5.º eje
      4.º | 5.º eje View All
      • 4.º | 5.º eje
    • Product Image Torretas y herramientas vivas
      Torretas y herramientas vivas
      Torretas y herramientas vivas View All
      • Torretas y herramientas vivas
    • Product Image Palpado
      Palpado
      Palpado View All
      • Palpado
    • Extracción de virutas y refrigeración de Haas Manejo del soluble refrigerante y virutas
      Manejo del soluble refrigerante y virutas
      Manejo del soluble refrigerante y virutas View All
      • Manejo del soluble refrigerante y virutas
    • El Control Haas El Control Haas
      El Control Haas
      El Control Haas View All
      • El Control Haas
    • Product Image Opciones para productos
      Opciones para productos
      Opciones para productos View All
      • Opciones para productos
    • Product Image Herramientas y sujeción
      Herramientas y sujeción
      Herramientas y sujeción View All
      • Herramientas y sujeción
    • Product Image Portapiezas
      Portapiezas
      Portapiezas View All
      • Portapiezas
    • View All
    • Product Image Soluciones de 5 ejes
      Soluciones de 5 ejes
      Soluciones de 5 ejes View All
      • Soluciones de 5 ejes
      • 5 Easy Steps to 5-Axis
    • Product Image Automatización
      Automatización
      Automatización View All
      • Automatización
    • ENLACES RÁPIDOS Special Series  Special Series 
      SERIE EU SERIE EU CONFIGURACIONES Y PRECIO | LISTA DE PRECIOS CONFIGURACIONES Y PRECIO | LISTA DE PRECIOS Las máquinas en stock Las máquinas en stock NOVEDADES NOVEDADES SU PRIMER CNC SU PRIMER CNC
      HERRAMIENTAS DE COMPRAS
      • Configure y obtenga el precio de su máquina Haas
      • Lista de precios
      • Inventario disponible
      • Financiación CNCA
      ¿QUIERE HABLAR CON ALGUIEN?

      En su Haas Factory Outlet (HFO) pueden resolver sus dudas y orientarle sobre las mejores opciones.

      CONTACT YOUR DISTRIBUTOR >
  • Main Menu
      Descubra la diferencia Haas
    • Por qué Haas
    • MyHaas
    • Comunidad de capacitación
    • Industria 4.0
    • Certificado Haas
    • Testimonios de clientes
  • Servicio técnico Main Menu
      Bienvenido a Haas Service
      PANTALLA DE INICIO DE SERVICIO Manuales del operador Procedimientos instructivos Guías de resolución de problemas Mantenimiento preventivo Piezas Haas Haas Tooling Vídeos
  • Videos Main Menu
×

Search Results

Web Pages

Images

    • <
    • 1
    • >
MyHaas Bienvenido:
!
Haas Tooling Guest Order History MyHaas/HaasConnect Sign In Register Haas Tooling Mi cuenta Order History Return History MyHaas/HaasConnect Sign Out Bienvenido: Mis maquinas Última actividad Mis presupuestos Mi cuenta Mis usuarios Sign Out
Encuentre su distribuidor
  1. Select Language
    1. Deutsch
    2. Español - España
    3. Español - México
    4. Français
    5. Italiano
    6. Português
    7. Český
    8. Dansk
    9. Nederlands
    10. Magyar
    11. Polski
    12. Svenska
    13. Türkçe
    14. 中文
    15. Suomi
    16. Norsk
    17. الإنجليزية
    18. български
    19. Hrvatski
    20. Ελληνικά
    21. Română
    22. Slovenský
    23. Slovenščina
    24. 한국어
    25. 日本語
×

Search Results

Web Pages

Images

    • <
    • 1
    • >

Spindle - Replacement - DM-1 - DT-1

Pantalla de inicio de servicio Procedimientos instructivos DT/DM - Acoplamiento de araña - Husillo - Reemplazo
Recently Updated Last updated: 12/15/2022

DT/DM - Accionamiento de acoplamiento de araña - Husillo - Reemplazo


DT/DM - Acoplamiento de araña - Husillo - Reemplazo

- Saltar a la sección - 1. Introducción 2. Spindle Installation Preparation (2 steps) 3. Mid-Point Oiling (MPO) Spindle - Installation (9 steps) 4. Desmontaje del husillo (4 steps) Back to Top

Introducción

Realice este procedimiento para un DM-1 o un DT-1. Este procedimiento le indica cómo reemplazar el husillo. Las máquinas construidas después de enero de 2014 utilizan un husillo de aceitado de punto medio (MPO). Utilizará un husillo MPO cuando reemplace el husillo.

Spindle Installation Preparation

1

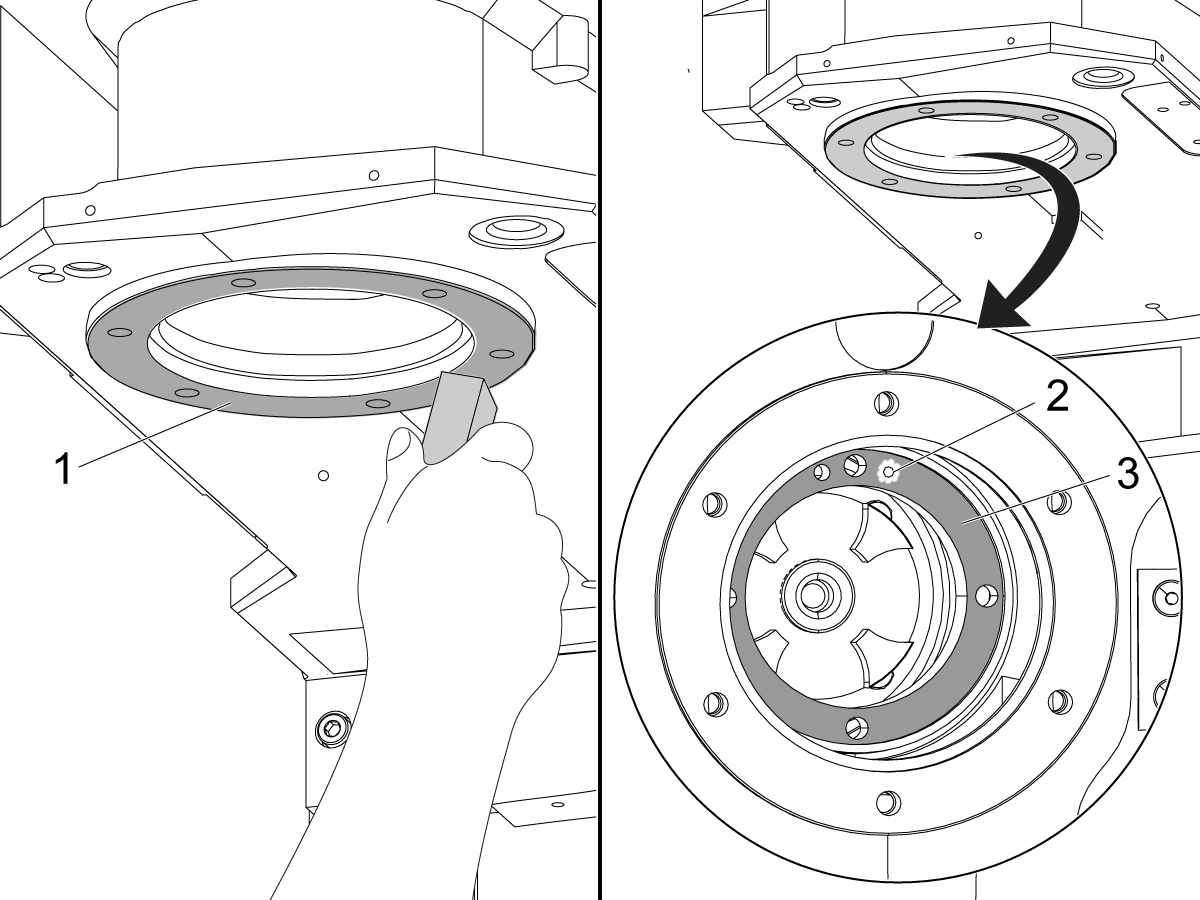
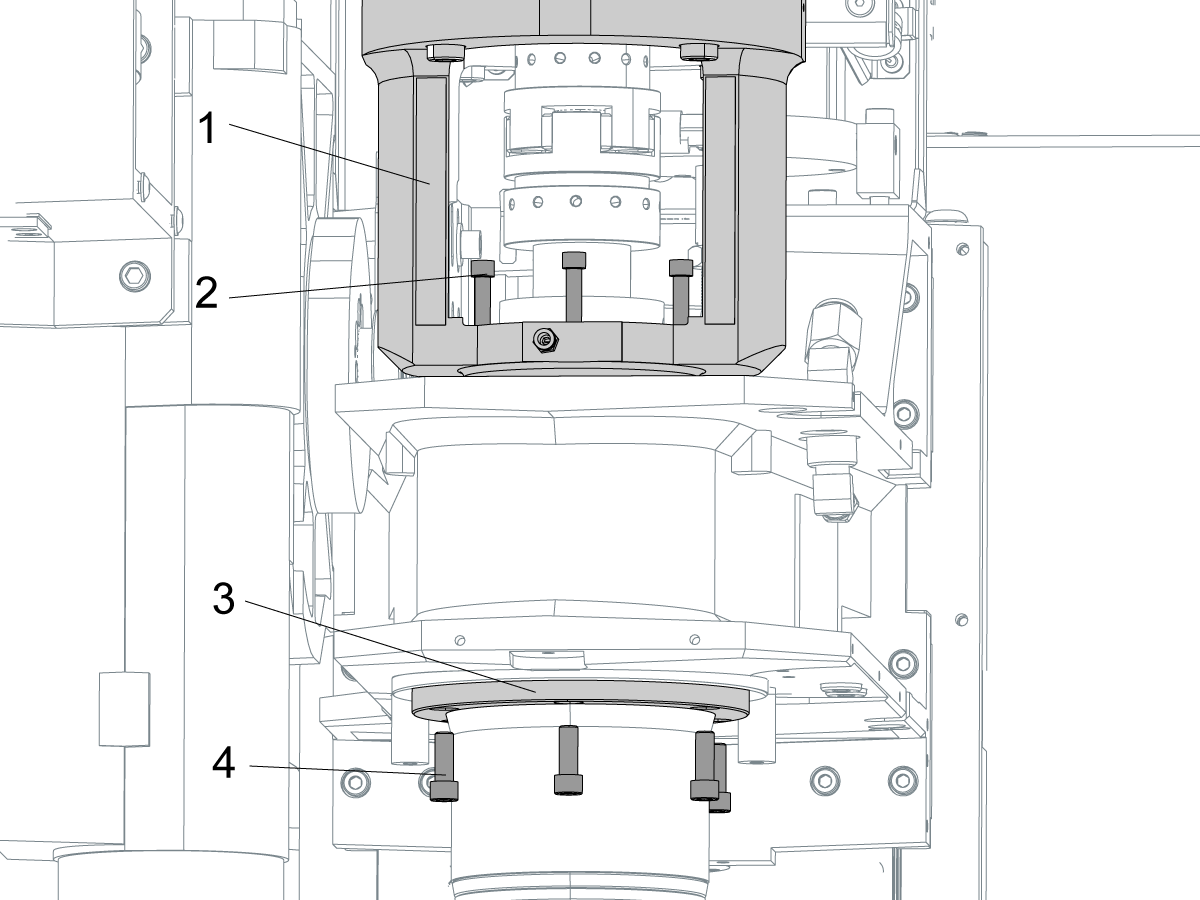
Clean the spindle head bore.

Stone the mating surface [1] on the spindle head casting.

Clean the motor adapter where it touches the spindle [3].

Do not stone the spindle lubrication port [2]. Keep all contamination out of the port.

2

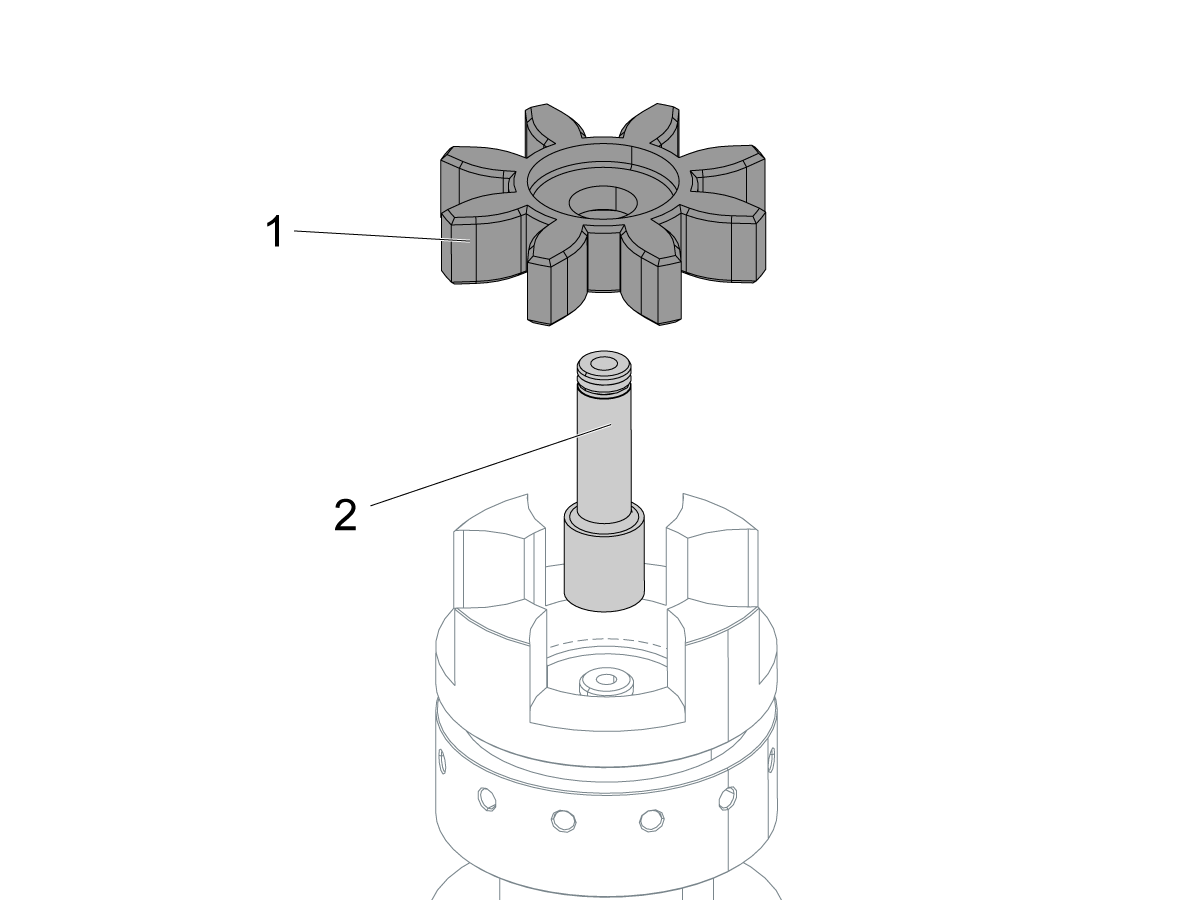
Replace the spider coupling [1] if it is worn or damaged.

Replace the transfer tube [2] if it is worn or damaged.

Mid-Point Oiling (MPO) Spindle - Installation

Do not remove the tape from the lubrication port.

Use a lift to support the motor until the spindle is attached.

 Important: Refer to the DT-1 - Mid-Point Oiling (MPO) - Spindle - Minimum Lubrication - Oil Pump Modification procedure.

1

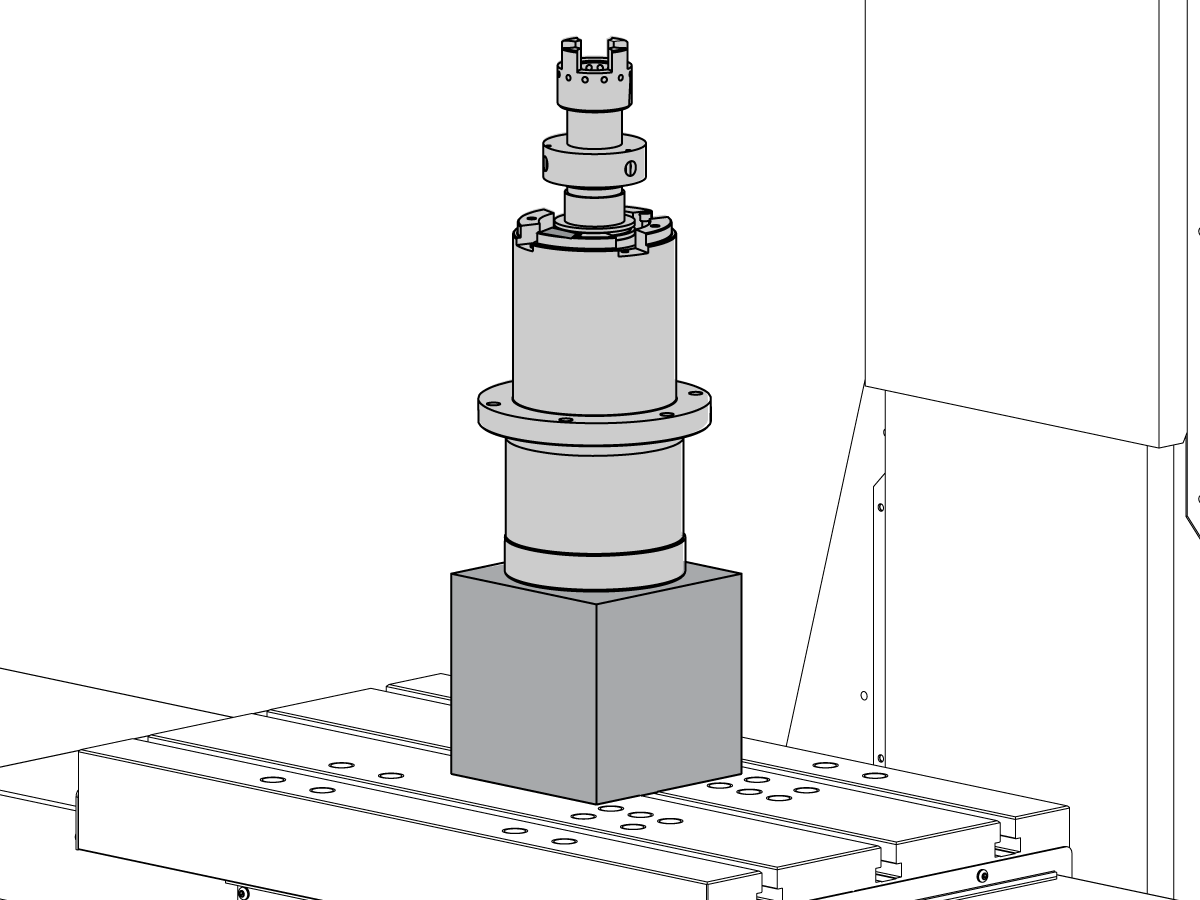
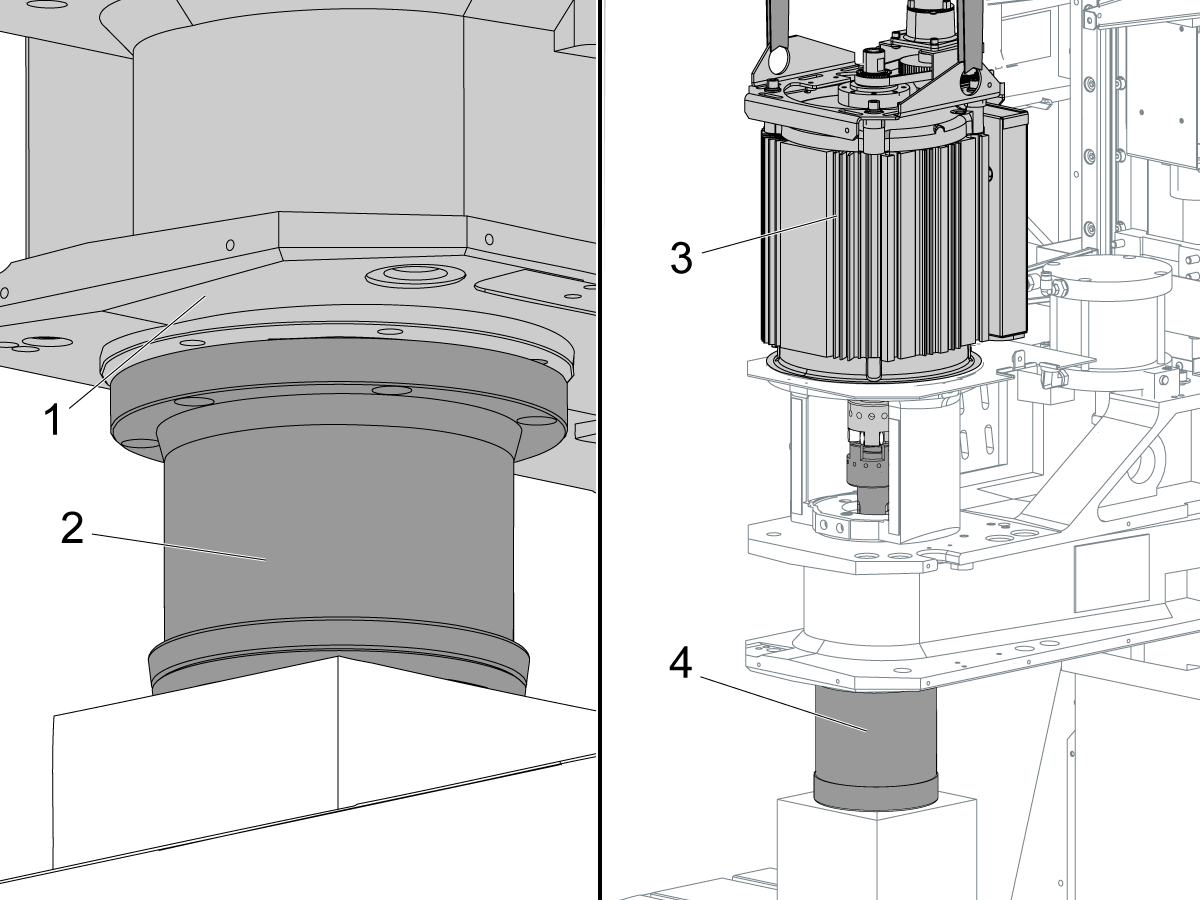
Attach the red protective cap [2] to the bottom of the MPO spindle.

Put a 6" x 6" x 6" (152 mm x 152 mm x 152 mm) wood or aluminum block [3] on the table.

Put the MPO spindle on the block.

Make sure that the spindle lubrication port [1] is in the front.

Put a long 5/16"-18 screw [4] through the rear hole on the motor adapter. This screw helps you align the motor adapter to the spindle.

2

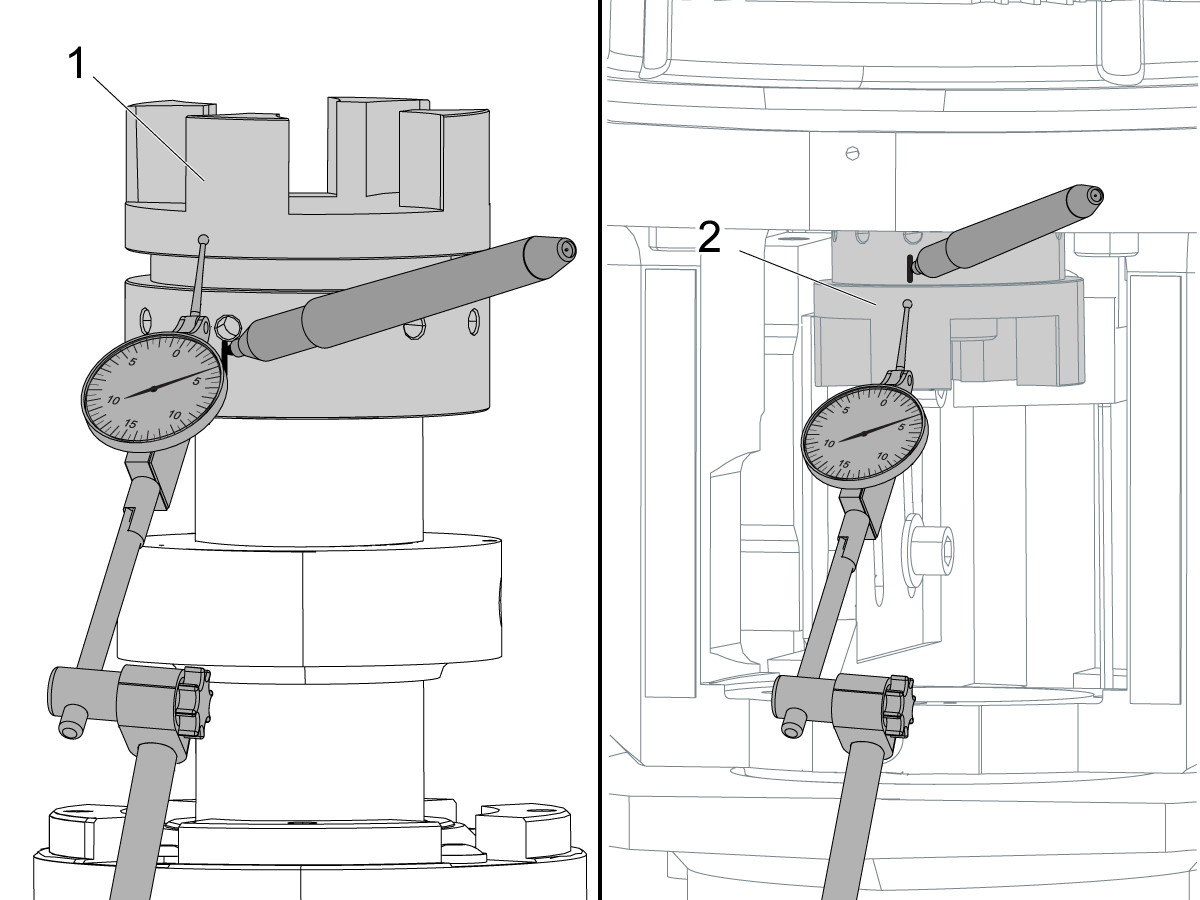
Put an indicator against the spindle coupler [1]. Zero the indicator.

Slowly turn the spindle with your hand to find the highest point on the coupler.

Put a mark on the point with a permanent marker.

Examine the coupler on the motor [2].

If the motor coupler has a mark, proceed to step 3.

If the motor coupler does not have a mark:

  • Put an indicator against the motor coupler [2]. Zero the indicator.
  • Slowly turn the motor by hand to find the highest point.
  • Use a permanent marker to mark the point.

3

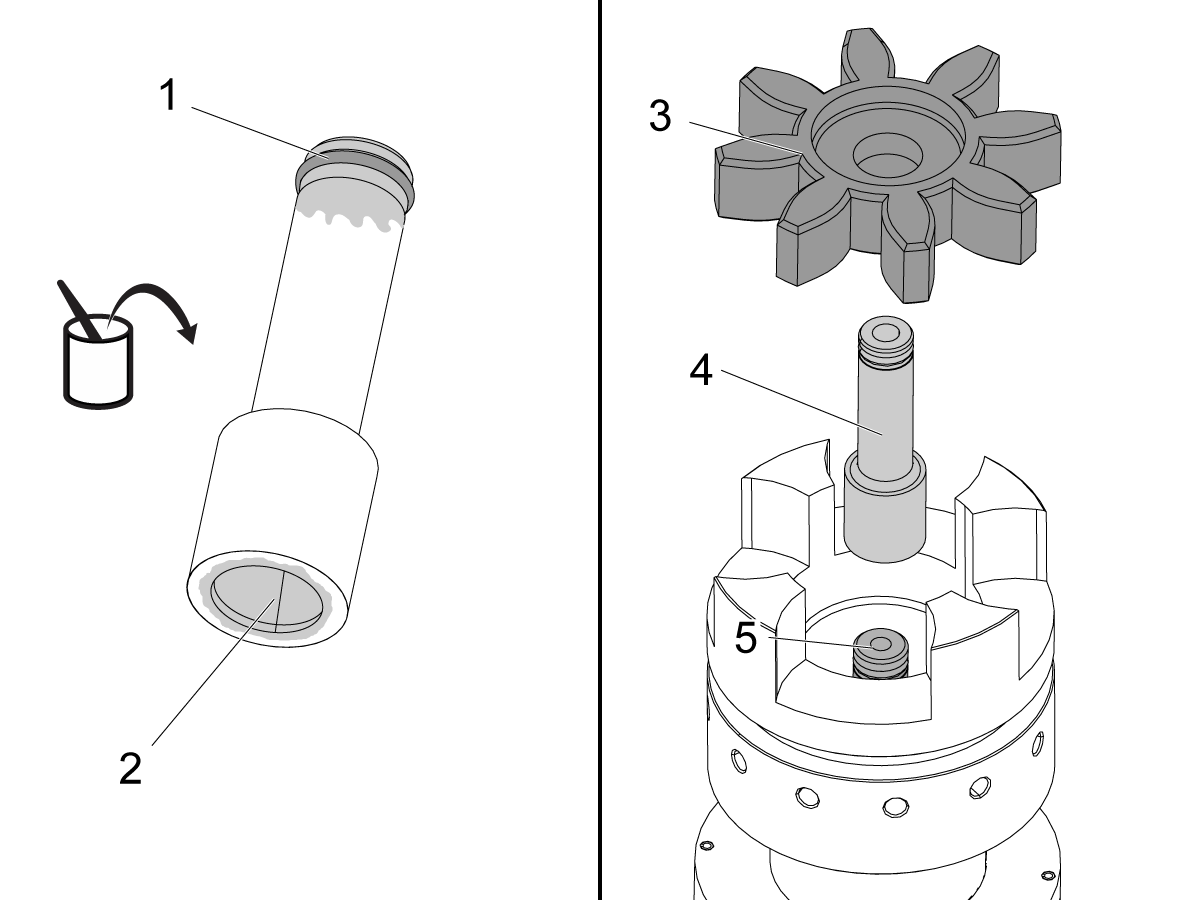
Apply grease to the transfer tube at these locations:

  • the o-ring [1] at the top
  • the socket [2] for the o-ring on the draw bar.

Push the transfer tube [4] onto the top of the draw bar [5].

Install the spider coupler [3].

4

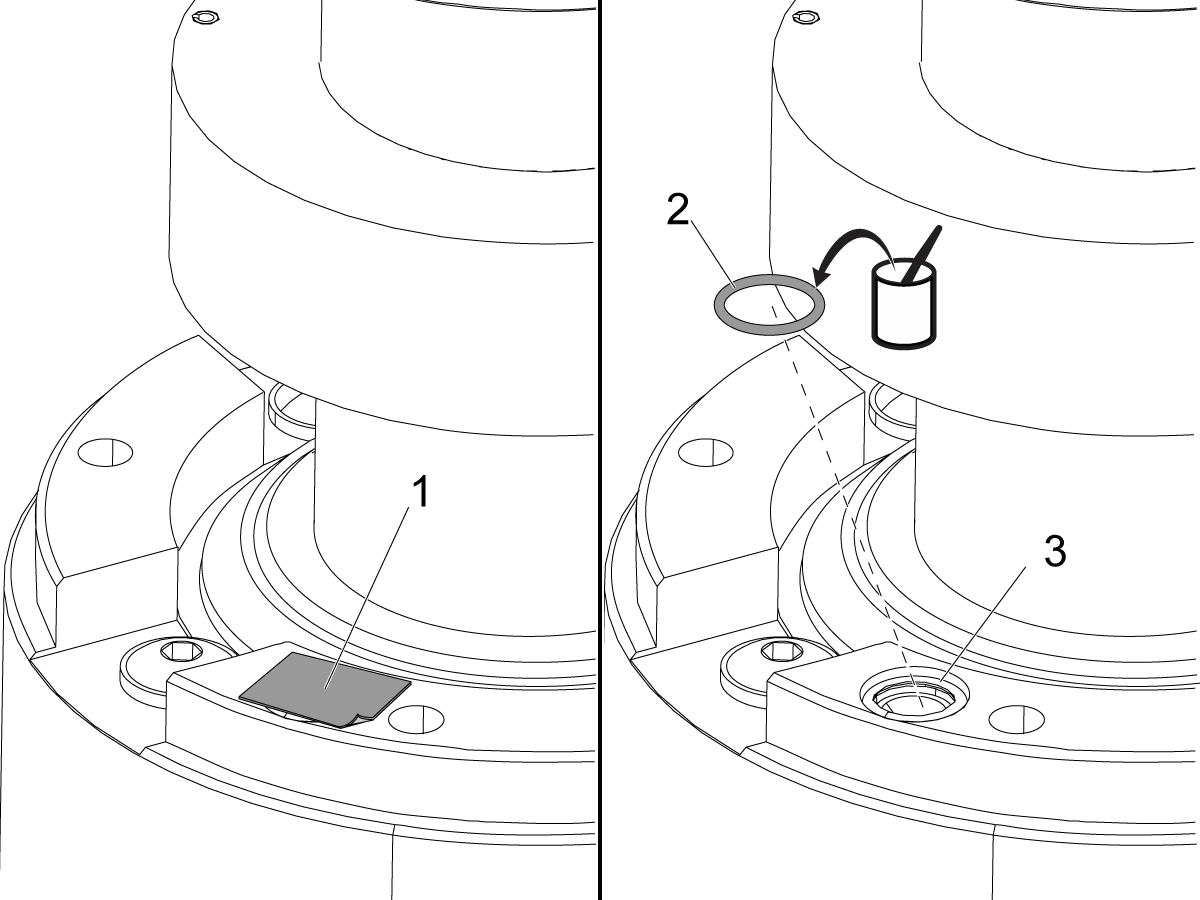
Remove the tape [1] from the spindle lubrication port.

Apply a small quantity of grease to the spindle seal o-ring [2].

Insert the o-ring into the lubrication port [3].

Put the tape over the lubrication port of the spindle that was removed.

5

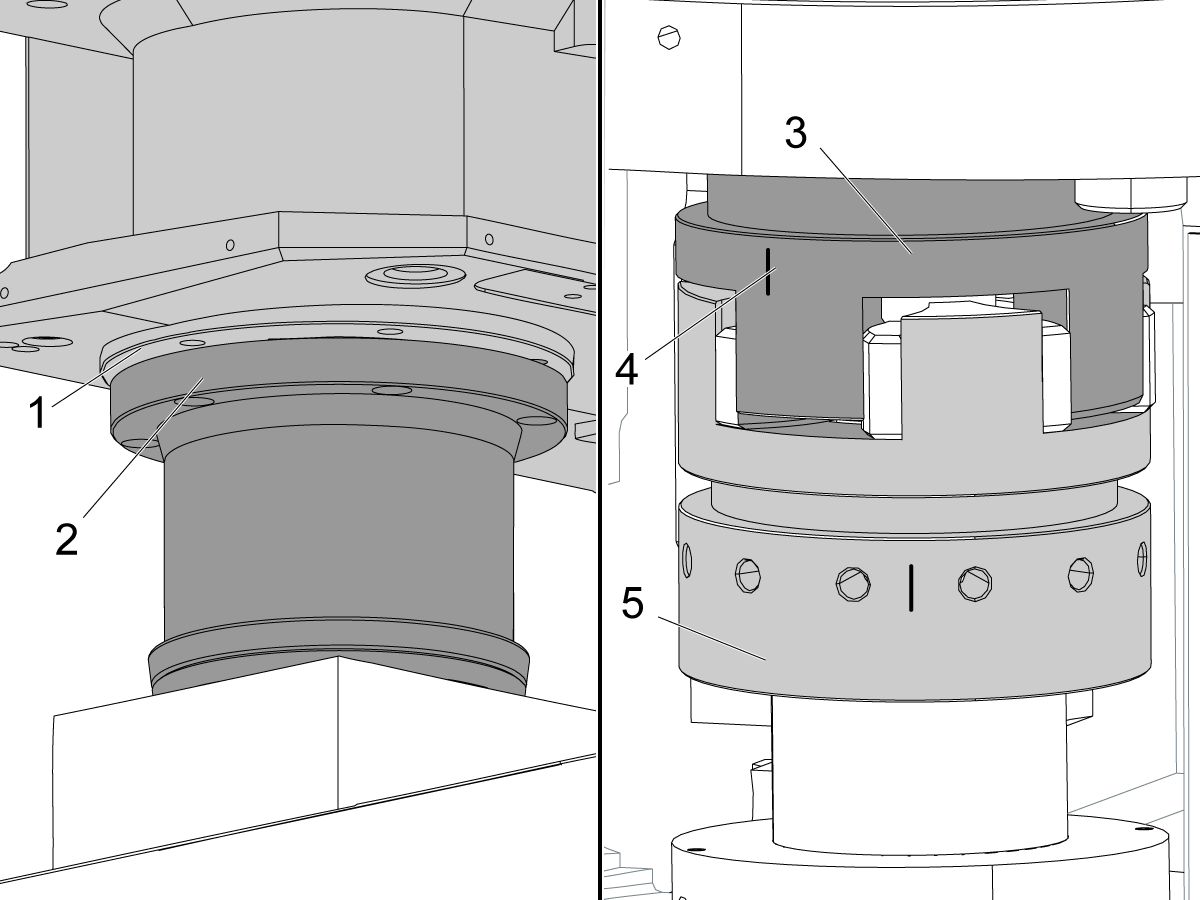
Slowly jog the Z Axis in the negative (-) direction until the head mount [1] is 0.5" (13 mm) above the spindle flange [2].

Use your hand to slowly turn the spindle coupler [5] until the mark on the spindle coupler aligns with the mark [4] on the motor coupler [3]. Align the (2) marks as closely as possible.

Slowly jog the Z Axis in the negative (-) direction.

 Caution: Lower the lift as you jog the Z Axis. The motor must be supported by the lift until the spindle is connected to the motor adapter.

Make sure the spindle is centered in the spindle bore.

Make sure the couplers engage smoothly.

6

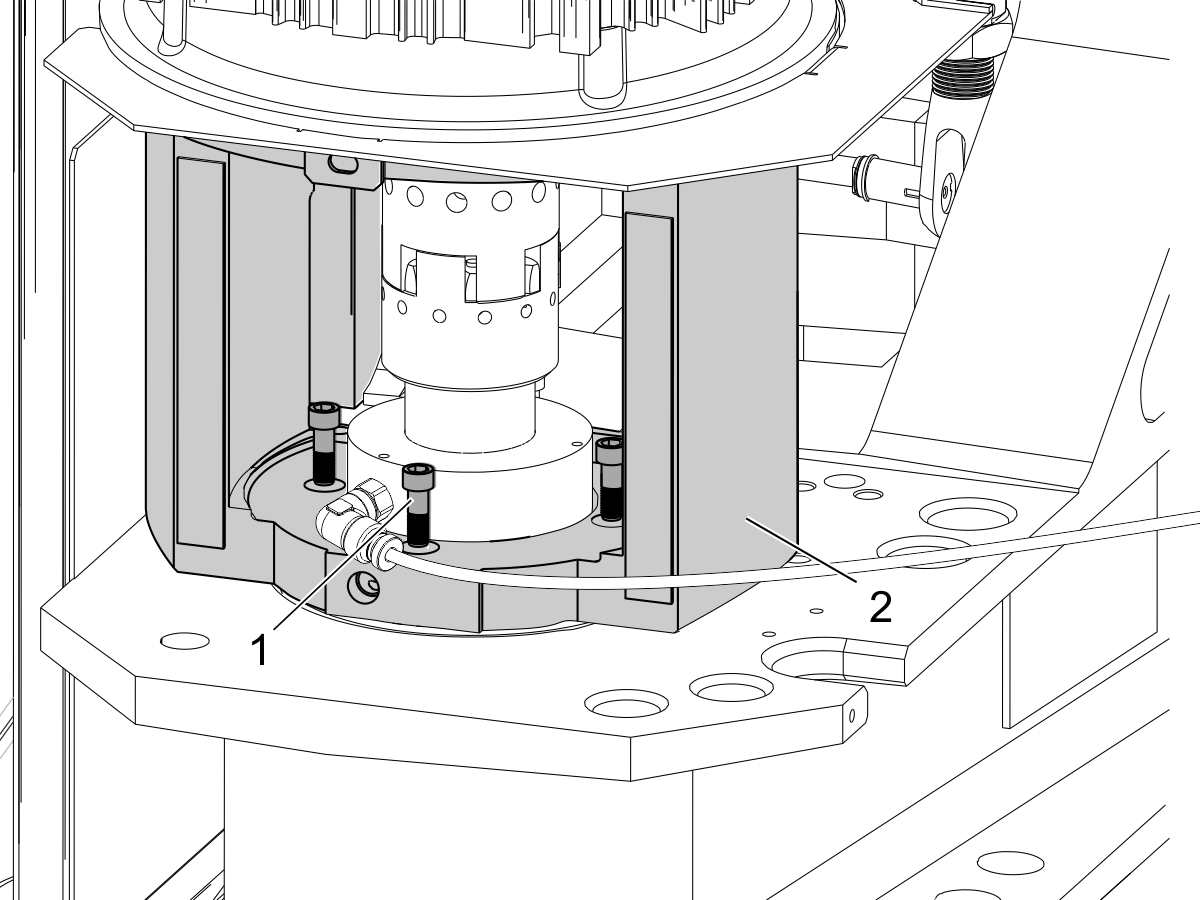
Remove the temporary screw you used in step 1.

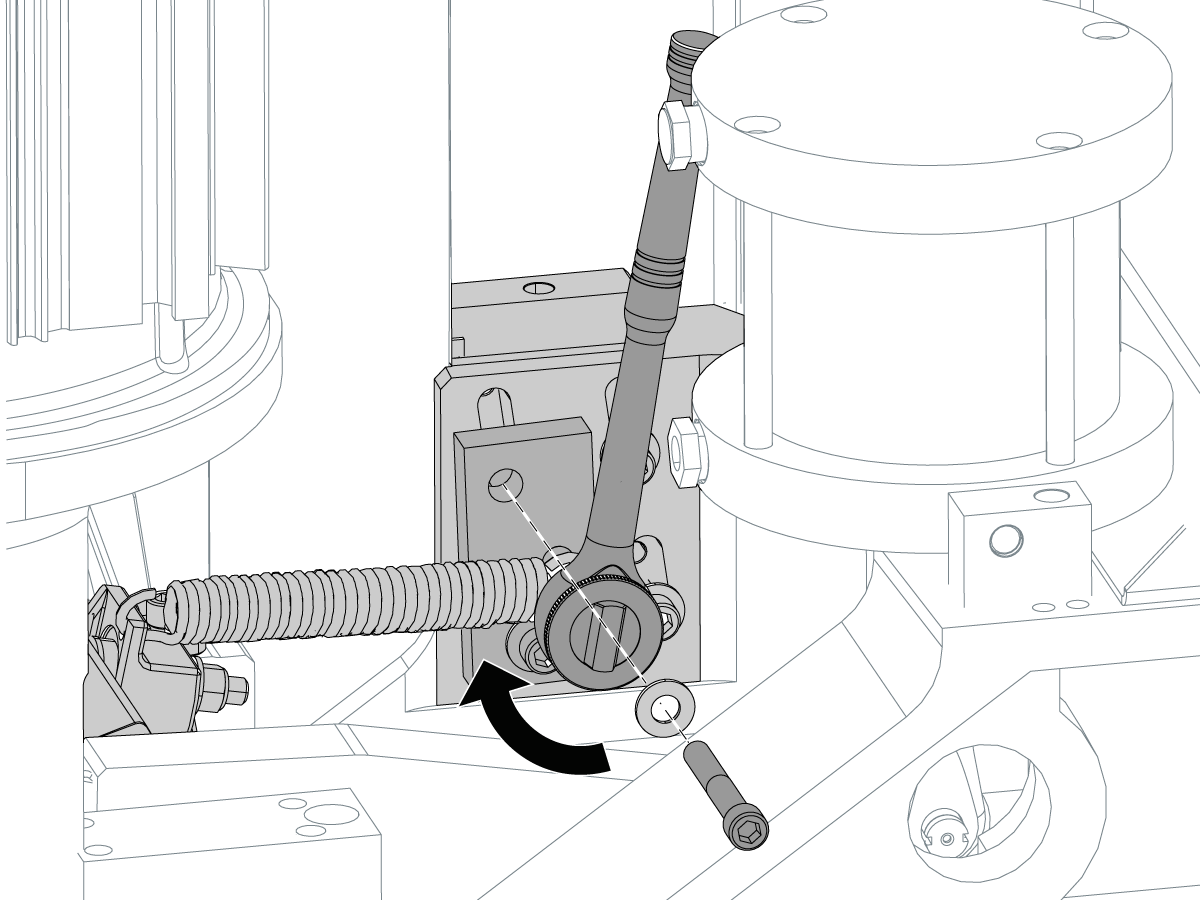
Install (4) motor mount screws [1] into the motor mount adapter [2].

Torque the screws. Refer to Haas Fastener Torque Specifications.

Remove the motor support lift.

Attach the oil supply fitting.

Connect the oil supply tube.

7

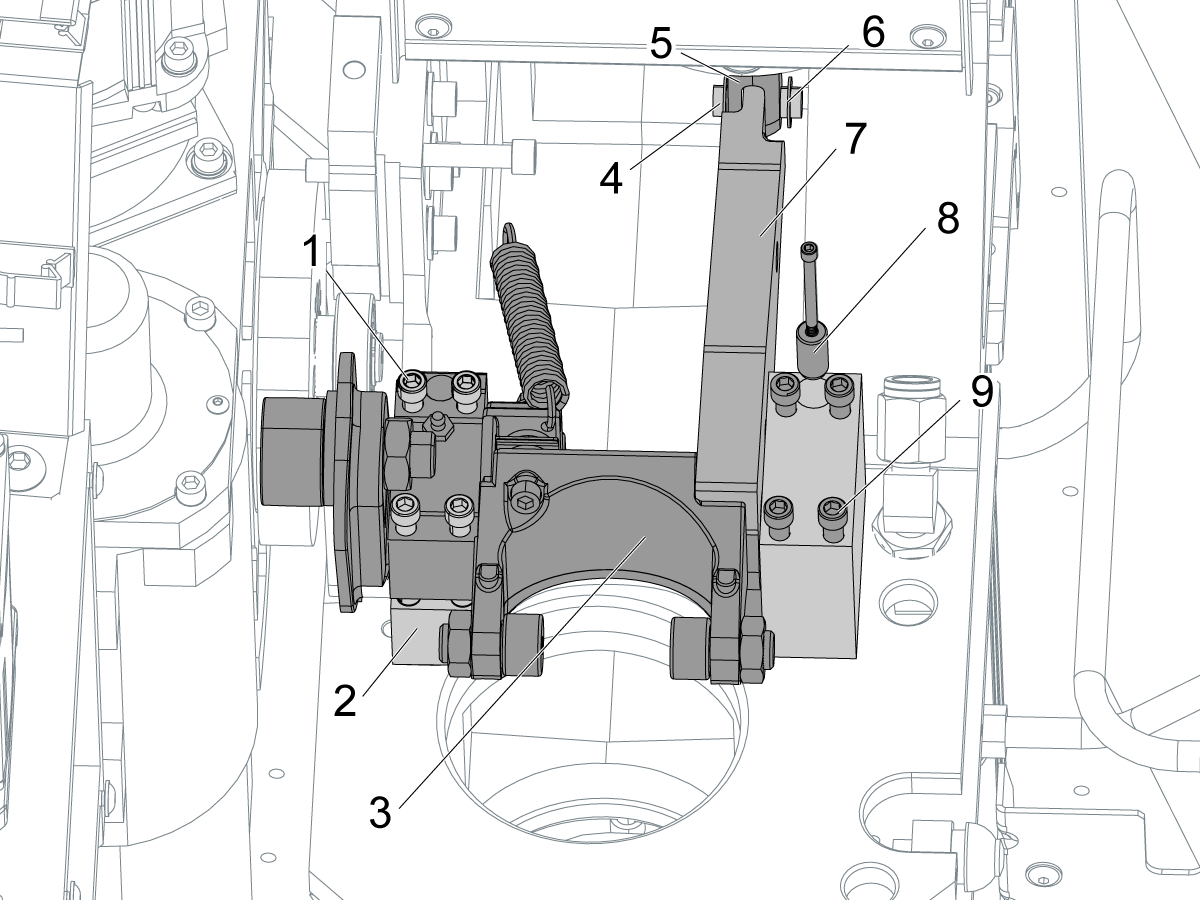
Put (4) screws [1] into the upper inside bearing block of the rocker assembly.

Put (4) screws [9] into the outer bearing block.

Put the rocker assembly [3] onto the spindle casting. Use the lower bearing block [2] on the inside as a guide.

Use a dowel pin [8] to align the outside bearing block.

Put the rocker arm [7] through the yoke [5] on shaft from the air cylinder.

Push the clevis pin [4] through the arm and the yoke.

Put the C-clip [6] onto the clevis pin.

Torque all of the screws. Refer to the Haas Fastener Torque Specifications.

Make sure the rocker assembly is correctly adjusted.

 Note: The illustration does not show the spindle and spindle motor.

8

Use the spring installation tool to attach the spring to the striker block.

Refer to DT-1 - Spindle Rocker Arm - Spring Installation Tool - Instructions.

Install the fan assembly onto the top of the spindle head.

Install the spindle head covers.

9

Refer ro the VMC - Spindle - Alignment ("Spindle Sweep") procedure.

Desmontaje del husillo

1

Avance el eje Z hasta la parte inferior del recorrido.

Pulse [EMERGENCY STOP].

Retire el conjunto de ventilador del husillo.

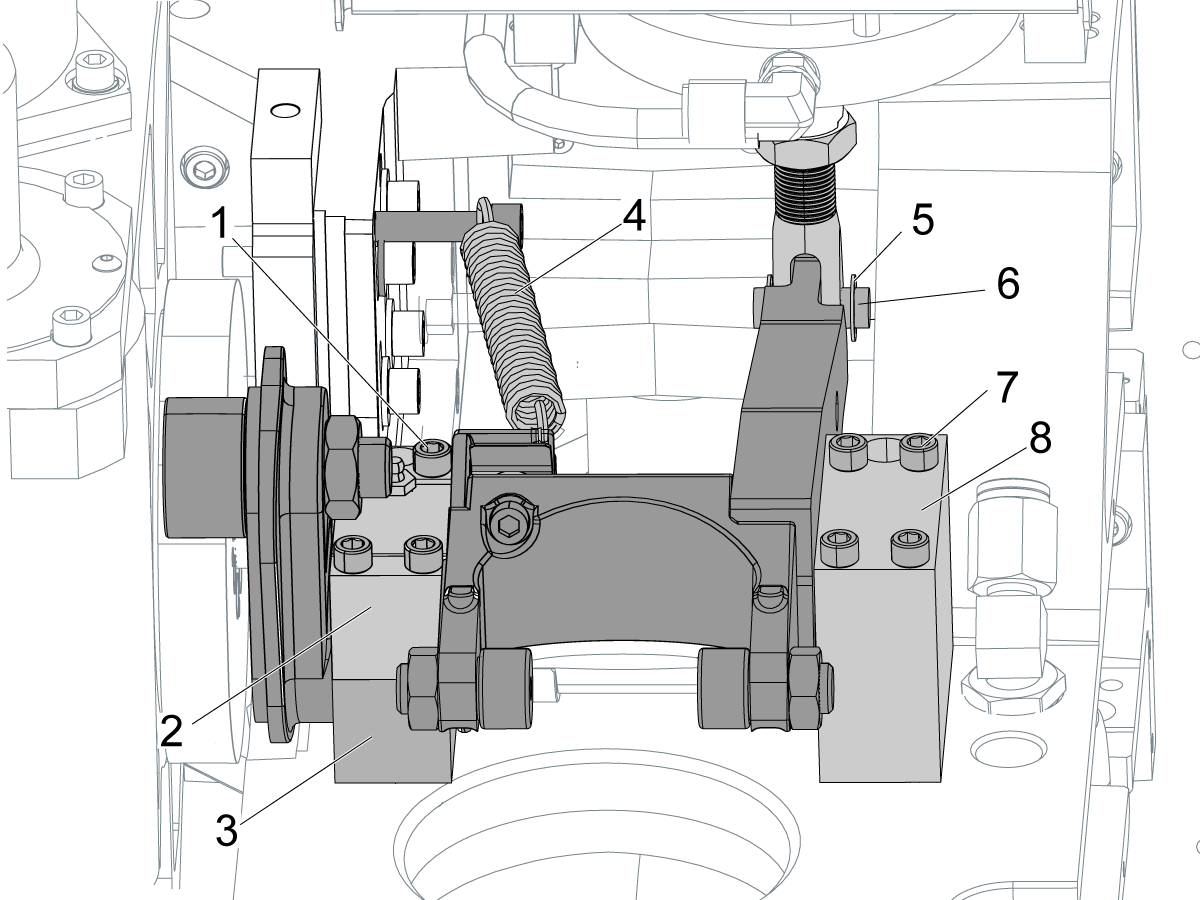
Retire el conjunto de brazo oscilante. Siga estos pasos:

  • Retire la pinza C [5] del pasador de la horquilla [6]. Empuje el pasador de la horquilla para extraerlo.
  • Desconecte el resorte [4] del bloque de ariete.
  • Afloje los (4) tornillos [1] del bloque de rodamientos interior [2].
  • Afloje los (4) tornillos [7] del bloque de rodamientos exterior [8].
  • Retire el conjunto del brazo oscilante balancín de la máquina.
  • No retire la mitad inferior [3] del bloque de rodamientos interior.
  • Retire los pernos de los bloques de rodamientos.

Nota: la ilustración no muestra el husillo y el motor del husillo.

2

Gire los ejes X e Y hasta que la mesa esté directamente debajo del husillo.

Presione [EMERGENCY STOP].

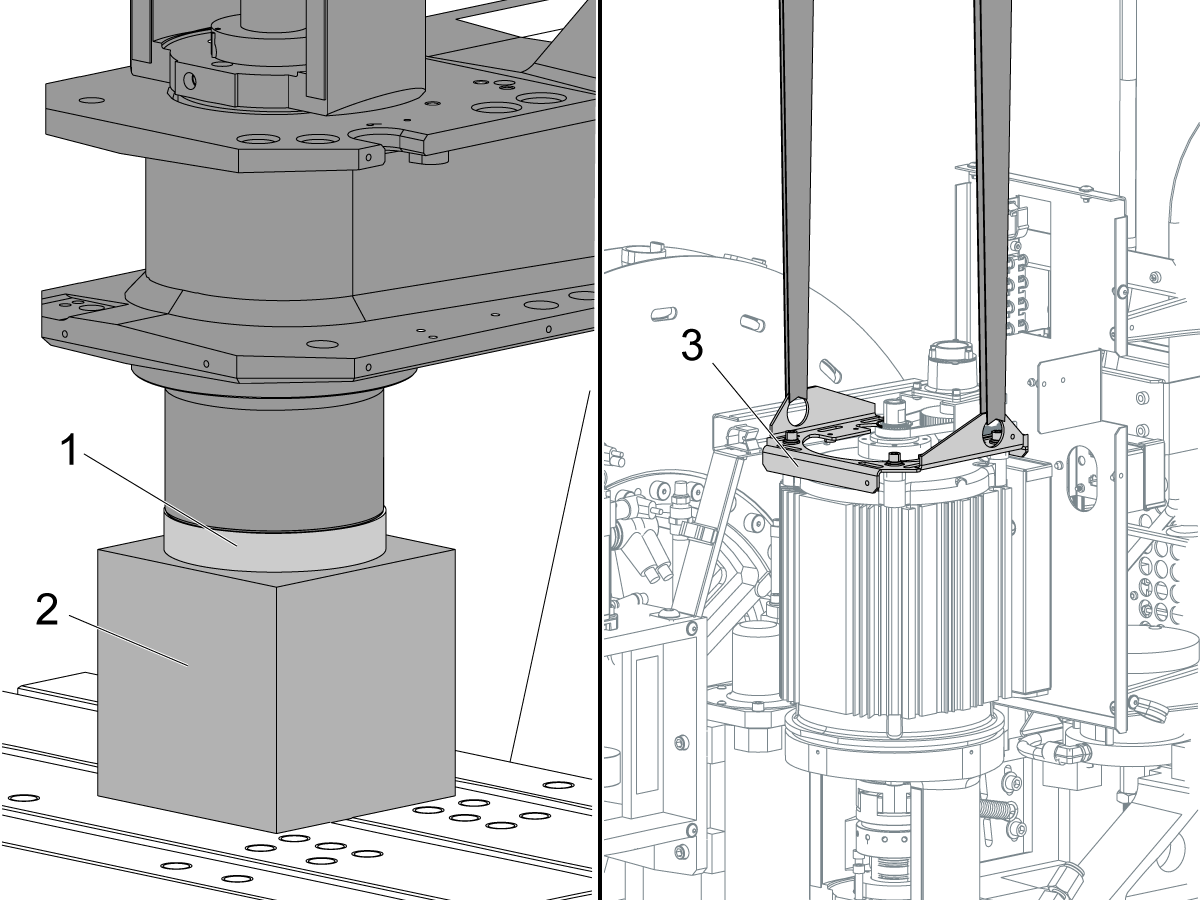
Coloque un bloque de madera o aluminio de 6" x 6" x 6" (152 mm x 152 mm x 152 mm) [2] sobre la mesa.

Coloque la cubierta protectora [1] sobre el husillo instalado en la máquina.

Suelte el[EMERGENCY STOP].

Pulse [RESET] para eliminar todas las alarmas.

Mueva el eje Z en la dirección negativa (-) hasta que el husillo apoye en el bloque.

Pulse [EMERGENCY STOP].

Fije un elevador en el soporte [3] para el Transductor/Contador.

 Precaución: Cuando el husillo está separado del adaptador del motor, el conjunto del motor debe ser apoyado por el elevador.

3

Desconecte el tubo de suministro de aceite.

Retire el racor de suministro de aceite.

Retire los (4) tornillos [2] que fijan el adaptador del motor [1] al husillo.

Retire los (6) tornillos de retención [4] para la brida del husillo [3].

4

Suelte el [EMERGENCY STOP].

Presione [RESET] para eliminar las alarmas.

Mueva lentamente el eje Z en incrementos de 0.001" en la dirección positiva (+) una distancia de 0.04" (1 mm).

 Nota: El husillo [2] cae 1/32" (1 mm) de la fundición del husillo [1].

Si el husillo no cae, utilice una llave de correa para girar el husillo 1/4 de vuelta en sentido horario (a la derecha) para aflojarlo.

Utilice el polipasto para elevar el conjunto de motor [3] al mismo tiempo que mueve el eje Z.

Mueva el eje Z en la dirección positiva (+) hasta que pueda extraer el husillo [4].

Recently Viewed Items

You Have No Recently Viewed Items Yet

Feedback
Haas Logo

美元价格不包括关税、报关费用、保险费、增值税及运费。
USD prices DO NOT include customs duty, customs fees, insurance, VAT, or freight.

人民币价格包含关税、报关费用、货运保险和增值税, 但不包括运费。
CNY prices include customs duty, customs fees, insurance, and VAT. DOES NOT include freight.

Haas Delivered Price

This price includes shipping cost, export and import duties, insurance, and any other expenses incurred during shipping to a location in France agreed with you as a buyer. No other mandatory costs can be added to the delivery of a Haas CNC Product.

ESTÉ AL TANTO DE LO ÚLTIMO EN TECNOLOGÍA Y CONSEJOS DE HAAS...

¡Regístrese ya!   

HAAS TOOLING ACCEPTS THE FOLLOWING:

  • Servicio y asistencia
  • Propietarios
  • Solicitar mantenimiento
  • Manuales del operador
  • Piezas Haas
  • Solicitud de reparación de mesas rotativas
  • Preinstalar guías
  • Herramientas de compras
  • Configure y conozca el precio de su nueva máquina Haas
  • Inventario disponible
  • Lista de precios de Haas
  • Financiación CNCA
  • Acerca de Haas
  • Declaración sobre el principio DNSH
  • Oportunidades laborales
  • Certificados y seguridad
  • Póngase en contacto con nosotros.
  • Historia
  • Terminos y Condiciones
  • Términos y condiciones de Haas Tooling
  • Privacidad
  • Garantía
  • Comunidad Haas
  • Programa de certificación de Haas
  • Haas Motorsports
  • Fundación de Gene Haas
  • Comunidad de educación técnica de Haas
  • Eventos
  • Platique con nosotros
  • Facebook
  • X
  • Flickr
  • YouTube
  • LinkedIn
  • Instagram
  • TikTok
© 2025 Haas Automation, Inc. - Máquinas herramienta CNC

This site is protected by reCAPTCHA and the Google Privacy Policy and Terms of Service apply.

2800 Sturgis Rd., Oxnard, CA 93030 / Toll Free: 800-331-6746
Phone: 805-278-1800 / Fax: 805-278-2255