
 主轴
主轴
 刀库
刀库
 第 4 轴 |第 5 轴
 刀塔和动力刀
 探测
探测
 切屑和冷却液管理
 Haas 控制系统
 产品选项
产品选项
 刀具和夹具
刀具和夹具
 工件夹具
工件夹具
 5 轴解决方案
 自动化
自动化

Your document is ready for download, please click below to download your document.
Download DocumentError processing this document, please try again or 联系我们.
Please wait while your document is being loaded.

AD0647
Your document is ready for download, please click below to download your document.
Download DocumentError processing this document, please try again or 联系我们.
Please wait while your document is being loaded.
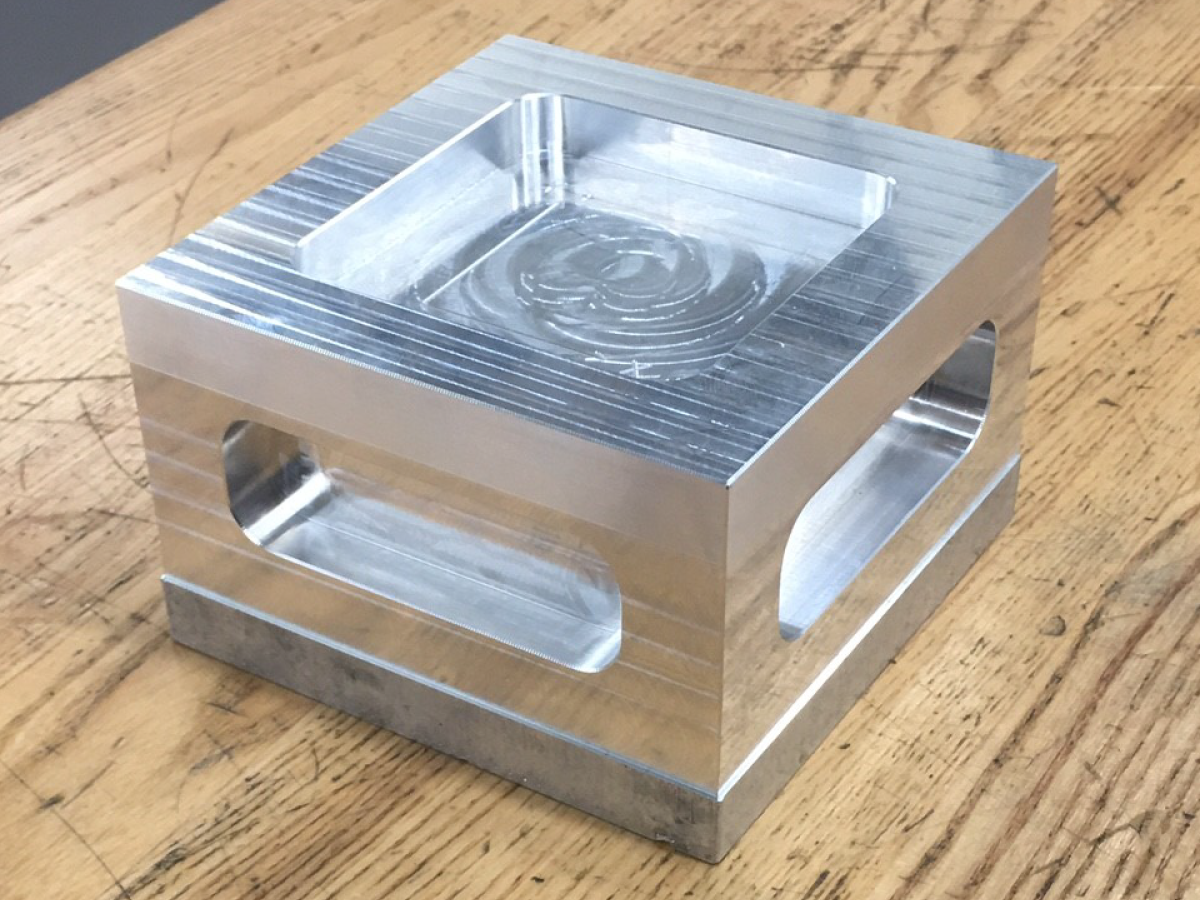
Demo Description:
Use the following test kit and procedure to determine the root cause of the mill chatter.
Perform all troubleshooting listed in the Mill chatter troubleshooting guide.
In addition to the inspections listed, perform the following:
After checking the above and if the chatter continues, gather the tools and parts listed below and run the Mill Chatter test cut program. This is a proven program and can be used on the following mill machines:
Part Program:
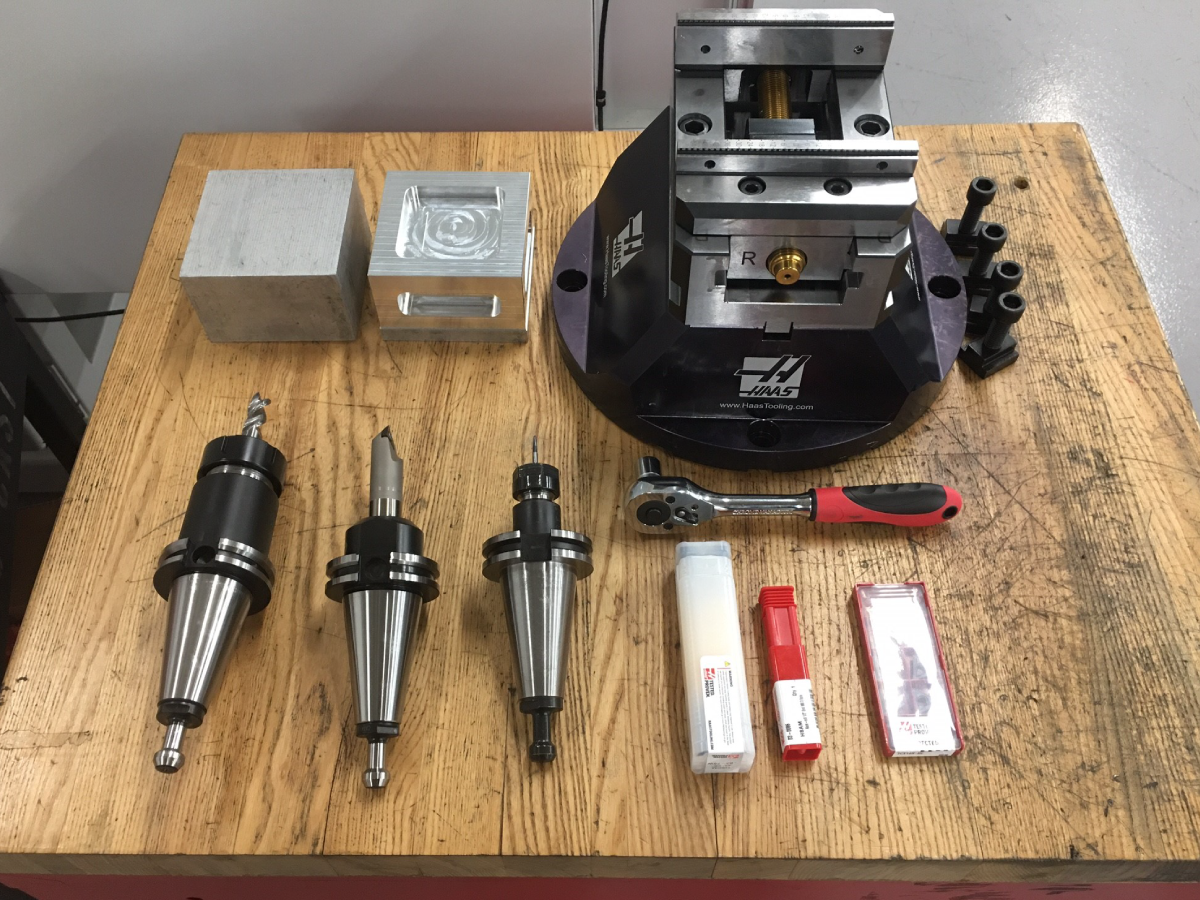
| Part Number | Quantity | Description |
| 99-05-0090 | 1 | Haas Riser For 5" Self Centering Vise |
| 99-05-0004 | 1 | 5" Manual Self Centering Vise |
| 99-03-0573 | 2 | ½” End Mill 3 Flute With .030" Radius |
| 99-01-0159 | 1 | 45 Degree Small Chamfer Mill |
| 99-02-0505 | 1 | Small Chamfer Mill Insert |
| 99-04-0004 | 1 | CAT40 ¾” End Mill Holder |
| 99-04-0011 | 1 | CAT40 ER32 Collet Chuck 4” Gage Length |
| 99-04-0006 | 1 | CAT40 ER16 Collet Chuck 2.5” Gage Length |
| 99-04-0200 | 1 | CAT40 Solid Pull Stud (10 pack) |
| 99-04-0250 | 1 | ER-32 Collet 13 |
| 99-04-0218 | 1 | ER-16 Collet 4 |
| 99-03-2088 | 2 | 1/8” Ball End Mill |
| N/A | 1 | 6061 Aluminum 3 Inch x 3 Inch Bar Cut To 0.75 Inch |
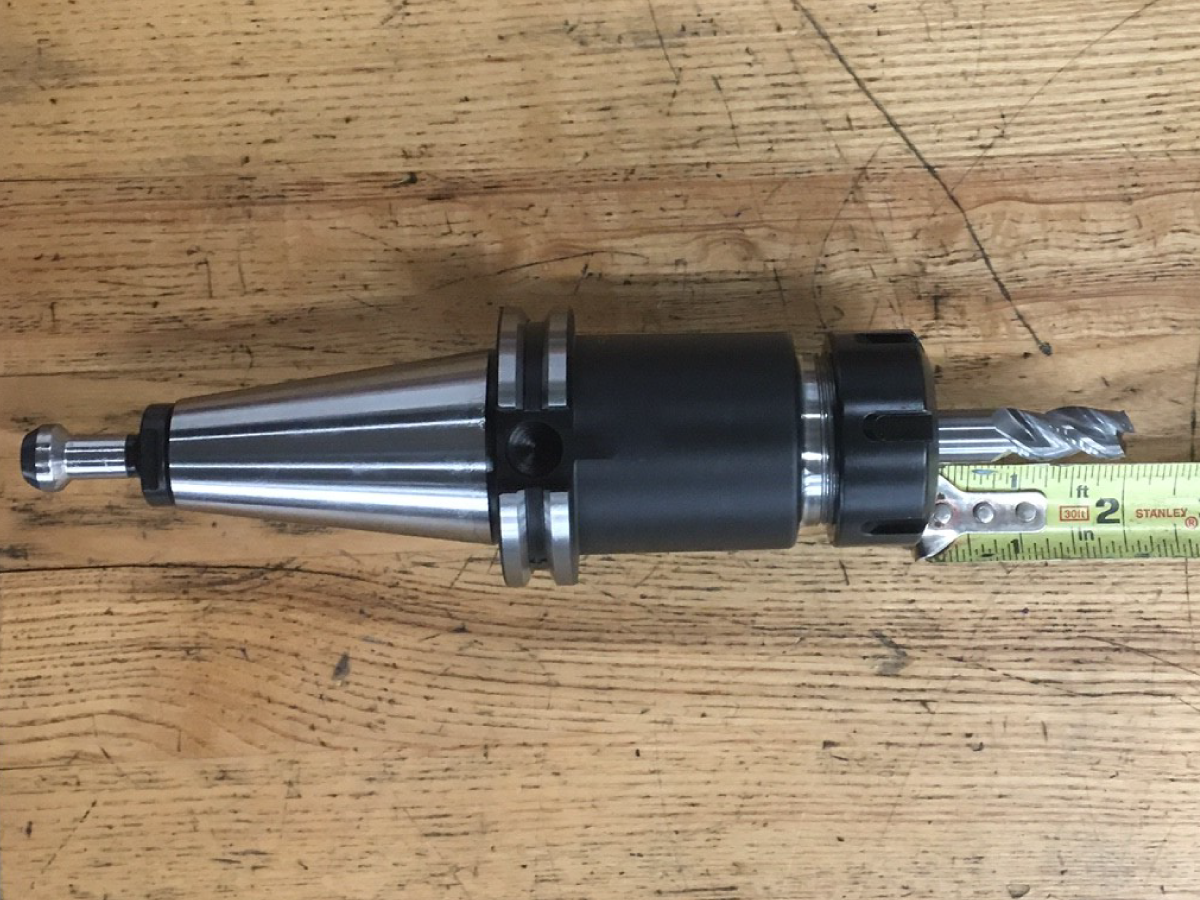
Tool Number 1:
Cutter Type: ½” End Mill 3 Flute with .030" Radius
Holder Type: ER Collet
RPM: 10,000
Number of Flutes: 3
Minimum Working Length: 1.9"
Haas Tool PN: 03-0573
Haas Tool Holder PN: 04-0011
Haas Collet PN: 04-0250
Haas Insert PN: N/A

Tool Number 2:
Cutter Type: ” ¾” Chamfer Tool
Holder Type: Weldon
RPM: 10,000
Number of Flutes: 1
Minimum Working Length: 2.75"
Haas Tool PN: 01-0159
Haas Tool Holder PN: 04-0200
Haas Collet PN: N/A
Haas Insert PN: 02-0505
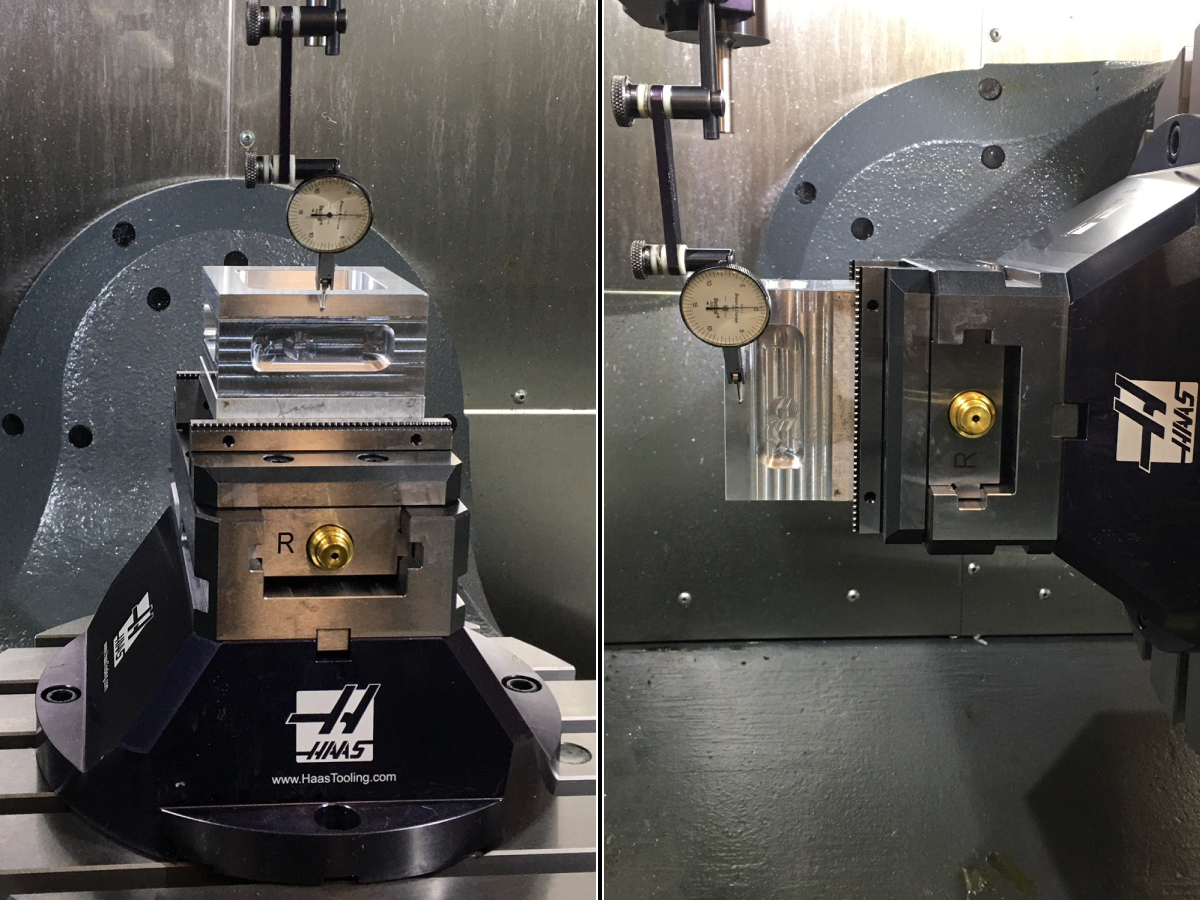
A vise of their choice.
The outside profile is .500” deep so they should grip on .150-.200”, .200” is max.
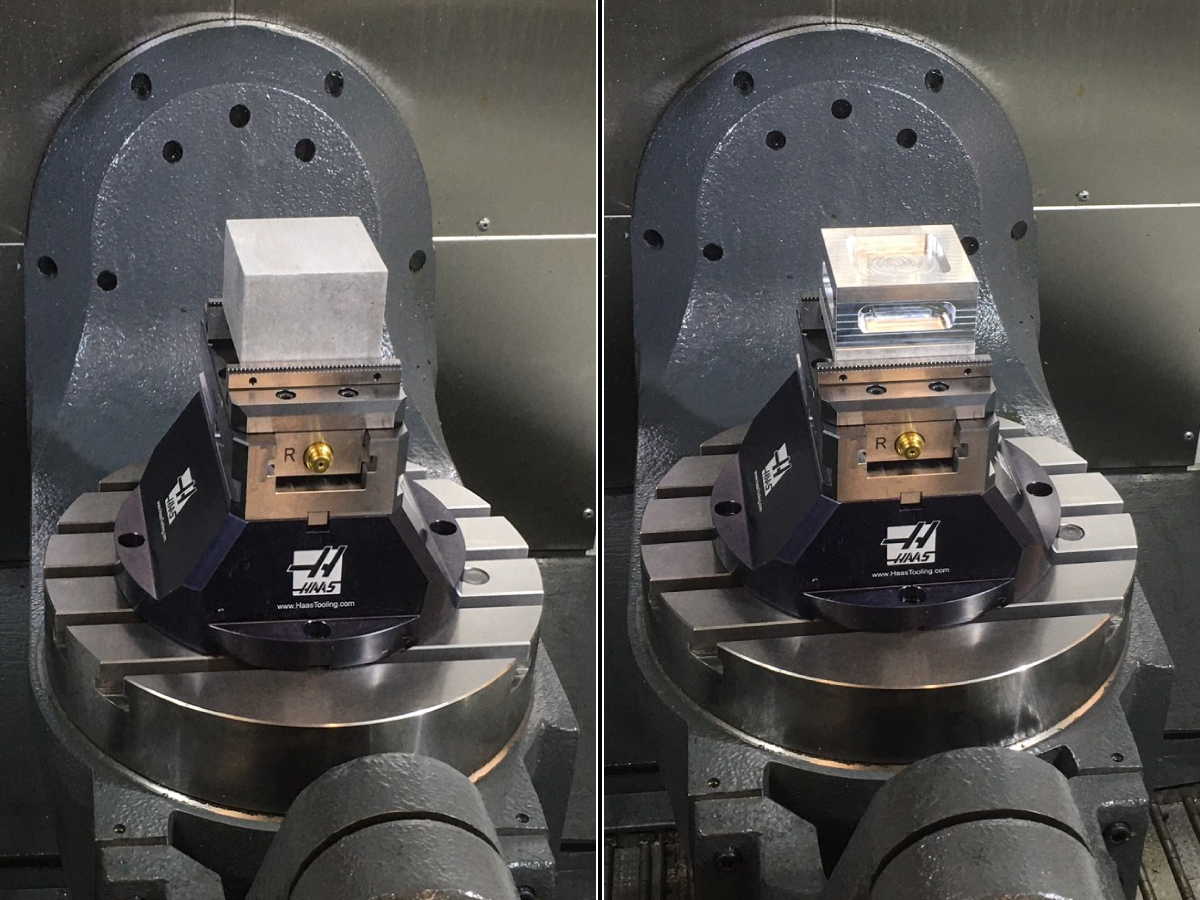
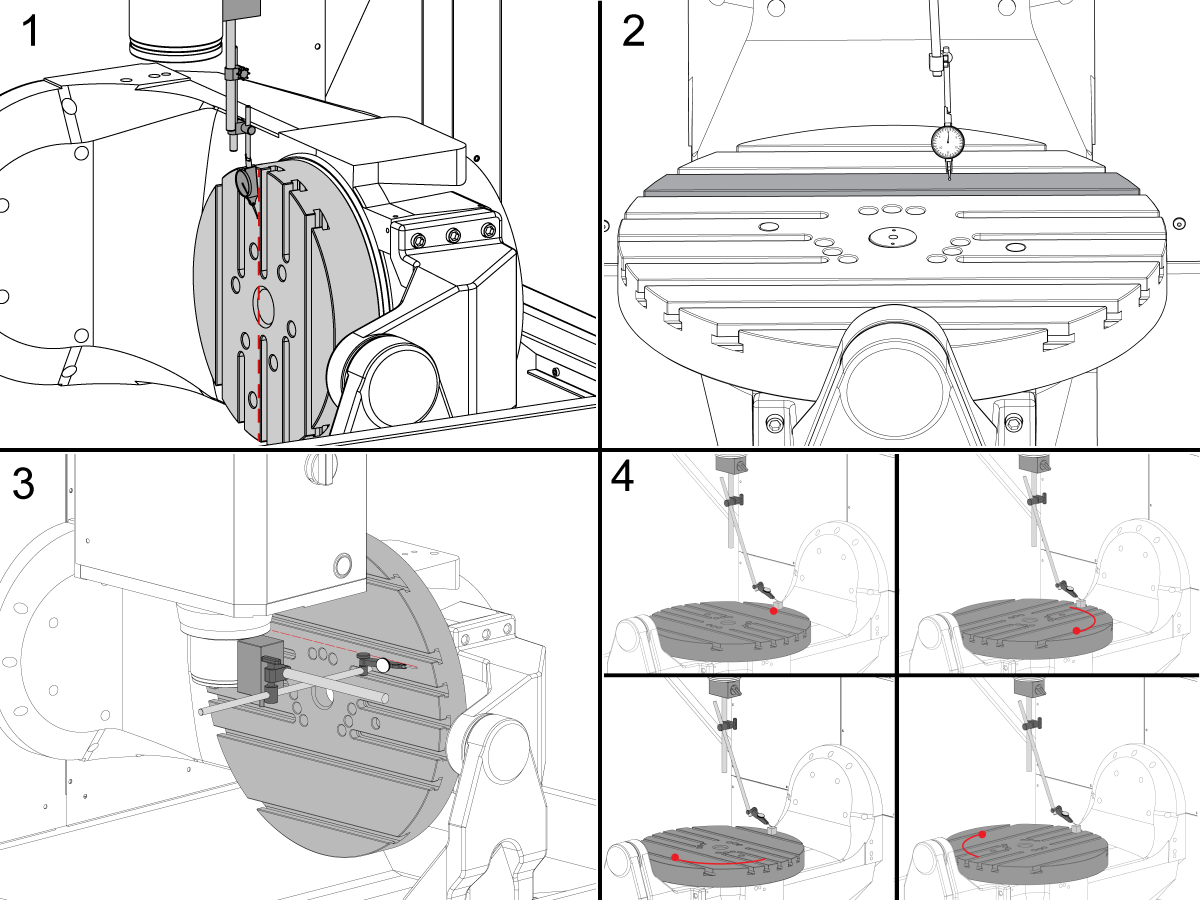
Set G54 Offset:
Bolt the vise to the center of the table as show in photo. Part center must be within 2 inches of the center of the table.
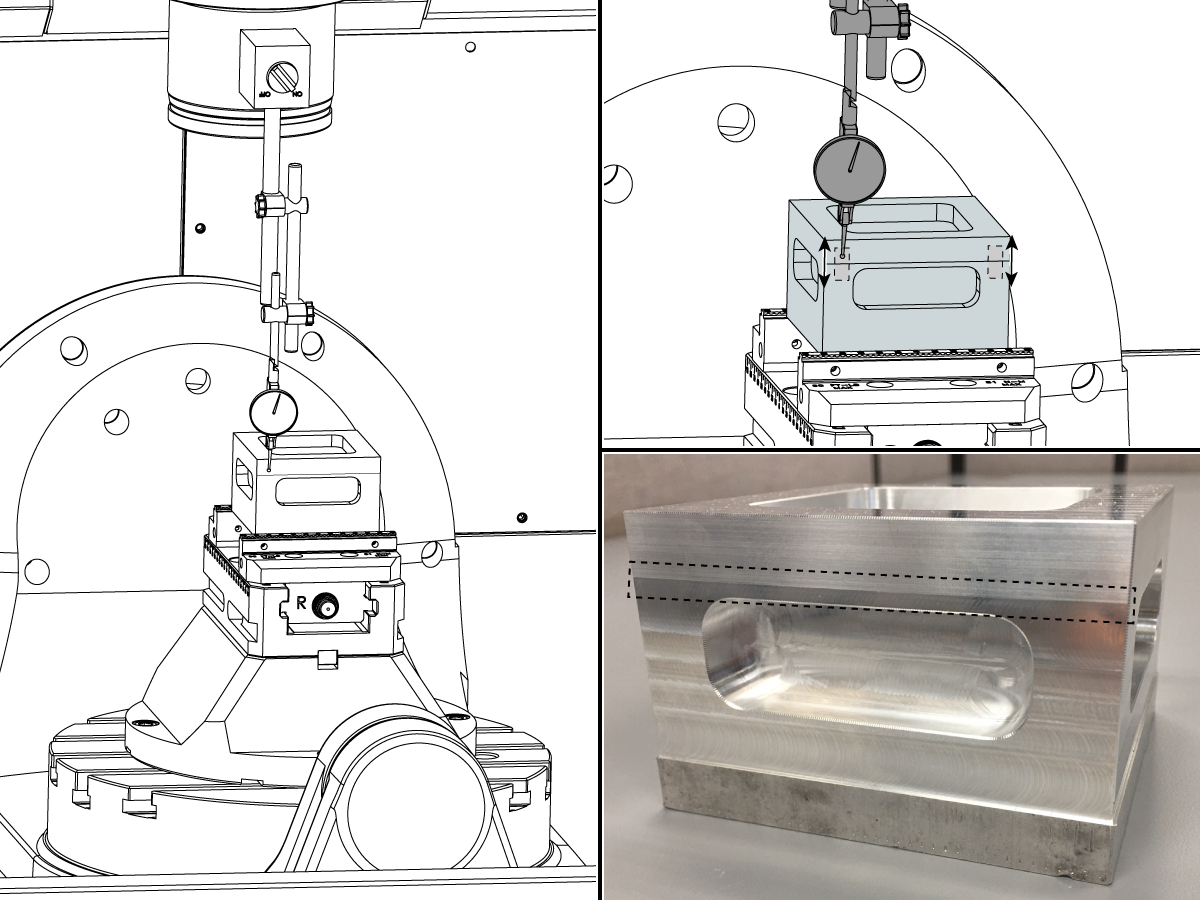
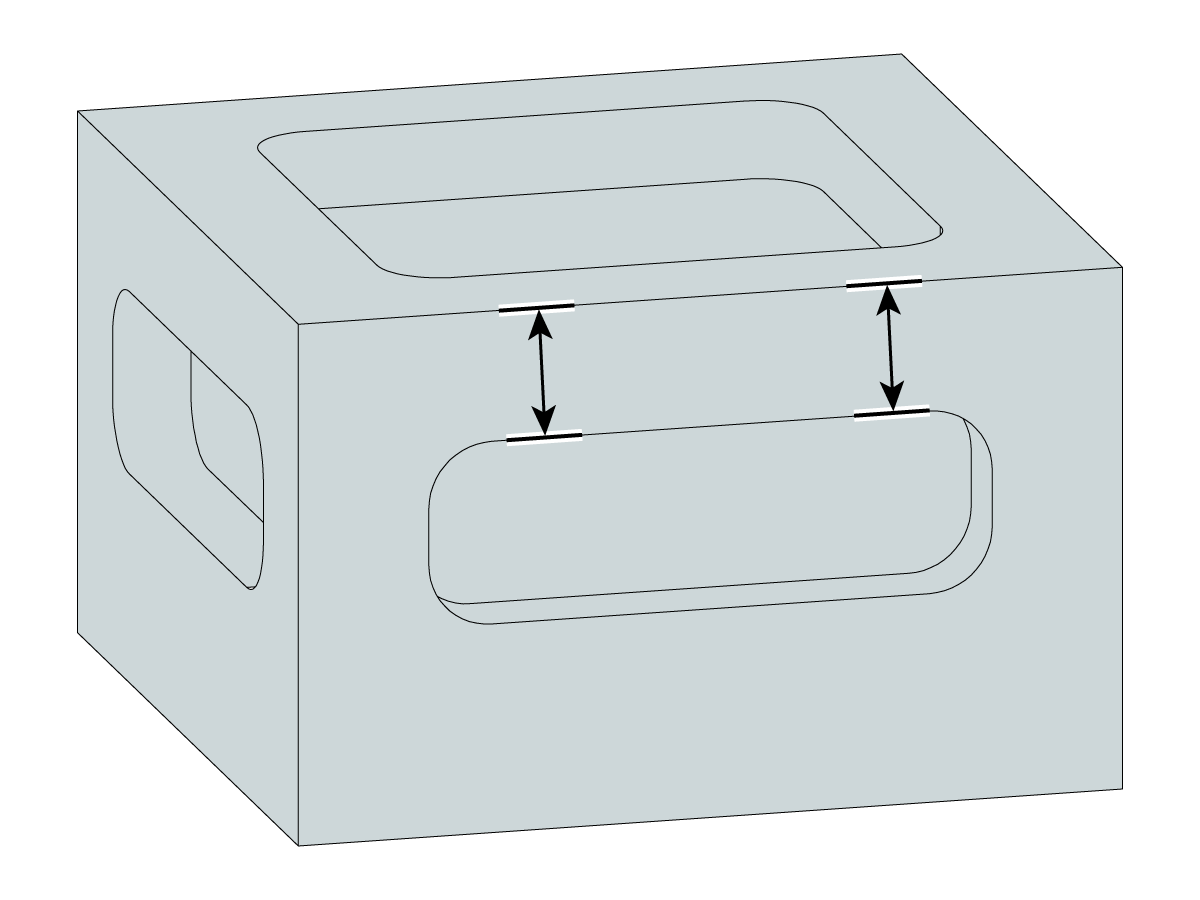
With the part in the vise, use a indicator to measure the step between the two tool paths.
Measure the step on either side of the pocket.
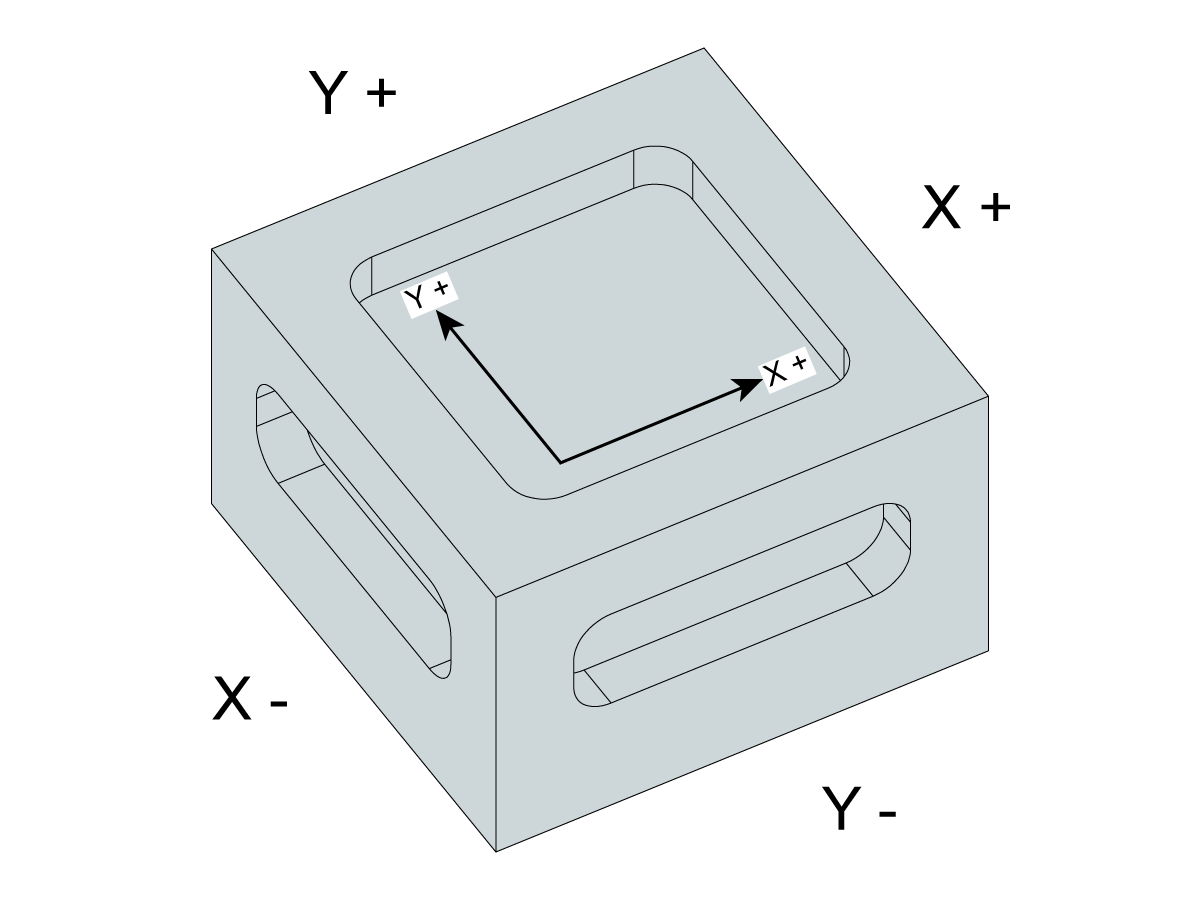
Measure these two locations on all four sides of the part and use the Y+ and X+ arrows to record the measurements below.
If there is a step out from the top surface to the bottom surface, record a positive value. If there is a step in from the top surface to the bottom surface, record a negative value.
Note: This step should be less than 0.001”.
| Left Side | Right Side | |
| X+ | ||
| X- | ||
| Y+ | ||
| Y- |
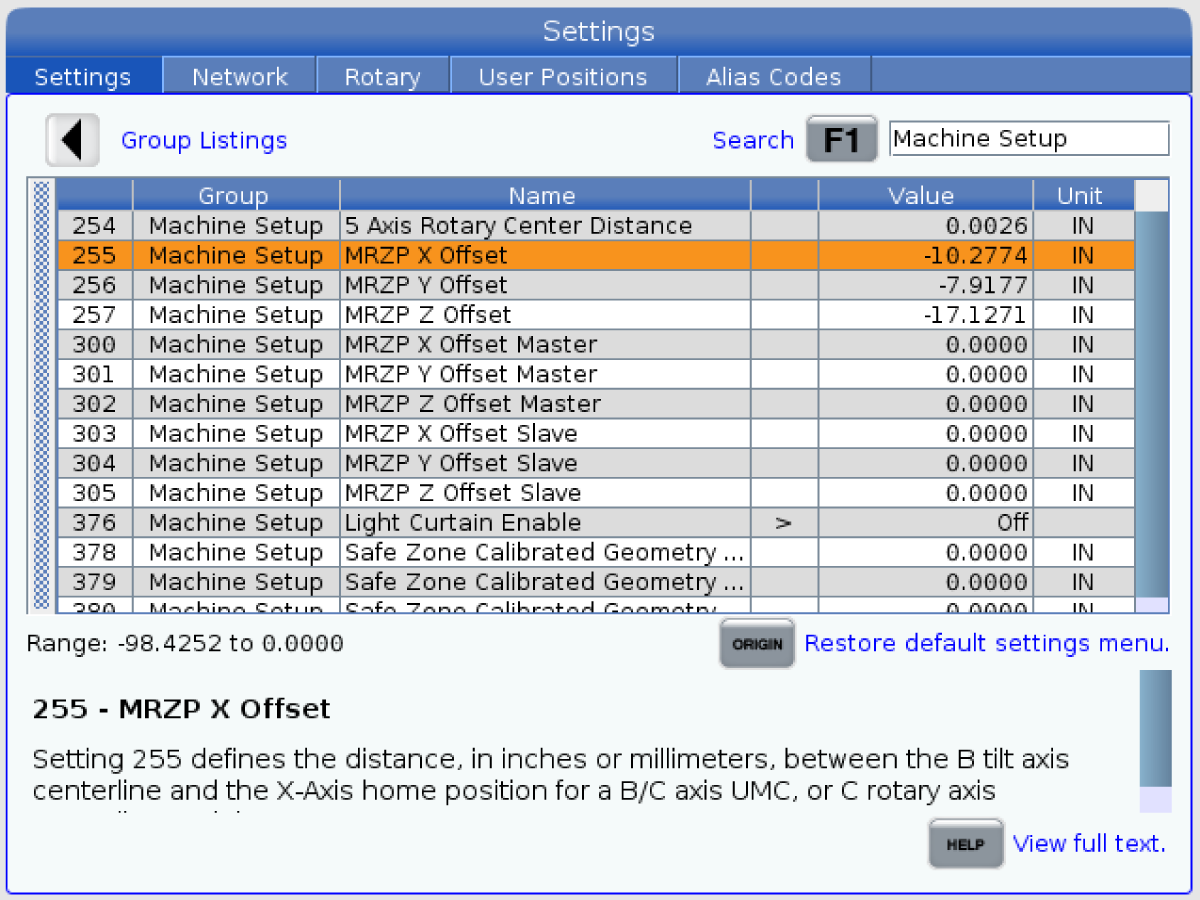
Adjust setting 255 MRZP X OFFSET or settings 300 MRZP X OFFSET MASTER and setting 303 MRZP X AXIS SLAVE until the X+ and X- results match.
Adjust setting 256 MRZP Y OFFSET or setting 304 MRZP Y AXIS SLAVE until the Y+ and Y- results match.
Once all four sides have the same step, adjust setting 257 MRZP Z OFFSET or setting 302 MRZP Z AXIS MASTER.
The tool length offset can also be used to adjust the step on all four sides of the part. If a large adjustment is needed, you need to make sure the probe calibration was done correctly.
With a micrometer, measure the distance between the top face and pocket. Measure in two locations, the left and right side of the pocket. Record the measured values for all four sides of the part.
This distance should be 0.625” +/- .001”
| Left Side | Right Side | |
| X+ | ||
| X- | ||
| Y+ | ||
| Y- |
If this distance is not 0.625” +/- .001” there could be a problem with the machine geometry.
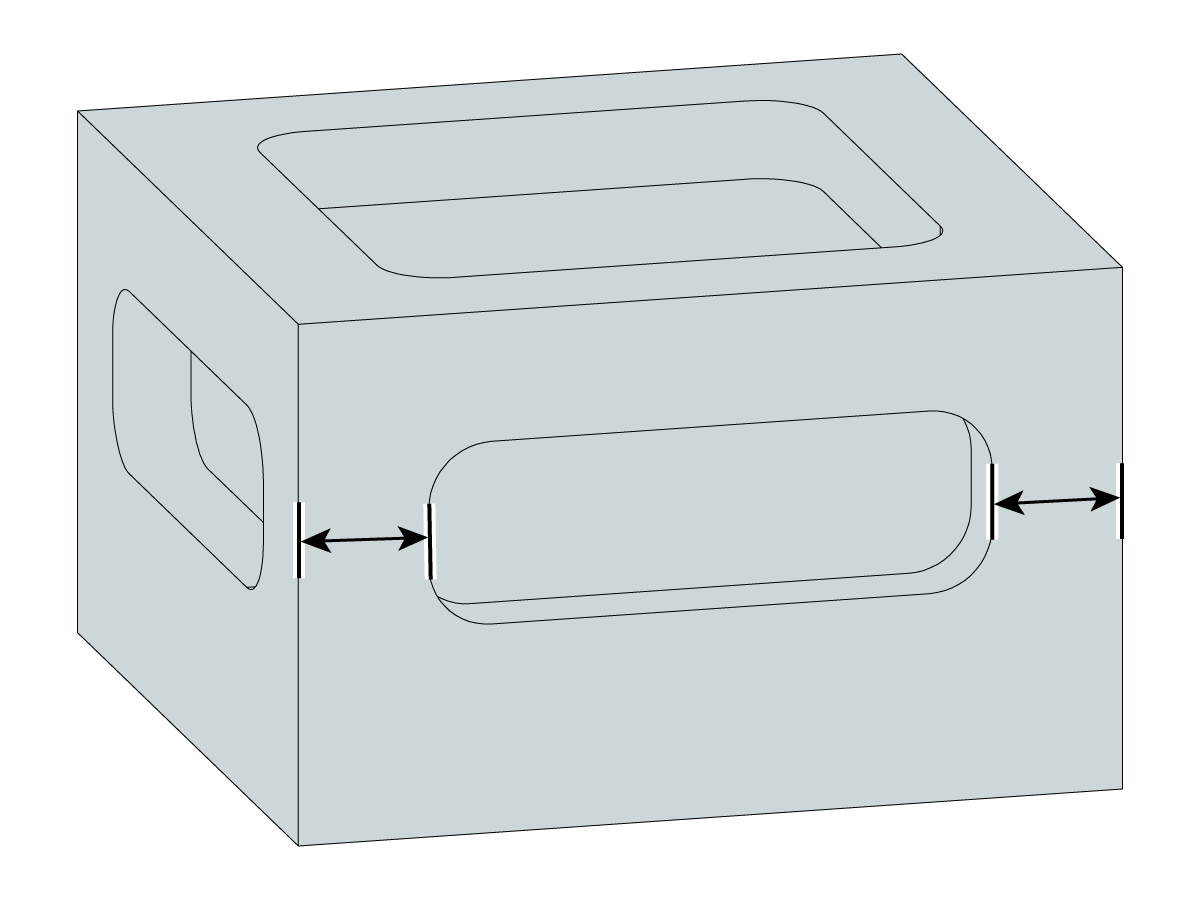
With a micrometer, measure the distance between the side face and pocket. Measure in two locations, the left and right side of the pocket. Record the measured values for all four sides of the part.
This distance should be 0.625” +/- .001”
| Left Side | Right Side | |
| X+ | ||
| X- | ||
| Y+ | ||
| Y- |
These values should be correct if the values in Step 3 are set correctly.
If you are seeing a difference between the left and right side measurements, make sure the X axis is perpendicular to the B axis centerline. This can be done by zeroing an indicator on the front of the part at B0 & C0. Then rotating the B axis to B90 and touching the indicator on the front of the part to see if the front of the part is moving along the Y axis as the B axis tilts. The measured difference between these two points should not exceed .002”.
If you have any problems adjusting the values in these three steps, you will need to fill out a full inspection report and adjust the machine geometry as needed.
Recently Viewed Items
You Have No Recently Viewed Items Yet

美元价格不包括关税、报关费用、保险费、增值税及运费。
USD prices DO NOT include customs duty, customs fees, insurance, VAT, or freight.
人民币价格包含关税、报关费用、货运保险和增值税, 但不包括运费。
CNY prices include customs duty, customs fees, insurance, and VAT. DOES NOT include freight.
此价格包含运费、出口和进口关税、保险费以及任何在运送至与您(买家)商定的位于法国的某一地点的过程中产生的其他费用。在 Haas 数控产品的交付中不会添加任何其他强制性费用。
随时掌握 HAAS 最新提示和技术……
HAAS TOOLING ACCEPTS THE FOLLOWING:


This site is protected by reCAPTCHA and the Google Privacy Policy and Terms of Service apply.

2800 Sturgis Rd., Oxnard, CA 93030 / Toll Free: 800-331-6746
Phone: 805-278-1800 / Fax: 805-278-2255


