My Haas Welcome,
!
Haas Tooling MyHaas/HaasConnect Sign In Register Haas Tooling MyHaas/HaasConnect Sign Out Welcome, My Machines Latest Activity My Quotes My Account My Users Sign Out
Find Your Distributor
  1. Select Language
    1. English
    2. Deutsch
    3. Español - España
    4. Español - México
    5. Français
    6. Italiano
    7. Português
    8. Český
    9. Dansk
    10. Nederlands
    11. Magyar
    12. Polski
    13. Svenska
    14. Türkçe
    15. 中文
    16. Suomi
    17. Norsk
    18. الإنجليزية
    19. български
    20. Hrvatski
    21. Ελληνικά
    22. Română
    23. Slovenský
    24. Slovenščina
    25. 한국어
    26. 日本語
    27. Українська
  • machines Main Menu
    • Vertical Mills
      Vertical Mills
      Vertical Mills View All
      • Vertical Mills
      • VF Series
      • Universal Machines
      • VR Series
      • VP-5 Prismatic
      • Pallet-Changing VMCs
      • Mini Mills
      • Mold Machines
      • High-Speed Drill Centers
      • Drill/Tap/ Mill Series
      • Toolroom Mills
      • Pocket Mill
      • Compact Mills
      • Gantry Series
      • SR Sheet Routers
      • Extra-Large VMC
      • Double-Column Mills
      • 3+2 Positioning Machines
    • Multi-Axis Solutions
      Multi-Axis Solutions
      Multi-Axis Solutions View All
      • Multi-Axis Solutions
      • Y-Axis Lathes
      • 5-Axis Mills
    • Lathes
      Lathes
      Lathes View All
      • Lathes
      • ST Series
      • Dual-Spindle
      • Box Way Series
      • Toolroom Lathes
      • Chucker Lathe
      • Pocket Lathe
      • Haas Bar Feeders
    • Horizontal Mills
      Horizontal Mills
      Horizontal Mills View All
      • Horizontal Mills
      • 50-Taper
      • 40-Taper
    • Rotaries & Indexers
      Rotaries & Indexers
      Rotaries & Indexers View All
      • Rotaries & Indexers
      • Rotary Tables
      • Indexers
      • 5-Axis Rotaries
      • Extra-Large Rotaries
    • Special Series
      Special Series
      Special Series View All
      • Special Series
      • EU_Series_Redirect
    • Automation Systems
      Automation Systems
      Automation Systems View All
      • Automation Systems
      • Mill Automation
      • Lathe Automation
      • Automatic Parts Loaders
      • Automation Models
    • Desktop Machines
      Desktop Machines
      Desktop Machines View All
      • Desktop Machines
      • Desktop Mill
      • Desktop Lathe
      • Control Simulator, Standard
      • Control Simulator, Premium
    • Shop Equipment
      Shop Equipment
      Shop Equipment View All
      • Shop Equipment
      • Knee Mill
      • Haas Manual Lathes
      • Haas Saws
    • Fabrication Machines
      Fabrication Machines
      Fabrication Machines View All
      • Fabrication Machines
      • Laser Cutting Machines
      • CNC Press Brakes
    • QUICK LINKS Special Series  Special Series 
      EU SERIES EU SERIES BUILD & PRICE | PRICE LIST BUILD & PRICE | PRICE LIST In-Stock Machines In-Stock Machines WHAT’S NEW WHAT’S NEW YOUR FIRST CNC YOUR FIRST CNC
      SHOPPING TOOLS
      • Build & Price a Haas
      • Price List
      • Available Inventory
      • CNCA Financing
      WANT TO TALK TO SOMEONE?

      A Haas Factory Outlet (HFO) can answer your questions, and walk you through your best options.

      CONTACT YOUR DISTRIBUTOR >
  • Options Main Menu
    • The Haas Control Value Option Packages
      Value Option Packages
      Value Option Packages View All
      • Value Option Packages
    • Product Image Spindles
      Spindles
      Spindles View All
      • Spindles
    • Product Image Tool Changers
      Tool Changers
      Tool Changers View All
      • Tool Changers
    • Product Image 4th- | 5th-Axis
      4th- | 5th-Axis
      4th- | 5th-Axis View All
      • 4th- | 5th-Axis
    • Product Image Turrets & Live Tooling
      Turrets & Live Tooling
      Turrets & Live Tooling View All
      • Turrets & Live Tooling
    • Product Image Probing
      Probing
      Probing View All
      • Probing
    • Haas Chip & Coolant Management Chip & Coolant Management
      Chip & Coolant Management
      Chip & Coolant Management View All
      • Chip & Coolant Management
    • The Haas Control The Haas Control
      The Haas Control
      The Haas Control View All
      • The Haas Control
    • Product Image Product Options
      Product Options
      Product Options View All
      • Product Options
    • Product Image Tooling & Fixturing
      Tooling & Fixturing
      Tooling & Fixturing View All
      • Tooling & Fixturing
    • Product Image Workholding
      Workholding
      Workholding View All
      • Workholding
    • Product Image 5-Axis Solutions
      5-Axis Solutions
      5-Axis Solutions View All
      • 5-Axis Solutions
      • 5 Easy Steps to 5-Axis
    • QUICK LINKS Special Series  Special Series 
      EU SERIES EU SERIES BUILD & PRICE | PRICE LIST BUILD & PRICE | PRICE LIST In-Stock Machines In-Stock Machines WHAT’S NEW WHAT’S NEW YOUR FIRST CNC YOUR FIRST CNC
      SHOPPING TOOLS
      • Build & Price a Haas
      • Price List
      • Available Inventory
      • CNCA Financing
      WANT TO TALK TO SOMEONE?

      A Haas Factory Outlet (HFO) can answer your questions, and walk you through your best options.

      CONTACT YOUR DISTRIBUTOR >
  • Why Haas Main Menu
      Discover the Haas Difference
    • Why Haas
    • MyHaas
    • Education Community
    • Industry 4.0
    • Haas Certification
    • Customer Testimonials
  • Service Main Menu
      Welcome to Haas Service
      SERVICE HOME Operator’s Manuals How-To Procedures Troubleshooting Guides Preventive Maintenance Haas Parts Haas Tooling Videos
  • Videos Main Menu
  • Main Menu
    • View All
    • View All
    • View All
    • View All
      • HTEC Curriculum Support
      • Haas Value Option Packages (VOP) Journey
    • View All
      • Haas 10 kg Cobot Package
      • Cobot Kits
      • DC-1 Drill Center
      • CNC Sales News
      • Do More With Your Haas
    • View All
    • View All
      • contact-us-test
      • 4 - AUTOMATION SYSTEMS
      • Carousel-V2
      • expert test
      • Demo_Day_Trident-test
      • Link Test
      • image-sale-tag-test
      • article-list-test
      • Haas 25 kg Robot Package
      • test-algolia-page
    • View All
    • View All
    • View All
    • View All
      • calc-test
    • View All
    • QUICK LINKS Special Series  Special Series 
      EU SERIES EU SERIES BUILD & PRICE | PRICE LIST BUILD & PRICE | PRICE LIST In-Stock Machines In-Stock Machines WHAT’S NEW WHAT’S NEW YOUR FIRST CNC YOUR FIRST CNC
      SHOPPING TOOLS
      • Build & Price a Haas
      • Price List
      • Available Inventory
      • CNCA Financing
      WANT TO TALK TO SOMEONE?

      A Haas Factory Outlet (HFO) can answer your questions, and walk you through your best options.

      CONTACT YOUR DISTRIBUTOR >
  • Haas Tooling Main Menu
  • Haas Service Parts Main Menu

My Haas Welcome,
!
Haas Tooling MyHaas/HaasConnect Sign In Register Haas Tooling MyHaas/HaasConnect Sign Out Welcome, My Machines Latest Activity My Quotes My Account My Users Sign Out
Find Your Distributor
  1. Select Language
    1. English
    2. Deutsch
    3. Español - España
    4. Español - México
    5. Français
    6. Italiano
    7. Português
    8. Český
    9. Dansk
    10. Nederlands
    11. Magyar
    12. Polski
    13. Svenska
    14. Türkçe
    15. 中文
    16. Suomi
    17. Norsk
    18. الإنجليزية
    19. български
    20. Hrvatski
    21. Ελληνικά
    22. Română
    23. Slovenský
    24. Slovenščina
    25. 한국어
    26. 日本語
    27. Українська
×

Search Results

Web Pages

Images

    • <
    • 1
    • >

H-5AX HSKA100 Dual-Support - Geometry Guide

Service Home How To Procedures H-5AX HSKA100 Dual-Support - Geometry Guide

H-5AX HSKA100 Dual-Support - Geometry Guide

- Jump to Section - Back to Top

9.1 HDC-3-5AX - Geometry Guide

Recently Updated Last updated: 03/10/2026

H-5AX HSKA100 Dual-Support - Geometry Guide


Revision A - 03/2026

Warning

Fill out the latest Inspection Report on EA - Alignment Inspection Report - Reference Table through the Dealer-Only Content page, and consult with Haas Service before attempting any geometry adjustments.

 Note: This site is available only to Haas Service Techs.

 WARNING: Breaking the DON'T REMOVE seal on the spindle without contacting Haas Service will VOID the warranty. Contact Haas Service before proceeding with process.

WARNING: This page may be used as reference for the inspection report but do not make any adjustments before consulting with Haas Service. Adjustments made without consulting Haas Service will void warranty.

 Warning: Do not home B or C-Axis with a tool in the spindle.

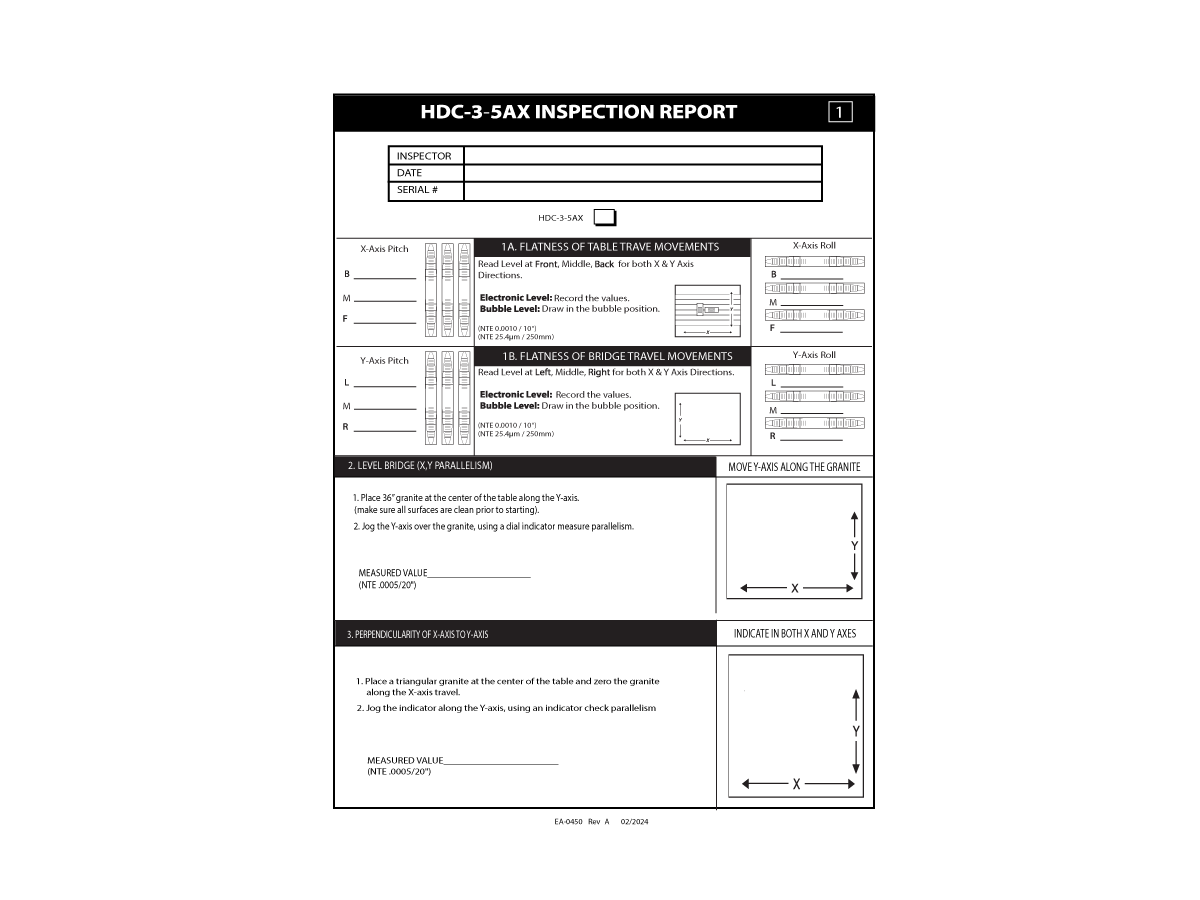
EA0450 Inspection Report

Introduction

This procedure will go over how to adjust the following components on the HDC-3-5AX machines:
 
  1. H-5AX HSKA100 Spindle
  2. Spindle Head
  3. Columns
  4. Bridge
  5. Saddle
  6. Table

Note: As mentioned before this procedure can be used as an aid to the inspection report, but adjustments made without consultation from Haas Service will void warranty for the machine. 

 Note:  All B and C-Axis geometry checks should be done with the B and C Axis brakes engaged.

Leveling

Verify the level, if the machine is not level follow the instructions below to level the machine. 

1

Level the Table 


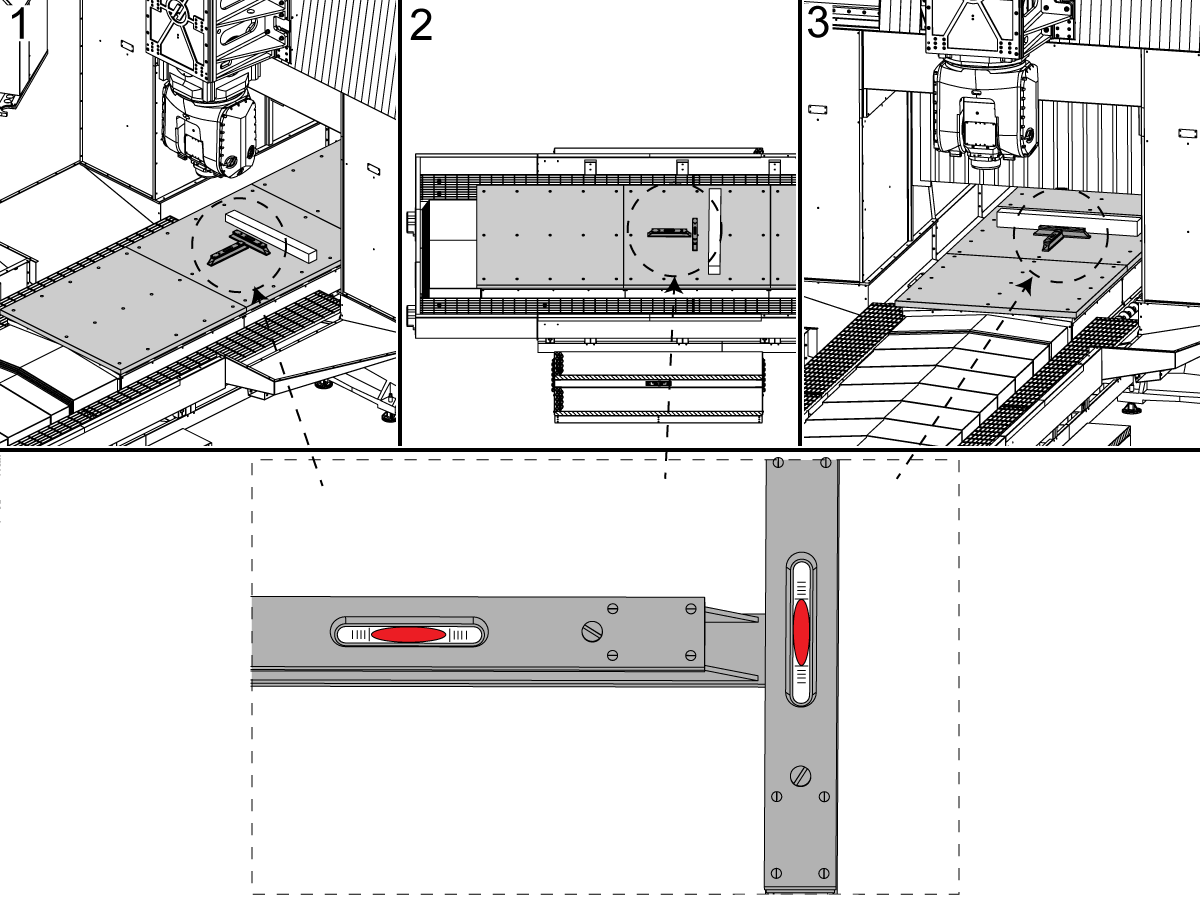
  • With the table in the center of travel, place two levels at right angles to each other as close as possible to the center of the table. One will show the level across the width of the table and the other will show the level along the length of the table.
  • Focus on leveling the table only in this X-axis position to establish a primary datum for the machine. 
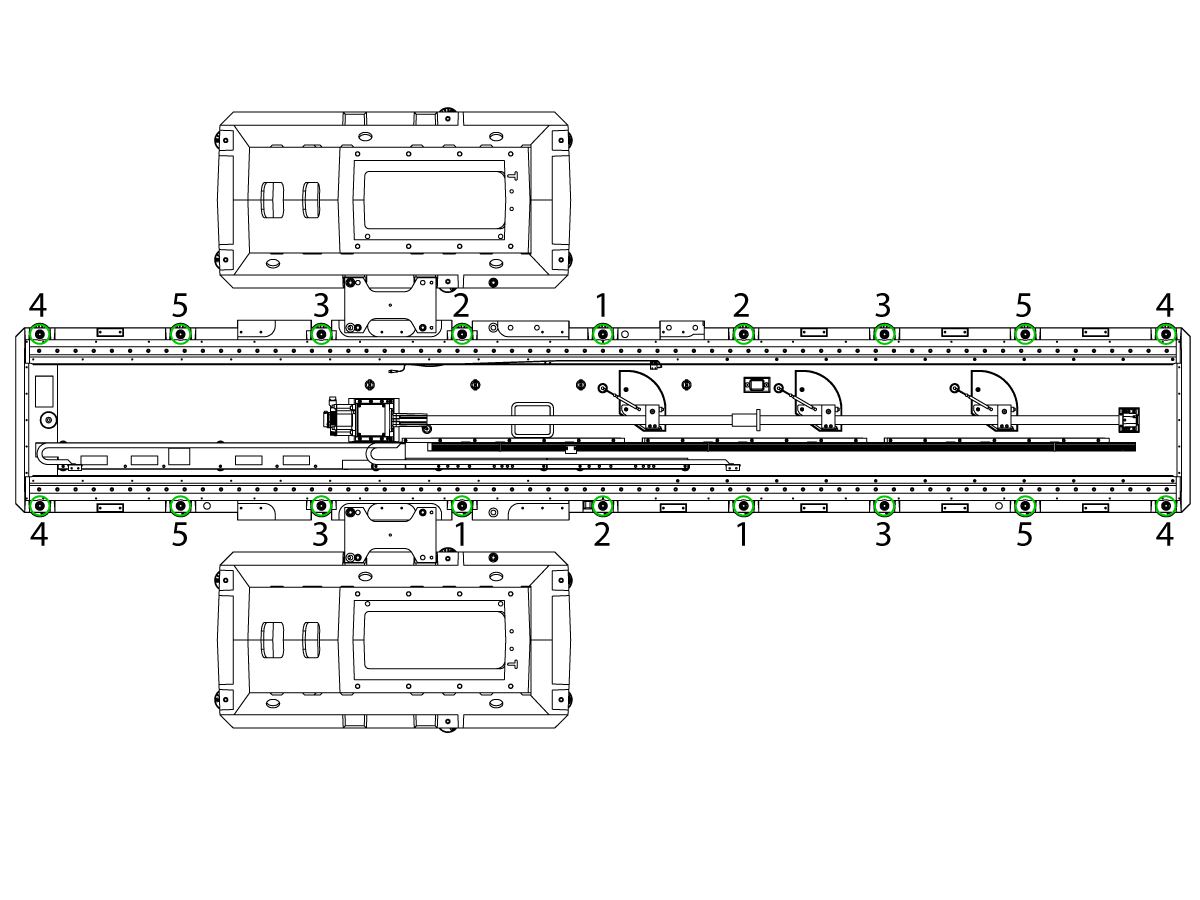
  • Only the first three leveling feet [1] should be supporting the saddle, the rest of the leveling feet should not be touching the pads. Use the precision levels and the three leveling screws to adjust pitch and roll. Once level, anchor those three feet to the full 80 ft-lbs. 
  • When the table level is close to zero in both directions, the three leveling screws [2] may be brought down to touch the leveling pads.
  • Use the three leveling screws [2] to adjust the pitch and roll. Once level, anchor those three feet to the full 80 ft-lbs. 
  • Lower the next four leveling feet [3]. Do not adjust the pitch and roll. Once the leveling feet are touching, anchor those four feet to 40 ft-lbs.
  • Lower the next four leveling feet [4]. Do not adjust the pitch and roll. Once the leveling feet are touching, anchor those four feet to 40 ft-lbs.
  • Lower the next four leveling feet [5]. Do not adjust the pitch and roll. Once the leveling feet are touching, anchor those four feet to 40 ft-lbs.

2


Sweeping the Table


  • Mounting the indicator on the spindle, first verify that the table is flat to the Y-axis plane.
  • Place a parallel granite (38") on the table surface. Sweep the granite in the Y-axis to determine, and correct column / table flatness in the Y-axis direction. This is a very sensitive measurement method and corrections to this flatness should be made in conservative steps.
  • Raise or lower the side of the table to get the flatness within specification using all the leveling screws on one side.
  • Move the levels to the table and place them as close to the center as possible.
  • One level should be parallel to the X-axis and one level should be perpendicular to the X-axis.
  • Once the Column to Table flatness has been established, check the table for twist using the step below.

3


Table Twist 


  • Focus on leveling the table only in this X-axis plane to establish a primary datum from the granite. 
  • Make note of the reading that is present. 
  • While monitoring the level, jog the table all the way to left and check if there is a change in the level reading.
  • While monitoring the level, jog the table all the way to right and check every 15 inches if there is a change in the level reading.
  •  If there is no change of reading, then the table has no twist. If there is a twist in the table, this must be corrected.

4

Level of the Bridge


  • With the Y-Axis and Z-Axis in their home positions, insert T-0157A SPINDLE LEVEL TOOL CT50/HSK100A VS/HDC into the spindle. 
  • Place a precision level on T-0157A
  • The level should be perpendicular to the X-axis of the machine to check the pitch [1]. It is very unlikely that this surface will read zero; do not expect it to. Make note of the reading that is present.
  • While monitoring the level, jog the Y-Axis to the end of travel and back and check if there is a change in the level reading. If there is no change in reading, then the columns are level. If the pitch is out, this must be corrected by adjusting all the leveling feet on one column evenly to either raise or lower one side of the bridge.
  • Place a single level on the spindle level tool (T-0157A), parallel to the X-axis of the machine to check the roll [2]. It is very unlikely that this surface will read zero; do not expect it to. Make note of the reading that is present.
  • While monitoring the level, jog the Y-Axis to the end of travel and back and check if there is a change in the level reading. If there is no change in reading, then the bridge has no twist. If there is a twist in the bridge, this must be corrected by evenly adjusting the front column leveling feet on the affected column.

5

Once the machine is rough leveled, torque all anchors to 40 ft-lbs.


X-Axis to Y-Axis Perpendicularity

1

The sweep of the X-axis to the Y-axis is accomplished using a granite square. Set zero by sweeping the X-axis on one side of the square, and then verify that the motion of the Y-axis is perpendicular by sweeping the adjacent side of the square. 

NTE 0.0010/35"

X-Z plane & Y-Z Plane Perpendicularity

1

X-Z plane:

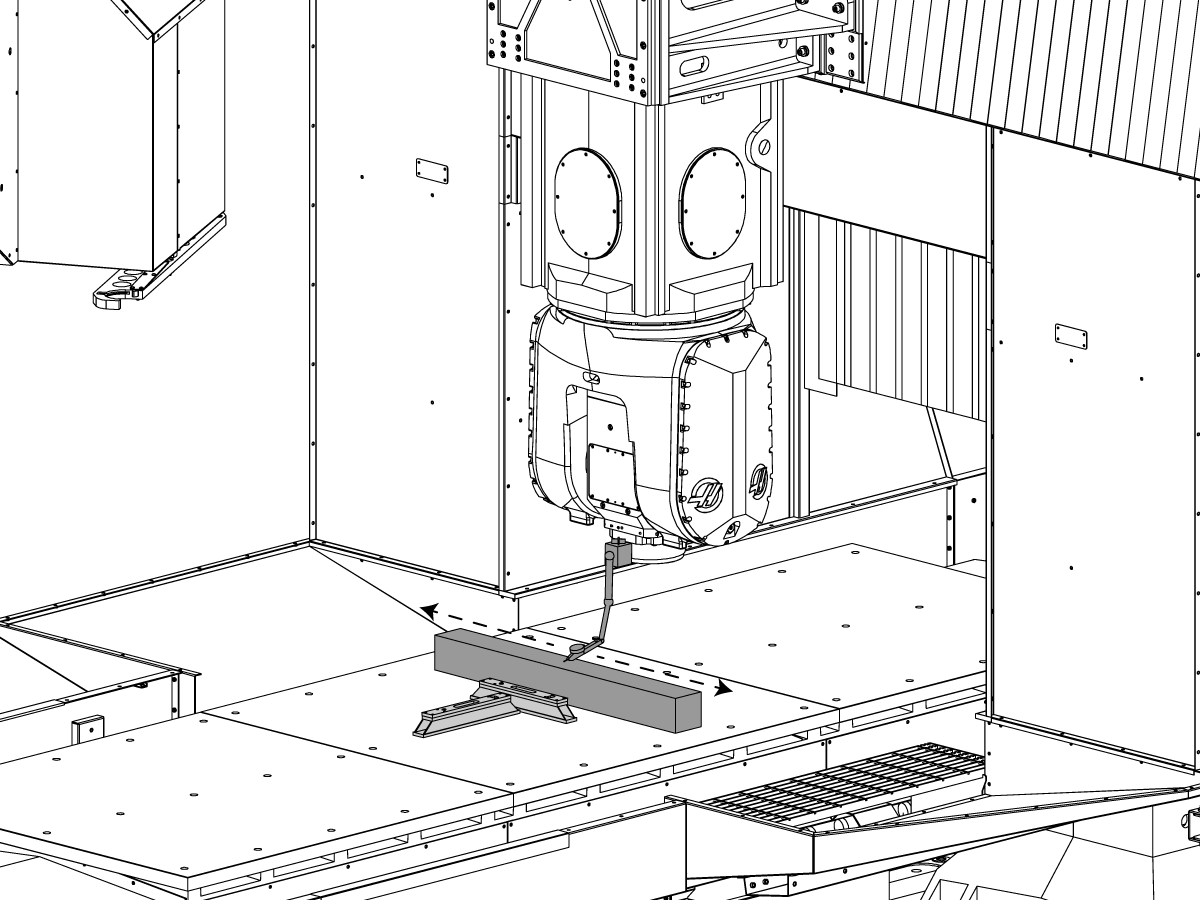
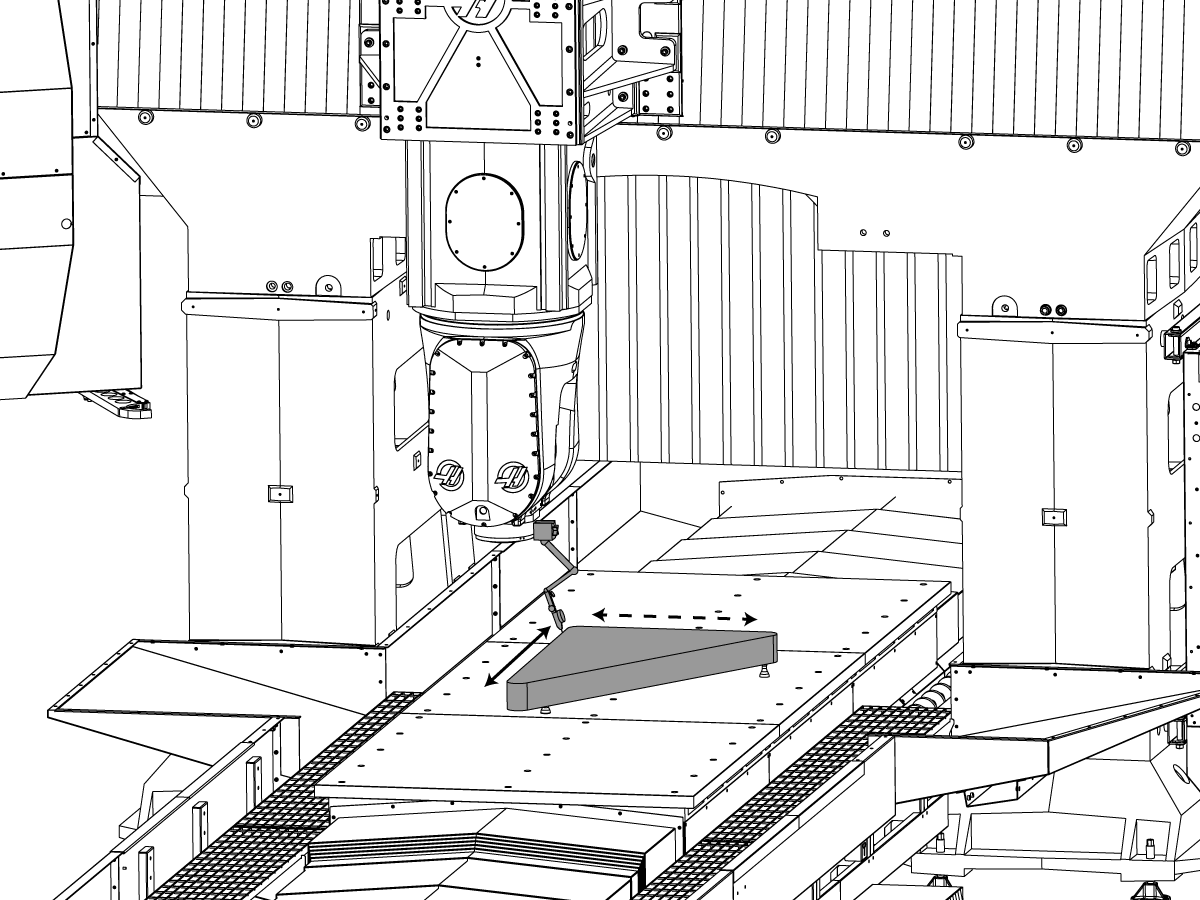
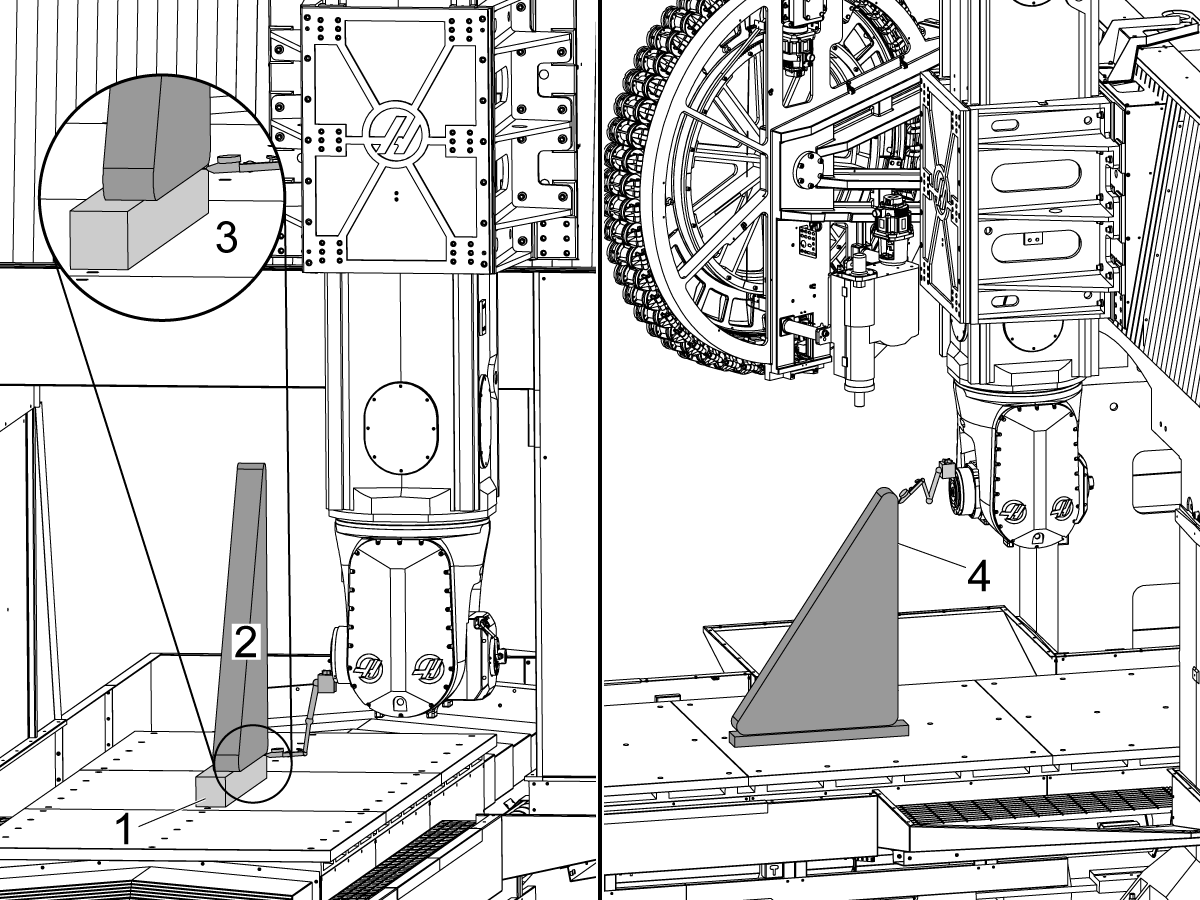
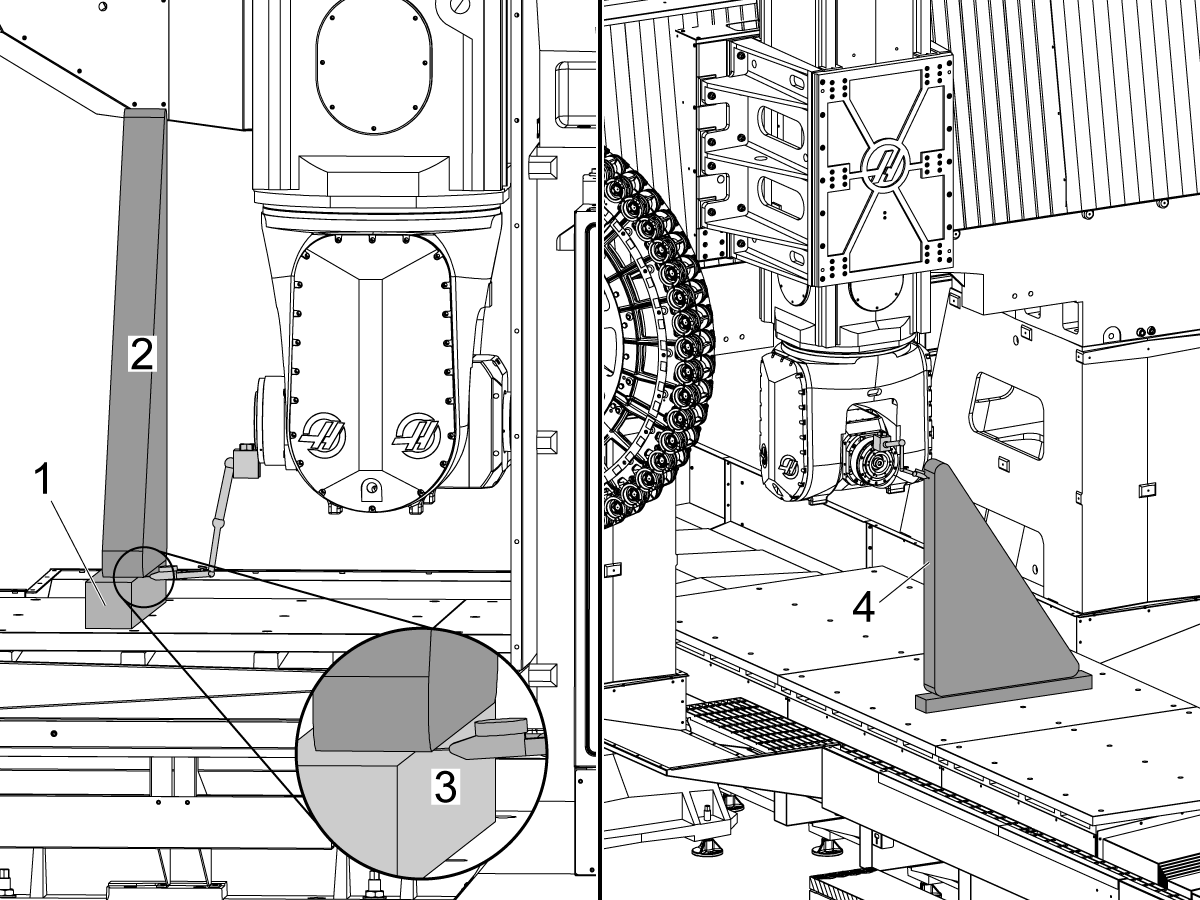
  • Place a parallel granite [1] in the middle of the table parallel to the X-Axis. 
  • Place the granite triangle [2] on top of the parallel granite with a one side of the triangle granite hanging over the edge of the parallel granite. 
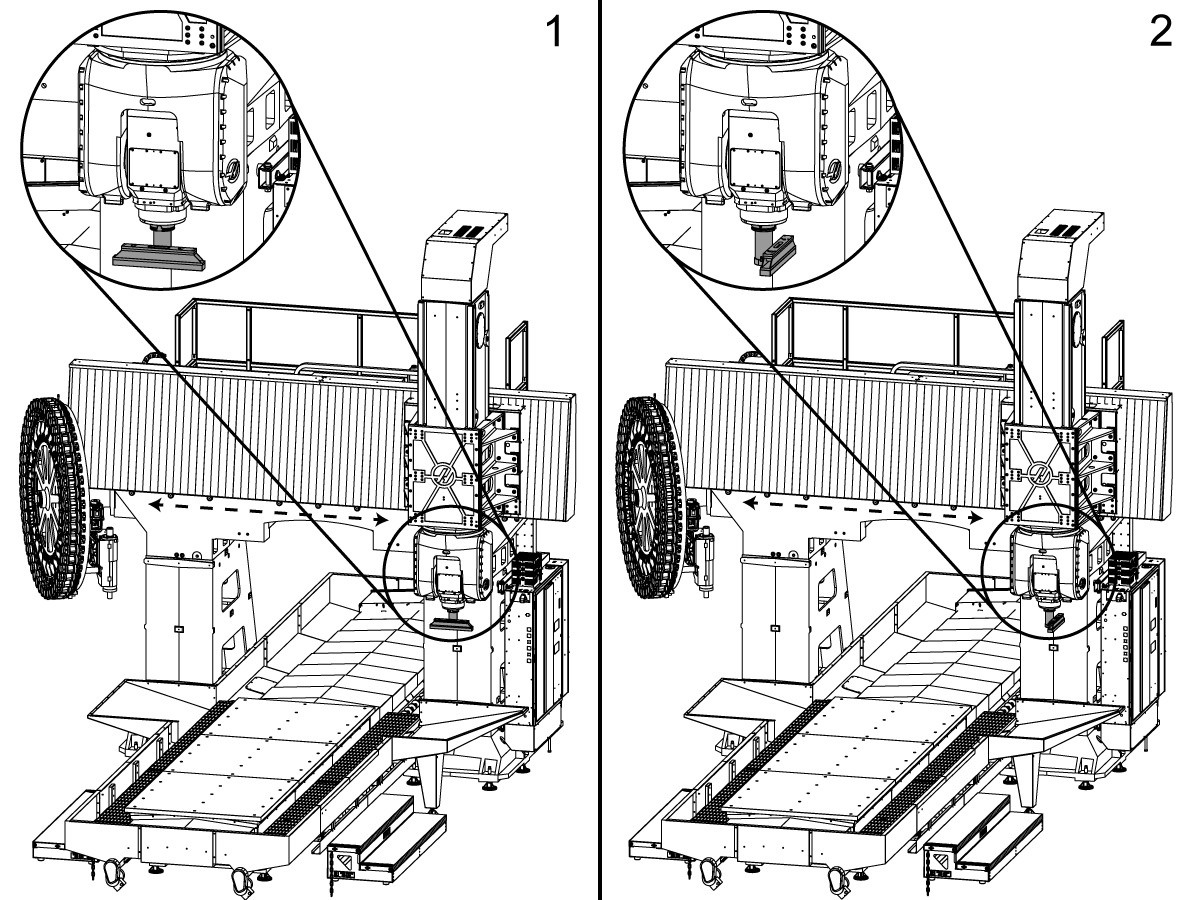
  • Attach an indicator to the spindle nose with the B-Axis at 90 degrees. 
  • Run the indicator along the bottom of the triangle that is hanging off the parallel granite [3]. Use mylar shims between the granites to adjust the triangles level. NTE 0.0001"
  • Once the triangle is level, jog the indicator along the long side [4] of the triangle in the X-Z plane. 
  • The X-Z plane is NTE 0.0010/35"

2

Y-Z plane: 

  • Place a parallel granite [1] in the middle of the table perpendicular to the X-Axis. 
  • Place the granite triangle [2] on top of the parallel granite with one side of the triangle granite hanging over the edge of the parallel granite. 
  • Attach an indicator to the spindle nose with the B-Axis at 90 degrees. 
  • Run the indicator along the bottom of the triangle that is hanging off the parallel granite [3]. Use mylar shims between the granites to adjust the triangles level. NTE 0.0001"
  • Once the triangle is level, jog the indicator along the long side [4] of the triangle in the Y-Z plane. 
  • The Y-Z plane is NTE 0.0010/35"

C-Axis Parallel to Z-Axis

1

Place an indicator on the B-Axis body and place the indicator on the face of the granite, set up the indicator so that it can sweep the granite with a 10" diameter.

Zero the indicator and rotate the C-Axis 360 degrees and record the measurement. This measurement is NTE 0.0008/10" diameter.

 Note: You will not be able to fully rotate 360 degrees in one direction as the head has +245 to -245 travel limits. 

B-Axis Tool Change offset

1

Home the B & C-Axis and place the indicator on the side face of the test arbor.

Find the high spot on the test bar by jogging the Y-Axis. Once the indicator is on the high spot jog the indicator up and down the test bar. The error on the indicator should be no more than 0.0001".

If the error exceeds 0.0001", adjust the B-Axis so that the error on the indicator is no more than 0.0001" and update the B-Axis Tool Change Offset using the steps below.

 Note: If the B-Axis Tool Change Offset is changed, the B and C-Axis compensation table needs to be recalculated. Follow the steps in the H-5AX - VR DOUBLE YOKE - HDC - B/C-AXIS COMPENSATION procedure.

2

Use the following instructions to change the B-Axis Tool Change Offset if a service key is not available. 

Press [SETTING] and navigate to the rotary tab. Highlight the 4th axis selection [1] and press [ALTER] [2] to set the B-Axis Tool Change Offset [3].

After adjusting the B-Axis Tool Change Offset. Redo the inclination test, sweeping from position [1] to [2]. If the inclination is out of tolerance after adjusting the offset, redo the adjustment portion. 

3

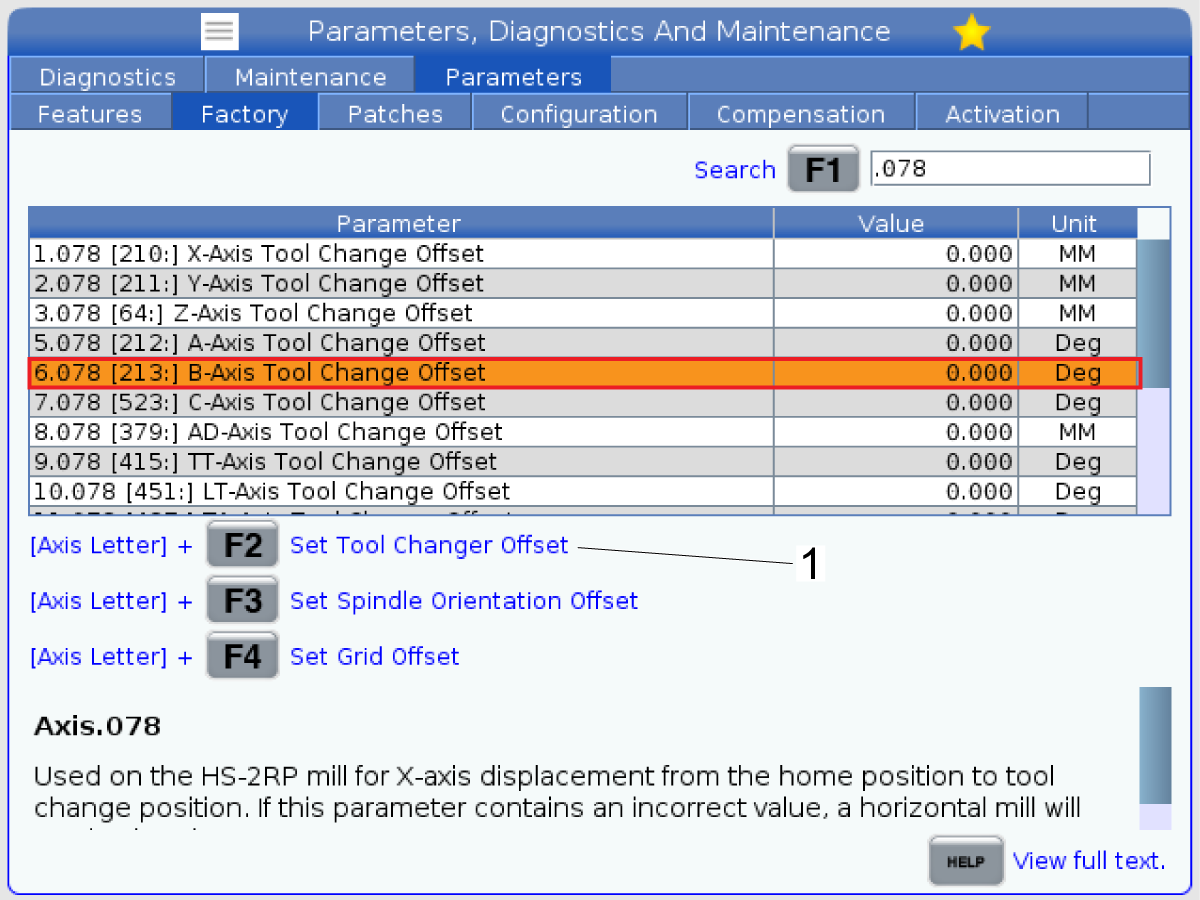
If a service key is available press [DIAGNOSTIC] and navigate to the parameters tab and to the factory tab. Find Parameter 6.078 B-AXIS TOOL CHANGE OFFSET to set the Tool Change Offset by pressing the [B] + [F2] to set the offset to the current position.

After adjusting the Tool Change Offset. Redo the inclination test, sweeping from position [1] to [2]. If the inclination is out of tolerance after adjusting the offset, redo the adjustment portion. 

C-Axis Tool Change Offset

1

Home the B and C-Axis.

In MDI command the B-Axis to -90°.

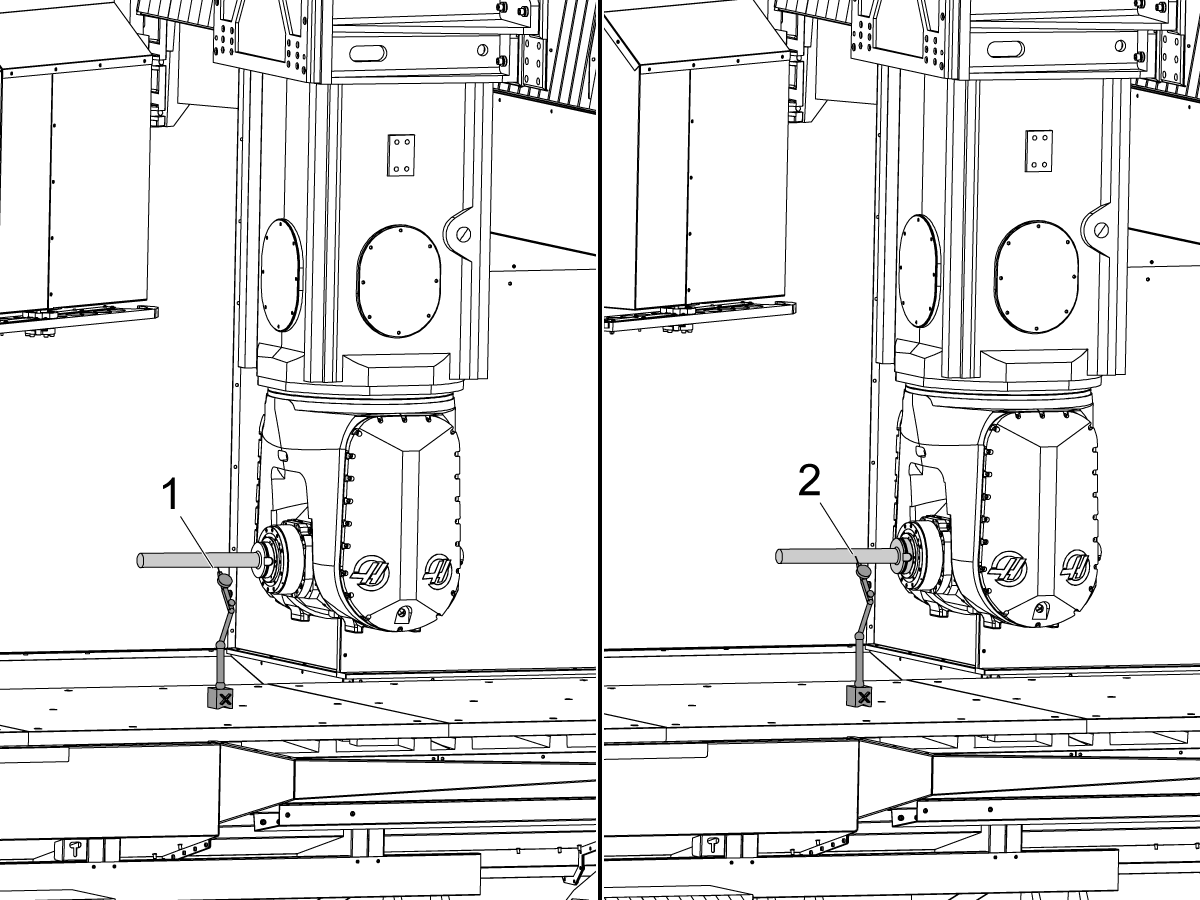
Place an indicator on the front face of the test bar at the end of the bar [1] on the high spot. Zero the indicator at this location.

Jog the Z-Axis up so the test bar clears the table and command B = +90°. Jog the table in the Z and X direction to move the indicator to position [2] on the front face of the test bar at the end of the bar on the high spot. The error on the indicator, between positions [1] and [2], should not exceed 0.0005".

If the error is larger than 0.0005", adjust the C-Axis so that the error on the indicator does not exceed 0.0005" between positions [1] and [2].

Once the end of the test bar reads the same error at both B = -90 and B = +90 degrees set the C-Axis Tool Change Offset using the steps below.

 Note: Do not move the Y-Axis during this step.

 Note: If the B-Axis Tool Change Offset is changed, the B and C-Axis compensation table needs to be recalculated. Follow the steps in the H-5AX - VR DOUBLE YOKE - HDC - B/C-AXIS COMPENSATION procedure.

2

Use the following instructions to change the C-Axis Tool Change Offset if a service key is not available. 

Press [SETTING] and navigate to the rotary tab. Highlight the 5th axis selection [1] and press [ALTER] to set the C-Axis Tool Change Offset [3].

After adjusting the Tool Change Offset. Redo the inclination test, sweeping from position [1] to [2]. If the inclination is out of tolerance after adjusting the offset, redo the adjustment portion. 

3

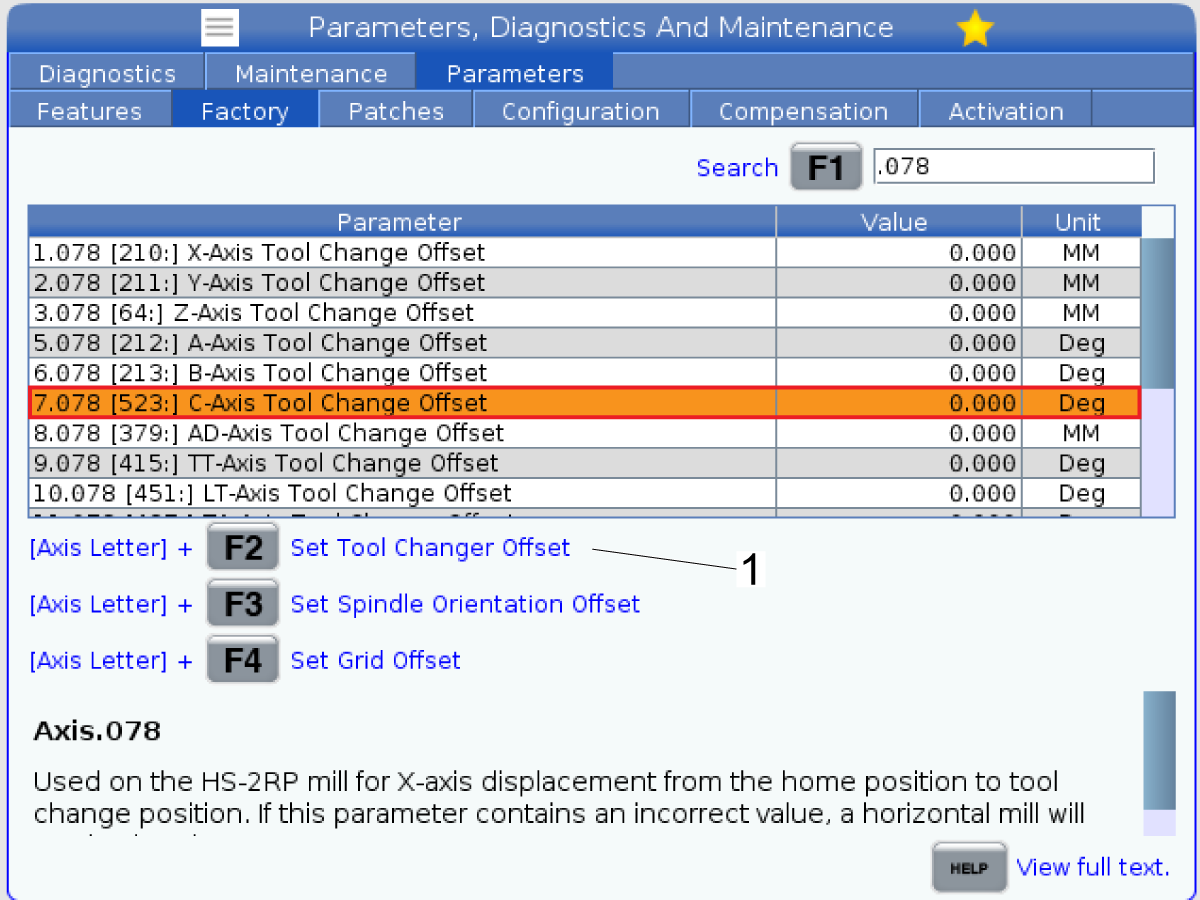
If a service key is available press [DIAGNOSTIC] and navigate to the parameters tab and to the factory tab. Find Parameter 7.078 C-AXIS TOOL CHANGE OFFSET to set the tool change offset by pressing [C] + [F2] to set the offset to the current position.

After adjusting the Tool Change Offset. Redo the inclination test, sweeping from position [1] to [2]. If the inclination is out of tolerance after adjusting the offset, redo the adjustment portion. 

B-Axis to C-Axis Perpendicularity

1

Home the B and C-Axis.

In MDI command the B-Axis to -90°.

Place an indicator on the front face of the test bar at the end of the bar [1] on the high spot. Zero the indicator at this location.

Jog the Z-Axis up so the test bar clears the table and command B = +90°. Jog in the Z and X directions to move the indicator to position [2] on the front face of the test bar at the end of the bar on the high spot. Adjust the C-Axis so that the error on the indicator is the same between positions [1] and [2]. This should not exceed 0.0005".

 Note: Do not move the Y-Axis during this step.

2

Once the face of the test bar reads zero at B =-90° and B = +90°, in MDI command the B-Axis to 0°.

Jog the table to move the indicator to position [1] on the test bar. Make sure to jog in the Z and X direction to find the "high" value in the B = 0 position. Record the value. DO NOT SET THE INDICATOR BACK TO ZERO. 

 Note: Do not move the Y-Axis during this step.

Spindle Centerline to B-Axis Perpendicularity

1

Home the B and C-Axis.

In MDI command the B-Axis to -90°.

Place an indicator on the front face of the test bar at the end of the bar [1] on the high spot. Zero the indicator at this location.

Jog the Z-Axis up so the test bar clears the table and command B = +90°. Jog in the Z and X directions to move the indicator to position [2] on the front face of the test bar at the end of the bar on the high spot. Adjust the C-Axis so that the error on the indicator is the same between positions [1] and [2]. This should not exceed 0.0005".

 Note: Do not move the Y-Axis during this step.

2

Once the face of the test bar reads zero at B =-90° and B = +90°, in MDI command the B-Axis to 0°.

Jog the table to move the indicator to position [1] on the test bar. Make sure to jog in the Z and X direction to find the "high" value in the B = 0 position.  This value should match the one found in the B-Axis to C-Axis Perpendicularity section.

Zero the indicator at position [1]. Jog in the Z direction up the test bar. Record the error seen.

 Note: Do not move the Y-Axis during this step.

B-Axis Sweep

1

Home the B and C-Axis.

In MDI command the B-Axis to -90°.

Place an indicator on the front face of the test bar at the end of the bar [1] on the high spot. Zero the indicator at this location.

Jog the Z-Axis up so the test bar clears the table and command B = +90°. Jog in the Z and X directions to move the indicator to position [2] on the front face of the test bar at the end of the bar on the high spot. Adjust the C-Axis so that the error on the indicator is the same between positions [1] and [2]. This should not exceed 0.0005".

 Note: Do not move the Y-Axis during this step.

2

In MDI command the B-Axis to +90°.

Place the indicator on the bottom face [1] of the test bar and sweep the whole travel. Make sure this is straight, if not, adjust the B-Axis until it is. 

Then place the indicator on the front face and zero the indicator 4 inches away from the face of the spindle [2]. It is recommended to mark a point on the test bar to indicate the spot to take measurements on the next portion of the test. 

On the operators page, set the Y, Z, and B-Axis to zero. 

3

 Note: This test will move the B-Axis in 45 degree increments and creates a plane that will be evaluated.

The starting position will be at B = +90 shown in the previous step, this will always be our zero. 

Jog the B-Axis to B = +45.

Jog the table to move the indicator to the position that was marked on the test bar. Make sure to jog in the Z and X directions to find the "high" value in the B = +45 position. Record the value.

 Note: It is recommended to use a dual dial test indicator.

Jog the B-Axis to B = 0, B = -45, and B = -90 position, all while jogging the table to move the indicator to the marked position on the test bar in each of the B-Axis movements and record the values. Find the "high" spot in each of these positions to take the measurement. 

 Note: It is recommended to not move the Y-Axis during this test, but if it is moved return it to the operators Y-Axis zero position.

4

In MDI command the C-Axis to +180°.

Place an indicator on the front face of the test bar at the end of the bar [1] on the high spot. 

 Note: It is recommended to not move the Y-Axis during this test, but if it is moved return it to the operators Y-Axis zero position.

Jog the Z-Axis up so the test bar clears the table and command B = +90°. Jog in the Z and X directions to move the indicator to position [2] on the front face of the test bar at the end of the bar on the high spot. Adjust the C-Axis so that the error on the indicator is the same between positions [1] and [2]. This should not exceed 0.0005".

 Note: Do not move the Y-Axis during this step.

5

Jog the B-Axis to B = -90. 

Then place the indicator on the front face and zero the indicator 4 inches away from the face of the spindle. It is recommended to mark a point on the test bar to indicate the spot to take measurements on the next portion of the test. 

Redo the sweep steps mentioned in the previous step and record the values. The difference between the measurements in run 1 and run 2 at each B-Axis position divided by 2, is NTE 0.004" (Run 1 is at C = 0, Run 2 is at C = 180; use latest inspection report to help calculate).

 Note: The latest inspection report can be found on EA - Alignment Inspection Report - Reference Table through the Dealer-Only Content page.

EA0450 Inspection Report

Spindle Centerline Parallel to C-Axis

1

Home the B and C-Axis, mount the indicator on the spindle nose and set the indicator to sweep a 10" diameter circle. Set the indicator to zero at position [1] and sweep to position [2]. This is NTE 0.0005"

Record the measurement and fix this by adjusting the B-Axis Tool Change Offset. See the B-Axis Tool Change Offset steps.

Note: The B-Axis Tool Change Offset must be set before moving on.

2

Repeat the same steps above with the C-Axis at C = +90 [A].

Set the indicator to zero at position [3] and sweep to position [4]. 

This is NTE 0.002"

 Note: This check is to make sure the C-Axis is parallel to Z-Axis. You should see the same error when C = 0 and when C = +90. Any additional error is from the C-Axis parallel to Z-Axis step.

C-Axis Runout

1

Home the B & C-Axis and place the indicator on the side face of the test arbor.

Find the high spot [1] on the test bar by jogging the Y-Axis. Once the indicator is on the high spot jog the indicator up and down [2] the test bar and adjust the B-Axis so that the error on the indicator is no more than 0.0001".

2

Place an indicator on the front of the test bar 4 inches away from the spindle face. Find the high spot on the test bar by jogging the indicator along the X-Axis.

 Note: Hold the test bar when jogging the C-Axis. 

Zero the indicator on the high spot and rotate the C- Axis +180/-180 degree's. Record the error at the following positions: C = +90, C = +180/-180, C = -90.

The error between C = 0 and C = +180/-180 is NTE 0.0015" TIR. 

The error between C = -90 and C = +90 is NTE 0.003" TIR.

 Note: You will not be able to fully rotate 360 degrees in one direction as the head has +245 to -245 travel limits. 

Make a note of the C-Axis positions where the runout was the highest as this will be needed to make the adjustment.

Spindle Centerline and B-axis Intersection

1

Home the B and C-Axis.

In MDI command the B-Axis to -90°.

Place an indicator on the front face of the test bar at the end of the bar [1] on the high spot. Zero the indicator at this location.

Jog the Z-Axis up so the test bar clears the table and command B = +90°. Jog in the Z and X directions to move the indicator to position [2] on the front face of the test bar at the end of the bar on the high spot. Adjust the C-Axis so that the error on the indicator is the same between positions [1] and [2]. This is NTE 0.0005".

 Note: Do not move the Y-Axis during this step.

2

Place the indicator on the bottom face [1] of the test bar and sweep the whole travel. Make sure this is straight, if not, adjust the B-Axis until it is. 

On the operators page, set the Y, Z, and B-Axis to zero. 

3

 Note: It is recommended to use a dual dial test indicator.

Rotate the B-Axis 180 degrees to B = -90 and jog the table to set the indicator on the bottom side of the test bar. 

It is recommended to not move the Y-Axis and only the X and Z. Jog the Z down to the zero position on the operators page. Sweep the bottom length of the test bar to make sure the error reads the same across the test bar. If it does not, adjust the B-Axis until it does. DO NOT MOVE THE Z-AXIS while making the adjustments, only the B-Axis. Divide the error by two. This is NTE 0.002".

If error exceeds tolerance contact Haas Service.

Recently Viewed Items

You Have No Recently Viewed Items Yet

Feedback
Haas Logo

Haas Delivered Price

This price includes shipping cost, export and import duties, insurance, and any other expenses incurred during shipping to a location in France agreed with you as a buyer. No other mandatory costs can be added to the delivery of a Haas CNC Product.

KEEP UP WITH THE LATEST HAAS TIPS AND TECHNOLOGY...

Sign up now!   

HAAS TOOLING ACCEPTS THE FOLLOWING:

  • Service & Support
  • Owners
  • Request Service
  • Operator Manuals
  • Haas Parts
  • Rotary Repair Request
  • Pre-Install Guides
  • Shopping Tools
  • Build & Price a New Haas
  • Available Inventory
  • The Haas Price List
  • CNCA Financing
  • About Haas
  • Accessibility Statement
  • DNSH Statement
  • Export Compliance
  • Careers
  • Certifications & Safety
  • Contact Us
  • History
  • Terms & Conditions
  • Haas Tooling Terms & Conditions
  • Privacy
  • Warranty
  • Haas Community
  • Haas Certification Program
  • Haas Motorsports
  • Gene Haas Foundation
  • Haas Technical Education Community
  • Events
  • Join the Conversation
  • Facebook
  • X
  • Flickr
  • YouTube
  • LinkedIn
  • Instagram
  • TikTok
© 2026 Haas Automation, Inc – CNC Machine Tools
This site is protected by reCAPTCHA and the Google Privacy Policy and Terms of Service apply.

2800 Sturgis Rd., Oxnard, CA 93030
Toll Free: (888) 817-4446 / Fax: 805-278-8554