My Haas Welcome,
!
Haas Tooling MyHaas/HaasConnect Sign In Register Haas Tooling MyHaas/HaasConnect Sign Out Welcome, My Machines Latest Activity My Quotes My Account My Users Sign Out
Find Your Distributor
  1. Select Language
    1. English
    2. Українська
  • machines Main Menu
    • Vertical Mills
      Vertical Mills
      Vertical Mills View All
      • Vertical Mills
      • VF Series
      • Universal Machines
      • VR Series
      • VP-5 Prismatic
      • Pallet-Changing VMCs
      • Mini Mills
      • Mold Machines
      • High-Speed Drill Centers
      • Drill/Tap/ Mill Series
      • Toolroom Mills
      • Pocket Mill
      • Compact Mills
      • Gantry Series
      • SR Sheet Routers
      • Extra-Large VMC
      • Double-Column Mills
      • 3+2 Positioning Machines
    • Multi-Axis Solutions
      Multi-Axis Solutions
      Multi-Axis Solutions View All
      • Multi-Axis Solutions
      • Y-Axis Lathes
      • 5-Axis Mills
    • Lathes
      Lathes
      Lathes View All
      • Lathes
      • ST Series
      • Dual-Spindle
      • Box Way Series
      • Toolroom Lathes
      • Chucker Lathe
      • Pocket Lathe
      • Haas Bar Feeders
    • Horizontal Mills
      Horizontal Mills
      Horizontal Mills View All
      • Horizontal Mills
      • 50-Taper
      • 40-Taper
    • Rotaries & Indexers
      Rotaries & Indexers
      Rotaries & Indexers View All
      • Rotaries & Indexers
      • Rotary Tables
      • Indexers
      • 5-Axis Rotaries
      • Extra-Large Rotaries
    • Special Series
      Special Series
      Special Series View All
      • Special Series
      • EU_Series_Redirect
    • Automation Systems
      Automation Systems
      Automation Systems View All
      • Automation Systems
      • Mill Automation
      • Lathe Automation
      • Automatic Parts Loaders
      • Automation Models
    • Desktop Machines
      Desktop Machines
      Desktop Machines View All
      • Desktop Machines
      • Desktop Mill
      • Desktop Lathe
      • Control Simulator, Standard
      • Control Simulator, Premium
    • Shop Equipment
      Shop Equipment
      Shop Equipment View All
      • Shop Equipment
      • Knee Mill
      • Haas Manual Lathes
      • Haas Saws
    • Fabrication Machines
      Fabrication Machines
      Fabrication Machines View All
      • Fabrication Machines
      • Laser Cutting Machines
      • CNC Press Brakes
    • QUICK LINKS Special Series  Special Series 
      EU SERIES EU SERIES BUILD & PRICE | PRICE LIST BUILD & PRICE | PRICE LIST In-Stock Machines In-Stock Machines WHAT’S NEW WHAT’S NEW YOUR FIRST CNC YOUR FIRST CNC
      SHOPPING TOOLS
      • Build & Price a Haas
      • Price List
      • Available Inventory
      • CNCA Financing
      WANT TO TALK TO SOMEONE?

      A Haas Factory Outlet (HFO) can answer your questions, and walk you through your best options.

      CONTACT YOUR DISTRIBUTOR >
  • Options Main Menu
    • The Haas Control Value Option Packages
      Value Option Packages
      Value Option Packages View All
      • Value Option Packages
    • Product Image Spindles
      Spindles
      Spindles View All
      • Spindles
    • Product Image Tool Changers
      Tool Changers
      Tool Changers View All
      • Tool Changers
    • Product Image 4th- | 5th-Axis
      4th- | 5th-Axis
      4th- | 5th-Axis View All
      • 4th- | 5th-Axis
    • Product Image Turrets & Live Tooling
      Turrets & Live Tooling
      Turrets & Live Tooling View All
      • Turrets & Live Tooling
    • Product Image Probing
      Probing
      Probing View All
      • Probing
    • Haas Chip & Coolant Management Chip & Coolant Management
      Chip & Coolant Management
      Chip & Coolant Management View All
      • Chip & Coolant Management
    • The Haas Control The Haas Control
      The Haas Control
      The Haas Control View All
      • The Haas Control
    • Product Image Product Options
      Product Options
      Product Options View All
      • Product Options
    • Product Image Tooling & Fixturing
      Tooling & Fixturing
      Tooling & Fixturing View All
      • Tooling & Fixturing
    • Product Image Workholding
      Workholding
      Workholding View All
      • Workholding
    • Product Image 5-Axis Solutions
      5-Axis Solutions
      5-Axis Solutions View All
      • 5-Axis Solutions
      • 5 Easy Steps to 5-Axis
    • QUICK LINKS Special Series  Special Series 
      EU SERIES EU SERIES BUILD & PRICE | PRICE LIST BUILD & PRICE | PRICE LIST In-Stock Machines In-Stock Machines WHAT’S NEW WHAT’S NEW YOUR FIRST CNC YOUR FIRST CNC
      SHOPPING TOOLS
      • Build & Price a Haas
      • Price List
      • Available Inventory
      • CNCA Financing
      WANT TO TALK TO SOMEONE?

      A Haas Factory Outlet (HFO) can answer your questions, and walk you through your best options.

      CONTACT YOUR DISTRIBUTOR >
  • Why Haas Main Menu
      Discover the Haas Difference
    • Why Haas
    • MyHaas
    • Education Community
    • Industry 4.0
    • Haas Certification
    • Customer Testimonials
  • Service Main Menu
      Welcome to Haas Service
      SERVICE HOME Operator’s Manuals How-To Procedures Troubleshooting Guides Preventive Maintenance Haas Parts Haas Tooling Videos
  • Videos Main Menu
  • Main Menu
    • View All
    • View All
    • View All
    • View All
      • HTEC Curriculum Support
      • Haas Value Option Packages (VOP) Journey
    • View All
      • Haas 10 kg Cobot Package
      • Cobot Kits
      • DC-1 Drill Center
      • CNC Sales News
      • Do More With Your Haas
    • View All
    • View All
      • contact-us-test
      • 4 - AUTOMATION SYSTEMS
      • Carousel-V2
      • expert test
      • Demo_Day_Trident-test
      • Link Test
      • image-sale-tag-test
      • article-list-test
      • Haas 25 kg Robot Package
      • test-algolia-page
    • View All
    • View All
    • View All
    • View All
      • calc-test
    • View All
    • QUICK LINKS Special Series  Special Series 
      EU SERIES EU SERIES BUILD & PRICE | PRICE LIST BUILD & PRICE | PRICE LIST In-Stock Machines In-Stock Machines WHAT’S NEW WHAT’S NEW YOUR FIRST CNC YOUR FIRST CNC
      SHOPPING TOOLS
      • Build & Price a Haas
      • Price List
      • Available Inventory
      • CNCA Financing
      WANT TO TALK TO SOMEONE?

      A Haas Factory Outlet (HFO) can answer your questions, and walk you through your best options.

      CONTACT YOUR DISTRIBUTOR >
  • Haas Tooling Main Menu
  • Haas Service Parts Main Menu

My Haas Welcome,
!
Haas Tooling MyHaas/HaasConnect Sign In Register Haas Tooling MyHaas/HaasConnect Sign Out Welcome, My Machines Latest Activity My Quotes My Account My Users Sign Out
Find Your Distributor
  1. Select Language
    1. English
    2. Українська
×

Search Results

Web Pages

Images

    • <
    • 1
    • >

Single Axis Rotary MRZP Setup

Service Home How To Procedures Single Axis Rotary MRZP Setup

Single Axis Rotary MRZP Setup

- Jump to Section - Back to Top

2.10 Single Axis MRZP

Recently Updated Last updated: 04/26/2022

Single Axis Rotary MRZP Setup


Revision A - 03/2026

Introduction

The Machine Rotary Zero Point (MRZP) Offsets are control settings that define the centers of rotation for the rotary table relative to the home positions of the linear axes. This program can be used to obtain MRZP values for any rotary axis, A, B or C.

Required parts

  • 93-2880 MRZP MASTER TOOL KIT W/O PROBE&PULL STUD MRZP kit 
  • Wireless Intuitive Probing System

Machine Requirements

  • Software 100.20.000.1200 or higher

Note: The tool shown in pictures in the the NCG is no longer being sold by Haas. 

Probe Cycle Instructions

1

This procedure requires that the spindle probe be calibrated and that the rotary be square to the machine's movement. Verify both of these before continuing.

Warning: The face of the rotary needs to be square to the machine motion within 0.002 inch (0.05 mm). An alarm will be generated if the rotary is not square within this tolerance. 

The steps to calibrate a probe can be found at Wireless Probing How-To PART 1 - Calibrating the System.


2

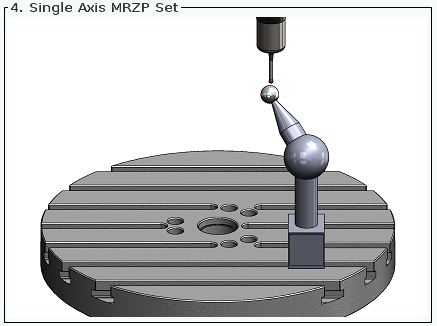
If necessary assemble the calibration tool and mount it to the rotary.

Mag base: The pervious MRZP tool used a mag base to attach to the rotary face. Place it anywhere on the rotary where it will not crash into any thing as it moves around. 

T-slots: See the details tab on the product page for information on how to configure the MRZP tool. Bolt down the MRZP tool using the T bolts. The tool does not need to be centered. 

IMPORTANT: Make sure the gauge ball will stay within the XYZ travel limits when attempting to run the probing cycle at different angles in rotation. 

3

Press [Offset] then navigate to the Work tab and set G154 P80, P81 & P82 to zero in all axis. These will be used to store data collected during the test. 

Also check that setting 254 and macro variable 10800 is set to zero. 

Press settings then type 254 and press [F1] to search for the setting. Set it to zero. 

Press [Current Commands] and open the Macro Vars tab. Navigate to the right to the (Global) 10800 - 10999 section. Highlight the Var 10800 and set its value to zero. 

4

Place the spindle probe in the spindle.

The spindle probe must be calibrated before the probing cycle is started. If it has not been calibrated do so before continuing. 

The steps to calibrate a probe can be found at Wireless Probing How-To PART 1 - Calibrating the System.

5

Position the spindle probe over the gauge ball. The probe stylus must be positioned near centerline of the calibration ball, and about 1/4 inch (6.35 mm) above the top surface. 

Important: It is important that the be as close to 1/4 inch above the part as possible. If it is too low it may hit the stem and generate alarm 1092 (UNEXPECTED SUREFACE FOUND). If the probe is too high that will reduce the accuracy of the of the procedure. 

If the probe is too far off center in the ball or is too low or too high you will get the alarm 1092 (UNEXPECTED SUREFACE FOUND). Clear the alarm and move the probe closer to the center axis of the ball and to the correct height above the ball. 

Tip: Place your thumb and index finger on horizontal axis of the gauge ball. Move your fingers up together to the top of the ball. Once they get to the top and are gently pinching the ruby tip of the probe. You should be able to feel if the ruby tip is centered. 

Warning: Do not pinch the probe too hard as this can damage the probe. Additionally, the probe should not move while it is being handled as this can also damage the probe. 

6

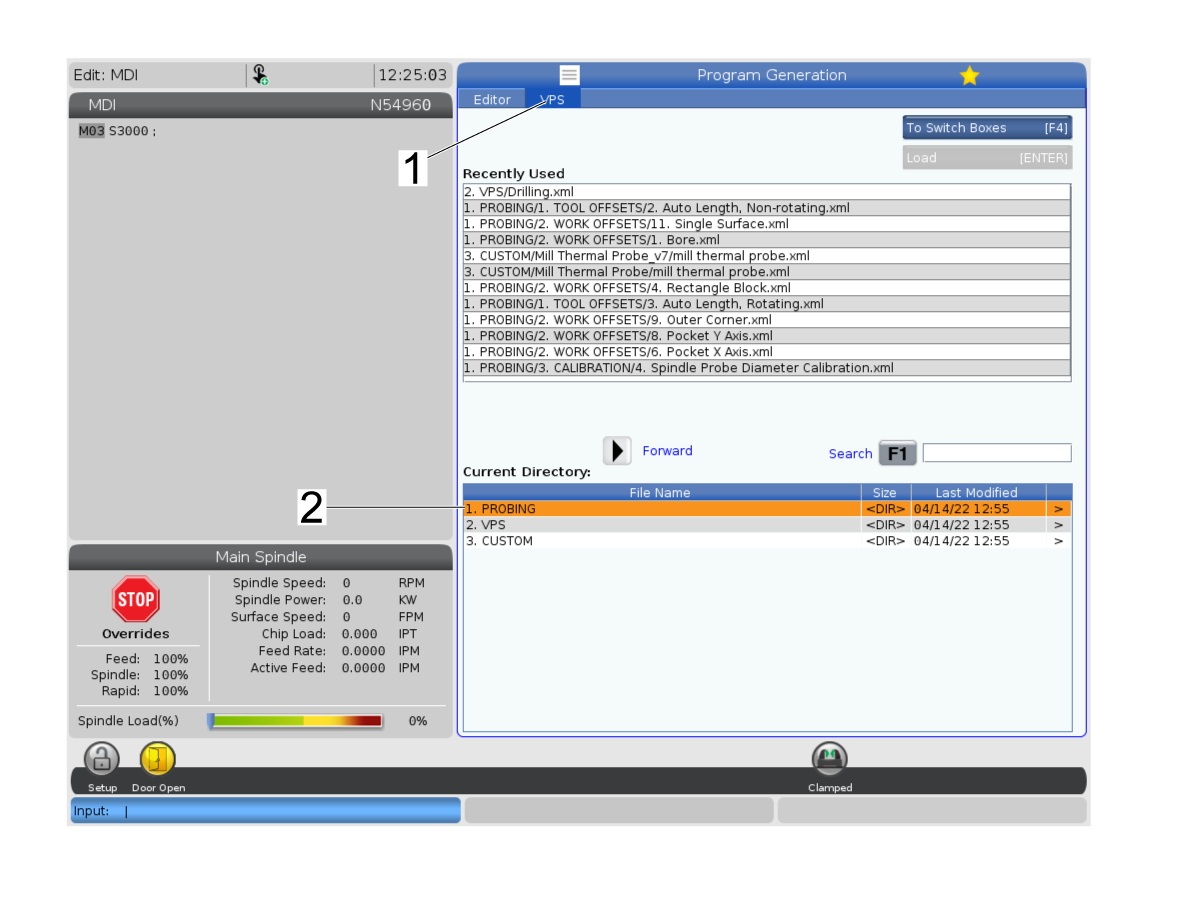
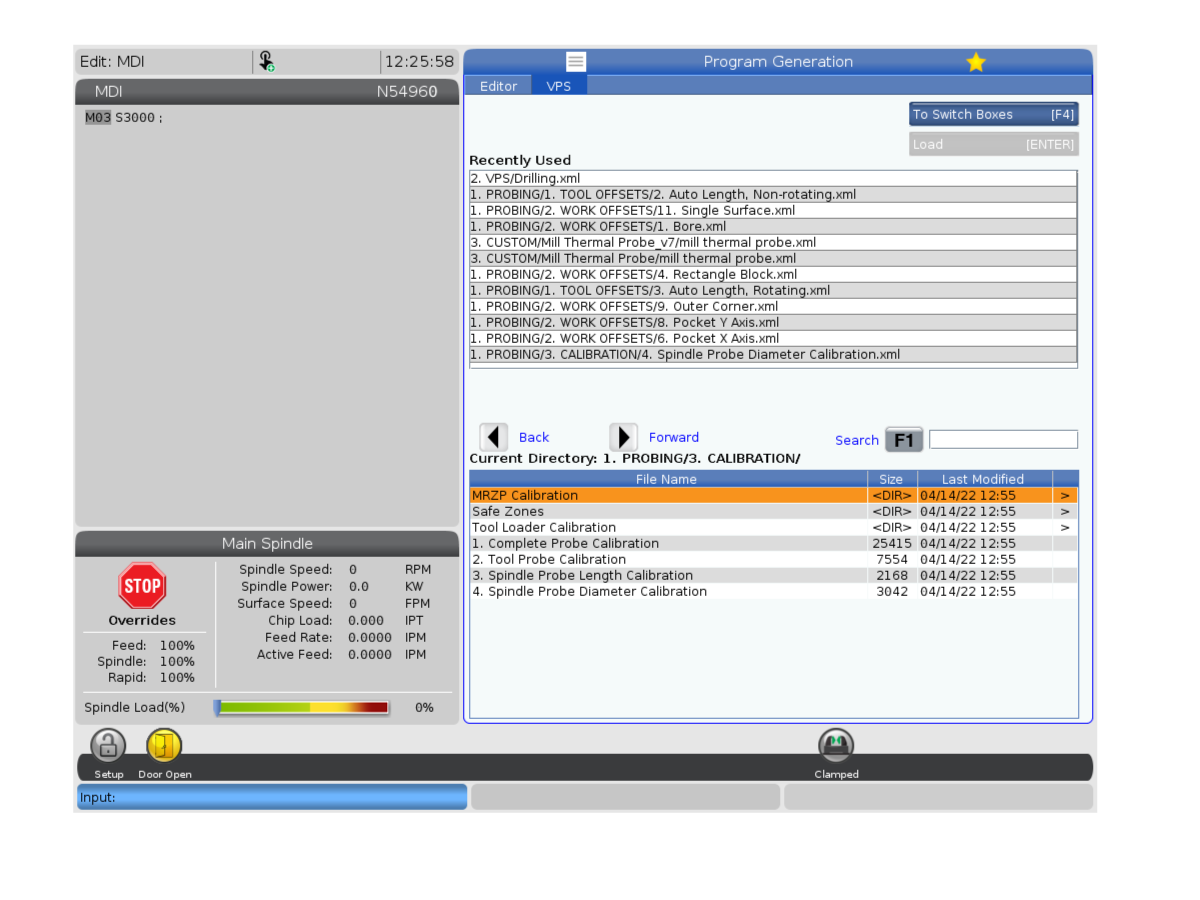
Press [EDIT] then navigate to the VPS tab.

Then highlight PROBING directory and press right arrow.

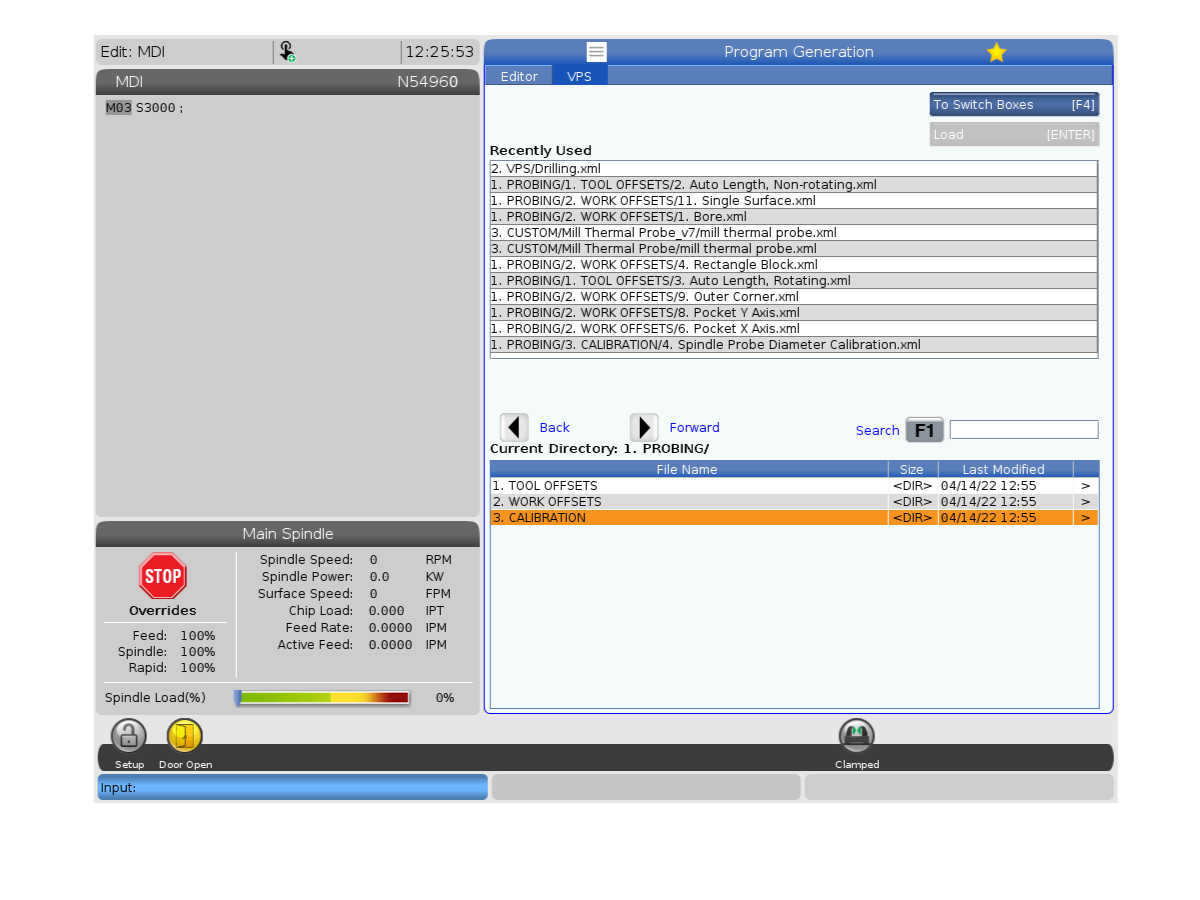
7

Highlight the CALIBRATION directory and press the right arrow button.

8

Highlight the MRZP Calibration directory and then press the right arrow button.

9

Highlight A, B, or C Single Axis Rough and Finish MRZP Set directory and press [ENTER].

10

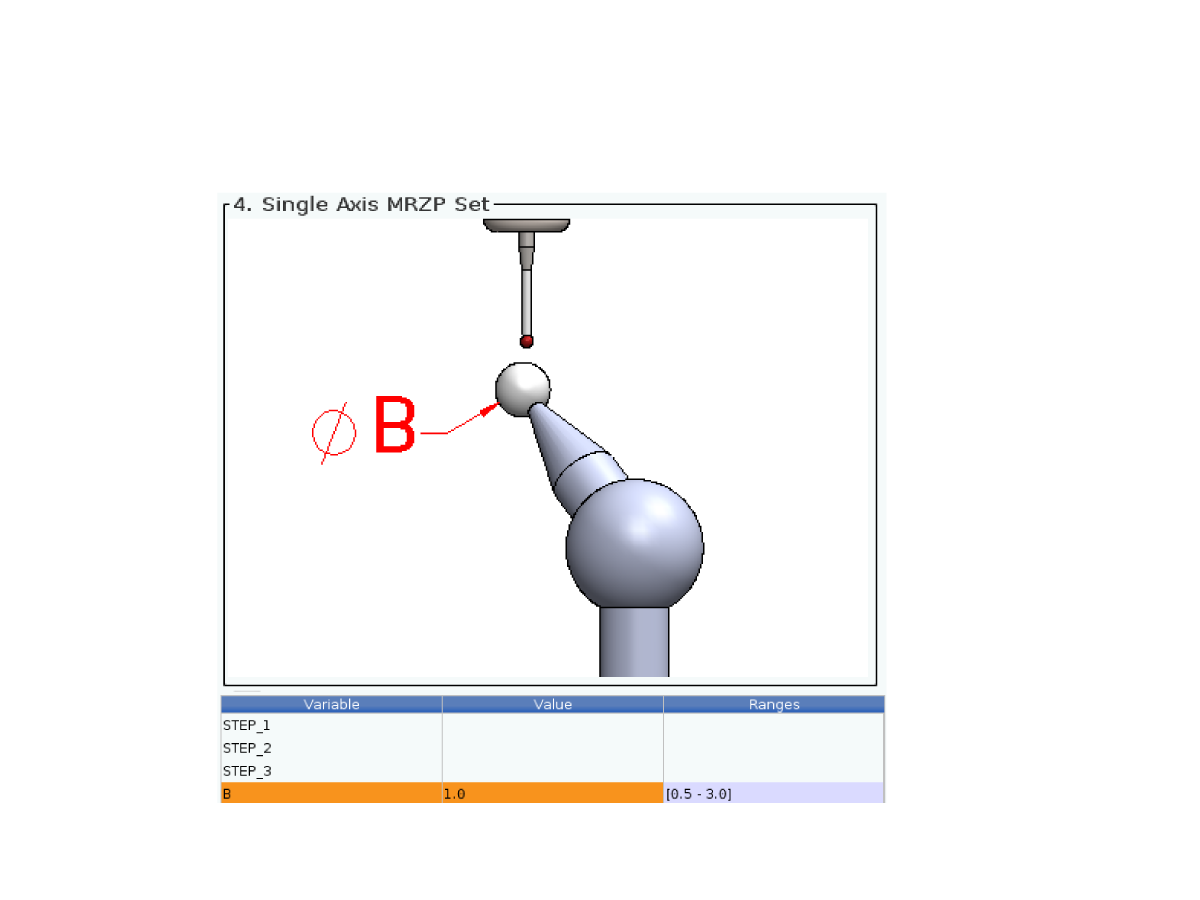
Highlight the row with Variable B and Input your gauge ball diameter into the template and press [ENTER]. 

93-2880 has a 1.0 inch diameter ball. It is necessary to include the decimal place when entering the diameter. 

11

Highlight the operation Step_1. 

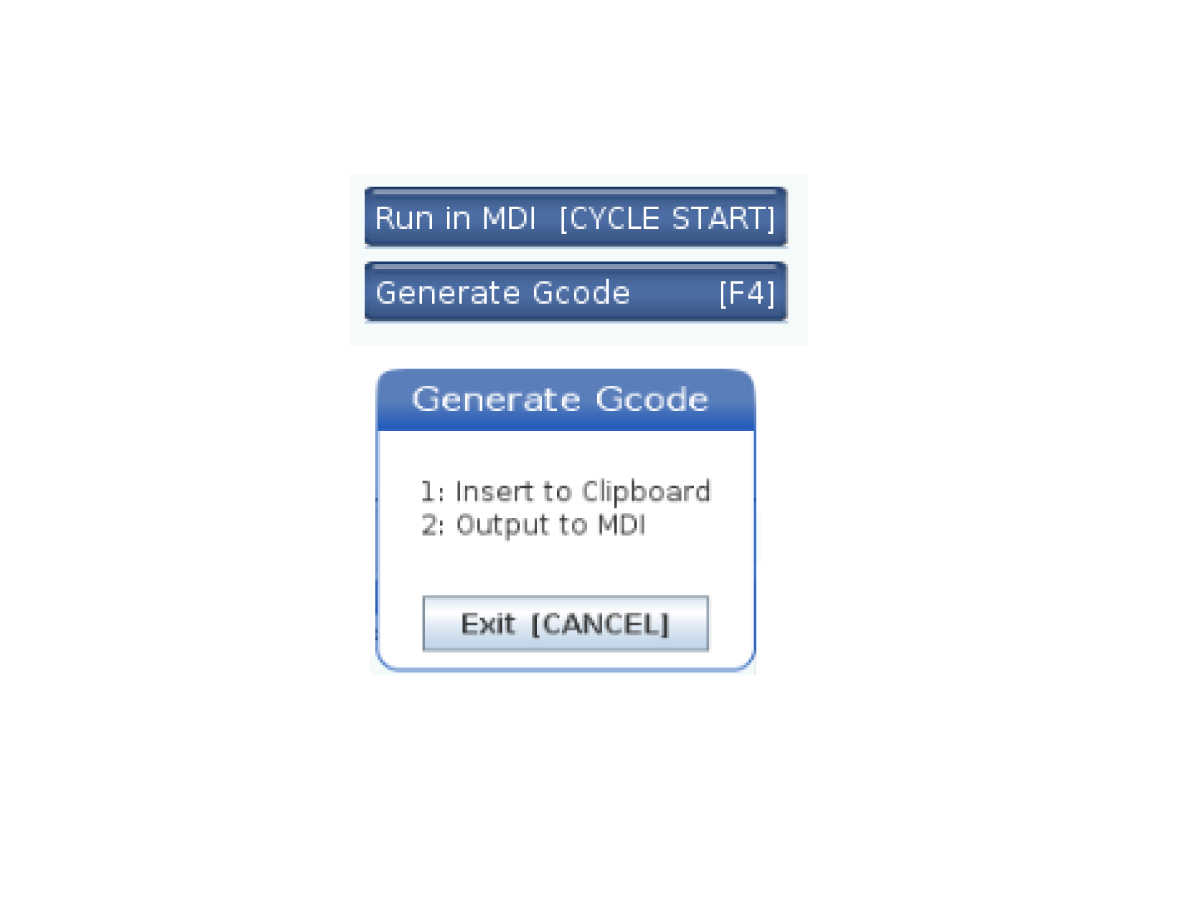
On the top right hand corner of the screen you will see your next options.

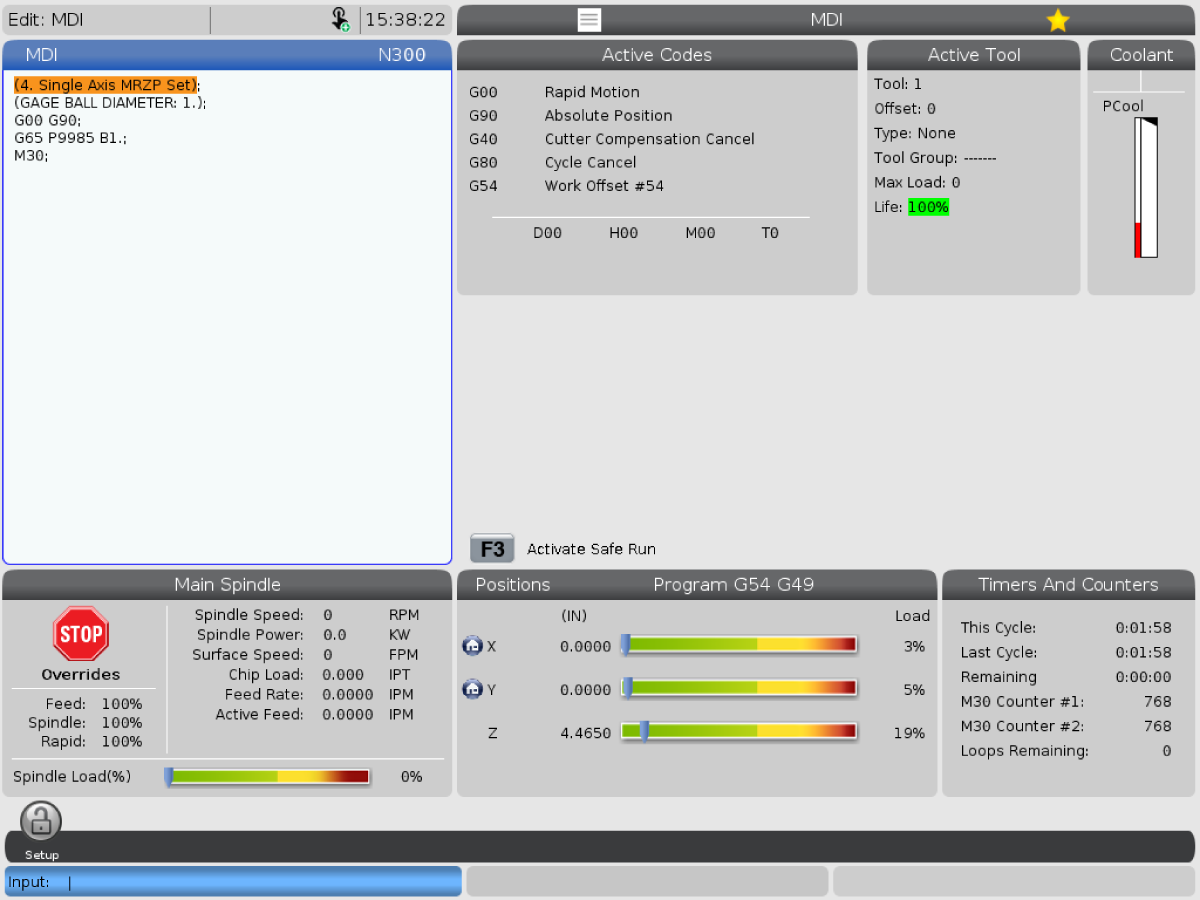
If you press [CYCLE START] the program will automatically be output into MDI and the program will begin its first cycle. If you choose [F4] the following choices will pop up. Once you have made your output decision run the program.

12

When the first cycle is complete the screen will revert back to what was output into MDI and repeatedly beep. Press [ENTER] to stop the beeping. 

13

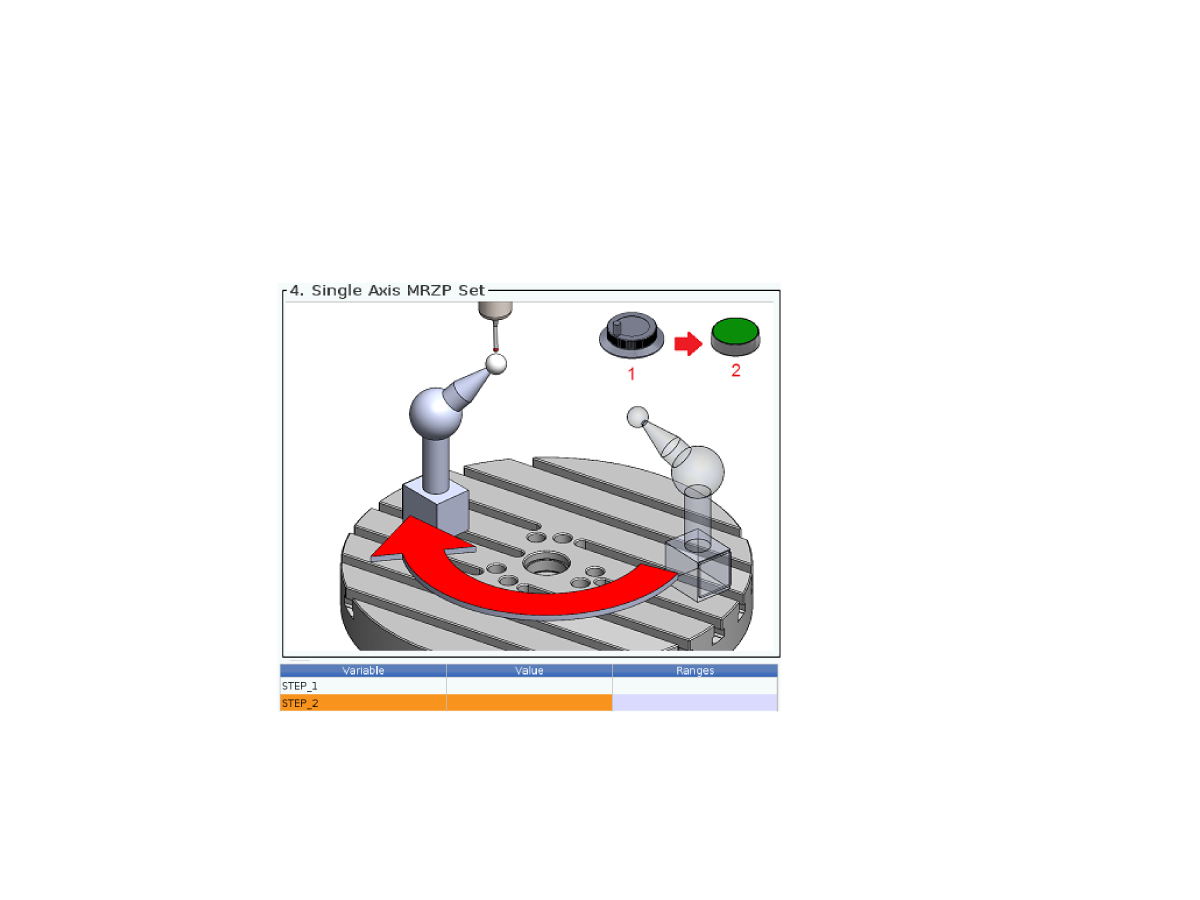
Use handle jog to move the probe out of the way then rotate the axis. It does not matter how much the axis is move, however it is recommended to turn the rotary at about a third the max travel range or a third of a rotation. Once the rotary is in its new orientation jog probe over the gauge ball.

Once the probe is in place press [EDIT]. This should direct to the VPS menu you were previously in. If so then run Step_2. If not then follow steps 5 through 8 to get back to the MRZP calibration menu and run Step_2.  

When the second cycle is complete the screen will revert back to what was output into MDI and repeatedly beep. Press [ENTER] to stop the beeping. 

14

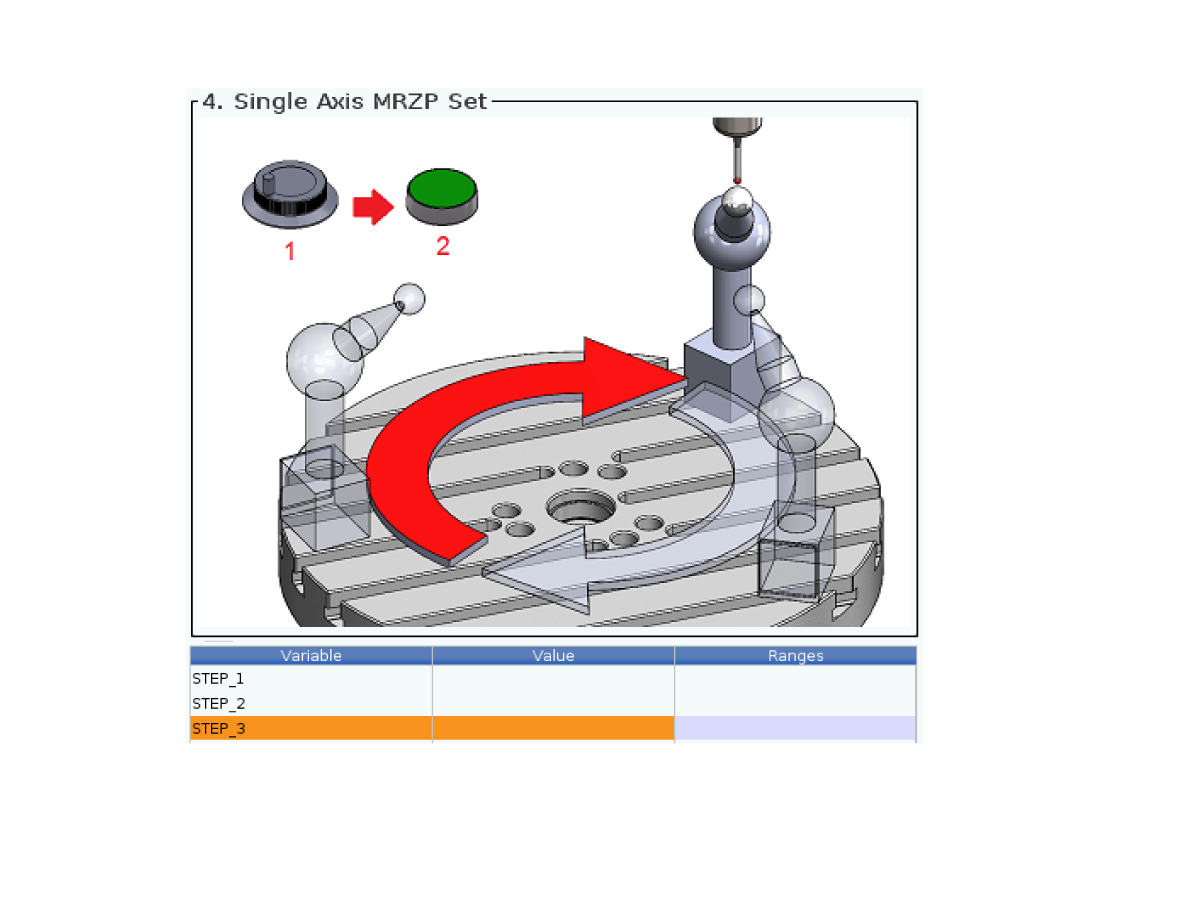
Use handle jog to move the probe out of the way then rotate the axis. It does not matter how much the axis is move, however it is recommended to turn the rotary at about a third the max travel range or a third of a rotation. Once the rotary is in its new orientation jog probe over the gauge ball.

Once the probe is in place press [EDIT]. This should direct to the VPS menu you were previously in. If so then run Step_3. If not then follow steps 5 through 8 to get back to the MRZP calibration menu and run Step_3.  

Once the final cycle is complete the screen will revert back to what was output into MDI and repeatedly beep. Press [ENTER] to stop the beeping. 

Input Settings and Verification

Updated

When using the A, B, or C Single-Axis Rough and Finish MRZP Set, only two of the below macro variables will be populated. The other macro variable should be zero.

In the set up shown to the left, you would get a Y and Z offset while X would be zero because the axis of rotation is pointed in the X direction. 

Copy the populated macro variable values into the corresponding setting. 

  • Macro #10121 is setting 300 - MRZP X OFFSET MASTER
  • Macro #10122 is setting 301 - MRZP Y OFFSET MASTER
  • Macro #10123 is setting 302 - MRZP Z OFFSET MASTER

Note: Make sure to copy over the correct sign convention when inputting the populated value into the corresponding setting.

Run a test part to verify that the MRZP settings have been implemented correctly. 

Recently Viewed Items

You Have No Recently Viewed Items Yet

Feedback
Haas Logo

Haas Delivered Price

This price includes shipping cost, export and import duties, insurance, and any other expenses incurred during shipping to a location in France agreed with you as a buyer. No other mandatory costs can be added to the delivery of a Haas CNC Product.

KEEP UP WITH THE LATEST HAAS TIPS AND TECHNOLOGY...

Sign up now!   

HAAS TOOLING ACCEPTS THE FOLLOWING:

  • Service & Support
  • Owners
  • Request Service
  • Operator Manuals
  • Haas Parts
  • Rotary Repair Request
  • Pre-Install Guides
  • Shopping Tools
  • Build & Price a New Haas
  • Available Inventory
  • The Haas Price List
  • CNCA Financing
  • About Haas
  • Accessibility Statement
  • DNSH Statement
  • Export Compliance
  • Careers
  • Certifications & Safety
  • Contact Us
  • History
  • Terms & Conditions
  • Haas Tooling Terms & Conditions
  • Privacy
  • Warranty
  • Haas Community
  • Haas Certification Program
  • Haas Motorsports
  • Gene Haas Foundation
  • Haas Technical Education Community
  • Events
  • Join the Conversation
  • Facebook
  • X
  • Flickr
  • YouTube
  • LinkedIn
  • Instagram
  • TikTok
© 2026 Haas Automation, Inc – CNC Machine Tools

This site is protected by reCAPTCHA and the Google Privacy Policy and Terms of Service apply.

2800 Sturgis Rd., Oxnard, CA 93030
Toll Free: (888) 817-4446 / Fax: 805-278-8554