My Haas Welcome,
!
Haas Tooling MyHaas/HaasConnect Sign In Register Haas Tooling MyHaas/HaasConnect Sign Out Welcome, My Machines Latest Activity My Quotes My Account My Users Sign Out
Find Your Distributor
  1. Select Language
    1. English
  • machines Main Menu
    • Vertical Mills
      Vertical Mills
      Vertical Mills View All
      • Vertical Mills
      • VF Series
      • Universal Machines
      • VR Series
      • VP-5 Prismatic
      • Pallet-Changing VMCs
      • Mini Mills
      • Mold Machines
      • High-Speed Drill Centers
      • Drill/Tap/ Mill Series
      • Toolroom Mills
      • Pocket Mill
      • Compact Mills
      • Gantry Series
      • SR Sheet Routers
      • Extra-Large VMC
      • Double-Column Mills
      • 3+2 Positioning Machines
    • Multi-Axis Solutions
      Multi-Axis Solutions
      Multi-Axis Solutions View All
      • Multi-Axis Solutions
      • Y-Axis Lathes
      • 5-Axis Mills
    • Lathes
      Lathes
      Lathes View All
      • Lathes
      • ST Series
      • Dual-Spindle
      • Box Way Series
      • Toolroom Lathes
      • Chucker Lathe
      • Pocket Lathe
      • Haas Bar Feeders
    • Horizontal Mills
      Horizontal Mills
      Horizontal Mills View All
      • Horizontal Mills
      • 50-Taper
      • 40-Taper
    • Rotaries & Indexers
      Rotaries & Indexers
      Rotaries & Indexers View All
      • Rotaries & Indexers
      • Rotary Tables
      • Indexers
      • 5-Axis Rotaries
      • Extra-Large Rotaries
    • Special Series
      Special Series
      Special Series View All
      • Special Series
      • EU_Series_Redirect
    • Automation Systems
      Automation Systems
      Automation Systems View All
      • Automation Systems
      • Mill Automation
      • Lathe Automation
      • Automatic Parts Loaders
      • Automation Models
    • Desktop Machines
      Desktop Machines
      Desktop Machines View All
      • Desktop Machines
      • Desktop Mill
      • Desktop Lathe
      • Control Simulator, Standard
      • Control Simulator, Premium
    • Shop Equipment
      Shop Equipment
      Shop Equipment View All
      • Shop Equipment
      • Knee Mill
      • Haas Manual Lathes
      • Haas Saws
    • Fabrication Machines
      Fabrication Machines
      Fabrication Machines View All
      • Fabrication Machines
      • Laser Cutting Machines
      • CNC Press Brakes
    • QUICK LINKS Special Series  Special Series 
      EU SERIES EU SERIES BUILD & PRICE | PRICE LIST BUILD & PRICE | PRICE LIST In-Stock Machines In-Stock Machines WHAT’S NEW WHAT’S NEW YOUR FIRST CNC YOUR FIRST CNC
      SHOPPING TOOLS
      • Build & Price a Haas
      • Price List
      • Available Inventory
      • CNCA Financing
      WANT TO TALK TO SOMEONE?

      A Haas Factory Outlet (HFO) can answer your questions, and walk you through your best options.

      CONTACT YOUR DISTRIBUTOR >
  • Options Main Menu
    • The Haas Control Value Option Packages
      Value Option Packages
      Value Option Packages View All
      • Value Option Packages
    • Product Image Spindles
      Spindles
      Spindles View All
      • Spindles
    • Product Image Tool Changers
      Tool Changers
      Tool Changers View All
      • Tool Changers
    • Product Image 4th- | 5th-Axis
      4th- | 5th-Axis
      4th- | 5th-Axis View All
      • 4th- | 5th-Axis
    • Product Image Turrets & Live Tooling
      Turrets & Live Tooling
      Turrets & Live Tooling View All
      • Turrets & Live Tooling
    • Product Image Probing
      Probing
      Probing View All
      • Probing
    • Haas Chip & Coolant Management Chip & Coolant Management
      Chip & Coolant Management
      Chip & Coolant Management View All
      • Chip & Coolant Management
    • The Haas Control The Haas Control
      The Haas Control
      The Haas Control View All
      • The Haas Control
    • Product Image Product Options
      Product Options
      Product Options View All
      • Product Options
    • Product Image Tooling & Fixturing
      Tooling & Fixturing
      Tooling & Fixturing View All
      • Tooling & Fixturing
    • Product Image Workholding
      Workholding
      Workholding View All
      • Workholding
    • Product Image 5-Axis Solutions
      5-Axis Solutions
      5-Axis Solutions View All
      • 5-Axis Solutions
      • 5 Easy Steps to 5-Axis
    • QUICK LINKS Special Series  Special Series 
      EU SERIES EU SERIES BUILD & PRICE | PRICE LIST BUILD & PRICE | PRICE LIST In-Stock Machines In-Stock Machines WHAT’S NEW WHAT’S NEW YOUR FIRST CNC YOUR FIRST CNC
      SHOPPING TOOLS
      • Build & Price a Haas
      • Price List
      • Available Inventory
      • CNCA Financing
      WANT TO TALK TO SOMEONE?

      A Haas Factory Outlet (HFO) can answer your questions, and walk you through your best options.

      CONTACT YOUR DISTRIBUTOR >
  • Why Haas Main Menu
      Discover the Haas Difference
    • Why Haas
    • MyHaas
    • Education Community
    • Industry 4.0
    • Haas Certification
    • Customer Testimonials
  • Service Main Menu
      Welcome to Haas Service
      SERVICE HOME Operator’s Manuals How-To Procedures Troubleshooting Guides Preventive Maintenance Haas Parts Haas Tooling Videos
  • Videos Main Menu
  • Main Menu
    • View All
    • View All
    • View All
    • View All
      • HTEC Curriculum Support
      • Haas Value Option Packages (VOP) Journey
    • View All
      • Haas 10 kg Cobot Package
      • Cobot Kits
      • DC-1 Drill Center
      • CNC Sales News
      • Do More With Your Haas
    • View All
    • View All
      • contact-us-test
      • 4 - AUTOMATION SYSTEMS
      • Carousel-V2
      • expert test
      • Demo_Day_Trident-test
      • Link Test
      • image-sale-tag-test
      • article-list-test
      • Haas 25 kg Robot Package
      • test-algolia-page
    • View All
    • View All
    • View All
    • View All
      • calc-test
    • View All
    • QUICK LINKS Special Series  Special Series 
      EU SERIES EU SERIES BUILD & PRICE | PRICE LIST BUILD & PRICE | PRICE LIST In-Stock Machines In-Stock Machines WHAT’S NEW WHAT’S NEW YOUR FIRST CNC YOUR FIRST CNC
      SHOPPING TOOLS
      • Build & Price a Haas
      • Price List
      • Available Inventory
      • CNCA Financing
      WANT TO TALK TO SOMEONE?

      A Haas Factory Outlet (HFO) can answer your questions, and walk you through your best options.

      CONTACT YOUR DISTRIBUTOR >
  • Haas Tooling Main Menu
  • Haas Service Parts Main Menu

My Haas Welcome,
!
Haas Tooling MyHaas/HaasConnect Sign In Register Haas Tooling MyHaas/HaasConnect Sign Out Welcome, My Machines Latest Activity My Quotes My Account My Users Sign Out
Find Your Distributor
  1. Select Language
    1. English
×

Search Results

Web Pages

Images

    • <
    • 1
    • >

8 - HDC-3-5AX - Maintenance

HDC-3-5AX Operator's/Service Manual


  • 0 - HDC-3-5AX - Table of Contents
  • 1 - HDC-3-5AX - Introduction
  • 2 - HDC-3-5AX - Legal Information
  • 3 - HDC-3-5AX - Safety
  • 4 - HDC-3-5AX - Installation
  • 5 - HDC-3-5AX - Control Icons
  • 6 - HDC-3-5AX - Operation
  • 7 - HDC-3-5AX - MRZP
  • 8 - HDC-3-5AX - Maintenance
  • 9 - HDC-3-5AX - Geometry and Alignment

Go To :

  • HDC-3-5AX Maintenance Schedule
  • HDC-3-5AX - Spindle Chiller Maintenance
  • HDC-3-5AX - Service Parts List
  • VS/HDC Way Cover Wiper - Replacement

8.1 HDC-3-5AX Maintenance Schedule

HDC-3-5AX Tool Changer
Maintenance Item Interval
Clean the chips from the tool changer.
Weekly
Inspect motors and mechanical sensors.
Monthly
Inspect motors and proximity sensors.
Monthly
Grease the guide rails.
Monthly
Grease the extractor fingers.
Monthly
Auxiliary Filter
Maintenance Item Interval
Replace the filter bag.
Check the Gauge
Inspect the hoses for cracking.
Six Months
Electrical Cabinet
Maintenance Item Interval
Clean vector drive air vents / filter.
Monthly
Enclosure
Maintenance Item Interval
Inspect windows for damage.
Daily
Inspect the door interlock operation.
Daily
Inspect waycovers and lubricate.
Monthly
Pneumatics
Maintenance Item Interval
Inspect the spindle air regulator pressure.
Weekly
Inspect the hoses for cracking.
Six Months
Clean the Air Purge Solenoid.
Annually
Probe System
Maintenance Item Interval
Check the probe batteries.
Six Months
Check probe calibration.
Six Months
Standard Coolant System
Maintenance Item Interval
Clean the filter screen.
As Required
Inspect the coolant level.
Weekly
Inspect the coolant concentration. Fill out the Mixture - Maintenance Log sheet.
Weekly
Completely clean the coolant tank and replace the coolant.
Six Months
Clean the standard coolant filter.
Six Months
Verify coolant refill is operating correctly.
Six Months
Through Spindle Coolant (TSC) 300/1K PSI
Maintenance Item Interval
Clean the TSC-300 / 1K Pump Filter.
Six Months
Inspect the hoses for cracking.
Six Months
Verify the Auto Clean system is operating correctly.
Six Months
Spindle
Maintenance Item Interval
Spindle Warm-up. Daily
Clean and lubricate the spindle taper.
Monthly
Spindle drawbar force measurement.
Six Months
Spindle Chiller 
Maintenance Item Interval
Inspect/Clean Air filter Weekly
Check fluid tank level Weekly
Fill fluid tank As Required
Remove dust and decontamination from unit Weekly
Replace the chiller fluid Annualy
Inspect/Clean fluid tank When fluid is changed
Inspect/Clean condenser Annualy
Clean inside and outside of unit Annualy

8.2 HDC-3-5AX - Spindle Chiller Maintenance

Introduction

This section provides details about the maintenance required for the HDC-3-5AX spindle chiller.

Maintenance

Before performing maintenance on the chiller. The equipment must be shut down first. Turn off the machine and wait for the chiller to be shut down for 5 minutes. Otherwise there will be a risk of electric shock.

When the ambient temperature is below 0°C and the shutdown is long, the internal water must be drained.

Spindle Chiller 
Maintenance Item Interval
Inspect/Clean Air filter Weekly
Check fluid tank level Weekly
Fill fluid tank As Required
Remove dust and decontamination from unit Weekly
Replace the chiller fluid Annualy
Inspect/Clean fluid tank When fluid is changed
Inspect/Clean condenser Annualy
Clean inside and outside of unit Annualy

HDC-3-5AX Spindle Chiller Maintenance

1

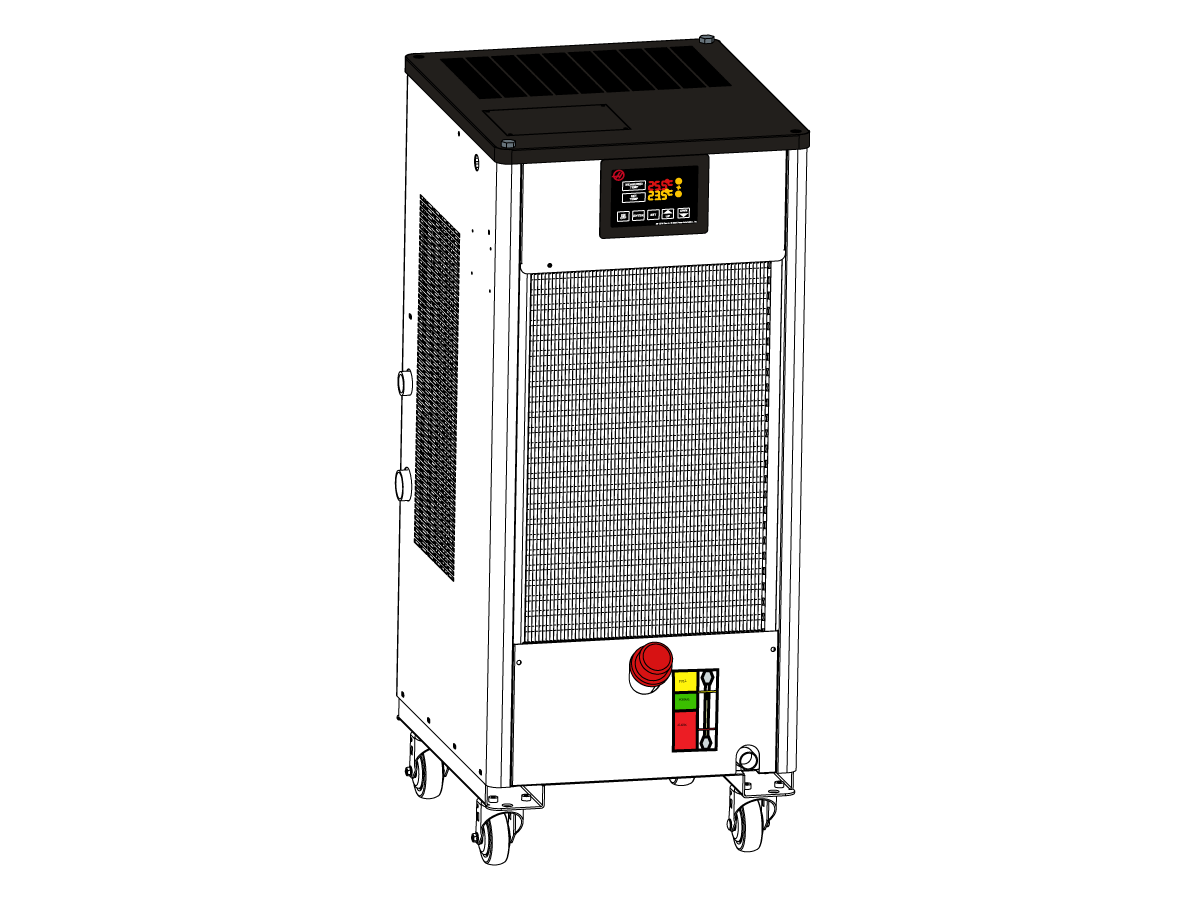
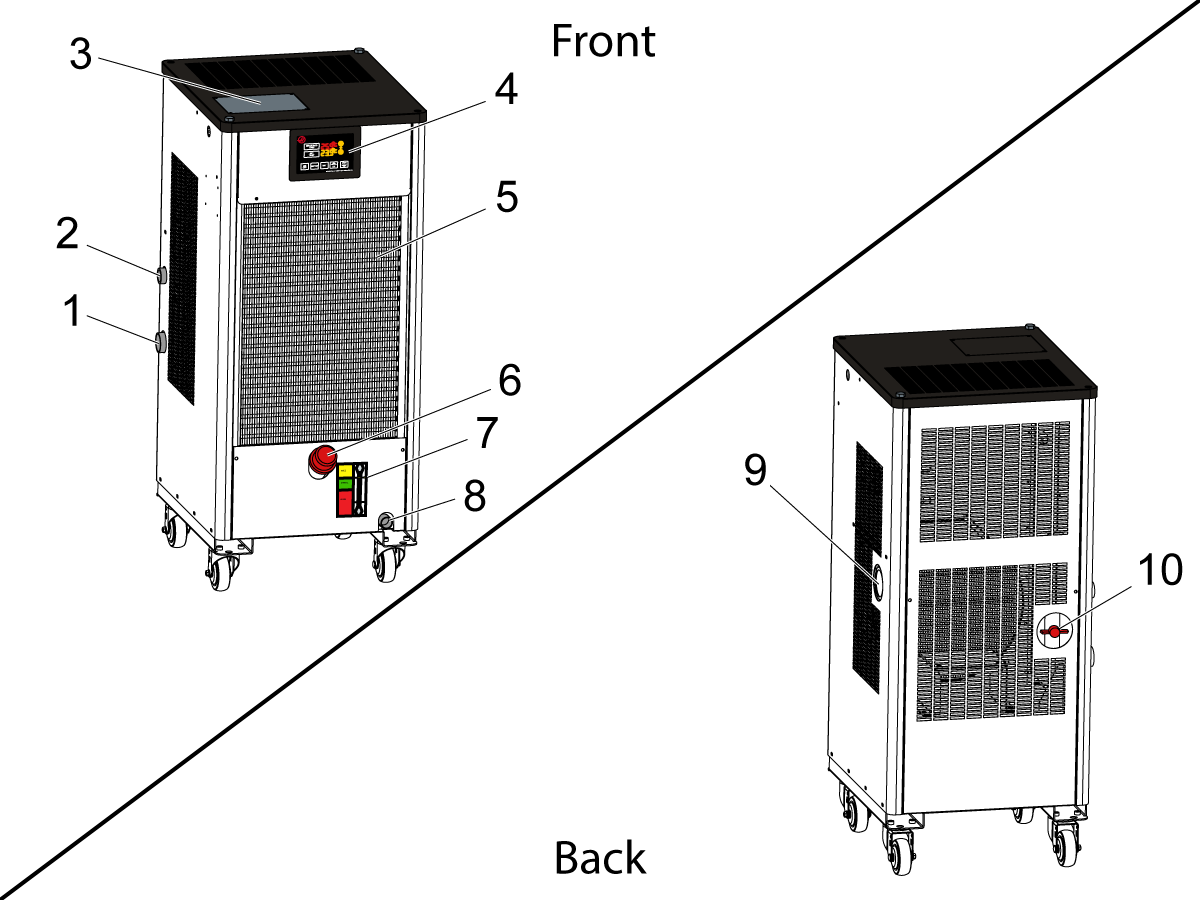
This image shows the key components of the Spindle Chiller:

Front of Chiller:

  1. Chiller Fluid Inlet
  2. Chiller Fuild Outlet
  3. Access Panel
  4. Display/Control Keypad
  5. Air Filter
  6. Chiller Fluid Tank Filler
  7. Chiller Fluid Level Gauge
  8. Drain Plug

Back of Chiller:

         9. Pressure Gauge
         10. Drain Value

2

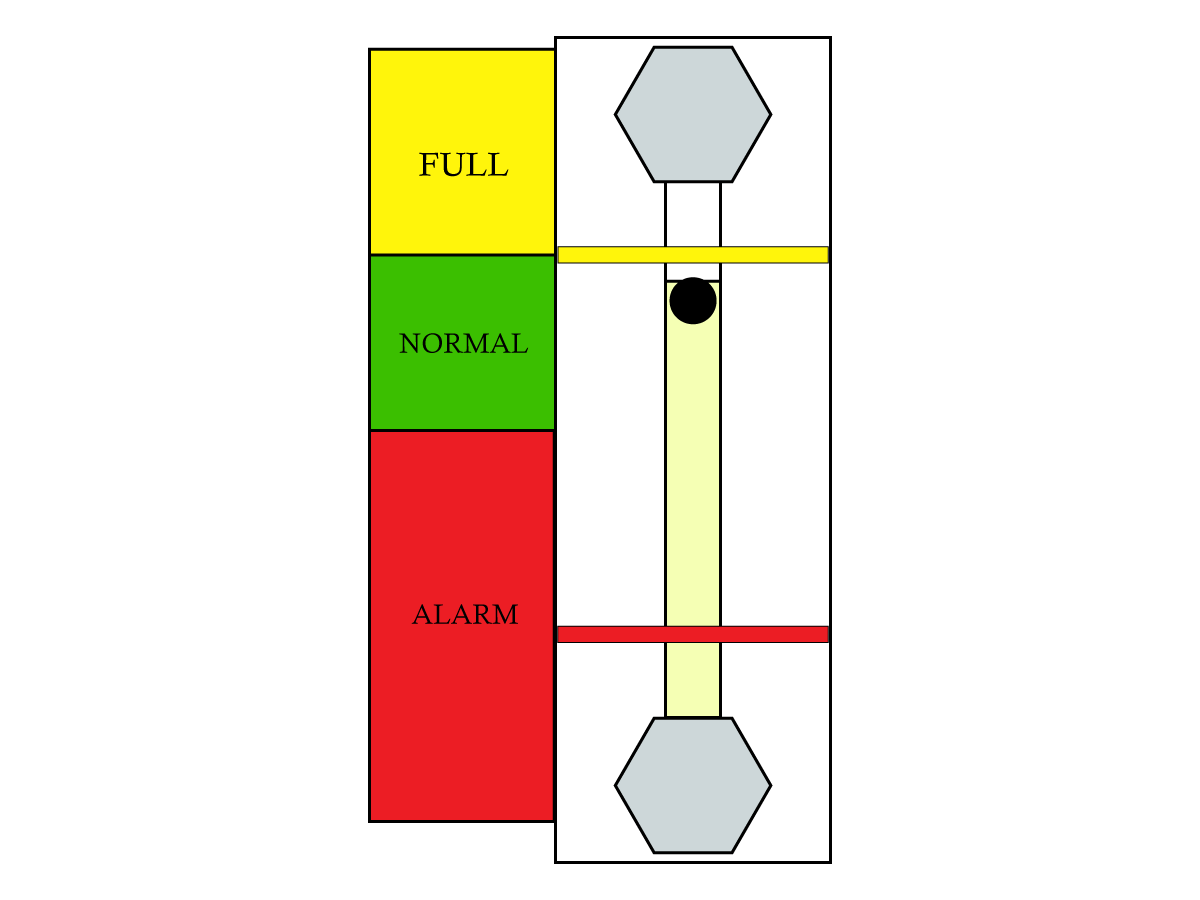
Inspect the fluid tank level by looking at the fluid level gauge located on the front of the spindle chiller [7]. To add fluid to the tank, remove the cap to the inlet at the top of the unit, and fill the tank with a Mobil Velocite Oil No 3 (PN: 93-4894) until the gauge reads the level is at the top of the NORMAL or at the FULL level. The tank capacity is approximately 25 liters.

3

To clean the air inlet filter, remove the grate to gain access to the filter unit. From there, remove the filter screen so that any dust or debris can be picked out of the filter. If necessary, wash the filter using water to get rid of contaminants. 

4

Make sure that the air outlets are clear of dust and debris. It is also recommended to allow a clear area of 12 inches directly behind the air outlet vents. This will allow for proper air circulation in the system.

Transportation Requirements

  1. When handling the chiller, do not overturn or tilt it.
  2. When lifting, make sure that the chiller is upright and is not higher than 7.8 inches above the ground.

Note: The chiller itself is designed with lifting eye bolts, please use these lifting eye bolts.

Storage Requirements

When the chiller is not being used for an extended period, protect the interior of the machine and the condenser from dust and moisture.
  • Drain the chiller fluid and drain the fluid in the pump, filter and plumbing.

Steps of operation:

  • First shut down and cut off the power supply, and operate after 5 minutes.
  • Close the inlet and export ball valve and remove the connection pipeline between the equipment.
  • Drain the water purification/oil tank, water/oil pump, filter, plate change, water/oil inside the pipeline in turn.
  • Use compressed air to blow the internal residual liquid through each interface. It is best to blow it several times at intervals. When no liquid flows out of the interface, it is proved that it has been blown clean. Repeat until no liquid flows out of the interface.
  • Close the inlet and outlet ball valve and each drainage valve.
 
  • Please place this machine away from the dust.
  • Please wipe the surface of the body clean, and blow away the dust and oil from the inside with an air pump.
  • A protective cover is put on the outside of the device to prevent dust and moisture from sticking.
  • Store this machine in a flat ground, dry and ventilated place to avoid direct sunlight.
  • If the device is equipped with casters, please make sure that the casters are fixed or locked to avoid damage caused by sliding the casters.
  • Ambient temperature requirements: 0-45 C degrees, ambient humidity requirements: ≤ 90%RH

8.3 HDC-3-5AX Service Parts List
Recently Updated

HDC-3-5AX - Service Parts List


Revision A 02/2026

Service Parts List
Important: Haas Service permission is required for certain kits before they may be ordered. 

PART NUMBER

DESCRIPTION

93-5381

SPINDLE CLAMPING SET HSK100A ES511

93-5373

TRP ANALOG SENSOR ES511

93-5372

TRP CYCLINDER ES511

93-5378

ENCDR NCE GEL2444M ES511 MITSUBISHI

93-5371

ENCODER CABLE EXTENSION ES511

93-5370

SENSOR CABLE EXTENSION ES511

93-5369

TRP SENSOR S5 ES511

93-5379

TSC ROTARY UNION OTT ES511

93-5380

TSC TRANSFER TUBE OTT ES511

93-5368

THERMAL SENSOR PT100 ES511

93-5619

ACCUMULATOR BOSCH HPU WORKHOLDING

93-5618

GAUGE 0-40 BAR G1/4B BOTTOM

57-0974

O-RING 1MM CORD STOCK

93-508

WAYCVR HDPE WIPER KIT X-AXIS VS-3/HDC

Note: The X-Axis Wiper Kits (93-5083) only have replacement parts for one waycover. If wipers are needed on both X-Axis waycovers, the service kit will need to be ordered twice. 

57-0897 O-RING .070 C.S. CORD STOCK
Recently Updated

VS/HDC Way Cover Wiper - Replacement


AD0869

Revision A 05/2025

Introduction

This procedure tells you how to replace the wipers on the telescopic style way covers. To replace the telescopic way cover wipers, you must order the correct kit. Use the parts included section below to find the correct kit. Go to the Way Cover Guide to troubleshoot the way covers.

Note: Do this procedure for the X- or Y-Axis way covers. The images in this procedure are shown on the X-Axis way cover.

Tools Required:

  • Flathead Screwdriver
  • Leather Gloves
  • Rubber Mallet
  • Mobil Grease XHP 222
  • RTV ASI 335 (P/N: 93-99-4452)

This document applies to these parts:

VS/HDC:

  • 93-5077 WAYCVR HDPE WIPER KIT Y-AXIS VS-1/3
  • 93-5081 WAYCVR HDPE WIPER KIT X-AXIS VS-1
  • 93-5083 WAYCVR HDPE WIPER KIT X-AXIS VS-3/HDC

 Note: The X-Axis Wiper Kits (93-5081 and 93-5083) only have replacement parts for one waycover. If wipers are needed on both X-Axis waycovers, the service kit will need to be ordered twice. 

Introduction

This procedure tells you how to replace the wipers on the telescopic style way covers. To replace the telescopic way cover wipers, you must order the correct kit. Use the parts included section below to find the correct kit. Go to the Way Cover Guide to troubleshoot the way covers.

Note: Do this procedure for the X- or Y-Axis way covers. The images in this procedure are shown on the X-Axis way cover.

Tools Required:

  • Flathead Screwdriver
  • Leather Gloves
  • Rubber Mallet
  • Mobil Grease XHP 222
  • RTV ASI 335 (P/N: 93-99-4452)

This document applies to these parts:

VS/HDC:

  • 93-5077 WAYCVR HDPE WIPER KIT Y-AXIS VS-1/3
  • 93-5081 WAYCVR HDPE WIPER KIT X-AXIS VS-1
  • 93-5083 WAYCVR HDPE WIPER KIT X-AXIS VS-3/HDC

Replacement

1

Jog axis to extend way cover and press [E-STOP].

2

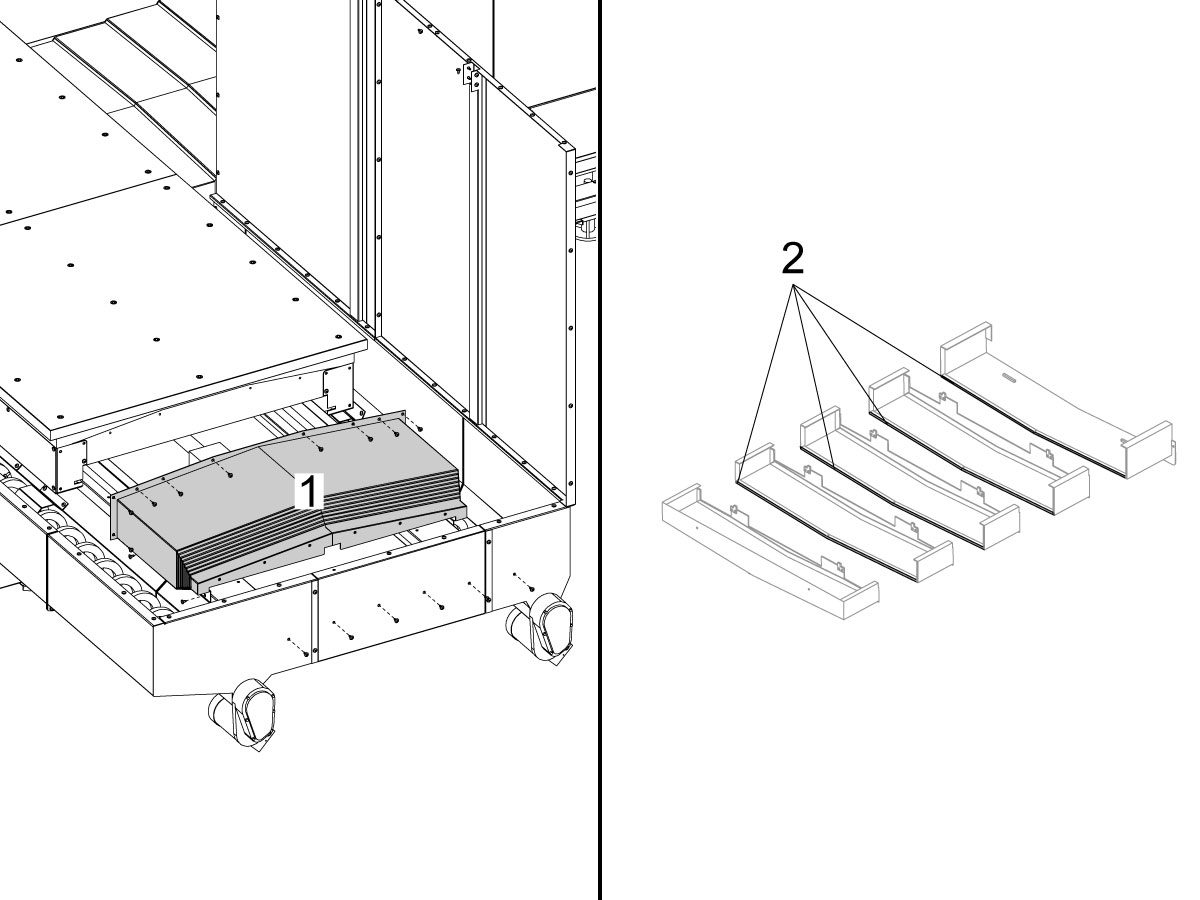
Remove these parts from the machine:

  • Telescopic way cover [1]

Caution: The way cover has sharp edges. Use the leather gloves when you handle the way cover.

Turn the way cover upside down.

Remove each section of the way cover by expanding the smallest leaf.

Apply outward pressure and rock the leaf back and forth to separate all the leaves.

3

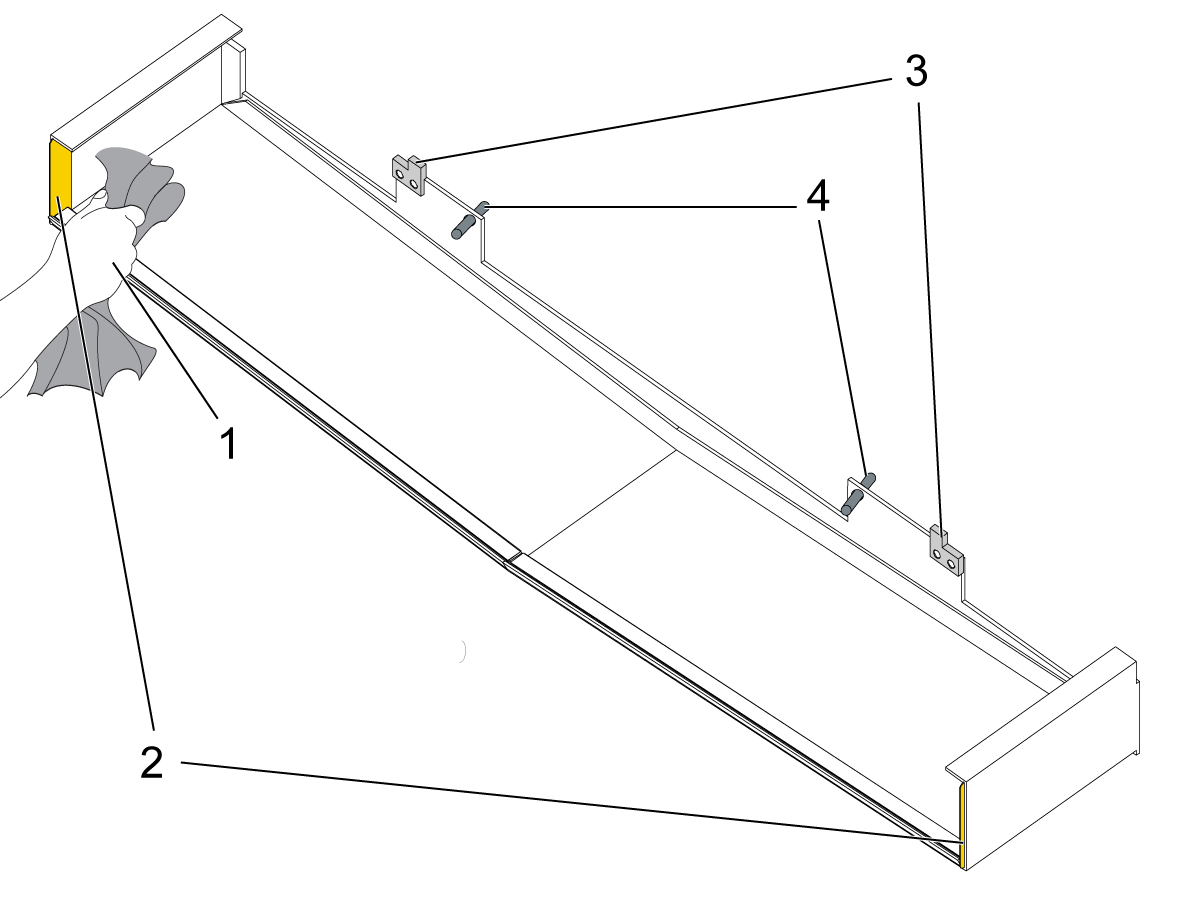
Wipe off excess grease [1] and inspect the brass seals [2], plastic slides [3], and bumpers [3]. Use the mallet to remove any dents from the way covers.

Note: Bumpers were added starting September 2021. However, they are not backwards compatible. If a bumper is damaged or missing, the way covers will still function properly. 


4

Select the wipers according to size for each leaf. There should be no cutting needed.

Inspect clear tubing before new wiper installation and make sure the length of the clear tubing is fully inserted in the proper channel of the wiper. 

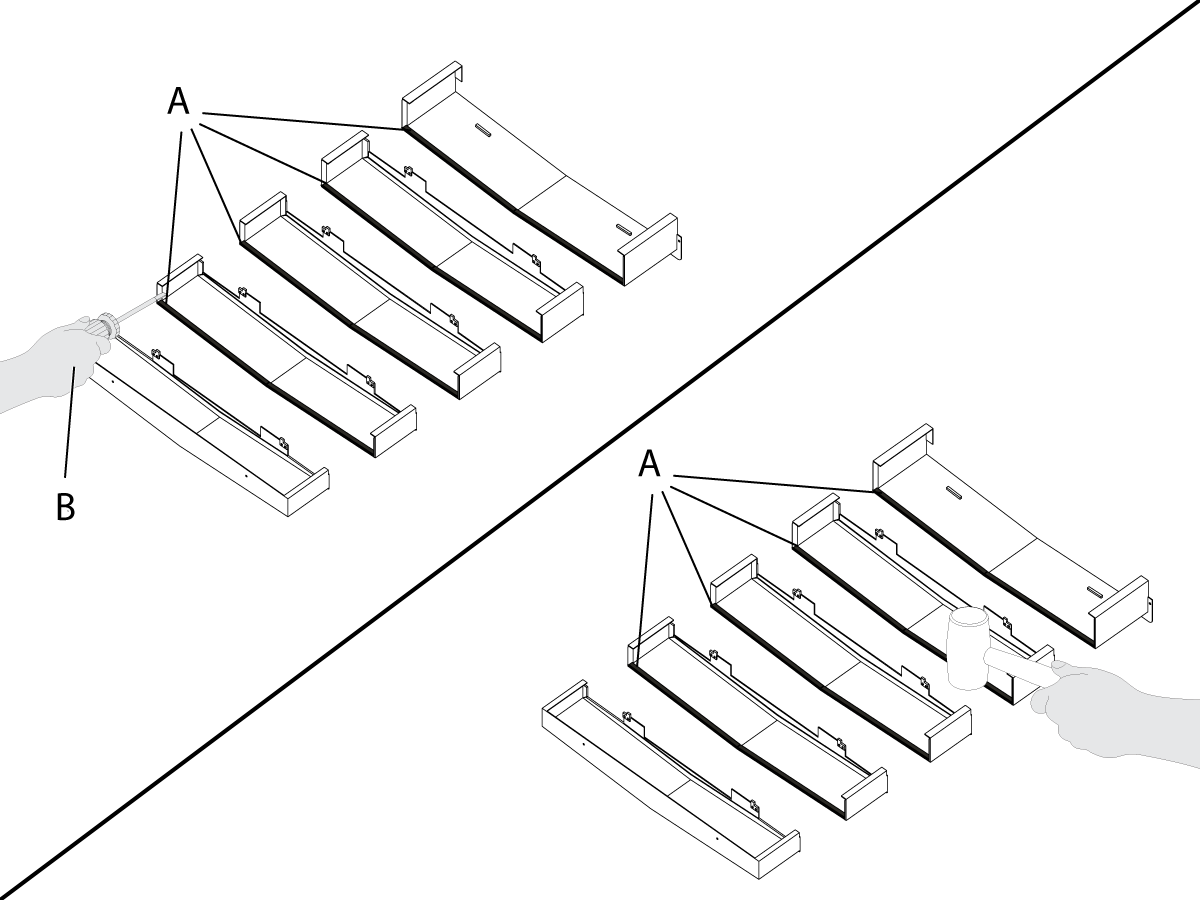
Install the REPLACEMENT WIPERS [A]. Put grease on the REPLACEMENT WIPERS [A]. Use the mallet to tap the REPLACEMENT WIPERS [A] into the slots.

Install each leaf one at a time by placing one edge of the leaf inside the front edge of the larger leaf, apply downward pressure to insert the other side. 

Note: Use the flathead screwdriver [B] to help pry the way cover leaf to insert another leaf.

Evenly apply force over the entire cover to help compress the clear tube and slide the leaf into place.

Follow this process to install all the leaves.

5

Remove chips and debris from the linear guides.

Clean the table mounting surface.

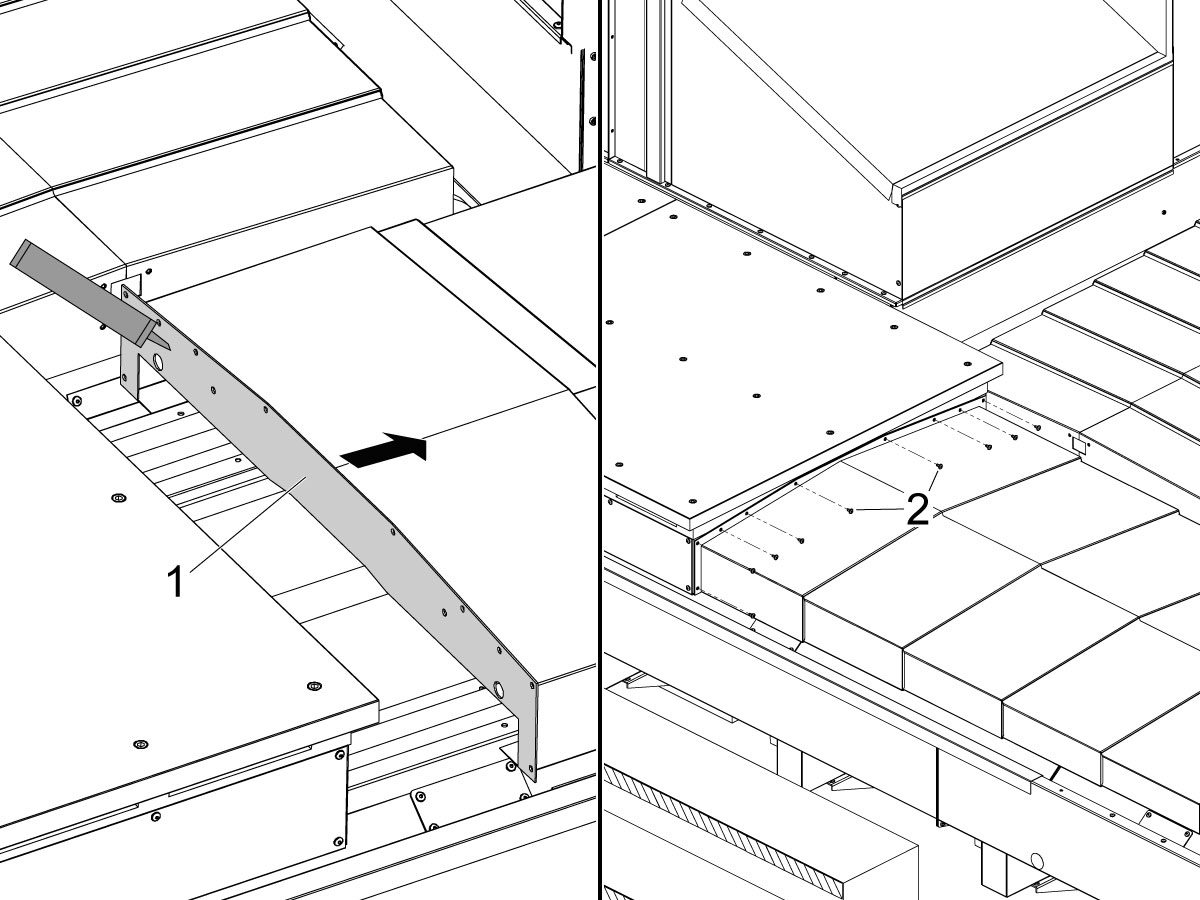
Apply a thin coat of grease to the way cover guide bars [1].

Install the way cover over the guide bars.

Attach the way cover end panel to the sheet metal. Use the end [2] and side [3] fasteners.

Move the table [4] to the full X-Axis travel.

Fully extend the sections of the way cover [5]. Make sure the way cover moves correctly and is the correct length.

Lightly spray a multi-purpose lubricant onto the tops and sides of each of the way cover panels.

6

Move the largest section of the way cover away from the table.

Put the RTV ASI 335 sealant on the way cover where it touches the table mounting surface [1].

Attach the way cover to the table with the (10) fasteners [2].

Remove any sealant that is squeezed out of the space between the way cover and the table.

Release the [E-STOP] and press [RESET] a couple times to clear the alarm.

Check the X-Axis and Y-Axis movement to make sure the way cover does not bind.

Recently Viewed Items

You Have No Recently Viewed Items Yet

Feedback
Haas Logo

Haas Delivered Price

This price includes shipping cost, export and import duties, insurance, and any other expenses incurred during shipping to a location in France agreed with you as a buyer. No other mandatory costs can be added to the delivery of a Haas CNC Product.

KEEP UP WITH THE LATEST HAAS TIPS AND TECHNOLOGY...

Sign up now!   

HAAS TOOLING ACCEPTS THE FOLLOWING:

  • Service & Support
  • Owners
  • Request Service
  • Operator Manuals
  • Haas Parts
  • Rotary Repair Request
  • Pre-Install Guides
  • Shopping Tools
  • Build & Price a New Haas
  • Available Inventory
  • The Haas Price List
  • CNCA Financing
  • About Haas
  • Accessibility Statement
  • DNSH Statement
  • Export Compliance
  • Careers
  • Certifications & Safety
  • Contact Us
  • History
  • Terms & Conditions
  • Haas Tooling Terms & Conditions
  • Privacy
  • Warranty
  • Haas Community
  • Haas Certification Program
  • Haas Motorsports
  • Gene Haas Foundation
  • Haas Technical Education Community
  • Events
  • Join the Conversation
  • Facebook
  • X
  • Flickr
  • YouTube
  • LinkedIn
  • Instagram
  • TikTok
© 2026 Haas Automation, Inc – CNC Machine Tools

This site is protected by reCAPTCHA and the Google Privacy Policy and Terms of Service apply.

2800 Sturgis Rd., Oxnard, CA 93030
Toll Free: (888) 817-4446 / Fax: 805-278-8554