My Haas Welcome,
!
Haas Tooling MyHaas/HaasConnect Sign In Register Haas Tooling MyHaas/HaasConnect Sign Out Welcome, My Machines Latest Activity My Quotes My Account My Users Sign Out
Find Your Distributor
  1. Select Language
    1. English
    2. Deutsch
    3. Español - ES
    4. Español - MX
    5. Français
    6. Italiano
    7. Português
    8. Český
    9. Dansk
    10. Nederlands
    11. Magyar
    12. Polski
    13. Svenska
    14. Türkçe
    15. 中文
    16. Suomi
    17. Norsk
    18. الإنجليزية
    19. български
    20. Hrvatski
    21. Ελληνικά
    22. Română
    23. Slovenský
    24. Slovenščina
    25. 한국어
    26. 日本語
    27. Українська
  • machines Main Menu
    • Vertical Mills
      Vertical Mills
      Vertical Mills View All
      • Vertical Mills
      • VF Series
      • Universal Machines
      • VR Series
      • VP-5 Prismatic
      • Pallet-Changing VMCs
      • Mini Mills
      • Mold Machines
      • High-Speed Drill Centers
      • Drill/Tap/ Mill Series
      • Toolroom Mills
      • Pocket Mill
      • Compact Mills
      • Gantry Series
      • SR Sheet Routers
      • Extra-Large VMC
      • Double-Column Mills
      • 3+2 Positioning Machines
    • Multi-Axis Solutions
      Multi-Axis Solutions
      Multi-Axis Solutions View All
      • Multi-Axis Solutions
      • Y-Axis Lathes
      • 5-Axis Mills
    • Lathes
      Lathes
      Lathes View All
      • Lathes
      • ST Series
      • Dual-Spindle
      • Box Way Series
      • Toolroom Lathes
      • Chucker Lathe
      • Pocket Lathe
      • Haas Bar Feeders
    • Horizontal Mills
      Horizontal Mills
      Horizontal Mills View All
      • Horizontal Mills
      • 50-Taper
      • 40-Taper
    • Rotaries & Indexers
      Rotaries & Indexers
      Rotaries & Indexers View All
      • Rotaries & Indexers
      • Rotary Tables
      • Indexers
      • 5-Axis Rotaries
      • Extra-Large Rotaries
    • Special Series
      Special Series
      Special Series View All
      • Special Series
      • EU_Series_Redirect
    • Automation Systems
      Automation Systems
      Automation Systems View All
      • Automation Systems
      • Mill Automation
      • Lathe Automation
      • Automatic Parts Loaders
      • Automation Models
    • Desktop Machines
      Desktop Machines
      Desktop Machines View All
      • Desktop Machines
      • Desktop Mill
      • Desktop Lathe
      • Control Simulator, Standard
      • Control Simulator, Premium
    • Shop Equipment
      Shop Equipment
      Shop Equipment View All
      • Shop Equipment
      • Knee Mill
      • Haas Manual Lathes
      • Haas Saws
    • Fabrication Machines
      Fabrication Machines
      Fabrication Machines View All
      • Fabrication Machines
      • Laser Cutting Machines
      • CNC Press Brakes
    • QUICK LINKS Special Series  Special Series 
      EU SERIES EU SERIES BUILD & PRICE | PRICE LIST BUILD & PRICE | PRICE LIST In-Stock Machines In-Stock Machines WHAT’S NEW WHAT’S NEW YOUR FIRST CNC YOUR FIRST CNC
      SHOPPING TOOLS
      • Build & Price a Haas
      • Price List
      • Available Inventory
      • CNCA Financing
      WANT TO TALK TO SOMEONE?

      A Haas Factory Outlet (HFO) can answer your questions, and walk you through your best options.

      CONTACT YOUR DISTRIBUTOR >
  • Options Main Menu
    • The Haas Control Value Option Packages
      Value Option Packages
      Value Option Packages View All
      • Value Option Packages
    • Product Image Spindles
      Spindles
      Spindles View All
      • Spindles
    • Product Image Tool Changers
      Tool Changers
      Tool Changers View All
      • Tool Changers
    • Product Image 4th- | 5th-Axis
      4th- | 5th-Axis
      4th- | 5th-Axis View All
      • 4th- | 5th-Axis
    • Product Image Turrets & Live Tooling
      Turrets & Live Tooling
      Turrets & Live Tooling View All
      • Turrets & Live Tooling
    • Product Image Probing
      Probing
      Probing View All
      • Probing
    • Haas Chip & Coolant Management Chip & Coolant Management
      Chip & Coolant Management
      Chip & Coolant Management View All
      • Chip & Coolant Management
    • The Haas Control The Haas Control
      The Haas Control
      The Haas Control View All
      • The Haas Control
    • Product Image Product Options
      Product Options
      Product Options View All
      • Product Options
    • Product Image Tooling & Fixturing
      Tooling & Fixturing
      Tooling & Fixturing View All
      • Tooling & Fixturing
    • Product Image Workholding
      Workholding
      Workholding View All
      • Workholding
    • Product Image 5-Axis Solutions
      5-Axis Solutions
      5-Axis Solutions View All
      • 5-Axis Solutions
      • 5 Easy Steps to 5-Axis
    • QUICK LINKS Special Series  Special Series 
      EU SERIES EU SERIES BUILD & PRICE | PRICE LIST BUILD & PRICE | PRICE LIST In-Stock Machines In-Stock Machines WHAT’S NEW WHAT’S NEW YOUR FIRST CNC YOUR FIRST CNC
      SHOPPING TOOLS
      • Build & Price a Haas
      • Price List
      • Available Inventory
      • CNCA Financing
      WANT TO TALK TO SOMEONE?

      A Haas Factory Outlet (HFO) can answer your questions, and walk you through your best options.

      CONTACT YOUR DISTRIBUTOR >
  • Why Haas Main Menu
      Discover the Haas Difference
    • Why Haas
    • MyHaas
    • Education Community
    • Industry 4.0
    • Haas Certification
    • Customer Testimonials
  • Service Main Menu
      Welcome to Haas Service
      SERVICE HOME Operator’s Manuals How-To Procedures Troubleshooting Guides Preventive Maintenance Haas Parts Haas Tooling Videos
  • Videos Main Menu
  • Main Menu
    • View All
    • View All
    • View All
    • View All
      • HTEC Curriculum Support
      • Haas Value Option Packages (VOP) Journey
    • View All
      • Haas 10 kg Cobot Package
      • Cobot Kits
      • DC-1 Drill Center
      • CNC Sales News
      • Do More With Your Haas
    • View All
    • View All
      • contact-us-test
      • 4 - AUTOMATION SYSTEMS
      • Carousel-V2
      • expert test
      • Demo_Day_Trident-test
      • Link Test
      • image-sale-tag-test
      • article-list-test
      • Haas 25 kg Robot Package
      • test-algolia-page
    • View All
    • View All
    • View All
    • View All
      • calc-test
    • View All
    • QUICK LINKS Special Series  Special Series 
      EU SERIES EU SERIES BUILD & PRICE | PRICE LIST BUILD & PRICE | PRICE LIST In-Stock Machines In-Stock Machines WHAT’S NEW WHAT’S NEW YOUR FIRST CNC YOUR FIRST CNC
      SHOPPING TOOLS
      • Build & Price a Haas
      • Price List
      • Available Inventory
      • CNCA Financing
      WANT TO TALK TO SOMEONE?

      A Haas Factory Outlet (HFO) can answer your questions, and walk you through your best options.

      CONTACT YOUR DISTRIBUTOR >
  • Haas Tooling Main Menu
  • Haas Service Parts Main Menu

My Haas Welcome,
!
Haas Tooling MyHaas/HaasConnect Sign In Register Haas Tooling MyHaas/HaasConnect Sign Out Welcome, My Machines Latest Activity My Quotes My Account My Users Sign Out
Find Your Distributor
  1. Select Language
    1. English
    2. Deutsch
    3. Español - ES
    4. Español - MX
    5. Français
    6. Italiano
    7. Português
    8. Český
    9. Dansk
    10. Nederlands
    11. Magyar
    12. Polski
    13. Svenska
    14. Türkçe
    15. 中文
    16. Suomi
    17. Norsk
    18. الإنجليزية
    19. български
    20. Hrvatski
    21. Ελληνικά
    22. Română
    23. Slovenský
    24. Slovenščina
    25. 한국어
    26. 日本語
    27. Українська
×

Search Results

Web Pages

Images

    • <
    • 1
    • >

3 - Haas Air Compressor - Operation

Haas Air Compressor - Operators/Service Manual


  • 0 - Haas Air Compressor - Table of Contents
  • 1 - Haas Air Compressor - Introduction
  • 2 - Haas Air Compressor - Installation
  • 3 - Haas Air Compressor - Operation
  • 4 - Haas Air Compressor - Maintenance
  • 5 - Haas Air Compressor - Troubleshooting

Go To :

  • 3.1 Compressor Operation
  • 3.2 Compressed Air Dryer Operation

3.1 Compressor Operation

Recently Updated

Haas Air Compressor - Operation


Revision B - 01/2026

Overview

This chapter will provide details on how to operate both the single and variable speed air compressors. It will cover how to navigate the main display as well as other basic operation details.

Warning: This section contains information for changing parameter values. Do not change parameters that are not mentioned in this section of the manual. The only parameters that need to be adjusted for operating the compressor are the "load pressure" and "unload pressure" parameters.

Air Compressor Display

1

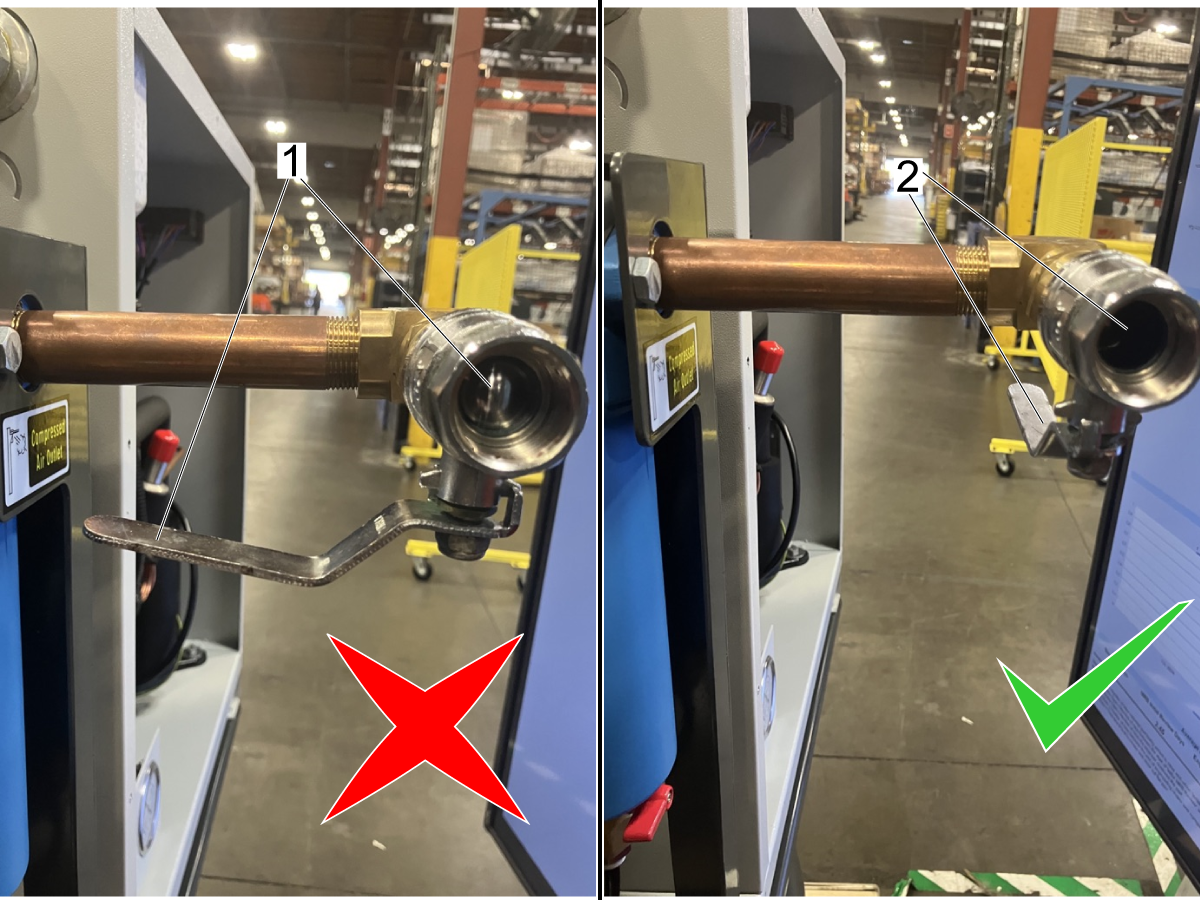
The outlet from the compressor to the compressed air filter should always be in the open position whether the compressor is running or stopped. Make sure the outlet airline is in the open position whenever turning on the air compressor.

2

Power On Compressor:

Before powering on the air compressor, verify that there are no problems with the electrical connections and that the wiring is correct. Refer to the previous installation procedure for further information.

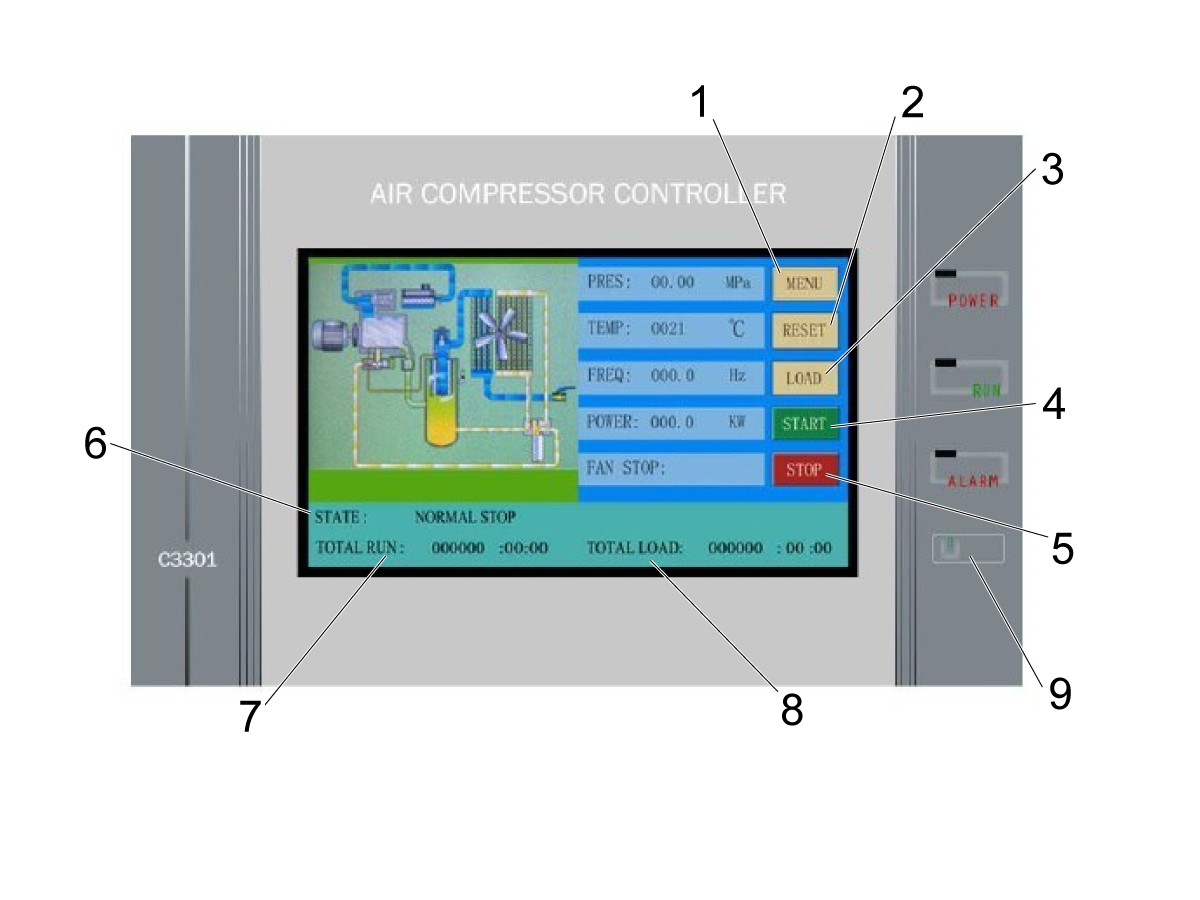
To power on the compressor press the Power On button [9].

Press START [4] to start the compressor.

Check the discharge and lubrication oil pressure and verify they are nominal.

This image shows the main interface from the air compressor display.

  1. MENU
  2. RESET
  3. LOAD
  4. START - starts the compressor 
  5. STOP - stops the compressor        
  6. STATE - shows current state of compressor
  7. TOTAL RUN - total and current run time
  8. TOTAL LOAD - total and current run time

3

MENU Options:

After pressing the MENU button on the control, the display will show a list of options similar to the image. This menu has the following options:

  1. RUN PARA - Run parameters
  2. USER PARA - User parameters
  3. FACT PARA - Factory parameters (can't be modified)
  4. CALI PARA - Calibration parameters (only accessed by manufacturer)
  5. BLOCK PARA - Parameter set for group control
  6. CONF PARA - Remote control
  7. MAIN PARA - Main parameters
  8. VSD SET - For inverter parameters setting (set in factory)
  9. Touch CAL - Calibrate the touch screen
  10. SCH PRES - Set pressure range for schedule
  11. SCH WORK - Set schedule for air compressor
  12. FAULT REC - Gives alarm history for air compressor
  13. Motor VSD - Motor parameters (set in factory)
  14. FAN VSD - Variable speed fan parameters

Basic Operation

This section contains useful information to operating the compressor.

Important: There is a password needed to change certain parameter values that are mentioned in this section.

Warning: Parameters should not be altered with the exception of parameters mentioned in this section of the manual.

The password to set values in the User PARA menu is 1689. 

Note: If that password is not working, refer to 5.1 - Air Compressor Troubleshooting for information on changing passwords.

Before Starting the Compressor:

Before starting the compressor, the following things should be checked:

  1. Check that any valves on the outlet of the air compressor are Open [2] and not Closed [1] as shown in the image.
  2. Verify that the oil level is in the correct range.
  3. Inspect the inside of the compressor for any oil leaks.

Setting the Working Pressure:

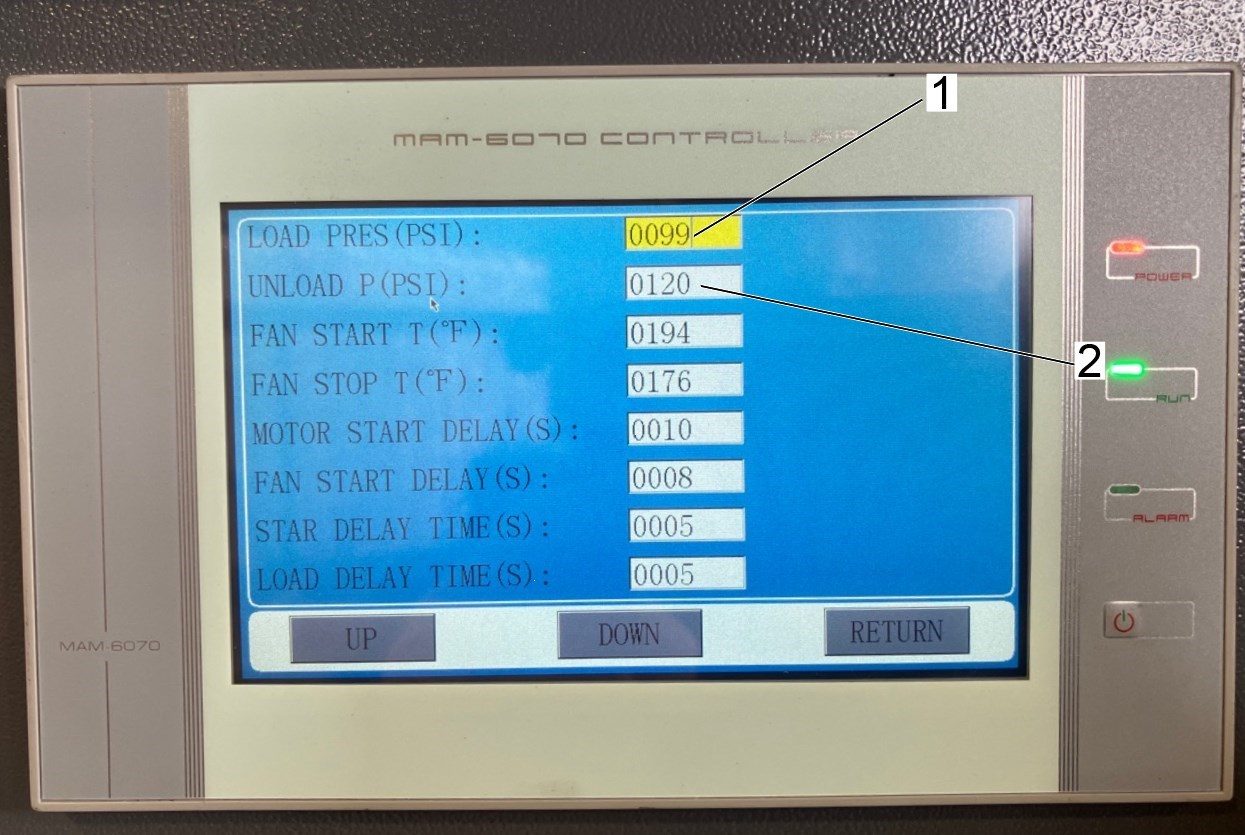
To set the working pressure range of the air compressor, select the USER PARA icon on the menu.

Enter the 1689 password so that you can change the settings.

From there, set the "Load Pres (PSI)" [1] and the "Unload P (PSI)" [2] values according to system demand.

This image shows setting the working pressure to be between 99-120 PSI. Set the range as needed.

Note: Refer to the password on the decal in the previous step to control screen, to set the values.

Starting the Air Compressor:

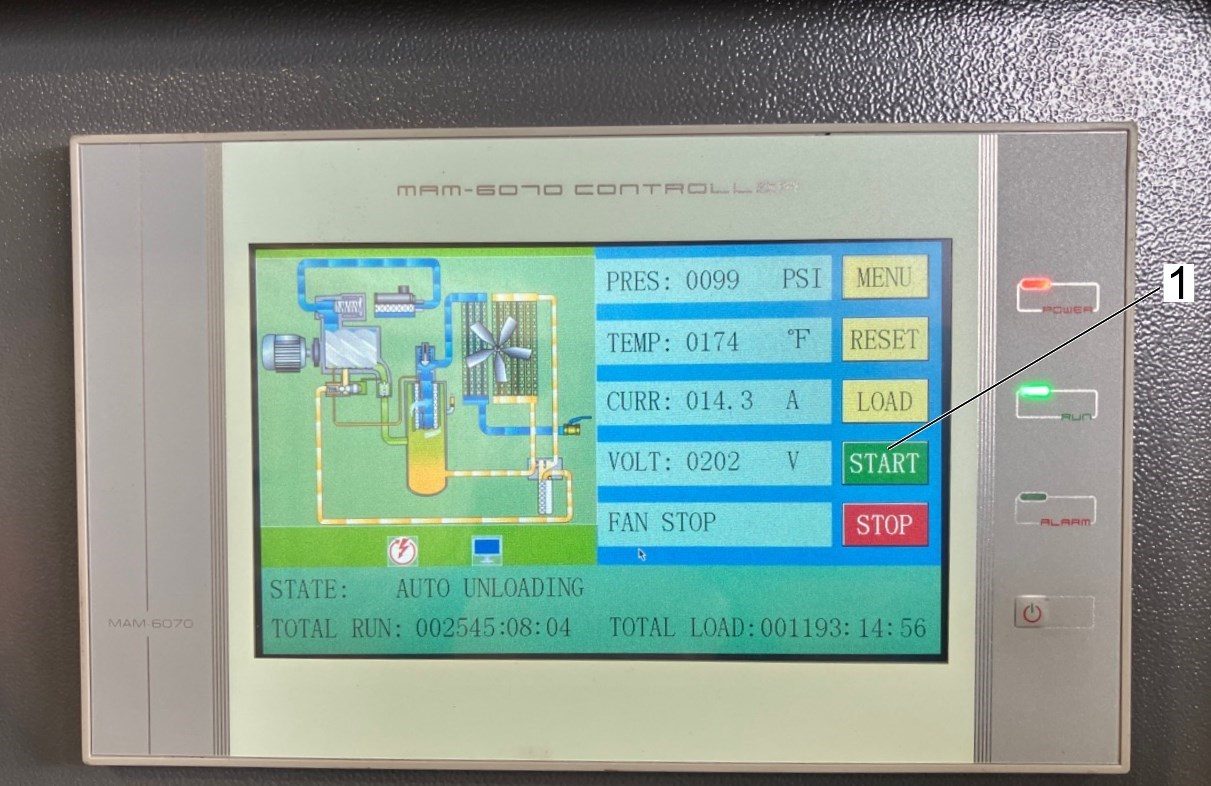
To start the air compressor, press the "START" button [1] on the main control screen.

Important: Make sure the outlet valve that takes compressed air from the compressor to the compressed air filter is open. This outlet valve can be kept open regardless of the state of the compressor.

Stopping the Air Compressor

To stop the compressor, navigate to the main menu and press the "STOP" button [1]. The compressor will stop running within 10-15 seconds.

Important: Do not use the red emergency stop located next to the control to stop the compressor. The compressor e-stop should only be used in case of an emergency.  

Setting a Weekly Schedule:

The Haas Air Compressor can be set to adhere to a weekly schedule.

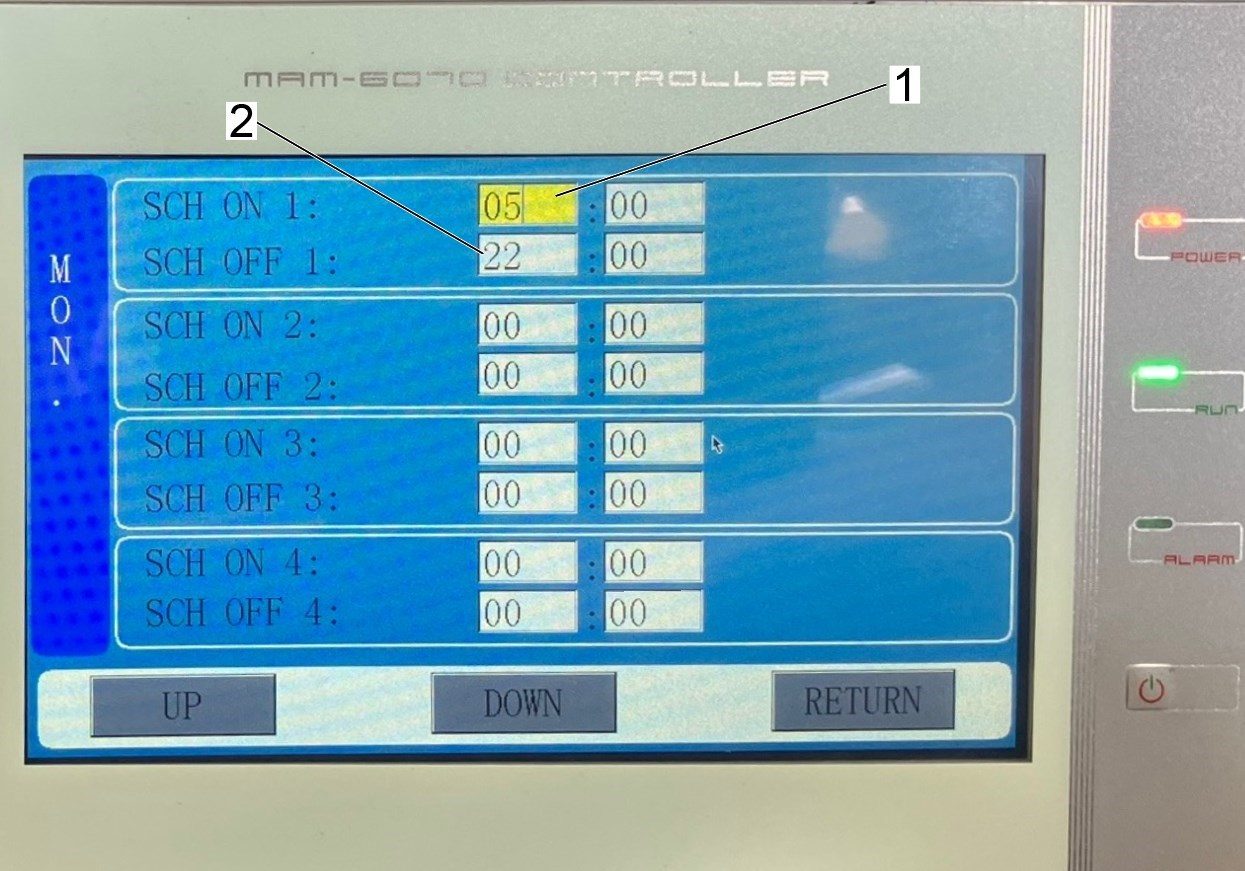
In order to set a new schedule press on the SCH WORK icon on the main menu.

In the SCH WORK page, set the times that you want the compressor to be operating. Each day of the week can be set with the "SCH ON" [1] and "SCH OFF" [2] fields. 

Note: The image shows a schedule where the compressor is scheduled to operate from 05:00 to 22:00. Follow this format to schedule the compressor according to your preference.

Once the schedule is set you need to set the scheduled pressures.

Go to the SCH PRESS and set the load and unload pressures [6] that you want the compressor to use during the scheduled times.

Go to FACT PARA menu and enter the 1689 password. 

Press DOWN until you get to Scheduled ON-OFF [3] field and the Scheduled Pres field [4].

To activate the schedule turn both these settings to ENABLE [5]. Similarly you can stop running a schedule by setting both of them to DISABLE.

Note: If you do not enable the Schedule Pressure option the compressor may shut off because the default schedule load and unload pressure is 0 psi.

Clearing Schedule Alarms:

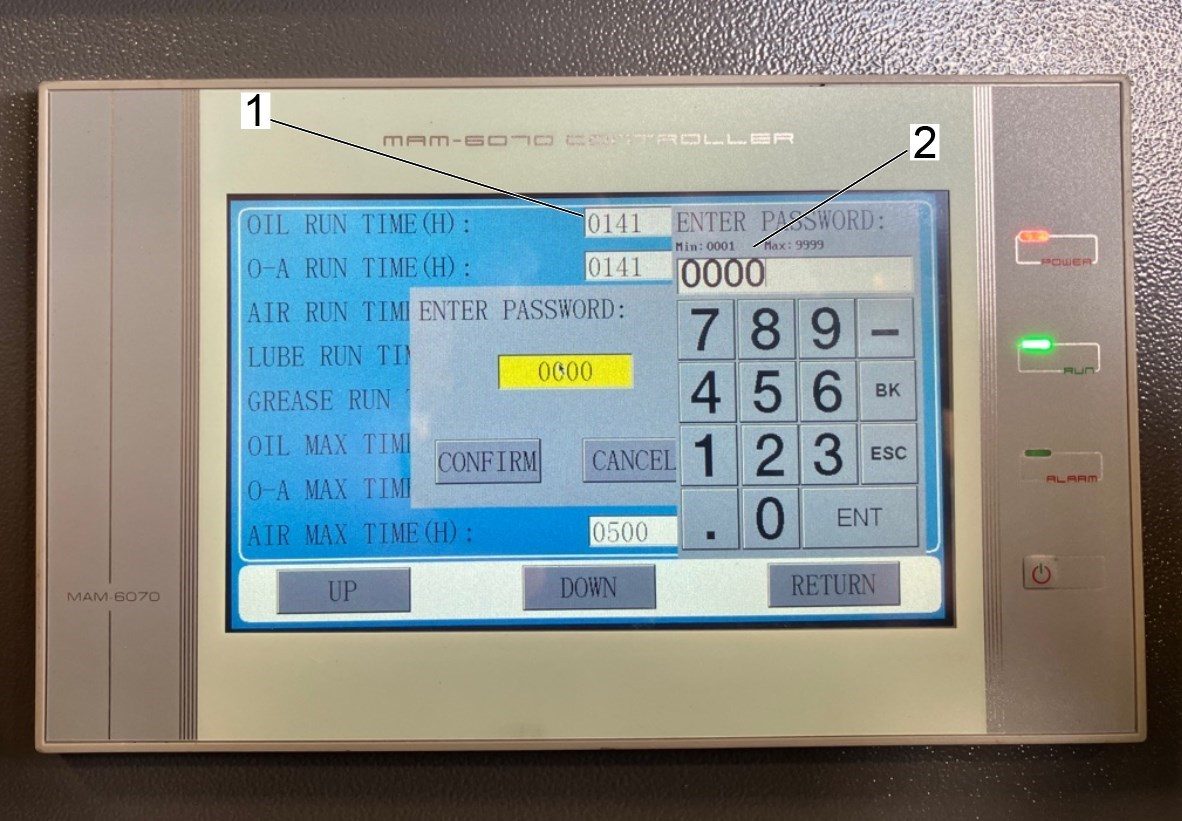
The Haas Air Compressor keeps a log of the amount of time that certain components have been running since their last maintenance event.  If the "run time" in this log exceed the "max time" limits then the air compressor will generate alarms.

To clear the alarms, perform the needed maintenance and reset the "run time" value to 0.

To access this log, press on the MAIN PARA icon on the main menu. After performing the needed maintenance (i.e. replacing the oil for an "oil run time alarm"):

  1. Select that items run time.
  2. Enter the password 1689.
  3. Reset the run time value to 0.

The run time alarm for that item will now be cleared. Verify that the "run time" value [1] is set to 0.

The "max time" value [2] shows the amount of runtime that will elapse before the alarm is generated again.

Note: These images are using the "oil run time" value as an example. This procedure can be done for any of the run times in the MAIN PARA log.

Important: Make sure to perform the maintenance before clearing these alarms. Only clearing these alarms and neglecting the maintenance will lead to lost efficiency and compressor damage.


Navigate to the  "USER PARA" icon on the menu to change the following common settings:

Load Mode: Set to "Auto" by default. This allows compressor to start without having to press "Load" on the control display.

Language: The language of the control can be changed.

Units: You can change the pressure and temperature units in the "USER PARA" menu.

Navigate to the "FACT PARA" icon on the menu to change the following common setting:

Auto Restart: This parameter allows the compressor to start up even if the power was off. This can be set to "Enable" or "Disable."

Drainer Operation

1

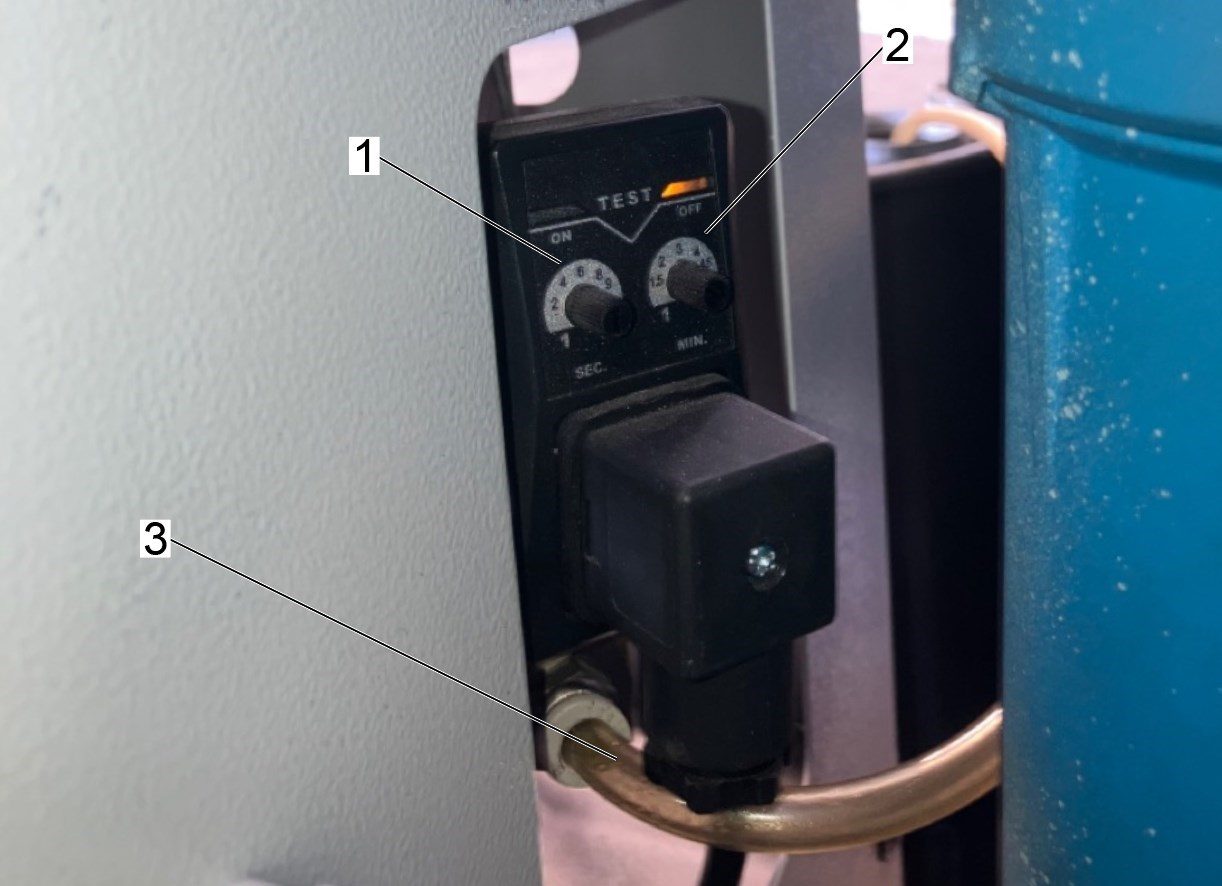
There are two knobs located on the drainers. These knobs are labeled "OFF" and "ON".

Rotate the "ON" knob [1] to set the duration of a single drainage cycle (in seconds).

Rotate the "OFF" knob [2] to set the drainage time interval. This is the time between each draining cycle (in minutes).

Make sure the hose coming from the auto drainer [3] is fed to the water runoff container that was set up during the installation. Refer to the installation chapter of this manual for more details.

Important:  It is not recommended to have the drain open duration set to longer than 10 seconds. 

Note: Clean the drain filter monthly as indicated on the purge system decal located on the air compressor.

3.2 Compressed Air Dryer Operation

Recently Updated

Haas Compressed Air Dryer - Operation


Controller Basics

1

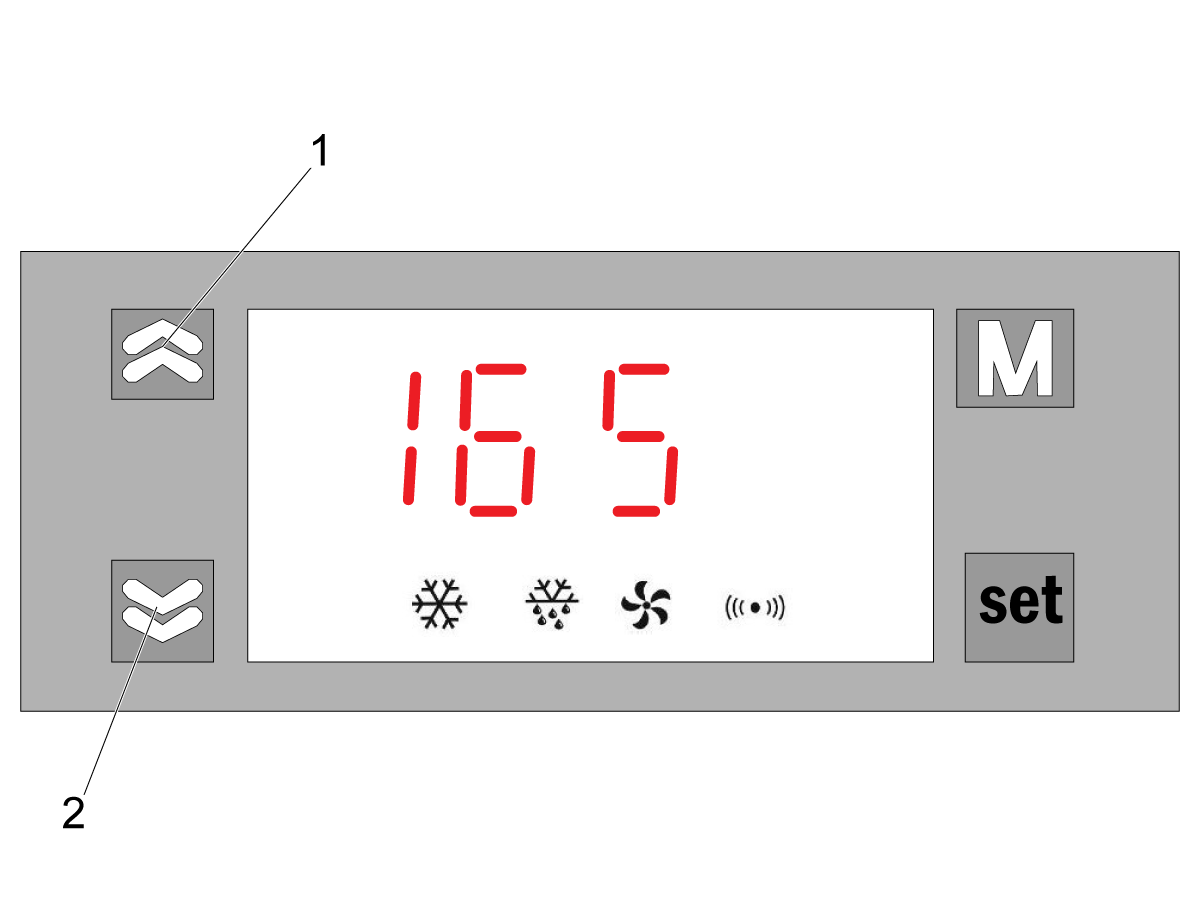
The control on the air dryer is shown in the image. The control contains the following components:

  1. LED Display [1]
  2. Up/Down Arrows [2]
  3. M Button [3]
  4. SET Button [4]

These buttons can be used to display different temperature readings as well as access parameter values.

2

Displaying Temperatures:

By default while the dryer is running, the dew point temperature value [1] is displayed on the LED.

To display the condenser temperature, press and hold the [down] arrow key [2]. When the [down] arrow key is released, then the display will return to showing the dew point temperature.

3

Displaying Total Working Time:

To display the total of working hours of the dryer, press and hold both the [up] arrow key [1] and [down] arrow key [2] at the same time.

Note: The working time is shown in hours.

When you release the keys, the display will go back to default.

Display Icons

Indicator Light Name Solid On Flashing On/Off
Cooling Air cooling in progress The compressor will begin cooling soon (time delay stage)
Fan Fan is running --
Anti-Freezing Antifreeze valve is open --
Alarm -- There is an active alarm

Air Dryer Parameters

1

To access the parameter values, press and hold the M key for 5 seconds to enter the parameter menu.

Once in the parameter menu, use the [up] and [down] keys [2] to go through the list of parameters.

Press the [set] key [3] to view the current value that the parameter is set to.

Below lists the different parameters and the function of each parameter.

Category Code Parameter Name Description Setting Range Default Units
Temperature F11 Dew point temperature alarm point An alarm is generated when the dew point temperature reaches this point -20 - 100 25 Celsius
F12 Condensation temperature alarm point An alarm is generated when the condensation temperature reaches this point -20 - 100 63 Celsius
F18 Dew point sensor correction Value to help correct the dew point temperature sensor readings -20.0 - 20.0 0.0 Celsius
F19 Condensation sensor correction Value to help correct the condensation temperature sensor readings -20.0 - 20.0 0.0 Celsius
Compressor F20 Compressor power-on delay The time delay after initial power-on before the compressor can begin 0.2 - 10.0 1.0 Minutes
F21 Minimum compressor downtime Always used after compressor initial power-on 0.2 - 60.0 3.0 Minutes
Antifreeze F31 Antifreeze start temperature Anti-freeze starts when the dew point temperature falls below this value -30 - 100 0.5 Celsius
F32 Antifreeze differential Antifreeze stops once dew point temperature reaches F31 + F32 degrees 1.0 - 5.0 2.0 Celsius
Fans F42 Fan stop temperature Fan starts when condensing temperature is above F42.  -20 - 100 46  Celsius
F43 Fan differential Fan stops when condensing temperature is below F42 - F43 degrees. 0.5 - 10.0 2 Celsius
Other F85 Operating time Display of time that the dryer has been operating -- -- Hours
F86 Clear operating time Choose whether to reset the total dryer operating time No-Yes No --
Feedback

Recently Viewed Items

You Have No Recently Viewed Items Yet

Feedback
Haas Logo

Haas Delivered Price

This price includes shipping cost, export and import duties, insurance, and any other expenses incurred during shipping to a location in France agreed with you as a buyer. No other mandatory costs can be added to the delivery of a Haas CNC Product.

KEEP UP WITH THE LATEST HAAS TIPS AND TECHNOLOGY...

Sign up now!   

HAAS TOOLING ACCEPTS THE FOLLOWING:

  • Service & Support
  • Owners
  • Request Service
  • Operator Manuals
  • Haas Parts
  • Rotary Repair Request
  • Pre-Install Guides
  • Shopping Tools
  • Build & Price a New Haas
  • Available Inventory
  • The Haas Price List
  • CNCA Financing
  • About Haas
  • Accessibility Statement
  • DNSH Statement
  • Export Compliance
  • Careers
  • Certifications & Safety
  • Contact Us
  • History
  • Terms & Conditions
  • Haas Tooling Terms & Conditions
  • Privacy
  • Warranty
  • Haas Community
  • Haas Certification Program
  • Haas Motorsports
  • Gene Haas Foundation
  • Haas Technical Education Community
  • Events
  • Join the Conversation
  • Facebook
  • X
  • Flickr
  • YouTube
  • LinkedIn
  • Instagram
  • TikTok
© 2026 Haas Automation, Inc – CNC Machine Tools

This site is protected by reCAPTCHA and the Google Privacy Policy and Terms of Service apply.

2800 Sturgis Rd., Oxnard, CA 93030
Toll Free: (888) 817-4446 / Fax: 805-278-8554