My Haas Welcome,
!
Haas Tooling MyHaas/HaasConnect Sign In Register Haas Tooling MyHaas/HaasConnect Sign Out Welcome, My Machines Latest Activity My Quotes My Account My Users Sign Out
Find Your Distributor
  1. Select Language
    1. English
    2. Deutsch
    3. Español - España
    4. Español - México
    5. Français
    6. Italiano
    7. Português
    8. Český
    9. Dansk
    10. Nederlands
    11. Magyar
    12. Polski
    13. Svenska
    14. Türkçe
    15. 中文
    16. Suomi
    17. Norsk
    18. الإنجليزية
    19. български
    20. Hrvatski
    21. Ελληνικά
    22. Română
    23. Slovenský
    24. Slovenščina
    25. 한국어
    26. 日本語
    27. Українська
  • machines Main Menu
    • Vertical Mills
      Vertical Mills
      Vertical Mills View All
      • Vertical Mills
      • VF Series
      • Universal Machines
      • VR Series
      • VP-5 Prismatic
      • Pallet-Changing VMCs
      • Mini Mills
      • Mold Machines
      • High-Speed Drill Centers
      • Drill/Tap/ Mill Series
      • Toolroom Mills
      • Pocket Mill
      • Compact Mills
      • Gantry Series
      • SR Sheet Routers
      • Extra-Large VMC
      • Double-Column Mills
      • 3+2 Positioning Machines
    • Multi-Axis Solutions
      Multi-Axis Solutions
      Multi-Axis Solutions View All
      • Multi-Axis Solutions
      • Y-Axis Lathes
      • 5-Axis Mills
    • Lathes
      Lathes
      Lathes View All
      • Lathes
      • ST Series
      • Dual-Spindle
      • Box Way Series
      • Toolroom Lathes
      • Chucker Lathe
      • Haas Bar Feeders
    • Horizontal Mills
      Horizontal Mills
      Horizontal Mills View All
      • Horizontal Mills
      • 50-Taper
      • 40-Taper
    • Rotaries & Indexers
      Rotaries & Indexers
      Rotaries & Indexers View All
      • Rotaries & Indexers
      • Rotary Tables
      • Indexers
      • 5-Axis Rotaries
      • Extra-Large Rotaries
    • Special Series
      Special Series
      Special Series View All
      • Special Series
      • EU_Series_Redirect
    • Automation Systems
      Automation Systems
      Automation Systems View All
      • Automation Systems
      • Mill Automation
      • Lathe Automation
      • Automatic Parts Loaders
      • Automation Models
    • Desktop Machines
      Desktop Machines
      Desktop Machines View All
      • Desktop Machines
      • Desktop Mill
      • Desktop Lathe
      • Control Simulator, Standard
      • Control Simulator, Premium
    • Shop Equipment
      Shop Equipment
      Shop Equipment View All
      • Shop Equipment
      • Knee Mill
      • Haas Manual Lathes
      • Haas Saws
    • Fabrication Machines
      Fabrication Machines
      Fabrication Machines View All
      • Fabrication Machines
      • Laser Cutting Machines
      • CNC Press Brakes
    • QUICK LINKS Special Series  Special Series 
      EU SERIES EU SERIES BUILD & PRICE | PRICE LIST BUILD & PRICE | PRICE LIST In-Stock Machines In-Stock Machines WHAT’S NEW WHAT’S NEW YOUR FIRST CNC YOUR FIRST CNC
      SHOPPING TOOLS
      • Build & Price a Haas
      • Price List
      • Available Inventory
      • CNCA Financing
      WANT TO TALK TO SOMEONE?

      A Haas Factory Outlet (HFO) can answer your questions, and walk you through your best options.

      CONTACT YOUR DISTRIBUTOR >
  • Options Main Menu
    • The Haas Control Value Option Packages
      Value Option Packages
      Value Option Packages View All
      • Value Option Packages
    • Product Image Spindles
      Spindles
      Spindles View All
      • Spindles
    • Product Image Tool Changers
      Tool Changers
      Tool Changers View All
      • Tool Changers
    • Product Image 4th- | 5th-Axis
      4th- | 5th-Axis
      4th- | 5th-Axis View All
      • 4th- | 5th-Axis
    • Product Image Turrets & Live Tooling
      Turrets & Live Tooling
      Turrets & Live Tooling View All
      • Turrets & Live Tooling
    • Product Image Probing
      Probing
      Probing View All
      • Probing
    • Haas Chip & Coolant Management Chip & Coolant Management
      Chip & Coolant Management
      Chip & Coolant Management View All
      • Chip & Coolant Management
    • The Haas Control The Haas Control
      The Haas Control
      The Haas Control View All
      • The Haas Control
    • Product Image Product Options
      Product Options
      Product Options View All
      • Product Options
    • Product Image Tooling & Fixturing
      Tooling & Fixturing
      Tooling & Fixturing View All
      • Tooling & Fixturing
    • Product Image Workholding
      Workholding
      Workholding View All
      • Workholding
    • Product Image 5-Axis Solutions
      5-Axis Solutions
      5-Axis Solutions View All
      • 5-Axis Solutions
      • 5 Easy Steps to 5-Axis
    • QUICK LINKS Special Series  Special Series 
      EU SERIES EU SERIES BUILD & PRICE | PRICE LIST BUILD & PRICE | PRICE LIST In-Stock Machines In-Stock Machines WHAT’S NEW WHAT’S NEW YOUR FIRST CNC YOUR FIRST CNC
      SHOPPING TOOLS
      • Build & Price a Haas
      • Price List
      • Available Inventory
      • CNCA Financing
      WANT TO TALK TO SOMEONE?

      A Haas Factory Outlet (HFO) can answer your questions, and walk you through your best options.

      CONTACT YOUR DISTRIBUTOR >
  • Why Haas Main Menu
      Discover the Haas Difference
    • Why Haas
    • MyHaas
    • Education Community
    • Industry 4.0
    • Haas Certification
    • Customer Testimonials
  • Service Main Menu
      Welcome to Haas Service
      SERVICE HOME Operator’s Manuals How-To Procedures Troubleshooting Guides Preventive Maintenance Haas Parts Haas Tooling Videos
  • Videos Main Menu
  • Main Menu
    • View All
    • View All
    • View All
    • View All
      • HTEC Curriculum Support
      • Haas Value Option Packages (VOP) Journey
    • View All
      • Haas 10 kg Cobot Package
      • Cobot Kits
      • DC-1 Drill Center
      • CNC Sales News
      • Do More With Your Haas
    • View All
    • View All
      • contact-us-test
      • 4 - AUTOMATION SYSTEMS
      • Carousel-V2
      • expert test
      • Demo_Day_Trident-test
      • Link Test
      • image-sale-tag-test
      • article-list-test
      • Haas 25 kg Robot Package
      • test-algolia-page
    • View All
    • View All
    • View All
    • View All
      • calc-test
    • View All
    • QUICK LINKS Special Series  Special Series 
      EU SERIES EU SERIES BUILD & PRICE | PRICE LIST BUILD & PRICE | PRICE LIST In-Stock Machines In-Stock Machines WHAT’S NEW WHAT’S NEW YOUR FIRST CNC YOUR FIRST CNC
      SHOPPING TOOLS
      • Build & Price a Haas
      • Price List
      • Available Inventory
      • CNCA Financing
      WANT TO TALK TO SOMEONE?

      A Haas Factory Outlet (HFO) can answer your questions, and walk you through your best options.

      CONTACT YOUR DISTRIBUTOR >
  • Haas Tooling Main Menu
  • Haas Service Parts Main Menu

My Haas Welcome,
!
Haas Tooling MyHaas/HaasConnect Sign In Register Haas Tooling MyHaas/HaasConnect Sign Out Welcome, My Machines Latest Activity My Quotes My Account My Users Sign Out
Find Your Distributor
  1. Select Language
    1. English
    2. Deutsch
    3. Español - España
    4. Español - México
    5. Français
    6. Italiano
    7. Português
    8. Český
    9. Dansk
    10. Nederlands
    11. Magyar
    12. Polski
    13. Svenska
    14. Türkçe
    15. 中文
    16. Suomi
    17. Norsk
    18. الإنجليزية
    19. български
    20. Hrvatski
    21. Ελληνικά
    22. Română
    23. Slovenský
    24. Slovenščina
    25. 한국어
    26. 日本語
    27. Українська
×

Search Results

Web Pages

Images

    • <
    • 1
    • >

7 - RPL - Light Curtain Installation

Haas Robot Pallet Loader - Operators / Service Manual


  • 0 - RPL - Table of Contents
  • 1 - RPL - Introduction
  • 2 - RPL - Legal Information
  • 3 - RPL - Safety
  • 4 - RPL - Zero Point Ready - Installation
  • 5 - RPL - Installation
  • 6 - RPL - Fence/Interlock Installation
  • 7 - RPL - Light Curtain Installation
  • 8 - RPL - DCS Setup
  • 9- RPL - Pallet Loader Setup
  • 10 - RPL - Operation
  • 11 - RPL - Maintenance
  • 12 - RPL - Troubleshooting

Go To :

  • 7.1 RPL - Light Curtain Installation
  • 7.2 RPL - Light Curtain Troubleshooting

7.1 RPL - Light Curtain Installation

Recently Updated

Light Curtain - Installation


AD0704

Revision B - 5/2025

Introduction

The light curtain can be used to protect the user from the robot without needing to use an interlocking fence or area scanner. 

The light curtain is composed of two main parts—the emitter and receiver. The light curtain emitter sends out parallel beams that will be received by the light curtain receiver if there are no obstacles in the way. When this is the case, the machine is considered to be in a safe state and can operate. 

NOTE: For more Light Curtain information, refer to the Light Curtain Troubleshooting Guide. 

Machine Requirements:

  • Compatible Interface Box:
    • 93-3806  ELECT INTERFACE LIGHT CURTAIN HRP-1 
    • 93-3911   ELECT INTERFACE LIGHT CURTAIN HRP-2/3

 IMPORTANT: Without the light curtain compatible interface box, the light curtain won't be connected to the machine. These upgraded interface boxes were added to all COBOT packages & HRP-1/2/3 packages built after 07/10/2023. If the machine's interface box was built before these dates, refer to the Robot Safety Device Interface Box Installation - AD0703 procedure for more information. 

Required Accessories:

  • 09-0954: Light Curtain Mounting Plate

 NOTE: The light curtain mounting plates are not included in the light curtain kits and must be ordered separately as an accessory. 

Software Requirements:

  • 100.23.000.1120 version or higher 

Tool Needed:

  • Vertical Laser Level - recommended to speed up the alignment process.

This Procedure Applies to the following Part Numbers:

  • 09-0940 Light Curtain Emitter & Receiver 920mm Protective Height [1]
  • 09-0624 Light Curtain Emitter & Receiver 1720mm Protective Height [2]
  • 09-0623 Reflective Mirror Post for Light Curtain 1910mm, Set of 2 [3]
  • 08-1898 Multi-Sided Light Curtain Kit for Haas Cobot 1720mm Protective Height 
  • 08-1899 Multi-Sided Light Curtain Kit for HRP 1720mm Protective Height 

Installation

1

With the machine in service mode, go to Parameters > Factory tab.

Set Parameter 2191 [694] LIGHT CURTAIN TYPE to LC_TYPE_1.

Set Parameter 2192 [:] LIGHT CURTAIN TRIGGER THRESHOLD to 0. 

Set the Setting 376 LIGHT CURTAIN ENABLED to ON. 

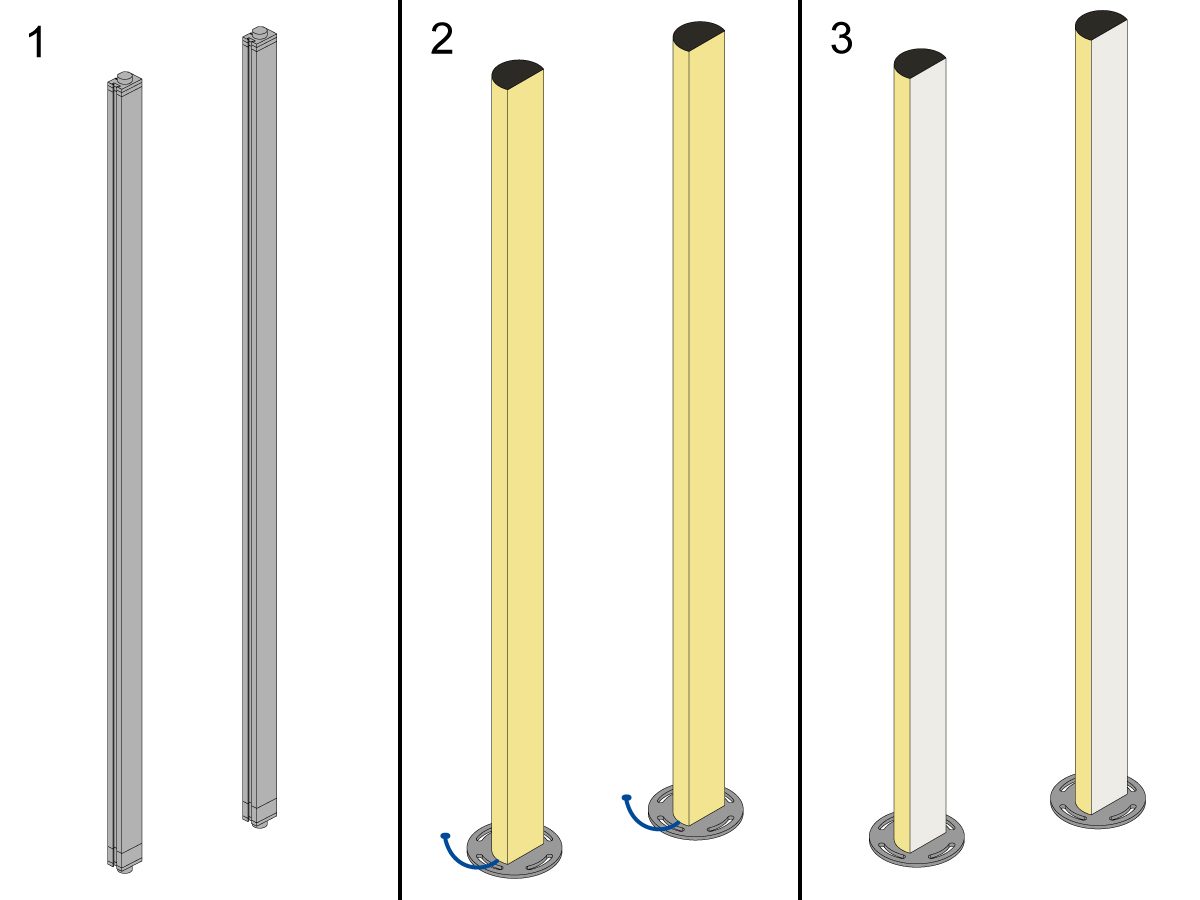
2

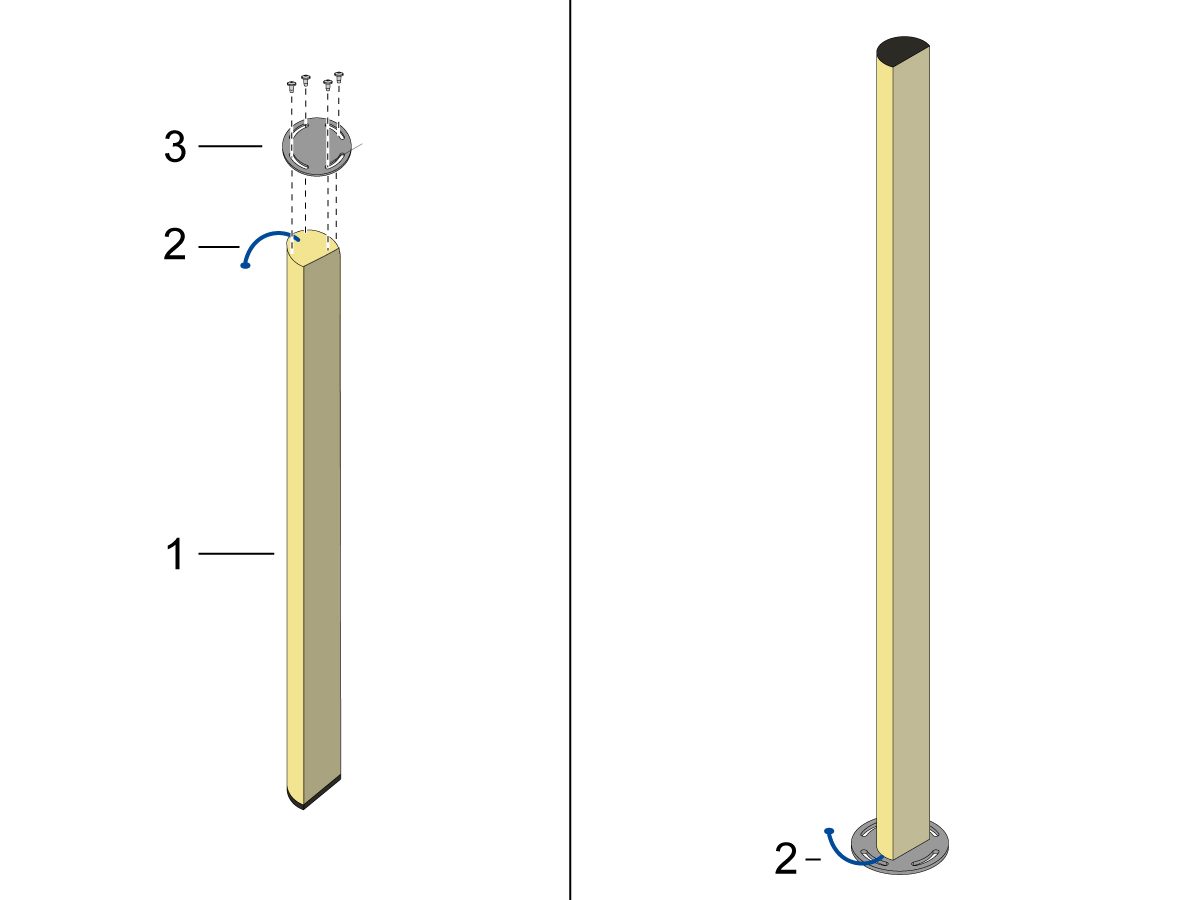
When installing the light curtain to the light curtain housing:

Place the light curtain housing [1] standing up on the ground.

NOTE: Make sure to have the light curtain receiver/emitter cable [2] located on the top. 

Install the light curtain housing stand [3] onto the top of the light curtain housing [1].

Flip the light curtain. 

Repeat this process to the second light curtain housing.

3

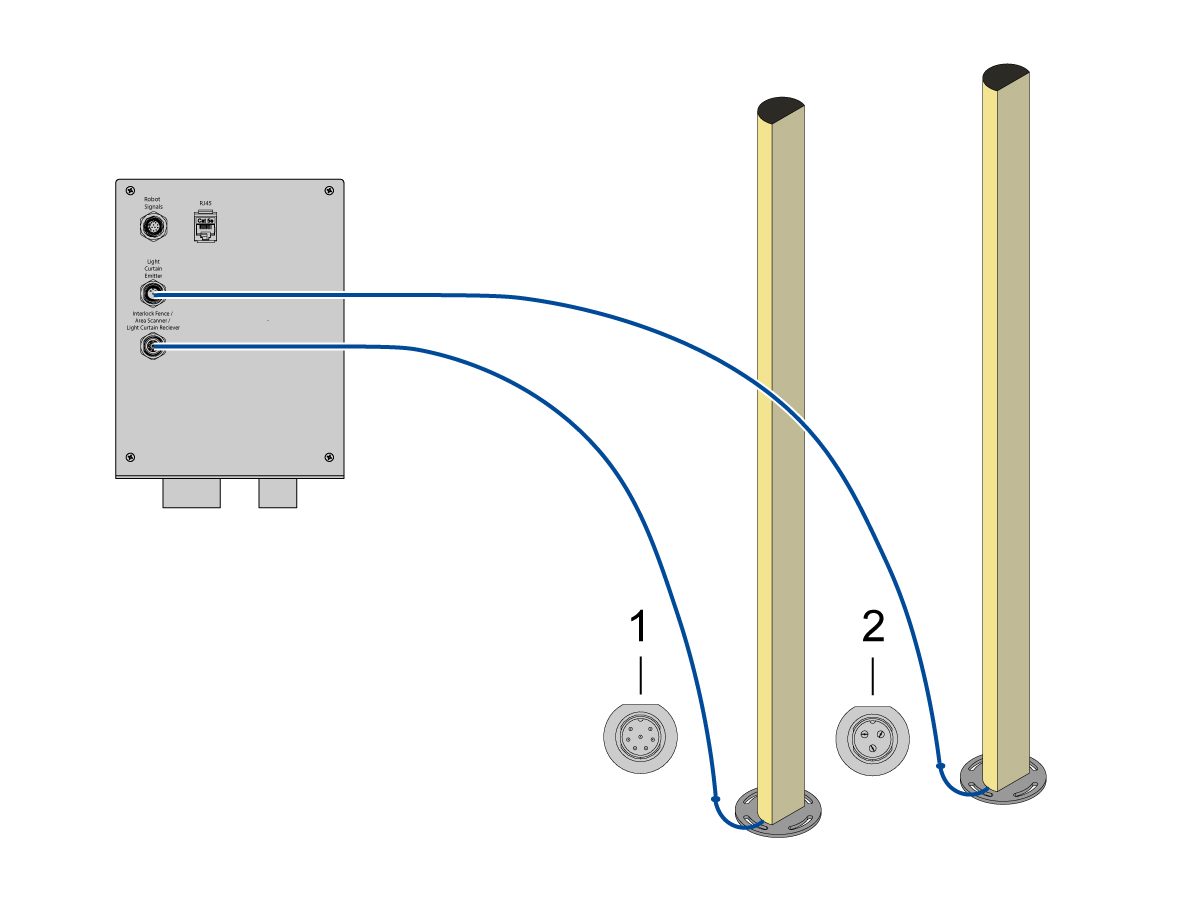
Power OFF the machine.

Plug the light curtain receiver [1] and emitter [2] cable into the machine's robot safety device interface box.

 NOTE: Make sure to connect the light curtain receiver cable [1] to the matching connector on the light curtain receiver & connect the light curtain emitter cable [2] to the matching connector on the light curtain emitter. 

Power ON the machine.

4

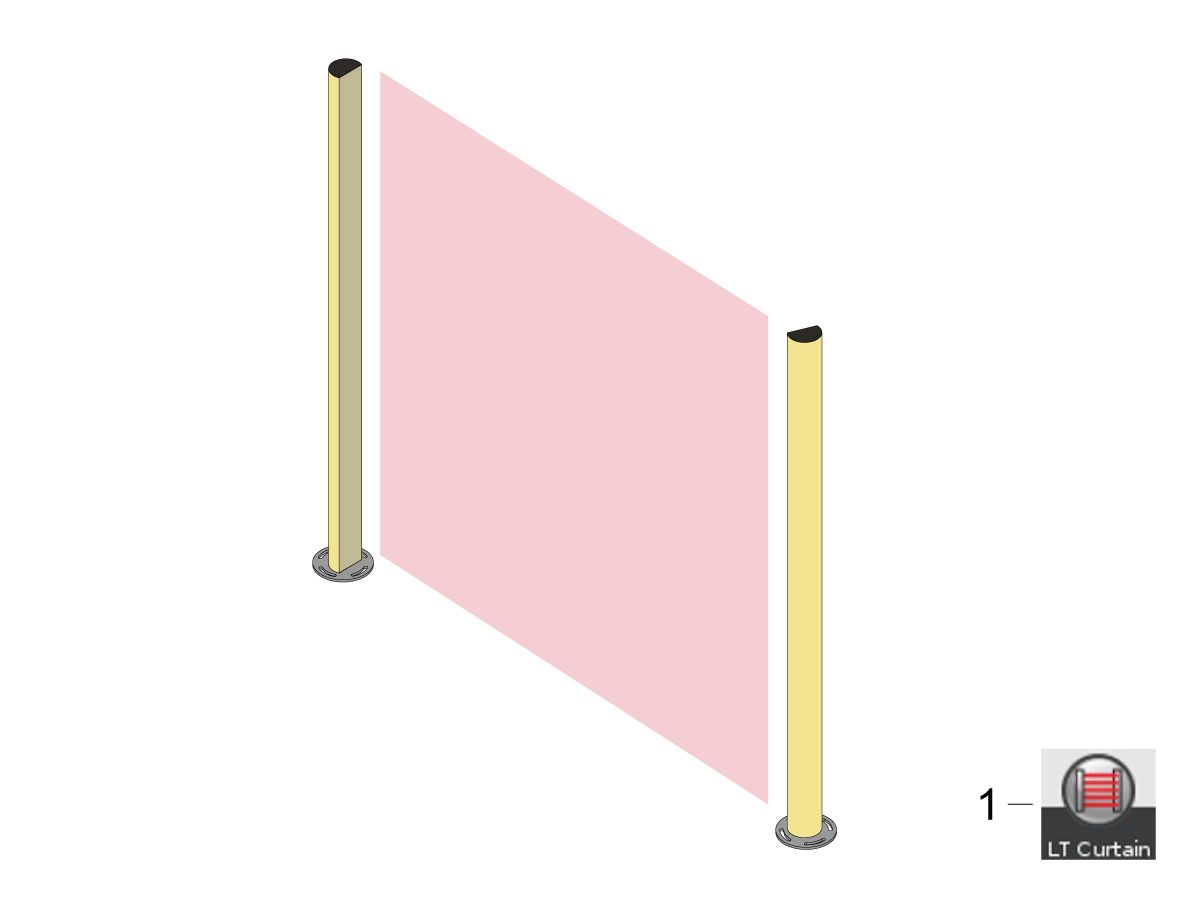
Place the light curtain emitter directly across from the light curtain receiver. 

Test the functionality of the light curtain by interfering the light curtain beams and verifying that the light curtain triggered icon [1] appears on the Haas pendant. 

Make sure that when nothing is interfering the light curtain beams, that the light curtain triggered icon [1] disappeared on the Haas pendant. 

NOTE: Make sure that the light curtain sits flat on the surface. If not, shim under the light curtain until flat. 

5

Find the desired light curtain location where the emitter can send out light beam that will be received by the receiver without any obstacles in the path. 

NOTE: To help find the desired light curtain location, refer to the Cobot Machine Layout Drawing. 

Note: For more information on how to align the light curtains, refer to the Light Curtain Alignment section below.

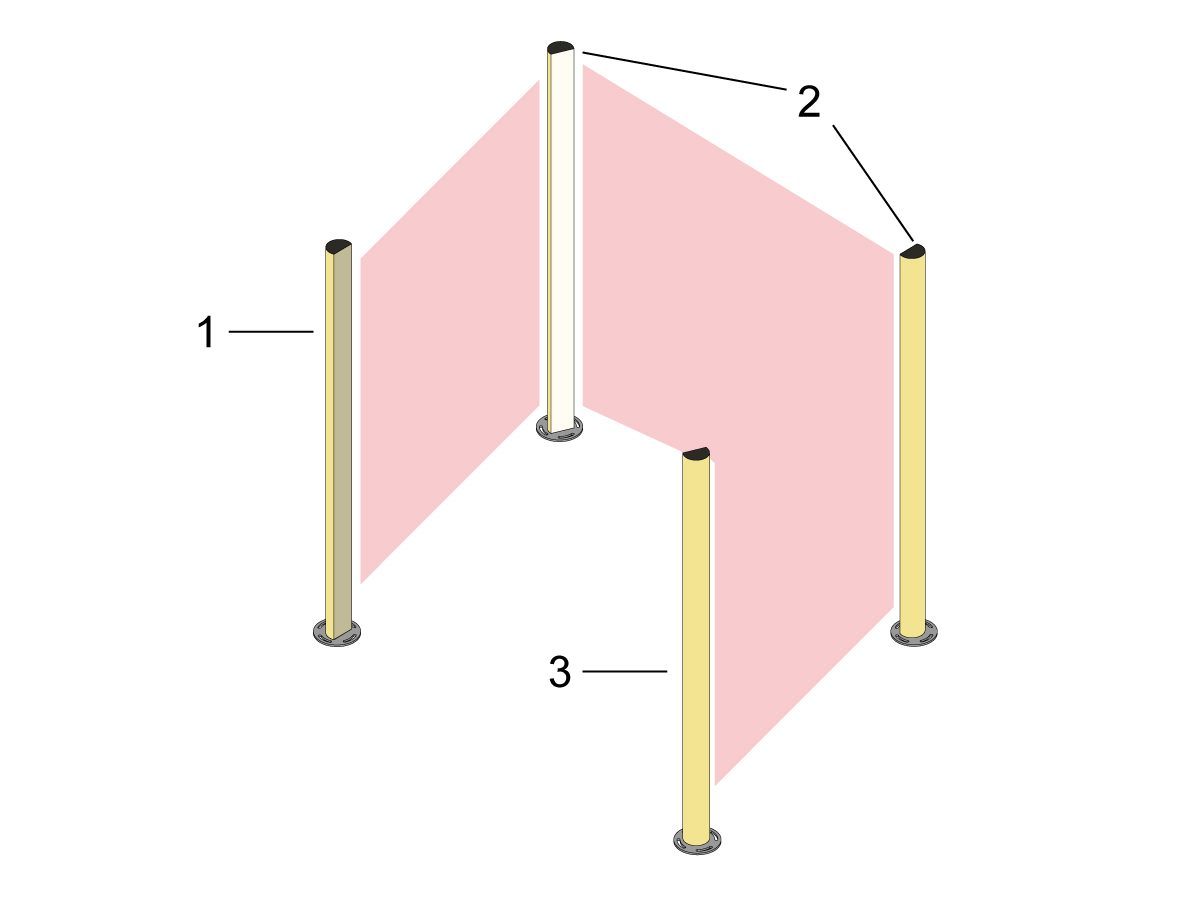
IMPORTANT: With the multi-sided light curtain package, there are two additional mirror posts. Set the light curtain emitter up in a position so that the light curtain beam is reflected off of the mirror post oriented at 45° and returns to the light curtain receiver. 

Verify the location of the light curtain by interfering the light curtain field and ensuring the machine's light curtain is triggered. 

Anchor all the light curtain posts to the floor OR fasten the light curtain to a secured surface.

Light Curtain Alignment

1

Aligning the light curtains can take time. When anchoring the posts, the mirror orientation can shift, throwing off the alignment.

To speed up the alignment process, you can use a vertical laser level to have a visual representation of the beam produced by the light curtain emitter.

This section shows how to align light curtains on a pallet surface. This section can be used as reference for installing on any level mounting surface.

Note: The laser level is not needed for installation, but it is a tool that can help speed up the installation process.

2

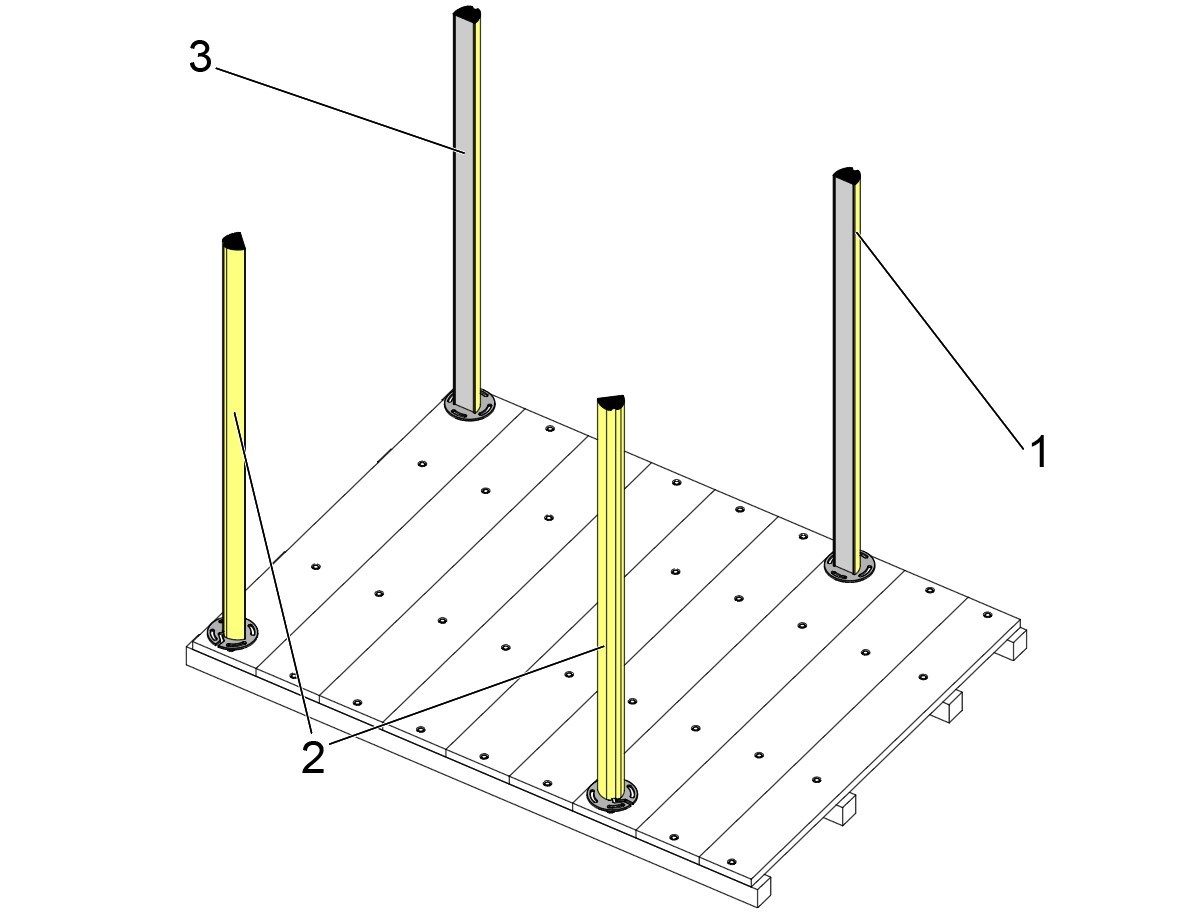
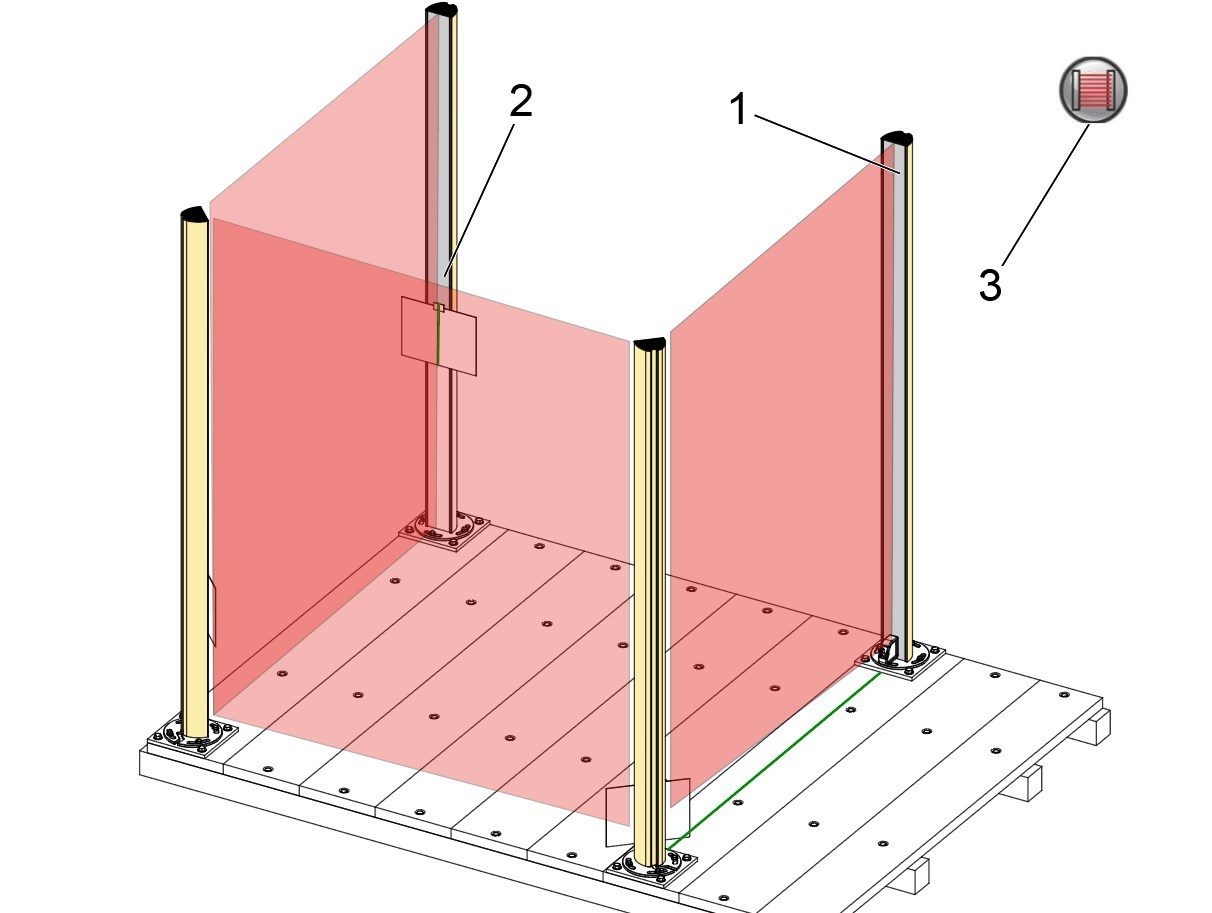
Position the posts on the pallet. Do a rough alignment so that the mirrors [2] have close to the correct orientation to reflect the beam from the emitter [1] to the receiver [3]. 

Note: In this example a pallet is used to anchor the light curtains. Any surface can be used.

3

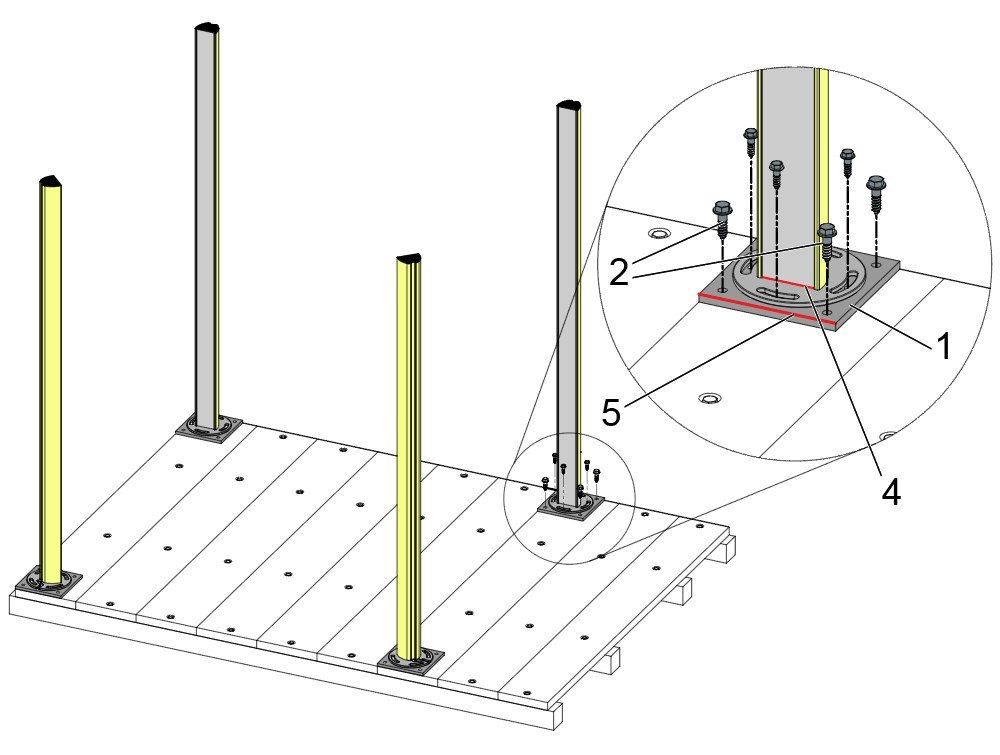
Place the post mounting plates [1] underneath the light curtain posts. 

Align the edges of the mounting plates so that they are parallel with the edges of the pallet.

Fasten the mounting plate [1] for the emitter post to the pallet using the lag screws [2] and washers [3].

Align the emitter post so that the face of the emitter [4] is parallel to the edge of the mounting plate [5].

Fasten the emitter post to the mounting plate using the lag screws and washers.

 NOTE: Leave the remaining posts in their position. The mirrors and receiver can be adjusted individually to compensate for orientation changes when emitter is fastened to the pallet.

4

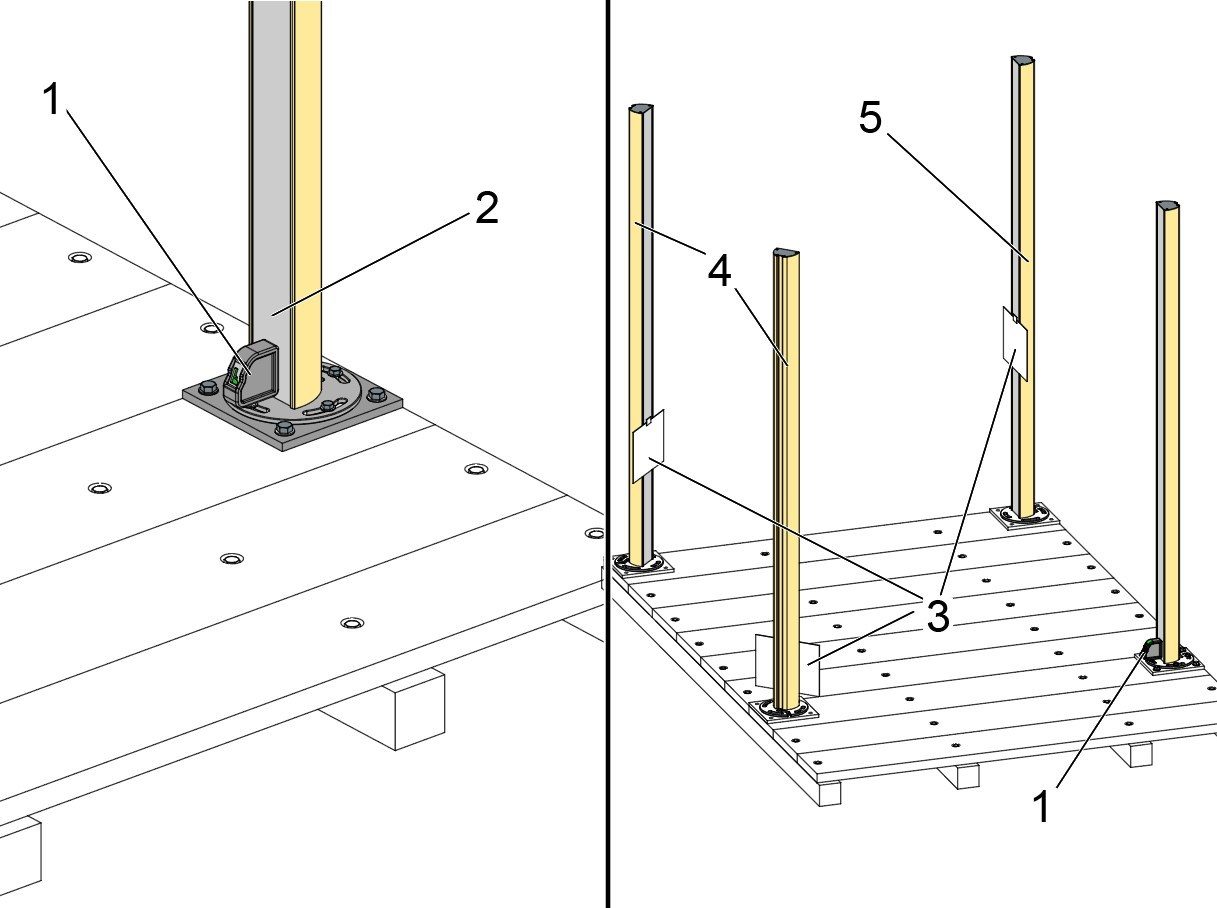
After installing the emitter post to the pallet, place a vertical laser level [1] centered on the post so that it is sitting flush against the emitter face [2].

This will ensure that the laser from the level is matching the plane of the beam from the emitter. 

Tape a piece of paper [3] to each mirror [4] and the receiver [5] at different heights.

These pieces of paper will be an indicator for the location that the laser is hitting each mirror.

Note: The paper needs to be placed at different heights on each post. Any part of the laser that hits paper will not be reflected to the next mirror in the chain.

5

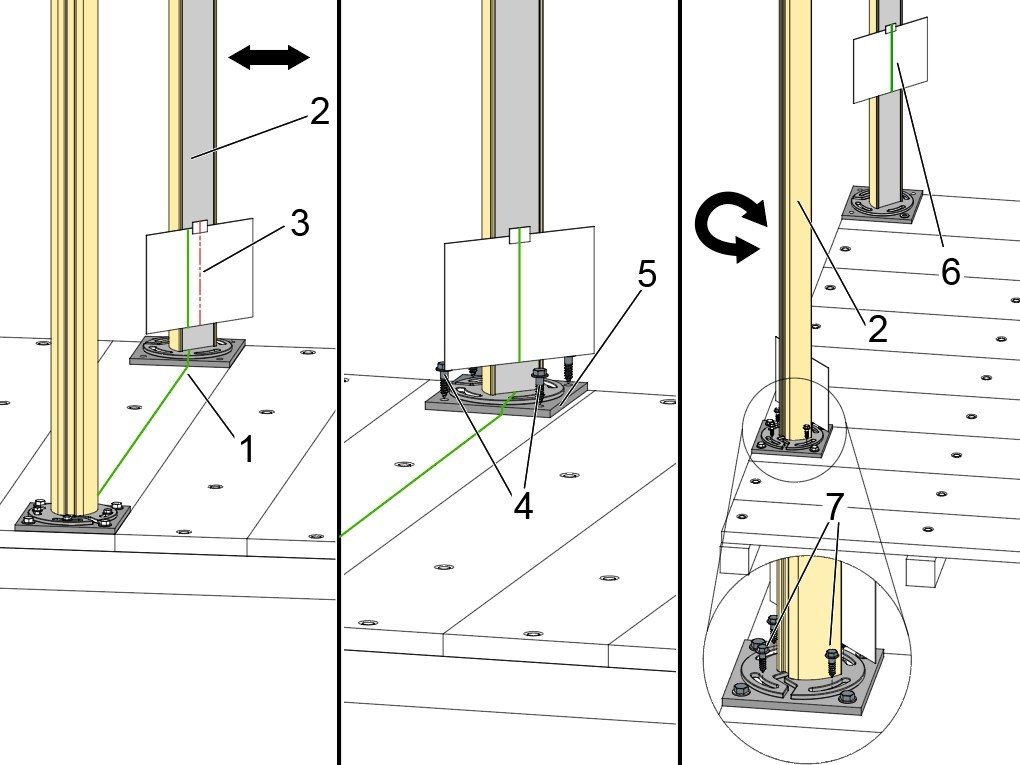
Use the laser [1] as a guide to adjust the post [2] so that the laser hits the mirror in the center.

The image on the left has a red line [3] showing where the laser should hit the mirror. Slide the post [2] and mounting plate so that the laser hits the center as shown in the middle image.

Fasten the mounting plate [5] to the pallet using the lag screws [4].  

6

To set the orientation, pivot the post clockwise or counterclockwise as needed so that the laser is reflected to the centerline of the next post [6] as shown in the right image.

Once aligned, fasten the post in position using the lag screws [7].

 NOTE: Fastening the post in position can shift the alignment. Verify that the alignment is still correct after fastening the post to the mount bracket.

7

Repeat steps 5 and 6 on the remaining posts.

When the receiver post [2] is aligned and fastened to the pallet, the laser from the emitter post [1] should be visible on the receiver post [2] as shown in the image.

Remove the laser level and the paper from the light curtain and verify that the light curtains are functioning.

The light curtain icon [3] should appear on the control when the light curtain beam is broken.

RJH-XL Remote E-Stop Installation

1

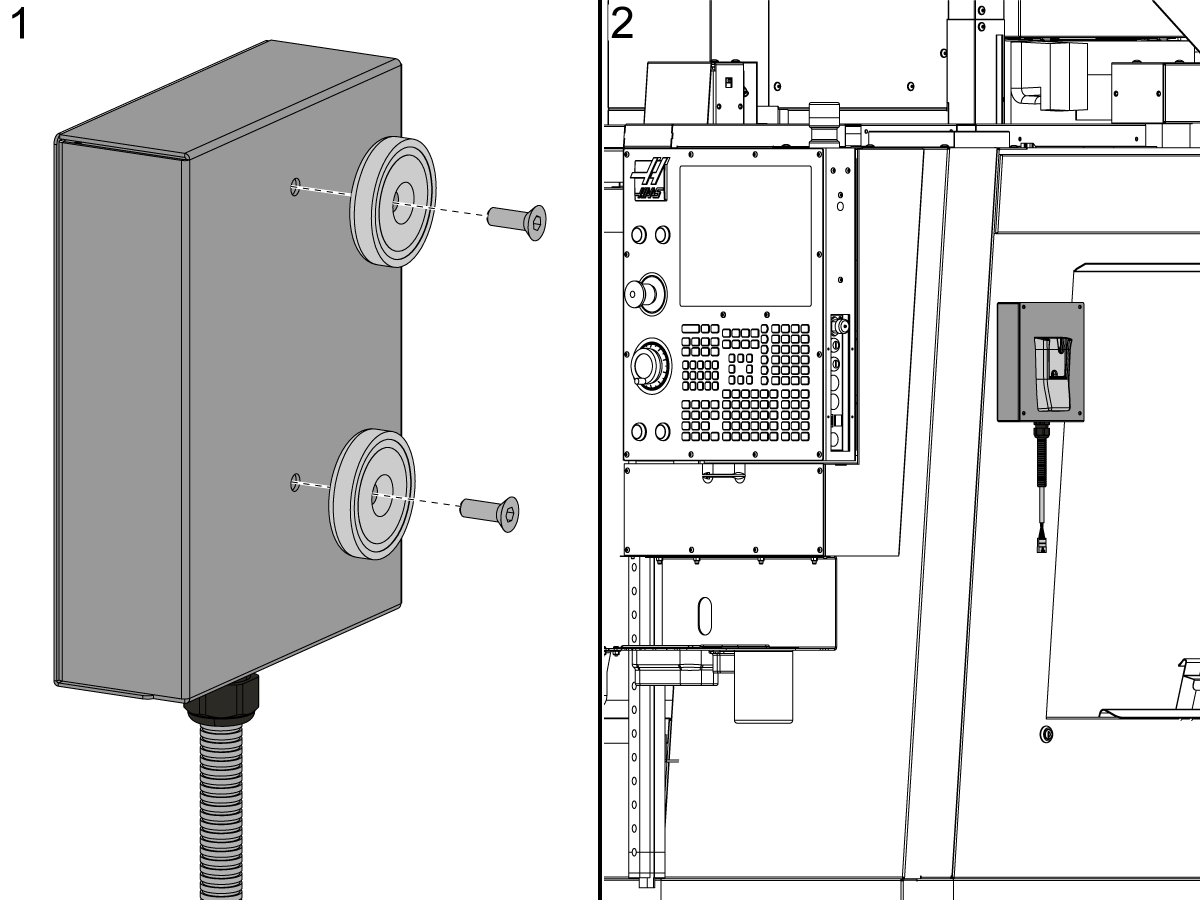
If the Control Pendant is outside of the light curtain field the RJH-XL can mounted on the pendant as normal.

If the the Control Pendant is inside the light curtain field the magnets that come in the HRP install kit can be installed on the RJH-XL holster [1] and be mounted on the side of the machine [2].

Follow the directions below to install the RJH-XL.

RJH-XL Installation

7.2 RPL - Light Curtain Troubleshooting

Recently Updated

Light Curtain - Troubleshooting Guide


Introduction

The light curtain is a transmitter/emitter and receiver system. When the light curtain is broken, the APL or machine motion will stop until the curtain is unbroken and cycle start is pressed. 

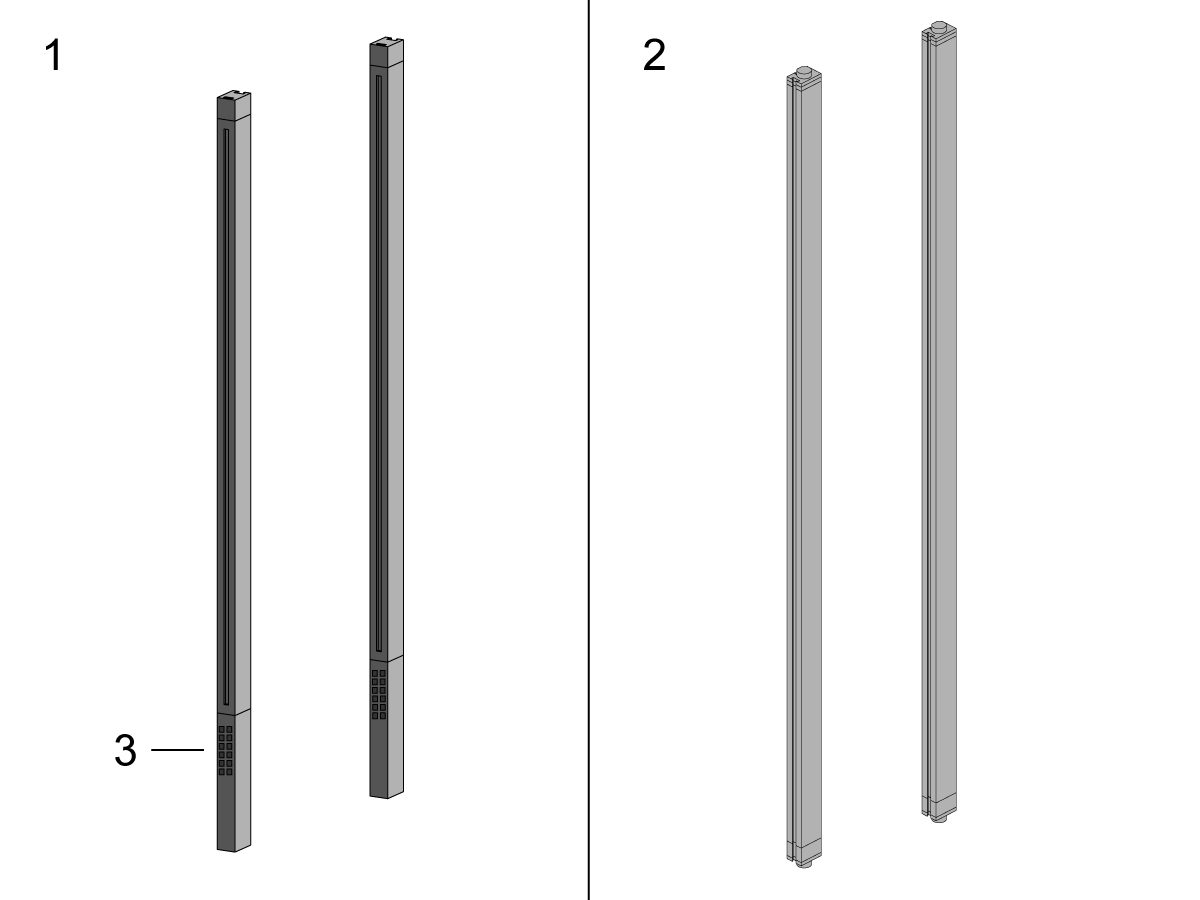
There are two types of light curtains:

  • Light Curtain for APL [1]
  • Light Curtain for HRP/Cobots [2]

NOTE: The main appearance difference between the Light Curtain for APL [1] vs. HRP/Cobots [2] is that the Light Curtain for APL [1] has programmable buttons [3] on the bottom whereas the Light Curtain for HRP/Cobots [2] has no programmable buttons on the bottom. 

Light Curtain for APL - Service Video

The following video will help to troubleshoot the light curtain used for APL. 

NOTE:  This  service video is for reference only and does not replace the written procedure. 

Symptom Table

Symptom Possible Cause Corrective Action

Light Curtain for APL Only: The light curtain logic is reversed. When the light curtain is broken the icon (shown below) is not displayed and the I/O is a 0 and the APL motion is not stopped.


The Light curtain parameters are set incorrectly so the logic is reversed. Reset the light curtain parameters. See the Light Curtain for APL - Reset Parameters section below.
The programming buttons were unintentionally pressed changing the parameters. A cover can be made to cover the programmable buttons. See the Light Curtain for APL - Programming Button Cover section below.

Light Curtain for HRP/Cobot Only: The Light Curtain icon does not clear when the Light Curtain is not tripped.


The electrical connections are not correct.    Check the connections from the Light Curtain to I/O PCB. Refer to the Electrical Schematic section below.
There is something interfering the light curtain.   Remove the object interfering the light curtain protective field.
On Multi-sided light curtain the mirrors are not correctly align. Make sure you correct the position of the mirrors.  Refer to the Light Curtain Installation - AD0704 procedure.
The Light Curtain when broken does not trigger the machine to stop APL motion. There is no input from the light curtain to the machine.
Light Curtain wired correctly and receiving power. Check from the PSUP > 24V Transformer > I/O > Light Curtain. Refer to the Electrical Diagram section below. 
Light Curtain transmitter and receiver are not aligned.
The Light Curtain Parameter 2191 is not enabled.
The Setting 376 Light Curtain Enable is not turned ON.
Light Curtain for APL Only: Reset the light curtain parameters.

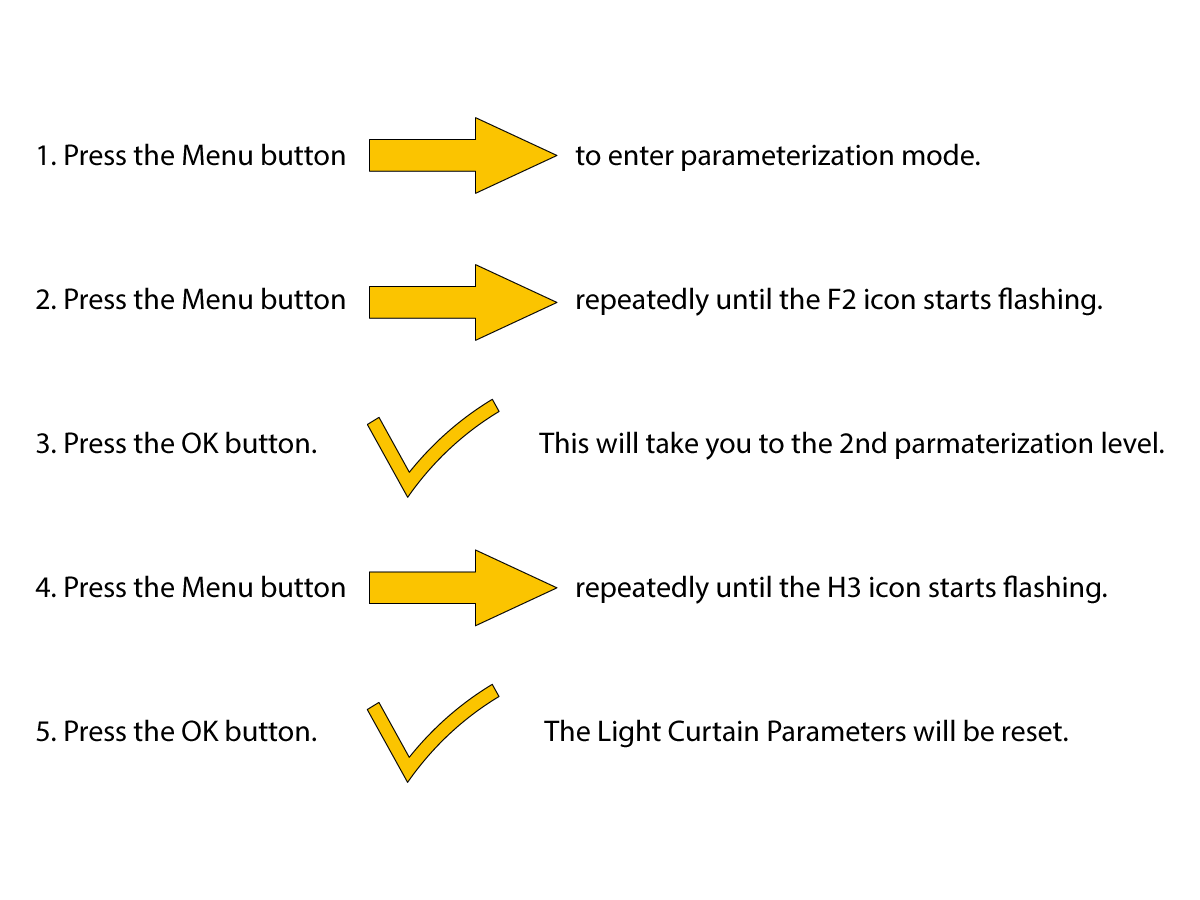
Light Curtain for APL - Reset Parameters

Follow the following steps to reset the Light Curtain Factory Parameters.

1. Press the Menu button to enter parameterization mode.

2. Press the Menu button repeatedly until the F2 icon starts flashing.

3. Press the OK button. This will take you to the 2nd parmaterization level.

4. Press the Menu button repeatedly until the H3 icon starts flashing.

5. Press the OK button. The Light Curtain Parameters will be reset.

See the Light Curtain User Manual below for more information.

Light Curtain - User Manual

Light Curtain - Programming Button Cover

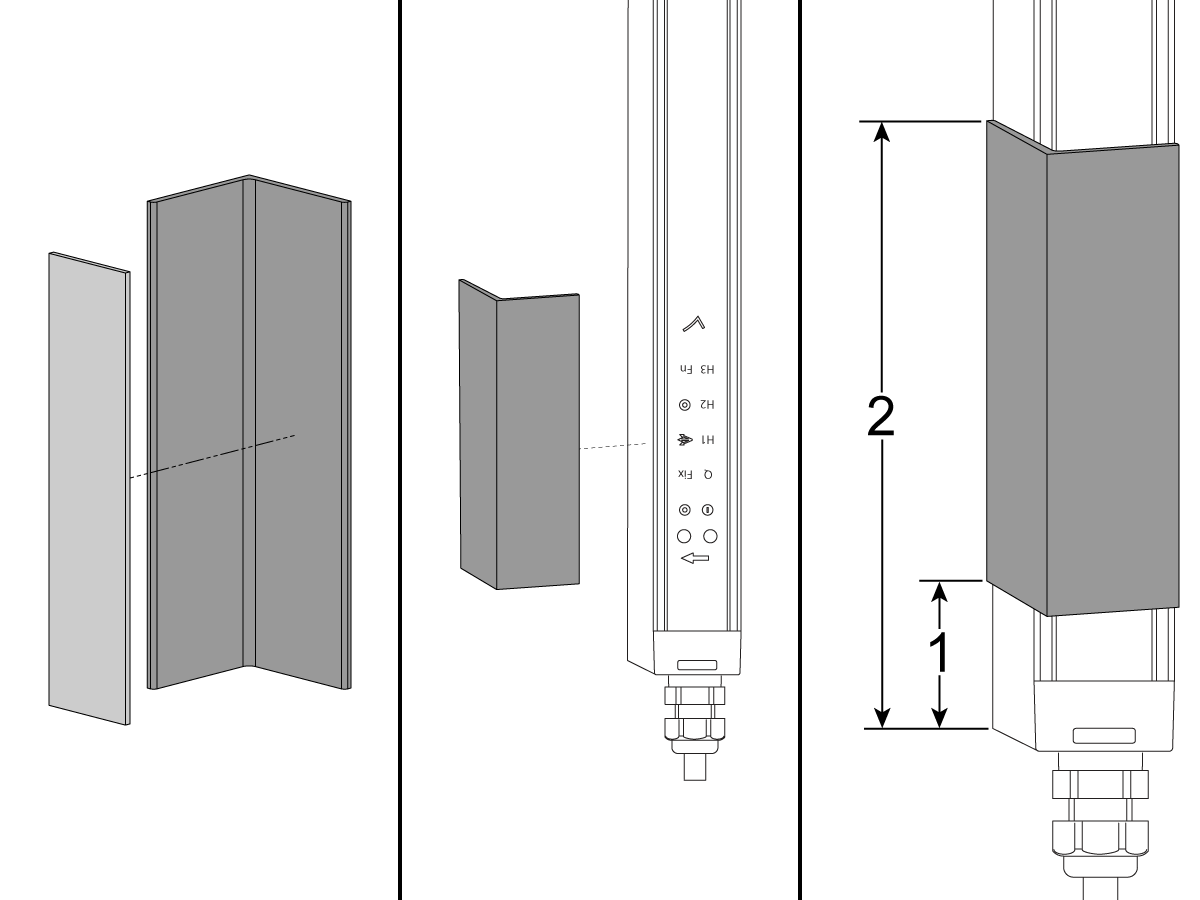
If the buttons are pressed and the programming changed unintentionally. A shield can be added to cover the programming buttons.

Install a 0.75 inch wide double sided tape to a 1" x 1" aluminum angle that is 3.5" long.

Apply this to the side of the light curtain to cover the buttons.

The cover should be 1.5" from the bottom of the light curtain[1]. The top of the cover should not exceed 5.25" from the bottom of the light curtain[2] or it will trip the light curtain.

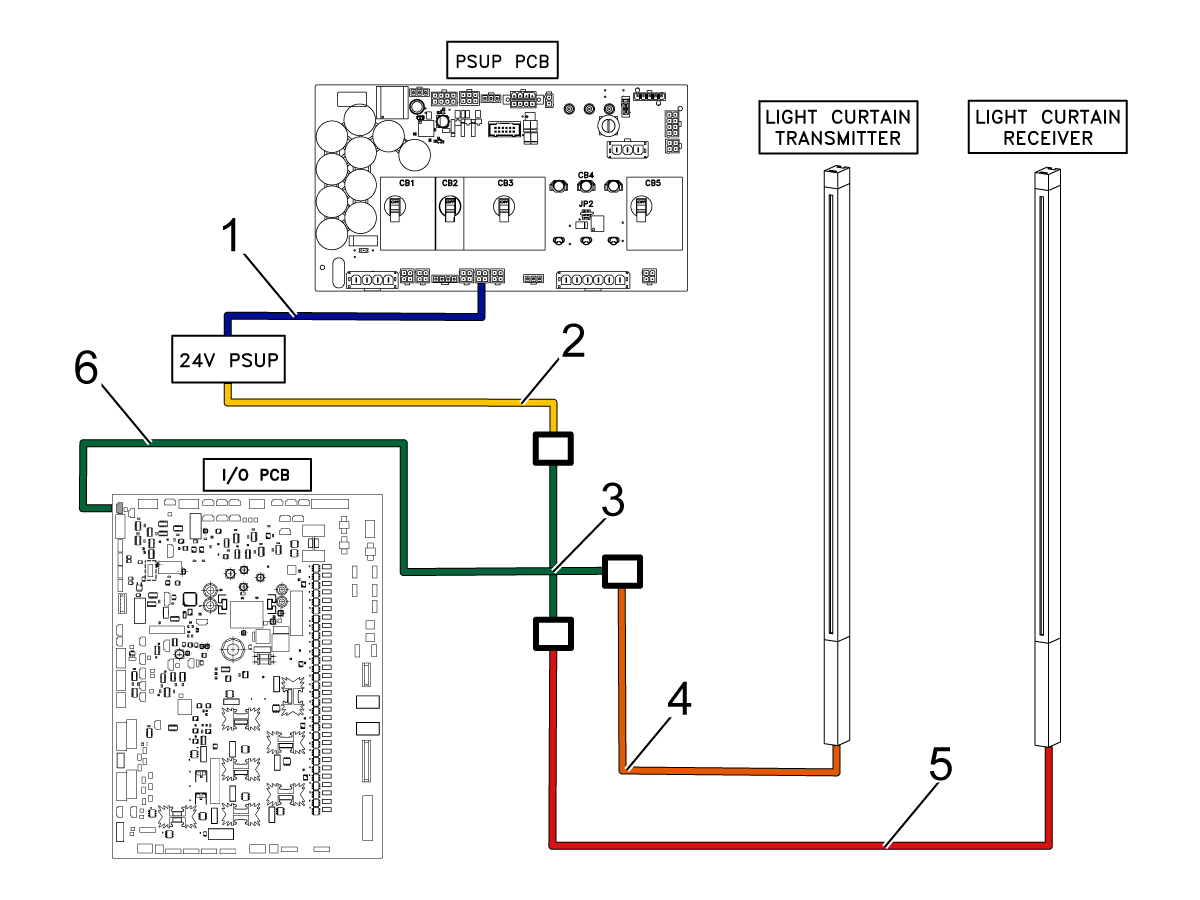
Light Curtain for APL - Electrical Diagrams

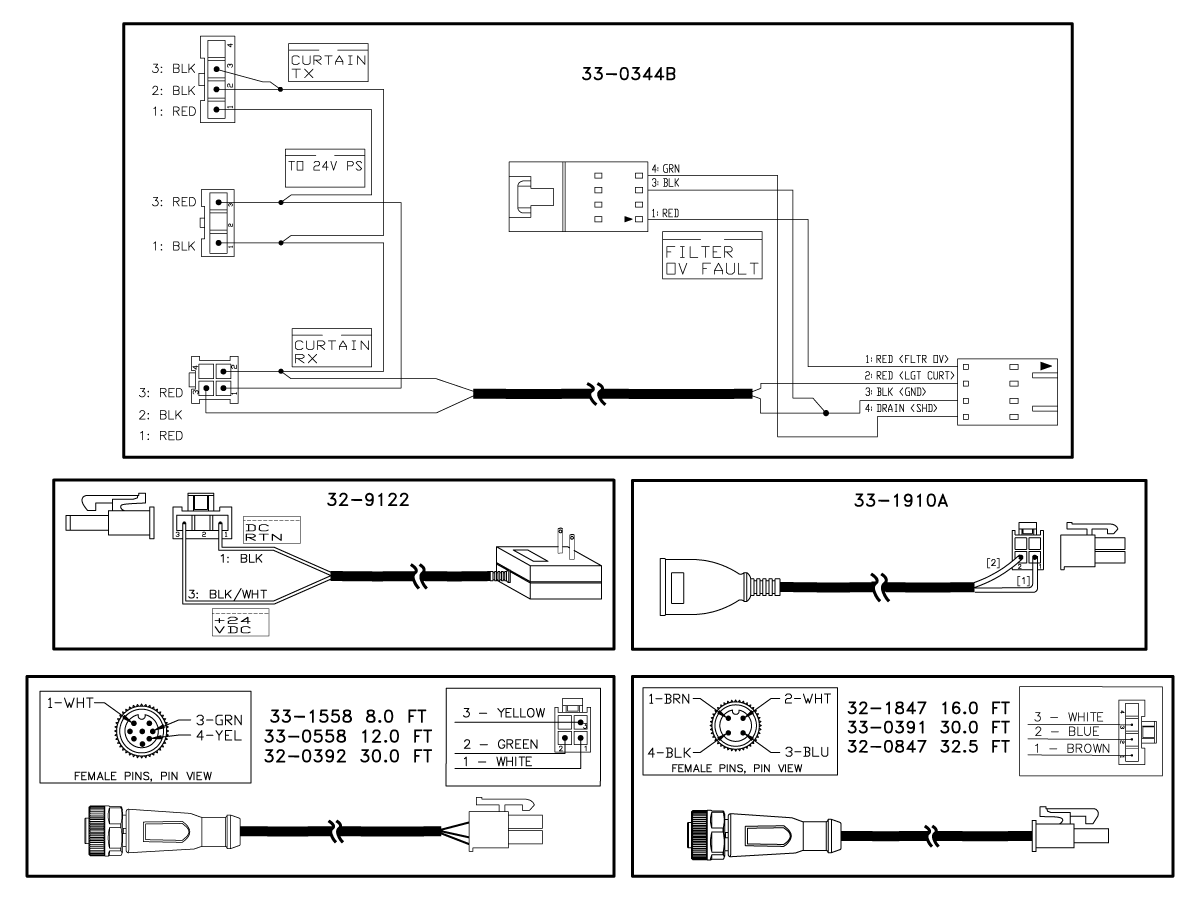
[1] Connect cable 33-1910A CBL90B 115V TO 24V PS from PSUP P5/6/7 to 32-9122 24VDC Power Supply.

[2] Connect 24VDC Power Supply Cable 32-9122 from 33-1910A CBL90B 115V TO 24V PS to 33-0344B CBL LIGHT CURTAIN HARNESS WITH FILTER OV.

[3] Cable 33-0344B CBL LIGHT CURTAIN HARNESS WITH FILTER

[4] Connect cable 32-1847 CBL LIGHT CURTAIN TRANSMITTER to the Light Curtain Transmitter.

[5] Connect cable 33-1558 CBL LIGHT CURTAIN RECEIVER to the Light Curtain Receiver. 

[6] Connect Cable 33-0344B CBL LIGHT CURTAIN HARNESS WITH FILTER to the I/O PCB at P1.

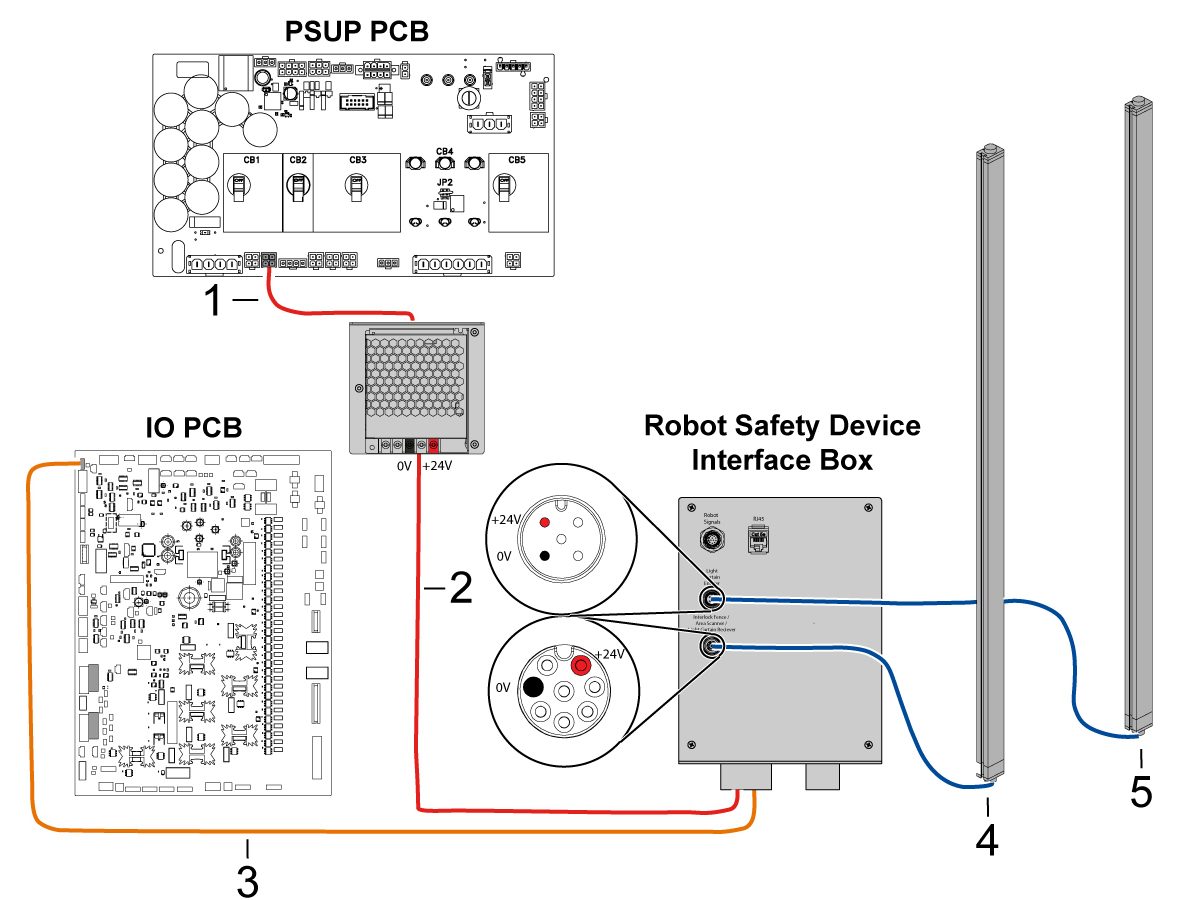
Light Curtain for HRP/Cobot - Electrical Diagram

[1] Connect cable 33-1281 CBL 50W 24VDC PS 120VAC PWR IN from PSUP P3 to 32-1277 24V Power Supply. 

[2] Connect 24VDC Power Supply Cable 32-1277 from 33-1281 CBL 50W 24VDC PS 120VAC PWR IN to 33-8562C CBL 18' HRP SIG FROM I/O TO INTF BOX.

[3] Connect 33-8562C CBL 18' HRP SIG FROM I/O TO INTF BOX to the I/O PCB at P1.

 NOTE: If the machine has a Regen Vector Drive, unplug cable 33-0634 FILTER OV TO IOPCB P1 from P1 SIO and plug it into the connector FILTER OV FAULT on cable 33-8562C. If the machine does not have a Regen Vector Drive, do not plug anything into the connector FILTER OV FAULT.

[4] Connect cable 09-0638 LIGHT CURTAIN EMITTER CABLE from the Light Curtain Emitter to the interface box.

[5] Connect cable 09-0639 LIGHT CURTAIN RECEIVER CABLE from the Light Curtain Receiver to the interface box.

Recently Viewed Items

You Have No Recently Viewed Items Yet

Feedback
Haas Logo

Haas Delivered Price

This price includes shipping cost, export and import duties, insurance, and any other expenses incurred during shipping to a location in France agreed with you as a buyer. No other mandatory costs can be added to the delivery of a Haas CNC Product.

KEEP UP WITH THE LATEST HAAS TIPS AND TECHNOLOGY...

Sign up now!   

HAAS TOOLING ACCEPTS THE FOLLOWING:

  • Service & Support
  • Owners
  • Request Service
  • Operator Manuals
  • Haas Parts
  • Rotary Repair Request
  • Pre-Install Guides
  • Shopping Tools
  • Build & Price a New Haas
  • Available Inventory
  • The Haas Price List
  • CNCA Financing
  • About Haas
  • Accessibility Statement
  • DNSH Statement
  • Export Compliance
  • Careers
  • Certifications & Safety
  • Contact Us
  • History
  • Terms & Conditions
  • Haas Tooling Terms & Conditions
  • Privacy
  • Warranty
  • Haas Community
  • Haas Certification Program
  • Haas Motorsports
  • Gene Haas Foundation
  • Haas Technical Education Community
  • Events
  • Join the Conversation
  • Facebook
  • X
  • Flickr
  • YouTube
  • LinkedIn
  • Instagram
  • TikTok
© 2026 Haas Automation, Inc – CNC Machine Tools
This site is protected by reCAPTCHA and the Google Privacy Policy and Terms of Service apply.

2800 Sturgis Rd., Oxnard, CA 93030
Toll Free: (888) 817-4446 / Fax: 805-278-8554