My Haas Welcome,
!
Haas Tooling MyHaas/HaasConnect Sign In Register Haas Tooling MyHaas/HaasConnect Sign Out Welcome, My Machines Latest Activity My Quotes My Account My Users Sign Out
Find Your Distributor
  1. Select Language
    1. English
    2. Deutsch
    3. Español - ES
    4. Español - MX
    5. Français
    6. Italiano
    7. Português
    8. Český
    9. Dansk
    10. Nederlands
    11. Magyar
    12. Polski
    13. Svenska
    14. Türkçe
    15. 中文
    16. Suomi
    17. Norsk
    18. الإنجليزية
    19. български
    20. Hrvatski
    21. Ελληνικά
    22. Română
    23. Slovenský
    24. Slovenščina
    25. 한국어
    26. 日本語
    27. Українська
  • machines Main Menu
    • Vertical Mills
      Vertical Mills
      Vertical Mills View All
      • Vertical Mills
      • VF Series
      • Universal Machines
      • VR Series
      • VP-5 Prismatic
      • Pallet-Changing VMCs
      • Mini Mills
      • Mold Machines
      • High-Speed Drill Centers
      • Drill/Tap/ Mill Series
      • Toolroom Mills
      • Pocket Mill
      • Compact Mills
      • Gantry Series
      • SR Sheet Routers
      • Extra-Large VMC
      • Double-Column Mills
      • 3+2 Positioning Machines
    • Multi-Axis Solutions
      Multi-Axis Solutions
      Multi-Axis Solutions View All
      • Multi-Axis Solutions
      • Y-Axis Lathes
      • 5-Axis Mills
    • Lathes
      Lathes
      Lathes View All
      • Lathes
      • ST Series
      • Dual-Spindle
      • Box Way Series
      • Toolroom Lathes
      • Chucker Lathe
      • Pocket Lathe
      • Haas Bar Feeders
    • Horizontal Mills
      Horizontal Mills
      Horizontal Mills View All
      • Horizontal Mills
      • 50-Taper
      • 40-Taper
    • Rotaries & Indexers
      Rotaries & Indexers
      Rotaries & Indexers View All
      • Rotaries & Indexers
      • Rotary Tables
      • Indexers
      • 5-Axis Rotaries
      • Extra-Large Rotaries
    • Special Series
      Special Series
      Special Series View All
      • Special Series
      • EU_Series_Redirect
    • Automation Systems
      Automation Systems
      Automation Systems View All
      • Automation Systems
      • Mill Automation
      • Lathe Automation
      • Automatic Parts Loaders
      • Automation Models
    • Desktop Machines
      Desktop Machines
      Desktop Machines View All
      • Desktop Machines
      • Desktop Mill
      • Desktop Lathe
      • Control Simulator, Standard
      • Control Simulator, Premium
    • Shop Equipment
      Shop Equipment
      Shop Equipment View All
      • Shop Equipment
      • Knee Mill
      • Haas Manual Lathes
      • Haas Saws
    • Fabrication Machines
      Fabrication Machines
      Fabrication Machines View All
      • Fabrication Machines
      • Laser Cutting Machines
      • CNC Press Brakes
    • QUICK LINKS Special Series  Special Series 
      EU SERIES EU SERIES BUILD & PRICE | PRICE LIST BUILD & PRICE | PRICE LIST In-Stock Machines In-Stock Machines WHAT’S NEW WHAT’S NEW YOUR FIRST CNC YOUR FIRST CNC
      SHOPPING TOOLS
      • Build & Price a Haas
      • Price List
      • Available Inventory
      • CNCA Financing
      WANT TO TALK TO SOMEONE?

      A Haas Factory Outlet (HFO) can answer your questions, and walk you through your best options.

      CONTACT YOUR DISTRIBUTOR >
  • Options Main Menu
    • The Haas Control Value Option Packages
      Value Option Packages
      Value Option Packages View All
      • Value Option Packages
    • Product Image Spindles
      Spindles
      Spindles View All
      • Spindles
    • Product Image Tool Changers
      Tool Changers
      Tool Changers View All
      • Tool Changers
    • Product Image 4th- | 5th-Axis
      4th- | 5th-Axis
      4th- | 5th-Axis View All
      • 4th- | 5th-Axis
    • Product Image Turrets & Live Tooling
      Turrets & Live Tooling
      Turrets & Live Tooling View All
      • Turrets & Live Tooling
    • Product Image Probing
      Probing
      Probing View All
      • Probing
    • Haas Chip & Coolant Management Chip & Coolant Management
      Chip & Coolant Management
      Chip & Coolant Management View All
      • Chip & Coolant Management
    • The Haas Control The Haas Control
      The Haas Control
      The Haas Control View All
      • The Haas Control
    • Product Image Product Options
      Product Options
      Product Options View All
      • Product Options
    • Product Image Tooling & Fixturing
      Tooling & Fixturing
      Tooling & Fixturing View All
      • Tooling & Fixturing
    • Product Image Workholding
      Workholding
      Workholding View All
      • Workholding
    • Product Image 5-Axis Solutions
      5-Axis Solutions
      5-Axis Solutions View All
      • 5-Axis Solutions
      • 5 Easy Steps to 5-Axis
    • QUICK LINKS Special Series  Special Series 
      EU SERIES EU SERIES BUILD & PRICE | PRICE LIST BUILD & PRICE | PRICE LIST In-Stock Machines In-Stock Machines WHAT’S NEW WHAT’S NEW YOUR FIRST CNC YOUR FIRST CNC
      SHOPPING TOOLS
      • Build & Price a Haas
      • Price List
      • Available Inventory
      • CNCA Financing
      WANT TO TALK TO SOMEONE?

      A Haas Factory Outlet (HFO) can answer your questions, and walk you through your best options.

      CONTACT YOUR DISTRIBUTOR >
  • Why Haas Main Menu
      Discover the Haas Difference
    • Why Haas
    • MyHaas
    • Education Community
    • Industry 4.0
    • Haas Certification
    • Customer Testimonials
  • Service Main Menu
      Welcome to Haas Service
      SERVICE HOME Operator’s Manuals How-To Procedures Troubleshooting Guides Preventive Maintenance Haas Parts Haas Tooling Videos
  • Videos Main Menu
  • Main Menu
    • View All
    • View All
    • View All
    • View All
      • HTEC Curriculum Support
      • Haas Value Option Packages (VOP) Journey
    • View All
      • Haas 10 kg Cobot Package
      • Cobot Kits
      • DC-1 Drill Center
      • CNC Sales News
      • Do More With Your Haas
    • View All
    • View All
      • contact-us-test
      • 4 - AUTOMATION SYSTEMS
      • Carousel-V2
      • expert test
      • Demo_Day_Trident-test
      • Link Test
      • image-sale-tag-test
      • article-list-test
      • Haas 25 kg Robot Package
      • test-algolia-page
    • View All
    • View All
    • View All
    • View All
      • calc-test
    • View All
    • QUICK LINKS Special Series  Special Series 
      EU SERIES EU SERIES BUILD & PRICE | PRICE LIST BUILD & PRICE | PRICE LIST In-Stock Machines In-Stock Machines WHAT’S NEW WHAT’S NEW YOUR FIRST CNC YOUR FIRST CNC
      SHOPPING TOOLS
      • Build & Price a Haas
      • Price List
      • Available Inventory
      • CNCA Financing
      WANT TO TALK TO SOMEONE?

      A Haas Factory Outlet (HFO) can answer your questions, and walk you through your best options.

      CONTACT YOUR DISTRIBUTOR >
  • Haas Tooling Main Menu
  • Haas Service Parts Main Menu

My Haas Welcome,
!
Haas Tooling MyHaas/HaasConnect Sign In Register Haas Tooling MyHaas/HaasConnect Sign Out Welcome, My Machines Latest Activity My Quotes My Account My Users Sign Out
Find Your Distributor
  1. Select Language
    1. English
    2. Deutsch
    3. Español - ES
    4. Español - MX
    5. Français
    6. Italiano
    7. Português
    8. Český
    9. Dansk
    10. Nederlands
    11. Magyar
    12. Polski
    13. Svenska
    14. Türkçe
    15. 中文
    16. Suomi
    17. Norsk
    18. الإنجليزية
    19. български
    20. Hrvatski
    21. Ελληνικά
    22. Română
    23. Slovenský
    24. Slovenščina
    25. 한국어
    26. 日本語
    27. Українська
×

Search Results

Web Pages

Images

    • <
    • 1
    • >

7 - Haas COBOT-F - Maintenance

Haas COBOT-F Package - Operators / Service Manual


  • 1 - Haas COBOT-F - Introduction
  • 4 - HC20KG-F - Installation
  • 7 - Haas COBOT-F - Maintenance
  • 8 - Haas COBOT-F - Troubleshooting

Go To :

  • 7.1 Cobot-F Maintenance Schedule
  • 7.2 HC20KG-F Operating Space & Joint Travel Limits
  • 7.3 Mastering and Quick Mastering
  • 7.4 Joint Module Battery Replacement

7.1 Maintenance

Recently Updated

COBOT-F Maintenance


Revision A - 03/2026

Maintenance Schedule

Maintenance Item Interval
Clean ventilation fans on control box  3 months
Check pneumatic gripper air pressure and hoses 1 month
Check the cobot arm for damage. Look for scratches, cracked covers, etc 3 months
Check and clean coolant/oil from arm 3 months
Check teach pendent and cable is operational 1 year
Check if gripper mounting bolts and pedestal mounting bolts have loosened 1 year
Change batteries for absolute encoders 3 years
   
Recently Updated

HC20KG-F - Operating Space and Joint Travel Limits


Revision A - 03/2026

Operating Space

The HC20KG-F has a defined operating space as shown below. The end of the gripper mounting flange can reach 1418mm out from the center of the base.

The J5-axis rotational center can reach 1250mm from the center of the base.

Joint Travel Limits

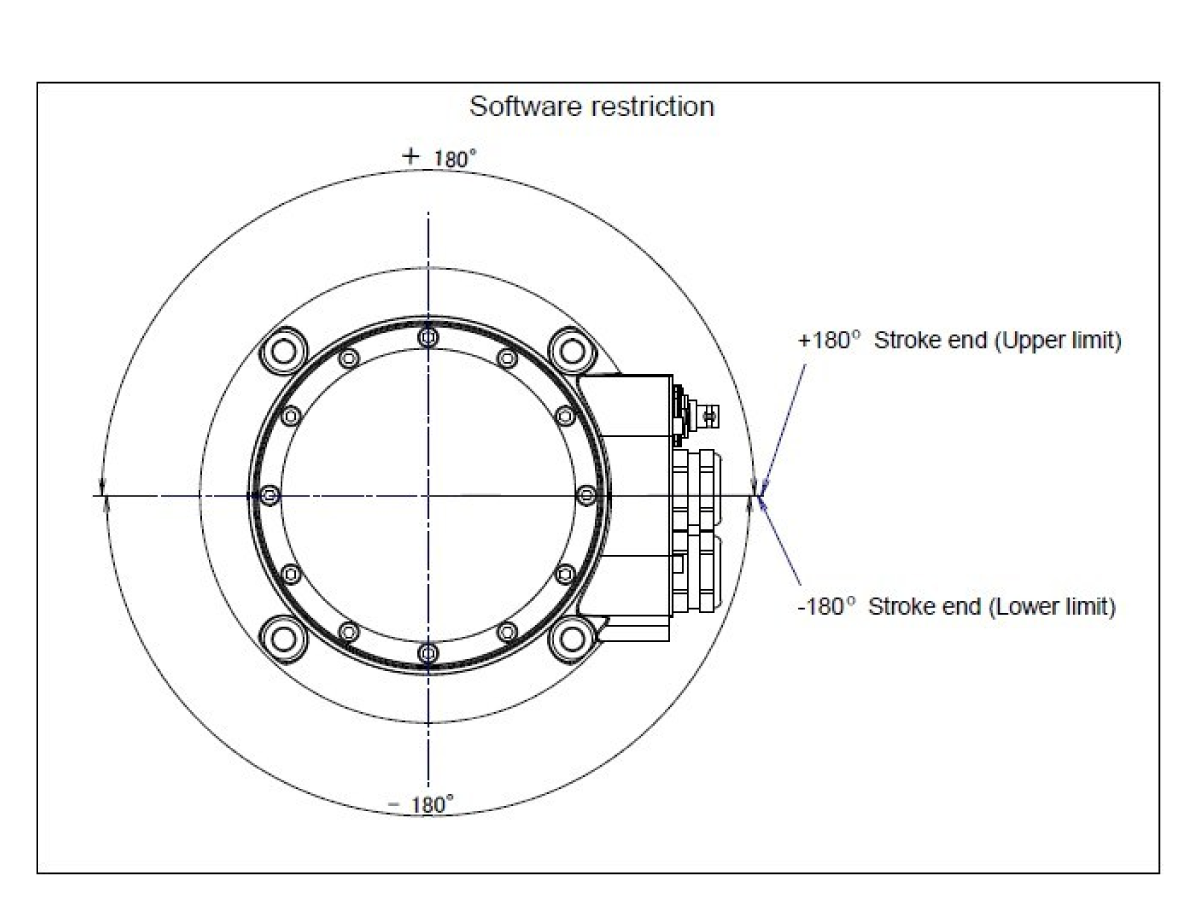
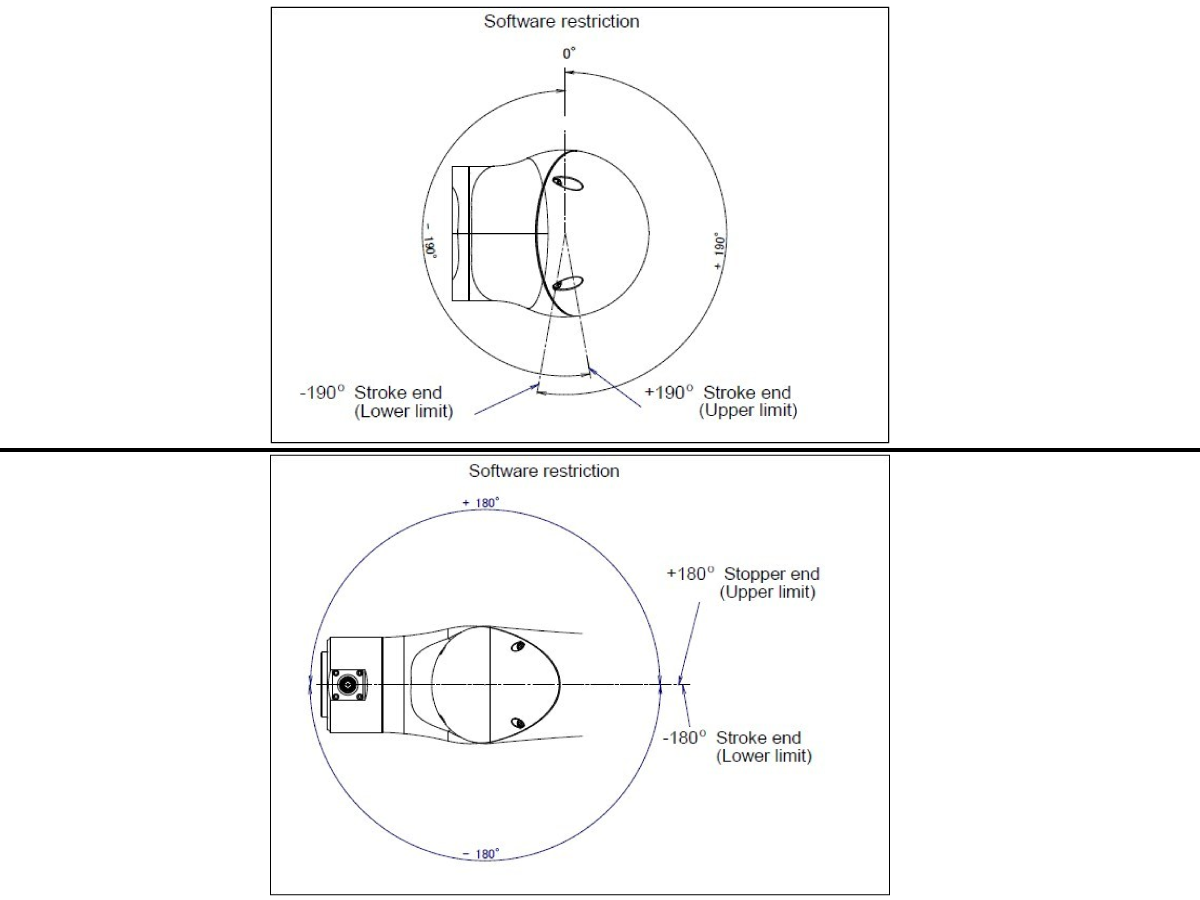
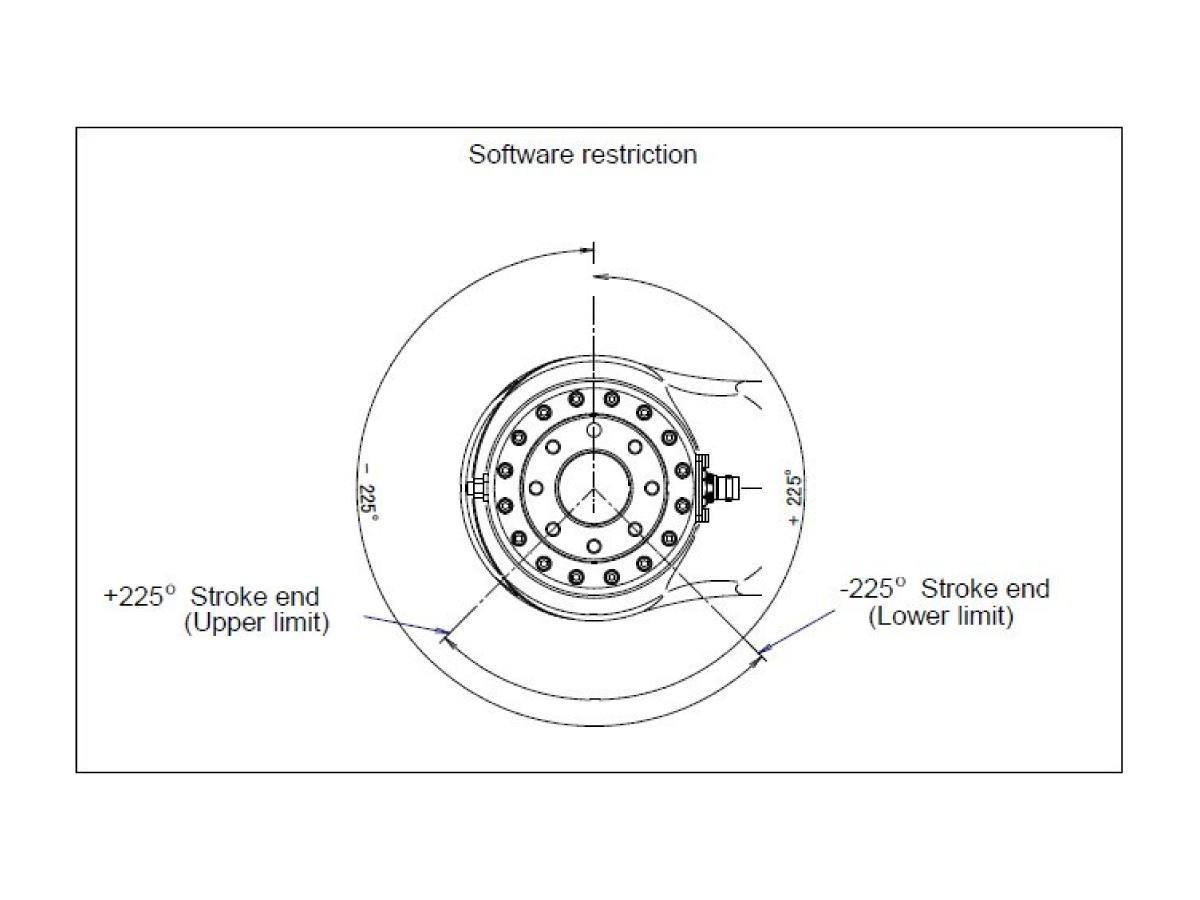
Below are the joint limits shown for each axis. There are software restrictions put in place to protect the arm from potential damage. 

The "+" angle value indicates the degrees you can rotate in the positive direction from the zero position before reaching a travel limit.

The "-" angle value indicates the degrees you can rotate the joint in the negative direction from the zero position before reaching a travel limit.

Note: The travel limits for joint-2 and joint-3 are dependent on the position of the other axis. So the travel limit for joint-3 will change as the position of joint-2 changes.

Joint 1 Travel Limit

Joint 2 & 3 Travel Limit

Joint 4 & 5 Travel Limit

Joint 6 Travel Limit

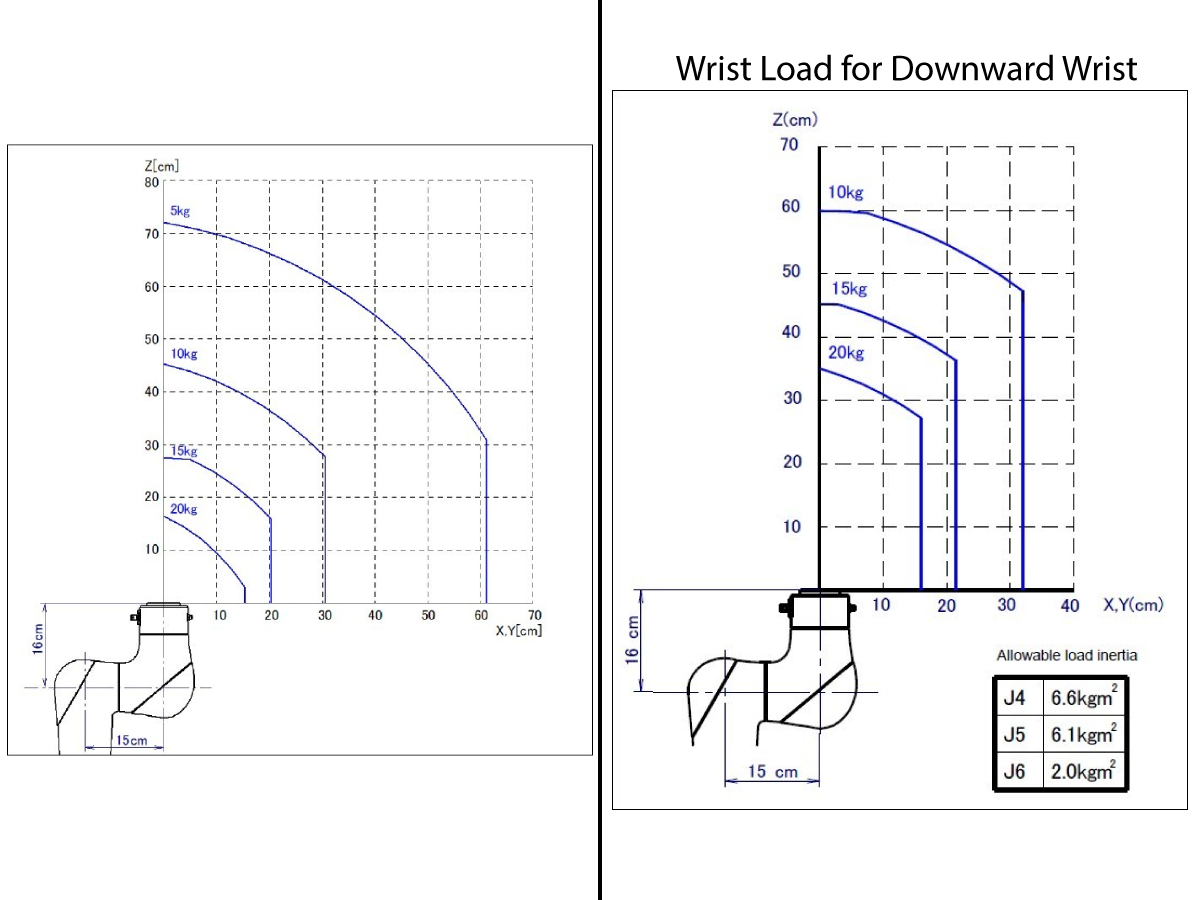
Wrist Load Conditions

7.3 Mastering and Quick Mastering

Recently Updated

Cobot-F - Mastering and Quick Mastering


Revision A - 03/2026

Introduction

This section details how to perform mastering using the teach pendent.

Mastering is necessary in some situations where the pulse counter batteries died, or the arm position moved while power was OFF.

Follow the steps below for mastering the cobot and resetting the pulse counter alarms.

Quick Mastering

1

Follow this video to connect to the virtual teach pendent on a laptop.

2

Go into the Navigate iPendent to check Master/Cal is enabled.

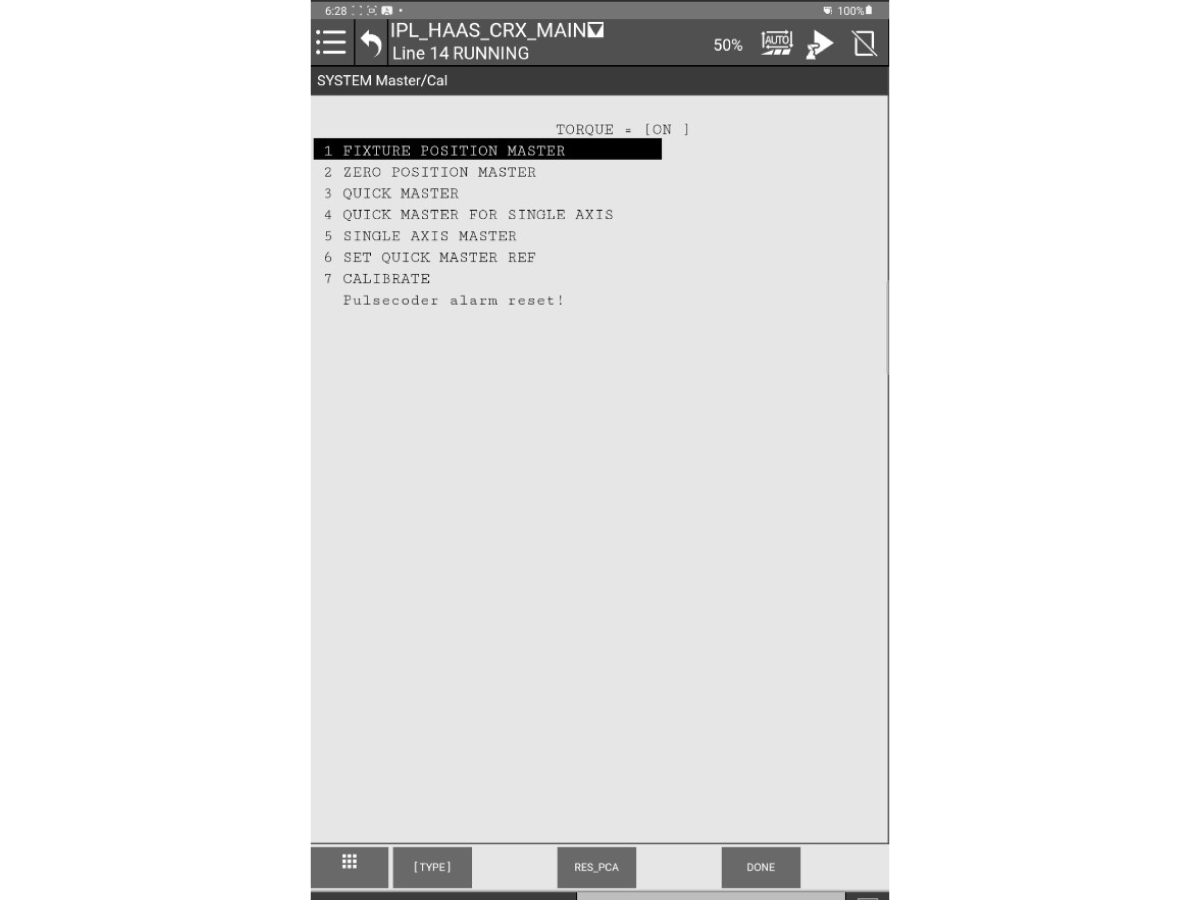
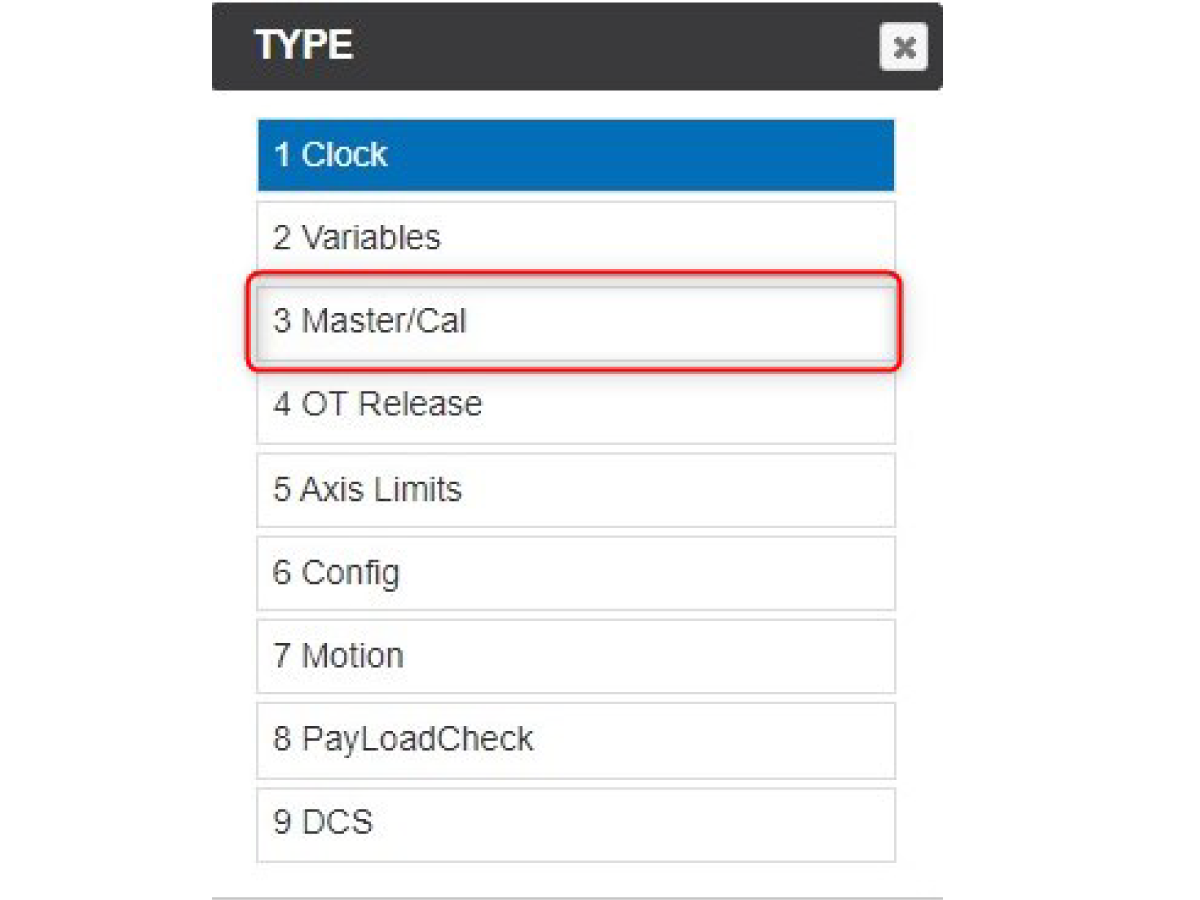
Click MENU>NEXT>SYSTEM>Master/Cal, it will pop-up in the list on the screen as shown.

Skip this step if Master/Cal is already enabled.

If it is not enabled, follow these steps:

  •  Go to the System Variables screen: MENU>NEXT>SYSTEM>Variables
  • Scroll down to $MASTER_ENB
  • Set $MASTER_ENB to 1 by pressing 1 and pressing enter

3

Reset Pulsecoder Alarm

Go the the Master/Cal screen: MENU>NEXT>SYSTEM>Master/Cal

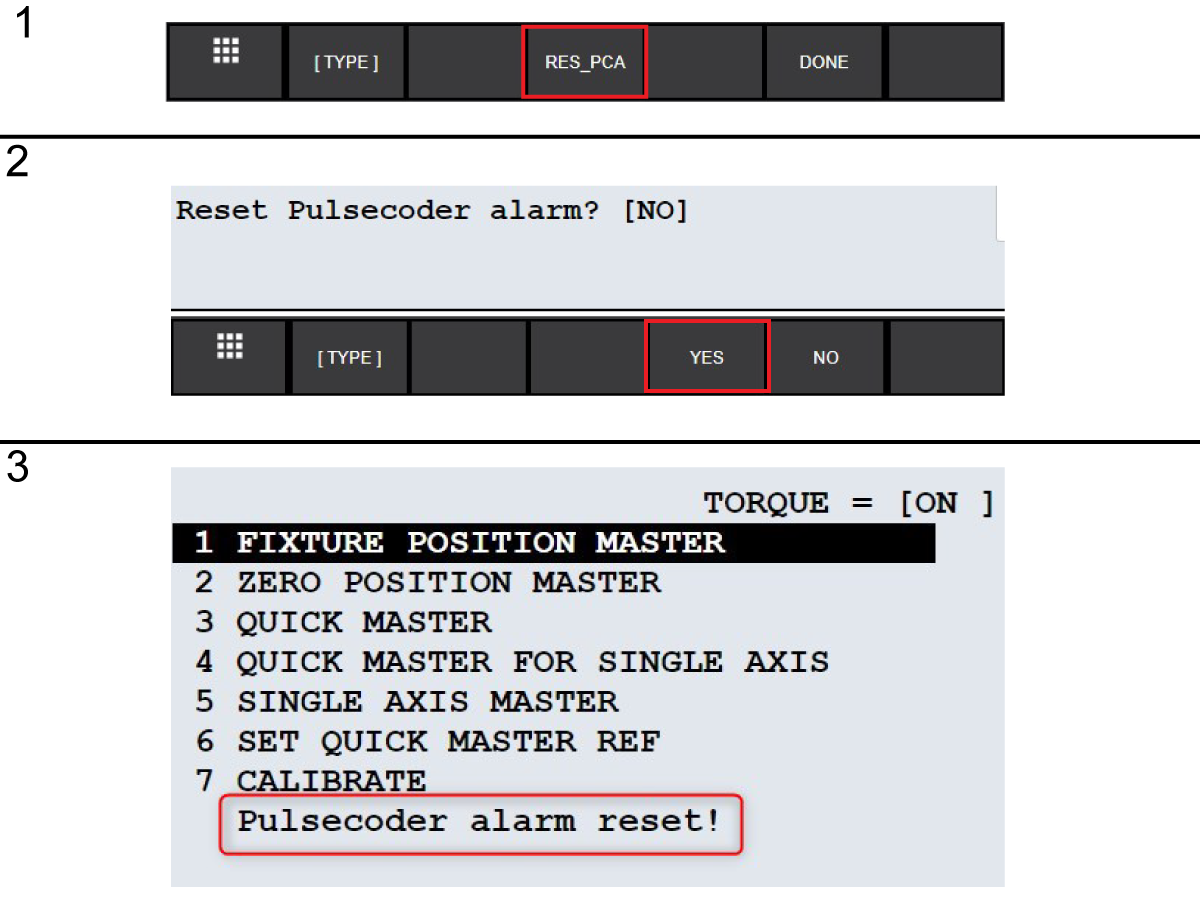
Click RES_PCA [1], the pendent will display a message asking if you want to reset pulsecoder alarms.

Click Yes [2], a message will appear as shown that says 'Pulsecoder alarm reset!' [3]

After the pulsecoder alarm has been reset, cycle power on the robot. DO NOT cycle power on the machine.

4

Re-establish pulse for each axis

When axes lose power, the pulse on each axis needs to be re-established. This is done by jogging each joint at least 10-20 degrees in each direction.

Follow these steps to do this:

  • Enter the Jogging iPendent from the Robot Homepage.
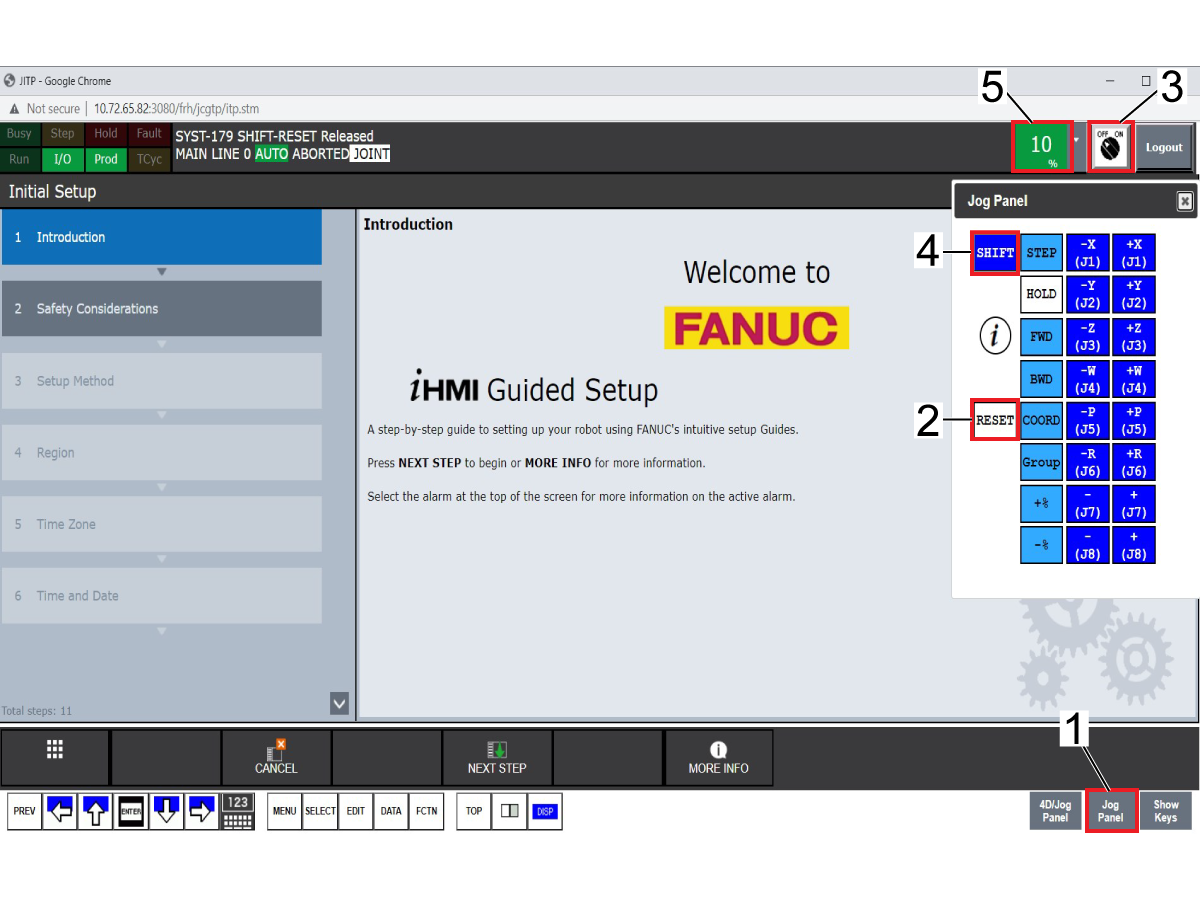
  • Click the Jog Panel button [1] to open the Jog Panel, make sure the E-Stop on the machine is released.
  • Click Reset [2] to reset all faults
  • Click the switch [3] to turn it on
  • Click Shift [4] and then jog the joints

Note: If an alarm pops up while jogging, reset the alarm and lower the jogging rate [5] until the arm is able to be jogged again. This will happen once the arm has left the DCS zone and it will need to be jogged at a slower rate.

5

Copy Master Count to Reference Count & Checking the Zero Reference Position

Go back to the Navigate iPendent.

Copy the Master Count values to the Reference Count values by doing the following:

  • Go to the System Variables screen: MENU>NEXT>SYSTEM>TYPE>Variables
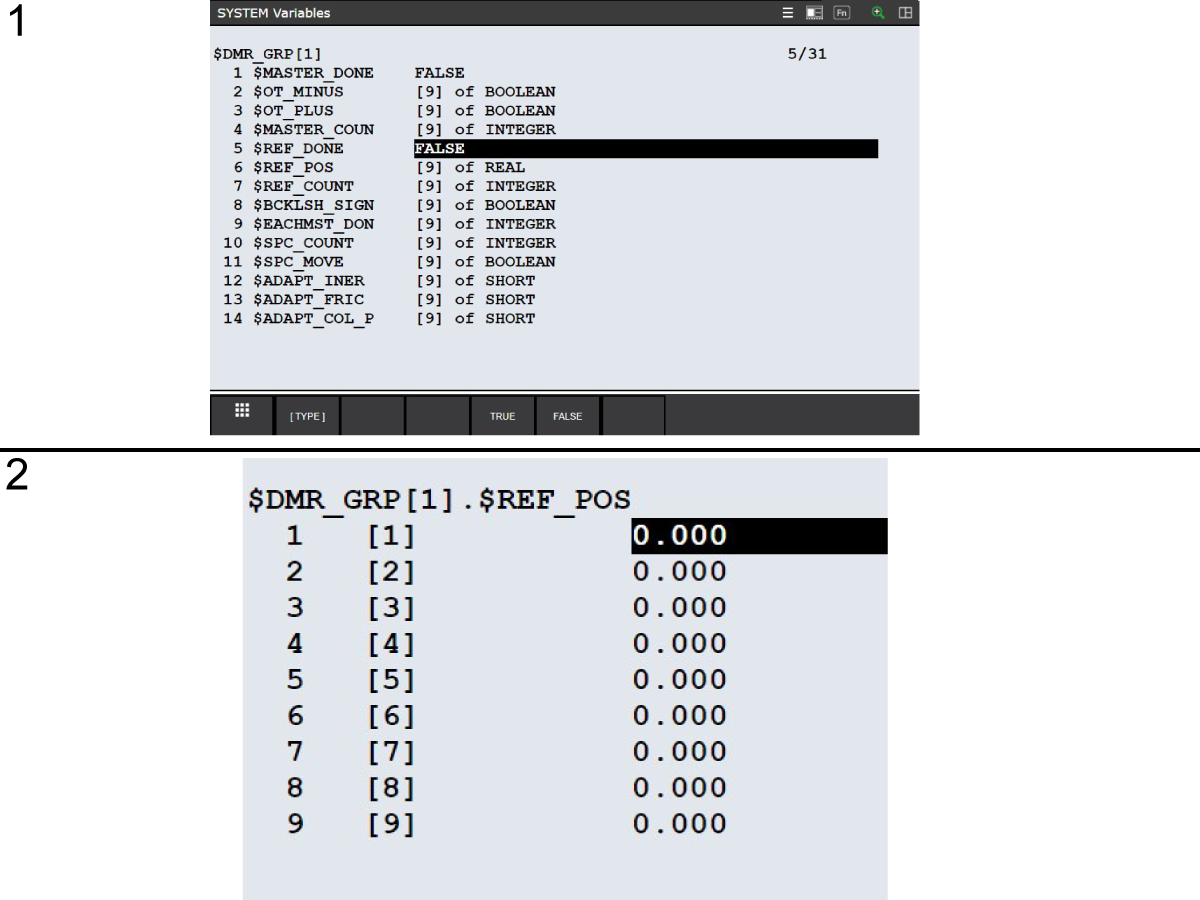
  • Scroll down to $DMR_GRP (should be number 199) and once it is highlighted, hit ENTER twice and the variables shown in [1] should be on the screen.
  • Scroll to $MASTER_COUNT and click DETAIL when it is highlighted. Take note of these values.
  • Press PREV to go back to the variable list and then go into the $REF_COUNT by pressing DETAIL when it is highlighted. Copy the values from the $MASTER_COUNT by typing them in and pressing enter to change the values.
  • Press PREV to go back to the variable list and set $REF_DONE to TRUE

While still inside $DMR_GRP[1] System Variables, go to $REF_POS and make sure the axis values are set to a value of 0 as shown in [2].


6

Line Up Witness Marks

Go back to the Jogging iPendent, open the Jog Panel and turn on the switch.

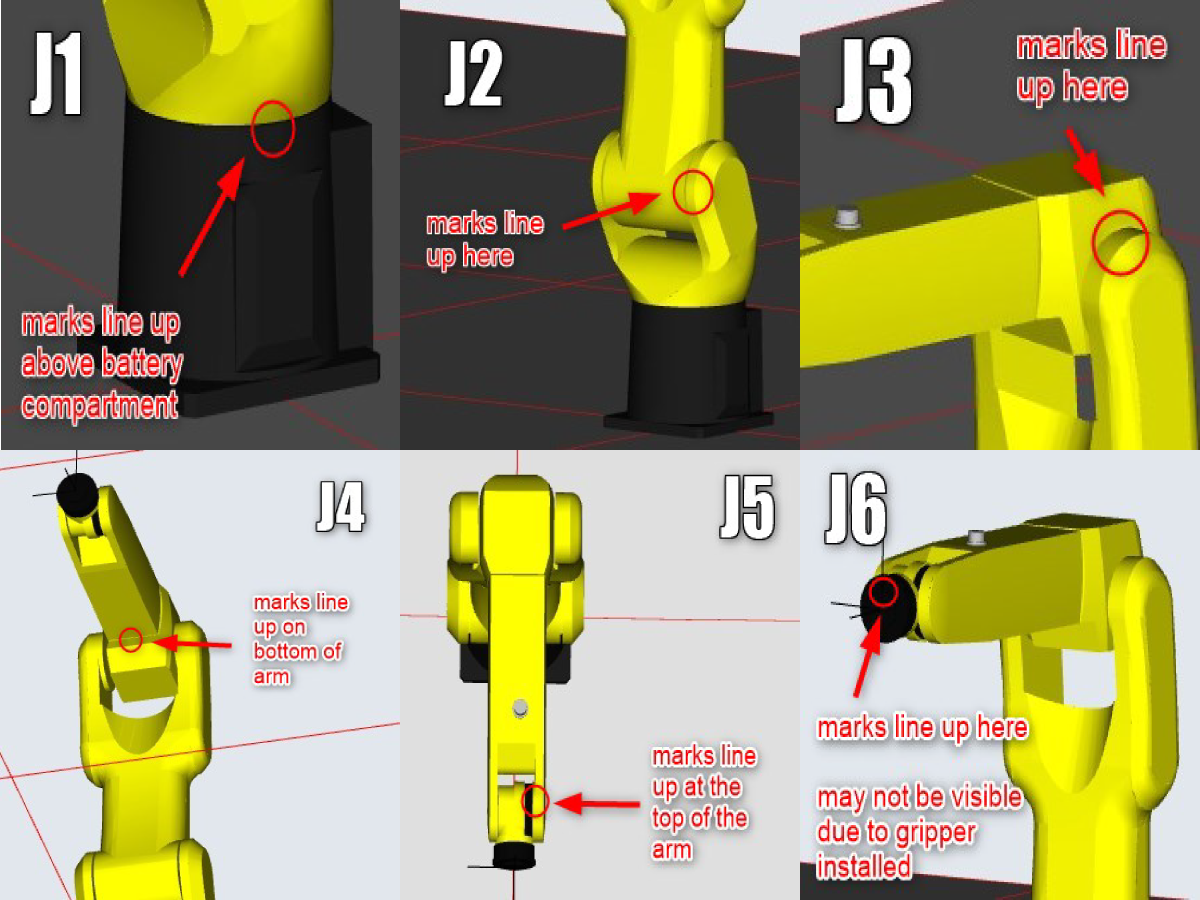
Jog each joint so that the witness marks line up, use the image shown to locate the positions of the witness marks on HRP-1.

For HRP-1 witness mark locations, see page 76 of the HRP-1 Mechanical Unit Operator's Manual in the link below.

For HRP-2 witness mark locations, see page 82 of the HRP-2 Mechanical Unit Operator's Manual in the link below.

For HRP-3 witness mark locations, see page 117-118 of the HRP-3 Mechanical Unit Operator's Manual in the link below.

Note: The witness marks on Joint 6 may not be visible, remove the gripper and make sure the dowel pin hole is positioned upward.

HRP-1 Fanuc Robot M-200iD Mechanical Unit Operator's Manual
HRP-2 Fanuc Robot M-20iD/25 Mechanical Unit Operator's Manual
HRP-3 Fanuc Robot M-710iC/50 Mechanical Unit Operator's Manual

7

Quick Master and Calibrate

After lining up the witness marks, the robot is at its zero position.

Go to Master/Cal screen: MENU>NEXT>SYSTEM>Master/Cal 

Note: if Master/Cal is not showing up, go back to step 2 to enable it again.

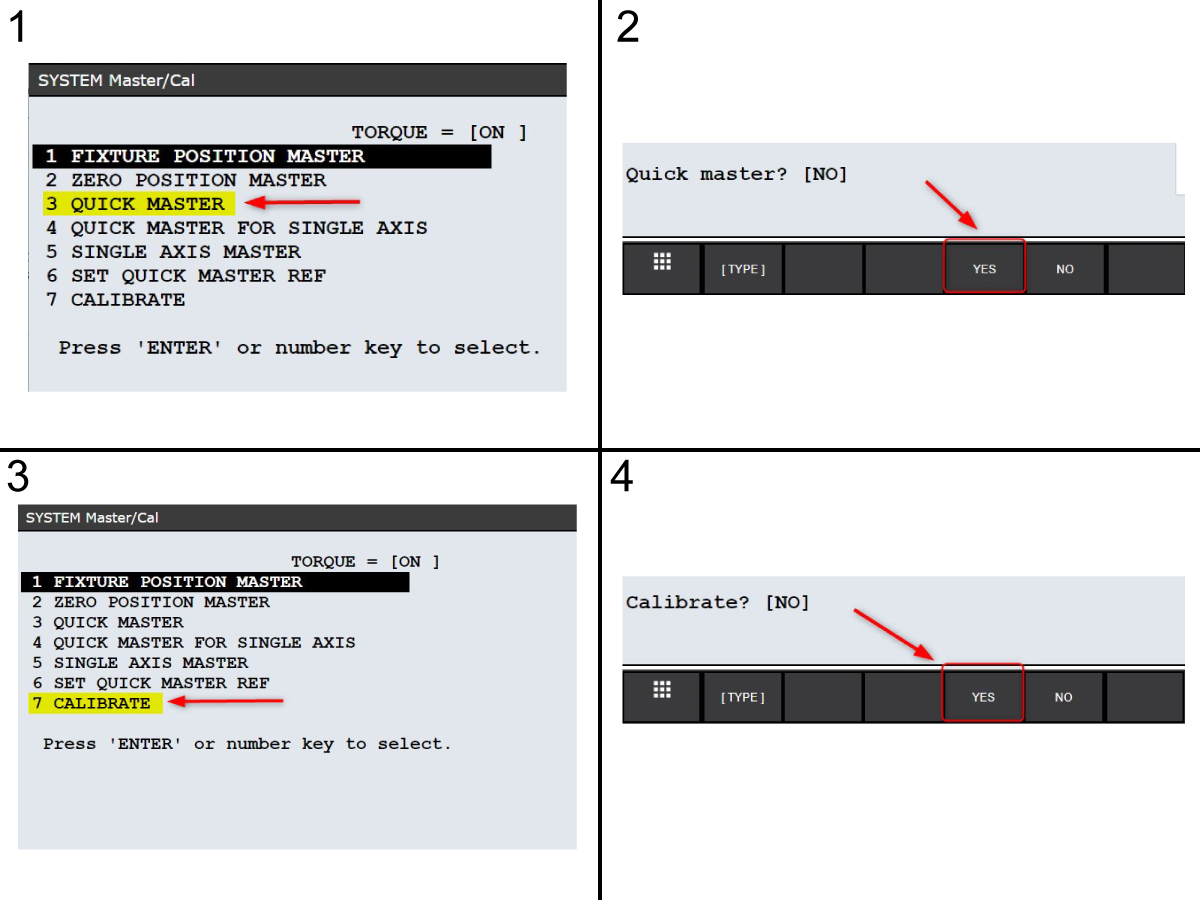
Scroll to QUICK MASTER and press ENTER to select [1].

A message will appear asking if you want to quick master, click YES [2].

A message will appear saying that the Robot has been mastered.

While still in Mast/Cal mode, scroll to CALIBRATE and press ENTER [3].

Click YES when the screen asks if you want to calibrate [4].

A message will display saying that the robot has been calibrated, then press DONE.

8

Apply DCS Parameters

After quick mastering and calibrating, the robot will be in a faulted state until you apply DCS parameters.

Go into the Jogging iPendent mode.

Go to the DCS menu: MENU>NEXT>SYSTEM>DCS

Scroll down to option 13 - Mastering parameters.

Click APPLY to apply the changes and press OK.

Enter 1111 for the Master Code.

Cycle power on the robot.


9

Verify Quick Mastering

Move all joints to zero and check to see if the lines on both sides of the joint are lined up. If they are not lined up, repeat the procedure.

Mastering

Recently Updated

COBOT-F Joint Module Battery Replacement


AD0939

Revision B - 02/2026

Introduction

The servo motors for each joint rely on battery power to keep track of their position when the cobot control box is powered OFF. 

If the batteries die, the cobot will lose track of its position and you will need to reset the zero position of the cobot when it is first powered ON after the batteries have died.

It is recommended to change out the batteries every 2 years to prevent them from dying unexpectedly.

This procedure applies to the following service kits:

  • 93-5889 - BATTERY COBOT-F JOINT REPLACEMENT

Important: 93-5889 only contains 1 battery. HC20KG-F requires 2 batteries so you need to order 2x 93-5889 to replace all the batteries. 

If the batteries died unexpectedly, follow this procedure to replace the batteries and then refer to section 7.3 Mastering and Quick Mastering to remaster the joint positions.

Remove Batteries

1

Make sure that the control box is powered ON before you begin replacing the batteries.

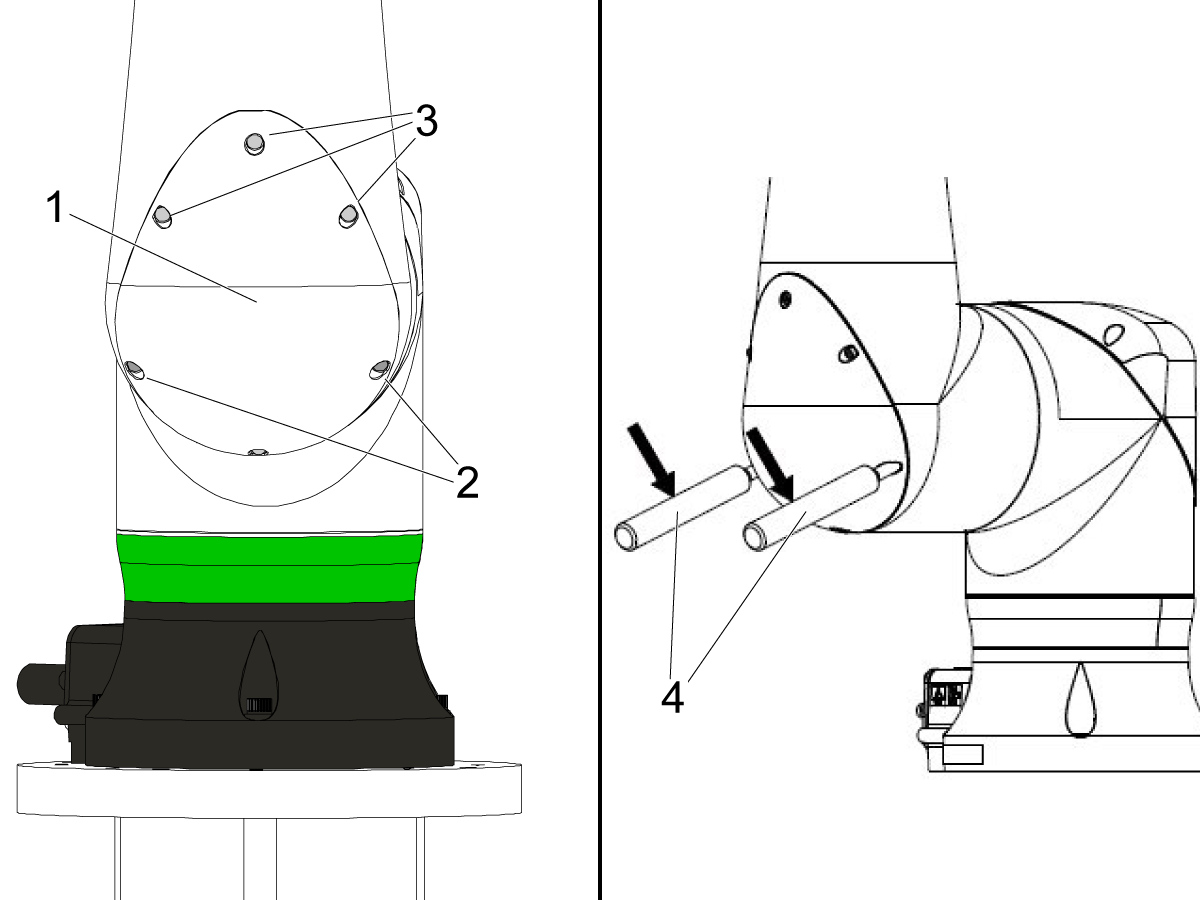
The servo batteries are located behind the cover of Joint-2 [1]

Remove the 2 side screws from the lower part [2] of the Joint-2 cover.

Loosen the remaining screws [3] of the cover.

Use two pins [4] to help free the cover from the joint. Apply force down on the pins as shown in the image to loosen the cover.

Remove the remaining M4 fasteners [1] once the cover is loose.

Remove the cover and the gasket [2] to gain access to the internal components inside Joint-2 where the batteries are located.

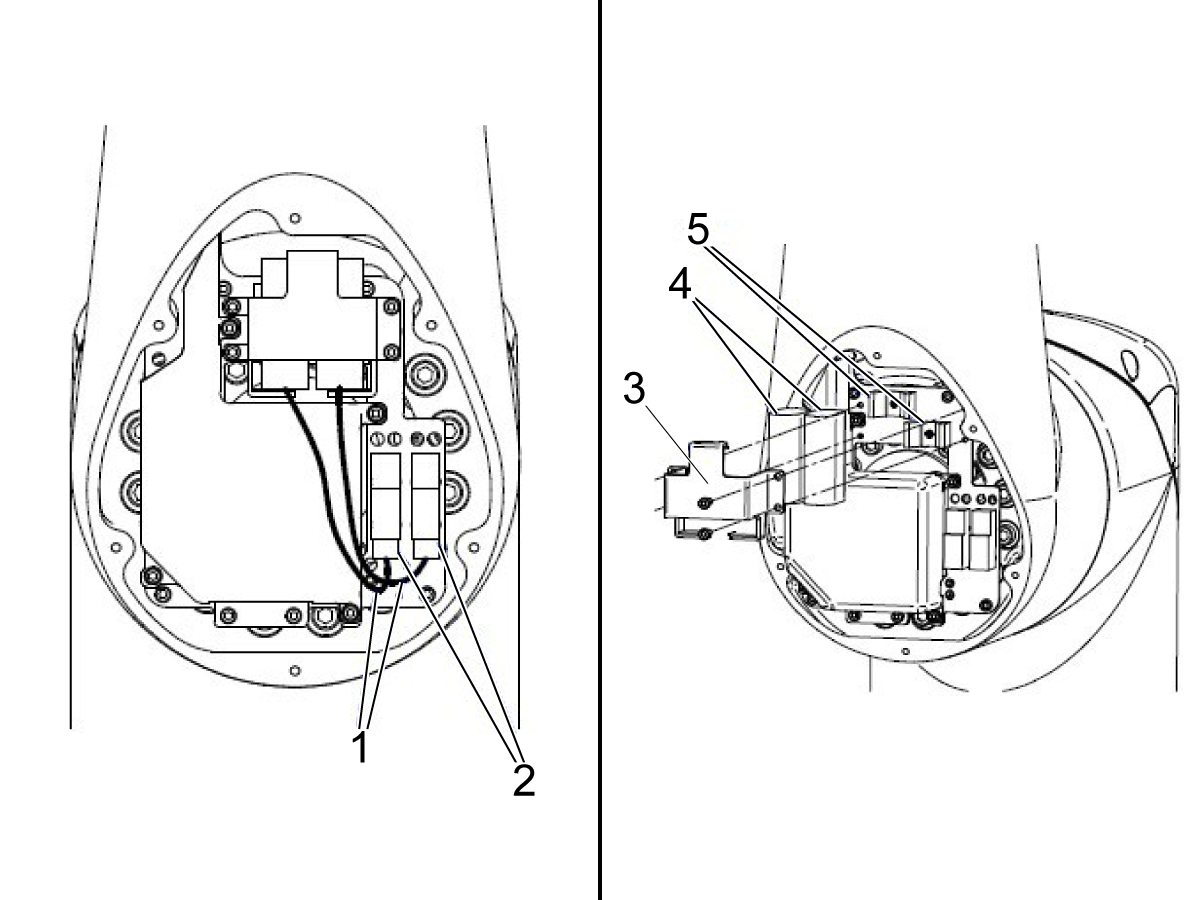
Locate the battery cables [1] going to the right side of the connector.

Disconnect the battery connectors [2].

Loosen the screws that hold the battery cover [3].

Remove the two batteries [4] from the battery clips [5] and note the orientation of the batteries.

Install Replacement Batteries

Install the replacement batteries from 93-5889 into the battery clips. Reinstall the battery cover that was removed in the previous section.

Then reconnect the battery cables to the connectors. 

Reinstall the gasket and the joint cover using the M4 SHCS.  Do not over torque the cover fasteners. Torque them to 4.5 Nm.

After reinstalling all the components that were removed, jog each joint of the cobot to the zero position to ensure the mastering positions do not need to be reset. 

 Note: If you are replacing the batteries because the cobot generated an alarm and the batteries are dead, then you need to continue onto section 7.3 Mastering and Quick Mastering to remaster the cobot.

Recently Viewed Items

You Have No Recently Viewed Items Yet

Feedback
Haas Logo

Haas Delivered Price

This price includes shipping cost, export and import duties, insurance, and any other expenses incurred during shipping to a location in France agreed with you as a buyer. No other mandatory costs can be added to the delivery of a Haas CNC Product.

KEEP UP WITH THE LATEST HAAS TIPS AND TECHNOLOGY...

Sign up now!   

HAAS TOOLING ACCEPTS THE FOLLOWING:

  • Service & Support
  • Owners
  • Request Service
  • Operator Manuals
  • Haas Parts
  • Rotary Repair Request
  • Pre-Install Guides
  • Shopping Tools
  • Build & Price a New Haas
  • Available Inventory
  • The Haas Price List
  • CNCA Financing
  • About Haas
  • Accessibility Statement
  • DNSH Statement
  • Export Compliance
  • Careers
  • Certifications & Safety
  • Contact Us
  • History
  • Terms & Conditions
  • Haas Tooling Terms & Conditions
  • Privacy
  • Warranty
  • Haas Community
  • Haas Certification Program
  • Haas Motorsports
  • Gene Haas Foundation
  • Haas Technical Education Community
  • Events
  • Join the Conversation
  • Facebook
  • X
  • Flickr
  • YouTube
  • LinkedIn
  • Instagram
  • TikTok
© 2026 Haas Automation, Inc – CNC Machine Tools

This site is protected by reCAPTCHA and the Google Privacy Policy and Terms of Service apply.

2800 Sturgis Rd., Oxnard, CA 93030
Toll Free: (888) 817-4446 / Fax: 805-278-8554