MyHaas 환영합니다,
!
Haas Tooling 게스트 주문 이력 MyHaas/HaasConnect 로그인 등록 Haas Tooling 내 계정 Order History Return History MyHaas/HaasConnect 로그아웃 환영합니다, 내 기계 최근 활동 내 견적 내 계정 내 사용자 로그아웃
0
담당 대리점 찾기
  1. 언어 선택
    1. English
    2. Deutsch
    3. Español - España
    4. Español - México
    5. Français
    6. Italiano
    7. Português
    8. Český
    9. Dansk
    10. Nederlands
    11. Magyar
    12. Polski
    13. Svenska
    14. Türkçe
    15. 中文
    16. Suomi
    17. Norsk
    18. الإنجليزية
    19. български
    20. Hrvatski
    21. Ελληνικά
    22. Română
    23. Slovenský
    24. Slovenščina
    25. 한국어
    26. 日本語
    27. Українська
  • 기계 Main Menu
    • Haas 수직 밀 수직 밀
      수직 밀
      수직 밀 View All
      • 수직 밀
      • VF 시리즈
      • 유니버설 기계
      • VR 시리즈
      • VP-5 프리즈매틱
      • 팔레트 교환 VMC
      • 미니밀
      • 몰드 기계
      • 고속 드릴 센터
      • 드릴/탭/밀 시리즈
      • 툴룸 밀
      • 컴팩트 밀
      • 갠트리 시리즈
      • SR 시트 라우터
      • 초대형 VMC
      • 이중 컬럼 밀
      • 제어 시뮬레이터
      • 밀 자동 공작물 적재장치
      • VMC/UMC 측면 적재 자동 공작물 적재장치
      • 컴팩트한 자동 공작물 적재장치
    • Product Image 멀티 축 솔루션
      멀티 축 솔루션
      멀티 축 솔루션 View All
      • 멀티 축 솔루션
      • Y축 선반
      • 5축 밀
    • Haas 선반 선반
      선반
      선반 View All
      • 선반
      • ST 시리즈
      • 이중 스핀들
      • 박스 웨이 시리즈
      • 툴룸 선반
      • 척커 선반
      • HAAS 봉재 이송장치 V2
      • 선반 자동 공작물 적재장치
    • Haas 수평 밀 수평 밀
      수평 밀
      수평 밀 View All
      • 수평 밀
      • 50-테이퍼
      • 40-테이퍼
    • Haas 로터리 및 인덱서 로터리 및 인덱서
      로터리 및 인덱서
      로터리 및 인덱서 View All
      • 로터리 및 인덱서
      • 회전 테이블
      • 인덱서
      • 5축 로터리
      • 초대형 로터리
    • Product Image 자동화 시스템
      자동화 시스템
      자동화 시스템 View All
      • 자동화 시스템
      • 밀 자동화
      • 선반 자동화
      • 자동화 모델
    • Haas 드릴 센터 데스크톱 기계
      데스크톱 기계
      데스크톱 기계 View All
      • 데스크톱 기계
      • 데스크톱 밀
      • 데스크톱 선반
    • Haas 공장 장비 공장 장비
      공장 장비
      공장 장비 View All
      • 공장 장비
      • 밴드쏘
      • 니형 밀
      • 표면 연마기, 2550
      • 표면 연마기, 3063
      • 레이저 절삭 기계
    • 빠른 링크 특별 시리즈  특별 시리즈 
      EU 시리즈 EU 시리즈 제작 및 가격 | 가격 목록 제작 및 가격 | 가격 목록 재고품 기계 재고품 기계 신제품 신제품 첫 CNC 첫 CNC
      공구 쇼핑
      • Haas 제품 제작 및 가격
      • 가격 목록
      • 사용 가능한 재고
      • CNCA 파이낸싱
      상담을 받고 싶으신가요?

      Haas Factory Outlet (HFO)은 고객님의 질문에 답변을 드리며 가장 좋은 선택지를 안내해 드립니다.

      CONTACT YOUR DISTRIBUTOR >
  • 옵션 Main Menu
    • Product Image 스핀들
      스핀들
      스핀들 View All
      • 스핀들
    • Product Image 공구 교환장치
      공구 교환장치
      공구 교환장치 View All
      • 공구 교환장치
    • Product Image 4 | 5축
      4 | 5축
      4 | 5축 View All
      • 4 | 5축
    • Product Image 터렛 및 라이브 툴링
      터렛 및 라이브 툴링
      터렛 및 라이브 툴링 View All
      • 터렛 및 라이브 툴링
    • Product Image 검사
      검사
      검사 View All
      • 검사
    • Haas 칩 및 절삭유 관리 칩 및 절삭유 관리
      칩 및 절삭유 관리
      칩 및 절삭유 관리 View All
      • 칩 및 절삭유 관리
    • Haas Control Haas Control
      Haas Control
      Haas Control View All
      • Haas Control
    • Product Image 제품 선택 사항
      제품 선택 사항
      제품 선택 사항 View All
      • 제품 선택 사항
    • Product Image 툴링 및 픽스처링
      툴링 및 픽스처링
      툴링 및 픽스처링 View All
      • 툴링 및 픽스처링
    • Product Image 워크홀딩
      워크홀딩
      워크홀딩 View All
      • 워크홀딩
    • View All
    • Product Image 5축 솔루션
      5축 솔루션
      5축 솔루션 View All
      • 5축 솔루션
      • 5 Easy Steps to 5-Axis
    • Product Image 자동화
      자동화
      자동화 View All
      • 자동화
    • 빠른 링크 특별 시리즈  특별 시리즈 
      EU 시리즈 EU 시리즈 제작 및 가격 | 가격 목록 제작 및 가격 | 가격 목록 재고품 기계 재고품 기계 신제품 신제품 첫 CNC 첫 CNC
      공구 쇼핑
      • Haas 제품 제작 및 가격
      • 가격 목록
      • 사용 가능한 재고
      • CNCA 파이낸싱
      상담을 받고 싶으신가요?

      Haas Factory Outlet (HFO)은 고객님의 질문에 답변을 드리며 가장 좋은 선택지를 안내해 드립니다.

      CONTACT YOUR DISTRIBUTOR >
  • Why Haas Main Menu
      Haas의 차이를 알아보세요
    • Haas여야만 하는 이유
    • MyHaas
    • 교육 커뮤니티
    • Industry 4.0
    • Haas 인증
    • 고객 사용후기
  • 서비스 Main Menu
      Haas Service 에 오신 것을 환영합니다
      서비스 홈 조작자 설명서 방법 절차 문제해결 가이드 예방적 유지관리 Haas 부품 Haas Tooling 동영상
  • 동영상 Main Menu
×

검색 결과

Web Pages

Images

    • <
    • 1
    • >
Use the up and down arrows to select a result. Press enter to go to the selected search result. Touch device users can use touch and swipe gestures.
MyHaas 환영합니다,
!
Haas Tooling 게스트 주문 이력 MyHaas/HaasConnect 로그인 등록 Haas Tooling 내 계정 Order History Return History MyHaas/HaasConnect 로그아웃 환영합니다, 내 기계 최근 활동 내 견적 내 계정 내 사용자 로그아웃
0
담당 대리점 찾기
  1. 언어 선택
    1. English
    2. Deutsch
    3. Español - España
    4. Español - México
    5. Français
    6. Italiano
    7. Português
    8. Český
    9. Dansk
    10. Nederlands
    11. Magyar
    12. Polski
    13. Svenska
    14. Türkçe
    15. 中文
    16. Suomi
    17. Norsk
    18. الإنجليزية
    19. български
    20. Hrvatski
    21. Ελληνικά
    22. Română
    23. Slovenský
    24. Slovenščina
    25. 한국어
    26. 日本語
    27. Українська
×

검색 결과

Web Pages

Images

    • <
    • 1
    • >

Coolant Level Float Sensor - Troubleshooting Guide

서비스 홈 절삭유 레벨 플로트 센서 - 문제 해결 안내서

절삭유 레벨 플로트 센서 - 문제 해결 안내서

- 원인으로 건너뛰기 - Back to Top

16.2 Coolant Level Float Sensor - Troubleshooting Guide

Recently Updated Last updated: 04/25/2025

Coolant Float Sensor - Troubleshooting Guide


Revision A - 04/2025

Coolant Level Float Sensor Inspection Report

Download and fill out the Coolant Float Sensor Inspection Report Checklist below before replacing any parts.

Coolant Float Sensor Inspection Report

Introduction

The image shows the following components of the Coolant Float Sensor:

  1. Float [1]
  2. Potentiometer [2]
  3. Bracket [3]
  4. Power Cord [4]
  5. Potentiometer Cover (not shown for clarity)

Symptom Table

Symptom Possible Cause Corrective Action
The coolant level sensor displays an incorrect coolant level. The coolant float is installed incorrectly.  See Check Float Installation section below.
The float is blocked and cannot move.  Clear all chips from float and coolant tank. 
The factory settings 603 and 604 have the incorrect values.  Refer to Coolant Level Float Sensor - Installation for the correct parameter values.
The cable is damaged or unplugged.  Make sure that the cable is securely connected and is not damaged. 
The sensor is damaged. Check all of the wires and clear chips blocking the float. Inspect for any leaks. If issue persists, follow the Malfunctioning Sensor section below. 
Coolant level sensor displays 0% with no change when level sensor is moved up/down.  The coolant float is installed incorrectly.   See Check Float Installation section below.
The sensor is damaged or the float cannot move.  Check all of the wires and clear chips blocking the float. Inspect for any leaks. If issue persists, follow the Malfunctioning Sensor section below. 
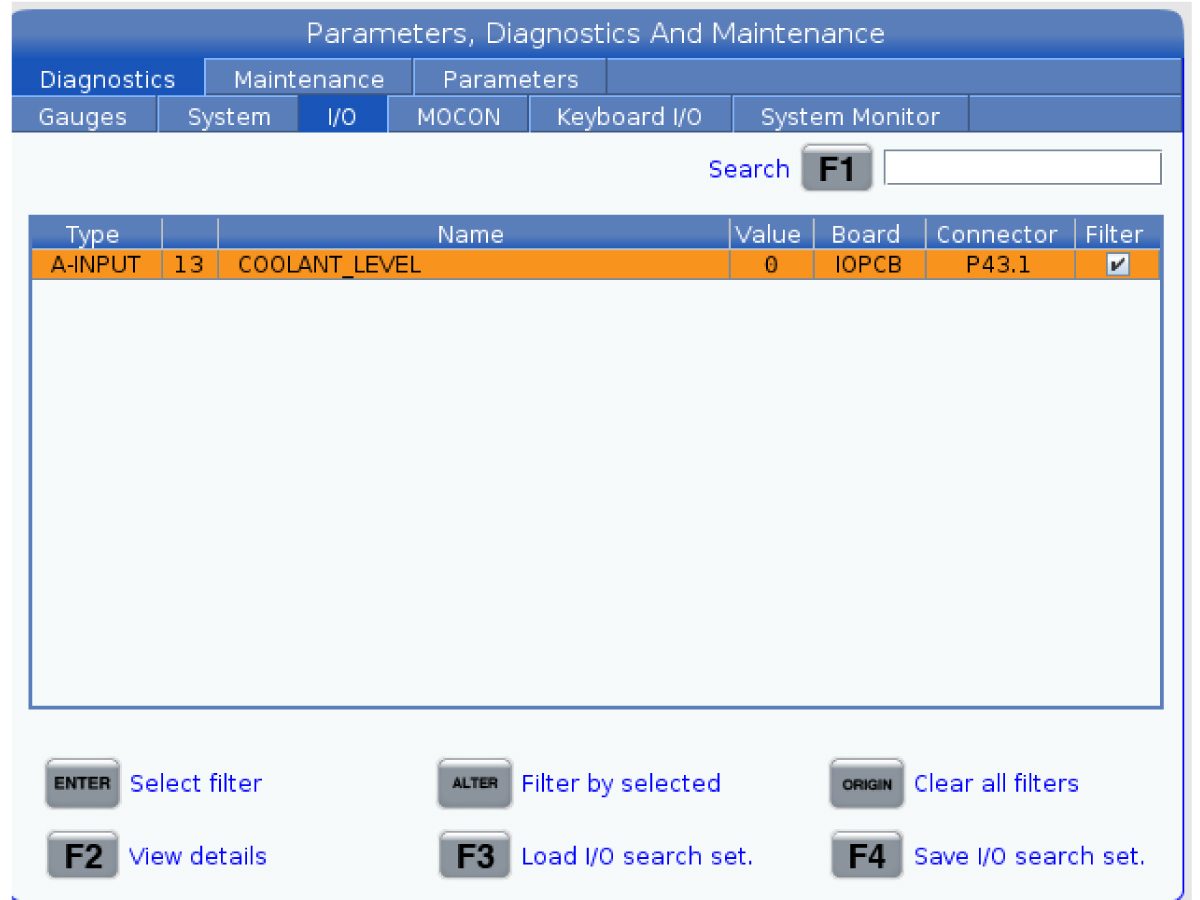
The I/O PCB isn't configured properly with the coolant level sensor.  Display analog input 13 while manually moving the coolant level float up/down. The input value should change from ~2500 to ~3150. If the input value remains the same, make sure that I/O configuration is correct. A-Input 13 should be mapped to P43.1. Refer to I/O Mapping section below. 

Low coolant alerts appearing and disappearing frequently while machine is idle.

20022 and 20023 notification occurences in Alarm History.

Coolant level is close to 50%.  Fill coolant tank until coolant touches chip filter. Ensure that coolant level is above 70% before starting any operation that requires coolant. Clear any chips and debris from coolant filter, tank and machine. If issue persists, follow the Malfunctioning Sensor section below. 

Low coolant alerts appearing and disappearing frequently while machine is cutting.

20022 and 20023 notification occurences in Alarm History.

Coolant is cycling through the machine during operations.  Fill coolant tank until coolant touches chip filter. Ensure that coolant level is above 70% before starting any operation that requires coolant. Clear any chips and debris from coolant filter, tank, and machine. If issue persists, follow the Malfunctioning Sensor section below. 

Check Float Installation

1

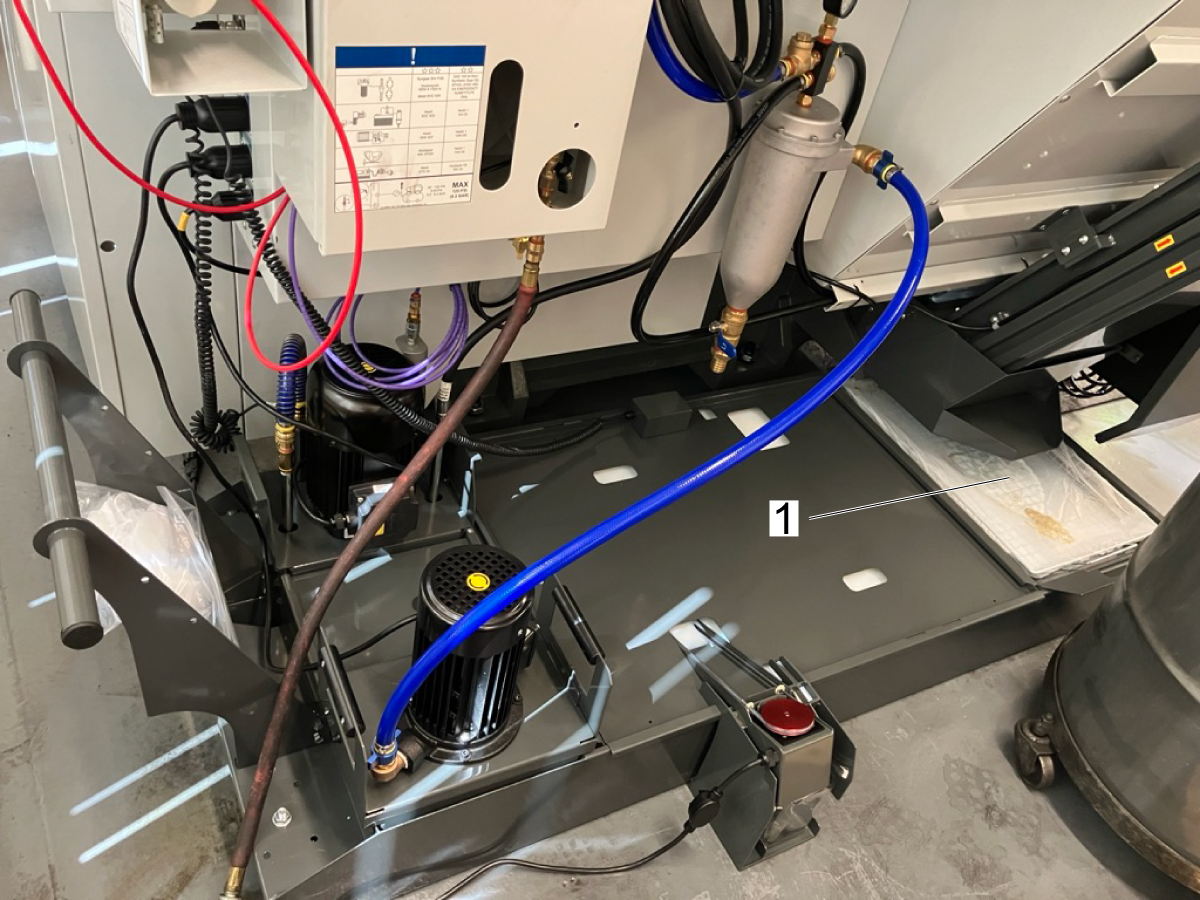
Check the orientation of the coolant tank lid. The cutout containing the coolant float [1] should be on the side of the coolant tank closest to the machine, as shown.

Ensure that the lid is sitting flat on top of the coolant tank. 

2

Check that the dimples on the coolant float are properly seated in the dimples on the coolant tank. Check that the coolant float is sitting flat on top of the lid. 

3

Re-fill coolant tank until coolant level touches the bottom of the chip filter [1]. 

Malfunctioning Sensor

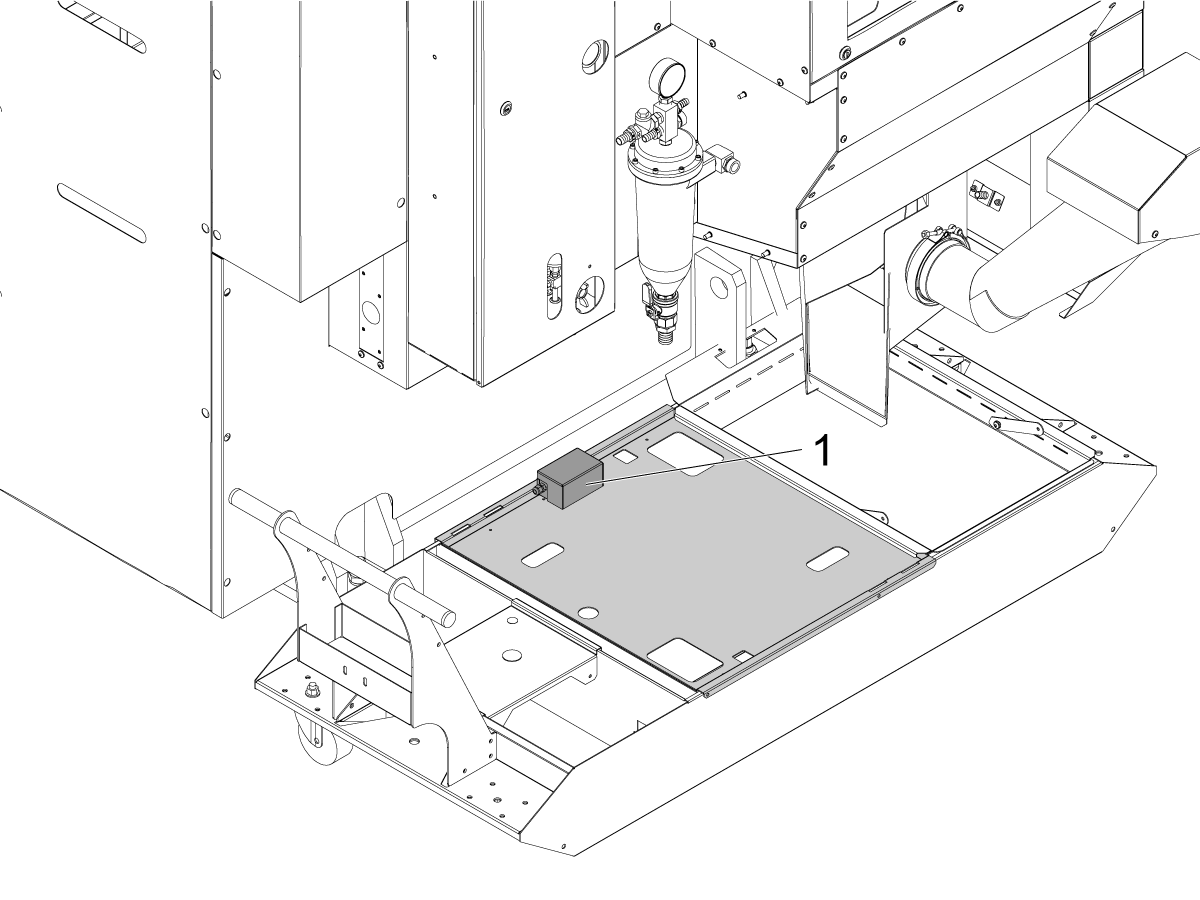
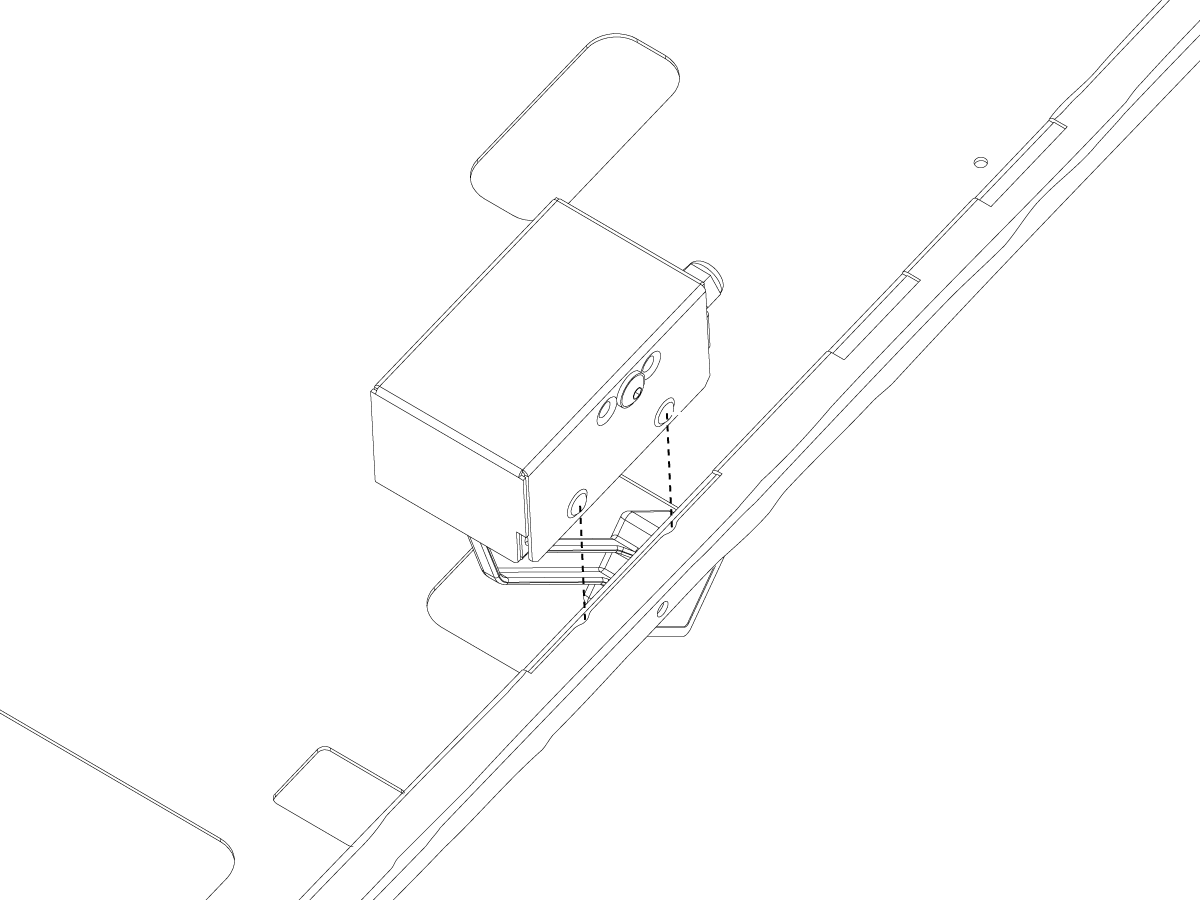
In the first image, you can see the location of the coolant level sensor on the coolant tank.

If your coolant level sensor does not display the correct level on the screen, look in the coolant tank to make sure a chip build-up does not block the float from moving freely. Also, inspect the float for any leaks to make sure no coolant has wept in. 

Corrective Action:

Make sure the coolant level sensor operates correctly:

  • Press [MEMORY]. The upper-right corner of the screen will show the coolant level.
  • Remove the coolant float sensor from the tank and manually move the float to max and min conditions.  The coolant level indicator on the screen should move at a slow pace. It takes approximately (1) minute to move from empty [2] to full [1] on the screen, but it starts to move immediately. Note the percentages that the coolant level indicator reports when the float is at min and max conditions. 
  • If the coolant level sensor does not operate correctly, unplug the coolant level sensor from the machine.


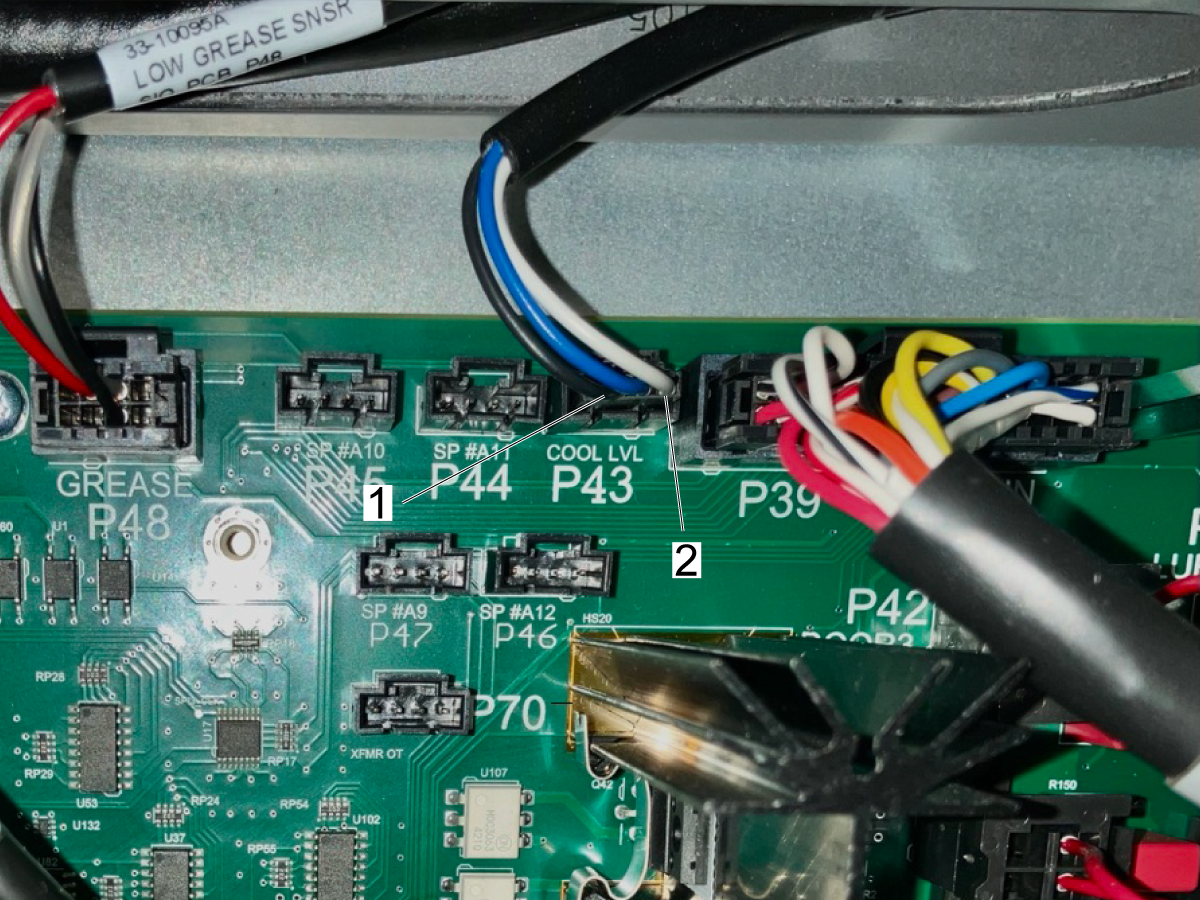
Measure the voltage across the black [1] and blue [2] wires on P43 on the I/O board when the float is up and down. The voltage should be approximately 3.8V when the float is up and 2.6V when it is down.


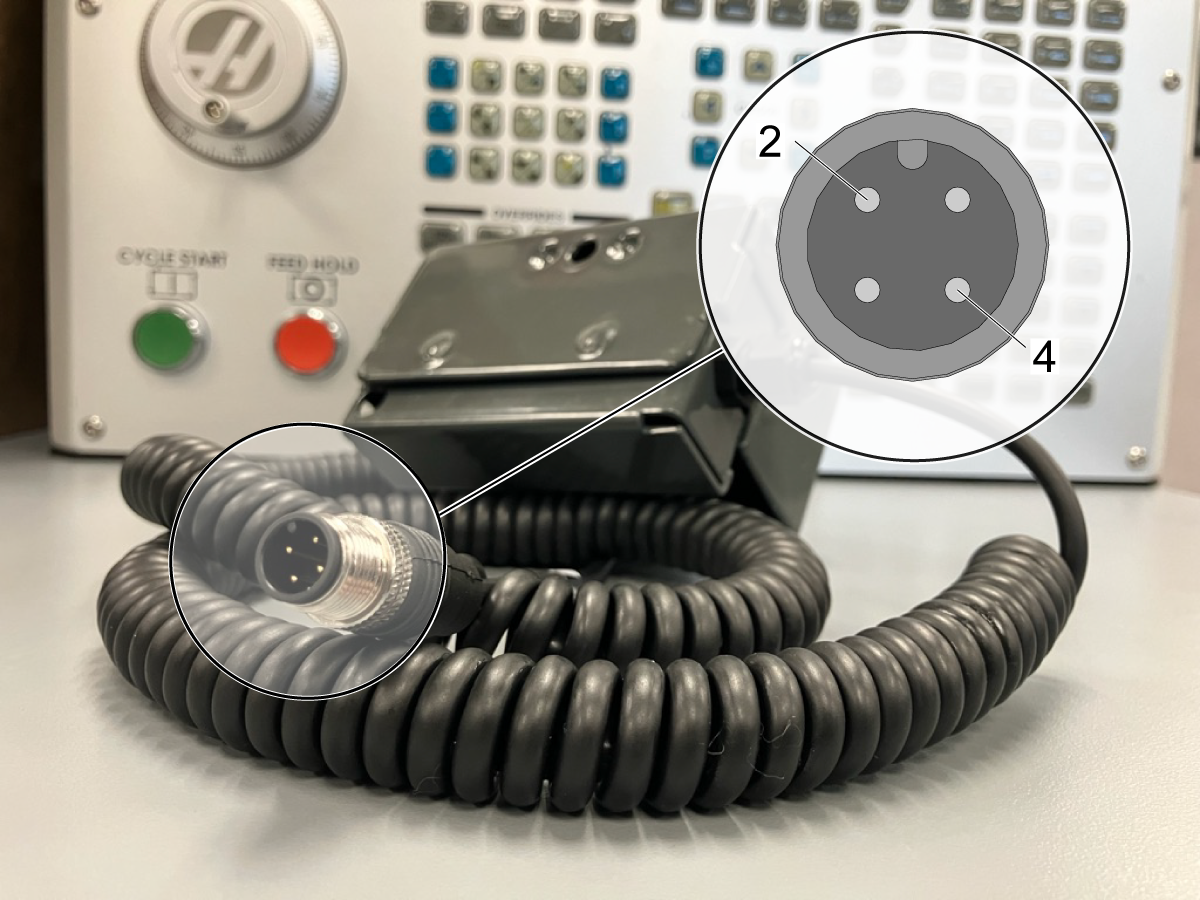
Measure the resistance at pins [2] and [4] on M12 connector when the float is up and down. The resistance should be approximately 371 Ohms when the float is up and 286 Ohms when it is down.

NOTE: Do not remove the coating around the wire, rather take the reading at the M12.


If another machine is present, test float on different machine. If the coolant level sensor continues to read incorrectly, and you have completed the troubleshooting instructions, replace the sensor.

 IMPORTANT: When returning the sensor, make sure to include an error report.

 IMPORTANT: When returning the sensor, please include the following information:

  • Machine state during malfunction (idle or cutting)
  • A video showing coolant level in the tank and on the pendant screen
  • Error Report
  • Resistance across black and white wires (see above)

I/O Mapping

The coolant level float sensor is controlled by analog input 13. The analog input uses an electronic counter to measure the input voltage signal. This input voltage signal is shown in the value section. For more information, refer to the Analog Sensors - Troubleshooting Guide. 

As the coolant lower in the tank, the less input voltage there should be. As the coolant raises in the tank, the more input voltage there should be. When moving the coolant level float, the voltage value should change from ~2500 to ~3150.

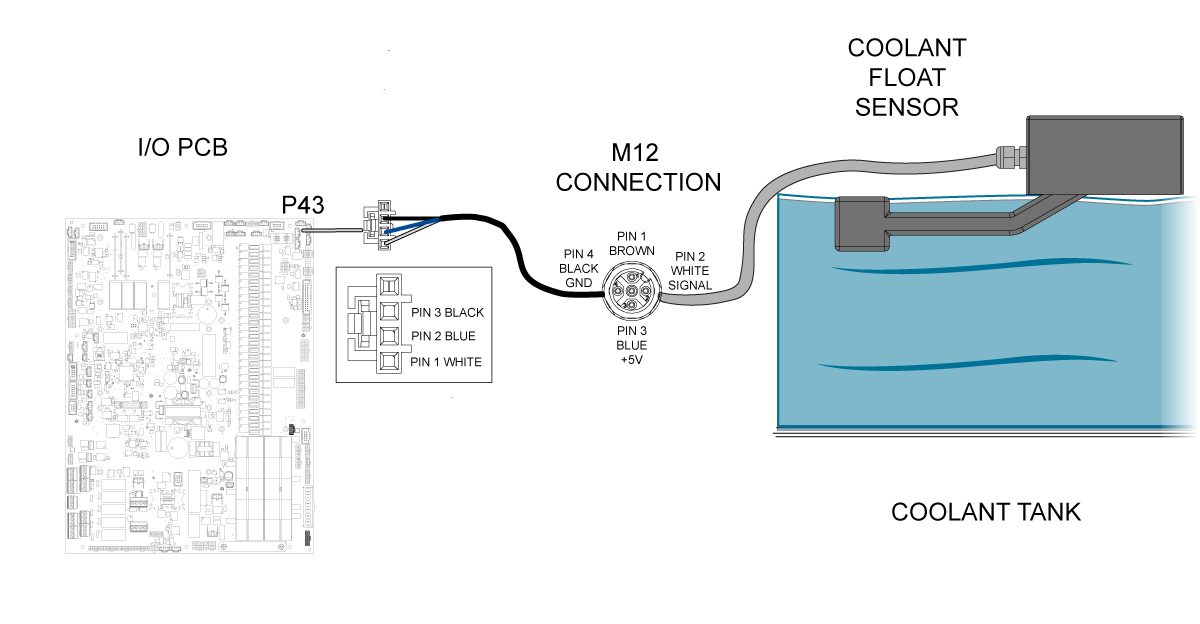
The coolant level float sensor is connected to the I/O board at pin 43 shown in the connector section. Check the end of the M12 cable that is plugged into the I/O board to make sure the voltage across pin 3 and 4. If the 5VDC is not present, then troubleshoot the I/O PCB refer to the I/O PCB - Troubleshooting Guide. 

Electrical Schematic

Recently Viewed Items

You Have No Recently Viewed Items Yet

피드백
Haas Logo

美元价格不包括关税、报关费用、保险费、增值税及运费。
USD prices DO NOT include customs duty, customs fees, insurance, VAT, or freight.

人民币价格包含关税、报关费用、货运保险和增值税, 但不包括运费。
CNY prices include customs duty, customs fees, insurance, and VAT. DOES NOT include freight.

Haas 납품 가격

이 가격에는 구매자인 귀사와 합의된 프랑스 국내 지역으로 배송 중에 발생하는 배송 비용, 수출 및 수입 관세, 보험료 및 그 외 모든 비용이 포함됩니다. Haas CNC 제품의 납품에는 그 외 의무 비용이 추가되지 않습니다.

최신 HAAS 팁 및 기술을 확인해 보세요…

지금 가입하기!   

HAAS TOOLING ACCEPTS THE FOLLOWING:

  • 서비스 및 지원
  • 소유자
  • 서비스 요청
  • 조작자 설명서
  • Haas 부품
  • 로터리 수리 요청
  • 사전 설치 가이드
  • 공구 쇼핑
  • Haas 신규 제품 제작 및 가격
  • 사용 가능한 재고
  • Haas 가격 목록
  • CNCA 파이낸싱
  • Haas 소개
  • DNSH 문
  • 채용
  • 인증 및 안전
  • 연락처
  • 이력
  • 이용약관
  • Haas Tooling 이용 약관
  • 개인정보 보호
  • 보증
  • Haas 커뮤니티
  • Haas 인증 프로그램
  • Haas Motorsports
  • Gene Haas 재단
  • Haas 기술 교육 커뮤니티
  • 이벤트
  • SNS 참여
  • Facebook
  • X
  • Flickr
  • YouTube
  • LinkedIn
  • Instagram
  • TikTok
© 2025 Haas Automation Inc. - CNC 공작 기계

This site is protected by reCAPTCHA and the Google Privacy Policy and Terms of Service apply.

2800 Sturgis Rd., Oxnard, CA 93030 / Toll Free: 800-331-6746
Phone: 805-278-1800 / Fax: 805-278-2255