My Haas Welcome,
!
Haas Tooling MyHaas/HaasConnect Sign In Register Haas Tooling MyHaas/HaasConnect Sign Out Welcome, My Machines Latest Activity My Quotes My Account My Users Sign Out
Find Your Distributor
  1. Select Language
    1. English
    2. Deutsch
    3. Español - ES
    4. Español - MX
    5. Français
    6. Italiano
    7. Português
    8. Český
    9. Dansk
    10. Nederlands
    11. Magyar
    12. Polski
    13. Svenska
    14. Türkçe
    15. 中文
    16. Suomi
    17. Norsk
    18. الإنجليزية
    19. български
    20. Hrvatski
    21. Ελληνικά
    22. Română
    23. Slovenský
    24. Slovenščina
    25. 한국어
    26. 日本語
    27. Українська
  • machines Main Menu
    • Vertical Mills
      Vertical Mills
      Vertical Mills View All
      • Vertical Mills
      • VF Series
      • Universal Machines
      • VR Series
      • VP-5 Prismatic
      • Pallet-Changing VMCs
      • Mini Mills
      • Mold Machines
      • High-Speed Drill Centers
      • Drill/Tap/ Mill Series
      • Toolroom Mills
      • Pocket Mill
      • Compact Mills
      • Gantry Series
      • SR Sheet Routers
      • Extra-Large VMC
      • Double-Column Mills
      • 3+2 Positioning Machines
    • Multi-Axis Solutions
      Multi-Axis Solutions
      Multi-Axis Solutions View All
      • Multi-Axis Solutions
      • Y-Axis Lathes
      • 5-Axis Mills
    • Lathes
      Lathes
      Lathes View All
      • Lathes
      • ST Series
      • Dual-Spindle
      • Box Way Series
      • Toolroom Lathes
      • Chucker Lathe
      • Pocket Lathe
      • Haas Bar Feeders
    • Horizontal Mills
      Horizontal Mills
      Horizontal Mills View All
      • Horizontal Mills
      • 50-Taper
      • 40-Taper
    • Rotaries & Indexers
      Rotaries & Indexers
      Rotaries & Indexers View All
      • Rotaries & Indexers
      • Rotary Tables
      • Indexers
      • 5-Axis Rotaries
      • Extra-Large Rotaries
    • Special Series
      Special Series
      Special Series View All
      • Special Series
      • EU_Series_Redirect
    • Automation Systems
      Automation Systems
      Automation Systems View All
      • Automation Systems
      • Mill Automation
      • Lathe Automation
      • Automatic Parts Loaders
      • Automation Models
    • Desktop Machines
      Desktop Machines
      Desktop Machines View All
      • Desktop Machines
      • Desktop Mill
      • Desktop Lathe
      • Control Simulator, Standard
      • Control Simulator, Premium
    • Shop Equipment
      Shop Equipment
      Shop Equipment View All
      • Shop Equipment
      • Knee Mill
      • Haas Manual Lathes
      • Haas Saws
    • Fabrication Machines
      Fabrication Machines
      Fabrication Machines View All
      • Fabrication Machines
      • Laser Cutting Machines
      • CNC Press Brakes
    • QUICK LINKS Special Series  Special Series 
      EU SERIES EU SERIES BUILD & PRICE | PRICE LIST BUILD & PRICE | PRICE LIST In-Stock Machines In-Stock Machines WHAT’S NEW WHAT’S NEW YOUR FIRST CNC YOUR FIRST CNC
      SHOPPING TOOLS
      • Build & Price a Haas
      • Price List
      • Available Inventory
      • CNCA Financing
      WANT TO TALK TO SOMEONE?

      A Haas Factory Outlet (HFO) can answer your questions, and walk you through your best options.

      CONTACT YOUR DISTRIBUTOR >
  • Options Main Menu
    • The Haas Control Value Option Packages
      Value Option Packages
      Value Option Packages View All
      • Value Option Packages
    • Product Image Spindles
      Spindles
      Spindles View All
      • Spindles
    • Product Image Tool Changers
      Tool Changers
      Tool Changers View All
      • Tool Changers
    • Product Image 4th- | 5th-Axis
      4th- | 5th-Axis
      4th- | 5th-Axis View All
      • 4th- | 5th-Axis
    • Product Image Turrets & Live Tooling
      Turrets & Live Tooling
      Turrets & Live Tooling View All
      • Turrets & Live Tooling
    • Product Image Probing
      Probing
      Probing View All
      • Probing
    • Haas Chip & Coolant Management Chip & Coolant Management
      Chip & Coolant Management
      Chip & Coolant Management View All
      • Chip & Coolant Management
    • The Haas Control The Haas Control
      The Haas Control
      The Haas Control View All
      • The Haas Control
    • Product Image Product Options
      Product Options
      Product Options View All
      • Product Options
    • Product Image Tooling & Fixturing
      Tooling & Fixturing
      Tooling & Fixturing View All
      • Tooling & Fixturing
    • Product Image Workholding
      Workholding
      Workholding View All
      • Workholding
    • Product Image 5-Axis Solutions
      5-Axis Solutions
      5-Axis Solutions View All
      • 5-Axis Solutions
      • 5 Easy Steps to 5-Axis
    • QUICK LINKS Special Series  Special Series 
      EU SERIES EU SERIES BUILD & PRICE | PRICE LIST BUILD & PRICE | PRICE LIST In-Stock Machines In-Stock Machines WHAT’S NEW WHAT’S NEW YOUR FIRST CNC YOUR FIRST CNC
      SHOPPING TOOLS
      • Build & Price a Haas
      • Price List
      • Available Inventory
      • CNCA Financing
      WANT TO TALK TO SOMEONE?

      A Haas Factory Outlet (HFO) can answer your questions, and walk you through your best options.

      CONTACT YOUR DISTRIBUTOR >
  • Why Haas Main Menu
      Discover the Haas Difference
    • Why Haas
    • MyHaas
    • Education Community
    • Industry 4.0
    • Haas Certification
    • Customer Testimonials
  • Service Main Menu
      Welcome to Haas Service
      SERVICE HOME Operator’s Manuals How-To Procedures Troubleshooting Guides Preventive Maintenance Haas Parts Haas Tooling Videos
  • Videos Main Menu
  • Main Menu
    • View All
    • View All
    • View All
    • View All
      • HTEC Curriculum Support
      • Haas Value Option Packages (VOP) Journey
    • View All
      • Haas 10 kg Cobot Package
      • Cobot Kits
      • DC-1 Drill Center
      • CNC Sales News
      • Do More With Your Haas
    • View All
    • View All
      • contact-us-test
      • 4 - AUTOMATION SYSTEMS
      • Carousel-V2
      • expert test
      • Demo_Day_Trident-test
      • Link Test
      • image-sale-tag-test
      • article-list-test
      • Haas 25 kg Robot Package
      • test-algolia-page
    • View All
    • View All
    • View All
    • View All
      • calc-test
    • View All
    • QUICK LINKS Special Series  Special Series 
      EU SERIES EU SERIES BUILD & PRICE | PRICE LIST BUILD & PRICE | PRICE LIST In-Stock Machines In-Stock Machines WHAT’S NEW WHAT’S NEW YOUR FIRST CNC YOUR FIRST CNC
      SHOPPING TOOLS
      • Build & Price a Haas
      • Price List
      • Available Inventory
      • CNCA Financing
      WANT TO TALK TO SOMEONE?

      A Haas Factory Outlet (HFO) can answer your questions, and walk you through your best options.

      CONTACT YOUR DISTRIBUTOR >
  • Haas Tooling Main Menu
  • Haas Service Parts Main Menu

My Haas Welcome,
!
Haas Tooling MyHaas/HaasConnect Sign In Register Haas Tooling MyHaas/HaasConnect Sign Out Welcome, My Machines Latest Activity My Quotes My Account My Users Sign Out
Find Your Distributor
  1. Select Language
    1. English
    2. Deutsch
    3. Español - ES
    4. Español - MX
    5. Français
    6. Italiano
    7. Português
    8. Český
    9. Dansk
    10. Nederlands
    11. Magyar
    12. Polski
    13. Svenska
    14. Türkçe
    15. 中文
    16. Suomi
    17. Norsk
    18. الإنجليزية
    19. български
    20. Hrvatski
    21. Ελληνικά
    22. Română
    23. Slovenský
    24. Slovenščina
    25. 한국어
    26. 日本語
    27. Українська
×

Search Results

Web Pages

Images

    • <
    • 1
    • >

ST-10/15 - Tailstock - Installation - AD0587

Service Home How To Procedures ST-10/15 - Tailstock - Installation - AD0587

ST-10/15 - Tailstock - Installation - AD0587

- Jump to Section - 1. Introduction 2. Tailstock - Removal (8 steps) 3. Tailstock - Installation (16 steps) 4. Tailstock Activation 5. Settings Verification Back to Top
Recently Updated Last updated: 08/19/2025

ST-10/15 - Tailstock - Installation


AD0587

Revision A - 08/2025

Introduction

This procedure will show you how to field install the Tailstock option on a ST-10/15 machine. 

This Document Applies to the following Service Kits:

  • 93-1000327 TAILSTOCK INSTALL KIT ST-10/15

Lifting Requirements:

  • The tailstock assembly weighs approximately 200 lbs and requires a crane to lift safely.

Machine Compatibility :

  •    ST-10/10Y/15/15Y after 09/2018

 Note: All images are taken from an ST-10 Lathe, however the procedure will remain the same for an ST-15 Lathe.

 Caution: You should not do machine repairs or service procedures unless you are qualified and knowledgeable about the processes. Serious damage to the machine components can result in costly repairs. The service technicians at your Haas Factory Outlet (HFO) have the training and experience, and are certified to do these tasks safely and correctly. The repair and service work performed by your HFO is protected with a limited warranty.

Tailstock - Removal

This section applies to machines that are replacing a tailstock, if the machine is installing a brand new tailstock option please refer to the Tailstock - Installation section. 

1

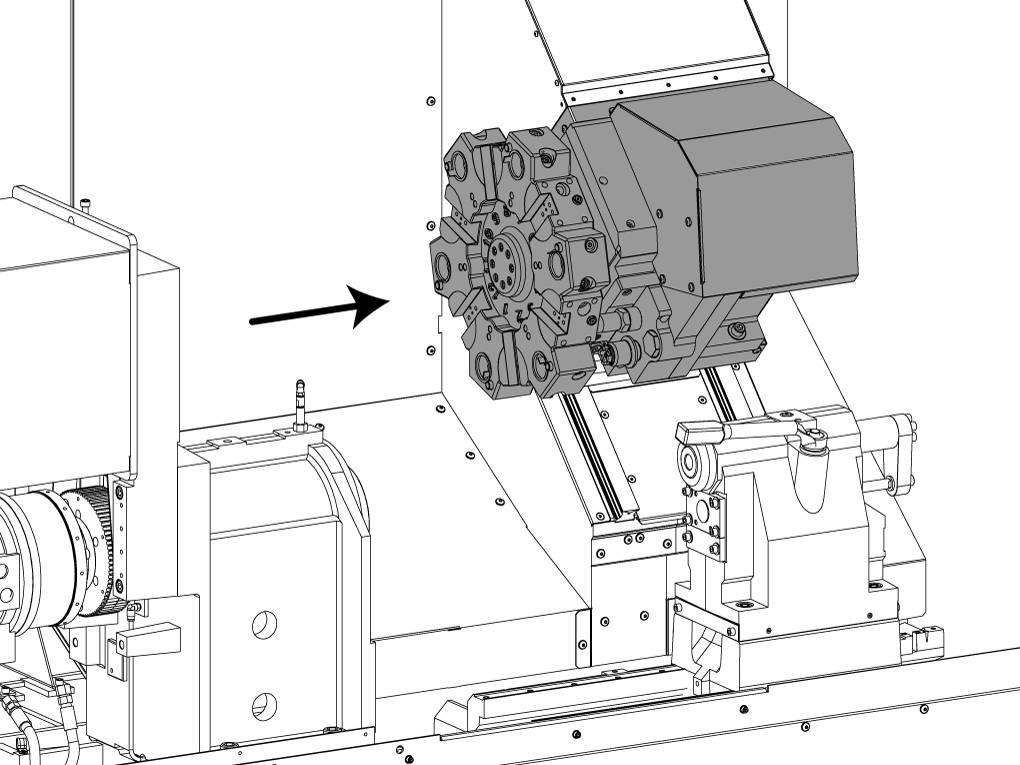
Jog the Z-axis away from the spindle towards the right side of the machine. 

Jog the X-Axis and Y-Axis (if available) away from the tailstock, this will put the turret at the top right corner of the machine.  

2

It is recommended to watch the Chuck Installation Guide video for detailed information on how to remove the chuck from the spindle. 

The TL-1/2 - 10" Manual 3-Jaw Chuck (2.5K Max RPM) - Installation can be followed as a general guidance on how to remove the chuck. 

3

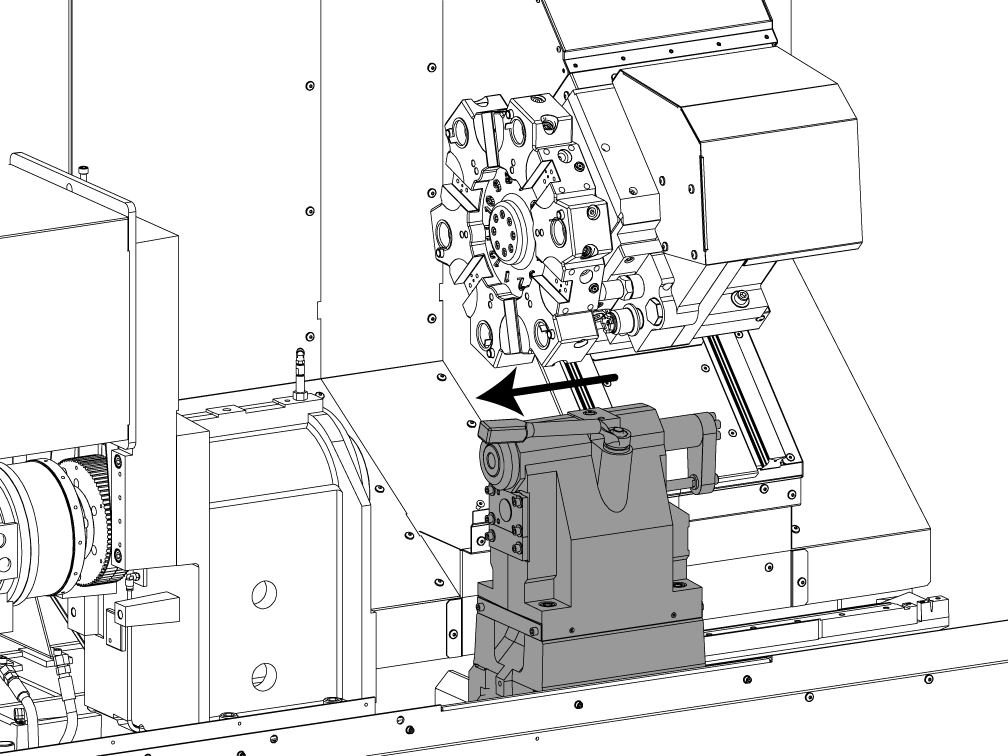
With the chuck removed move the tailstock as close to the spindle as possible. 

NOTE: Disconnect the hydraulic hoses from the HPU if you are replacing the Tailstock assembly. Make sure there is no pressure in the lines before removing the hydraulic hose to avoid an oil spillage. 

4

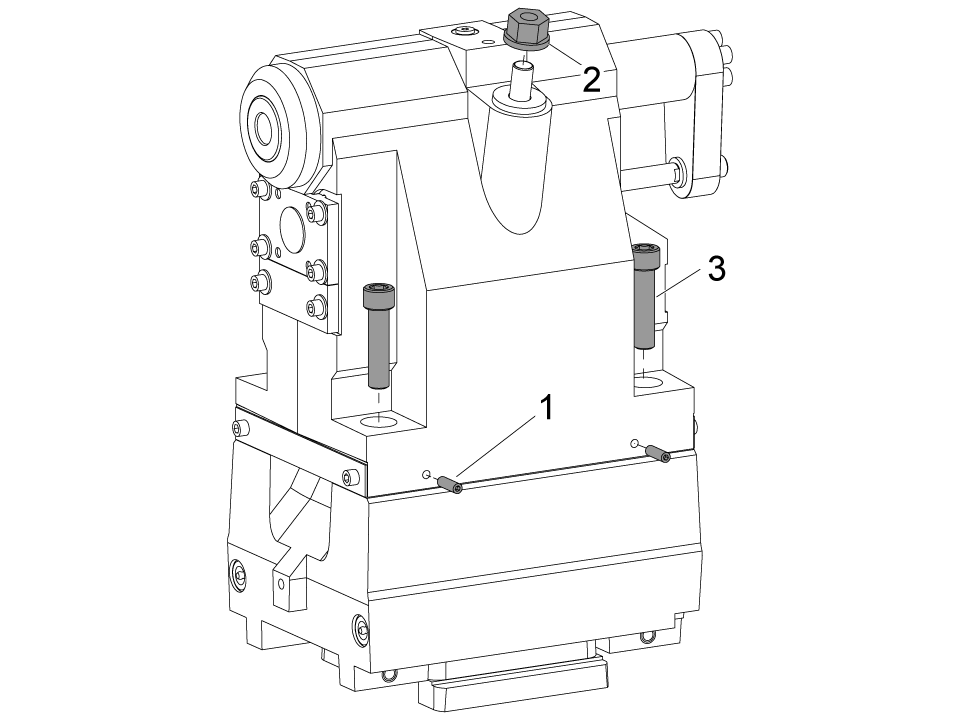
Remove the set screws from the tailstock head assembly [1]. 

Remove the 5/8-11 NUT from the clamping rod [2] 

Remove the (4x) SHCS 5/8-11 x 2 1/2 that hold the tailstock head assembly to the base casting [3]

5

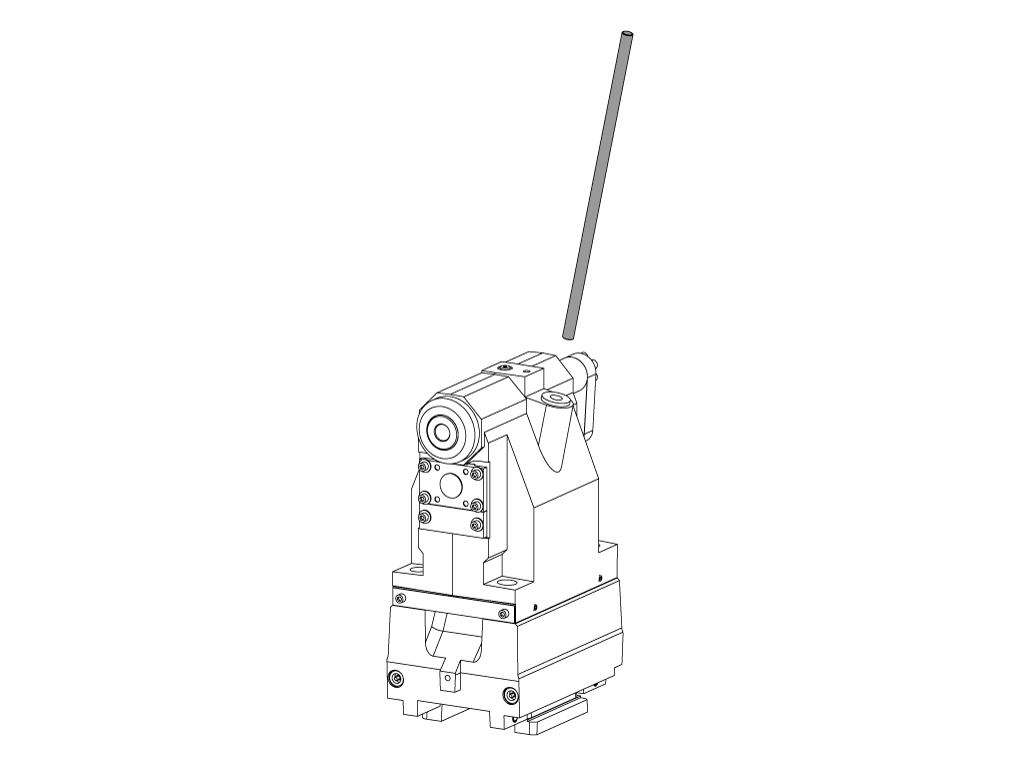
To remove the clamp rod [1] from the Tailstock Head assembly unthread the rod from the bottom of the Clamp Casting [1] and raise the rod out of the hole on the top of the tailstock.

NOTE: The clamp casting may fall out of place when removing rod from the assembly. Be sure to support the casting before removing the clamp rod. Remove the clamp casting after the clamp rod has been removed. 


6

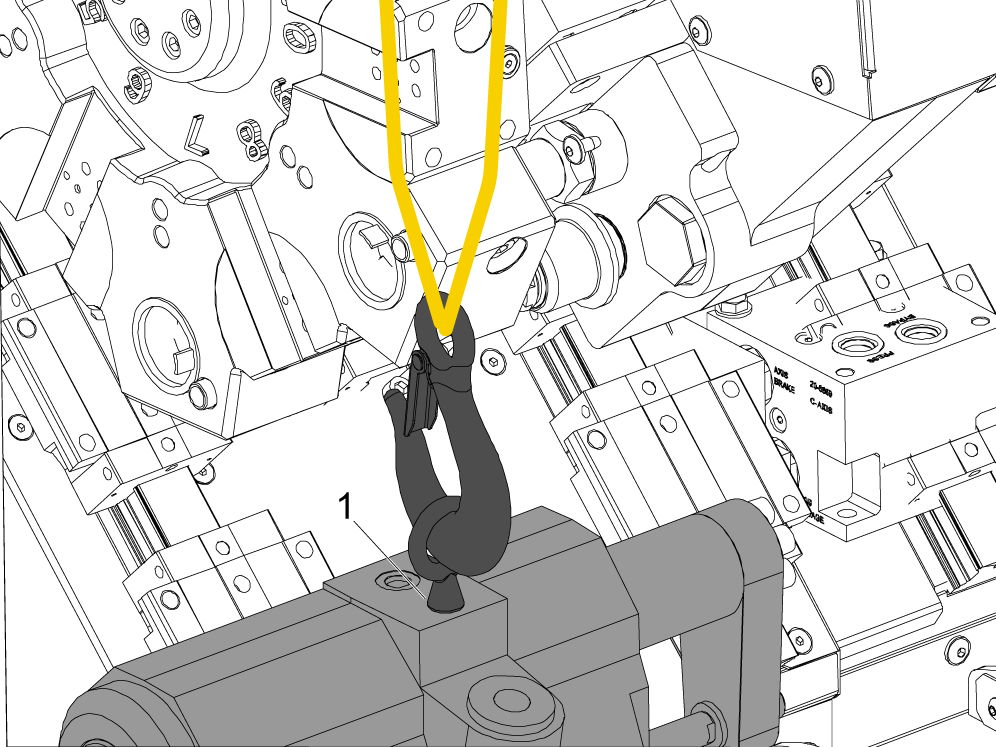
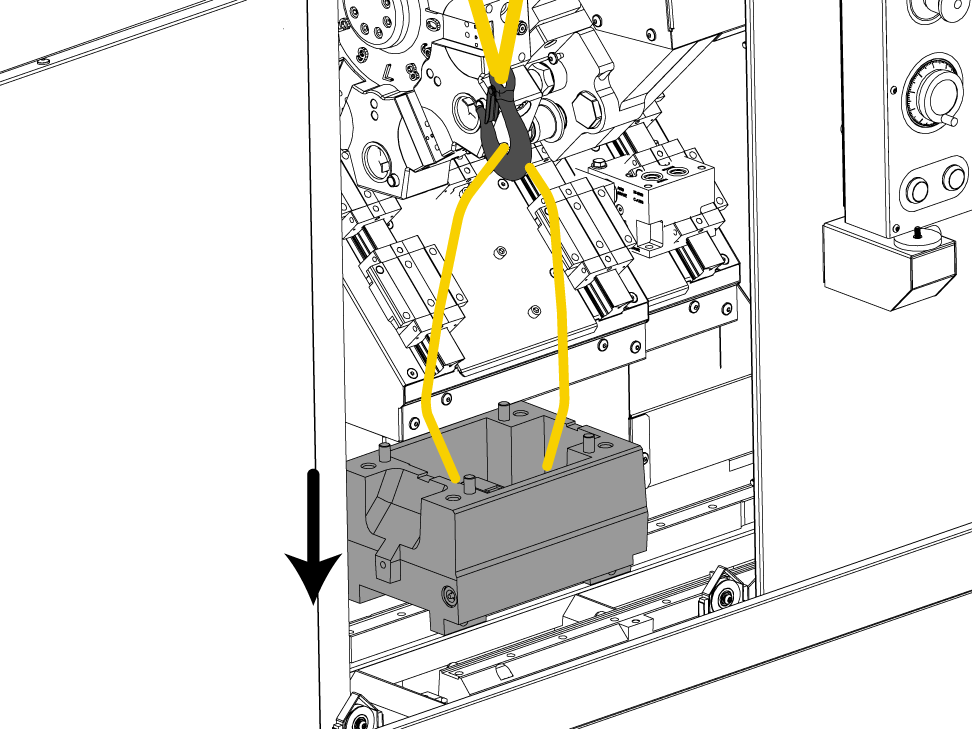
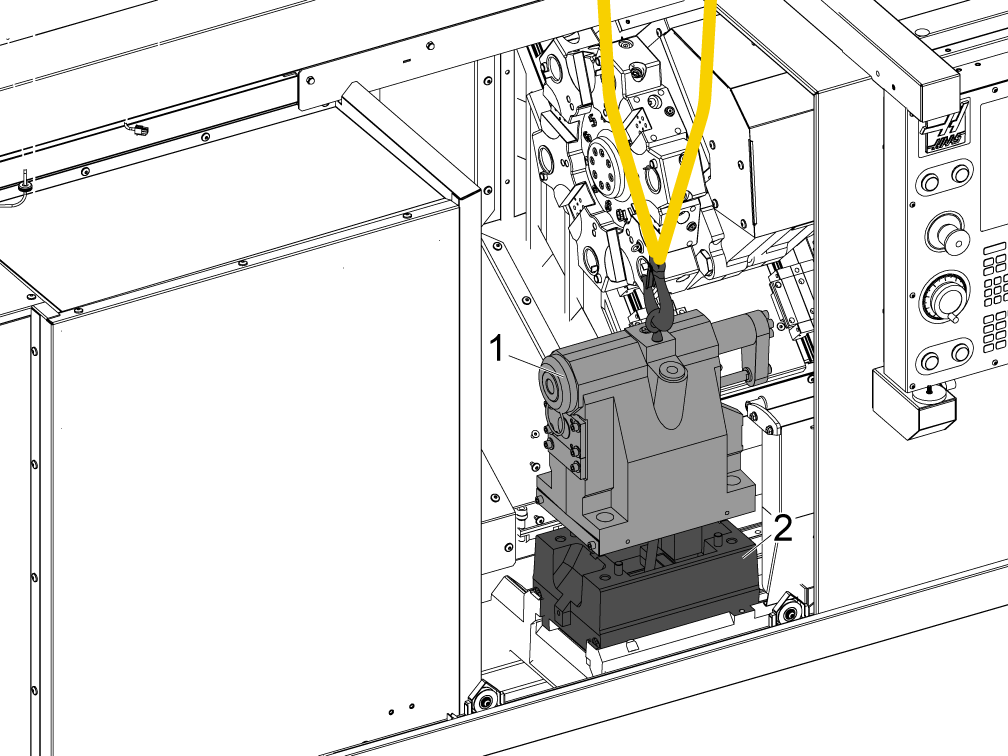
Place a 3/8-16 eye-bolt in the hole [1] shown in the image, attach a lifting hook with a strap or chain to lift the tailstock components out of the machine. 

WARNING: Make sure to inspect the lifting straps/chains, eyebolts, and any other lifting apparatus before using to ensure user safety. 


7

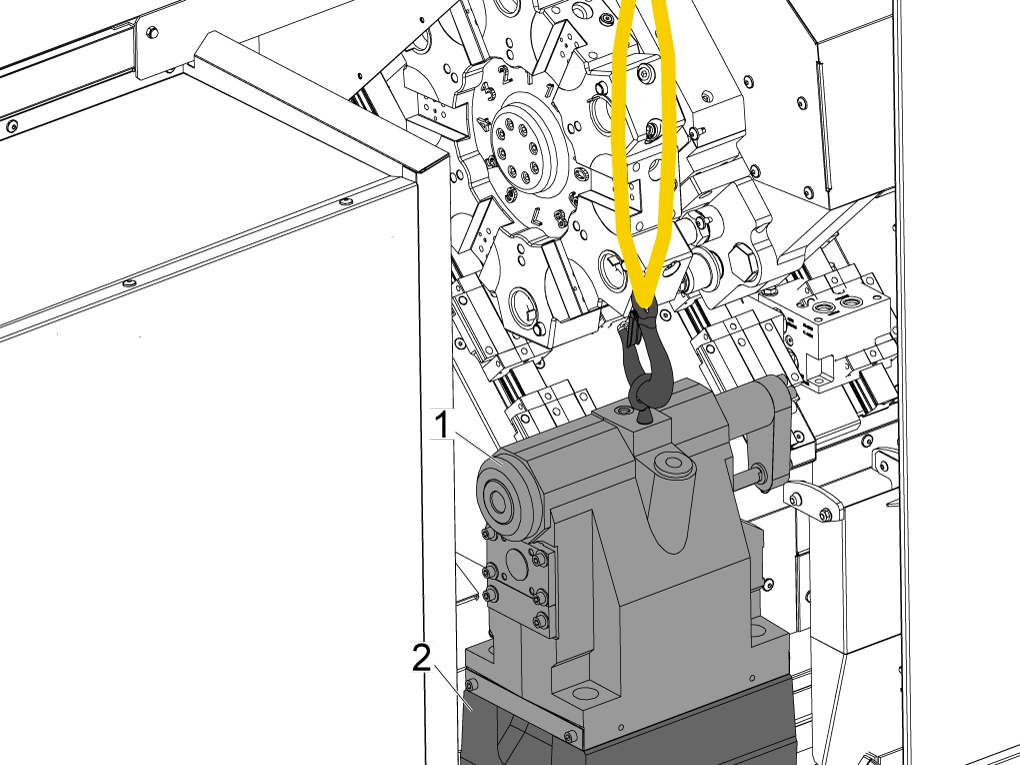
With all the hardware removed separate the Tailstock Head assembly [1] from the Tailstock Base casting [2] using the lifting hook.

NOTE: The Tailstock Head assembly is mounted on 4 dowel pins, ensure the assembly is lifted as vertical as possible to avoid the pins wedging into the casting. 

8

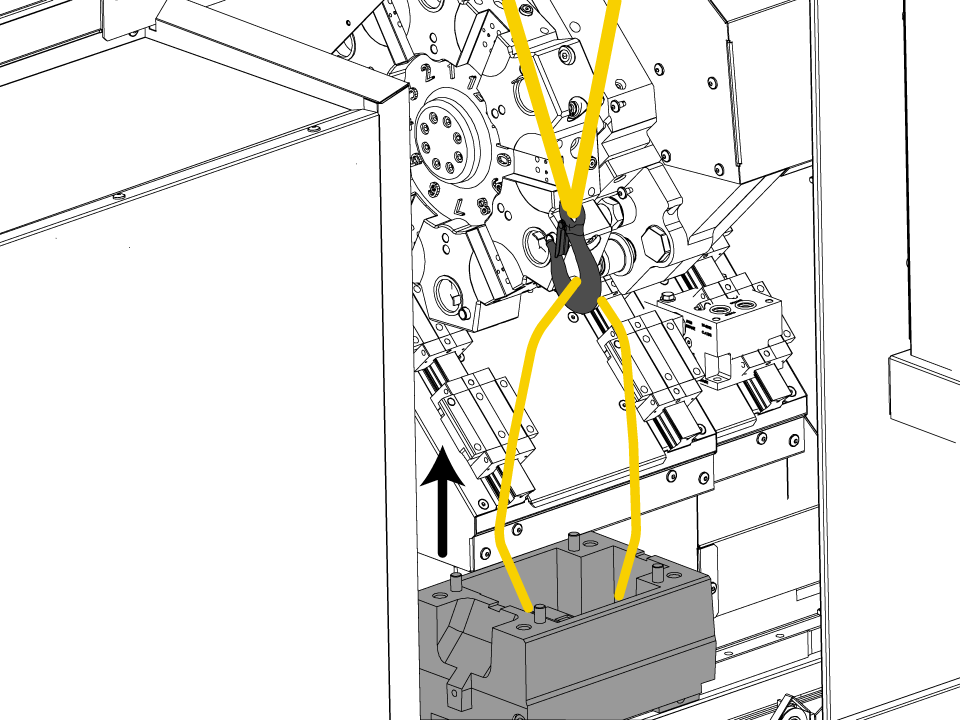
Remove the Tailstock Base assembly from the machine. 

NOTE: The base casting without the clamp casting is approximately 60 lbs use the proper safe lifting apparatus to remove. 


Tailstock - Installation

1

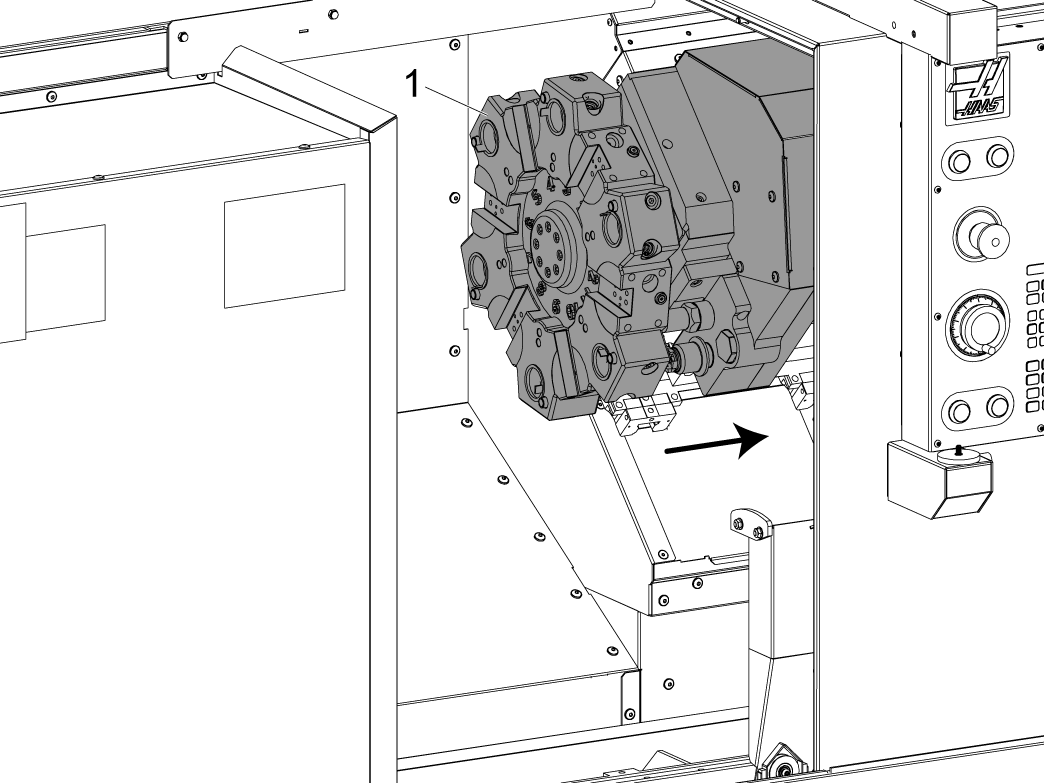
Jog the Z-axis away from the spindle towards the right side of the machine. 

Jog the X-Axis and Y-Axis (if available) to the top right corner of the machine.  


2

It is recommended to watch the Chuck Installation Guide video for detailed information on how to remove the chuck from the spindle. 

The TL-1/2 - 10" Manual 3-Jaw Chuck (2.5K Max RPM) - Installation can be followed as a general guidance on how to remove the chuck. 

3

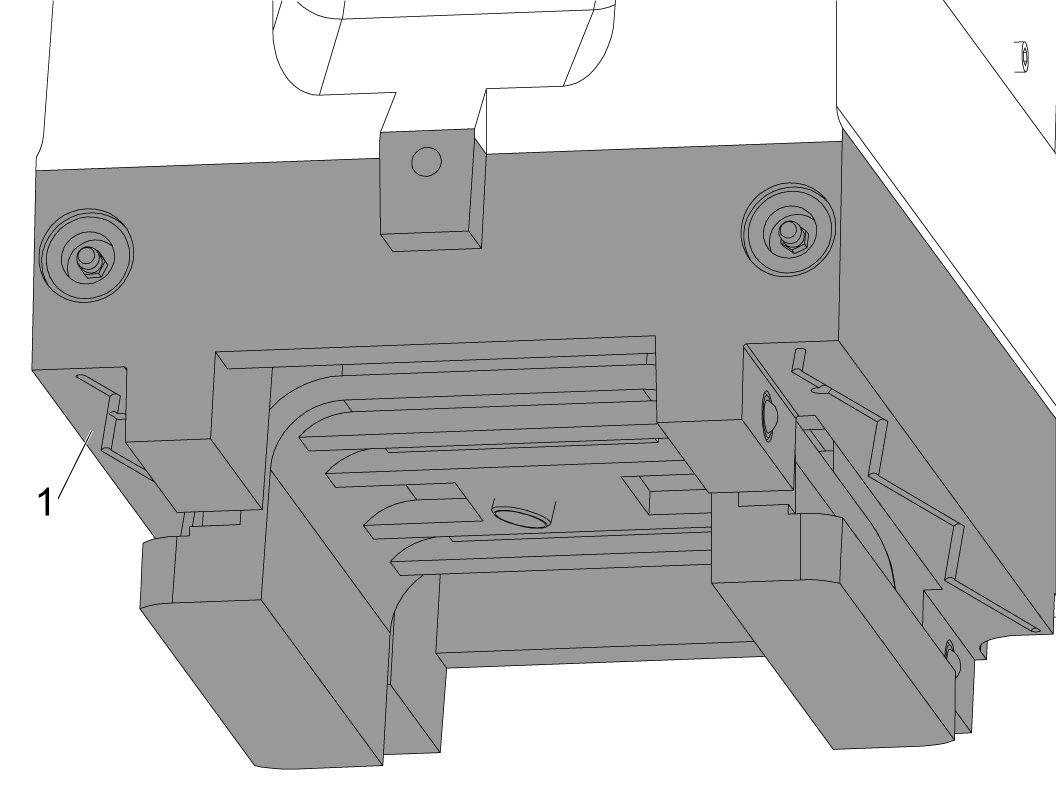
Separate the Tailstock Head from the Tailstock Base, make sure to remove all the hardware 


4

Place the Tailstock clamp [1] under the Tailstock base and install the clamp rod to the Tailstock clamp. 

5

With the Tailstock Clamp in position install the Tailstock Head onto the Tailstock Base.

Reinstall the following hardware that was removed:

  • The set screws from the tailstock head assembly. 
  • The (4x) SHCS 5/8-11 x 2 1/2 that hold the tailstock head assembly to the base casting 
    •      Torque these bolts to the specification found on the HAAS TORQUE SPECIFICATION document. 

NOTE: Be sure to place any shims found in between the tailstock head and base when re-installing the head.

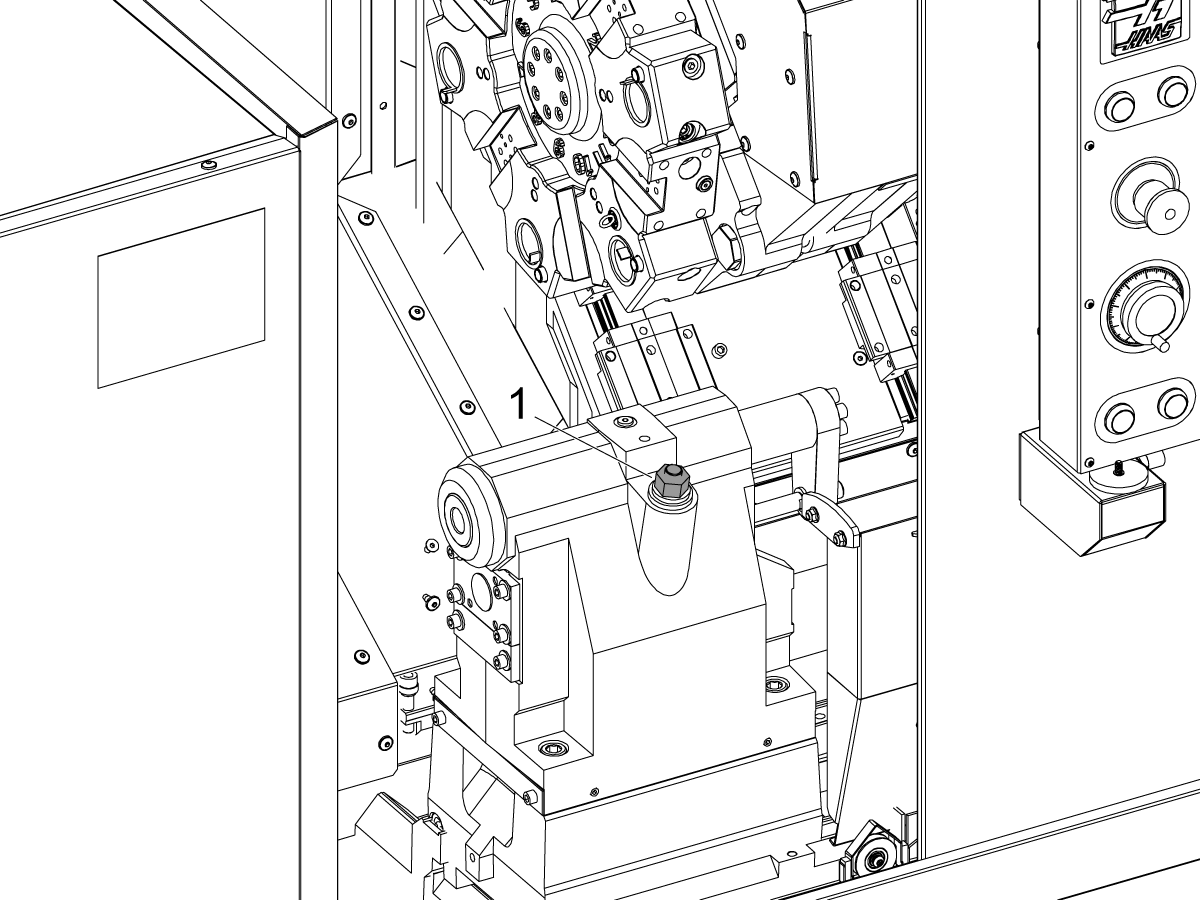
6

Raise the Tailstock clamp and pull the rod out of the hole on the top of the tailstock head. Tighten the nut on the top of the rod [1].

If the rod does not stick out of the hole of the Tailstock head un-thread the rod from the Tailstock Clamp until enough of the rod is outside of the head. 

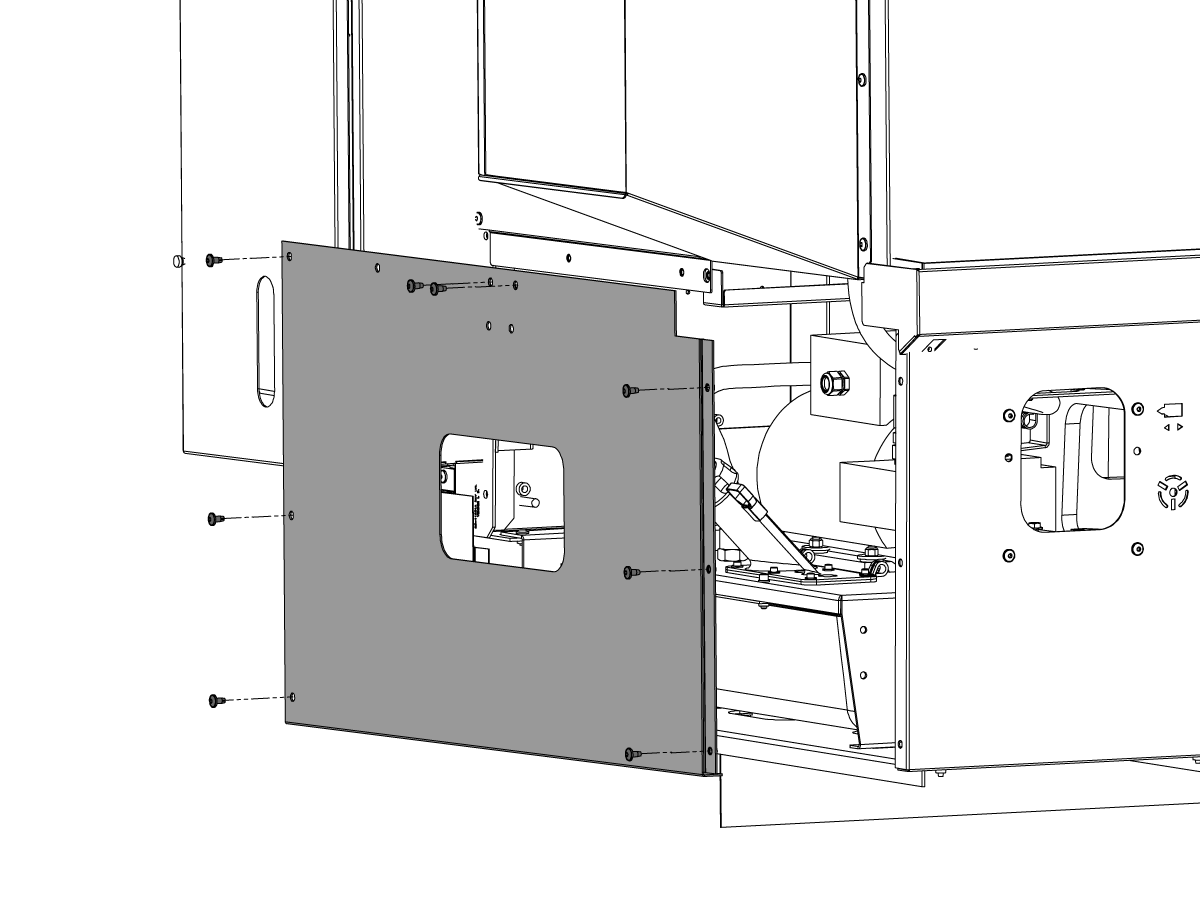
7

Remove the HPU enclosure panel to access the HPU. 

8

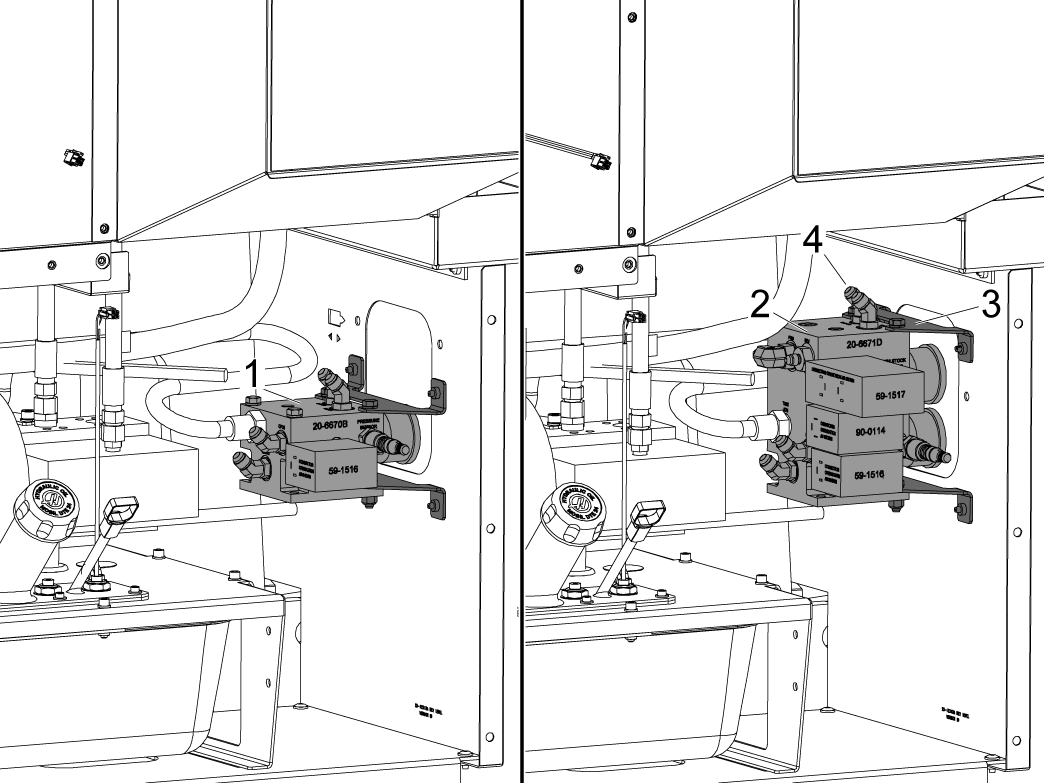
Lathes will come standard with the chuck / steady rate option [1]. If this is the only manifold present remove the manifold and replace it with the one provided in the kit [2].

Move the top mounting bracket in the position denoted as [3]. Make sure the O-rings are in the grooves before installing the (2x) FITG ORB6M JIC6M 45 STL [4]. 

9

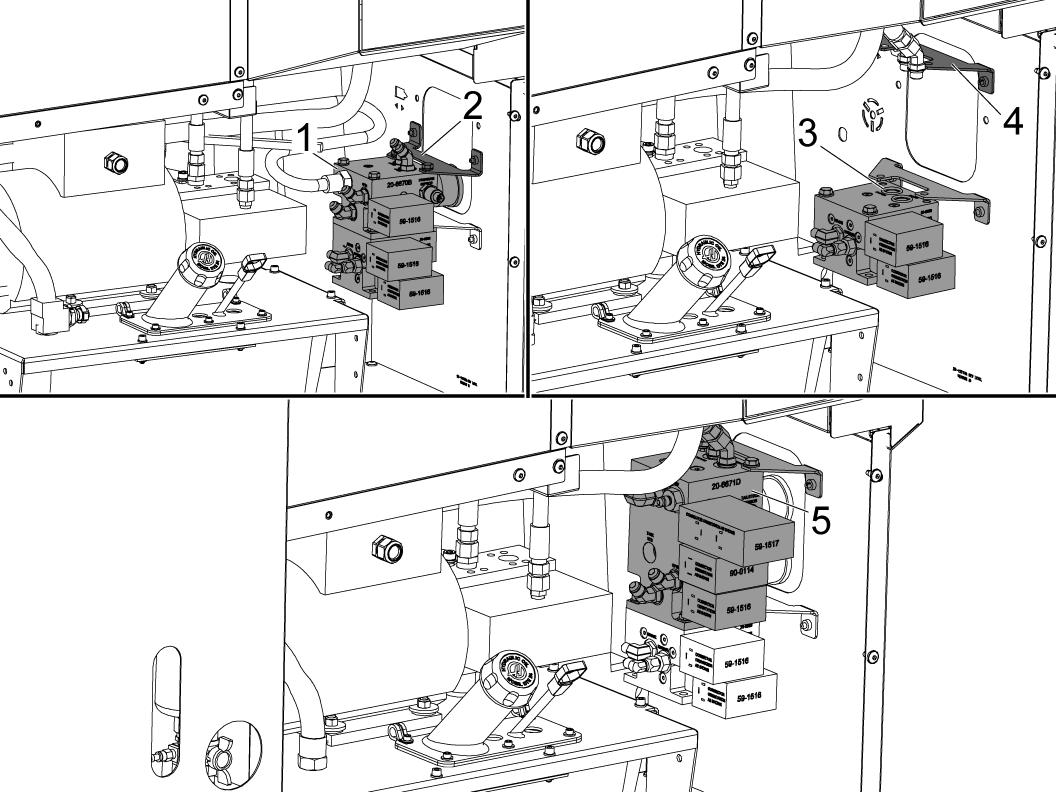
If the machine has the C-axis option remove thee the chuck / steady rate option [1] from the C-axis manifold. Move the mounting bracket [2] to the top hole pattern position [4]. Make sure the O-rings [3] are in the grooves between the C-axis manifold and the new manifold that will be installed. 

With the top mounting bracket in position [4] install the manifold supplied in the kit [5]. Make sure the O-rings are in the grooves before installing the (2x) FITG ORB6M JIC6M 45 STL at the top of the new manifold. . 

10

This step applies to machines with sheet metal built BEFORE 1/2022

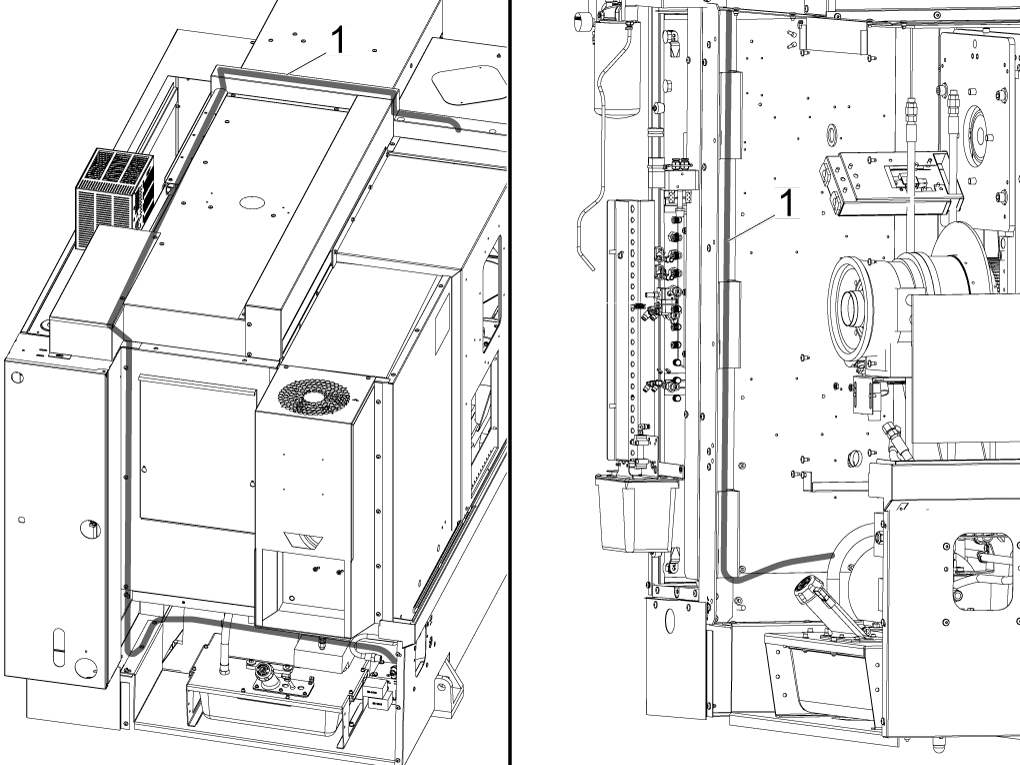
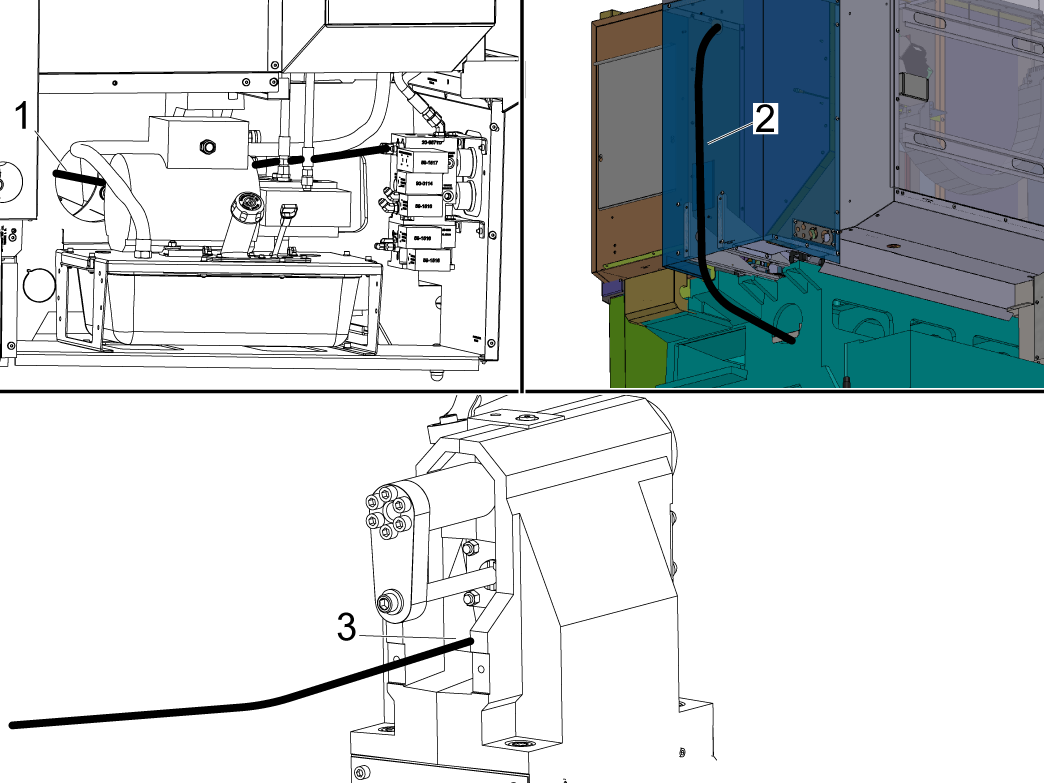
Route the hydraulic hosing [1], provided in the kit, in back of the HPU and through the channel in the base casting.

Route the hoses through the back and through the access port shown in image [2].

Route the hydraulic hoses though the back of the tailstock assembly [3]. 

NOTE: The kit will provide components such as a conduit bulkhead, a conduit bracket and other components for the newer sheet metal configuration. You do not need to use this for machines built BEFORE 1/2022

11

This step applies to machines with sheet metal built AFTER 1/2022

Route the hydraulic hosing [1] provided in the kit behind the HPU, through the cable channel as shown in the image to the right,  and through the cable channel above the machine as shown in the image. 

There will be an opening on the top enclosure panel that these hoses can be fed through. 

12

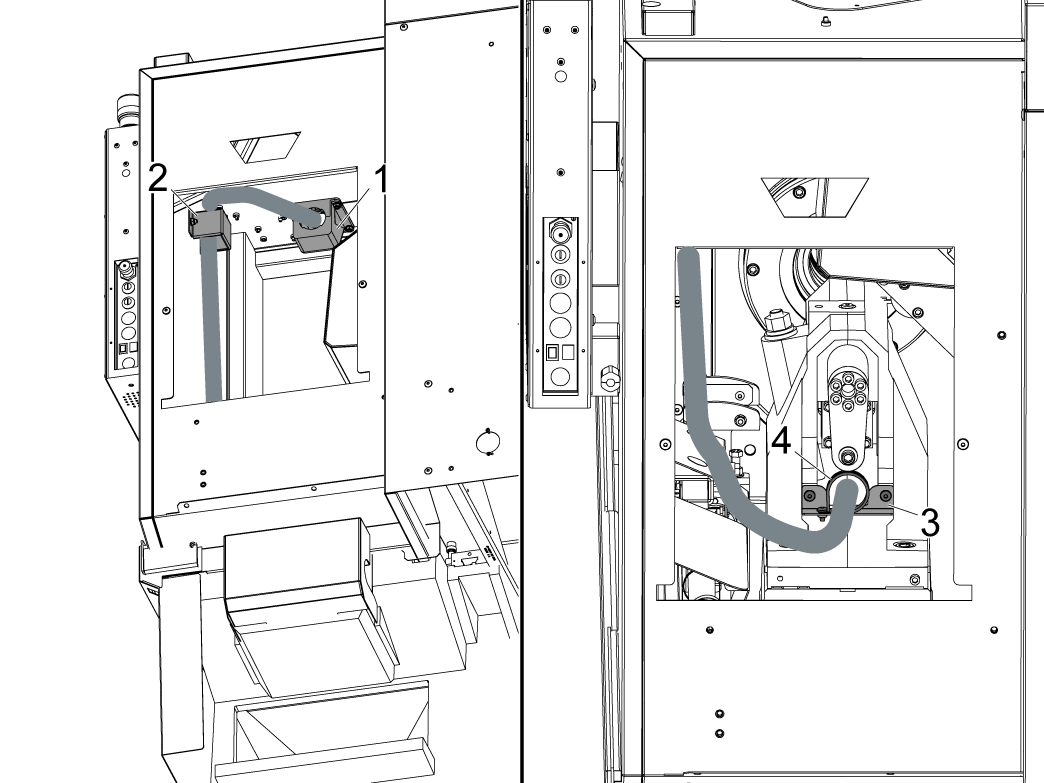
This step applies to machines with sheet metal built AFTER 1/2022

Install the conduit bulkhead [1], the tailstock hose bracket [3] and the conduit clamp [4] using the provided hardware.

Route the hydraulic hoses to the cylinder in the tailstock and install the conduit around the hydraulic hoses. Install the conduit bracket [2] over the conduit. 

13

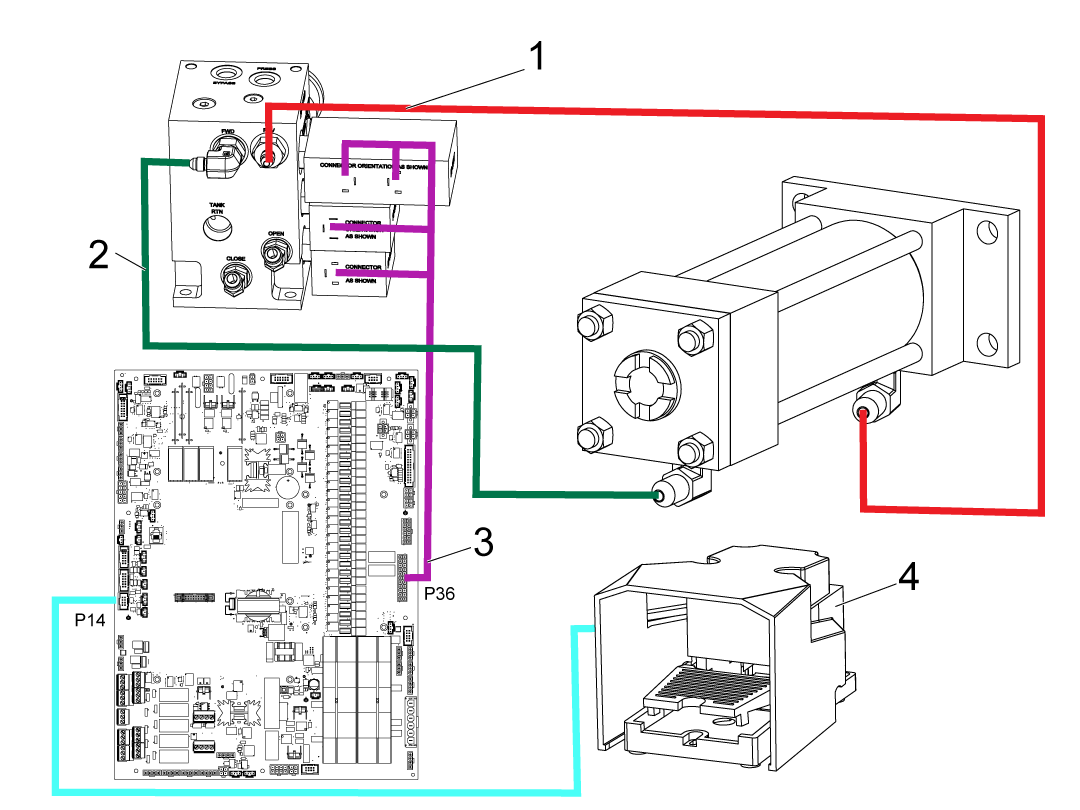
The wiring diagram can be used as refernce.

The tailstock hydraulc hoses reverse [1] and forward [2] ports. 

The HPU solenoids [3] will connect to P36 on the I/O PCB.

The foot pedal [4] will connect to the front of the machine and will be daisy chained with the chuck clamp foot pedal and connect to P14 on the I/O PCB.

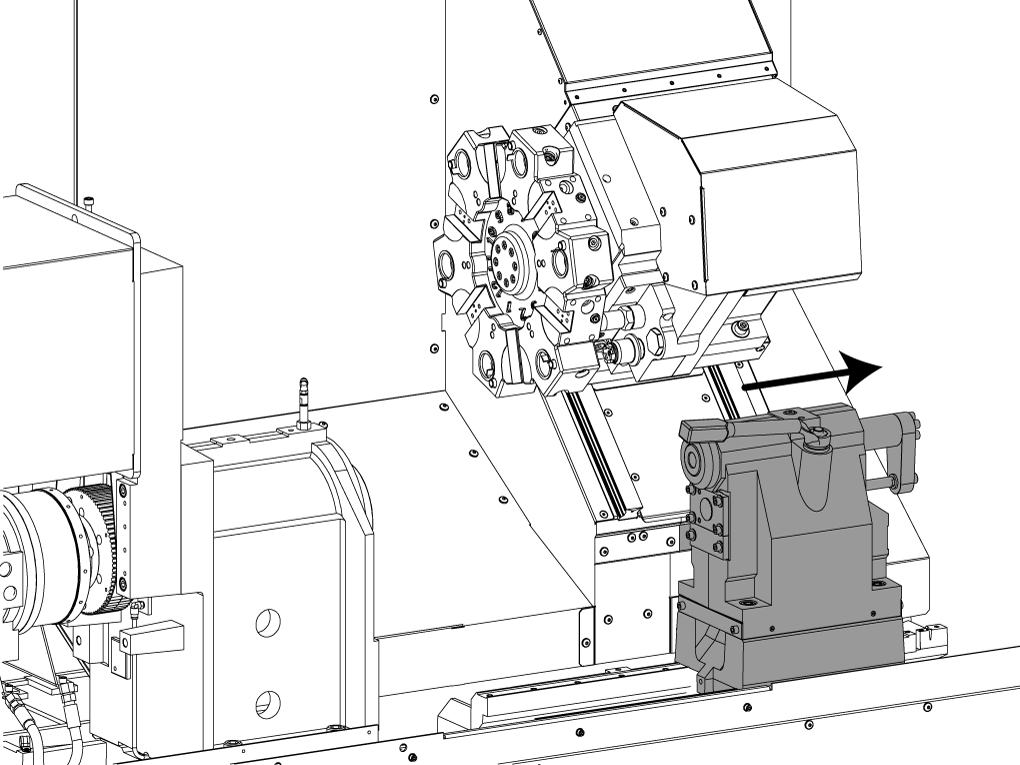
14

Now that the tailstock assembly is installed, manually slide the entire tailstock to the right side and away from the chuck.


15

It is recommended to watch the Chuck Installation Guide video for detailed information on how to re-install the chuck from the spindle.

16

Test the tailstock by pressing the foot pedal and make sure it actuates properly. 

After testing the tailstock follow the ST Lathe Alignment Indicating Zones procedure to align the spindle/chuck and tailstock. 

Tailstock Activation

Turn on the machine.

Login to the HBC PORTAL.

Download the TAILSTOCK INSTALL KIT ST-10/15 configuration patch files.

Note : The option files will appear on the configuration download page after it has been ordered. If the option does not appear, contact the service department.

Load the option configuration patch file to the control. Refer to the NEXT GENERATION CONTROL - CONFIGURATION FILE - DOWNLOAD/LOAD procedure. 

Settings Verification

Setting Name Value  
429  Tailstock Quill Part Hold Time 10
428  Tailstock Quill Retract Time 10
322  Foot Pedal Tailstock Alarm OFF
241  Tailstock Hold Force 0
145 
Tailstock At Part For Cyclestart OFF

Recently Viewed Items

You Have No Recently Viewed Items Yet

Feedback
Haas Logo

Haas Delivered Price

This price includes shipping cost, export and import duties, insurance, and any other expenses incurred during shipping to a location in France agreed with you as a buyer. No other mandatory costs can be added to the delivery of a Haas CNC Product.

KEEP UP WITH THE LATEST HAAS TIPS AND TECHNOLOGY...

Sign up now!   

HAAS TOOLING ACCEPTS THE FOLLOWING:

  • Service & Support
  • Owners
  • Request Service
  • Operator Manuals
  • Haas Parts
  • Rotary Repair Request
  • Pre-Install Guides
  • Shopping Tools
  • Build & Price a New Haas
  • Available Inventory
  • The Haas Price List
  • CNCA Financing
  • About Haas
  • Accessibility Statement
  • DNSH Statement
  • Export Compliance
  • Careers
  • Certifications & Safety
  • Contact Us
  • History
  • Terms & Conditions
  • Haas Tooling Terms & Conditions
  • Privacy
  • Warranty
  • Haas Community
  • Haas Certification Program
  • Haas Motorsports
  • Gene Haas Foundation
  • Haas Technical Education Community
  • Events
  • Join the Conversation
  • Facebook
  • X
  • Flickr
  • YouTube
  • LinkedIn
  • Instagram
  • TikTok
© 2026 Haas Automation, Inc – CNC Machine Tools
This site is protected by reCAPTCHA and the Google Privacy Policy and Terms of Service apply.

2800 Sturgis Rd., Oxnard, CA 93030
Toll Free: (888) 817-4446 / Fax: 805-278-8554