My Haas Welcome,
!
Haas Tooling MyHaas/HaasConnect Sign In Register Haas Tooling MyHaas/HaasConnect Sign Out Welcome, My Machines Latest Activity My Quotes My Account My Users Sign Out
Find Your Distributor
  1. Select Language
    1. English
    2. Deutsch
    3. Español - ES
    4. Español - MX
    5. Français
    6. Italiano
    7. Português
    8. Český
    9. Dansk
    10. Nederlands
    11. Magyar
    12. Polski
    13. Svenska
    14. Türkçe
    15. 中文
    16. Suomi
    17. Norsk
    18. الإنجليزية
    19. български
    20. Hrvatski
    21. Ελληνικά
    22. Română
    23. Slovenský
    24. Slovenščina
    25. 한국어
    26. 日本語
    27. Українська
  • machines Main Menu
    • Vertical Mills
      Vertical Mills
      Vertical Mills View All
      • Vertical Mills
      • VF Series
      • Universal Machines
      • VR Series
      • VP-5 Prismatic
      • Pallet-Changing VMCs
      • Mini Mills
      • Mold Machines
      • High-Speed Drill Centers
      • Drill/Tap/ Mill Series
      • Toolroom Mills
      • Pocket Mill
      • Compact Mills
      • Gantry Series
      • SR Sheet Routers
      • Extra-Large VMC
      • Double-Column Mills
      • 3+2 Positioning Machines
    • Multi-Axis Solutions
      Multi-Axis Solutions
      Multi-Axis Solutions View All
      • Multi-Axis Solutions
      • Y-Axis Lathes
      • 5-Axis Mills
    • Lathes
      Lathes
      Lathes View All
      • Lathes
      • ST Series
      • Dual-Spindle
      • Box Way Series
      • Toolroom Lathes
      • Chucker Lathe
      • Pocket Lathe
      • Haas Bar Feeders
    • Horizontal Mills
      Horizontal Mills
      Horizontal Mills View All
      • Horizontal Mills
      • 50-Taper
      • 40-Taper
    • Rotaries & Indexers
      Rotaries & Indexers
      Rotaries & Indexers View All
      • Rotaries & Indexers
      • Rotary Tables
      • Indexers
      • 5-Axis Rotaries
      • Extra-Large Rotaries
    • Special Series
      Special Series
      Special Series View All
      • Special Series
      • EU_Series_Redirect
    • Automation Systems
      Automation Systems
      Automation Systems View All
      • Automation Systems
      • Mill Automation
      • Lathe Automation
      • Automatic Parts Loaders
      • Automation Models
    • Desktop Machines
      Desktop Machines
      Desktop Machines View All
      • Desktop Machines
      • Desktop Mill
      • Desktop Lathe
      • Control Simulator, Standard
      • Control Simulator, Premium
    • Shop Equipment
      Shop Equipment
      Shop Equipment View All
      • Shop Equipment
      • Knee Mill
      • Haas Manual Lathes
      • Haas Saws
    • Fabrication Machines
      Fabrication Machines
      Fabrication Machines View All
      • Fabrication Machines
      • Laser Cutting Machines
      • CNC Press Brakes
    • QUICK LINKS Special Series  Special Series 
      EU SERIES EU SERIES BUILD & PRICE | PRICE LIST BUILD & PRICE | PRICE LIST In-Stock Machines In-Stock Machines WHAT’S NEW WHAT’S NEW YOUR FIRST CNC YOUR FIRST CNC
      SHOPPING TOOLS
      • Build & Price a Haas
      • Price List
      • Available Inventory
      • CNCA Financing
      WANT TO TALK TO SOMEONE?

      A Haas Factory Outlet (HFO) can answer your questions, and walk you through your best options.

      CONTACT YOUR DISTRIBUTOR >
  • Options Main Menu
    • The Haas Control Value Option Packages
      Value Option Packages
      Value Option Packages View All
      • Value Option Packages
    • Product Image Spindles
      Spindles
      Spindles View All
      • Spindles
    • Product Image Tool Changers
      Tool Changers
      Tool Changers View All
      • Tool Changers
    • Product Image 4th- | 5th-Axis
      4th- | 5th-Axis
      4th- | 5th-Axis View All
      • 4th- | 5th-Axis
    • Product Image Turrets & Live Tooling
      Turrets & Live Tooling
      Turrets & Live Tooling View All
      • Turrets & Live Tooling
    • Product Image Probing
      Probing
      Probing View All
      • Probing
    • Haas Chip & Coolant Management Chip & Coolant Management
      Chip & Coolant Management
      Chip & Coolant Management View All
      • Chip & Coolant Management
    • The Haas Control The Haas Control
      The Haas Control
      The Haas Control View All
      • The Haas Control
    • Product Image Product Options
      Product Options
      Product Options View All
      • Product Options
    • Product Image Tooling & Fixturing
      Tooling & Fixturing
      Tooling & Fixturing View All
      • Tooling & Fixturing
    • Product Image Workholding
      Workholding
      Workholding View All
      • Workholding
    • Product Image 5-Axis Solutions
      5-Axis Solutions
      5-Axis Solutions View All
      • 5-Axis Solutions
      • 5 Easy Steps to 5-Axis
    • QUICK LINKS Special Series  Special Series 
      EU SERIES EU SERIES BUILD & PRICE | PRICE LIST BUILD & PRICE | PRICE LIST In-Stock Machines In-Stock Machines WHAT’S NEW WHAT’S NEW YOUR FIRST CNC YOUR FIRST CNC
      SHOPPING TOOLS
      • Build & Price a Haas
      • Price List
      • Available Inventory
      • CNCA Financing
      WANT TO TALK TO SOMEONE?

      A Haas Factory Outlet (HFO) can answer your questions, and walk you through your best options.

      CONTACT YOUR DISTRIBUTOR >
  • Why Haas Main Menu
      Discover the Haas Difference
    • Why Haas
    • MyHaas
    • Education Community
    • Industry 4.0
    • Haas Certification
    • Customer Testimonials
  • Service Main Menu
      Welcome to Haas Service
      SERVICE HOME Operator’s Manuals How-To Procedures Troubleshooting Guides Preventive Maintenance Haas Parts Haas Tooling Videos
  • Videos Main Menu
  • Main Menu
    • View All
    • View All
    • View All
    • View All
      • HTEC Curriculum Support
      • Haas Value Option Packages (VOP) Journey
    • View All
      • Haas 10 kg Cobot Package
      • Cobot Kits
      • DC-1 Drill Center
      • CNC Sales News
      • Do More With Your Haas
    • View All
    • View All
      • contact-us-test
      • 4 - AUTOMATION SYSTEMS
      • Carousel-V2
      • expert test
      • Demo_Day_Trident-test
      • Link Test
      • image-sale-tag-test
      • article-list-test
      • Haas 25 kg Robot Package
      • test-algolia-page
    • View All
    • View All
    • View All
    • View All
      • calc-test
    • View All
    • QUICK LINKS Special Series  Special Series 
      EU SERIES EU SERIES BUILD & PRICE | PRICE LIST BUILD & PRICE | PRICE LIST In-Stock Machines In-Stock Machines WHAT’S NEW WHAT’S NEW YOUR FIRST CNC YOUR FIRST CNC
      SHOPPING TOOLS
      • Build & Price a Haas
      • Price List
      • Available Inventory
      • CNCA Financing
      WANT TO TALK TO SOMEONE?

      A Haas Factory Outlet (HFO) can answer your questions, and walk you through your best options.

      CONTACT YOUR DISTRIBUTOR >
  • Haas Tooling Main Menu
  • Haas Service Parts Main Menu

My Haas Welcome,
!
Haas Tooling MyHaas/HaasConnect Sign In Register Haas Tooling MyHaas/HaasConnect Sign Out Welcome, My Machines Latest Activity My Quotes My Account My Users Sign Out
Find Your Distributor
  1. Select Language
    1. English
    2. Deutsch
    3. Español - ES
    4. Español - MX
    5. Français
    6. Italiano
    7. Português
    8. Český
    9. Dansk
    10. Nederlands
    11. Magyar
    12. Polski
    13. Svenska
    14. Türkçe
    15. 中文
    16. Suomi
    17. Norsk
    18. الإنجليزية
    19. български
    20. Hrvatski
    21. Ελληνικά
    22. Română
    23. Slovenský
    24. Slovenščina
    25. 한국어
    26. 日本語
    27. Українська
×

Search Results

Web Pages

Images

    • <
    • 1
    • >

EC-1600 - Chip Conveyor - Field Installation - AD0003

Service Home How To Procedures EC-1600 - Chip Conveyor - Field Installation
Recently Updated Last updated: 06/23/2022

EC-1600 - Chip Conveyor - Field Installation


AD0003

EC-1600 - Chip Conveyor - Field Installation

- Jump to Section - 1. Introduction 2. Removal (4 steps) 3. Conveyor Assembly (3 steps) 4. Mechanical Assembly (3 steps) 5. Field Installation (6 steps) 6. I/O PCB Cover - Assembly (4 steps) 7. Quad Chip PCB - Installation (3 steps) 8. Operation Test (6 steps) Back to Top

Introduction

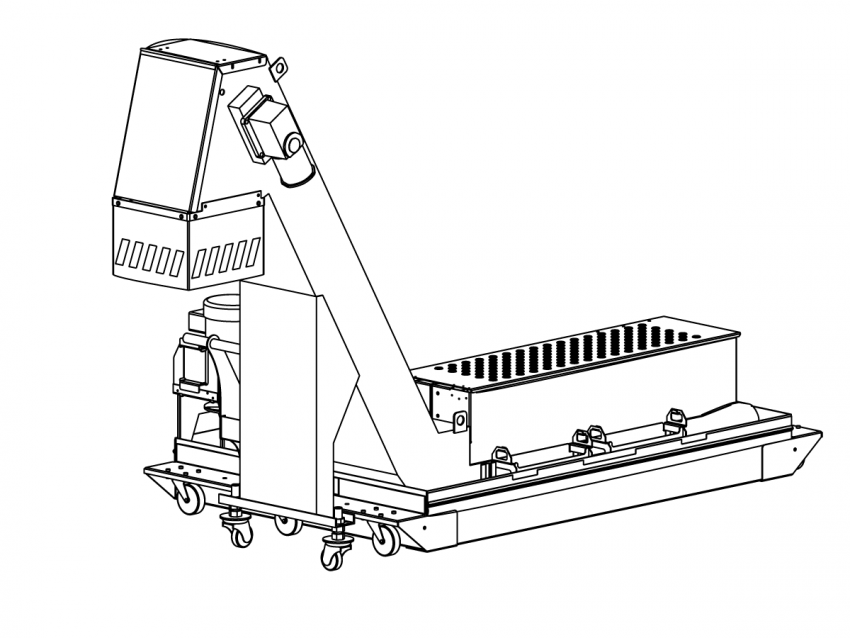
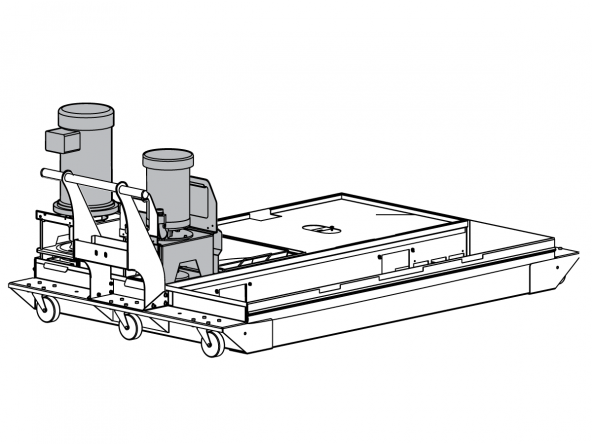
This procedure tells you how to install a chip conveyor in the optional 95-Gallon tank on an EC-1600 mill.

Removal

1

Power [OFF] the machine, then Lockout/Tagout the main circuit breaker.

Remove the coolant tank [1] and coolant pump(s) [2].

Note: Optional 95 gallon tank shown.

2

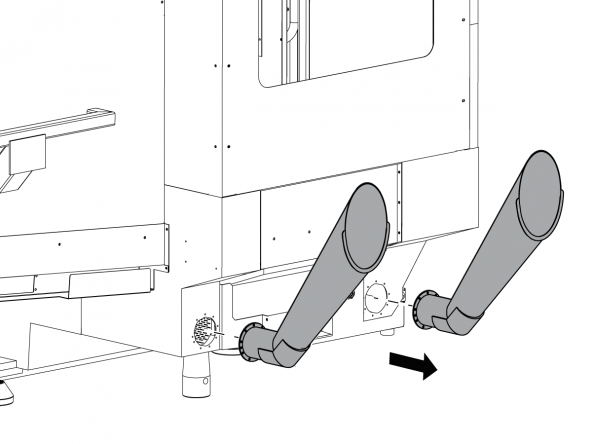
Remove the discharge chutes.

3

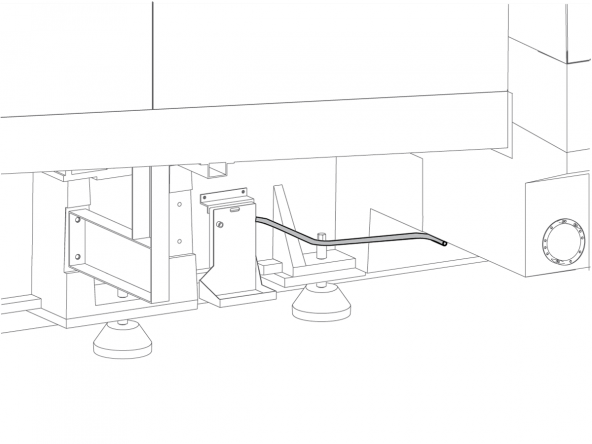
Machines built before 2008: Remove the drain back tube.

4

Machines built before 2008: remove the drain plenum and drain trough from between the drain augers.

Conveyor Assembly

1

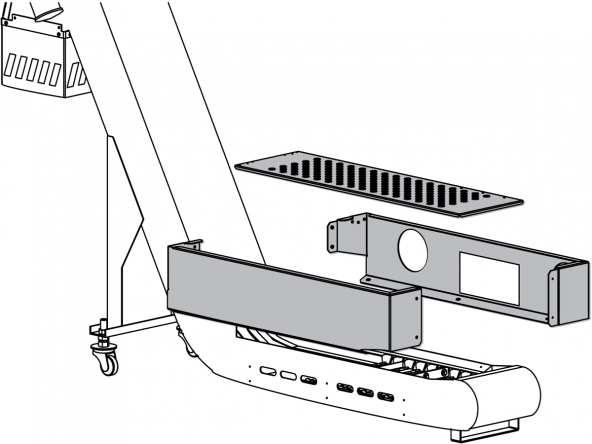
Assemble the conveyor covers.

2

Attach the conveyor location rail to the side of the conveyor cover with the circular holes.

3

Attach the chip basket mounting brackets to the side of the conveyor with drain holes.

Mechanical Assembly

1

Machines built before 2008: install the replacement drain back tube (included in the conveyor kit).

2

Machines built before 2008: Install the plenum [1] included in the conveyor kit. Use an adhesive sealant to seal the edges of the plenum where they meet the base casting.

All machines: Attach the drain chute extension [2] to the plenum.

3

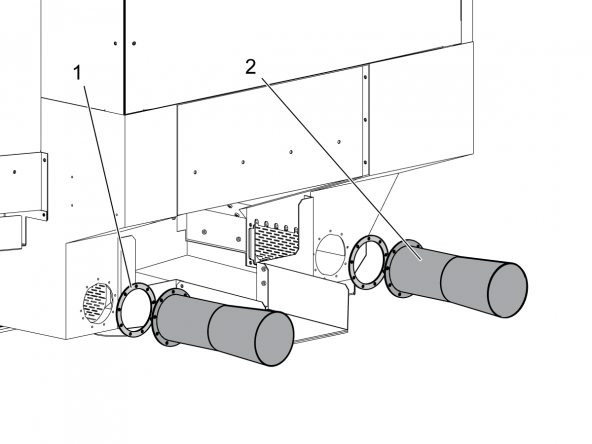
Install the discharge gaskets [1] and discharge chute assemblies [2] to the base.

Field Installation

1

Place the coolant pump and optional TSC pump into the 95 gallon coolant tank.

2

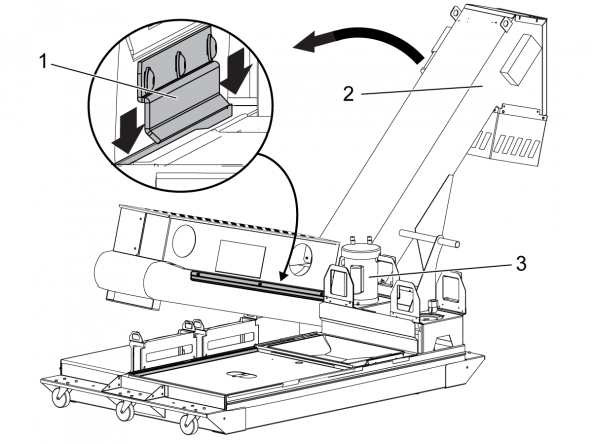
Lift the discharge end [2] of the chip conveyor and put it into the coolant tank next to the coolant pump(s)[3]. Make sure that the conveyor location rail [1] rests on the raised edge of the coolant tank closest to the level sensor lid. Lower the conveyor assembly into the coolant tank.

3

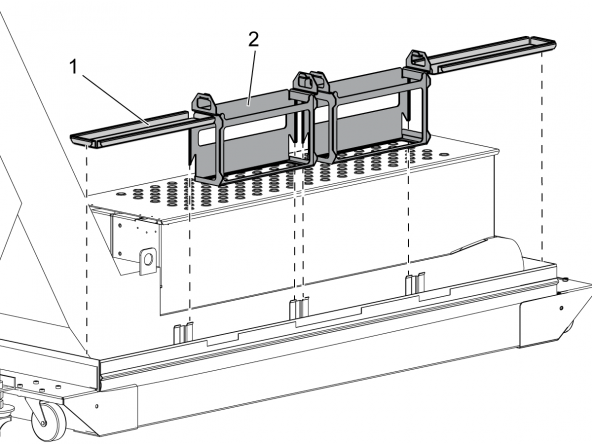
Slide the chip baskets [2] onto the mounting brackets on the side of the conveyor. Place the chip covers [1] over the open spaces on either side of the chip baskets.

4

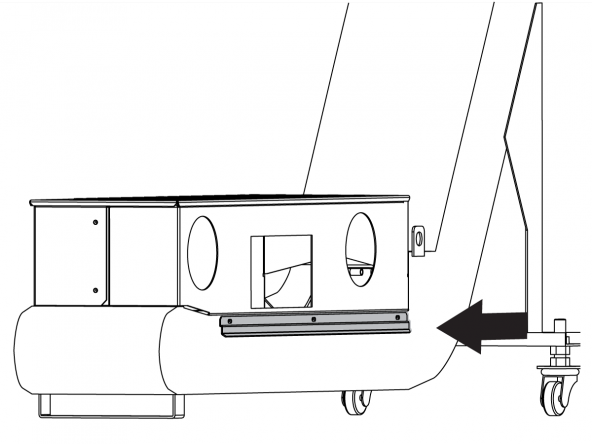
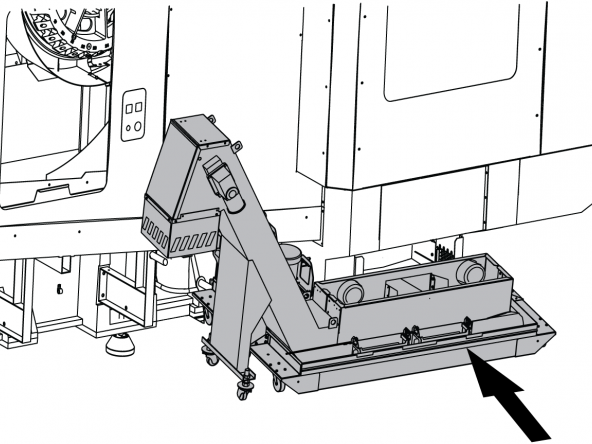
Roll the coolant tank/conveyor into place under the drain plenum. Make sure that the chip chute extensions and drain chute extension fit through the holes in the conveyor side cover.

5

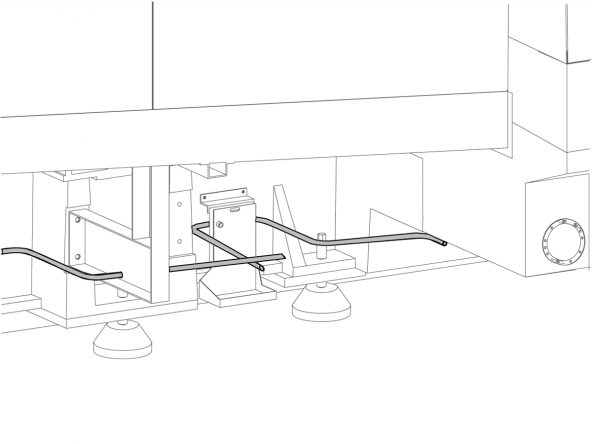
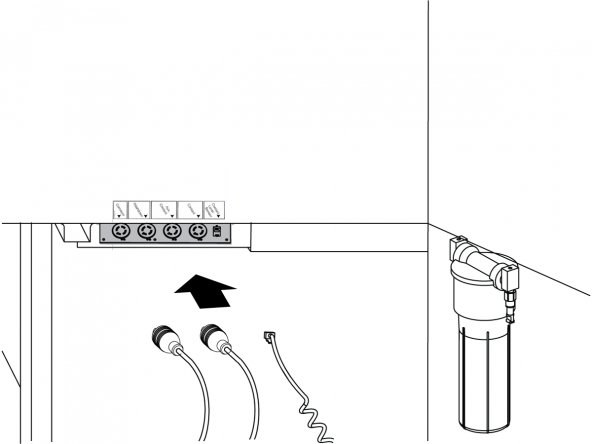
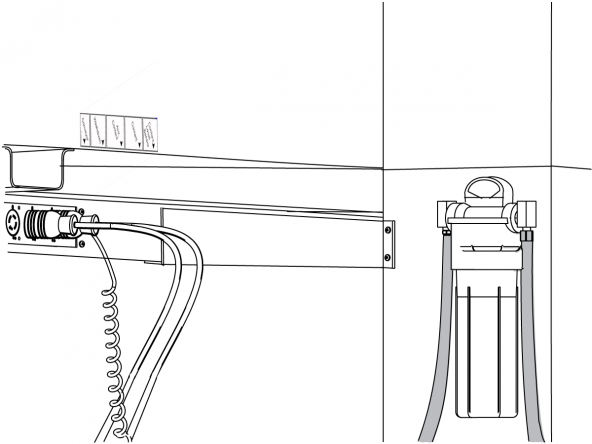
Connect the pump power cable(s), conveyor motor cable, and the coolant level sensor cable to the coolant connector panel on the EC-1600, located above the coolant tank assembly.

6

Connect the coolant hoses to the coolant manifold (and the TSC filter if equipped) on the EC-1600 per the coolant system instructions.

I/O PCB Cover - Assembly

1

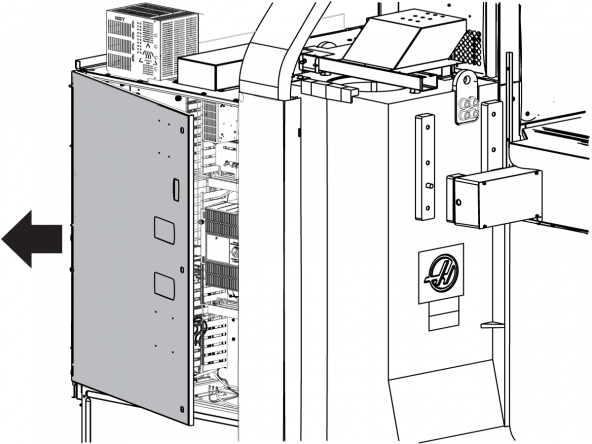
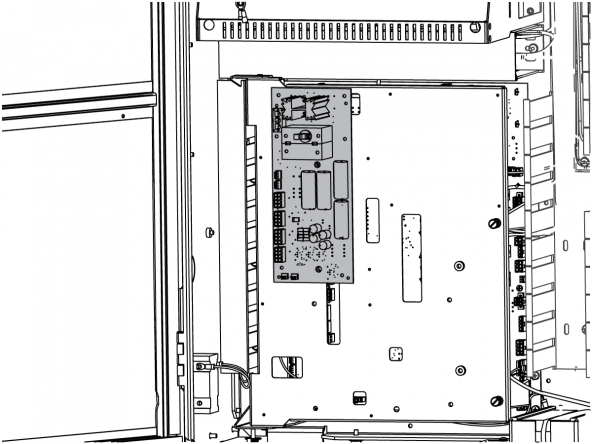
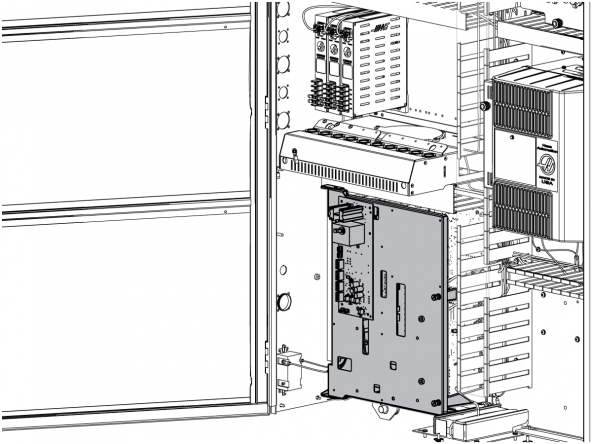
The I/O PCB cover is mounted over the I/O PCB on the lower left corner of the control assembly.

Open the control cabinet door.

2

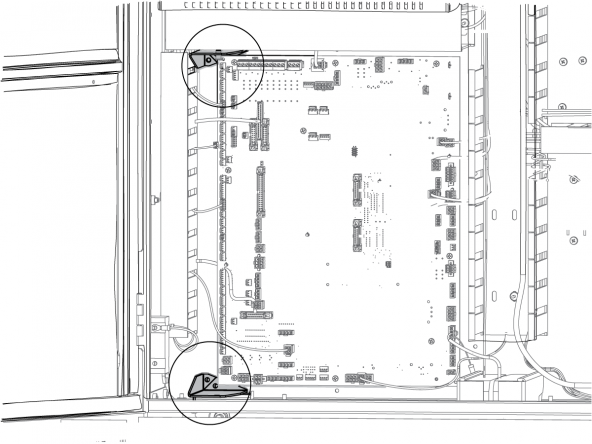
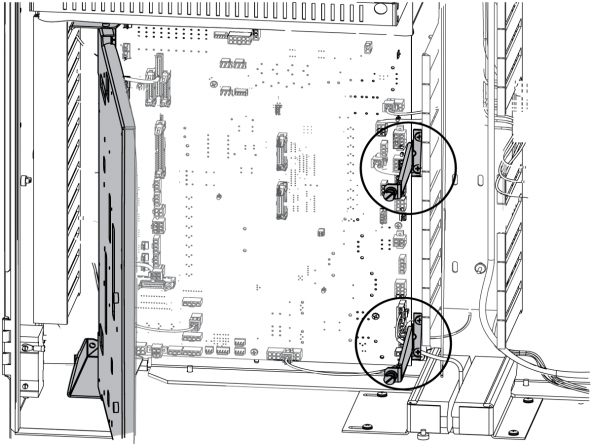
Use (4) 10-32 x 3/8" Phillips pan head screws (PPHS) to attach the top and bottom panel hinge mounts to the cabinet.

3

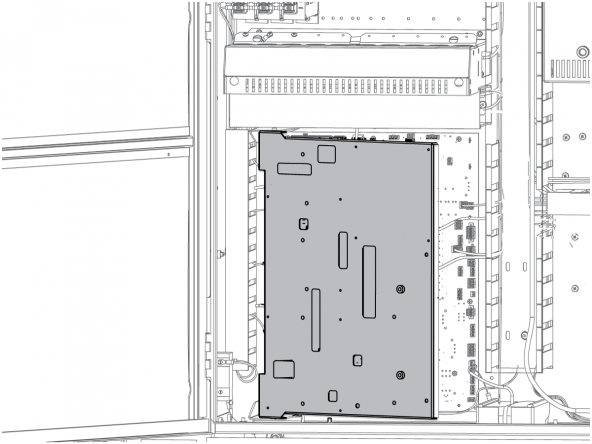
Attach the I/O PCB cover to the panel hinge mounts.

4

Open the I/O PCB cover and install the standoffs at the right-hand side of the I/O PCB, through the holes in the control cabinet.

Quad Chip PCB - Installation

1

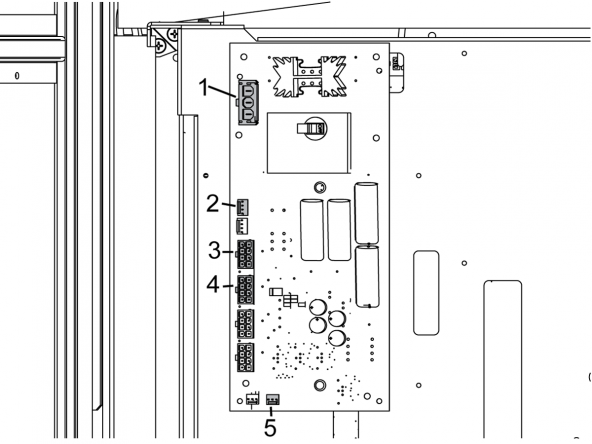
Attach the quad chip conveyor PCB to the mounting holes in the I/O PCB cover with the screws and spacers included in the kit.

2

Make these connections:

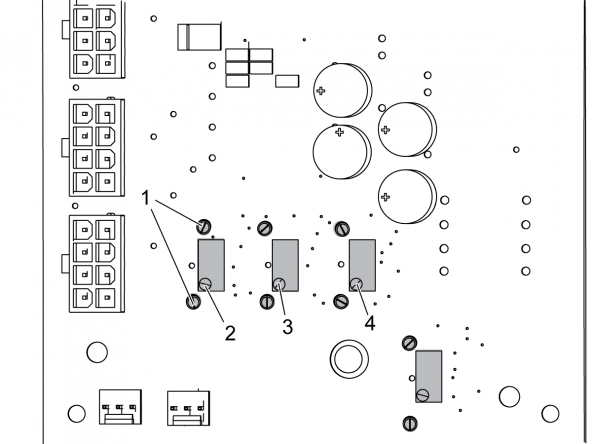
Connect the input power cable from the transformer TB2 77/78 to P1 [1].

Connect the over-current sensor cable between P8 on the chip conveyor PCB [5] and P1 on the I/O PCB.

Connect the chipc en/rev cable between P2 [2] on the chip conveyor PCB and P37 on the I/O PCB.

Connect (2) auger power cables to P6 [3] and P7 [4].

3

Close the cover and tighten the two cover locking screws.

Operation Test

1

The chip conveyor over-current potentiometers reverse the direction of the conveyor belt if it becomes jammed or stalls. The potentiometers are preset at the factory. In most cases you should not need to adjust the potentiometers.

2

Untag/Unlock and turn on the main circuit breaker, and power [ON] the machine.

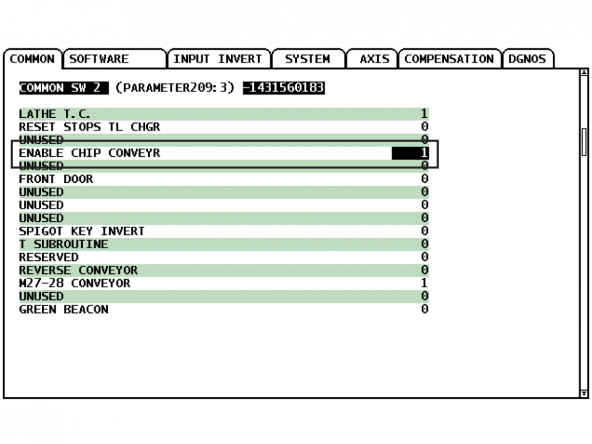
Change Parameter 209:3 from 0 to 1.

3

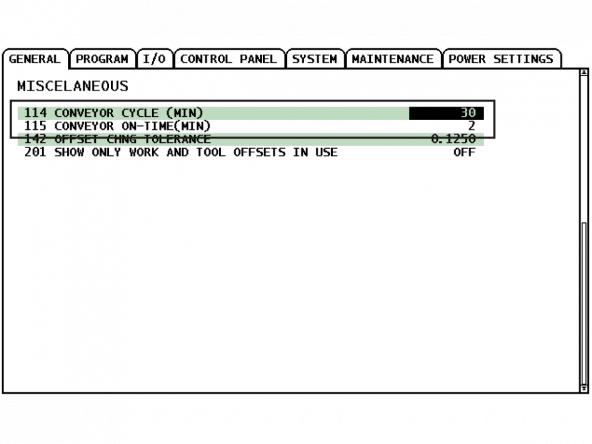
Change Settings 114 (CONVEYOR CYCLE (MIN)) and 115 (CONVEYOR ON-TIME (MIN)) to set chip conveyor run times.

If Setting 114 is set to 30 and Setting 115 is set to 2, the conveyor will turn itself on every 30 minutes, run for 2 minutes, and then shut itself off.

4

Adjust the chip conveyor over-current potentiometers to 4.5Kohm ± 100ohm. Touch the probes of a digital ohmmeter to the contact points [1] on R15 [2], R23 [3], and R31 [4].

5

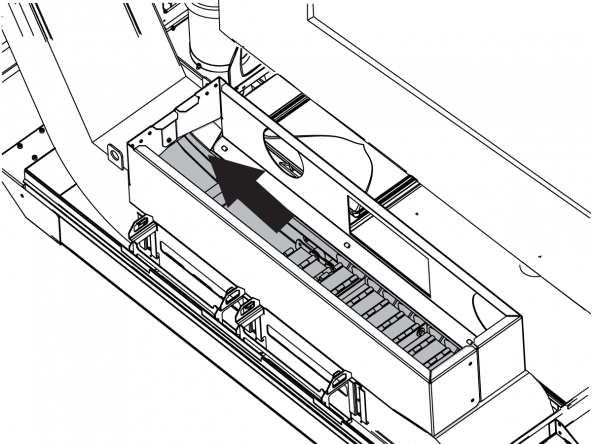
Remove the conveyor cover.

Caution: Make sure to keep hair, clothing, and tools away from the conveyor belt when it is in operation with the cover removed.

Press [CHIP FWD].

The conveyor belt should move forward continuously.

If the conveyor belt does not move forward continuously, adjust each of the over-current potentiometers to 3.5Kohm.

If the conveyor belt still does not move forward continuously, visually inspect the conveyor belt to make sure that it is not mechanically bound.

Press [CHIP REV].

The belt should move backwards briefly and then stop.

6

To test the auto-reverse function:

Press [CHIP FWD].

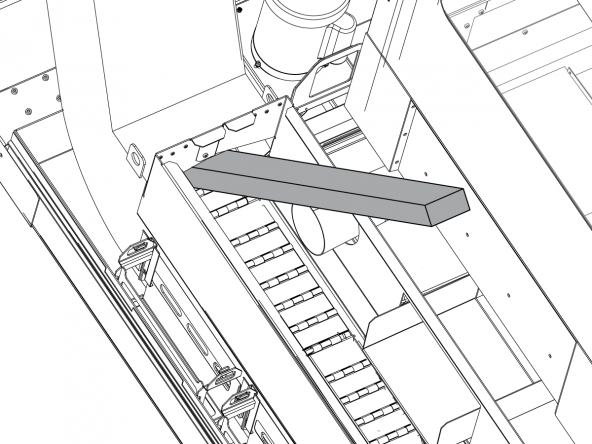
Briefly wedge a 2" (50.8 mm) x 4" (101.6 mm) x 48" (122 cm) piece of wood between the sheet metal housing and the conveyor belt to stall the conveyor.

Caution: Make sure to keep both hands on the wood piece so that it doesn't move suddenly.

The conveyor belt should pause briefly and then reverse direction.

Remove the wood piece.

If the conveyor belt does not reverse automatically, adjust the over-current potentiometers to 5.5Kohm and repeat the test.

Lastly, install the conveyor cover.

Recently Viewed Items

You Have No Recently Viewed Items Yet

Feedback
Haas Logo

Haas Delivered Price

This price includes shipping cost, export and import duties, insurance, and any other expenses incurred during shipping to a location in France agreed with you as a buyer. No other mandatory costs can be added to the delivery of a Haas CNC Product.

KEEP UP WITH THE LATEST HAAS TIPS AND TECHNOLOGY...

Sign up now!   

HAAS TOOLING ACCEPTS THE FOLLOWING:

  • Service & Support
  • Owners
  • Request Service
  • Operator Manuals
  • Haas Parts
  • Rotary Repair Request
  • Pre-Install Guides
  • Shopping Tools
  • Build & Price a New Haas
  • Available Inventory
  • The Haas Price List
  • CNCA Financing
  • About Haas
  • Accessibility Statement
  • DNSH Statement
  • Export Compliance
  • Careers
  • Certifications & Safety
  • Contact Us
  • History
  • Terms & Conditions
  • Haas Tooling Terms & Conditions
  • Privacy
  • Warranty
  • Haas Community
  • Haas Certification Program
  • Haas Motorsports
  • Gene Haas Foundation
  • Haas Technical Education Community
  • Events
  • Join the Conversation
  • Facebook
  • X
  • Flickr
  • YouTube
  • LinkedIn
  • Instagram
  • TikTok
© 2026 Haas Automation, Inc – CNC Machine Tools
This site is protected by reCAPTCHA and the Google Privacy Policy and Terms of Service apply.

2800 Sturgis Rd., Oxnard, CA 93030
Toll Free: (888) 817-4446 / Fax: 805-278-8554