My Haas Welcome,
!
Haas Tooling MyHaas/HaasConnect Sign In Register Haas Tooling MyHaas/HaasConnect Sign Out Welcome, My Machines Latest Activity My Quotes My Account My Users Sign Out
Find Your Distributor
  1. Select Language
    1. English
    2. Deutsch
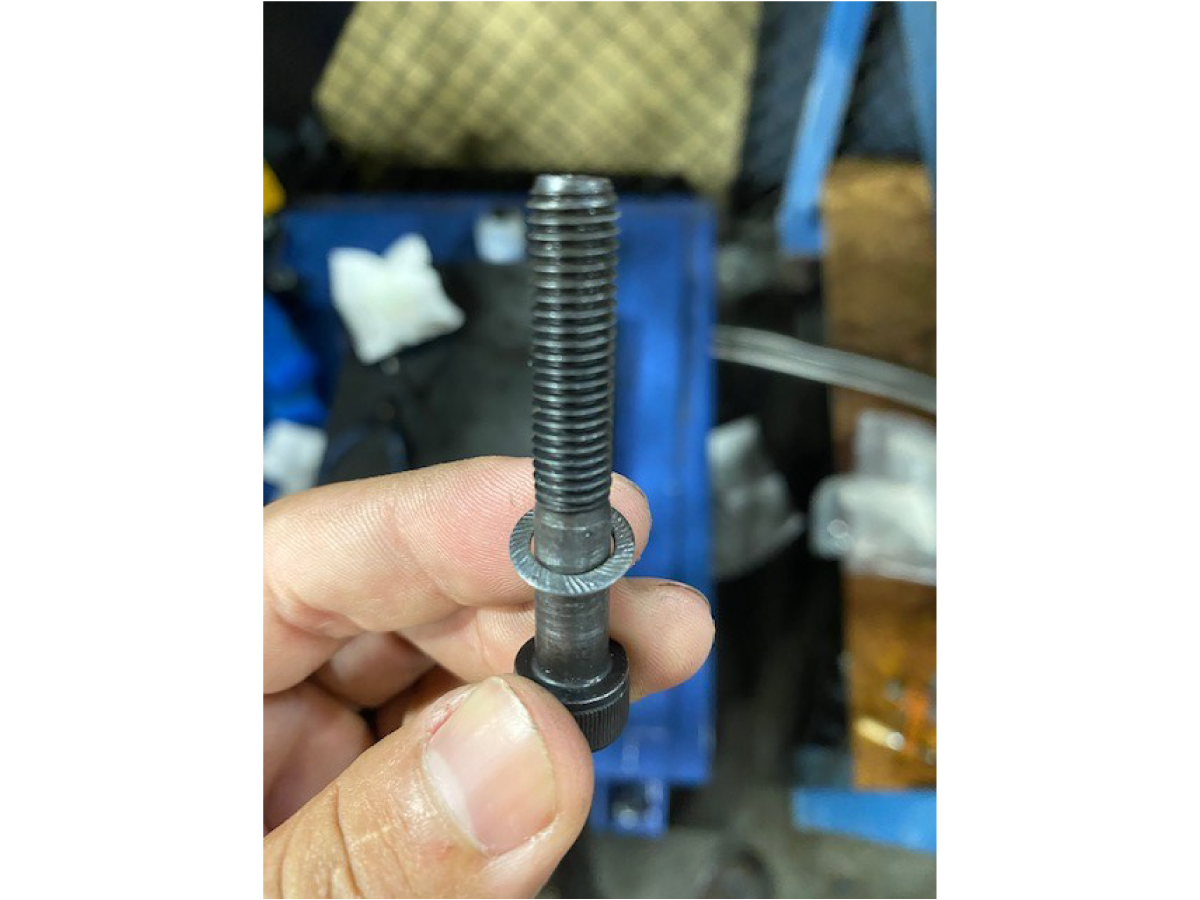
    3. Español - ES
    4. Español - MX
    5. Français
    6. Italiano
    7. Português
    8. Český
    9. Dansk
    10. Nederlands
    11. Magyar
    12. Polski
    13. Svenska
    14. Türkçe
    15. 中文
    16. Suomi
    17. Norsk
    18. الإنجليزية
    19. български
    20. Hrvatski
    21. Ελληνικά
    22. Română
    23. Slovenský
    24. Slovenščina
    25. 한국어
    26. 日本語
    27. Українська
  • machines Main Menu
    • Vertical Mills
      Vertical Mills
      Vertical Mills View All
      • Vertical Mills
      • VF Series
      • Universal Machines
      • VR Series
      • VP-5 Prismatic
      • Pallet-Changing VMCs
      • Mini Mills
      • Mold Machines
      • High-Speed Drill Centers
      • Drill/Tap/ Mill Series
      • Toolroom Mills
      • Pocket Mill
      • Compact Mills
      • Gantry Series
      • SR Sheet Routers
      • Extra-Large VMC
      • Double-Column Mills
      • 3+2 Positioning Machines
    • Multi-Axis Solutions
      Multi-Axis Solutions
      Multi-Axis Solutions View All
      • Multi-Axis Solutions
      • Y-Axis Lathes
      • 5-Axis Mills
    • Lathes
      Lathes
      Lathes View All
      • Lathes
      • ST Series
      • Dual-Spindle
      • Box Way Series
      • Toolroom Lathes
      • Chucker Lathe
      • Pocket Lathe
      • Haas Bar Feeders
    • Horizontal Mills
      Horizontal Mills
      Horizontal Mills View All
      • Horizontal Mills
      • 50-Taper
      • 40-Taper
    • Rotaries & Indexers
      Rotaries & Indexers
      Rotaries & Indexers View All
      • Rotaries & Indexers
      • Rotary Tables
      • Indexers
      • 5-Axis Rotaries
      • Extra-Large Rotaries
    • Special Series
      Special Series
      Special Series View All
      • Special Series
      • EU_Series_Redirect
    • Automation Systems
      Automation Systems
      Automation Systems View All
      • Automation Systems
      • Mill Automation
      • Lathe Automation
      • Automatic Parts Loaders
      • Automation Models
    • Desktop Machines
      Desktop Machines
      Desktop Machines View All
      • Desktop Machines
      • Desktop Mill
      • Desktop Lathe
      • Control Simulator, Standard
      • Control Simulator, Premium
    • Shop Equipment
      Shop Equipment
      Shop Equipment View All
      • Shop Equipment
      • Knee Mill
      • Haas Manual Lathes
      • Haas Saws
    • Fabrication Machines
      Fabrication Machines
      Fabrication Machines View All
      • Fabrication Machines
      • Laser Cutting Machines
      • CNC Press Brakes
    • QUICK LINKS Special Series  Special Series 
      EU SERIES EU SERIES BUILD & PRICE | PRICE LIST BUILD & PRICE | PRICE LIST In-Stock Machines In-Stock Machines WHAT’S NEW WHAT’S NEW YOUR FIRST CNC YOUR FIRST CNC
      SHOPPING TOOLS
      • Build & Price a Haas
      • Price List
      • Available Inventory
      • CNCA Financing
      WANT TO TALK TO SOMEONE?

      A Haas Factory Outlet (HFO) can answer your questions, and walk you through your best options.

      CONTACT YOUR DISTRIBUTOR >
  • Options Main Menu
    • The Haas Control Value Option Packages
      Value Option Packages
      Value Option Packages View All
      • Value Option Packages
    • Product Image Spindles
      Spindles
      Spindles View All
      • Spindles
    • Product Image Tool Changers
      Tool Changers
      Tool Changers View All
      • Tool Changers
    • Product Image 4th- | 5th-Axis
      4th- | 5th-Axis
      4th- | 5th-Axis View All
      • 4th- | 5th-Axis
    • Product Image Turrets & Live Tooling
      Turrets & Live Tooling
      Turrets & Live Tooling View All
      • Turrets & Live Tooling
    • Product Image Probing
      Probing
      Probing View All
      • Probing
    • Haas Chip & Coolant Management Chip & Coolant Management
      Chip & Coolant Management
      Chip & Coolant Management View All
      • Chip & Coolant Management
    • The Haas Control The Haas Control
      The Haas Control
      The Haas Control View All
      • The Haas Control
    • Product Image Product Options
      Product Options
      Product Options View All
      • Product Options
    • Product Image Tooling & Fixturing
      Tooling & Fixturing
      Tooling & Fixturing View All
      • Tooling & Fixturing
    • Product Image Workholding
      Workholding
      Workholding View All
      • Workholding
    • Product Image 5-Axis Solutions
      5-Axis Solutions
      5-Axis Solutions View All
      • 5-Axis Solutions
      • 5 Easy Steps to 5-Axis
    • QUICK LINKS Special Series  Special Series 
      EU SERIES EU SERIES BUILD & PRICE | PRICE LIST BUILD & PRICE | PRICE LIST In-Stock Machines In-Stock Machines WHAT’S NEW WHAT’S NEW YOUR FIRST CNC YOUR FIRST CNC
      SHOPPING TOOLS
      • Build & Price a Haas
      • Price List
      • Available Inventory
      • CNCA Financing
      WANT TO TALK TO SOMEONE?

      A Haas Factory Outlet (HFO) can answer your questions, and walk you through your best options.

      CONTACT YOUR DISTRIBUTOR >
  • Why Haas Main Menu
      Discover the Haas Difference
    • Why Haas
    • MyHaas
    • Education Community
    • Industry 4.0
    • Haas Certification
    • Customer Testimonials
  • Service Main Menu
      Welcome to Haas Service
      SERVICE HOME Operator’s Manuals How-To Procedures Troubleshooting Guides Preventive Maintenance Haas Parts Haas Tooling Videos
  • Videos Main Menu
  • Main Menu
    • View All
    • View All
    • View All
    • View All
      • HTEC Curriculum Support
      • Haas Value Option Packages (VOP) Journey
    • View All
      • Haas 10 kg Cobot Package
      • Cobot Kits
      • DC-1 Drill Center
      • CNC Sales News
      • Do More With Your Haas
    • View All
    • View All
      • contact-us-test
      • 4 - AUTOMATION SYSTEMS
      • Carousel-V2
      • expert test
      • Demo_Day_Trident-test
      • Link Test
      • image-sale-tag-test
      • article-list-test
      • Haas 25 kg Robot Package
      • test-algolia-page
    • View All
    • View All
    • View All
    • View All
      • calc-test
    • View All
    • QUICK LINKS Special Series  Special Series 
      EU SERIES EU SERIES BUILD & PRICE | PRICE LIST BUILD & PRICE | PRICE LIST In-Stock Machines In-Stock Machines WHAT’S NEW WHAT’S NEW YOUR FIRST CNC YOUR FIRST CNC
      SHOPPING TOOLS
      • Build & Price a Haas
      • Price List
      • Available Inventory
      • CNCA Financing
      WANT TO TALK TO SOMEONE?

      A Haas Factory Outlet (HFO) can answer your questions, and walk you through your best options.

      CONTACT YOUR DISTRIBUTOR >
  • Haas Tooling Main Menu
  • Haas Service Parts Main Menu

My Haas Welcome,
!
Haas Tooling MyHaas/HaasConnect Sign In Register Haas Tooling MyHaas/HaasConnect Sign Out Welcome, My Machines Latest Activity My Quotes My Account My Users Sign Out
Find Your Distributor
  1. Select Language
    1. English
    2. Deutsch
    3. Español - ES
    4. Español - MX
    5. Français
    6. Italiano
    7. Português
    8. Český
    9. Dansk
    10. Nederlands
    11. Magyar
    12. Polski
    13. Svenska
    14. Türkçe
    15. 中文
    16. Suomi
    17. Norsk
    18. الإنجليزية
    19. български
    20. Hrvatski
    21. Ελληνικά
    22. Română
    23. Slovenský
    24. Slovenščina
    25. 한국어
    26. 日本語
    27. Українська
×

Search Results

Web Pages

Images

    • <
    • 1
    • >

H-5AX C-Axis Counterbore Touch Up - Instructions AD0671

Service Home How To Procedures H-5AX C-Axis Counterbore Touch Up - Instructions
Recently Updated Last updated: 05/07/2025

H-5AX C-Axis Counterbore Touch Up - Instructions


AD0671

UNDER CONSTRUCTION

H-5AX C-Axis Counterbore Touch Up - Instructions

- Jump to Section - 1. Introduction 2. Instruction (32 steps) Back to Top

IMPORTANT: This tool has not been released yet, this page is currently for reference only. This warning and the "UNDER CONSTRUCTION" tag will be removed once it has been released.

Introduction

This procedure is intended for VR machines that need to touch up the C-axis mounting screws counterbore hole.

This tool is intended for use after gaining SERVICE APPROVAL. Failure to do so can result in void warraty for the H-5AX spindle head. 

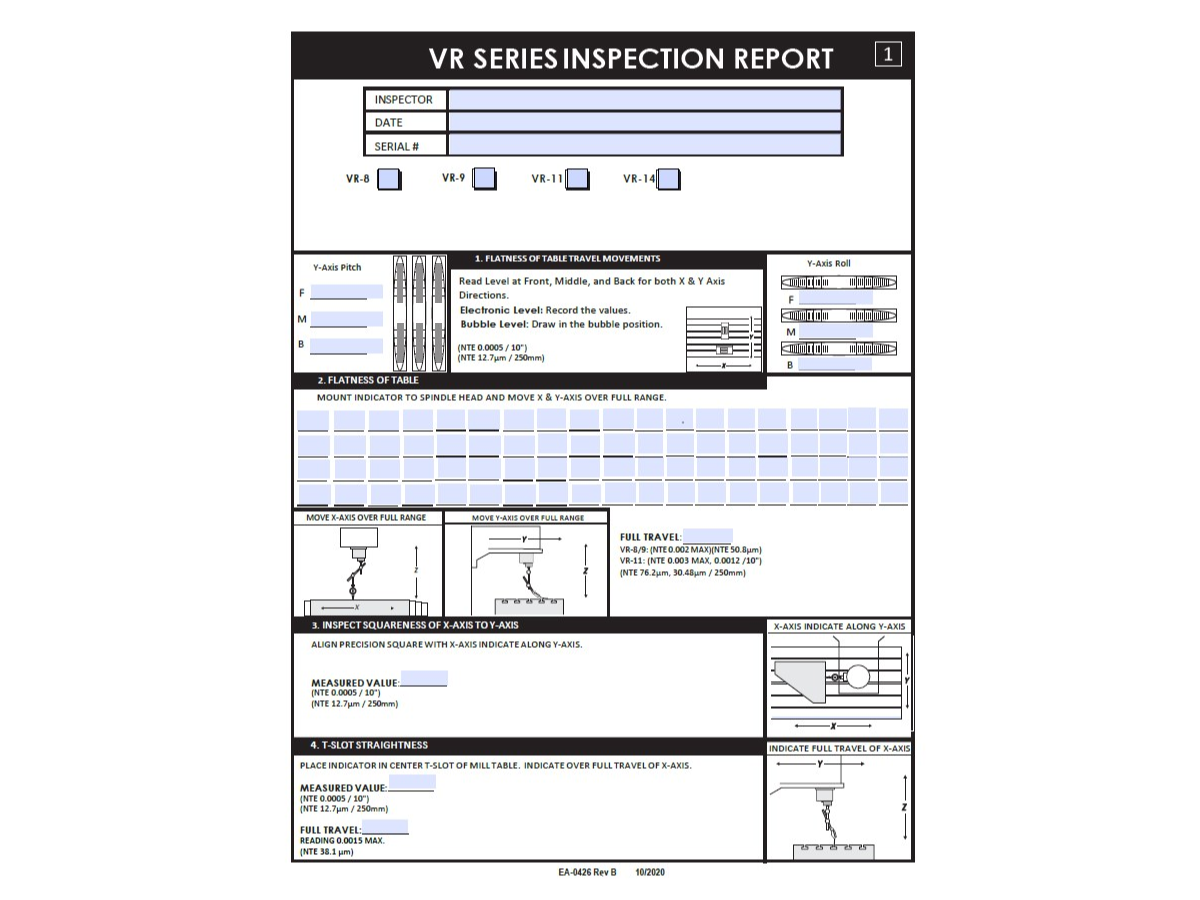
Spindle approval requires to fill out the latest Inspection Report on HBC and consult with Haas Service before attempting any geometry adjustments.

 Note: This site is available only to Haas Service Techs.

 WARNING: Breaking the DON'T REMOVE seal on the spindle without contacting Haas Service will VOID the warranty. Contact Haas Service before proceeding with process.

NOTE: It is highly recommended to obtain a borescope for this procedure, this will be used for the majority of this procedure.

This procedure applies to the following kits:

  • T-0158 HSD C-AXIS COUNTERBORE CLEANUP KIT

NOTE: Haas is requiring that the serrated/small steel washers be replaced with hardened thick washers. Order part number 93-3769 HSD C-AXIS MOUNTING HARDWARE SVC KIT for the proper hardened washers and longer bolts. 

Inspection Report

Instruction

1

Remove BSPP plug fittings to access the C-Axis M8 socket head cap screws (QTY. 7 ). Plug fittings should be present.

2

BSPP fitting removed for access.

3

Begin with holes [1] - [4] marked in this image. These will be the easiest as they do not require the protection sleeve.

Do not proceed with the unmarked holes in the image without the protection sleeve. That process will be explained at a later point in this procedure.

4

Start with the hole marked [1] as shown in the image.

NOTE: You may start with any hole that is marked [1] - [4] in the previous step, but for this example we are choosing to start with [1]

5

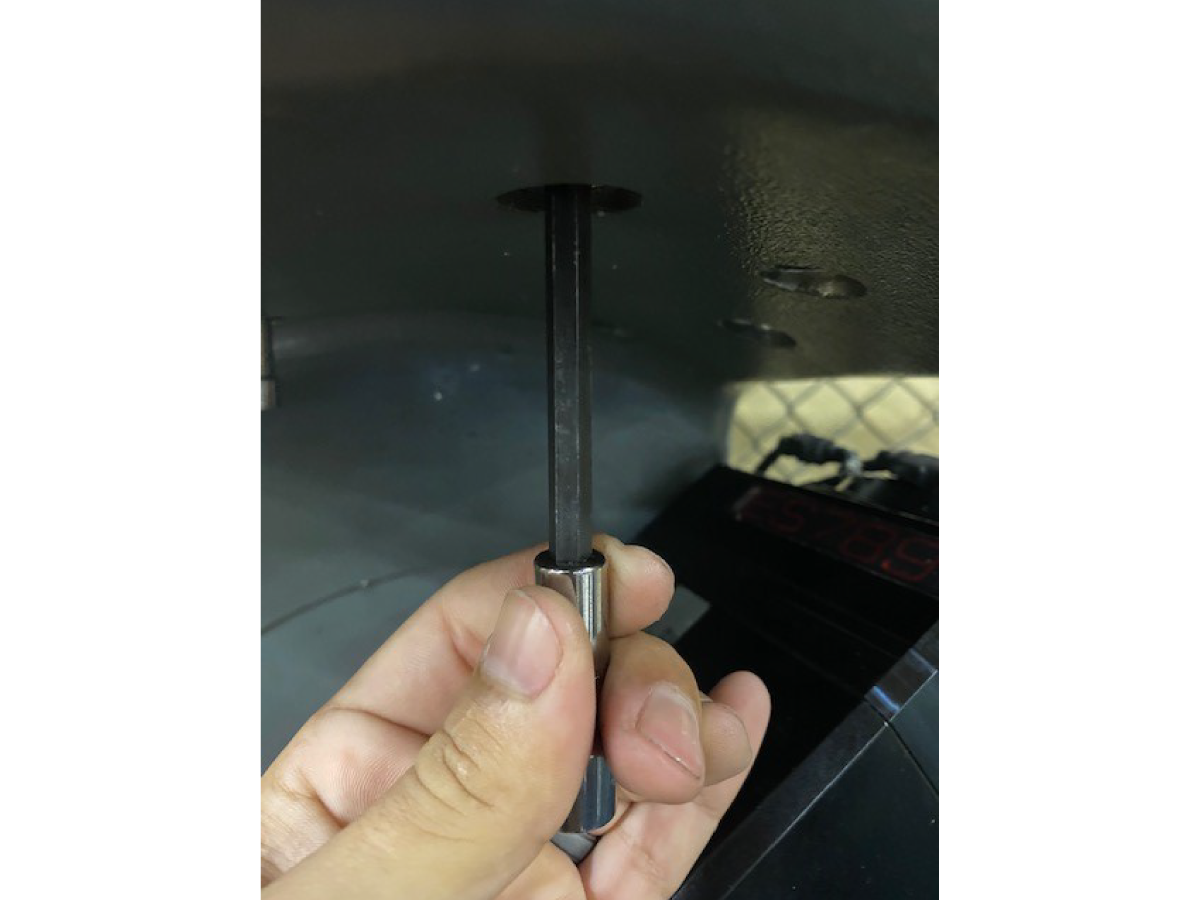
Using a deep hex 6mm socket bit, remove one SHCS.

6

Do not remove all SHCS’s at once. Complete the process for one SHCS and then move on to the next.

7

The SHCS’s will have serrated washers. These need to be removed before cleaning the counter bore seats. Otherwise, the HSS counterbore tool life will be reduced.

NOTE: Check inside the bore  using a borescpoe if the serrated washer is stuck to the casting body, remove them they are stuck. It is recommended to use the threads of the bolt to try and retrieve the serrated washer if it is stuck.

8

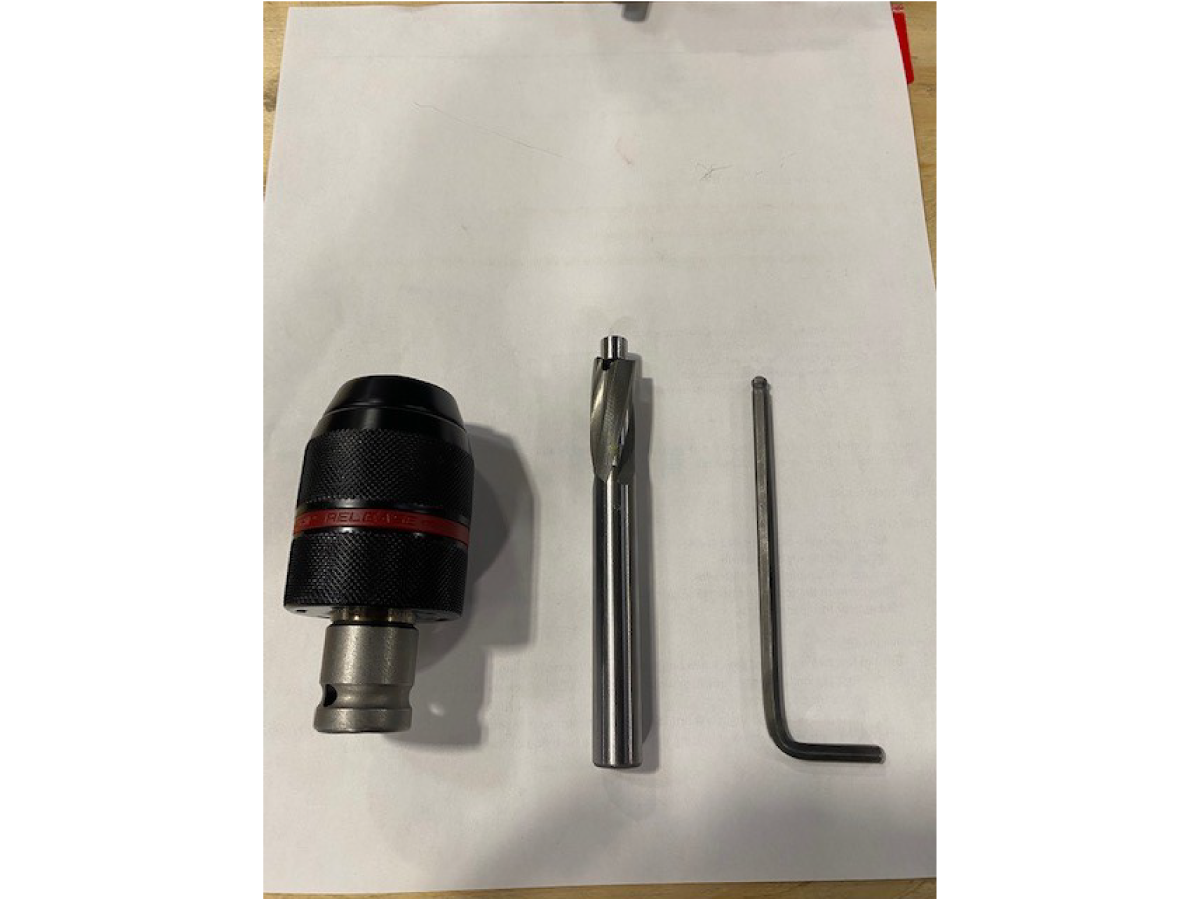
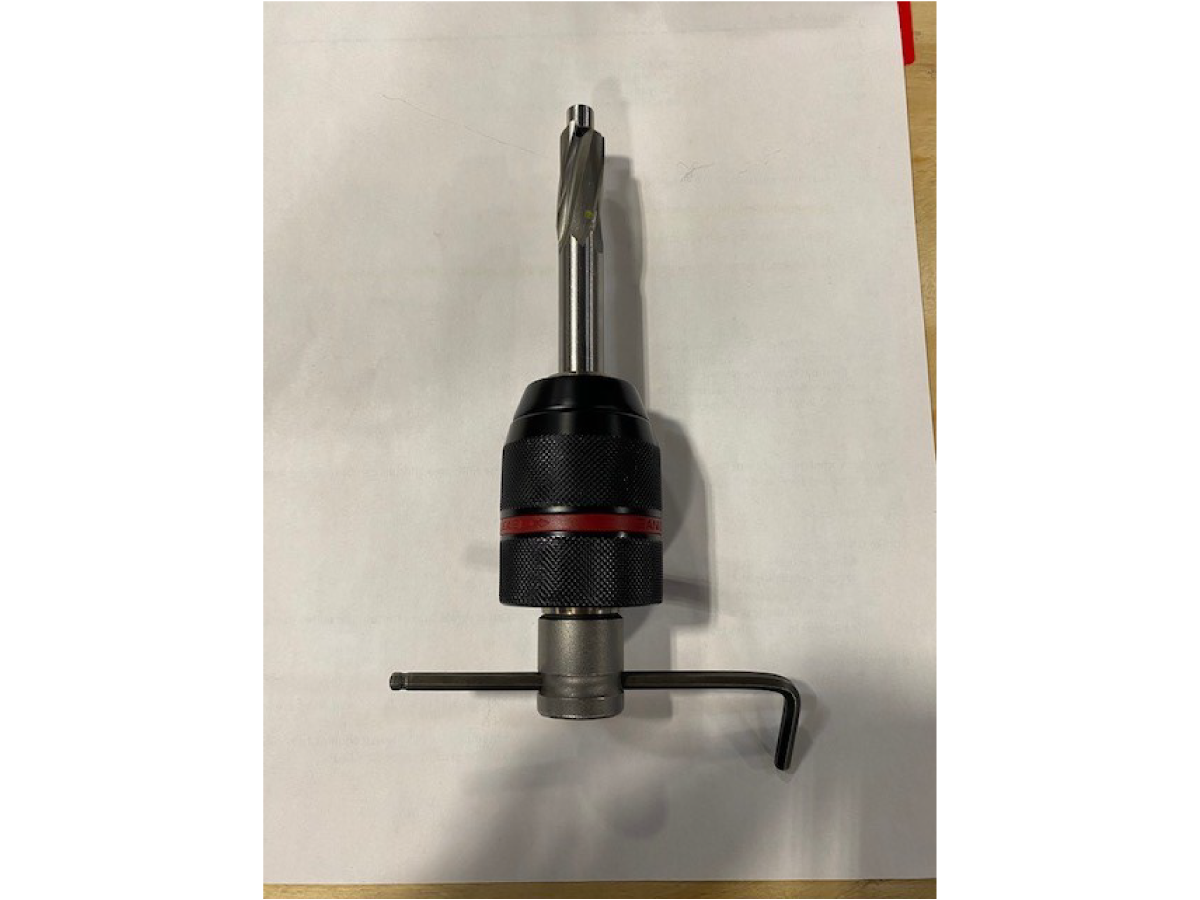
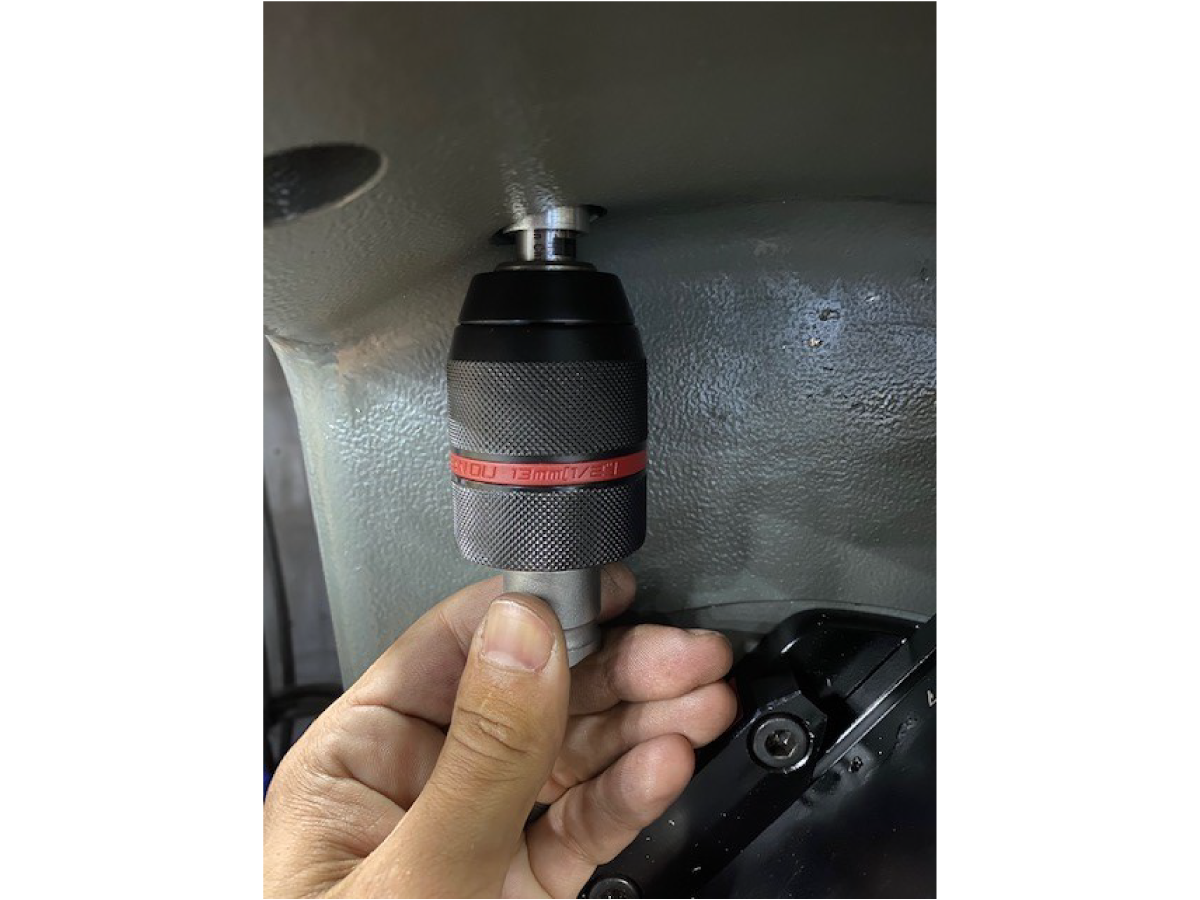
Once the single SHCS and serrated washer are removed, assemble the counter bore cleaning tool. Parts include the drill chuck (provided), the HSS counterbore tool with pilot (provided), and a 4mm allen key (not provided).
9

The tool assembled should look as shown.

NOTE: It is recommended that for the seat to be cut without the allen key. This allows for a good cutting feedback through the tool.

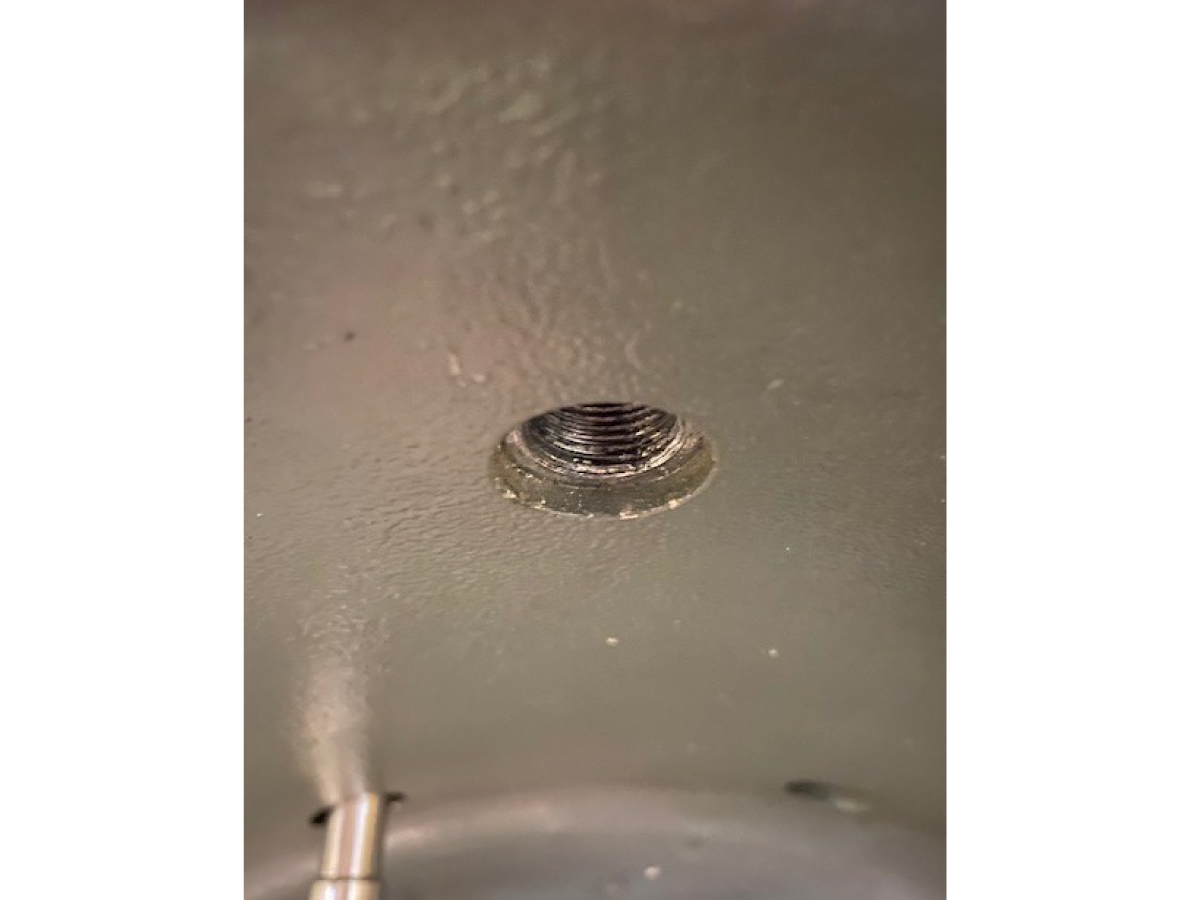
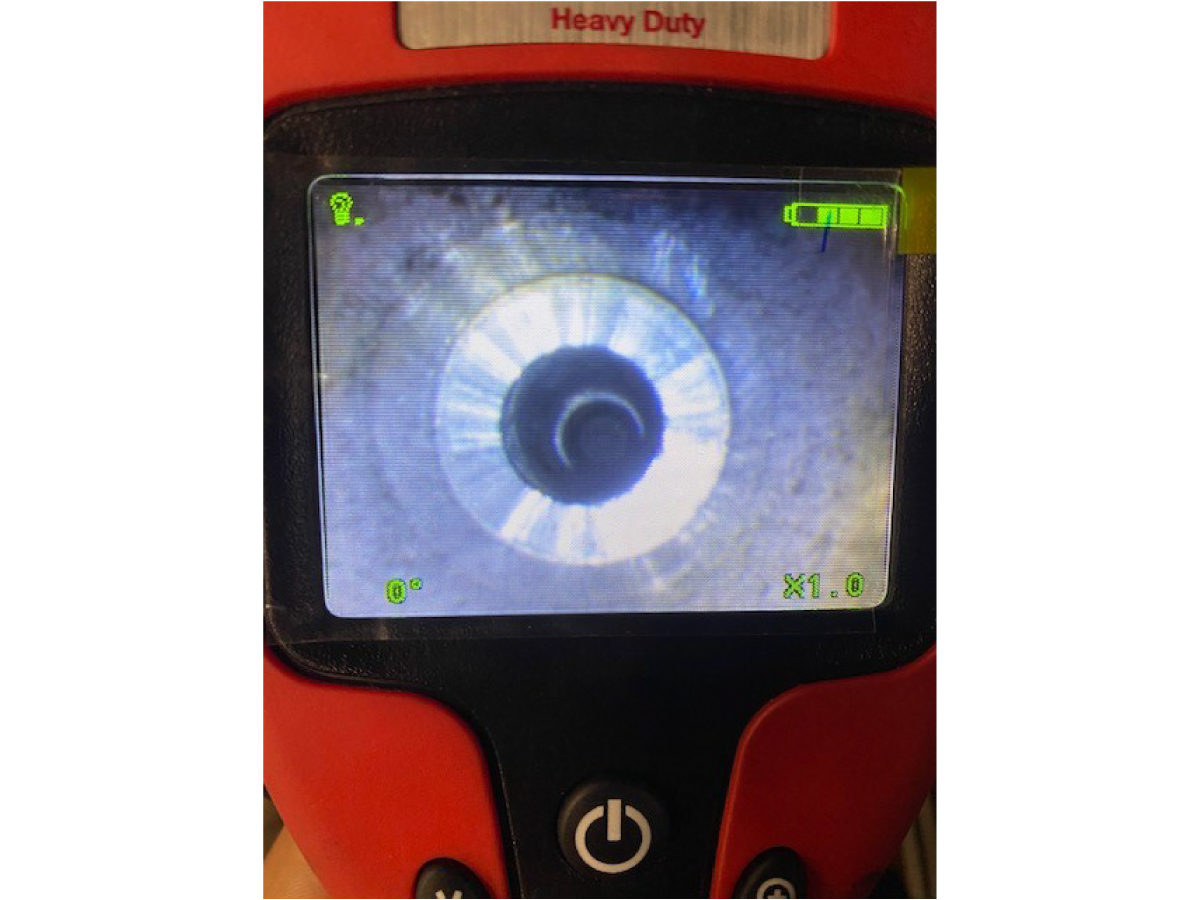
10

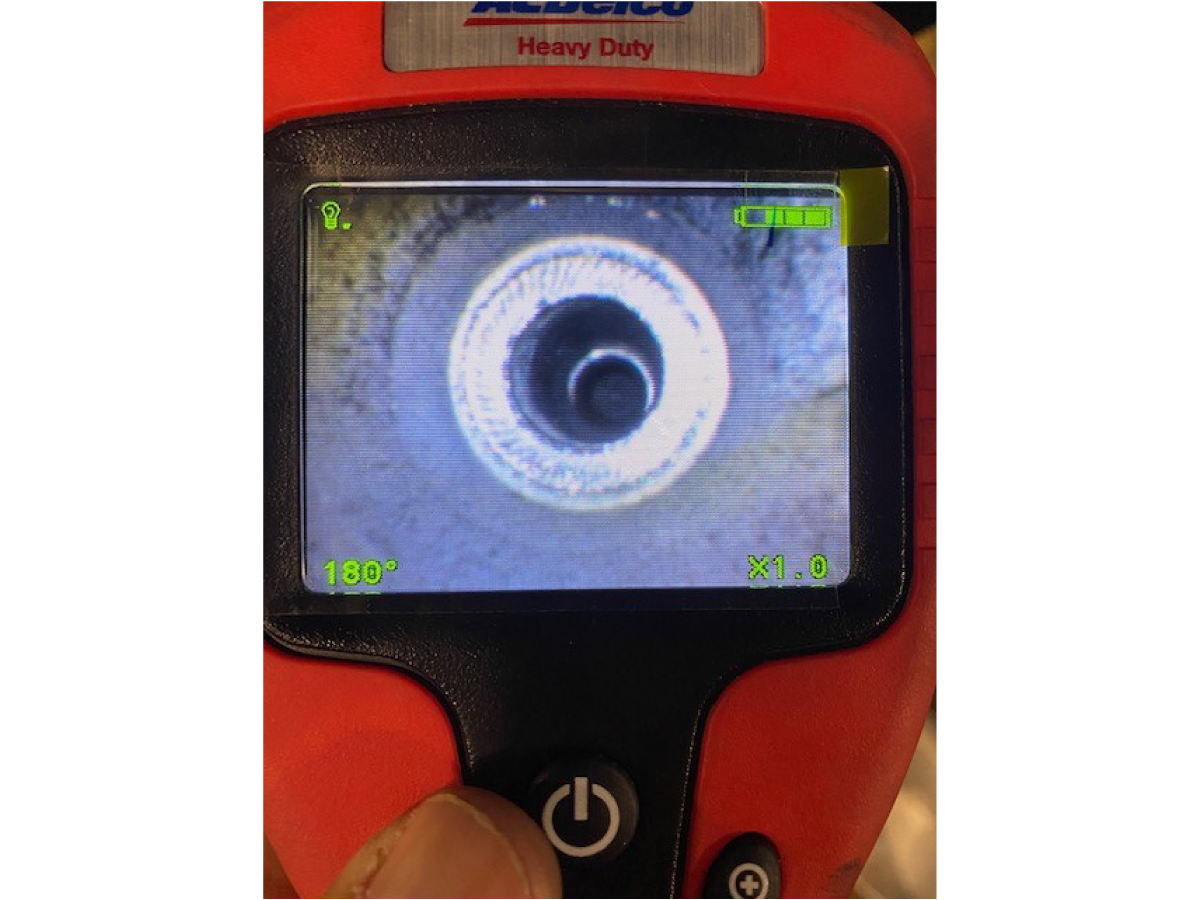
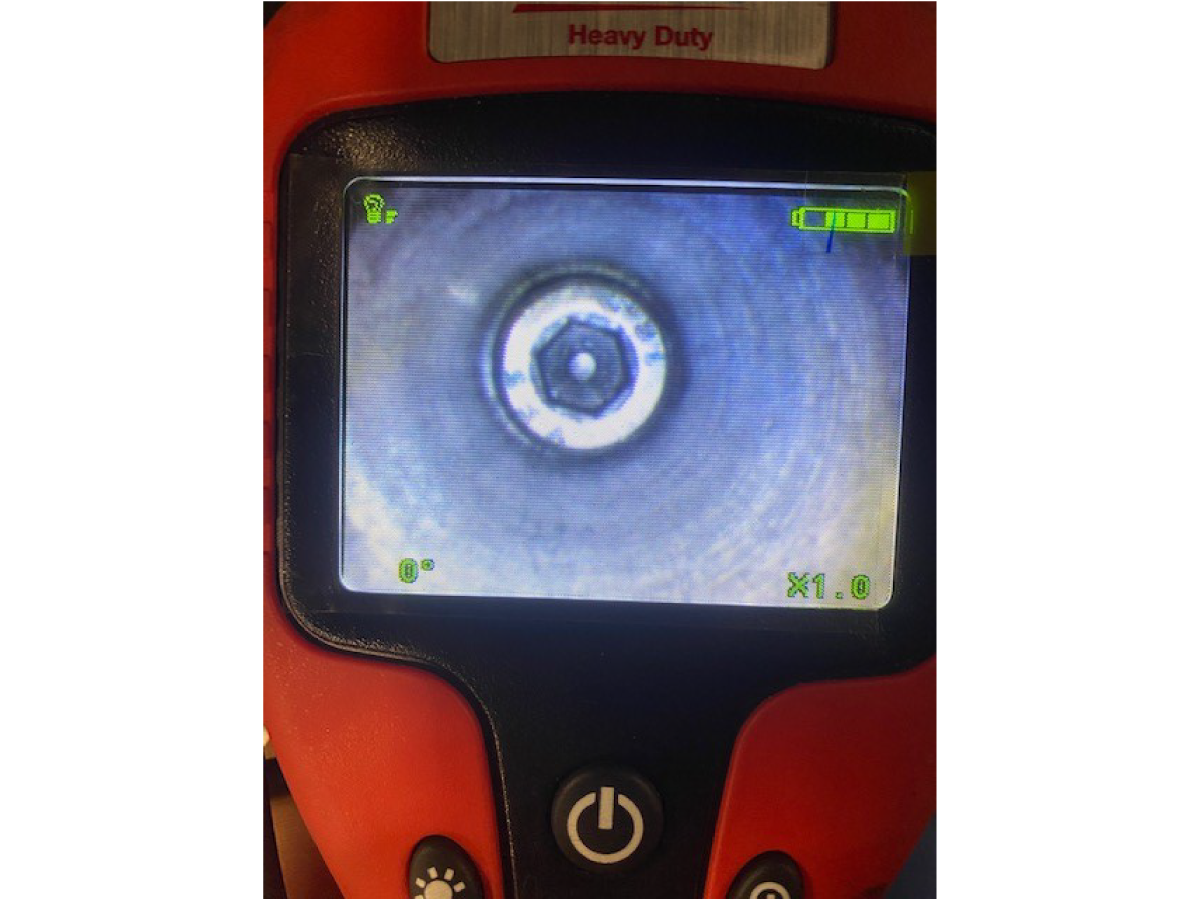
This is a reference photo of the counterbore seat before being cleaned.

NOTE: It is recommended to have some kind of borescope to view the progress of the hole

11

Insert the tool and rotate clockwise  approximately 15-20 revolutions to clean the counterbore seat. Maintain constant pressure while rotating. Aluminum shavings should fall from the access port.

NOTE: It is recommended that for the seat to be cut without the allen key. This allows for a good cutting feedback through the tool.

NOTE: Depending on the quality of the hole and the pressure applied it may take more or less than 15-20 revolutions to clean the counterbore. 

12

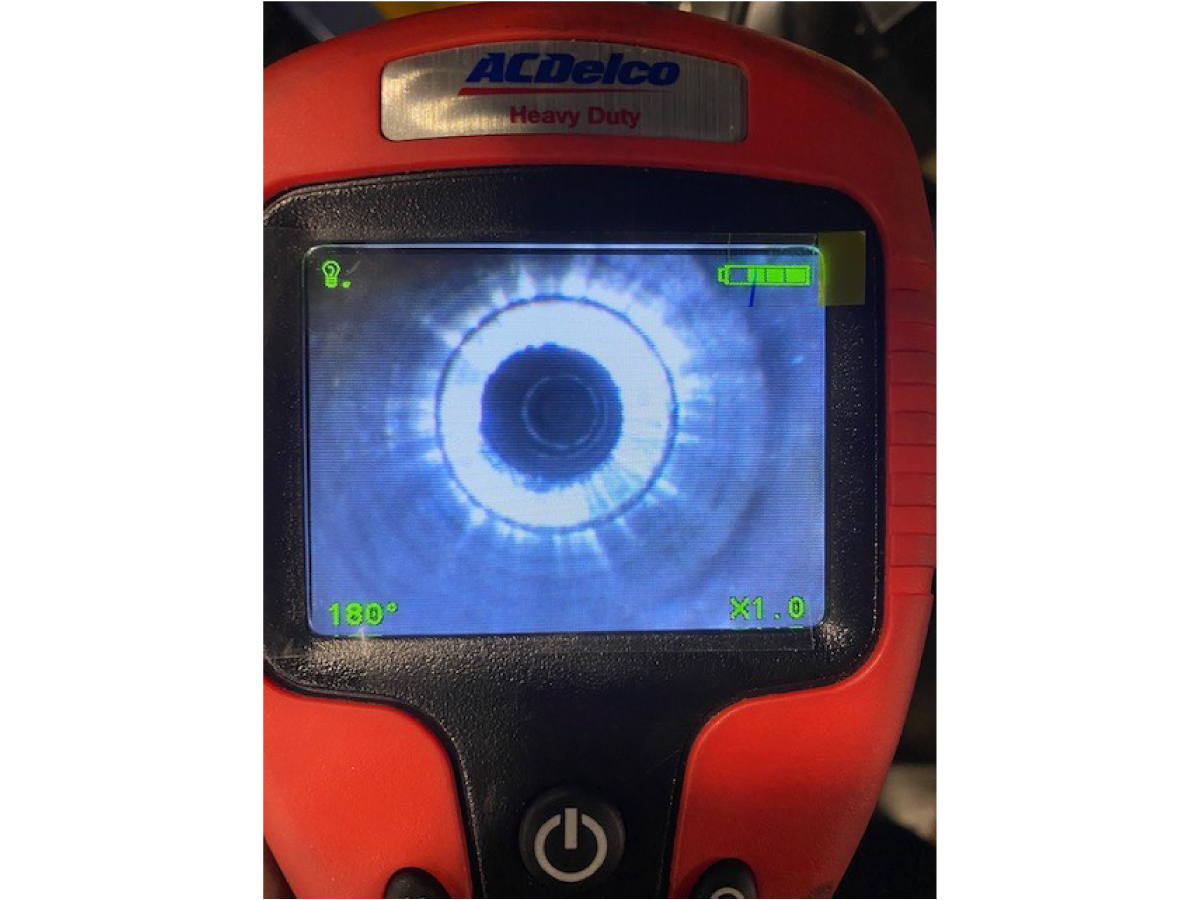
This is a reference photo of the counterbore seat after the cleaning. Washer serrations have been removed.

NOTE: Keep checking the counterbore to make sure the whole surface has been cleaned up.

13

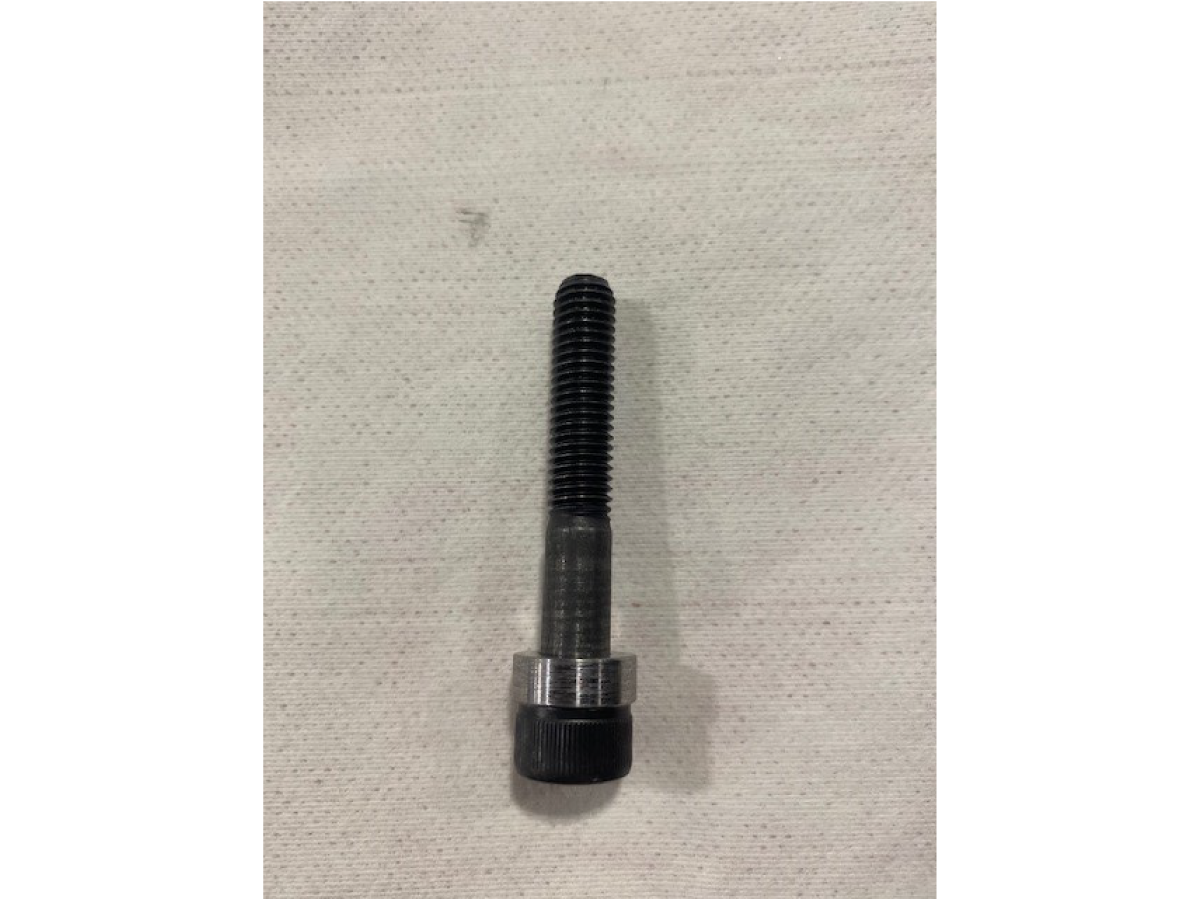
Using the hard washer and the M8 X 1.25 X 50mm Class 12.9 SHCS provided in kit 93-3769 HSD C-AXIS MOUNTING HARDWARE SVC KIT.

NOTE: The original bolt will not reusable as it cannot accomodate for the hard washers.

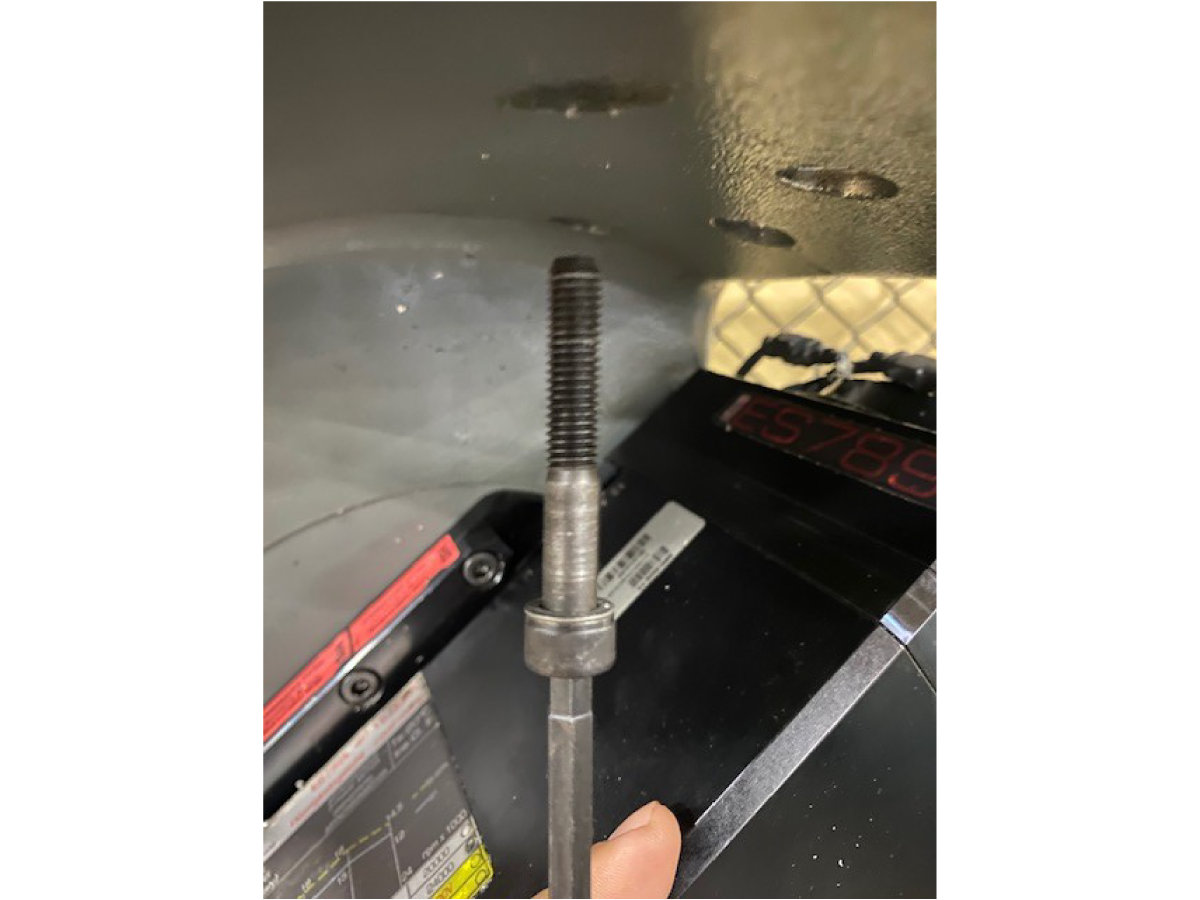
14

Assemble the hard washer and SHCS for installation.

15

Install hard washer and SHCS. Tighten the SHCS. Do not torque as the head still needs to be aligned. 

16

Repeat the process starting on Page 4 for [2], [3], and [4].

17

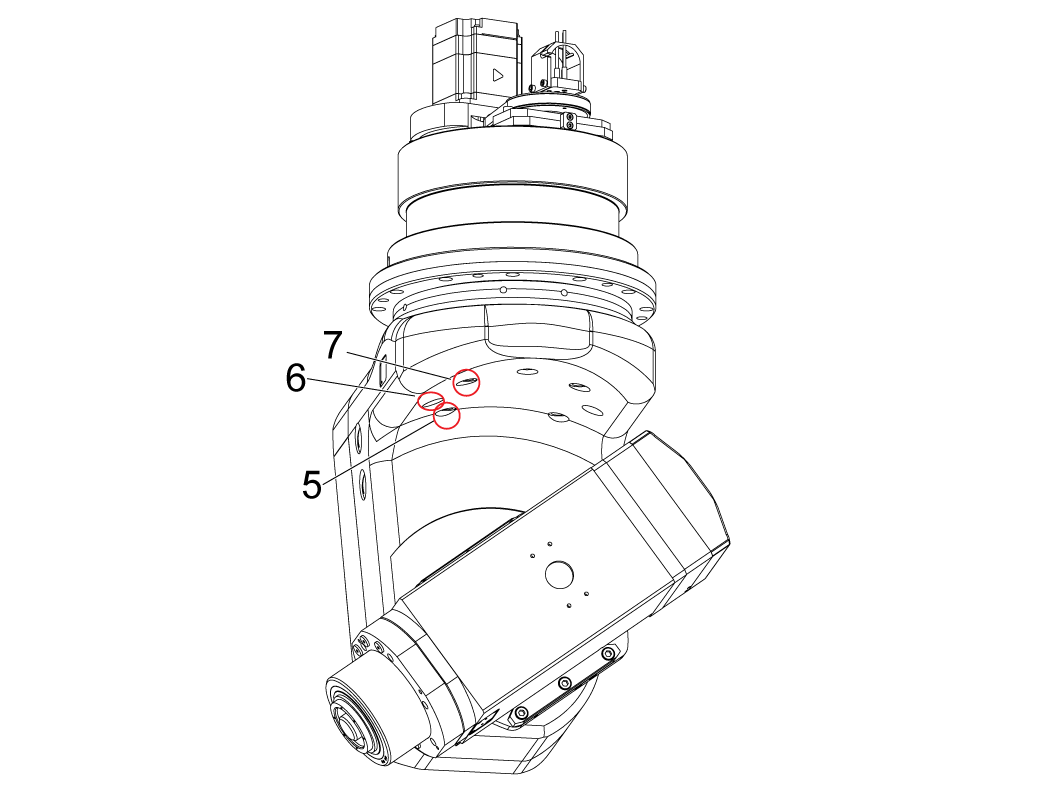
Once [1] - [4] have been addressed, move on to locations [5], [6], and [7]. These will require the B-axis to be positioned at  approximately 45°  as shown in order to access with the counterbore tooling.

This processes will slightly vary from holes [1] - [4].

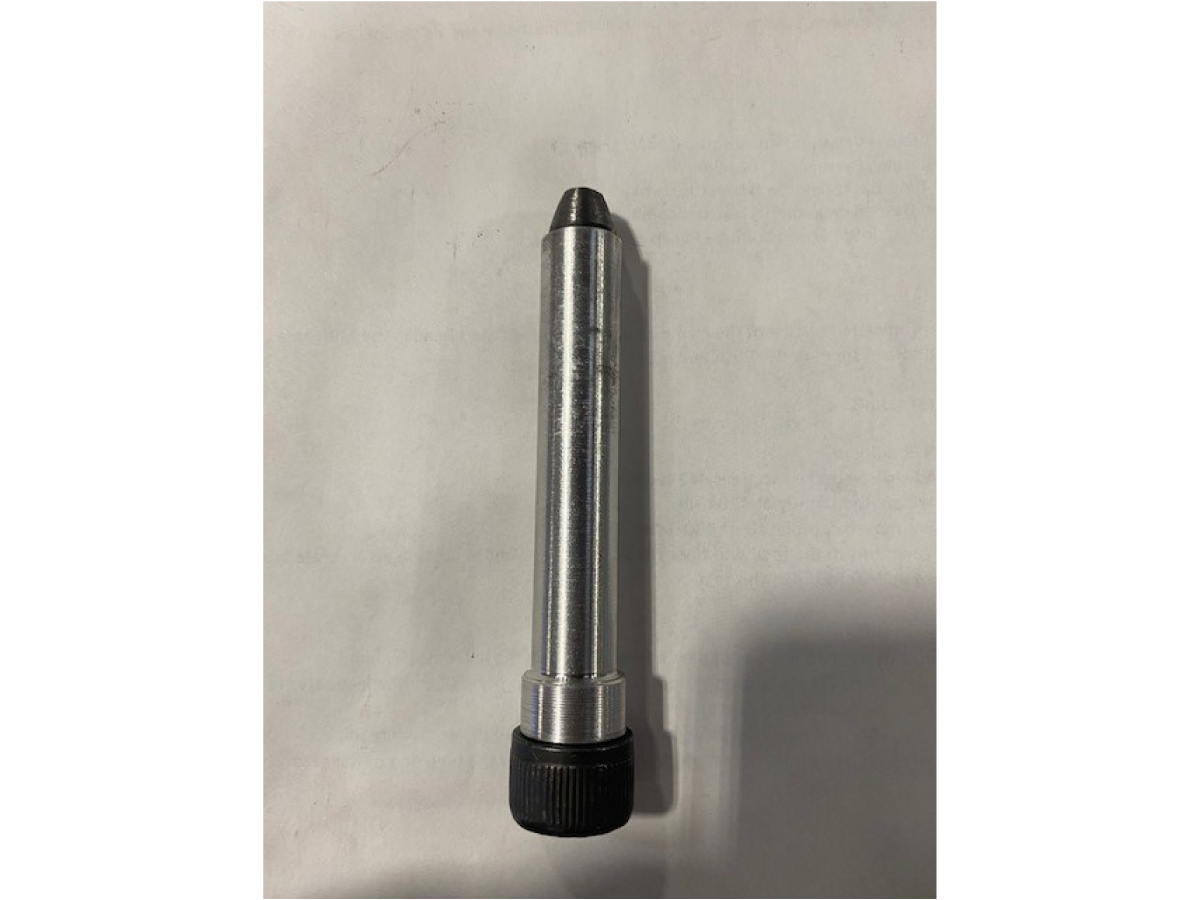
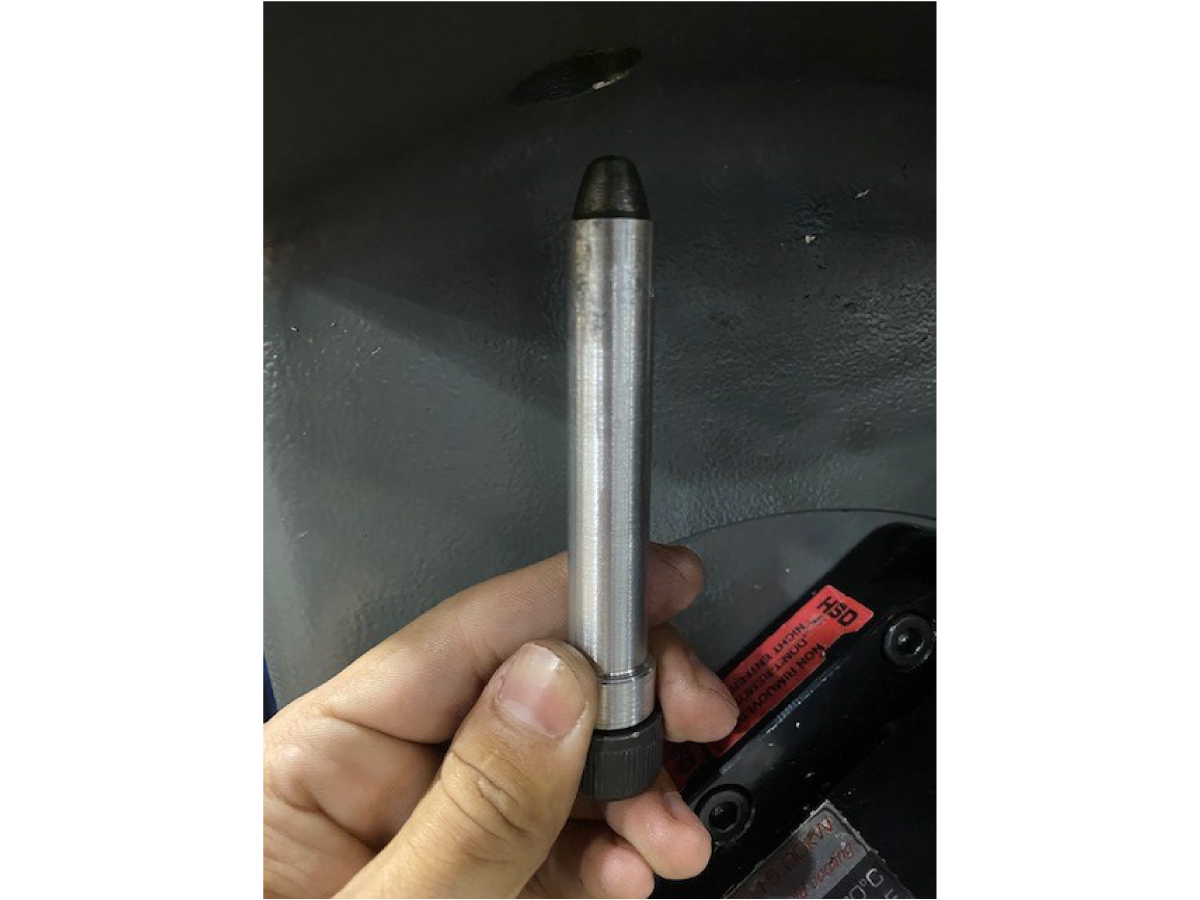
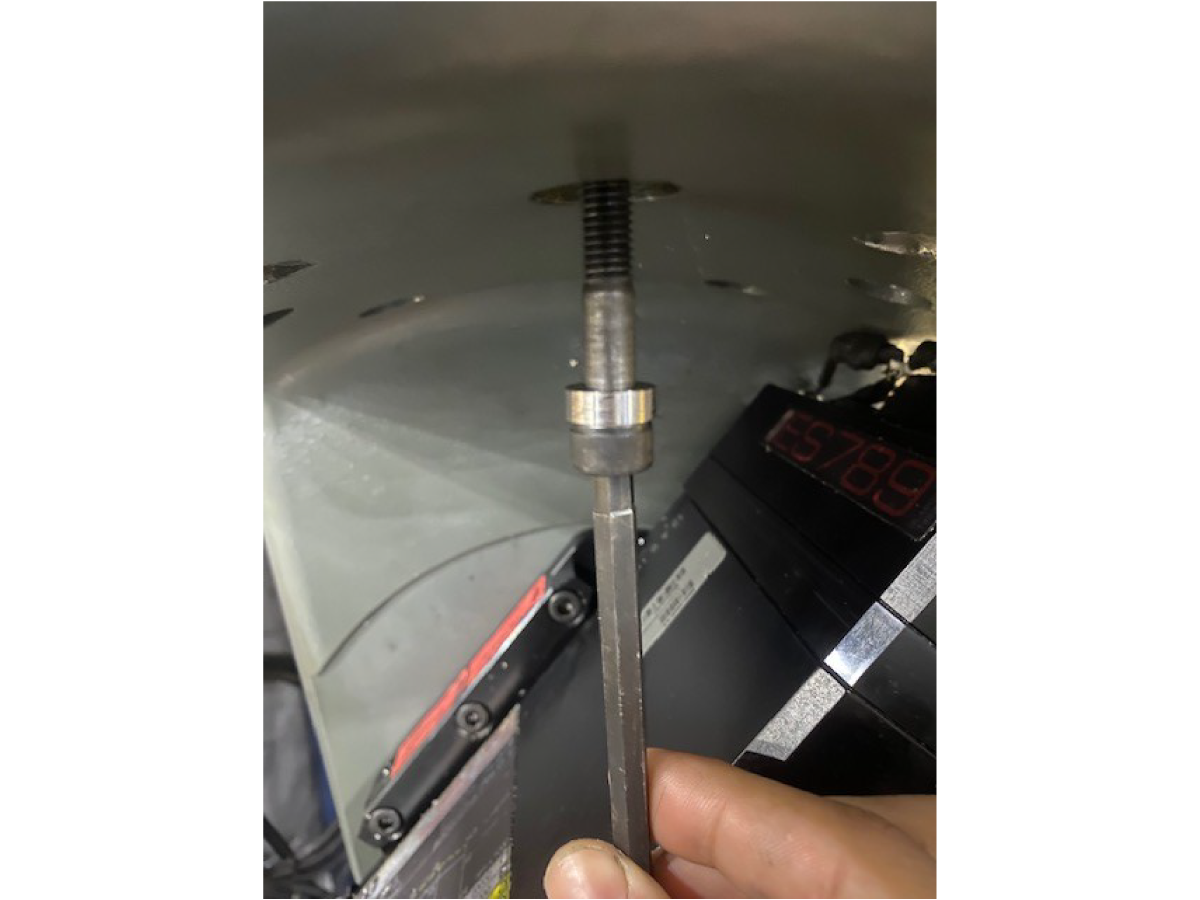
18

Start with the tapered pin (provided) and the aluminum protection sleeve (provided).

19

Assemble the two as shown.

20

The purpose of this assembly is to move the cabling out of the way to seat the aluminum sleeve. Once the sleeve is properly seated, remove the tapered pin. There should be no cable obstruction.

21

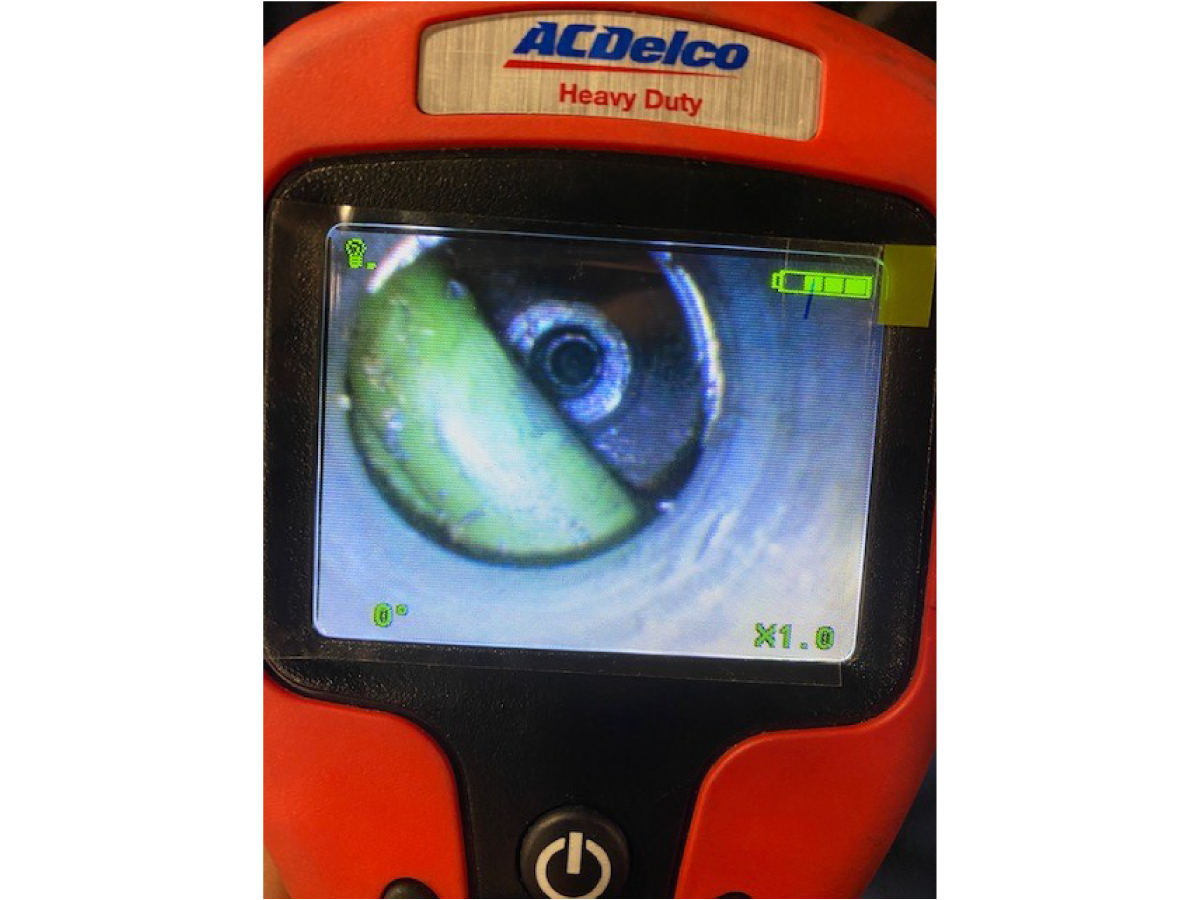
Here is a reference photo of the cabling through the access holes. Because of the cabling, the aluminum protection sleeve (provided) is needed to prevent damage to the cabling from the counterbore tool.

22

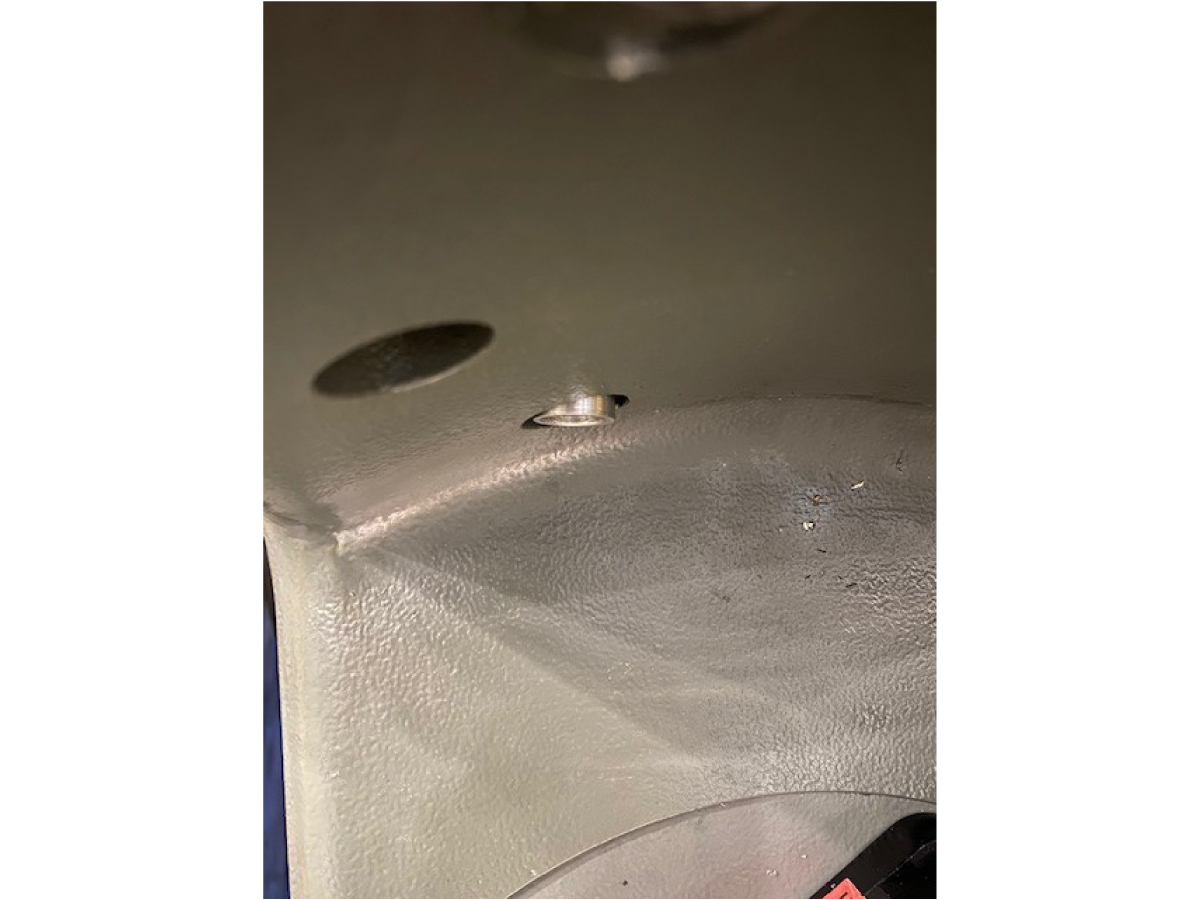
If the sleeve is properly seated, there should be no springy feeling and it should look like the image shown.

The cable will slightly wedge the sleeve to the hole causing the sleeve not to fall out.

23

This is an example of a sleeve that is fully seated. Notice there is no cable obstruction.

24

Remove the SHCS and ensure that the serrated washer is also removed before cleaning the counterbore seat.

NOTE: Check inside the bore  using a borescpoe if the serrated washer is stuck to the casting body, remove them they are stuck. It is recommended to use the threads of the bolt to try and retrieve the serrated washer if it is stuck.

25

Once the SHCS and serrated washer are removed, insert the HSS counterbore tool (provided). The counterbore tool needs to be installed before the drill chuck to avoid interference.

26

Install drill chuck (provided).

27

The seat can be cut in this configuration without additional tooling. This way allows for a good cutting feedback through the tool. Maintain constant upward pressure while rotating the assembly approximately 15-20 revolutions.

NOTE: Depending on the quality of the hole and the pressure applied it may take more or less than 15-20 revolutions to clean the counterbore. 

28

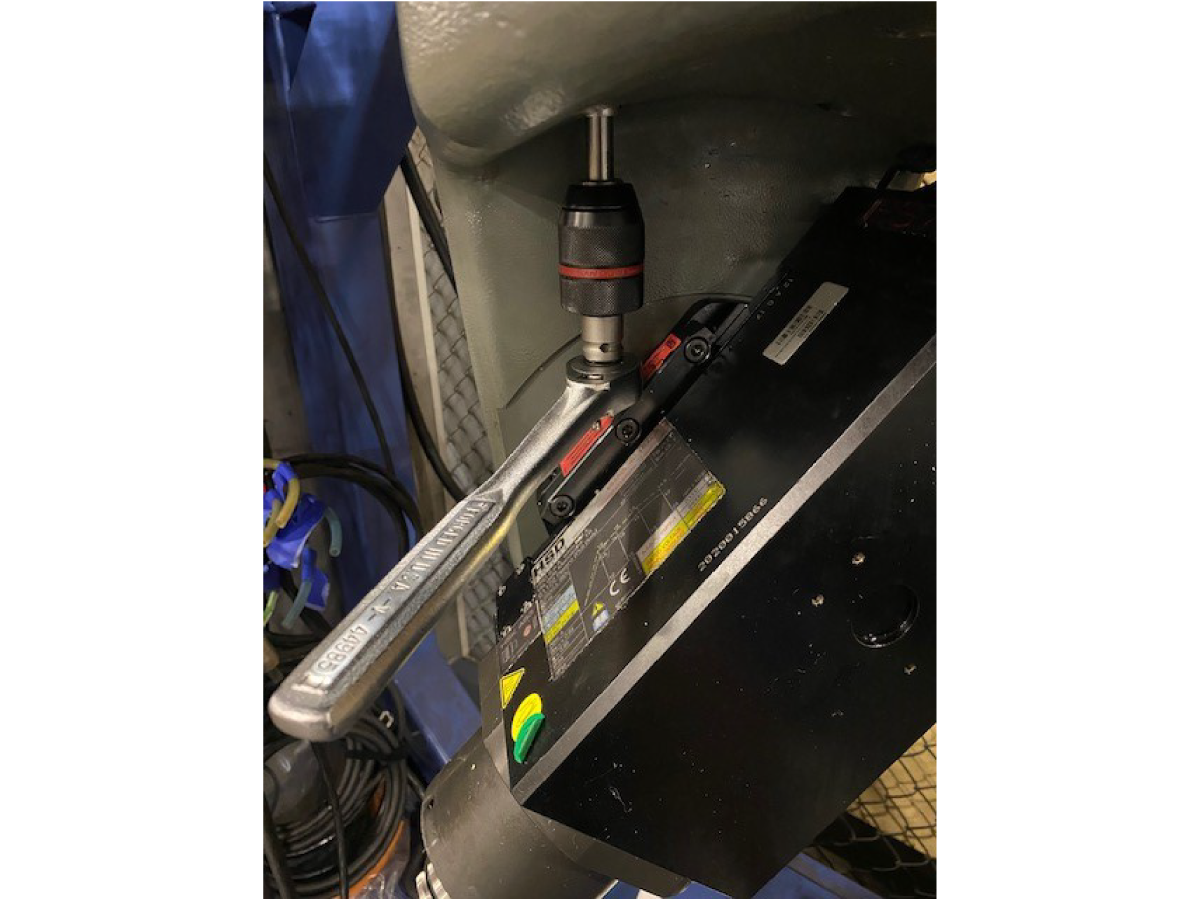
A ½” drive ratchet (not provided) can be used as an optional addition to the drill chuck. However, this method doesn’t provide as much cutting confirmation feedback.

29

Reference photo of the counterbore seat after cleaning.

30

Once the seat is cleaned, remove the aluminum protection sleeve and install the SHCS and hard washer. Tighten the SHCS. Do not torque as the head still needs to be aligned.

31

Repeat the clean up process starting on from step 19 for locations [6] and [7].

32

Once this process is complete, proceed to the alignment of the head. This can be found using the links below.

GEOMETRY GUIDE - VR SERIES

GM-2-5AX HEAD ALIGNMENT PROCEDURE

Recently Viewed Items

You Have No Recently Viewed Items Yet

Feedback
Haas Logo

Haas Delivered Price

This price includes shipping cost, export and import duties, insurance, and any other expenses incurred during shipping to a location in France agreed with you as a buyer. No other mandatory costs can be added to the delivery of a Haas CNC Product.

KEEP UP WITH THE LATEST HAAS TIPS AND TECHNOLOGY...

Sign up now!   

HAAS TOOLING ACCEPTS THE FOLLOWING:

  • Service & Support
  • Owners
  • Request Service
  • Operator Manuals
  • Haas Parts
  • Rotary Repair Request
  • Pre-Install Guides
  • Shopping Tools
  • Build & Price a New Haas
  • Available Inventory
  • The Haas Price List
  • CNCA Financing
  • About Haas
  • Accessibility Statement
  • DNSH Statement
  • Export Compliance
  • Careers
  • Certifications & Safety
  • Contact Us
  • History
  • Terms & Conditions
  • Haas Tooling Terms & Conditions
  • Privacy
  • Warranty
  • Haas Community
  • Haas Certification Program
  • Haas Motorsports
  • Gene Haas Foundation
  • Haas Technical Education Community
  • Events
  • Join the Conversation
  • Facebook
  • X
  • Flickr
  • YouTube
  • LinkedIn
  • Instagram
  • TikTok
© 2026 Haas Automation, Inc – CNC Machine Tools

This site is protected by reCAPTCHA and the Google Privacy Policy and Terms of Service apply.

2800 Sturgis Rd., Oxnard, CA 93030
Toll Free: (888) 817-4446 / Fax: 805-278-8554