My Haas Welcome,
!
Haas Tooling MyHaas/HaasConnect Sign In Register Haas Tooling MyHaas/HaasConnect Sign Out Welcome, My Machines Latest Activity My Quotes My Account My Users Sign Out
Find Your Distributor
  1. Select Language
    1. English
    2. Deutsch
    3. Español - ES
    4. Español - MX
    5. Français
    6. Italiano
    7. Português
    8. Český
    9. Dansk
    10. Nederlands
    11. Magyar
    12. Polski
    13. Svenska
    14. Türkçe
    15. 中文
    16. Suomi
    17. Norsk
    18. الإنجليزية
    19. български
    20. Hrvatski
    21. Ελληνικά
    22. Română
    23. Slovenský
    24. Slovenščina
    25. 한국어
    26. 日本語
    27. Українська
  • machines Main Menu
    • Vertical Mills
      Vertical Mills
      Vertical Mills View All
      • Vertical Mills
      • VF Series
      • Universal Machines
      • VR Series
      • VP-5 Prismatic
      • Pallet-Changing VMCs
      • Mini Mills
      • Mold Machines
      • High-Speed Drill Centers
      • Drill/Tap/ Mill Series
      • Toolroom Mills
      • Pocket Mill
      • Compact Mills
      • Gantry Series
      • SR Sheet Routers
      • Extra-Large VMC
      • Double-Column Mills
      • 3+2 Positioning Machines
    • Multi-Axis Solutions
      Multi-Axis Solutions
      Multi-Axis Solutions View All
      • Multi-Axis Solutions
      • Y-Axis Lathes
      • 5-Axis Mills
    • Lathes
      Lathes
      Lathes View All
      • Lathes
      • ST Series
      • Dual-Spindle
      • Box Way Series
      • Toolroom Lathes
      • Chucker Lathe
      • Pocket Lathe
      • Haas Bar Feeders
    • Horizontal Mills
      Horizontal Mills
      Horizontal Mills View All
      • Horizontal Mills
      • 50-Taper
      • 40-Taper
    • Rotaries & Indexers
      Rotaries & Indexers
      Rotaries & Indexers View All
      • Rotaries & Indexers
      • Rotary Tables
      • Indexers
      • 5-Axis Rotaries
      • Extra-Large Rotaries
    • Special Series
      Special Series
      Special Series View All
      • Special Series
      • EU_Series_Redirect
    • Automation Systems
      Automation Systems
      Automation Systems View All
      • Automation Systems
      • Mill Automation
      • Lathe Automation
      • Automatic Parts Loaders
      • Automation Models
    • Desktop Machines
      Desktop Machines
      Desktop Machines View All
      • Desktop Machines
      • Desktop Mill
      • Desktop Lathe
      • Control Simulator, Standard
      • Control Simulator, Premium
    • Shop Equipment
      Shop Equipment
      Shop Equipment View All
      • Shop Equipment
      • Knee Mill
      • Haas Manual Lathes
      • Haas Saws
    • Fabrication Machines
      Fabrication Machines
      Fabrication Machines View All
      • Fabrication Machines
      • Laser Cutting Machines
      • CNC Press Brakes
    • QUICK LINKS Special Series  Special Series 
      EU SERIES EU SERIES BUILD & PRICE | PRICE LIST BUILD & PRICE | PRICE LIST In-Stock Machines In-Stock Machines WHAT’S NEW WHAT’S NEW YOUR FIRST CNC YOUR FIRST CNC
      SHOPPING TOOLS
      • Build & Price a Haas
      • Price List
      • Available Inventory
      • CNCA Financing
      WANT TO TALK TO SOMEONE?

      A Haas Factory Outlet (HFO) can answer your questions, and walk you through your best options.

      CONTACT YOUR DISTRIBUTOR >
  • Options Main Menu
    • The Haas Control Value Option Packages
      Value Option Packages
      Value Option Packages View All
      • Value Option Packages
    • Product Image Spindles
      Spindles
      Spindles View All
      • Spindles
    • Product Image Tool Changers
      Tool Changers
      Tool Changers View All
      • Tool Changers
    • Product Image 4th- | 5th-Axis
      4th- | 5th-Axis
      4th- | 5th-Axis View All
      • 4th- | 5th-Axis
    • Product Image Turrets & Live Tooling
      Turrets & Live Tooling
      Turrets & Live Tooling View All
      • Turrets & Live Tooling
    • Product Image Probing
      Probing
      Probing View All
      • Probing
    • Haas Chip & Coolant Management Chip & Coolant Management
      Chip & Coolant Management
      Chip & Coolant Management View All
      • Chip & Coolant Management
    • The Haas Control The Haas Control
      The Haas Control
      The Haas Control View All
      • The Haas Control
    • Product Image Product Options
      Product Options
      Product Options View All
      • Product Options
    • Product Image Tooling & Fixturing
      Tooling & Fixturing
      Tooling & Fixturing View All
      • Tooling & Fixturing
    • Product Image Workholding
      Workholding
      Workholding View All
      • Workholding
    • Product Image 5-Axis Solutions
      5-Axis Solutions
      5-Axis Solutions View All
      • 5-Axis Solutions
      • 5 Easy Steps to 5-Axis
    • QUICK LINKS Special Series  Special Series 
      EU SERIES EU SERIES BUILD & PRICE | PRICE LIST BUILD & PRICE | PRICE LIST In-Stock Machines In-Stock Machines WHAT’S NEW WHAT’S NEW YOUR FIRST CNC YOUR FIRST CNC
      SHOPPING TOOLS
      • Build & Price a Haas
      • Price List
      • Available Inventory
      • CNCA Financing
      WANT TO TALK TO SOMEONE?

      A Haas Factory Outlet (HFO) can answer your questions, and walk you through your best options.

      CONTACT YOUR DISTRIBUTOR >
  • Why Haas Main Menu
      Discover the Haas Difference
    • Why Haas
    • MyHaas
    • Education Community
    • Industry 4.0
    • Haas Certification
    • Customer Testimonials
  • Service Main Menu
      Welcome to Haas Service
      SERVICE HOME Operator’s Manuals How-To Procedures Troubleshooting Guides Preventive Maintenance Haas Parts Haas Tooling Videos
  • Videos Main Menu
  • Main Menu
    • View All
    • View All
    • View All
    • View All
      • HTEC Curriculum Support
      • Haas Value Option Packages (VOP) Journey
    • View All
      • Haas 10 kg Cobot Package
      • Cobot Kits
      • DC-1 Drill Center
      • CNC Sales News
      • Do More With Your Haas
    • View All
    • View All
      • contact-us-test
      • 4 - AUTOMATION SYSTEMS
      • Carousel-V2
      • expert test
      • Demo_Day_Trident-test
      • Link Test
      • image-sale-tag-test
      • article-list-test
      • Haas 25 kg Robot Package
      • test-algolia-page
    • View All
    • View All
    • View All
    • View All
      • calc-test
    • View All
    • QUICK LINKS Special Series  Special Series 
      EU SERIES EU SERIES BUILD & PRICE | PRICE LIST BUILD & PRICE | PRICE LIST In-Stock Machines In-Stock Machines WHAT’S NEW WHAT’S NEW YOUR FIRST CNC YOUR FIRST CNC
      SHOPPING TOOLS
      • Build & Price a Haas
      • Price List
      • Available Inventory
      • CNCA Financing
      WANT TO TALK TO SOMEONE?

      A Haas Factory Outlet (HFO) can answer your questions, and walk you through your best options.

      CONTACT YOUR DISTRIBUTOR >
  • Haas Tooling Main Menu
  • Haas Service Parts Main Menu

My Haas Welcome,
!
Haas Tooling MyHaas/HaasConnect Sign In Register Haas Tooling MyHaas/HaasConnect Sign Out Welcome, My Machines Latest Activity My Quotes My Account My Users Sign Out
Find Your Distributor
  1. Select Language
    1. English
    2. Deutsch
    3. Español - ES
    4. Español - MX
    5. Français
    6. Italiano
    7. Português
    8. Český
    9. Dansk
    10. Nederlands
    11. Magyar
    12. Polski
    13. Svenska
    14. Türkçe
    15. 中文
    16. Suomi
    17. Norsk
    18. الإنجليزية
    19. български
    20. Hrvatski
    21. Ελληνικά
    22. Română
    23. Slovenský
    24. Slovenščina
    25. 한국어
    26. 日本語
    27. Українська
×

Search Results

Web Pages

Images

    • <
    • 1
    • >

Solenoid - Troubleshooting Guide - TG0131

Service Home Solenoid - Troubleshooting Guide - TG0131

Solenoid - Troubleshooting Guide - TG0131

Jump to Section 1. Introduction 2. Solenoid Valve Troubleshooting 3. 2-PORT SOLENOIDS 4. Cleaning ASCO, SMC and FESTO Brand Solenoids 5. 3-PORT SOLENOIDS 6. 4-PORT, TWO-OUTLET SOLENOIDS 7. 5-PORT SOLENOIDS Back to Top
Recently Updated Last updated: 03/12/2026

Solenoid - Troubleshooting Guide


TG0131

Revision B - 03/2026

Introduction

Symptom Possible Cause Corrective Action

Machines with I/O PCB 34-3490A/B

Alarm 131 TOOL NOT CLAMP intermittently generated on machines with a digital SMC solenoid.

There is a small delay when the solenoid is commanded off, thus causing the alarm to be generated.  Order service kits 93-3451 & 93-3452 and follow the Low Load Solenoid Valve Kit - Installation procedure.

Machines with I/O PCB 34-3490A/B

Alarm 126 GEARBOX FAULT intermittently generated on machines built with a digital SMC gearbox solenoid 

There is a small delay when the solenoid is commanded, thus causing the alarm to generate. Order service kits 93-3450 & 93-3452 and follow the Low Load Solenoid Valve Kit - Installation procedure.

Machines with I/O PCB 34-3490A/B

There is a delay when the grippers on an APL are commanded to rotate or clamp/unclamp.

There is a small delay when the digital SMC solenoid is commanded.

EMC Brand Solenoids

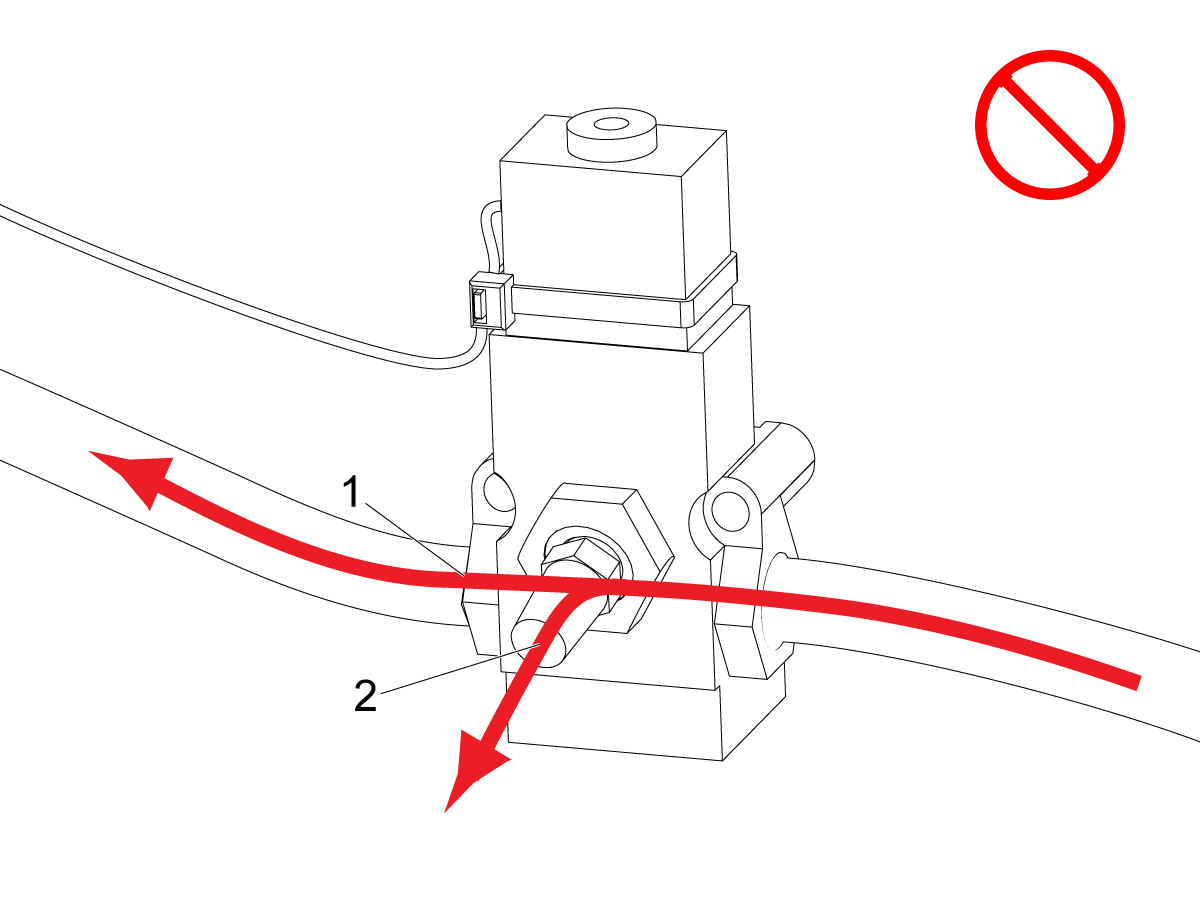
The solenoid vibrates when actuated.

The plastic nut on the side is loose. Tighten the nut [1] on the side.

EMC-solenoid.png

EMC Brand Solenoids

The solenoid is not physically shifting despite good air pressure and power.

The piston is locked preventing mechanical actuation.

Rotate manual overide knob [1] counter-clockwise to release lock. Rotate until button elevates into the unlocked position [2]. 

Solenoids with Check Valves

Solenoid not actuating when commanded.

OR 

Solenoid port is not getting proper air flow.

Check value has failed and the check valve internals have gone into the solenoid. Replace BOTH the solenoid and the check valve.

Solenoid Valve Troubleshooting

  • Make sure the machine receives the correct air pressure and flow. Make sure the shut off valve is completely open. Many solenoids will not shift correctly without correct air pressure and back pressure. Test the solenoid in the system. Do not expect the solenoid to operate correctly if the outlets are not connected to the system.
  • Turrets on ST model lathes, TRPs, and Side-Mount Tool Changer Pockets have specific troubleshooting steps. Refer to the following troubleshooting guides for more information:
    • Tool Release Piston - Troubleshooting Guide
    • Side Mount (SMTC) - VF/VM/UMC/EC - Carousel and Pocket - Troubleshooting Guide
    • TSC-300/1K - Troubleshooting Guide
  • If you command the solenoid to open or close without the correct air pressure, the solenoid can go into an intermediate state that may not correct itself when the machine has correct air pressure. To move the solenoid out of the intermediate state, close the air valve and power off the machine.

     Note: Do not use the machine before the air supply to the machine is correct.

  • A clogged exhaust muffler can prevent the solenoid to operate correctly. Remove the exhaust mufflers from the solenoid and test the solenoid again.  
  • Turn on the machine and use the control to activate the solenoid. You can write a simple program in MDI mode to command the electrical output to the solenoid.
  • Go to the I/O tab on the diagnostics screen on the control. Make sure the state of the output changes when it is commanded. If the state does not change, troubleshoot and fix the problem before you continue.
  • Listen for a clicking or buzzing noise from the coil area of the solenoid. The coil area of the solenoid is the black plastic area on most solenoids. You can also feel the clicking if you place your finger on the solenoid. If there is not a clicking sound when the solenoid is commanded, make sure the solenoid valve is connected correctly and that the electrical supply is correct. Inspect the solenoid cables to make sure they are not damaged. Make sure the solenoid receives the correct voltage. The measured voltage must be 120 VAC.

     Note: Use a voltage detector or a multimeter with needle-tipped probes to measure the voltage. Always measure the voltage from the back of the connector. Always measure the voltage with the solenoid connected.

    If the solenoid still does not operate correctly, disconnect the solenoid from the machine and connect it to a known electrical source. If the solenoid operates correctly, the machine has an electrical problem. Do not replace the solenoid. If the solenoid receives the correct voltage and does not operate correctly, check the solenoid coil for continuity. If there is no continuity, replace the solenoid. If the coil has continuity, go to the correct section for your solenoid.
  • If there is coolant leaking from any solenoid, the problem is the TSC check valve in the spindle head.

Many symptoms can be caused by contamination or debris in the solenoid. If the solenoid leaks after you tested it for correct air and power, manually activate it with a 2 mm allen key. Cycle the valve to release any contamination or debris that may have been stuck in the valve. If the solenoid still does not operate correctly, remove the solenoid and inspect the ports for contamination or debris. Clean the solenoid with compressed air while cycling it. Some solenoids (i.e. Asco) have the capability to be disassembled in the field. See the Cleaning ASCO, SMC or FESTO Brand Solenoids section in this document. Replace the solenoid if the ports are covered in contamination or debris that cannot be removed.

2-PORT SOLENOIDS

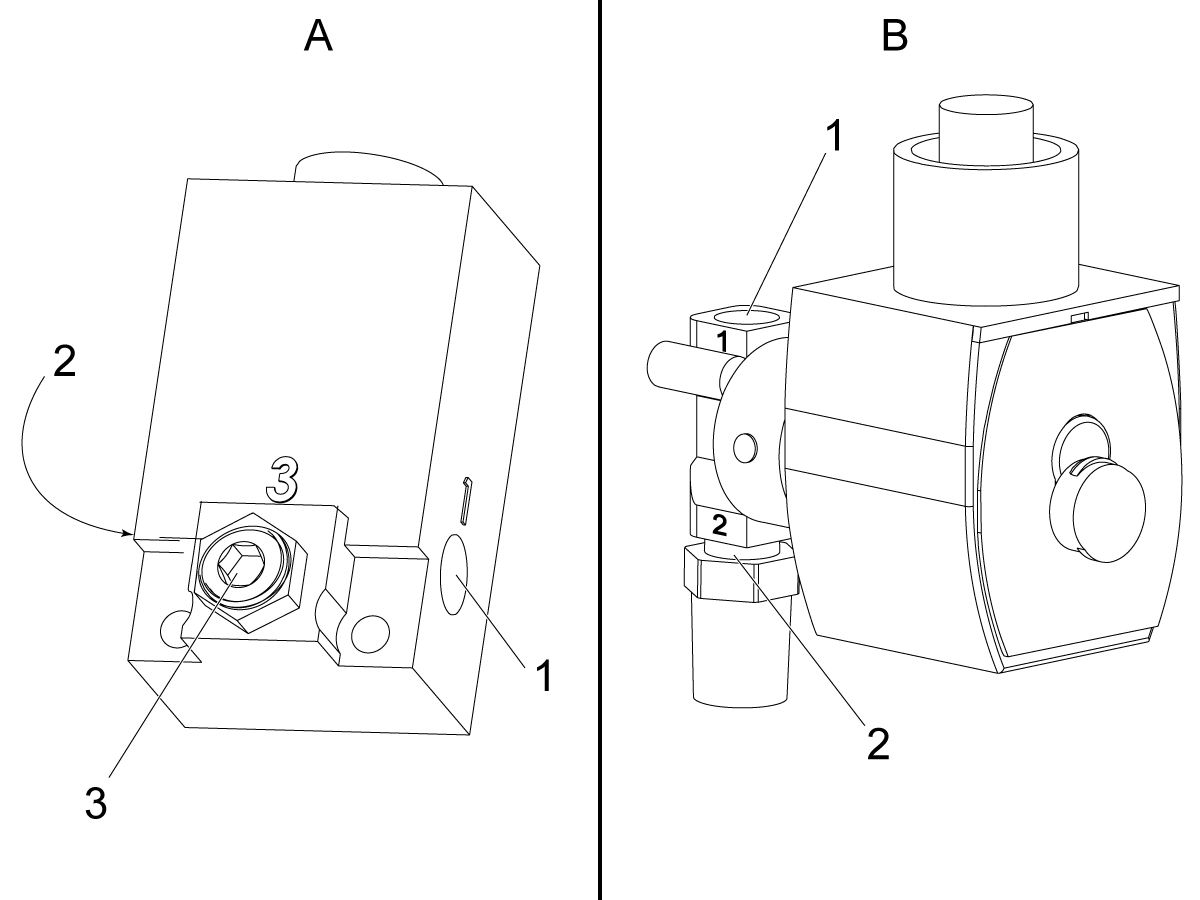
A: MAC, SMC, and Festo Brand

  1. Port 1 is usually the input port.
  2. Port 2 is usually the outlet port.
  3. Port 3 can have a plug to make this a 2-port solenoid. This is the configuration for some air-purge solenoids.

B: ASCO Brand

  1. Port 1 is usually the input port.
  2. Port 2 is usually the outlet port.
  1. When the solenoid is de-energized, the air flow stops at port 1.
  2. When the solenoid is energized, the air flows through port 1 and out through port 2.
  3. If the power fails, air flow stops. The solenoid goes back to its de-energized position.

The air-purge solenoid is energized on a timed cycle. If too much contamination collects inside the solenoid, leaks from the outlet port can occur. You can manually energize some brands of solenoids. This has no effect on the time cycle.

ASCO or SMC brand 2-Port solenoid valves are most commonly used for the air system purge. These solenoids are also used in the Coolant Refill and TAB options.

 Note: MAC 3-Port poppet style solenoid valves are also used for the air system purge. There is a plug on port number 3 when MAC 3-way poppet style solenoid valves are used. If there is a leak from one of the ports on a MAC 3-Port poppet style solenoid valve, push the manual activation button multiple times to clear out any debris in the solenoid. If this does not work, remove the solenoid and clean it with compressed air while cycling the solenoid. If a MAC purge solenoid replacement is necessary, do not substitute a different MAC solenoid. Use the approved replacement solenoid.

If these solenoids leak air when the solenoid is not activated, it is likely that debris holds the plunger in an open position. Follow this procedures to clean the 2-Port air purge solenoid valve:

Cleaning ASCO, SMC and FESTO Brand Solenoids

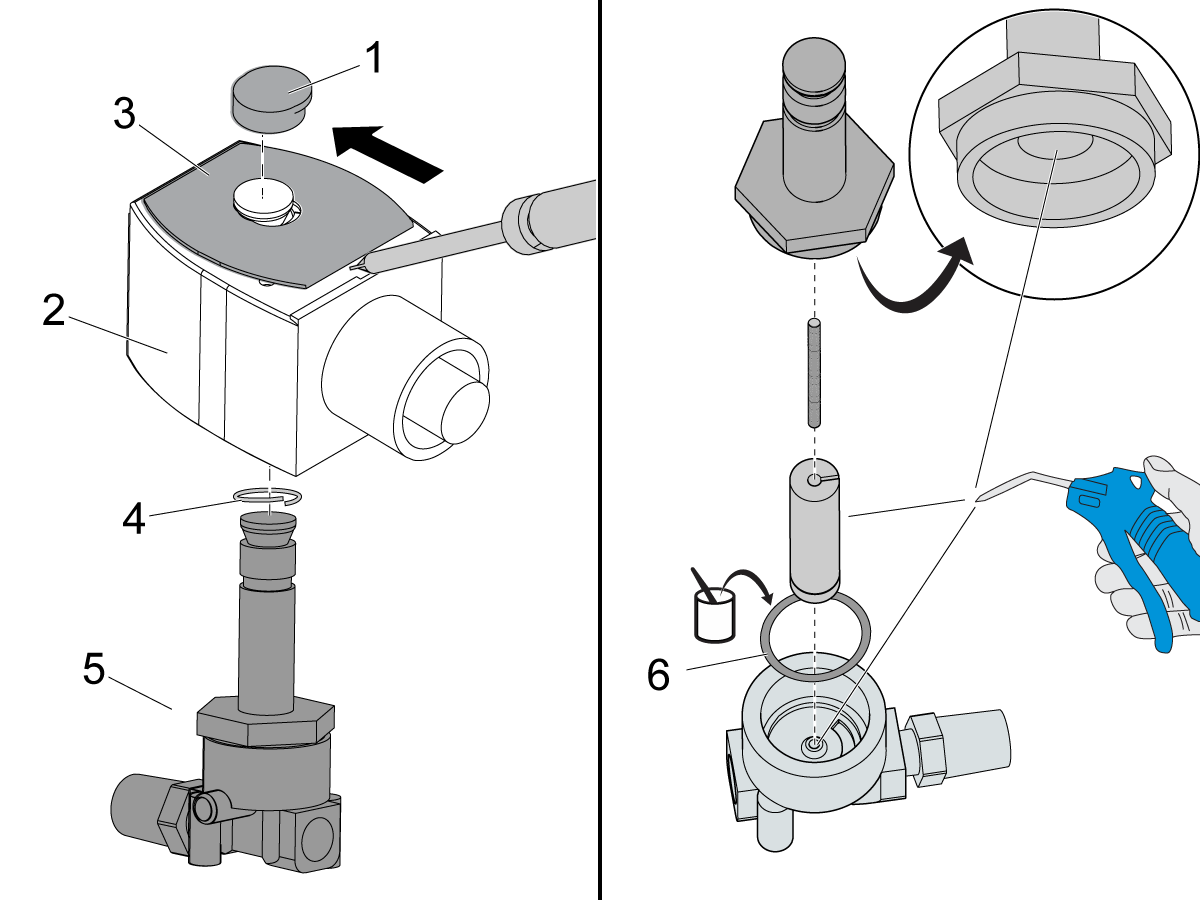
ASCO air purge solenoid:

  • Remove the red cap [1].
  • Push the solenoid coil assembly [2] down to compress the spring inside.
  • Remove the specification plate [3] by sliding off.
  • Remove the split spring [4] and valve subassembly [5] from the coil assembly [2].
  • Disassemble the valve subassembly [5].
  • Clean the parts with compressed air. Be sure to remove all debris from inside the valve.
  • Apply a thin coat of silicone grease to the body gasket [6].
  • Assemble the components in the opposite order they were removed.
  • Open the primary air valve. Make sure there are no leaks.

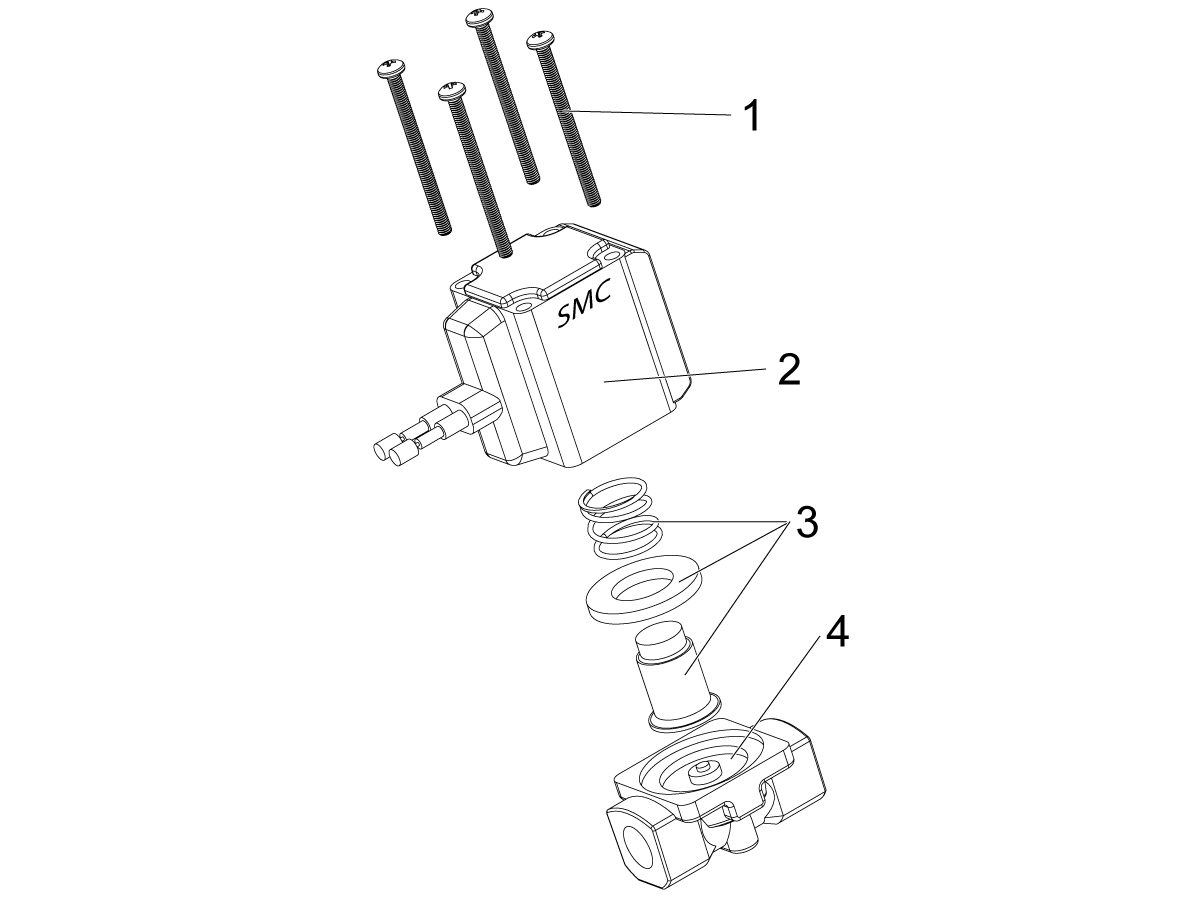
SMC air purge solenoid:

  • Remove the four screws [1].
  • Remove the solenoid coil assembly [2].
  • Clean the internal solenoid parts [3] with compressed air. Be sure to remove all debris from inside the valve [4].
  • Apply a thin coat of silicone grease to the rubber seals.
  • Assemble the components in the opposite order they were removed.

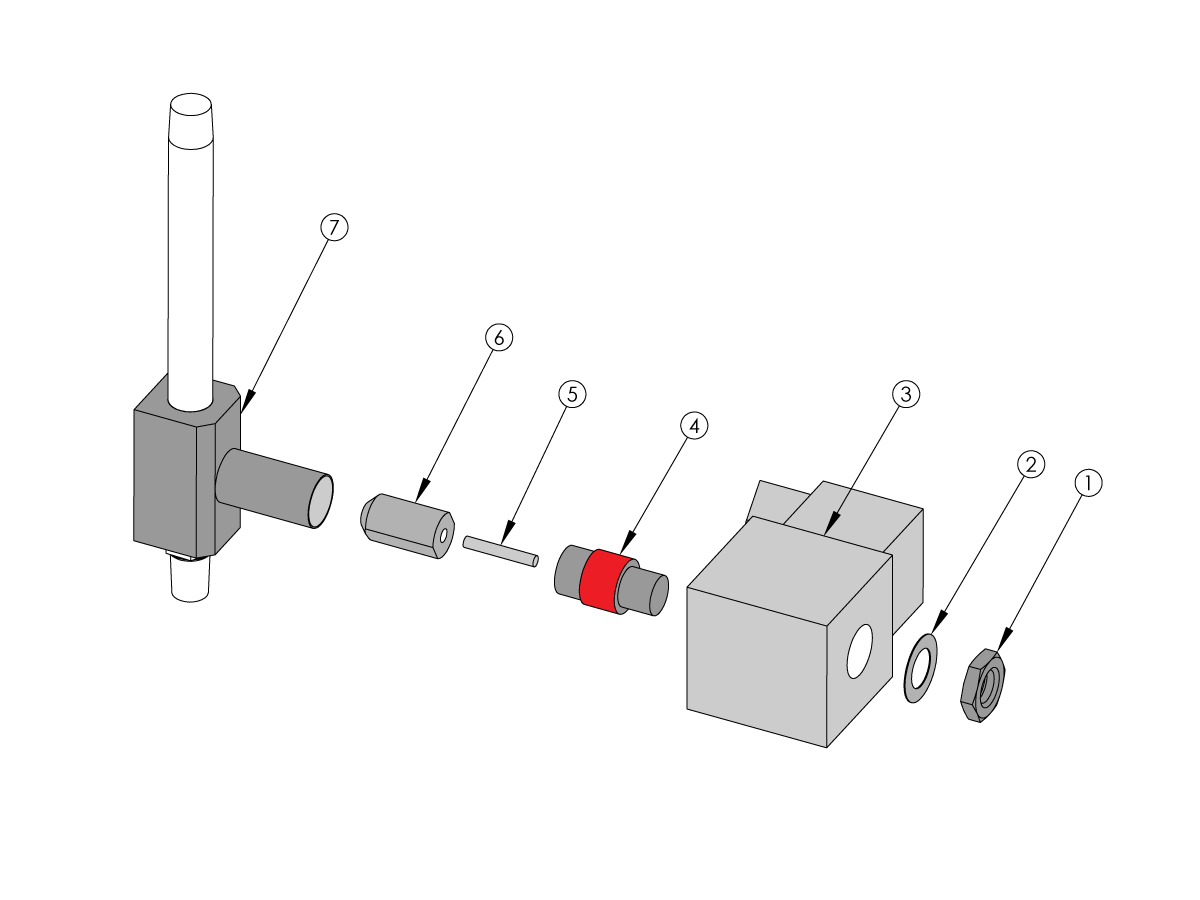
FESTO air purge solenoid: 

  • Remove the nut [1].
  • Remove the washer [2].
  • Remove the solenoid coil [3]. Note the orientation of the coil.
  • Remove the plug nut [4]. 

 NOTE: Hold the outside diameter (pictured RED) of the plug nut in the vice with the aluminum jaws to prevent the damage.

  • Remove the spring [5].
  • Remove the valve poppet [6].
  • Use the compressed air to clean the valve body [7] valve poppet and the spring.
  • Clean the old thread sealant off the plug nut threads and apply fresh sealant.
  • Assemble the solenoid in the reverse order.

3-PORT SOLENOIDS

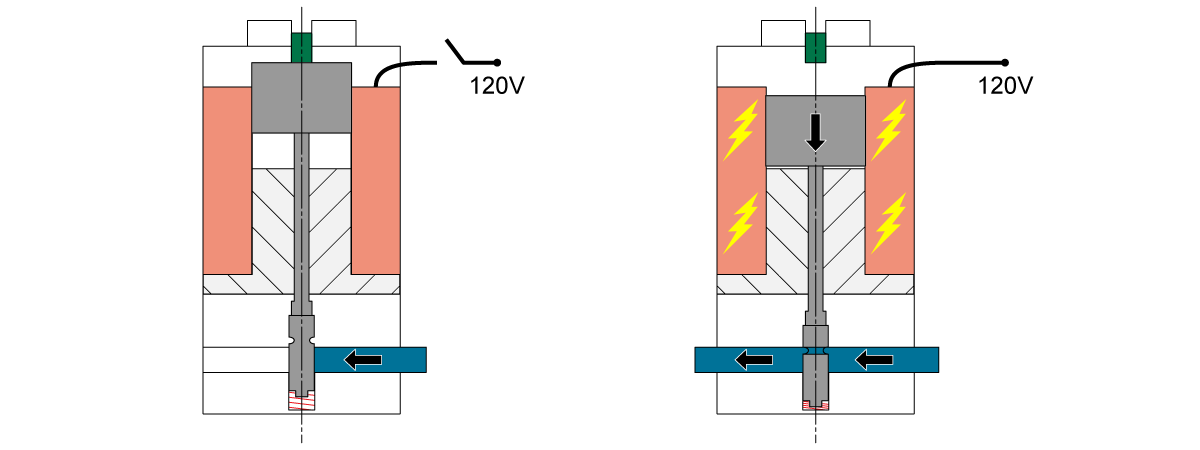
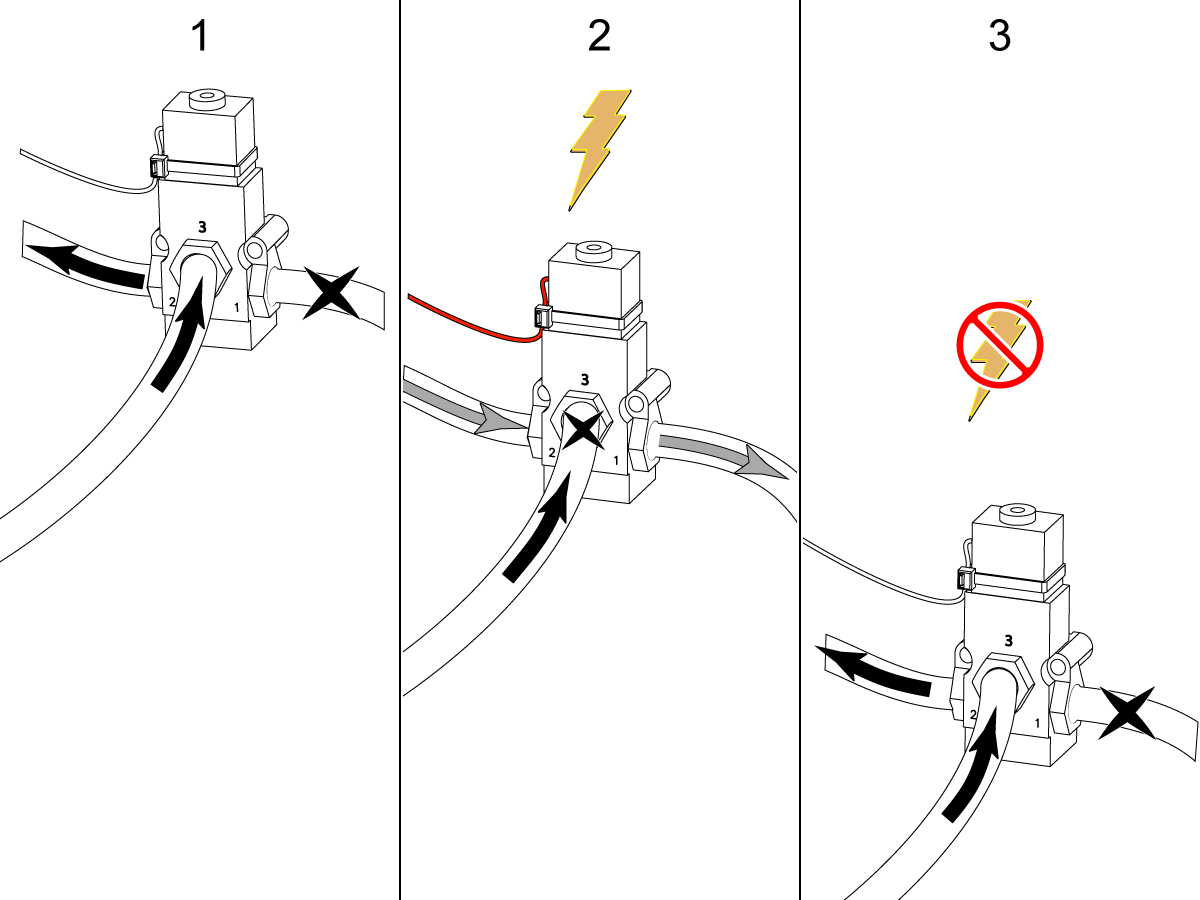
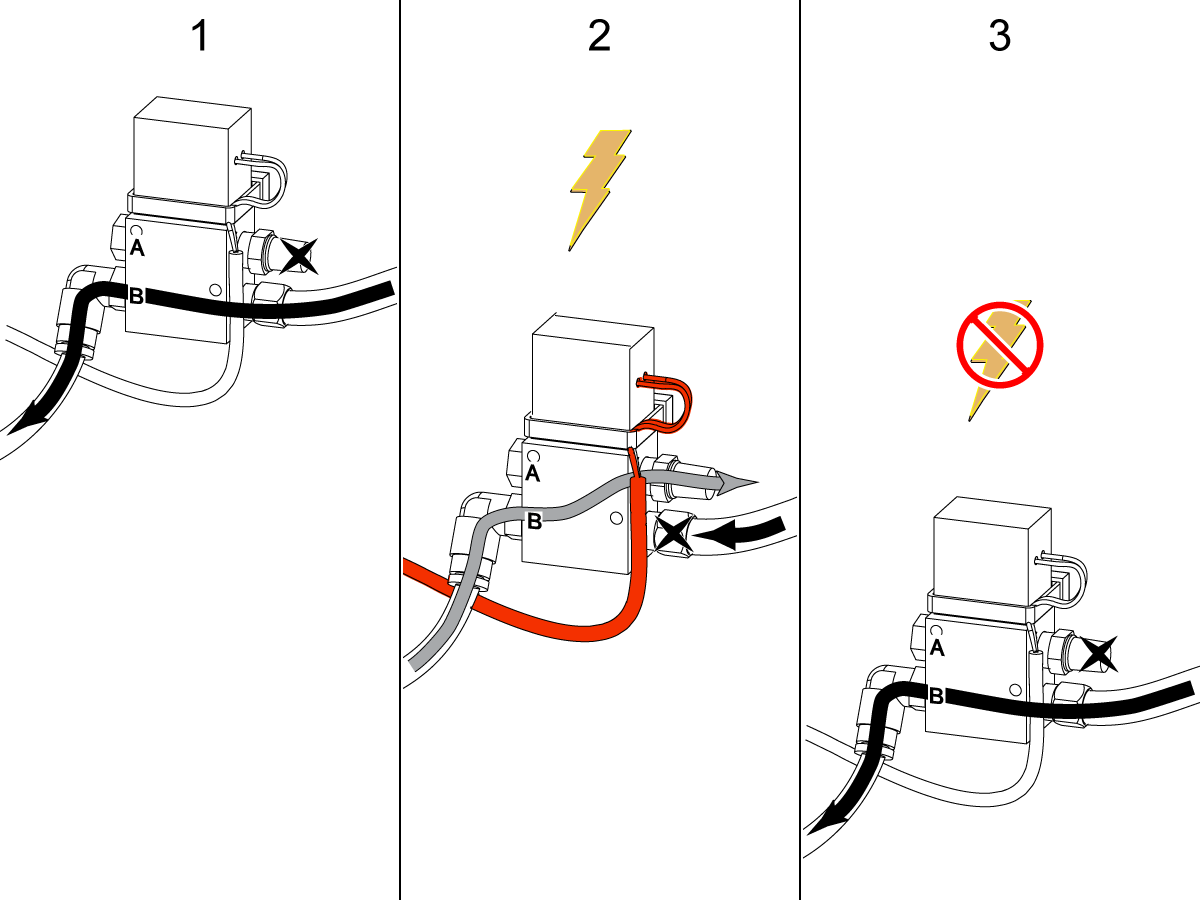
3-Port poppet style solenoid valves are the most common solenoid valves used on Haas machines. These illustrations show how a normally-closed MAC 3-Port poppet style solenoid valve operates:

Black arrows illustrate air pressure from the air supply. Grey arrows illustrate exhaust flow from the machine.

Solenoid Operation : Normally-Closed Application

Solenoid Operation : Normally-Open Application

3-Port Solenoid Troubleshooting

Disconnect the output hose from port number 2 on the solenoid valve. Activate the solenoid. If air exits from the output port number 2, the solenoid is operating correctly. Do not replace the solenoid. Continue to troubleshoot the solenoid if air does not exit output port number 2 when it is activated. With the output hose disconnected, use the manual activation button on the top of the solenoid valve to manually activate the solenoid:

  • Disconnect the solenoid from the electrical connector.
  • Check for air that escapes from the ports.
  • Push the manual activation button multiple times. Air should only exit from the output port number 2.
  • If there is not a blast of air from the output port number 2 when you push the manual activation button, verify there is air pressure at port 1. If there is pressure at port 1, the solenoid is damaged. If there is a blast of air from the output port number 2, debris was removed from the valve by repeated manual activation, or there is an electrical problem with the machine or the solenoid. If the machine has an electrical problem, find the cause of the problem. If the solenoid has an electrical problem, replace it.

Make sure the solenoid valve does not have leaks:

Feel and listen to the exhaust port [2] of the solenoid.

If there is a constant air releasing from the exhaust port, the internal piston is stuck and releases air through the exhaust port [2] and outlet port [1].

 Note: There must never be a constant stream of air from the exhaust port.

Stop the air supply to the solenoid and remove the solenoid. Use compressed air to thoroughly clean the solenoid.

Install the solenoid. If the problem continues, replace the solenoid.

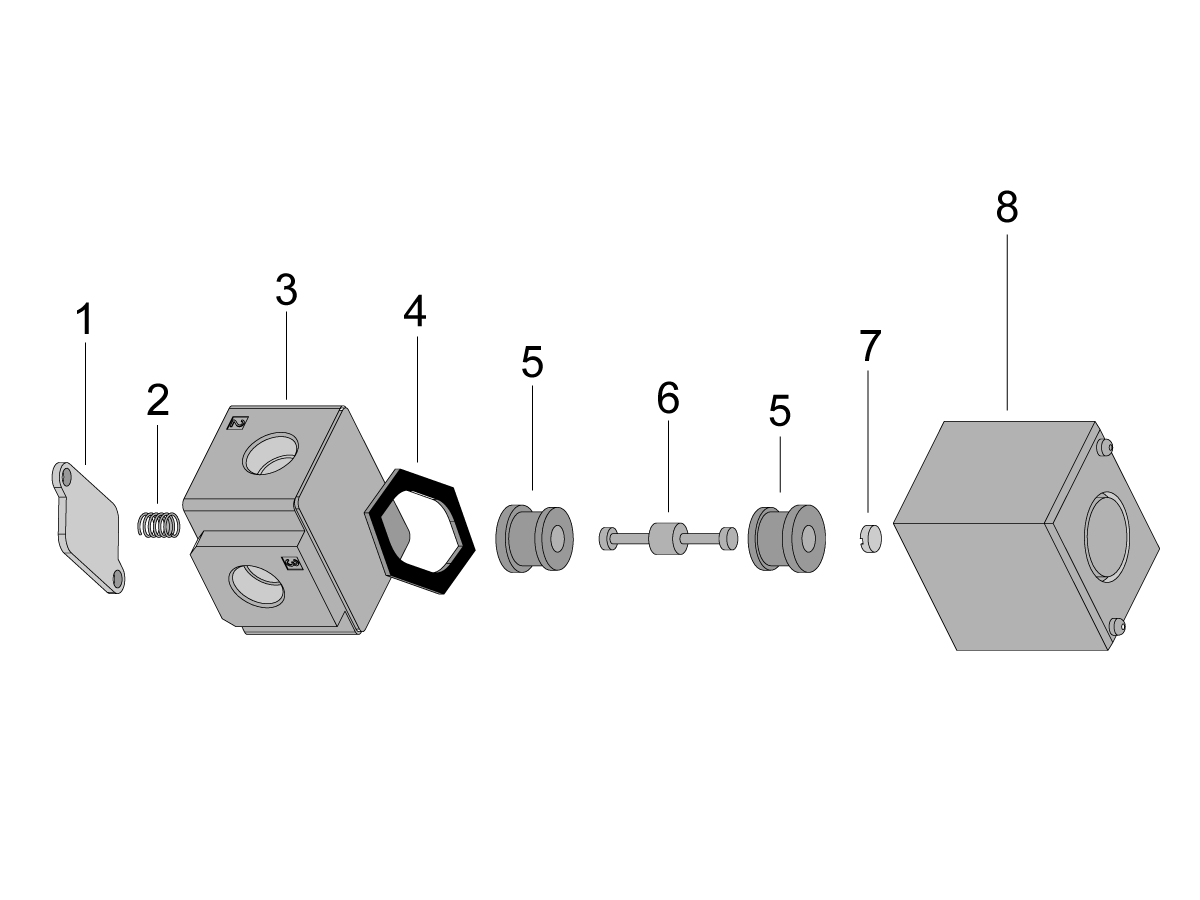
Cleaning 3 Port Solenoids (SMC):

  • Remove the screws connecting the solenoid coil [8] to the valve [3].
  • Carefully remove the small spacer [7] and the gasket [4] from the valve body.
  • Unscrew and remove the spring plate [1], careful not to lose the return spring [2].
  • Push out the valve assembly by applying pressure to the valve stem [6]
  • One orifice [5] should be removed with the stem [6], remove the remaining orifice [5].

________

  • Clean the internal solenoid parts [4-7] with compressed air. Be sure to remove all debris from inside the valve body [3].
  • Apply a thin coat of silicone grease to the gasket [4] and o-rings seals on the valve stem [6] and the orifices [5].
  • Assemble the components in the opposite order they were removed.

4-PORT, TWO-OUTLET SOLENOIDS

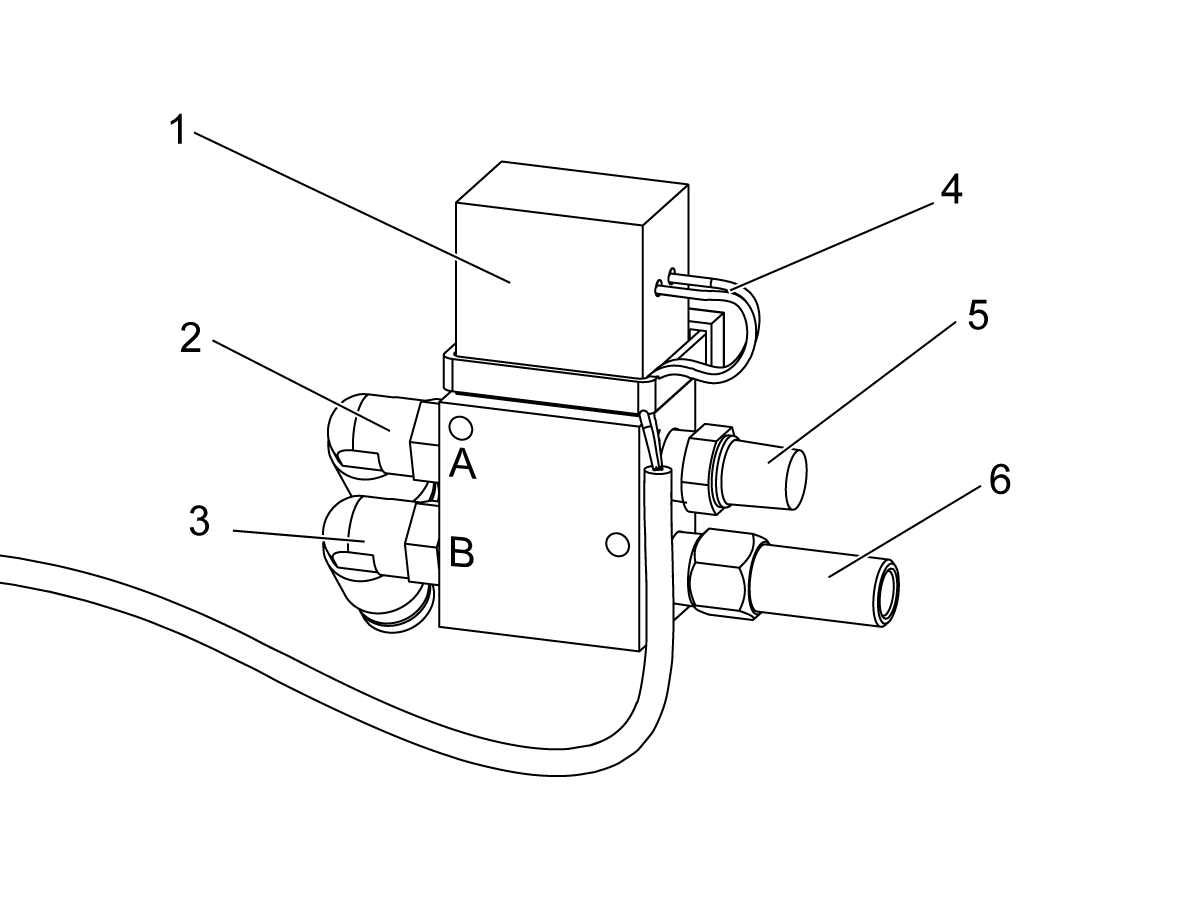
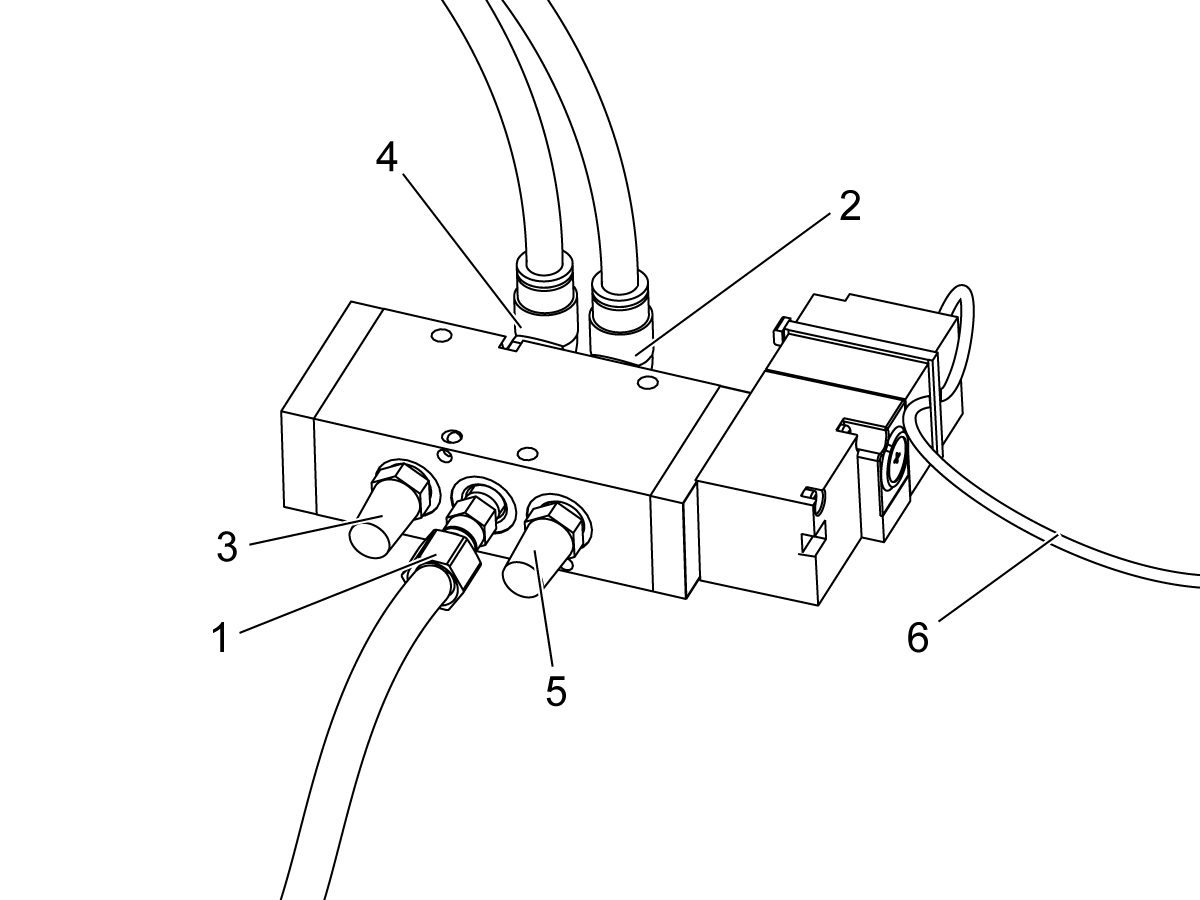
4-Port, Single Coil Solenoid

  1. Solenoid coil
  2. Port A
  3. Port B
  4. Electrical cable
  5. Exhaust port
  6. Input port

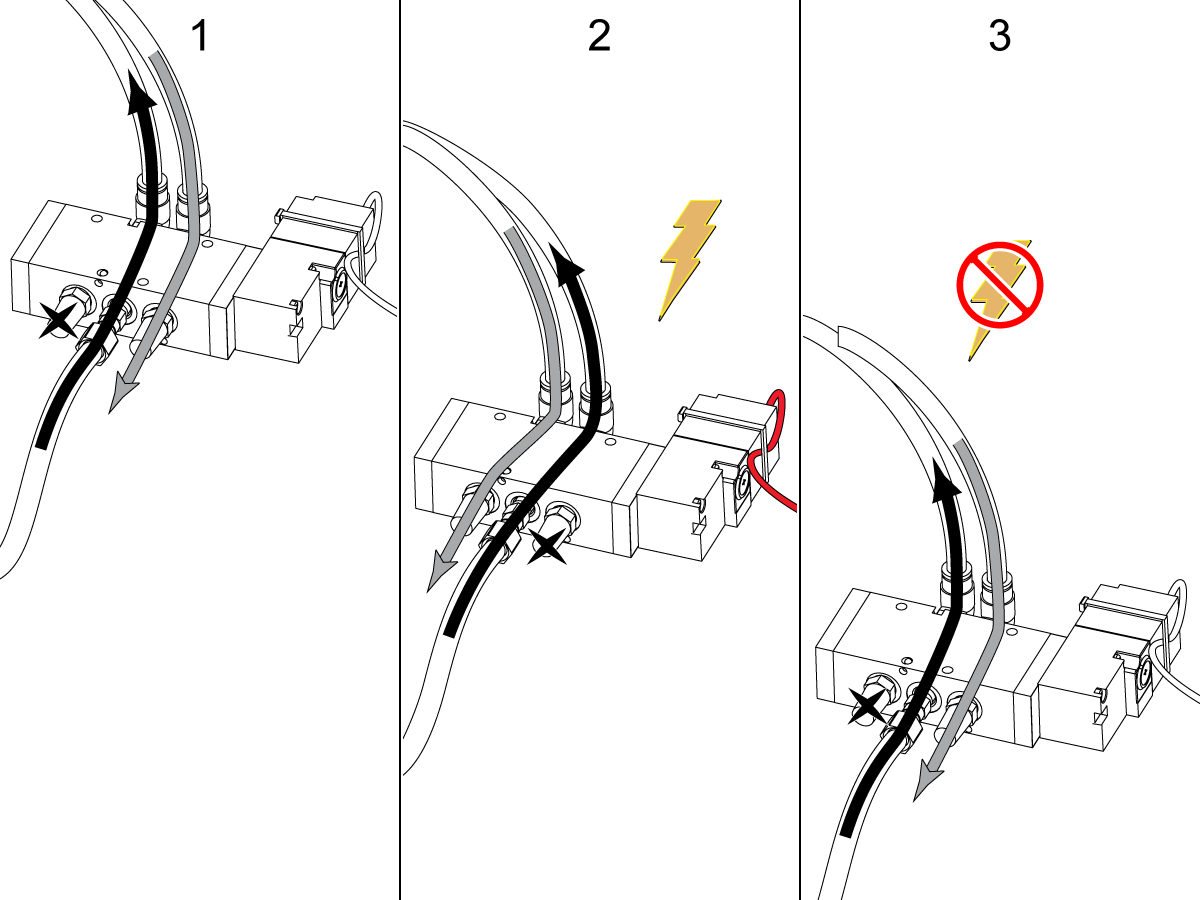
4-Port Solenoid Operation

Black arrows illustrate air pressure from the air supply. Grey arrows illustrate exhaust flow from the machine.

4-Port Solenoid - Double Acting

4-Port Solenoid :Normally-Open Function

In this application, a plug is in one of the ports. This lets the solenoid operate as a 3-Port, normally-open solenoid. Haas machines use these solenoids as an alternative to a 3-port solenoid in some applications.

 Note: A plug is in port A.

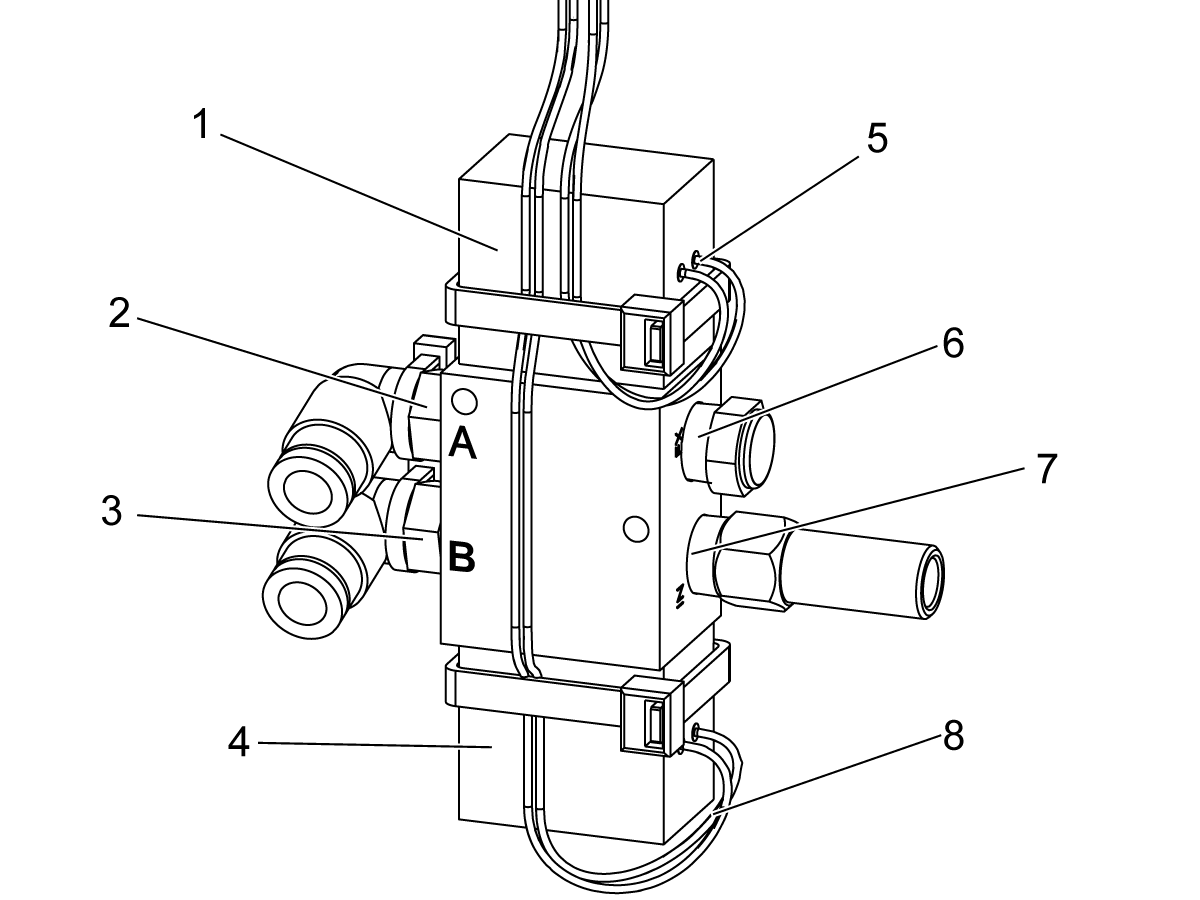
4-Port, Dual Coil Solenoid

  1. Low-gear coil
  2. Low-gear port
  3. High-gear port
  4. High-gear coil
  5. Low-gear cable
  6. Exhaust port
  7. Input port
  8. High-gear cable

 Note: Low-gear and High-gear coils are never energized at the same time. The only function of these solenoids is to change gears on the Haas transmissions.

4-Port, Dual Coil Solenoid Operation

Black arrows illustrate air pressure from the air supply. Grey arrows illustrate exhaust flow from the machine.

 Note: EC-400 PP machines use a 4- or 5- port solenoid to lift the H-Frame. Do not replace the solenoid with another 4- or 5-port solenoid. The configuration for the pallet lift system was upgraded. Use service kit 93-2248 to replace the solenoid.

4-Port Solenoid Valve Troubleshooting

Make sure the incoming air pressure and flow are correct. Feel and listen to the exhaust port of the solenoid. If there is constant air releasing from the exhaust port, disconnect the non-pressurized line between the cylinder and the solenoid. If the air continues to flow through the exhaust port and/or the non-pressurized line port on the solenoid follow these steps:

  1. Disconnect the air supply from the machine and release all the air pressure from the machine.
  2. If the solenoid is powered on, power it off.
  3. Reconnect the air to the machine.
  4. Command the solenoid to activate. If the solenoid continues to leak, disconnect the air supply and release the air pressure with the solenoid still energized. If the solenoid continues to leak, continue troubleshooting the solenoid.

Remove the air supply to the machine and remove the solenoid. Use compressed air to thoroughly clean the solenoid. Install the solenoid and check for leaks. If the solenoid continues to leak, follow these steps.

  1. With no power to the solenoid, remove the unpressurized hose that runs between the solenoid and the cylinder.
  2. The solenoid has a leak if air is released out of the exhaust.
  3. The cylinder has a leak if air is released out of the cylinder return hose.
  4. Repeat the test while the solenoid is energized. The other hose between the cylinder and solenoid is now pressurized.

5-PORT SOLENOIDS

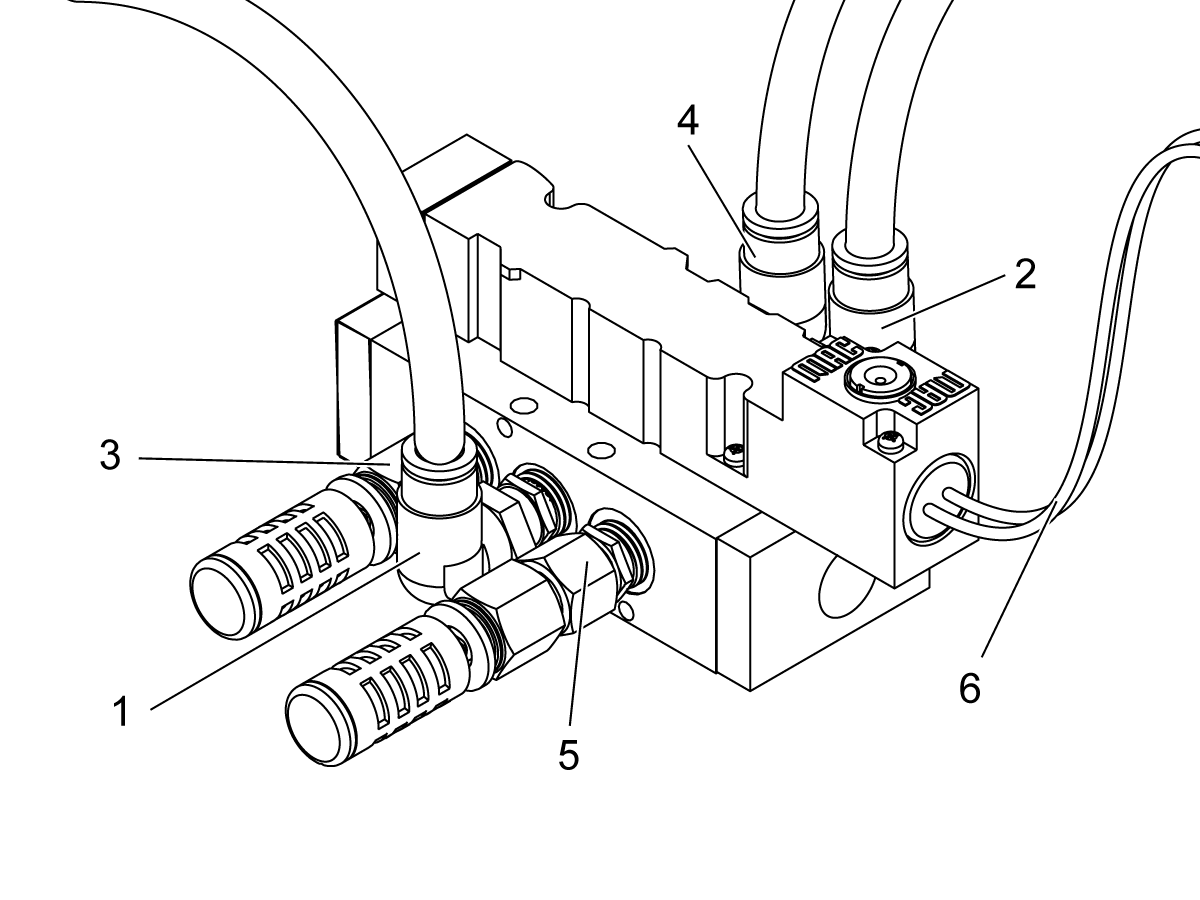
  1. Input port
  2. Port 2
  3. Exhaust port 3
  4. Port 4
  5. Exhaust port 5
  6. Electrical cable

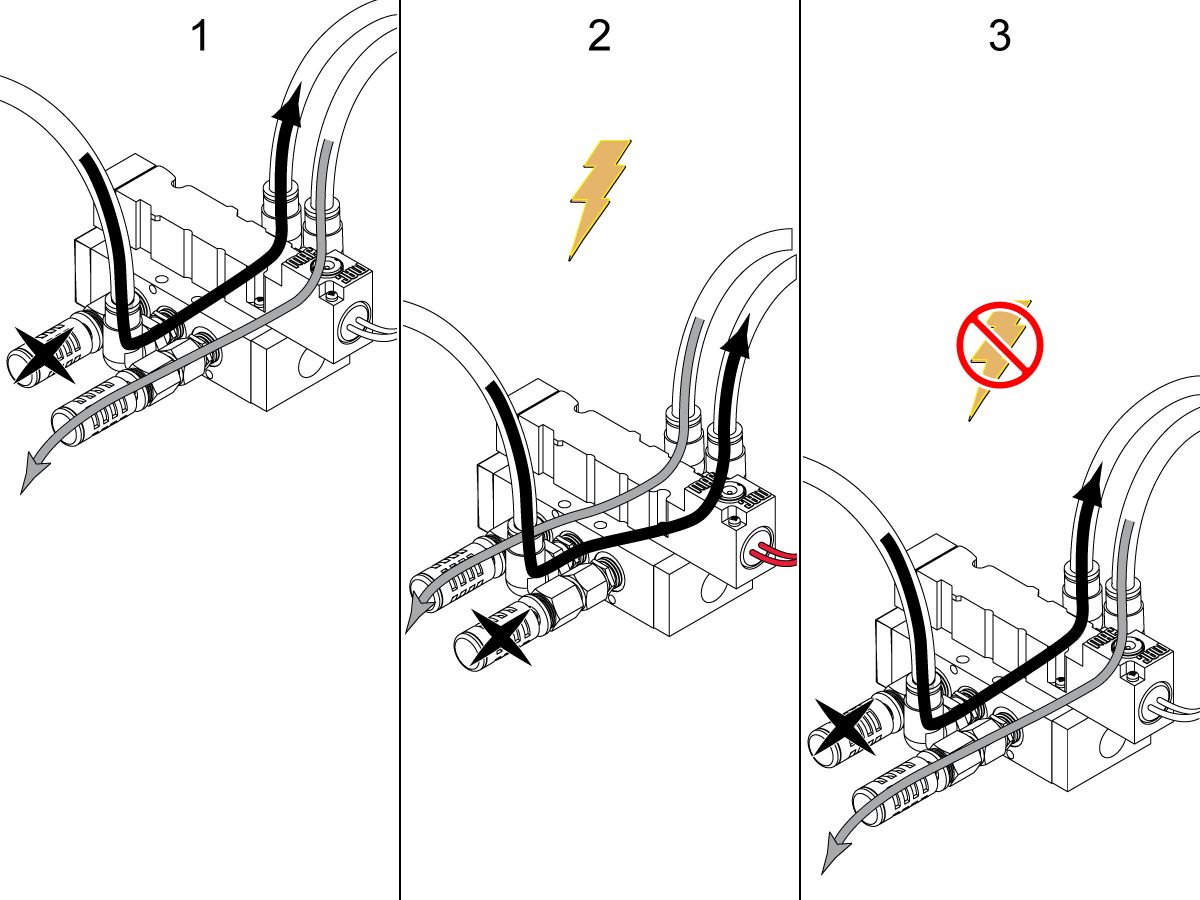
5-Port Solenoid Operation

Black arrows illustrate air pressure from the air supply. Grey arrows illustrate exhaust flow from the machine.

  1. Input port
  2. Clamp port
  3. Exhaust port 3
  4. Unclamp port
  5. Exhaust port 5
  6. Electrical cable

4-Way Solenoid - Turret Clamp / Unclamp Solenoid Operation

Black arrows illustrate air pressure from the air supply. Grey arrows illustrate exhaust flow from the machine.

4-Way Solenoid Valve Troubleshooting

The steps to troubleshoot a 5-port solenoid valve are the same as a 4-port solenoid valve.


Recently Viewed Items

You Have No Recently Viewed Items Yet

Feedback
Haas Logo

Haas Delivered Price

This price includes shipping cost, export and import duties, insurance, and any other expenses incurred during shipping to a location in France agreed with you as a buyer. No other mandatory costs can be added to the delivery of a Haas CNC Product.

KEEP UP WITH THE LATEST HAAS TIPS AND TECHNOLOGY...

Sign up now!   

HAAS TOOLING ACCEPTS THE FOLLOWING:

  • Service & Support
  • Owners
  • Request Service
  • Operator Manuals
  • Haas Parts
  • Rotary Repair Request
  • Pre-Install Guides
  • Shopping Tools
  • Build & Price a New Haas
  • Available Inventory
  • The Haas Price List
  • CNCA Financing
  • About Haas
  • Accessibility Statement
  • DNSH Statement
  • Export Compliance
  • Careers
  • Certifications & Safety
  • Contact Us
  • History
  • Terms & Conditions
  • Haas Tooling Terms & Conditions
  • Privacy
  • Warranty
  • Haas Community
  • Haas Certification Program
  • Haas Motorsports
  • Gene Haas Foundation
  • Haas Technical Education Community
  • Events
  • Join the Conversation
  • Facebook
  • X
  • Flickr
  • YouTube
  • LinkedIn
  • Instagram
  • TikTok
© 2026 Haas Automation, Inc – CNC Machine Tools
This site is protected by reCAPTCHA and the Google Privacy Policy and Terms of Service apply.

2800 Sturgis Rd., Oxnard, CA 93030
Toll Free: (888) 817-4446 / Fax: 805-278-8554