MyHaas Willkommen
!
Haas Tooling Gast-Bestellverlauf MyHaas/HaasConnect Anmelden Registrieren Haas Tooling Mein Konto Order History Return History MyHaas/HaasConnect Abmelden Willkommen Meine Maschinen Letzte Aktivität Meine Angebote Mein Konto Meine Nutzer Abmelden
Ein Händler in Ihrer Nähe
  1. Sprache auswählen
    1. English
    2. Deutsch
    3. Español
    4. Français
    5. Italiano
    6. Português
    7. Český
    8. Dansk
    9. Nederlands
    10. Magyar
    11. Polski
    12. Svenska
    13. Русский
    14. Türkçe
    15. 中文
    16. Suomi
    17. Norsk
    18. الإنجليزية
    19. български
    20. Hrvatski
    21. Ελληνικά
    22. Română
    23. Slovenský
    24. Slovenščina
    25. 한국어
    26. 日本語
Search
  • Maschinen Main Menu
    • Vertikale Fräsmaschinen von Haas Vertikale Fräsmaschinen
      Vertikale Fräsmaschinen
      Vertikale Fräsmaschinen Alles anzeigen
      • Vertikale Fräsmaschinen
      • VF-Baureihe
      • Universalmaschinen
      • VR Serie
      • VMCs mit Palettenwechsler
      • MiniMill
      • Formenbaumaschinen
      • Bohren/Gewindebohren/Fräsen-Baureihe
      • Werkzeug- und Vorrichtungsbau
      • Kompaktfräsmaschinen
      • Portal-Baureihe
      • Extra große VMC
      • Tischfräsmaschine
      • Steuerungssimulator
      • Automatischer Werkstücklader für Fräsen
      • Kompakter automatischer Werkstücklader
    • Product Image Mehrachsen-Lösungen
      Mehrachsen-Lösungen
      Mehrachsen-Lösungen Alles anzeigen
      • Mehrachsen-Lösungen
      • Mit Y-Achse
      • 5-Achsen-Fräsmaschinen
    • Haas Drehmaschinen Drehmaschinen
      Drehmaschinen
      Drehmaschinen Alles anzeigen
      • Drehmaschinen
      • ST-Baureihe
      • Doppelspindel
      • Drehmaschinen für den Werkzeug- und Vorrichtungsbau
      • Kompaktdrehmaschine
      • Haas Stangenlader V2
      • Automatischer Werkstücklader für Drehmaschine
    • Horizontale Fräsmaschinen von Haas Horizontale Fräsmaschinen
      Horizontale Fräsmaschinen
      Horizontale Fräsmaschinen Alles anzeigen
      • Horizontale Fräsmaschinen
      • SK 50
      • SK 40
    • Haas Dreh- und Indexiertische Dreh- und Indexiertische
      Dreh- und Indexiertische
      Dreh- und Indexiertische Alles anzeigen
      • Dreh- und Indexiertische
      • Drehtische
      • Indexiertische
      • 5-Achsen-Drehtische
      • Extra große Drehtische
    • Product Image Automatisierungssysteme
      Automatisierungssysteme
      Automatisierungssysteme Alles anzeigen
      • Automatisierungssysteme
      • Roboter- Pakete
      • Automatische Werkstücklader
      • Palettenbahnhofsysteme
      • Stangenlader von Haas
      • Models
    • LINKS Sondermodelle  Sondermodelle 
      BERUFLICHE PERSPEKTIVEN BEI HAAS BERUFLICHE PERSPEKTIVEN BEI HAAS MODELL UND PREIS MODELL UND PREIS PREISLISTE PREISLISTE DAS NEUESTE IN KÜRZE DAS NEUESTE IN KÜRZE IHRE ERSTE CNC IHRE ERSTE CNC HAAS SIX PACK HAAS SIX PACK
      EINKAUFSINFORMATIONEN
      • Zusammenstellung und Preis einer Haas-Maschine
      • Preisliste
      • Verfügbare Produkte
      • CNCA Finanzierung
      MÖCHTEN SIE MIT JEMANDEM SPRECHEN?

      Ihr Haas-Händler (Haas Factory Outlet, HFO) kann Ihre Fragen beantworten und Sie durch die besten Varianten führen.

      CONTACT YOUR DISTRIBUTOR >
  • Sonderzubehör Main Menu
    • Product Image Spindeln
      Spindeln
      Spindeln Alles anzeigen
      • Spindeln
    • Product Image Werkzeugwechsler
      Werkzeugwechsler
      Werkzeugwechsler Alles anzeigen
      • Werkzeugwechsler
    • Product Image 4- | 5-Achsen
      4- | 5-Achsen
      4- | 5-Achsen Alles anzeigen
      • 4- | 5-Achsen
    • Product Image Revolver und angetriebene Werkzeuge
      Revolver und angetriebene Werkzeuge
      Revolver und angetriebene Werkzeuge Alles anzeigen
      • Revolver und angetriebene Werkzeuge
    • Product Image Messtasten
      Messtasten
      Messtasten Alles anzeigen
      • Messtasten
    • Haas Späneabfuhr- und Kühlmittelverwaltung Späneabfuhr- und Kühlmittelverwaltung
      Späneabfuhr- und Kühlmittelverwaltung
      Späneabfuhr- und Kühlmittelverwaltung Alles anzeigen
      • Späneabfuhr- und Kühlmittelverwaltung
    • Die Haas Steuerung Die Haas Steuerung
      Die Haas Steuerung
      Die Haas Steuerung Alles anzeigen
      • Die Haas Steuerung
    • Product Image Produktoptionen
      Produktoptionen
      Produktoptionen Alles anzeigen
      • Produktoptionen
    • Product Image Werkzeuge und Spannvorrichtungen
      Werkzeuge und Spannvorrichtungen
      Werkzeuge und Spannvorrichtungen Alles anzeigen
      • Werkzeuge und Spannvorrichtungen
    • Product Image Werkstückhalterung
      Werkstückhalterung
      Werkstückhalterung Alles anzeigen
      • Werkstückhalterung
    • Product Image 5-Achsen-Lösungen
      5-Achsen-Lösungen
      5-Achsen-Lösungen Alles anzeigen
      • 5-Achsen-Lösungen
      • 5 Easy Steps to 5-Axis
    • Product Image Automatisierung
      Automatisierung
      Automatisierung Alles anzeigen
      • Automatisierung
    • LINKS Sondermodelle  Sondermodelle 
      BERUFLICHE PERSPEKTIVEN BEI HAAS BERUFLICHE PERSPEKTIVEN BEI HAAS MODELL UND PREIS MODELL UND PREIS PREISLISTE PREISLISTE DAS NEUESTE IN KÜRZE DAS NEUESTE IN KÜRZE IHRE ERSTE CNC IHRE ERSTE CNC HAAS SIX PACK HAAS SIX PACK
      EINKAUFSINFORMATIONEN
      • Zusammenstellung und Preis einer Haas-Maschine
      • Preisliste
      • Verfügbare Produkte
      • CNCA Finanzierung
      MÖCHTEN SIE MIT JEMANDEM SPRECHEN?

      Ihr Haas-Händler (Haas Factory Outlet, HFO) kann Ihre Fragen beantworten und Sie durch die besten Varianten führen.

      CONTACT YOUR DISTRIBUTOR >
  • Why Haas Main Menu
      Entdecken Sie den Haas Unterschied
    • Warum gerade Haas?
    • MyHaas
    • Education Community
    • Industrie 4.0
    • Haas-Zertifizierung
    • Kundenreferenzen
  • Service Main Menu
      Willkommen bei Haas Service
      SERVICE-HOME Bedienerhandbücher Vorgehensweisen Anleitungen zur Fehlersuche Vorbeugende Wartung Haas Ersatzteile Haas Tooling Videos
  • Videos Main Menu
  • Haas Werkzeuge Main Menu
      Fräsen-Werkzeughalter Werkstückhalterung für Fräsen Manuelle Spannfutter zum Fräsen Fräsen Werkzeuge für Drehzentren Drehmaschinen-Werkzeughalter Drehmaschine-Werkstückhalterung ER Spannzangen und Spannfutter Bohren Gewindedrehen Räumen Werkzeugwechsel Werkzeugzubehör Entgraten und Schleifen Paketsätze Bekleidung und Zubehör Aufstellung und Bedienung Mess- und Prüfwerkzeuge Winner's Circle
    • Haas Tooling
    • Fräsen-Werkzeughalter
      Fräsen-Werkzeughalter Shop All
      • Schaftfräskopf
      • Fräseraufnahmen
      • Schrumpfhalter
      • ER Spannhülsenfutter
      • Spannzangenfutter und Spannzangen
      • Bohrfutter
      • Zugbolzen
      • Werkzeughaltersätze für Fräsen
      • Hydraulische Spannzangenfutter und Spannzangen
    • Werkstückhalterung für Fräsen
      Werkstückhalterung für Fräsen Shop All
      • Schraubstöcke mit festen Spannbacken
      • Selbstzentrierende Schraubstöcke
      • Adapterplatten
      • Frässchraubstock-Backen
      • Zubehör für die Werkstückspannung
      • Schraubstocksätze
      • Schraubstock-Parallelunterlagen
      • HA5C-Spannfutter
      • Drehmaschinen-Schraubstock-Sätze
    • Manuelles Spannfutter zum Fräsen
      Manuelles Spannfutter zum Fräsen Shop All
      • 5C-Indexiertisch-Spannfutter
      • Dreibackenfutter und Halterungen für Fräsen
    • Fräsen
      Fräsen Shop All
      • Fräseraufnahmekörper
      • Frässchneidplatten
      • Schaftfräsen
      • Schaftfräser-Satz
      • Phasenfräser und Schneidplatten
      • Indexierbare Schaftfräser-Körper
      • Kugelschaftfräser
      • Phasen-Stirnfräser
      • Schruppen (mit Schaftfräser)
      • INDX-Kugelfräser und -Wendeschneidplatten
      • Werkzeughaltersätze für Plan- und Eckfräser
      • Fasenfräsersätze
      • Indexierbare Schaftfräsersätze
      • Schwalbenschwanzfräser
      • Indexierbare Schwalbenschwanzfräser
      • Gravur-Schaftfräser
      • Grate
      • Schlitzfräser
      • Schaftfräser zur Eckenabrundung
    • Werkzeuge für Drehzentren
      Werkzeuge für Drehzentren Shop All
      • Abstechwerkzeuge
      • Abstechwerkzeugsätze
      • Drehschneidplatten
      • Einstechwerkzeuge
      • Einstech- und Gewindewerkzeuge mit kleinem ID
      • Gewindeeinsatz
      • Gewindeschneiden Werkzeughalter
      • Außendrehwerkzeughalter
      • Cermet-Wendeschneidplatten
      • CBN-Drehwendeschneidplatten
      • Haas Wendeschneidplatten zur Bearbeitung von Nuten und für Gewinde
      • Haas Werkzeughalter – Bearbeitung von Nuten und Gewindedrehen
      • Bohrstangen
    • Drehmaschinen-Werkzeugaufnahme
      Drehmaschinen-Werkzeugaufnahme Shop All
      • TL- und CL-Werkzeugaufnahme
      • BOT-Werkzeugaufnahme
      • BMT-Werkzeugaufnahme
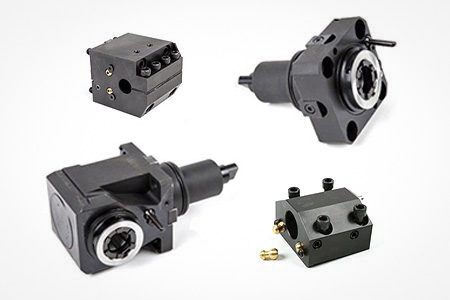
      • Angetriebene Werkzeugaufnahme
      • Reduziermuffe
      • VDI-Werkzeugaufnahme
    • Drehmaschine-Werkstückhalterung
      Drehmaschine-Werkstückhalterung Shop All
      • Live-Zentren
      • Spindel-Führungsbüchsen
      • Schnellwechselspannzangen
      • Spannzangenfutter für Drehmaschinen
      • 5C-Spannzangen
      • 5C-Spannzangensätze
      • Drehmaschinen-Ausdrehringe
      • Drehmaschinen-Spannbacken
    • ER Spannhülsen und Spannfutter
      ER Spannhülsen und Spannfutter Shop All
      • ER-Spannzangen
      • ER-Dichtspannfutter
      • ER-Gewindebohr-Spannzangen
      • ER-Spannzangensätze und Zubehör
      • ER Spannhülsenfutter
      • ER-Spannhülsenfutter mit Zylinderschaft
      • Schlüssellose Bohrspannfutter mit Zylinderschaft
    • Bohren
      Bohren Shop All
      • Vollhartmetallbohrer
      • Indexierbarer Bohrerschaft
      • Indexierbare Bohreinsätze
      • Modularer Bohrerschaft
      • Modulare Bohrköpfe
      • Kobalt-Bohrer und -Sätze
      • Zentrierbohrer
      • Reibahle
      • Indexierbare Bohrsätze
      • Anbohrer
      • Spatenbohrerschäfte
      • Spatenbohrerschaft-Wendeschneidplatten
      • Senker
    • Gewindedrehen
      Gewindedrehen Shop All
      • Gewindebohrer
      • Gewindeeinsatz
      • Gewindeschneiden Werkzeughalter
      • Gewindefräsen
      • Rohrgewindebohrer
      • Gewindebohr- und Bohrsätze
    • Räumen
      Räumen Shop All
      • Räumwerkzeughalter
      • Räumeinsätze
    • Werkzeugwechsel
      Werkzeugwechsel Shop All
      • Werkzeugvoreinstellmaschinen
      • Schrumpfmaschine
    • Werkzeugzubehör
      Werkzeugzubehör Shop All
      • Spindelkonusreiniger
      • Haas Shop Lift
      • Werkzeughalter-Befestigungen
      • CNC-Gebläse zur Spanentfernung
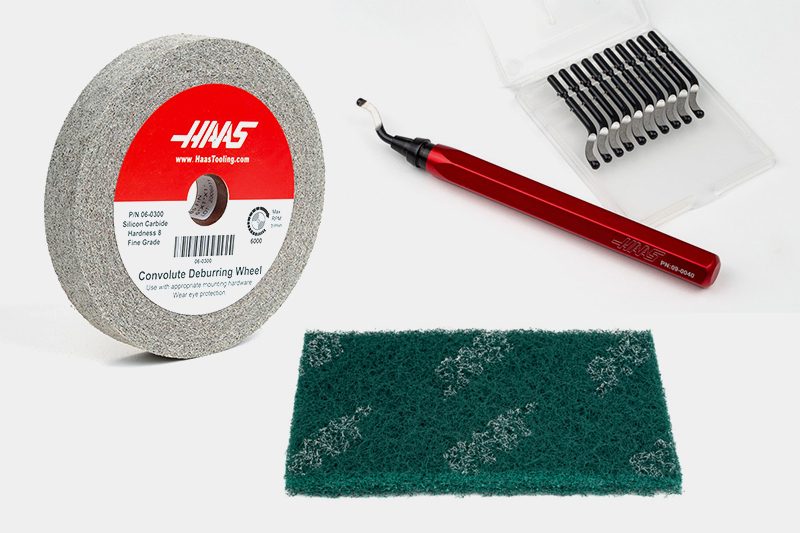
    • Entgrat- und Schleifmittel
      Entgrat- und Schleifmittel Shop All
      • Schleifpads
      • Entgratwerkzeuge
      • Entgratungsräder
    • Paketsätze
      Paketsätze Shop All
      • SPANLÜFTERSÄTZE
      • Schneidwerkzeugsätze
      • Indexierbare Schaftfräsersätze
      • Abstechwerkzeugsätze
      • Gewindebohr- und Bohrsätze
      • Indexierbare Bohrsätze
      • Werkzeughaltersätze für Plan- und Eckfräser
      • Fasenfräsersätze
      • Werkzeughaltersätze für Fräsen
      • Werkstückhalterungssätze
      • Drehmaschinen-Schraubstock-Sätze
      • Schraubstocksätze
      • Dreibackenfutter Sätze für Fräsen
      • Reduzierhülse Sätze
      • Werkzeugsätze für Drehmaschinen
    • Lagerung und Handhabung
      Lagerung und Handhabung Shop All
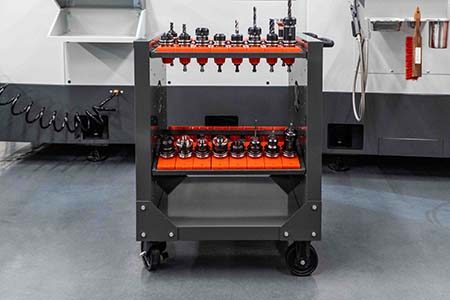
      • Werkzeugwägen
    • Mess- und Prüfwerkzeuge
      Mess- und Prüfwerkzeuge Shop All
      • Prüfstangen
      • Kontrollsätze
      • Messtasterzubehör
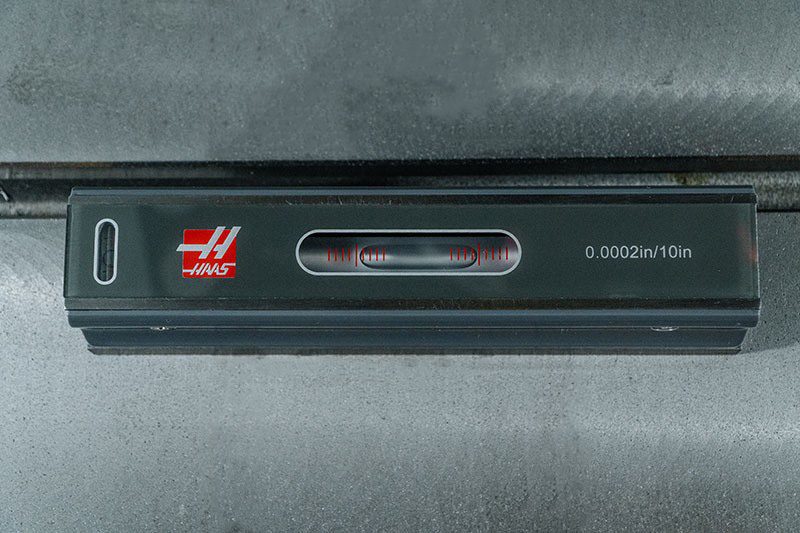
      • Wasserwaagen
      • Refraktometer
      • Messgeräte für Werkzeugeinstellungen
      • Kanten- und Mittentaster
      • Vergleichsmessgeräte
      • Messtaster-Sätze und Zubehör
    • Bekleidung und Zubehör
      Bekleidung und Zubehör Shop All
      • Zubehör
      • Bekleidung
    • Winner's Circle
      Winner's Circle Shop All
      • WINNERS_CIRCLE-1Y
    • HAAS TOOLING QUICK LINKS
      NEUE PRODUKTE NEUE PRODUKTE NEW PRODUCTS NEW PRODUCTS
      AM BELIEBTESTEN AM BELIEBTESTEN
      WERBEAKTIONEN FÜR WERKZEUGE WERBEAKTIONEN FÜR WERKZEUGE
      FINANZIERUNG UND OFFENE BEDINGUNGEN FINANZIERUNG UND OFFENE BEDINGUNGEN
      Häufig gestellte Fragen Häufig gestellte Fragen
      SÄTZE SPEZIELL FÜR SIE SÄTZE SPEZIELL FÜR SIE
  • Schreiben Sie uns oder rufen Sie uns an!

×

Suchergebnisse

Web Pages

Bilder

    • <
    • 1
    • >
MyHaas Willkommen
!
Haas Tooling Gast-Bestellverlauf MyHaas/HaasConnect Anmelden Registrieren Haas Tooling Mein Konto Order History Return History MyHaas/HaasConnect Abmelden Willkommen Meine Maschinen Letzte Aktivität Meine Angebote Mein Konto Meine Nutzer Abmelden
Ein Händler in Ihrer Nähe
  1. Sprache auswählen
    1. English
    2. Deutsch
    3. Español
    4. Français
    5. Italiano
    6. Português
    7. Český
    8. Dansk
    9. Nederlands
    10. Magyar
    11. Polski
    12. Svenska
    13. Русский
    14. Türkçe
    15. 中文
    16. Suomi
    17. Norsk
    18. الإنجليزية
    19. български
    20. Hrvatski
    21. Ελληνικά
    22. Română
    23. Slovenský
    24. Slovenščina
    25. 한국어
    26. 日本語
Search
×

Suchergebnisse

Web Pages

Bilder

    • <
    • 1
    • >

UMC-750/1000 Pallet Pool - Installation

Service Home How-To-Verfahren UMC-750/1000 Pallet Pool - Installation

UMC-750/1000 Pallet Pool - Installation

- Zum Abschnitt springen - Back to Top

3.2 UMC PP - 8/10 Station - Version 2

Recently Updated Last updated: 10/28/2022

UMC PP - 8/10 Station Version 2 - Installation


Pallet Pool Installation Video

Introduction

The following procedure will show you how to install an 8/10 station Pallet Pool on the following machines:

  • UMC-500/SS
  • UMC-750/SS
  • UMC-1000/SS

The Next Generation software on the machine must be version 100.20.000.1110 or higher.

The Pallet Pool option is currently not field installable.

Important: To ensure that the Pallet Pool does not become mis-aligned, it is recommended that the machine and Pallet Pool be anchored. Refer to the following link: Anchoring Instructions.

The Pallet Pool option has a room for a total of 9 pallets that can be installed on a UMC-500/750/1000 with the Pallet Pool option.

The Pallet Pool has 2 servo axes. The PR axis rotates the Pallet Pool ram and the PS axis extends and retracts the Pallet Pool ram to load/unload the pallets.

The UMC-500/750/1000 must be level before the Pallet Pool can be installed. Refer to the installation procedures linked below:

  • UMC-500 Installation
  • UMC-750 Installation
  • UMC-1000 Installation

Push [POWER OFF].

Set the main circuit breaker to the OFF position.

Lock the main circuit breaker. Use an approved lock with an approved safety tag.

Caution: When you handle a PCB, you must wear an Electrostatic Discharge (ESD) strap.

To level the machine without the Pallet Pool connected to the machine, do the following: 

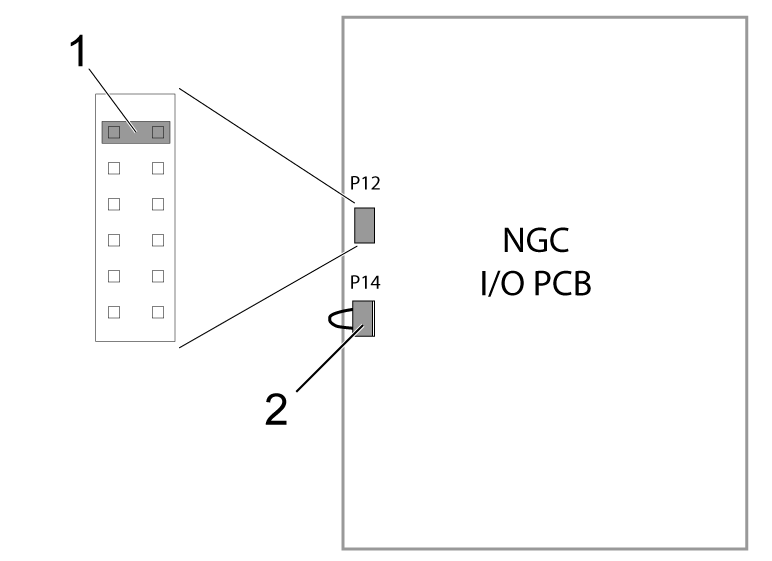
Make sure that there is a shorting block [1] installed on the top two pins of the P12 connector on the I/O PCB 

Make sure there is a jumper (P/N 33-0527) [2] connected to I/O PCB at P14.
 Note: These jumpers are needed to operate the machine without the Pallet Pool.

Disable the pallet pool, change setting 382 Disable Pallet Changer to Pallet Pool.


Note: The above step will disabled the Pallet Pool to allow you to zero return the machine so it can be leveled.

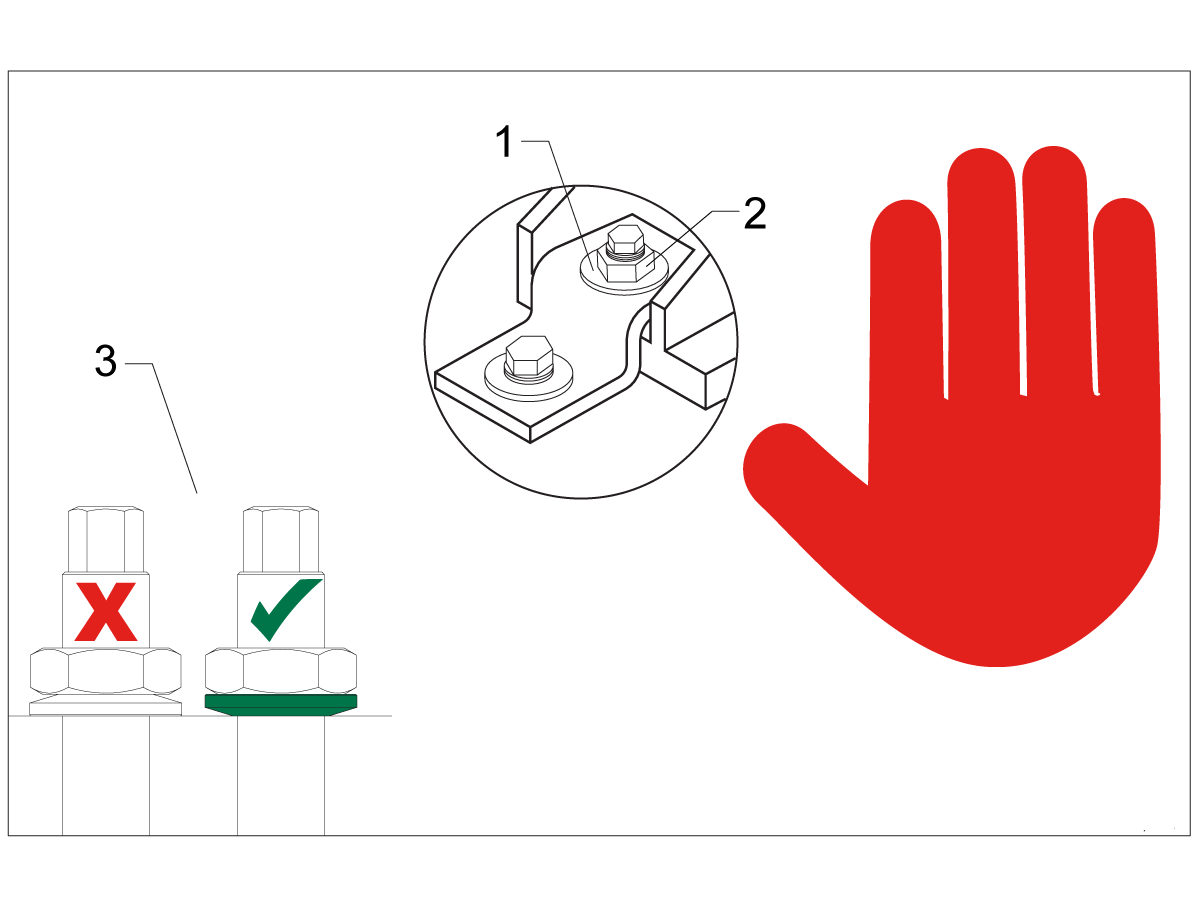
Leveling Screws Hardware

Note: The washers [1] and nuts [2] are installed during shipping and should be saved for installation and not be discarded.

Note: The washer orientation [3] is important.  The conical part of the washer should be against the casting,  see illustration.

Mating the Pallet Pool


1

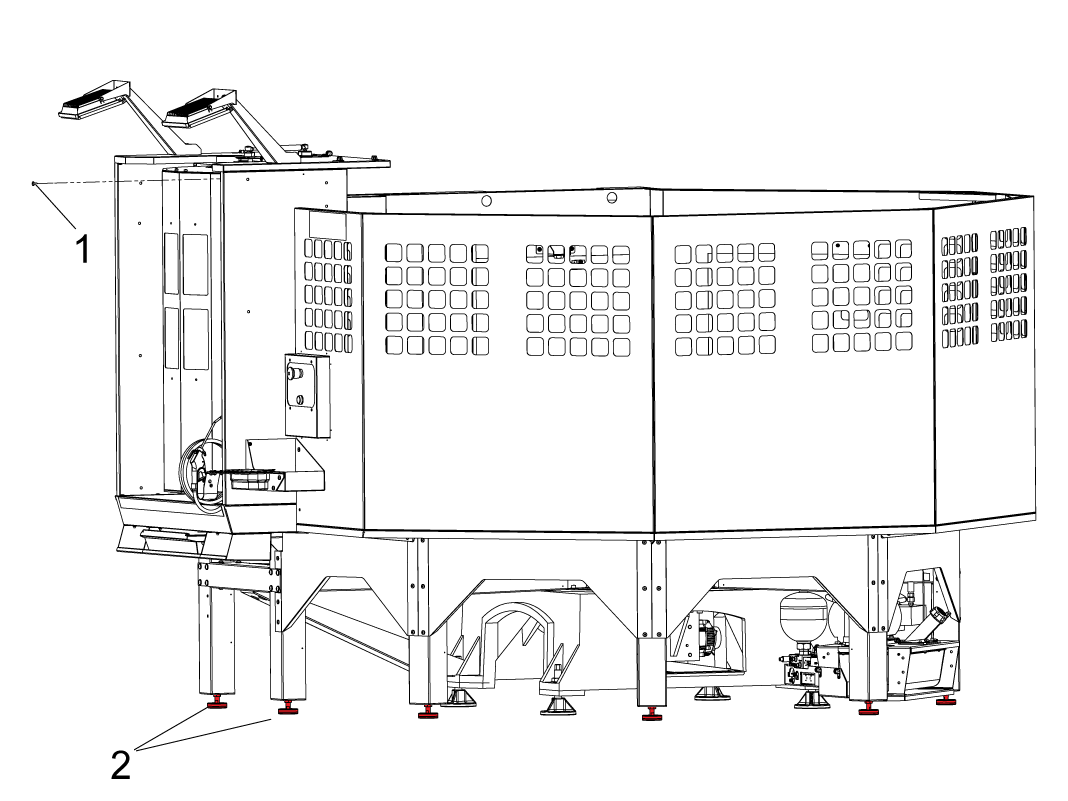
Remove the loading station door blocking bolt [1].

Make sure to raise all of the pallet shelf supporting screws [2] before placing the pallet pool on the floor. 

2

Remove 25-14314 cross bracing from the pallet pool

3

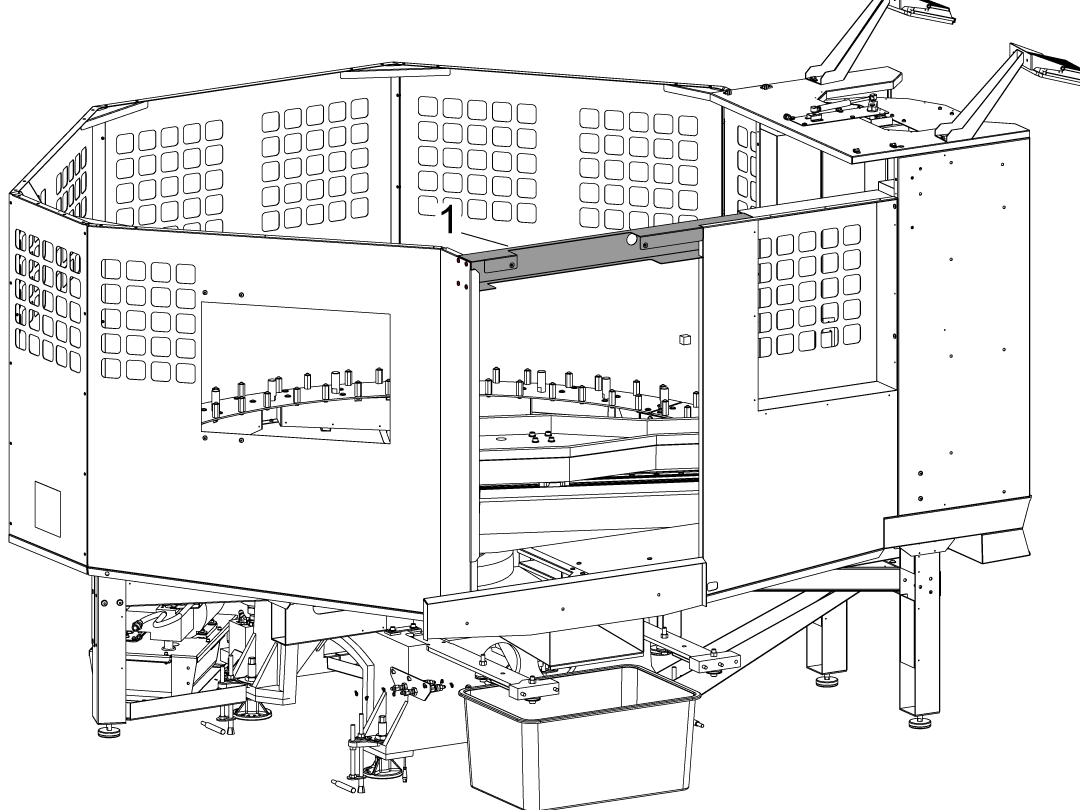
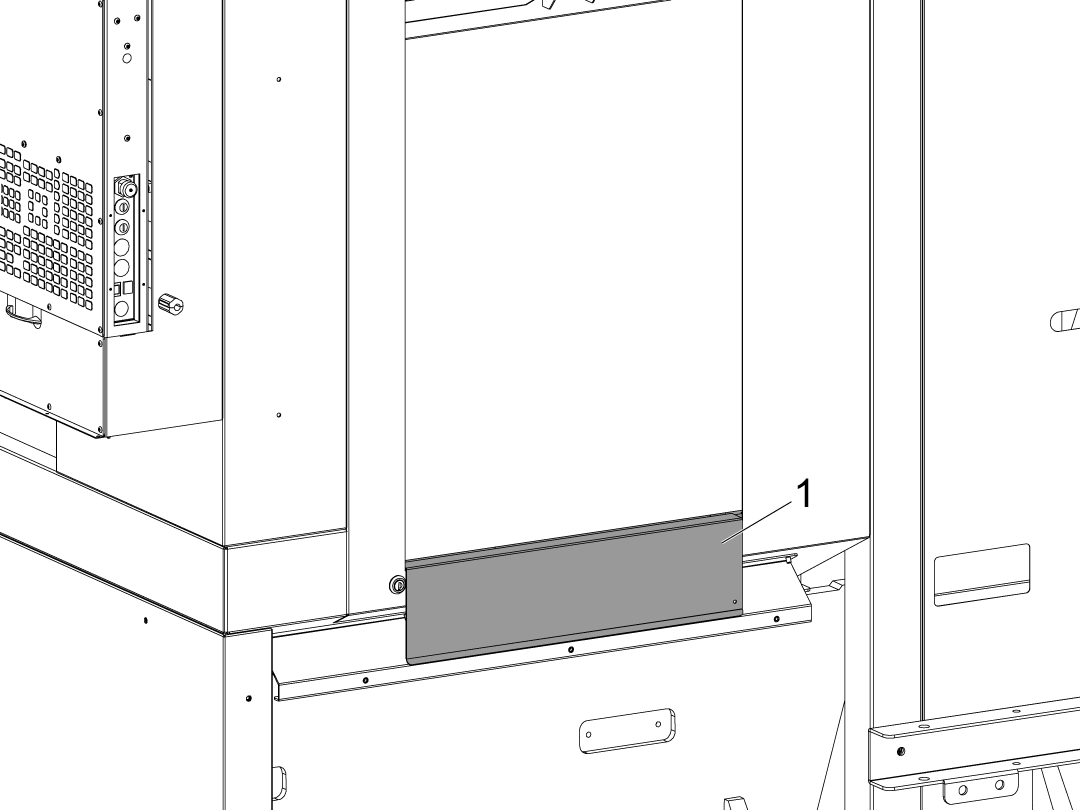
Install the drip tray [1] on the bottom of the auto window, this component should slide right on the window. 

4

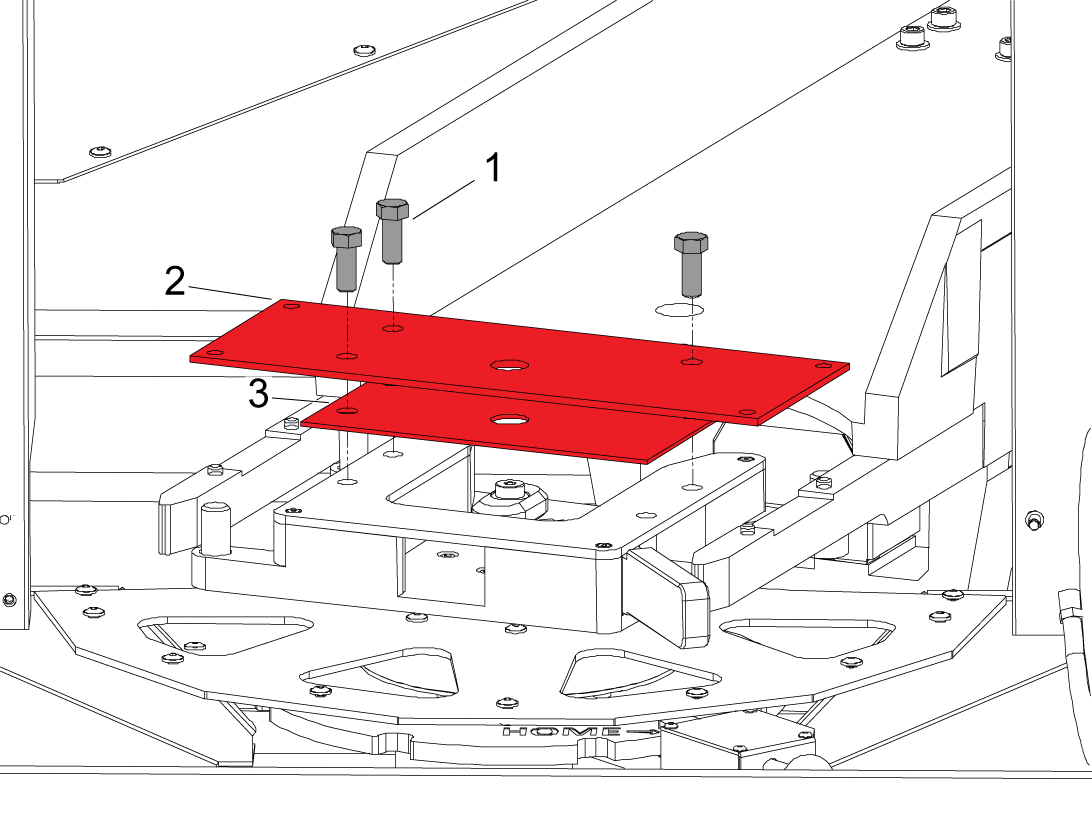
Remove the bolts [1] to remove the shipping brackets. There are two brackets, the first [2] that hold the forks to the loading station, and the bottom [3] that just holds the loading station. 

5

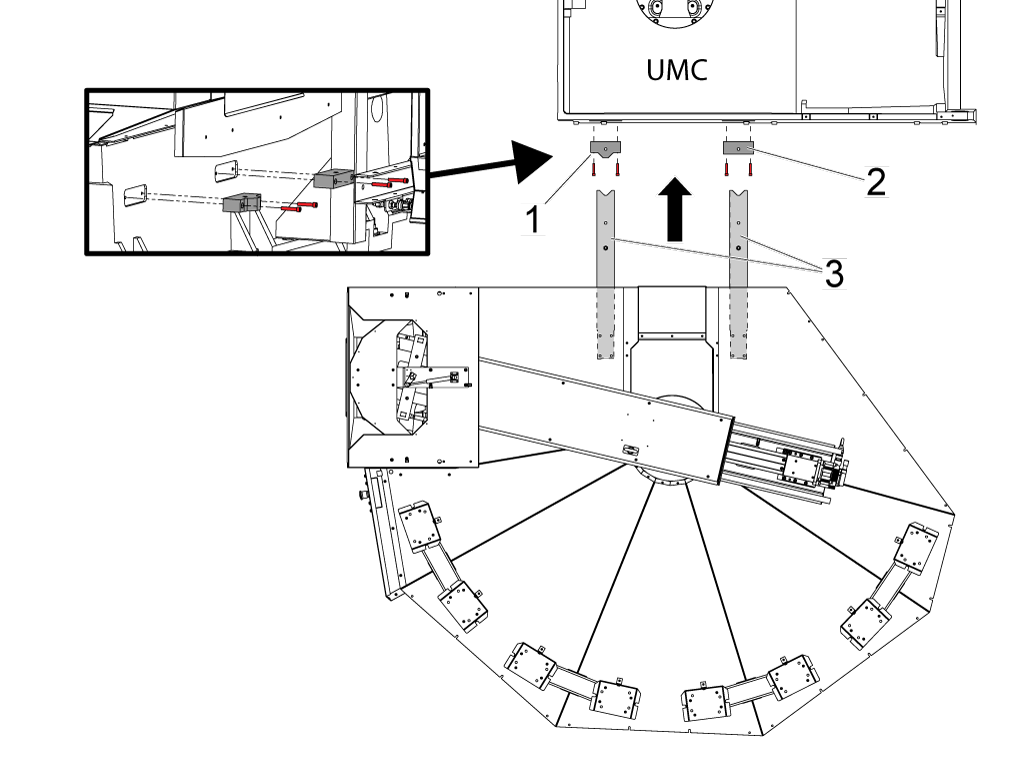
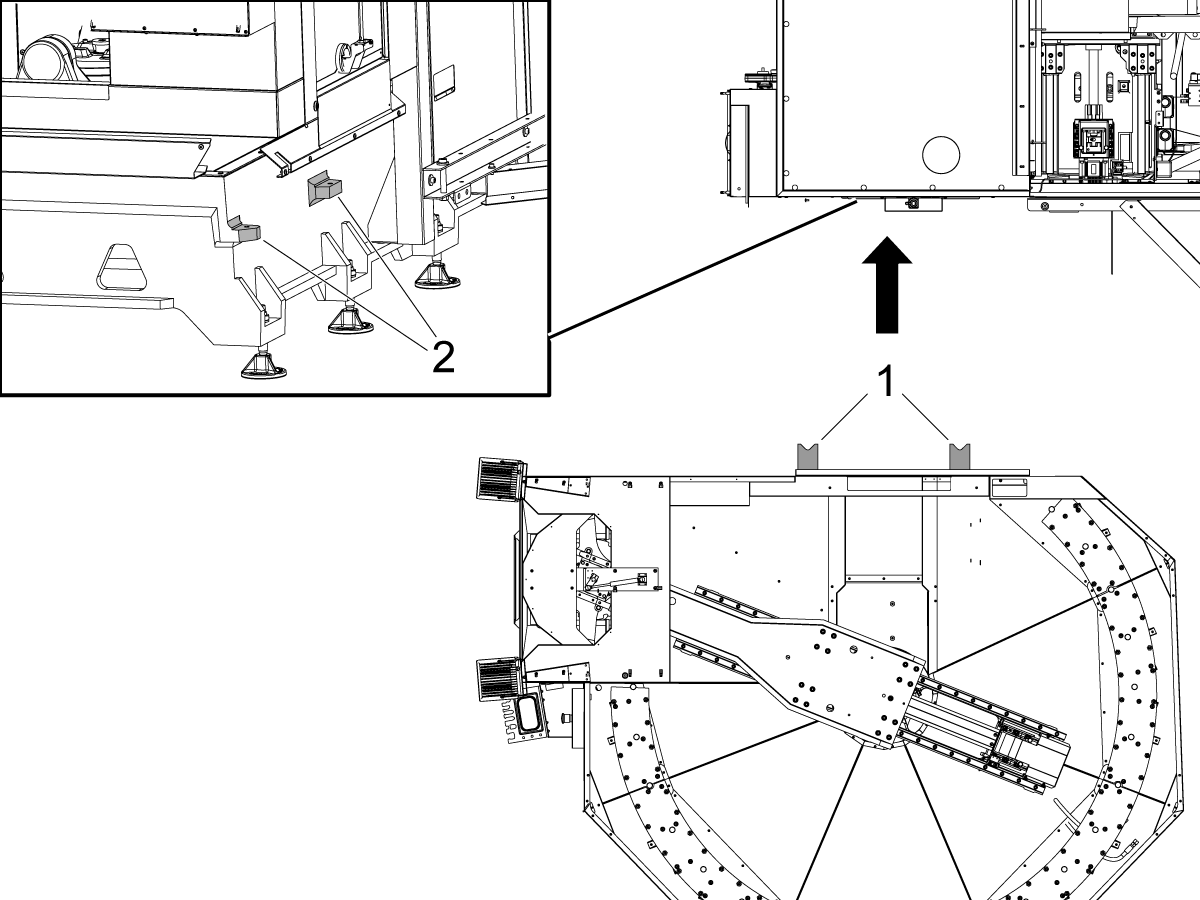
Install the Pallet Pool alignment blocks onto the host machine's base.

Note: The alignment block with the radius [2] must be installed towards the back of the UMC and the alignment block with the flat side [1] must be installed towards the front of the machine. Use the three SHCS 3/8-16 X 2 and the one SHCS 3/8-16 X 1 3/8 [4].

Install the alignment bars [3] onto the pallet pool base.

 NOTE: Use the CABCOOL as a height reference in relation to the pallet pool enclosure opening.

Move the pallet pool assembly so the alignment arms are 3 - 6” (76 - 152 mm) away from the alignment blocks. 

Install the leveling pads under the pallet pool and lower the pallet pool. 

6

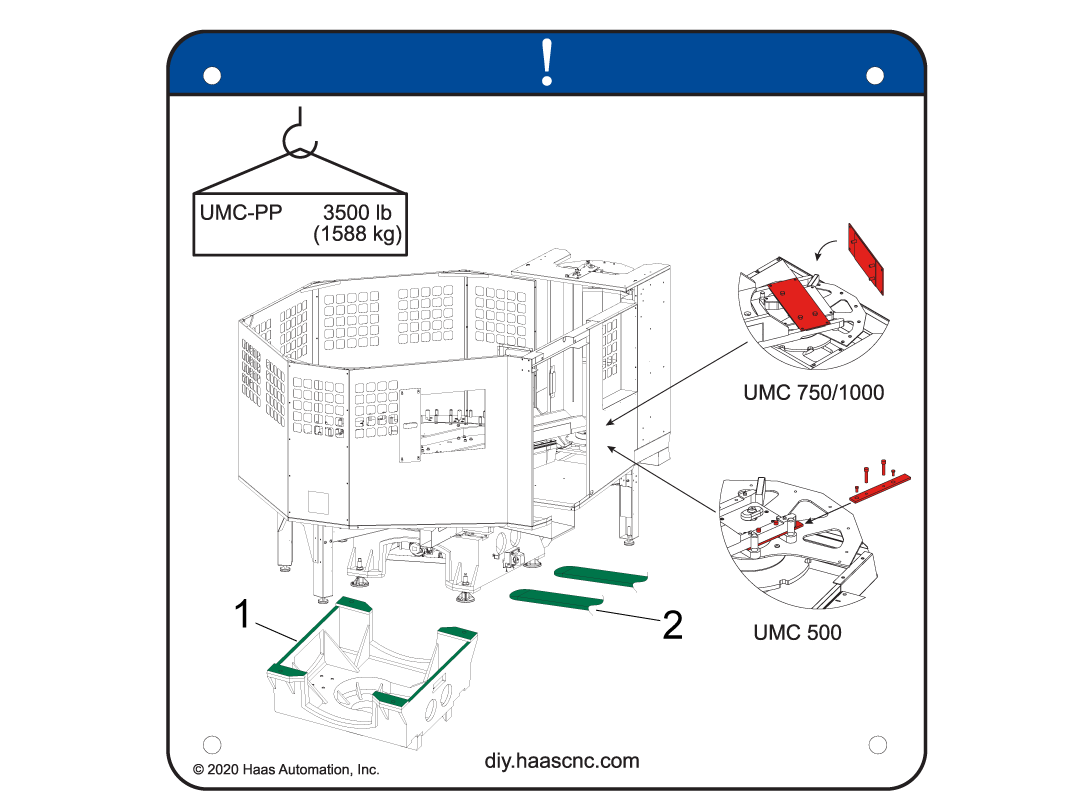
Use a pallet jack or forklift to move the pallet pool close to the machine.

A decal has been placed on the rear of the machine to indicate where the pallet forks should lift the machine from.

NOTE: Have the pallet jack pick up the pallet pool from the opposite side of where the slide window would be.

7

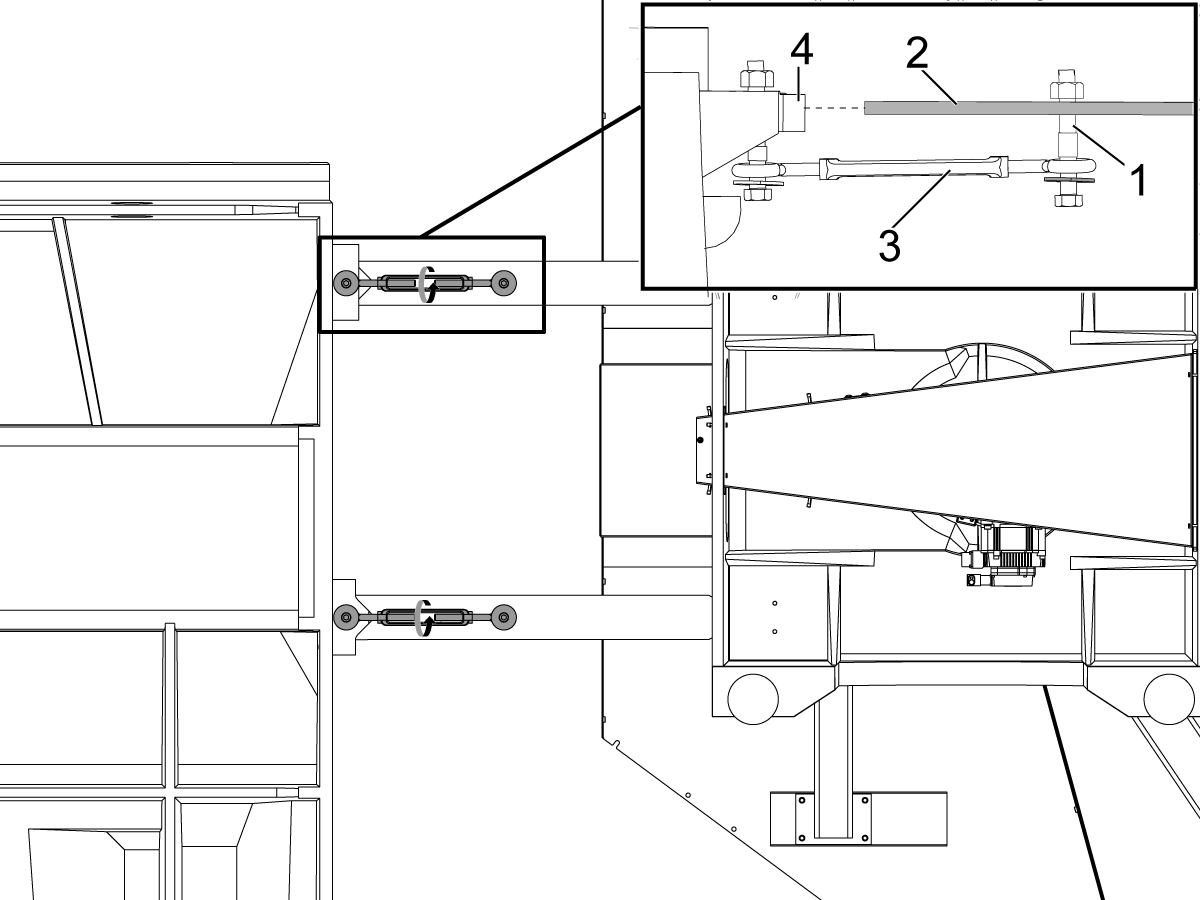
Install the turnbuckles [3] with the provided hardware (SHCS, washer, and bushings [1]) onto the alignment arms [2] and the base casting [4].

NOTE: The side of the turnbuckle with the two bushings should be installed on the side of the pallet pool.

Evenly tighten the turnbuckles until the alignment arms are almost tight against the alignment bars, STOP once the alignment bars areapproximately 1-2" away from the alignment blocks.

Adjust the height of the pallet pool so that the height of the alignment bars are to the center of the blocks before tightening the turnbuckles flush to the alignment blocks. Raise or lower the pallet pool leveling screws evenly when doing so.

Continue to evenly tighten the turnbuckles until the alignment arms are tight against the alignment blocks.

Once the alignment bars and vlocks are evenly flush to each other loosen up the turn buckles.

8

Turn [OFF] the main circuit breaker and wait until the Vector Drive High-Voltage light turns off.

 Note: The PR (Pallet Rotate) and PS (Pallet Slide) amps are already installed at the factory.

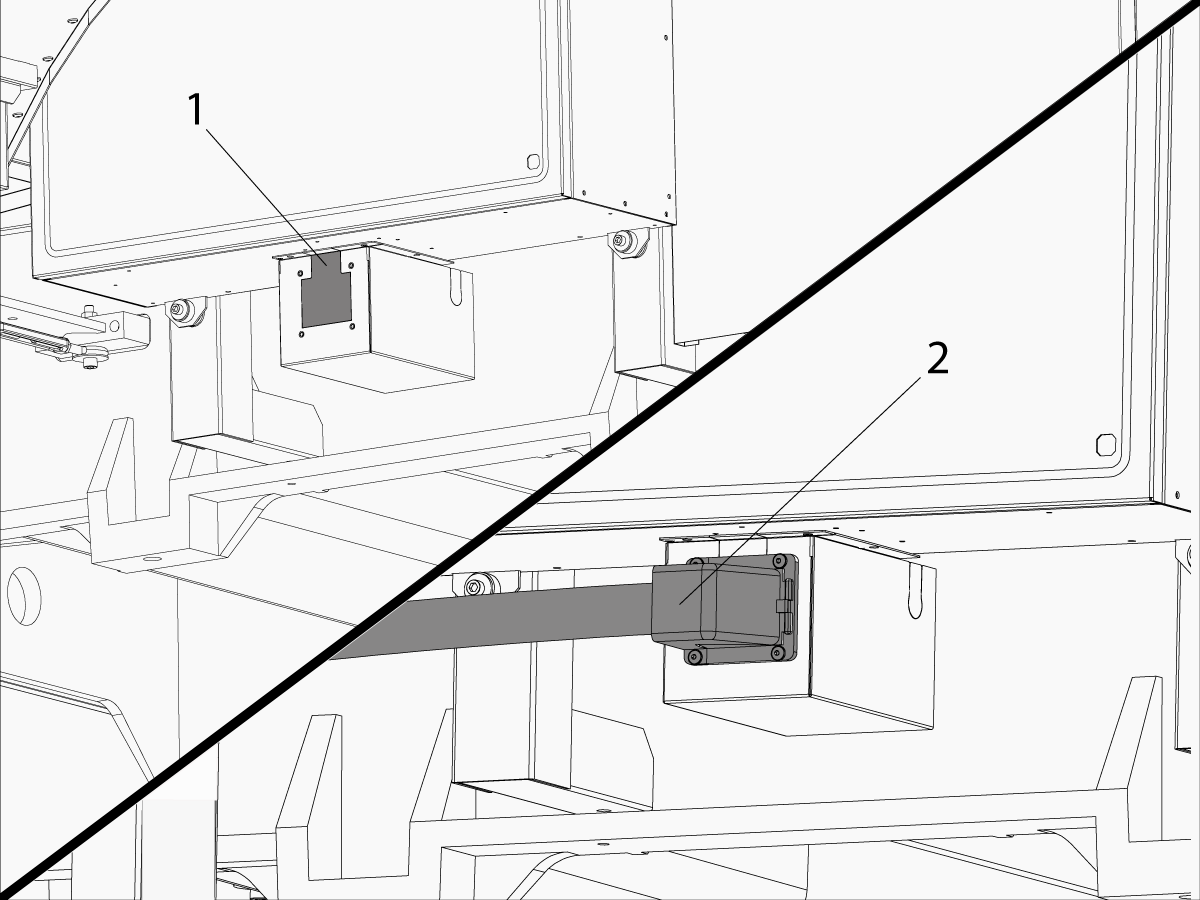
Knock out the pre-cut access panel [1].

Route the pallet pool cables [2] into the control cabinet as shown in the illustration.

Connect the PR motor encoder cable to Maincon PCB channel 15
Connect the PS motor encoder cable to Maincon PCB channel 16.

Connect the PR motor power cable to the amplifier labeled PR. Install the ferrite filter bead on the motor power cable.

Connect the PS motor power cable to the amplifier labeled PS. Install the ferrite filter bead on the motor power cable.

9

Updated

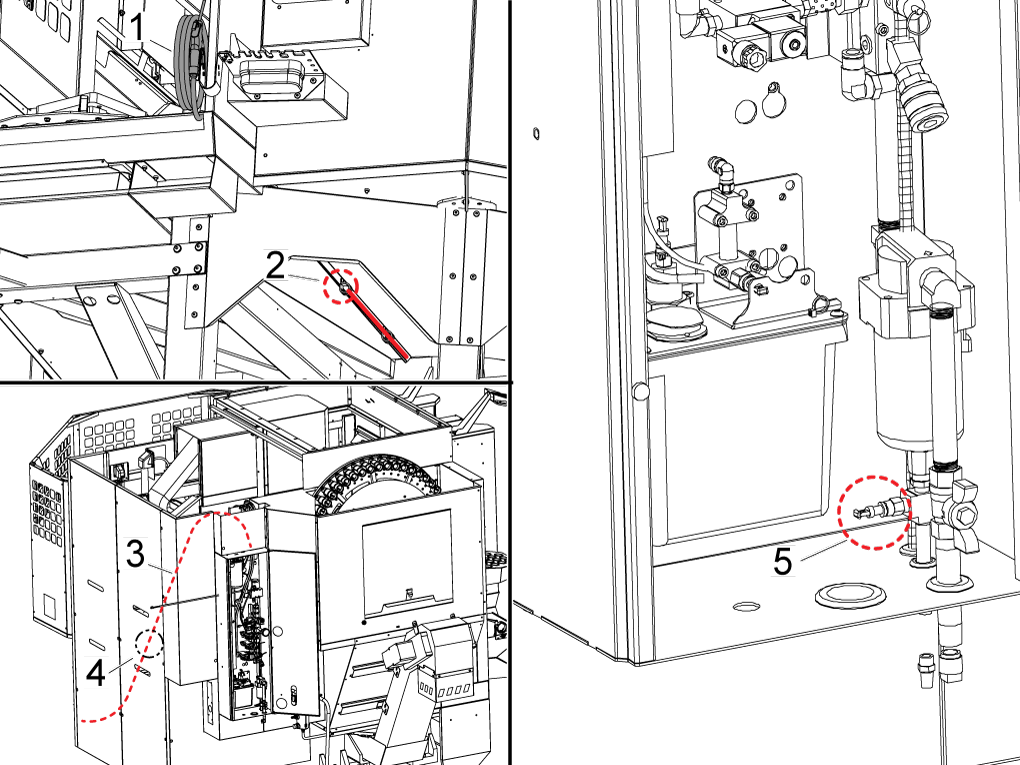
Connect the air gun hose [1] to the air line under the pallet pool [2]. 

Route the air hose from the pallet pool to line coming from the the lube cabinet [3].

Connect the air line from the pallet pool to the to the T-fitting [4] connecting the machine air gun line to the lube cabinet.

Follow the line from the lube cabinet [5] to help locate the T-fitting.

10

Updated

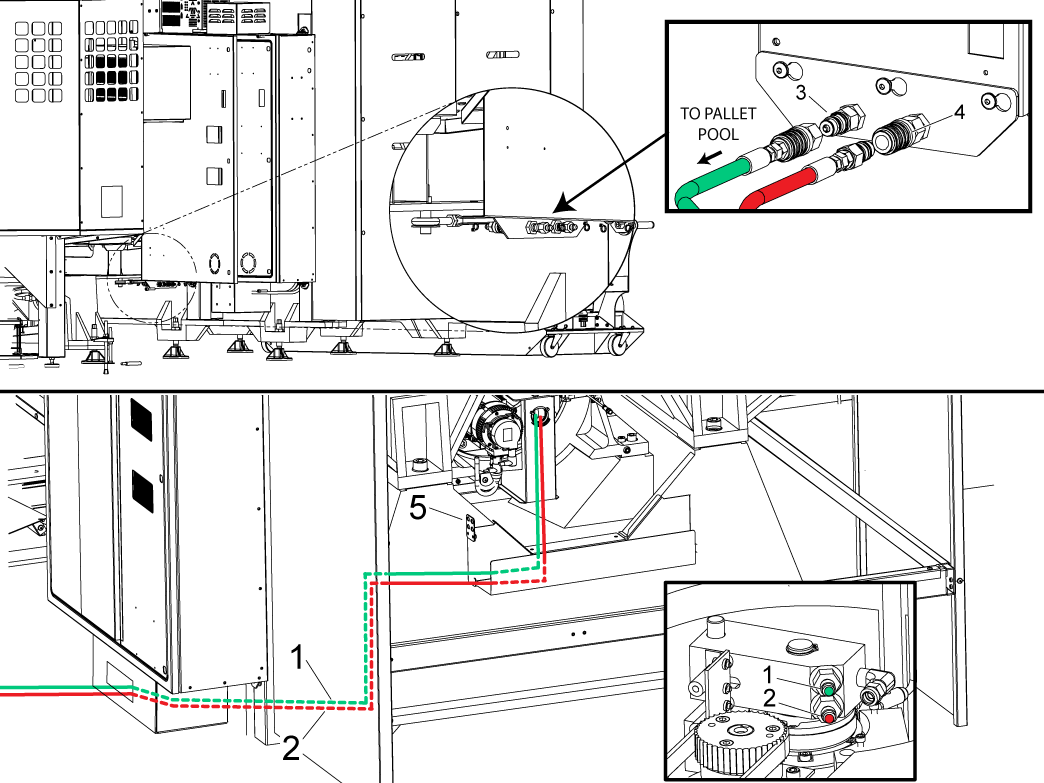
Connect the hydrualic lines to the bulkhead. The pallet clamp [1] is marked with a green zip tie and pallet unclamp [2] is marked with a red zip tie. The hydraulic lines should run through the conduit neatly.

NOTE: The bulkhead uses quick disconnects  for the hydraulic hoses. The clamp side has the male side quick disconnect [3] and the unclamp has the female side [4], this is to avoid switching the hoses.

Route the HPU oil level sensor cable 32-0423 from the HPU to the connector bracket [5].

11

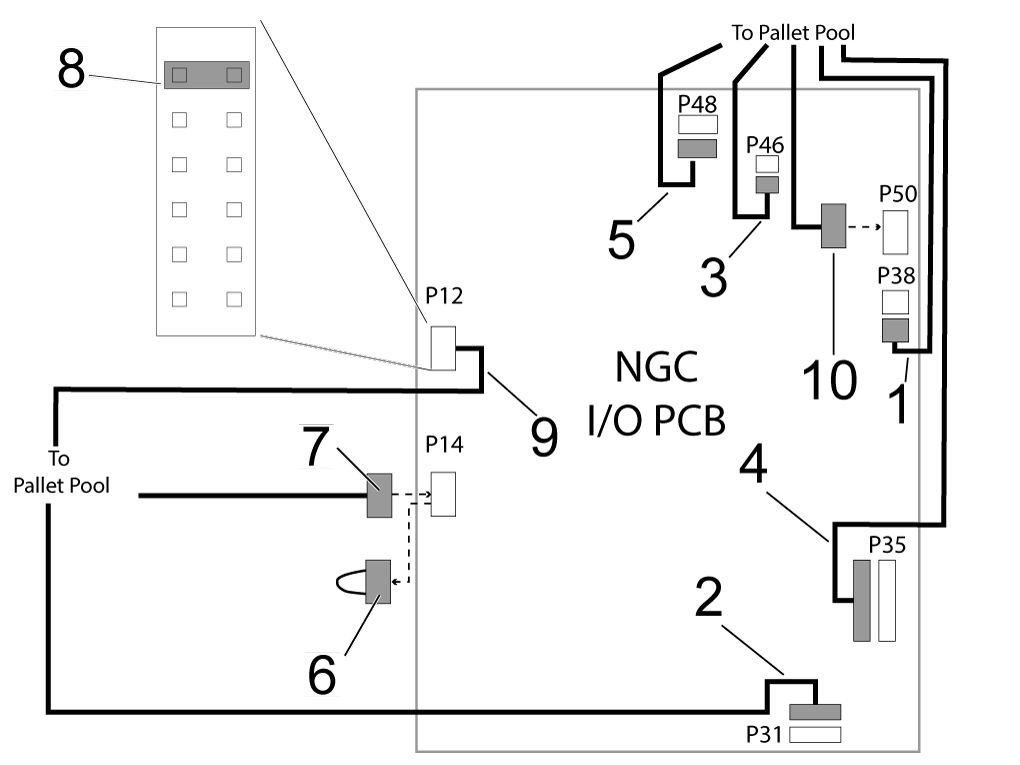
Connect HPU UP/ DWN SOL [1] to P38.

Connect HPU PUMP PWR [2] to P31.

Connect HPU THRML PROBE [3] to P46.

Connect HPU PALLET CLMP SOL  [4] to P35.

Connect HPU PRESSURE SNSR [5] to P48.

Remove the jumper connection from the P14 [6] connector on the I/O PCB.

Connect PP STATUS SWITCHES [7] to P14

Remove the shorting block from the P12 [8] connector on the I/O PCB

Connect PALLET CHNGR STATION [9] to P12

Connect PALLET ALRAM [10]  to P50.

Make sure all the Pallet Pool status bracket connectors are plugged into the correct location.

 NOTE: Store the Pallet Pool jumpers in a safe location, these will be used by the service personnel to move or service the machine.

12

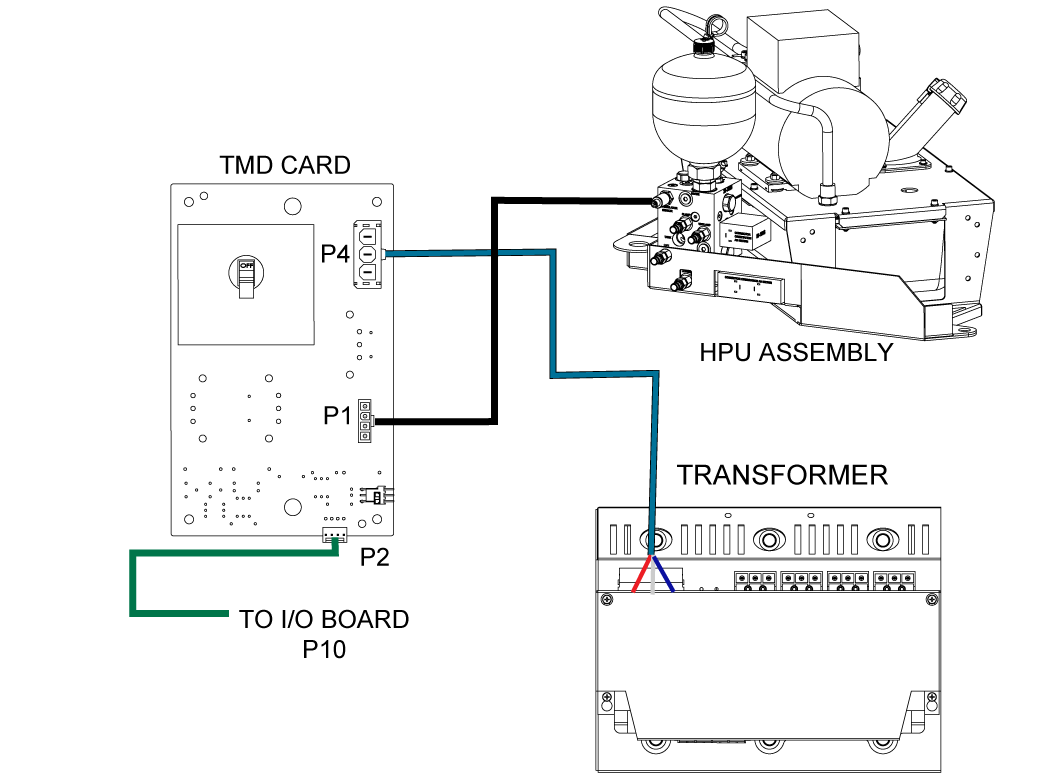
Route the HPU PUMP PWR cable  to P1 on the TMD card located on the I/O PCB hinged door. 

The rest of the components in this image are already connected but this diagram can be used as reference. 

13

Set the main circuit breaker to the ON position.

Push [POWER ON].

Zero Return all the Axis'

Do the following to enable the pallet pool option..  

Important:  You will need to do this step if you perform a option 5 clean install option on a UMC with a pallet pool.

Set setting 382 Disable Pallet Changer to None.

Find the Haas Pallet Pool Parameters decal on the E-Stop on the Pallet Pool machine.  Write down the values.

Use the USB Service key to go into Service Mode.

Press [DIAGNOSTIC] Go to the PARAMETERS> Factory setting tab.

Set the following factory settings values:

  1. 2128 [:] Pallet Pool Type = HPU Lift
  2. 40.011 (HPU 1 Type ) = On Demand
  3. 15.019 [:] PR-Axis Invisible = False
  4. 16.019 [:] PS-Axis Invisible = False
  5. 15.004 [:] PR-Axis Disable = False
  6. 16.004 [16:3] PS-Axis Disabled = False
  7. Turn TMD card on
Set the Grid and TC offsets for PR and PS axis
 
  1. 15.078 PR-Axis Tool Change Offset = Use the decal value.
  2. 15.140 PR-Axis Grid Offset = Use the decal value.
  3. 16.078 PS-Axis Tool Change Offset = Use the decal value.
  4. 16.140 PS-Axis Grid Offset = Use the decal value.
  5. Zero Return after the grid offset is adjusted

Base Level Pallet Pool

1

Verify all outer supports legs are NOT touching the floor.

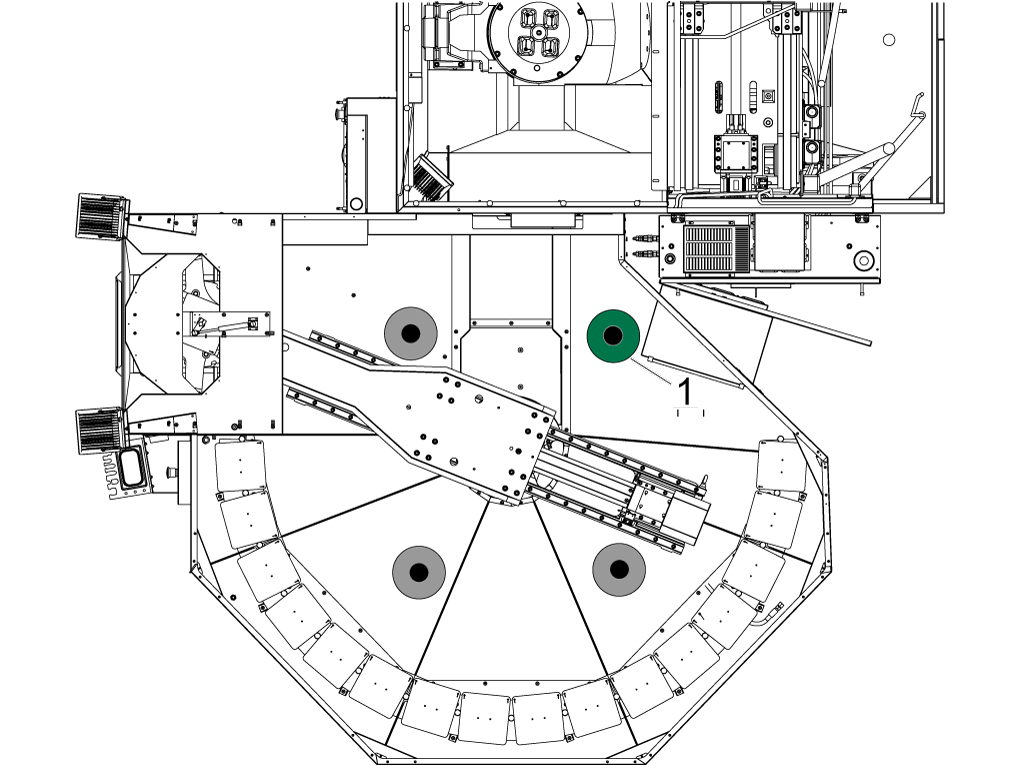
Make sure the pallet pool sit on 3 points, the leveling foot that is not touching the puck is the one closest to the machine control cabinet [1].

2

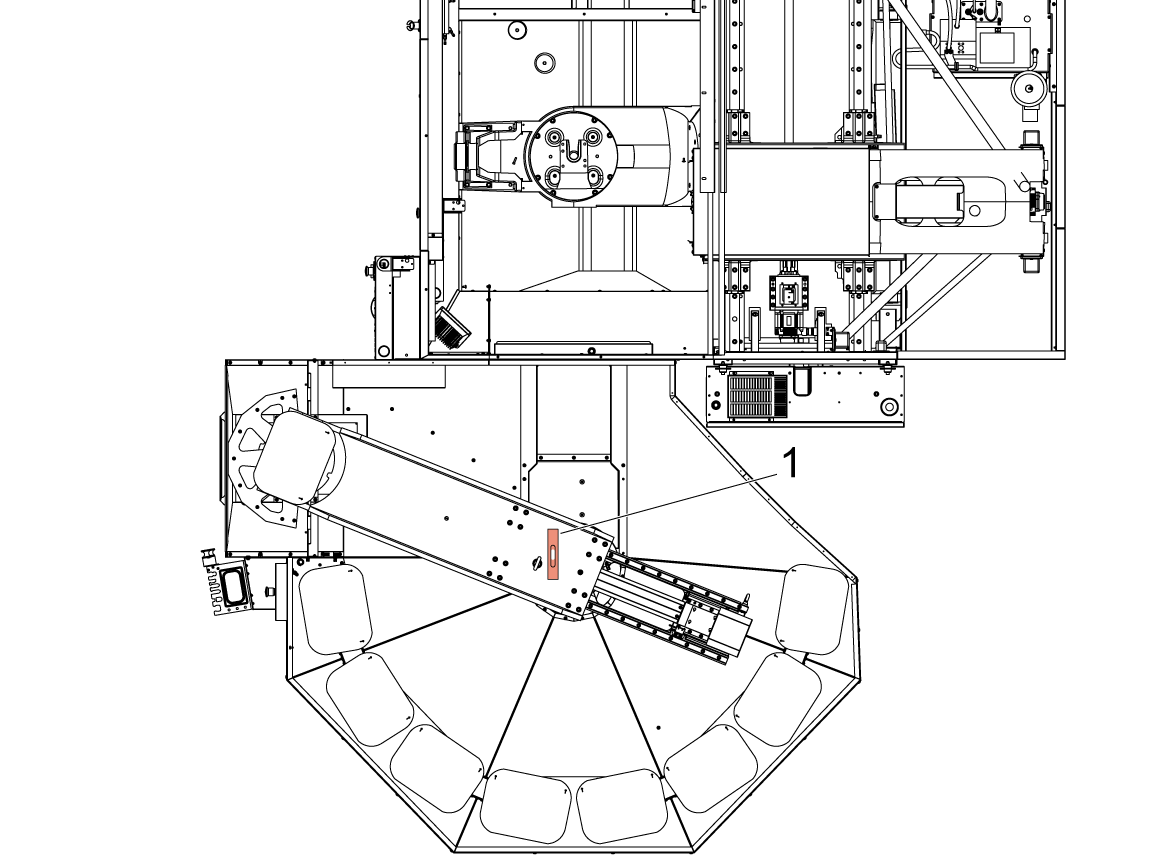
Move the ram to its home position if it is not already, place the bubble level on ram and rough level with respect to X & Y. 

NOTE: Rough level by adjusting the 3 leveling feet without adjusting the 4th in the air.

Assigning Missing Pallets on Scheduler

1

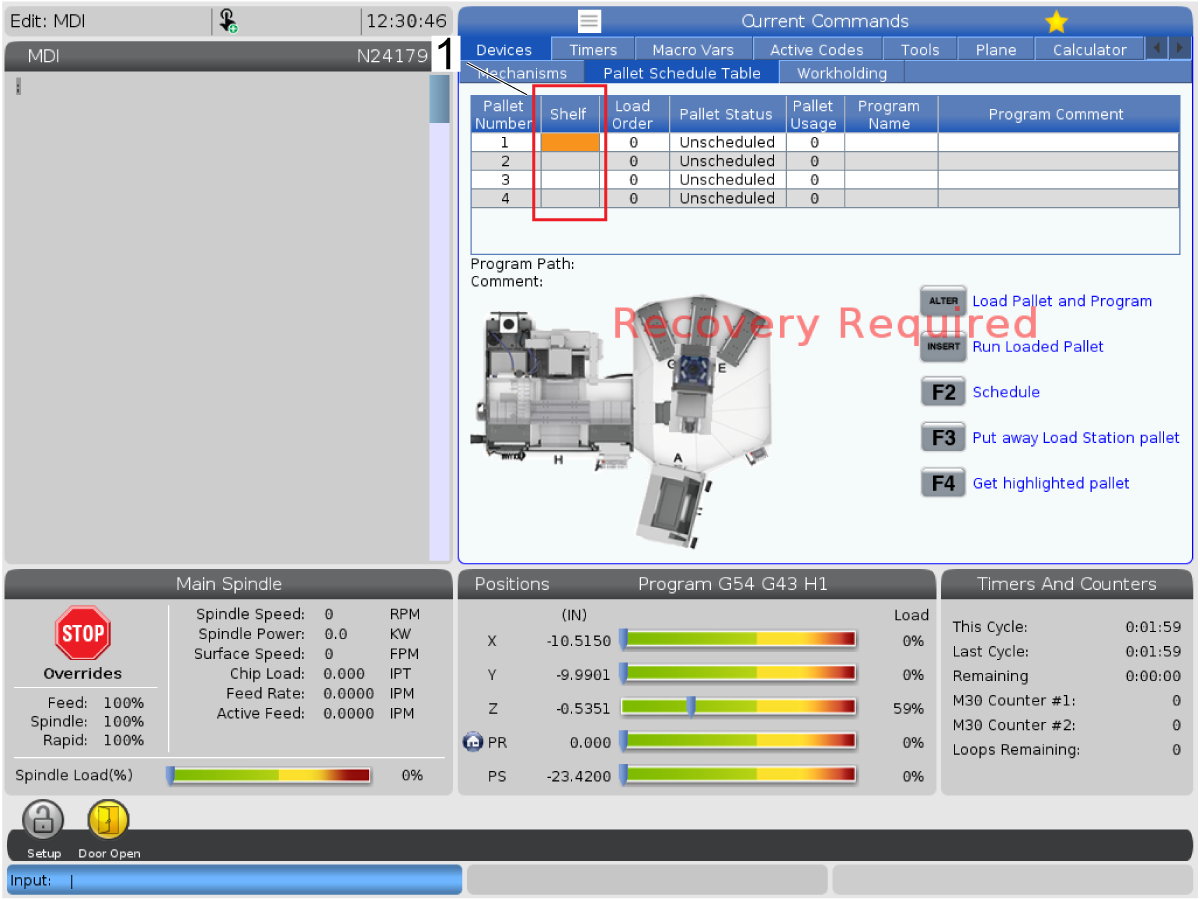
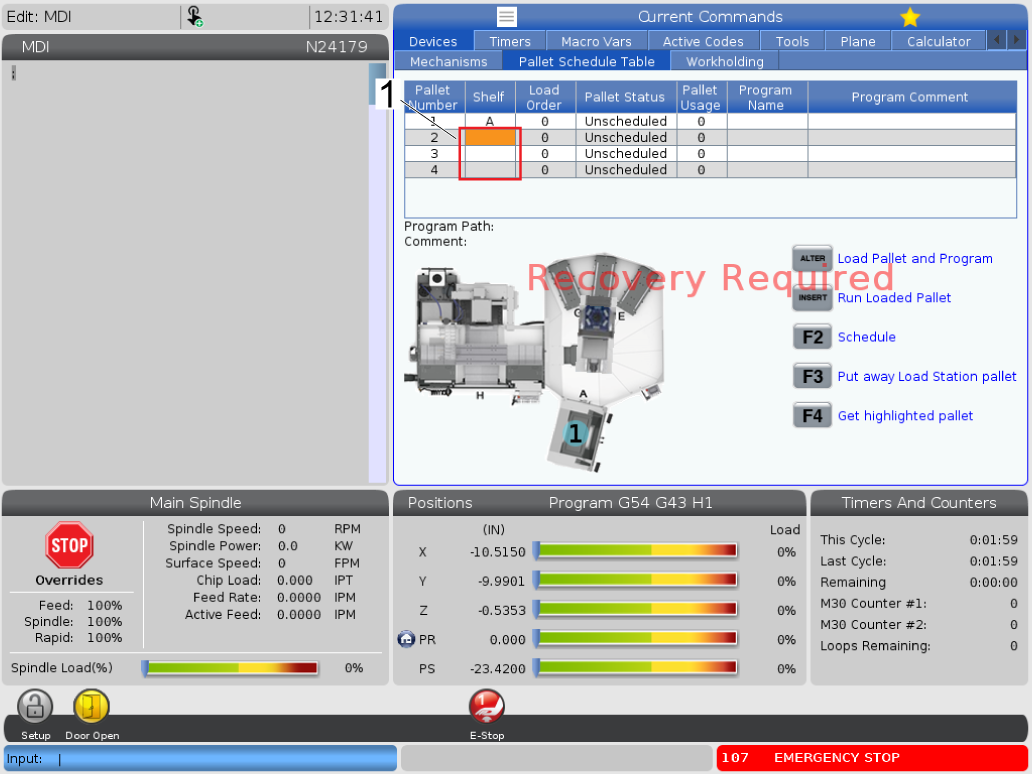
It is a possible to enter a condition where the shelves in the pallet scheduling page are not assigned [1]. This will not allow the PR and PS to zero return or recover the machine. 

This section will explain how to assign the missing shelves, if your machine is not in this condition please skip to the next section. 

First, press [CURRENT COMMANDS] and navigate to the Pallet Schedule Table tab.

2

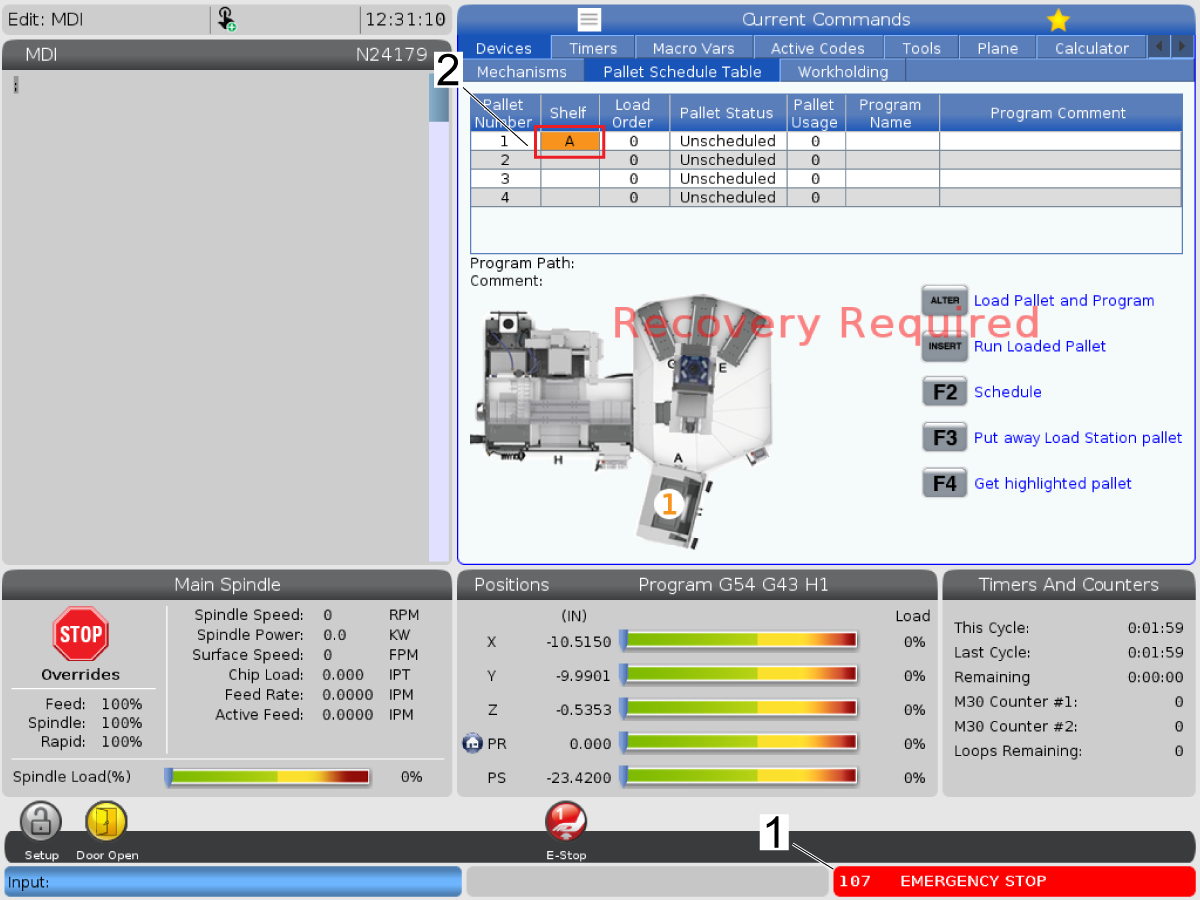
Press [EMERGENCY STOP] [1] and highlight the shelf tab on pallet number one.

With [EMERGENCY STOP] pressed, type the letter A and press [ENTER]. This will assign shelf A to pallet number 1 [2].

3

Repeat the previous step for the remaining pallet numbers in alphabetical number [1].

NOTE: The shelves can be re-assigned at any point  however the user chooses by repeating the same process (e.g. pallet number 3 can be assigned shelf B).


Align Pallet Drop Off Station

1

Insert the Service Key USB and put the machine in Service Mode.

Make sure there are no obstructions inside the machine or inside the pallet pool area. Pull out all the [E-STOPS] and [RESET] the alarms.

Press [ZERO RETURN] and then press [ALL]. The machine will zero return all the axes.

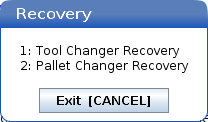
Once all the axis are zero returned press [RECOVER]. A pop up box will appear, select [2] for Pallet Changer Recovery.

2

The Pallet Changer Recovery screen shows the Pallet Pool Status. Make sure the Pallet Lifter is Down [1]. If not press [ALTER] to bring the Pallet Lifter down.

Press [J] and then the [DELETE] button. This will rotate the pallet lifter towards station J.

Press [F1] to open the auto window [3].


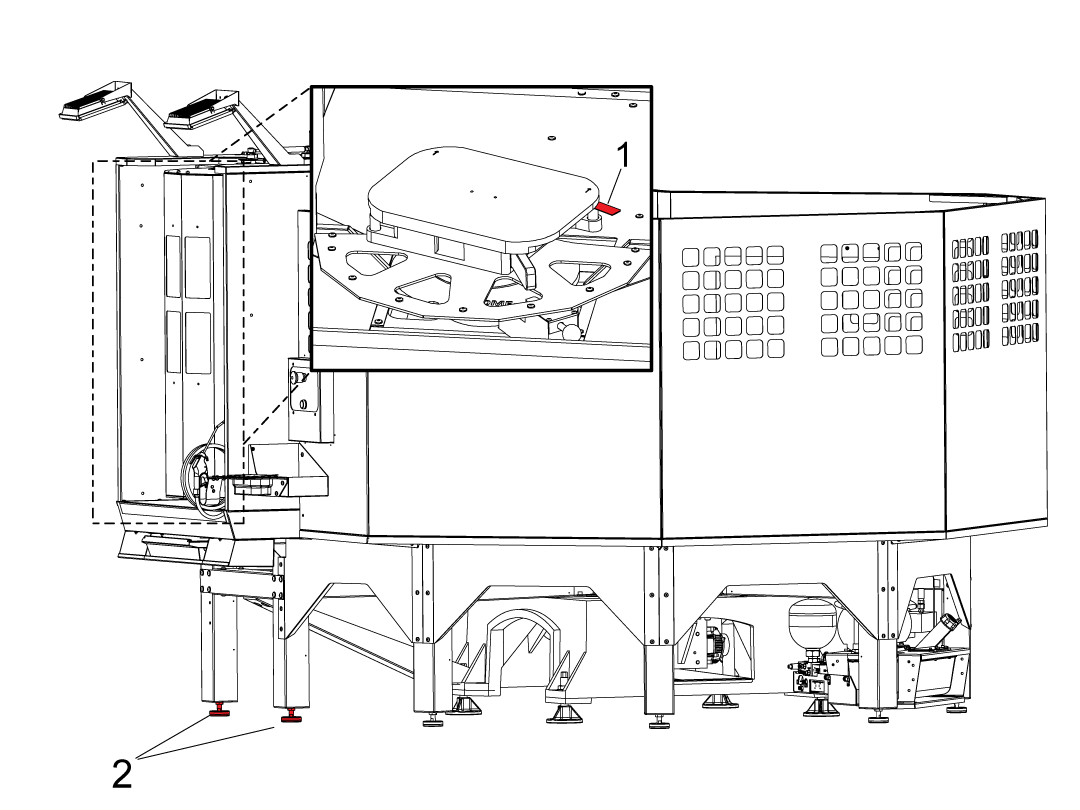
3

While still in the pallet recovery page press [J] then [DELETE] to rotate pallet pool to J position.

Open the window by pressing [F1] then press [+Z] to select Pallet slide Axis manually slide the RAM in the machine to the pickup location.

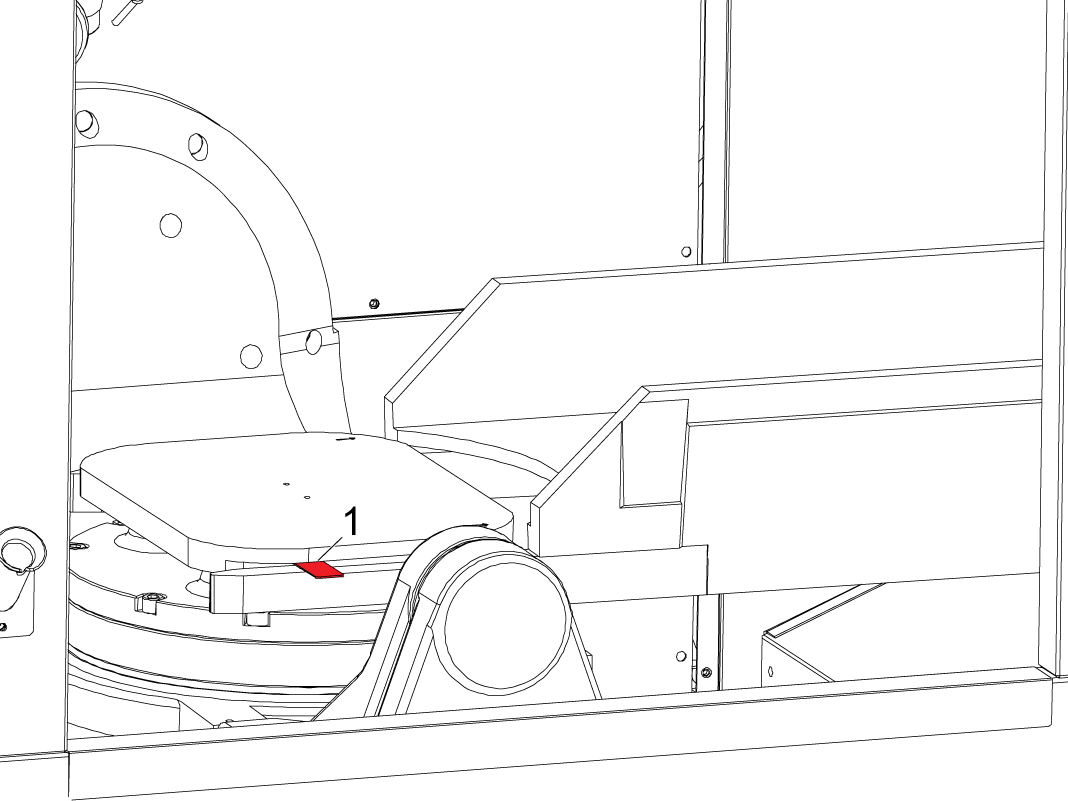
NOTE: Jog the slide axis slownly and make sure the bottom of the forks clear the receiver casting. Raise the pallet pool evenly if they do not.

With the Pallet Pool in the down position, use the Gap Gauge [1] 25-14354 to set the gap by adjusting the height of the Pallet Pool. Evenly raise or lower the pallet pool leveling screws in accordance to the gap gauge.

NOTE: The pallet pool should still be only on 3 points while adjusting the gap.


4

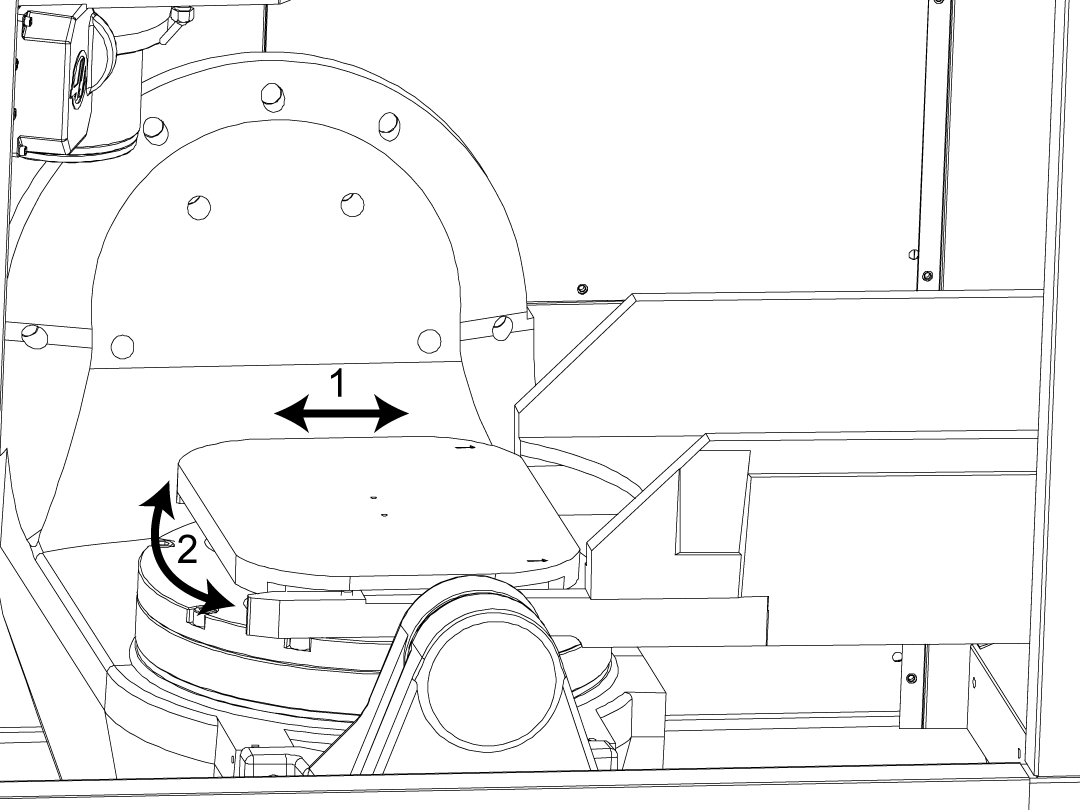
Adjust the pallet pool slider by jogging the PS or PR axis so the forks align correctly underneath the pallet.

The RAM should still be in its slide position, adjust the PR position by pressing [-Z] to select the Pallet Rotate Axis  on the pallet recovery page.  

Press [F2] to unclamp the pallet and press [ALTER] to lift and lower the pallet to make sure the pallet falls onto the pins smoothly. Continuouly make adjustments to the PR and PS axis to make sure the pins are aligned to the holes.

 WARNING: The air blast on the receiver makes a loud noise ear plugs are recommended.

Press [Recovery] to get out of pallet recovery and go to Factory Settings 2139 [:] Shelf J Slide Offset and 2149 [:] Shelf J Rotary Offset, and make sure the values match the PS and PR axis position, if they do not update the values.

NOTE: You should be able to align the pallet pool using factory settings 2136 and 2146 only, if it becomes difficult to do so with only these two settings adjust Parameter 7.310 this is the position that the C-axis will rotate to during a pallet change operation.

Manually remove the pallet from the machine. 

Finally, drop the fourth leveling screw onto the puck.


5

Re-enter the pallet recovery page and make sure the pallet is unclamped before pressing [INSERT] to return the RAM to the pallet pool area.

Press [A] then [DELETE] to rotate the RAM to its home position.

Press [A] and [UNDO] to slide the RAM to its home position.

Verify that the level is still acceptable in the X & Y direction [1].

Once verified, zero return the PR and PS axis.

Align Pallet Loading Station

1

Load a pallet onto the loading station, and with the RAM in the loading station use the gap gauge 25-14354 to set the gap between the pins on the RAM forks and the pallet. 

Adjust the two loading station leveling feet until the gap is set. Raise and lower the pallet to ensure it does so smoothly. 

Setting Up Pallet Stations

1

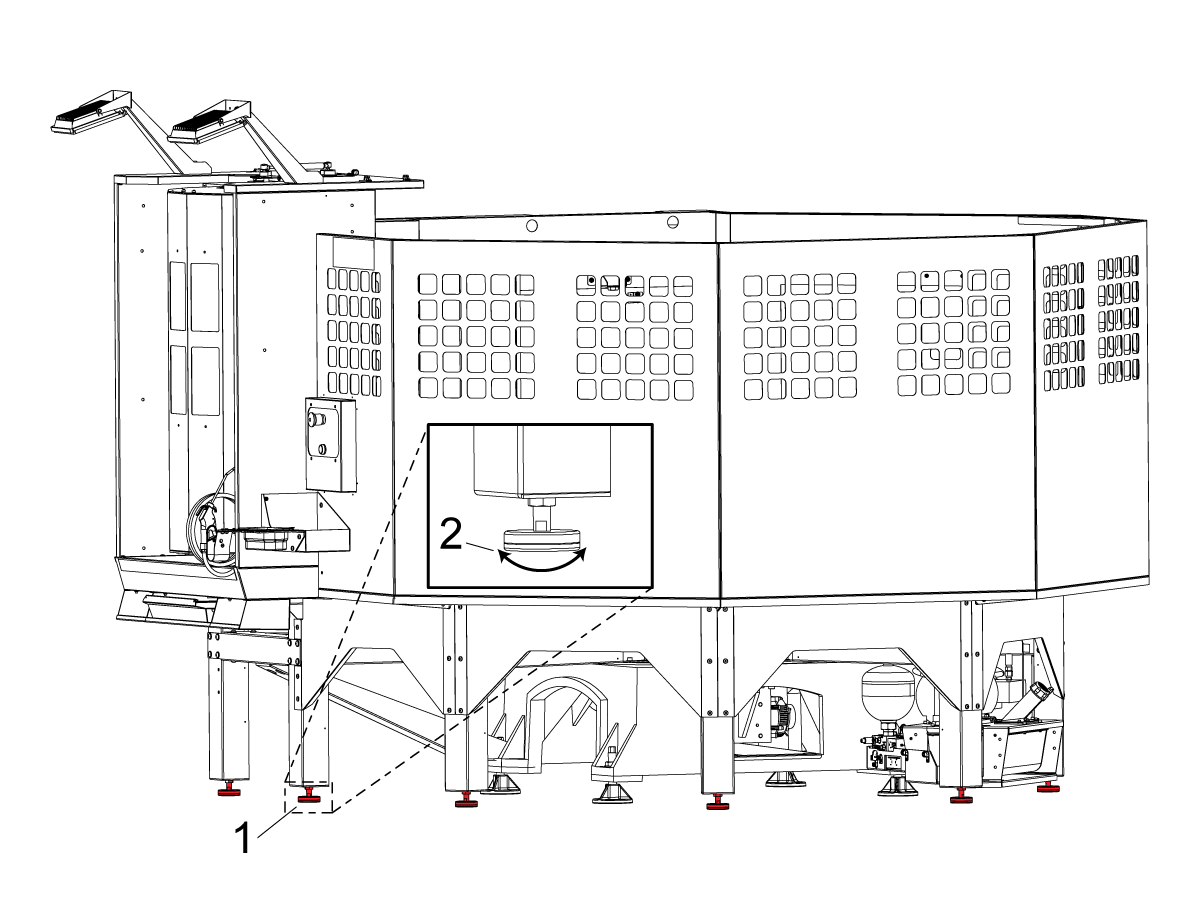
Lower all outer leveling feet [1] to the ground by hand then rotate each leveling foot by another 1/2 turn [2]. 

2

Please refer to the PALLET POOL OPERATORS MANUAL for how to load the pallets onto the machine using the Pallet Scheduling Table.

3

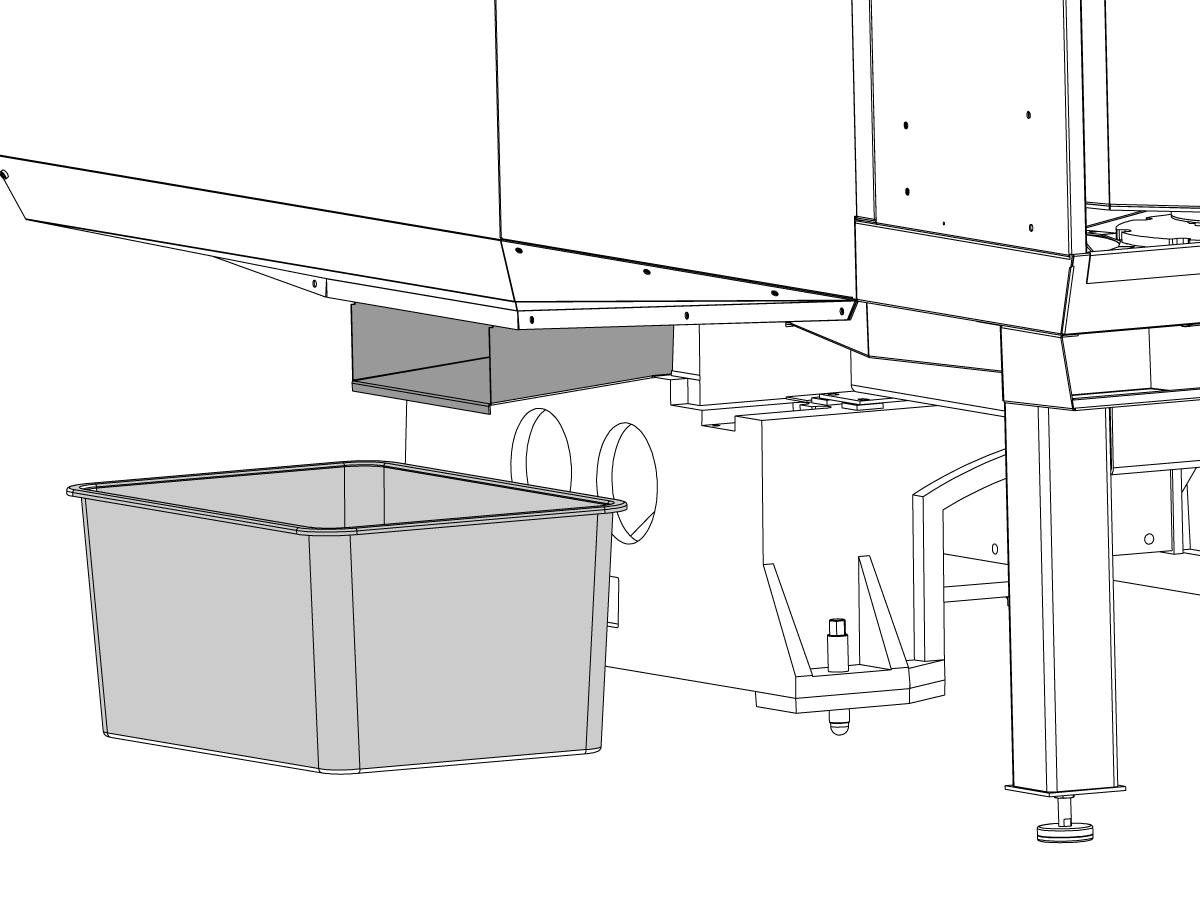
Place the provided tote under the Pallet Pool coolant discharge tray to catch the coolant and chips that drains from the pallets.

Empty the tote as needed. 

Test the pick up / drop off operation on the remaining stations by using the pallet pool recovery functions.  

Install the anchors.

Install the Pallet Pool guard panels.

FINDEN SIE EINEN HÄNDLER
Feedback
Haas Logo

美元价格不包括关税、报关费用、保险费、增值税及运费。
USD prices DO NOT include customs duty, customs fees, insurance, VAT, or freight.

人民币价格包含关税、报关费用、货运保险和增值税, 但不包括运费。
CNY prices include customs duty, customs fees, insurance, and VAT. DOES NOT include freight.

Haas Auslieferungspreis

Dieser Preis enthält Versandkosten, Export- und Importzölle, Versicherungsgebühren und sämtliche weiteren Kosten, die beim Versand an einen mit Ihnen als Käufer vereinbarten Auslieferungsort in Frankreich anfallen. Es können keine weiteren obligatorischen Kosten zur Lieferung eines Haas CNC-Produkts hinzugefügt werden.

BLEIBEN SIE AUF DEM NEUESTEN STAND MIT TECHNOLOGIE UND GEHEIMTIPPS VON HAAS!

Melden Sie sich jetzt an!   

HAAS TOOLING ACCEPTS THE FOLLOWING:

  • Service und Support
  • Eigentümer
  • Service anfordern
  • Betriebsanleitungen
  • Haas Ersatzteile
  • Reparaturanfrage Drehtisch
  • Installationsvorbereitungsanleitungen
  • Einkaufsinformationen
  • Zusammenstellung und Preis einer neuen Haas
  • Verfügbare Produkte
  • Die Haas-Preisliste
  • CNCA-Finanzierung
  • Über Haas
  • Berufliche Perspektiven
  • Zertifizierungen und Sicherheit
  • Schreiben Sie uns, oder rufen Sie uns an
  • Geschichte
  • Allgemeine Geschäftsbedingungen
  • Haas Tooling Allgemeine Geschäftsbedingungen
  • Privatsphäre
  • Garantie
  • Haas Community
  • Haas Zertifizierungsprogramm
  • Haas Motorsport
  • Gene Haas Foundation
  • Haas Technical Education Community
  • Veranstaltungen
  • Nehmen Sie an der Diskussion teil!
  • Facebook
  • Twitter
  • Flickr
  • YouTube
  • LinkedIn
  • Instagram
  • TikTok
© 2023 Haas Automation, Inc – CNC-Werkzeugmaschinen

This site is protected by reCAPTCHA and the Google Privacy Policy und Terms of Service apply.


2800 Sturgis Rd., Oxnard, CA 93030 / Toll Free: 800-331-6746
Phone: 805-278-1800 / Fax: 805-278-2255

Cookie-Richtlinien

Wir verwenden Cookies, um Ihre Benutzererfahrung zu verbessern.. Unser Cookie-Hinweis beschreibt, welche Cookies wir verwenden, warum wir Sie verwenden und wie Sie weitere diesbezügliche Informationen erhalten. Bitte bestätigen Sie Ihr Einverständnis, dass wir Analyse-Cookies verwenden. Falls Sie Ihr Einverständnis nicht geben möchten, können Sie unsere Website trotzdem verwenden, jedoch mit eingeschränkter Benutzererfahrung.

Einstellungen verwalten

Cookie-Richtlinien

Wir verwenden Cookies, um Ihre Benutzererfahrung zu verbessern.. Unser Cookie-Hinweis beschreibt, welche Cookies wir verwenden, warum wir Sie verwenden und wie Sie weitere diesbezügliche Informationen erhalten. Bitte bestätigen Sie Ihr Einverständnis, dass wir Analyse-Cookies verwenden. Falls Sie Ihr Einverständnis nicht geben möchten, können Sie unsere Website trotzdem verwenden, jedoch mit eingeschränkter Benutzererfahrung.

Functional Cookies

Analytics Cookies