MyHaas Bienvenido:
!
Haas Tooling Historial de órdenes de invitados MyHaas/HaasConnect Iniciar sesión Registrar Haas Tooling Mi cuenta Order History Return History MyHaas/HaasConnect Cerrar sesión Bienvenido: Mis máquinas Última actividad Mis presupuestos Mi cuenta Mis usuarios Cerrar sesión
Encuentre su distribuidor
  1. Seleccionar idioma
    1. English
    2. Deutsch
    3. Español
    4. Français
    5. Italiano
    6. Português
    7. Český
    8. Dansk
    9. Nederlands
    10. Magyar
    11. Polski
    12. Svenska
    13. Русский
    14. Türkçe
    15. 中文
    16. Suomi
    17. Norsk
    18. الإنجليزية
    19. български
    20. Hrvatski
    21. Ελληνικά
    22. Română
    23. Slovenský
    24. Slovenščina
    25. 한국어
    26. 日本語
Search
  • máquinas Main Menu
    • Fresadoras verticales de Haas Fresadoras verticales
      Fresadoras verticales
      Fresadoras verticales Ver todo
      • Fresadoras verticales
      • Serie VF
      • Máquinas universales
      • Series VR
      • VMC con cambio de paletas
      • Mini Mills
      • Máquinas de moldeo
      • Serie de taladrado/roscado/fresado
      • Fresadoras Toolroom
      • Fresadoras compactas
      • CMV portico router serie GR y GM
      • CMV de gran tamaño
      • Fresadora de sobremesa
      • Simulador del control
      • Cargador automático de piezas de fresadora
      • Cargador automático de piezas compacto
    • Product Image Soluciones multieje
      Soluciones multieje
      Soluciones multieje Ver todo
      • Soluciones multieje
      • Tornos con eje Y
      • Fresadoras de 5 ejes
    • Tornos Haas Tornos
      Tornos
      Tornos Ver todo
      • Tornos
      • Serie ST
      • Doble husillo
      • Tornos Toolroom
      • Torno con plato de garras
      • Alimentador de barras Haas V2
      • Cargador automático de piezas de torno
    • Fresadoras horizontales Haas Fresadoras horizontales
      Fresadoras horizontales
      Fresadoras horizontales Ver todo
      • Fresadoras horizontales
      • Cono ISO 50
      • Cono ISO 40
    • Mesas giratorias y divisores Haas Mesas giratorias y divisores
      Mesas giratorias y divisores
      Mesas giratorias y divisores Ver todo
      • Mesas giratorias y divisores
      • Mesas giratorias
      • Divisores
      • Equipos giratorios de 5 ejes
      • Equipos rotativos extragrandes
    • Product Image Sistemas de automatización
      Sistemas de automatización
      Sistemas de automatización Ver todo
      • Sistemas de automatización
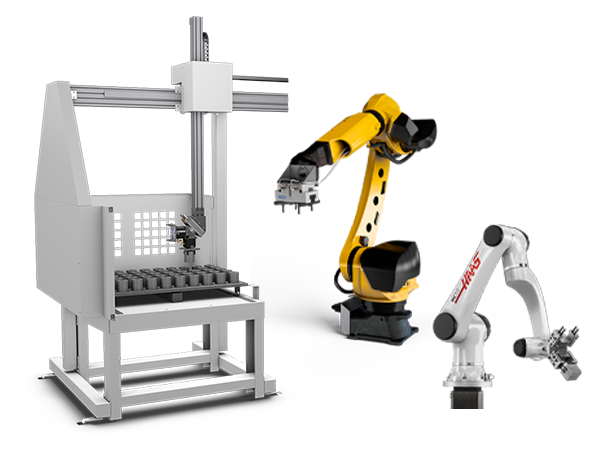
      • Paquetes de robot
      • Cargadores automáticos de piezas
      • Sistemas Pallet Pool
      • Alimentador de barras Haas
      • Models
    • ENLACES RÁPIDOS Serie especial  Serie especial 
      OPORTUNIDADES LABORALES EN HAAS OPORTUNIDADES LABORALES EN HAAS CONFIGURACIÓN Y PRECIO CONFIGURACIÓN Y PRECIO LISTA DE PRECIOS LISTA DE PRECIOS NOVEDADES NOVEDADES SU PRIMERA MÁQUINA CNC SU PRIMERA MÁQUINA CNC HAAS SIX PACK HAAS SIX PACK
      COMPRAR HERRAMIENTAS
      • Configure y sepa el precio de su máquina Haas
      • Lista de precios
      • Inventario disponible
      • Financiación CNCA
      ¿QUIERE HABLAR CON ALGUIEN?

      En las tiendas Haas Factory Outlet (HFO) pueden resolver sus dudas y orientarlo sobre las mejores opciones.

      CONTACT YOUR DISTRIBUTOR >
  • Opciones Main Menu
    • Product Image Husillos
      Husillos
      Husillos Ver todo
      • Husillos
    • Product Image Cambiadores de herramientas
      Cambiadores de herramientas
      Cambiadores de herramientas Ver todo
      • Cambiadores de herramientas
    • Product Image 4.º | 5.º eje
      4.º | 5.º eje
      4.º | 5.º eje Ver todo
      • 4.º | 5.º eje
    • Product Image Torretas y herramientas motorizadas
      Torretas y herramientas motorizadas
      Torretas y herramientas motorizadas Ver todo
      • Torretas y herramientas motorizadas
    • Product Image Palpado
      Palpado
      Palpado Ver todo
      • Palpado
    • Extracción de virutas y refrigeración de Haas Tratamiento de refrigerante y virutas
      Tratamiento de refrigerante y virutas
      Tratamiento de refrigerante y virutas Ver todo
      • Tratamiento de refrigerante y virutas
    • El Control Haas El Control Haas
      El Control Haas
      El Control Haas Ver todo
      • El Control Haas
    • Product Image Opciones para productos
      Opciones para productos
      Opciones para productos Ver todo
      • Opciones para productos
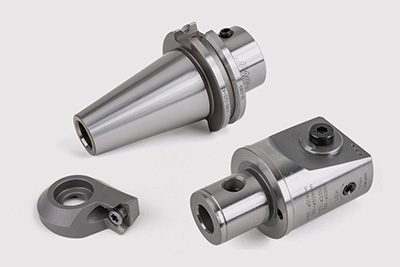
    • Product Image Herramientas y utillaje
      Herramientas y utillaje
      Herramientas y utillaje Ver todo
      • Herramientas y utillaje
    • Product Image Portapiezas
      Portapiezas
      Portapiezas Ver todo
      • Portapiezas
    • Product Image Soluciones de 5 ejes
      Soluciones de 5 ejes
      Soluciones de 5 ejes Ver todo
      • Soluciones de 5 ejes
      • 5 Easy Steps to 5-Axis
    • Product Image Automatización
      Automatización
      Automatización Ver todo
      • Automatización
    • ENLACES RÁPIDOS Serie especial  Serie especial 
      OPORTUNIDADES LABORALES EN HAAS OPORTUNIDADES LABORALES EN HAAS CONFIGURACIÓN Y PRECIO CONFIGURACIÓN Y PRECIO LISTA DE PRECIOS LISTA DE PRECIOS NOVEDADES NOVEDADES SU PRIMERA MÁQUINA CNC SU PRIMERA MÁQUINA CNC HAAS SIX PACK HAAS SIX PACK
      COMPRAR HERRAMIENTAS
      • Configure y sepa el precio de su máquina Haas
      • Lista de precios
      • Inventario disponible
      • Financiación CNCA
      ¿QUIERE HABLAR CON ALGUIEN?

      En las tiendas Haas Factory Outlet (HFO) pueden resolver sus dudas y orientarlo sobre las mejores opciones.

      CONTACT YOUR DISTRIBUTOR >
  • Why Haas Main Menu
      Descubra la diferencia Haas
    • Por qué Haas
    • MyHaas
    • Comunidad de educación
    • Industria 4.0
    • Certificado Haas
    • Testimonios de clientes
  • Servicio Main Menu
      Bienvenido al Haas Service
      INICIO DE SERVICIO Manuales del operador Procedimientos instructivos Guías de resolución de problemas Mantenimiento preventivo Recambios Haas Haas Tooling Vídeos
  • Vídeos Main Menu
  • Herramientas de Haas Main Menu
      Portaherramientas de fresadora Amarre de pieza de fresadora Platos manuales para fresado Fresado Herramientas de tornos Portaherramientas de torno AMARRE DE PIEZAS DE TORNOS Platos de pinza ER Hacer agujeros Roscado Brocas Cambio de herramientas Accesorios de herramientas Desbarbado y abrasivos Kits de paquetes Vestuario y accesorios Almacenamiento y manipulación Medición e inspección Winner's Circle
    • Haas Tooling
    • Portaherramientas de fresadora
      Portaherramientas de fresadora Shop All
      • Portafresas
      • Soportes de plato de fresado
      • Soportes de ajuste por contracción
      • Pinzas de sujeción ER
      • Mandriles de fresado y pinzas
      • Portabrocas para taladros
      • Tiradores
      • Kits de portaherramientas de fresadoras
      • Platos hidráulicos y pinzas
      • Mandriles de fresado y pinzas hidráulicos
    • Amarre de pieza de fresadora
      Amarre de pieza de fresadora Shop All
      • Tornos de banco de garra fija
      • Tornos de banco con centrado automático
      • Placas adaptadoras
      • Mandíbulas de torno de banco de fresa
      • Accesorios de amarre de pieza
      • Kits de torno de banco
      • Paralelas de torno de banco
      • Kits de torno de banco giratorio
      • Cubos
    • Platos manuales para fresado
      Platos manuales para fresado Shop All
      • Platos de garras divisores 5C
      • Soportes para fresadoras y platos de tres mordazas
    • Fresado
      Fresado Shop All
      • Cuerpos de plato de fresado
      • Insertos de fresado
      • Fresadoras frontales
      • Insertos y fresas de chaflán
      • Cuerpos de fresa de punta indexables
      • Fresas de punta esférica
      • Fresas de chaflán
      • Fresas de desbaste
      • Insertos y fresas de punta de bola indexables
      • Kits de plato de fresado
      • Kits de fresas de chaflán
      • Kits de fresas de punta divisibles
      • Herramientas de corte con cola de milano
      • Herramientas de corte de cola de milano indexables
      • Engrabado de fresas de punta
      • Rebabas
      • Herramientas de corte de chavetero
      • Fresas para redondeado de esquinas
    • Herramientas de tornos
      Herramientas de tornos Shop All
      • Herramientas de corte
      • Kits de herramientas de corte
      • Insertos de torneado
      • Herramientas de ranurado
      • Herramientas de roscado y ranurado con DI pequeño
      • Insertos de roscado
      • Portaherramientas de roscado
      • Portaherramientas OD
      • Insertos de torneado de cermet
      • Insertos de torneado CBN
      • Insertos de roscado y ranura de Haas Notch
      • Portaherramientas para roscado y ranurado Haas Notch
      • Barras de mandrinar
    • Portaherramientas de torno
      Portaherramientas de torno Shop All
      • Portaherramientas TL y CL
      • Portaherramientas BOT
      • Portaherramientas BMT
      • Portaherramientas eléctricas
      • Manguitos reductores
      • Portaherramientas VDI
    • AMARRE DE PIEZAS DE TORNOS
      AMARRE DE PIEZAS DE TORNOS Shop All
      • Centros activos
      • Tubos guía del husillo
      • Pinzas de cambio rápido
      • Pinzas de sujeción para torno
      • Pinzas 5C
      • Kits de pinzas 5C
      • Aros de mandrinar para torno
      • Garras de torno
    • Pinzas y mandriles ER
      Pinzas y mandriles ER Shop All
      • Pinzas ER
      • Pinzas selladas ER
      • Pinzas de rosca ER
      • Accesorios y juegos de pinzas ER
      • Pinzas de sujeción ER
      • Pinzas de sujeción ER con mango recto
      • Portabrocas para talados sin llave de mango recto
    • Hacer agujeros
      Hacer agujeros Shop All
      • Brocas de carburo
      • Cuerpos de broca indexables
      • Insertos de broca indexable
      • Cuerpos de broca modular
      • Cabezas de broca modular
      • Juegos y brocas de cobalto
      • Brocas de centro
      • Escariadores
      • Kits de taladrado indexable
      • Taladros de puntos
      • Cuerpos de la broca de pala
      • Insertos de la broca de pala
      • Brocas de avellanado
    • Roscado
      Roscado Shop All
      • Machos de roscar
      • Insertos de roscado
      • Portaherramientas de roscado
      • Fresas de rosca
      • Roscas para tubos
      • Kits de taladrado y roscado
    • Brocas
      Brocas Shop All
      • Portaherramientas de brocas
      • Insertos para brocas
    • Cambio de herramientas
      Cambio de herramientas Shop All
      • Máquinas de medición de herramientas
      • Máquinas de ajuste por contracción
    • Accesorios de herramientas
      Accesorios de herramientas Shop All
      • Limpiador de cono de husillo
      • Elevador de taller Haas
      • Utillajes de portaherramientas
      • Ventiladores de limpieza de CNC
      • Recambios
    • Desbarbado y abrasivos
      Desbarbado y abrasivos Shop All
      • Almohadillas abrasivas
      • Herramientas de desbarbado
      • Ruedas de desbarbado
    • Kits de paquetes
      Kits de paquetes Shop All
      • Kits de ventilador de limpieza de virutas
      • Kits de herramientas de corte
      • Kits de fresas de punta divisibles
      • Kits de herramientas de corte
      • Kits de taladrado y roscado
      • Kits de taladrado indexable
      • Kits de plato de fresado
      • Kits de fresas de chaflán
      • Kits de portaherramientas de fresadoras
      • Kits de amarre de pieza
      • Kits de torno de banco giratorio
      • Kits de torno de banco
      • Kits de plato de 3 mordazas para fresadoras
      • Kits de manguitos reductores
      • Kits de herramientas de torno
    • Almacenamiento y manipulación
      Almacenamiento y manipulación Shop All
      • Carros de herramientas
    • Medición e inspección
      Medición e inspección Shop All
      • Barras de prueba
      • Kits de inspección
      • Accesorios para sondas
      • Niveles
      • Refractómeros
      • Calibres de medición de ajuste de herramientas
      • Detectores de filos y centros
      • Calibres de medición comparativa
      • Kits de sondas y accesorios
    • Vestuario y accesorios
      Vestuario y accesorios Shop All
      • Accesorios
      • Ropa
    • Círculo ganador
      Círculo ganador Shop All
      • WINNERS_CIRCLE-1Y
    • ENLACES RÁPIDOS DE HAAS TOOLING
      PRODUCTOS NUEVOS PRODUCTOS NUEVOS NEW PRODUCTS NEW PRODUCTS
      EL MÁS POPULAR EL MÁS POPULAR
      PROMOCIONES DE HERRAMIENTAS PROMOCIONES DE HERRAMIENTAS
      FINANCIACIÓN Y PLAZOS ABIERTOS FINANCIACIÓN Y PLAZOS ABIERTOS
      Preguntas frecuentes Preguntas frecuentes
      KITS CREADOS PARA USTED KITS CREADOS PARA USTED
  • Póngase en contacto con nosotros

×

Resultados de la búsqueda

Web Pages

Imágenes

    • <
    • 1
    • >
MyHaas Bienvenido:
!
Haas Tooling Historial de órdenes de invitados MyHaas/HaasConnect Iniciar sesión Registrar Haas Tooling Mi cuenta Order History Return History MyHaas/HaasConnect Cerrar sesión Bienvenido: Mis máquinas Última actividad Mis presupuestos Mi cuenta Mis usuarios Cerrar sesión
Encuentre su distribuidor
  1. Seleccionar idioma
    1. English
    2. Deutsch
    3. Español
    4. Français
    5. Italiano
    6. Português
    7. Český
    8. Dansk
    9. Nederlands
    10. Magyar
    11. Polski
    12. Svenska
    13. Русский
    14. Türkçe
    15. 中文
    16. Suomi
    17. Norsk
    18. الإنجليزية
    19. български
    20. Hrvatski
    21. Ελληνικά
    22. Română
    23. Slovenský
    24. Slovenščina
    25. 한국어
    26. 日本語
Search
×

Resultados de la búsqueda

Web Pages

Imágenes

    • <
    • 1
    • >

UMC-750/1000 Pallet Pool - Installation

Inicio de servicio Procedimientos técnicos UMC-750/1000 Pallet Pool - Installation

UMC-750/1000 Pallet Pool - Installation

- Saltar a la sección - Back to Top

3.2 UMC PP - 8/10 Station - Version 2

Recently Updated Last updated: 10/26/2022

UMC PP - 8/10 Station Version 2 - Installation


Pallet Pool Installation Video

Introduction

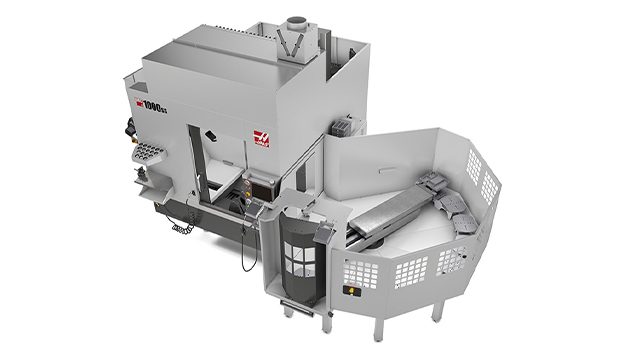
The following procedure will show you how to install an 8/10 station Pallet Pool on the following machines:

  • UMC-500/SS
  • UMC-750/SS
  • UMC-1000/SS

The Next Generation software on the machine must be version 100.20.000.1110 or higher.

The Pallet Pool option is currently not field installable.

Important: To ensure that the Pallet Pool does not become mis-aligned, it is recommended that the machine and Pallet Pool be anchored. Refer to the following link: Anchoring Instructions.

The Pallet Pool option has a room for a total of 9 pallets that can be installed on a UMC-500/750/1000 with the Pallet Pool option.

The Pallet Pool has 2 servo axes. The PR axis rotates the Pallet Pool ram and the PS axis extends and retracts the Pallet Pool ram to load/unload the pallets.

The UMC-500/750/1000 must be level before the Pallet Pool can be installed. Refer to the installation procedures linked below:

  • UMC-500 Installation
  • UMC-750 Installation
  • UMC-1000 Installation

Push [POWER OFF].

Set the main circuit breaker to the OFF position.

Lock the main circuit breaker. Use an approved lock with an approved safety tag.

Caution: When you handle a PCB, you must wear an Electrostatic Discharge (ESD) strap.

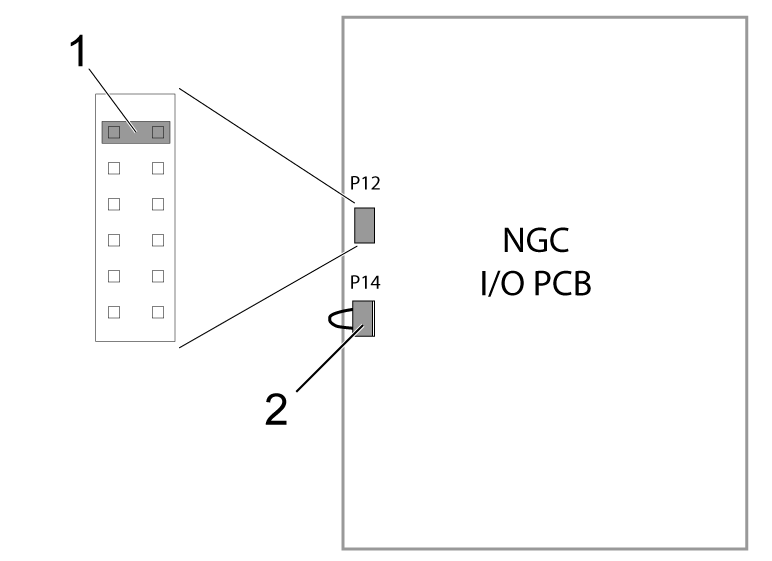
To level the machine without the Pallet Pool connected to the machine, do the following: 

Make sure that there is a shorting block [1] installed on the top two pins of the P12 connector on the I/O PCB 

Make sure there is a jumper (P/N 33-0527) [2] connected to I/O PCB at P14.
 Note: These jumpers are needed to operate the machine without the Pallet Pool.

Disable the pallet pool, change setting 382 Disable Pallet Changer to Pallet Pool.


Note: The above step will disabled the Pallet Pool to allow you to zero return the machine so it can be leveled.

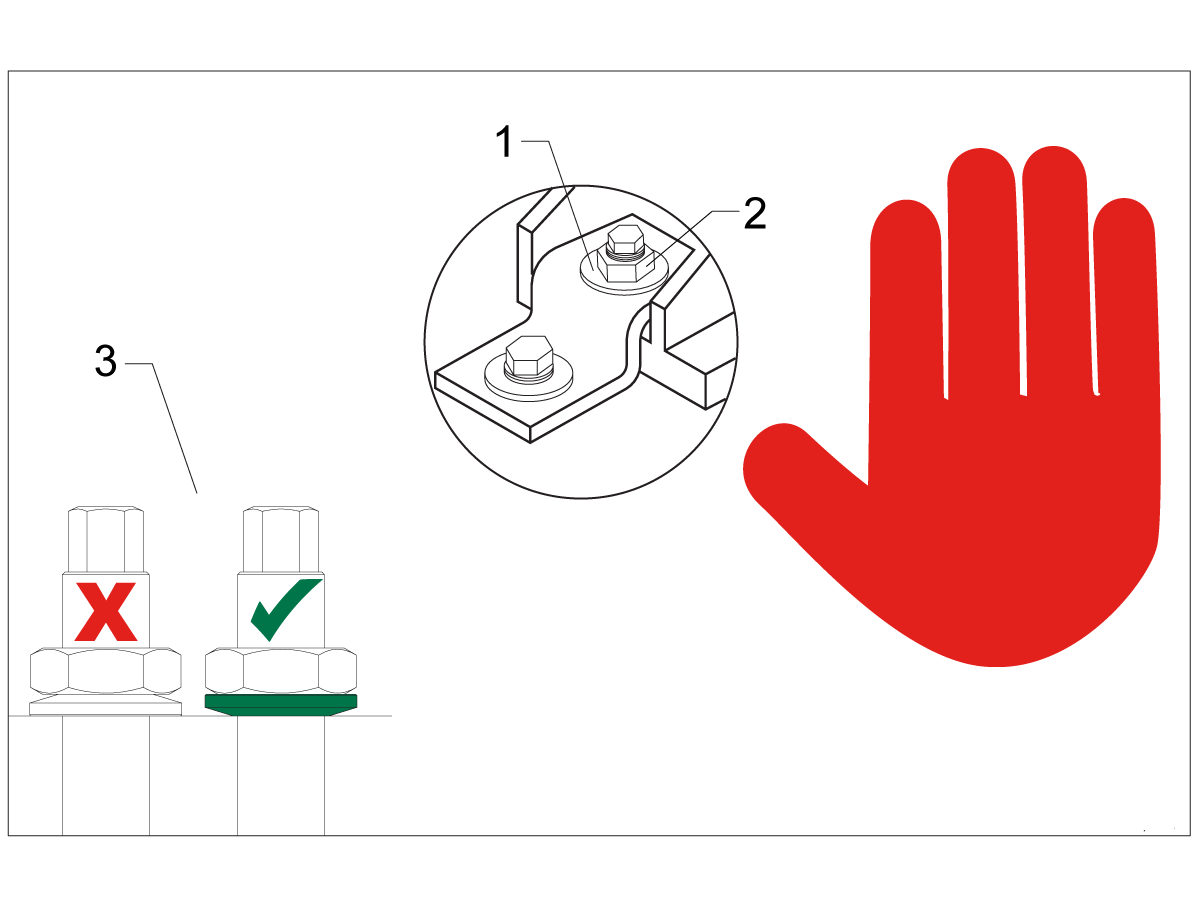
Leveling Screws Hardware

Note: The washers [1] and nuts [2] are installed during shipping and should be saved for installation and not be discarded.

Note: The washer orientation [3] is important.  The conical part of the washer should be against the casting,  see illustration.

Mating the Pallet Pool


1

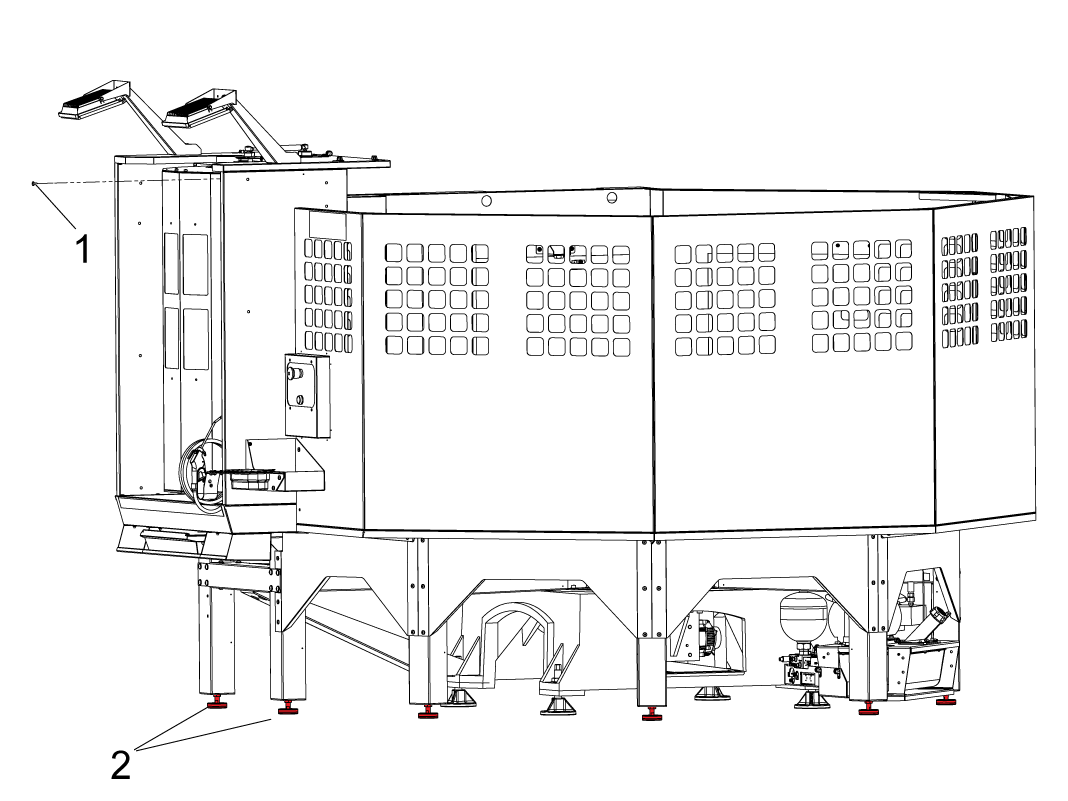
Remove the loading station door blocking bolt [1].

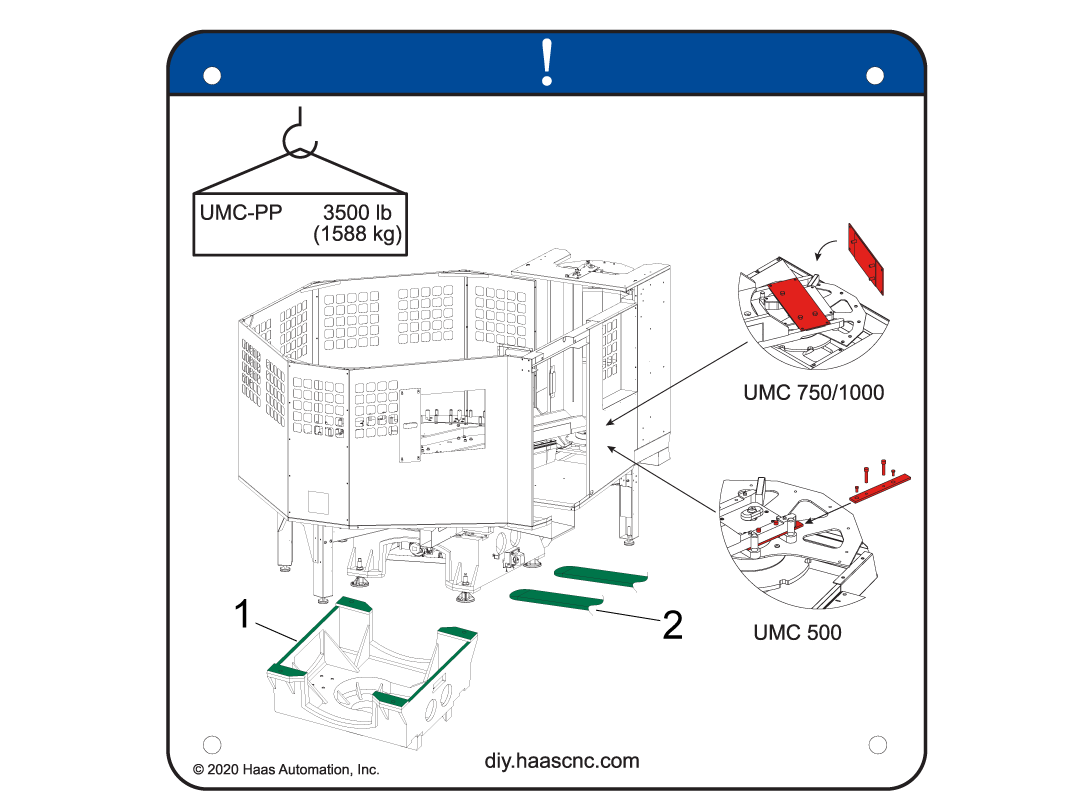
Make sure to raise all of the pallet shelf supporting screws [2] before placing the pallet pool on the floor. 

2

Remove 25-14314 cross bracing from the pallet pool

3

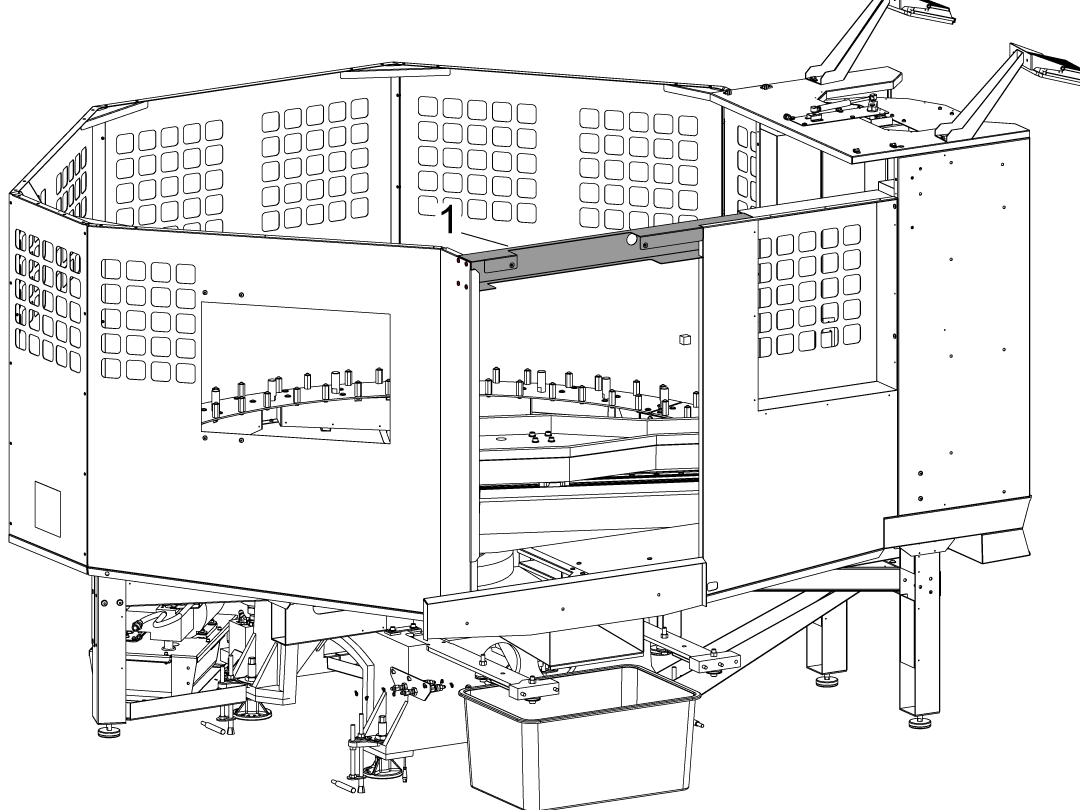
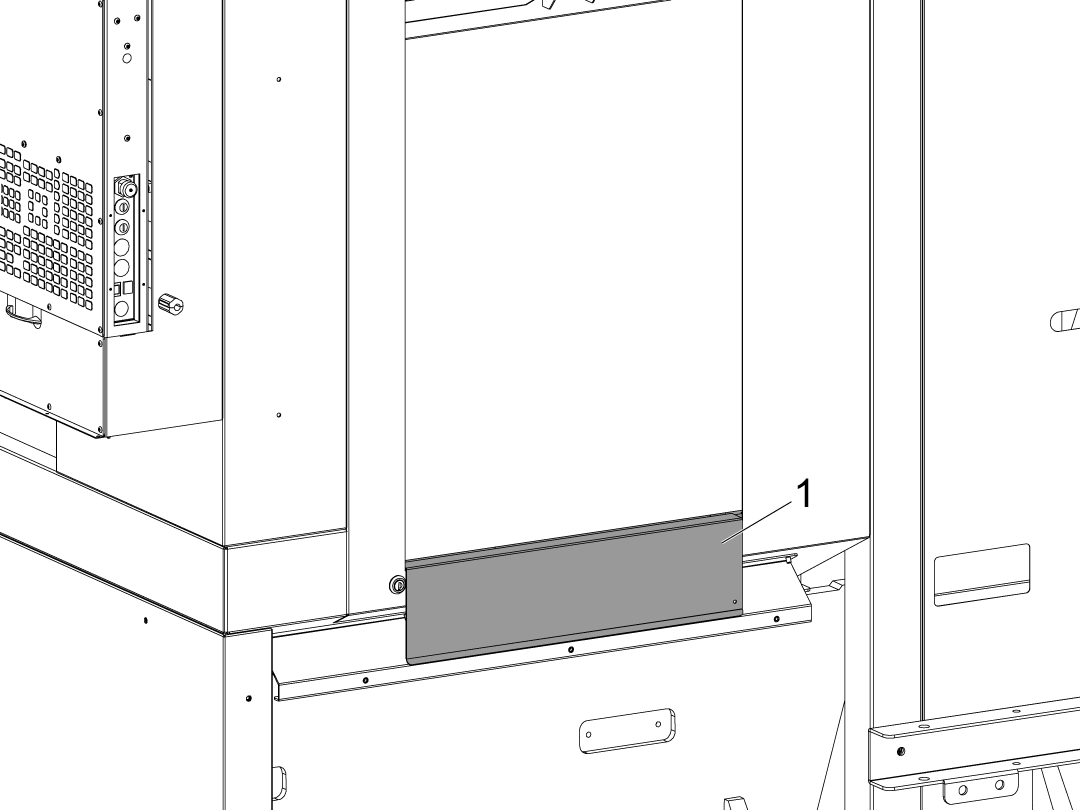
Install the drip tray [1] on the bottom of the auto window, this component should slide right on the window. 

4

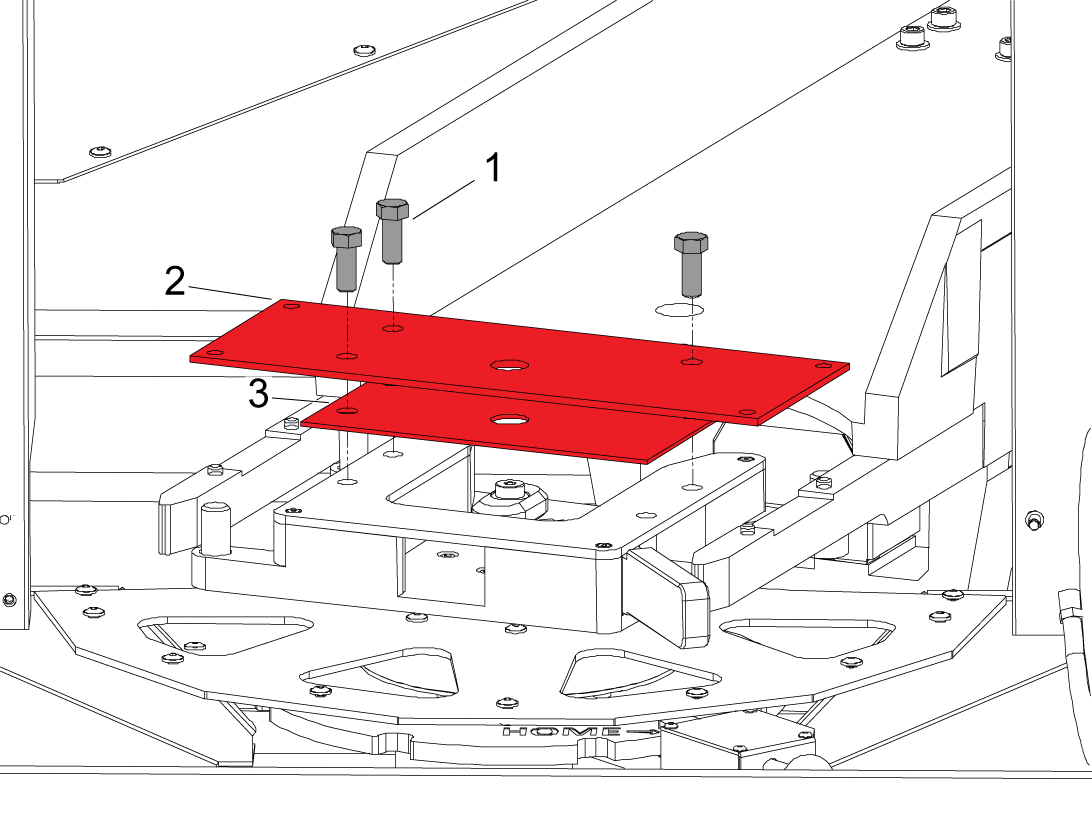
Remove the bolts [1] to remove the shipping brackets. There are two brackets, the first [2] that hold the forks to the loading station, and the bottom [3] that just holds the loading station. 

5

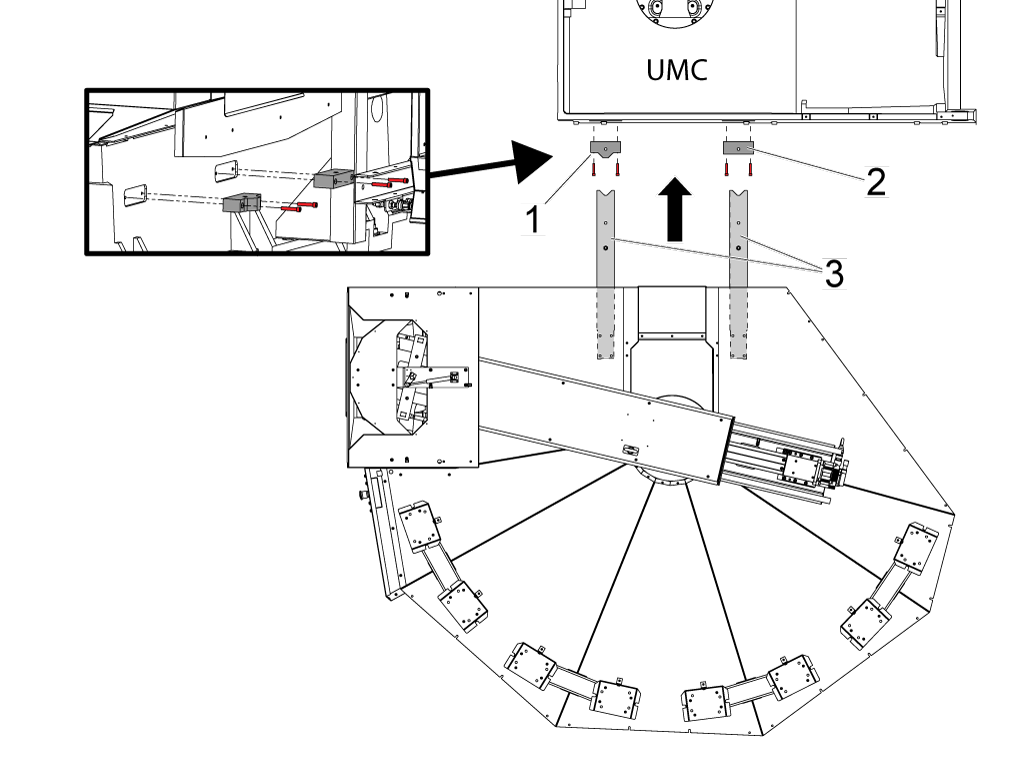
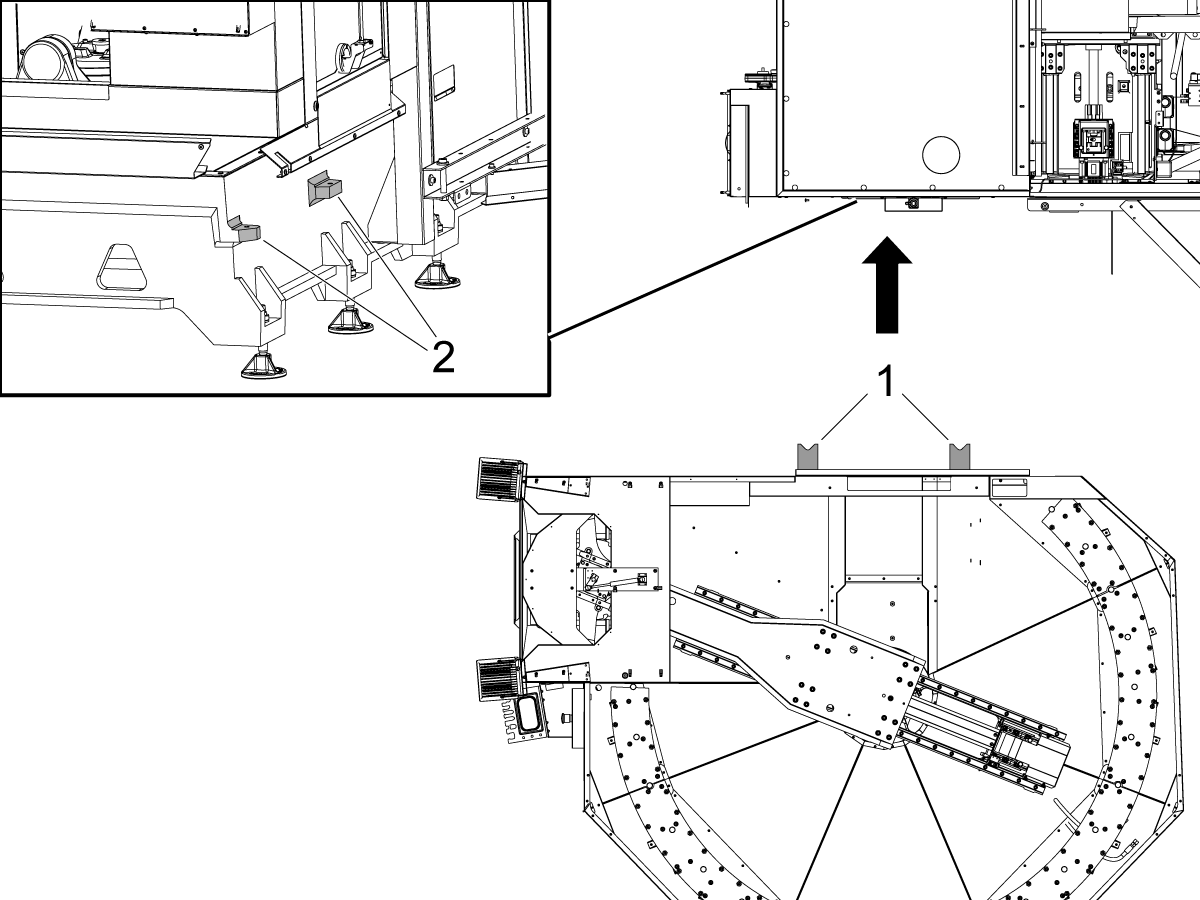
Install the Pallet Pool alignment blocks onto the host machine's base.

Note: The alignment block with the radius [2] must be installed towards the back of the UMC and the alignment block with the flat side [1] must be installed towards the front of the machine. Use the three SHCS 3/8-16 X 2 and the one SHCS 3/8-16 X 1 3/8 [4].

Install the alignment bars [3] onto the pallet pool base.

 NOTE: Use the CABCOOL as a height reference in relation to the pallet pool enclosure opening.

Move the pallet pool assembly so the alignment arms are 3 - 6” (76 - 152 mm) away from the alignment blocks. 

Install the leveling pads under the pallet pool and lower the pallet pool. 

6

Use a pallet jack or forklift to move the pallet pool close to the machine.

A decal has been placed on the rear of the machine to indicate where the pallet forks should lift the machine from.

NOTE: Have the pallet jack pick up the pallet pool from the opposite side of where the slide window would be.

7

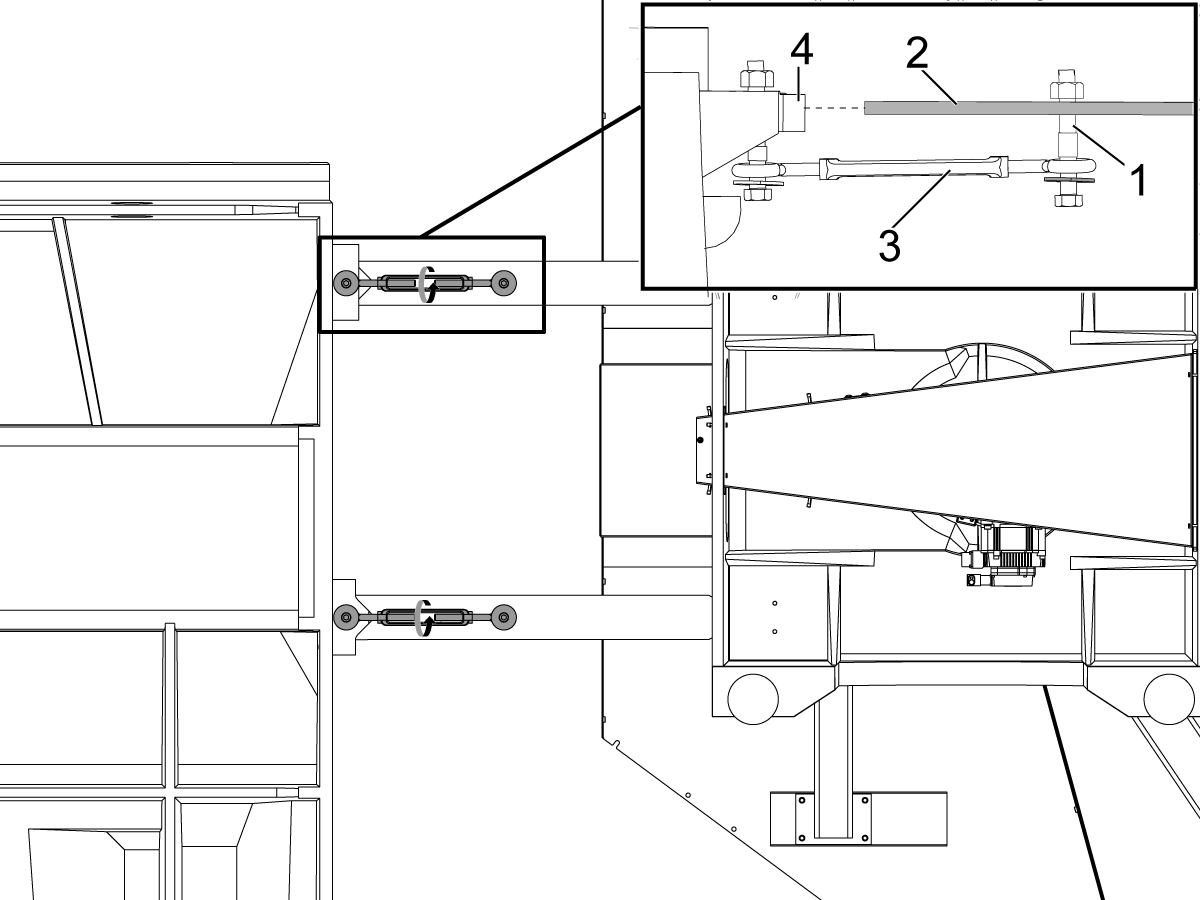
Install the turnbuckles [3] with the provided hardware (SHCS, washer, and bushings [1]) onto the alignment arms [2] and the base casting [4].

NOTE: The side of the turnbuckle with the two bushings should be installed on the side of the pallet pool.

Evenly tighten the turnbuckles until the alignment arms are almost tight against the alignment bars, STOP once the alignment bars areapproximately 1-2" away from the alignment blocks.

Adjust the height of the pallet pool so that the height of the alignment bars are to the center of the blocks before tightening the turnbuckles flush to the alignment blocks. Raise or lower the pallet pool leveling screws evenly when doing so.

Continue to evenly tighten the turnbuckles until the alignment arms are tight against the alignment blocks.

Once the alignment bars and vlocks are evenly flush to each other loosen up the turn buckles.

8

Turn [OFF] the main circuit breaker and wait until the Vector Drive High-Voltage light turns off.

 Note: The PR (Pallet Rotate) and PS (Pallet Slide) amps are already installed at the factory.

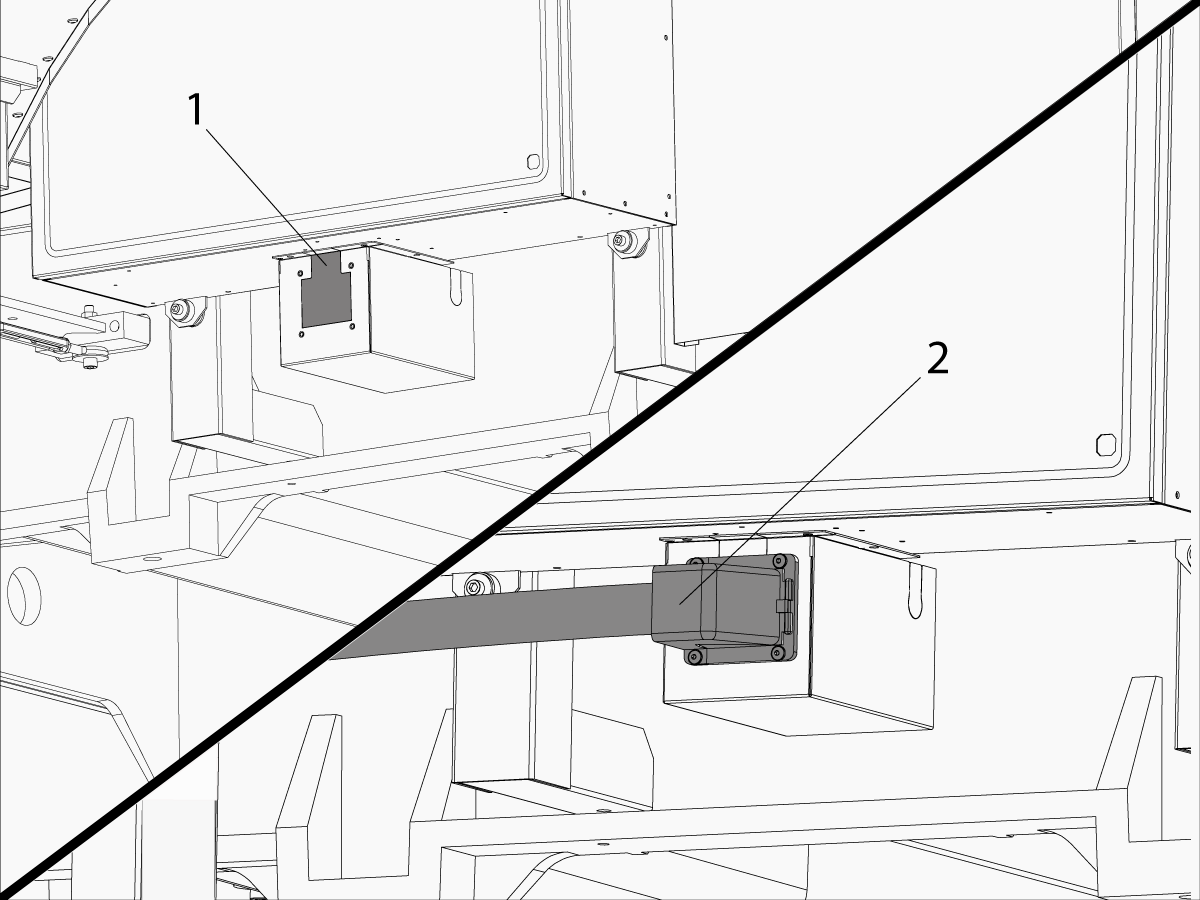
Knock out the pre-cut access panel [1].

Route the pallet pool cables [2] into the control cabinet as shown in the illustration.

Connect the PR motor encoder cable to Maincon PCB channel 15
Connect the PS motor encoder cable to Maincon PCB channel 16.

Connect the PR motor power cable to the amplifier labeled PR. Install the ferrite filter bead on the motor power cable.

Connect the PS motor power cable to the amplifier labeled PS. Install the ferrite filter bead on the motor power cable.

9

Updated

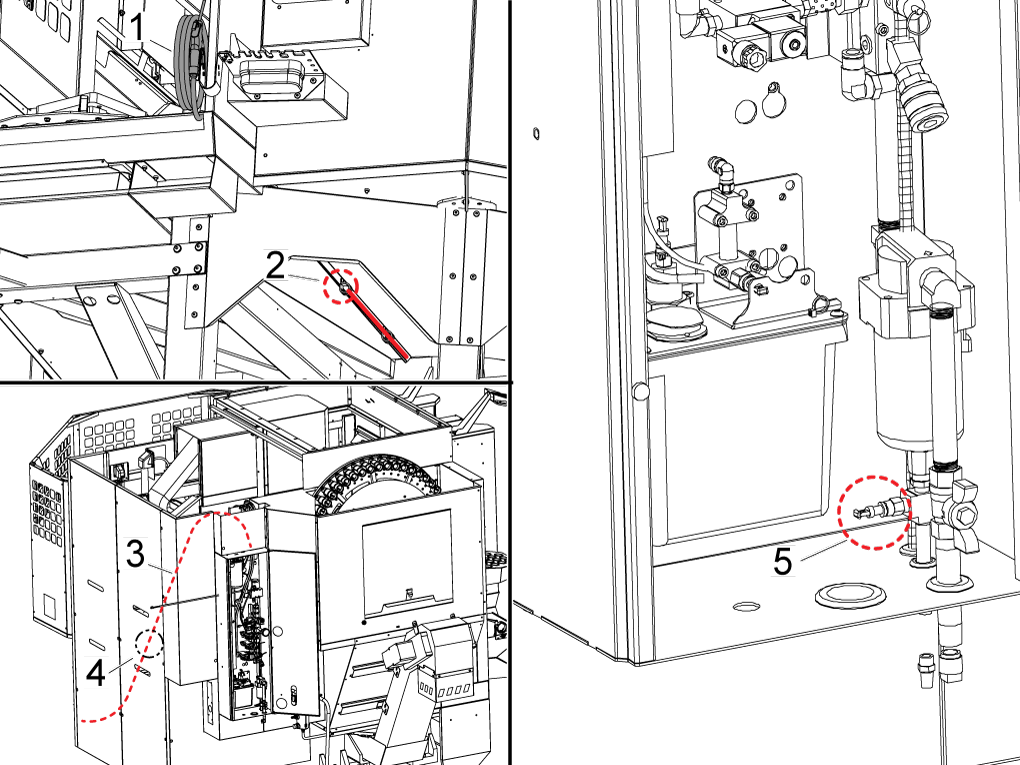
Connect the air gun hose [1] to the air line under the pallet pool [2]. 

Route the air hose from the pallet pool to line coming from the the lube cabinet [3].

Connect the air line from the pallet pool to the to the T-fitting [4] connecting the machine air gun line to the lube cabinet.

Follow the line from the lube cabinet [5] to help locate the T-fitting.

10

Updated

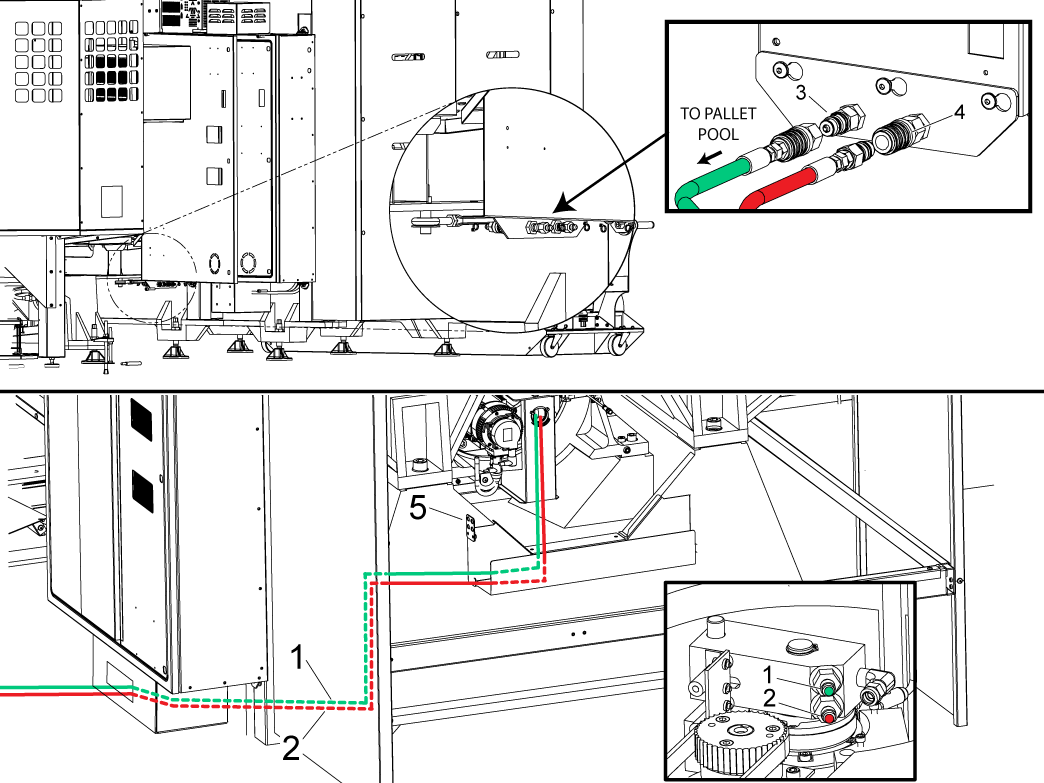
Connect the hydrualic lines to the bulkhead. The pallet clamp [1] is marked with a green zip tie and pallet unclamp [2] is marked with a red zip tie. The hydraulic lines should run through the conduit neatly.

NOTE: The bulkhead uses quick disconnects  for the hydraulic hoses. The clamp side has the male side quick disconnect [3] and the unclamp has the female side [4], this is to avoid switching the hoses.

Route the HPU oil level sensor cable 32-0423 from the HPU to the connector bracket [5].

11

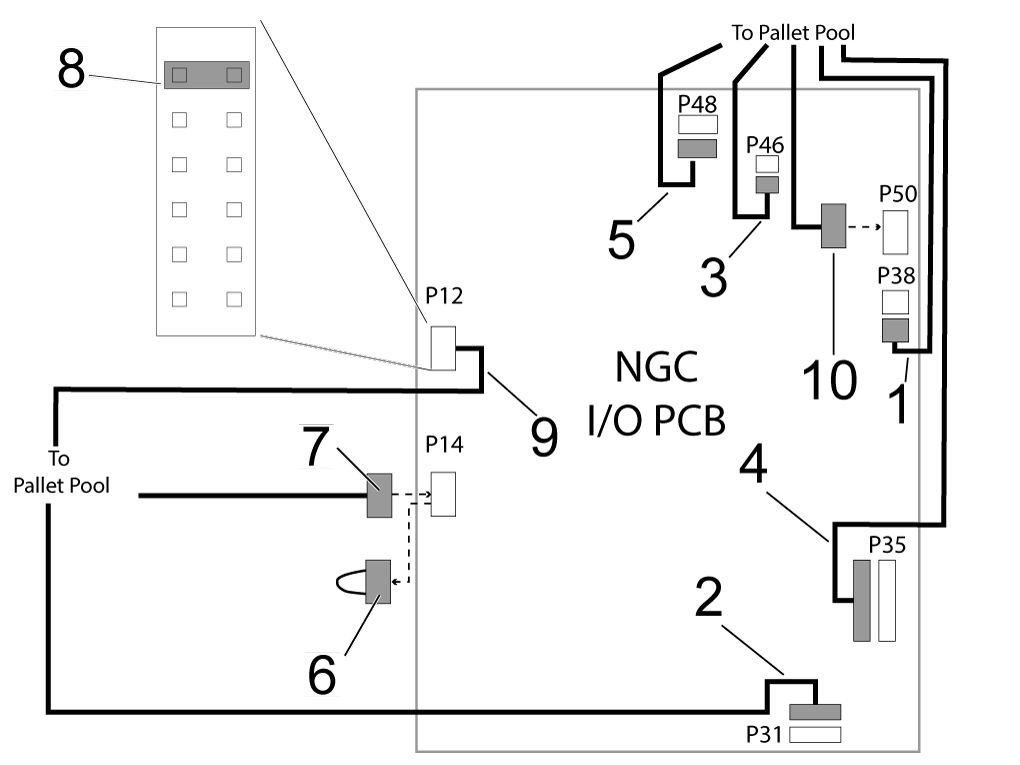
Connect HPU UP/ DWN SOL [1] to P38.

Connect HPU PUMP PWR [2] to P31.

Connect HPU THRML PROBE [3] to P46.

Connect HPU PALLET CLMP SOL  [4] to P35.

Connect HPU PRESSURE SNSR [5] to P48.

Remove the jumper connection from the P14 [6] connector on the I/O PCB.

Connect PP STATUS SWITCHES [7] to P14

Remove the shorting block from the P12 [8] connector on the I/O PCB

Connect PALLET CHNGR STATION [9] to P12

Connect PALLET ALRAM [10]  to P50.

Make sure all the Pallet Pool status bracket connectors are plugged into the correct location.

 NOTE: Store the Pallet Pool jumpers in a safe location, these will be used by the service personnel to move or service the machine.

12

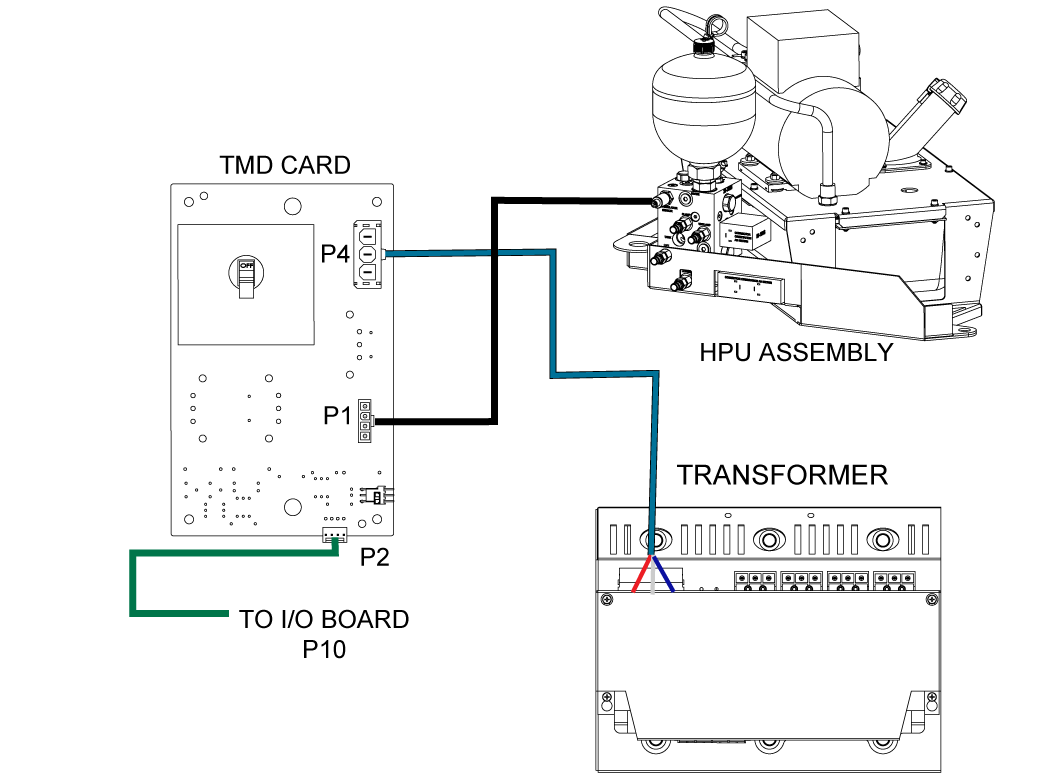
Route the HPU PUMP PWR cable  to P1 on the TMD card located on the I/O PCB hinged door. 

The rest of the components in this image are already connected but this diagram can be used as reference. 

13

Set the main circuit breaker to the ON position.

Push [POWER ON].

Zero Return all the Axis'

Do the following to enable the pallet pool option..  

Important:  You will need to do this step if you perform a option 5 clean install option on a UMC with a pallet pool.

Set setting 382 Disable Pallet Changer to None.

Find the Haas Pallet Pool Parameters decal on the E-Stop on the Pallet Pool machine.  Write down the values.

Use the USB Service key to go into Service Mode.

Press [DIAGNOSTIC] Go to the PARAMETERS> Factory setting tab.

Set the following factory settings values:

  1. 2128 [:] Pallet Pool Type = HPU Lift
  2. 40.011 (HPU 1 Type ) = On Demand
  3. 15.019 [:] PR-Axis Invisible = False
  4. 16.019 [:] PS-Axis Invisible = False
  5. 15.004 [:] PR-Axis Disable = False
  6. 16.004 [16:3] PS-Axis Disabled = False
  7. Turn TMD card on
Set the Grid and TC offsets for PR and PS axis
 
  1. 15.078 PR-Axis Tool Change Offset = Use the decal value.
  2. 15.140 PR-Axis Grid Offset = Use the decal value.
  3. 16.078 PS-Axis Tool Change Offset = Use the decal value.
  4. 16.140 PS-Axis Grid Offset = Use the decal value.
  5. Zero Return after the grid offset is adjusted

Base Level Pallet Pool

1

Verify all outer supports legs are NOT touching the floor.

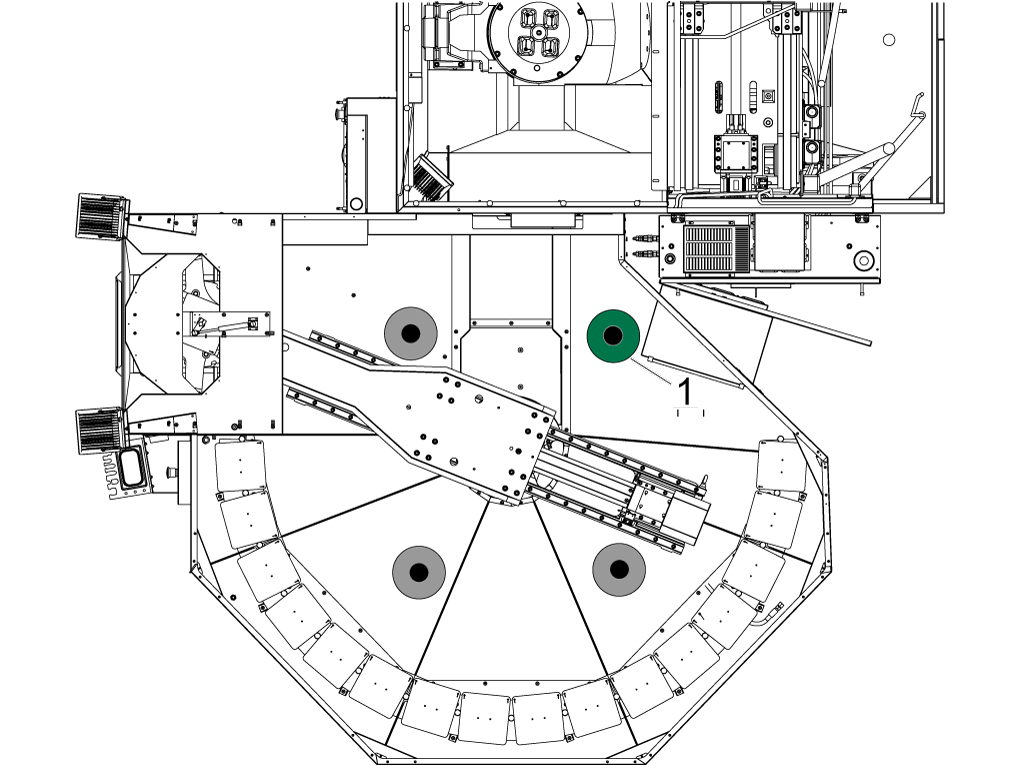
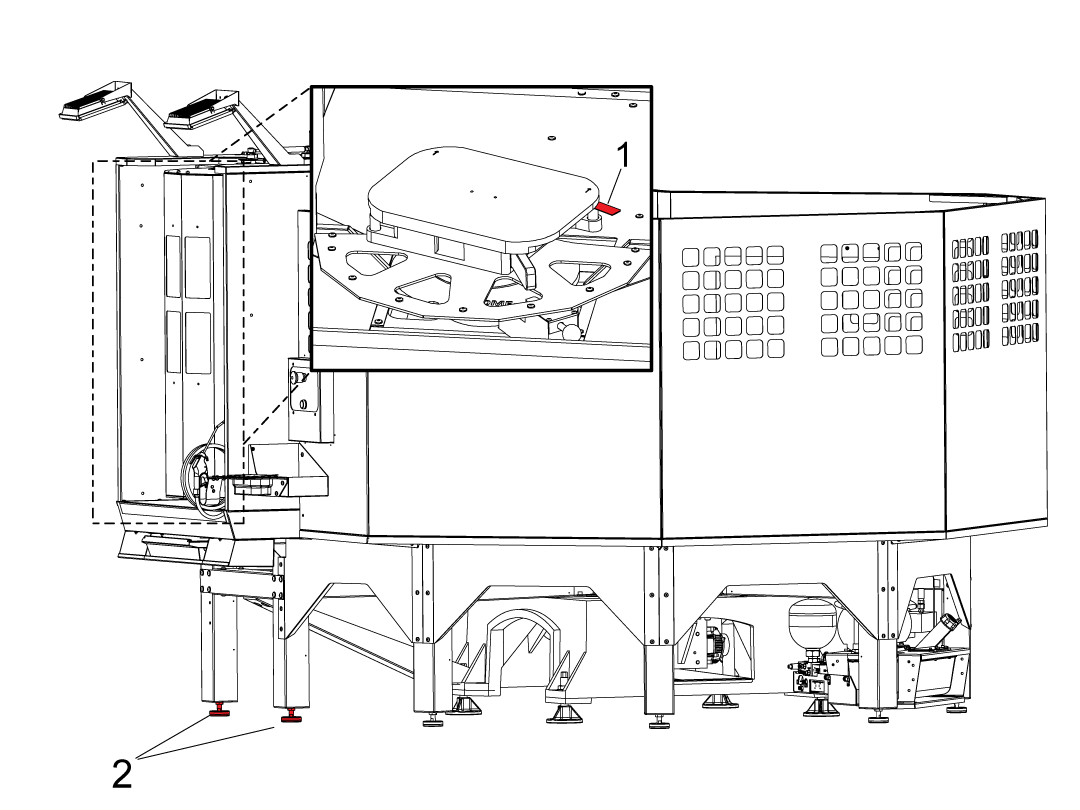
Make sure the pallet pool sit on 3 points, the leveling foot that is not touching the puck is the one closest to the machine control cabinet [1].

2

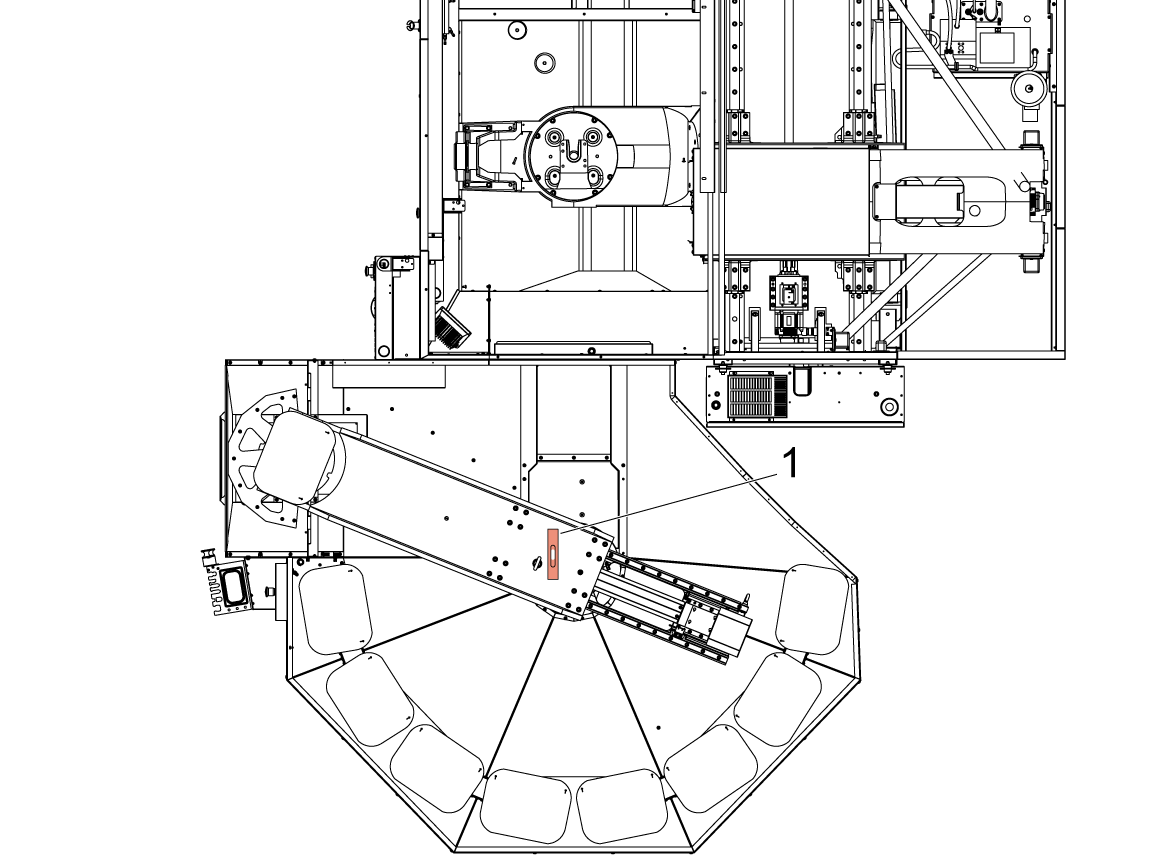
Move the ram to its home position if it is not already, place the bubble level on ram and rough level with respect to X & Y. 

NOTE: Rough level by adjusting the 3 leveling feet without adjusting the 4th in the air.

Assigning Missing Pallets on Scheduler

1

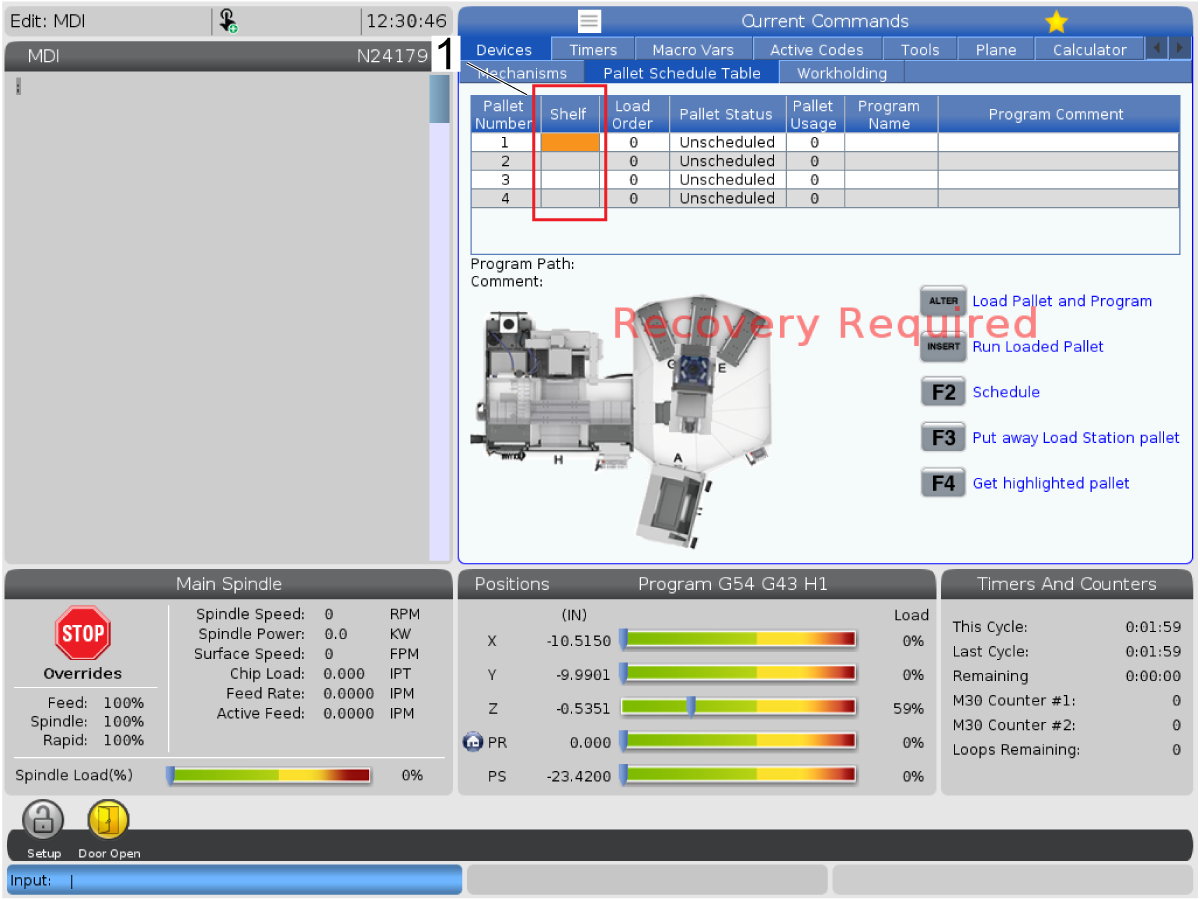
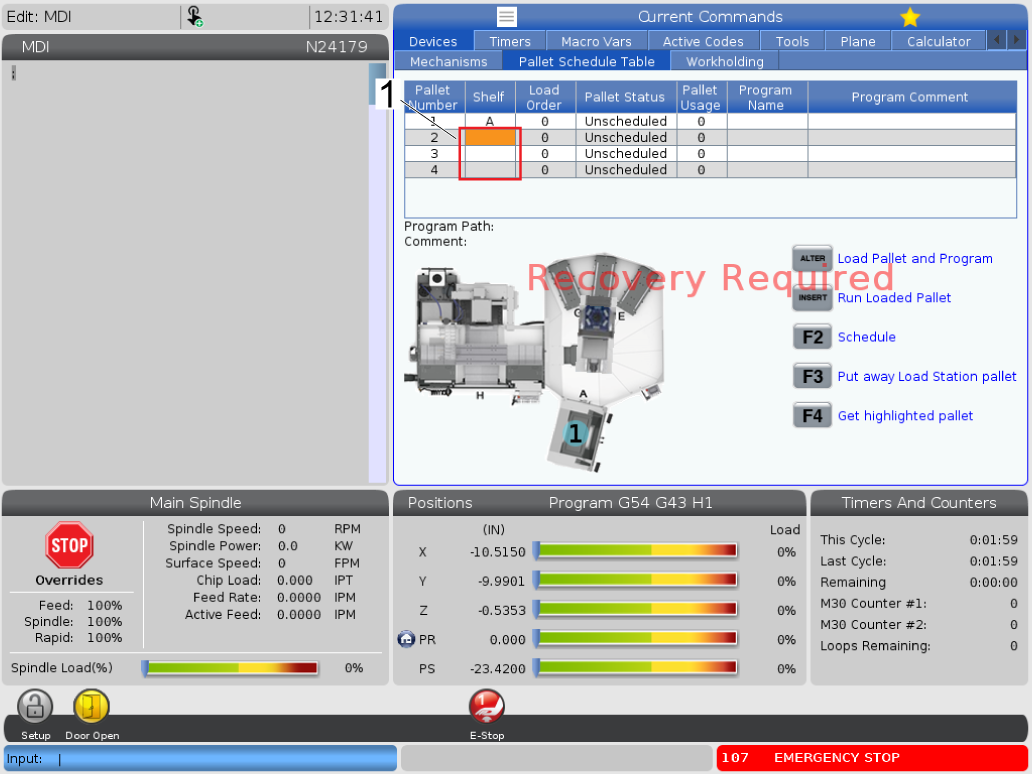
It is a possible to enter a condition where the shelves in the pallet scheduling page are not assigned [1]. This will not allow the PR and PS to zero return or recover the machine. 

This section will explain how to assign the missing shelves, if your machine is not in this condition please skip to the next section. 

First, press [CURRENT COMMANDS] and navigate to the Pallet Schedule Table tab.

2

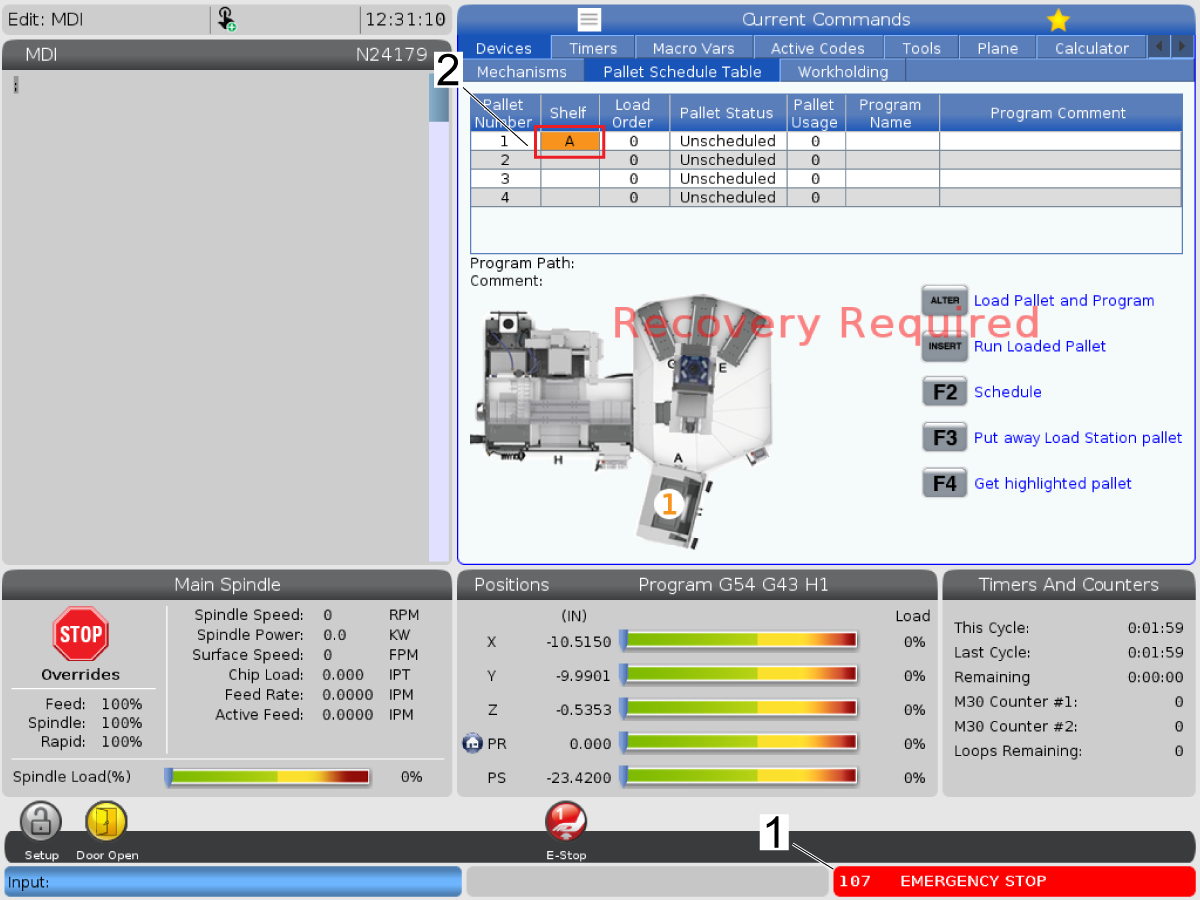
Press [EMERGENCY STOP] [1] and highlight the shelf tab on pallet number one.

With [EMERGENCY STOP] pressed, type the letter A and press [ENTER]. This will assign shelf A to pallet number 1 [2].

3

Repeat the previous step for the remaining pallet numbers in alphabetical number [1].

NOTE: The shelves can be re-assigned at any point  however the user chooses by repeating the same process (e.g. pallet number 3 can be assigned shelf B).


Align Pallet Drop Off Station

1

Insert the Service Key USB and put the machine in Service Mode.

Make sure there are no obstructions inside the machine or inside the pallet pool area. Pull out all the [E-STOPS] and [RESET] the alarms.

Press [ZERO RETURN] and then press [ALL]. The machine will zero return all the axes.

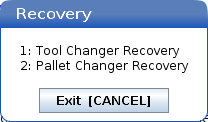
Once all the axis are zero returned press [RECOVER]. A pop up box will appear, select [2] for Pallet Changer Recovery.

2

The Pallet Changer Recovery screen shows the Pallet Pool Status. Make sure the Pallet Lifter is Down [1]. If not press [ALTER] to bring the Pallet Lifter down.

Press [J] and then the [DELETE] button. This will rotate the pallet lifter towards station J.

Press [F1] to open the auto window [3].


3

While still in the pallet recovery page press [J] then [DELETE] to rotate pallet pool to J position.

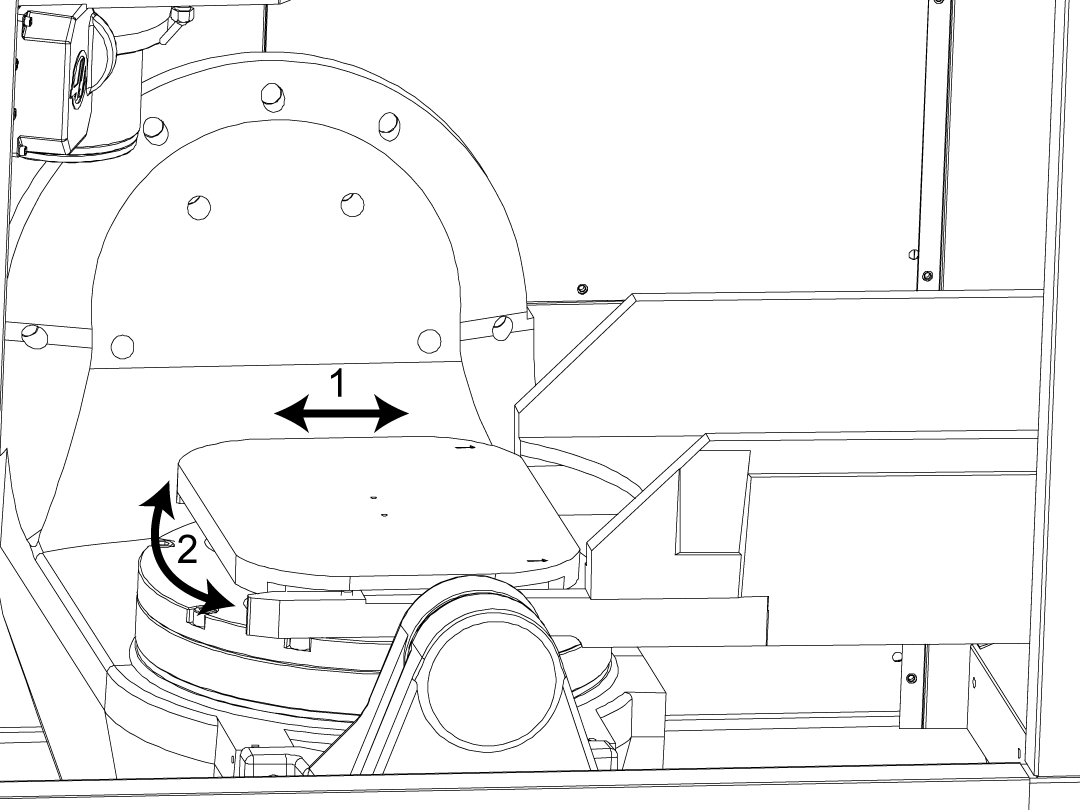
Open the window by pressing [F1] then press [+Z] to select Pallet slide Axis manually slide the RAM in the machine to the pickup location.

NOTE: Jog the slide axis slownly and make sure the bottom of the forks clear the receiver casting. Raise the pallet pool evenly if they do not.

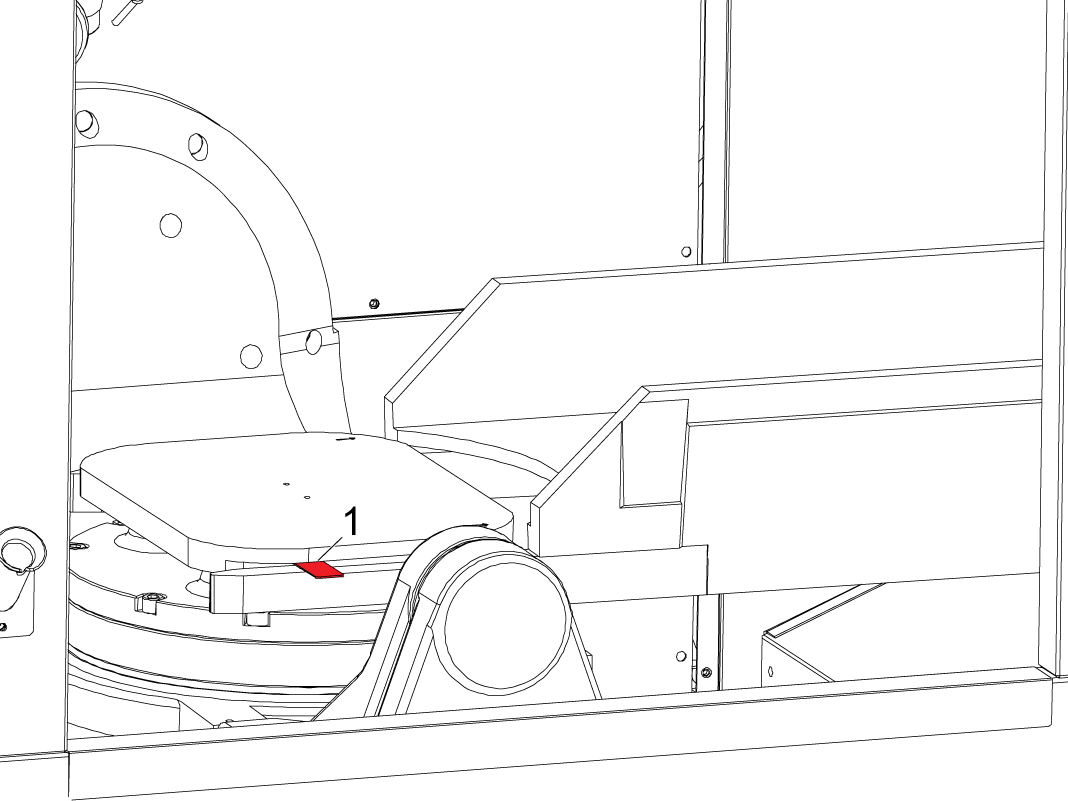
With the Pallet Pool in the down position, use the Gap Gauge [1] 25-14354 to set the gap by adjusting the height of the Pallet Pool. Evenly raise or lower the pallet pool leveling screws in accordance to the gap gauge.

NOTE: The pallet pool should still be only on 3 points while adjusting the gap.


4

Adjust the pallet pool slider by jogging the PS or PR axis so the forks align correctly underneath the pallet.

The RAM should still be in its slide position, adjust the PR position by pressing [-Z] to select the Pallet Rotate Axis  on the pallet recovery page.  

Press [F2] to unclamp the pallet and press [ALTER] to lift and lower the pallet to make sure the pallet falls onto the pins smoothly. Continuouly make adjustments to the PR and PS axis to make sure the pins are aligned to the holes.

 WARNING: The air blast on the receiver makes a loud noise ear plugs are recommended.

Press [Recovery] to get out of pallet recovery and go to Factory Settings 2139 [:] Shelf J Slide Offset and 2149 [:] Shelf J Rotary Offset, and make sure the values match the PS and PR axis position, if they do not update the values.

NOTE: You should be able to align the pallet pool using factory settings 2136 and 2146 only, if it becomes difficult to do so with only these two settings adjust Parameter 7.310 this is the position that the C-axis will rotate to during a pallet change operation.

Manually remove the pallet from the machine. 

Finally, drop the fourth leveling screw onto the puck.


5

Re-enter the pallet recovery page and make sure the pallet is unclamped before pressing [INSERT] to return the RAM to the pallet pool area.

Press [A] then [DELETE] to rotate the RAM to its home position.

Press [A] and [UNDO] to slide the RAM to its home position.

Verify that the level is still acceptable in the X & Y direction [1].

Once verified, zero return the PR and PS axis.

Align Pallet Loading Station

1

Load a pallet onto the loading station, and with the RAM in the loading station use the gap gauge 25-14354 to set the gap between the pins on the RAM forks and the pallet. 

Adjust the two loading station leveling feet until the gap is set. Raise and lower the pallet to ensure it does so smoothly. 

Setting Up Pallet Stations

1

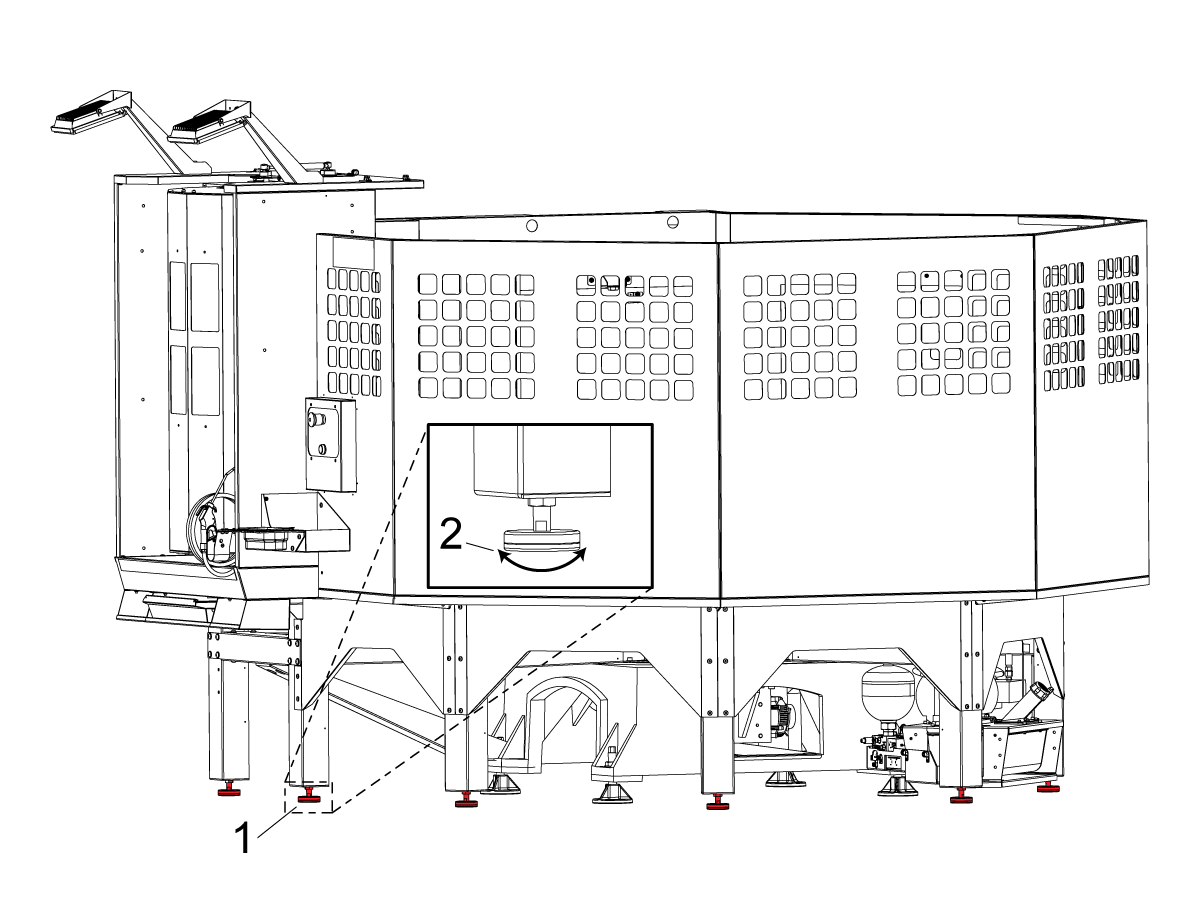
Lower all outer leveling feet [1] to the ground by hand then rotate each leveling foot by another 1/2 turn [2]. 

2

Please refer to the PALLET POOL OPERATORS MANUAL for how to load the pallets onto the machine using the Pallet Scheduling Table.

3

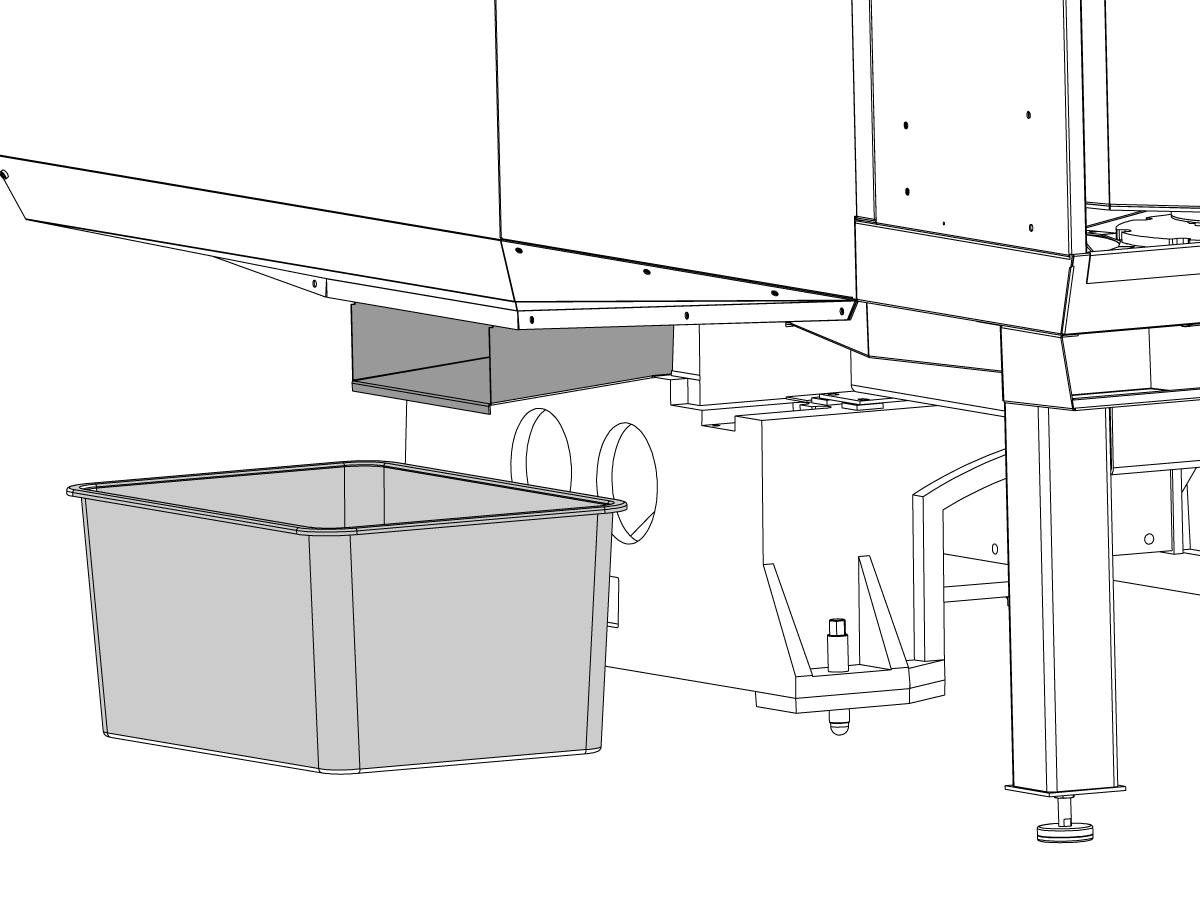
Place the provided tote under the Pallet Pool coolant discharge tray to catch the coolant and chips that drains from the pallets.

Empty the tote as needed. 

Test the pick up / drop off operation on the remaining stations by using the pallet pool recovery functions.  

Install the anchors.

Install the Pallet Pool guard panels.

BUSCAR DISTRIBUIDOR
Comentarios
Haas Logo

美元价格不包括关税、报关费用、保险费、增值税及运费。
USD prices DO NOT include customs duty, customs fees, insurance, VAT, or freight.

人民币价格包含关税、报关费用、货运保险和增值税, 但不包括运费。
CNY prices include customs duty, customs fees, insurance, and VAT. DOES NOT include freight.

Precio entregado por Haas

Este precio incluye el coste de envío, los aranceles de exportación e importación, el seguro y cualquier otro gasto en el que se incurra durante el envío a un lugar en Francia acordado con usted como comprador. No se pueden agregar otros costes obligatorios a la entrega de un producto CNC de Haas.

ESTÉ AL TANTO DE LO ÚLTIMO EN TECNOLOGÍA Y CONSEJOS DE HAAS...

¡Regístrese ya!   

HAAS TOOLING ACCEPTS THE FOLLOWING:
  • Servicio y asistencia
  • Propietarios
  • Solicitar mantenimiento
  • Manuales del operador
  • Recambios Haas
  • Solicitud de reparación de equipo rotativo
  • Guías de preinstalación
  • Comprar herramientas
  • Configure y sepa el precio de su nueva máquina Haas
  • Inventario disponible
  • Lista de precios de Haas
  • Financiación CNCA
  • Acerca de Haas
  • Oportunidades laborales
  • Certificados y seguridad
  • Póngase en contacto
  • Historial
  • CONDICIONES
  • Términos y condiciones de Haas Tooling
  • Privacidad
  • Garantía
  • Comunidad Haas
  • Programa de certificación de Haas
  • Haas Motorsports
  • Fundación Gene Haas
  • Comunidad de formación técnica de Haas
  • Eventos
  • Participe en la conversación
  • Facebook
  • Twitter
  • Flickr
  • YouTube
  • LinkedIn
  • Instagram
  • TikTok
© 2023 Haas Automation, Inc - Máquinas herramienta CNC

This site is protected by reCAPTCHA and the Google Privacy Policy y Terms of Service apply.


2800 Sturgis Rd., Oxnard, CA 93030 / Toll Free: 800-331-6746
Phone: 805-278-1800 / Fax: 805-278-2255

Aviso sobre cookies

Utilizamos cookies para mejorar su experiencia de usuario. Nuestro aviso de cookies describe las cookies que utilizamos, por qué las utilizamos y cómo puede encontrar más información al respecto. Confirme que acepta que utilicemos las cookies de análisis. Si no acepta, puede seguir utilizando nuestro sitio web con una experiencia de usuario reducida.

Administrar ajustes

Aviso sobre cookies

Utilizamos cookies para mejorar su experiencia de usuario. Nuestro aviso de cookies describe las cookies que utilizamos, por qué las utilizamos y cómo puede encontrar más información al respecto. Confirme que acepta que utilicemos las cookies de análisis. Si no acepta, puede seguir utilizando nuestro sitio web con una experiencia de usuario reducida.

Functional Cookies

Analytics Cookies