My Haas Welcome,
!
Haas Tooling MyHaas/HaasConnect Sign In Register Haas Tooling MyHaas/HaasConnect Sign Out Welcome, My Machines Latest Activity My Quotes My Account My Users Sign Out
Find Your Distributor
  1. Select Language
    1. English
    2. Deutsch
    3. Español - ES
    4. Español - MX
    5. Français
    6. Italiano
    7. Português
    8. Český
    9. Dansk
    10. Nederlands
    11. Magyar
    12. Polski
    13. Svenska
    14. Türkçe
    15. 中文
    16. Suomi
    17. Norsk
    18. الإنجليزية
    19. български
    20. Hrvatski
    21. Ελληνικά
    22. Română
    23. Slovenský
    24. Slovenščina
    25. 한국어
    26. 日本語
    27. Українська
  • machines Main Menu
    • Vertical Mills
      Vertical Mills
      Vertical Mills View All
      • Vertical Mills
      • VF Series
      • Universal Machines
      • VR Series
      • VP-5 Prismatic
      • Pallet-Changing VMCs
      • Mini Mills
      • Mold Machines
      • High-Speed Drill Centers
      • Drill/Tap/ Mill Series
      • Toolroom Mills
      • Pocket Mill
      • Compact Mills
      • Gantry Series
      • SR Sheet Routers
      • Extra-Large VMC
      • Double-Column Mills
      • 3+2 Positioning Machines
    • Multi-Axis Solutions
      Multi-Axis Solutions
      Multi-Axis Solutions View All
      • Multi-Axis Solutions
      • Y-Axis Lathes
      • 5-Axis Mills
    • Lathes
      Lathes
      Lathes View All
      • Lathes
      • ST Series
      • Dual-Spindle
      • Box Way Series
      • Toolroom Lathes
      • Chucker Lathe
      • Pocket Lathe
      • Haas Bar Feeders
    • Horizontal Mills
      Horizontal Mills
      Horizontal Mills View All
      • Horizontal Mills
      • 50-Taper
      • 40-Taper
    • Rotaries & Indexers
      Rotaries & Indexers
      Rotaries & Indexers View All
      • Rotaries & Indexers
      • Rotary Tables
      • Indexers
      • 5-Axis Rotaries
      • Extra-Large Rotaries
    • Special Series
      Special Series
      Special Series View All
      • Special Series
      • EU_Series_Redirect
    • Automation Systems
      Automation Systems
      Automation Systems View All
      • Automation Systems
      • Mill Automation
      • Lathe Automation
      • Automatic Parts Loaders
      • Automation Models
    • Desktop Machines
      Desktop Machines
      Desktop Machines View All
      • Desktop Machines
      • Desktop Mill
      • Desktop Lathe
      • Control Simulator, Standard
      • Control Simulator, Premium
    • Shop Equipment
      Shop Equipment
      Shop Equipment View All
      • Shop Equipment
      • Knee Mill
      • Haas Manual Lathes
      • Haas Saws
    • Fabrication Machines
      Fabrication Machines
      Fabrication Machines View All
      • Fabrication Machines
      • Laser Cutting Machines
      • CNC Press Brakes
    • QUICK LINKS Special Series  Special Series 
      EU SERIES EU SERIES BUILD & PRICE | PRICE LIST BUILD & PRICE | PRICE LIST In-Stock Machines In-Stock Machines WHAT’S NEW WHAT’S NEW YOUR FIRST CNC YOUR FIRST CNC
      SHOPPING TOOLS
      • Build & Price a Haas
      • Price List
      • Available Inventory
      • CNCA Financing
      WANT TO TALK TO SOMEONE?

      A Haas Factory Outlet (HFO) can answer your questions, and walk you through your best options.

      CONTACT YOUR DISTRIBUTOR >
  • Options Main Menu
    • The Haas Control Value Option Packages
      Value Option Packages
      Value Option Packages View All
      • Value Option Packages
    • Product Image Spindles
      Spindles
      Spindles View All
      • Spindles
    • Product Image Tool Changers
      Tool Changers
      Tool Changers View All
      • Tool Changers
    • Product Image 4th- | 5th-Axis
      4th- | 5th-Axis
      4th- | 5th-Axis View All
      • 4th- | 5th-Axis
    • Product Image Turrets & Live Tooling
      Turrets & Live Tooling
      Turrets & Live Tooling View All
      • Turrets & Live Tooling
    • Product Image Probing
      Probing
      Probing View All
      • Probing
    • Haas Chip & Coolant Management Chip & Coolant Management
      Chip & Coolant Management
      Chip & Coolant Management View All
      • Chip & Coolant Management
    • The Haas Control The Haas Control
      The Haas Control
      The Haas Control View All
      • The Haas Control
    • Product Image Product Options
      Product Options
      Product Options View All
      • Product Options
    • Product Image Tooling & Fixturing
      Tooling & Fixturing
      Tooling & Fixturing View All
      • Tooling & Fixturing
    • Product Image Workholding
      Workholding
      Workholding View All
      • Workholding
    • Product Image 5-Axis Solutions
      5-Axis Solutions
      5-Axis Solutions View All
      • 5-Axis Solutions
      • 5 Easy Steps to 5-Axis
    • QUICK LINKS Special Series  Special Series 
      EU SERIES EU SERIES BUILD & PRICE | PRICE LIST BUILD & PRICE | PRICE LIST In-Stock Machines In-Stock Machines WHAT’S NEW WHAT’S NEW YOUR FIRST CNC YOUR FIRST CNC
      SHOPPING TOOLS
      • Build & Price a Haas
      • Price List
      • Available Inventory
      • CNCA Financing
      WANT TO TALK TO SOMEONE?

      A Haas Factory Outlet (HFO) can answer your questions, and walk you through your best options.

      CONTACT YOUR DISTRIBUTOR >
  • Why Haas Main Menu
      Discover the Haas Difference
    • Why Haas
    • MyHaas
    • Education Community
    • Industry 4.0
    • Haas Certification
    • Customer Testimonials
  • Service Main Menu
      Welcome to Haas Service
      SERVICE HOME Operator’s Manuals How-To Procedures Troubleshooting Guides Preventive Maintenance Haas Parts Haas Tooling Videos
  • Videos Main Menu
  • Main Menu
    • View All
    • View All
    • View All
    • View All
      • HTEC Curriculum Support
      • Haas Value Option Packages (VOP) Journey
    • View All
      • Haas 10 kg Cobot Package
      • Cobot Kits
      • DC-1 Drill Center
      • CNC Sales News
      • Do More With Your Haas
    • View All
    • View All
      • contact-us-test
      • 4 - AUTOMATION SYSTEMS
      • Carousel-V2
      • expert test
      • Demo_Day_Trident-test
      • Link Test
      • image-sale-tag-test
      • article-list-test
      • Haas 25 kg Robot Package
      • test-algolia-page
    • View All
    • View All
    • View All
    • View All
      • calc-test
    • View All
    • QUICK LINKS Special Series  Special Series 
      EU SERIES EU SERIES BUILD & PRICE | PRICE LIST BUILD & PRICE | PRICE LIST In-Stock Machines In-Stock Machines WHAT’S NEW WHAT’S NEW YOUR FIRST CNC YOUR FIRST CNC
      SHOPPING TOOLS
      • Build & Price a Haas
      • Price List
      • Available Inventory
      • CNCA Financing
      WANT TO TALK TO SOMEONE?

      A Haas Factory Outlet (HFO) can answer your questions, and walk you through your best options.

      CONTACT YOUR DISTRIBUTOR >
  • Haas Tooling Main Menu
  • Haas Service Parts Main Menu

My Haas Welcome,
!
Haas Tooling MyHaas/HaasConnect Sign In Register Haas Tooling MyHaas/HaasConnect Sign Out Welcome, My Machines Latest Activity My Quotes My Account My Users Sign Out
Find Your Distributor
  1. Select Language
    1. English
    2. Deutsch
    3. Español - ES
    4. Español - MX
    5. Français
    6. Italiano
    7. Português
    8. Český
    9. Dansk
    10. Nederlands
    11. Magyar
    12. Polski
    13. Svenska
    14. Türkçe
    15. 中文
    16. Suomi
    17. Norsk
    18. الإنجليزية
    19. български
    20. Hrvatski
    21. Ελληνικά
    22. Română
    23. Slovenský
    24. Slovenščina
    25. 한국어
    26. 日本語
    27. Українська
×

Search Results

Web Pages

Images

    • <
    • 1
    • >

UMC 500-1000 Auto Door - Installation - AD0664

Service Home How To Procedures UMC 500-1000 Auto Door - Installation - AD0664
Recently Updated Last updated: 03/21/2023

UMC 500-1000 Auto Door - Installation


AD0664

UMC 500-1000 Auto Door - Installation - AD0664

- Jump to Section - 1. Introduction (7 steps) 2. Electrical Safety 3. Auto Door Installation (1 step) 4. Door Alignment (1 step) 5. Wiring (5 steps) 6. Auto Door Activation 7. Parameters 8. Testing Back to Top

Introduction

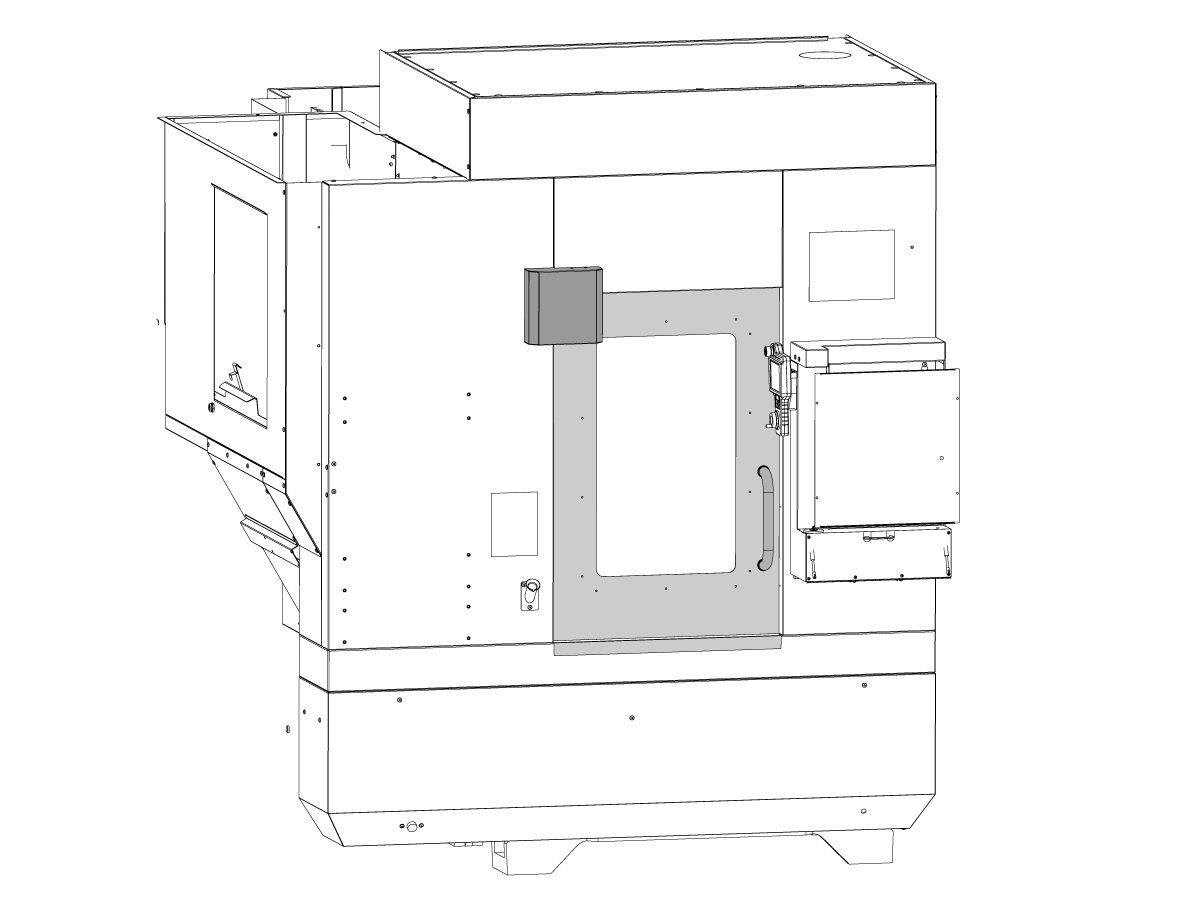
This procedure will show you how to install an Auto Door on UMC-500/SS-V, UMC-750/SS-V and UMC-1000/SS-V.

Machine Requirements:

  • UMC-500 manufactured after 04/13/2022
  • UMC-750 manufactured after 05/08/2022
  • UMC-1000 manufactured after 04/16/2022

Minimum Software:

  • 100.20.000.1200 or higher
  • I/O PCB 34-3490B or higher
  • AD PCB 34-3096A firmware version 1.30 or higher
  • I/O Firmware version 4.09 or higher
  • TC Firmware version 2.06 or higher

 NOTE: All the above software and firmware files can be downloaded from the Haas Service portal.

This procedure applies to the following kits: 

  • 93-1000925 - AUTODOOR FIELD INSTALL KIT UMC-500
  • 93-1000926 - AUTODOOR FIELD INSTALL KIT UMC-750
  • 93-1000927 - AUTODOOR FIELD INSTALL KIT UMC-1000

Electrical Safety

 CAUTION: When you do maintenance or repair on CNC machines and their components, you must always follow basic safety precautions. This decreases the risk of injury and mechanical damage.

  • Set the main circuit breaker to the [OFF] position.

 DANGER: Before beginning any work inside the control cabinet the High Voltage indicator light on the 320V Power Supply / Vector Drive must have been off for at least 5 minutes.

Some service procedures can be dangerous or life-threatening. DO NOT attempt a procedure that you do not fully understand. If you have any doubts about doing a procedure contact your Haas Factory Outlet (HFO) and schedule a service visit.

Auto Door Installation

1

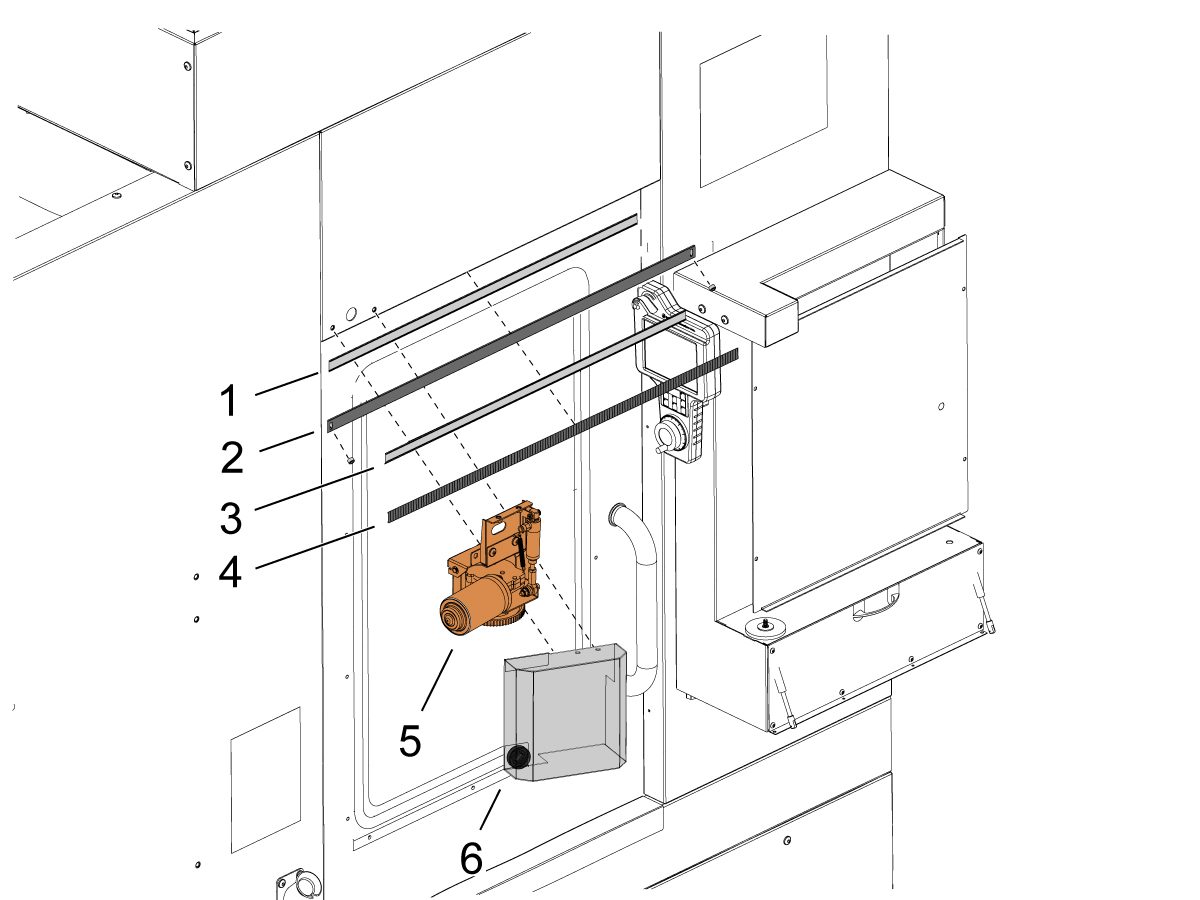
Peel off one side of the double sided tape [1] while leaving the other intact and stick under the auto door track [2].

Peel and stick another double sided tape [3] and stick it on top of the auto door track [2]. 

Place the belt [4] on top of the double sided tape. Make sure the belt is centered on the auto door track [2].

Bolt each side of the auto door track [2] to secure to the machine. 

Peel off a bit of the tape on both edges to stick to the machine.

 NOTE: Do not peel off the full amount of the double sided tape just yet for adjustments later. 

Bolt the motor assembly [5] onto the front enclosure panel above the door. 

Place a magnet [6] inside the cover flange. Let the magnet adhere to the enclosure around the motor [5]. 

Attach the cover to the motor bracket [5].

 NOTE: No need to bolt enclosure cover [2] yet as the track will need to be aligned in the Door Alignment section below. 

Door Alignment

1

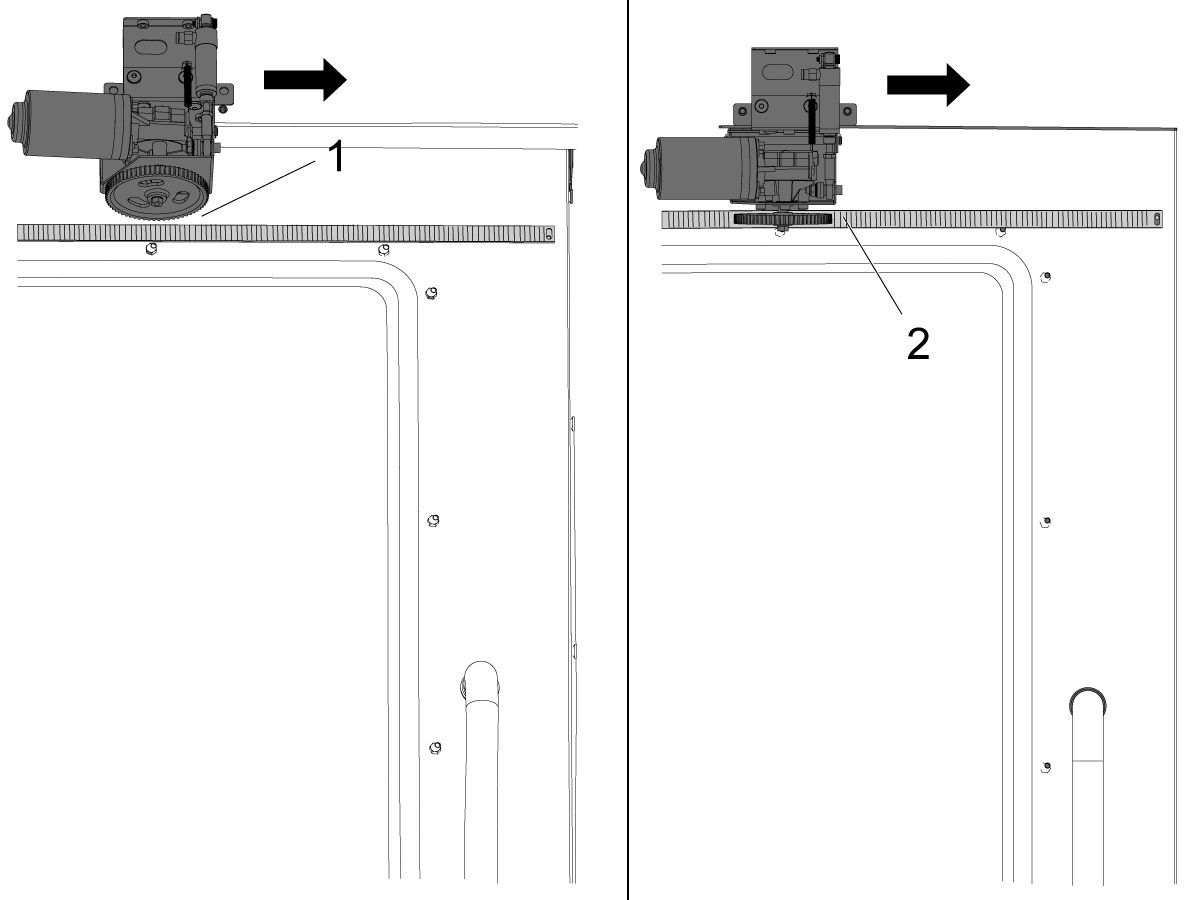
To align the track to the motor, it is important for the wheel to have full engagement on the track. DO NOT sacrifice door alignment for track alignment. If you are having issues aligning the track, adjust the track itself with the slots in the track clips.

Verify that the gap between the gear and track [1] is equal through the whole travel of the door when the motor is raised.

Verify that the gear is centered to the track [2] when the motor engages the track through the whole travel of the door. 

Once the track is aligned, peel the tape bit that was left and apply pressure as you peel.

Wiring

Push [POWER OFF]. 

Set main circuit breaker to the OFF position. 

Close the primary air valve. This stops the air supply to the machine. 

Open the bleed valve on the air manifold until air pressure is released. Make sure the air pressure is 0 psi (0 bar). 

1

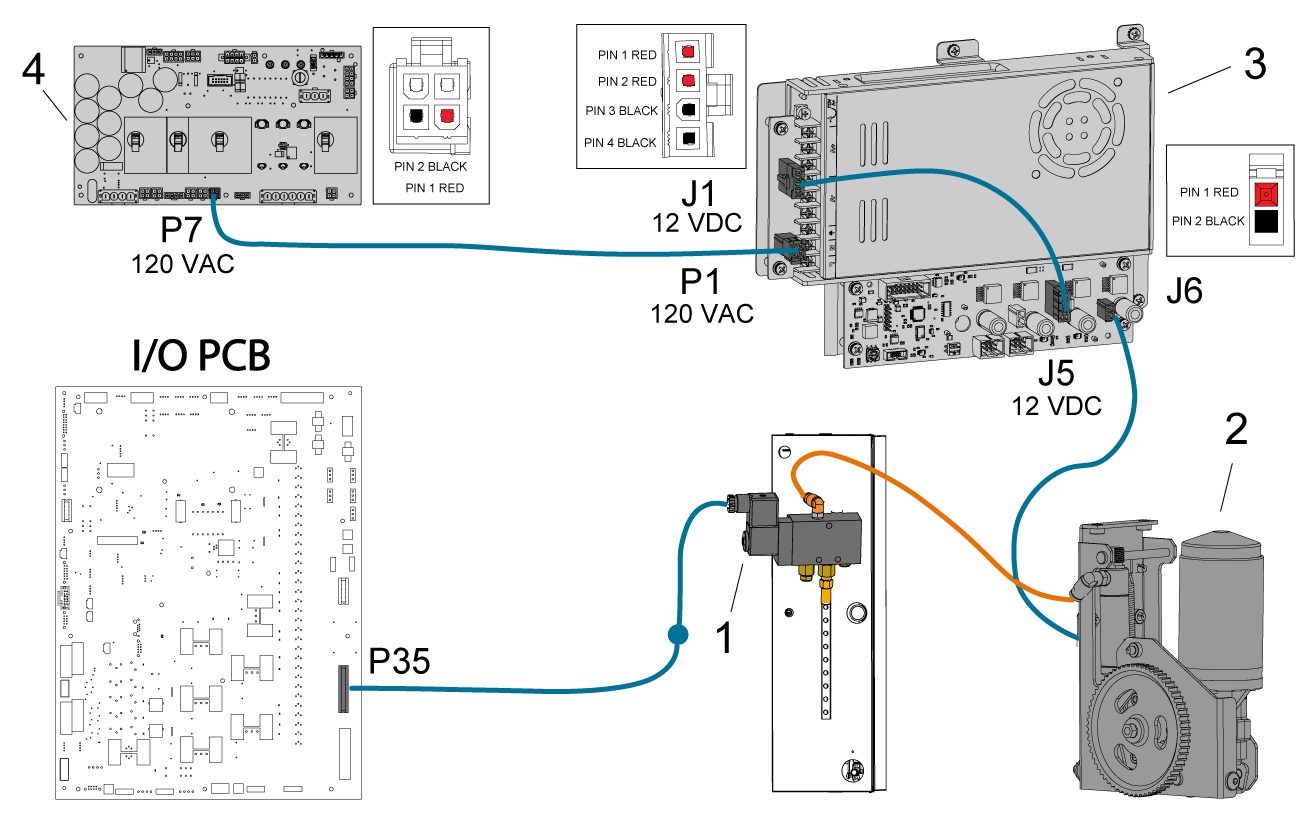
Inside the CALM cabinet, remove and discard the manifold plug. Install the solenoid assembly [1] into the manifold. Connect the air hose.

Connect auto door solenoid power cable to the connector labeled UMC Auto Door on the terminal bracket. This connects to the Air/Lube Solenoid cable that connects to P35 on the IO PCB board.

The motor [2] power cable connects to J6 on the LVPS [3].

Jumper cable 33-4310B connects J1 to J5 on the LVPS [3].

Cable 33-3310 connects P7 on the PSUP [4] to P1 on the LVPS [3] for the main power supply. 

NOTE: If the PSUP [4] connectors are used up, can use either P5, P6 and P7 on PSUP.

2

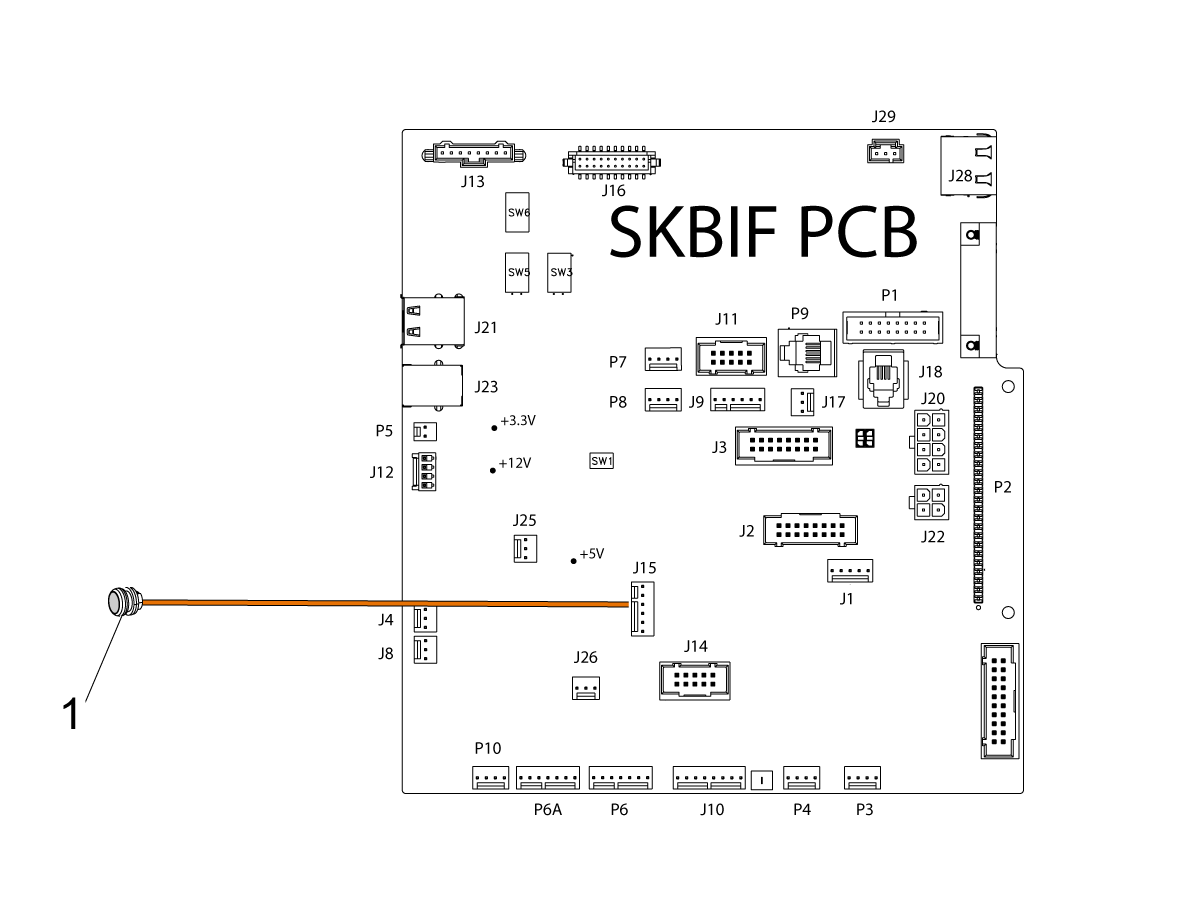
Connect the autodoor button to J15 on the SKBIF PCB.

3

Remove the large enclosure panel above the window.

NOTE: Large enclosure panel is hidden in the illustration for clarity. This enclosure panel would be covering the enclosure cable carrier panel [1]. 

Remove the enclosure cable carrier panel [1] that is under the large enclosure panel. 

Remove both back enclosure panels [2].

4

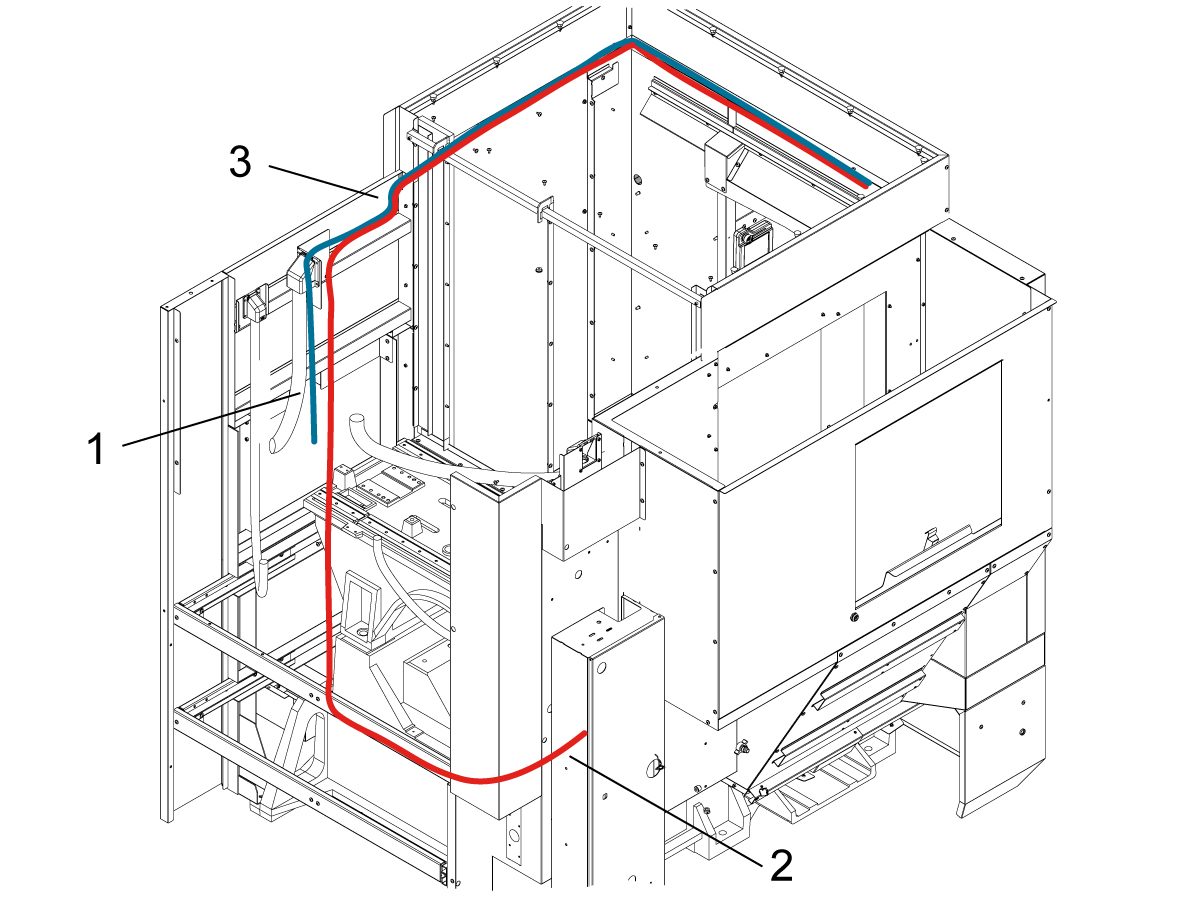
From the inside of the machine, route the motor power cable [1] and air hose [2] around the perimeter of the enclosure. 

Route both cables through the cable carrier enclosure panel grouped together with other cables.

NOTE: If cables aren't able to route easily from the cable carrier enclosure panel to the next enclosure side panel [3], a small notch needs to be made in the enclosure side panel to fit the cables through.

Route the motor power cable [1] down into the control cabinet.

Route the air hose [2] around the perimeter and behind the column into the CALM cabinet.

5

Reinstall the enclosure cable carrier panel [1] covering the wires.

Reinstall the large enclosure panel above the window covering the enclosure cable carrier panel [1]. 

Reinstall both back enclosure panels [2].

Auto Door Activation

Turn on the machine.

Login to the HBC PORTAL.

Download the Auto Door option configuration patch files.

 Note: The option files will appear on the configuration download page after the Auto Door service kit has been ordered. If the option does not appear, contact the service department.

Load the option configuration patch file to the control. Refer to the NEXT GENERATION CONTROL - CONFIGURATION FILE - DOWNLOAD/LOAD procedure. 

Parameters

Turn on the machine.

Verify that any necessary patched have been applied.

Go into Service Mode and set the factory setting 9013.001 CAN NODE 13 ENABLE to TRUE.

Go to the DIAGNOSTICS > SYSTEM tab. Verify that you have the correct software and firmware versions installed.

Go to Setting 131 AUTO DOOR and set to ON. 

Testing

Verify Auto Window works properly with a test program:

NOTE: The M-codes work only while the machine recieves a cell-safe signal from a robot or if it has a light curtain installed. 

M80;

G04 P5.;

M81;

G04 P5.;

M99;


OR


Press the Auto Door button on the side of the control pendant.


While the program is running, watch the DIAGNOSTICS screen to verify the Auto Door's input triggers the sensors properly. 

Recently Viewed Items

You Have No Recently Viewed Items Yet

Feedback
Haas Logo

Haas Delivered Price

This price includes shipping cost, export and import duties, insurance, and any other expenses incurred during shipping to a location in France agreed with you as a buyer. No other mandatory costs can be added to the delivery of a Haas CNC Product.

KEEP UP WITH THE LATEST HAAS TIPS AND TECHNOLOGY...

Sign up now!   

HAAS TOOLING ACCEPTS THE FOLLOWING:

  • Service & Support
  • Owners
  • Request Service
  • Operator Manuals
  • Haas Parts
  • Rotary Repair Request
  • Pre-Install Guides
  • Shopping Tools
  • Build & Price a New Haas
  • Available Inventory
  • The Haas Price List
  • CNCA Financing
  • About Haas
  • Accessibility Statement
  • DNSH Statement
  • Export Compliance
  • Careers
  • Certifications & Safety
  • Contact Us
  • History
  • Terms & Conditions
  • Haas Tooling Terms & Conditions
  • Privacy
  • Warranty
  • Haas Community
  • Haas Certification Program
  • Haas Motorsports
  • Gene Haas Foundation
  • Haas Technical Education Community
  • Events
  • Join the Conversation
  • Facebook
  • X
  • Flickr
  • YouTube
  • LinkedIn
  • Instagram
  • TikTok
© 2026 Haas Automation, Inc – CNC Machine Tools

This site is protected by reCAPTCHA and the Google Privacy Policy and Terms of Service apply.

2800 Sturgis Rd., Oxnard, CA 93030
Toll Free: (888) 817-4446 / Fax: 805-278-8554