My Haas Welcome,
!
Haas Tooling MyHaas/HaasConnect Sign In Register Haas Tooling MyHaas/HaasConnect Sign Out Welcome, My Machines Latest Activity My Quotes My Account My Users Sign Out
Find Your Distributor
  1. Select Language
    1. English
    2. Deutsch
    3. Español - ES
    4. Español - MX
    5. Français
    6. Italiano
    7. Português
    8. Český
    9. Dansk
    10. Nederlands
    11. Magyar
    12. Polski
    13. Svenska
    14. Türkçe
    15. 中文
    16. Suomi
    17. Norsk
    18. الإنجليزية
    19. български
    20. Hrvatski
    21. Ελληνικά
    22. Română
    23. Slovenský
    24. Slovenščina
    25. 한국어
    26. 日本語
    27. Українська
  • machines Main Menu
    • Vertical Mills
      Vertical Mills
      Vertical Mills View All
      • Vertical Mills
      • VF Series
      • Universal Machines
      • VR Series
      • VP-5 Prismatic
      • Pallet-Changing VMCs
      • Mini Mills
      • Mold Machines
      • High-Speed Drill Centers
      • Drill/Tap/ Mill Series
      • Toolroom Mills
      • Pocket Mill
      • Compact Mills
      • Gantry Series
      • SR Sheet Routers
      • Extra-Large VMC
      • Double-Column Mills
      • 3+2 Positioning Machines
    • Multi-Axis Solutions
      Multi-Axis Solutions
      Multi-Axis Solutions View All
      • Multi-Axis Solutions
      • Y-Axis Lathes
      • 5-Axis Mills
    • Lathes
      Lathes
      Lathes View All
      • Lathes
      • ST Series
      • Dual-Spindle
      • Box Way Series
      • Toolroom Lathes
      • Chucker Lathe
      • Pocket Lathe
      • Haas Bar Feeders
    • Horizontal Mills
      Horizontal Mills
      Horizontal Mills View All
      • Horizontal Mills
      • 50-Taper
      • 40-Taper
    • Rotaries & Indexers
      Rotaries & Indexers
      Rotaries & Indexers View All
      • Rotaries & Indexers
      • Rotary Tables
      • Indexers
      • 5-Axis Rotaries
      • Extra-Large Rotaries
    • Special Series
      Special Series
      Special Series View All
      • Special Series
      • EU_Series_Redirect
    • Automation Systems
      Automation Systems
      Automation Systems View All
      • Automation Systems
      • Mill Automation
      • Lathe Automation
      • Automatic Parts Loaders
      • Automation Models
    • Desktop Machines
      Desktop Machines
      Desktop Machines View All
      • Desktop Machines
      • Desktop Mill
      • Desktop Lathe
      • Control Simulator, Standard
      • Control Simulator, Premium
    • Shop Equipment
      Shop Equipment
      Shop Equipment View All
      • Shop Equipment
      • Knee Mill
      • Haas Manual Lathes
      • Haas Saws
    • Fabrication Machines
      Fabrication Machines
      Fabrication Machines View All
      • Fabrication Machines
      • Laser Cutting Machines
      • CNC Press Brakes
    • QUICK LINKS Special Series  Special Series 
      EU SERIES EU SERIES BUILD & PRICE | PRICE LIST BUILD & PRICE | PRICE LIST In-Stock Machines In-Stock Machines WHAT’S NEW WHAT’S NEW YOUR FIRST CNC YOUR FIRST CNC
      SHOPPING TOOLS
      • Build & Price a Haas
      • Price List
      • Available Inventory
      • CNCA Financing
      WANT TO TALK TO SOMEONE?

      A Haas Factory Outlet (HFO) can answer your questions, and walk you through your best options.

      CONTACT YOUR DISTRIBUTOR >
  • Options Main Menu
    • The Haas Control Value Option Packages
      Value Option Packages
      Value Option Packages View All
      • Value Option Packages
    • Product Image Spindles
      Spindles
      Spindles View All
      • Spindles
    • Product Image Tool Changers
      Tool Changers
      Tool Changers View All
      • Tool Changers
    • Product Image 4th- | 5th-Axis
      4th- | 5th-Axis
      4th- | 5th-Axis View All
      • 4th- | 5th-Axis
    • Product Image Turrets & Live Tooling
      Turrets & Live Tooling
      Turrets & Live Tooling View All
      • Turrets & Live Tooling
    • Product Image Probing
      Probing
      Probing View All
      • Probing
    • Haas Chip & Coolant Management Chip & Coolant Management
      Chip & Coolant Management
      Chip & Coolant Management View All
      • Chip & Coolant Management
    • The Haas Control The Haas Control
      The Haas Control
      The Haas Control View All
      • The Haas Control
    • Product Image Product Options
      Product Options
      Product Options View All
      • Product Options
    • Product Image Tooling & Fixturing
      Tooling & Fixturing
      Tooling & Fixturing View All
      • Tooling & Fixturing
    • Product Image Workholding
      Workholding
      Workholding View All
      • Workholding
    • Product Image 5-Axis Solutions
      5-Axis Solutions
      5-Axis Solutions View All
      • 5-Axis Solutions
      • 5 Easy Steps to 5-Axis
    • QUICK LINKS Special Series  Special Series 
      EU SERIES EU SERIES BUILD & PRICE | PRICE LIST BUILD & PRICE | PRICE LIST In-Stock Machines In-Stock Machines WHAT’S NEW WHAT’S NEW YOUR FIRST CNC YOUR FIRST CNC
      SHOPPING TOOLS
      • Build & Price a Haas
      • Price List
      • Available Inventory
      • CNCA Financing
      WANT TO TALK TO SOMEONE?

      A Haas Factory Outlet (HFO) can answer your questions, and walk you through your best options.

      CONTACT YOUR DISTRIBUTOR >
  • Why Haas Main Menu
      Discover the Haas Difference
    • Why Haas
    • MyHaas
    • Education Community
    • Industry 4.0
    • Haas Certification
    • Customer Testimonials
  • Service Main Menu
      Welcome to Haas Service
      SERVICE HOME Operator’s Manuals How-To Procedures Troubleshooting Guides Preventive Maintenance Haas Parts Haas Tooling Videos
  • Videos Main Menu
  • Main Menu
    • View All
    • View All
    • View All
    • View All
      • HTEC Curriculum Support
      • Haas Value Option Packages (VOP) Journey
    • View All
      • Haas 10 kg Cobot Package
      • Cobot Kits
      • DC-1 Drill Center
      • CNC Sales News
      • Do More With Your Haas
    • View All
    • View All
      • contact-us-test
      • 4 - AUTOMATION SYSTEMS
      • Carousel-V2
      • expert test
      • Demo_Day_Trident-test
      • Link Test
      • image-sale-tag-test
      • article-list-test
      • Haas 25 kg Robot Package
      • test-algolia-page
    • View All
    • View All
    • View All
    • View All
      • calc-test
    • View All
    • QUICK LINKS Special Series  Special Series 
      EU SERIES EU SERIES BUILD & PRICE | PRICE LIST BUILD & PRICE | PRICE LIST In-Stock Machines In-Stock Machines WHAT’S NEW WHAT’S NEW YOUR FIRST CNC YOUR FIRST CNC
      SHOPPING TOOLS
      • Build & Price a Haas
      • Price List
      • Available Inventory
      • CNCA Financing
      WANT TO TALK TO SOMEONE?

      A Haas Factory Outlet (HFO) can answer your questions, and walk you through your best options.

      CONTACT YOUR DISTRIBUTOR >
  • Haas Tooling Main Menu
  • Haas Service Parts Main Menu

My Haas Welcome,
!
Haas Tooling MyHaas/HaasConnect Sign In Register Haas Tooling MyHaas/HaasConnect Sign Out Welcome, My Machines Latest Activity My Quotes My Account My Users Sign Out
Find Your Distributor
  1. Select Language
    1. English
    2. Deutsch
    3. Español - ES
    4. Español - MX
    5. Français
    6. Italiano
    7. Português
    8. Český
    9. Dansk
    10. Nederlands
    11. Magyar
    12. Polski
    13. Svenska
    14. Türkçe
    15. 中文
    16. Suomi
    17. Norsk
    18. الإنجليزية
    19. български
    20. Hrvatski
    21. Ελληνικά
    22. Română
    23. Slovenský
    24. Slovenščina
    25. 한국어
    26. 日本語
    27. Українська
×

Search Results

Web Pages

Images

    • <
    • 1
    • >

5 - HAB - Maintenance


  • 0 - HAB - Table of Contents
  • 1 - HAB - Introduction
  • 2 - HAB - Safety
  • 3 - HAB - Installation
  • 4 - HAB - Operation
  • 5 - HAB - Maintenance
  • 6 - HAB - Troubleshooting

Go To :

  • 5.1 HAB Maintenance
  • 5.2 HAB Software Update
  • 5.3 HAB PLC Software Update
  • 5.4 HAB Feed Rate Calibration
  • 5.5 HAB Service Parts List
  • 5.6 HAB Hydraulic Motor Replacement
  • 5.7 HAB V1 Service Parts
5.1 HAB Maintenance

Recently Updated

HAAS Automatic Band Saw - Maintenance Schedule


Revision B - 10/2025

Maintenance

Regular maintenance is essential for the Haas Automatic Band Saw.  This page provides the recommended maintenance intervals along with the corresponding instructions.

Maintenance Item Interval
Wire Brush Positioning.  As needed. 
Hydraulic Oil Gauge Level. As needed. 
Gearbox Oil Gauge Level. As needed. 
Grease The Main Pillar.  Every Month. 
Grease Guide Arm Bearings.  Every Month.
Grease Feed Rollers.  Every Month.
Inspect the coolant level. Weekly
Inspect the coolant concentration.  Weekly
Completely clean the coolant tank. Replace the coolant. Six Months.

1

Wire Brush Positioning 

Position the wire brush correctly in relation to the saw blade. 

Note: Refer to the illustration to find the proper location of the wire brush.

2

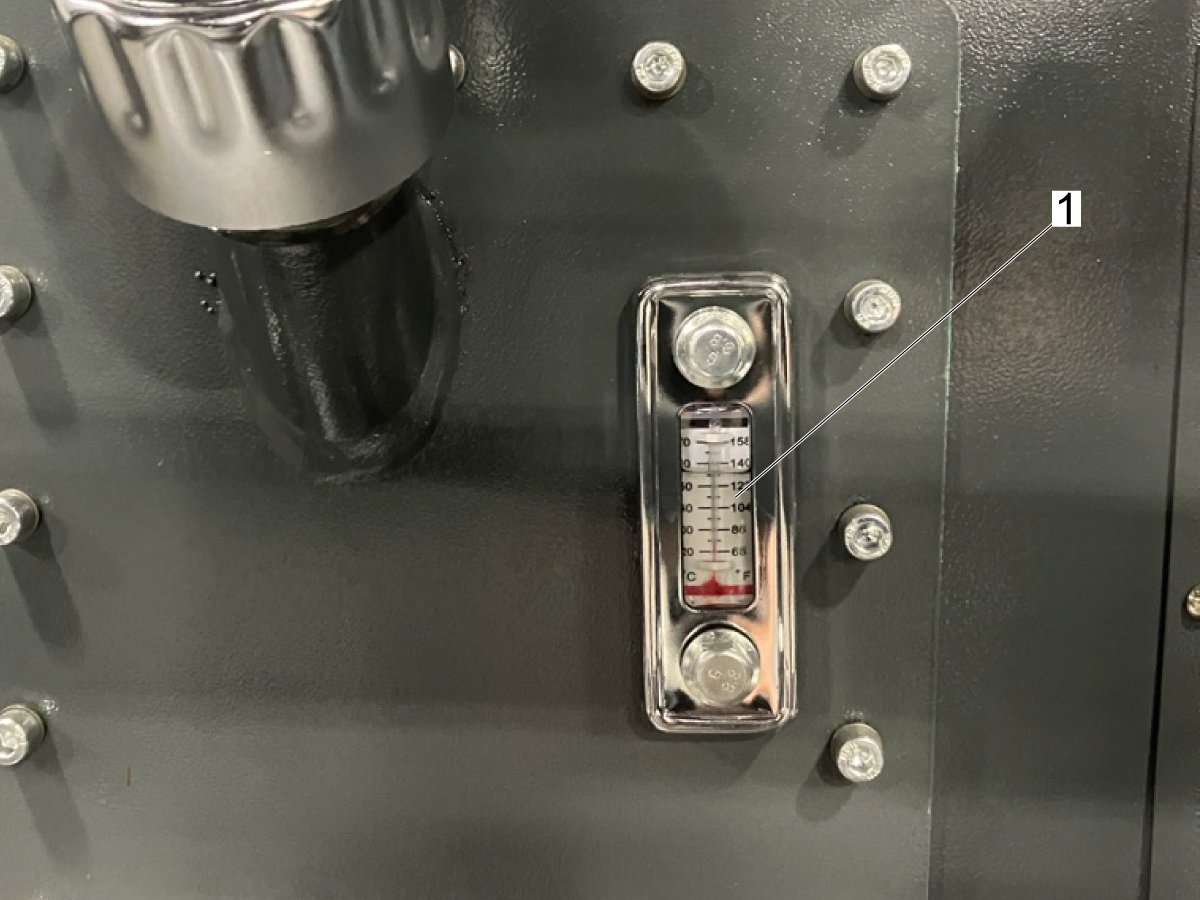
Hydraulic Oil Guage Level 

Check the hydraulic oil level on the gauge. If the level is below ¾ full, you will need to add more hydraulic oil.

Turn OFF the band saw. 

Remove oil tank cap and fill with ISO 46 / ISO 32 oil.

Note: Band saw will require 16 gallons of oil before any kind of startup. 

3

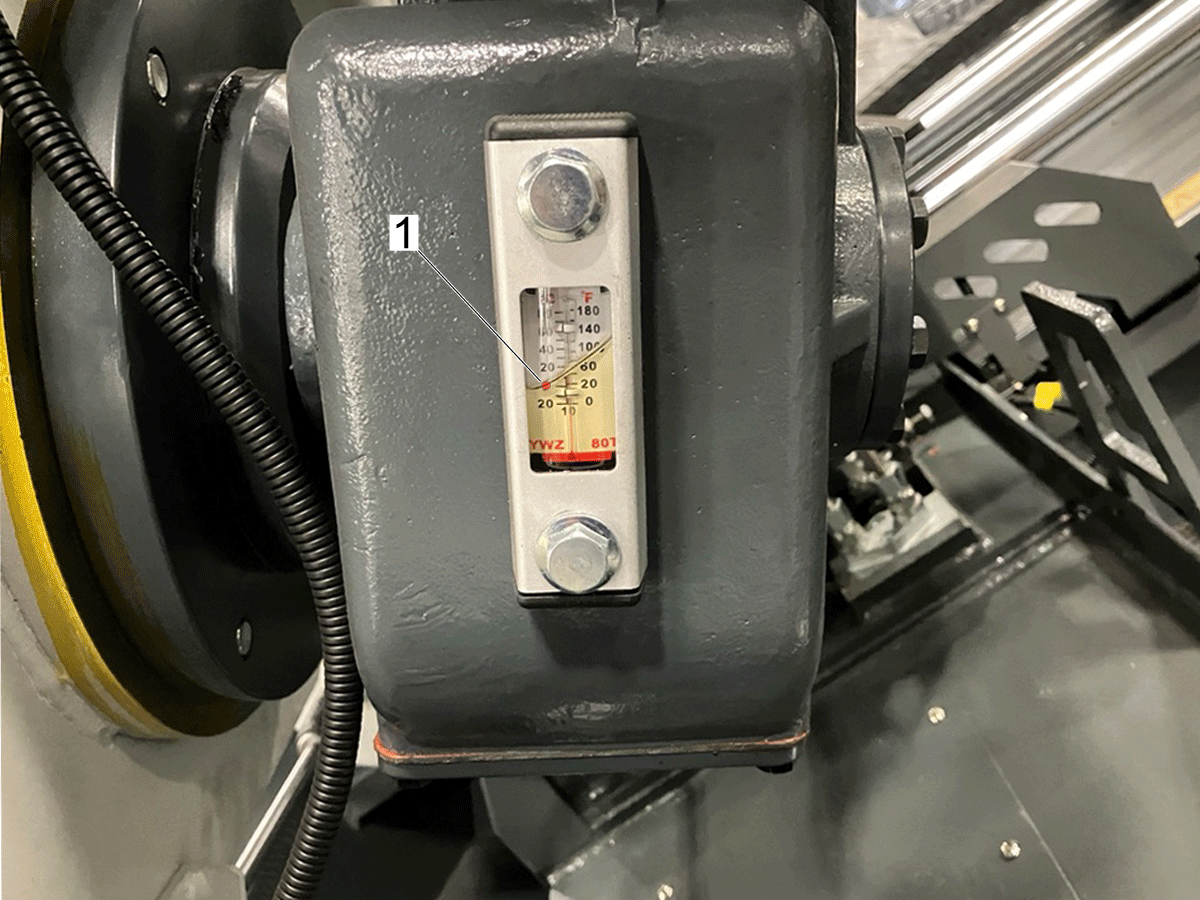
Gearbox Oil Guage Level

Check the oil level on the gearbox gauge located behind the drive wheel.

The quantity of gearbox lubricating oil must remain above the red mark.

Note: Machine requires the addition of #220 Gear Oil.

4

Grease Main Pillar 

Use the zerk fitting located at [1] to inject grease onto the main pillar. 


5

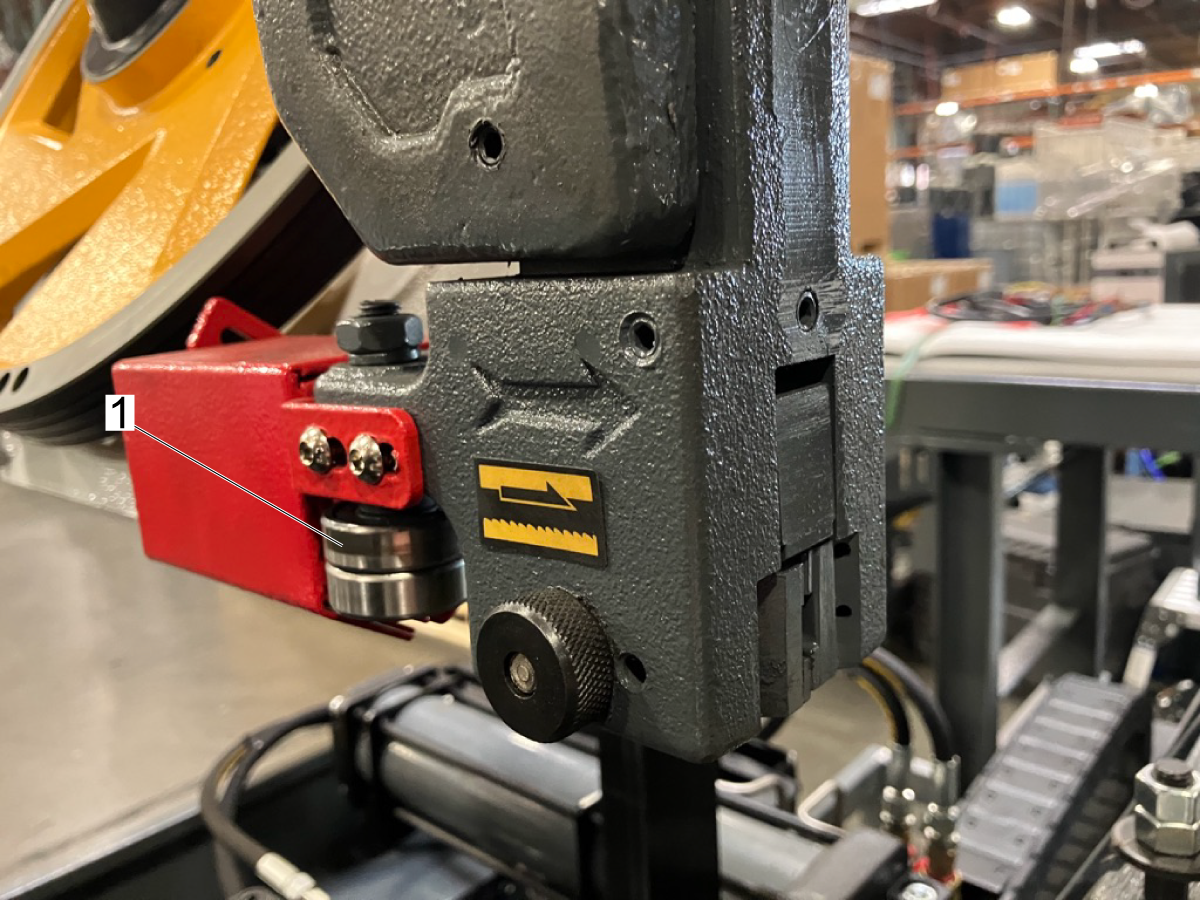
Grease Guide Arm Bearings

Apply grease to the guide arm bearings [1].


6

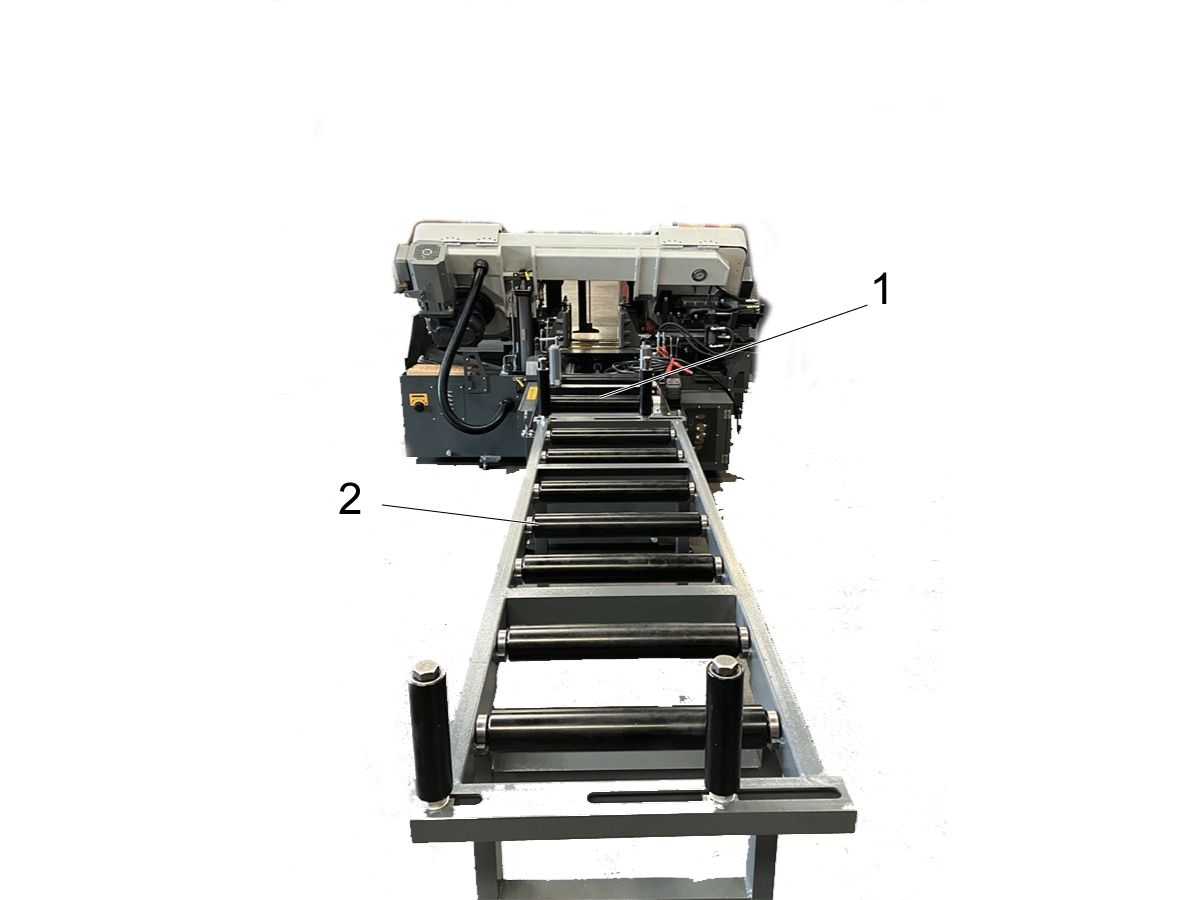
Grease Stock Rollers 

Manually apply grease to the stock rollers on the machine [1] and on the extended bed [2].


5.2 HAB - Software Update

Recently Updated

HAB 3232 - Software Update


Revision C - 3/2026

The following chapter provides a step-by-step guide for correctly updating the control software and the control panel software on the HAB3232.

Note: This procedure does not apply to CE bandsaws.

Warning: Do not install HAB v.1 software on a v.2 saw. 


Warning: When updating the bandsaw software, PLC software should also be updated.  See 5.3 HAB PLC SOFTWARE UPDATE for procedure. Incompatible control software and PLC software will cause errors. 

HAB - Control Software Download

1

Contact the Haas Service Department for the latest compatible software to your machine. Include your machine serial number and any issues you may have been experiencing. 

Warning: Software should only be updated at the instruction of the Haas Service Department. Uploading the incorrect software can cause errors and unecessary downtime. 

HAB - HMI Software Installation

NOTE: Follow this procedure to install your HMI software patch. The machine must have its parameters initialized and AI module recalibrated after installing the software. 

1

Extract the folder named HAB - Control Panel Software. Inside, you'll find another folder called tpcbackup.

Drag and drop the folder titled tpcbackup onto the USB 2.0 Flash Drive. 

Connect the USB 2.0 flash drive containing the folder named tpcbackup to the USB port located on the back of the control panel.


2

Warning: Do not install HAB v.1 software on a v.2 saw. 

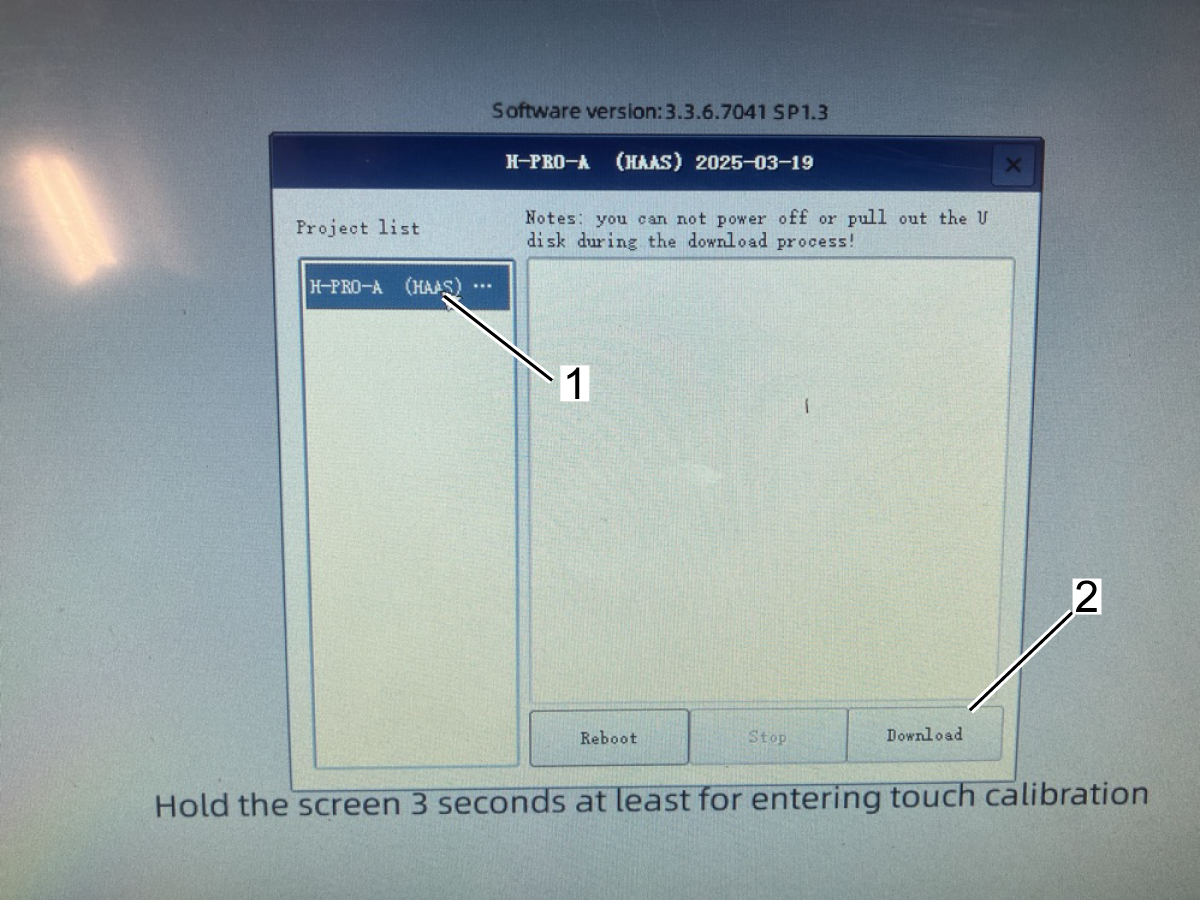
Follow the on-screen instructions to proceed with the download.

Before downloading the new software, make sure the correct files are selected [1].

Select Download [2].

When the download has completed the machine will automatically reboot. 

Note: When the machine reboots, it may start up in a different language. Refer to the HAB Troubleshooting Guide for instructions on how to change the language correctly.

HAB - Controller Software Installation

1

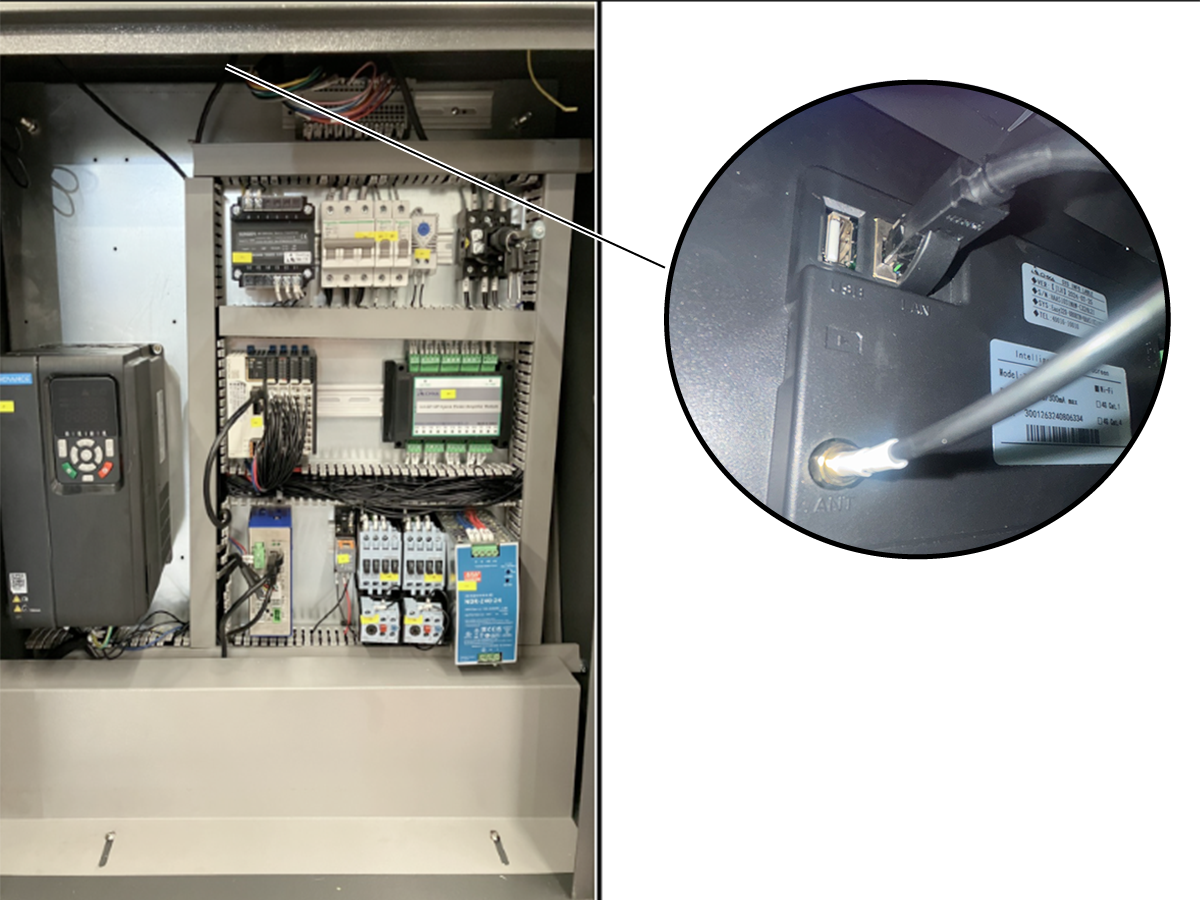
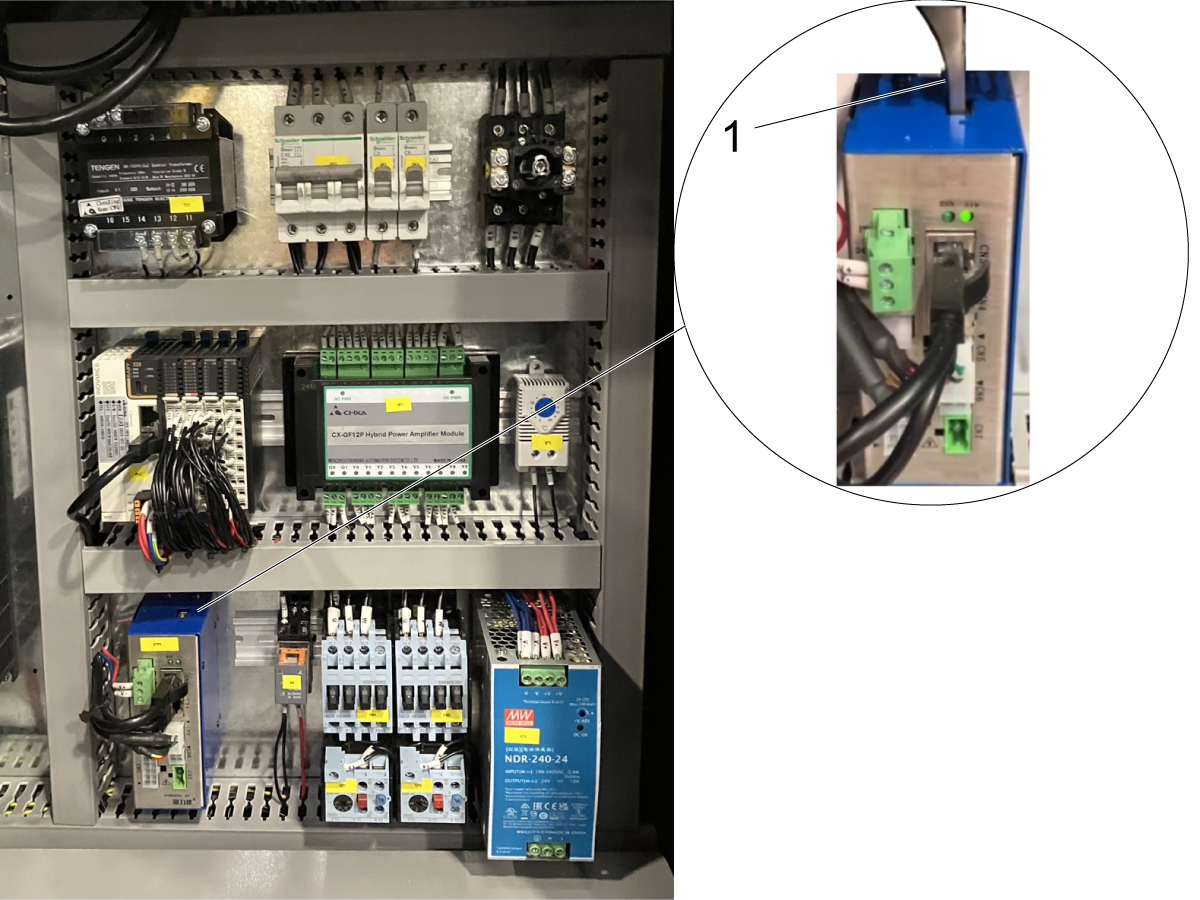
Locate the interface drive found near the bottom of the control cabinet. 

The port for the USB 2.0 flash drive can be found at the top of the drive [1].


2

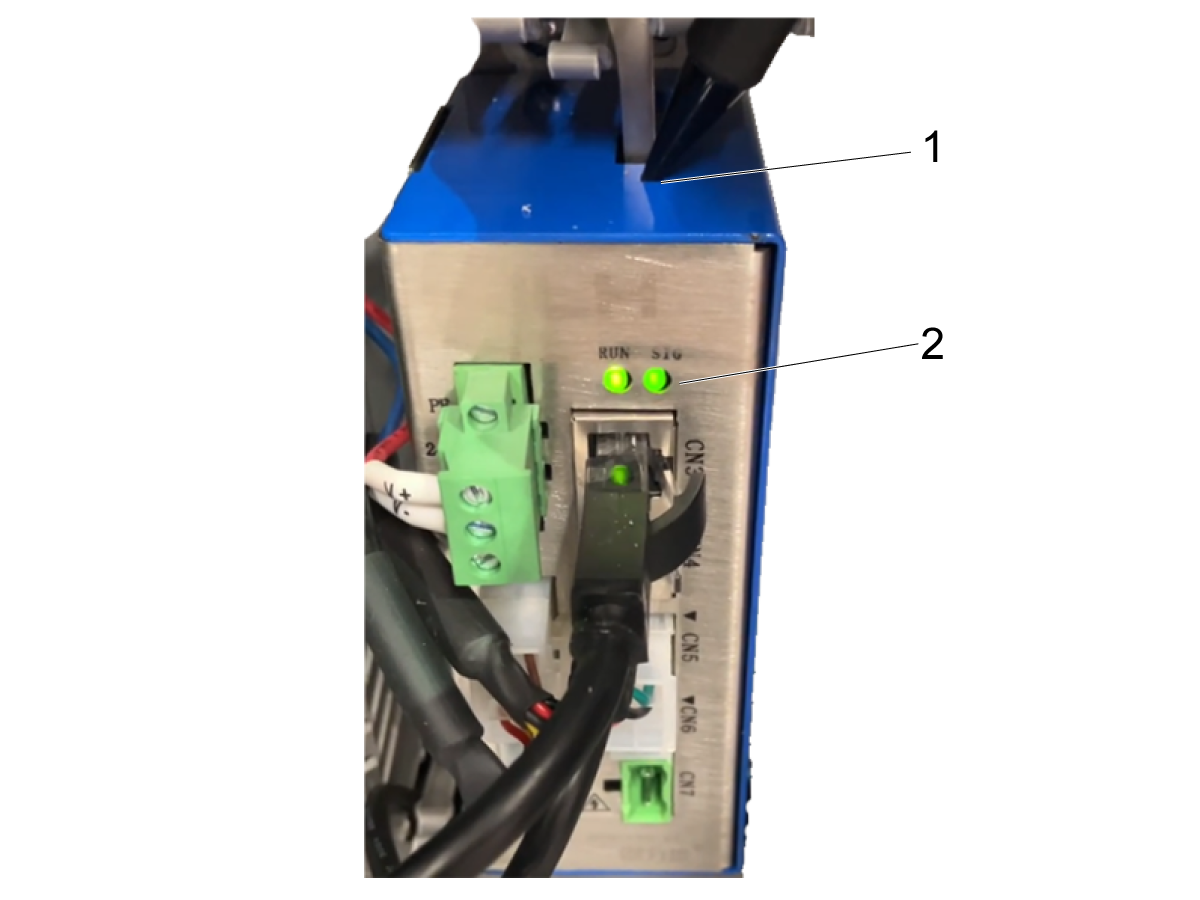
With the USB plugged into the drive, press and hold the Upgrade Button found on the top [1]. 

Hold the button until both lights glow green, then release. 

Note: When the upgrade is completed, the two lights will resume flashing alternately. 

Note: To confirm the update was successful, go back to the Advanced Functions, navigate to Machine Information, and check the intelligent version. The intelligent version should be updated for the procedure to be considered successful.

HAB - Parameter Initialization

1

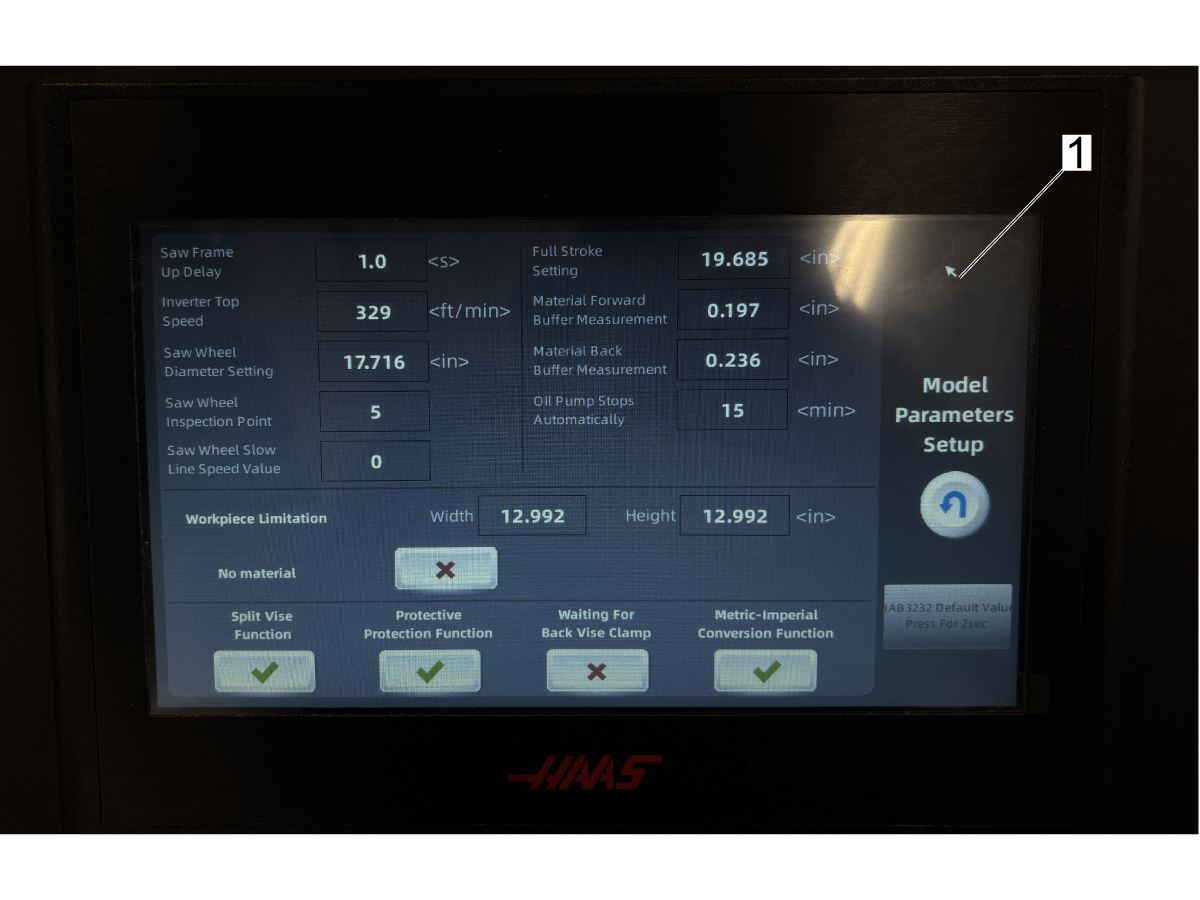
After the interface drive has been updated, the new parameters must be initialized on the control panel.

Select Advanced Functions 

Navigate to Type Parameter and enter the password 123.

Once inside the Type Parameters page press and hold the blank space [1] for 5 seconds until a hidden interface page will appear. 

2

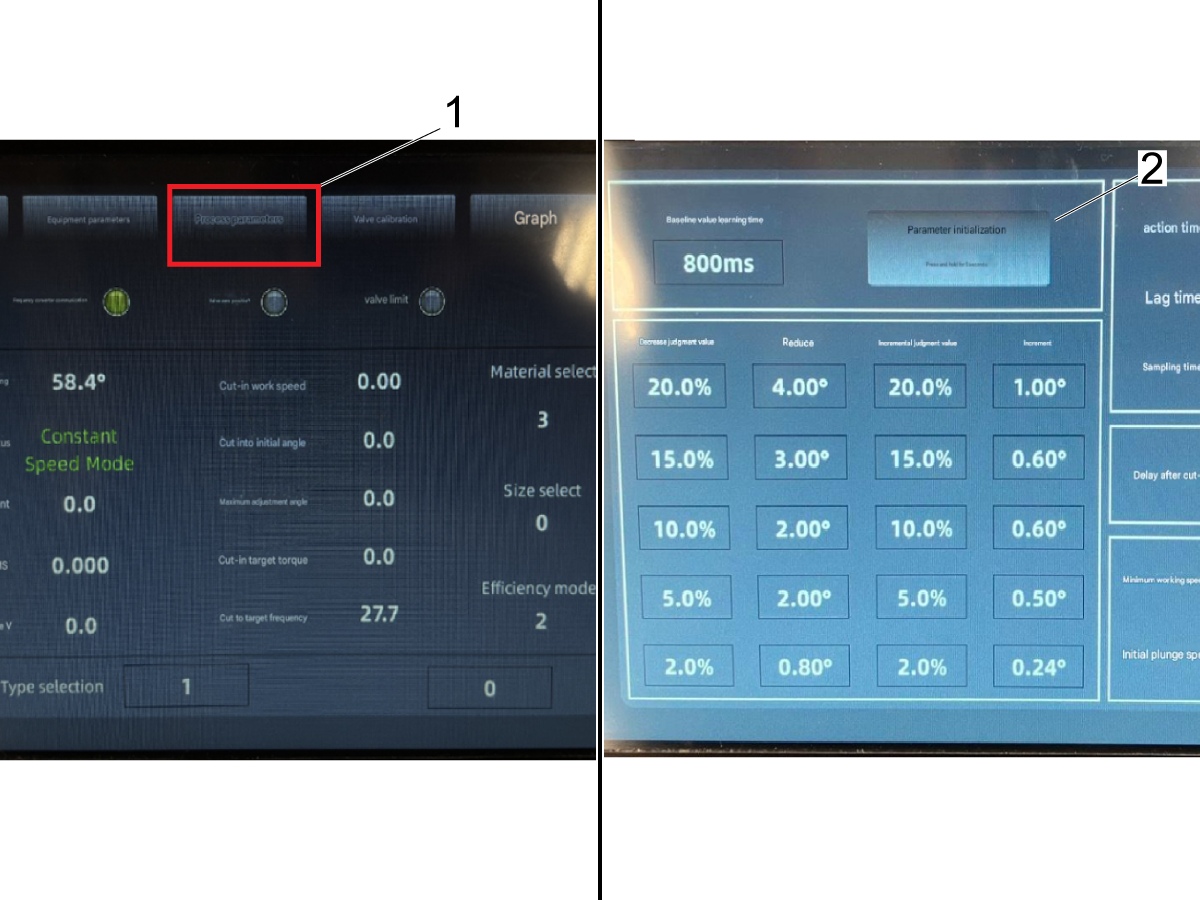
After navigating to the hidden interface page:

Select Process Parameters [1]. 

Select and hold Parameter Initialization [2].

HAB - A.I. Calibration Procedure

Updated

Important: After updating the software on the machine, the saw will need to be recalibrated. Refer to the 5.4 HAB - Feed Rate Calibration for more details. 

5.3 HAB - PLC Software Update

Recently Updated

HAB 3232 - PLC Software Update


Revision C- 05/2026

Under Construction

The following chapter provides a step-by-step guide for correctly updating the control software on the PLC for the HAB-3232.

Note: Contact the Haas Service department for the latest PLC software. 

Warning: PLC Software should only be updated along with a HAB-3232 software update or at the instruction of the Haas Service Department. Uploading the incorrect PLC software or changing PLC settings can cause errors and damage to the machine.

Connect to PLC

1

Connect computer to the PLC via a USB to USB-C cable [1]. 

Verify that the orange switch on top of the PLC is set to 'RUN'.

2

Open the AutoShop app on computer. 

3

Click 'Test' button in toolbar [1].

4

Set the 'Communication Type' to USB and press 'Test' [1]. A pop-up confirms that the USB is connected correctly. 

5

The 'RUN' indicator [1] on the front face of the PLC will flash slowly, indicating that it is connected correctly. 

Load New Software

1

Contact the Haas Service Department for the latest PLC software. 

2

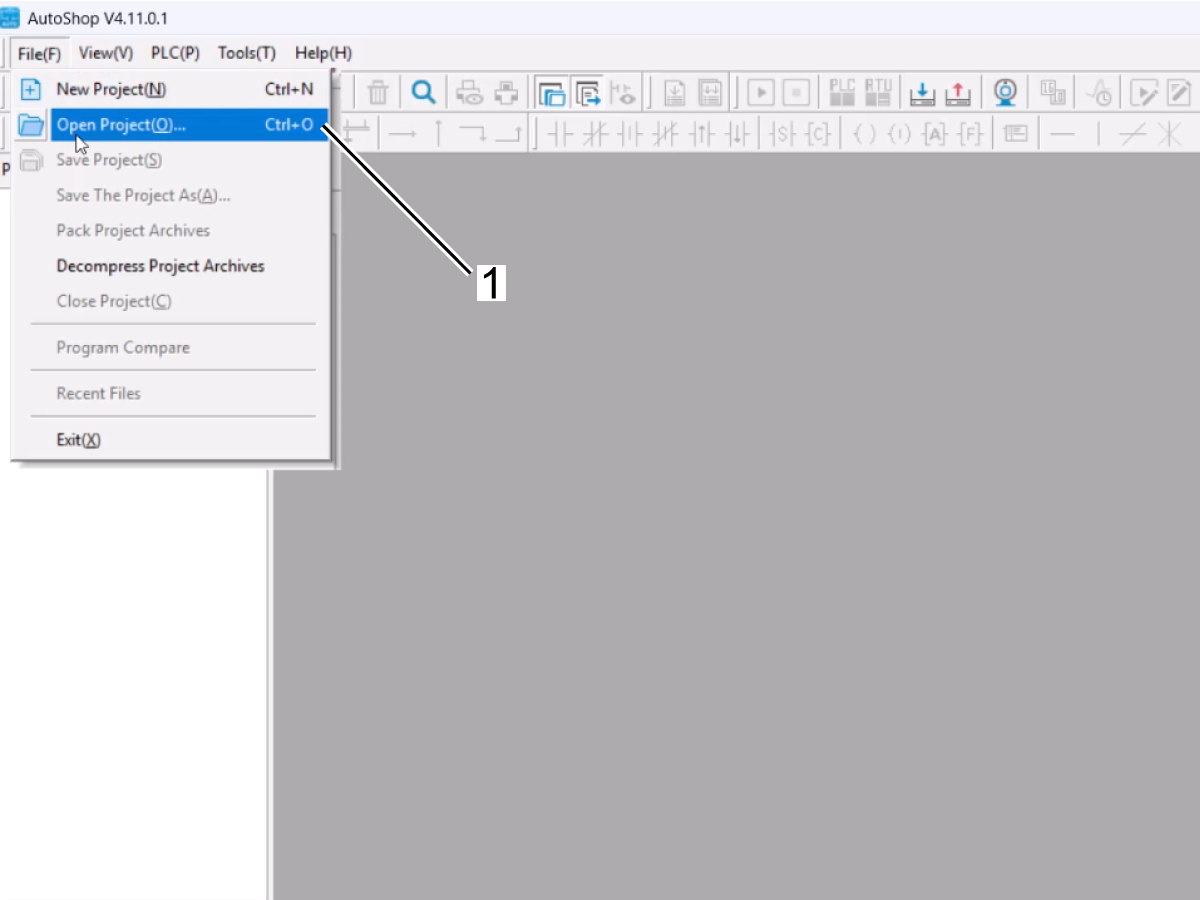
In the AutoShop app, navigate to File>Open Project [1]. Open the Auto-Shop File downloaded from HBC. 

3

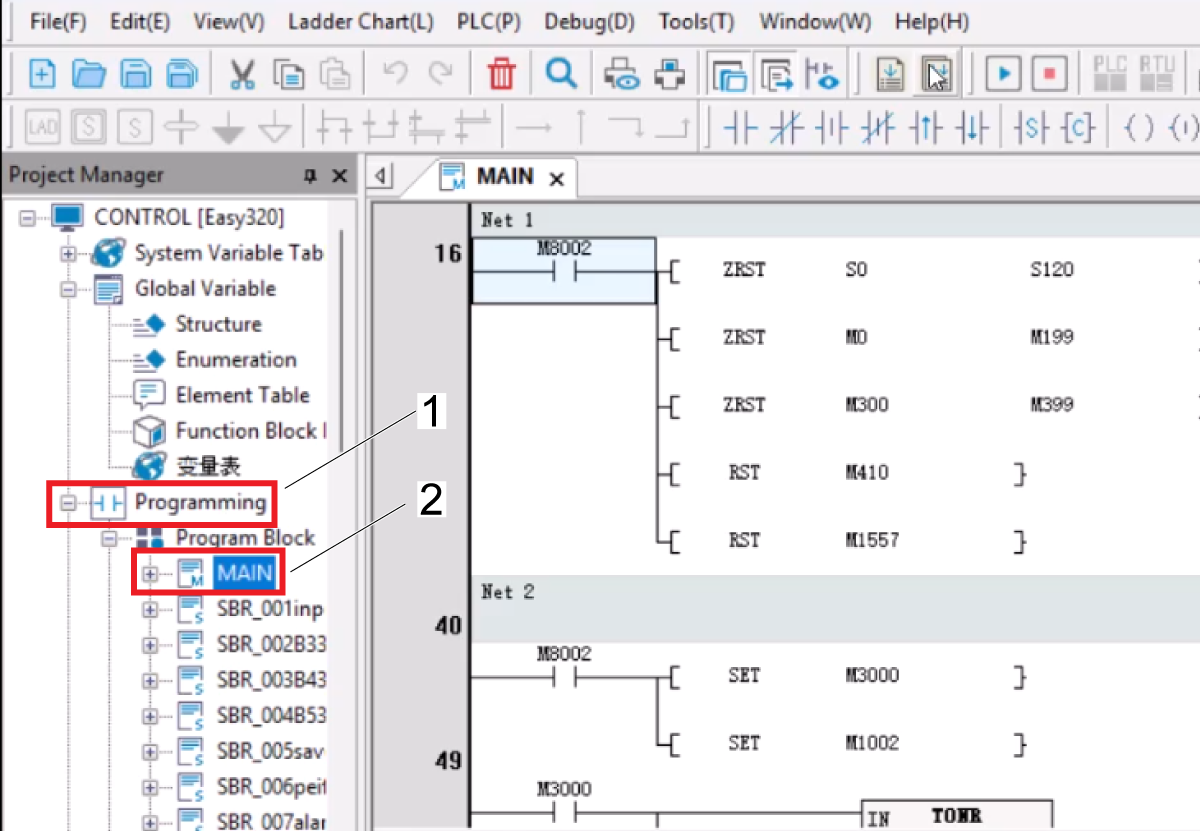
In the 'Project Manager'  tree, expand the 'Programming' menu [1] and double click on 'MAIN' [2]. 

4

In the toolbar, click the 'Compile All' symbol [1] to begin compiling the program. 

When compiling is complete, a 'Complete Compilation' notification [2] will be displayed in the Information Output Window. 

Update PLC Software

1

At the end of compilation, press the 'Download' [1] button to begin downloading the PLC software.


2

Press 'OK' [1] in the pop-up menu. 

3

The file will load, and a 'Complete Program Compilation' notification [1] will be displayed in the Information Output Window. 

A pop-up will appear after upload is complete, asking to stop and continue the operation of the PLC. Press 'OK' [2].

4

The new software will begin downloading. At the end of the download, a 'Download Successful!' notification will be displayed in the Information Output Window. 


A pop-up will appear on screen, asking to run the PLC and continue. Press 'OK' [1]. 

5

In the toolbar, click the 'Run' symbol [1]. A notification will be displayed in the Information Output Window that 'The PLC is in Operation'. 

The PLC software is successfully updated. The computer can be disconnected from the PLC. Test the operation of the bandsaw to ensure that any issues have been remedied. 

5.3 HAB - Feed Rate Calibration

Recently Updated

HAAS Automatic Band Saw - Feed Rate Calibration


Revision B - 01/2026

Introduction

The HAB-3232 had a variable down feed that must be calibrated to be accurate. This procedure will affect the accuracy of manual feed rate adjustments and AI mode cuts.

The system works by using a motor to control the opening of a variable orifice.  The degrees that the motor rotates varies the opening of an orifice, which limits the flow of hydraulic fluid, which controls the rate that the saw frame feeds downwards.

This procedure will tune the feed rate with respect to the degrees of turn at the motor.

Feed Rate Calibration

1

Power on the band saw and switch into manual mode. 

Select Advance Functions button found at the bottom of the display page. 

2

Navigate to Type Parameter [1] and enter the password 123.

Once inside the parameters page press and hold the blank space [2] for 5 seconds until the hidden interface will appear. 

3

Before proceeding, it is important to verify which transmission module is found in the band saw.

Located in cabinet on the left side of the machine.

Important: 

[1] 1st generation 

[2] 2nd generation.  


4

Set the angle of the motor shaft [1] indicated in the photo to 55 degrees using the hand wheel.

Note: You will have to be in manual mode and have wheel speed adjust selected to do this.


Navigate to the valve calibration tab found [2].


5

Select which generation transmission module [3] the bandsaw uses. Reference step 3

Note the initial value [1] at the top of the page.

Select and hold the Valve Calibration button [2] for 3 seconds .

Note: The machine will establish the set feed rate [1] as the correct rate for 55 degrees [4] of motor rotation. When the valve calibration button is pressed it will repopulate the table using these values as its point of reference.

6

After calibration, return to the hidden parameters page and readjust the valve to 55 degrees if necessary. See step 4.

Note the feed rate on the HMI. This is the rate that we will be cross referencing the measured rate with.

Then proceed to the next step.


7

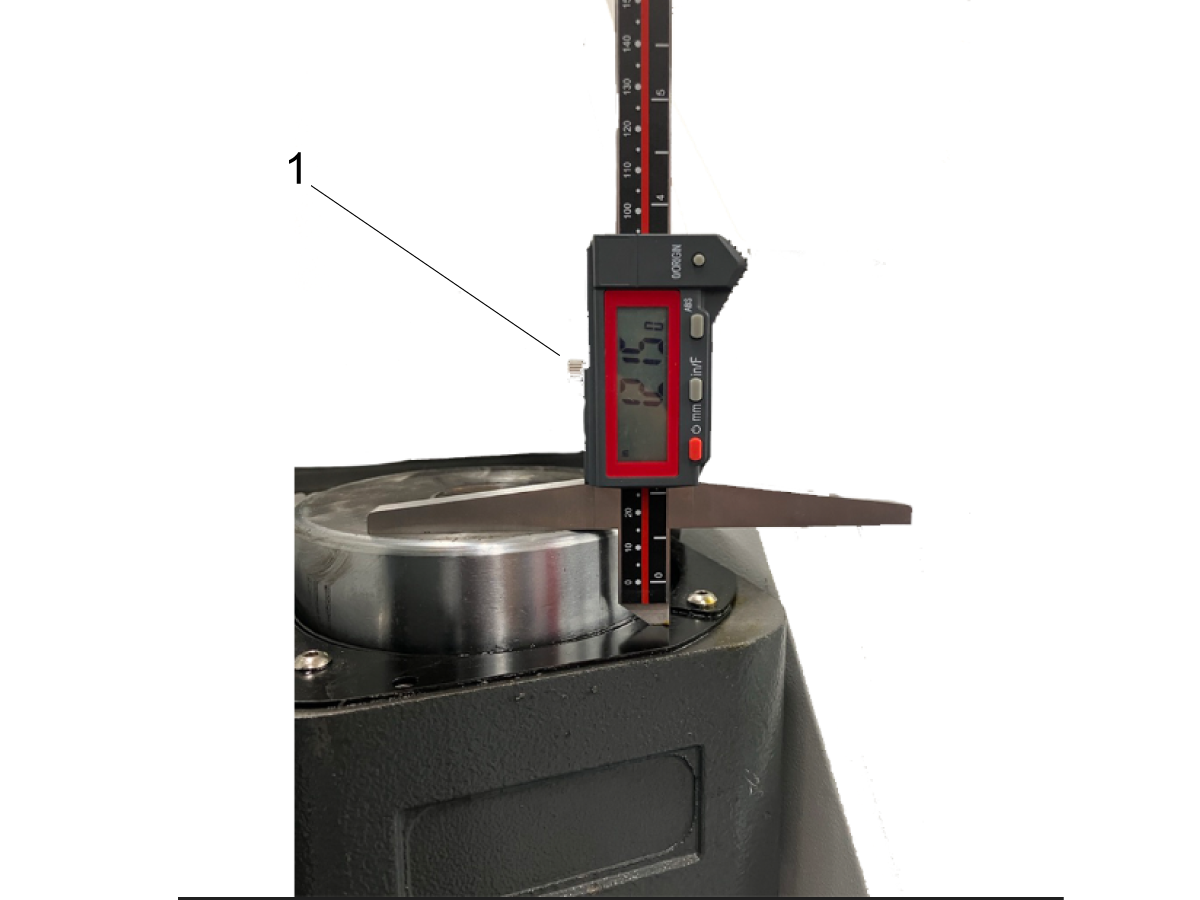
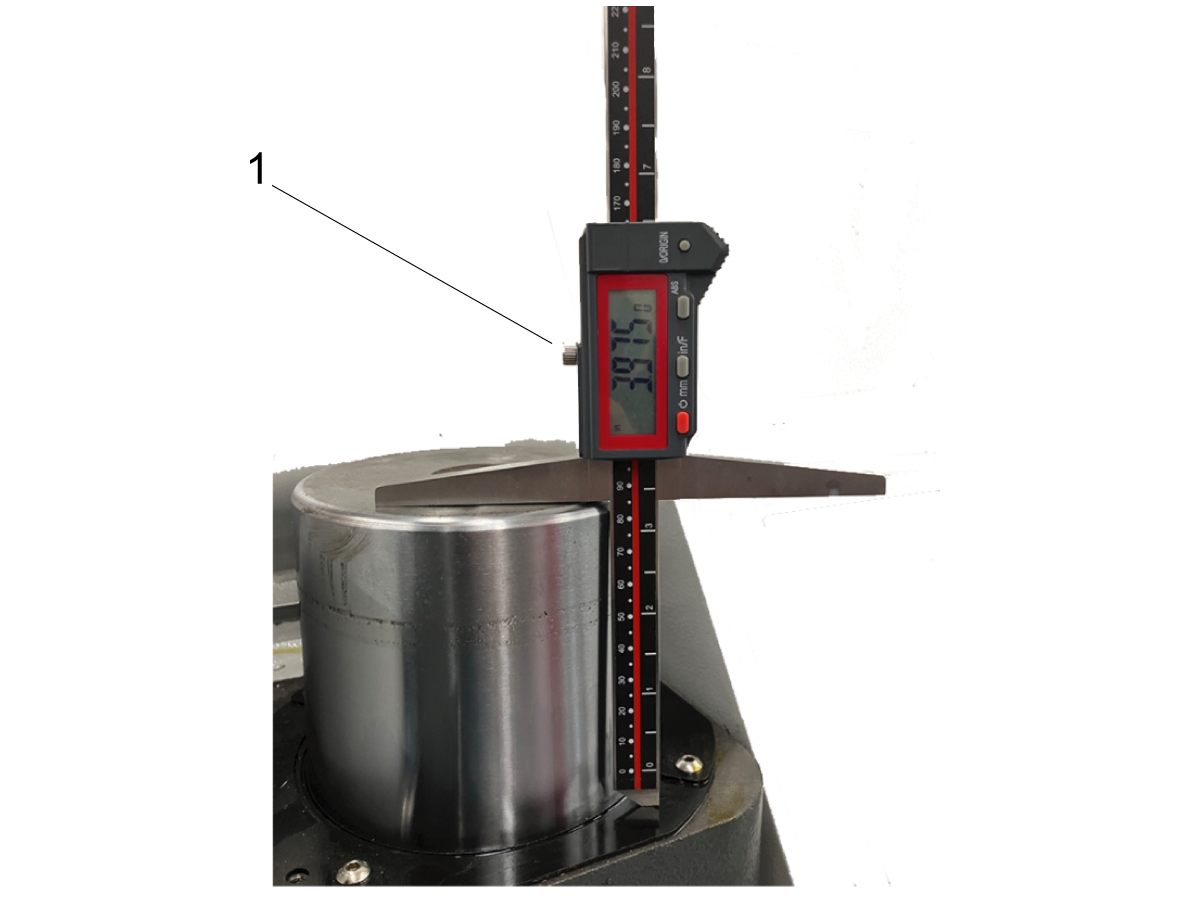
Raise the saw frame to its highest point,.

Using a depth gage, measure the distance between the top of the cylinder to the oil seal ring [1].

Record this height. It will be the same each time the saw is at its maximum position.


8

Lift the quick drop lever up [2] and secure it with the set screw, ensuring that the sensor does not detect it. 

This disables the saws rapid motion and engages the feed rate set on the HMI. (red light off [3])

Note: When sensor is triggered, the sensor's light will glow red [1].

9

Cycle start the machine and set a timer for 1 minute.

When the timer has reached 1 minute, stop cutting by pressing the e-stop or the cycle stop button.

Measure the distance the saw frame dropped from its initial position [1]. This is the value we will use to calibrate the saw.

Compare this distance to the feed rate on the HMI. If it is within +/- 0.10 in/min it is within tolerance.

10

In this step we are correlating a measured value of feed rate to 55 degrees of the hydraulic orifices opening which we previously set.

The new value for calibration [1] is the measured rate from the test in the last step in units of mm/min.

        Inches to mm conversion: 1.0 in = 25.4 mm

               X.xxx  in/min * (25.4) = X.xxx mm/min

Once that new value [1] has been entered. Select and hold the Valve Calibration button [2] for 3 seconds.

Important: When the machine repopulates the table using the new input value from the test, go back and verify that the hand dial is set to 55 degrees like in step 4 BEFORE the feed rate is tested again.

11

Important: Before proceeding to test the new value, reverify that the valve is at 55 degrees [1]. See step 4.

Repeat steps 7-9 with the new calibration. Verify if the measured value is within +/- 0.10 in/min. of the value displayed on the HMI.

If the values are within tolerance then the procedure is completed.

5.4 HAB Service Parts List
Recently Updated

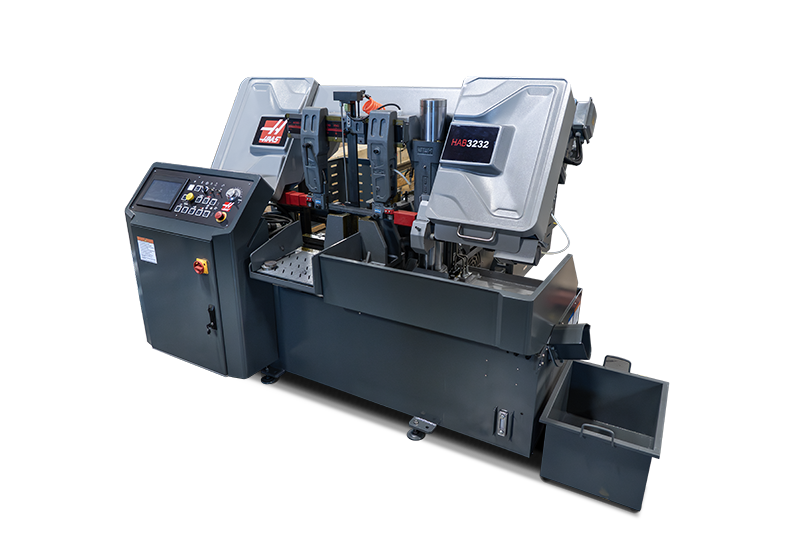
HAAS Automatic Band Saw - Service Parts List

Revision G - 07/2026

Service Parts List
Machine Part Number DESCRIPTION


HAB-3232 V1/V2/CE

93-4857 POWER ON/OFF SWITCH HAB-3232 HVS-1
93-5045 VFD PROGRAMMED REPLACEMENT KIT HAB-3232
93-5085 ROUND HYD PRESS GAUGE HAB-3232
93-5212 CONVEYOR TABLE HAB-3232
93-5208 STOP TOOL ROLL OFF PLATE ROD HAB-3232
93-5207 GLASS COOLANT LEVEL INDICATOR HAB-3232
93-5272 HYD PUMP FAN HAB-3232
93-5178 OIL TANK CAP HAB-3232
93-5173 WHEEL BRUSH MOTOR HAB-3232
93-5306 HYDRAULIC POWER UNIT HAB-3232
93-5297 POWER AMPLIFICATION MODULE HAB3232
93-5298 POWER SUPPLY HAB-3232 V1/V2
93-5311 MAIN HYDRAULIC PRESSURE SEAL B HAB-3232
93-5314 MAIN HYDRAULIC PRESSURE SEAL A HAB-3232
93-5310 HYDRAULIC CYLINDER SEAL MAIN HAB-3232
93-5302 HYDRAULIC BLADE TENSION ACTUATOR HAB3232
93-5299 TRANSFORMER HAB-3232
93-5554 YELLOW SAW HEAD HEIGHT BUTTON HAB-3232
93-5555 PLC HAB-3232
93-5556 VARIABLE FREQUENCY DRIVE CE HAB3232
93-5557 MAGNETIC SCALE X-AXIS HAB-3232
93-5588 BROKEN BLADE DETECT PROX SWITCH HAB-3232
93-5589 VISE CRASH DETECT PROX SWITCH HAB-3232
93-5602 SHCS M12X20 HAB-3232
93-5603 M12 SPLIT WASHER HAB-3232
93-5644 PROX SWITCH HAB-3232
93-5657 TOUCH SCREEN HAB-3232
93-5658 CONTROL DIAL HAB-3232
93-5672 COMPUTER CONTROLLER HAB-3232
93-5961 VISE PRESSURE VALVE FRONT HAB-3232
93-5904 COOLANT PUMP HAB-3232
93-5665 AC CONTACTOR HAB-3232
93-5654 BLADE COVER LEFT RED HAB-3232
93-5655 BLADE FEED BALL BEARING SEALED HAB-3232
93-5615 PROX SENSOR HAB3232
93-5271 RIGHT BLADE GUIDE HEAD HAB3232
93-5270 LEFT BLADE GUIDE HEAD HAB3232
93-5213 BLADE TENSION SEAL RING HAB-3232
93-5691 CHECK VALVE HAB-3232
93-5692 THERMAL RELAY, OIL PUMP HAB-3232
93-5693 THERMAL RELAY, WATER PUMP HAB-3232
93-5723 SAW BLADE MOTOR FAN HAB-3232
93-5724 COMMUNICATION CABLE HAB-3232
93-5725 OIL PUMP HAB-3232
93-5726 OIL PUMP MOTOR HAB-3232
93-5773 HMI SCREEN SHIELD HAB-3232
93-5764 FITTING M18 X 1.5 HPU HAB-3232
93-5765 FITTING M22 X 1.5 HPU HAB-3232
93-5816 FITG JIC1/4M X M14 MALE HAB-3232
93-5817 DOOR LATCH HAB-3232
93-5819 LEVELING FEET HAB-3232
93-5821 REAR VISE MICROSWITCH HAB-3232
93-5824 VISE JAWS HAB-3232
93-5825 VISE JAWS FRONT RIGHT HAB-3232
93-5827 BREAKER CABLE HAB-3232
09-0680 BS BLADE M42 34x1.1x4115mm 3/4 PITCH
09-0681 BS BLADE M42 34x1.1x4115mm 4/6 PITCH
09-0682 BS BLADE M42 34x1.1x4115mm 5/8 PITCH
09-0683 BS BLADE M42 34x1.1x4115mm 6/10 PITCH
09-0852 BANDSAW, STEEL WIRE BRUSH
09-0853 BANDSAW, OIL TANK FILTER SCREEN
93-6128 BLADE COVER RIGHT RED HAB3232
93-6074 GUIDE ARM THUMBSCREW HAB3232
93-6129 SPACER CONVEYOR TABLE HAB3232
93-6075 THUMBSCREW SHAFT HAB3232
93-6052 REAR CARBIDE LFT GUIDE ARM HAB-3232
93-6054 FRONT CARBIDE LFT GUIDE ARM HAB-3232
93-6149 CONVEYOR TABLE SPACER KIT HAB-3232
HAB-3232 V1 ONLY 93-5086 GUARD RIGHT SIDE HAB-3232 V1
93-5087 GUARD LEFT SIDE HAB-3232 V1
93-5591 E-STOP BUTTON HAB-3232 V1
93-5592 MODE SELECT SWITCH HAB-3232 V1
93-5595 TOGGLE SWITCH HAB-3232 V1
93-5596 CONVEYOR TABLE SPEED BUTTON HAB-3232 V1
93-5659 SQUARE BUTTONS HAB-3232 V1
93-5670 POWER ON IDICATOR SQUARE HAB-3232 V1
93-5712 SAW BLADE MOTOR HAB-3232 V1
93-5834 WARNING DECAL SET HAB-3232 V1
HAB-3232 V2 ONLY 93-5668 GUARD LEFT SIDE HAB-3232 V2
93-5669 GUARD RIGHT SIDE HAB-3232 V2
93-5772 PRESSURE GAUGES HAB-3232 V2
93-5774 CHIP AUGER CONNECTOR HAB-3232 V2
93-5778 CONTROL PANEL FACE HAB-3232 V2
93-5911 MAGNETIC SCALE HAB-3232 V2
93-5932 MAGNETIC READ HEAD HAB-3232 V2
93-6019 FRONT VISE PROX SWITCH HAB-3232 V2
93-6066 LEGS EXTENDED BED HAB3232 V2
HAB-3232 CE ONLY 93-5597 HEAD HEIGHT BUTTON CE HAB3232
93-5598 RESET BUTTON HAB-3232 CE
93-5599 KEY AND LOCK SWITCH HAB-3232 CE
93-5558 POWER SUPPLY HAB-3232 CE
93-5559 TRANSFORMER CE HAB-3232
HAB-3232 V1 OR HAB-3232 CE 93-5593 E-STOP BUTTON HAB-3232 CE/V2
HAB-3232 V2 OR HAB-3232 CE 93-5594 MODE SELECT SWITCH HAB-3232 CE/V2 HVS-1
93-5600 BLACK PUSH BUTTON HAB-3232 V2/CE HVS-1
93-5601 GREEN PUSH BUTTON HAB-3232 V2/CE
93-5666 SQUARE RELAY HAB-3232 V2/CE
93-5671 POWER ON INDICATOR HAB-3232 V2/CE HVS-1

5.5 HAB Hydraulic Motor Replacement

Recently Updated

HAAS Automatic Band Saw - Hydraulic Motor Replacement


Revision B - 10/2025

The following chapter offers a guide to replacing the Hydraulic Motor found inside the HAB-3232. 

Hydraulic Motor Removal

1

Note: Before removing the hydraulic motor and pump assembly from the internal cabinet of the bandsaw, the bandsaw must have its oil drained. 

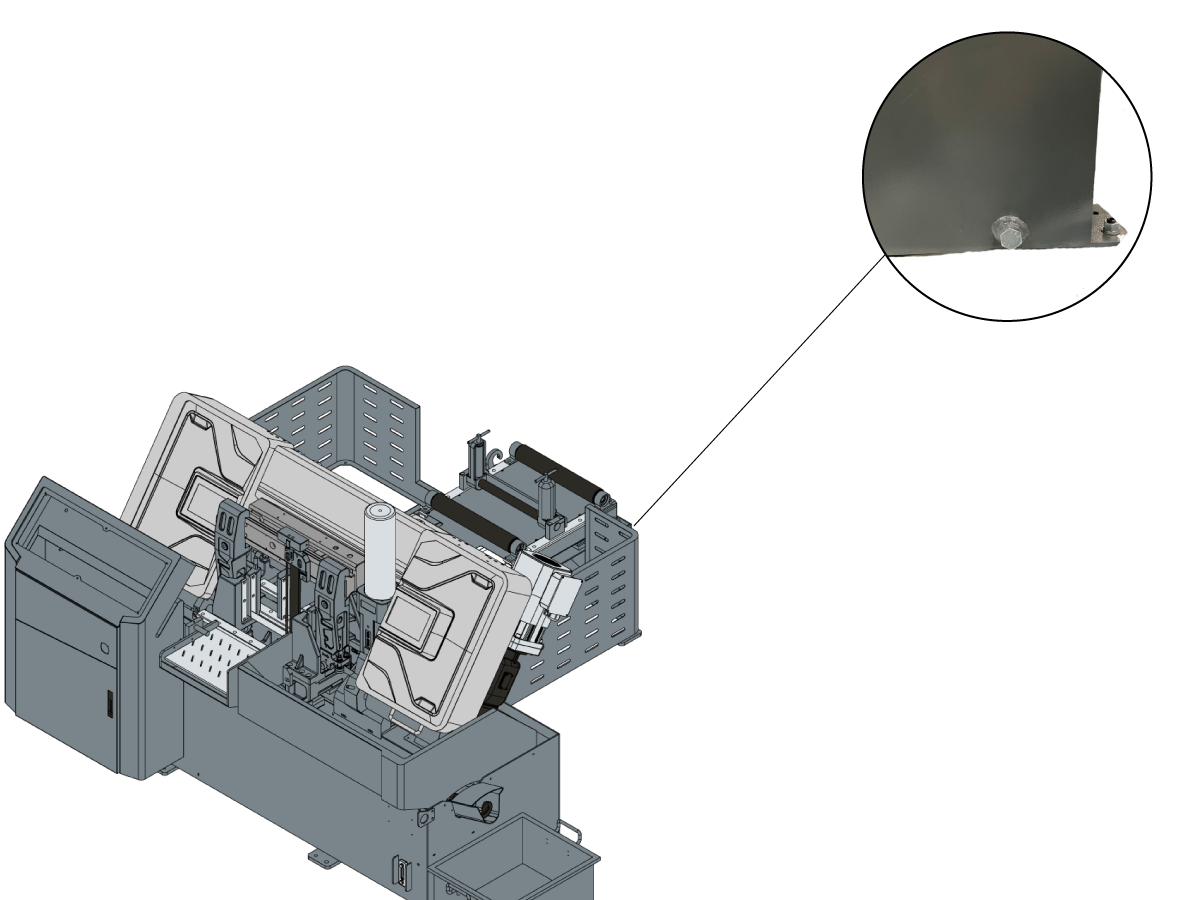
Locate the drain plug found in the rear machine as shown in the image. 

Use a large container to temporarily hold the oil during the installation.

2

Remove each of the three fluid lines [1] that are attached to the hydraulic pump. 

Note: Cover the open fluid lines to block each line from contamination. 

Using a 7mm wrench, unbolt the hydraulic motor from the mount [2].

3

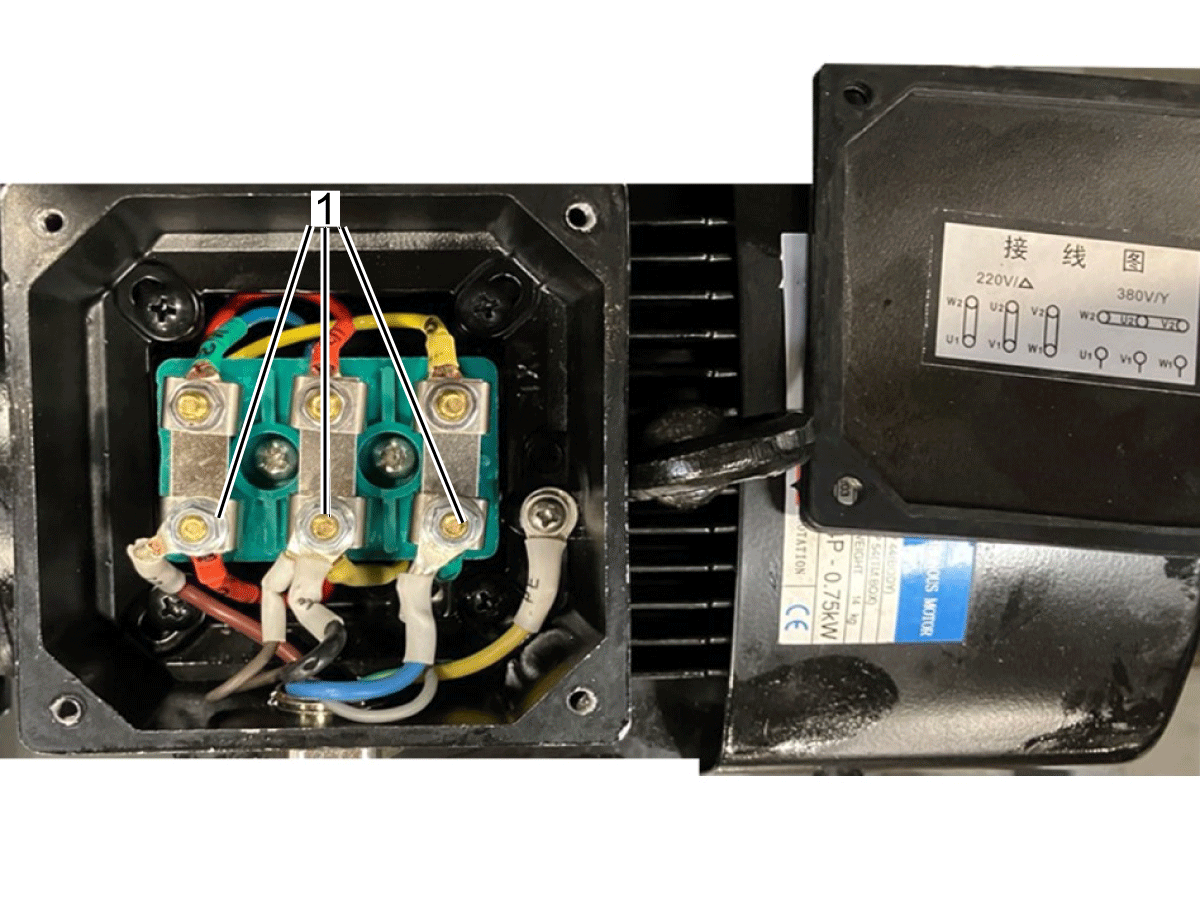
Disconnect the incoming power cables from inside the motor junction box [1]. 

Note: Be sure to note the correct location of each wire, as this information will be necessary for the installation.

Hydraulic Motor Installation

1

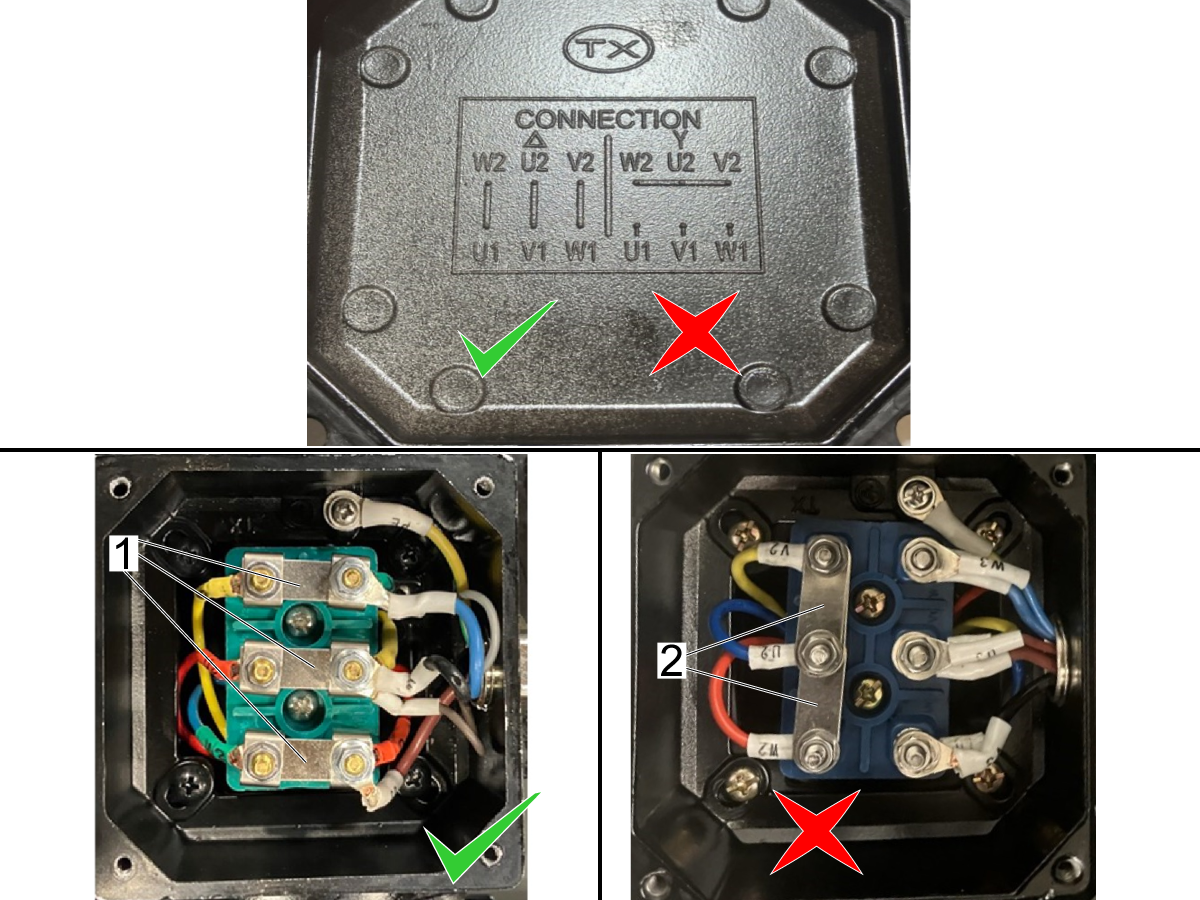
Before connecting the motor to the power cable, remove the J-box cover and verify that the motor windings are configured correctly.

On the J-Box cover, there is a diagram showing the Wye and Delta configurations for the motor.

Verify that the motor is setup in the Delta Configuration, with the terminals bridged straight across [1].

Note: If the motor is in a Wye configuration [2], reconfigure it so that the windings are bridged straight across as shown by [1] in the image.

2

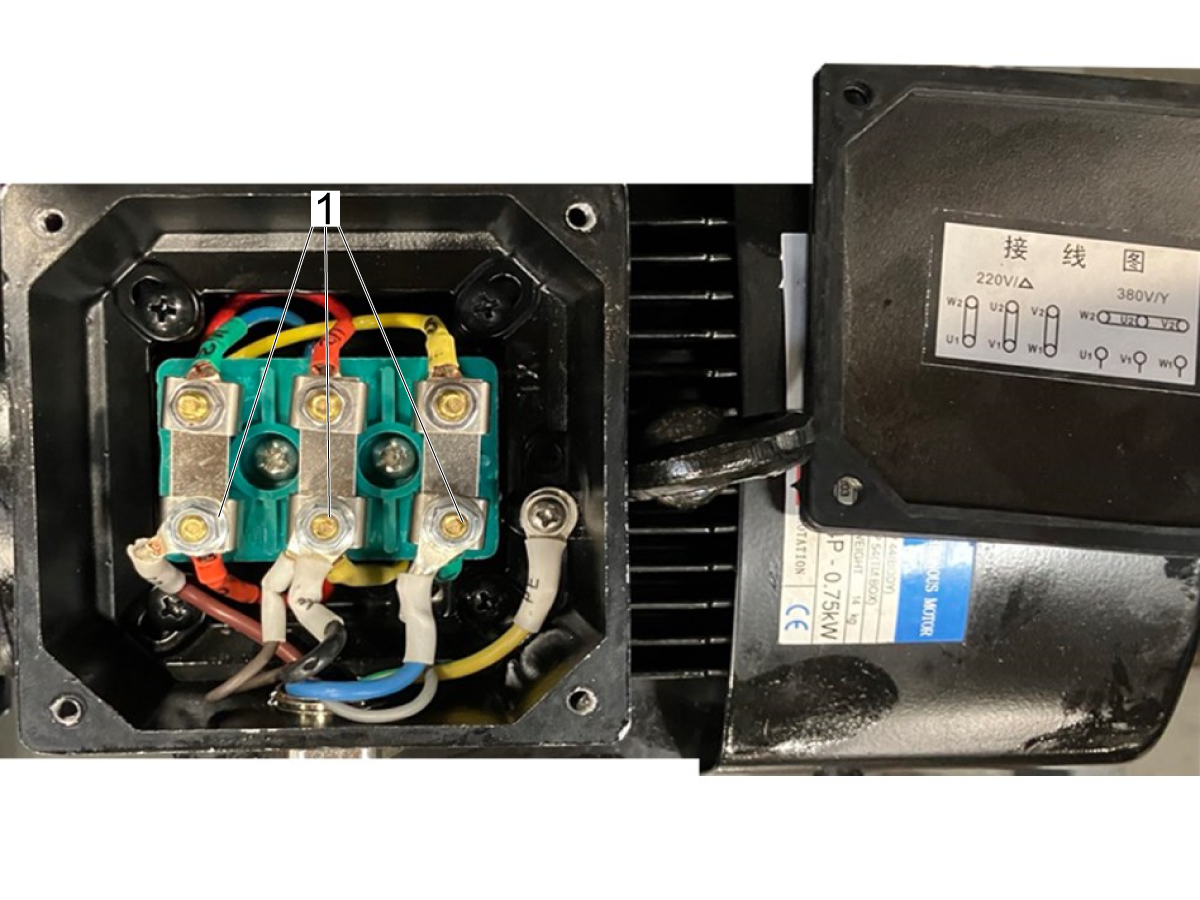
Reconnect the incoming power cables from inside the motor junction box [1]. 

Note: Use the chart below to match the incoming cables to their respective phase. 

W2 U2 V2
U3 V3 W3
U1 V1 W1

3

Reinstall the three fluid lines [1] that should be attached to the hydraulic pump. 

Reinstall the removed hardware [2] to mount the motor on the motor bracket. 

Refill the band saw with the oil that was removed. 

4

After oil is added back into the saw, power on the saw so that you can turn on the pump with the push button [1].

Start by turning the pump [ON] for 3 seconds then turning it [OFF]. Repeat this cycle a few times to ensure the pump is able to circulate fluid through the system.

Note: You should start to see pressure build on the main pressure gauge [2]. 

Check to see if the pressure shown on the main gauge is within the correct operating range. The operating range is 3.8 - 4.1MPA as shown on the decal [3]. The next step shows how to adjust the pressure of the pump.

5

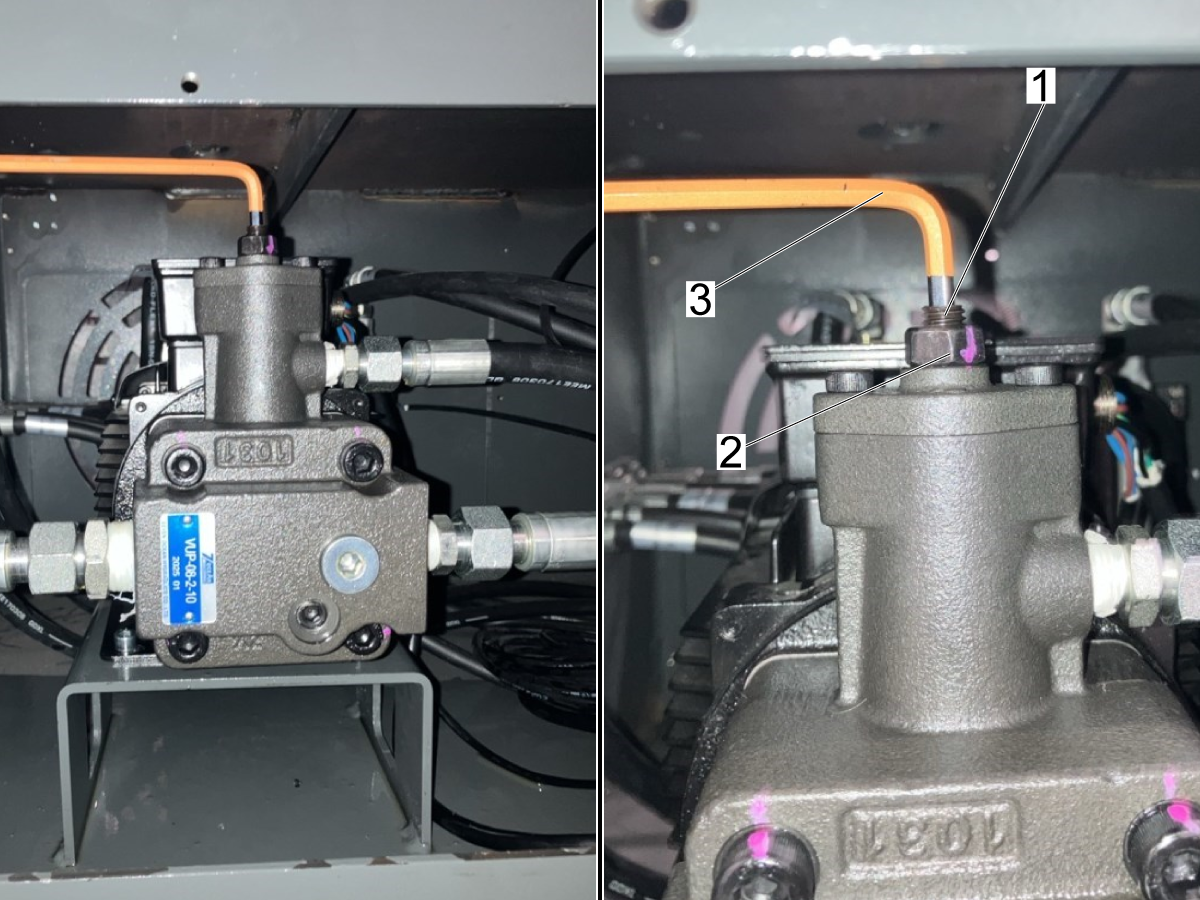
To adjust the pressure, tighten/loosen the pressure relief set screw [1] until the operating pressure is between 3.8 - 4.1 MPA.

Break loose the locknut [2] so that the set screw can be adjusted.

To increase the operating pressure, tighten the set screw [1] with an 5mm Allen key [3]. To decrease the operating pressure, loosen the set screw.

 Note: Make small adjustments and give a few seconds in between each adjustment so that the system has time to build to the new operating pressure.

Once you have the operating pressure in the correct range, turn off the pump and allow it to sit for 30-60 seconds. Then power the pump back up to verify that the pressure builds to the same MPA it was set at.

Tighten the locknut [2] to hold the set screw in position.

6

Once the pressure is set, switch to manual mode and incrementally exercise all the hydraulic cylinders. This includes the:

  1. Front Vise 
  2. Back Vise
  3. Shuttle Material
  4. Saw Frame Raise

Note: While exercising these cylinders, the pump may make irregular noises. When it does this, allow the pump to sit for a few seconds, then continue exercising the cylinder.  

5.6 HAB V1 Service Parts List
Recently Updated

HAB Version 1 - Service Parts List

Under Construction

Revision A - 2/2026

Electrical Cabinet Service Parts
Number Part Number Description
1 93-5555 PLC HAB-3232
2 93-5299 TRANSFORMER HAB-3232
3 93-4857 POWER ON/OFF SWITCH HAB-3232
4 93-5297 POWER AMPLIFICATION MODULE HAB 3232
5 93-5298 POWER SUPPLY HAB-3232 V1/V2
6 93-5692 THERMAL RELAY, OIL PUMP HAB-3232
7 93-5672 COMPUTER CONTROLLER HAB-3232
8 93-5045 VFD PROGRAMMED REPLACEMENT KIT HAB-3232

Recently Viewed Items

You Have No Recently Viewed Items Yet

Feedback
Haas Logo

Haas Delivered Price

This price includes shipping cost, export and import duties, insurance, and any other expenses incurred during shipping to a location in France agreed with you as a buyer. No other mandatory costs can be added to the delivery of a Haas CNC Product.

KEEP UP WITH THE LATEST HAAS TIPS AND TECHNOLOGY...

Sign up now!   

HAAS TOOLING ACCEPTS THE FOLLOWING:

  • Service & Support
  • Owners
  • Request Service
  • Operator Manuals
  • Haas Parts
  • Rotary Repair Request
  • Pre-Install Guides
  • Shopping Tools
  • Build & Price a New Haas
  • Available Inventory
  • The Haas Price List
  • CNCA Financing
  • About Haas
  • Accessibility Statement
  • DNSH Statement
  • Export Compliance
  • Careers
  • Certifications & Safety
  • Contact Us
  • History
  • Terms & Conditions
  • Haas Tooling Terms & Conditions
  • Privacy
  • Warranty
  • Haas Community
  • Haas Certification Program
  • Haas Motorsports
  • Gene Haas Foundation
  • Haas Technical Education Community
  • Events
  • Join the Conversation
  • Facebook
  • X
  • Flickr
  • YouTube
  • LinkedIn
  • Instagram
  • TikTok
© 2026 Haas Automation, Inc – CNC Machine Tools

This site is protected by reCAPTCHA and the Google Privacy Policy and Terms of Service apply.

2800 Sturgis Rd., Oxnard, CA 93030
Toll Free: (888) 817-4446 / Fax: 805-278-8554