My Haas Welcome,
!
Haas Tooling MyHaas/HaasConnect Sign In Register Haas Tooling MyHaas/HaasConnect Sign Out Welcome, My Machines Latest Activity My Quotes My Account My Users Sign Out
Find Your Distributor
  1. Select Language
    1. English
    2. Deutsch
    3. Español - ES
    4. Español - MX
    5. Français
    6. Italiano
    7. Português
    8. Český
    9. Dansk
    10. Nederlands
    11. Magyar
    12. Polski
    13. Svenska
    14. Türkçe
    15. 中文
    16. Suomi
    17. Norsk
    18. الإنجليزية
    19. български
    20. Hrvatski
    21. Ελληνικά
    22. Română
    23. Slovenský
    24. Slovenščina
    25. 한국어
    26. 日本語
    27. Українська
  • machines Main Menu
    • Vertical Mills
      Vertical Mills
      Vertical Mills View All
      • Vertical Mills
      • VF Series
      • Universal Machines
      • VR Series
      • VP-5 Prismatic
      • Pallet-Changing VMCs
      • Mini Mills
      • Mold Machines
      • High-Speed Drill Centers
      • Drill/Tap/ Mill Series
      • Toolroom Mills
      • Pocket Mill
      • Compact Mills
      • Gantry Series
      • SR Sheet Routers
      • Extra-Large VMC
      • Double-Column Mills
      • 3+2 Positioning Machines
    • Multi-Axis Solutions
      Multi-Axis Solutions
      Multi-Axis Solutions View All
      • Multi-Axis Solutions
      • Y-Axis Lathes
      • 5-Axis Mills
    • Lathes
      Lathes
      Lathes View All
      • Lathes
      • ST Series
      • Dual-Spindle
      • Box Way Series
      • Toolroom Lathes
      • Chucker Lathe
      • Pocket Lathe
      • Haas Bar Feeders
    • Horizontal Mills
      Horizontal Mills
      Horizontal Mills View All
      • Horizontal Mills
      • 50-Taper
      • 40-Taper
    • Rotaries & Indexers
      Rotaries & Indexers
      Rotaries & Indexers View All
      • Rotaries & Indexers
      • Rotary Tables
      • Indexers
      • 5-Axis Rotaries
      • Extra-Large Rotaries
    • Special Series
      Special Series
      Special Series View All
      • Special Series
      • EU_Series_Redirect
    • Automation Systems
      Automation Systems
      Automation Systems View All
      • Automation Systems
      • Mill Automation
      • Lathe Automation
      • Automatic Parts Loaders
      • Automation Models
    • Desktop Machines
      Desktop Machines
      Desktop Machines View All
      • Desktop Machines
      • Desktop Mill
      • Desktop Lathe
      • Control Simulator, Standard
      • Control Simulator, Premium
    • Shop Equipment
      Shop Equipment
      Shop Equipment View All
      • Shop Equipment
      • Knee Mill
      • Haas Manual Lathes
      • Haas Saws
    • Fabrication Machines
      Fabrication Machines
      Fabrication Machines View All
      • Fabrication Machines
      • Laser Cutting Machines
      • CNC Press Brakes
    • QUICK LINKS Special Series  Special Series 
      EU SERIES EU SERIES BUILD & PRICE | PRICE LIST BUILD & PRICE | PRICE LIST In-Stock Machines In-Stock Machines WHAT’S NEW WHAT’S NEW YOUR FIRST CNC YOUR FIRST CNC
      SHOPPING TOOLS
      • Build & Price a Haas
      • Price List
      • Available Inventory
      • CNCA Financing
      WANT TO TALK TO SOMEONE?

      A Haas Factory Outlet (HFO) can answer your questions, and walk you through your best options.

      CONTACT YOUR DISTRIBUTOR >
  • Options Main Menu
    • The Haas Control Value Option Packages
      Value Option Packages
      Value Option Packages View All
      • Value Option Packages
    • Product Image Spindles
      Spindles
      Spindles View All
      • Spindles
    • Product Image Tool Changers
      Tool Changers
      Tool Changers View All
      • Tool Changers
    • Product Image 4th- | 5th-Axis
      4th- | 5th-Axis
      4th- | 5th-Axis View All
      • 4th- | 5th-Axis
    • Product Image Turrets & Live Tooling
      Turrets & Live Tooling
      Turrets & Live Tooling View All
      • Turrets & Live Tooling
    • Product Image Probing
      Probing
      Probing View All
      • Probing
    • Haas Chip & Coolant Management Chip & Coolant Management
      Chip & Coolant Management
      Chip & Coolant Management View All
      • Chip & Coolant Management
    • The Haas Control The Haas Control
      The Haas Control
      The Haas Control View All
      • The Haas Control
    • Product Image Product Options
      Product Options
      Product Options View All
      • Product Options
    • Product Image Tooling & Fixturing
      Tooling & Fixturing
      Tooling & Fixturing View All
      • Tooling & Fixturing
    • Product Image Workholding
      Workholding
      Workholding View All
      • Workholding
    • Product Image 5-Axis Solutions
      5-Axis Solutions
      5-Axis Solutions View All
      • 5-Axis Solutions
      • 5 Easy Steps to 5-Axis
    • QUICK LINKS Special Series  Special Series 
      EU SERIES EU SERIES BUILD & PRICE | PRICE LIST BUILD & PRICE | PRICE LIST In-Stock Machines In-Stock Machines WHAT’S NEW WHAT’S NEW YOUR FIRST CNC YOUR FIRST CNC
      SHOPPING TOOLS
      • Build & Price a Haas
      • Price List
      • Available Inventory
      • CNCA Financing
      WANT TO TALK TO SOMEONE?

      A Haas Factory Outlet (HFO) can answer your questions, and walk you through your best options.

      CONTACT YOUR DISTRIBUTOR >
  • Why Haas Main Menu
      Discover the Haas Difference
    • Why Haas
    • MyHaas
    • Education Community
    • Industry 4.0
    • Haas Certification
    • Customer Testimonials
  • Service Main Menu
      Welcome to Haas Service
      SERVICE HOME Operator’s Manuals How-To Procedures Troubleshooting Guides Preventive Maintenance Haas Parts Haas Tooling Videos
  • Videos Main Menu
  • Main Menu
    • View All
    • View All
    • View All
    • View All
      • HTEC Curriculum Support
      • Haas Value Option Packages (VOP) Journey
    • View All
      • Haas 10 kg Cobot Package
      • Cobot Kits
      • DC-1 Drill Center
      • CNC Sales News
      • Do More With Your Haas
    • View All
    • View All
      • contact-us-test
      • 4 - AUTOMATION SYSTEMS
      • Carousel-V2
      • expert test
      • Demo_Day_Trident-test
      • Link Test
      • image-sale-tag-test
      • article-list-test
      • Haas 25 kg Robot Package
      • test-algolia-page
    • View All
    • View All
    • View All
    • View All
      • calc-test
    • View All
    • QUICK LINKS Special Series  Special Series 
      EU SERIES EU SERIES BUILD & PRICE | PRICE LIST BUILD & PRICE | PRICE LIST In-Stock Machines In-Stock Machines WHAT’S NEW WHAT’S NEW YOUR FIRST CNC YOUR FIRST CNC
      SHOPPING TOOLS
      • Build & Price a Haas
      • Price List
      • Available Inventory
      • CNCA Financing
      WANT TO TALK TO SOMEONE?

      A Haas Factory Outlet (HFO) can answer your questions, and walk you through your best options.

      CONTACT YOUR DISTRIBUTOR >
  • Haas Tooling Main Menu
  • Haas Service Parts Main Menu

My Haas Welcome,
!
Haas Tooling MyHaas/HaasConnect Sign In Register Haas Tooling MyHaas/HaasConnect Sign Out Welcome, My Machines Latest Activity My Quotes My Account My Users Sign Out
Find Your Distributor
  1. Select Language
    1. English
    2. Deutsch
    3. Español - ES
    4. Español - MX
    5. Français
    6. Italiano
    7. Português
    8. Český
    9. Dansk
    10. Nederlands
    11. Magyar
    12. Polski
    13. Svenska
    14. Türkçe
    15. 中文
    16. Suomi
    17. Norsk
    18. الإنجليزية
    19. български
    20. Hrvatski
    21. Ελληνικά
    22. Română
    23. Slovenský
    24. Slovenščina
    25. 한국어
    26. 日本語
    27. Українська
×

Search Results

Web Pages

Images

    • <
    • 1
    • >

4 - HAB - Operation


  • 0 - HAB - Table of Contents
  • 1 - HAB - Introduction
  • 2 - HAB - Safety
  • 3 - HAB - Installation
  • 4 - HAB - Operation
  • 5 - HAB - Maintenance
  • 6 - HAB - Troubleshooting

Go To :

  • 4.1 HAB Manual Display
  • 4.2 HAB Version 1 Automatic Display
  • 4.3 HAB Version 2 Automatic Display
  • 4.4 HAB Controls
  • 4.5 HAB Saw blade Selection
  • 4.6 HAB speed recommendation
  • 4.7 HAB Bundle Cutting
  • 4.8 HAB Cut Compensations
  • 4.9 HAB Settings and Parameters

4.1 HAB Manual Display

Recently Updated

HAB 3232 - Manual Display Overview


Revision B - 05/2026

Manual Mode Interface

1

Updated

To activate the manual function, first turn the external knob to the specified icon [1].

Note: Each tab on the control will have an image of corresponding physical button that indicates its purpose.

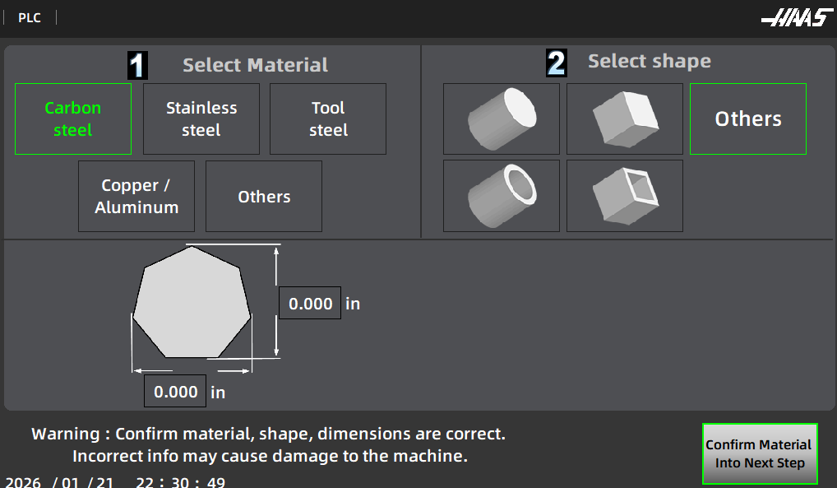
In order to proceed with the manual mode, a material must be confirmed. 

2

Updated

Check the material, shape, size and quantity in this interface, click "Material Confirmation" after completion, and then click NEXT.

3

Updated

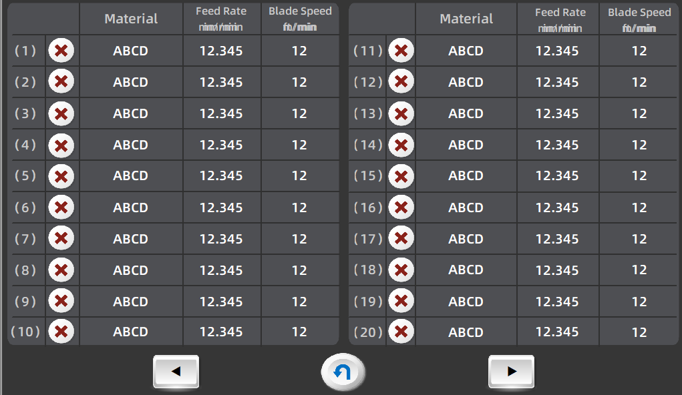
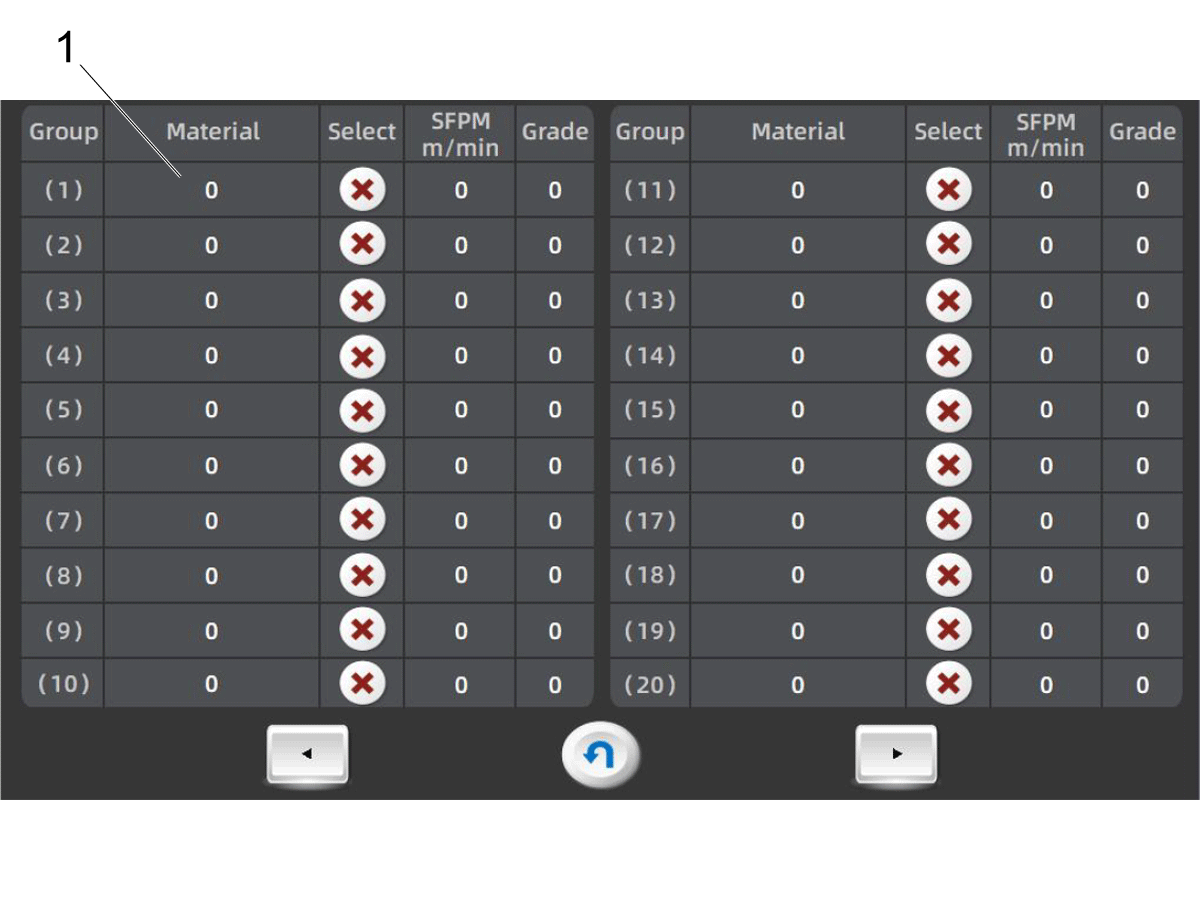
Click OTHERS to access a customization page that will allow the operator to set a specific material and set a custom saw blade speed. 

4

Updated

In order to start a job, there are some requirements that must be met. 

When starting a job the front vise must be clamped. 

Note: When either the front vise  or rear vise are clamped a green indicator will show [1]. 

Note: When the front vise and back vise are clamped  Material in Feed and Material Out cannot be executed. 

After the vise or vises have been clamped, press the BLADE START button to begin the job.

Note: Refer to the HAB CONTROLS chapter for an identified list of the control panel. 

4.2 HAB Automatic Display

Recently Updated

HAB 3232 - Version 1 - Automatic Display Overview


Revision B - 9/2025

Introduction

This chapter will provide details on how to operate the automatic mode of the Version 1 Haas Automatic Bandsaw. 

Note: To determine if your HAB-3232 is a V1 or V2 refer to the HAB-3232 – Identification Guide  for reference.

Automatic Mode Interface

1

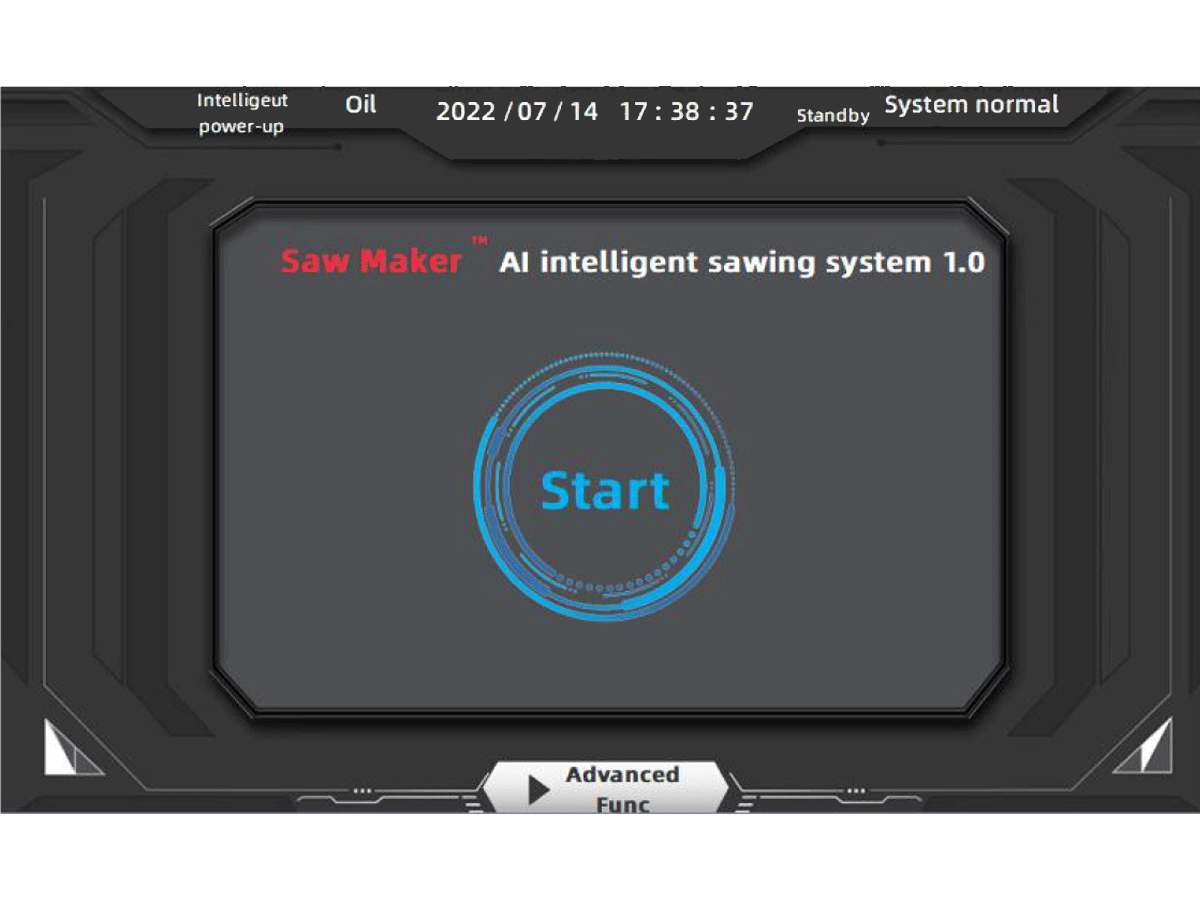
To activate the automatic function, first turn the external knob to the left. 

Press START to continue. 

2

Check the material, shape, size and quantity in this interface, click "Material Confirmation" after completion, and then click NEXT.

3

Click OTHERS to access a customization page that will allow the operator to set a specific material and set a custom saw blade speed. 

4

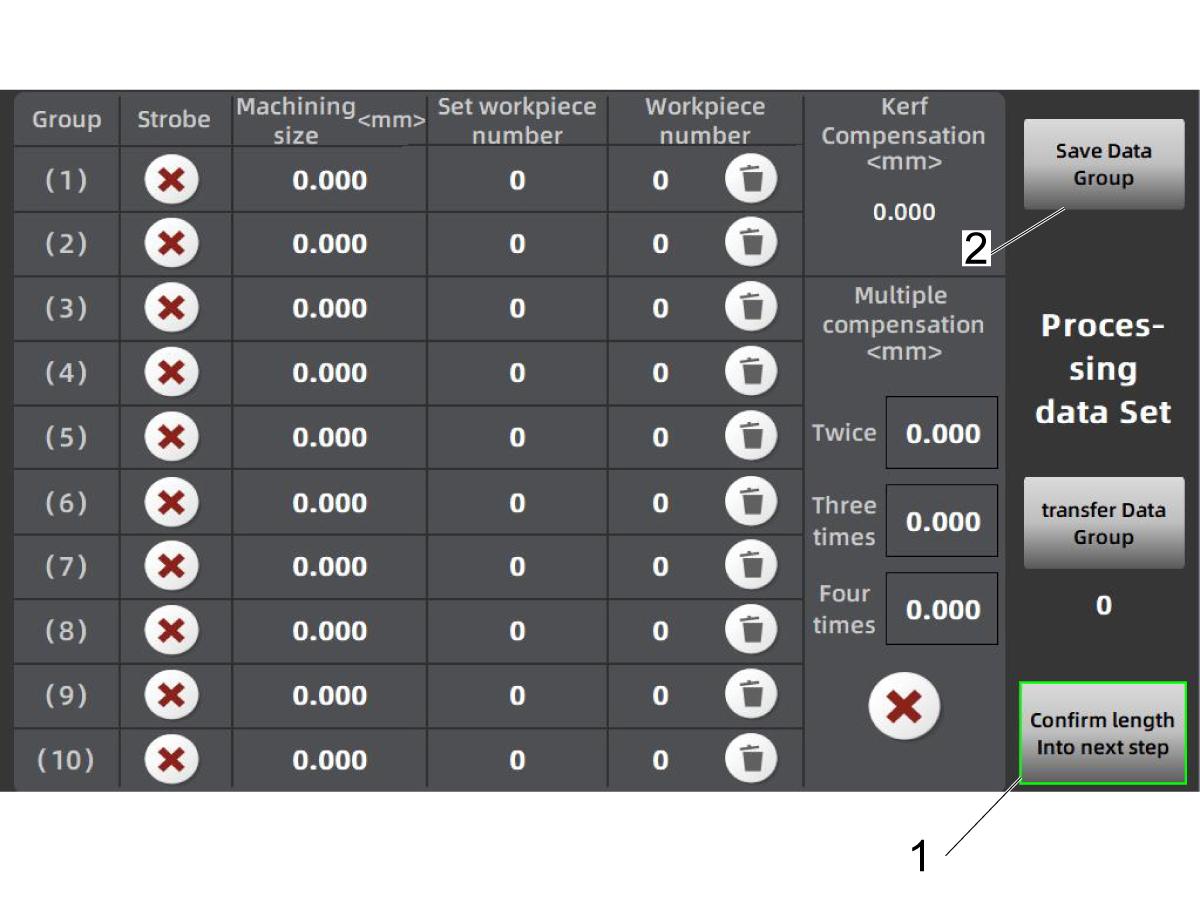
Set the size of the workpiece to be processed in this screen.

Note: The Confirm length icon will glow green after the length has been confirmed.

Click [1] to continue. 

Note: Click SAVE DATA GROUP [2] on this page in order to store into a specific data group. When you need to use it, just click the corresponding data group to call it.

5

Set the kerf compensation value based on the thickness of the saw blade [1].

Note: The kerf compensation value for the original saw blade provided with the machine should be set to 0.07in (1.8mm).

Use the multiple compensation [2] feature to account for part length deviation over multiple shuttles of the rear vise.

See more information on these settings in section 4.8 HAB Cut Compensations

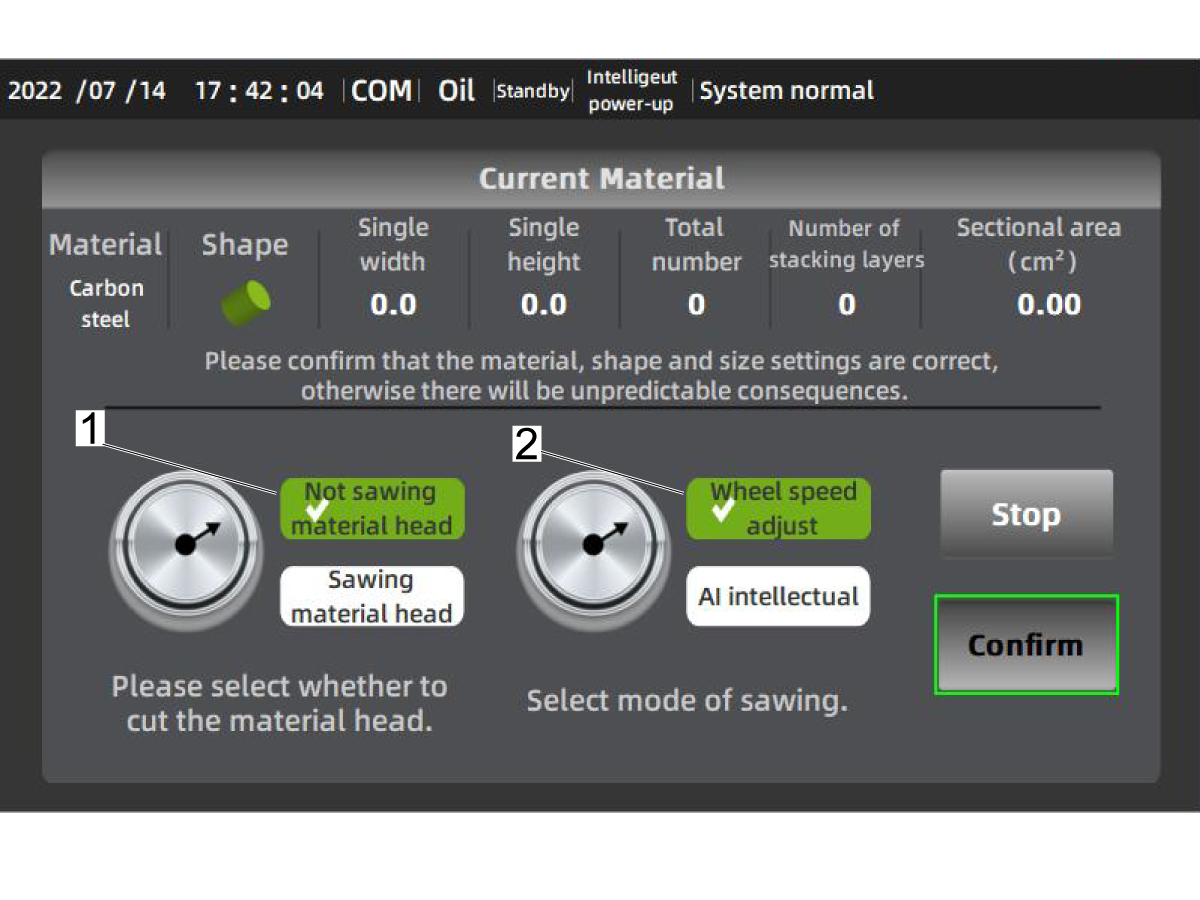
6

Choose whether to cut the material head [1].

Choose the mode of sawing [2]. 

Click CONFIRM to start the sawing process.

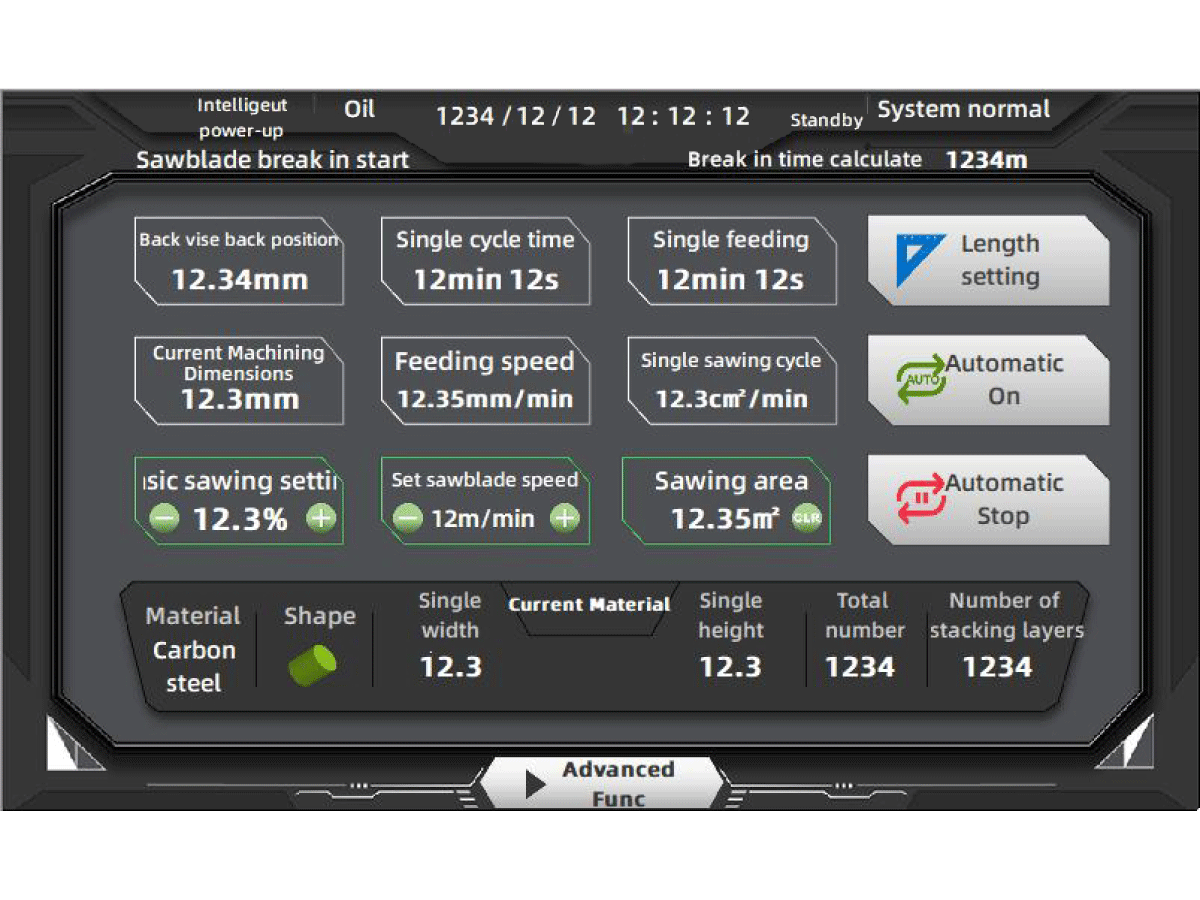
7

 Note: Once a job has started, the machine will display the following screen. This screen adjusts and monitors the parameters and sawing efficiency in the automatic working mode. 

4.3 HAB Version 2 Automatic Display

Recently Updated

HAB 3232 - Version 2 - Automatic Display Overview


Revision B - 05/2026

Introduction

This chapter will provide details on how to operate the automatic mode of the Version 2 Haas Automatic Bandsaw. 

Note: To determine if your HAB-3232 is a V1 or V2 refer to the HAB-3232 – Identification Guide  for reference.

Automatic Mode Interface

1

Updated

To activate the automatic function, first turn the external knob to the left. 

Press HOMING to home and recalibrate the saw before use. 

Note: Before using the saw for the first time, make sure to remove the shipping bracket located at the bottom of the main cylinder. For details on its exact placement, refer to the HAB - Installation chapter. 

Once the screen states "Homing Completed", press START to proceed.

2

Updated

Check the material, shape, size and quantity in this interface, click CONFIRM MATERIAL after completion, and then click NEXT.

Note: The bandsaw will calculate a target cutting efficiency to measure how effectively the bandsaw removes material during cutting. 

Note: Based on the geometry of the material, the bandsaw calculates the maximum allowable feed speed for the specified material

3

Updated

Under "Select Shape" click OTHERS to access a customization page that will allow the operator to set a specific cross sectional dimension. 

Set the size of the workpiece to be processed in this screen. The Confirm Material icon will glow green after the dimensions have been confirmed.

Note: When selecting "Other" material, the "AI Intelligence" mode will be disabled, and only "Handwheel Speed Adjustment" is allowed.

4

Updated

Under "Select Material", click OTHERS to access a customization page that will allow the operator to set a specific material, feed rate, and blade speed. 


5

Updated

Designate the cutting length (L), the set quantity (P), and completed quantity (C) of each material. 

Set the kerf compensation value based on the thickness of the saw blade.

Note: The kerf compensation value for the original saw blade provided with the machine should be set to 0.07in (1.8mm).

See more information on these settings in section 4.8 HAB Cut Compensations

6

Updated

Choose whether to start with the first cut or trim cut [1]. 

Choose the mode of sawing [2]. 

Click CONFIRM to start the sawing process.

7

Updated

 Note: Once a job has started, the machine will display the following screen. This screen adjusts and monitors the parameters and sawing efficiency in the automatic working mode. 

To adjust the length of the part, select LENGTH SETTING [1] on the display. To pause automatic mode, select the AUTOMATIC PAUSE [3] button. To resume automatic mode, select AUTOMATIC ON [2]. 

4.3 HAB Controls

Recently Updated

HAB 3232 - Controls


Revision A - 11/2025

HAB Version 1 - Control Panel

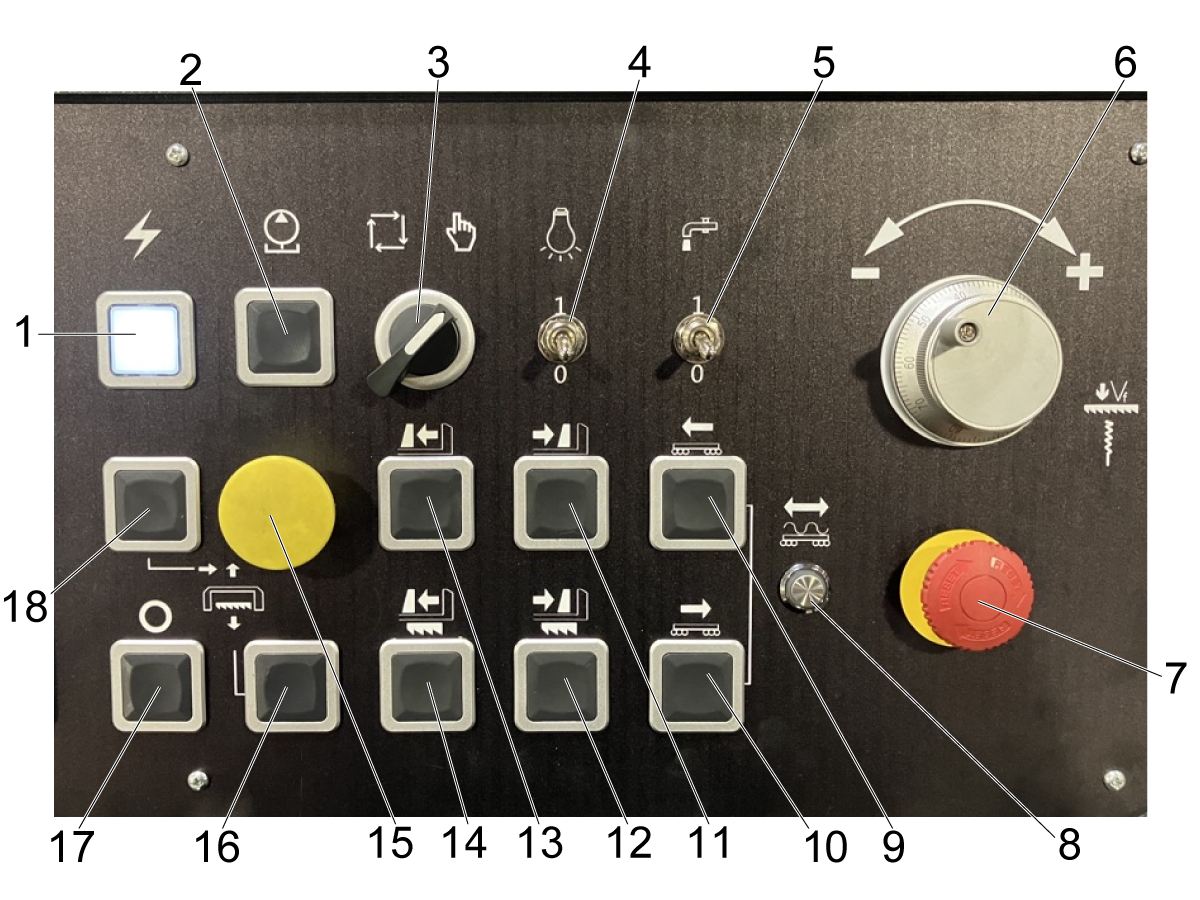
Use the table below to understand the functions of the HAB-3232 V1 control panel. 

Number Button Function Description
1 Power Indicator Light This light indicates that power is being supplied to the machine. If the light is off while the breaker is in the ON position, there may be an issue with the power source.
2 Oil Pump Start/Stop The following button will start the hydraulic pump. If the hydraulic pump is already running, pressing this button will stop it.
3 Manual/Auto Switch Mode The button toggles the saw between Auto Mode and Manual Mode. When the switch is pointing to the hand, the saw is in Manual Mode; when it points to the box on the right, the saw is in Auto Mode.
4 Saw Table Light This light turns on the light that illuminates the saw bed area.
5 Coolant On/Off Turns the coolant ON/OFF
6 Saw Down Feed Speed The dial adjusts the rapid speed at which the saw frame descends toward the saw bed.
7 Emergency Stop This is the emergency stop for the saw. Activate it during maintenance to prevent the saw from operating.
8 Feed/Return Material Speed Switch This button slows down the speed at which the material is fed forward and backward. 
9 Reverse Feed Material Feeds the material back away from the saw blade.
10 Feed Material Forward Feeds the material forward towards the saw blade.
11 Close Rear Vise Closes the rear vise on the saw bed. Holding the button will move the rear vise in until the vise is clamped on the stock.
12 Close Front Vise Closes the front vise on the saw bed that is closest to the front of the machine. Holding the button will move the vise in to clamp on the stock.
13 Open Rear Vise Opens the rear vise on the saw bed. 
14 Open Front Vise Opens the front vise on the saw bed.
15 Raise Saw Frame This raises the entire frame. The frame must be lifted to install or tension the blade
16 Lower Saw Frame This button lowers the entire saw frame. Hold down the button until it reaches the end of travel.
17 Blade Stop  In Manual Mode, this button stops the saw wheel from turning. In Automatic Mode, it pauses the automatic cycle.
18 Blade Start In Manual Mode, this button starts the saw wheel. In Automatic Mode, this button starts the automatic cycle that was set up.

HAB Version 2 - Control Panel

Updated

Use the table below to understand the functions of the HAB-3232 V2 control panel. 

Number Button Function Description
1 Power Indicator Light This light indicates that power is being supplied to the machine. If the light is off while the breaker is in the ON position, there may be an issue with the power source.
2 Oil Pump Start/Stop The following button will start the hydraulic pump. If the hydraulic pump is already running, pressing this button will stop it.
3 Manual/Auto Switch Mode The button toggles the saw between Auto Mode and Manual Mode. When the switch is pointing to the hand, the saw is in Manual Mode; when it points to the box on the right, the saw is in Auto Mode.
4 Saw Table Light This light turns on the light that illuminates the saw bed area.
5 Coolant On/Off Turns the coolant ON/OFF
6 Saw Down Feed Speed The dial adjusts the rapid speed at which the saw frame descends toward the saw bed.
7 Emergency Stop This is the emergency stop for the saw. Activate it during maintenance to prevent the saw from operating.
8 Feed/Return Material Speed Switch This button slows down the speed at which the material is fed forward and backward. 
9 Reverse Feed Material Feeds the material back away from the saw blade.
10 Feed Material Forward Feeds the material forward towards the saw blade.
11 Close Rear Vise Closes the rear vise on the saw bed. Holding the button will move the rear vise in until the vise is clamped on the stock.
12 Close Front Vise Closes the front vise on the saw bed that is closest to the front of the machine. Holding the button will move the vise in to clamp on the stock.
13 Open Rear Vise Opens the rear vise on the saw bed. 
14 Open Front Vise Opens the front vise on the saw bed.
15 Raise Saw Frame This raises the entire frame. The frame must be lifted to install or tension the blade
16 Lower Saw Frame This button lowers the entire saw frame. Hold down the button until it reaches the end of travel.
17 Blade Stop  In Manual Mode, this button stops the saw wheel from turning. In Automatic Mode, it pauses the automatic cycle.
18 Blade Start In Manual Mode, this button starts the saw wheel. In Automatic Mode, this button starts the automatic cycle that was set up.

4.4 HAB Saw Blade Selection

Recently Updated

HAB 3232 - Saw Blade Selection


The chart below provides recommendations for selecting a saw blade by teeth per inch, based on the width of rectangular stock, the diameter of cylindrical stock, or the wall thickness of tubing stock.

Note: The saw blade provided with the machine has a tooth profile of 8/12 teeth per inch.

Saw Blade Selection

Rectangular Stock Round Stock Tubing (square and round)
Width (inch) Teeth Per Inch Diameter (Inch) Teeth Per Inch Wall thickness (Inch) TPI
0.40 - 0.51 8/12T 0.40 - 0.51 8/12T 0.16 8/12T
0.55 - 0.63 6/10T 0.55 - 0.63 6/10T 0.20 - 0.24 6/10T
0.67 - 0.98 5/8T 0.67 - 0.98 5/8T 0.28 - 0.35 5/8T
1.02 - 2.09 4/6T 1.02 - 2.09 4/6T 0.39 - 0.71 4/6T
2.13 - 4.49 3/4T 2.13 - 4.49 3/4T 0.74 - 1.30 3/4T
4.53 - 8.07 2/3T 4.53 - 8.07 2/3T >1.34 2/3T
8.11 - 15.0 1.4/2.5T 8.11 - 15.0 1.4/2.5T - -
>15.04 1/1.5T >15.04 1/1.5T - -

4.5 HAB Speed Recommendation

Recently Updated

HAB 3232 - Speed Recommendation


The chart below offers recommendations for cutting speeds based on specific materials. Depending on the material, they provide guidance on both blade speed and cutting rate.

Speed Recommendation

Material Specification Blade speed (Fpm) Cutting rate (inch² / min)
Mild Steel 1010 164 - 246 11 - 12
1015 164 - 246 11 - 12
Medium Steel 1045 164 - 230 9 - 11
1055 164 - 230 8 - 9
Tool Carbon Steel W1 131 - 164 3.9 - 7
Structural Alloy Steel 3140 98 - 131 4.7 - 6.2
4140 131 - 164 5 - 7
4340 115 - 148 4.7 - 6.2
High-Speed Steel T1 82 - 115 3.1 - 4.7
T4 66 - 98 2.3 - 3.9
Cold Molded Alloy Tool Steel D2 82 - 115 3.1 - 3.9
D7 66 - 98 1.5 - 3.1
D1 82 - 115 3.1 - 3.9
Hot Molded Alloy Tool Steel H21 115 - 148 4.7 - 5
H13 98 - 131 3.9 - 4.7
L6 82 - 98 3.1 - 3.9
Alloy Spring Steel 6150 66 - 115 3.9 - 5
Bearing Steel 52100 115 - 148 4.7 - 6.2
Stainless Steel 304 115 - 148 3.1 - 4.7
316 66 - 82 2.3 - 3.1
430 98 - 131 3.9 - 5

4.6 HAB Bundle Cutting

Recently Updated

HAB 3232 - Bundle Cutting


Revision B - 05/2026

Operation

Updated

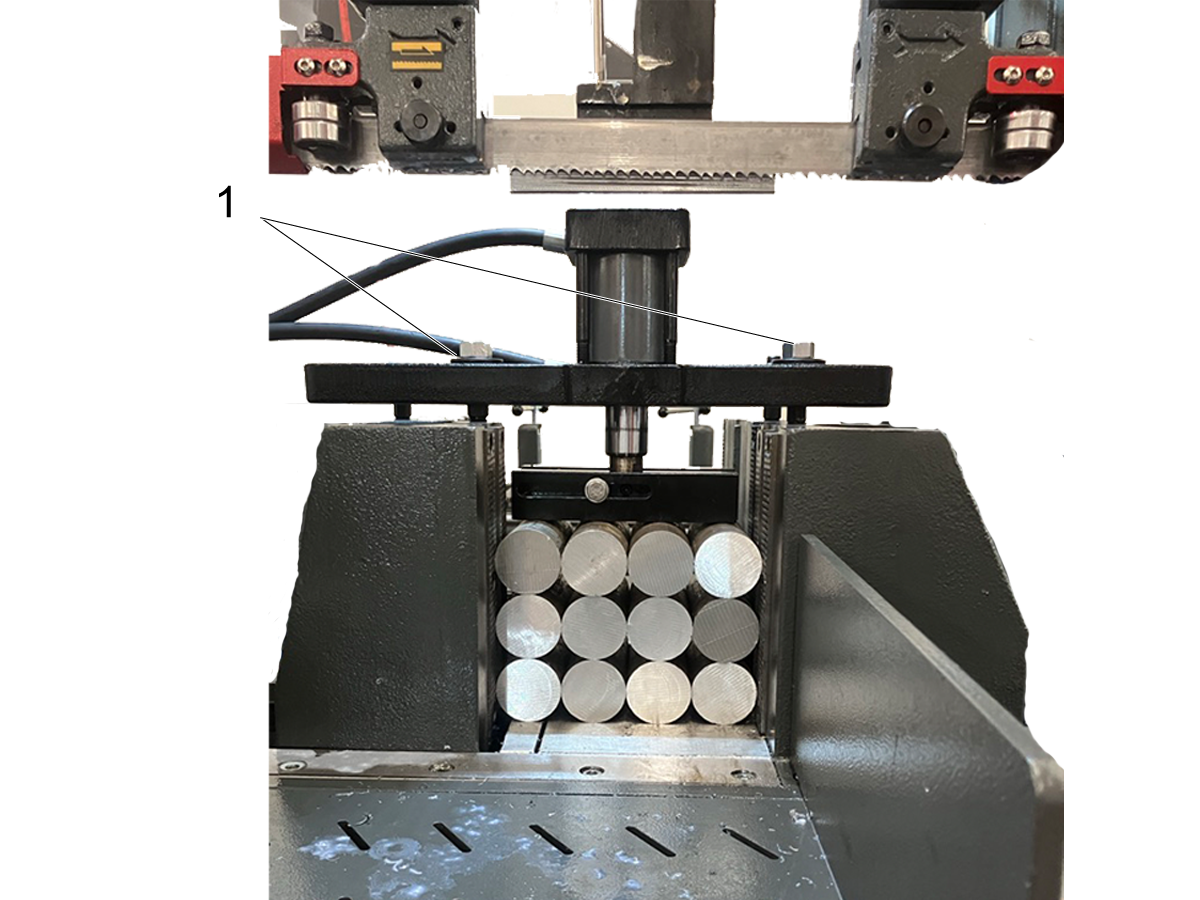
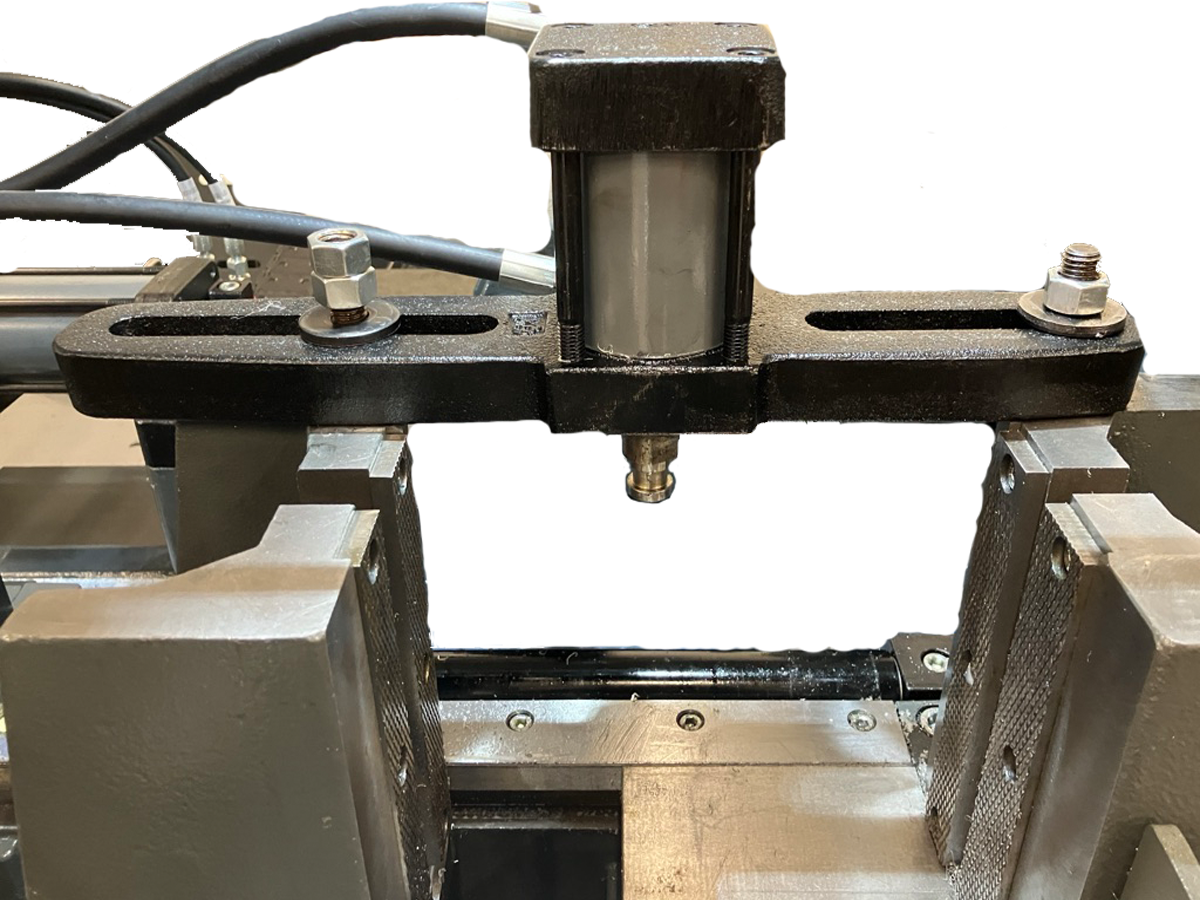
The bundle cut dimensions provided are to serve as a reference, and may vary depending on the installation of the bundle cut piston and threaded piston rod. 

The bandsaw comes with two threaded rod sizes for the bundle cut piston; a 6.0 inch "Extended Rod" and a 3.4 inch "Stubby Rod". The height of your bundle cut will depend on which threaded piston rod is installed.

Bundle cut height dimensions with the "Extended Rod" :

  • Minimum Height (piston extended) = 2.1 inch
  • Maximum Height (piston retracted) = 2.9 inch

Bundle cut height dimensions with the "Stubby Rod" :

  • Minimum Bundle Height (piston extended) =  5.2 inch
  • Maximum Bundle Height (piston retracted) = 6.0 inch

Bundle cut width dimensions:

  • Minimum Width  = 6.6 inch
  • Maximum Width = 12.8 inch

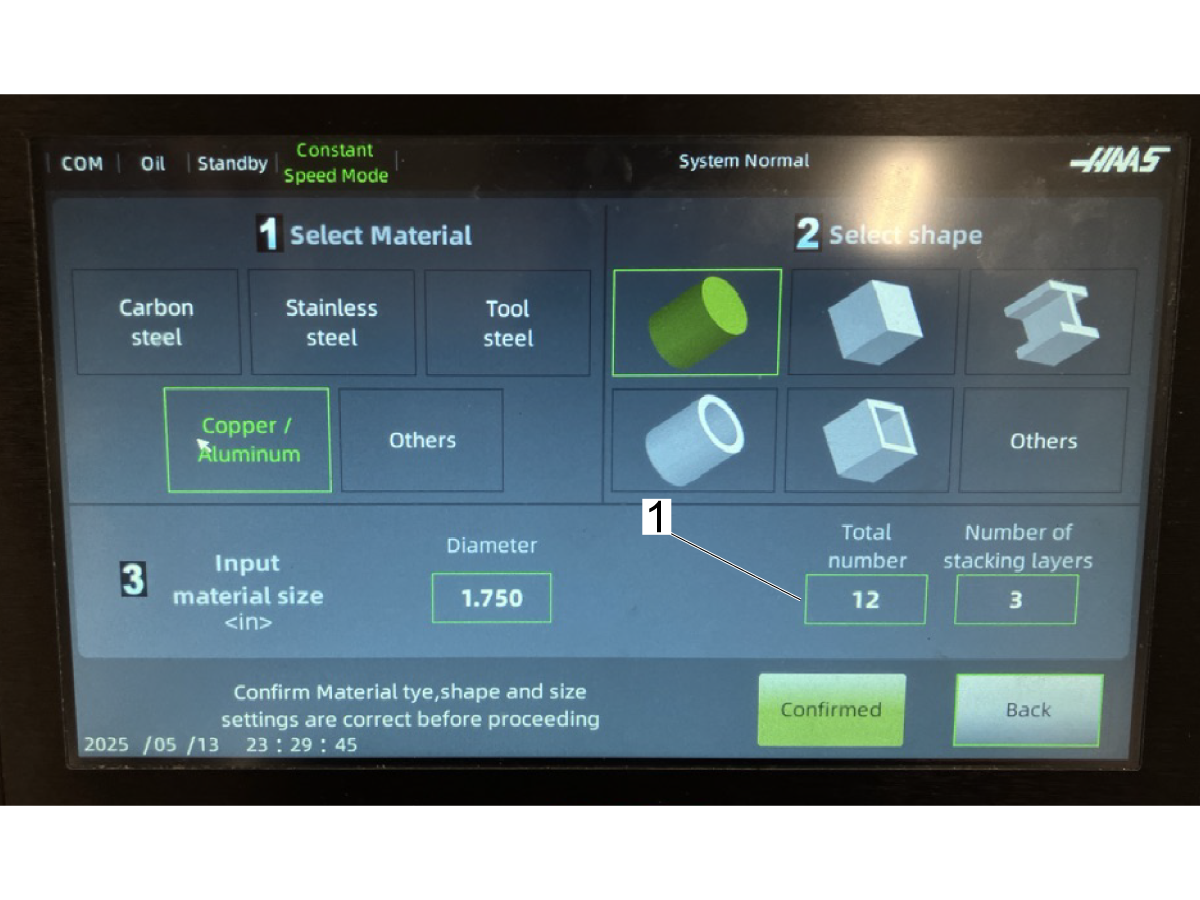
Note: When setting up a job on the material selection page, enter the total number of pieces in the bundle [1], along with the number of stacking layers.

Installation

1

Locate the black vertical vise clamps positioned at the rear of the machine. One clamp will be used for the front vise, and the other for the rear vise.

Remove the hardware from the front and rear vises, then insert the black vertical vise clamp onto the threaded rods of the front and rear vise. 

Install the hardware to securely fasten the vertical clamp back into place. as shown. 


2

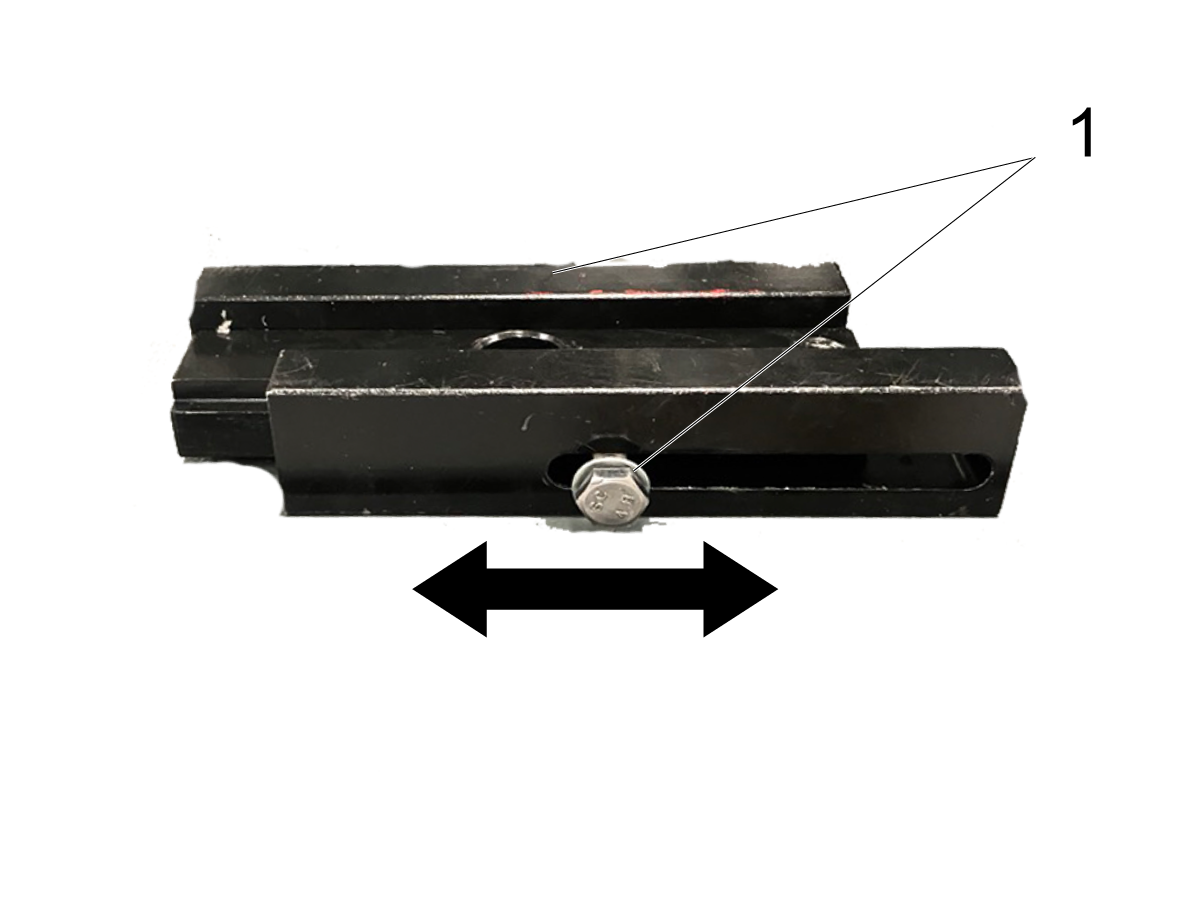
Locate the two black machined blocks that arrived with the Band Saw.

Note: To adjust the width of each machined block, use a 14mm wrench [1] to loosen the two hex bolts on both sides of the block until you reach the desired length.

3

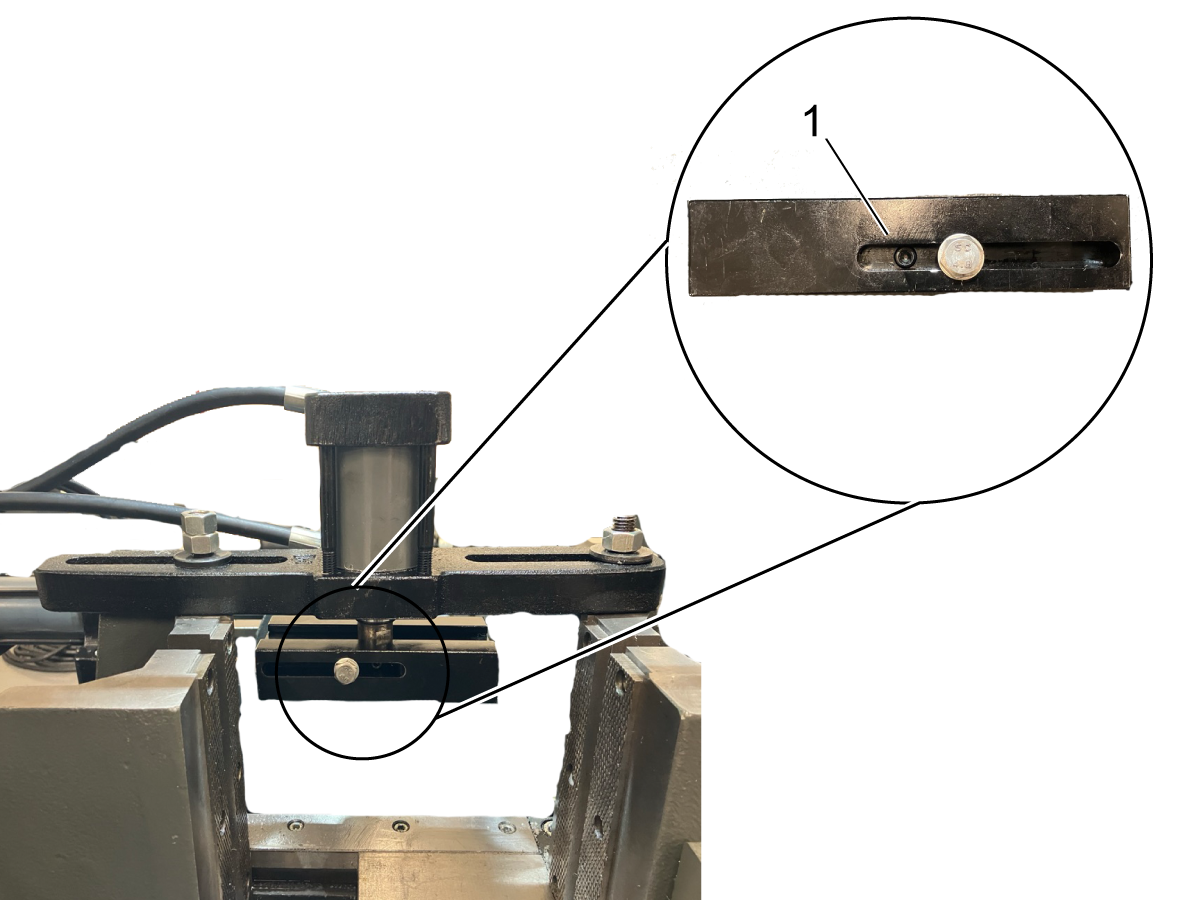
Locate the set screw on the machined block [1].

Use a 4 mm Allen key to loosen up the setscrew. 

Align the center bore of the machined block to the piston rod.

Once secure, tighten down the set screw to the piston rod. 

4

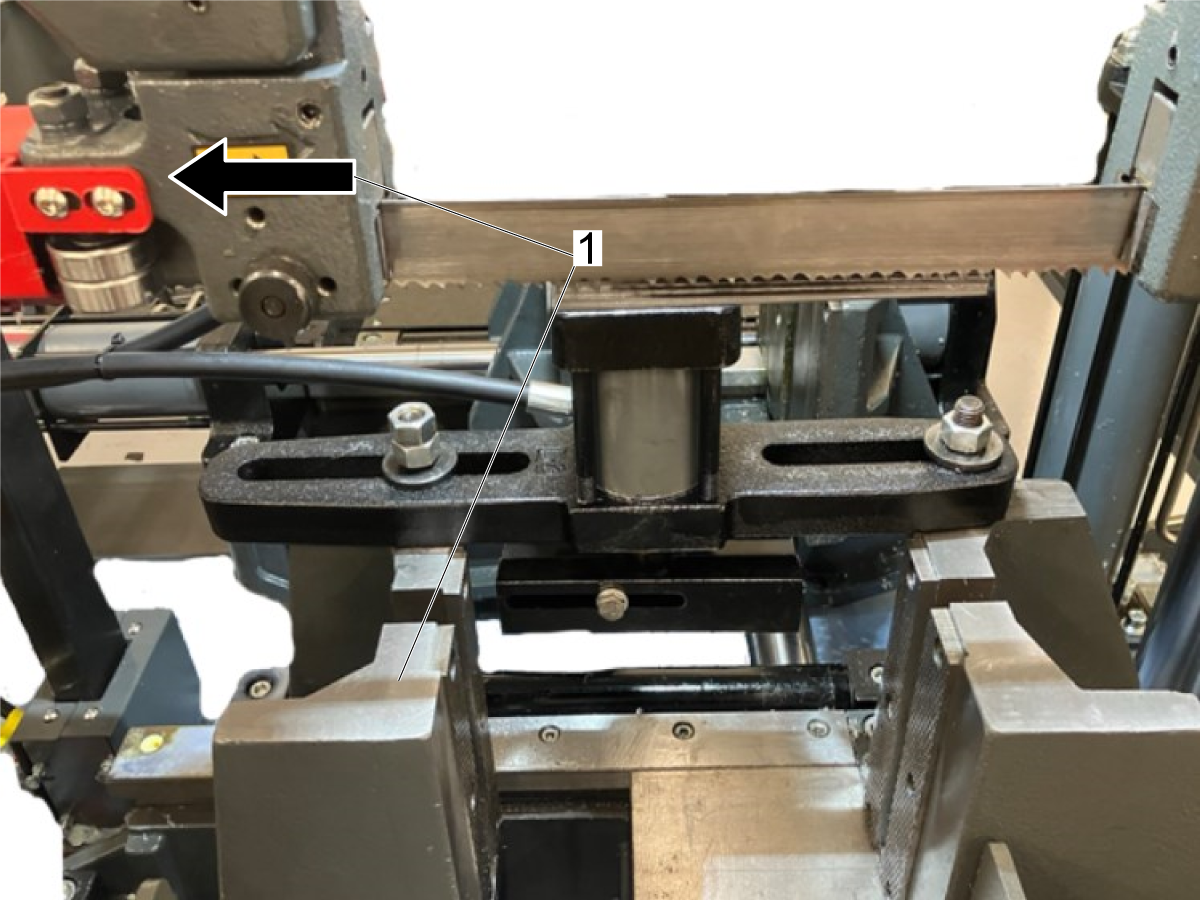
Note: Adjust the position of the saw blade guide arms [1]  that way the frame does not crash into the front vise before commanding the saw to cut.  

4.8 Cut Compensations

Recently Updated

HAB 3232 - Cut Compensations


Revision A - 10/2025

Kerf Compensation

1

Kerf compensation is used to account for the width of the blade and the variation in width the machine creates through motion.

Note: The kerf compensation value for the original saw blade provided with the machine should be set to 0.07in (1.8mm).

2

Kerf: Cut width of the blade including the offset of the teeth.

1 = Kerf width

2 = Blade width


3

1: Effective kerf width

2: Kerf compensation (value in machine)

(A) If the kerf compensation set in the machine is smaller than the blade's tooth set then the work will be smaller in length.

(B) If the kerf compensation set in the machine is larger than the blade's tooth set then the work will be larger in length.

The datum for the kerf compensation, and part length measurement, is based off the center line of the blade. Therefore, if the kerf value is not correct the deviation in length will be consistent.

Note: The effective kerf is subject to change as the blade dulls and is used. A new blade will require a new compensation depending on the wear or new tooth set.


Multiple Compensation

1

The maximum length of material that the HAB3232 can move in one shuttle of the rear vise is 19.7 inches (500mm). 

If a part is longer than this maximum feed of the rear vise, the machine will have to un-clamp and reposition itself on the work. This can cause error in the overall part length.

With Multiple Compensation the machine is able to account for this variation in length.

2

When the Multiple Compensation button shows the green check mark the setting is enabled.

The machine is able to adjust for variation on a total of 4 feeds individually (for one cut length). 

Once: This is accounted for with kerf compensation

Material Range: 0 - 19.7 in (0 - 500 mm)

Two times: Second time the shuttle has to move.

Material Range: 19.7 - 39.4 in (500 - 1000 mm)

Three times: Third time the shuttle has to move

Material Range: 39.4 - 59.1 in (1000 - 1500 mm)

Four times: Fourth time the shuttle has to move

Material Range:  59.1 in - end (1500mm - end)

3

The multiple compensation feature is not a compounding compensation. If a value is set in the Two Times category then the machine will not use that value when compensating the Three Times category.

Note: For example if Two Times is set to 2.00in and all other compensations in this category are zero,.

Parts from 0 - 19.7 in will be nominal.
Parts from 19.7 - 39.4in will be 2 inches longer than nominal.

Parts greater than 39.4in will be nominal.

4.9 HAB settings and Parameters

Recently Updated

HAB 3232 - Settings and Parameters


Revision A - 11/2025

Advanced Functions

# Setting Description Reccomended Setting Reccomended Value
1 Front Vise Time Set Clamping Set the time associated with opening and closing the front vise. N/A

Open:     2.5s

Release: 1.0s

 Clamp Time  Set the time associated with opening and closing the rear vise. N/A

Open:     2.5s

Release: 1.0s

2 Deviation Detection Releases both vises after a set number of parts in automatic mode. It will re-level the stock in the vises when machining materials that are subject to warping or deflecting mid-operation. OFF User Dependent
3 Blade Break Detection Machine will stop if the blade is broken. ON 1.5s
4 Blade Break-in Mode Will lower the cutting efficiency of the machine. This function will hone the teeth of the blade, decreasing the likelyhood of breaking or chipping teeth. This setting will have to be turned on and off manually. There will be an alarm/notification stating that the set time for break in has elapsed. ON

Efficiency: 70.0%

Time: 20 min

5 No Material Detected Function Toggles the material detection switch on the rear vise. This setting will stop an automatic process when it detects that there is no material left to be sawed. User Dependent N/A
6 Sawing Wheel Function Will keep the saw running until the process quantity has been met or the automatic stop is engaged. OFF N/A

Recently Viewed Items

You Have No Recently Viewed Items Yet

Feedback
Haas Logo

Haas Delivered Price

This price includes shipping cost, export and import duties, insurance, and any other expenses incurred during shipping to a location in France agreed with you as a buyer. No other mandatory costs can be added to the delivery of a Haas CNC Product.

KEEP UP WITH THE LATEST HAAS TIPS AND TECHNOLOGY...

Sign up now!   

HAAS TOOLING ACCEPTS THE FOLLOWING:

  • Service & Support
  • Owners
  • Request Service
  • Operator Manuals
  • Haas Parts
  • Rotary Repair Request
  • Pre-Install Guides
  • Shopping Tools
  • Build & Price a New Haas
  • Available Inventory
  • The Haas Price List
  • CNCA Financing
  • About Haas
  • Accessibility Statement
  • DNSH Statement
  • Export Compliance
  • Careers
  • Certifications & Safety
  • Contact Us
  • History
  • Terms & Conditions
  • Haas Tooling Terms & Conditions
  • Privacy
  • Warranty
  • Haas Community
  • Haas Certification Program
  • Haas Motorsports
  • Gene Haas Foundation
  • Haas Technical Education Community
  • Events
  • Join the Conversation
  • Facebook
  • X
  • Flickr
  • YouTube
  • LinkedIn
  • Instagram
  • TikTok
© 2026 Haas Automation, Inc – CNC Machine Tools

This site is protected by reCAPTCHA and the Google Privacy Policy and Terms of Service apply.

2800 Sturgis Rd., Oxnard, CA 93030
Toll Free: (888) 817-4446 / Fax: 805-278-8554