×

Suchergebnisse

Web Pages

Bilder

    • <
    • 1
    • >
  • Maschinen
    • Vertikale Fräsmaschinen von Haas
      Vertikale Fräsmaschinen
      • Vertikale Fräsmaschinen
      • VF-Baureihe
      • Universalmaschinen
      • VR Serie
      • VMCs mit Palettenwechsler
      • MiniMill
      • Formenbaumaschinen
      • Bohren/Gewindebohren/Fräsen-Baureihe
      • Werkzeug- und Vorrichtungsbau
      • Kompaktfräsmaschinen
      • Portal-Baureihe
      • Vertikale Dreh/Fräszentren
      • Extra große VMC
      • Tischfräsmaschine
      • Steuerungssimulator
      • Fräse mit automatischem Werkstücklader
    • Product Image
      Mehrachsen-Lösungen
      • Mehrachsen-Lösungen
      • 5-Achsen-Fräsmaschinen
      • Mit Y-Achse
    • Haas Drehmaschinen
      Drehmaschinen
      • Drehmaschinen
      • ST-Baureihe
      • Doppelspindel
      • Drehmaschinen für den Werkzeug- und Vorrichtungsbau
      • Kompaktdrehmaschine
      • Haas Stangenlader V2
      • Automatischer Drehstücklader
    • Horizontale Fräsmaschinen von Haas
      Horizontale Fräsmaschinen
      • Horizontale Fräsmaschinen
      • SK 50
      • SK 40
    • Haas Dreh- und Indexiertische
      Dreh- und Indexiertische
      • Dreh- und Indexiertische
      • Drehtische
      • Indexiertische
      • 5-Achsen-Drehtische
      • Extra große Drehtische
    • Product Image
      Automatisierungssysteme
      • Automatisierungssysteme
      • Robotersysteme
      • Automatische Werkstücklader
      • verstehen
      • Stangenlader von Haas
      • Models
    • LINKS Sondermodelle  Sondermodelle  PREISLISTE PREISLISTE MODELL UND PREIS MODELL UND PREIS
      EINKAUFSINFORMATIONEN
      • Zusammenstellung und Preis einer Haas-Maschine
      • Preisliste
      • Verfügbare Produkte
      • CNCA Finanzierung
      MÖCHTEN SIE MIT JEMANDEM SPRECHEN?

      Ihr Haas-Händler (Haas Factory Outlet, HFO) kann Ihre Fragen beantworten und Sie durch die besten Varianten führen.

      CONTACT YOUR DISTRIBUTOR >
  • Sonderzubehör
    • Product Image
      Spindeln
      • Spindeln
    • Product Image
      Werkzeugwechsler
      • Werkzeugwechsler
    • Product Image
      4- | 5-Achsen
      • 4- | 5-Achsen
    • Product Image
      Revolver und angetriebene Werkzeuge
      • Revolver und angetriebene Werkzeuge
    • Product Image
      Messtasten
      • Messtasten
    • Haas Späneabfuhr- und Kühlmittelverwaltung
      Späneabfuhr- und Kühlmittelverwaltung
      • Späneabfuhr- und Kühlmittelverwaltung
    • Die Haas Steuerung
      Die Haas Steuerung
      • Die Haas Steuerung
    • Product Image
      Produktoptionen
      • Produktoptionen
    • Product Image
      Werkzeuge und Vorrichtungen
      • Werkzeuge und Vorrichtungen
    • Product Image
      Werkstückhalterung
      • Werkstückhalterung
    • Product Image
      5-Achsen-Lösungen
      • 5-Achsen-Lösungen
      • 5 Easy Steps to 5-Axis
    • Product Image
      Automatisierung
      • Automatisierung
    • LINKS Sondermodelle  Sondermodelle  PREISLISTE PREISLISTE MODELL UND PREIS MODELL UND PREIS
      EINKAUFSINFORMATIONEN
      • Zusammenstellung und Preis einer Haas-Maschine
      • Preisliste
      • Verfügbare Produkte
      • CNCA Finanzierung
      MÖCHTEN SIE MIT JEMANDEM SPRECHEN?

      Ihr Haas-Händler (Haas Factory Outlet, HFO) kann Ihre Fragen beantworten und Sie durch die besten Varianten führen.

      CONTACT YOUR DISTRIBUTOR >
  • Why Haas
      Entdecken Sie den Haas Unterschied
      Warum gerade Haas? MyHaas Automatisierung HTEC-Netzwerk Industrie 4.0 Haas-Zertifizierung
  • Service
    • SEARCH ALARM CODES
      Suchen
    • Leitfäden zur Fehlerbehebung und How-To-Verfahren
      • Product Image
        Anleitungen zur Fehlerbehebung
      • Product Image
        How-To-Verfahren
    • Handbücher
      • Product Image
        Betriebsanleitungen
      • Product Image
        Interactive Service Manuals
  • Videos
  • My Haas

    • Compare Quotes
      • Compare Quotes

    • Über MyHaas
      • Über MyHaas

    • Haas CNC-Zertifizierungsprogramm
      • Haas CNC-Zertifizierungsprogramm

    • Haas CNC Certification Program-Redirect
      • Haas CNC Certification Program-Redirect

    • Haas CNC-Zertifizierungsprogramm
      • Haas CNC-Zertifizierungsprogramm

    • Haas Learning Resources
      • Haas Learning Resources

    • Haas Global Learning Resources
      • Haas Global Learning Resources
    • LINKS Sondermodelle  Sondermodelle  PREISLISTE PREISLISTE MODELL UND PREIS MODELL UND PREIS
      EINKAUFSINFORMATIONEN
      • Zusammenstellung und Preis einer Haas-Maschine
      • Preisliste
      • Verfügbare Produkte
      • CNCA Finanzierung
      MÖCHTEN SIE MIT JEMANDEM SPRECHEN?

      Ihr Haas-Händler (Haas Factory Outlet, HFO) kann Ihre Fragen beantworten und Sie durch die besten Varianten führen.

      CONTACT YOUR DISTRIBUTOR >

    • HFO Weman
      • HFO Weman
      • Über uns
      • Service
      • Finanzierung
      • Ausbildung
      • Veranstaltungen
      • Kontakt

    • HFO Norddeutschland
      • HFO Norddeutschland
      • Über uns
      • Service
      • Finanzierung
      • Kontakt

    • HFO M&L
      • HFO M&L
      • Über uns
      • Service
      • Vertrieb / Finanzierung
      • Schulung
      • Ausstellungsraum
      • Veranstaltungen
      • Kontakt

    • HFO Austria
      • HFO Austria
      • Über uns
      • Service
      • Finanzierung
      • Schulung
      • Ausstellungsraum
      • Kontakt
    • LINKS Sondermodelle  Sondermodelle  PREISLISTE PREISLISTE MODELL UND PREIS MODELL UND PREIS
      EINKAUFSINFORMATIONEN
      • Zusammenstellung und Preis einer Haas-Maschine
      • Preisliste
      • Verfügbare Produkte
      • CNCA Finanzierung
      MÖCHTEN SIE MIT JEMANDEM SPRECHEN?

      Ihr Haas-Händler (Haas Factory Outlet, HFO) kann Ihre Fragen beantworten und Sie durch die besten Varianten führen.

      CONTACT YOUR DISTRIBUTOR >
  • Schreiben Sie uns oder rufen Sie uns an!

Mein Warenkorb
MyHaas Willkommen
!
Haas Tooling Gast-Bestellverlauf MyHaas/HaasConnect Anmelden Registrieren Haas Tooling Mein Konto Order History Return History MyHaas/HaasConnect Abmelden Willkommen Meine Maschinen Letzte Aktivität Meine Angebote Mein Konto Meine Benutzer Abmelden
Einen Händler finden
  1. Sprache auswählen
    1. English
    2. Deutsch
    3. Español
    4. Français
    5. Italiano
    6. Português
    7. Česky
    8. Dansk
    9. Nederlands
    10. Magyar
    11. Polski
    12. Svenska
    13. Русский
    14. Türkçe
    15. 中文
    16. Suomi
    17. Norsk
    18. الإنجليزية
    19. Български
    20. Hrvatski
    21. Ελληνικά
    22. Română
    23. Slovenský
    24. Slovenščina
    25. 한국어
    26. 日本語
Search
×

Suchergebnisse

Web Pages

Bilder

    • <
    • 1
    • >

UMC -500 - Pallet Pool Installation

Service How-To-Verfahren UMC-500 - Palettenbahnhof – Installation
Recently Updated Last updated: 12/15/2020

UMC-500 - Palettenbahnhof – Installation


UMC-500 - Palettenbahnhof – Installation

- Zum Abschnitt springen - 1. Einführung 2. Nivellierschrauben Hardware 3. Mating the Pallet Pool (11 Schritte) 4. Base Level Pallet Pool (2 Schritte) 5. Align Pallet Drop Off Station (6 Schritte) 6. Align Pallet Loading Station (1 Schritt) 7. Setting Up Pallet Stations (3 Schritte) Back to Top

Einführung

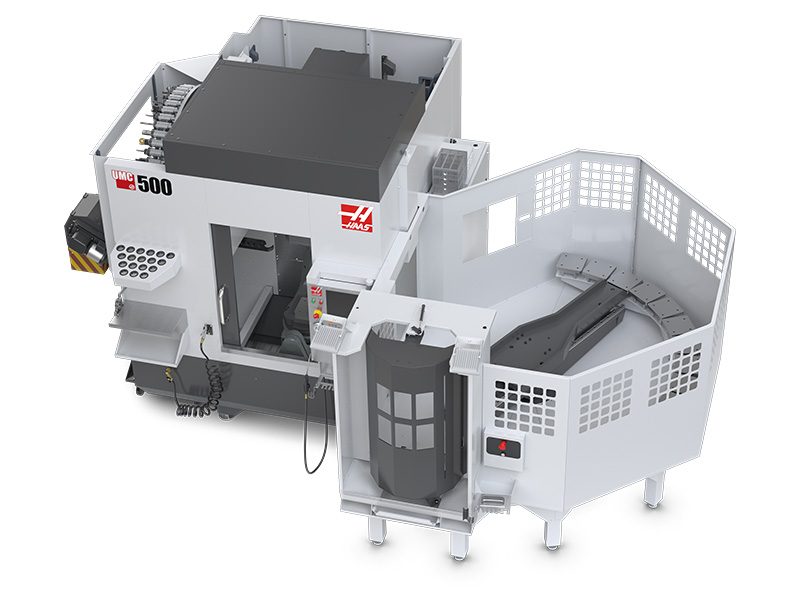
Das folgende Verfahren zeigt Ihnen, wie Sie einen Palettenbahnhof auf einer UMC-500-Maschine installieren können.

Die Software der nächsten Generation auf der Maschine muss die Version 100.20.000.1110 oder höher haben.

Die Option Palettenbahnhof ist derzeit nicht beim Kunden eingebaut.

Wichtig: Um eine Fehlausrichtung des Palettenbahnhofs zu vermeiden, wird empfohlen, die Maschine und den Palettenbahnhof zu verankern. Siehe folgenden Link: Verankerungshinweise.

Die Option Palettenbahnhof bietet Platz für insgesamt 17 Paletten, die mit der Option Palettenbahnhof auf einer UMC-500 installiert werden können.

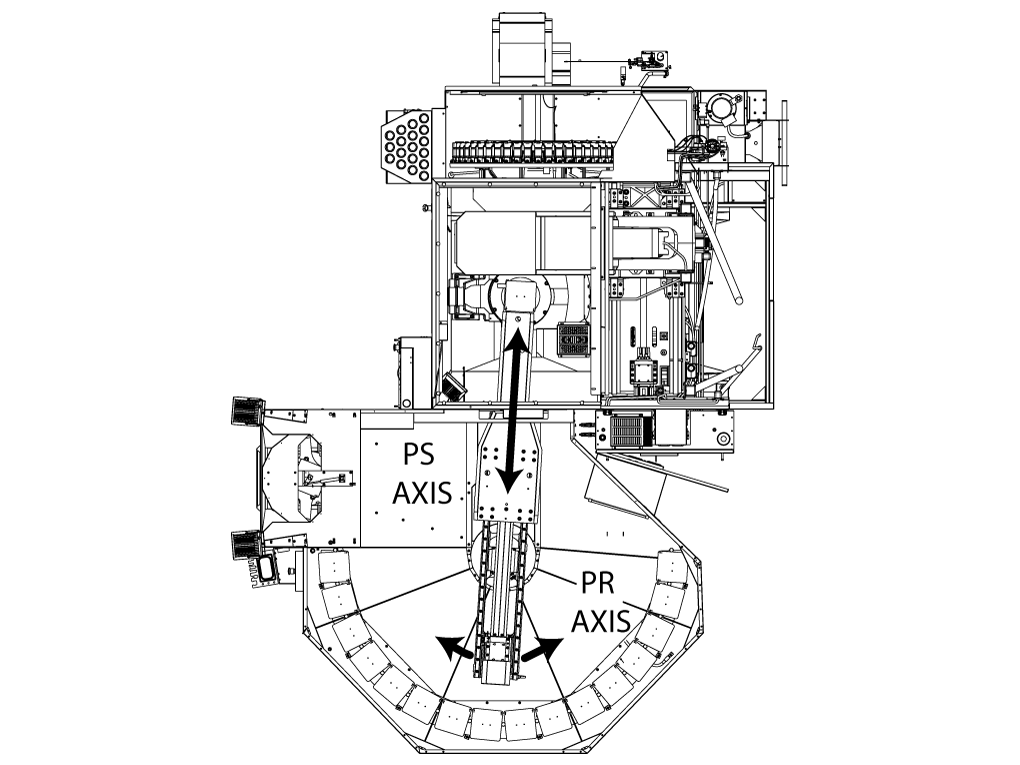
Der Palettenbahnhof hat 2 Servoachsen. Die PR-Achse dreht den Stößel des Palettenbahnhofs und die PS-Achse fährt den Stößel des Palettenbahnhofs aus und ein zum Laden/Entladen der Paletten.

Der UMC-500 muss eben sein, bevor der Palettenbahnhof installiert werden kann. Siehe die UMC-500 Installation Verfahren.

Push [POWER OFF].

Set the main circuit breaker to the OFF position.

Lock the main circuit breaker. Use an approved lock with an approved safety tag.

Caution: When you handle a PCB, you must wear an Electrostatic Discharge (ESD) strap.

Um die Maschine ohne Palettenbahnhof, der mit der Maschine verbunden ist, auszurichten, gehen Sie wie folgt vor:  

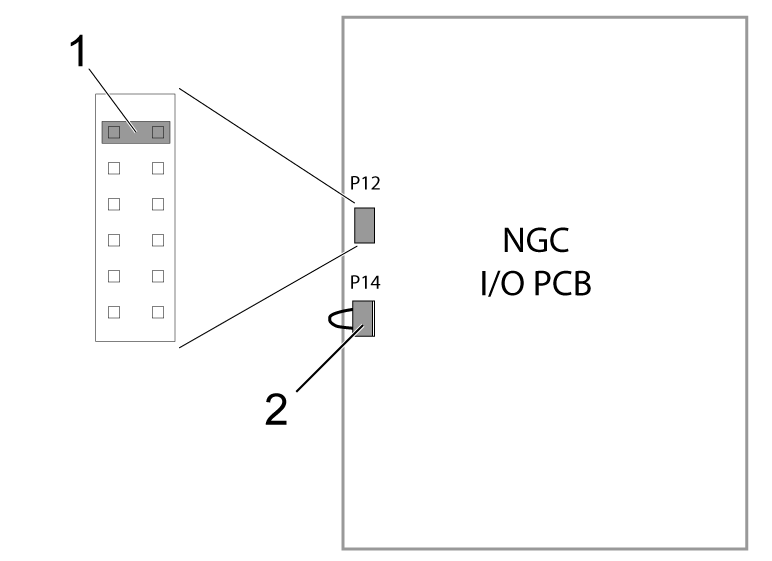
Stellen Sie sicher, dass ein Kurzschlussblock [1] an den oberen beiden Stiften des P12-Steckverbinders auf der E/A-Platine installiert ist 

Vergewissern Sie sich, dass ein Brückenstecker (P/N 33-0527)[2] an der E/A-Leiterplatte an P14 angeschlossen ist.
 Hinweis: Diese Brückenstecker werden benötigt, um die Maschine ohne den Palettenbahnhof zu betreiben.

Deaktivieren Sie den Palettenbahnhof und ändern Sie die Einstellung 382 Palettenwechsler zum Palettenbahnhof deaktivieren.


Hinweis: Durch den obigen Schritt wird der Palettenbahnhof deaktiviert, damit Sie die Maschine auf Null zurücksetzen können, wodurch sie nivelliert werden kann.

Siehe die UMC-500 Installations verfahren.

Nivellierschrauben Hardware

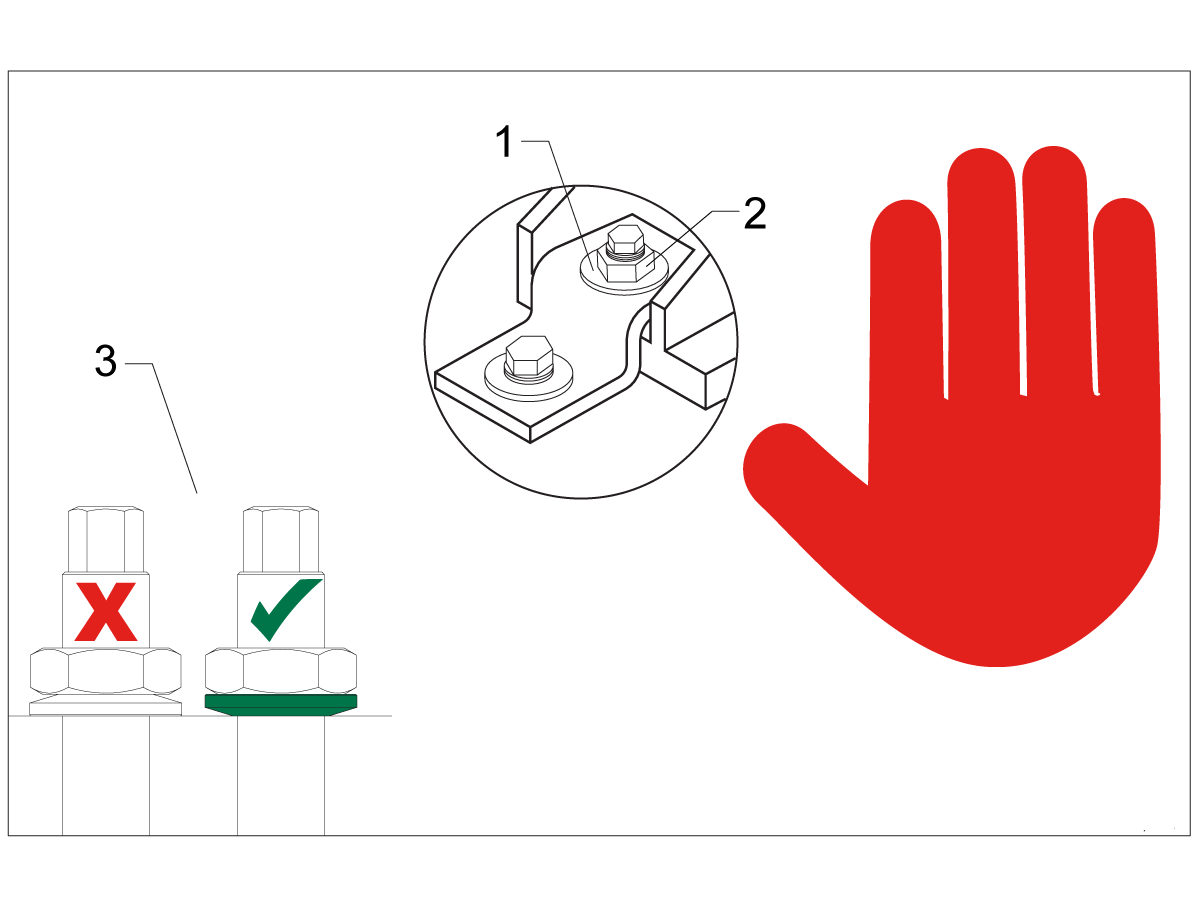
Hinweis: Die Unterlegscheiben [1] und Muttern [2] werden beim Versand installiert und sollten für die Installation aufbewahrt und nicht weggeworfen werden.

Hinweis: Die Ausrichtung der Unterlegscheibe [3] ist wichtig.  Der konische Teil der Unterlegscheibe sollte gegen das Gussteil liegen,  siehe Darstellung.

Mating the Pallet Pool


1

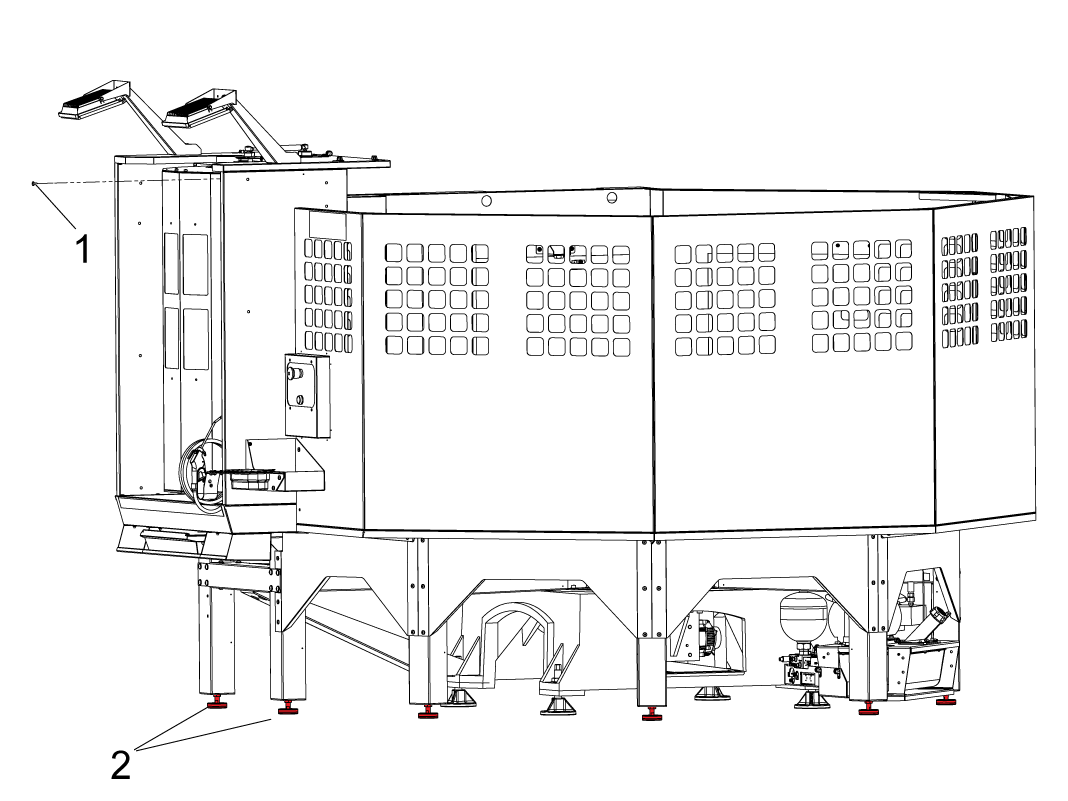
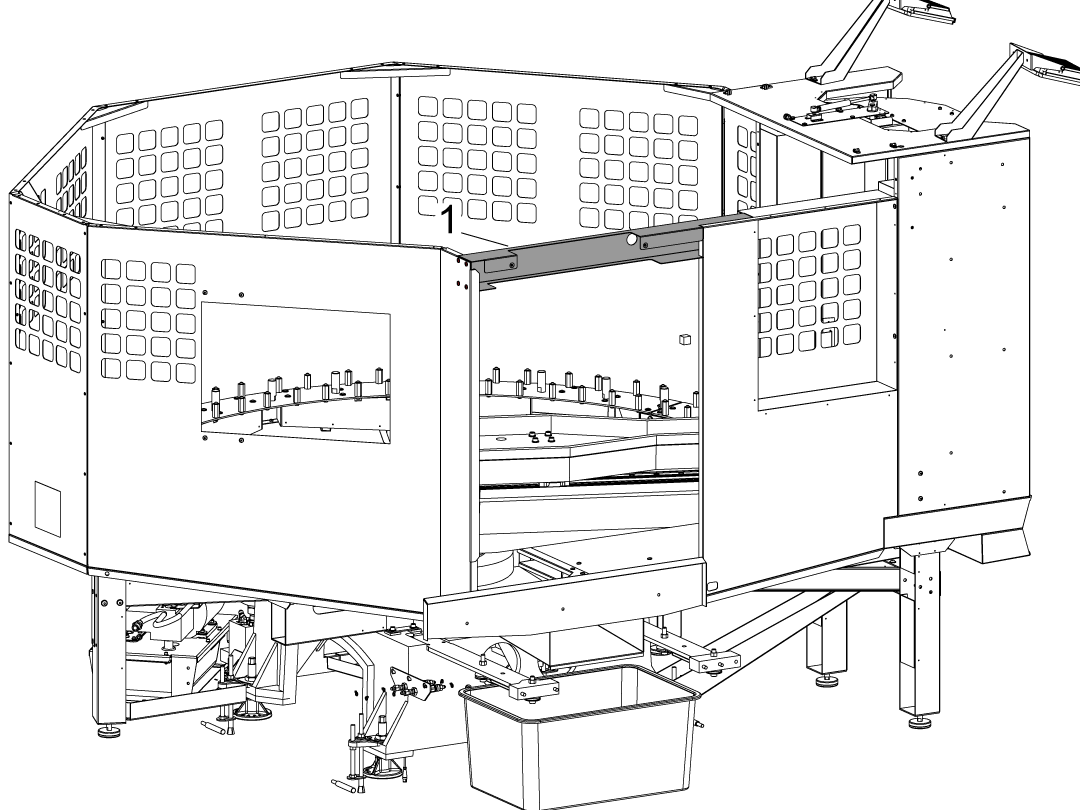
Remove the loading station door blocking bolt [1].

Make sure to raise all of the pallet shelf supporting screws [2] before placing the pallet pool on the floor. 

2

Remove cross bracing [1] from the pallet pool before mating the pallet pool.

3

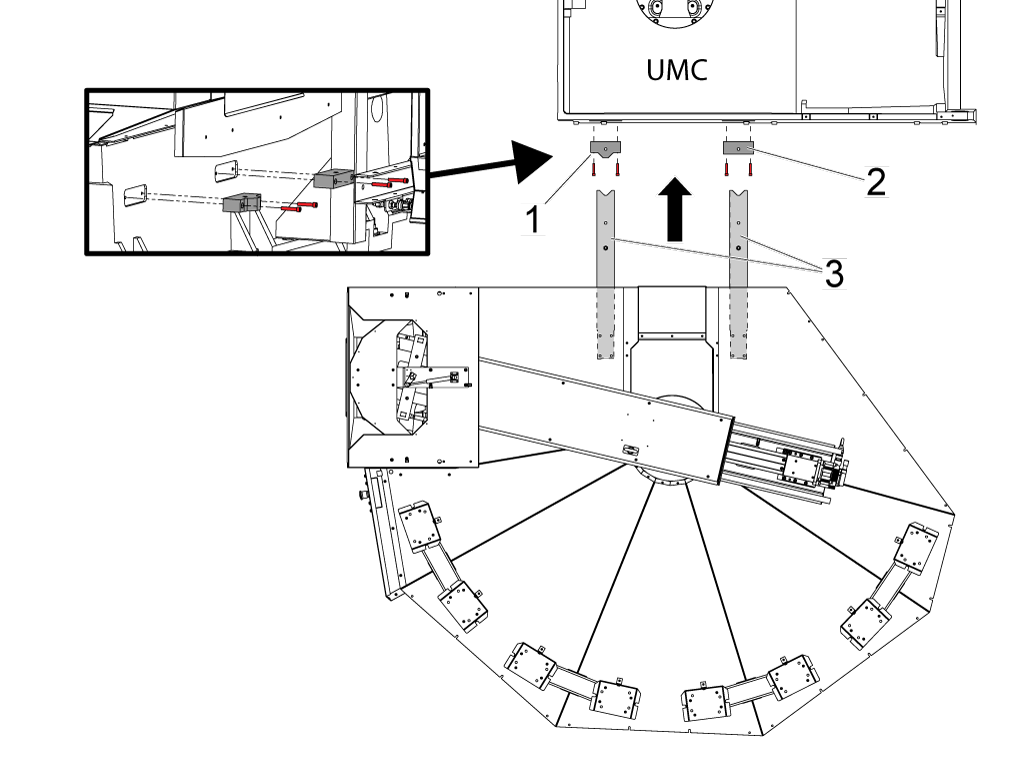
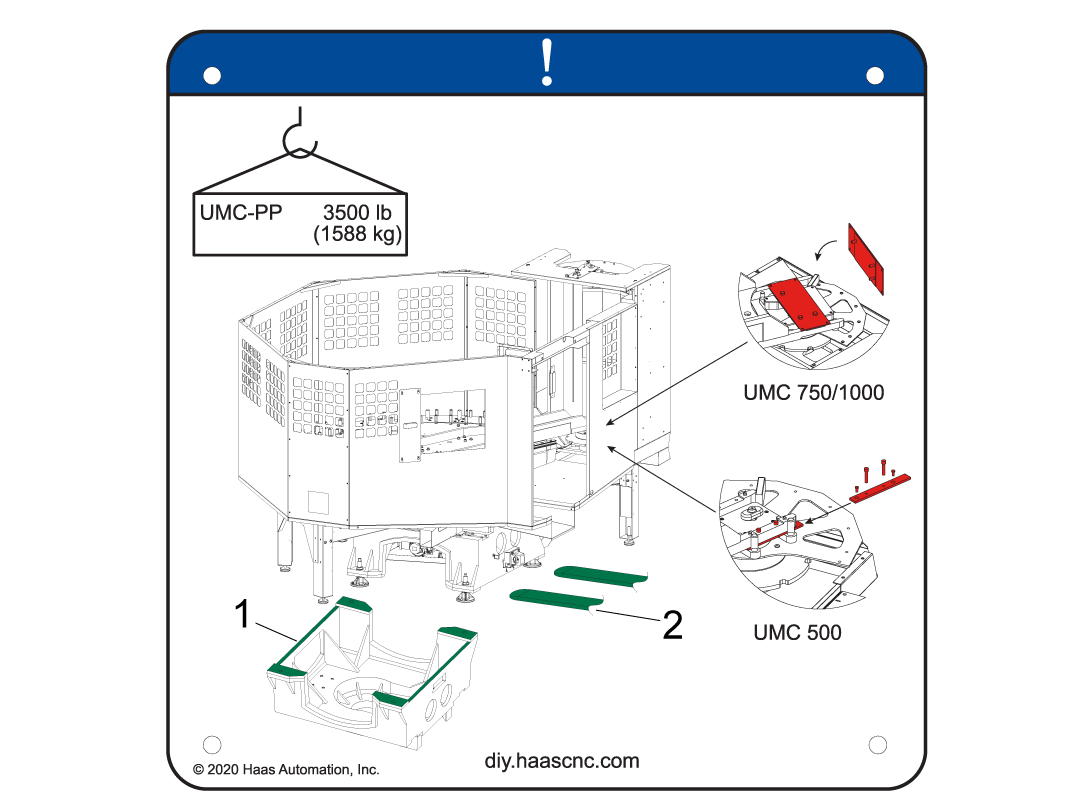
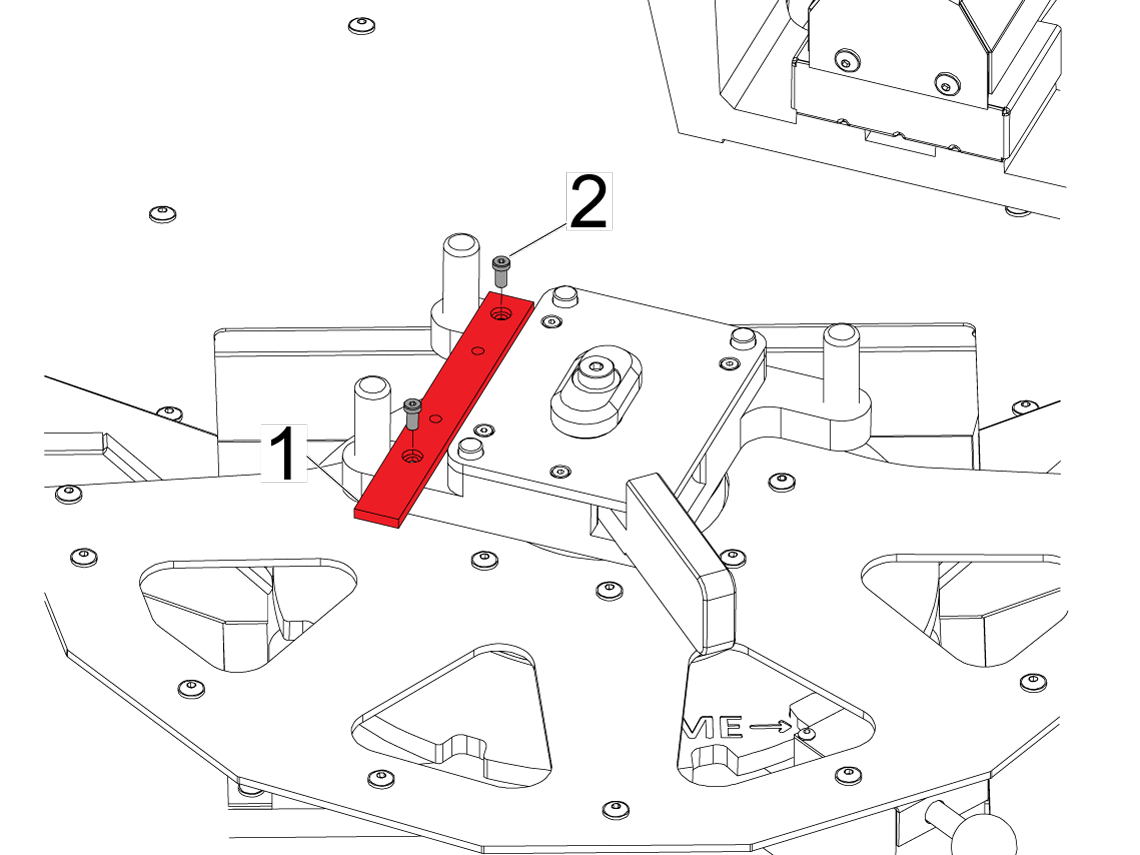
Install the Pallet Pool alignment blocks onto the host machine's base.

Note: The alignment block with the radius [2] must be installed towards the back of the UMC and the alignment block with the flat side [1] must be installed towards the front of the machine. Use the three SHCS 3/8-16 X 2 and the one SHCS 3/8-16 X 1 3/8 [4].

Install the alignment bars [3] onto the pallet pool base.

 NOTE: Use the CABCOOL as a height reference in relation to the pallet pool enclosure opening.

Move the pallet pool assembly so the alignment arms are 3 - 6” (76 - 152 mm) away from the alignment blocks. 

Install the leveling pads under the pallet pool and lower the pallet pool. 

4

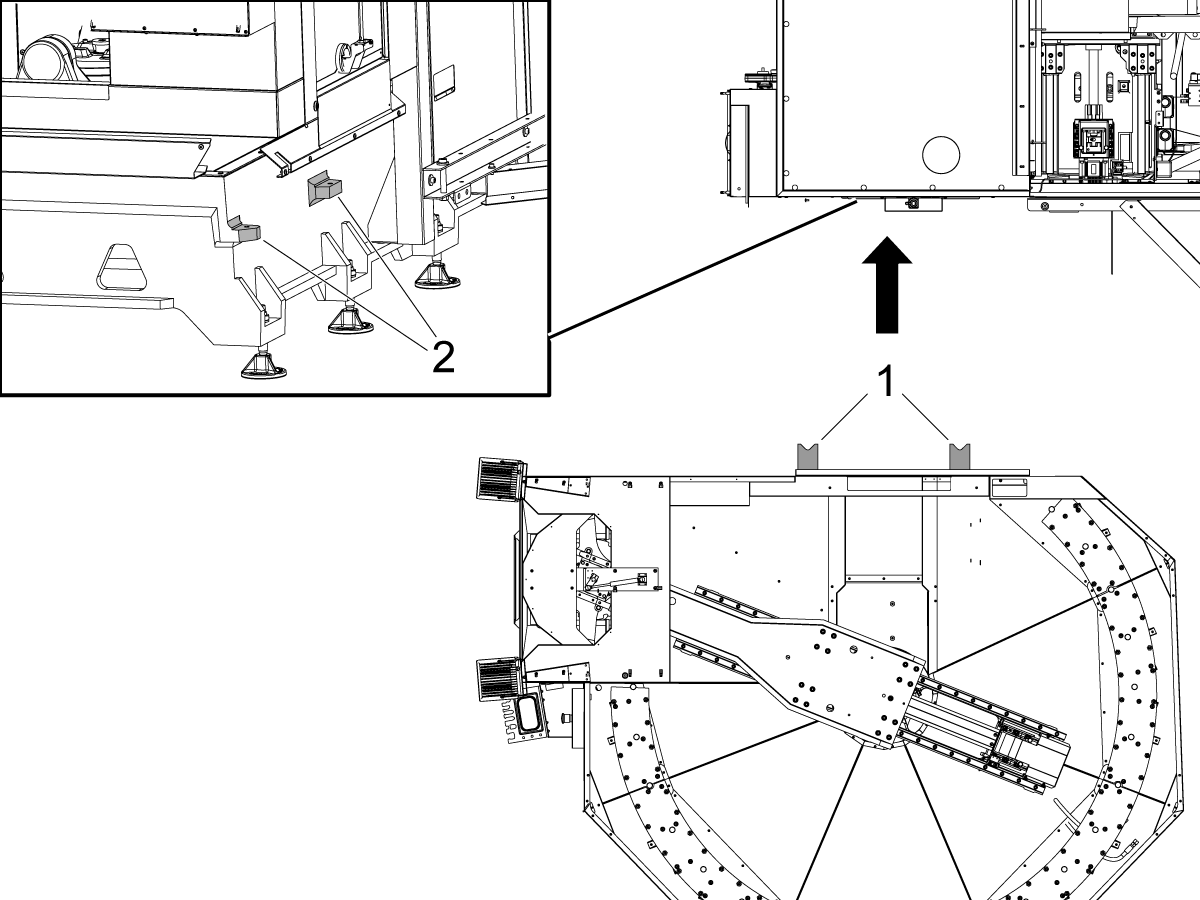
Use a pallet jack or forklift to move the pallet pool close to the machine.

A decal has been placed on the rear of the machine to indicate where the pallet forks [2] should lift the machine from [1].

NOTE: Have the pallet jack pick up the pallet pool from the opposite side of where the slide window would be.

5

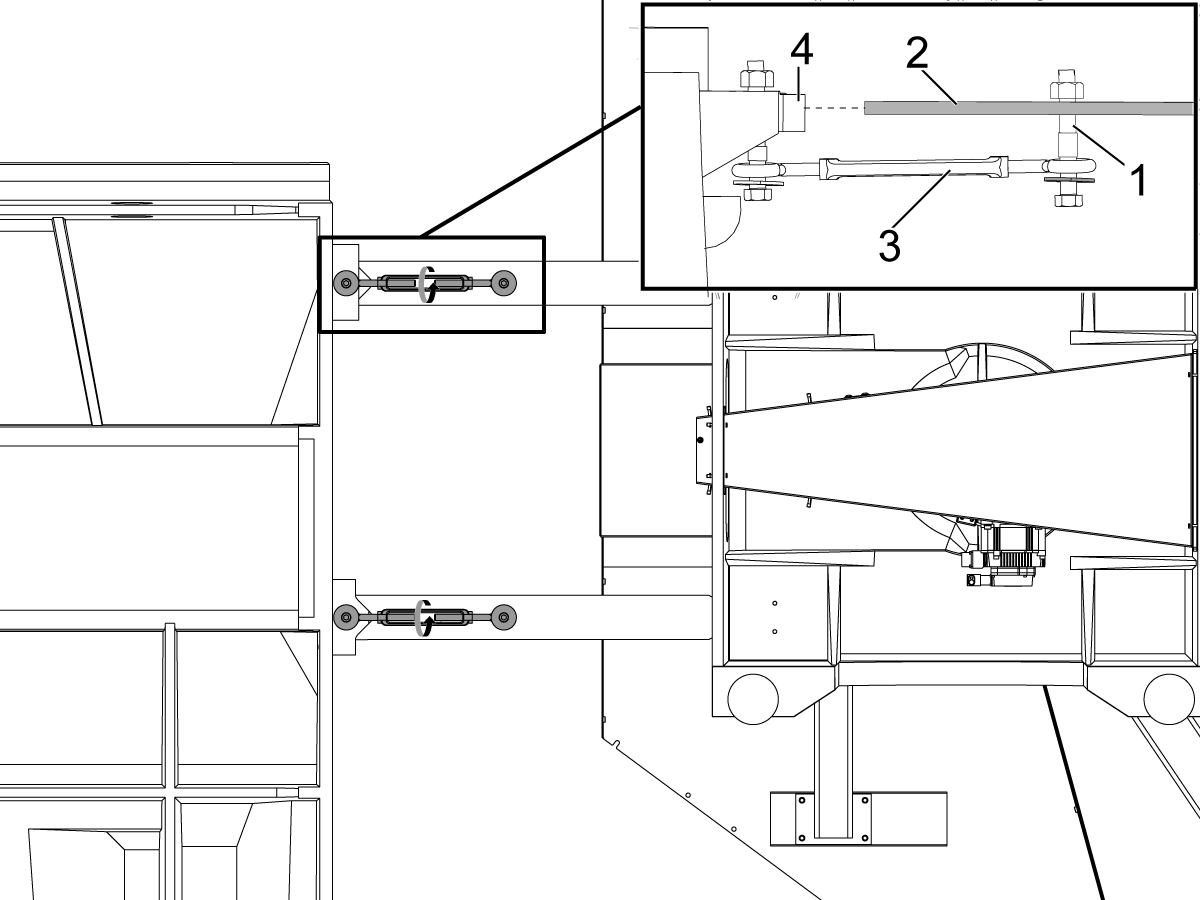
Install the turnbuckles [3] with the provided hardware (SHCS, washer, and bushings [1]) onto the alignment arms [2] and the base casting [4].

NOTE: The side of the turnbuckle with the two bushings should be installed on the side of the pallet pool.

Evenly tighten the turnbuckles until the alignment arms are almost tight against the alignment bars, STOP once the alignment bars areapproximately 1-2" away from the alignment blocks.

Adjust the height of the pallet pool so that the height of the alignment bars are to the center of the blocks before tightening the turnbuckles flush to the alignment blocks. Raise or lower the pallet pool leveling screws evenly when doing so.

Continue to evenly tighten the turnbuckles until the alignment arms are tight against the alignment blocks.

Once the alignment bars and blocks are evenly flush to each other loosen up the turn buckles.

6

Make sure the main circuit breaker is in the [OFF] position and wait until the Vector Drive High-Voltage light turns off.

 Note: The PR (Pallet Rotate) and PS (Pallet Slide) amps are already installed at the factory.

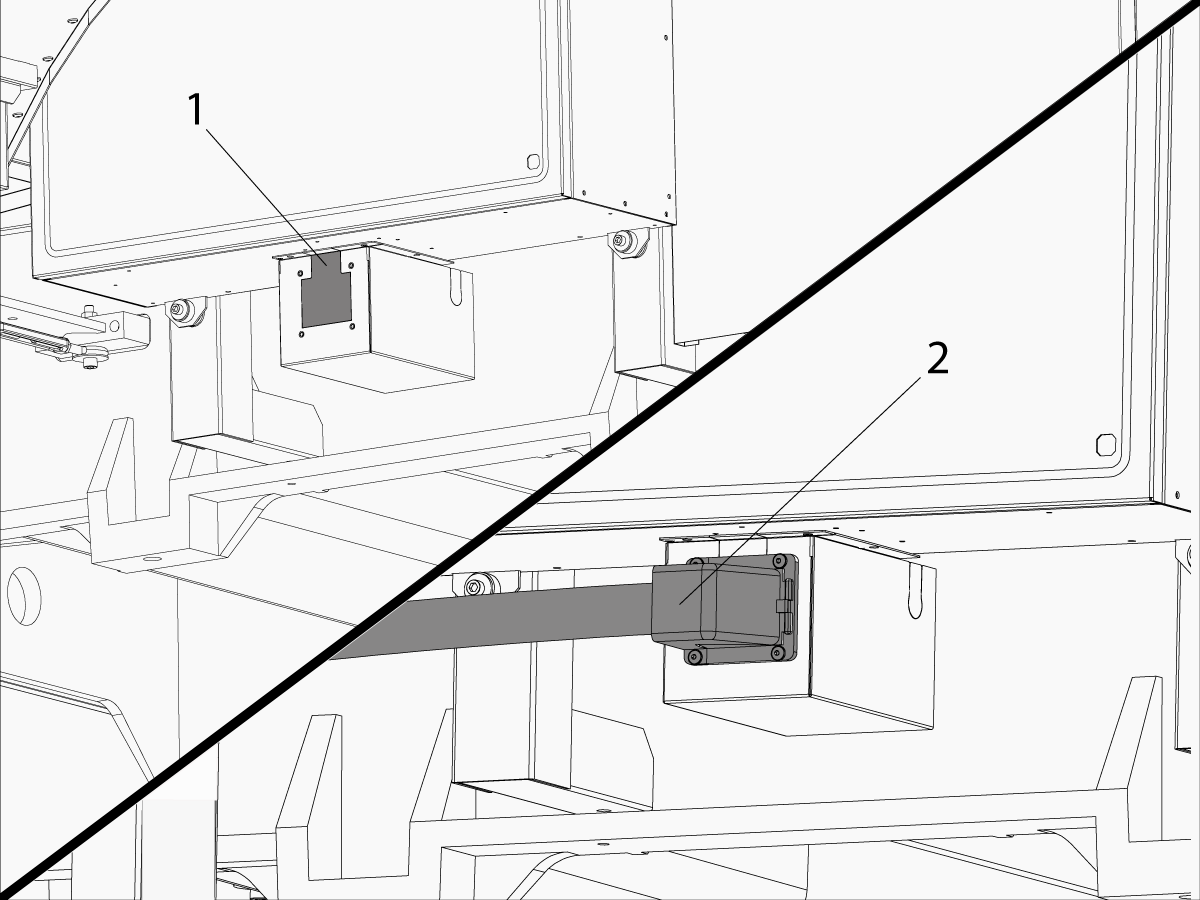
Knock out the pre-cut access panel [1].

Route the pallet pool cables [2] into the control cabinet as shown in the illustration.

Connect the PR motor encoder cable to Maincon PCB channel 15
Connect the PS motor encoder cable to Maincon PCB channel 16.

Connect the PR motor power cable to the amplifier labeled PR. Install the ferrite filter bead on the motor power cable.

Connect the PS motor power cable to the amplifier labeled PS. Install the ferrite filter bead on the motor power cable.

7

Updated

Install the bulkhead under the control cabinet using the machine screws.

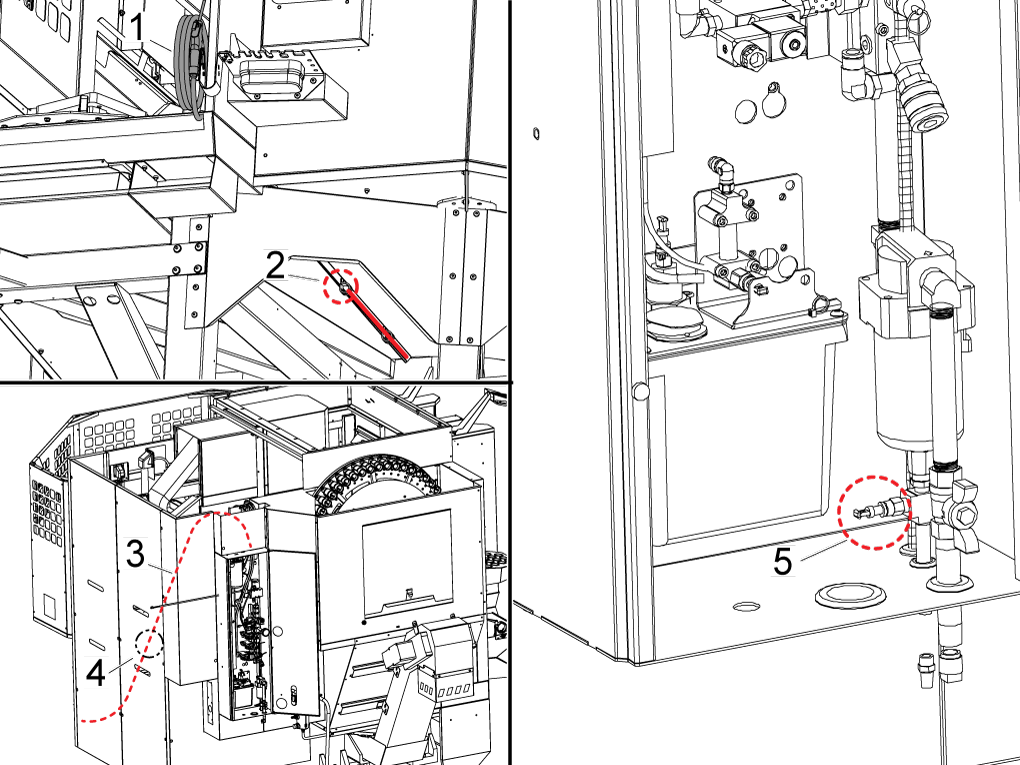
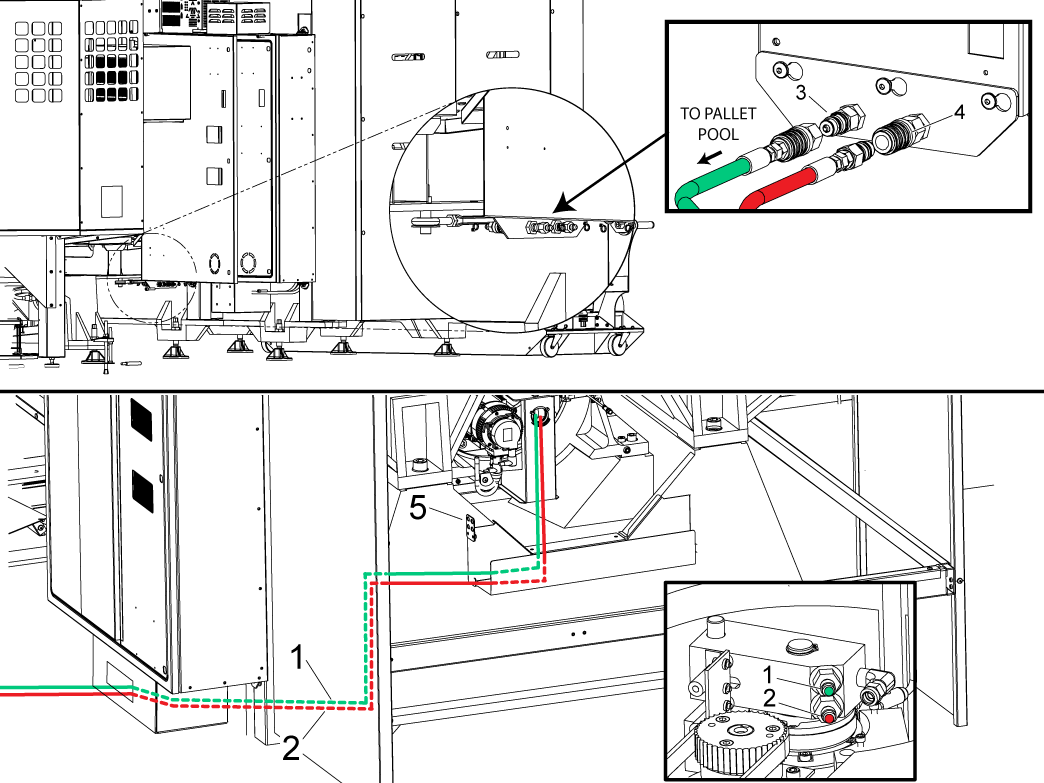
Connect the hydrualic lines to the bulkhead. The pallet unclamp [2] is marked with a red zip tie and pallet clamp [1] is marked with a green zip tie. The hydraulic lines should run through the conduit neatly.

Route the HPU oil level sensor cable 32-0423 from the HPU to the connector bracket [4].

8

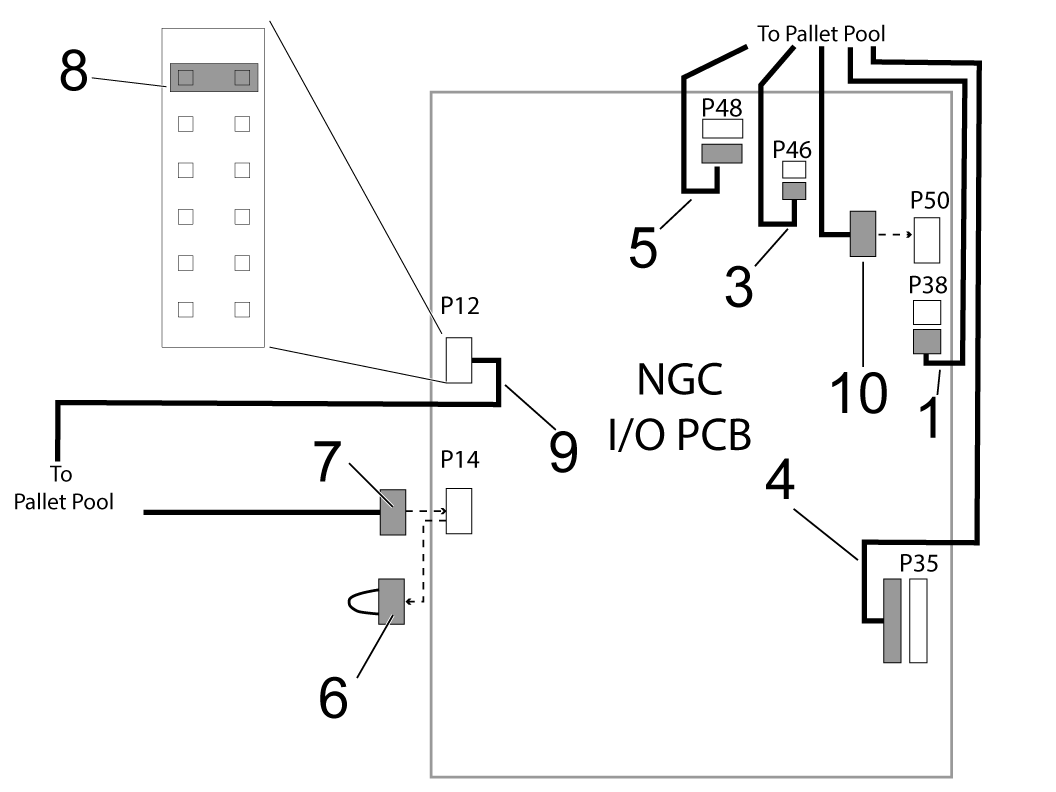
Connect HPU UP/ DWN SOL 33-1576 [1] to P38.

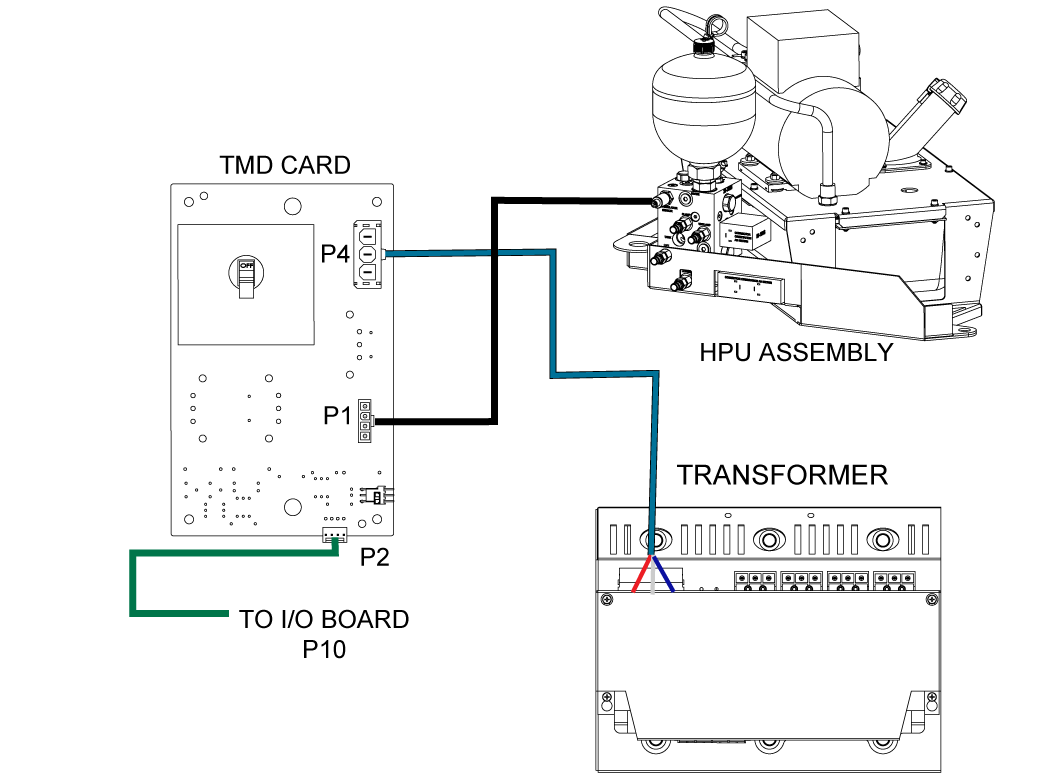
Connect HPU PUMP PWR 33-0429  [2] to P31.

Connect HPU THRML PROBE 32-1805 [3] to P36.

Connect HPU PALLET CLMP SOL 32-1527 [4] to P35.

Connect HPU PRESSURE SNSR [5] to P48.

Remove the jumper connection from the P14 [6] connector on the I/O PCB.

Connect PP STATUS SWITCHES 32-0523 [7] to P14

Remove the shorting block from the P12 [8] connector on the I/O PCB

Connect PALLET CHNGR STATION 33-0508A [9] to P12

Connect PALLET ALRAM cable 33-0509 [10]  to P50.

Make sure all the Pallet Pool status bracket connectors are plugged into the correct location.

 NOTE: Store the Pallet Pool jumpers in a safe location, these will be used by the service personnel to move or service the machine.

9

Remove the bolts [2] that attach the RAM forks to the shipping bracket [1].

10

Set the main circuit breaker to the ON position.

Push [POWER ON].

Zero Return all the Axis'

Do the following to enable the pallet pool option on a UMC-500.  

Important:  You will need to do this step if you perform a option 5 clean install option on a UMC-500 with a pallet pool.

Set setting 382 Disable Pallet Changer to None.

Find the Haas Pallet Pool Parameters decal on the E-Stop on the Pallet Pool machine.  Write down the values.

Use the USB Service key to go into Service Mode.

Press [DIAGNOSTIC] Go to the PARAMETERS> Factory setting tab.

Set the following factory settings values:

  1. 2128 [:] Pallet Pool Type = HPU Lift
  2. 40.011 (HPU 1 Type ) = On Demand
  3. 15.019 [:] PR-Axis Invisible = False
  4. 16.019 [:] PS-Axis Invisible = False
  5. 15.004 [:] PR-Axis Disable = False
  6. 16.004 [16:3] PS-Axis Disabled = False
  7. Turn TMD card on
Set the Grid and TC offsets for PR and PS axis
 
  1. 15.078 PR-Axis Tool Change Offset = Use the decal value.
  2. 15.140 PR-Axis Grid Offset = Use the decal value.
  3. 16.078 PS-Axis Tool Change Offset = Use the decal value.
  4. 16.140 PS-Axis Grid Offset = Use the decal value.
  5. Zero Return after the grid offset is adjusted

11

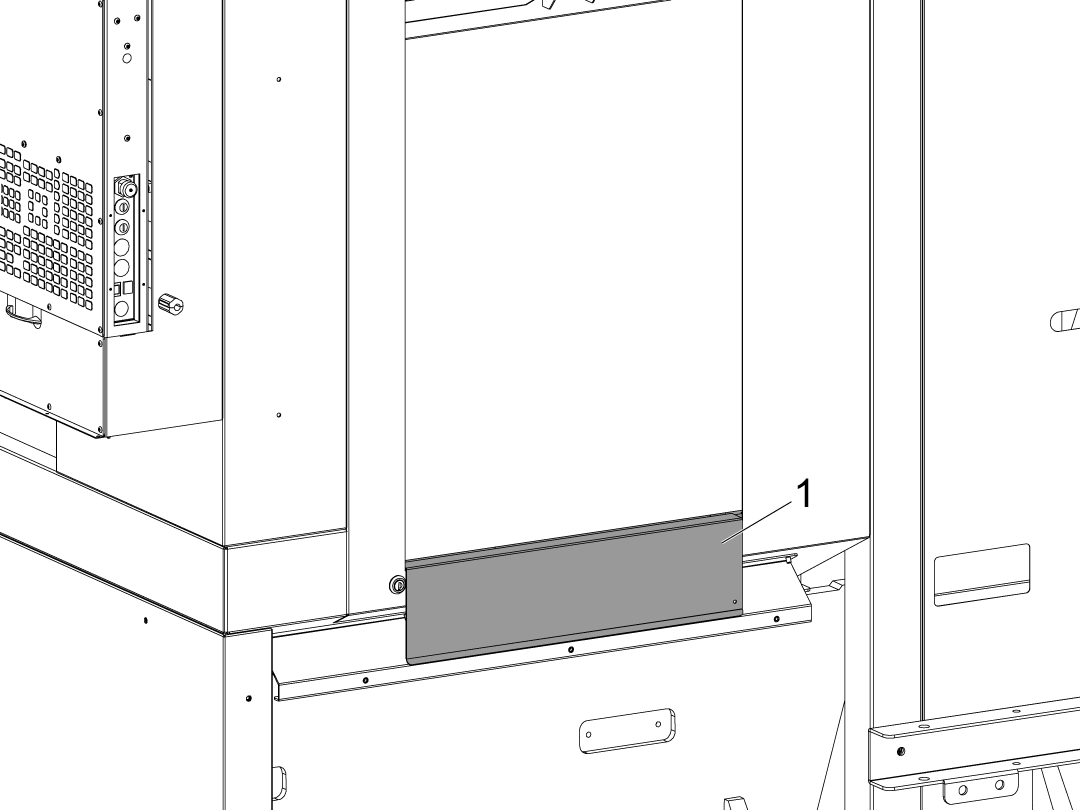
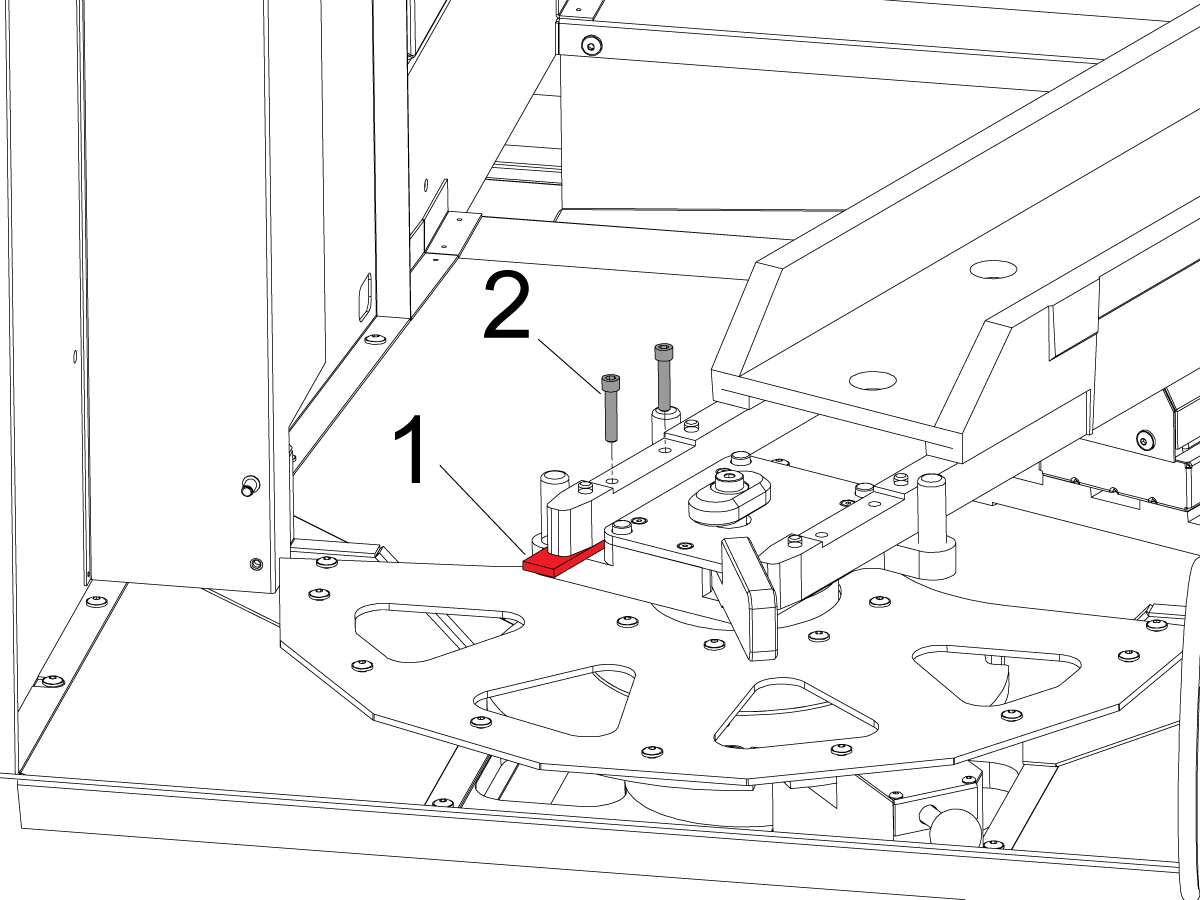
Remove the shipping brackets [1] by removing the hardware [2] attaching the shipping bracket to the loading station .

Base Level Pallet Pool

1

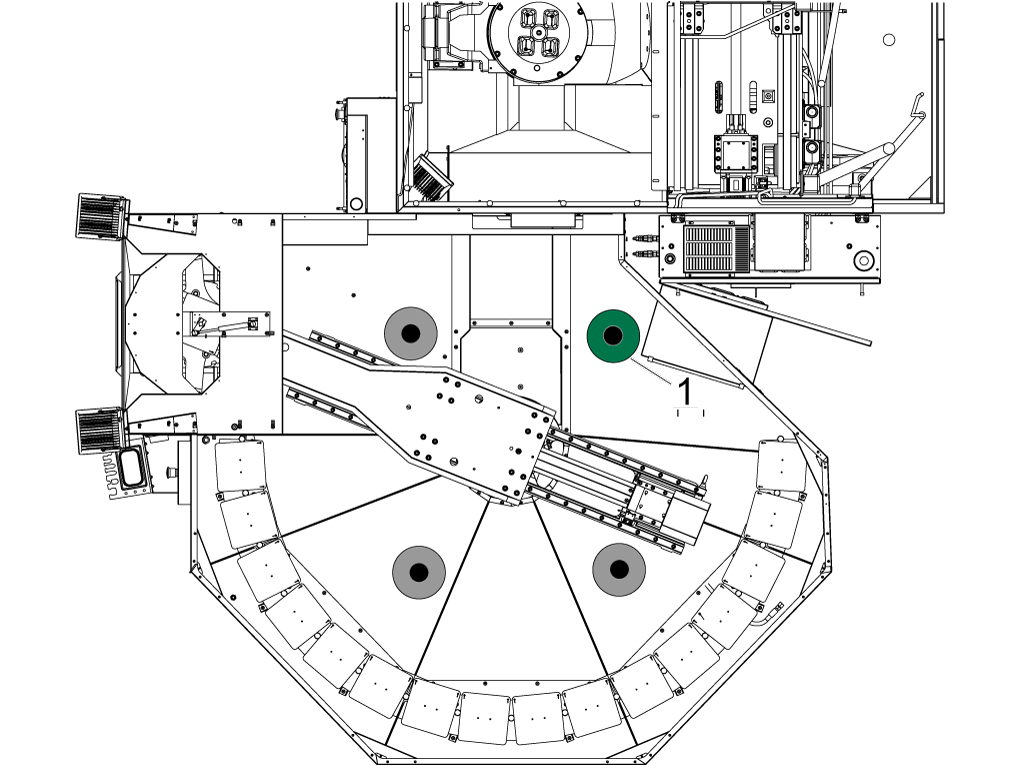
Verify all outer supports legs are NOT touching the floor.

Make sure the pallet pool sit on 3 points, the leveling foot that is not touching the puck is the one closest to the machine control cabinet [1].

2

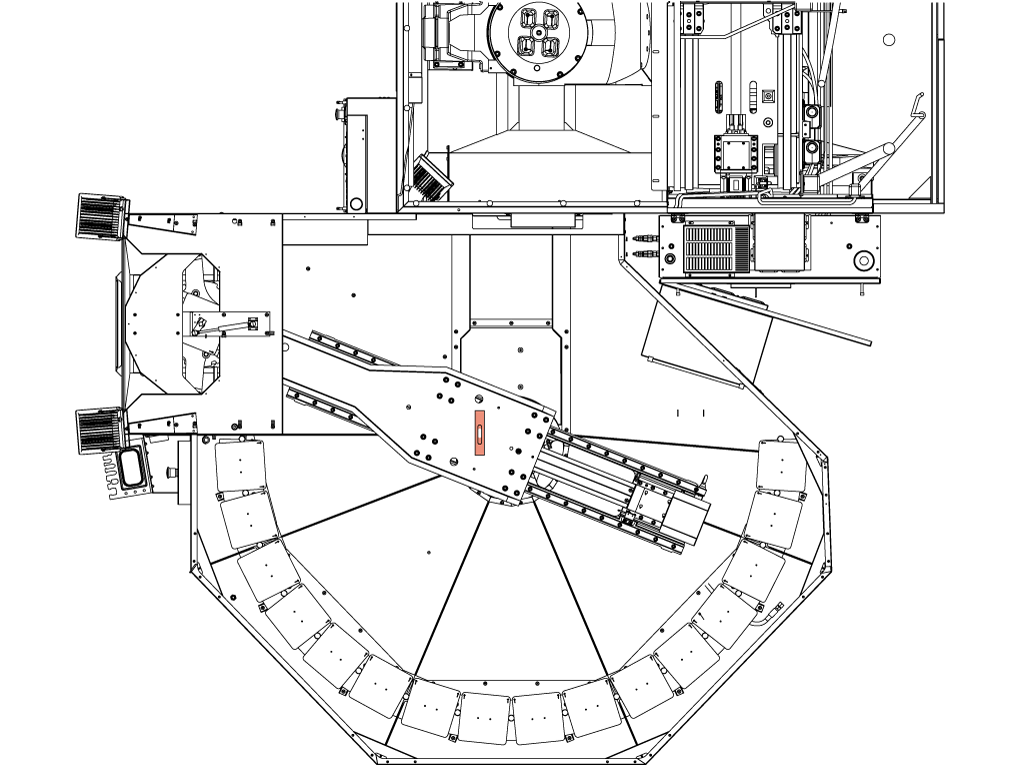
Move the ram to its home position if it is not already, place the bubble level on ram and rough level with respect to X & Y. 

NOTE: Rough level by adjusting the 3 leveling feet without adjusting the 4th in the air.

Align Pallet Drop Off Station

1

Insert the Service Key USB and put the machine in Service Mode.

Make sure there are no obstructions inside the machine or inside the pallet pool area. Pull out all the [E-STOPS] and [RESET] the alarms.

Press [ZERO RETURN] and then press [ALL]. The machine will zero return all the axes.

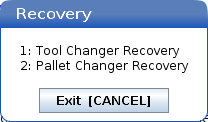
Once all the axis are zero returned press [RECOVER]. A pop up box will appear, select [2] for Pallet Changer Recovery.

2

The Pallet Changer Recovery screen shows the Pallet Pool Status. Make sure the Pallet Lifter is Down [1]. If not press [ALTER] to bring the Pallet Lifter down.

Press [R] and then the [DELETE] button. This will rotate the pallet lifter towards station R.

Press [F1] to open the auto window [3].


3

Still on the pallet recovery page press [+Z] to select the Pallet Slide Axis to send the RAM in the machine.

Make sure the bottom of the forks clear the receiver casting. Raise the pallet pool leveling screws evenly if they do not.

Then press [-Z] to select the Pallet Rotate Axis and manually rotate the RAM  adjust the PR axis until the forks are aligned side to side to the locating pins on the receiver. 

Press [Recovery] to get out of pallet recovery and go to Factory Settings 2321 [:] Shelf R Rotary Offset, set this offset to the current PR axis position.

Jog the PS axis to send the RAM back into the pallet pool area and zero return the PR axis.

4

Re-enter pallet recovery page and press [R] then [DELETE] to rotate pallet pool to R position.

Then press [F1] to open the window and then press [+Z] to select the Pallet Slide Axis and jog the RAM into the machine. 

Press [F2]  to unclamp the clamp cylinder and place a pallet onto the receiver with the arrows pointing towards the slide window.

 WARNING: The air blast on the receiver makes a loud noise ear plugs are recommended.

Press [F2] to clamp the pallet. 

With the Pallet Pool in the down position, use the Gap Gauge [1] 25-14354 to set the gap by adjusting the height of the Pallet Pool. Evenly raise or lower the pallet pool leveling screws in accordance to the gap gauge.

NOTE: The pallet pool should still be only on 3 points while adjusting the gap.


5

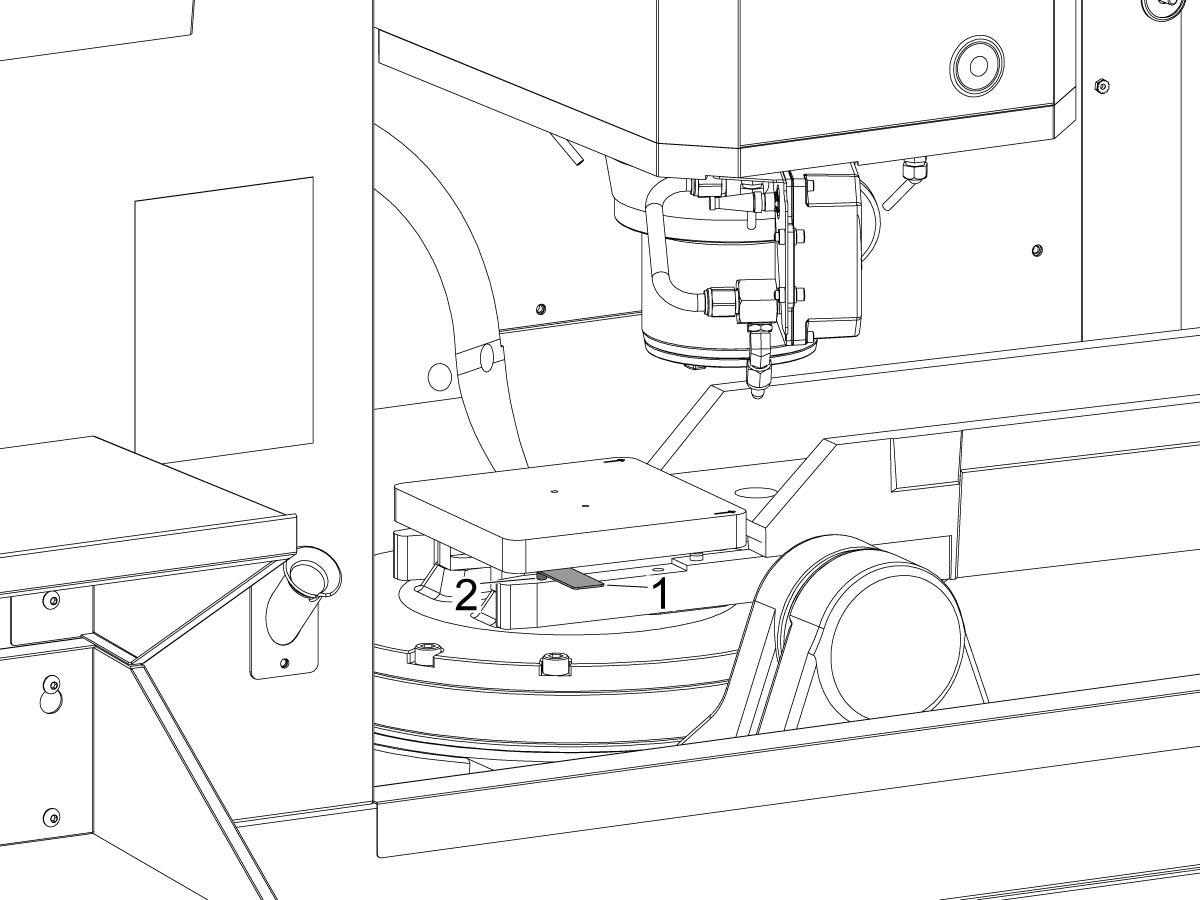
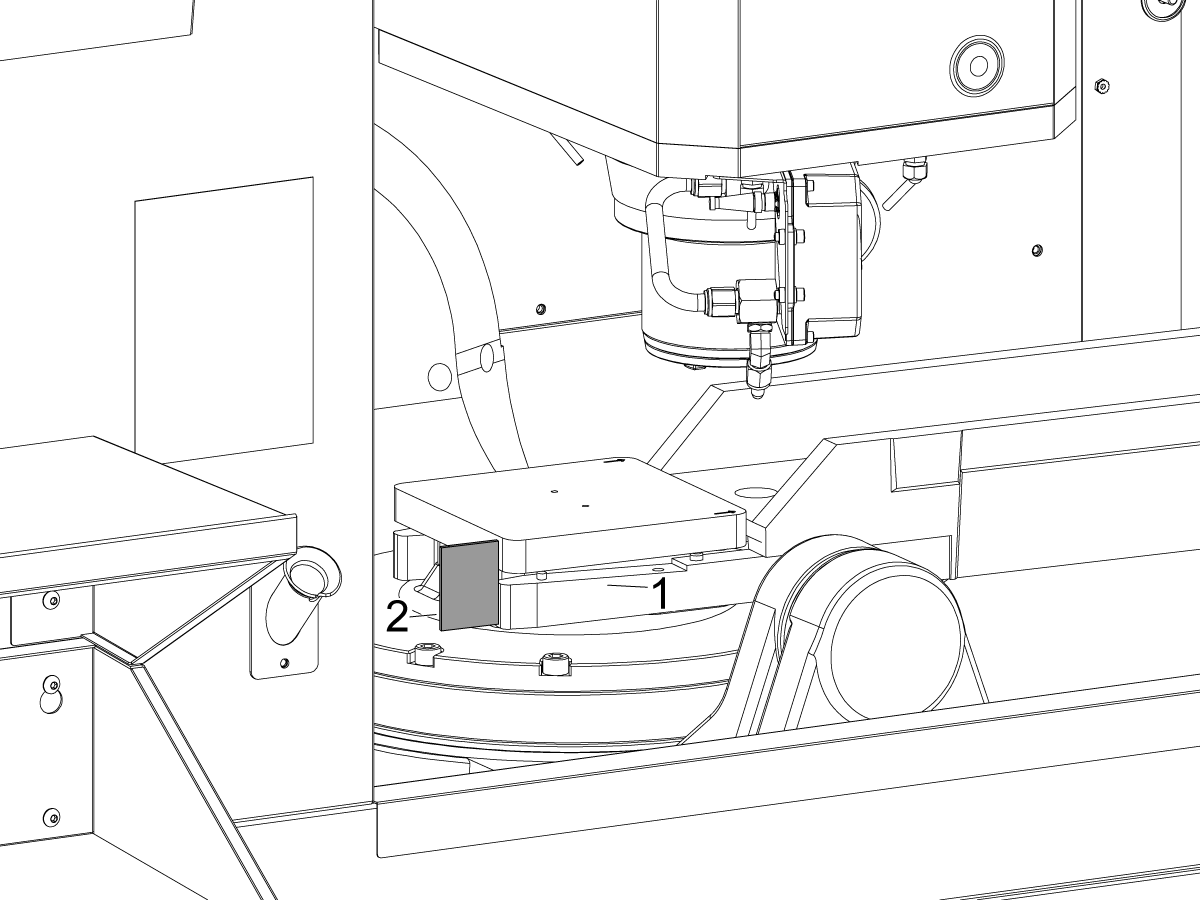
While in the same position adjust the Pallet Slide Offset.

Use the provided shim 25-14354 [2] as a straight edge to align the pallet to the fork [1] as shown in the image.

Press [Recovery] to get out of pallet recovery and go to Factory Settings 2313 [:] Shelf R Slide Offset and set the current PS axis position as the offset.

Jog the RAM back into the machine and zero return the pallet pool.

Re-enter the pallet recovery page and press [R] then [DELETE]  to send the RAM to the shelf R rotate position. Then press [R ] then [UNDO]  to send the RAM to the shelf R slide position.

Verify the pins are aligned to the holes on the pallet. Unclamp the pallet and raise and lower the pallet to verify it does so smoothly. If it does not adjust Parameters 2321 and 2313 accordingly.

Finally, drop the fourth leveling screw onto the puck.

6

Make sure the RAM is in the down position and press [INSERT] to return the RAM to the pallet pool area.

Press [A] then [DELETE] to rotate the RAM to its home position.

Press [A] and [UNDO] to slide the RAM to its home position.

Verify that the level is still acceptable in the X & Y direction [1].


Align Pallet Loading Station

1

Load a pallet onto the loading station, and with the RAM in the loading station use the shipping bracket [1] to set the gap between the bottom of the RAM forks and the loading station.

Adjust the two loading station leveling feet [2] until the gap is set. Raise and lower the pallet to ensure it does so smoothly. 

NOTE: The gap should be set evenly on both side. 

Setting Up Pallet Stations

1

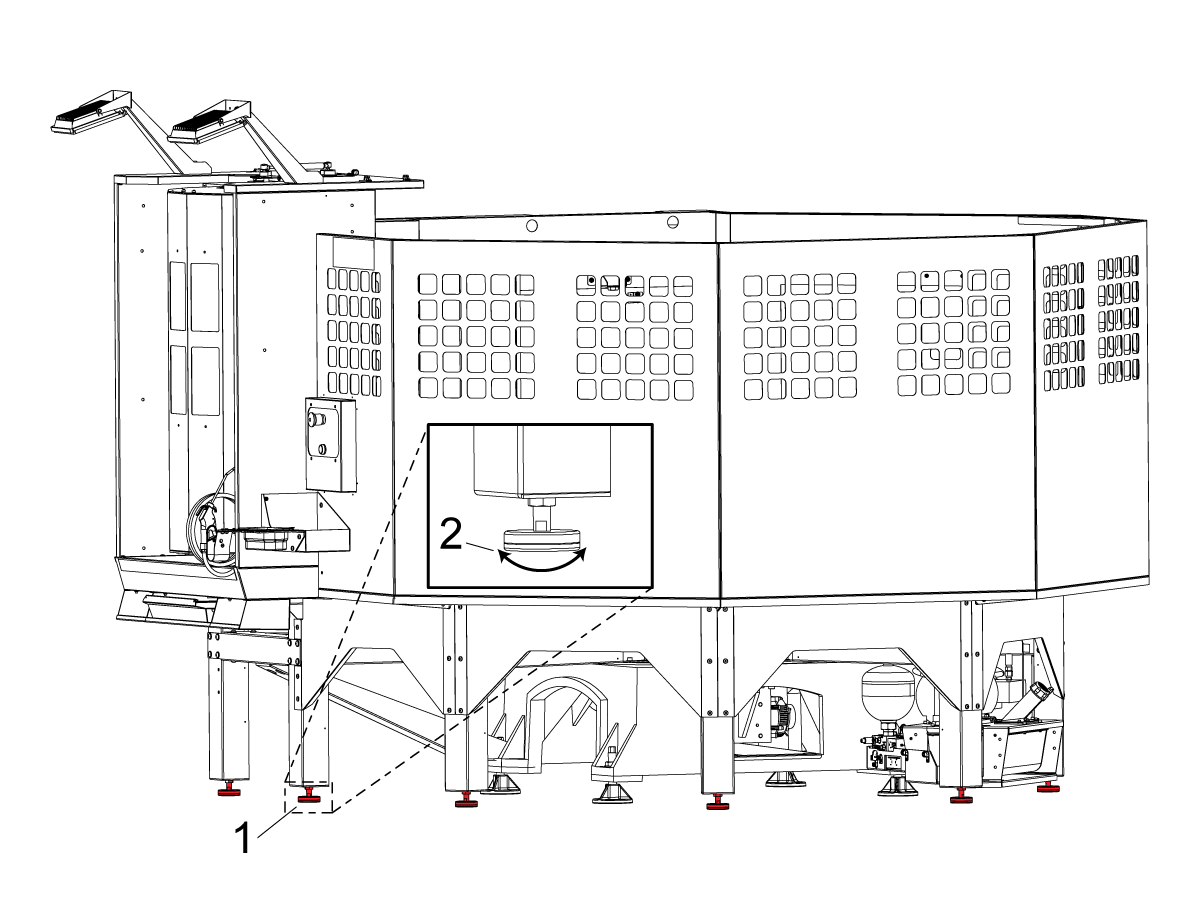
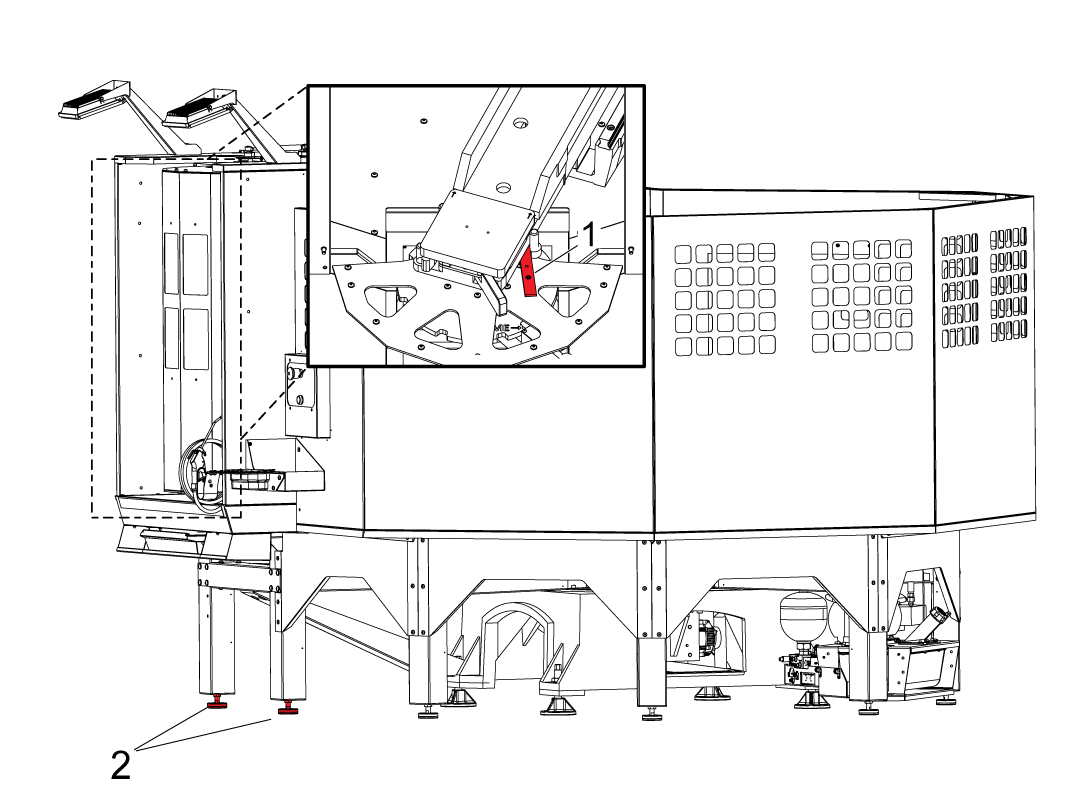
Lower all outer leveling feet [1] to the ground by hand then rotate each leveling foot by another 1/2 turn [2]. 

2

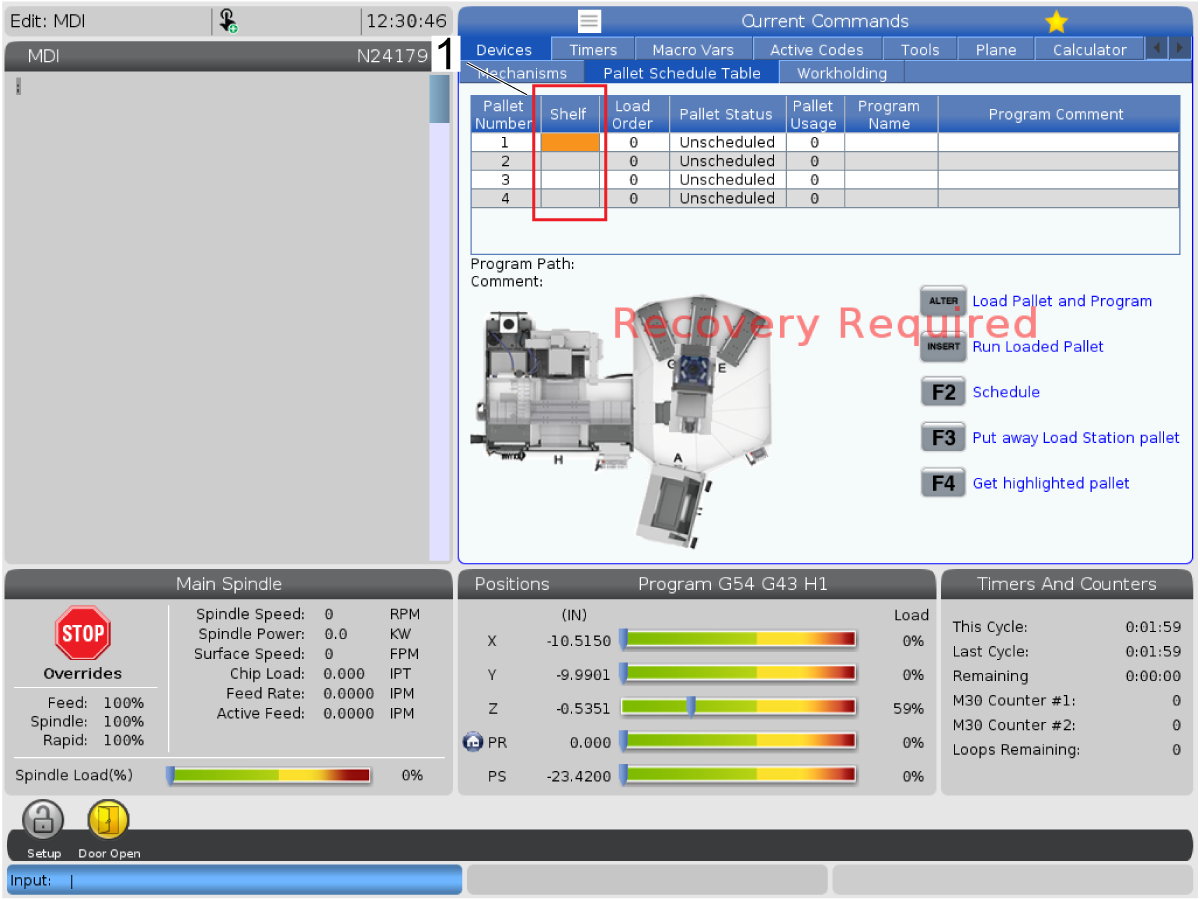
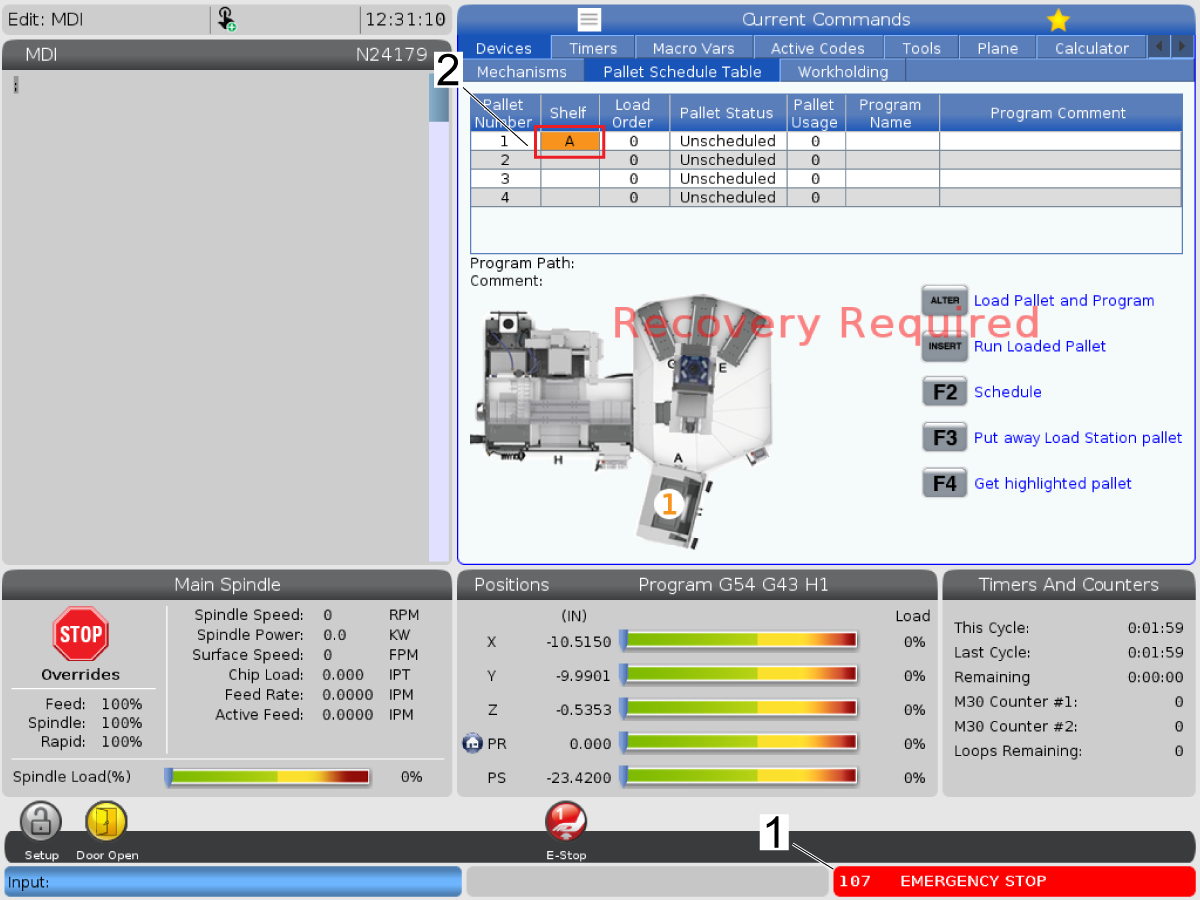
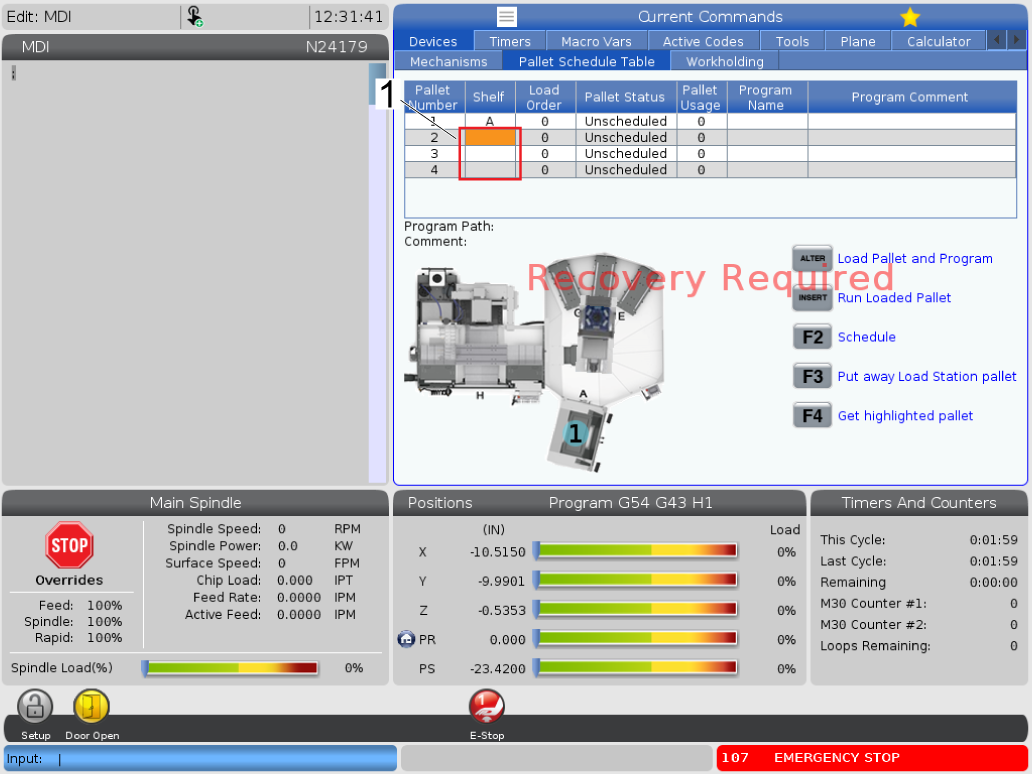
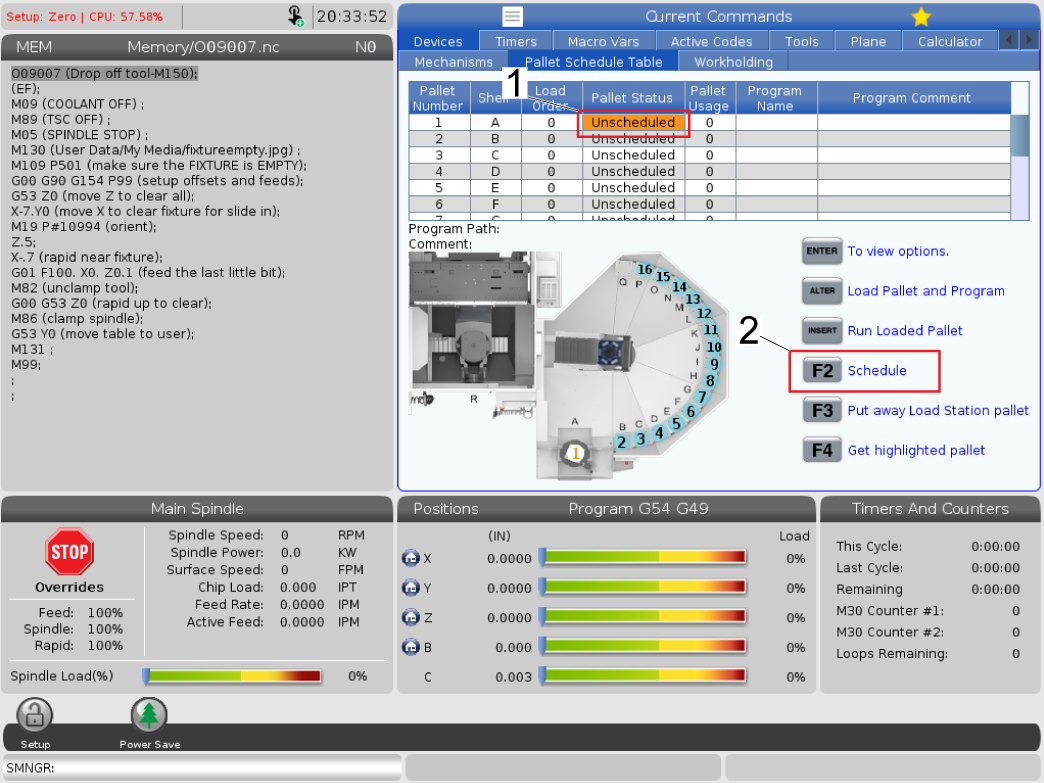
Go to the Pallet Schedule Table and press [F3] to put away the pallet from the load station with the arrows on the pallet facing toward the center of the pallet pool. 

Test the pick up / drop off operation on the remaining stations by using the pallet pool recovery functions.  

Install the anchors.

Install the Pallet Pool guard panels.

Load the remaining pallets using the load station.

3

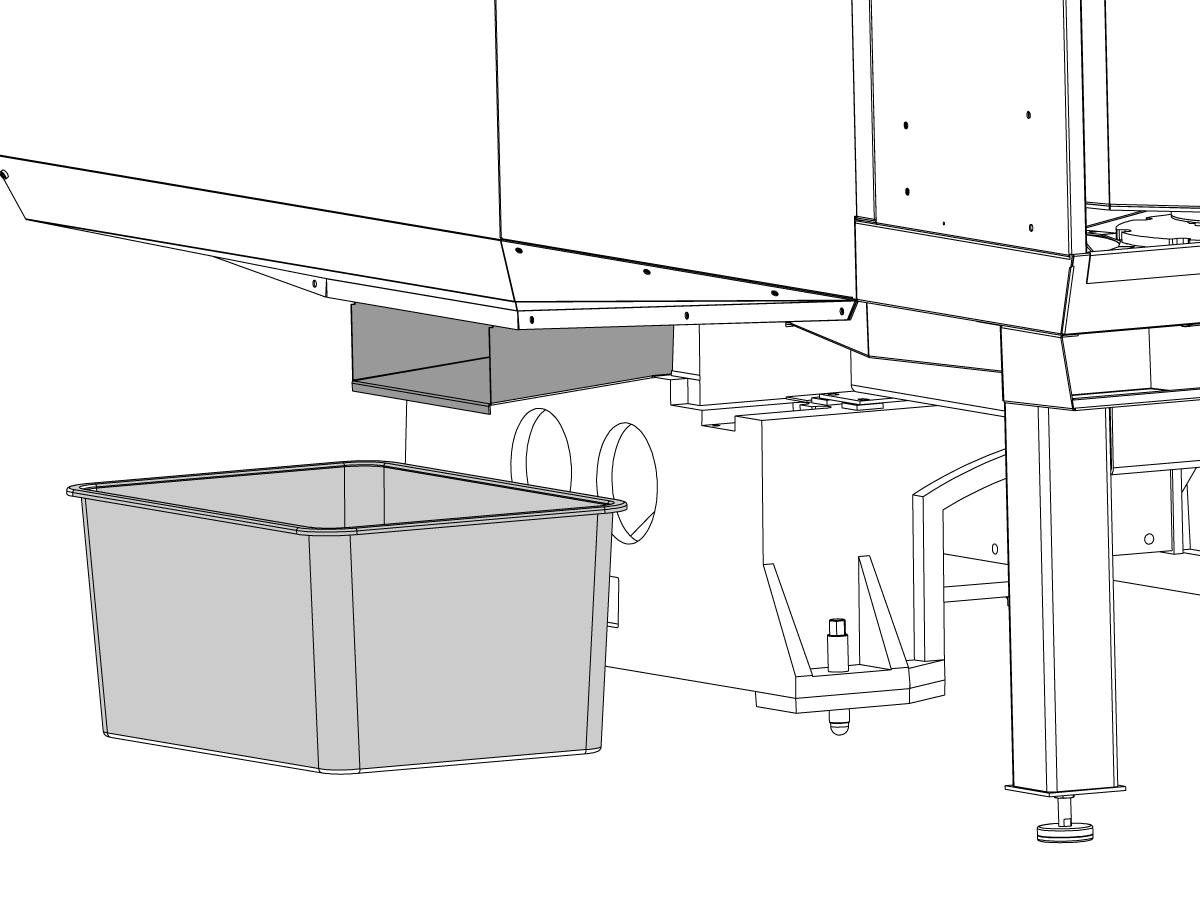
Place the provided tote under the Pallet Pool coolant discharge tray to catch the coolant and chips that drains from the pallets.

Empty the tote as needed. 

FINDEN SIE EINEN HÄNDLER
Haas Logo

美元价格不包括关税、报关费用、保险费、增值税及运费。
USD prices DO NOT include customs duty, customs fees, insurance, VAT, or freight.

人民币价格包含关税、报关费用、货运保险和增值税, 但不包括运费。
CNY prices include customs duty, customs fees, insurance, and VAT. DOES NOT include freight.

Haas Auslieferungspreis

Dieser Preis enthält Versandkosten, Export- und Importzölle, Versicherungsgebühren und sämtliche weiteren Kosten, die beim Versand an einen mit Ihnen als Käufer vereinbarten Auslieferungsort in Frankreich anfallen. Es können keine weiteren obligatorischen Kosten zur Lieferung eines Haas CNC-Produkts hinzugefügt werden.

BLEIBEN SIE AUF DEM NEUESTEN STAND MIT TECHNOLOGIE UND GEHEIMTIPPS VON HAAS!

Melden Sie sich jetzt an!   

HAAS TOOLING ACCEPTS THE FOLLOWING:

  • Service und Support
  • Eigentümer
  • Service anfordern
  • Betriebsanleitungen
  • Haas Ersatzteile
  • Reparaturanfrage Drehtisch
  • Einkaufsinformationen
  • Zusammenstellung und Preis einer neuen Haas
  • Verfügbare Produkte
  • Die Haas-Preisliste
  • CNCA Finanzierung
  • Über Haas
  • Berufliche Perspektiven
  • Zertifizierungen und Sicherheit
  • Schreiben Sie uns, oder rufen Sie uns an
  • Geschichte
  • Allgemeine Geschäftsbedingungen
  • Haas Tooling Allgemeine Geschäftsbedingungen
  • Privatsphäre
  • Garantie
  • Haas Community
  • Haas Zertifizierungsprogramm
  • Haas Motorsport
  • Gene Haas Foundation
  • HTEC-Netzwerk
  • Veranstaltungen
  • Nehmen Sie an der Diskussion teil!
  • Facebook
  • Twitter
  • Flickr
  • YouTube
  • LinkedIn
  • Instagram
© 2021 Haas Automation, Inc – CNC-Werkzeugmaschinen

2800 Sturgis Rd., Oxnard, CA 93030 / Toll Free: 800-331-6746
Phone: 805-278-1800 / Fax: 805-278-2255

Cookie-Richtlinien

Wir verwenden Cookies, um Ihre Benutzererfahrung zu verbessern.. Unser Cookie-Hinweis beschreibt, welche Cookies wir verwenden, warum wir Sie verwenden und wie Sie weitere diesbezügliche Informationen erhalten. Bitte bestätigen Sie Ihr Einverständnis, dass wir Analyse-Cookies verwenden. Falls Sie Ihr Einverständnis nicht geben möchten, können Sie unsere Website trotzdem verwenden, jedoch mit eingeschränkter Benutzererfahrung.

Manage Settings

Cookie-Richtlinien

Wir verwenden Cookies, um Ihre Benutzererfahrung zu verbessern.. Unser Cookie-Hinweis beschreibt, welche Cookies wir verwenden, warum wir Sie verwenden und wie Sie weitere diesbezügliche Informationen erhalten. Bitte bestätigen Sie Ihr Einverständnis, dass wir Analyse-Cookies verwenden. Falls Sie Ihr Einverständnis nicht geben möchten, können Sie unsere Website trotzdem verwenden, jedoch mit eingeschränkter Benutzererfahrung.

Functional Cookies

Analytics Cookies