My Haas Welcome,
!
Haas Tooling MyHaas/HaasConnect Sign In Register Haas Tooling MyHaas/HaasConnect Sign Out Welcome, My Machines Latest Activity My Quotes My Account My Users Sign Out
Find Your Distributor
  1. Select Language
    1. English
    2. Deutsch
    3. Español - ES
    4. Español - MX
    5. Français
    6. Italiano
    7. Português
    8. Český
    9. Dansk
    10. Nederlands
    11. Magyar
    12. Polski
    13. Svenska
    14. Türkçe
    15. 中文
    16. Suomi
    17. Norsk
    18. الإنجليزية
    19. български
    20. Hrvatski
    21. Ελληνικά
    22. Română
    23. Slovenský
    24. Slovenščina
    25. 한국어
    26. 日本語
    27. Українська
  • machines Main Menu
    • Vertical Mills
      Vertical Mills
      Vertical Mills View All
      • Vertical Mills
      • VF Series
      • Universal Machines
      • VR Series
      • VP-5 Prismatic
      • Pallet-Changing VMCs
      • Mini Mills
      • Mold Machines
      • High-Speed Drill Centers
      • Drill/Tap/ Mill Series
      • Toolroom Mills
      • Pocket Mill
      • Compact Mills
      • Gantry Series
      • SR Sheet Routers
      • Extra-Large VMC
      • Double-Column Mills
      • 3+2 Positioning Machines
    • Multi-Axis Solutions
      Multi-Axis Solutions
      Multi-Axis Solutions View All
      • Multi-Axis Solutions
      • Y-Axis Lathes
      • 5-Axis Mills
    • Lathes
      Lathes
      Lathes View All
      • Lathes
      • ST Series
      • Dual-Spindle
      • Box Way Series
      • Toolroom Lathes
      • Chucker Lathe
      • Pocket Lathe
      • Haas Bar Feeders
    • Horizontal Mills
      Horizontal Mills
      Horizontal Mills View All
      • Horizontal Mills
      • 50-Taper
      • 40-Taper
    • Rotaries & Indexers
      Rotaries & Indexers
      Rotaries & Indexers View All
      • Rotaries & Indexers
      • Rotary Tables
      • Indexers
      • 5-Axis Rotaries
      • Extra-Large Rotaries
    • Special Series
      Special Series
      Special Series View All
      • Special Series
      • EU_Series_Redirect
    • Automation Systems
      Automation Systems
      Automation Systems View All
      • Automation Systems
      • Mill Automation
      • Lathe Automation
      • Automatic Parts Loaders
      • Automation Models
    • Desktop Machines
      Desktop Machines
      Desktop Machines View All
      • Desktop Machines
      • Desktop Mill
      • Desktop Lathe
      • Control Simulator, Standard
      • Control Simulator, Premium
    • Shop Equipment
      Shop Equipment
      Shop Equipment View All
      • Shop Equipment
      • Knee Mill
      • Haas Manual Lathes
      • Haas Saws
    • Fabrication Machines
      Fabrication Machines
      Fabrication Machines View All
      • Fabrication Machines
      • Laser Cutting Machines
      • CNC Press Brakes
    • QUICK LINKS Special Series  Special Series 
      EU SERIES EU SERIES BUILD & PRICE | PRICE LIST BUILD & PRICE | PRICE LIST In-Stock Machines In-Stock Machines WHAT’S NEW WHAT’S NEW YOUR FIRST CNC YOUR FIRST CNC
      SHOPPING TOOLS
      • Build & Price a Haas
      • Price List
      • Available Inventory
      • CNCA Financing
      WANT TO TALK TO SOMEONE?

      A Haas Factory Outlet (HFO) can answer your questions, and walk you through your best options.

      CONTACT YOUR DISTRIBUTOR >
  • Options Main Menu
    • The Haas Control Value Option Packages
      Value Option Packages
      Value Option Packages View All
      • Value Option Packages
    • Product Image Spindles
      Spindles
      Spindles View All
      • Spindles
    • Product Image Tool Changers
      Tool Changers
      Tool Changers View All
      • Tool Changers
    • Product Image 4th- | 5th-Axis
      4th- | 5th-Axis
      4th- | 5th-Axis View All
      • 4th- | 5th-Axis
    • Product Image Turrets & Live Tooling
      Turrets & Live Tooling
      Turrets & Live Tooling View All
      • Turrets & Live Tooling
    • Product Image Probing
      Probing
      Probing View All
      • Probing
    • Haas Chip & Coolant Management Chip & Coolant Management
      Chip & Coolant Management
      Chip & Coolant Management View All
      • Chip & Coolant Management
    • The Haas Control The Haas Control
      The Haas Control
      The Haas Control View All
      • The Haas Control
    • Product Image Product Options
      Product Options
      Product Options View All
      • Product Options
    • Product Image Tooling & Fixturing
      Tooling & Fixturing
      Tooling & Fixturing View All
      • Tooling & Fixturing
    • Product Image Workholding
      Workholding
      Workholding View All
      • Workholding
    • Product Image 5-Axis Solutions
      5-Axis Solutions
      5-Axis Solutions View All
      • 5-Axis Solutions
      • 5 Easy Steps to 5-Axis
    • QUICK LINKS Special Series  Special Series 
      EU SERIES EU SERIES BUILD & PRICE | PRICE LIST BUILD & PRICE | PRICE LIST In-Stock Machines In-Stock Machines WHAT’S NEW WHAT’S NEW YOUR FIRST CNC YOUR FIRST CNC
      SHOPPING TOOLS
      • Build & Price a Haas
      • Price List
      • Available Inventory
      • CNCA Financing
      WANT TO TALK TO SOMEONE?

      A Haas Factory Outlet (HFO) can answer your questions, and walk you through your best options.

      CONTACT YOUR DISTRIBUTOR >
  • Why Haas Main Menu
      Discover the Haas Difference
    • Why Haas
    • MyHaas
    • Education Community
    • Industry 4.0
    • Haas Certification
    • Customer Testimonials
  • Service Main Menu
      Welcome to Haas Service
      SERVICE HOME Operator’s Manuals How-To Procedures Troubleshooting Guides Preventive Maintenance Haas Parts Haas Tooling Videos
  • Videos Main Menu
  • Main Menu
    • View All
    • View All
    • View All
    • View All
      • HTEC Curriculum Support
      • Haas Value Option Packages (VOP) Journey
    • View All
      • Haas 10 kg Cobot Package
      • Cobot Kits
      • DC-1 Drill Center
      • CNC Sales News
      • Do More With Your Haas
    • View All
    • View All
      • contact-us-test
      • 4 - AUTOMATION SYSTEMS
      • Carousel-V2
      • expert test
      • Demo_Day_Trident-test
      • Link Test
      • image-sale-tag-test
      • article-list-test
      • Haas 25 kg Robot Package
      • test-algolia-page
    • View All
    • View All
    • View All
    • View All
      • calc-test
    • View All
    • QUICK LINKS Special Series  Special Series 
      EU SERIES EU SERIES BUILD & PRICE | PRICE LIST BUILD & PRICE | PRICE LIST In-Stock Machines In-Stock Machines WHAT’S NEW WHAT’S NEW YOUR FIRST CNC YOUR FIRST CNC
      SHOPPING TOOLS
      • Build & Price a Haas
      • Price List
      • Available Inventory
      • CNCA Financing
      WANT TO TALK TO SOMEONE?

      A Haas Factory Outlet (HFO) can answer your questions, and walk you through your best options.

      CONTACT YOUR DISTRIBUTOR >
  • Haas Tooling Main Menu
  • Haas Service Parts Main Menu

My Haas Welcome,
!
Haas Tooling MyHaas/HaasConnect Sign In Register Haas Tooling MyHaas/HaasConnect Sign Out Welcome, My Machines Latest Activity My Quotes My Account My Users Sign Out
Find Your Distributor
  1. Select Language
    1. English
    2. Deutsch
    3. Español - ES
    4. Español - MX
    5. Français
    6. Italiano
    7. Português
    8. Český
    9. Dansk
    10. Nederlands
    11. Magyar
    12. Polski
    13. Svenska
    14. Türkçe
    15. 中文
    16. Suomi
    17. Norsk
    18. الإنجليزية
    19. български
    20. Hrvatski
    21. Ελληνικά
    22. Română
    23. Slovenský
    24. Slovenščina
    25. 한국어
    26. 日本語
    27. Українська
×

Search Results

Web Pages

Images

    • <
    • 1
    • >

CAN DC Autodoor Troubleshooting Guide - NGC - TG0044

Service Home CAN DC Autodoor Troubleshooting Guide - NGC - TG0044

CAN DC Autodoor Troubleshooting Guide - NGC - TG0044

- Jump to Cause - Back to Top

9.1 Can Autodoor - Troubleshooting

Recently Updated Last updated: 10/10/2025

CAN DC Autodoor - Troubleshooting Guide - NGC


TG0044

Revision D - 01/2026

Introduction

This troubleshooting guide will show you how to troubleshoot a CAN Autodoor.  For troubleshooting other CAN systems refer to the CAN Lube Panel and Spindle Head - Troubleshooting Guide 

Download and fill out the CAN Autodoor Inspection Report Checklist below before replacing any parts.

CAN Autodoor Inspection Report Checklist

The following video shows you how to troubleshoot the Smart CAN Bus and the Auto Door.

 Note: This service video is for reference only and does not replace the written procedure.

Symptom Table

Symptom Possible Cause Corrective Action
Alarm 548 DOOR M CODES NOT ALLOWED The machine does not have a cell safe signal or the light curtain is not enabled. The Mill M80/M81 and Lathe M85/M86 M-codes work only while the machine receives a cell-safe signal from a robot or if it has a light curtain installed. For more information refer to Robot Integration Aid - NGC reference document.

ALARM / CAN CODE

BEFORE SOFTWARE 100.21.000.1100:

Alarm 9898.001: CAN NODE WARNING

CAN code [0x43]: CAN NODE WARNING

SOFTWARE 100.21.000.1100 and Later:

Alarm 9706 or (100.001): CAN NODE COMMANDED CURRENT OUT OF RANGE

CAN code [0x43]

Outdated Firmware & Parameters

Upgrade to the latest Software, Configuration files, and I/O / CAN AD Firmware.

Alarm 9701: Node ID: XX Node reported it lost communication from I/O board

CAN code [0x01]

Old IO firmware. Load I/O firmware 4.09 or greater.
Poor connection  Verify CAN Bus Connectors are fully seated and termination resistor set correctly.
The door does not fully open. Chip build up in the door rollers or coolant contamination on the auto door wheel. Clean the chips away from the door rollers. Clean the coolant from the auto door wheel.
The door open time factory setting values are not set correctly. Refer to Smart CAN Autodoor Upgrade procedure.
The motor is not aligned to door track. Check the door alignment. See Auto Door - Door Alignment section below.
The motor pulley may have come unattached. Remove the motor cover to see if the pulley is securely attached, if not inspect pulley and motor shaft and apply red Loctite to motor shaft and threads.
DM/DT/UMC-350 Machines built before 7/15/2023: The auto door is skipping gears. Replace the auto door adapter bracket with new, stiffened adapter bracket 25-14189B. 
There is a delay at the end of the door open sequence. The autodoor CAN board firmware may be outdated. Go to Diagnostic > System Tab and verify the Auto Door Version is upgraded to firmware aV142 or higher.
The door opens all the way but does not hold and retract causing the motor to pop off the door track when disengaging. Defective Motor.

If a single door machine, install a new motor and check if the door holds and retracts. If it holds and retracts, replace the defective motor.

If a dual door machine, swap the motors and check if motor holds and retracts. If it holds and retracts, replace the defective motor.

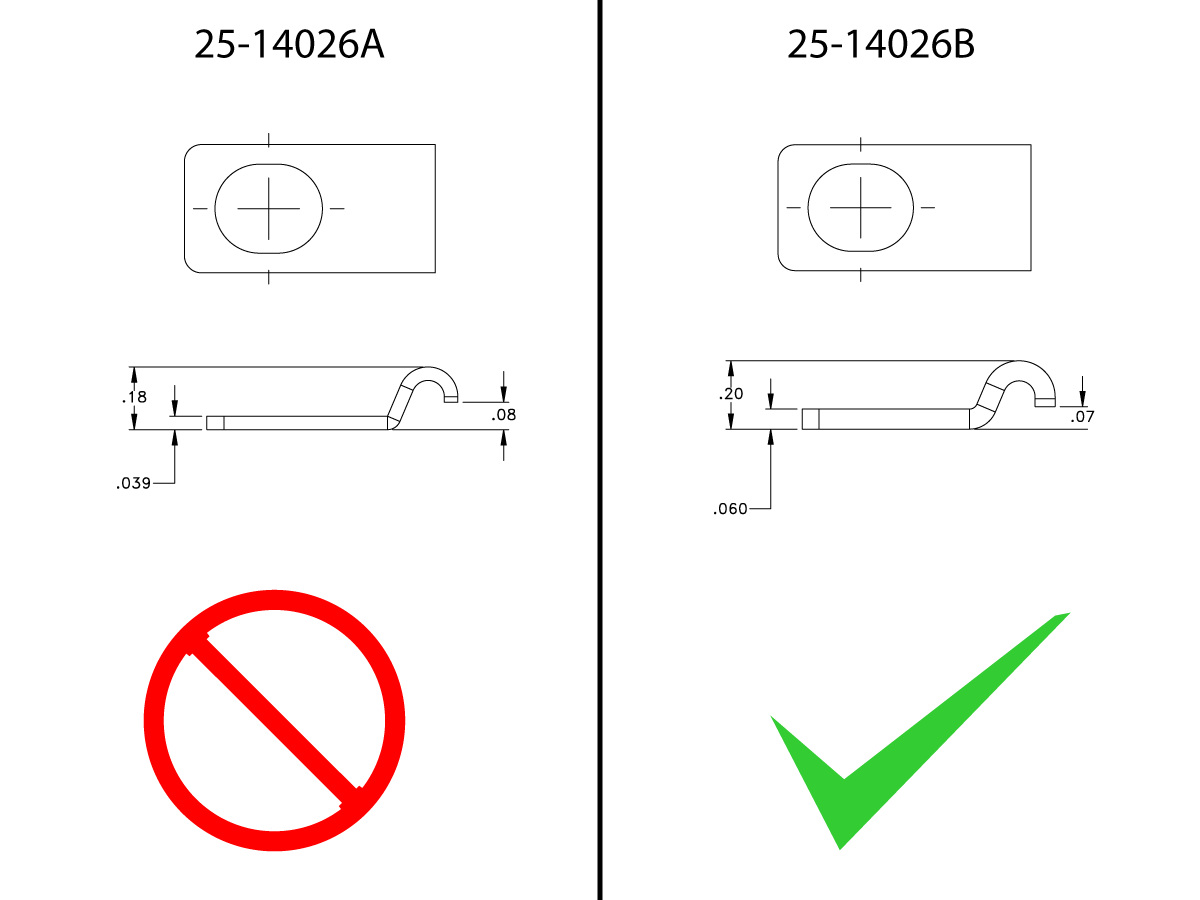
The door tracks are coming undone. The track clip is not engaging properly onto the tooth profile. The track clip size has been increased, check the Autodoor Track Clip section below to determine if the machine has the updated track clips. If the new clips are needed, order the track clip replacement kit and follow the Autodoor Track Replacement procedure.
When Opening or closing the doors, the doors will stop and retract and a message "Auto Door Collision Detected" is generated. Chip build up in the door rollers or doors are not aligned correctly. Clean the chips away from the door rollers. Make sure the doors are aligned and can open and close smoothly.
The machine has outdated configuration files. Download and update the machine with the latest configuration files from the Haas Portal.
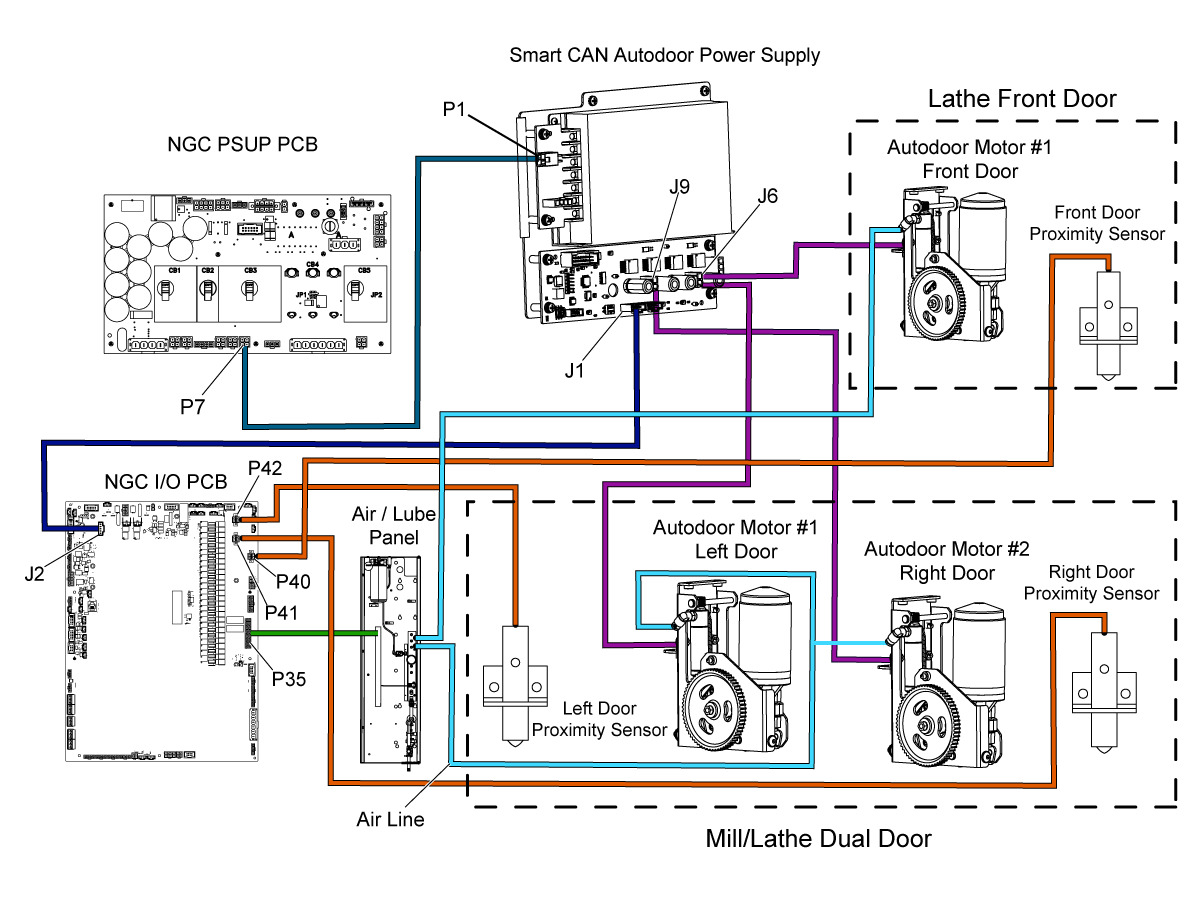
(2-Door Autodoor only) The motor power cables are plugged into the incorrect outputs. Check that the motor cables are plugged into the correct outputs on the Smart CAN PCB.  Motor 1 should be connected to J6.  Motor 2 cable should be connected to J9.  Use the electrical diagram shown below.
(2-Door Autodoor only) The left and right door open switches are connected backwards on the I/O PCB. Make sure that when you open the left door the left door input on the I/O PCB diagnostic screen change states.  If it does not check the door inputs on the I/O PCB (P41 Right Door Open and P42 Left Door Open).
Machines with dual doors only: The motor current when opening or closing is over the current limit. Machines with dual doors only: Upgrade to the 350W Power MSupply and install the parameter patch and IO patch.

Multiple CAN Alarms:

9899 IOPCB CAN FAULT

and/ or

9105 IO BOARD COMMAND EXECUTION FAILURE
and / or

9702 IO LOST COMMUNICATION WITH AUTODOOR


The CAN node I/O Configuration is incorrect. Update the I/O configuration via the I/O Config tab.
The incorrect CAN node is enabled. Verify that Factory Settings 9000.001 -> 9031.001 are set correctly. Only active nodes should be enabled.
The Autodoor CAN PCB does not have power. Verify that the Low Volt Power supply is supplying power to the CAN Autodoor PCB.
The CAN node Communication cable is disconnected. Power down machine for at least a minute. Verify all CAN communication cables are connected correctly.
The CAN Module ID Selector is incorrect. Power down machine for at least a minute. Set ID selector correctly. Power up machine.
The CAN Modules have incorrect termination. Power down machine for at least a minute. Verify that only last node in the chain is terminated. Power up machine.
The Autodoor Motor Power cables have a short circuit. Disconnect the J6 & J9 motor output cables from the Autodoor PCB.   Cycle the power.  If the alarms go away troubleshoot the Autodoor motor cables.
The CAN Node needs to be reset. Disable CAN Node via 9000.001 -> 9031.001. If the machine recovers (I/O page isn’t “X”) after disabling a particular node, try to enable the node again.
Alarm 9172 AUTO DOOR COLLISION  Auto Door detected a collision while closing. Check for objects blocking the door from closing.
Check for chip build up on the door roller rails.
Check that the door drive wheels are not stuck or are losing contact with the top of the door.
Check the wiring for short circuits.

Outdated Firmware & Parameters

Upgrade to the latest Software, Configuration files, and I/O / CAN AD Firmware.

Alarm 9118 AUTO DOOR DID NOT OPEN 

or

Alarm 9983 AUTO DOOR DID NOT CLOSE

DC Autodoor did not open or close within the allowed time. Check for any obstructions in the path of the door. 
Check for chip build up on the door roller rails.
Check that the door drive wheels are not slipping or are losing contact with the top of the door.
Detents are installed. Remove the door detents. Refer to the Detent Removal section below.

Outdated Firmware & Parameters

Upgrade to the latest Software, Configuration files, and I/O / CAN AD Firmware.
Alarm 9829 CAN ANALOG OVER LIMIT Outdated Firmware and Parameters. Upgrade to the latest Configuration files, and I/O / CAN AD Firmware.
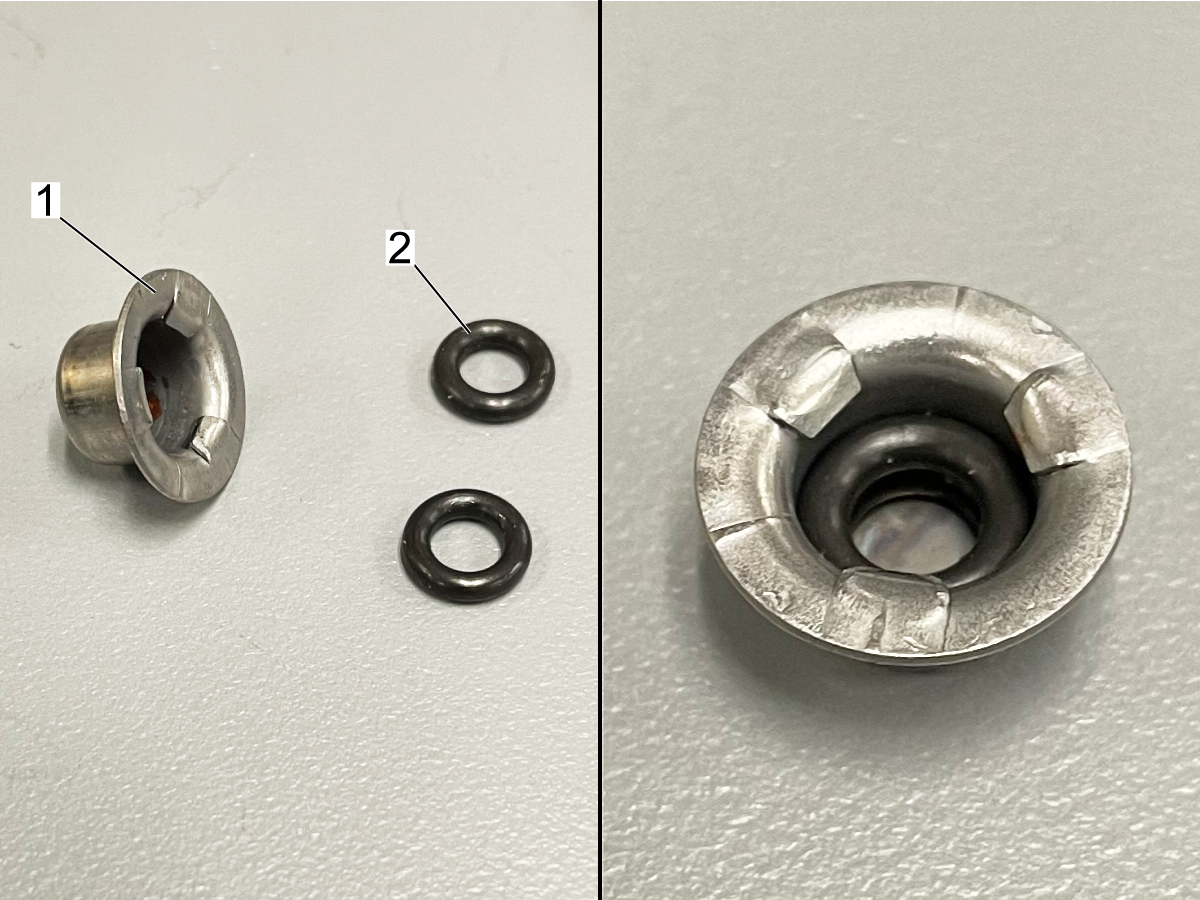
(Only Lathes) Door seems to be dragging. The push nuts on the pivot pin in the motor assembly have come off. Order (2x) o-rings PN# 57-0551 and install them as shown below in the Push Nut Re-Attachment section below.
(Only Lathes) Rattling/grinding noise coming from the motor area.
Autodoor motor continues to run after being fully open. Machine was built with autodoor between February 2023 to June 2023 or if a belt was changed between these dates, the belt may be defective. Inspect the Autodoor system thoroughly. If it all checks good, the belt will need to be replaced. Refer to DC Autodoor Track Replacement - AD0465.
The air pressure is over 85 psi. Check that there is nothing loose or broken on the autodoor motor or the air piston belt track.
 Verify that the door is not angled downards as it is opening. 
Check the air piston adjustment.
Activate the autodoor motor and confirm that it is properly engaged with the belt track.
Autodoor CAN system is not detecting amp draw, leading to continuation of running motor at the end of the track.

Upgrade to the latest Software, Configuration files, and I/O / CAN AD Firmware.

Power Supply Identification

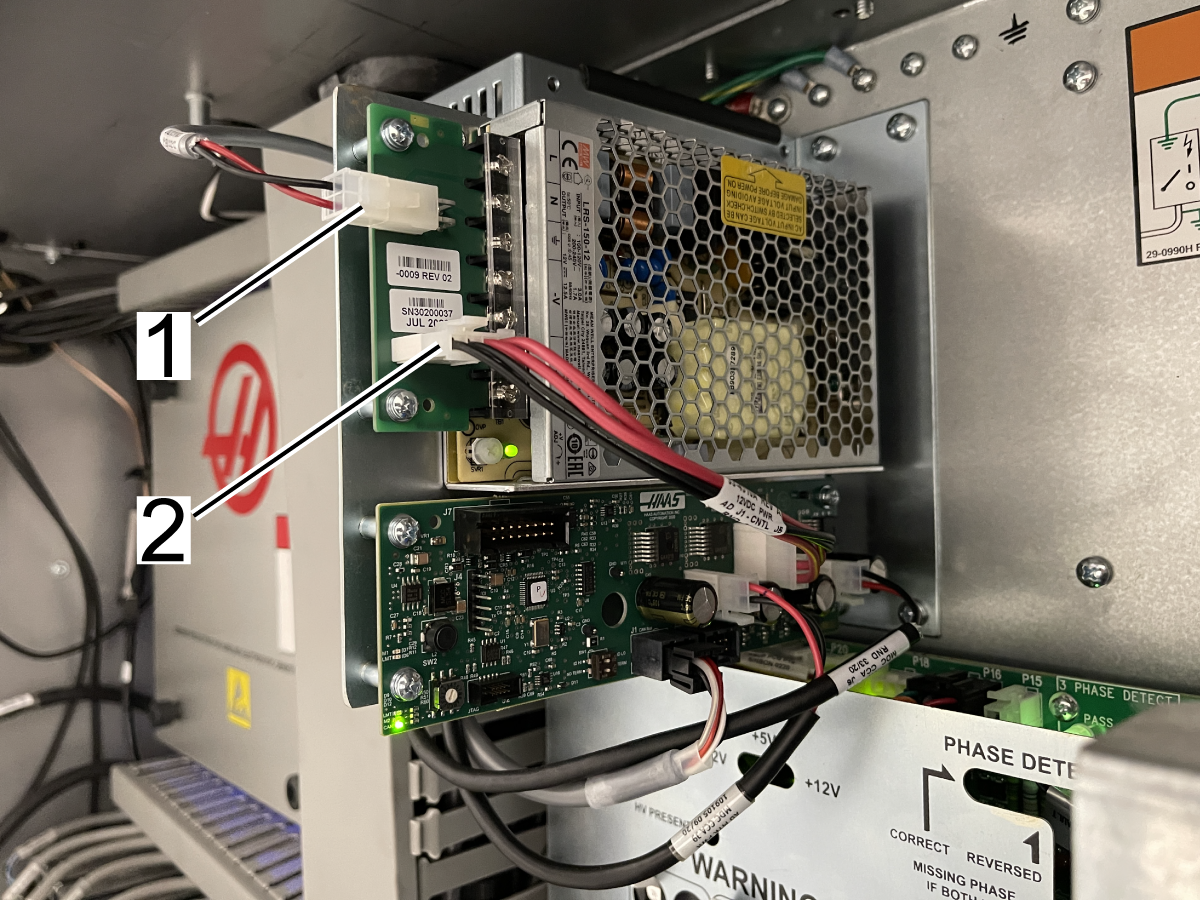
150W CAN Auto Door Power Supply

The power input on the power supply is on the top [1].

The power output on the power supply is on the bottom [2].

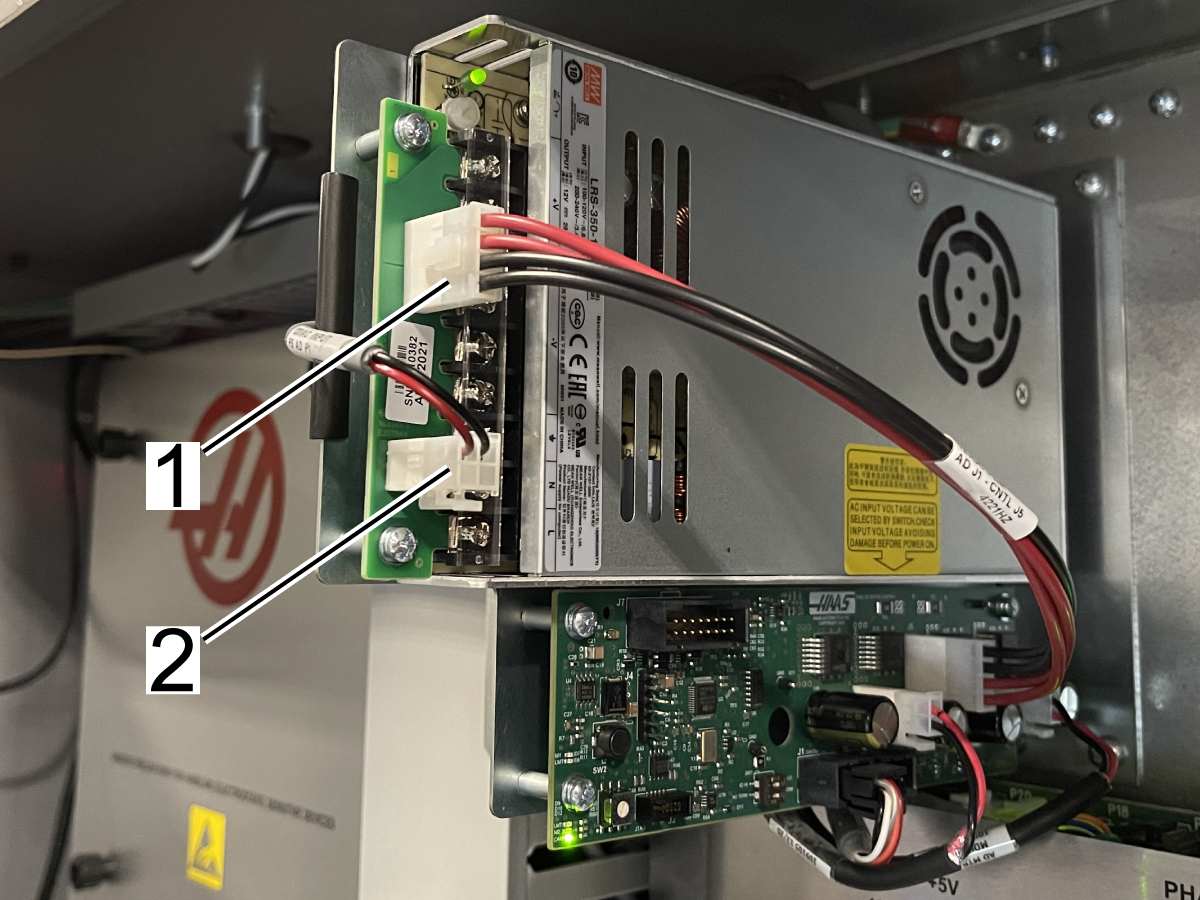
350W CAN Auto Door Power Supply

The power output on the power supply is on the top [1].

The power input on the power supply is on the bottom [2].

Door Track Clip

The track clip size has been increased, make sure that the machine has the updated clips.

If the machine needs the updated clips, go to the Autodoor Track Replacement procedure and order the replacement kit.

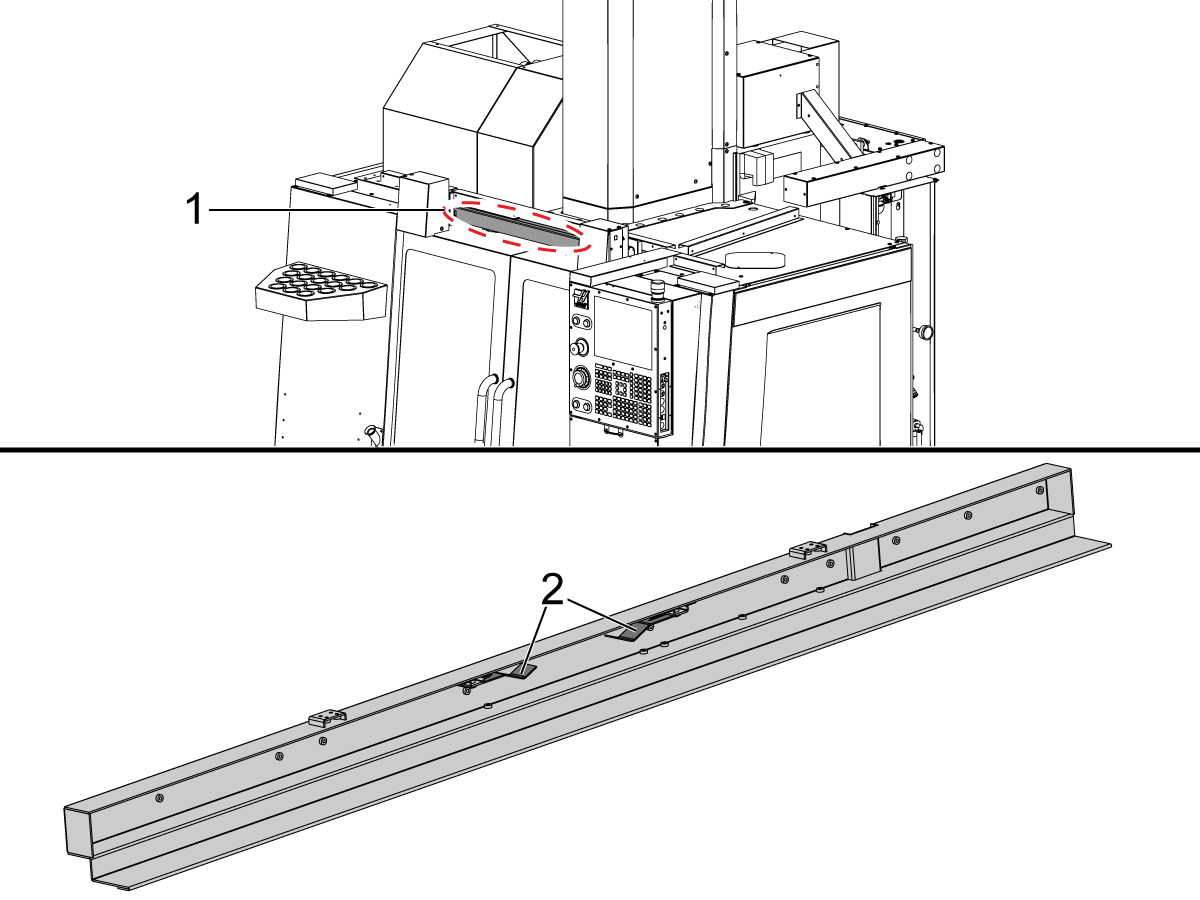
Detent Removal

If the machine is outputting Alarms 9118 or 9983 and there are no obstructions in the path of the door, the detents may need to be removed if they are installed.

The detents are attached to the sheet metal above the door(s) [1]. 

Remove the hardware and detents [2] from the machine.

Push Nut Re-Attachment

If the push nuts (PN# 46-0043) come off the pivot pin, order (2x) o-rings PN# 57-0551.

Take one push nut [1] and put the o-rings [2] inside the push nut as shown in the right picture.

Attach the push nut with the o-rings on to the pivot pin.

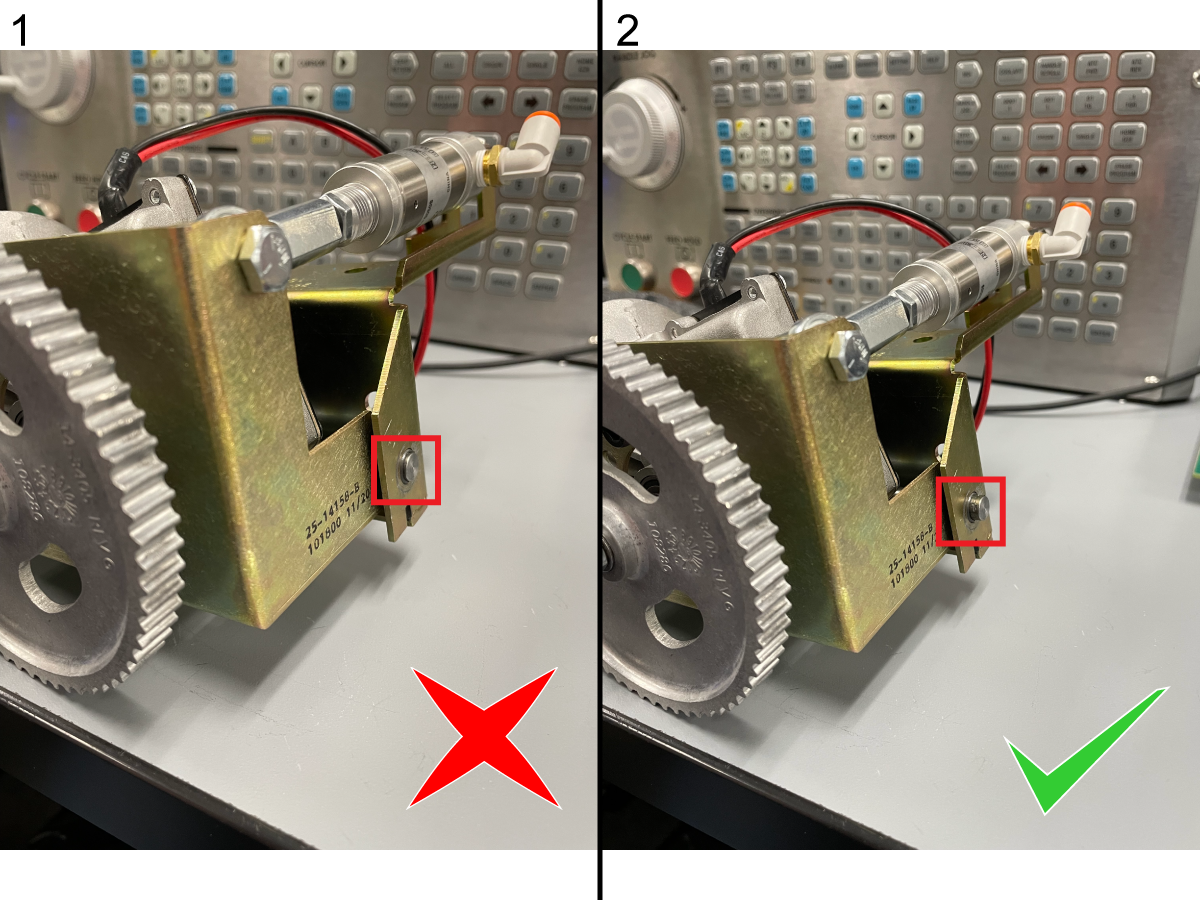
If the push nut is attached without the o-rings it will look like the image on the left.

When the push nut with the o-rings is attached, the pivot pin will stick out like the image on the right.

Make sure the pivot pin sticks out like the image on the right and re-attach the other push nut.

Dual Door - 350W Power Supply Upgrade

Machines with dual doors only:

If a Vertical Mill or Longbed Lathe with Dual doors fails to open or close the doors, perform all the troubleshooting steps.

If the machines continues to alarm out, install the new power supply released for Smart CAN Auto Doors.

93-3354 CAN AUTODOOR POWER SUPPLY KIT 2021

Note: This applies to machines with dual doors only.

Note: Patches required to upgrade current limits.

Parameter Patch: AD 350W PS CV

IO Patch: AD 350W PS IO

Auto Door - Data Collection

Use the Data Collection tool to collect the motor current data when the doors are opening.

The Data Collection Tool file and How-To procedure is found on the HBC Site.

Files are found: Service Tab > Documents and Software > Control Software > Next Generation Control > CAN Auto Door & E-Vise

Note: The machine must have the latest Software, and I/O & AD Firmware. The correct CAN node must be enabled and all troubleshooting done before using the Data Collection tool. Include this data with the Service Notification.

Auto Door - Door Alignment

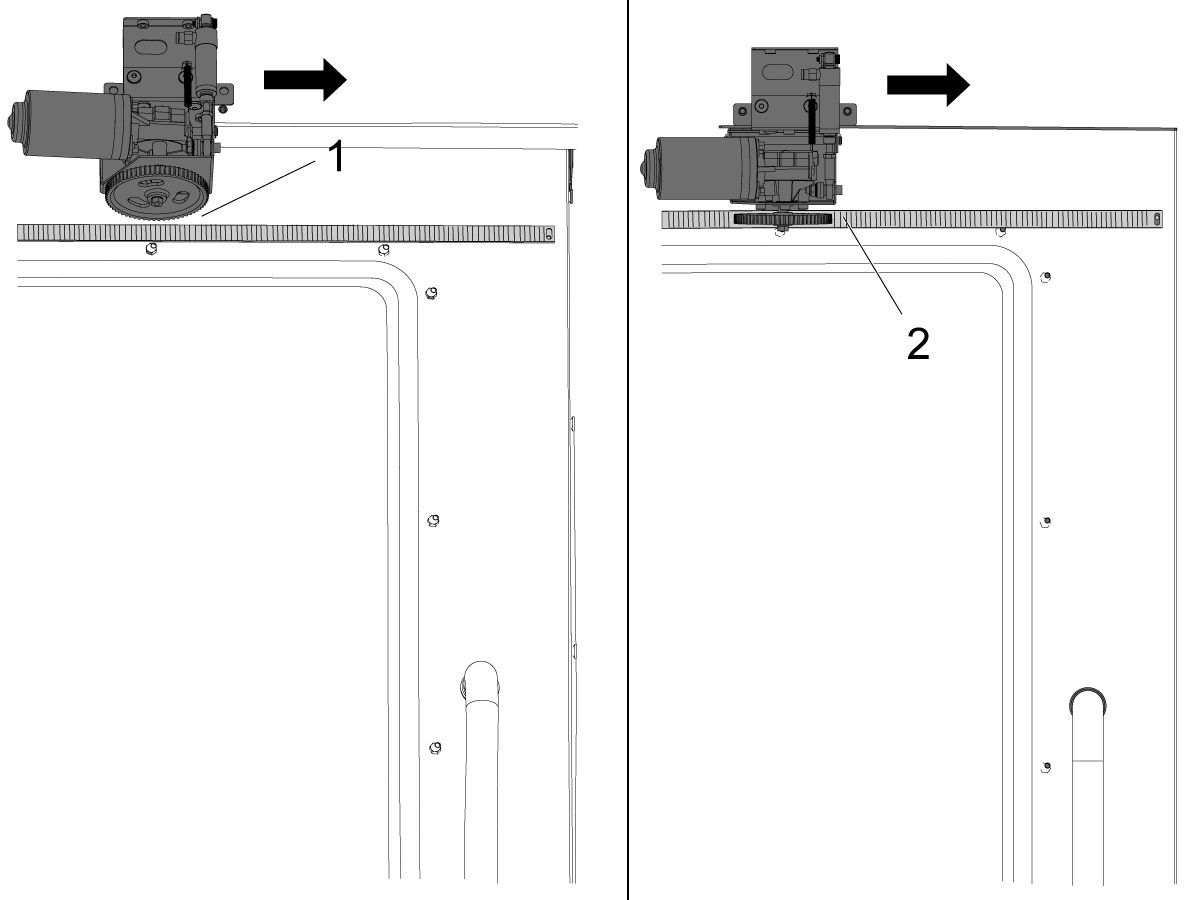
To align the track to the motor, it is important for the wheel to have full engagement on the track. DO NOT sacrifice door alignment for track alignment. If you are having issues aligning the track, adjust the track itself with the slots in the track clips.

Verify that the gap between the gear and track [1] is equal through the whole travel of the door when the motor is raised.

Verify that the gear is centered to the track [2] when the motor engages the track through the whole travel of the door. 

Verify that the gear is perpendicular to the track [2] when the motor engages the track through the whole travel of the door. 

NOTE: The illustration shown is from a UMC Auto Door installation. 

Autodoor Settings

SETTING

DESCRIPTION

USAGE

131

Auto Door

When this setting is set to ON the door closes when [CYCLE START] is pressed and opens when the program reaches an M00, M01 (with Optional Stop turned ON), M02, or M30 and the spindle has stopped turning. 

Note:  The Autodoor button Open/Closes the door regardless if setting 131 is set to On/OFF, except if the machine has the HE patch.

Mill:  To use M80/ M81 Auto Door Open / Close M-codes. Refer to M80 / M81 (Auto Door Open / close M-codes).

Lathe: To use M85/ M86 Auto Door Open / Close M-codes. Refer to M85 / M86 (Auto Door Open / close M-codes) .

Note:  The M-codes work only while the machine receives a cell-safe signal from a robot or if it has a light curtain installed. For more information refer to Robot Integration Aid - NGC reference document.

NOTE:  The following factory settings are listed for reference and they can only be changed by a HFO technician.

FACTORY SETTING

DESCRIPTION

USAGE

2194 Enable Front Door Fully Open Switch (Single Door) Enables checking of front door fully open switch at end of door sequence, behavior is unaffected otherwise

2195

Enable Right Door Fully Open Switch

(Double Door) Enables checking of right door fully open switch at end of door sequence, behavior is unaffected otherwise

2196

Enable Left Door Fully Open Switch

(Double Door) Enables checking of left door fully open switch at end of door sequence, behavior is unaffected otherwise

9009.001

CAN NODE 9 (LEGACY AUTODOOR)

Enabled when the Legacy CAN Autodoor power supply is installed.

9013.001

CAN NODE 13 (AUTODOOR) ENABLE

Enabled when the Smart CAN Autodoor power supply is installed.

Smart CAN Autodoor Sequences

 Note: The following sequence scenarios only apply to the Smart CAN Autodoor.

Open  Sequence with Door Fully Open Switch:

  1. Engage motors and wait for timeout.
  2. Unlock the door wait for timeout.
  3. Until Door opening time expires
    • Drive Door at open voltage
    • Drive Door at open current,
      • If CAN node enters protection state due to current of motors exceeding commanded, door sequence will stop
        1. If run via M-Code/Robot/APL there is an alarm
        2. If run via autodoor button there is a message
  4. Until settle time expires
    • Drive Door at slow open voltage
    • Drive Door at slow open current
      • When the door hits the endstop the current will rise and CAN Node will enter a protected state
        1. CAN Node will signal main process is done and won't wait until time expires.
  5. Wait for timeout.
  6. Reverse motors for time.
  7. Disengage motors and wait for timeout.
  8. If Fully open switches are enabled
    • Check switches
      • If not fully opened
        1. If run via M-Code/Robot/APL there is an alarm
        2. If run via autodoor button there is a message

Open Sequence without Door Fully Open Switch:

  1. Engage motors and wait for timeout.
  2. Unlock the door wait for timeout.
  3. Until Door opening time expires
    • Drive Door at open voltage.
    • Drive Door at open current.
      • If CAN node enters protection state due to current of motors exceeding commanded, door sequence will stop
        1. If run via M-Code/Robot/APL there is an alarm
        2. If run via autodoor button there is a message
  4. Until settle time expires.
    • Drive Door at slow open voltage.
    • Drive Door at slow open current.
      • When the door hits the endstop the current will rise and CAN Node will enter a protected state
        1. CAN Node will signal main process is done and won't wait until time expires.
  5. Wait for timeout.
  6. Reverse motors for time.
  7. Disengage motors and wait for timeout.

Close Sequence:

  1. Engage motors and wait for timeout.
  2. Unlock the door wait for timeout.
  3. Until Door Close Time expires.
    • Drive door at close speed.
    • Drive door at close current.
      • Software will monitor reported current and if it exceeds limit for longer than max time assume collision and reverse motors.
        1. If run via M-Code/Robot/APL there is an alarm
        2. If run via autodoor button there is a message
      • If firmware detects current over commanded for longer than 250 ms enter safe state and signal Software. Software will assume collision and reverse motors.
        1. If run via M-Code/Robot/APL there is an alarm
        2. If run via autodoor button there is a message
  4. If close switch not found
    • If run via M-Code/Robot/APL there is an alarm
    • If run via autodoor button there is a message

Electrical Diagrams

Related Content

CAN Bus Systems TSG
I/O Troubleshooting
CAN Spindle Head and Lube Panel TSG
DIagnostic Data
Firmware Update
Robot Integration

Recently Viewed Items

You Have No Recently Viewed Items Yet

Feedback
Haas Logo

Haas Delivered Price

This price includes shipping cost, export and import duties, insurance, and any other expenses incurred during shipping to a location in France agreed with you as a buyer. No other mandatory costs can be added to the delivery of a Haas CNC Product.

KEEP UP WITH THE LATEST HAAS TIPS AND TECHNOLOGY...

Sign up now!   

HAAS TOOLING ACCEPTS THE FOLLOWING:

  • Service & Support
  • Owners
  • Request Service
  • Operator Manuals
  • Haas Parts

  • Rotary Repair Request
  • Pre-Install Guides
  • Shopping Tools
  • Build & Price a New Haas
  • Available Inventory
  • The Haas Price List
  • CNCA Financing
  • About Haas
  • Accessibility Statement
  • DNSH Statement
  • Export Compliance
  • Careers
  • Certifications & Safety
  • Contact Us
  • History
  • Terms & Conditions
  • Haas Tooling Terms & Conditions
  • Privacy
  • Warranty
  • Haas Community
  • Haas Certification Program
  • Haas Motorsports
  • Gene Haas Foundation
  • Haas Technical Education Community
  • Events
  • Join the Conversation
  • Facebook
  • X
  • Flickr
  • YouTube
  • LinkedIn
  • Instagram
  • TikTok
© 2026 Haas Automation, Inc – CNC Machine Tools

This site is protected by reCAPTCHA and the Google Privacy Policy and Terms of Service apply.

2800 Sturgis Rd., Oxnard, CA 93030
Toll Free: (888) 817-4446 / Fax: 805-278-8554