My Haas Welcome,
!
Haas Tooling MyHaas/HaasConnect Sign In Register Haas Tooling MyHaas/HaasConnect Sign Out Welcome, My Machines Latest Activity My Quotes My Account My Users Sign Out
Find Your Distributor
  1. Select Language
    1. English
    2. Deutsch
    3. Español - ES
    4. Español - MX
    5. Français
    6. Italiano
    7. Português
    8. Český
    9. Dansk
    10. Nederlands
    11. Magyar
    12. Polski
    13. Svenska
    14. Türkçe
    15. 中文
    16. Suomi
    17. Norsk
    18. الإنجليزية
    19. български
    20. Hrvatski
    21. Ελληνικά
    22. Română
    23. Slovenský
    24. Slovenščina
    25. 한국어
    26. 日本語
    27. Українська
  • machines Main Menu
    • Vertical Mills
      Vertical Mills
      Vertical Mills View All
      • Vertical Mills
      • VF Series
      • Universal Machines
      • VR Series
      • VP-5 Prismatic
      • Pallet-Changing VMCs
      • Mini Mills
      • Mold Machines
      • High-Speed Drill Centers
      • Drill/Tap/ Mill Series
      • Toolroom Mills
      • Pocket Mill
      • Compact Mills
      • Gantry Series
      • SR Sheet Routers
      • Extra-Large VMC
      • Double-Column Mills
      • 3+2 Positioning Machines
    • Multi-Axis Solutions
      Multi-Axis Solutions
      Multi-Axis Solutions View All
      • Multi-Axis Solutions
      • Y-Axis Lathes
      • 5-Axis Mills
    • Lathes
      Lathes
      Lathes View All
      • Lathes
      • ST Series
      • Dual-Spindle
      • Box Way Series
      • Toolroom Lathes
      • Chucker Lathe
      • Pocket Lathe
      • Haas Bar Feeders
    • Horizontal Mills
      Horizontal Mills
      Horizontal Mills View All
      • Horizontal Mills
      • 50-Taper
      • 40-Taper
    • Rotaries & Indexers
      Rotaries & Indexers
      Rotaries & Indexers View All
      • Rotaries & Indexers
      • Rotary Tables
      • Indexers
      • 5-Axis Rotaries
      • Extra-Large Rotaries
    • Special Series
      Special Series
      Special Series View All
      • Special Series
      • EU_Series_Redirect
    • Automation Systems
      Automation Systems
      Automation Systems View All
      • Automation Systems
      • Mill Automation
      • Lathe Automation
      • Automatic Parts Loaders
      • Automation Models
    • Desktop Machines
      Desktop Machines
      Desktop Machines View All
      • Desktop Machines
      • Desktop Mill
      • Desktop Lathe
      • Control Simulator, Standard
      • Control Simulator, Premium
    • Shop Equipment
      Shop Equipment
      Shop Equipment View All
      • Shop Equipment
      • Knee Mill
      • Haas Manual Lathes
      • Haas Saws
    • Fabrication Machines
      Fabrication Machines
      Fabrication Machines View All
      • Fabrication Machines
      • Laser Cutting Machines
      • CNC Press Brakes
    • QUICK LINKS Special Series  Special Series 
      EU SERIES EU SERIES BUILD & PRICE | PRICE LIST BUILD & PRICE | PRICE LIST In-Stock Machines In-Stock Machines WHAT’S NEW WHAT’S NEW YOUR FIRST CNC YOUR FIRST CNC
      SHOPPING TOOLS
      • Build & Price a Haas
      • Price List
      • Available Inventory
      • CNCA Financing
      WANT TO TALK TO SOMEONE?

      A Haas Factory Outlet (HFO) can answer your questions, and walk you through your best options.

      CONTACT YOUR DISTRIBUTOR >
  • Options Main Menu
    • The Haas Control Value Option Packages
      Value Option Packages
      Value Option Packages View All
      • Value Option Packages
    • Product Image Spindles
      Spindles
      Spindles View All
      • Spindles
    • Product Image Tool Changers
      Tool Changers
      Tool Changers View All
      • Tool Changers
    • Product Image 4th- | 5th-Axis
      4th- | 5th-Axis
      4th- | 5th-Axis View All
      • 4th- | 5th-Axis
    • Product Image Turrets & Live Tooling
      Turrets & Live Tooling
      Turrets & Live Tooling View All
      • Turrets & Live Tooling
    • Product Image Probing
      Probing
      Probing View All
      • Probing
    • Haas Chip & Coolant Management Chip & Coolant Management
      Chip & Coolant Management
      Chip & Coolant Management View All
      • Chip & Coolant Management
    • The Haas Control The Haas Control
      The Haas Control
      The Haas Control View All
      • The Haas Control
    • Product Image Product Options
      Product Options
      Product Options View All
      • Product Options
    • Product Image Tooling & Fixturing
      Tooling & Fixturing
      Tooling & Fixturing View All
      • Tooling & Fixturing
    • Product Image Workholding
      Workholding
      Workholding View All
      • Workholding
    • Product Image 5-Axis Solutions
      5-Axis Solutions
      5-Axis Solutions View All
      • 5-Axis Solutions
      • 5 Easy Steps to 5-Axis
    • QUICK LINKS Special Series  Special Series 
      EU SERIES EU SERIES BUILD & PRICE | PRICE LIST BUILD & PRICE | PRICE LIST In-Stock Machines In-Stock Machines WHAT’S NEW WHAT’S NEW YOUR FIRST CNC YOUR FIRST CNC
      SHOPPING TOOLS
      • Build & Price a Haas
      • Price List
      • Available Inventory
      • CNCA Financing
      WANT TO TALK TO SOMEONE?

      A Haas Factory Outlet (HFO) can answer your questions, and walk you through your best options.

      CONTACT YOUR DISTRIBUTOR >
  • Why Haas Main Menu
      Discover the Haas Difference
    • Why Haas
    • MyHaas
    • Education Community
    • Industry 4.0
    • Haas Certification
    • Customer Testimonials
  • Service Main Menu
      Welcome to Haas Service
      SERVICE HOME Operator’s Manuals How-To Procedures Troubleshooting Guides Preventive Maintenance Haas Parts Haas Tooling Videos
  • Videos Main Menu
  • Main Menu
    • View All
    • View All
    • View All
    • View All
      • HTEC Curriculum Support
      • Haas Value Option Packages (VOP) Journey
    • View All
      • Haas 10 kg Cobot Package
      • Cobot Kits
      • DC-1 Drill Center
      • CNC Sales News
      • Do More With Your Haas
    • View All
    • View All
      • contact-us-test
      • 4 - AUTOMATION SYSTEMS
      • Carousel-V2
      • expert test
      • Demo_Day_Trident-test
      • Link Test
      • image-sale-tag-test
      • article-list-test
      • Haas 25 kg Robot Package
      • test-algolia-page
    • View All
    • View All
    • View All
    • View All
      • calc-test
    • View All
    • QUICK LINKS Special Series  Special Series 
      EU SERIES EU SERIES BUILD & PRICE | PRICE LIST BUILD & PRICE | PRICE LIST In-Stock Machines In-Stock Machines WHAT’S NEW WHAT’S NEW YOUR FIRST CNC YOUR FIRST CNC
      SHOPPING TOOLS
      • Build & Price a Haas
      • Price List
      • Available Inventory
      • CNCA Financing
      WANT TO TALK TO SOMEONE?

      A Haas Factory Outlet (HFO) can answer your questions, and walk you through your best options.

      CONTACT YOUR DISTRIBUTOR >
  • Haas Tooling Main Menu
  • Haas Service Parts Main Menu

My Haas Welcome,
!
Haas Tooling MyHaas/HaasConnect Sign In Register Haas Tooling MyHaas/HaasConnect Sign Out Welcome, My Machines Latest Activity My Quotes My Account My Users Sign Out
Find Your Distributor
  1. Select Language
    1. English
    2. Deutsch
    3. Español - ES
    4. Español - MX
    5. Français
    6. Italiano
    7. Português
    8. Český
    9. Dansk
    10. Nederlands
    11. Magyar
    12. Polski
    13. Svenska
    14. Türkçe
    15. 中文
    16. Suomi
    17. Norsk
    18. الإنجليزية
    19. български
    20. Hrvatski
    21. Ελληνικά
    22. Română
    23. Slovenský
    24. Slovenščina
    25. 한국어
    26. 日本語
    27. Українська
×

Search Results

Web Pages

Images

    • <
    • 1
    • >

5 - Side Mount Tool Changer - Service Replacements

Mill Tool Changer - Service Manual


  • 0 - Mill Tool Changer - Table of Contents
  • 1 - Mill Tool Changer - Introduction
  • 2 - Mill Tool Changer - Overviews
  • 3 - Umbrella Tool Changer - Service Replacements
  • 4 - Umbrella Tool Changer - Alignment
  • 5 - Side Mount Tool Changer - Service Replacements
  • 6 - Side Mount Tool Changer - Alignment
  • 7 - Double Arm and Cambox - Service Replacements
  • 8 - Track Tool Changer - Service Replacements
  • 9 - Tool Changer - Troubleshooting Guides
  • 10 - Side-mount Tool Changer - Maintenance

Go To :

  • 5.1 SMTC - Carousel DC Motor - Replacement
  • 5.2 SMTC - 30/50 Pocket - Replacement
  • 5.3 SMTC - HSK Pocket and Plunger - Replacement
  • 5.4 SMTC - Pocket Check Valve - Replacement
  • 5.5 SMTC-30/50 - Air Cylinder - Replacement
  • 5.6 SMTC-50 - Installation - VMC
  • 5.7 SMTC - Pocket Slider - Set Screw - Adjustment - VMC

5.1 Side-Mount Tool Changer - Carousel DC Motor - Replacement

Recently Updated

Side-Mount Tool Changer - Carousel DC Motor - Replacement


AD0362

Revision A 08/2025

Parts Required
This procedure applies to several kits. You need only (1) of the motors listed here:

  • 93-30-2111 Motor, SMTC Carousel 40T     
  • 93-1642 Motor, SMTC Carousel 30/40T   
  • 93-1664 Motor, SMTC Carousel 50T 

Remove/Replace Motor

1

Remove the carousel cover assembly.

Disconnect the motor cable [1] from the electrical connector bracket.

Remove the (2) motor mount screws [2], the belt [3], and the used motor.

2

Install the new motor with the (2) motor mount screws [2].

Tighten the screws, but leave them loose enough to control the adjustment of the belt.

Put the new belt around the tool changer sprocket and the motor sprocket.

Tighten the belt until it has no more than 1/8 inch (3 mm) of deflection.

3

Torque the motor mount place screws [2] to 15 ft-lb (20.34 Nm).

Connect the motor cable [1] at the electrical connector bracket.

Replace the carousel cover assembly.

5.2 SMTC - 30/50 Pocket - Replacement

Recently Updated

SMTC-30/50 Pocket - Replacement


Revision A 08/2025

Introduction

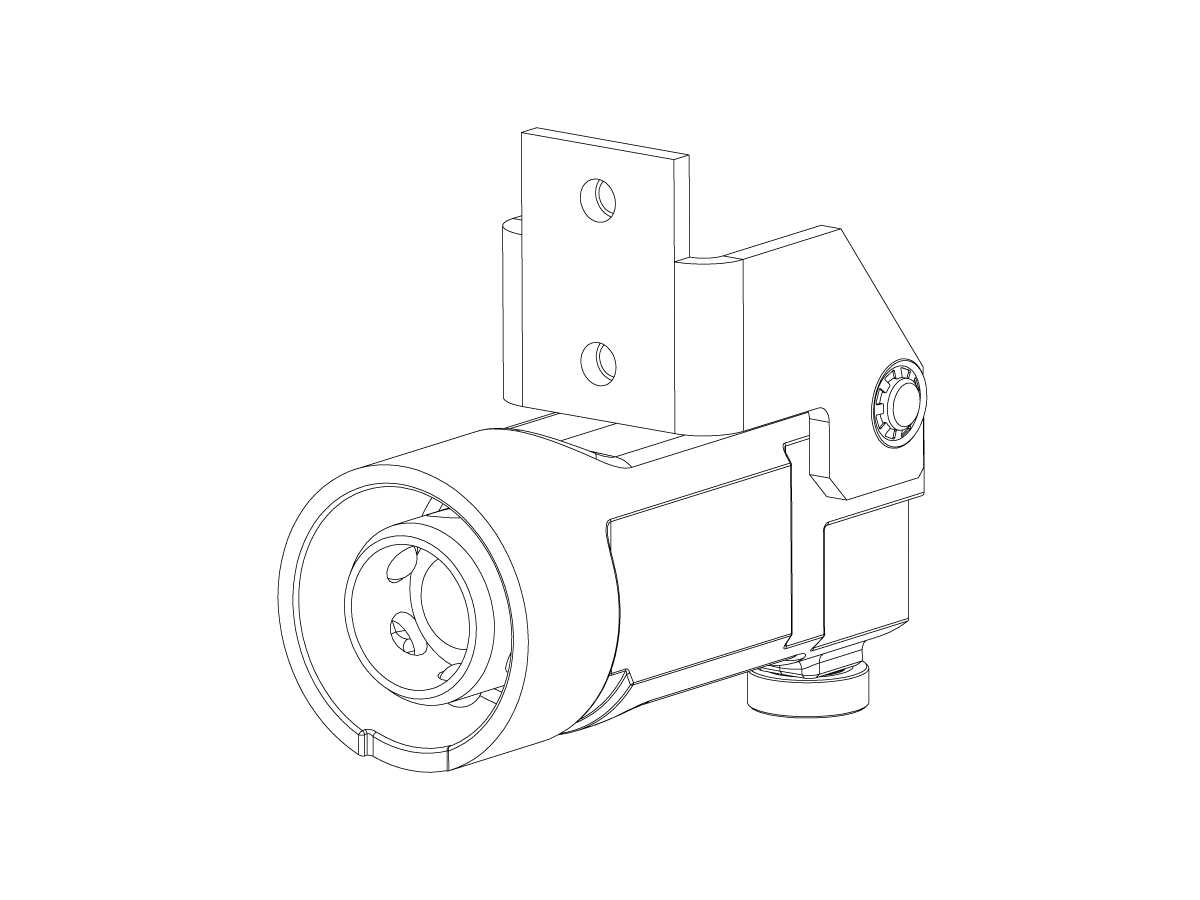
This procedures tells you how to replace the tool pocket on the SMTC-30T/50T.

Replacement

1

Remove the number plate from the carousel.

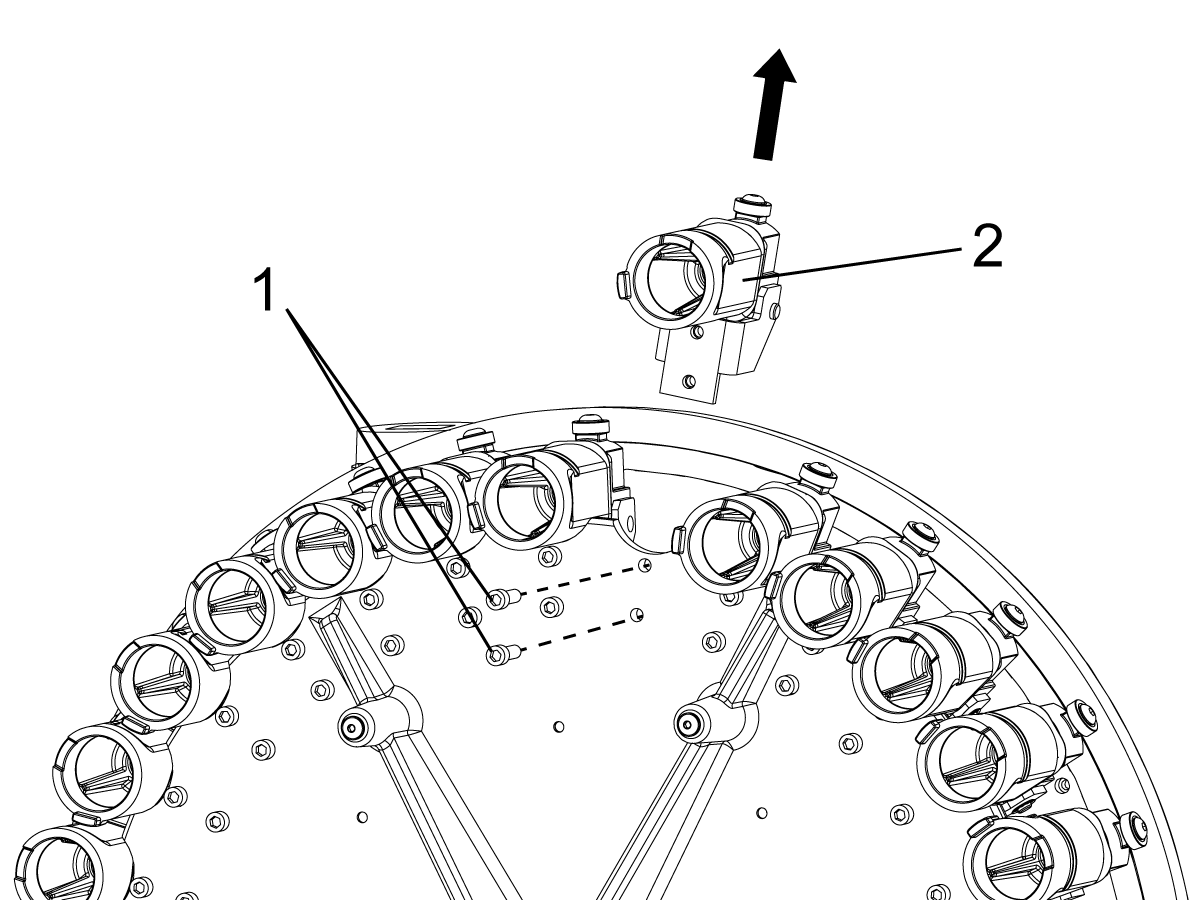
Remove the (2) 5/16-18 bolts [1] from the carousel for the damaged pocket.

Slide the pocket assembly [2] out from under the carousel plate.

Install the replacement pocket. Torque the (2) 5/16-18 bolts [1] to 25 ft lbs. Install the number ring in the correct orientation.

5.3 SMTC - HSK Pocket and Plunger - Replacement

Recently Updated

HSK Pocket and Plunger - Replacement


AD0805

Revision A 08/2025

Introduction

This procedure will go over how to replace the HSK pocket and plungers. 

Pocket Replacement

1

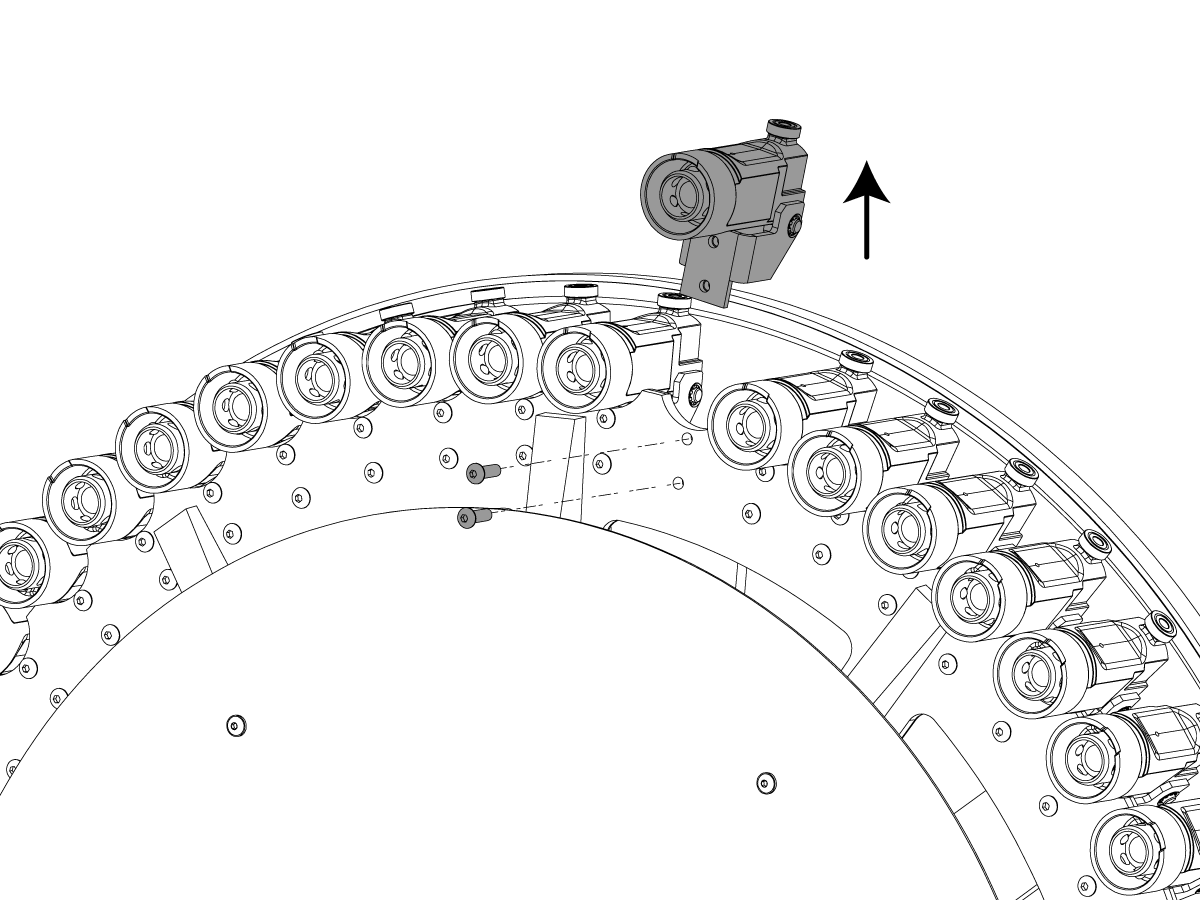
Remove the (2) 5/16-18 bolts [1] from the carousel for the damaged pocket.

Slide the pocket assembly [2] out from under the carousel plate.

Before installing the new pocket, make sure to lubricate the collet assembley by spreading tacky grease on it.

Slide the new pocket assembley under the carousel plate and attach using the (2) 5/16-18 bolts [1].

Contiue to next steps to further disassemble the HSK pocket.

Plunger Replacement

1

Remove the screw to allow the collet assembly to come out of the pocket.

2

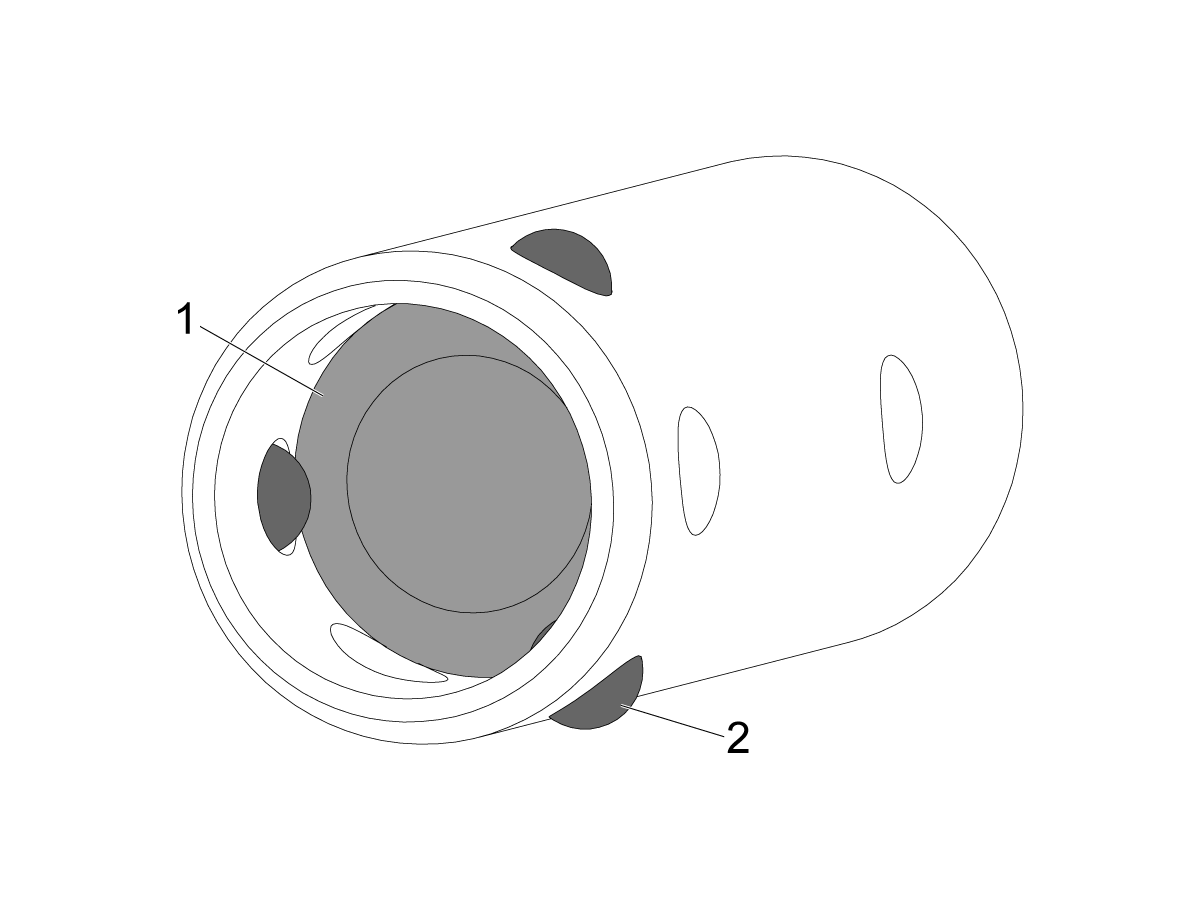
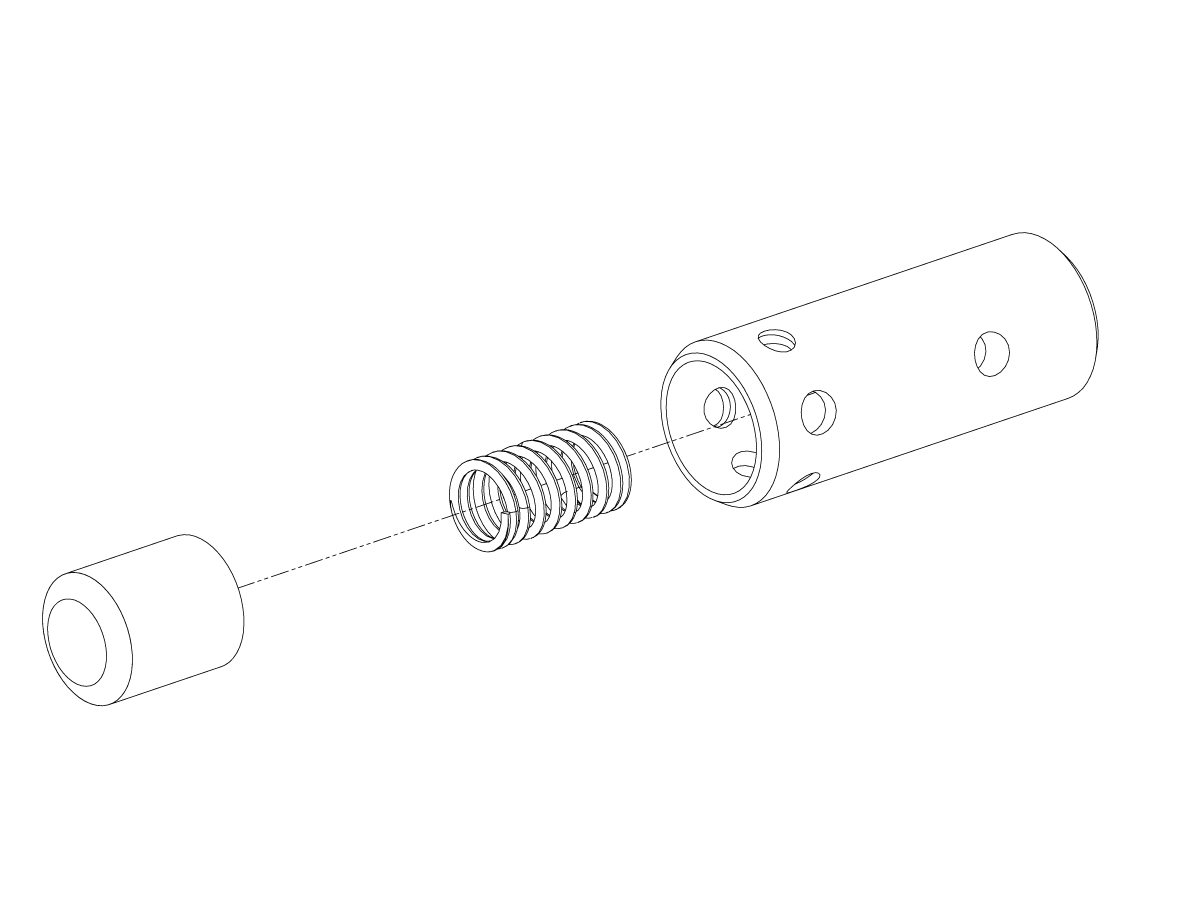
With the collect assembly removed from the pocket, press the center cap [1] in to be able to remove the plungers [2].

NOTE: There is a spring behind the cap, be careful to make sure the cap does not shoot out after the plungers are removed.

3

Verify the spring is in good condition before reinstalling the plungers and collet assembly. Make sure to grease the plungers and cap before reassembling. 

To reassemble, follow this procedure in reverse order.

5.4 SMTC - Pocket Check Valve - Replacement

Recently Updated

SMTC - Pocket Check Valve - Replacement


AD0534

Revision B - 04/2026

Introduction

This procedure will describe how to replace the check valve at the air cylinder side of the tool changer to a compression fitting and move the check valve to the solenoid side. 

Machine Requirements:

  • Haas Classic Control M18.XX and below

The following kit pertains to this instruction:

  • 93-3278: 58-7243 PO CHECK VALVE REPLACEMENT KIT

1

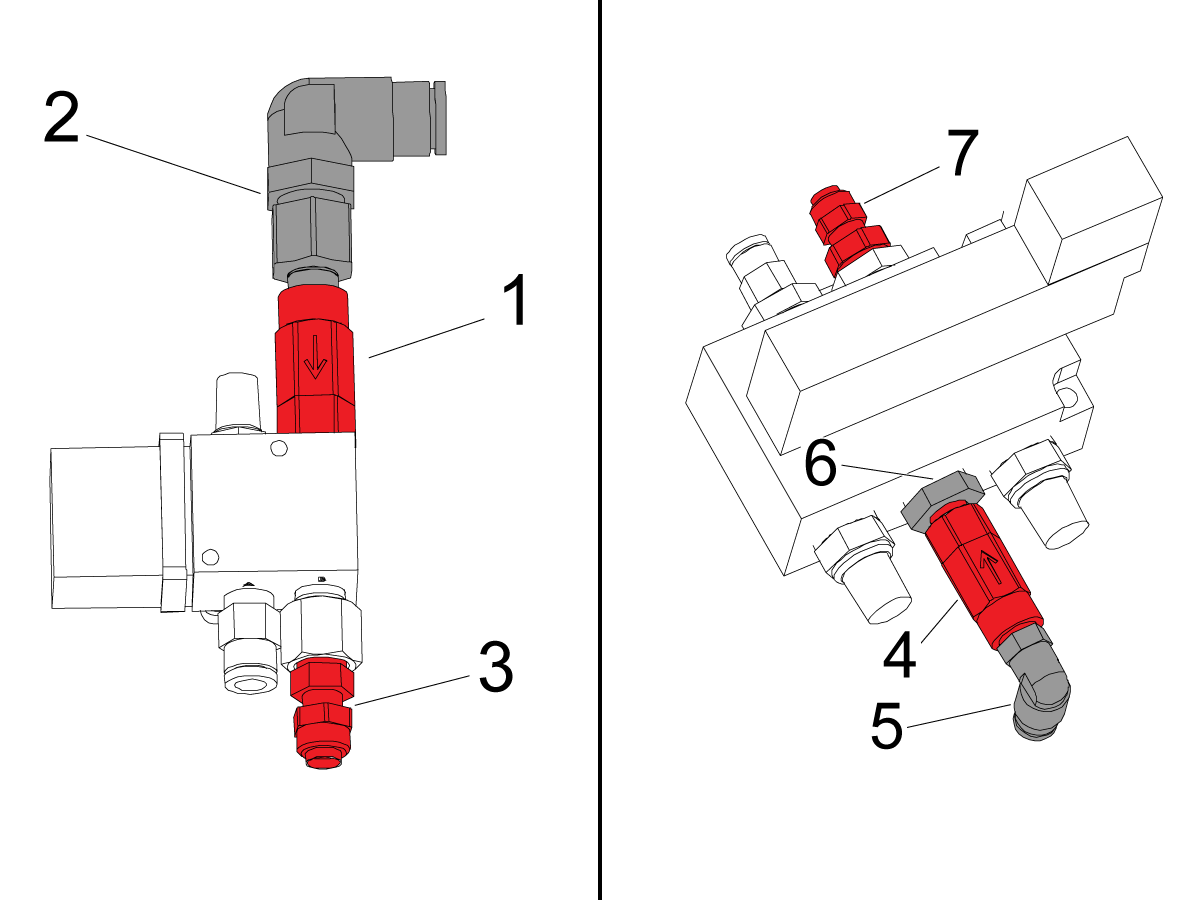
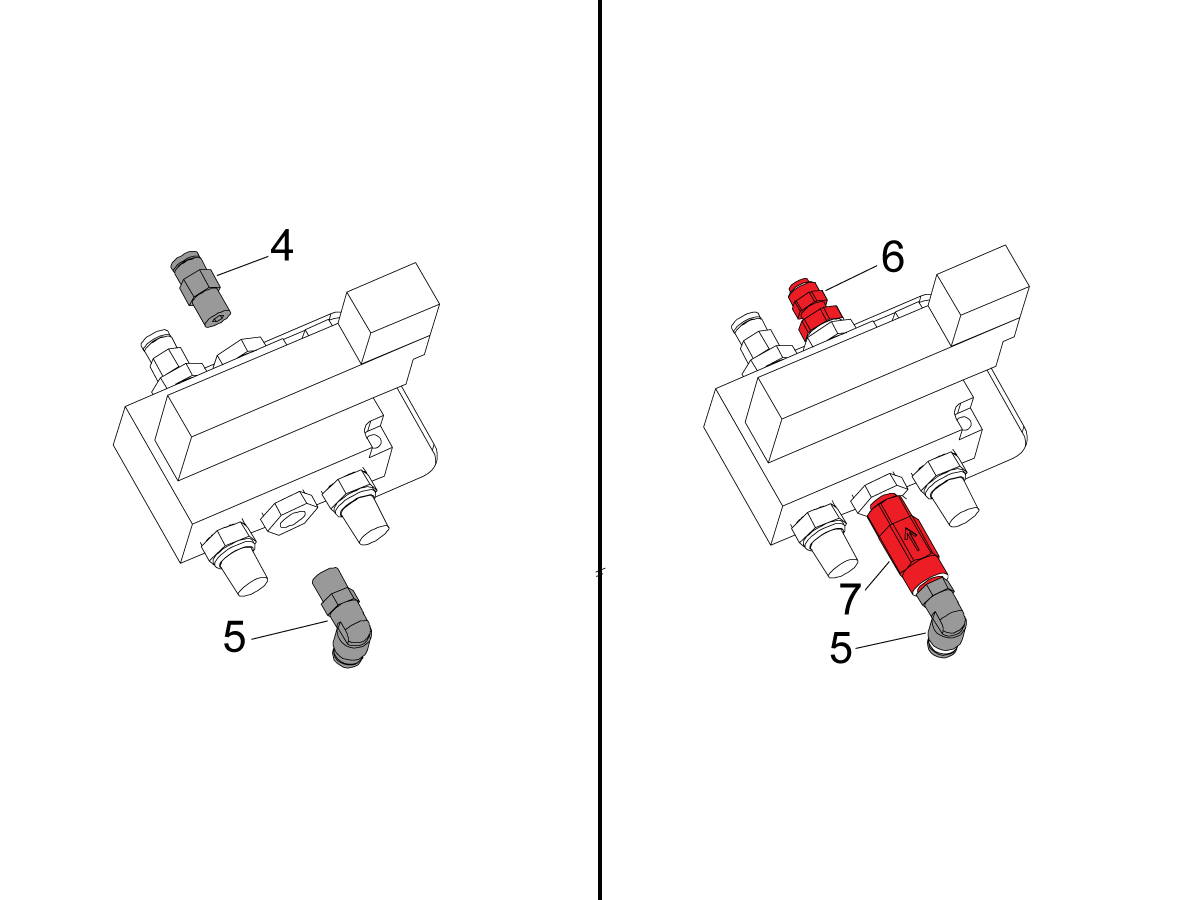
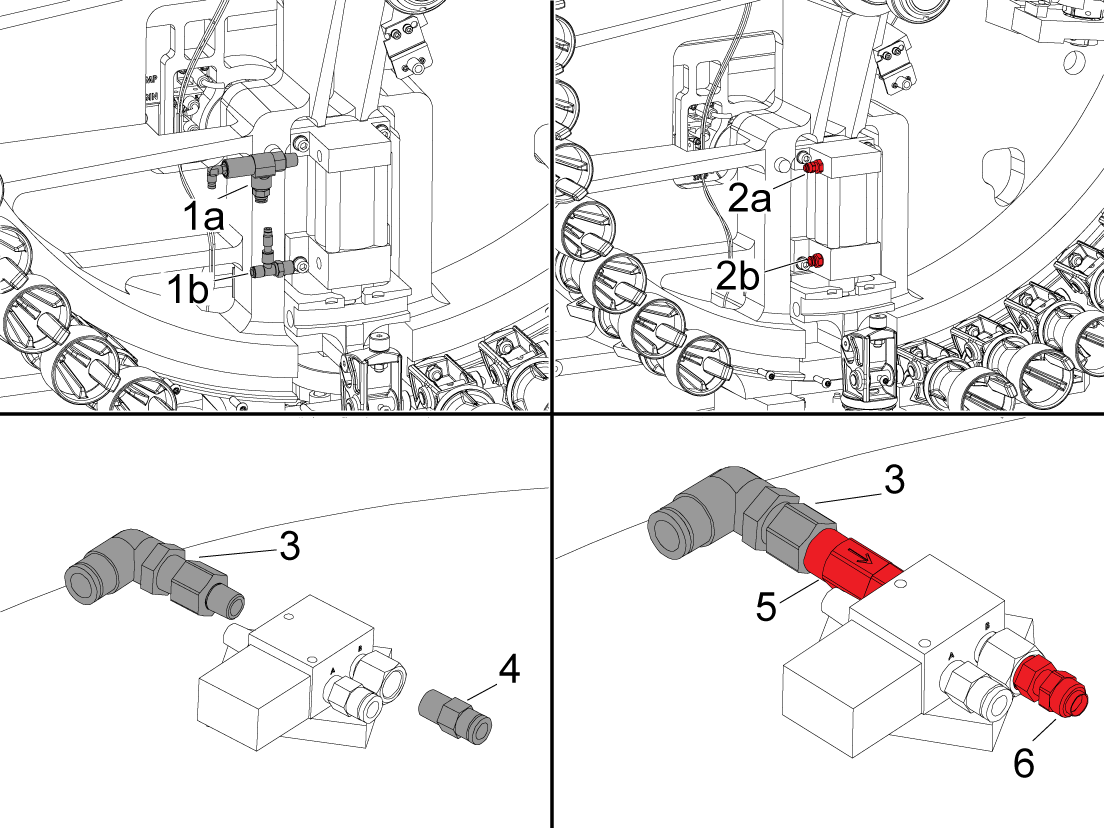
SOLENOID CAUTION: Some of the solenoid configurations may not work as shown in the images due to space available around the solenoid . If that is the case some adjustments may have to be made to fit the check valve and compression fitting. 

There are two solenoids you may encounter, a 4 port and a 5 port, they should follow the general configurations shown in the image.

  • For the 4 port solenoid the check valve [1] should go in the port across from the compression fitting in port B [3] and a fitting to connect the air line [2] should be assembled to the check valve [1].. 
  • For the 5 port solenoid the check valve [4] goes in between the reducer [6] and air line fitting [5] in the port labeled IN. The compression fitting [7] goes in the port labeled A.


Accessing the Air Cylinder

1

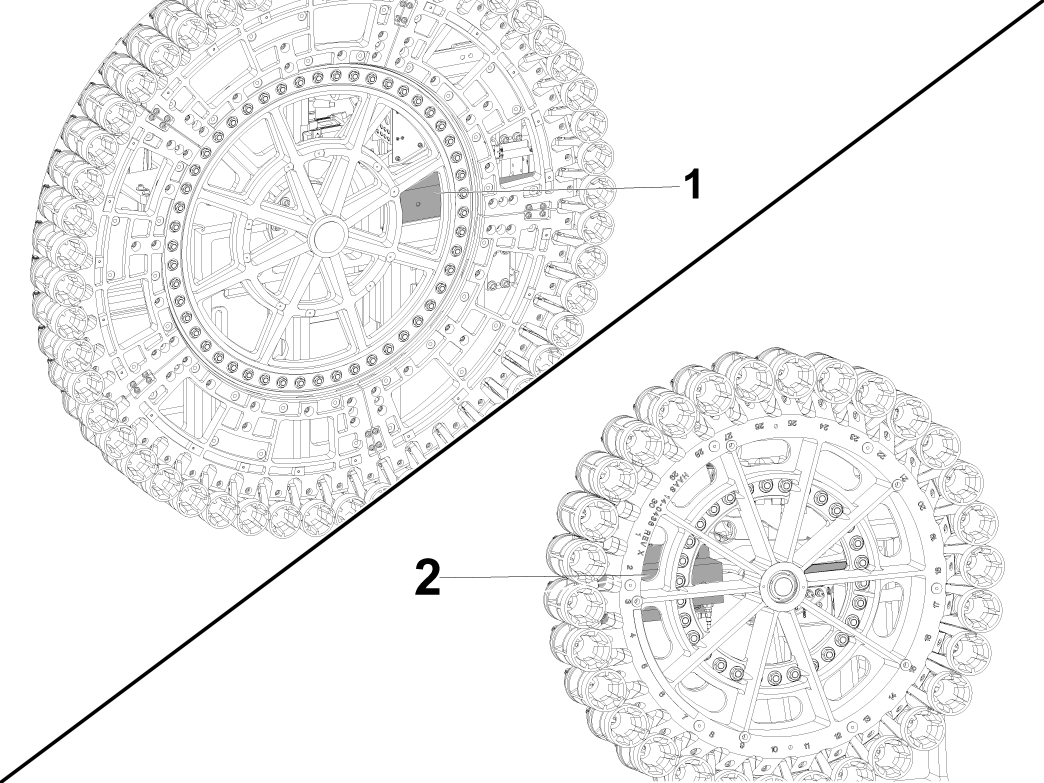
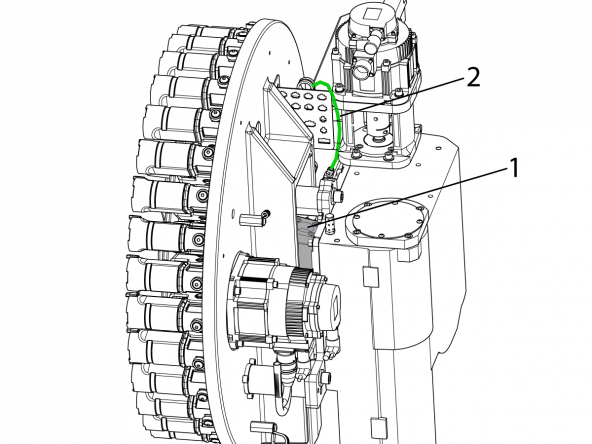
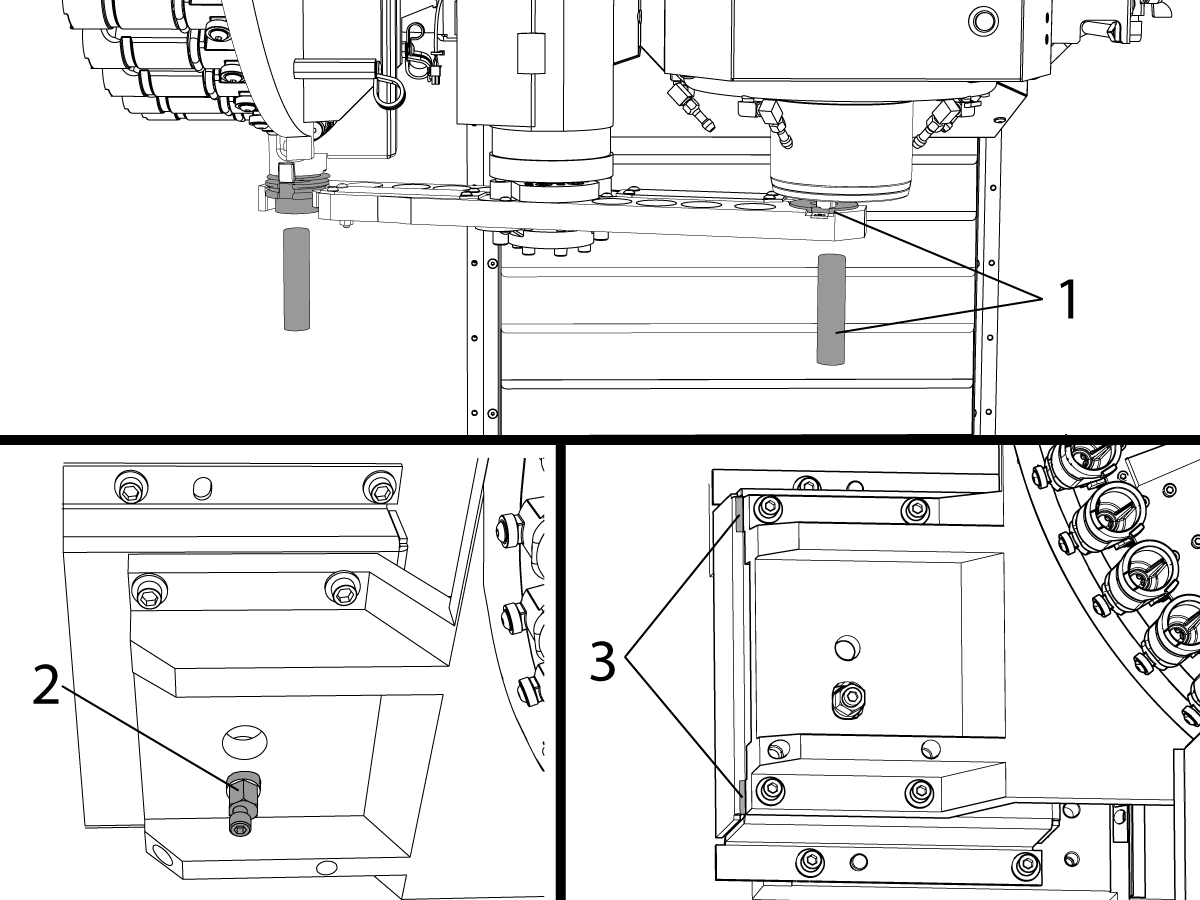
This picture shows the air cylinder on the 50-Pocket 50T tool changer [1] and the 30-Pocket 50T tool changer [2].

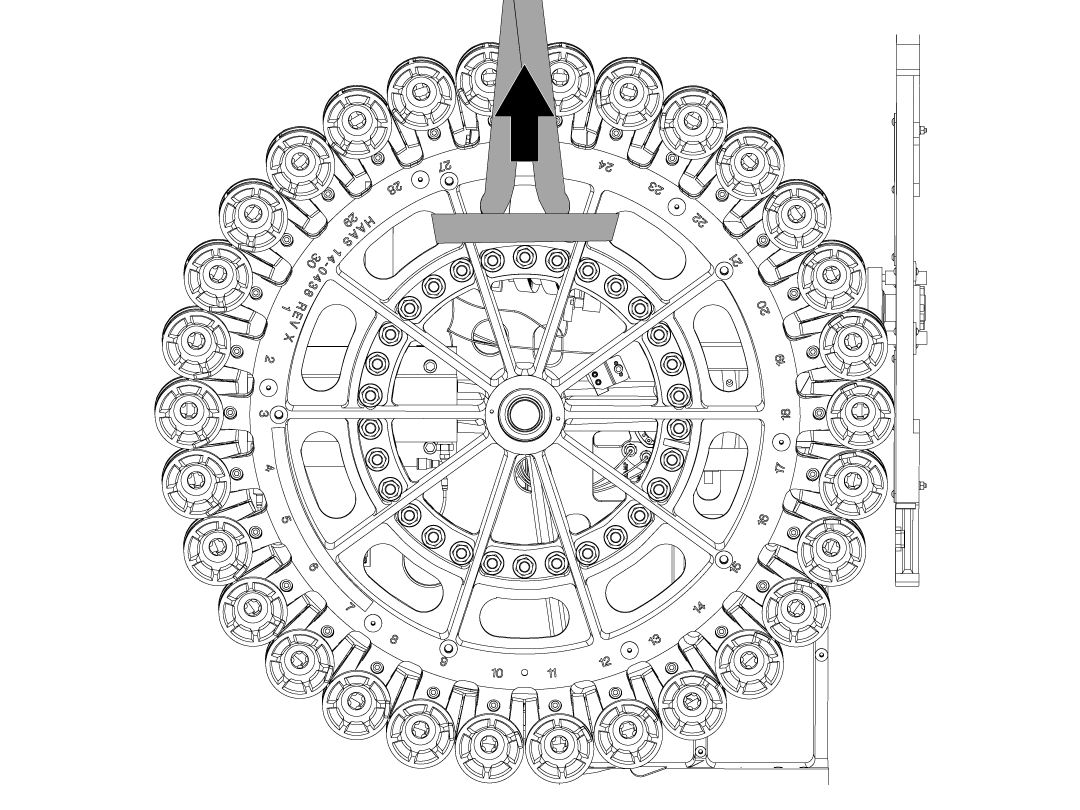
For the 50 & 30-Pocket tool changer, this procedure shows how to access the air cylinder through the front of the carousel.

As an alternative, you can remove the carousel to access the air cylinder.

All other tool changers air cylinders may be accessed the same way.

SMTC - Pocket Check Valve - Replacement

2

If you remove the carousel please use the appropriate lifting aids to safely lift the tool changer out of the machine. 

WARNING: There is a locknut on the  30-Pocket 50T tool changer, use tool P/N T-1357 to remove and replace the bearing lock nut (P/N 51-2043). Torque the bearing lock nut to 80 ft-lb (108 Nm).


24 pocket, 30T, 40T

1

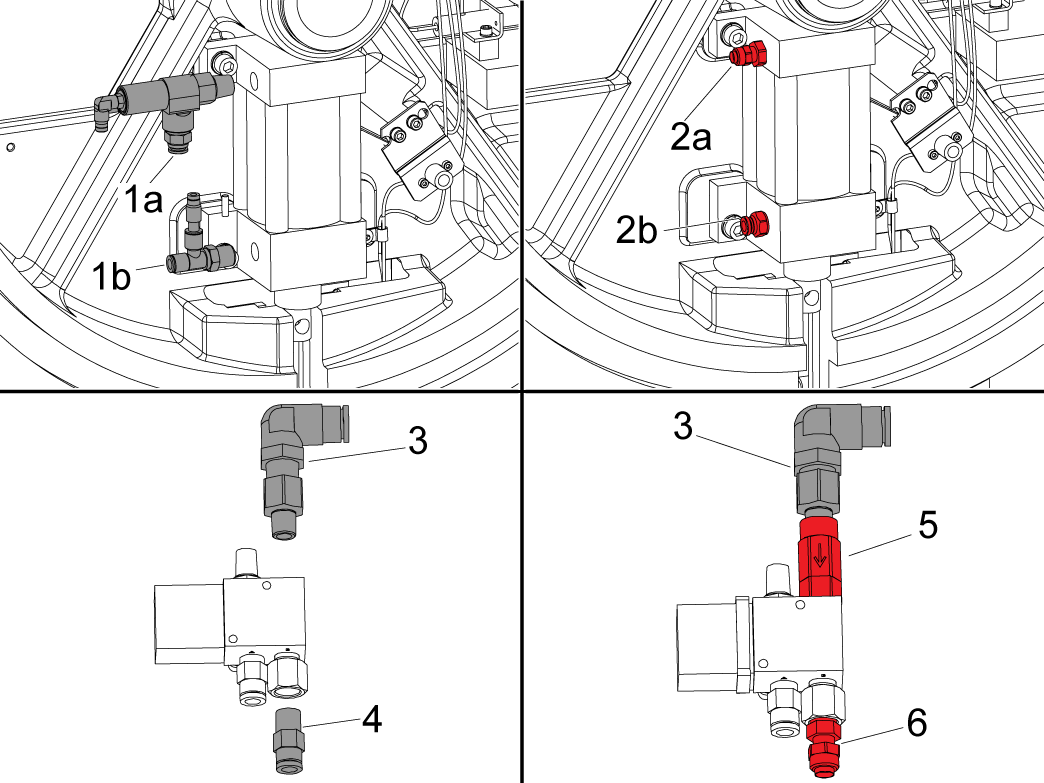
At the air cylinder replace the 58-7243 check valve [1a] & 58-7244 tee fitting [1b] with the 58-16708 FITG POLY1/4F NPT1/4M STR BRASS [2a] and 58-1349 FITG PC1/4F NPT1/4M STR BRASS [2b].

At the solenoid side replace 58-3070 [4] with 58-16706 compression fitting [6] at output B. Add 58-2019 check valve [5] at the input across from output B between the existing fittings and solenoid [3].

40 pocket, 40T

1

At the air cylinder replace the 58-7243 check valve [1a] & 58-7244 tee fitting [1b] with the 58-16708 FITG POLY1/4F NPT1/4M STR BRASS [2a] and 58-1349 FITG PC1/4F NPT1/4M STR BRASS [2b].

At the solenoid side replace 58-3070 [4] with 58-16706 compression fitting [6] at output B. Add 58-2019 check valve [5] at the input across from output B between the existing fittings and solenoid [3].

60 pocket, 40T

NOTE: No model was found to create the images, use the following as a guideline:

At the air cylinder replace the 58-7243 check valve & 58-7244 tee fitting with the 58-16708 FITG POLY1/4F NPT1/4M STR BRASS and 58-1349 FITG PC1/4F NPT1/4M STR BRASS.

NOTE: If a solenoid is present please refer to the solenoid caution in the introduction.

70 pocket, 40T

1

At the air cylinder replace the 58-7243 check valve [1a] & 58-7244 tee fitting [1b] with the 58-16708 FITG POLY1/4F NPT1/4M STR BRASS [2a] and 58-1349 FITG PC1/4F NPT1/4M STR BRASS [2b].

At the solenoid side replace 58-3070 [4] with 58-16706 compression fitting [6] at output B. Add 58-2019 check valve [5] at the input across from output B between 58-16700 FITG NPT1/8F NPT1/8M 90 BRASS and 58-1859 FITG PC3/8F NPT1/8M STR BRASS [3] built as shown.

30 pocket, 50T

1

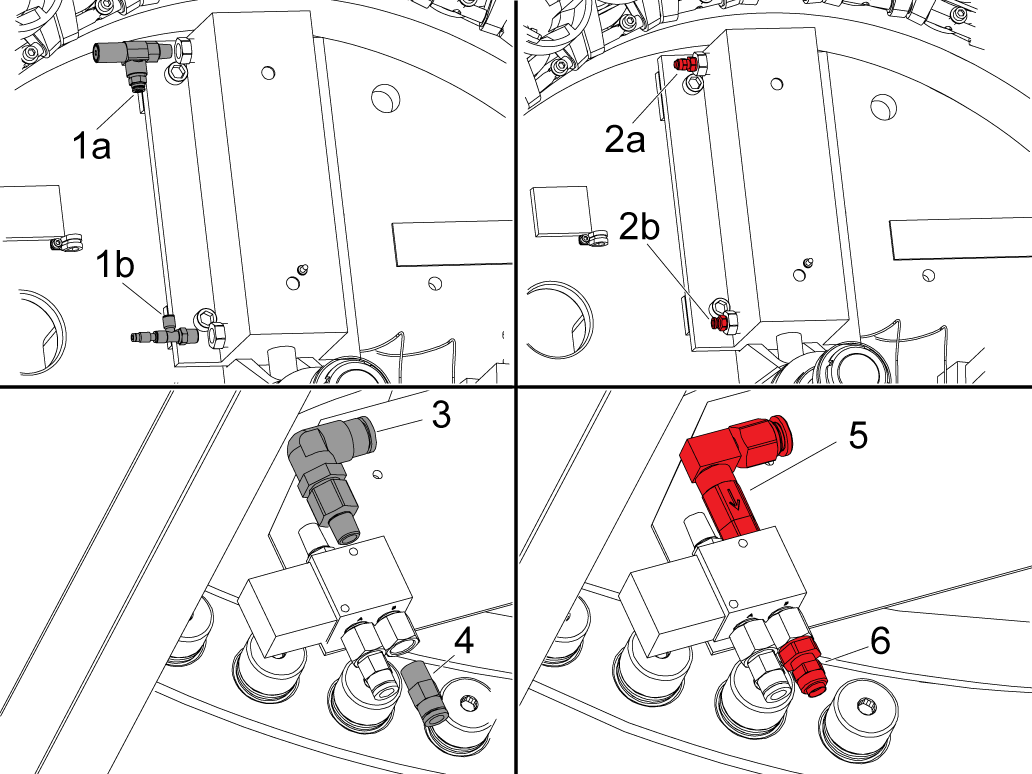
At the air cylinder replace the 58-7243 check valve [1a]  & 58-7244 tee fitting  [1b] with the 58-0914 FITG POLY3/8F NPT1/4M 90 BRASS (90 degree compression) & 58-0562 FITG LBO1/4 NPT1/8M STR [2]. 

2

Updated

At the solenoid side insert 58-2019 check valve [7]  between the reducer and elbow fitting [5] in the port labeled in.

Replace the PTC fitting in port A [4] with 58-16755 FITG COMP 1/4 X 1/8 MNPT BR STR or 58-3075 FITG POLY1/4F NPT1/8M 90 BRASS [6].

50 pocket, 50T

1

At the air cylinder replace the 58-7243 check valve [1a]  & 58-7244 tee fitting [1b] with the 58-16708 FITG POLY1/4F NPT1/4M STR BRASS [2] and 58-0562 FITG LBO1/4 NPT1/8M STR, this assembly has the reducer at the cylinder and a plug [3] . 


2

At the solenoid side insert 58-2019 check valve [7]  between the reducer and elbow fitting [5] in the port labeled in.

Replace the PTC fitting in port A [4] with 58-16755 FITG COMP 1/4 X 1/8 MNPT BR STR or 58-3075 FITG POLY1/4F NPT1/8M 90 BRASS [6].

72 pocket, 50T

1

At the air cylinder replace the 58-7243 check valve [1a] & 58-7244 tee fitting [1b] with the 58-16708 FITG POLY1/4F NPT1/4M STR BRASS [2a] and 58-1349 FITG PC1/4F NPT1/4M STR BRASS [2b].

At the solenoid side replace 58-3070 [4] with 58-16706 compression fitting [6] at output B. Add 58-2019 check valve [5] at the input across from output B built with 58-16700 FITG NPT1/8F NPT1/8M 90 BRASS and 58-1859 FITG PC3/8F NPT1/8M STR BRASS.

VR 32 Pocket Umbrella Tool Changer

1

At the air cylinder replace the 58-7243 check valve [1a] & 58-7244 tee fitting [1b] with the 58-16708 FITG POLY1/4F NPT1/4M STR BRASS [2a] and 58-1349 FITG PC1/4F NPT1/4M STR BRASS [2b].

At the solenoid side insert 58-2019 check valve [7]  between the reducer and elbow fitting [5] in the port labeled in. Replace the PTC fitting in port A [3] with 58-16755 FITG COMP 1/4 X 1/8 MNPT BR STR or 58-3075 FITG POLY1/4F NPT1/8M 90 BRASS [6].

5.5 SMTC - 30/50 - Air Cylinder - Replacement

Recently Updated

SMTC-30/50 - Air Cylinder - Replacement


Revision A 08/2025

Introduction

This procedures tells you how to replace the air cylinder on the SMTC-30/50.

Replacement

1

Remove the sheet metal covers.

Remove three adjacent pockets.

Rotate the carousel so the center removed pocket is in position.

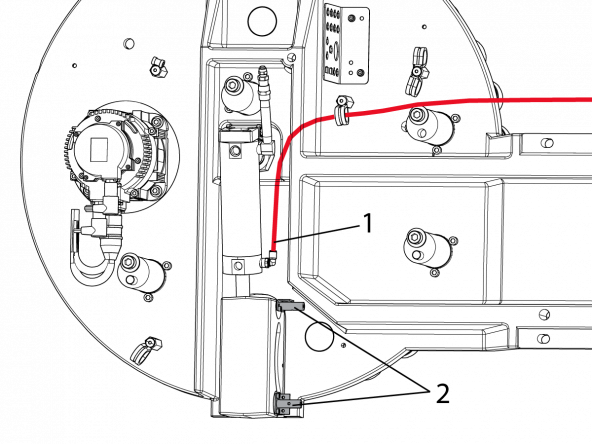
2

Shut off the main air supply to the machine.

Unplug the top air cylinder hose [2] (green).

Use a 1/4" ball-end allen wrench to remove the (4) top cylinder mounting bolts [1].

3

Unplug the lower air cylinder hose [1] (red) and remove the pocket up/down proximity sensors [2].

4

Remove the (4) mounting bolts for the pocket slide assembly.

The pocket slide assembly is on (2) alignment pins. Pull the slide assembly off the pins and drop the slide and cylinder out of the tool changer.

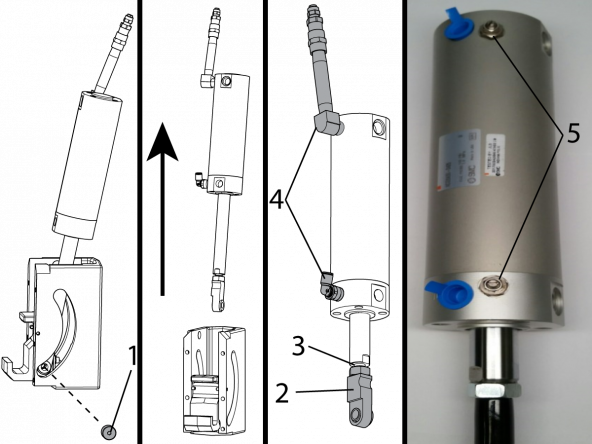
5

Remove the roller [1] from the cylinder side of the pocket slide assembly.

Remove the cylinder from the pocket slide.

Remove the bushing [2] and air fittings [4] and install them on the replacement cylinder. Thread the bushing [2] all the way on the cylinder shaft, then back it off approximately two turns so there is a 1/8" gap [3] between the flange on the shaft and the jam nut.

Loosen the cylinder jam nuts [5] and back off the set screws until they stop then tighten the jam nuts.

Re-assemble the pocket slide and install the cylinder in the reverse order they were removed.

Turn on the main air supply and test the pocket up/down cylinder. Re-install the sheet metal covers.

5.6 SMTC-50 - Installation - VMC

Recently Updated

SMTC-50 - Installation - VMC


AD0416

Revision A 08/2025

SMTC-50 - Installation

1

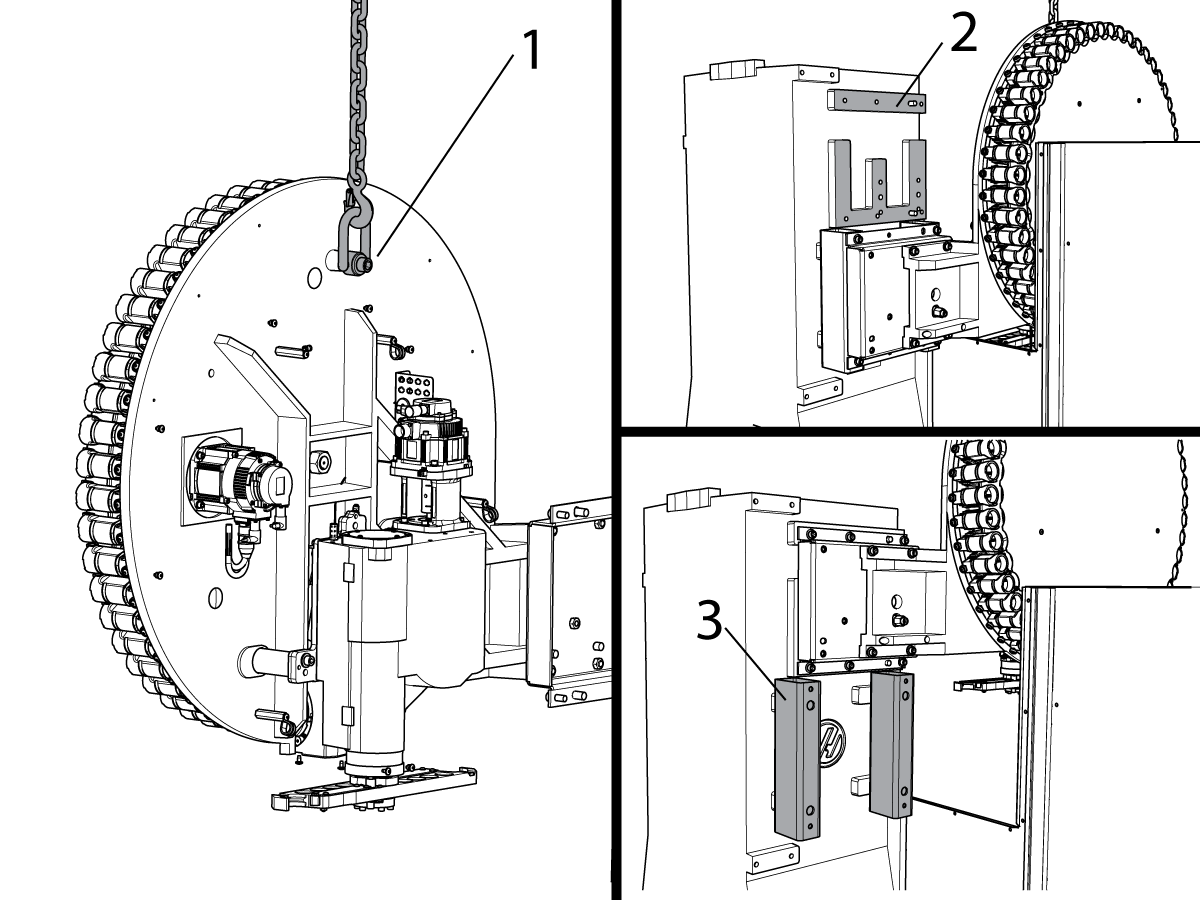
Use the lifting hoist ring [1] as shown to support the tool changer (aprox. 775 lbs/351 kg).

Clean the mating surface for the tool changer [2].

Place a piece of cardboard between the spindle head and the tool changer to prevent scratching the spindle head covers.

Unbolt the tool changer from the shipping mounts and lift it into position on the column [2] and tighten the (6) bolts to 80 ft-lb (108 N-m).

Remove the shipping mounts [3] but leave the lifting ring [1] on for alignment.

2

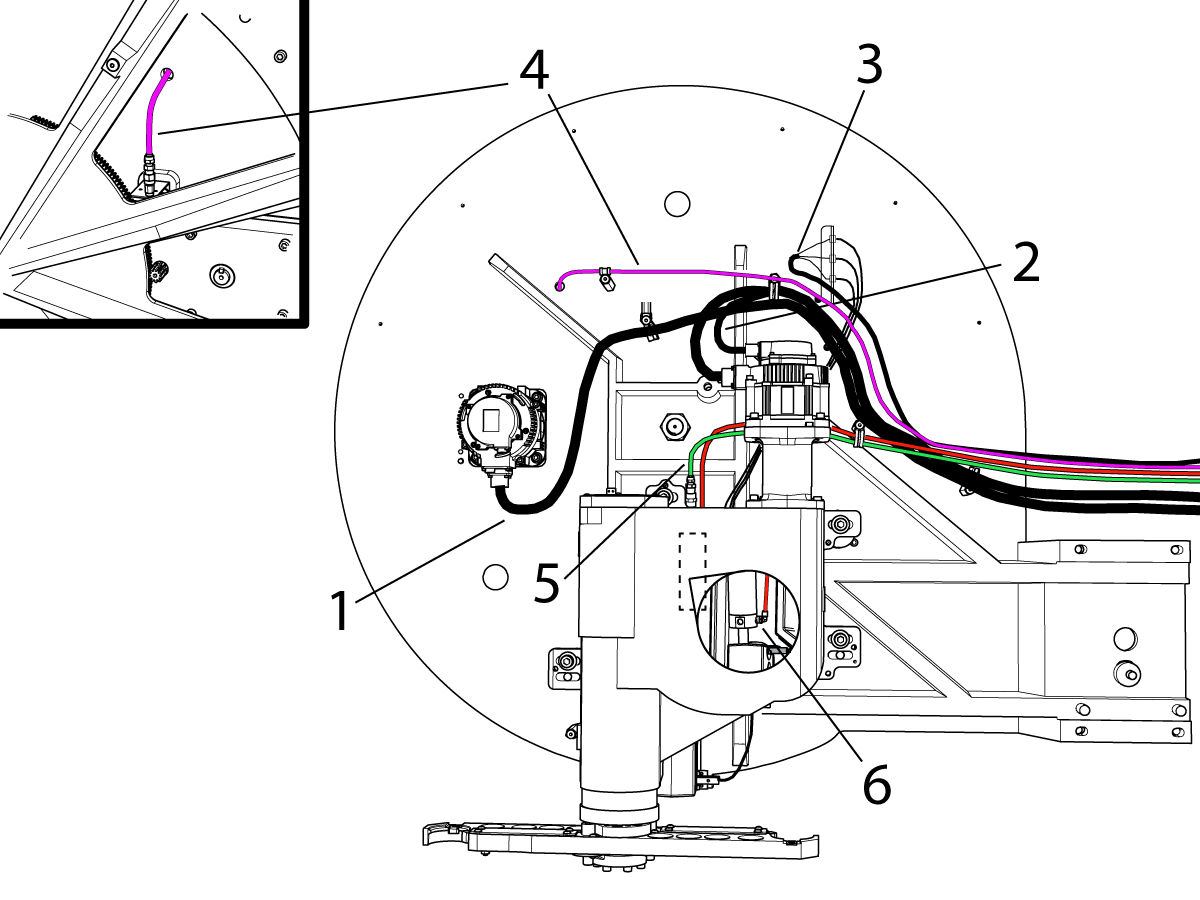
The tool changer is wired as shown:

  • Carousel Motor (TT) [1]
  • Cambox Motor (TA) [2]
  • Tool Changer Status Harness [3]
  • Carousel Lube Line [4]
  • Pocket Up Air Hose [5]
  • Pocket Down Air Hose [6]

The cable clamps are removed to reach the shipping position but the cables are still connected. Reinstall the cable clamps.

Power up and Activate the control. Remove the shipping brackets and complete the machine leveling procedure before aligning the tool changer in the next step.

3

Using a split tool [1] in RECOVERY mode, verify the alignment to the pocket and check the alignment to the spindle.

With the (4) TC bolts loose support the weight of the tool changer with the lifting ring, rotate the SMTC adjuster [2] to align the front-to-back of the arm to the spindle. The tool changer will not move unless you support the weight.

If the spindle alignment is out side-to-side, insert a shim [3] between the tool changer and the mount. Do not leave the shim exposed.

  Important:  You must set the Z-axis Tool Change Offset and Spindle Orientation after installing the 50 Pocket Tool Changer. Refer to Side Mount Tool Changer - Z-Axis Tool Change offset- NGC,  Side-Mount Tool Changer - Spindle Orientation Offset - NGC

4

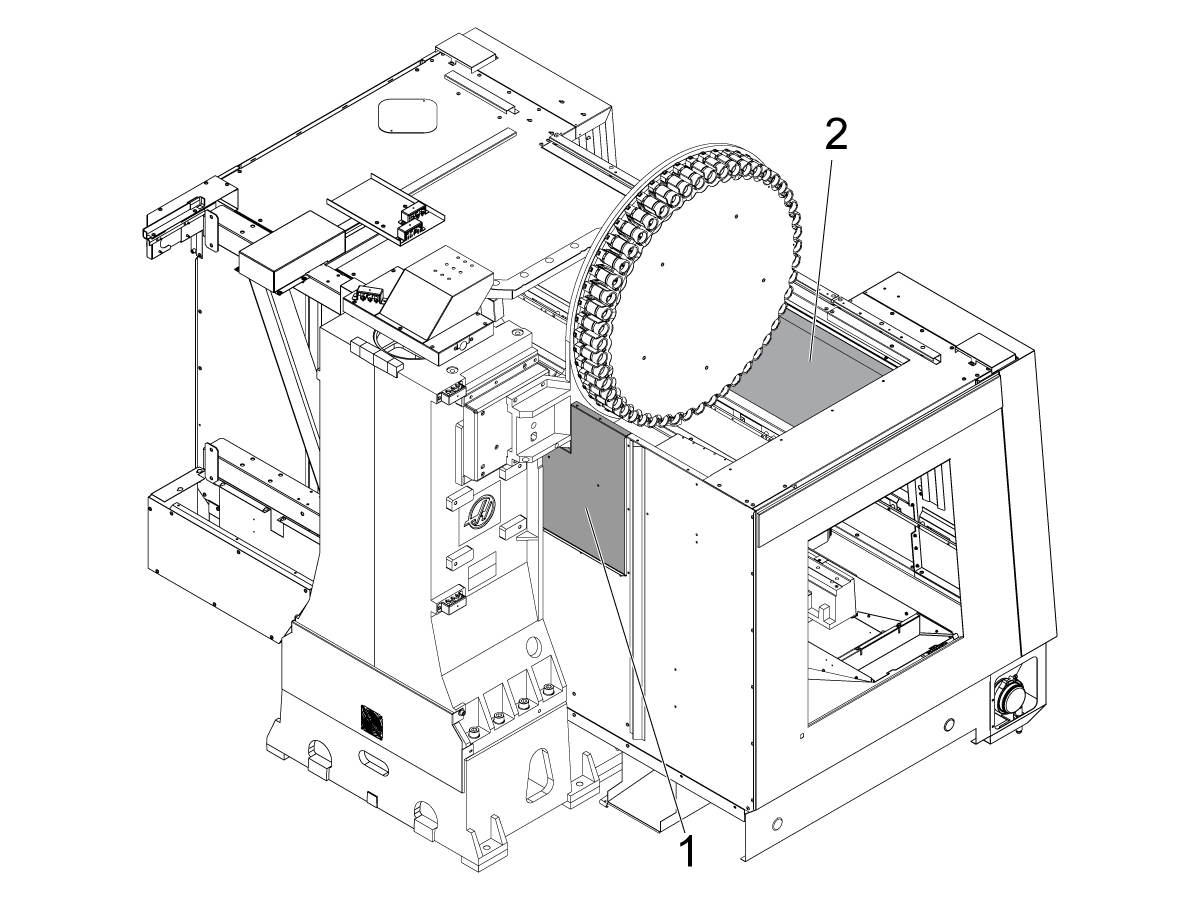
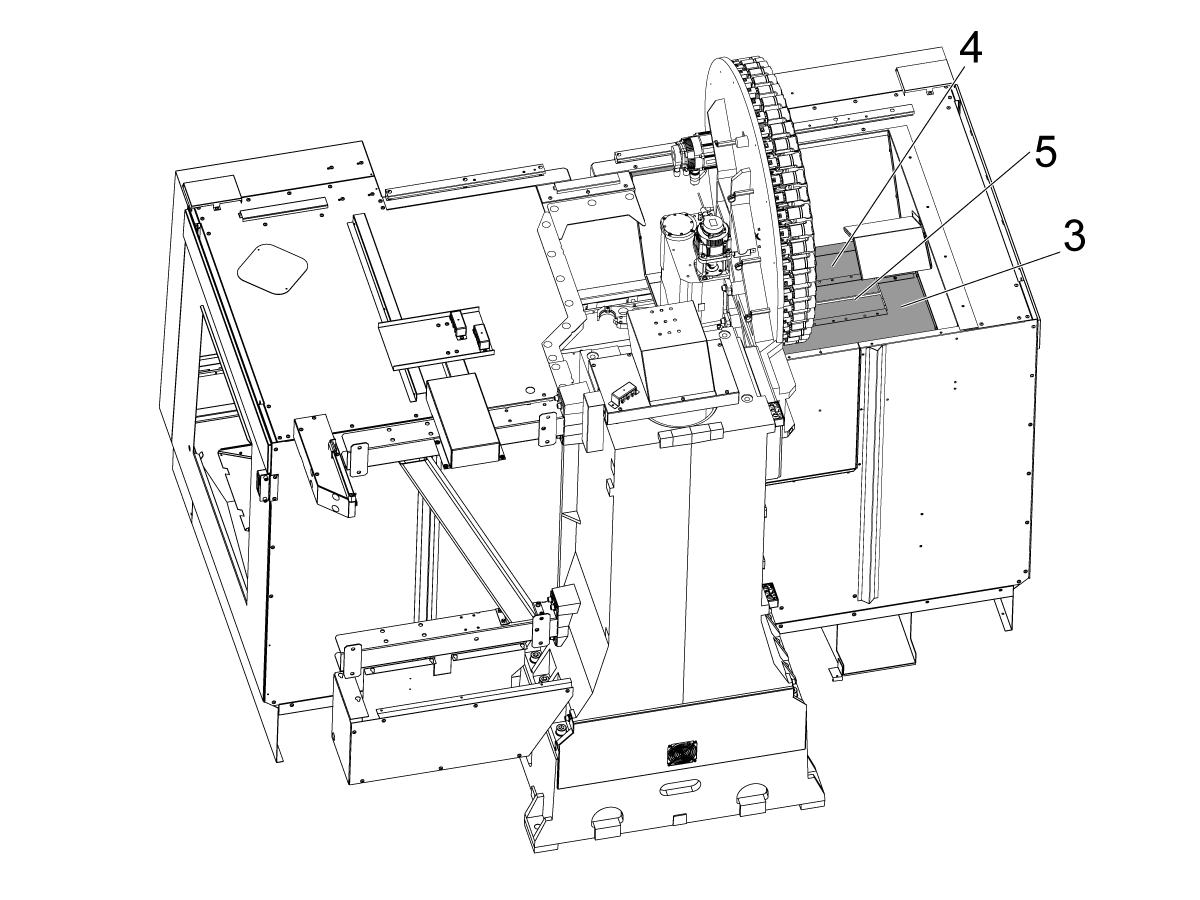
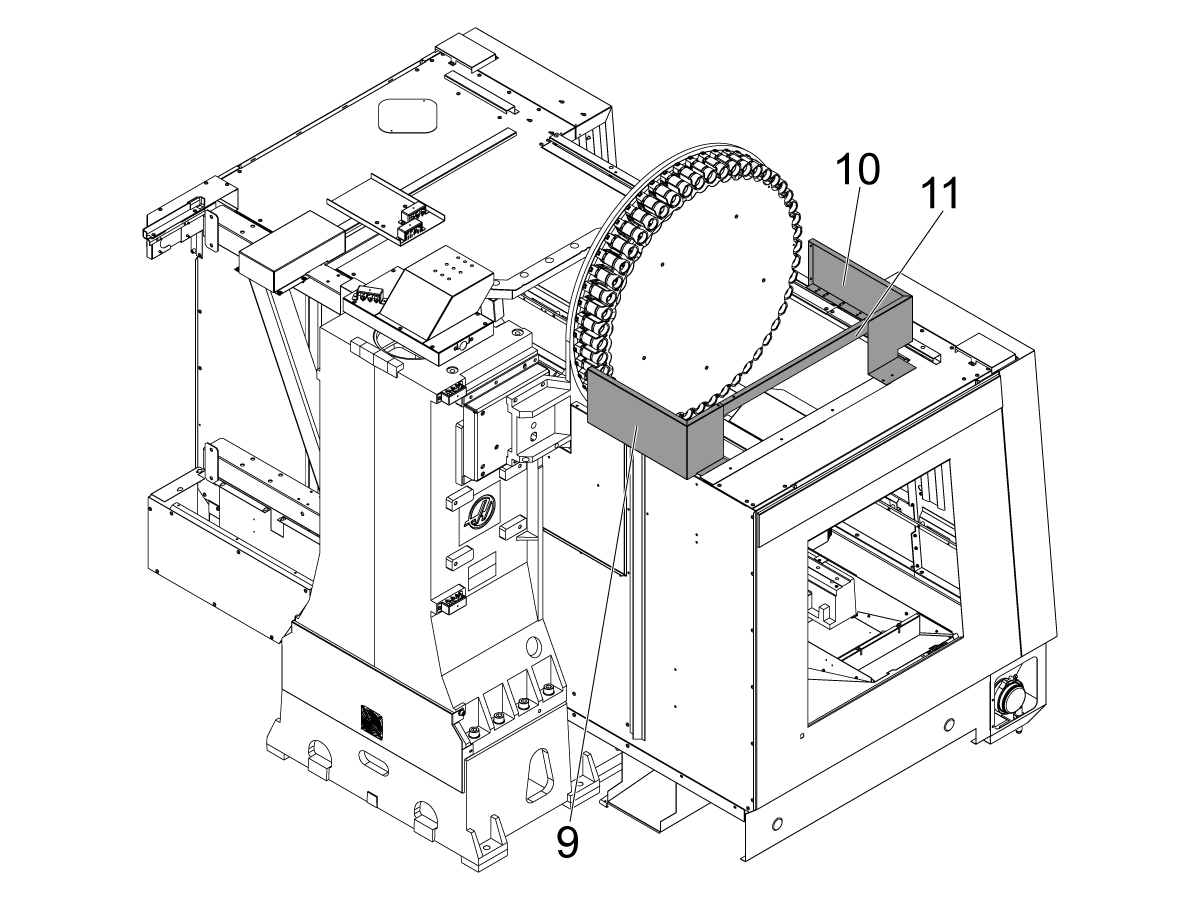
The sheet metal will be installed in this order.

  • [1] Back Enclosure Panel
  • [2] Cover Bottom Front
  • [3] Cover Bottom Back
  • [4] Cover Bottom Middle
  • [5] Brushes
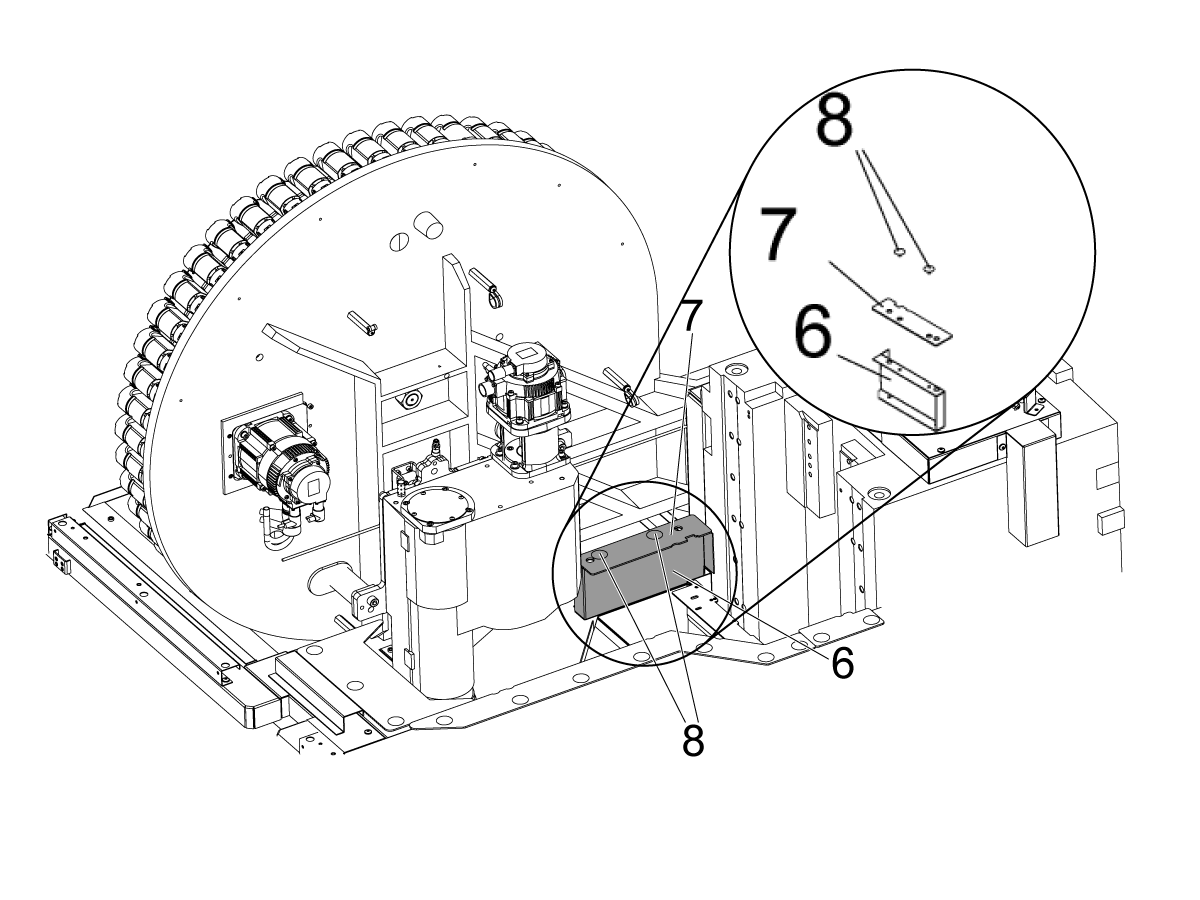
  • [6] Cover Seal Bracket
  • [7] Cover Seal Top
  • [8] 5/16 Plastic Rivet
  • [9] Cover Tool Back
  • [10] Cover Tool Front
  • [11] Cover Tool Brace
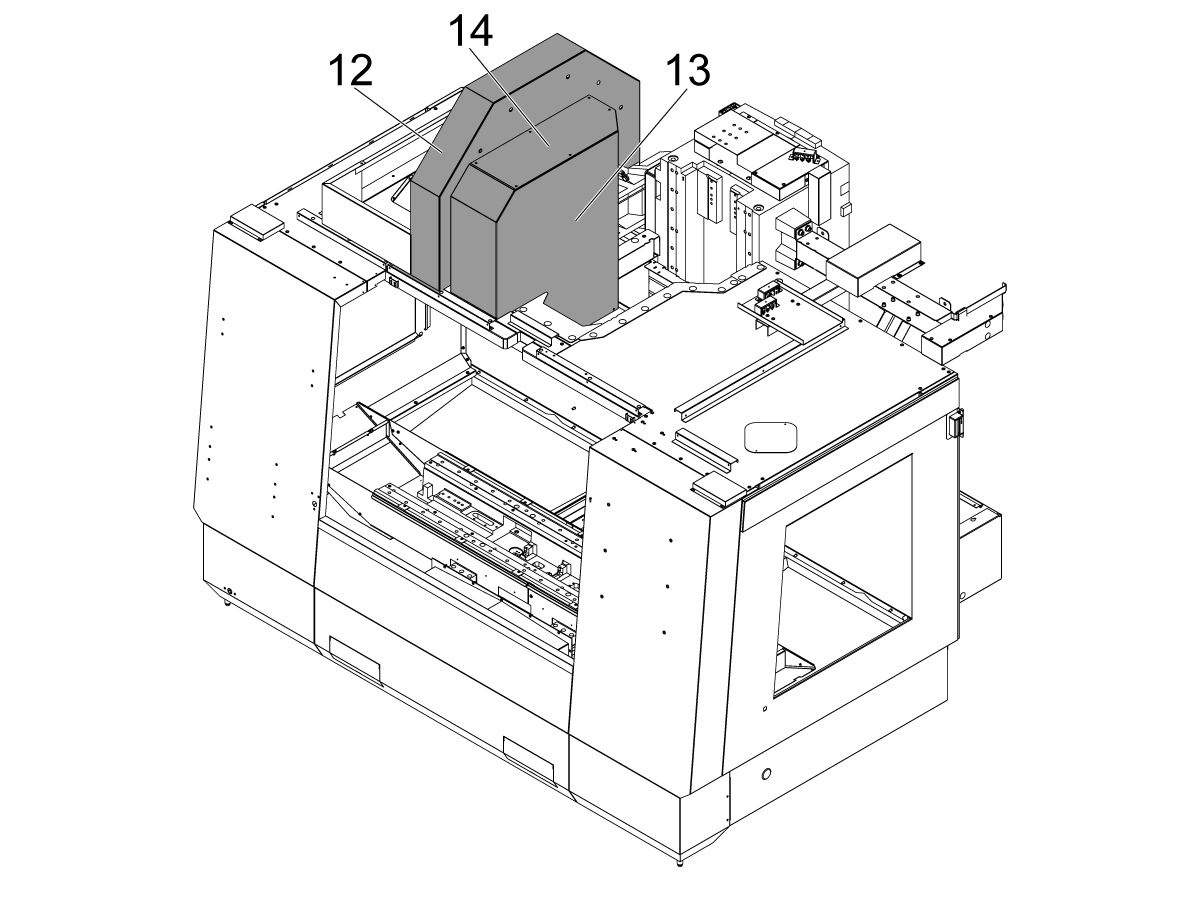
  • [12] Cover Carousel
  • [13] Cover Cambox
  • [14] Cover Top Access

5

Install

  • [1] Back Enclosure Panel
  • [2] Cover Bottom Front

6

Install

  • [3] Cover Bottom Back
  • [4] Cover Bottom Middle
  • [5] Brushes

7

Install [6] [7] [8], cover seal assembly.

8

Install

  • [9] Cover Tool Back
  • [10] Cover Tool Front
  • [11] Cover Tool Brace

9

Install

  • [12] Cover Carousel
  • [13] Cover Cambox
  • [14] Cover Top Access

5.7 Side-Mount Tool Changer - Pocket Slider - Set Screw - Adjustment - VMC

Recently Updated

Side-Mount Tool Changer - Pocket Slider - Set Screw - Adjustment - VMC


Revision A 08/2025

Introduction

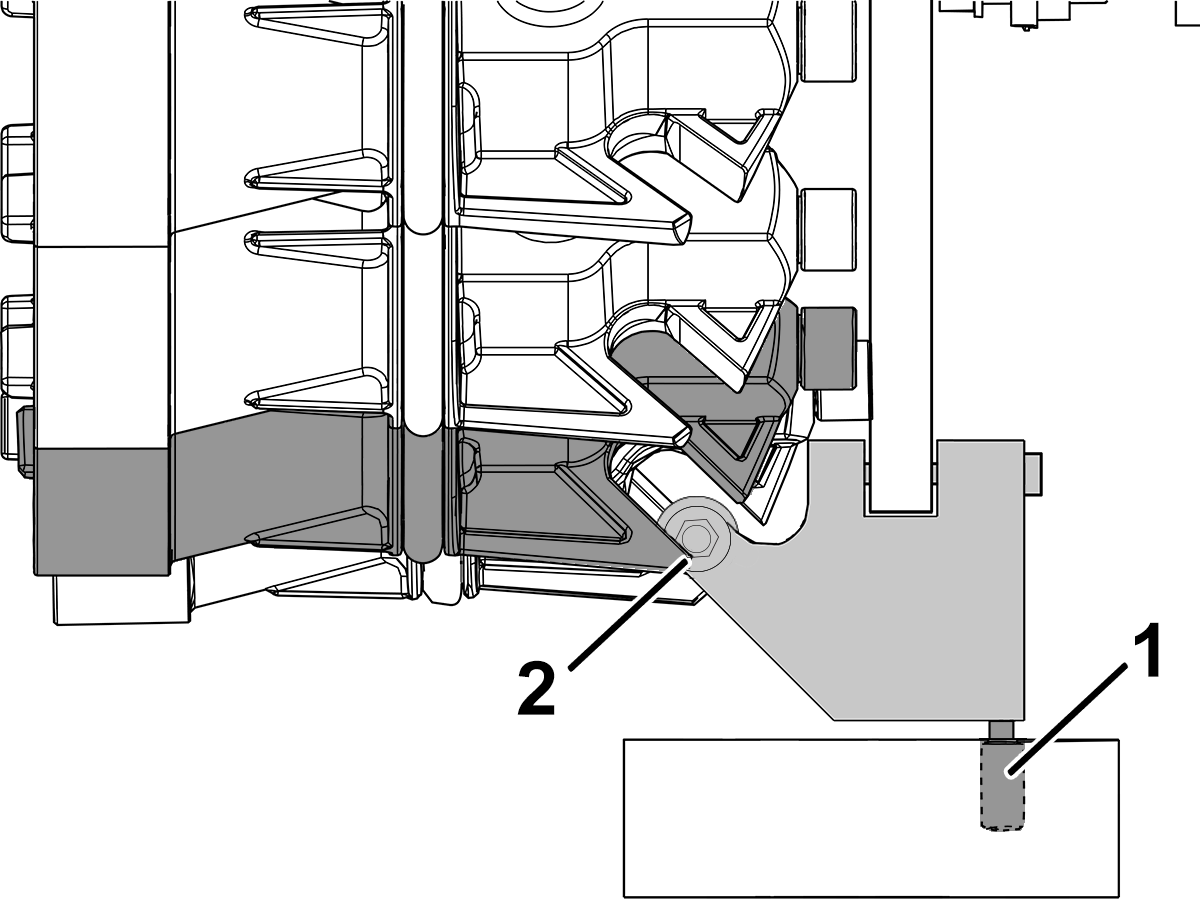
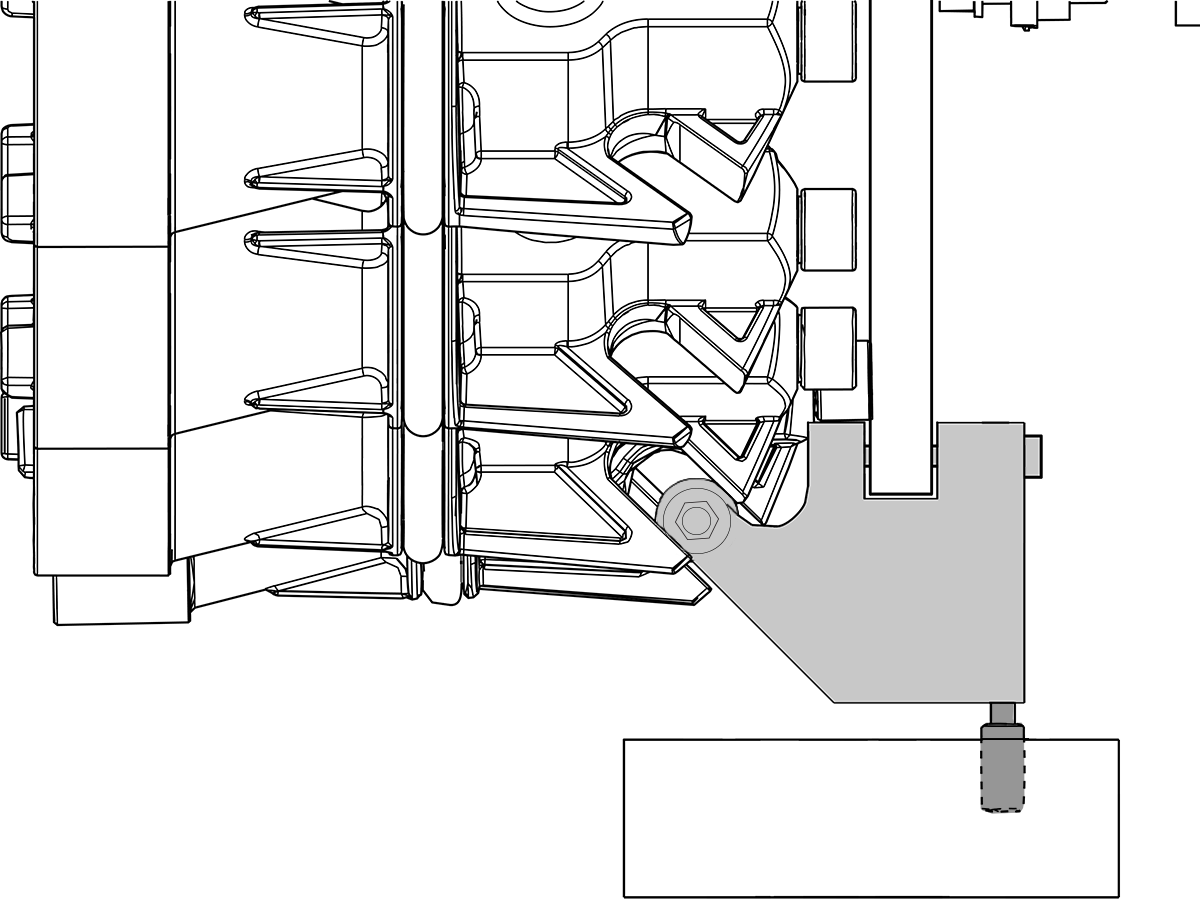
If the pocket slider set screw [1] is not correctly adjusted, the cam follower [2] may hit the pocket when the carousel turns.

This procedure tells you how to adjust the set screw for the pocket slider.

VMC - Side-Mount Tool Changer - Pocket Slider - Set Screw - Adjustment

1

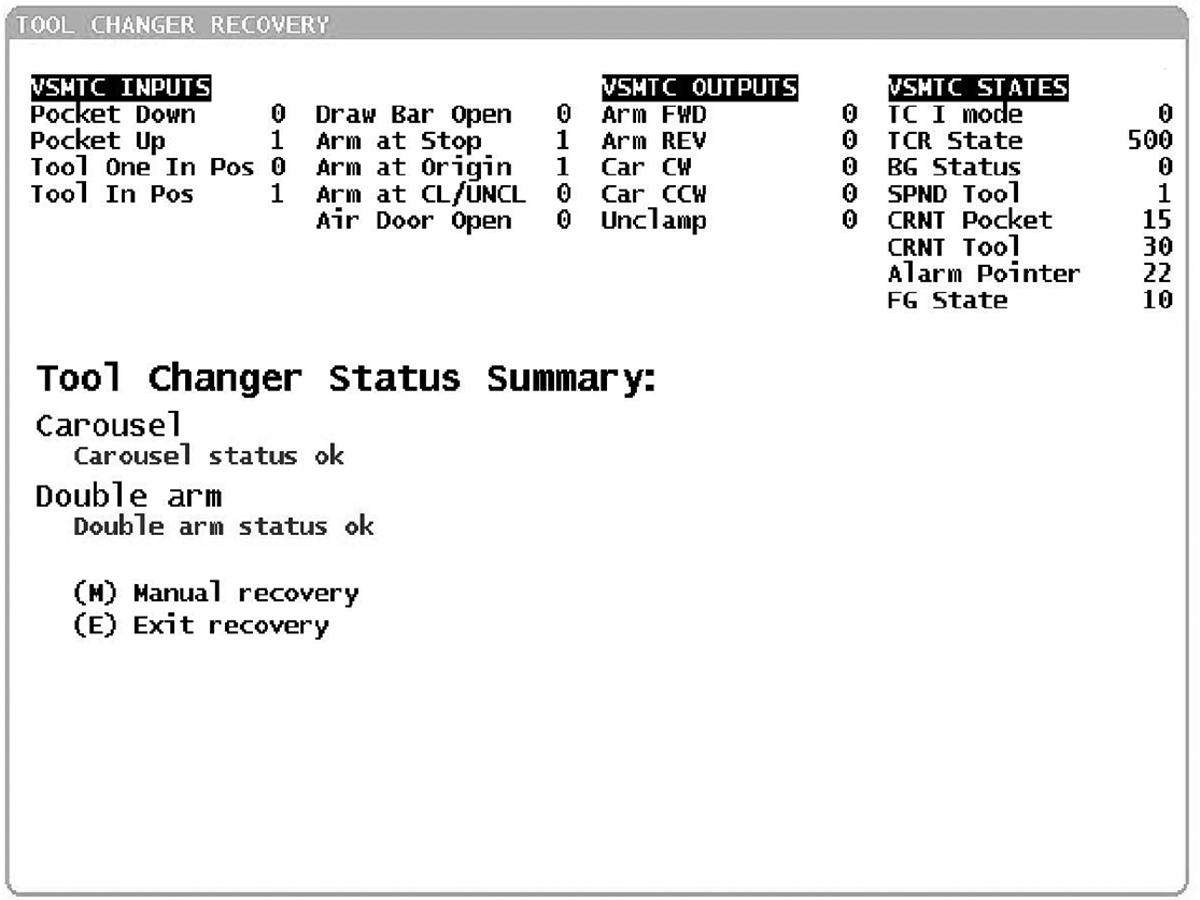
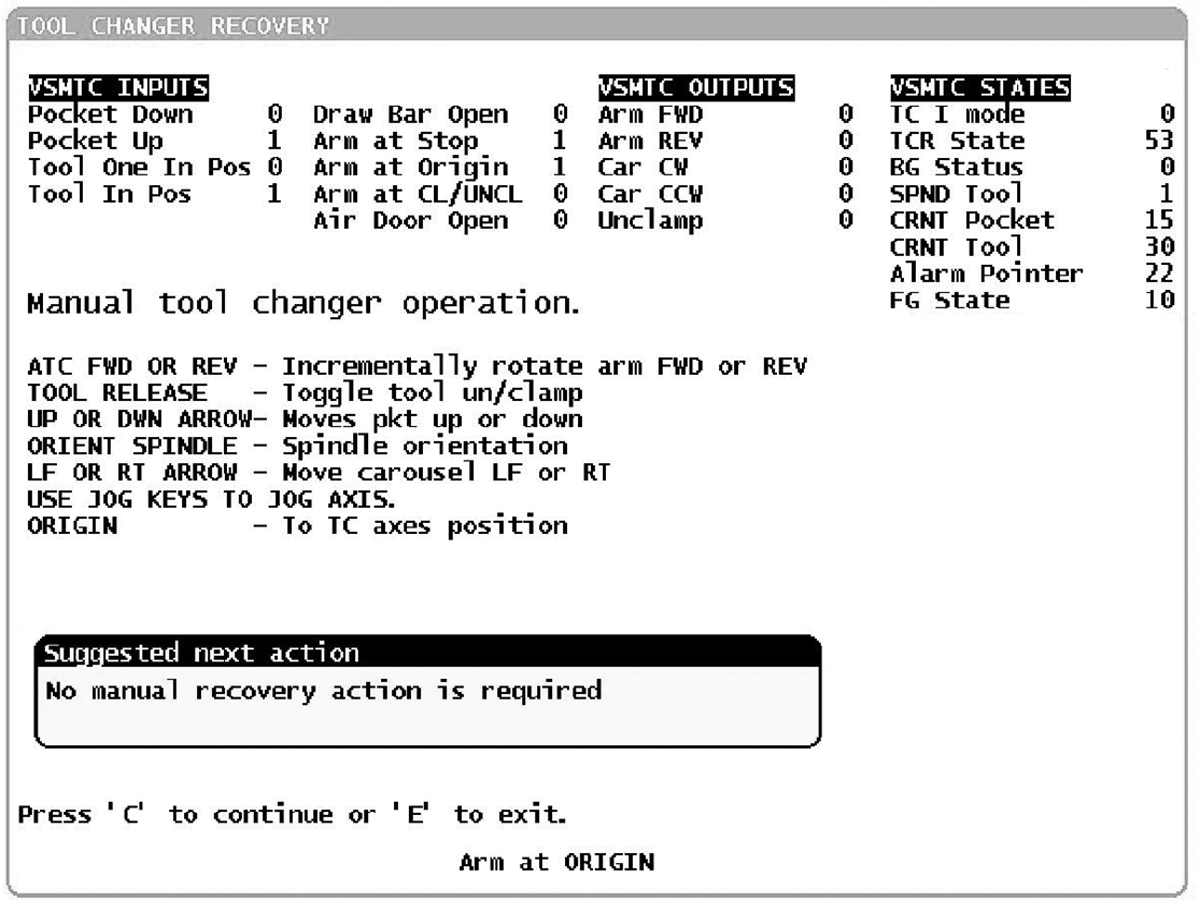
Go into DEBUG mode.

Press [RECOVER] to go into TOOL CHANGER RECOVERY mode.

2

For software 17.XX and later, press [M].

For software 16.XX and earlier, press [Y] (3) times.

The screen shows Manual Tool Changer Operation.

3

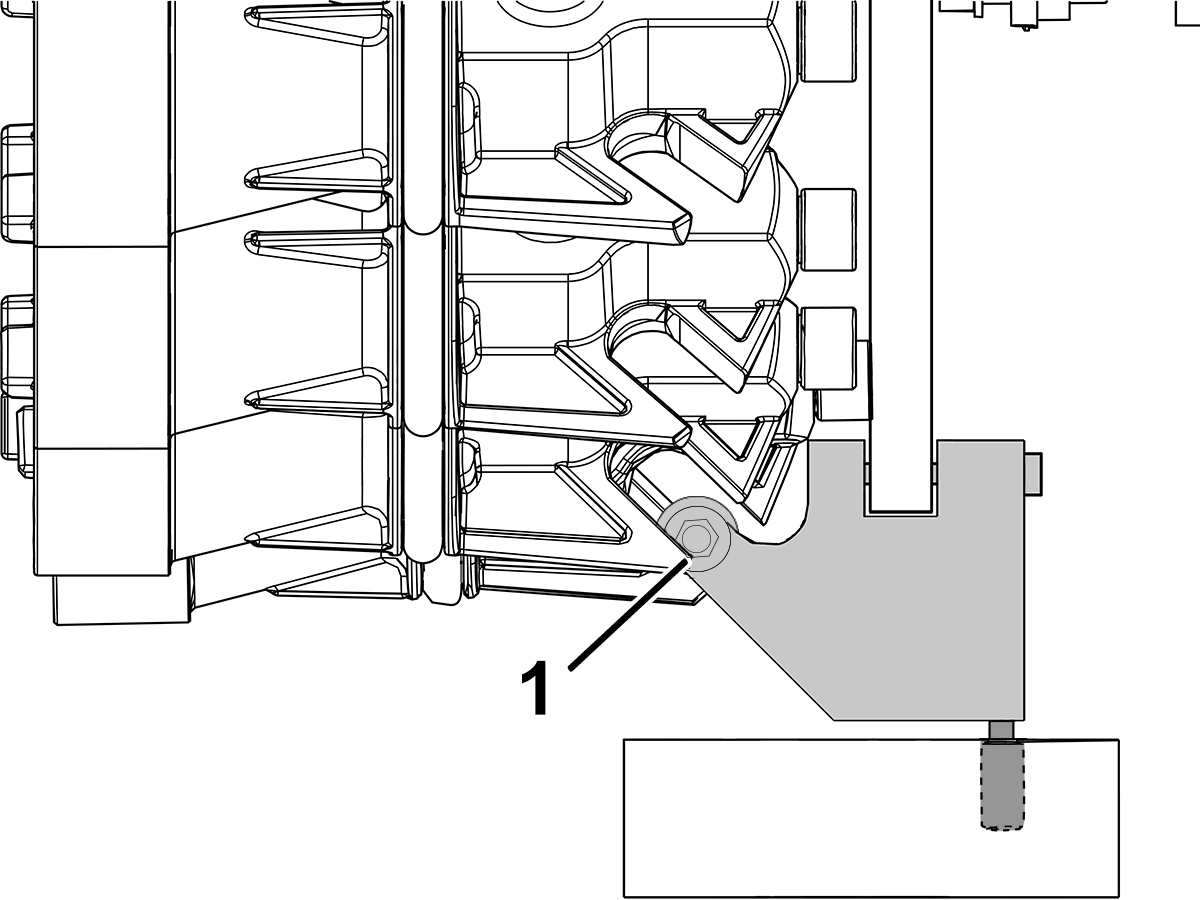
Press the [RIGHT] cursor arrow to move the carousel forward.

While the carousel turns, monitor the cam follower alignment with the pocket slot.

In this example, the slider is too low.

The cam follower hits the pocket when the carousel turns [1].

Adjust the set screw for the pocket slide, as follows.

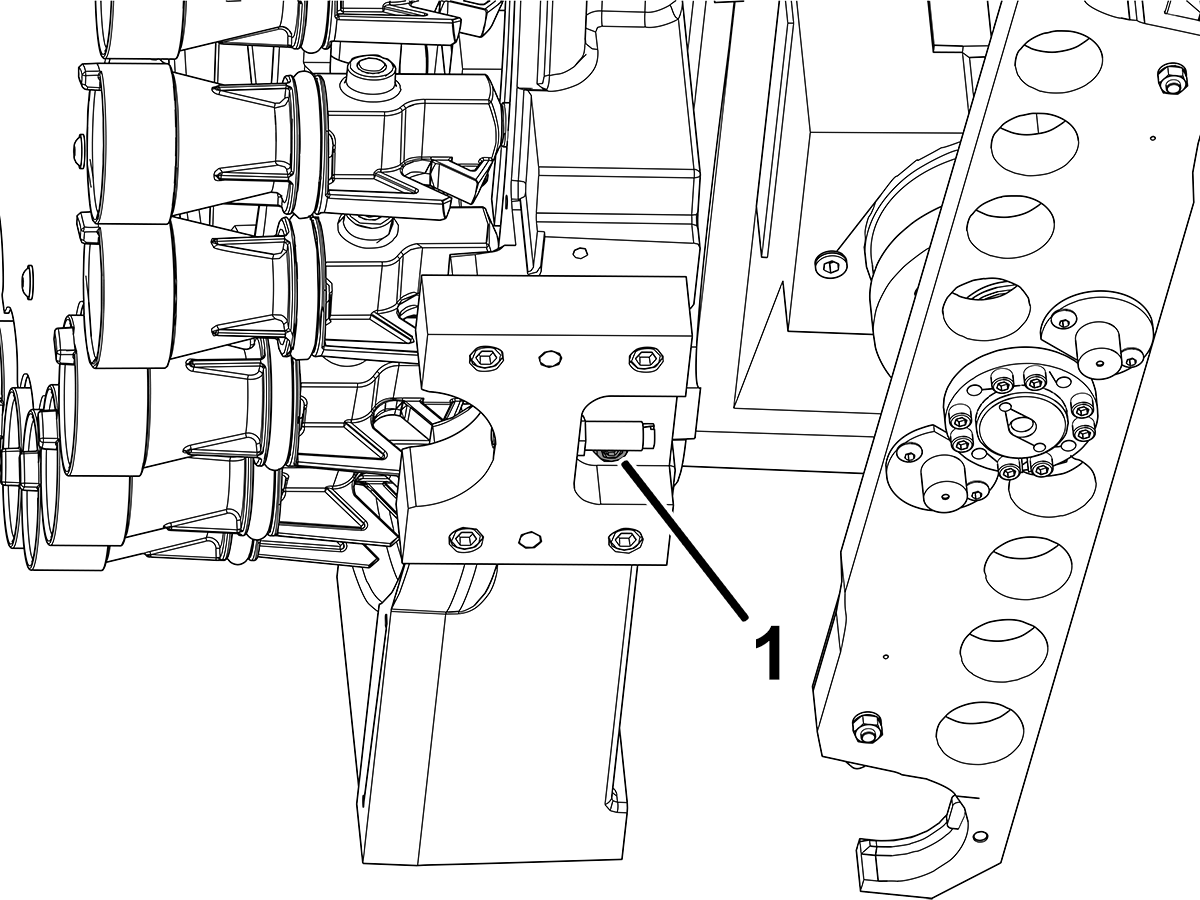
4

Under the pocket stop, find the lock nut [1] for the set screw. Loosen the lock nut.

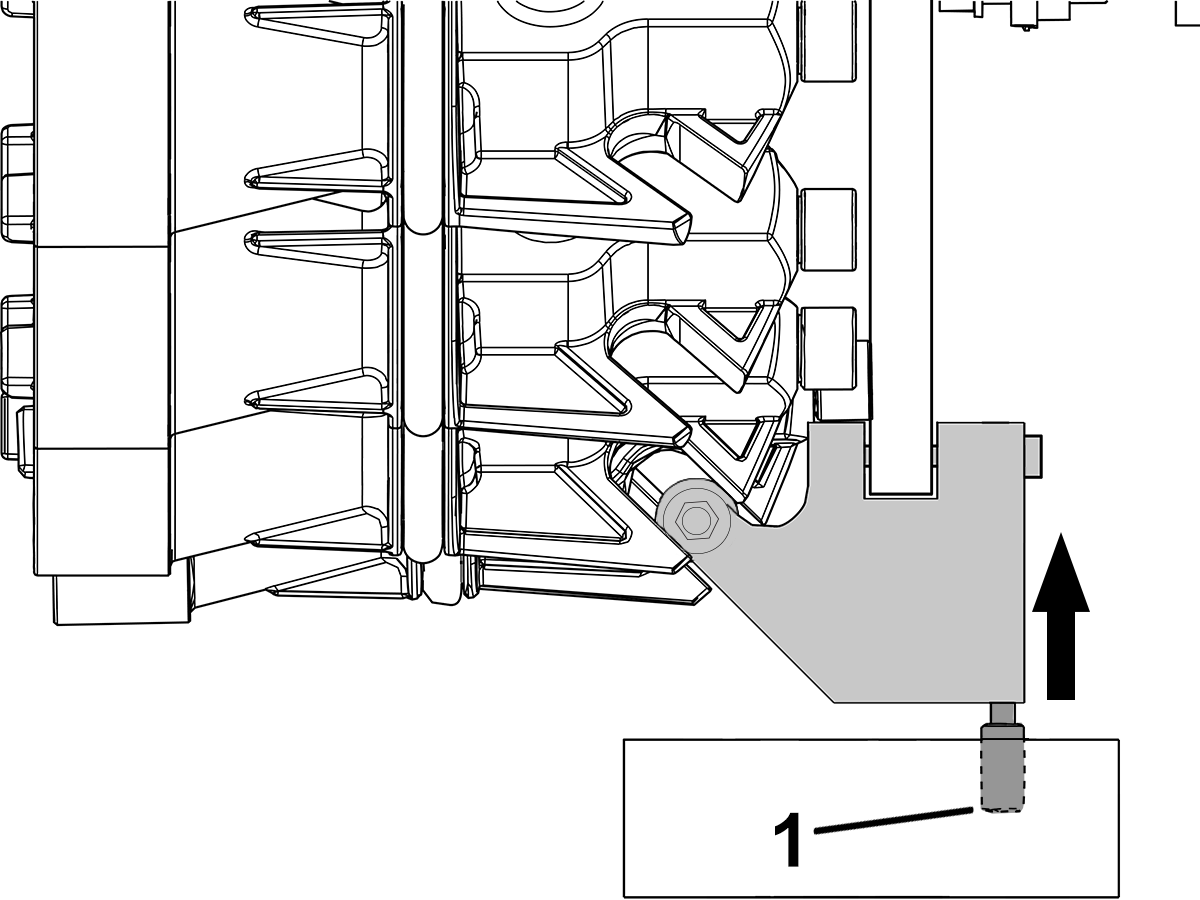
5

Turn the set screw [1] clockwise or counterclockwise.

This moves the pocket slider up or down.

For this example, turn the set screw clockwise. This moves the pocket slider up.

6

Press the [RIGHT] cursor arrow.

This moves the carousel to the next position.

If the adjustment is correct, the cam follower is in the center of the slot.

The cam follower does not hit the pocket when the carousel turns.

7

If the adjustment is correct, tighten the lock nut [1] for the set screw.

Recently Viewed Items

You Have No Recently Viewed Items Yet

Feedback
Haas Logo

Haas Delivered Price

This price includes shipping cost, export and import duties, insurance, and any other expenses incurred during shipping to a location in France agreed with you as a buyer. No other mandatory costs can be added to the delivery of a Haas CNC Product.

KEEP UP WITH THE LATEST HAAS TIPS AND TECHNOLOGY...

Sign up now!   

HAAS TOOLING ACCEPTS THE FOLLOWING:

  • Service & Support
  • Owners
  • Request Service
  • Operator Manuals
  • Haas Parts
  • Rotary Repair Request
  • Pre-Install Guides
  • Shopping Tools
  • Build & Price a New Haas
  • Available Inventory
  • The Haas Price List
  • CNCA Financing
  • About Haas
  • Accessibility Statement
  • DNSH Statement
  • Export Compliance
  • Careers
  • Certifications & Safety
  • Contact Us
  • History
  • Terms & Conditions
  • Haas Tooling Terms & Conditions
  • Privacy
  • Warranty
  • Haas Community
  • Haas Certification Program
  • Haas Motorsports
  • Gene Haas Foundation
  • Haas Technical Education Community
  • Events
  • Join the Conversation
  • Facebook
  • X
  • Flickr
  • YouTube
  • LinkedIn
  • Instagram
  • TikTok
© 2026 Haas Automation, Inc – CNC Machine Tools

This site is protected by reCAPTCHA and the Google Privacy Policy and Terms of Service apply.

2800 Sturgis Rd., Oxnard, CA 93030
Toll Free: (888) 817-4446 / Fax: 805-278-8554