×

Search Results

Web Pages

Images

    • <
    • 1
    • >
  • machines
    • Haas Vertical Mills
      Vertical Mills
      • Vertical Mills
      • VF Series
      • Universal Machines
      • VR Series
      • Pallet-Changing VMCs
      • Mini Mills
      • Mold Machines
      • Drill/ Tap/ Mill Series
      • Toolroom Mills
      • Compact Mills
      • Gantry Series
      • Vertical Mill/Turn
      • Extra-Large VMC
      • Double-Column Mills
      • Desktop Mill
      • Mill Auto Parts Loader
    • Product Image
      Multi-Axis Solutions
      • Multi-Axis Solutions
      • 5-Axis Mills
      • Y-Axis Lathes
    • Haas Lathes
      Lathes
      • Lathes
      • ST Series
      • Dual-Spindle
      • Toolroom Lathes
      • Chucker Lathe
      • Haas Bar Feeder V2
      • Lathe Auto Parts Loader
    • Haas Horizontal Mills
      Horizontal Mills
      • Horizontal Mills
      • 50-Taper
      • 40-Taper
    • Haas Rotaries & Indexers
      Rotaries & Indexers
      • Rotaries & Indexers
      • Rotary Tables
      • Indexers
      • 5-Axis Rotaries
      • Extra-Large Rotaries
    • Product Image
      Automation Systems
      • Automation Systems
      • Robot Systems
      • Automatic Parts Loaders
      • Pallet-Pool Systems
      • Haas Bar Feeder
      • Models
    • QUICK LINKS Special Series  Special Series 
      HAAS CAREERS HAAS CAREERS BUILD & PRICE BUILD & PRICE PRICE LIST PRICE LIST WHAT’S NEW WHAT’S NEW YOUR FIRST CNC YOUR FIRST CNC HAAS SIX PACK HAAS SIX PACK
      SHOPPING TOOLS
      • Build & Price a Haas
      • Price List
      • Available Inventory
      • CNCA Financing
      WANT TO TALK TO SOMEONE?

      A Haas Factory Outlet (HFO) can answer your questions, and walk you through your best options.

      CONTACT YOUR DISTRIBUTOR >
  • Options
    • Product Image
      Spindles
      • Spindles
    • Product Image
      Tool Changers
      • Tool Changers
    • Product Image
      4th- | 5th-Axis
      • 4th- | 5th-Axis
    • Product Image
      Turrets & Live Tooling
      • Turrets & Live Tooling
    • Product Image
      Probing
      • Probing
    • Haas Chip & Coolant Management
      Chip & Coolant Management
      • Chip & Coolant Management
    • The Haas Control
      The Haas Control
      • The Haas Control
    • Product Image
      Product Options
      • Product Options
    • Product Image
      Tooling & Fixturing
      • Tooling & Fixturing
    • Product Image
      Workholding
      • Workholding
    • Product Image
      5-Axis Solutions
      • 5-Axis Solutions
      • 5 Easy Steps to 5-Axis
    • Product Image
      Automation
      • Automation
    • QUICK LINKS Special Series  Special Series 
      HAAS CAREERS HAAS CAREERS BUILD & PRICE BUILD & PRICE PRICE LIST PRICE LIST WHAT’S NEW WHAT’S NEW YOUR FIRST CNC YOUR FIRST CNC HAAS SIX PACK HAAS SIX PACK
      SHOPPING TOOLS
      • Build & Price a Haas
      • Price List
      • Available Inventory
      • CNCA Financing
      WANT TO TALK TO SOMEONE?

      A Haas Factory Outlet (HFO) can answer your questions, and walk you through your best options.

      CONTACT YOUR DISTRIBUTOR >
  • Why Haas
      Discover the Haas Difference
      Why Haas MyHaas Education Community Industry 4.0 Haas Certification Customer Testimonials
  • Service
      Welcome to Haas Service
      SERVICE HOME Operator’s Manuals How-To Procedures Troubleshooting Guides Preventive Maintenance Haas Parts Haas Tooling Videos
  • Videos
  • MyHaas – One Place for Everything

    • Compare Quotes
      • Compare Quotes

    • About MyHaas
      • About MyHaas

    • Haas CNC Certification Program
      • Haas CNC Certification Program

    • Haas CNC Certification Program-Redirect
      • Haas CNC Certification Program-Redirect

    • Haas CNC Certification Program
      • Haas CNC Certification Program

    • Haas Learning Resources
      • Haas Learning Resources

    • Haas Global Learning Resources
      • Haas Global Learning Resources

    • MyHaas App Form
      • MyHaas App Form
    • QUICK LINKS Special Series  Special Series 
      HAAS CAREERS HAAS CAREERS BUILD & PRICE BUILD & PRICE PRICE LIST PRICE LIST WHAT’S NEW WHAT’S NEW YOUR FIRST CNC YOUR FIRST CNC HAAS SIX PACK HAAS SIX PACK
      SHOPPING TOOLS
      • Build & Price a Haas
      • Price List
      • Available Inventory
      • CNCA Financing
      WANT TO TALK TO SOMEONE?

      A Haas Factory Outlet (HFO) can answer your questions, and walk you through your best options.

      CONTACT YOUR DISTRIBUTOR >
  • Haas Tooling
      Haas Tooling Mill Toolholding Mill Workholding Milling Lathe Tooling Lathe Toolholding Lathe Workholding ER Collets & Chucks Holemaking Threading Tool Management Tooling Accessories Package Kits Measuring & Inspection Apparel & Accessories
      HAAS TOOLING QUICK LINKS
      NEW PRODUCTS NEW PRODUCTS
      MOST POPULAR MOST POPULAR
      OPEN TERMS OPEN TERMS
      FINANCING FINANCING
      FAQs FAQs
      KITS CREATED FOR YOU KITS CREATED FOR YOU
  • Haas Service Parts
      Haas Service Parts Automatic Pallet Changer Automatic Tool Changer Chip Management Coolant Counterbalance Electrical Cabinet Enclosure Field Install Options Hydraulics Lubrication Maintenance Pendant Probing Rotary Spindle Tailstock
  • Contact Us

My Cart
MyHaas Welcome,
!
Haas Tooling Guest Order History MyHaas/HaasConnect Sign In Register Haas Tooling My Account Order History Return History MyHaas/HaasConnect Sign Out Welcome, My Machines Latest Activity My Quotes My Account My Users Sign Out
Find A Dealer
  1. Select Language
    1. English
    2. Deutsch
    3. Español - España
    4. Español - Méjico
    5. Français
    6. Italiano
    7. Português
    8. Český
    9. Dansk
    10. Nederlands
    11. Magyar
    12. Polski
    13. Svenska
    14. Русский
    15. Türkçe
    16. 中文
    17. Suomi
    18. Norsk
    19. الإنجليزية
    20. български
    21. Hrvatski
    22. Ελληνικά
    23. Română
    24. Slovenský
    25. Slovenščina
    26. 한국어
    27. 日本語
Search
×

Search Results

Web Pages

Images

    • <
    • 1
    • >

6 - BF - Operation

Haas Bar Feeder - Operator's Manual Supplement


  • 1 - BF - Introduction
  • 2 - BF - Legal Information
  • 3 - BF - Safety
  • 4 - BF - Installation
  • 5 - BF - Control Icons
  • 6 - BF - Operation
  • 7 - BF - Programming
  • 8 - BF - G-Codes
  • 9 - BF - Settings
  • 10 - BF - Maintenance

Go To :

  • 6.1 Bar Feeder - Features
  • 6.2 Bar Feeder - Positions
  • 6.3 Bar Feeder - Workholding
  • 6.4 Bar Feeder - Haas Spindle Liners
  • 6.5 Bar Setup - Load Bars
  • 6.6 Bar Setup - Transfer Tray Adjustment
  • 6.7 Bar Setup - Push Rod Installation/Removal
  • 6.8 Bar Feeder - NGC Setup
  • 6.9 Bar Feeder - Loading Short Bars

6.1 BAR FEEDER - INSTALLATION

Haas Bar Feeder - Features

Bar Feeder setup consists of these tasks:

Lathe Setup:

  • Install the correct spindle liner for your application.
  • Set up the correct workholding for a bar feed application.

Bar Setup:

  • Load the bar stock.
  • Adjust the charging tray angle (if necessary).
  • Adjust the transfer tray height for the bar diameter.
  • Install the correct push rod.
  • Set up the bar feed variables.
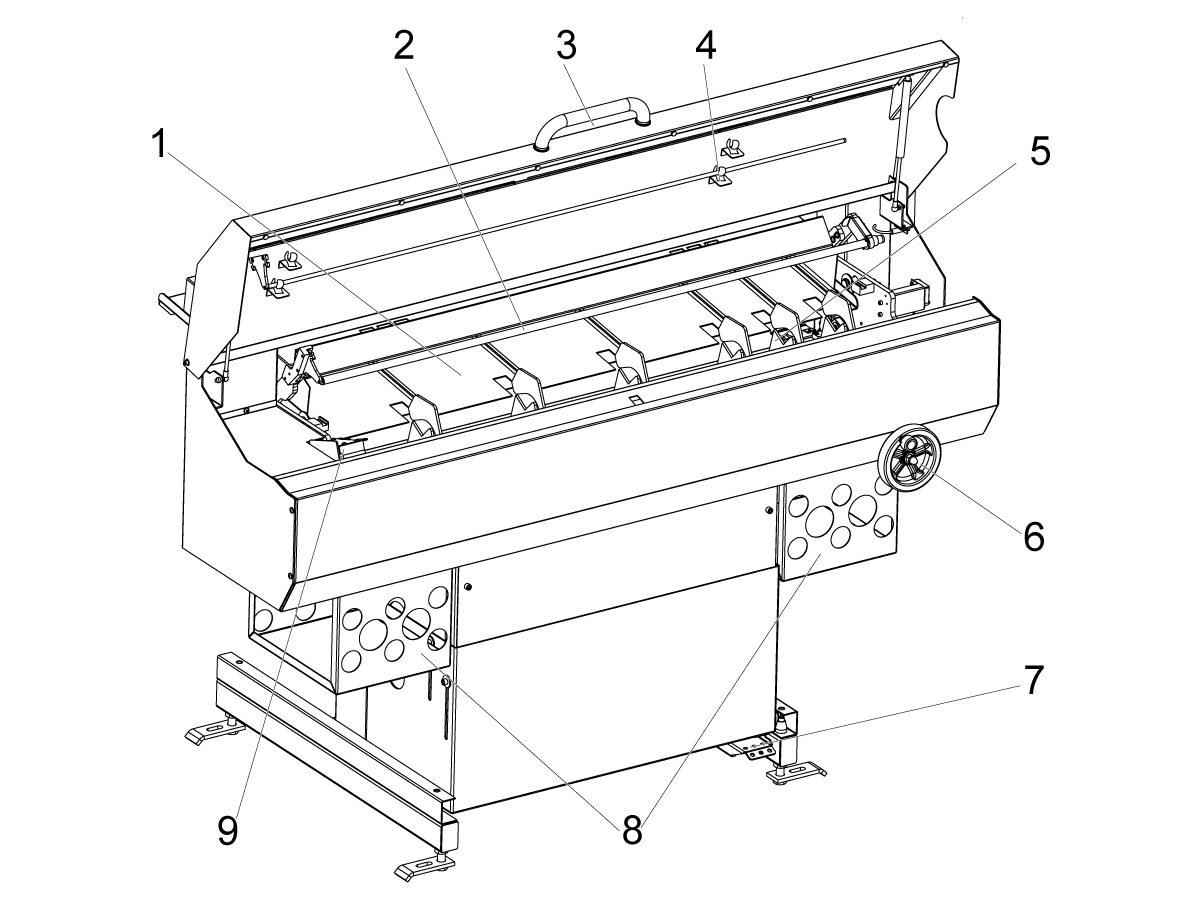
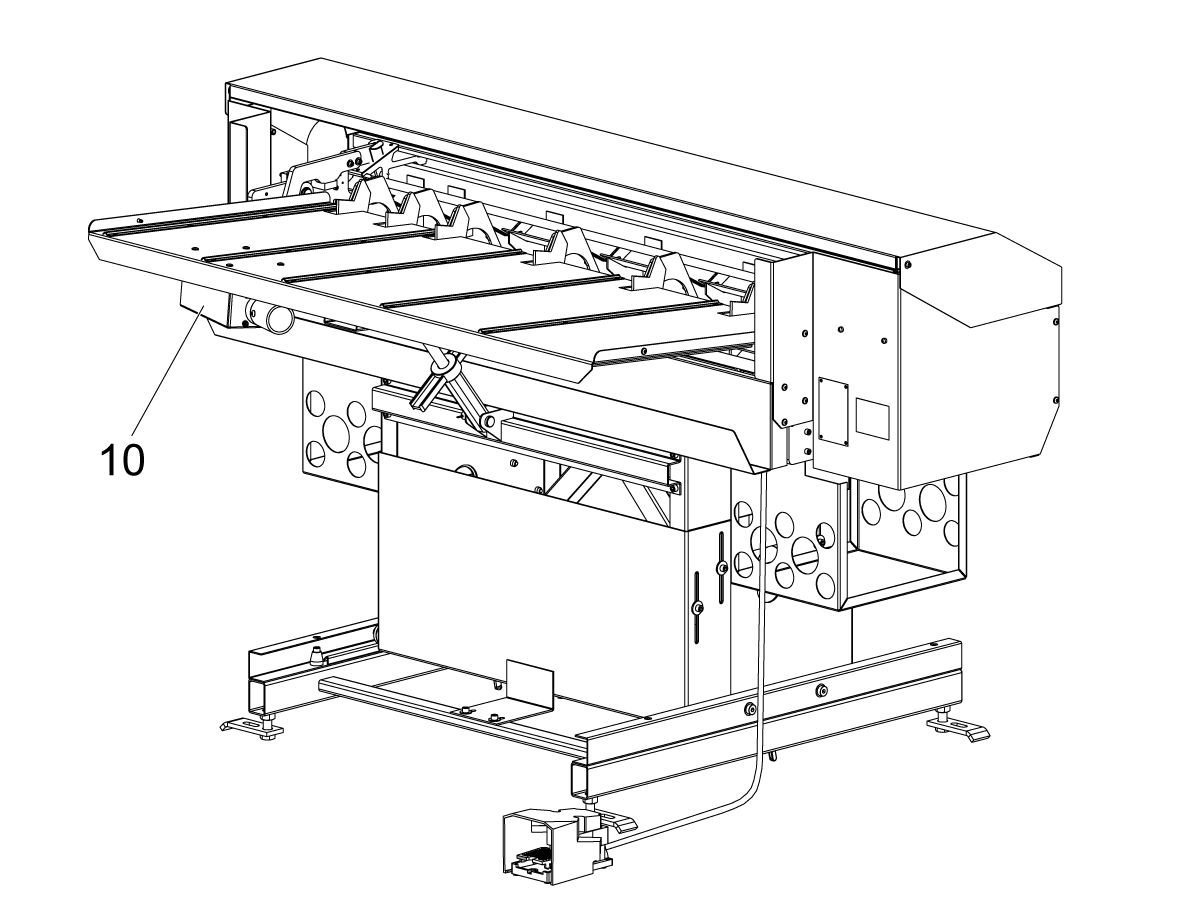
  1. Charging Tray
  2. Push Rod
  3. Set-up Lid Handle
  4. Push Rod Storage
  5. Load Mechanism
  6. Transfer Tray Adjustment Wheel
  7. Release Pedal
  8. Spindle Liner Storage
  9. Bar Pusher

6.2 BAR FEEDER - POSITIONS

Bar Feeder - Positions

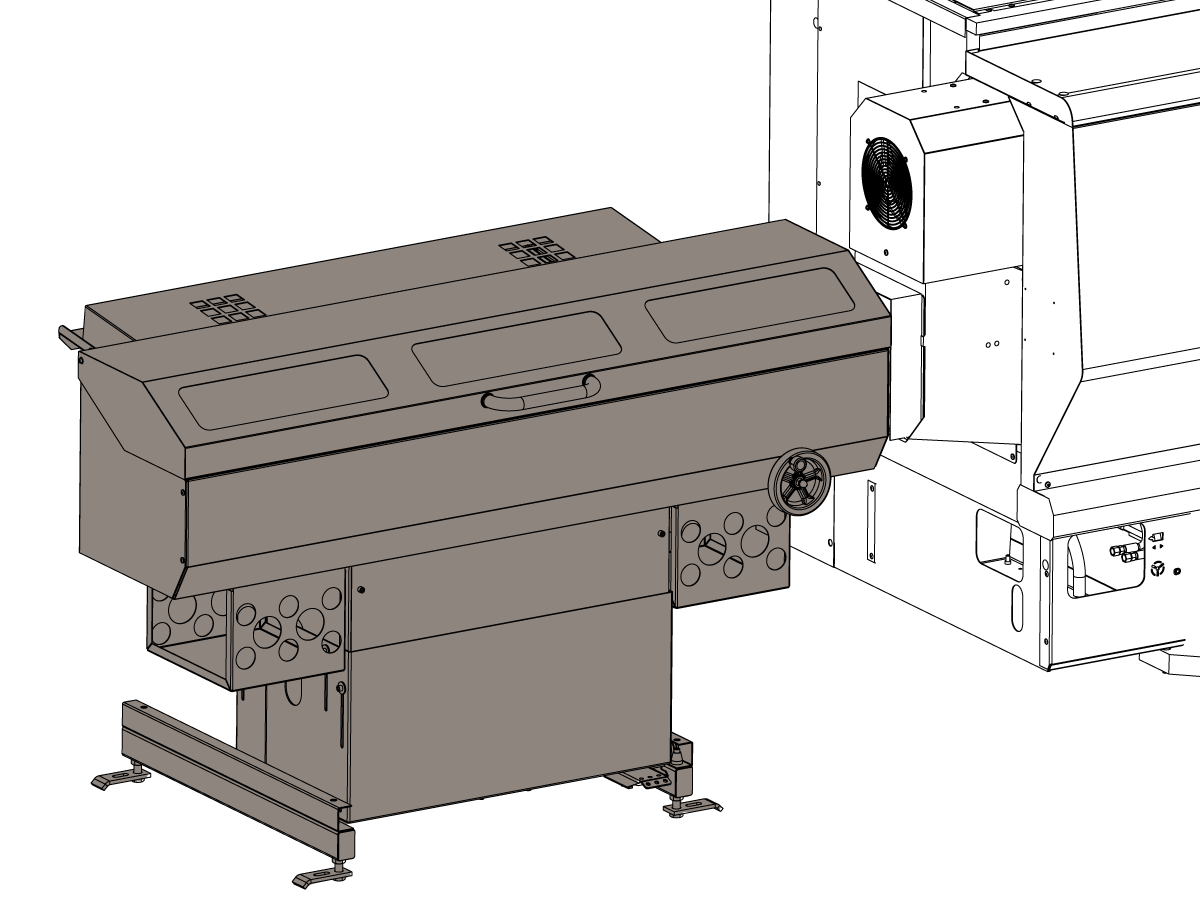
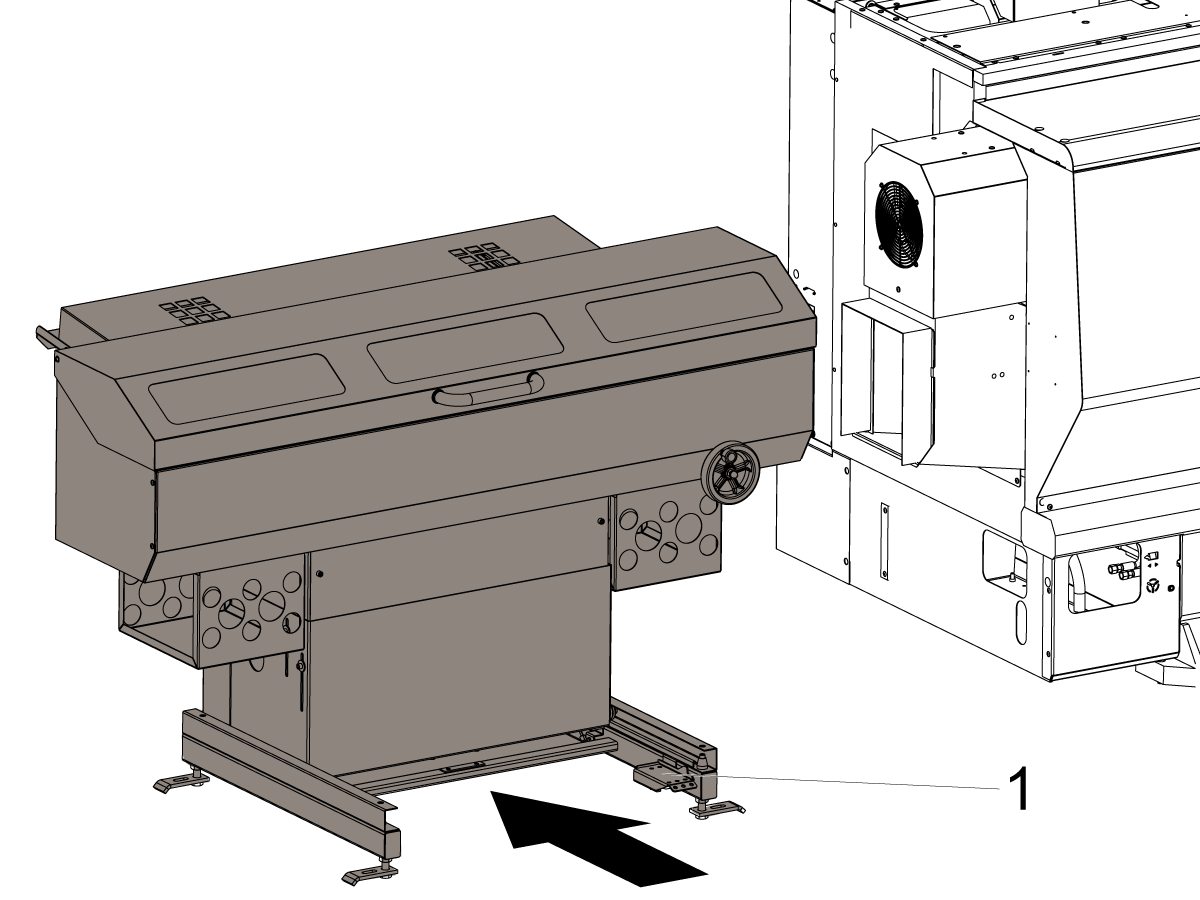
Feed / Auto Position: This is the Bar Feeder’s normal operating position. You can command Bar Feeder motion at reduced speed with the lid open. In this position, you can set up your bar feed application, check and adjust tray height alignment, and run your application.

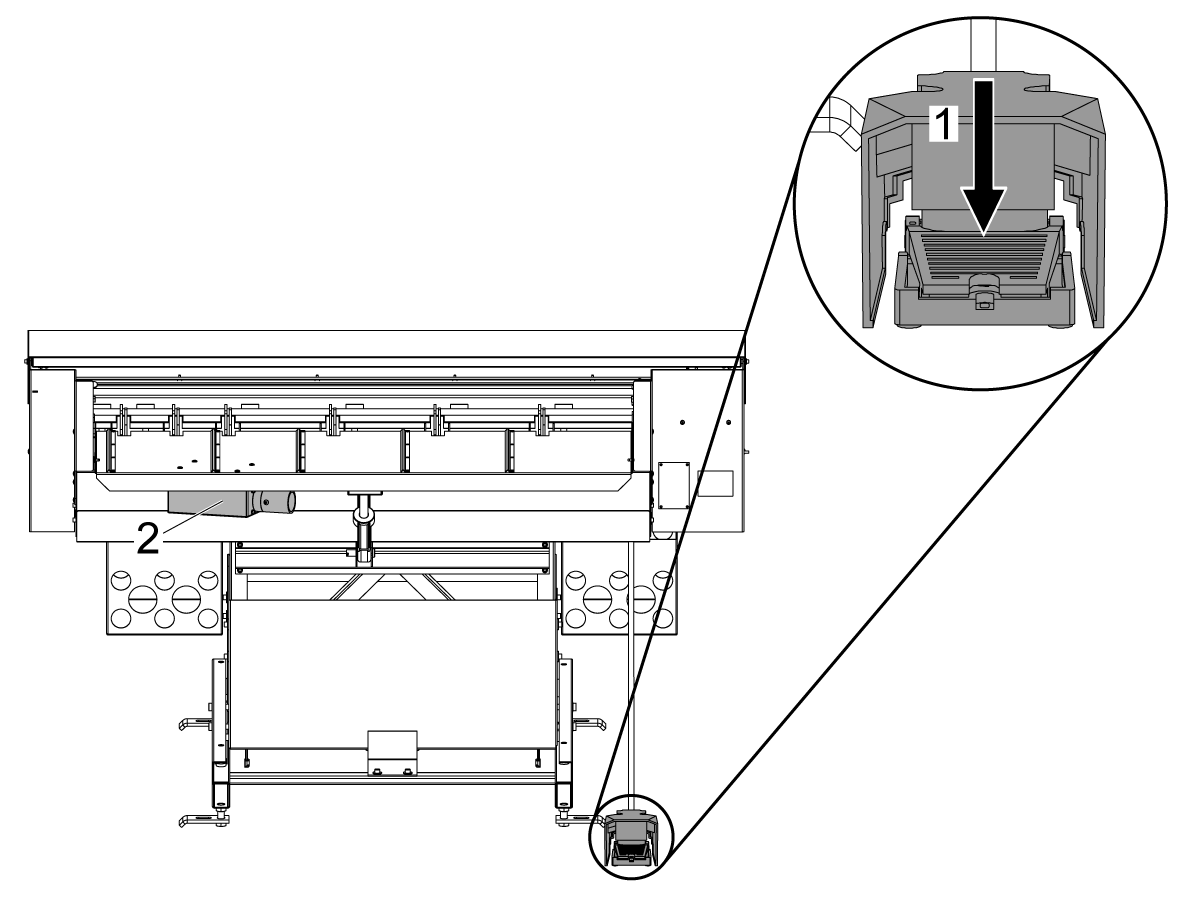
Lockout / Lathe Setup Position: Press the release pedal[1] at the base, and then push the Bar Feeder back. This mode disables all Bar Feeder motion. With the Bar Feeder in this position, you have easy access to change spindle liners, clean the coolant collector, or do other tasks on the lathe spindle.

6.3 BAR FEEDER - Workholding

Bar Feeder - Workholding

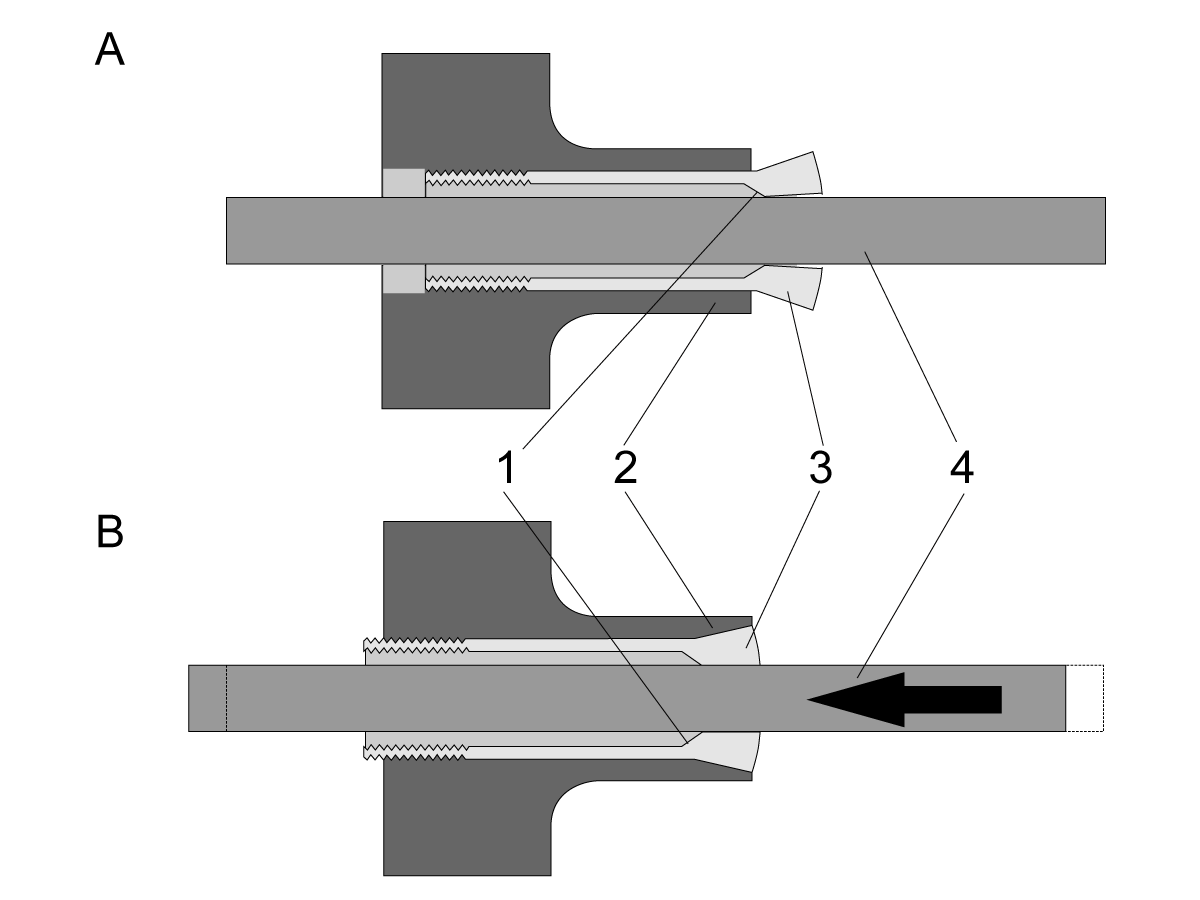
A drawback collet is required for bar feed applications. The Bar Feeder holds the push rod in place while the lathe drawtube clamps. If the collet does not pull the bar stock against the push rod when the drawtube clamps, length variation can occur and accuracy cannot be guaranteed.

Note: Your collet should also have a chamfered lead-in for smooth bar feeding.

[A] Collet Unclamped

[B] Collet Clamped

[1] Chamfered Collet Lead-In

[2] Collet Closer Body

[3] Collet

[4] Bar Stock 

For installation instructions, refer to the Lathe Operator’s Manual and the documentation that came with your workholding.

6.4 BAR FEEDER - Haas Spindle Liners

Haas Spindle Liners

Spindle liners adapt the size of your spindle bore to fit the bar stock that you process. This lets the bar stock feed and run smoothly. Properly fit spindle liners also help to reduce vibration and bar whip.

Note: Spindle liners do not grip the bar stock. If you have problems with vibration or poor surface finish in your application, check the clearance between the bar and the liner. Use a closer-fitting liner if possible.

Put the Bar Feeder in the Lathe Setup position to install spindle liners. Haas manufactures two types of spindle liners; extruded spindle liners, which fit most Haas lathes, and a bar-guide-and-spacer spindle liner system for 4"-bar-capacity lathes. The installation instructions for both liner types are available:

Extruded Spindle-Liner - Installation - AD0021
Extruded Spindle Liner - Adapter Kit Ø1.75 - Installation - AD0221
Spindle Liner Kit - ST-30/30Y/35/35Y - Big Bore Lathe - Installation - AD0020

Other Spindle Liners

Haas extruded spindle liners are designed to fit a wide range of bar stock sizes, and their one-piece finned design helps keep the bar stock centered in the spindle. If you use the bar-guide-and-spacer system or another spindle liner, remember these points:

  • The liner passage for the bar must fit the bar as closely as possible while still letting the bar move through smoothly. The larger your bar stock is in diameter, the closer the liner must fit.
  • The liner must be centered in the spindle.
  • Make custom liners or bar-guide disks with a generous lead-in chamfer. The Haas bar-guide disks use a 0.25" chamfer at 45 degrees.

6.5 BAR FEEDER - Load Bars

Bar Setup - Load Bars

Make sure that the bars you use are appropriate for your setup:

  • Test the fit of the bar stock in the spindle liner. The liner must fit close but be large enough to let the bar pass through freely. Use a different liner if necessary.
  • To determine the minimum bar length: Measure the gap between the end of the transfer tray and the lathe spindle liner. Multiply this distance by 2.25. Each bar must be at least as long as the result. For example, if the distance between the end of the transfer tray and the lathe spindle is 6.75" (171 mm), each bar must be at least 15.2" (386 mm) long.
  • Bar stock must be straight.
  • Add a chamfer to the leading end of the bar for better initial feeding. The leading end of the bar should have no sharp edges.
  • Bar stock must be cut square on the end that contacts the bar pusher, to prevent protrusions or length variation.
  • The bar stock should not extend outside of the spindle liner.
  • Large-diameter, heavy bar stock must be shorter than 36" (813 mm).
  • It is good practice to wipe the bars clean before you load them. Dirt and debris increase liner wear and could also become jammed inside the liner.

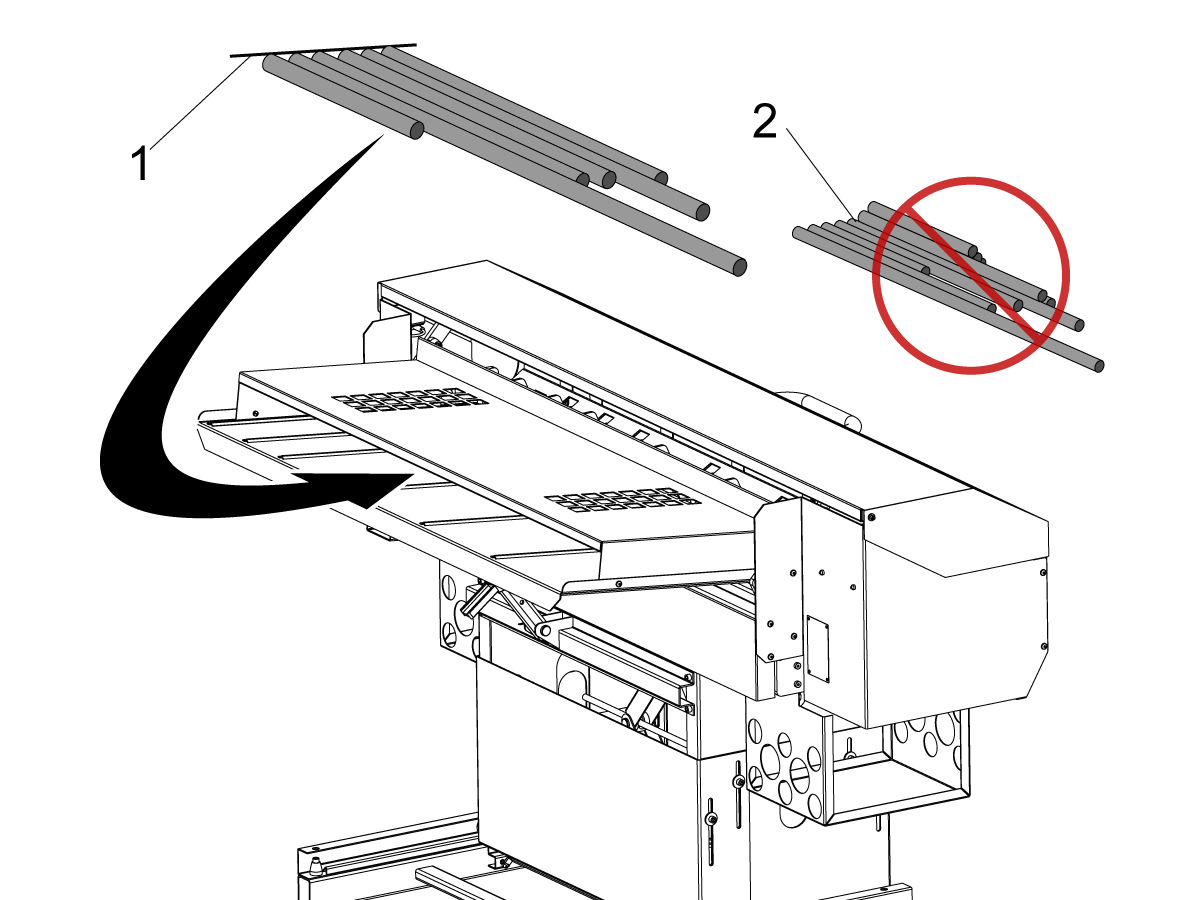
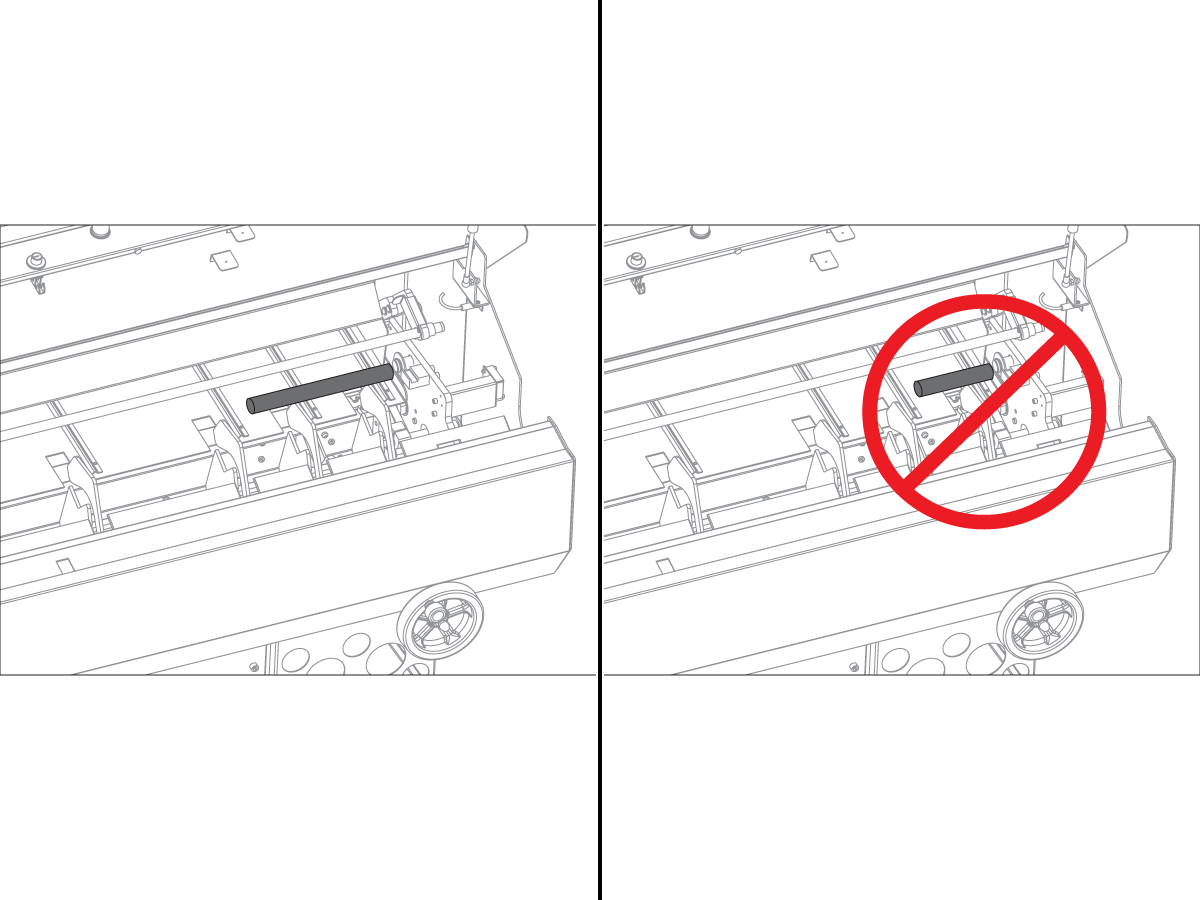
Load bars, one at a time, into the charging tray in a single layer. Push shorter bars toward the lathe. Do not let the bars stack. If the bars roll over each other as you load them, adjust the charging tray to a shallower angle.

Bar Loading Example. Align the Leading Ends of the Bars with the Edge of the Tray[1]. Do Not Stack the Bars[2].

Hexagonal Bar Stock

If you use hexagonal bar stock:

  • Hexagonal liners are highly recommended. They should maintain a consistent orientation inside the spindle.
  • If you use the bar-guide-and-spacer style of spindle liners, the first (2) guide disks should have hexagonal holes, oriented with the collet.
  • The V-shape of the transfer tray keeps hexagonal stock in a consistent orientation.
  • The lead end of the bar should have a 30-degree chamfer.
  • Use M19 commands to set the spindle orientation to align the collet flats with the bar flats in the bar feeder tray.

Note: The spindle orientation option is necessary to do this.

6.6 BAR FEEDER - Transfer Tray Adjustment

Bar Setup - Transfer Tray Adjustment

The transfer tray provides the bar stock a path that leads into the lathe spindle. When your Bar Feeder was installed, the service technician adjusted the Bar Feeder height to align the lathe spindle with the adjustment range of the transfer tray. With this procedure, you raise or lower the transfer tray to adjust it for the bar diameter.

  1. Press [EMERGENCY STOP] on the lathe.
  2. Put the Bar Feeder in the Feed/Auto position.
  3. Put a piece of bar stock in the transfer tray.
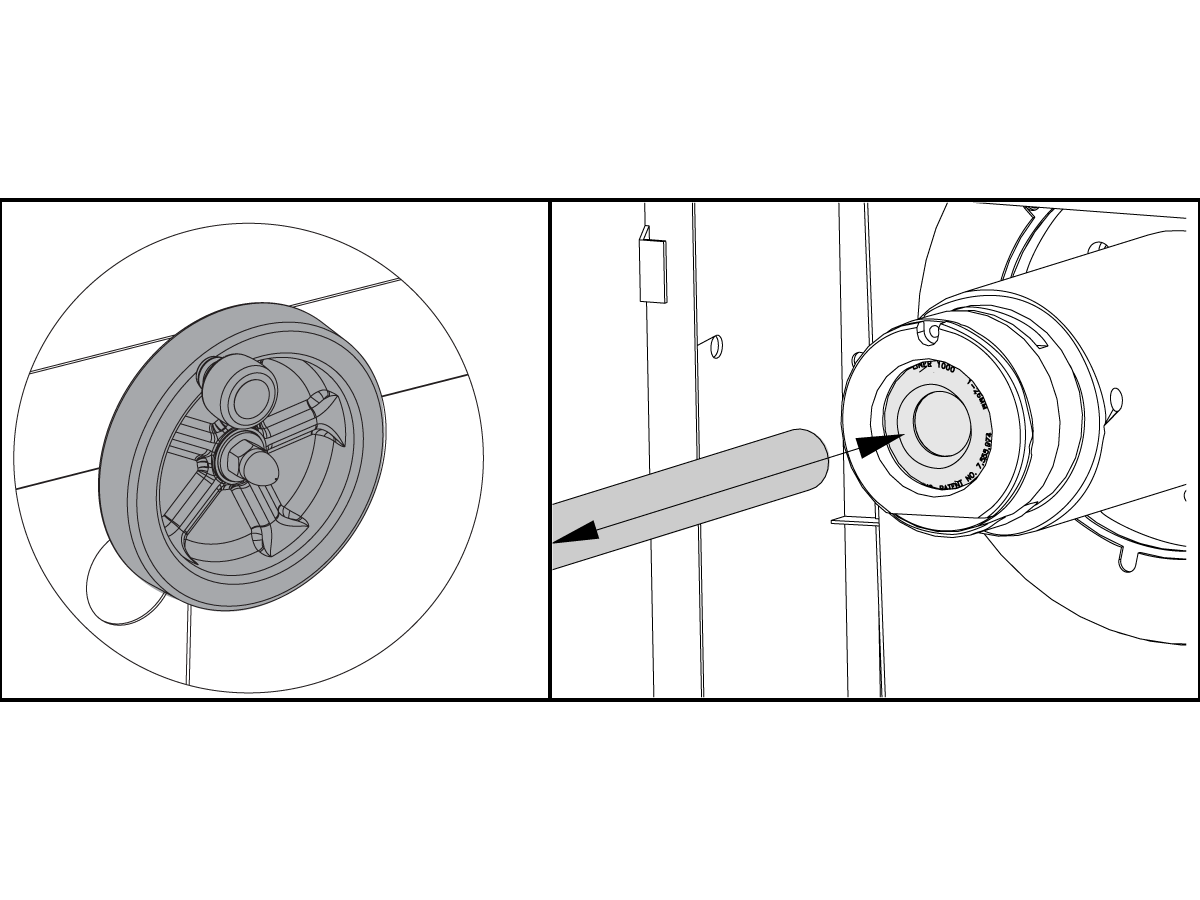
  4. Use the wheel to adjust the transfer tray height. Turn it clockwise to raise the tray and counterclockwise to lower the tray. As you adjust the transfer tray height, move the bar into the spindle liner by hand. Continue to adjust the transfer tray height until the bar slides freely into the liner.
  5. Make sure that the collet is set for the diameter of the loaded bar:
  6. With the collet open and the spindle stopped, slide the bar into the spindle liner and collet by hand, and check for misalignment, binding or interference.
  7. Remove the bar and place it in the charging tray

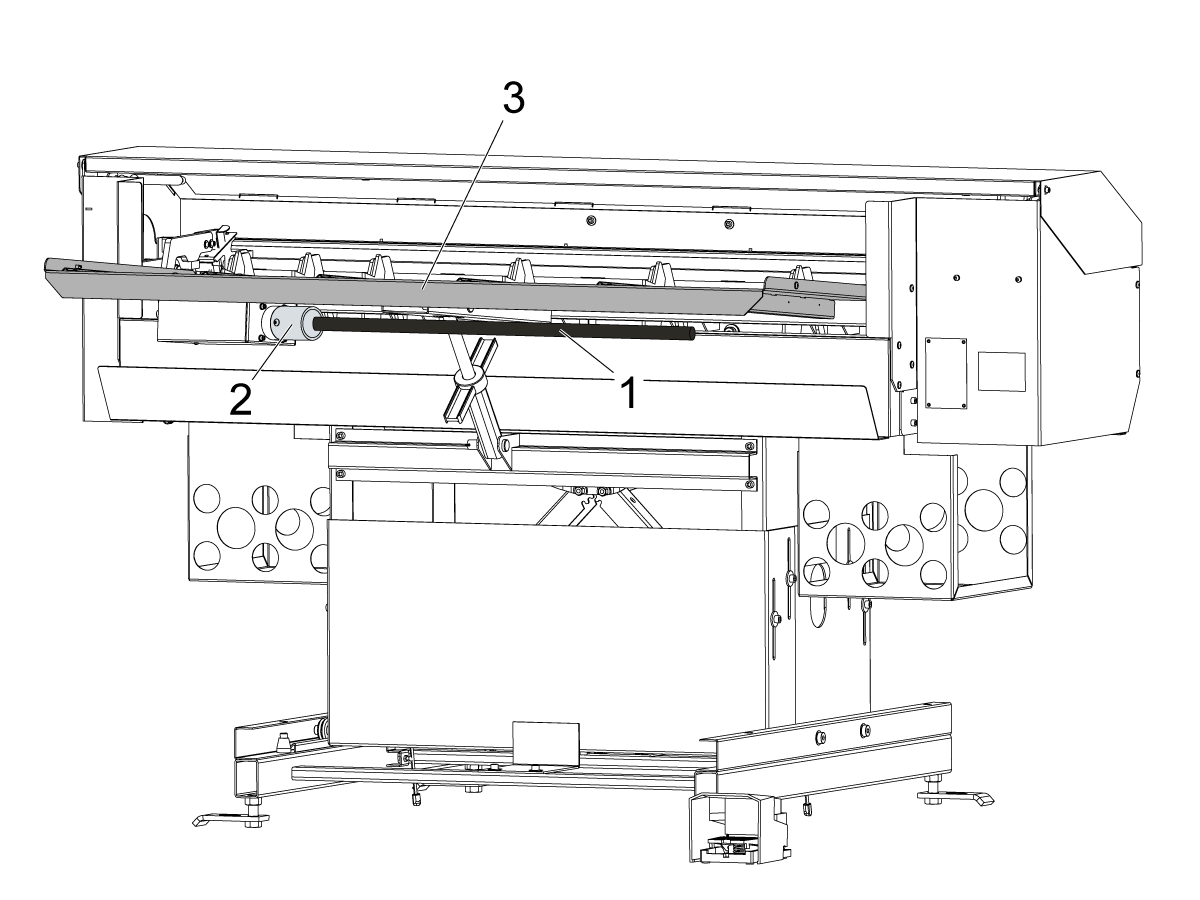
6.7 Bar Setup - Push Rod Installation/Removal

Bar Setup - Push Rod Installation/Removal

The Bar Feeder comes with push rods that are 3/4" and 3/8" in diameter. Use the 3/8" push rod for all round stock material that is smaller than 0.8" (20 mm) in diameter. Use the 3/4" push rod for material 0.8" (20 mm) in diameter and larger.

Caution: Do not use the 3/8" push rod to push bars larger than 0.8" in diameter. The push rod can bend.

To change the push rod:

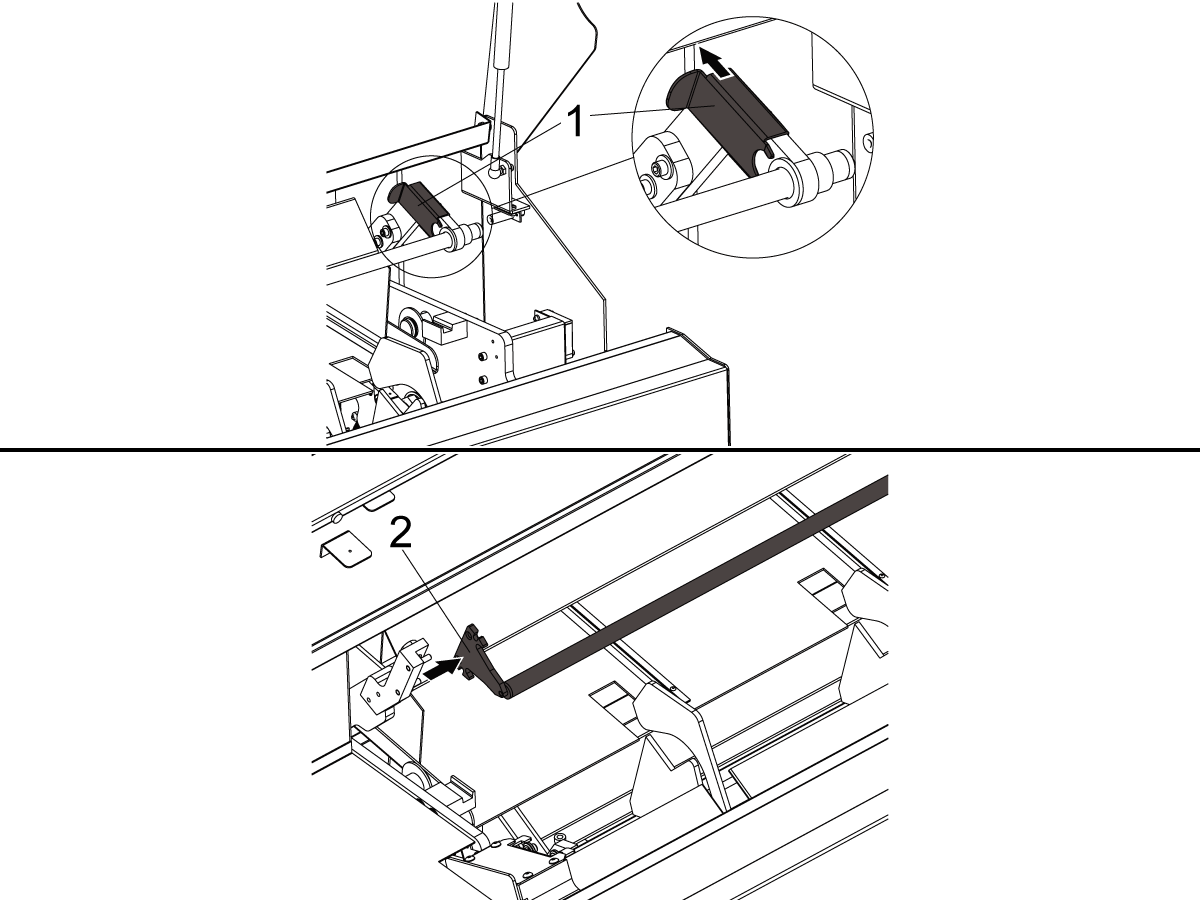
  1. Press [EMERGENCY STOP] on the lathe. Open the set-up lid.
  2. At the lathe end of the push rod, slide the bushing retainer[1] away from the push rod.
  3. At the other end of the push rod, pull the retention blade[2] off of the holder block.
  4. Remove the push rod and bushing. Follow this procedure in reverse to install the other push rod.
  5. Store the unused push rod and bushing under the set-up lid.
  6. Close the lid and reset [EMERGENCY STOP] to resume operation.

6.8 Bar Feeder - NGC Setup

Bar Feeder - NGC Setup

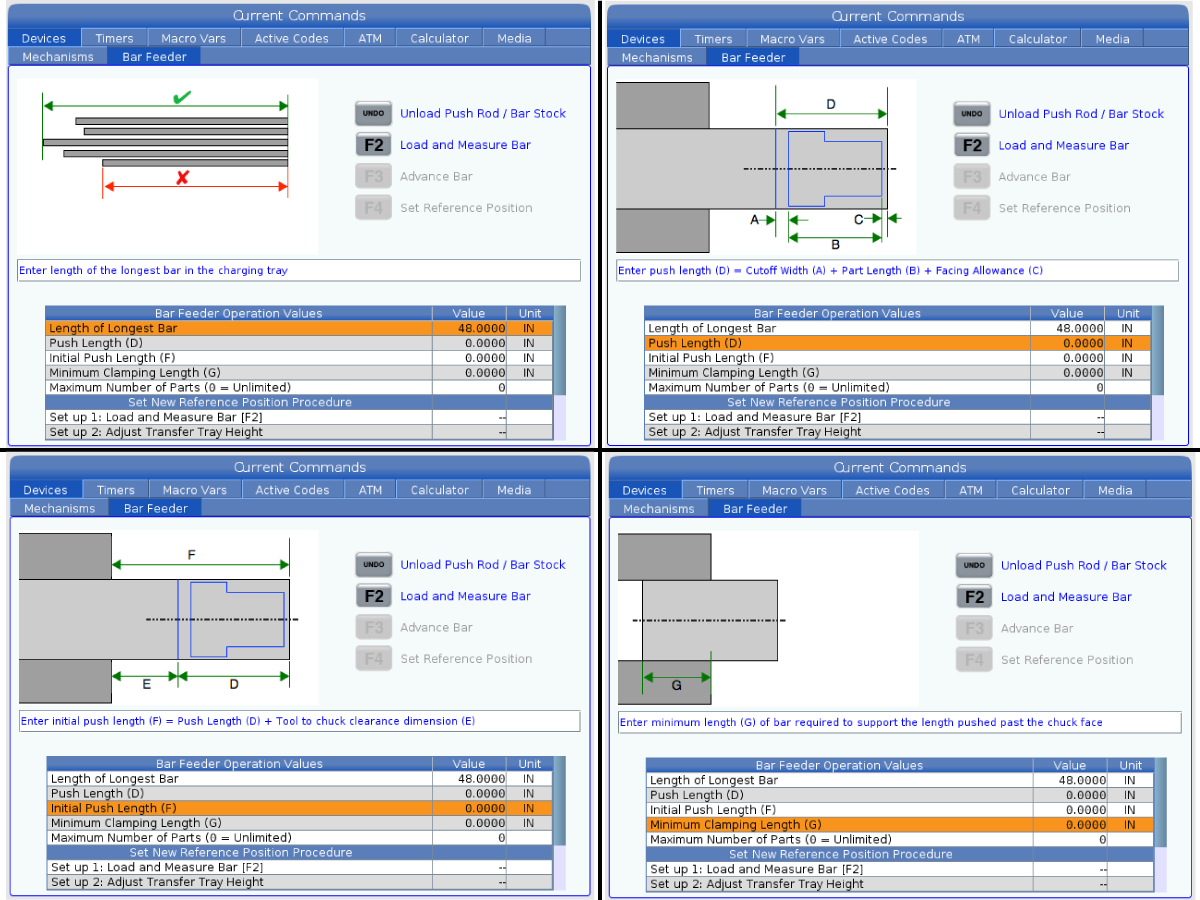
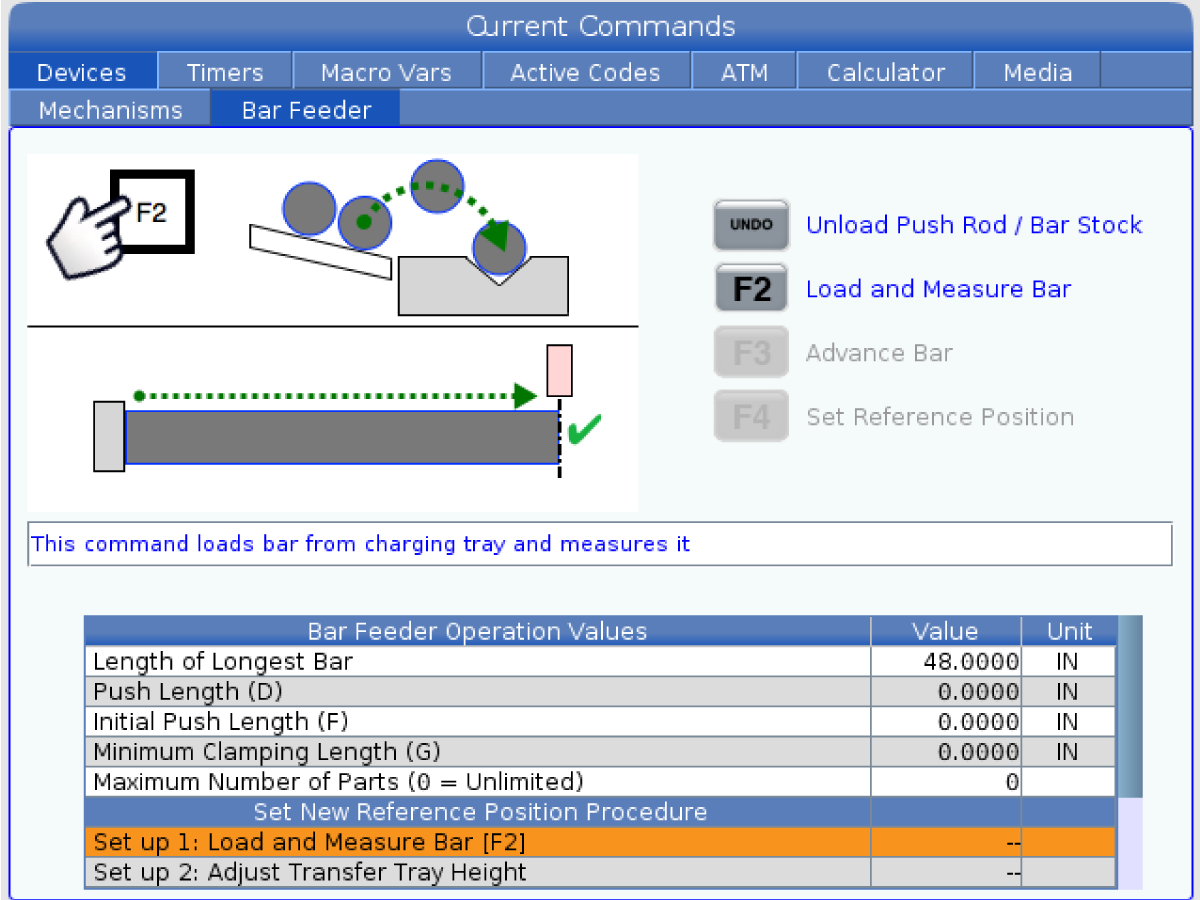
Press [CURRENT COMMANDS] and navigate to the Bar Feeder page in the Devices tab.

  1. Enter the length of the longest bar that will be used.
  2. Enter the value from the cutoff face to the final push length desired (D).
  3. Enter the value of the initial push length (F).
  4. Enter the minimum clamping length, or remnant length (G). Make sure to leave enough length to safely hold the stock in the chuck.
  5. Enter the maximum number of parts to run. Enter a value of 0 for unlimited parts.

Use the down cursor arrow to navigate between steps.

  1. Press [F2] to load and measure the bar stock. Make sure only one bar loads.
  2. Adjust the transfer tray height so the material slides into the spindle liner smoothly.
  3. Press [F3] to advance the bar stock to the chuck.
  4. Press [HANDLE JOG] and jog the bar stock to the face of the chuck.
  5. Step on the foot pedal to clamp the chuck.
  6. Press [F4] to set the chuck face position and feed the bar stock to the initial push length.

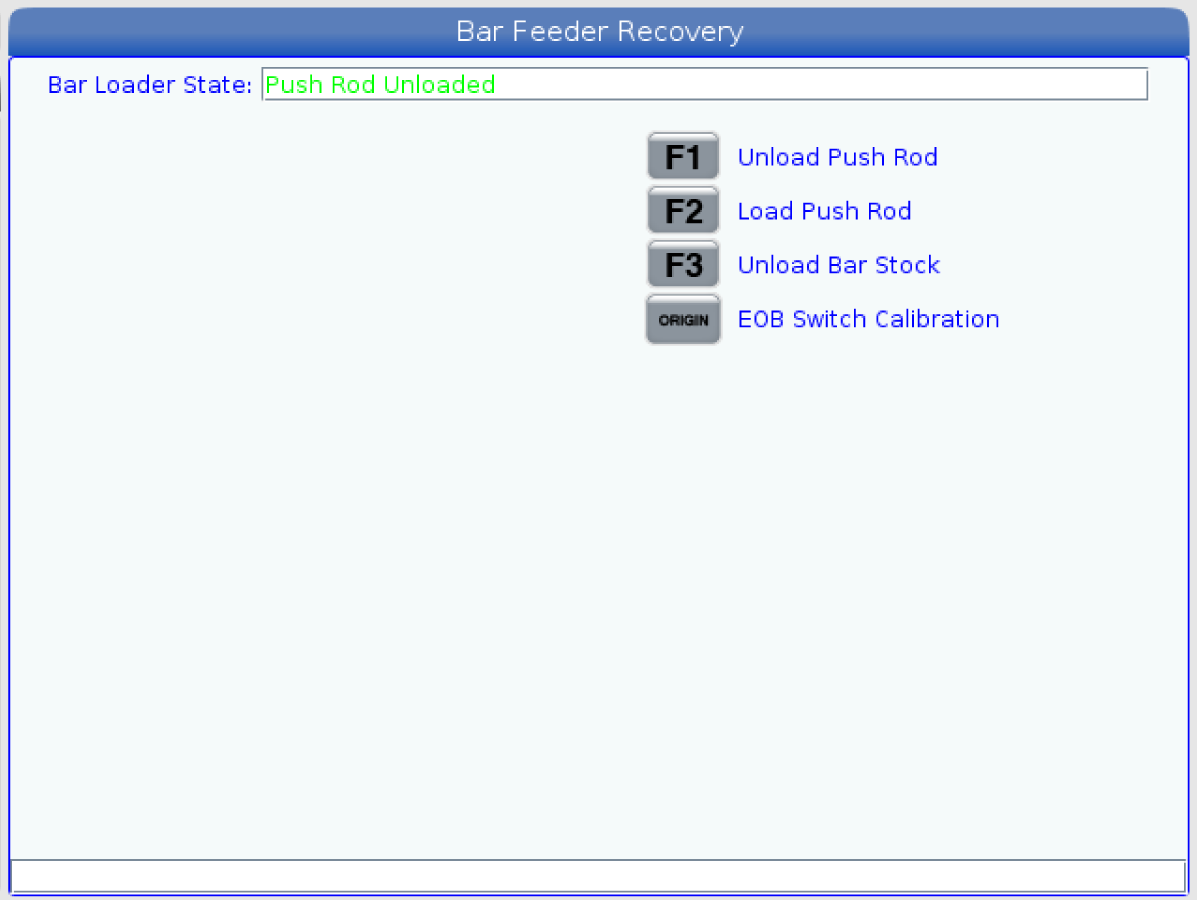
Bar Feeder - NGC Recovery

Press the [RECOVERY] button to access the bar feeder recovery mode.

The Bar Loader Status box will show the push rod position. If it displays an Unsafe Position, use the up/down cursor arrows to bump the loader into position.

Use the other function commands as needed.

EOB Switch Calibration only needs to be performed at first install, or if the EOB sensor, home switch, or trolley are disassembled or replaced.

6.9 Bar Feeder - Loading Short Bars

Bar Feeder - Loading Short Bars

To machine short bars:

  1. Open the Bar Feeder door and place the short bar on the charging tray. Make sure that the bar is long enough so at least two of the pick-up arms can pick up the bar. If not the bar may not load properly.
  2. Close the Bar Feeder door.
  3. Press the [CURRENT COMMANDS] button and navigate to the Bar Feeder tab.
  4. Press the [F2] button. The Bar Feeder will load and measure the bar.
  5. Open the Bar feeder door and remove the short bar from the Bar Feeder tray.
  6. Open the operator door and manually load the bar through the chuck.
  7. Press the [F3] button. The Bar Feeder will load the push rod and advance the bar.
  8. Press the [HANDLE JOG] button and slowly jog the bar until the bar is aligned with the chuck or collect face.
  9. Press the Chuck Foot Pedal to clamp the bar.
  10. Press the [F4] button to set the reference position. A window pop up will show Advance bar to initial length? Press [Y] or [N] to advance the bar. Repeat these steps for the next short bar.
FIND DISTRIBUTOR
Feedback
Haas Logo

美元价格不包括关税、报关费用、保险费、增值税及运费。
USD prices DO NOT include customs duty, customs fees, insurance, VAT, or freight.

人民币价格包含关税、报关费用、货运保险和增值税, 但不包括运费。
CNY prices include customs duty, customs fees, insurance, and VAT. DOES NOT include freight.

Haas Delivered Price

This price includes shipping cost, export and import duties, insurance, and any other expenses incurred during shipping to a location in France agreed with you as a buyer. No other mandatory costs can be added to the delivery of a Haas CNC Product.

KEEP UP WITH THE LATEST HAAS TIPS AND TECHNOLOGY...

Sign up now!   

HAAS TOOLING ACCEPTS THE FOLLOWING:

  • Service & Support
  • Owners
  • Request Service
  • Operator Manuals
  • Haas Parts
  • Rotary Repair Request
  • Pre-Install Guides
  • Shopping Tools
  • Build & Price a New Haas
  • Available Inventory
  • The Haas Price List
  • CNCA Financing
  • About Haas
  • Careers
  • Certifications & Safety
  • Contact Us
  • History
  • Terms & Conditions
  • Haas Tooling Terms & Conditions
  • Privacy
  • Warranty
  • Haas Community
  • Haas Certification Program
  • Haas Motorsports
  • Gene Haas Foundation
  • Haas Technical Education Community
  • Events
  • Join the Conversation
  • Facebook
  • Twitter
  • Flickr
  • YouTube
  • LinkedIn
  • Instagram
  • TikTok
© 2022 Haas Automation, Inc – CNC Machine Tools

2800 Sturgis Rd., Oxnard, CA 93030 / Toll Free: 800-331-6746
Phone: 805-278-1800 / Fax: 805-278-2255

Cookie Notice

We use cookies to improve your user experience. Our Cookie Notice describes which cookies we use, why we use them, and how you can find more information about them. Please confirm you consent to us using analytics cookies. If you do not consent, you may still use our website with a reduced user experience.

Manage Settings

Cookie Notice

We use cookies to improve your user experience. Our Cookie Notice describes which cookies we use, why we use them, and how you can find more information about them. Please confirm you consent to us using analytics cookies. If you do not consent, you may still use our website with a reduced user experience.

Functional Cookies

Analytics Cookies