MyHaas Welcome,
!
Haas Tooling Guest Order History MyHaas/HaasConnect Sign In Register Haas Tooling My Account Order History Return History MyHaas/HaasConnect Sign Out Welcome, My Machines Latest Activity My Quotes My Account My Users Sign Out
Find Your Distributor
  1. Select Language
    1. English
    2. Deutsch
    3. Español
    4. Français
    5. Italiano
    6. Português
    7. Český
    8. Dansk
    9. Nederlands
    10. Magyar
    11. Polski
    12. Svenska
    13. Русский
    14. Türkçe
    15. 中文
    16. Suomi
    17. Norsk
    18. الإنجليزية
    19. български
    20. Hrvatski
    21. Ελληνικά
    22. Română
    23. Slovenský
    24. Slovenščina
    25. 한국어
    26. 日本語
Search
  • machines Main Menu
    • Haas Vertical Mills Vertical Mills
      Vertical Mills
      Vertical Mills View All
      • Vertical Mills
      • VF Series
      • Universal Machines
      • VR Series
      • Pallet-Changing VMCs
      • Mini Mills
      • Mold Machines
      • Drill/ Tap/ Mill Series
      • Toolroom Mills
      • Compact Mills
      • Gantry Series
      • Extra-Large VMC
      • Desktop Mill
      • Control Simulator
      • Mill Automatic Parts Loader
      • Compact Automatic Parts Loader
    • Product Image Multi-Axis Solutions
      Multi-Axis Solutions
      Multi-Axis Solutions View All
      • Multi-Axis Solutions
      • Y-Axis Lathes
      • 5-Axis Mills
    • Haas Lathes Lathes
      Lathes
      Lathes View All
      • Lathes
      • ST Series
      • Dual-Spindle
      • Toolroom Lathes
      • Chucker Lathe
      • Haas Bar Feeder V2
      • Lathe Automatic Parts Loader
    • Haas Horizontal Mills Horizontal Mills
      Horizontal Mills
      Horizontal Mills View All
      • Horizontal Mills
      • 50-Taper
      • 40-Taper
    • Haas Rotaries & Indexers Rotaries & Indexers
      Rotaries & Indexers
      Rotaries & Indexers View All
      • Rotaries & Indexers
      • Rotary Tables
      • Indexers
      • 5-Axis Rotaries
      • Extra-Large Rotaries
    • Product Image Automation Systems
      Automation Systems
      Automation Systems View All
      • Automation Systems
      • Robot Packages
      • Automatic Parts Loaders
      • Pallet-Pool Systems
      • Haas Bar Feeder
      • Models
    • QUICK LINKS Special Series  Special Series 
      HAAS CAREERS HAAS CAREERS BUILD & PRICE BUILD & PRICE PRICE LIST PRICE LIST WHAT’S NEW WHAT’S NEW YOUR FIRST CNC YOUR FIRST CNC HAAS SIX PACK HAAS SIX PACK
      SHOPPING TOOLS
      • Build & Price a Haas
      • Price List
      • Available Inventory
      • CNCA Financing
      WANT TO TALK TO SOMEONE?

      A Haas Factory Outlet (HFO) can answer your questions, and walk you through your best options.

      CONTACT YOUR DISTRIBUTOR >
  • Options Main Menu
    • Product Image Spindles
      Spindles
      Spindles View All
      • Spindles
    • Product Image Tool Changers
      Tool Changers
      Tool Changers View All
      • Tool Changers
    • Product Image 4th- | 5th-Axis
      4th- | 5th-Axis
      4th- | 5th-Axis View All
      • 4th- | 5th-Axis
    • Product Image Turrets & Live Tooling
      Turrets & Live Tooling
      Turrets & Live Tooling View All
      • Turrets & Live Tooling
    • Product Image Probing
      Probing
      Probing View All
      • Probing
    • Haas Chip & Coolant Management Chip & Coolant Management
      Chip & Coolant Management
      Chip & Coolant Management View All
      • Chip & Coolant Management
    • The Haas Control The Haas Control
      The Haas Control
      The Haas Control View All
      • The Haas Control
    • Product Image Product Options
      Product Options
      Product Options View All
      • Product Options
    • Product Image Tooling & Fixturing
      Tooling & Fixturing
      Tooling & Fixturing View All
      • Tooling & Fixturing
    • Product Image Workholding
      Workholding
      Workholding View All
      • Workholding
    • Product Image 5-Axis Solutions
      5-Axis Solutions
      5-Axis Solutions View All
      • 5-Axis Solutions
      • 5 Easy Steps to 5-Axis
    • QUICK LINKS Special Series  Special Series 
      HAAS CAREERS HAAS CAREERS BUILD & PRICE BUILD & PRICE PRICE LIST PRICE LIST WHAT’S NEW WHAT’S NEW YOUR FIRST CNC YOUR FIRST CNC HAAS SIX PACK HAAS SIX PACK
      SHOPPING TOOLS
      • Build & Price a Haas
      • Price List
      • Available Inventory
      • CNCA Financing
      WANT TO TALK TO SOMEONE?

      A Haas Factory Outlet (HFO) can answer your questions, and walk you through your best options.

      CONTACT YOUR DISTRIBUTOR >
  • Why Haas Main Menu
      Discover the Haas Difference
    • Why Haas
    • MyHaas
    • Education Community
    • Industry 4.0
    • Haas Certification
    • Customer Testimonials
  • Service Main Menu
      Welcome to Haas Service
      SERVICE HOME Operator’s Manuals How-To Procedures Troubleshooting Guides Preventive Maintenance Haas Parts Haas Tooling Videos
  • Videos Main Menu
  • Main Menu
    • View All
      • 5% off + saving on Automation
    • View All
      • VF-2SS
    • View All
    • View All
      • About Haas
    • View All
    • View All
      • 5% off + saving on Automation
    • View All
    • View All
      • 05-0258
      • 08-1760
      • 08-1760
      • 08-1761
    • View All
      • Mill Workholding
    • View All
    • View All
    • View All
      • video-test-page
    • View All
    • QUICK LINKS Special Series  Special Series 
      HAAS CAREERS HAAS CAREERS BUILD & PRICE BUILD & PRICE PRICE LIST PRICE LIST WHAT’S NEW WHAT’S NEW YOUR FIRST CNC YOUR FIRST CNC HAAS SIX PACK HAAS SIX PACK
      SHOPPING TOOLS
      • Build & Price a Haas
      • Price List
      • Available Inventory
      • CNCA Financing
      WANT TO TALK TO SOMEONE?

      A Haas Factory Outlet (HFO) can answer your questions, and walk you through your best options.

      CONTACT YOUR DISTRIBUTOR >
  • Haas Tooling Main Menu
      Mill Toolholding Mill Workholding Manual Chucks For Milling Milling Lathe Tooling Lathe Toolholding Lathe Workholding ER Collets & Chucks Holemaking Threading Broaching Tool Management Tooling Accessories Deburring & Abrasives Package Kits Apparel & Accessories Storage & Handling Measuring & Inspection Winner's Circle
    • Haas Tooling
    • Mill Toolholding
      Mill Toolholding Shop All
      • End Mill Holders
      • Shell Mill Holders
      • Shrink Fit Holders
      • ER Collet Chucks
      • Milling Chucks & Collets
      • Drill Chucks
      • Pull Studs
      • Mill Toolholding Kits
      • Hydraulic Milling Chucks & Collets
    • Mill Workholding
      Mill Workholding Shop All
      • Fixed Jaw Vises
      • Self-Centering Vises
      • Adapter Plates
      • Mill Vise Jaws
      • Workholding Accessories
      • Vise Kits
      • Vise Parallels
      • Rotary Vise Kits
    • Manual Chucks For Milling
      Manual Chucks For Milling Shop All
      • 5C Indexer Chucks
      • 3-Jaw Chucks & Mounts for Mills
    • Milling
      Milling Shop All
      • Shell Mill Bodies
      • Milling Inserts
      • End Mills
      • Chamfer Mills & Inserts
      • Indexable End Mill Bodies
      • Ball End Mills
      • Chamfer End Mills
      • Roughing End Mills
      • Indexable Ball End Mills & Inserts
      • Shell Mill Kits
      • Chamfer Mill Kits
      • Indexable End Mill Kits
      • Dovetail Cutters
      • Indexable Dovetail Cutters
      • Engraving End Mills
      • Burrs
      • Keyseat Cutters
      • Corner Rounding End Mills
    • Lathe Tooling
      Lathe Tooling Shop All
      • Cut-Off Tooling
      • Cut-Off Tooling Kits
      • Turning Inserts
      • Grooving Tools
      • Small ID Grooving & Threading Tools
      • Threading Inserts
      • Threading Toolholders
      • Boring Bars
      • OD Toolholders
      • Cermet Turning Inserts
      • CBN Turning Inserts
      • Haas Notch Groove & Thread Inserts
      • Haas Notch Groove & Thread Toolholders
    • Lathe Toolholding
      Lathe Toolholding Shop All
      • TL & CL Toolholding
      • BOT Toolholding
      • BMT Toolholding
      • Live Toolholding
      • Reduction Sleeves
      • VDI Toolholding
    • Lathe Workholding
      Lathe Workholding Shop All
      • Live Centers
      • Spindle Liners
      • Quick-Change Collets
      • Lathe Collet Chucks
      • 5C Collets
      • 5C Collet Sets
      • Lathe Boring Rings
      • Lathe Jaws
    • ER Collets & Chucks
      ER Collets & Chucks Shop All
      • ER Collets
      • ER Sealed Collets
      • ER Tap Collets
      • ER Collet Sets & Accessories
      • ER Collet Chucks
      • Straight Shank ER Collet Chucks
      • Straight Shank Keyless Drill Chucks
    • Holemaking
      Holemaking Shop All
      • Carbide Drills
      • Indexable Drill Bodies
      • Indexable Drill Inserts
      • Modular Drill Bodies
      • Modular Drill Heads
      • Cobalt Drills & Sets
      • Center Drills
      • Reamers
      • Indexable Drilling Kits
      • Spot Drills
      • Spade Drill Bodies
      • Spade Drill Inserts
      • Countersinks
    • Threading
      Threading Shop All
      • Taps
      • Threading Inserts
      • Threading Toolholders
      • Thread Mills
      • Pipe Taps
      • Drill Tap Kits
    • Broaching
      Broaching Shop All
      • Broaching Toolholders
      • Broaching Inserts
    • Tool Management
      Tool Management Shop All
      • Tool Presetting Machines
      • Shrink Fit Machines
    • Tooling Accessories
      Tooling Accessories Shop All
      • Spindle Taper Cleaner
      • Haas Shop Lift
      • Toolholder Fixtures
      • CNC Clearing Fans
    • Deburring & Abrasives
      Deburring & Abrasives Shop All
      • Abrasive Pads
      • Deburr Tools
      • Deburr Wheels
    • Package Kits
      Package Kits Shop All
      • Chip Clearing Fan Kits
      • Cutting Tool Kits
      • Indexable End Mill Kits
      • Cut-Off Tooling Kits
      • Drill Tap Kits
      • Indexable Drilling Kits
      • Shell Mill Kits
      • Chamfer Mill Kits
      • Mill Toolholding Kits
      • Lathe Tooling Kits
      • Workholding Kits
      • Rotary Vise Kits
      • Vise Kits
      • 3-Jaw Chuck Kits for Mills
      • Reduction Sleeve Kits
    • Storage & Handling
      Storage & Handling Shop All
      • Tool Carts
    • Measuring & Inspection
      Measuring & Inspection Shop All
      • Test Bars
      • Inspection Kits
      • Probe Kits & Accessories
      • Levels
      • Refractometers
      • Tool Setting Measuring Gauges
      • Edge & Center Finders
      • Comparative Measuring Gauges
    • Apparel & Accessories
      Apparel & Accessories Shop All
      • Accessories
      • Apparel
    • Winner's Circle
      Winner's Circle Shop All
      • WINNERS_CIRCLE-1Y
    • HAAS TOOLING QUICK LINKS
      NEW PRODUCTS NEW PRODUCTS NEW PRODUCTS NEW PRODUCTS
      MOST POPULAR MOST POPULAR
      TOOLING PROMOS TOOLING PROMOS
      FINANCING & OPEN TERMS FINANCING & OPEN TERMS
      FAQs FAQs
      KITS CREATED FOR YOU KITS CREATED FOR YOU
  • Haas Service Parts Main Menu
      Automatic Pallet Changer Lathe Turret Tool Changer Chip Management Coolant Counterbalance Electrical Cabinet Enclosure Hydraulics Lubrication Maintenance Pendant Probing Rotary Spindle Tailstock
    • Haas Service Parts
    • Automatic Pallet Changer
      Automatic Pallet Changer Shop All
      • HMC - Automatic Pallet Changer
      • VMC - Automatic Pallet Changer
    • Lathe Turret
      Lathe Turret Shop All
      • Lathe - Turret
      • Live Tooling
    • Tool Changer
      Tool Changer Shop All
      • Side Mount
      • Umbrella
    • Chip Management
      Chip Management Shop All
      • Multi Auger
      • Single Auger
    • Coolant
      Coolant Shop All
      • Auxiliary Filter
      • HPC-300 (Lathe)
      • HPC-1000 (Lathe)
      • Oil Skimmer
      • Standard Coolant
      • TSC-300 (Mill)
      • TSC-1000 (Mill)
      • Coolant Refill
      • Loc-Line
    • Counterbalance
      Counterbalance Shop All
      • Charge & Discharge Hose
    • Electrical Cabinet
      Electrical Cabinet Shop All
      • Fans
      • Filters
      • Upgrade Kits
    • Enclosure
      Enclosure Shop All
      • Accessories
      • Air Nozzle
      • Decals
      • Door Bumpers
      • Lighting
      • Windows, Gaskets, & Weather Strip
      • Chip & Coolant Management
    • Hydraulics
      Hydraulics Shop All
      • Filters
      • Gauges
      • Heat Exchanger
      • Hoses
    • Lubrication
      Lubrication Shop All
      • Bijur Mechanical Lubrication
      • Minimum Lubrication
    • Maintenance
      Maintenance Shop All
      • Grease, Oil, & Sealants
    • Pendant
      Pendant Shop All
      • Floppy Disk & USB
      • Keypad
      • Keys
      • Lens
      • Gaskets & Seals
    • Probing
      Probing Shop All
      • Mill Probing
      • Lathe Tool Presetter
    • Rotary
      Rotary Shop All
      • Rotary Gaskets & Seals
    • Spindles
      Spindles Shop All
      • Couplings
      • Gaskets & Seals
      • Spindle Motor Drive
      • Gearbox Drive
      • Tool Release Piston
    • Tailstock
      Tailstock Shop All
      • Handles
  • Contact Us

×

Search Results

Web Pages

Images

    • <
    • 1
    • >
MyHaas Welcome,
!
Haas Tooling Guest Order History MyHaas/HaasConnect Sign In Register Haas Tooling My Account Order History Return History MyHaas/HaasConnect Sign Out Welcome, My Machines Latest Activity My Quotes My Account My Users Sign Out
Find Your Distributor
  1. Select Language
    1. English
    2. Deutsch
    3. Español
    4. Français
    5. Italiano
    6. Português
    7. Český
    8. Dansk
    9. Nederlands
    10. Magyar
    11. Polski
    12. Svenska
    13. Русский
    14. Türkçe
    15. 中文
    16. Suomi
    17. Norsk
    18. الإنجليزية
    19. български
    20. Hrvatski
    21. Ελληνικά
    22. Română
    23. Slovenský
    24. Slovenščina
    25. 한국어
    26. 日本語
Search
×

Search Results

Web Pages

Images

    • <
    • 1
    • >

Wireless Intuitive Probe System - WIPS - Troubleshooting Guide

Service Home Wireless Intuitive Probe System - WIPS - Troubleshooting Guide

Wireless Intuitive Probe System - WIPS - Troubleshooting Guide

Jump to Section Back to Top
Recently Updated Last updated: 05/05/2022

Wireless Intuitive Probe System - WIPS - Troubleshooting Guide


Download and fillout the Probe Inspection Report Checklist below before replacing any parts.

Probe Inspection Report Checklist

Introduction

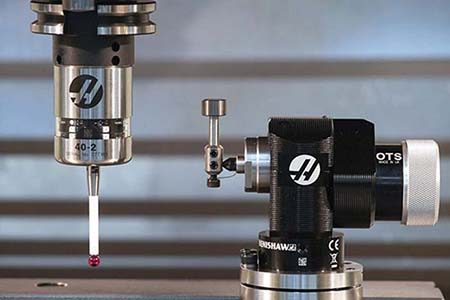
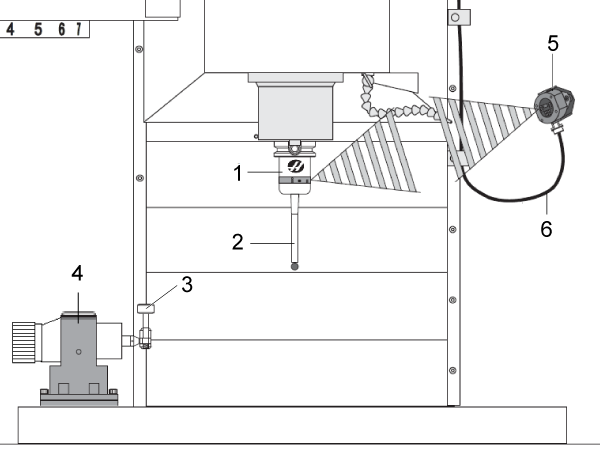
  1. OMP40-2 work probe: A spindle-mounted wireless probe that communicates with an optical interface.
  2. Work probe stylus: The part of the work probe that touches parts during measurement.
  3. Tool probe stylus: The part of the tool probe that tools touch during measurement. Tools touch the top and side of the stylus when the probe measures tool length and diameter.
  4. OTS tool probe:The OTS is a battery-powered, wireless probe.
  5. OMI-2H Optical Machine Interface:The wireless interface for the OMP40-2 work probe. The OMI-2H uses infrared light to communicate with the CNC control and switch the probe on or off.
  6. OMI cable: This cable connects the OMI to the CNC control.

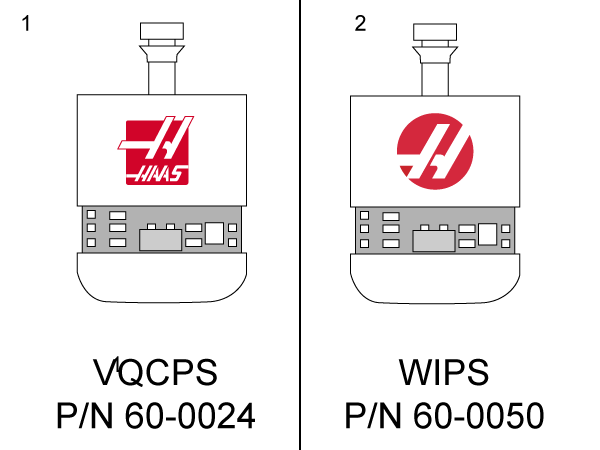
Work probes for Wireless Intuitive Probe System (WIPS) do not work in the wired probe systems (VQCPS). The work probes can be differentiated by:

  1. The VQCPS work probe (P/N 60-0024) has a square Haas logo.
  2. The WIPS work probe (P/N 60-0050) has a round Haas logo.

For installation instructions for both the work probe and tool probe refer to: Wireless Intuitive Probe System (WIPS) - Installation

Powering on the Work Probe and Tool Probe

Probe Operation: Power on the Work Probe Power on the Tool Probe
Classic Haas Control (CHC)

M59 P1134;

Push [CYCLE START].

M59 P1133;

G04 P1.0;

M59 P1134;

Push [CYCLE START].

Next Generation Contol (NGC)

M59 P3;

Push [CYCLE START].

M59 P2;

G04 P1.0;

M59 P3;

Push [CYCLE START].


The LEDs on the work probe flash green when the probe is powered on and ready for use.

When the probe stylus is touched, a “beep” sound is made by the CNC control.

The LEDs on the work probe flash red each time the stylus is touched.

The LEDs on the work probe flash green when the probe is powered on and ready for use.

When the probe stylus is touched, a “beep” sound is made by the CNC control.

The LEDs on the work probe flash red each time the stylus is touched.

When the stylus on the tool probe is touched, the CNC control makes a "beep" sound.

The tool probe does not have any LEDs.

Symptom Table

Symptom Possible Cause Corrective Action
Alarm 1086 PATH OBSTRUCTED  Protected Positioning Cycle only. Clear the obstruction and start again from a safe position.
Alarm 1088 NO FEED RATE Protected Positioning Cycle only. Insert the F code input and start again from a safe position. Recommended protected positioning feed rate is 120 in/min.
Alarm 1089 NO TOOL LENGTH ACTIVE G43 or G44 is not active before the cycle is called. Edit the program and start again from a safe position.
Alarm 1091 FORMAT ERROR  Inputs are mixed, missing, or incorrectly formatted. Edit the program and start again from a safe position.

Alarm 1092 PROBE OPEN/UNEXPECTED SURFACE FOUND


Interference from the work lights. Adjust the work lights
Settings in the work probe are not correct. Correct the settings.
The surface of the part was found, when not expected. Edit the program.
Occurs if the probe is already triggered before a move or triggered while positioning the probe or tool. Clear faults and restart from safe position, check if chips are trapped around probe eyelids
Alarm 1093 PROBE FAIL/SURFACE NOT FOUND Interference from the work lights. Adjust the work lights
Settings in the work probe are not correct. Correct the settings.
The surface of the part was not found. Edit the program.
Alarm 1099 BROKEN TOOL This alarm occurs if a tool is out of user defined tolerance. Replace defective tool and establish correct tool offset value.
Alarm 1101 PROBE STARTUP FAILURE. Bad Batteries. Replace the batteries.
The macros are corrupted. Reload the macros
Settings in the work probe are not correct Correct the settings 
Alarm 1011 OMP40 Not Calibrated The spindle probe tool offset does not match macro variable #10561. To correct this issue re-calibrate the spindle probe.
The spindle probe is not calibrated. To correct this issue calibrate the spindle probe.
Alarm 1106 or 1107 OMP40 Needs Calibration The spindle probe tool offset does not match macro variable #10561. To correct this issue re-calibrate the spindle probe.
The spindle probe is not calibrated. To correct this issue calibrate the spindle probe.
Alarm 1010 OTS Not Calibrated The tool probe is not calibrated. Calibrate the tool probe.
Alarm 1104 OTS Needs Calibration The tool probe is not calibrated. Calibrate the tool probe.
Incorrect measurements. The probe does not give repeatable location results. The probe is not calibrated. Calibrate the probe.
The probe stylus is loose. Check the probe stylus.
The probe stylus is not concentric to the spindle centerline (runout). Adjust the probe stylus to eliminate runout.
The WIPS programs or macro variables are corrupted. Load the latest Renishaw macro programs. Make sure to overwrite the current macro programs.
On an EC-400 the probe was commanded to expand or retract using M104/M105 then Alarm 329 UNDEFINED M CODE appears Probe arm type parameter value was set incorrectly Check Parameter 805 PROBE ARM TYPE and verify the value is on AUTO. 
On EC-400 Alarm 808 AUTOMATIC PROBE ARM FAULT appears while retracting The connector for the probe down switch on the cable is pinned incorrectly Check the pin out on the probe down switch cable. Refer to the EC-400 Automatic Probe arm Cable section for further information. 
The probe is not communicating with the OMI. The probe may be in the wrong mode. Check which mode the probe is in by refering to the light sequence guide in the relevant section below. Change the mode as needed.

EC-400 Automatic Probe Arm Cable

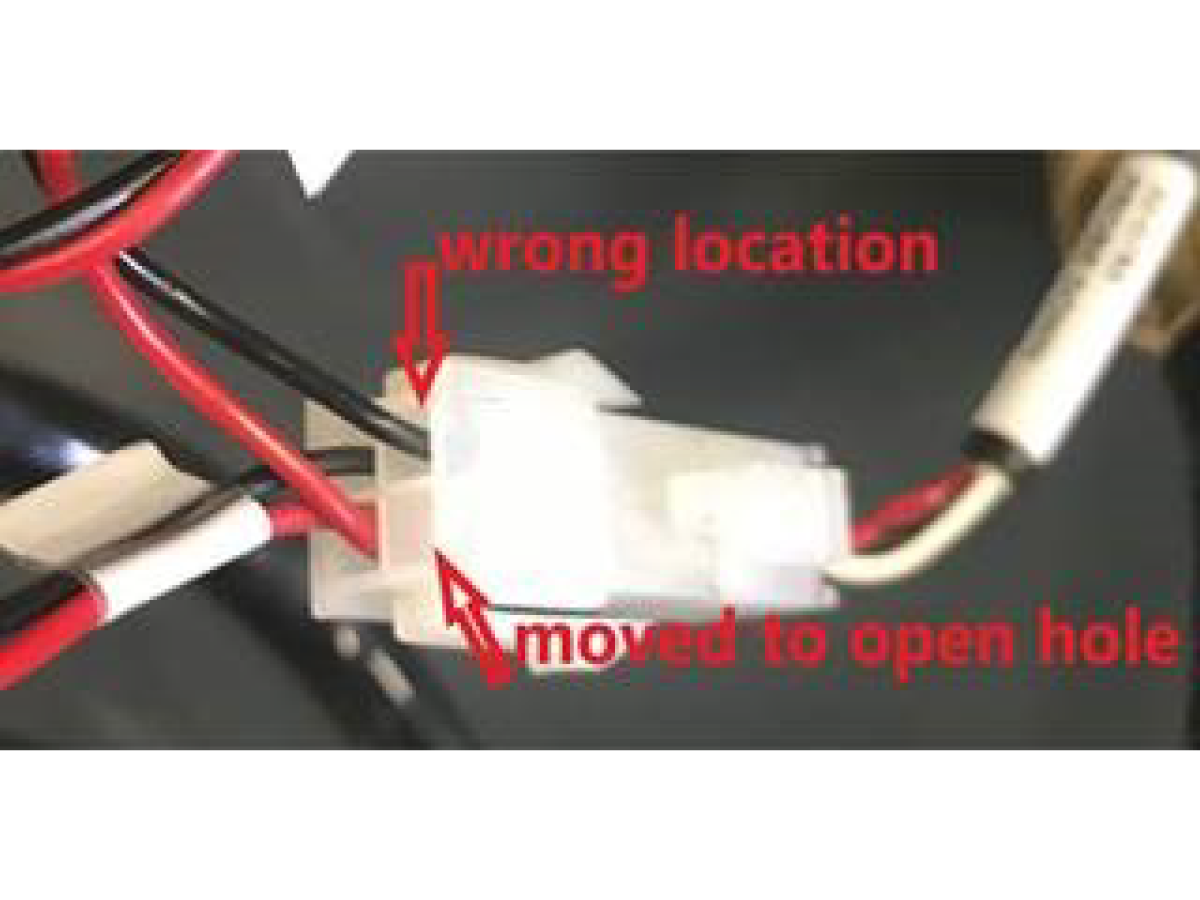
1

An example of a mispinned connector is shown on the left, the cable that conencts to cable 32-0763 had a pin in the wrong location. 

Re-pin the wire to the correct location indicated in the image. 

2

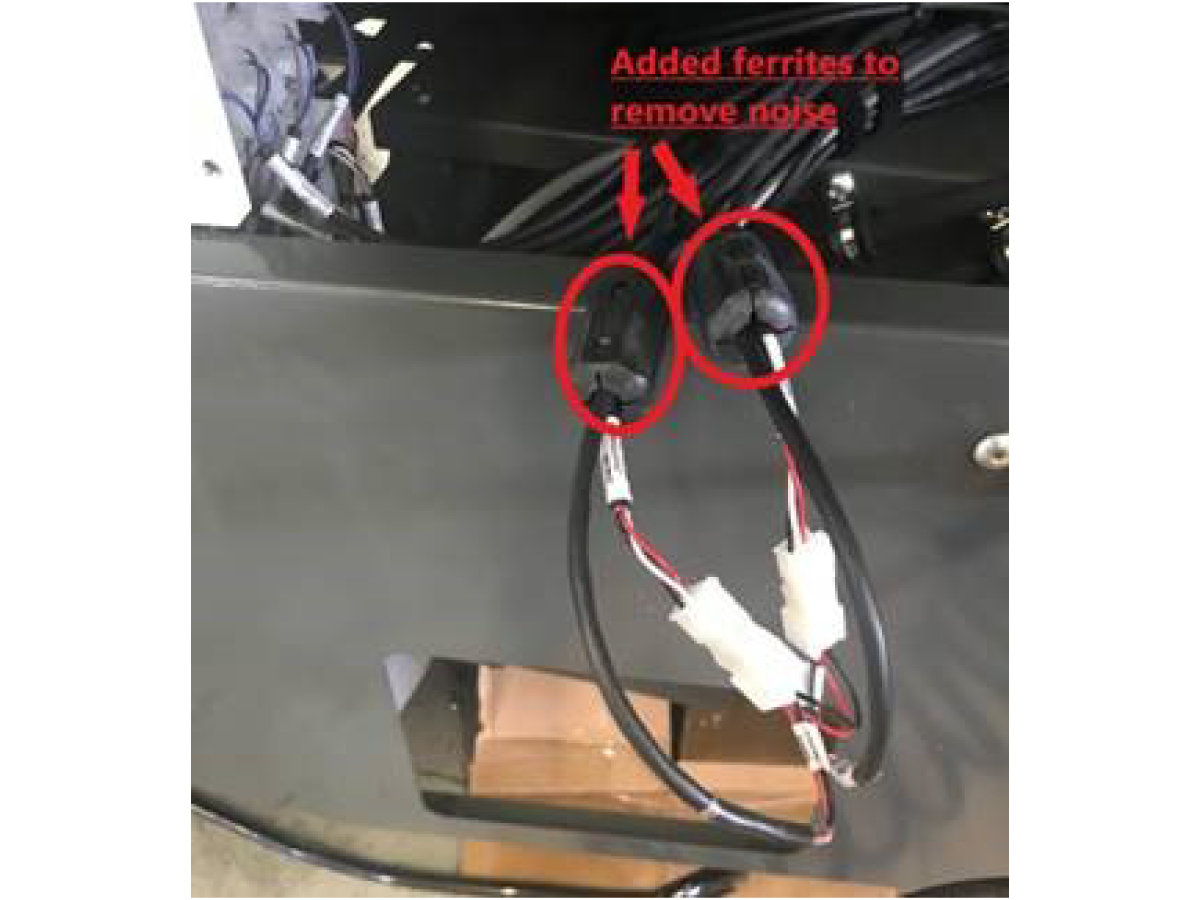
If the probe up input flickers between 1 and 0 add ferrite filters to reduce noise. 

Batteries

Corrective Action:

Battery replacement is always the first step in probe troubleshooting. Replace both batteries at the same time. Test the batteries before you install them.

The batteries in the probes have a life span of about (8) months, and must be replaced regularly. If the batteries are low, the work probe's green and blue LEDs may flash. If the batteries are completely dead, the red LED may constantly be on.

Do not rely on a multimeter for testing the batteries. The lithium batteries in the probe may read 3.6 Volts from a multimeter, even though they are low.

Write the date on newly installed batteries for future reference.

 Note: Do not touch the stylus during battery replacement. If the stylus is touched, the probe may power on in the setting mode. Settings can be accidentally changed in this mode.

Interference

Corrective Action:

Turn the work lights off to begin troubleshooting. Make sure the work lights inside the machine are not aimed at the probe or the OMI-2H. Bright lights can interfere with the work probe. Make sure no bright lights are aimed at the machine.

Surface Not Found

Corrective Action:

Edit the program to start the probe closer to the part.

Calibration

Corrective Action:

The probes need to be calibrated any time a stylus has been replaced, the tool probe has been moved, or if the CNC control generates alarms during probe routines. The probe needs to be calibrated when changing from inch to metric or metric to inch.

Follow the procedure to calibrate the tool probe and the work probe. Refer to:

  • CHC: Wireless Intuitive Probe System (WIPS) - Calibration.
  • NGC: Next Generation Control - Probe Calibration (VPS)

The probes must be calibrated in this order:

  1. Tool probe
  2. Work probe length
  3. Work probe diameter

OMP 40-2 Work Probe Settings

Probe Settings Basics

The probe settings are in these (4) groups:

  1. Switch-Off Method
  2. Enhanced Trigger Filter
  3. Optical Transmission Method/Probe Identification
  4. Optical Power

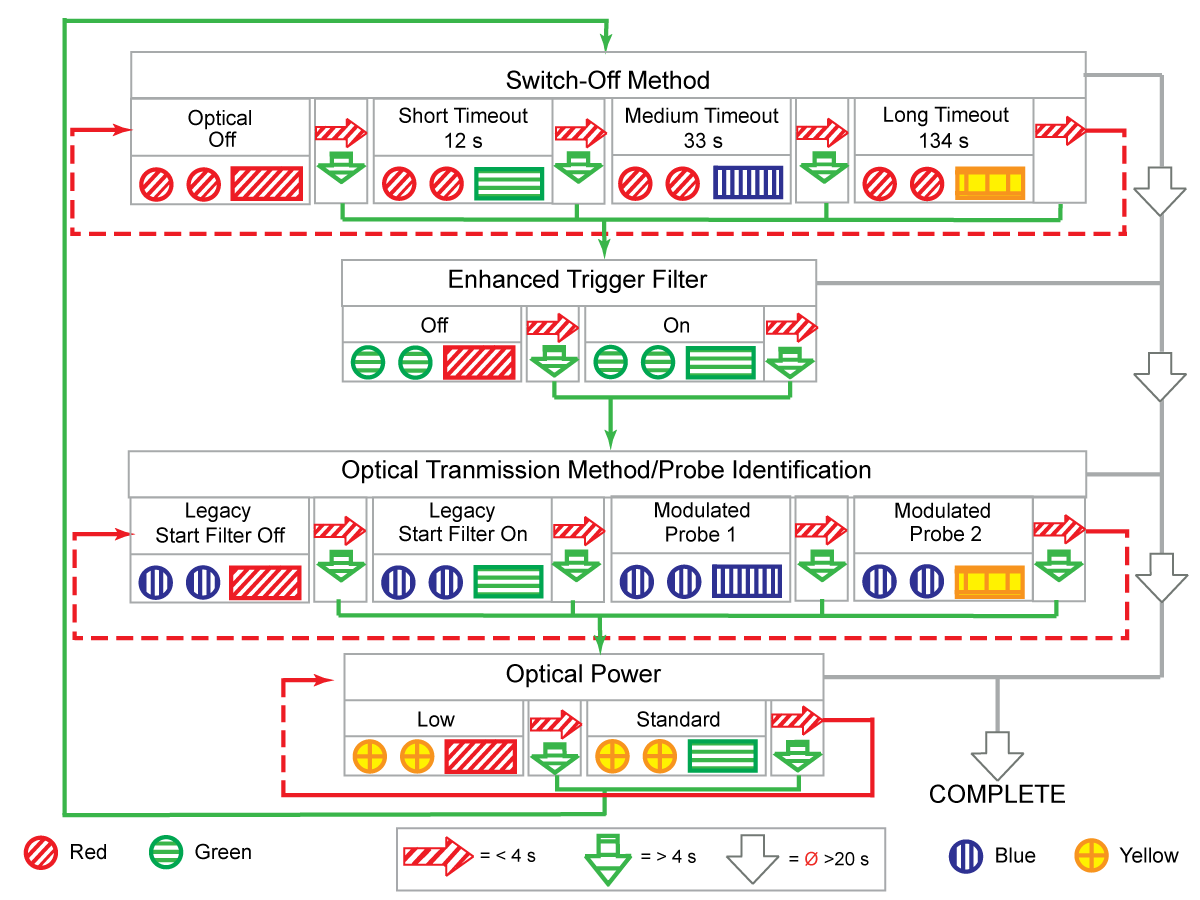
The sequence that probe flashes tells you the current probe settings.

 Note: The LEDs flash in different colors and different lengths of time. The sequence that the LED flashes tells you the probe settings. The LEDs flashes a short or a long time. In the tables that follow, a small colored circle  shows that the LED flashes a short time. A rectangle  shows that the LED flashes a long time.

To see what the current probe settings are, do the following:

Remove the batteries from the probe for a minimum of 5 seconds.

Install the batteries.

Important: Do not touch the probe stylus after re-inserting batteries - this is how probe settings are changed. Only touch it later if necessary to change the settings.

After you replace the batteries, the probe LED flashes in a specific sequence.

Look at the probe LEDs. Record the sequence that the LED flashes.

Refer to Renishaw - Probe - OMP40-2 - Settings for the meaning of the sequence.

If you would like to change the probe settings, do the following:


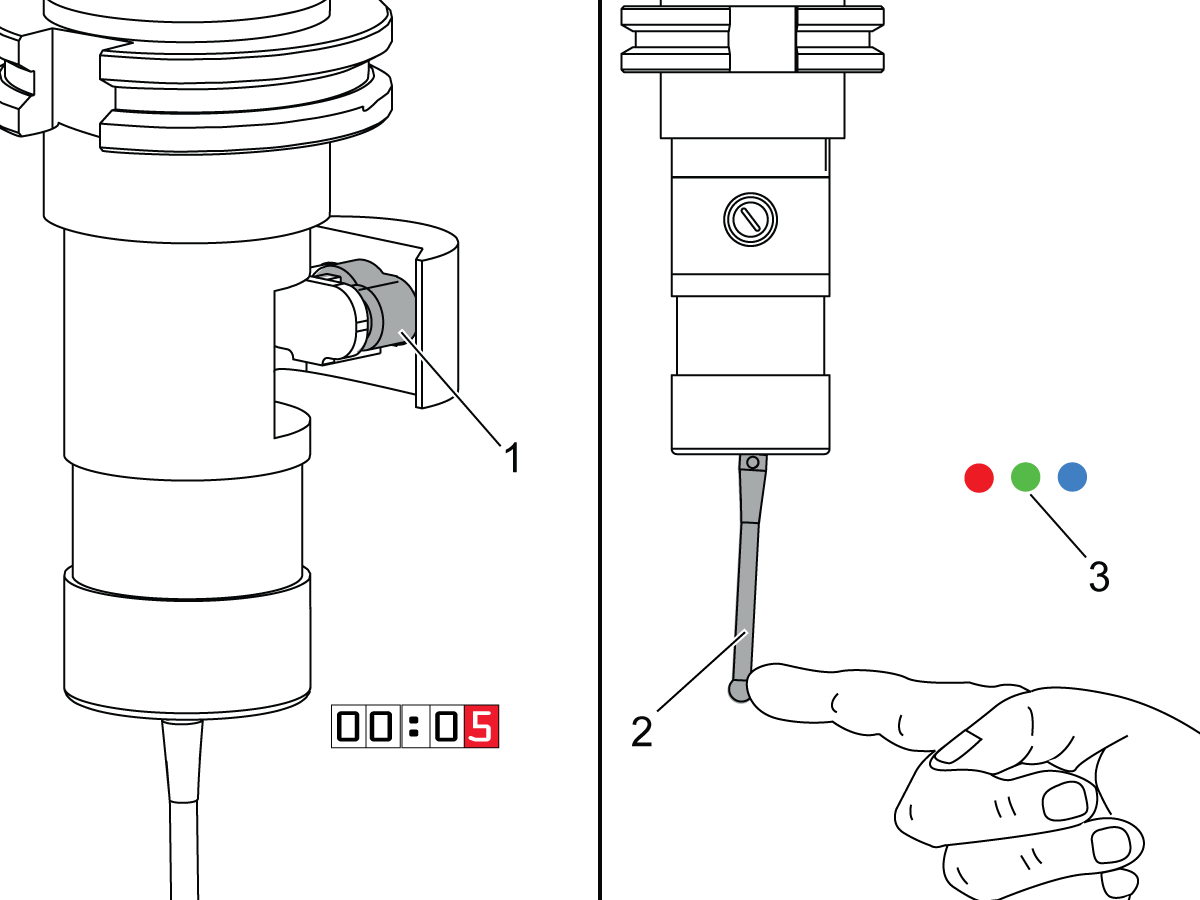
Remove the batteries [1] from the probe for a minimum of 5 seconds.

Move and hold the stylus [2] while installing the batteries.

Hold the stylus until the probe completes the LED sequence [3] and flashes Red 5 times.

Release the stylus.

To change the probe settings you move the stylus in a specified order, refer to the tables below for the orders for different settings:


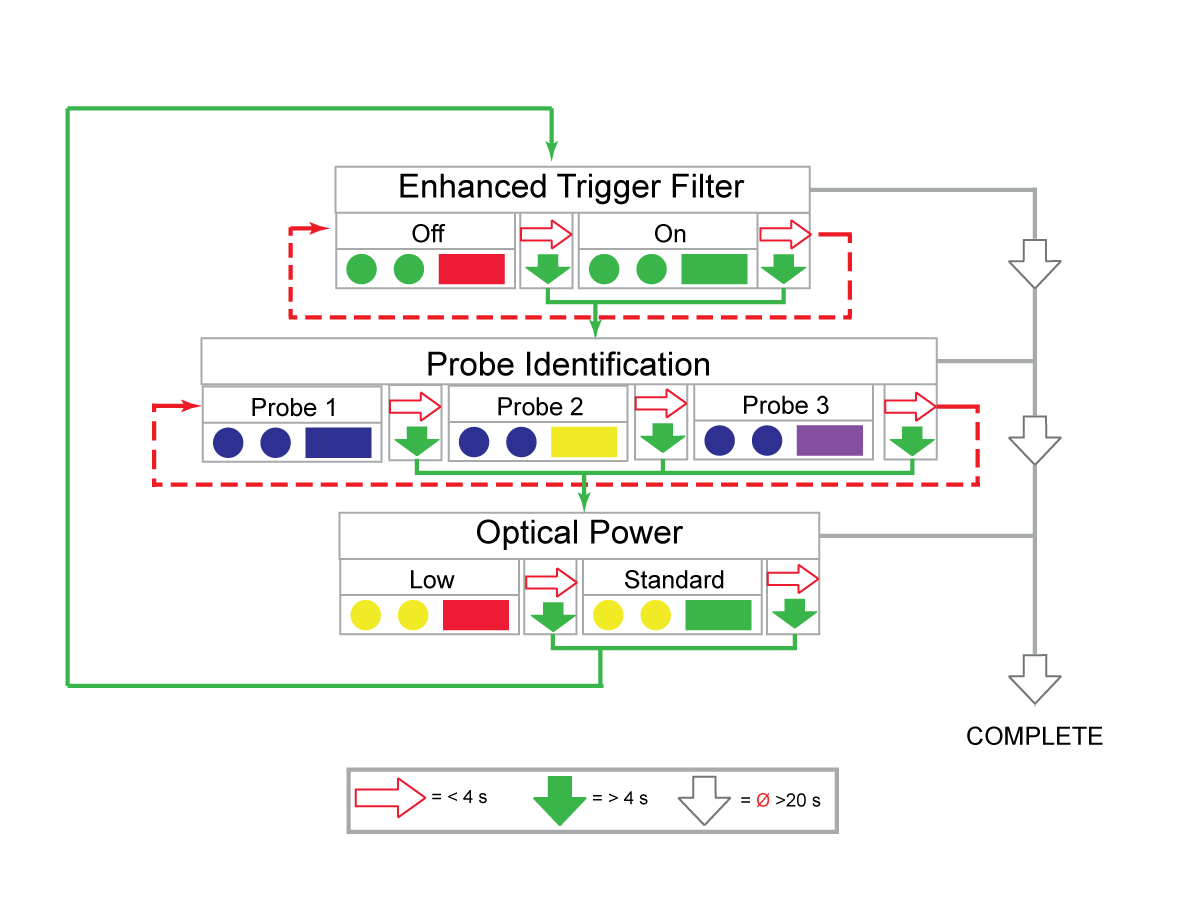
The Illustration shows these symbols: The symbols tells you this: This gives this result:
A red arrow that points to the right. Move and hold the stylus for less than (4) seconds. Selects the next option within a group.
A green arrow that points down. Move and hold the stylus for more than (4) seconds. Moves from one group to another.
A white arrow that points down. Do not touch the stylus for (20) seconds or more. Exits the set up.

Default OMP40-2 settings are the following:

  • Switch Off Method: Optical Off
  • Enhanced Trigger Filter: Trigger Filter Off
  • Optical Transmission Method/Probe Identification: Modulate Probe 1
  • Optical Power: Low

OMP40-2 - Macro Variables.

  • 556: (XRAD) Stylus X calibration radius
  • 557: (YRAD) Stylus Y calibration radius
  • 558: (XOFF) X axis stylus offset (run out)
  • 559: (YOFF) Y axis stylus offset (run out)
  • 560: Tool number for the OMP40-2 probe

OTS Tool Probe Settings

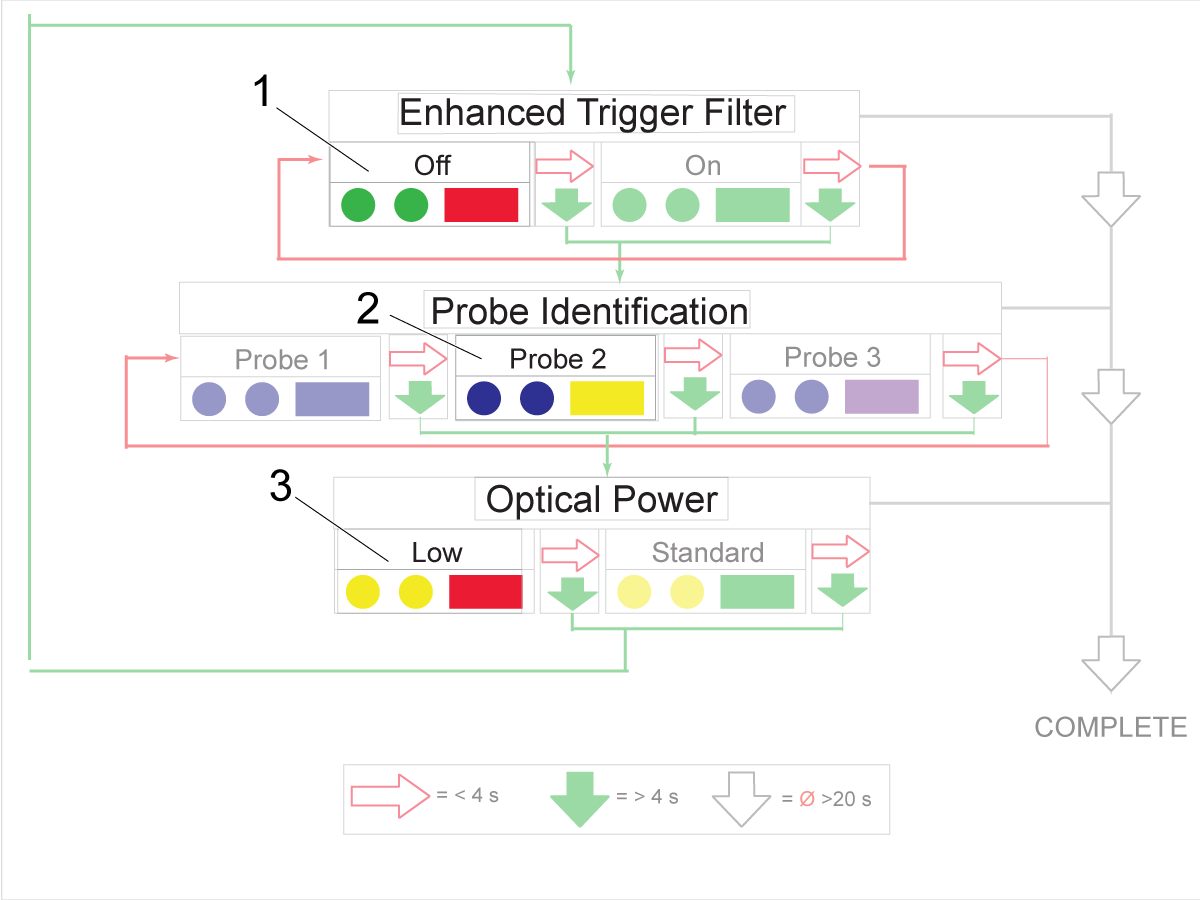
OTS Settings Basics:

The probe settings are in these (3) groups.

  1. Enhanced Trigger Filter
  2. Probe Identification
  3. Optical Power

The LEDs flash in different colors and different lengths of time. The sequence that the LED flashes tells you the probe settings. The LEDs flash a short or a long time. In the tables that follow, a small colored circle  shows that the LED flashes a short time. A colored rectangle  shows that the LED flashes a long time.

To find the current OTS probe settings do the following:

Remove and re-install the batteries. After you install the batteries, the probe LED flashes in a special sequence. These LEDs should show the initial factory settings.

Note: Do not touch the probe when installing the batteries, this could alter the probe settings.

Look at the probe LEDs. Record the sequence of color and length of time that the LED flashes

Refer to Renishaw - Probe - OTS - Settings for light sequence meanings.

To change the OTS probe settings do the following:

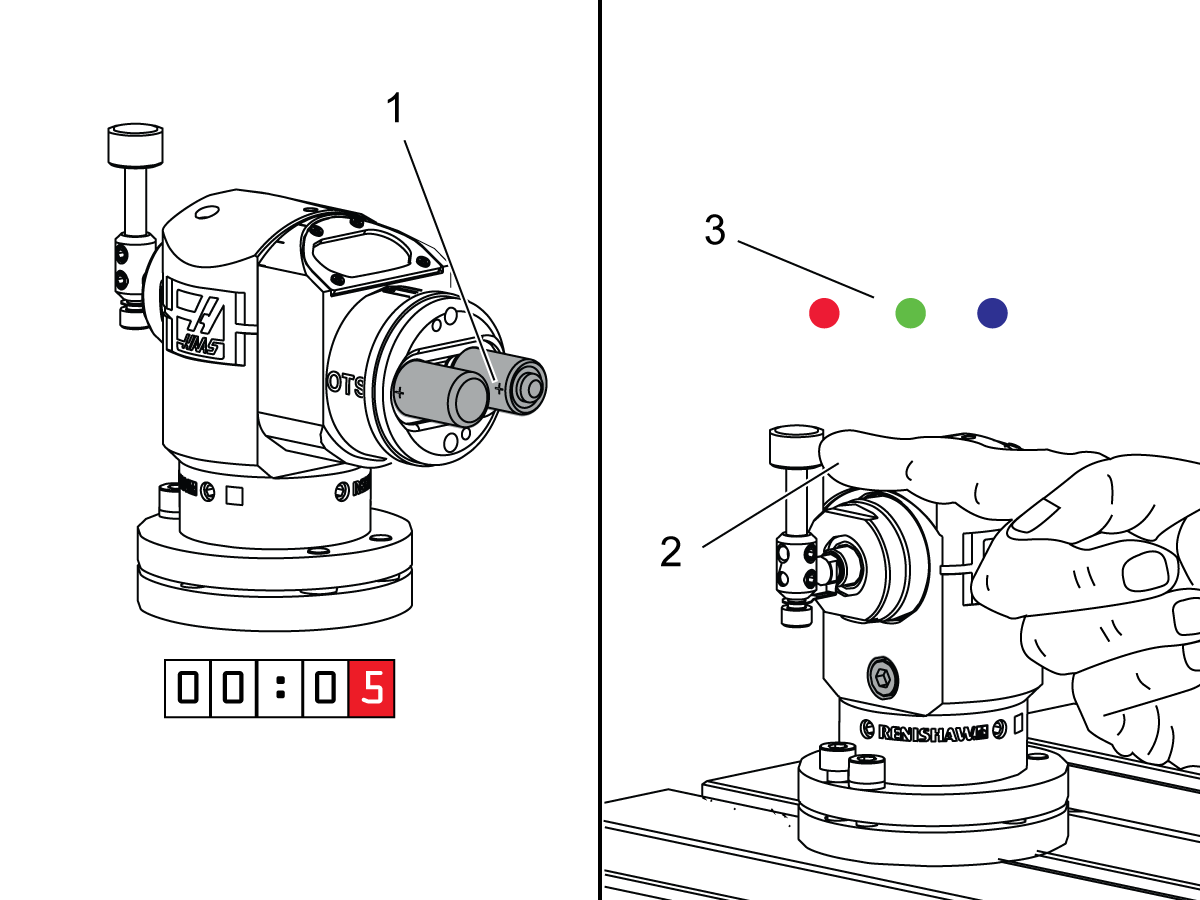
Remove the batteries [1] from the probe for a minimum of 5 seconds.

Move and hold the stylus [2] while installing the batteries. Hold the stylus until the probe completes the LED sequence [3] and flashes Red 5 times.

Release the stylus.

Follow the below tables to select the values you want for the settings. Default factory settings are shown in the next set of tables:


The Illustration shows these symbols: The symbols tells you this: This gives this result:
A red arrow that points to the right. Move and hold the stylus for less than (4) seconds. Selects the next option within a group.
A green arrow that points down. Move and hold the stylus for more than (4) seconds. Moves from one group to another.
A white arrow that points down. Do not touch the stylus for (20) seconds or more. Exits the set up.

Default probe settings are the following:

  • Enhanced Trigger Filter is set to Off [1].
  • Probe Identification is set to Probe 2 [2].
  • Optical Power is set to Low [3].

OTS Macro Variables

  • 582: OTS stylus Z location, non rotating tools
  • 583: OTS stylus Z locations, rotating tools
  • 584: Stylus size for diameter setting
  • 585: X-Axis stylus center location
  • 586: Y-Axis stylus center location
  • 587: Z approach position (This is used in length and diameter probing only). The first fast positioning move to the position where the tool offset is applied (height above stylus).
  • 588: Z clearance position (This is used in length and diameter probing only). The position above the stylus for clearance moves around the stylus (height above stylus).
  • 589: Tools above this diameter rotate (This is used in length and diameter probing only)
  • 590: Maximum cutter diameter size (This is used in length and diameter probing only)
  • 592: Probe orientation. This defines the diameter measuring axis, and the radius offsetting direction for rotating length setting.

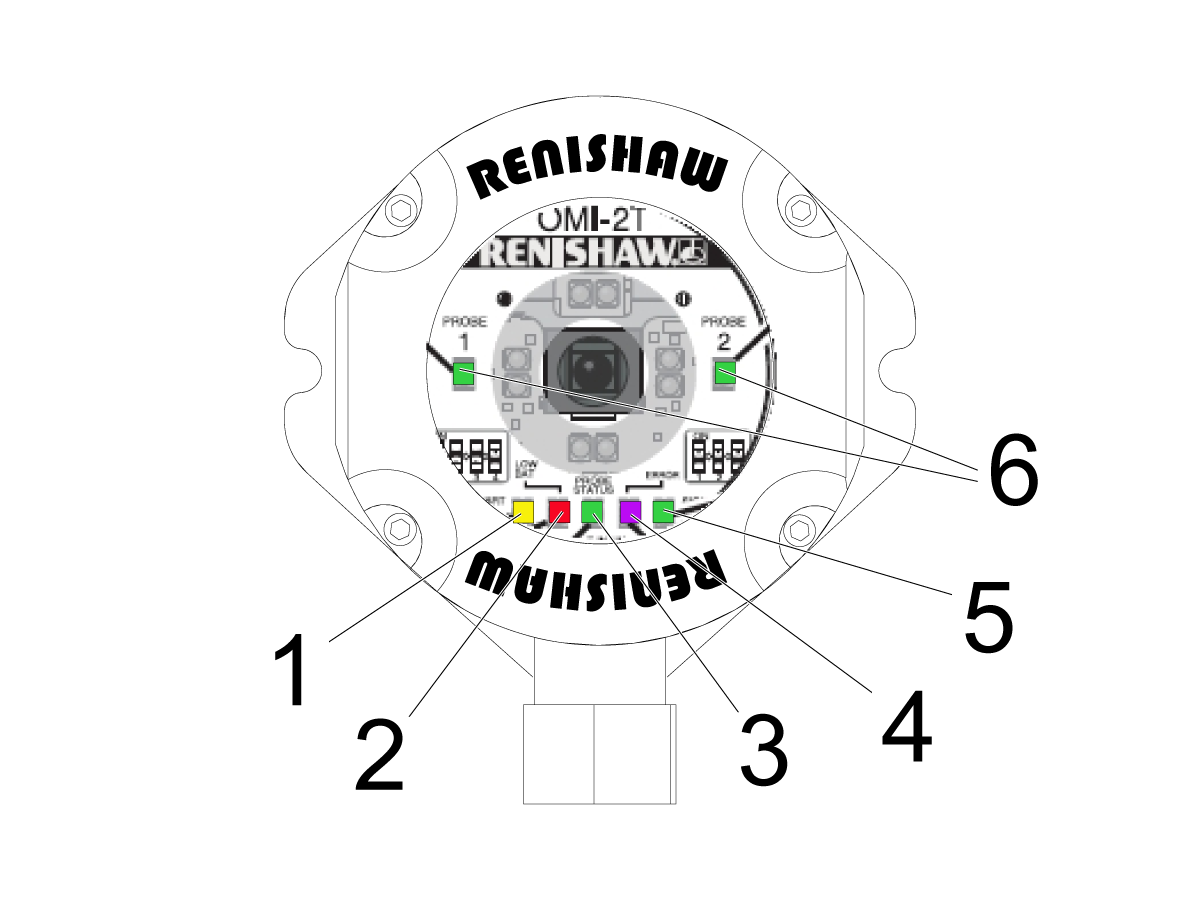
OMI-2H Operation:

  1. START SIGNAL (yellow): This LED flashes for one second when the OMI-2H sends a start signal to switch on or switch off the work probe or the tool probe.
  2. LOW BATTERY (red): If the OMI-2H detects a low battery from one of the probes, the low battery LED is on. Replace the batteries in the probes.
  3. PROBE STATUS (green,red): This bi-color LED is green when the probe is powered on, and red when the probe is triggered.
  4. ERROR (red, blue, yellow): Tri-color LED indicates a weak or lost signal from the probe. Red indicates the probe has failed or switched off. Blue indicates a signal from a second probe is being received. Yellow indicates that a weak signal is received. The probe signal could be blocked from a fixture or rotary table.
  5. SIGNAL CONDITION (red, blue, yellow): This tri-colored LED indicates the strength of the signal from the probes. Red indicates no signal from the probe. Yellow indicates a weak signal. Green indicates a good signal.
  6. ACTIVE PROBE (green): There are (2) LEDs that show which probe is currently active.

For more information refer to Optical Machine Interface (OMI) - Lights Information.

FIND DISTRIBUTOR
Feedback
Haas Logo

美元价格不包括关税、报关费用、保险费、增值税及运费。
USD prices DO NOT include customs duty, customs fees, insurance, VAT, or freight.

人民币价格包含关税、报关费用、货运保险和增值税, 但不包括运费。
CNY prices include customs duty, customs fees, insurance, and VAT. DOES NOT include freight.

Haas Delivered Price

This price includes shipping cost, export and import duties, insurance, and any other expenses incurred during shipping to a location in France agreed with you as a buyer. No other mandatory costs can be added to the delivery of a Haas CNC Product.

KEEP UP WITH THE LATEST HAAS TIPS AND TECHNOLOGY...

Sign up now!   

HAAS TOOLING ACCEPTS THE FOLLOWING:

  • Service & Support
  • Owners
  • Request Service
  • Operator Manuals
  • Haas Parts
  • Rotary Repair Request
  • Pre-Install Guides
  • Shopping Tools
  • Build & Price a New Haas
  • Available Inventory
  • The Haas Price List
  • CNCA Financing
  • About Haas
  • Careers
  • Certifications & Safety
  • Contact Us
  • History
  • Terms & Conditions
  • Haas Tooling Terms & Conditions
  • Privacy
  • Warranty
  • Haas Community
  • Haas Certification Program
  • Haas Motorsports
  • Gene Haas Foundation
  • Haas Technical Education Community
  • Events
  • Join the Conversation
  • Facebook
  • Twitter
  • Flickr
  • YouTube
  • LinkedIn
  • Instagram
  • TikTok
© 2023 Haas Automation, Inc – CNC Machine Tools

This site is protected by reCAPTCHA and the Google Privacy Policy and Terms of Service apply.


2800 Sturgis Rd., Oxnard, CA 93030 / Toll Free: 800-331-6746
Phone: 805-278-1800 / Fax: 805-278-2255

Cookie Notice

We use cookies to improve your user experience. Our Cookie Notice describes which cookies we use, why we use them, and how you can find more information about them. Please confirm you consent to us using analytics cookies. If you do not consent, you may still use our website with a reduced user experience.

Manage Settings

Cookie Notice

We use cookies to improve your user experience. Our Cookie Notice describes which cookies we use, why we use them, and how you can find more information about them. Please confirm you consent to us using analytics cookies. If you do not consent, you may still use our website with a reduced user experience.

Functional Cookies

Analytics Cookies