My Haas Welcome,
!
Haas Tooling MyHaas/HaasConnect Sign In Register Haas Tooling MyHaas/HaasConnect Sign Out Welcome, My Machines Latest Activity My Quotes My Account My Users Sign Out
Find Your Distributor
  1. Select Language
    1. English
    2. Deutsch
    3. Español - ES
    4. Español - MX
    5. Français
    6. Italiano
    7. Português
    8. Český
    9. Dansk
    10. Nederlands
    11. Magyar
    12. Polski
    13. Svenska
    14. Türkçe
    15. 中文
    16. Suomi
    17. Norsk
    18. الإنجليزية
    19. български
    20. Hrvatski
    21. Ελληνικά
    22. Română
    23. Slovenský
    24. Slovenščina
    25. 한국어
    26. 日本語
    27. Українська
  • machines Main Menu
    • Vertical Mills
      Vertical Mills
      Vertical Mills View All
      • Vertical Mills
      • VF Series
      • Universal Machines
      • VR Series
      • VP-5 Prismatic
      • Pallet-Changing VMCs
      • Mini Mills
      • Mold Machines
      • High-Speed Drill Centers
      • Drill/Tap/ Mill Series
      • Toolroom Mills
      • Pocket Mill
      • Compact Mills
      • Gantry Series
      • SR Sheet Routers
      • Extra-Large VMC
      • Double-Column Mills
      • 3+2 Positioning Machines
    • Multi-Axis Solutions
      Multi-Axis Solutions
      Multi-Axis Solutions View All
      • Multi-Axis Solutions
      • Y-Axis Lathes
      • 5-Axis Mills
    • Lathes
      Lathes
      Lathes View All
      • Lathes
      • ST Series
      • Dual-Spindle
      • Box Way Series
      • Toolroom Lathes
      • Chucker Lathe
      • Pocket Lathe
      • Haas Bar Feeders
    • Horizontal Mills
      Horizontal Mills
      Horizontal Mills View All
      • Horizontal Mills
      • 50-Taper
      • 40-Taper
    • Rotaries & Indexers
      Rotaries & Indexers
      Rotaries & Indexers View All
      • Rotaries & Indexers
      • Rotary Tables
      • Indexers
      • 5-Axis Rotaries
      • Extra-Large Rotaries
    • Special Series
      Special Series
      Special Series View All
      • Special Series
      • EU_Series_Redirect
    • Automation Systems
      Automation Systems
      Automation Systems View All
      • Automation Systems
      • Mill Automation
      • Lathe Automation
      • Automatic Parts Loaders
      • Automation Models
    • Desktop Machines
      Desktop Machines
      Desktop Machines View All
      • Desktop Machines
      • Desktop Mill
      • Desktop Lathe
      • Control Simulator, Standard
      • Control Simulator, Premium
    • Shop Equipment
      Shop Equipment
      Shop Equipment View All
      • Shop Equipment
      • Knee Mill
      • Haas Manual Lathes
      • Haas Saws
    • Fabrication Machines
      Fabrication Machines
      Fabrication Machines View All
      • Fabrication Machines
      • Laser Cutting Machines
      • CNC Press Brakes
    • QUICK LINKS Special Series  Special Series 
      EU SERIES EU SERIES BUILD & PRICE | PRICE LIST BUILD & PRICE | PRICE LIST In-Stock Machines In-Stock Machines WHAT’S NEW WHAT’S NEW YOUR FIRST CNC YOUR FIRST CNC
      SHOPPING TOOLS
      • Build & Price a Haas
      • Price List
      • Available Inventory
      • CNCA Financing
      WANT TO TALK TO SOMEONE?

      A Haas Factory Outlet (HFO) can answer your questions, and walk you through your best options.

      CONTACT YOUR DISTRIBUTOR >
  • Options Main Menu
    • The Haas Control Value Option Packages
      Value Option Packages
      Value Option Packages View All
      • Value Option Packages
    • Product Image Spindles
      Spindles
      Spindles View All
      • Spindles
    • Product Image Tool Changers
      Tool Changers
      Tool Changers View All
      • Tool Changers
    • Product Image 4th- | 5th-Axis
      4th- | 5th-Axis
      4th- | 5th-Axis View All
      • 4th- | 5th-Axis
    • Product Image Turrets & Live Tooling
      Turrets & Live Tooling
      Turrets & Live Tooling View All
      • Turrets & Live Tooling
    • Product Image Probing
      Probing
      Probing View All
      • Probing
    • Haas Chip & Coolant Management Chip & Coolant Management
      Chip & Coolant Management
      Chip & Coolant Management View All
      • Chip & Coolant Management
    • The Haas Control The Haas Control
      The Haas Control
      The Haas Control View All
      • The Haas Control
    • Product Image Product Options
      Product Options
      Product Options View All
      • Product Options
    • Product Image Tooling & Fixturing
      Tooling & Fixturing
      Tooling & Fixturing View All
      • Tooling & Fixturing
    • Product Image Workholding
      Workholding
      Workholding View All
      • Workholding
    • Product Image 5-Axis Solutions
      5-Axis Solutions
      5-Axis Solutions View All
      • 5-Axis Solutions
      • 5 Easy Steps to 5-Axis
    • QUICK LINKS Special Series  Special Series 
      EU SERIES EU SERIES BUILD & PRICE | PRICE LIST BUILD & PRICE | PRICE LIST In-Stock Machines In-Stock Machines WHAT’S NEW WHAT’S NEW YOUR FIRST CNC YOUR FIRST CNC
      SHOPPING TOOLS
      • Build & Price a Haas
      • Price List
      • Available Inventory
      • CNCA Financing
      WANT TO TALK TO SOMEONE?

      A Haas Factory Outlet (HFO) can answer your questions, and walk you through your best options.

      CONTACT YOUR DISTRIBUTOR >
  • Why Haas Main Menu
      Discover the Haas Difference
    • Why Haas
    • MyHaas
    • Education Community
    • Industry 4.0
    • Haas Certification
    • Customer Testimonials
  • Service Main Menu
      Welcome to Haas Service
      SERVICE HOME Operator’s Manuals How-To Procedures Troubleshooting Guides Preventive Maintenance Haas Parts Haas Tooling Videos
  • Videos Main Menu
  • Main Menu
    • View All
    • View All
    • View All
    • View All
      • HTEC Curriculum Support
      • Haas Value Option Packages (VOP) Journey
    • View All
      • Haas 10 kg Cobot Package
      • Cobot Kits
      • DC-1 Drill Center
      • CNC Sales News
      • Do More With Your Haas
    • View All
    • View All
      • contact-us-test
      • 4 - AUTOMATION SYSTEMS
      • Carousel-V2
      • expert test
      • Demo_Day_Trident-test
      • Link Test
      • image-sale-tag-test
      • article-list-test
      • Haas 25 kg Robot Package
      • test-algolia-page
    • View All
    • View All
    • View All
    • View All
      • calc-test
    • View All
    • QUICK LINKS Special Series  Special Series 
      EU SERIES EU SERIES BUILD & PRICE | PRICE LIST BUILD & PRICE | PRICE LIST In-Stock Machines In-Stock Machines WHAT’S NEW WHAT’S NEW YOUR FIRST CNC YOUR FIRST CNC
      SHOPPING TOOLS
      • Build & Price a Haas
      • Price List
      • Available Inventory
      • CNCA Financing
      WANT TO TALK TO SOMEONE?

      A Haas Factory Outlet (HFO) can answer your questions, and walk you through your best options.

      CONTACT YOUR DISTRIBUTOR >
  • Haas Tooling Main Menu
  • Haas Service Parts Main Menu

My Haas Welcome,
!
Haas Tooling MyHaas/HaasConnect Sign In Register Haas Tooling MyHaas/HaasConnect Sign Out Welcome, My Machines Latest Activity My Quotes My Account My Users Sign Out
Find Your Distributor
  1. Select Language
    1. English
    2. Deutsch
    3. Español - ES
    4. Español - MX
    5. Français
    6. Italiano
    7. Português
    8. Český
    9. Dansk
    10. Nederlands
    11. Magyar
    12. Polski
    13. Svenska
    14. Türkçe
    15. 中文
    16. Suomi
    17. Norsk
    18. الإنجليزية
    19. български
    20. Hrvatski
    21. Ελληνικά
    22. Română
    23. Slovenský
    24. Slovenščina
    25. 한국어
    26. 日本語
    27. Українська
×

Search Results

Web Pages

Images

    • <
    • 1
    • >

Fourth and Fifth Axis Drive - Installation - Mill - NGC

Service Home How To Procedures Fourth and Fifth Axis Drive - Installation - Mill - NGC

Fourth and Fifth Axis Drive - Installation - Mill - NGC

- Jump to Section - Back to Top

11.1 4th and 5th Axis Drive - Installation

Recently Updated Last updated: 02/11/2021

4th and 5th Axis Drive - Installation - NGC


AD0319

Revision A - 10/2025

Introduction

Refer to the Rotary - Installation procedure to install a TR, TRT, or a T5C rotary unit on a Haas VMC.

Machine Requirements:
  • Mills that have brushless servo amplifiers.
  • Machines with NGC.

Document Applies to these parts:

  • P/N 93-2389 4TH-AXIS DRIVE, NGC
  • P/N 93-1000276 4TH-AXIS DRIVE
  • P/N 93-2544 5TH-AXIS DRIVE, NGC
  • P/N 93-1000275 5TH AXIS DRIVE

Note: All machines must be geolocated by a service technician when a 5th axis upgrade is installed and activated. 

Motion sensor support has been posted on HBC in HBC -> Service -> Utilities -> Documents and software -> 11_Geolocation & Motion Sensor.

Electrical Safety

 DANGER: Working with the electrical services required for CNC machines is extremely hazardous and can result in serious injury or death.

Before connecting line wires to the CNC:

  • Turn off all power to the machine at the source.
  • Perform a Lockout-Tagout (LOTO) procedure to ensure the power remains off during service.
  • Verify that power has been disconnected by using an AC voltage detector on all incoming lines.

If you are uncertain about how to safely disconnect power or perform LOTO procedures:

  • Do not proceed.
  • Contact qualified personnel or obtain appropriate assistance before continuing.

Failure to follow these precautions may result in electrical shock, equipment damage, or fatal injury.

 Danger: Before beginning any work inside the control cabinet, verify that the High Voltage indicator light on the 320V Power Supply / Vector Drive has been off for a minimum of five (5) minutes. This waiting period ensures that residual voltage has dissipated and reduces the risk of electric shock.

Certain service procedures involve high-risk electrical components and may pose serious injury or fatality hazards. Technicians must not attempt any procedure unless they have a complete understanding of the steps involved and the associated risks.

If there is any uncertainty regarding a procedure, contact your Haas Factory Outlet (HFO) to arrange for a qualified service technician.

Rotary Scale Cable - Installation

Machine Compatibility:  Next Generation Control Machines with a trunnion rotary.

Document Applies to these Parts:

[A] 32-10053 QTY: 1 CABLE, [+12V] ROTARY SCALE FEEDBACK CONTROL END (NGC)

[B] 41-0040 QTY: 4 BOLT, PTHS 4-40X3/8 TRUSS MCMASTER-CARR

1

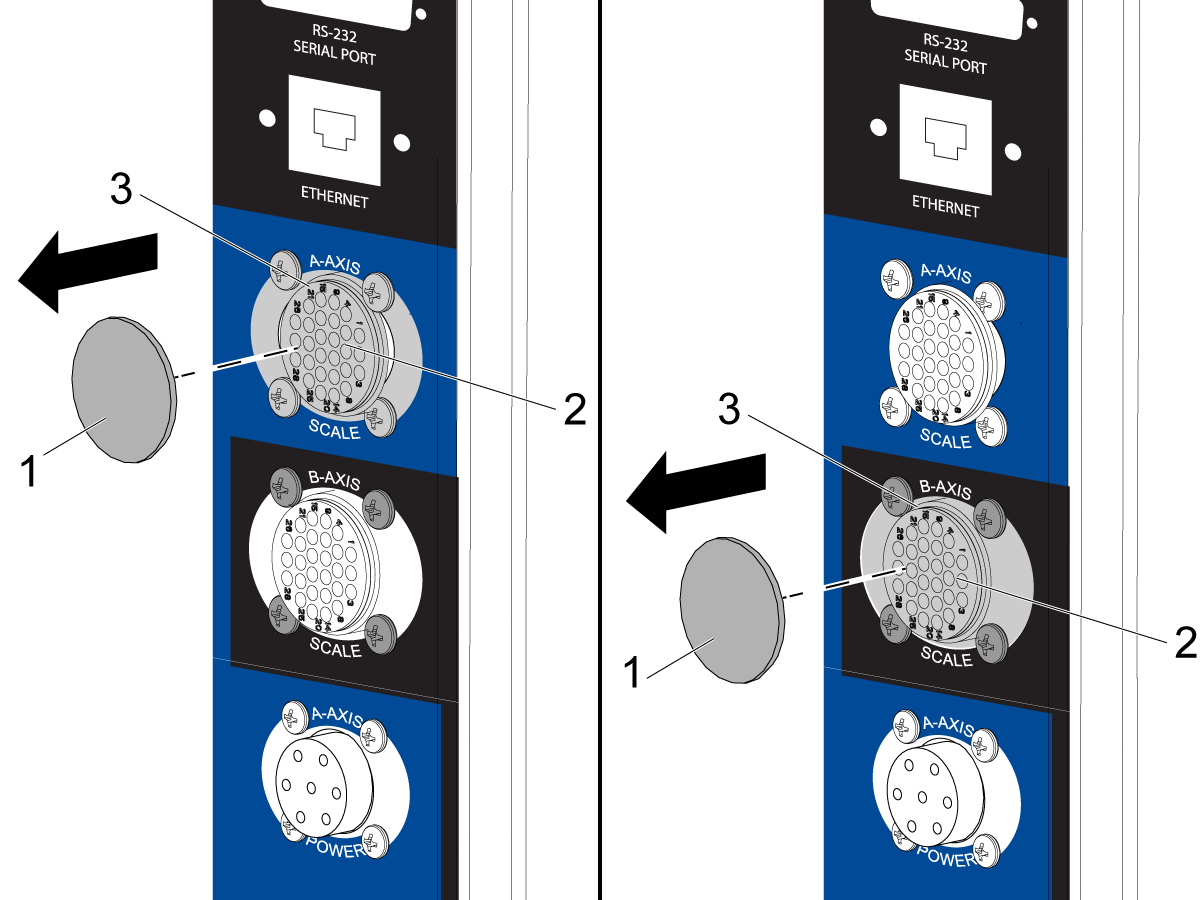
Find the plug [1] for the 4th-AXIS SCALE / A-AXIS SCALE or 5th-AXIS SCALE / B-AXIS SCALE receptacle. The plug is on the side of the control cabinet. Pull the plug out of the hole.

Connect the 28-pin connector [2] from the rotary scale feedback cable to the receptacle. Use the (4) 4-40 screws [3].

2

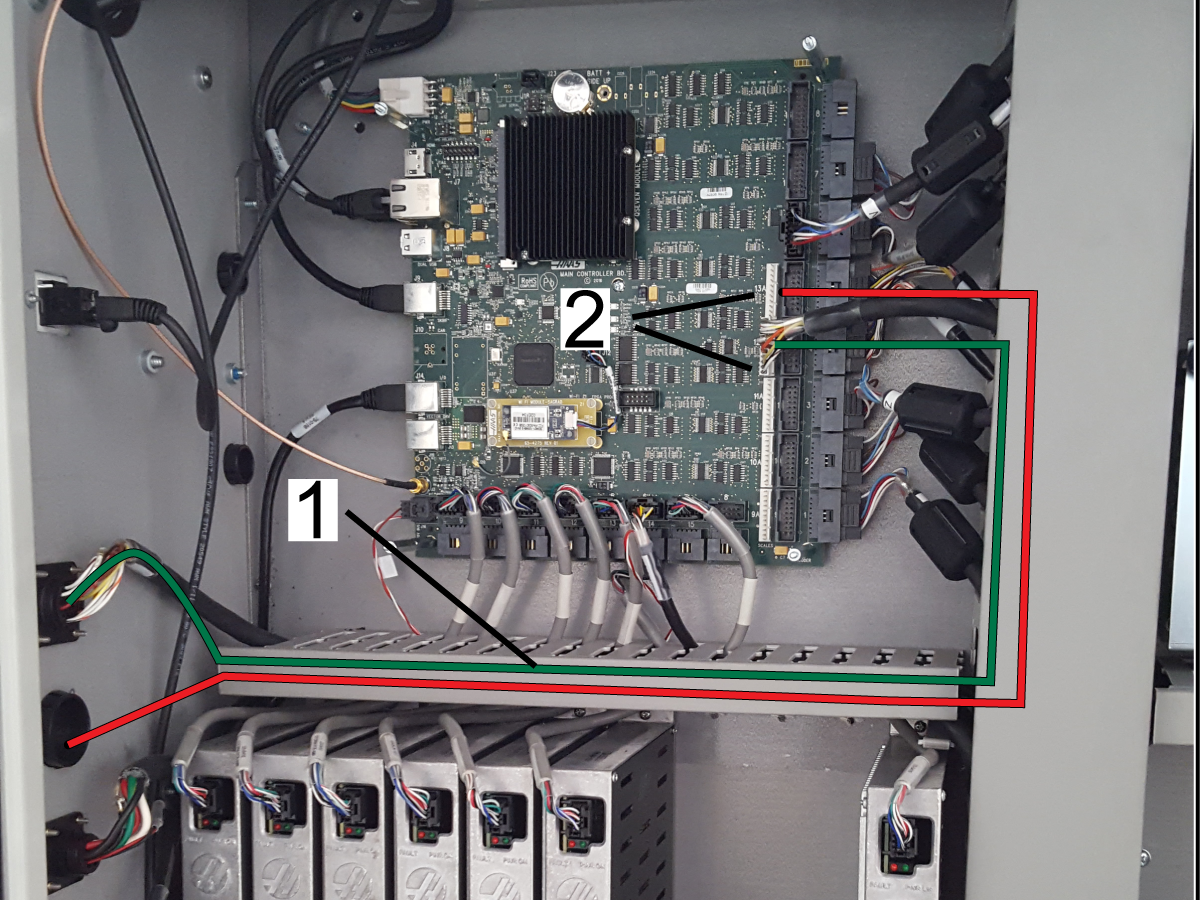
Remove the center cable track cover and the track cover below the MainCon PCB.

Remove the MainCon PCB cover.

Route the 4th-AXIS SCALE / A-AXIS SCALE or 5th-AXIS SCALE / B-AXIS SCALE cable [1] as shown.

Connect the 11-pin connector of the rotary scale feedback cable to the correct connector on the MainCon PCB:

  • 4th-AXIS SCALE / A-AXIS SCALE Scales Channel 12A (P36)
  • 5th-AXIS SCALE / B-AXIS SCALE Scales Channel 13A (P37)

Install the covers.

4th Drive - Installation - Mill

1

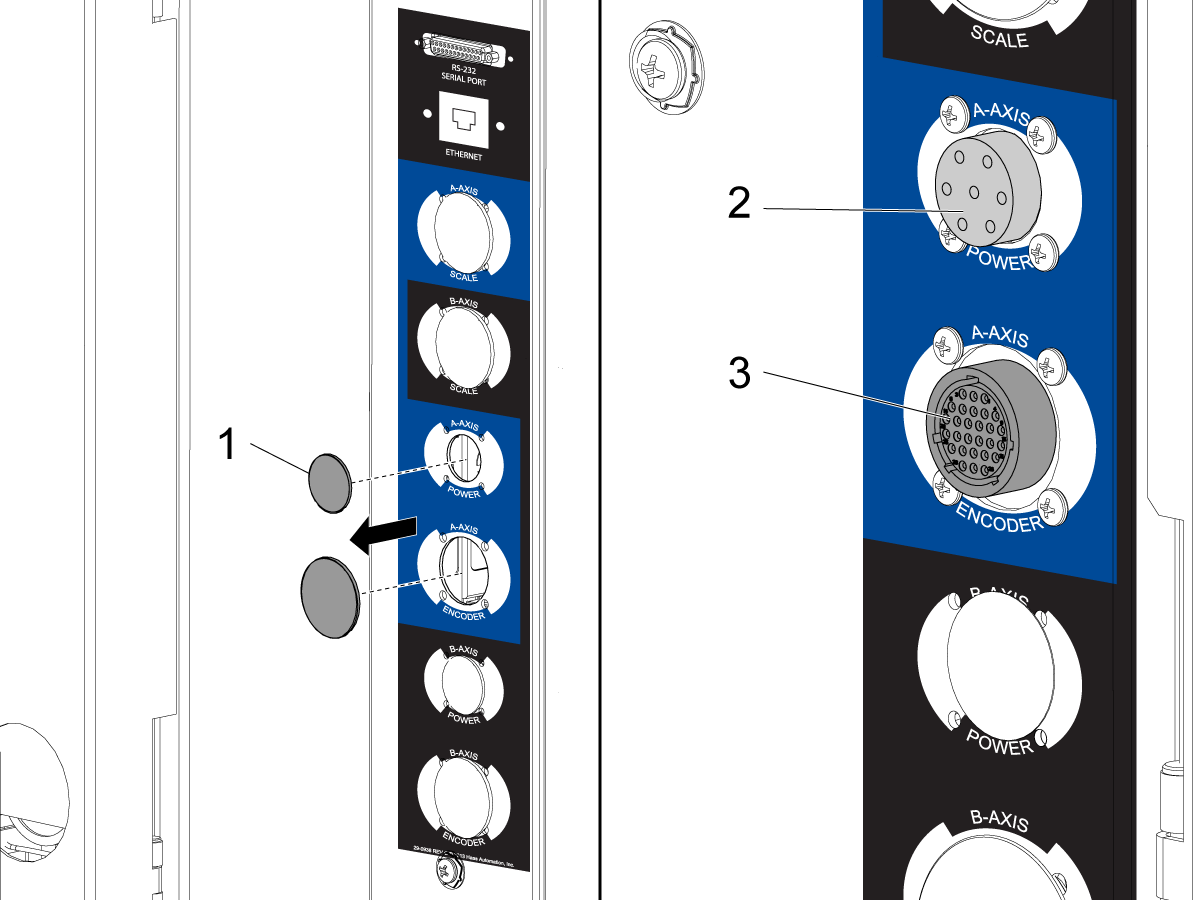
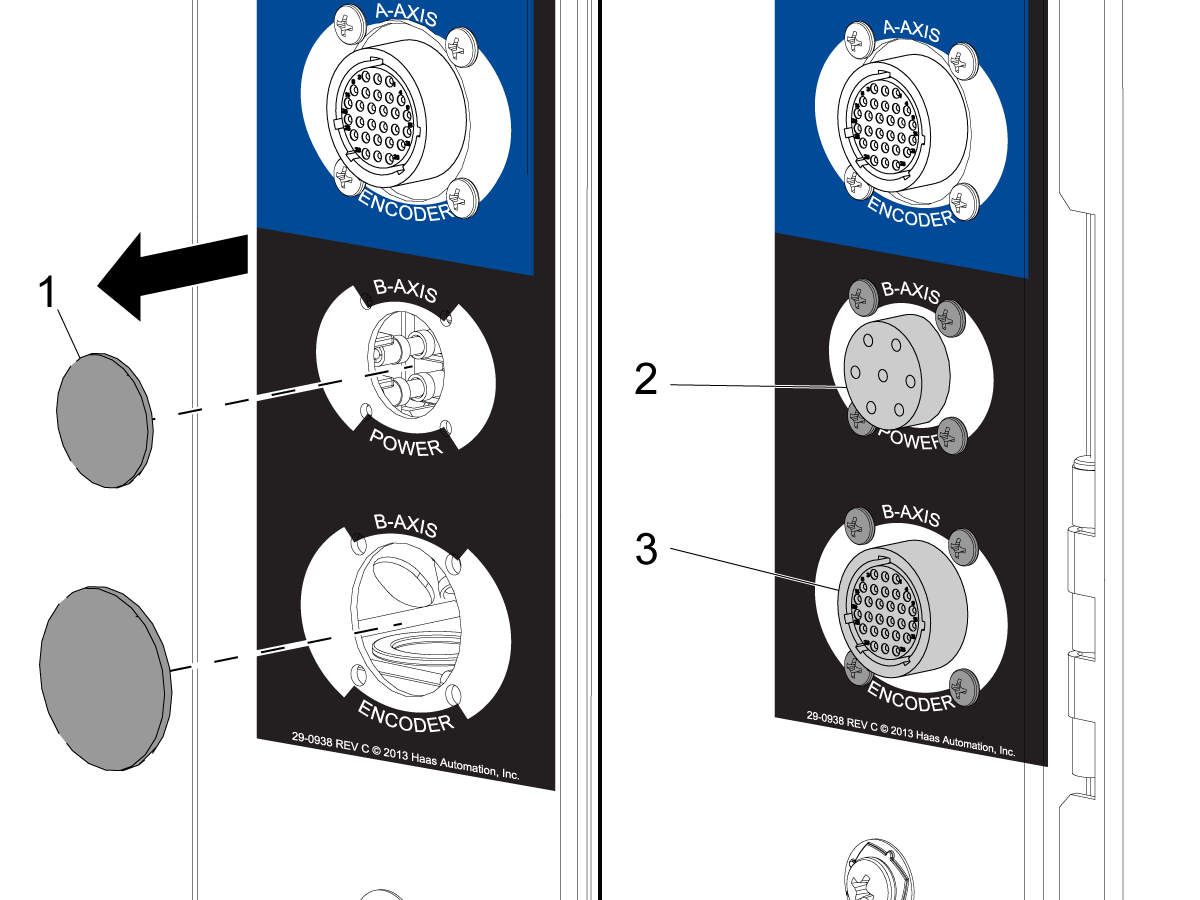
Find the (2) plugs [1] for the 4th-Axis / A-Axis receptacles. The plugs are on the side of the control cabinet. Push the plugs out of the holes.

Install the 7-pin power connector [2] into the receptacle that has the label 4th-AXIS POWER / A-AXIS POWER. Use the (4) screws.

Install the 28-pin encoder connector [3] in the receptacle that has the label 4th-AXIS ENCODER / A-AXIS POWER. Use the (4) screws.

Remove the I/O PCB cover.

Remove the Maincon PCB cover.

2

Find the location on the amplifier bank that has the A Axis / 4th Axis label. Install the amplifier for the fourth-axis drive at this location.

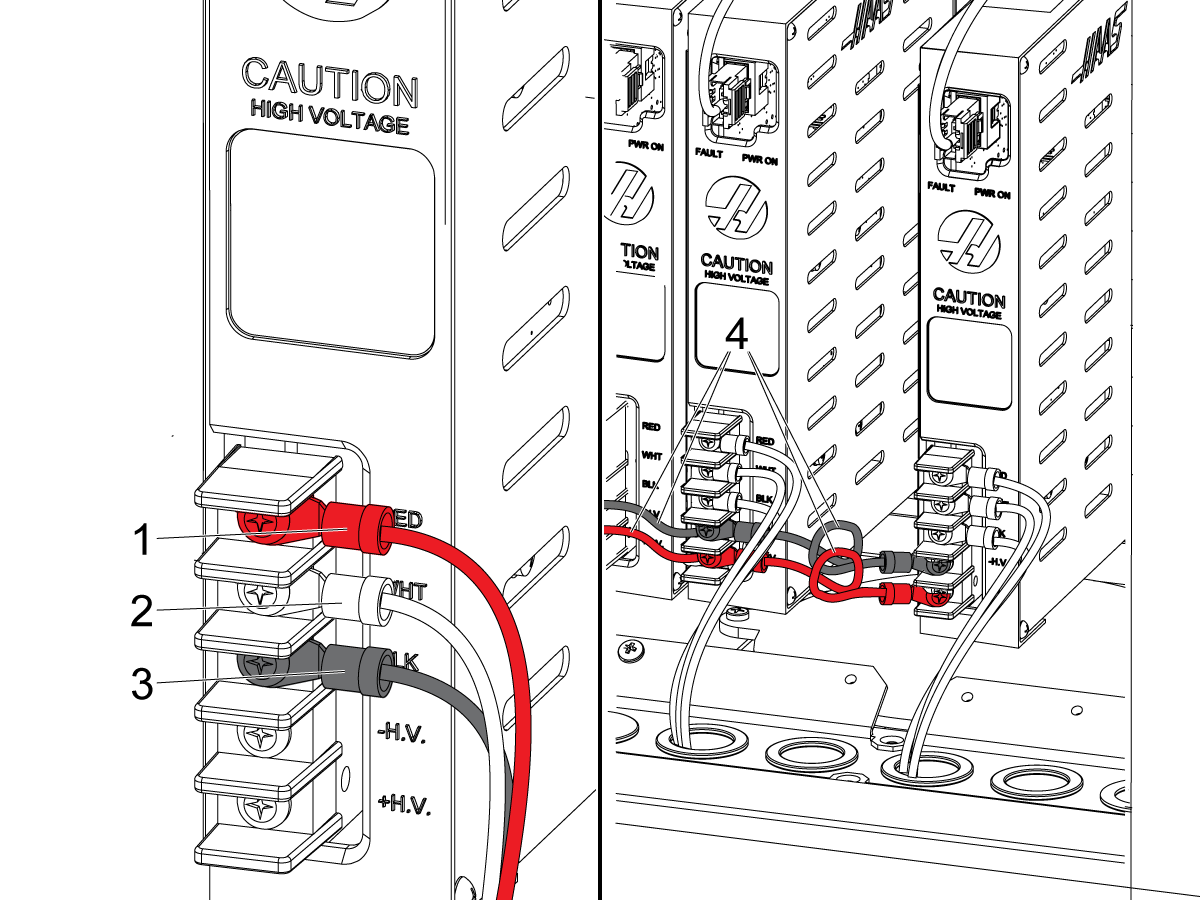
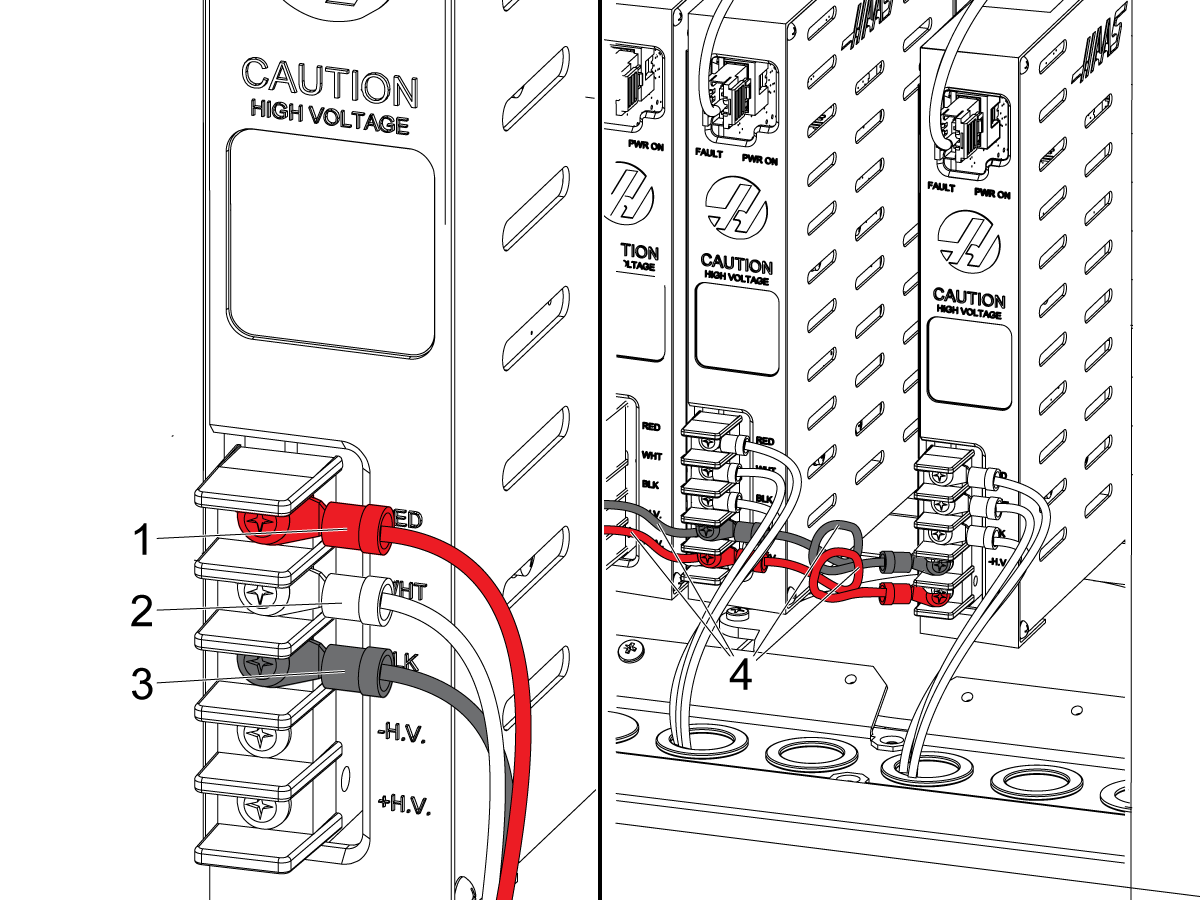
Connect the fourth-axis servo cable wires to the high-voltage terminals on the amplifier:

  • red to RED [1]
  • white to WHT [2]
  • black to BLK [3]

Connect jumpers [4] from the fourth-axis drive to the nearest amplifier on each side:

  • Connect the black wire to -H.V..
  • Connect the red wire to +H.V..

Put the cables in the cable tray.

3

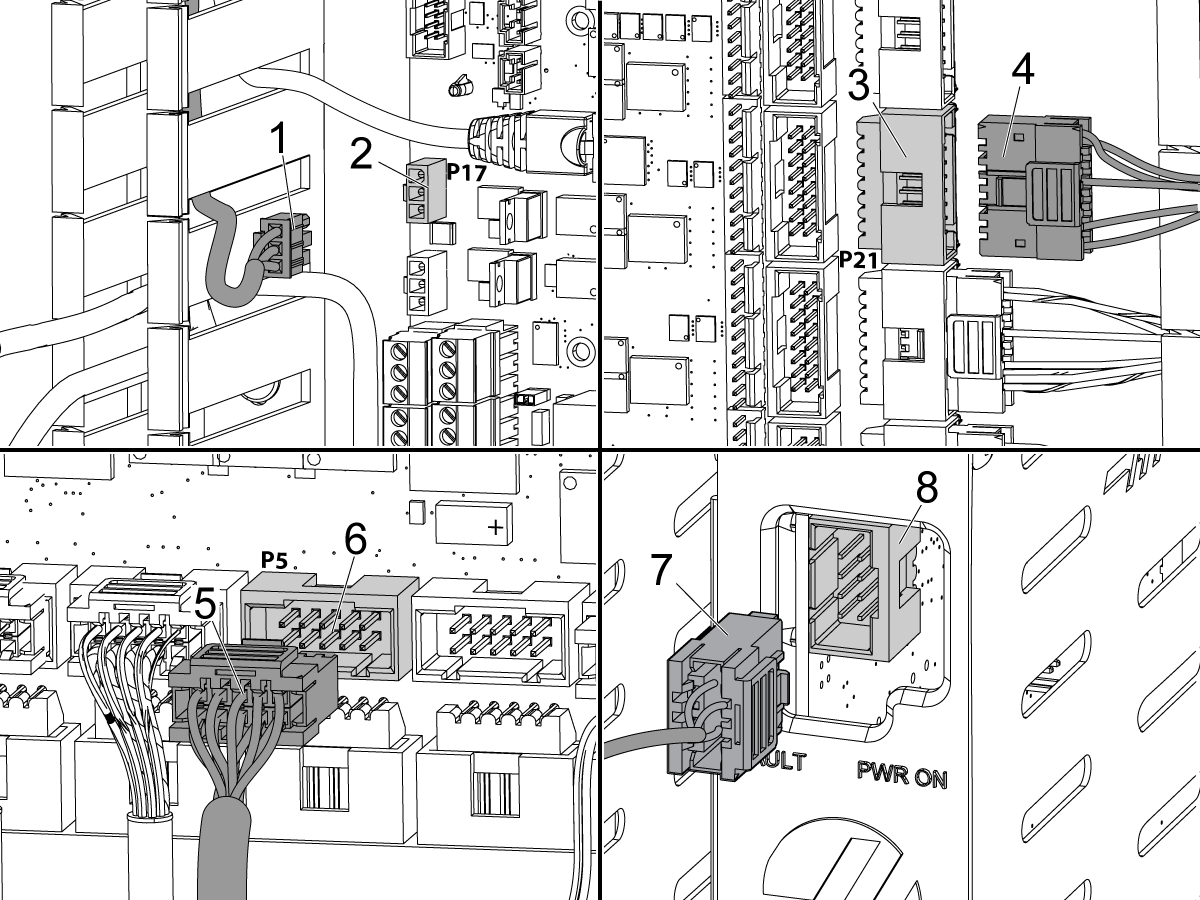
Connect the 3-pin connector [1] on the A-Axis brake cable to P16 [2] on the I/O PCB.

Connect the 16-pin connector [4] on the encoder cable to Encoder Channel 4 (P20) [3] on the Main Control PCB.

Connect the 8-pin connector [5] on the current-command cable to the Amplifier Channel 4 (P4) socket [6] of the Main Control PCB.

Connect the 8-pin connector [7] on the current-command cable to the ampifier [8].

4

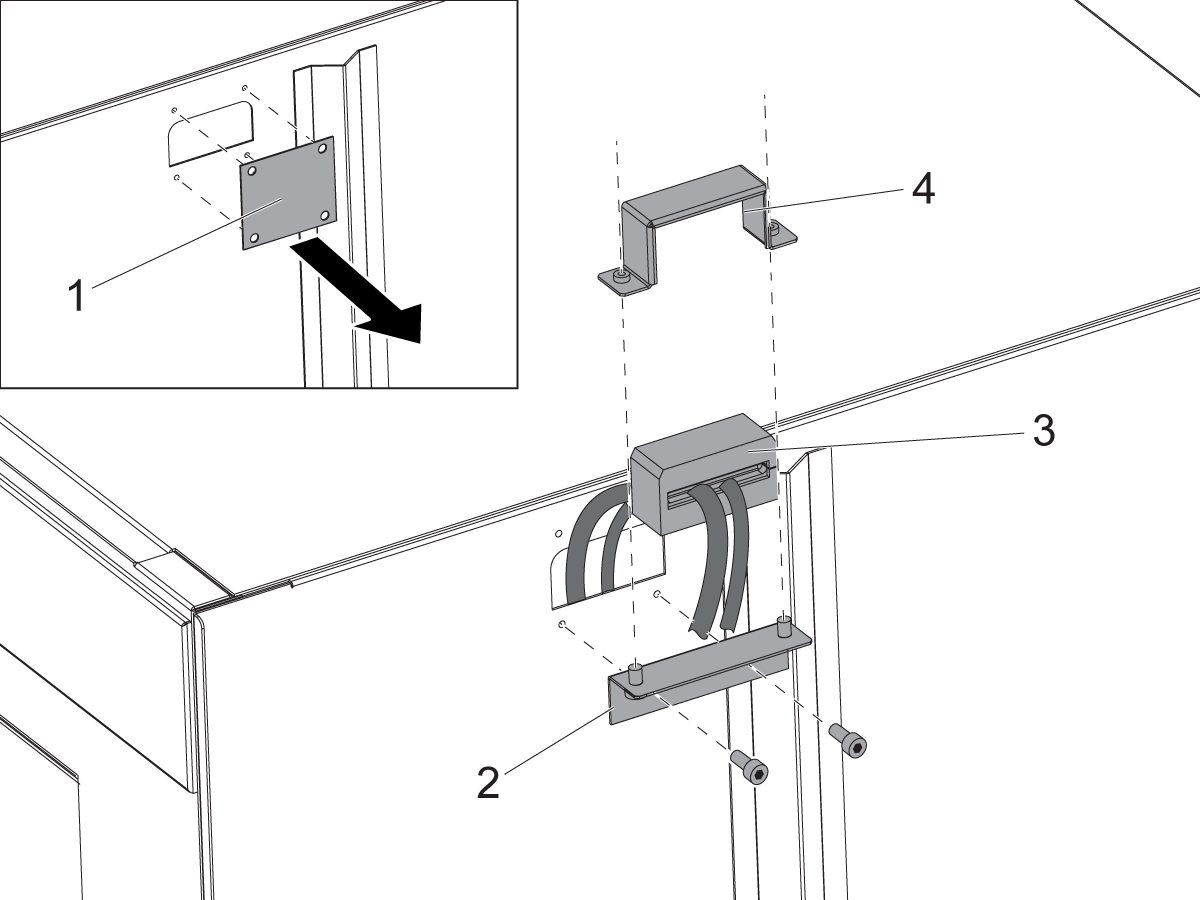
Remove the blanking plate [1].

Install the clamp block mount [2].

Put the rotary cables through the clamp block [3].

Install the clamp block retainer [4].

5

If you are not installing a fifth-axis drive, install the cover plates for the Maincon PCB and I/O PCB.

Set the main circuit breaker to the ON position.

Push [POWER ON].

Refer to: Next Generation Control - Option Activation Code to enable the fourth axis software.

5th Drive - Installation - Mill

1

Find the (2) plugs [1] for the 5th-Axis / B-Axis sockets. The plugs are on the side of the control cabinet. Pull the plugs out of the holes.

Install the 7-pin power connector [2] in the location that has the label 5th-AXIS POWER / B‑AXIS POWER. Use the (4) screws.

Install the 28-pin encoder connector [3] in the location that has the label 5th-AXIS ENCODER / B-AXIS ENCODER. Use the (4) screws.

Remove the I/O PCB cover.

Remove the Maincon PCB cover.

2

Find the location on the amplifier bank that has the B Axis label. Install the amplifier for the fifth-axis drive at this location.

Connect the fifth-axis servo cable wires to the high-voltage terminals on the amplifier:

  • red to RED [1]
  • white to WHT [2]
  • black to BLK [3]

Connect jumpers [4] from the fifth-axis drive to the nearest amplifier on each side:

  • Connect the black wire to -H.V..
  • Connect the red wire to +H.V..

Put the cables in the cable tray.

3

Connect the 3-pin connector [1] on the B-Axis brake cable to P17 [2] on the I/O PCB.

Connect the 16-pin connector [3] on the encoder cable to Encoder Channel 5 (P21) [4] on the MainCon PCB.

Connect the 10-pin connector [5] on the current-command cable to the Amplifier Channel 5 (P5) socket [6] of the MainCon PCB.

Connect the 8-pin connector [7] on the current-command cable to the ampifier [8].

4

Remove the blanking plate [1].

Install the clamp block mount [2].

Put the rotary cables through the clamp block [3].

Install the clamp block retainer [4].

5

Install the cover plates for the Maincon PCB and I/O PCB.

Set the main circuit breaker to the ON position.

Push [POWER ON].

Refer to: Next Generation Control - Option Activation Code to enable the fifth axis software.

Recently Viewed Items

You Have No Recently Viewed Items Yet

Feedback
Haas Logo

Haas Delivered Price

This price includes shipping cost, export and import duties, insurance, and any other expenses incurred during shipping to a location in France agreed with you as a buyer. No other mandatory costs can be added to the delivery of a Haas CNC Product.

KEEP UP WITH THE LATEST HAAS TIPS AND TECHNOLOGY...

Sign up now!   

HAAS TOOLING ACCEPTS THE FOLLOWING:

  • Service & Support
  • Owners
  • Request Service
  • Operator Manuals
  • Haas Parts

  • Rotary Repair Request
  • Pre-Install Guides
  • Shopping Tools
  • Build & Price a New Haas
  • Available Inventory
  • The Haas Price List
  • CNCA Financing
  • About Haas
  • Accessibility Statement
  • DNSH Statement
  • Export Compliance
  • Careers
  • Certifications & Safety
  • Contact Us
  • History
  • Terms & Conditions
  • Haas Tooling Terms & Conditions
  • Privacy
  • Warranty
  • Haas Community
  • Haas Certification Program
  • Haas Motorsports
  • Gene Haas Foundation
  • Haas Technical Education Community
  • Events
  • Join the Conversation
  • Facebook
  • X
  • Flickr
  • YouTube
  • LinkedIn
  • Instagram
  • TikTok
© 2026 Haas Automation, Inc – CNC Machine Tools

This site is protected by reCAPTCHA and the Google Privacy Policy and Terms of Service apply.

2800 Sturgis Rd., Oxnard, CA 93030
Toll Free: (888) 817-4446 / Fax: 805-278-8554