My Haas Welcome,
!
Haas Tooling MyHaas/HaasConnect Sign In Register Haas Tooling MyHaas/HaasConnect Sign Out Welcome, My Machines Latest Activity My Quotes My Account My Users Sign Out
Find Your Distributor
  1. Select Language
    1. English
    2. Deutsch
    3. Español - España
    4. Español - México
    5. Français
    6. Italiano
    7. Português
    8. Český
    9. Dansk
    10. Nederlands
    11. Magyar
    12. Polski
    13. Svenska
    14. Türkçe
    15. 中文
    16. Suomi
    17. Norsk
    18. الإنجليزية
    19. български
    20. Hrvatski
    21. Ελληνικά
    22. Română
    23. Slovenský
    24. Slovenščina
    25. 한국어
    26. 日本語
    27. Українська
  • machines Main Menu
    • Vertical Mills
      Vertical Mills
      Vertical Mills View All
      • Vertical Mills
      • VF Series
      • Universal Machines
      • VR Series
      • VP-5 Prismatic
      • Pallet-Changing VMCs
      • Mini Mills
      • Mold Machines
      • High-Speed Drill Centers
      • Drill/Tap/ Mill Series
      • Toolroom Mills
      • Pocket Mill
      • Compact Mills
      • Gantry Series
      • SR Sheet Routers
      • Extra-Large VMC
      • Double-Column Mills
      • 3+2 Positioning Machines
    • Multi-Axis Solutions
      Multi-Axis Solutions
      Multi-Axis Solutions View All
      • Multi-Axis Solutions
      • Y-Axis Lathes
      • 5-Axis Mills
    • Lathes
      Lathes
      Lathes View All
      • Lathes
      • ST Series
      • Dual-Spindle
      • Box Way Series
      • Toolroom Lathes
      • Chucker Lathe
      • Haas Bar Feeders
    • Horizontal Mills
      Horizontal Mills
      Horizontal Mills View All
      • Horizontal Mills
      • 50-Taper
      • 40-Taper
    • Rotaries & Indexers
      Rotaries & Indexers
      Rotaries & Indexers View All
      • Rotaries & Indexers
      • Rotary Tables
      • Indexers
      • 5-Axis Rotaries
      • Extra-Large Rotaries
    • Special Series
      Special Series
      Special Series View All
      • Special Series
      • EU_Series_Redirect
    • Automation Systems
      Automation Systems
      Automation Systems View All
      • Automation Systems
      • Mill Automation
      • Lathe Automation
      • Automatic Parts Loaders
      • Automation Models
    • Desktop Machines
      Desktop Machines
      Desktop Machines View All
      • Desktop Machines
      • Desktop Mill
      • Desktop Lathe
      • Control Simulator, Standard
      • Control Simulator, Premium
    • Shop Equipment
      Shop Equipment
      Shop Equipment View All
      • Shop Equipment
      • Knee Mill
      • Haas Manual Lathes
      • Haas Saws
    • Fabrication Machines
      Fabrication Machines
      Fabrication Machines View All
      • Fabrication Machines
      • Laser Cutting Machines
      • CNC Press Brakes
    • QUICK LINKS Special Series  Special Series 
      EU SERIES EU SERIES BUILD & PRICE | PRICE LIST BUILD & PRICE | PRICE LIST In-Stock Machines In-Stock Machines WHAT’S NEW WHAT’S NEW YOUR FIRST CNC YOUR FIRST CNC
      SHOPPING TOOLS
      • Build & Price a Haas
      • Price List
      • Available Inventory
      • CNCA Financing
      WANT TO TALK TO SOMEONE?

      A Haas Factory Outlet (HFO) can answer your questions, and walk you through your best options.

      CONTACT YOUR DISTRIBUTOR >
  • Options Main Menu
    • The Haas Control Value Option Packages
      Value Option Packages
      Value Option Packages View All
      • Value Option Packages
    • Product Image Spindles
      Spindles
      Spindles View All
      • Spindles
    • Product Image Tool Changers
      Tool Changers
      Tool Changers View All
      • Tool Changers
    • Product Image 4th- | 5th-Axis
      4th- | 5th-Axis
      4th- | 5th-Axis View All
      • 4th- | 5th-Axis
    • Product Image Turrets & Live Tooling
      Turrets & Live Tooling
      Turrets & Live Tooling View All
      • Turrets & Live Tooling
    • Product Image Probing
      Probing
      Probing View All
      • Probing
    • Haas Chip & Coolant Management Chip & Coolant Management
      Chip & Coolant Management
      Chip & Coolant Management View All
      • Chip & Coolant Management
    • The Haas Control The Haas Control
      The Haas Control
      The Haas Control View All
      • The Haas Control
    • Product Image Product Options
      Product Options
      Product Options View All
      • Product Options
    • Product Image Tooling & Fixturing
      Tooling & Fixturing
      Tooling & Fixturing View All
      • Tooling & Fixturing
    • Product Image Workholding
      Workholding
      Workholding View All
      • Workholding
    • Product Image 5-Axis Solutions
      5-Axis Solutions
      5-Axis Solutions View All
      • 5-Axis Solutions
      • 5 Easy Steps to 5-Axis
    • QUICK LINKS Special Series  Special Series 
      EU SERIES EU SERIES BUILD & PRICE | PRICE LIST BUILD & PRICE | PRICE LIST In-Stock Machines In-Stock Machines WHAT’S NEW WHAT’S NEW YOUR FIRST CNC YOUR FIRST CNC
      SHOPPING TOOLS
      • Build & Price a Haas
      • Price List
      • Available Inventory
      • CNCA Financing
      WANT TO TALK TO SOMEONE?

      A Haas Factory Outlet (HFO) can answer your questions, and walk you through your best options.

      CONTACT YOUR DISTRIBUTOR >
  • Why Haas Main Menu
      Discover the Haas Difference
    • Why Haas
    • MyHaas
    • Education Community
    • Industry 4.0
    • Haas Certification
    • Customer Testimonials
  • Service Main Menu
      Welcome to Haas Service
      SERVICE HOME Operator’s Manuals How-To Procedures Troubleshooting Guides Preventive Maintenance Haas Parts Haas Tooling Videos
  • Videos Main Menu
  • Main Menu
    • View All
    • View All
    • View All
    • View All
      • HTEC Curriculum Support
      • Haas Value Option Packages (VOP) Journey
    • View All
      • Haas 10 kg Cobot Package
      • Cobot Kits
      • DC-1 Drill Center
      • CNC Sales News
      • Do More With Your Haas
    • View All
    • View All
      • contact-us-test
      • 4 - AUTOMATION SYSTEMS
      • Carousel-V2
      • expert test
      • Demo_Day_Trident-test
      • Link Test
      • image-sale-tag-test
      • article-list-test
      • Haas 25 kg Robot Package
      • test-algolia-page
    • View All
    • View All
    • View All
    • View All
      • calc-test
    • View All
    • QUICK LINKS Special Series  Special Series 
      EU SERIES EU SERIES BUILD & PRICE | PRICE LIST BUILD & PRICE | PRICE LIST In-Stock Machines In-Stock Machines WHAT’S NEW WHAT’S NEW YOUR FIRST CNC YOUR FIRST CNC
      SHOPPING TOOLS
      • Build & Price a Haas
      • Price List
      • Available Inventory
      • CNCA Financing
      WANT TO TALK TO SOMEONE?

      A Haas Factory Outlet (HFO) can answer your questions, and walk you through your best options.

      CONTACT YOUR DISTRIBUTOR >
  • Haas Tooling Main Menu
  • Haas Service Parts Main Menu

My Haas Welcome,
!
Haas Tooling MyHaas/HaasConnect Sign In Register Haas Tooling MyHaas/HaasConnect Sign Out Welcome, My Machines Latest Activity My Quotes My Account My Users Sign Out
Find Your Distributor
  1. Select Language
    1. English
    2. Deutsch
    3. Español - España
    4. Español - México
    5. Français
    6. Italiano
    7. Português
    8. Český
    9. Dansk
    10. Nederlands
    11. Magyar
    12. Polski
    13. Svenska
    14. Türkçe
    15. 中文
    16. Suomi
    17. Norsk
    18. الإنجليزية
    19. български
    20. Hrvatski
    21. Ελληνικά
    22. Română
    23. Slovenský
    24. Slovenščina
    25. 한국어
    26. 日本語
    27. Українська
×

Search Results

Web Pages

Images

    • <
    • 1
    • >

ACME Screw Tailstock - Troubleshooting Guide - TG0022

Service Home ACME Screw Tailstock - Troubleshooting Guide - TG0022

ACME Screw Tailstock - Troubleshooting Guide - TG0022

- Jump to Cause - 1. Overview 2. Symptom Table 3. Quill Specification 4. ACME Screw Alignment (4 steps) 5. ACME Screw Wiper Installation Back to Top
Recently Updated Last updated: 10/08/2025

ACME Screw Tailstock - Troubleshooting Guide


TG0022

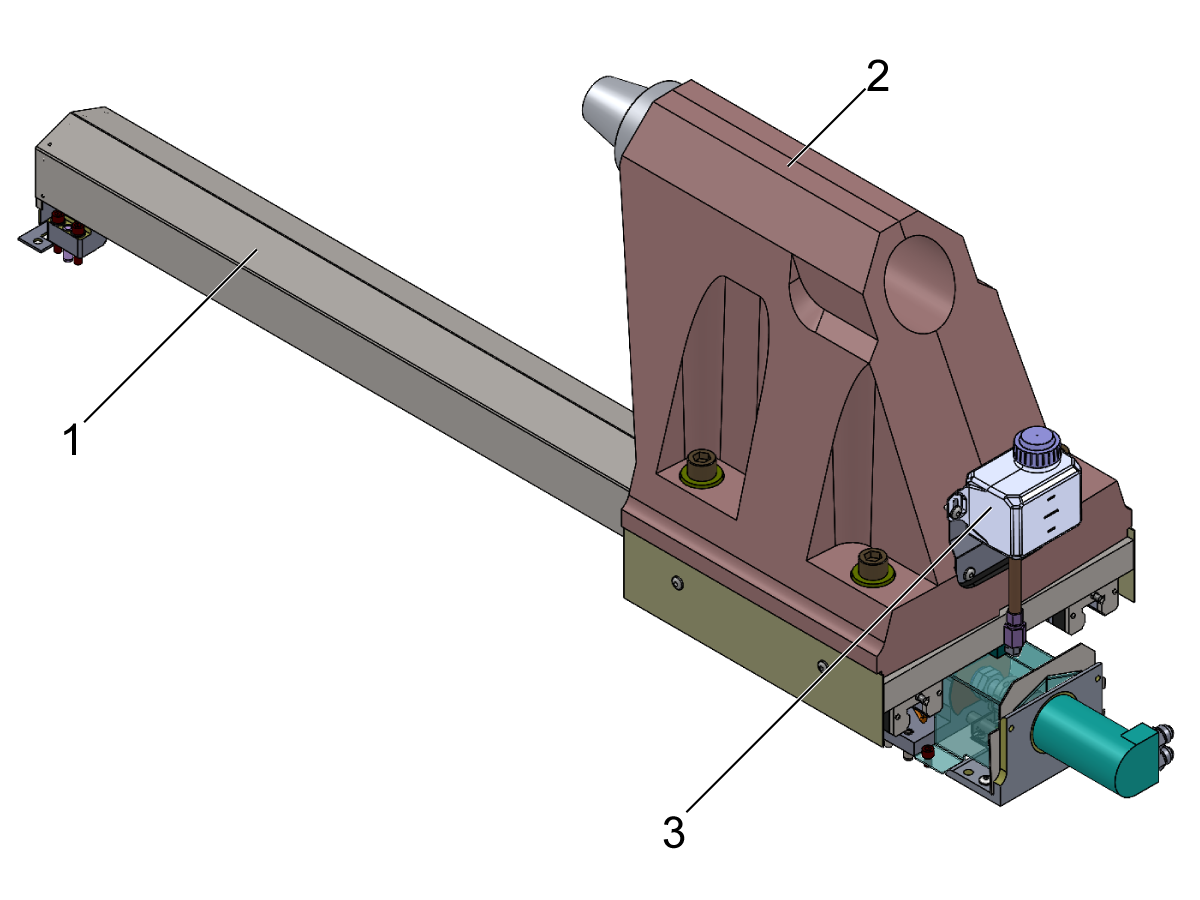
Overview

  1. ACME Screw cover
  2. Tailstock Body
  3. Tailstock Grease Reservoir
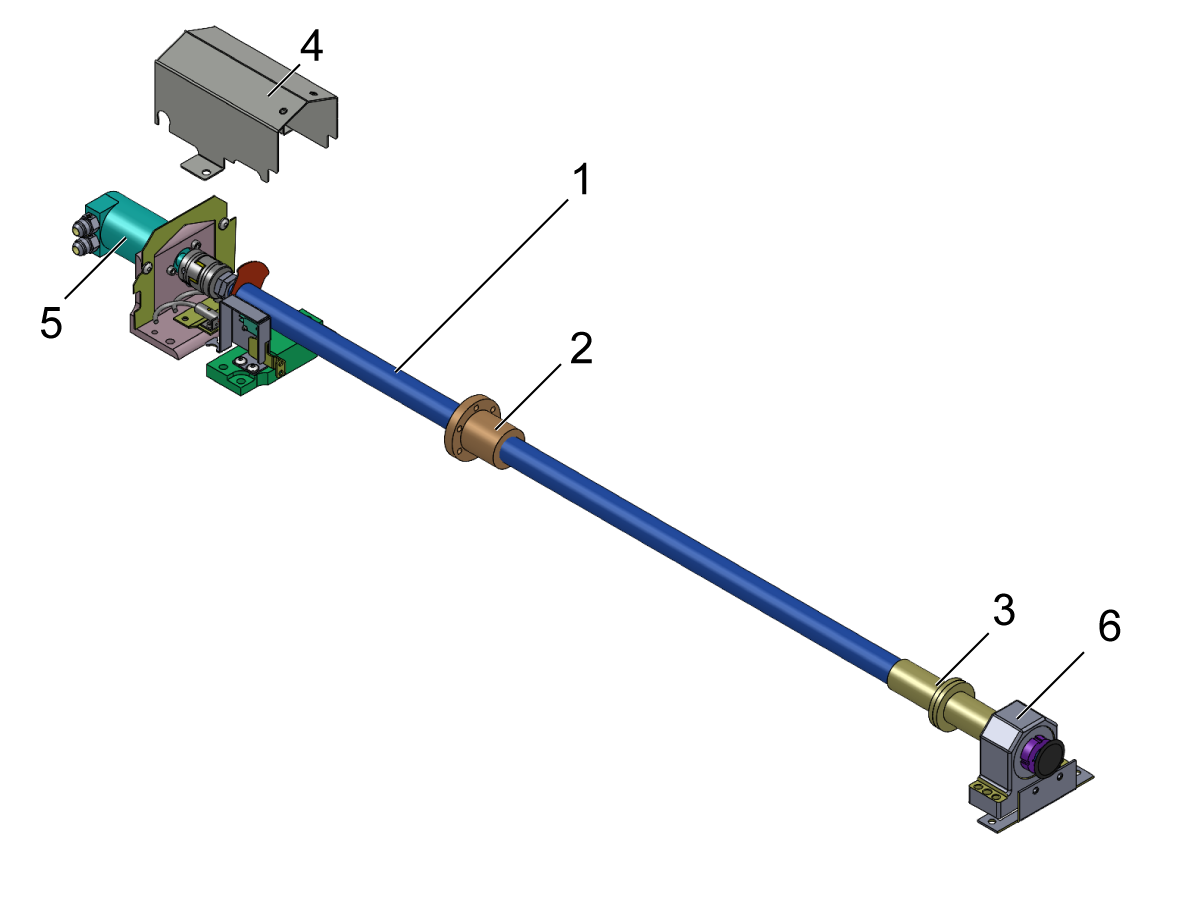
  1. ACME SCREW 1.25-5-47"-.625 R-ANC
  2. ACME SCREW NUT 1.25-5 X 2.5
  3. Ballscrew Bumper
  4. Tailstock motor cover
  5. Tailstock Hydraulic Motor
  6. ACME SCREW Bearing Housing Anchor
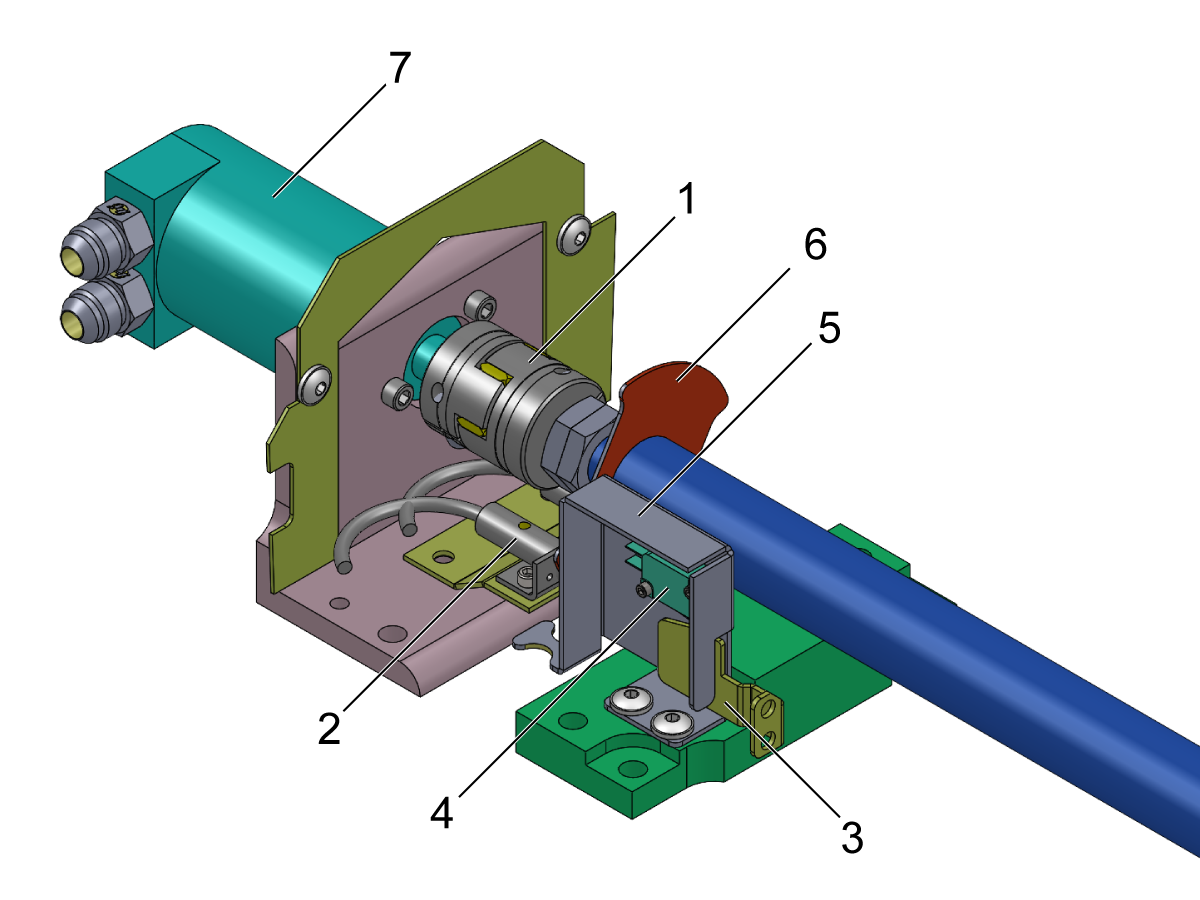
  1. Coupling Jaw Type 
  2. Proximity Sensors
  3. Microswitch Trip Flag
  4. Microswitch (Home Sensor)
  5. Microswitch Mount
  6. Proximity Sensor Trip Flag
  7. Hydraulic Tailstock Motor

Symptom Table

NOTE: This system is louder than other tailstock systems, due to the use of a hydraulic motor. This is normal operation and should not be disassembled for troubleshooting unless it is not positioning correctly.

Symptom Possible Cause Corrective Action
  • Excessive Noise from the tailstock
  • Mispositioning and backlash
  • Binding
  • Low hold force
The ACME Screw and ACME Nut are not lubricated. Clean and lubricate the ACME Screw and ACME Nut. Consider installing service kit P/N 93-4616 to upgrade the lubrication system. Refer to ST-20/30/L - Tailstock Forced Lubrication - AD0804 procedure.
The ACME Screw or ACME Nut are contaminated from chips.

Clean the ACME Screw and ACME Nut and check for damage and wear. Lubricate the screw after cleaning.

Install the B-Axis Protection Service Kit. Refer to the Lathe - B-Axis - Protection Service Kit - Installation procedure. If the Protection Kit was installed before the ACME Screw Wipers were included in the kit. Install 57-0939 to either side of the ACME Nut. Refer to the ACME Screw Wiper Installation section below.

Tailstock is jammed against a part. Remove tailstock ACME Screw front cap and turn the ACME Screw to unjam it. Reduce tailstock hydraulic pressure to 250 psi. There is no need to loosen the hydraulic hoses.
The ACME screw nut may have failed.

Inspect the ACME Screw Nut for damaged threads.  Replace the ACME screw nut if damaged.

Note: Before installing, clean the ACME screw and grease before reassembly.

Install the B-Axis Protection Service Kit. Refer to the Lathe - B-Axis - Protection Service Kit - Installation procedure. If the Protection Kit was installed before the ACME Screw Wipers were included in the kit. Install 57-0939 to either side of the ACME Nut. Refer to the ACME Screw Wiper Installation section below.

ACME Screw Misalignment

Check the ACME Screw Alignment. Refer to the ACME Screw Alignment section below.

ACME Screw Nut Housing part geometry

Check the ACME Screw Alignment. Refer to the ACME Screw Alignment section below.

Tapering on Tailstock supported parts Quill pre-load out of specification / Excessive play Check the Quill is within specification. Refer to the Quill Specification section below.
The tailstock zero returns in the wrong direction.  Or the Tailstock mispositions. The tailstock home sensor or trip flag has been damaged from chips.

Clean the ACME Screw and ACME Nut and check for damage and wear. Grease the screw after cleaning.

Inspect the tailstock home sensor and trip flag.  If the trip flag has been failing due to chip build-up install service kit P/N: 93-3393 tailstock home switch retrofit kit. Refer to the Tailstock Home Switch Retrofit - Installation procedure. Only applies to ST-20/25/28 machines built with 20-7462E BASE ST-20 MACH from 07/08/2021 to 09/16/2021 and ST-30/35 machines built with 20-7625D BASE ST-30 MACH from 12/01/2020 to 08/17/2021.

Install the B-Axis Protection Service Kit. Refer to the Lathe - B-Axis - Protection Service Kit - Installation procedure. If the Protection Kit was installed before the ACME Screw Wipers were included in the kit. Install 57-0939 to either side of the ACME Nut. Refer to the ACME Screw Wiper Installation section below.

The Tailstock pressure does not adjust. The Programmable Pressure Motor does not turn. Check electrical connections to the pressure switch or motor or for failed hardware such as the pressure valve, hydraulic motor, or coupler. Follow the Programmable Pressure Adjustment Valve - Troubleshooting Guide.
Alarm 9505 or 9505.001 COMMANDED PRESSURE NOT REACHED. The commanded device pressure was not reached within the specified timeout.  Check electrical connections to the pressure switch or motor or for failed hardware such as the pressure valve, hydraulic motor, or coupler. Follow the Programmable Pressure Adjustment Valve - Troubleshooting Guide.
Alarm 437 TAILSTOCK UNDERSHOOT The tailstock did not reach the commanded position. The encoder data isn’t being read during a zero return.

Clean the ACME Screw and ACME Nut and check for damage and wear. Grease the screw after cleaning.

Check the proximity switches and encoder switch trip flag are not obstructed or misaligned from chip build up. Verify the proximity sensors are working correctly. Follow the Proximity Sensor - Troubleshooting Guide. Inspect the tailstock encoder assembly and trip flag. If the encoder is failing due to chip build-up, then clean the encoder area from any debris. For ST-20/30 Series Machines, new encoder brackets will need to be ordered to fix any chip build-up. Refer to: HSG-N 05-29-2024.

  • Check that the values of Setting 341 and 342 (on the user position tab) are correct for the part
  • Check that the part is seated correctly in the chuck.
  • Check that the tailstock was not blocked by the tool turret or another solid object in the machine.
  • For a hydraulic tailstock, check that tailstock hydraulic pressure is not too low.
  • Check the solenoids are operating correctly.
  • Check the ACME Screw Alignment section below.

Inspect the tailstock home sensor and trip flag.  If the trip flag has been failing due to chip build-up install service kit P/N: 93-3393 tailstock home switch retrofit kit. Refer to the Tailstock Home Switch Retrofit - Installation procedure. Only applies to ST-20/25/28 machines built with 20-7462E BASE ST-20 MACH from 07/08/2021 to 09/16/2021 and ST-30/35 machines built with 20-7625D BASE ST-30 MACH from 12/01/2020 to 08/17/2021.

Alarm 6.9107 B (TAILSTOCK) CHECK YOUR HOME SWITCH The tailstock did not reach the commanded position because encoder data isn’t being read during a zero return.

Note: For software versions 100.23.000.1000 and later, alarm 437 TAILSTOCK UNDERSHOOT will generate in the event encoder data isn’t being read during a zero return.

Clean the ACME Screw and ACME Nut and check for damage and wear. Grease the screw after cleaning.

Check the proximity switches and encoder switch trip flag are not obstructed or misaligned from chip build up. Verify the proximity sensors are working correctly. Follow the Proximity Sensor - Troubleshooting Guide. Inspect the tailstock encoder assembly and trip flag. If the encoder is failing due to chip build-up install the B-Axis Protection Service Kit. Refer to the Lathe - B-Axis - Protection Service Kit - Installation procedure. If the Protection Kit was installed before the ACME Screw Wipers were included in the kit. Install 57-0939 to either side of the ACME Nut. Refer to the ACME Screw Wiper Installation section below.

Home switch not transitioning off/on the home position.

Clean the ACME Screw and ACME Nut and check for damage and wear. Grease the screw after cleaning.

Check the home switch trip flag to make sure it is not obstructed or misaligned. Inspect the tailstock home sensor and trip flag. If the trip flag has been failing due to chip build-up install service kit P/N: 93-3393 tailstock home switch retrofit kit. Refer to the Tailstock Home Switch Retrofit - Installation procedure. Only applies to ST-20/25/28 machines built with 20-7462E BASE ST-20 MACH from 07/08/2021 to 09/16/2021 and ST-30/35 machines built with 20-7625D BASE ST-30 MACH from 12/01/2020 to 08/17/2021.

Install the B-Axis Protection Service Kit. Refer to the Lathe - B-Axis - Protection Service Kit - Installation procedure. If the Protection Kit was installed before the ACME Screw Wipers were included in the kit. Install 57-0939 to either side of the ACME Nut. Refer to the ACME Screw Wiper Installation below.

Motor coupler cracks. When reinstalling the coupler the M6 screws are over torqued. Torque the coupler hardware to the correct torque specification 10 ft-lbs.
Tailstock gets stuck on the part and it will not retract when the tailstock is engaged at full hydraulic pressure. Tailstock settings may not be set correctly. Verify that settings 105 - TailStock Retract Distance, 341 - Tailstock Rapid Position, and 342 - Tailstock Advance Distance are correct.

Quill Specification

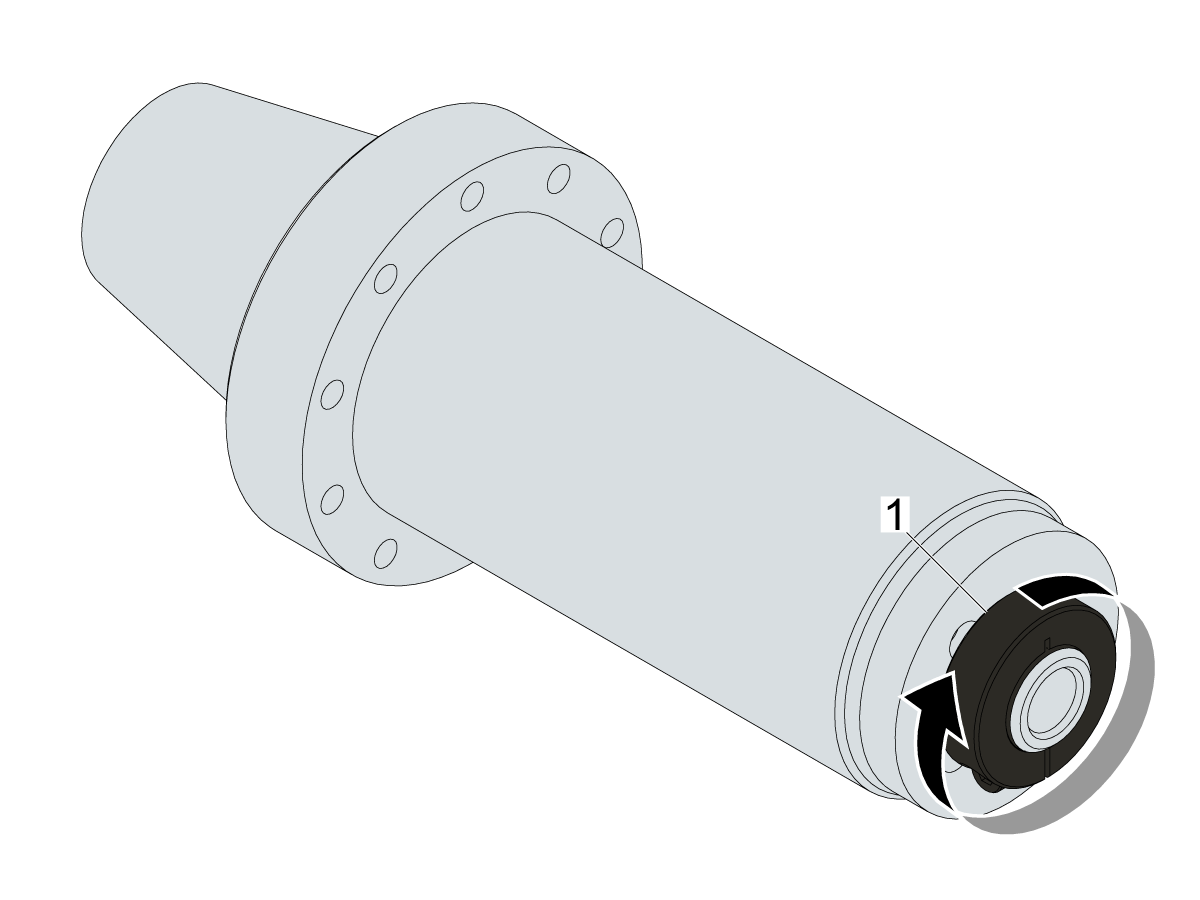
Quill Assembly Components :

  1. Quill
  2. O-ring
  3. Quill Liner
  4. Quill Isolator Pads
  5. Quill Retainer
  6. Clamp Collar

Overtime due to the compressive forces exerted on the quill assembly the quill isolator pads deform and become thinner which allows the quill to rotate when it is not compressed.

The quill assembly should not rotate if less than 70 in-lbs (7.91 Nm) of torque is applied to them.

If the quill rotates follow these steps to rebuild it.

  1. Loosen the pinch bolt on the clamp collar
  2. Tighten the clamp collar
  3. Re-torque the pinch bolt
  4. Check the quill again and repeat as needed

Important : Do not overtighten the clamp collar it is only meant to be finger tightened plus an additional 1/8th of a turn.

Note: The clamp collar is pinch bolt is torques to 15 ft-lbs (20.34 Nm).

To test if the quill assembly is damaged / out of spec clamp a work piece [1]  between the chuck and tailstock then use a scale to exert 60 lbs (81.3 Nm) of pull and push force at the tailstock [2] and measure the deflection using an indicator [3].

Note : Ensure that the tailstock pressure is set to 200 PSI (13.7895 Bar).

Deflection NTE 0.0014"(0.03556 mm).

ACME Screw Alignment

1

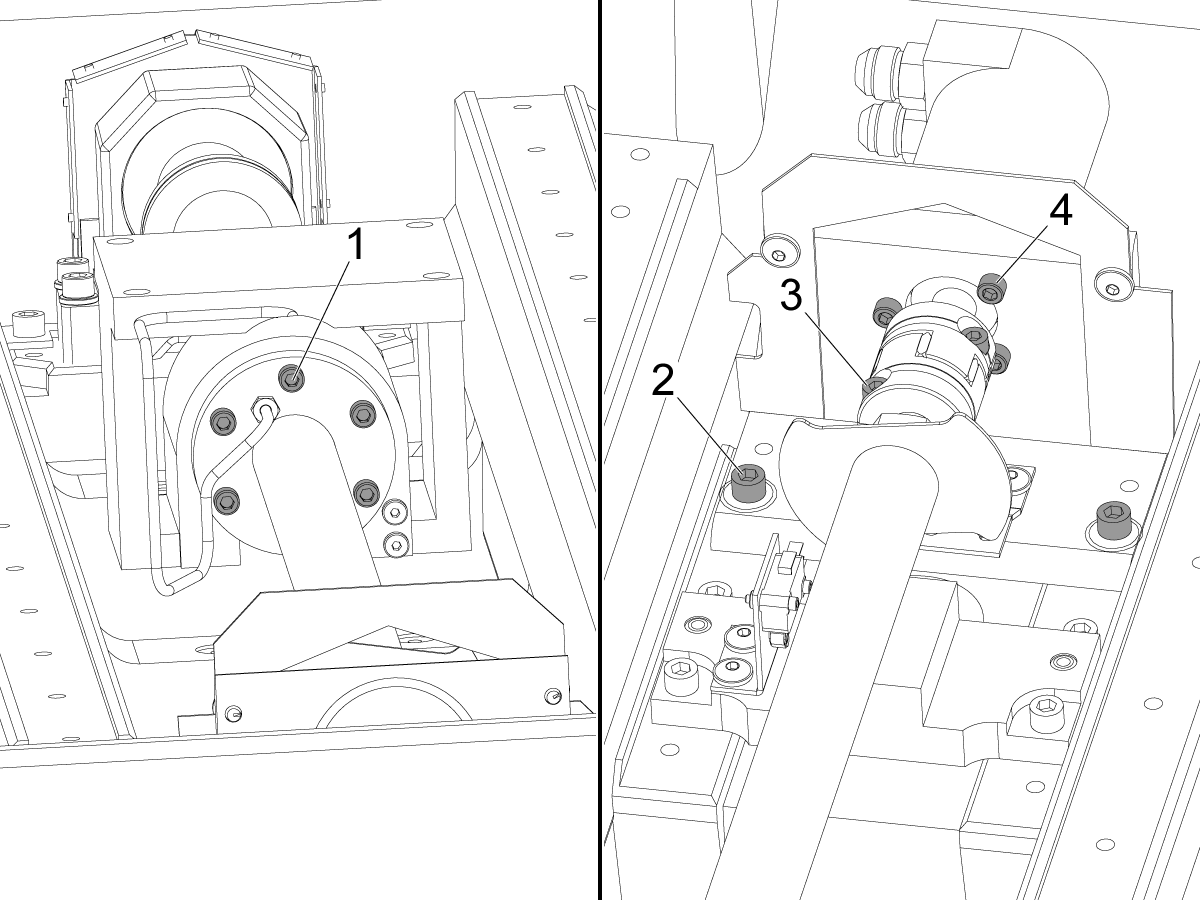
Disconnect the Hydraulic Motor Hoses. Using a collar nut tool and a drill, drive the riser assembly to the motor side of the screw. Loosen all the bolts below and make them finger tight:

  • ACME Nut to ACME Nut Housing[1]
  • Motor Mount[2]
  • Motor Coupler Pinch Bolts[3]
  • Motor Bolts[4]

Torque the bolts in the following order:

  • ACME Nut to ACME Nut Housing[1]

Using a collar nut tool and a drive. Run the ACME screw back and forth +/- 2 inches.

  • Motor Mount[2]
  • Motor Coupler Pinch Bolts[3] (10 ft-lbs) 

Using a collar nut tool and a drive. Run the ACME screw back and forth +/- 2 inches

  • Motor Bolts[4]

2

Reconnect the Hydraulic Motor Hoses.

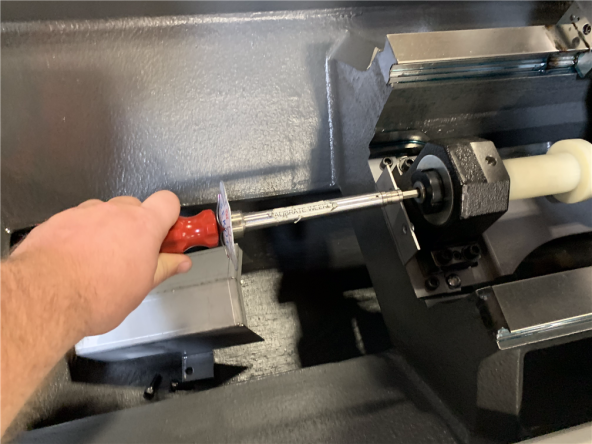
Use the hand torque meter to test the breakaway torque of the B-Axis at the start middle and end of travel. NTE 15 in-lbs.

If the torque exceeds 15 in-lbs. Continue the ACME Screw alignment.

3

Remove the Grease Reservoir if installed. Remove the tailstock quill assembly to install a sling through the bore. Remove the tailstock casting to access the ACME Screw Housing hardware.

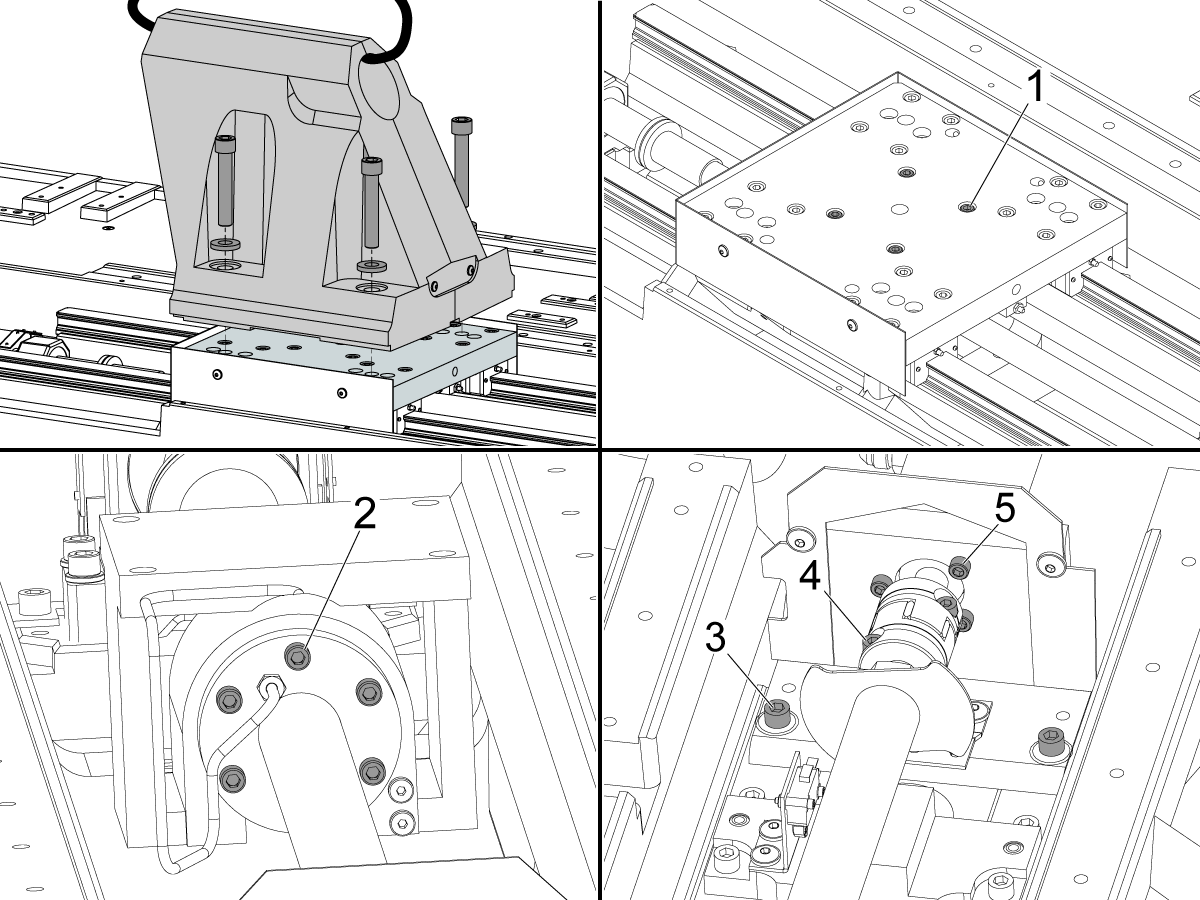
Disconnect the Hydraulic Motor Hoses. Using a collar nut tool and a drill, drive the riser assembly to the motor side of the screw. Loosen all the bolts below and make them finger tight:

  • ACME Nut Housing to Tailstock Riser[1]
  • ACME Nut to ACME Nut Housing[2]
  • Motor Mount[3]
  • Motor Coupler Pinch Bolts[4]
  • Motor Bolts[5]

Torque the bolts in the following order:

  • ACME Nut Housing to Tailstock Riser[1]
  • ACME Nut to ACME Nut Housing[2]

Using a collar nut tool and a drive. Run the ACME screw back and forth +/- 2 inches.

  • Motor Mount[3]
  • Motor Coupler Pinch Bolts[4] (10 ft-lbs) 

Using a collar nut tool and a drive. Run the ACME screw back and forth +/- 2 inches

  • Motor Bolts[5]

4

Reconnect the Hydraulic Motor Hoses.

Use the hand torque meter to test the breakaway torque of the B-Axis at the start middle and end of travel. NTE 15 in-lbs.

If the torque exceeds 15 in-lbs replace the ACME Screw Nut Housing.

ACME Screw Wiper Installation

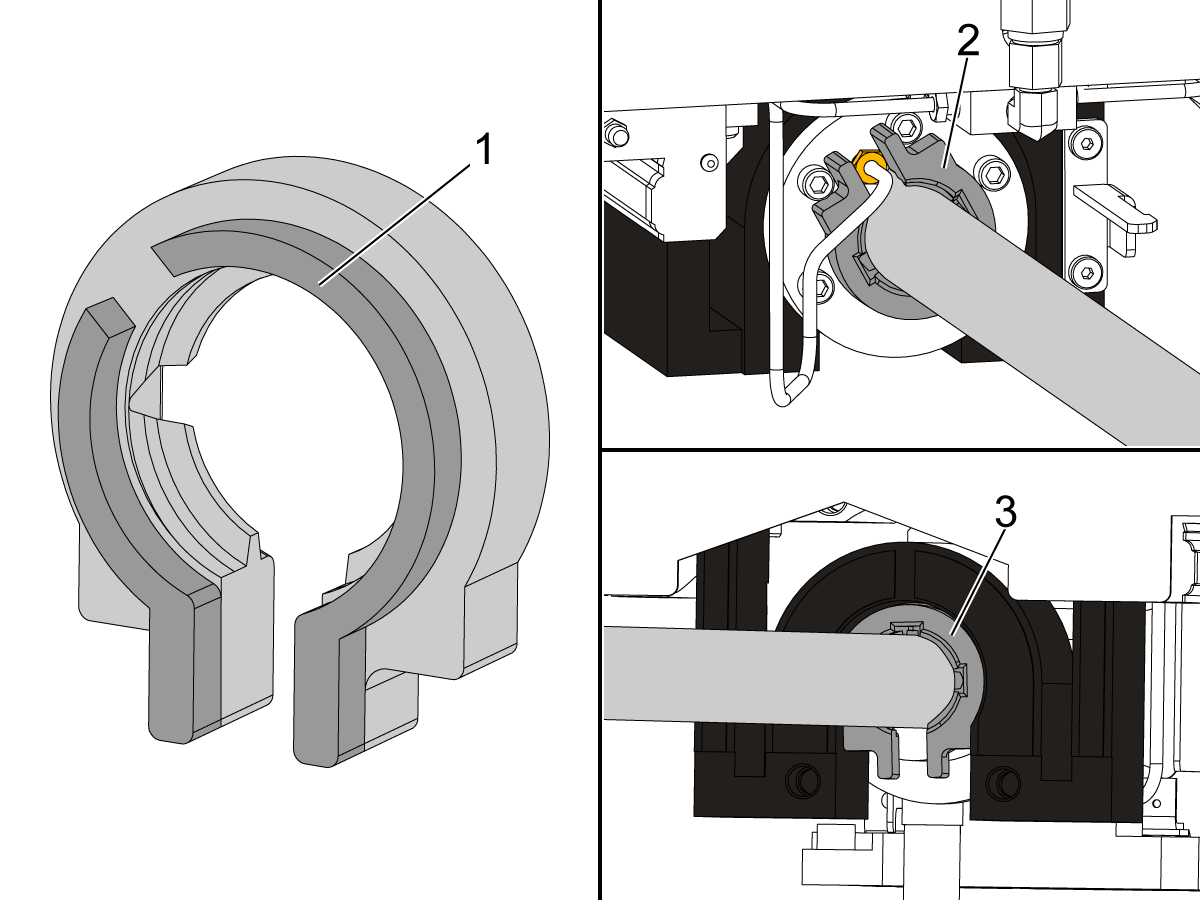
Install the each wiper so that the side with the shoulder[1] faces the ACME Nut.

Install the motor side wiper[2] against the ACME Nut with the ACME Nut grease fitting in the middle of the slot.

Install the support side wiper[3] against the ACME Nut with the slot facing down.

Tailstock Hydraulic Motor - Axis Movement Noise Reference

The following service video shows a tailstock hydrualic motor axis movement noise for reference.  

Recently Viewed Items

You Have No Recently Viewed Items Yet

Feedback
Haas Logo

Haas Delivered Price

This price includes shipping cost, export and import duties, insurance, and any other expenses incurred during shipping to a location in France agreed with you as a buyer. No other mandatory costs can be added to the delivery of a Haas CNC Product.

KEEP UP WITH THE LATEST HAAS TIPS AND TECHNOLOGY...

Sign up now!   

HAAS TOOLING ACCEPTS THE FOLLOWING:

  • Service & Support
  • Owners
  • Request Service
  • Operator Manuals
  • Haas Parts

  • Rotary Repair Request
  • Pre-Install Guides
  • Shopping Tools
  • Build & Price a New Haas
  • Available Inventory
  • The Haas Price List
  • CNCA Financing
  • About Haas
  • Accessibility Statement
  • DNSH Statement
  • Export Compliance
  • Careers
  • Certifications & Safety
  • Contact Us
  • History
  • Terms & Conditions
  • Haas Tooling Terms & Conditions
  • Privacy
  • Warranty
  • Haas Community
  • Haas Certification Program
  • Haas Motorsports
  • Gene Haas Foundation
  • Haas Technical Education Community
  • Events
  • Join the Conversation
  • Facebook
  • X
  • Flickr
  • YouTube
  • LinkedIn
  • Instagram
  • TikTok
© 2026 Haas Automation, Inc – CNC Machine Tools

This site is protected by reCAPTCHA and the Google Privacy Policy and Terms of Service apply.

2800 Sturgis Rd., Oxnard, CA 93030
Toll Free: (888) 817-4446 / Fax: 805-278-8554