×

Search Results

Web Pages

Images

    • <
    • 1
    • >
  • machines
    • Haas Vertical Mills
      Vertical Mills
      • Vertical Mills
      • VF Series
      • Universal Machines
      • VR Series
      • Pallet-Changing VMCs
      • Mini Mills
      • Mold Machines
      • Drill/ Tap/ Mill Series
      • Toolroom Mills
      • Compact Mills
      • Gantry Series
      • Vertical Mill/Turn
      • Extra-Large VMC
      • Double-Column Mills
      • Desktop Mill
      • Mill Auto Parts Loader
    • Product Image
      Multi-Axis Solutions
      • Multi-Axis Solutions
      • 5-Axis Mills
      • Y-Axis Lathes
    • Haas Lathes
      Lathes
      • Lathes
      • ST Series
      • Dual-Spindle
      • Toolroom Lathes
      • Chucker Lathe
      • Haas Bar Feeder V2
      • Lathe Auto Parts Loader
    • Haas Horizontal Mills
      Horizontal Mills
      • Horizontal Mills
      • 50-Taper
      • 40-Taper
    • Haas Rotaries & Indexers
      Rotaries & Indexers
      • Rotaries & Indexers
      • Rotary Tables
      • Indexers
      • 5-Axis Rotaries
      • Extra-Large Rotaries
    • Product Image
      Automation Systems
      • Automation Systems
      • Robot Systems
      • Automatic Parts Loaders
      • Pallet-Pool Systems
      • Haas Bar Feeder
      • Models
    • QUICK LINKS Special Series  Special Series 
      HAAS CAREERS HAAS CAREERS BUILD & PRICE BUILD & PRICE PRICE LIST PRICE LIST WHAT’S NEW WHAT’S NEW YOUR FIRST CNC YOUR FIRST CNC HAAS SIX PACK HAAS SIX PACK
      SHOPPING TOOLS
      • Build & Price a Haas
      • Price List
      • Available Inventory
      • CNCA Financing
      WANT TO TALK TO SOMEONE?

      A Haas Factory Outlet (HFO) can answer your questions, and walk you through your best options.

      CONTACT YOUR DISTRIBUTOR >
  • Options
    • Product Image
      Spindles
      • Spindles
    • Product Image
      Tool Changers
      • Tool Changers
    • Product Image
      4th- | 5th-Axis
      • 4th- | 5th-Axis
    • Product Image
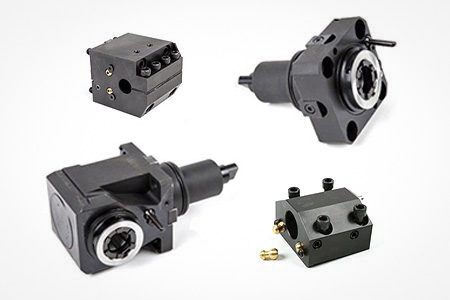
      Turrets & Live Tooling
      • Turrets & Live Tooling
    • Product Image
      Probing
      • Probing
    • Haas Chip & Coolant Management
      Chip & Coolant Management
      • Chip & Coolant Management
    • The Haas Control
      The Haas Control
      • The Haas Control
    • Product Image
      Product Options
      • Product Options
    • Product Image
      Tooling & Fixturing
      • Tooling & Fixturing
    • Product Image
      Workholding
      • Workholding
    • Product Image
      5-Axis Solutions
      • 5-Axis Solutions
      • 5 Easy Steps to 5-Axis
    • Product Image
      Automation
      • Automation
    • QUICK LINKS Special Series  Special Series 
      HAAS CAREERS HAAS CAREERS BUILD & PRICE BUILD & PRICE PRICE LIST PRICE LIST WHAT’S NEW WHAT’S NEW YOUR FIRST CNC YOUR FIRST CNC HAAS SIX PACK HAAS SIX PACK
      SHOPPING TOOLS
      • Build & Price a Haas
      • Price List
      • Available Inventory
      • CNCA Financing
      WANT TO TALK TO SOMEONE?

      A Haas Factory Outlet (HFO) can answer your questions, and walk you through your best options.

      CONTACT YOUR DISTRIBUTOR >
  • Why Haas
      Discover the Haas Difference
      Why Haas MyHaas Education Community Industry 4.0 Haas Certification Customer Testimonials
  • Service
      Welcome to Haas Service
      SERVICE HOME Operator’s Manuals How-To Procedures Troubleshooting Guides Preventive Maintenance Haas Parts Haas Tooling Videos
  • Videos
  • MyHaas – One Place for Everything

    • Compare Quotes
      • Compare Quotes

    • About MyHaas
      • About MyHaas

    • Haas CNC Certification Program
      • Haas CNC Certification Program

    • Haas CNC Certification Program-Redirect
      • Haas CNC Certification Program-Redirect

    • Haas CNC Certification Program
      • Haas CNC Certification Program

    • Haas Learning Resources
      • Haas Learning Resources

    • Haas Global Learning Resources
      • Haas Global Learning Resources

    • MyHaas App Form
      • MyHaas App Form
    • QUICK LINKS Special Series  Special Series 
      HAAS CAREERS HAAS CAREERS BUILD & PRICE BUILD & PRICE PRICE LIST PRICE LIST WHAT’S NEW WHAT’S NEW YOUR FIRST CNC YOUR FIRST CNC HAAS SIX PACK HAAS SIX PACK
      SHOPPING TOOLS
      • Build & Price a Haas
      • Price List
      • Available Inventory
      • CNCA Financing
      WANT TO TALK TO SOMEONE?

      A Haas Factory Outlet (HFO) can answer your questions, and walk you through your best options.

      CONTACT YOUR DISTRIBUTOR >
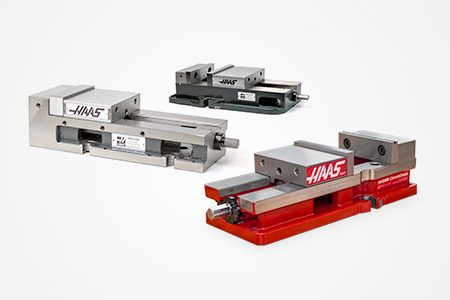
  • Haas Tooling
      Haas Tooling Mill Toolholding Mill Workholding Milling Lathe Tooling Lathe Toolholding Lathe Workholding ER Collets & Chucks Holemaking Threading Tool Management Tooling Accessories Package Kits Measuring & Inspection Apparel & Accessories
      HAAS TOOLING QUICK LINKS
      NEW PRODUCTS NEW PRODUCTS
      MOST POPULAR MOST POPULAR
      OPEN TERMS OPEN TERMS
      FINANCING FINANCING
      FAQs FAQs
      KITS CREATED FOR YOU KITS CREATED FOR YOU
  • Haas Service Parts
      Haas Service Parts Automatic Pallet Changer Automatic Tool Changer Chip Management Coolant Counterbalance Electrical Cabinet Enclosure Field Install Options Hydraulics Lubrication Maintenance Pendant Probing Rotary Spindle Tailstock
  • Contact Us

My Cart
MyHaas Welcome,
!
Haas Tooling Guest Order History MyHaas/HaasConnect Sign In Register Haas Tooling My Account Order History Return History MyHaas/HaasConnect Sign Out Welcome, My Machines Latest Activity My Quotes My Account My Users Sign Out
Find A Dealer
  1. Select Language
    1. English
    2. Deutsch
    3. Español - España
    4. Español - Méjico
    5. Français
    6. Italiano
    7. Português
    8. Český
    9. Dansk
    10. Nederlands
    11. Magyar
    12. Polski
    13. Svenska
    14. Русский
    15. Türkçe
    16. 中文
    17. Suomi
    18. Norsk
    19. الإنجليزية
    20. български
    21. Hrvatski
    22. Ελληνικά
    23. Română
    24. Slovenský
    25. Slovenščina
    26. 한국어
    27. 日本語
Search
×

Search Results

Web Pages

Images

    • <
    • 1
    • >

UMC AMO Non-Contact Encoder - Replacement (2011- Oct. 2016) -AD0577

Service Home How To Procedures UMC AMO Non-Contact Encoder - Replacement (2011- Oct. 2016) -AD0577
Recently Updated Last updated: 11/15/2021

UMC AMO Non-Contact Encoder - Replacement (2011- Oct. 2016)


AD0577

Under Construction

UMC AMO Non-Contact Encoder - Replacement (2011- Oct. 2016) -AD0577

- Jump to Section - 1. Introduction 2. Removal (6 steps) 3. B Axis 4. Installation (10 steps) 5. B Axis 6. Removal (4 steps) 7.  C Axis 8. Installation (6 steps) 9. C Axis Back to Top

Introduction

This procedure outlines how to the replace the 12V AMO Scale with a 5V AMO Scale on UMC-750 / 750P  built from 2011 to October 2016

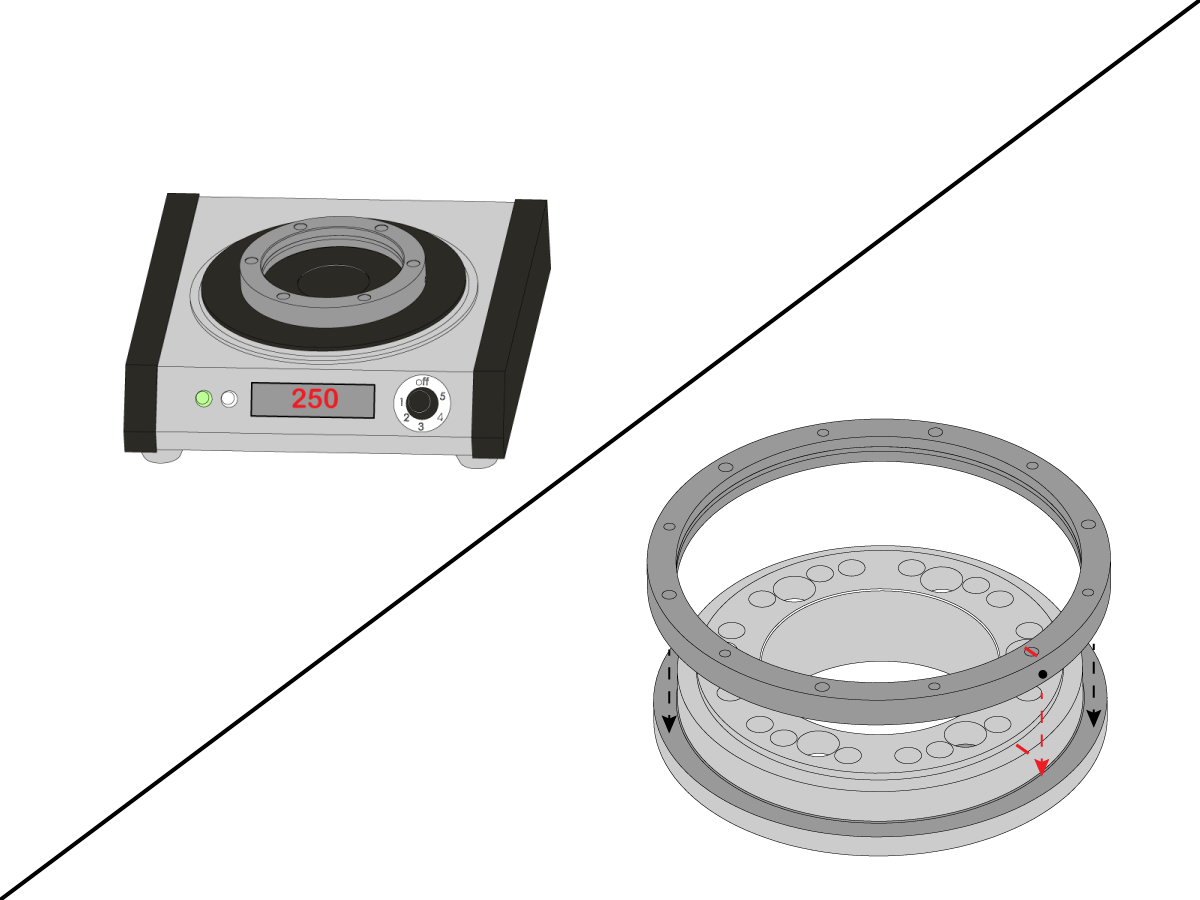
: A Hot Plate will be required to complete this procedure.

This procedure applies to the following service kits:

  • 93-3424 AMO 5V NCE SVC KIT UMC 4TH 2011-2016
  • 93-3425 AMO 5V NCE SVC KIT UMC 5TH 2011-2016

You should not do mechanical or electrical machine repairs or service procedures unless you are qualified and knowledgeable about the processes.

  Only authorized personnel with the proper training and certification should do this repair procedure.

  All information herein is provided as a courtesy for Haas machine owners for reference and illustrative purposes only. Haas Automation cannot be held responsible for repairs you perform. Only those services and repairs that are provided by authorized Haas Factory Outlet distributors are guaranteed.


Removal

B Axis

1

Note: Disable the scale being replaced, change parameter 270:0 (B axis), 526:0 (C axis) to Zero. 

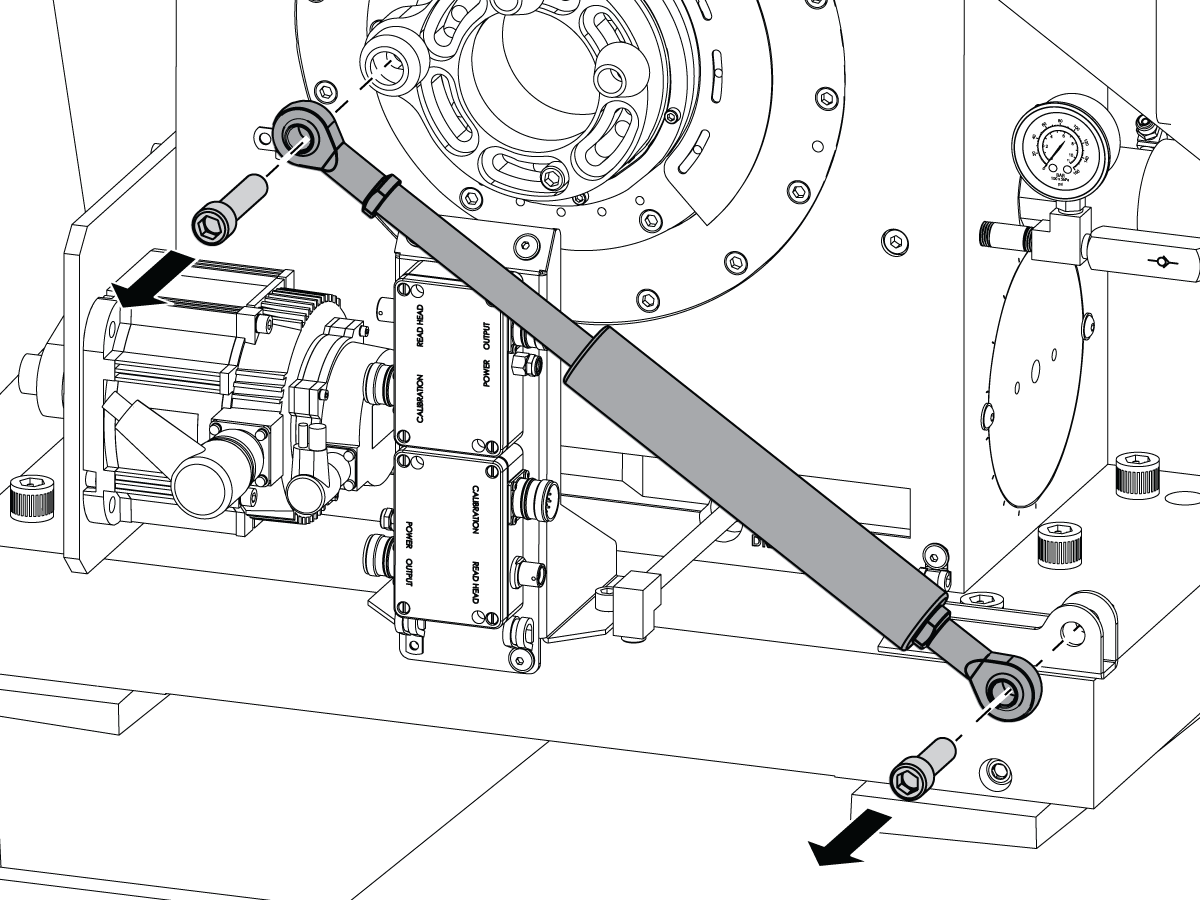
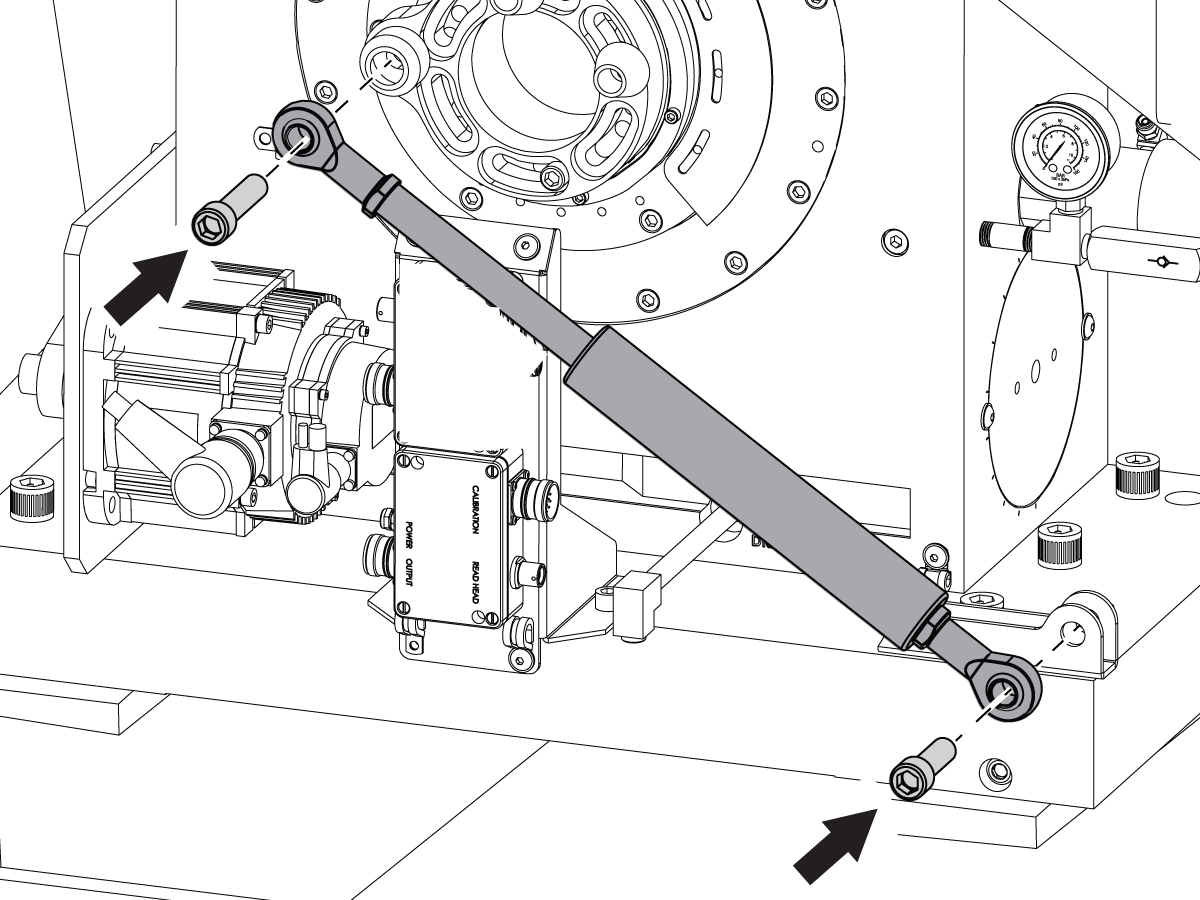
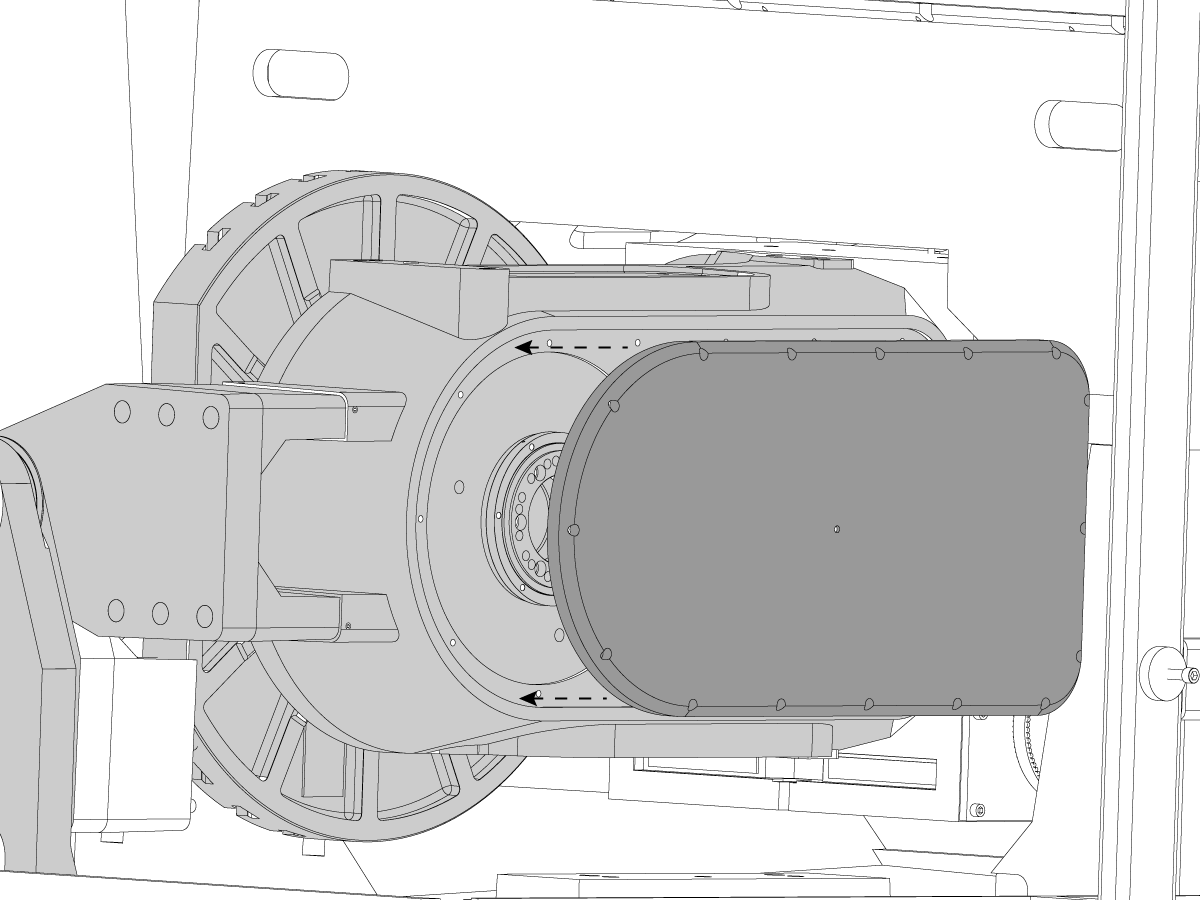
  • Remove B axis Counter Balance cylinder  (UMC-750 - Gas-Spring Counterbalance - Replacement)
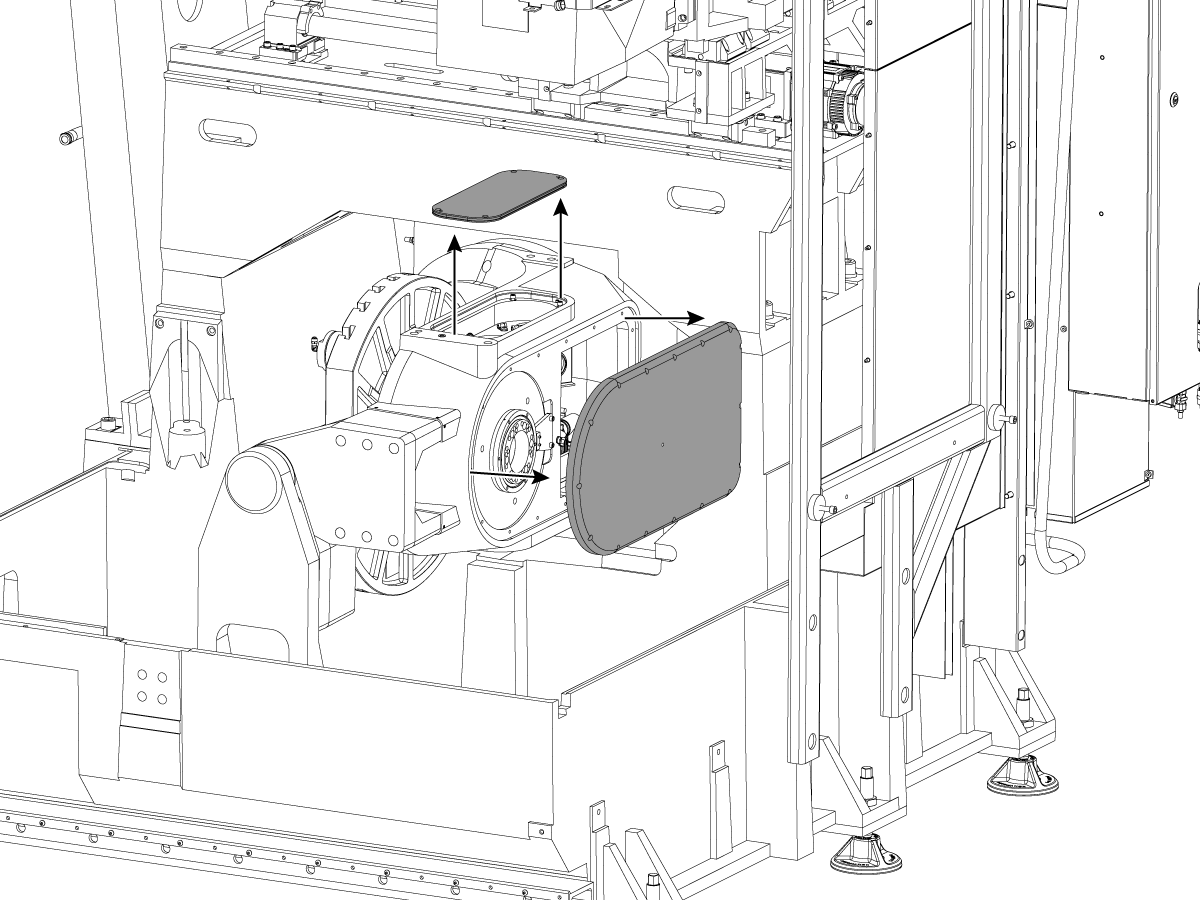
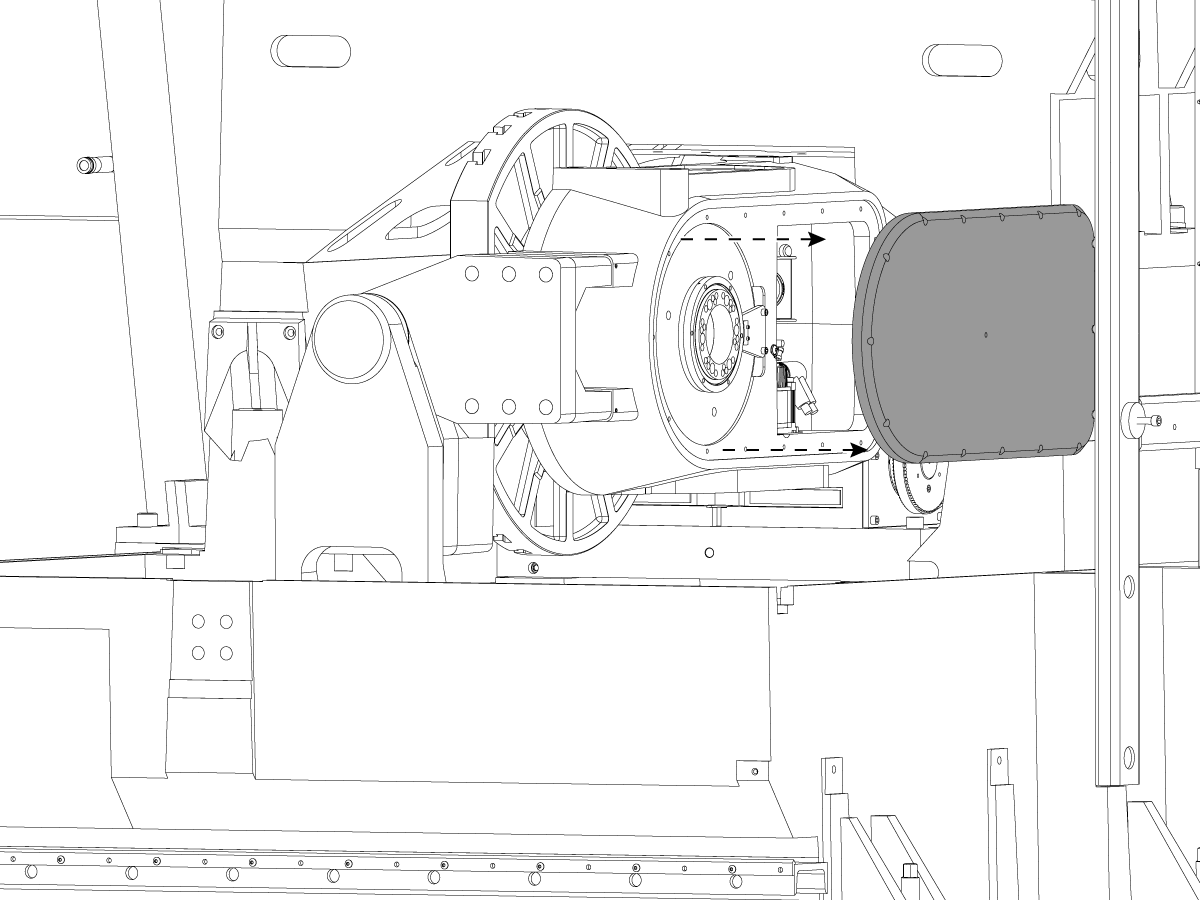
  • Rotate the B axis to 90°, remove the C-axis rotary bottom cover and rotary side cover.


2

Place the machine in Emergency Stop and disable the C axis.  Power off the machine to disconnect the C-axis motor, Home Switch, Brake line and pressure sensor cable.


3

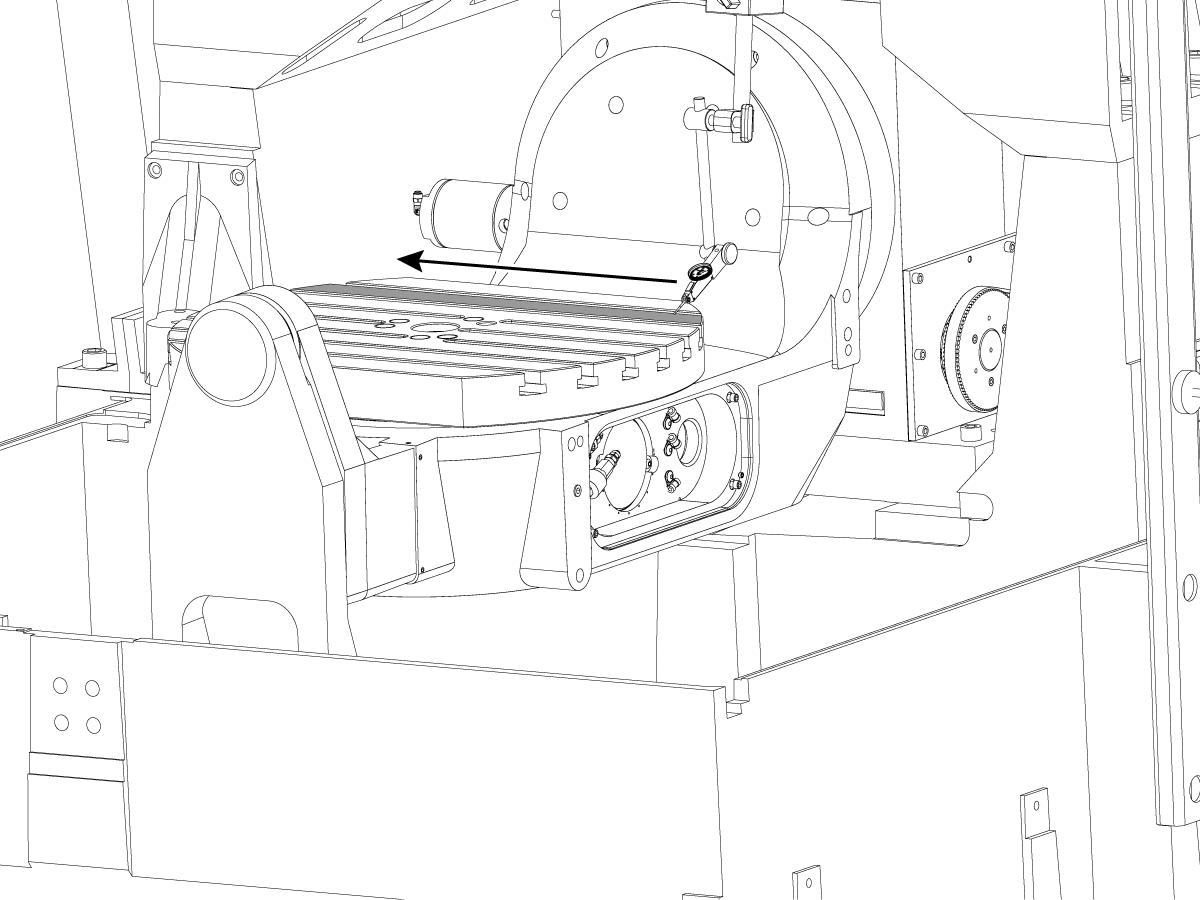
Power on the machine, verify the C axis is still Disabled. Zero Return All Axis . Verify the B - Axis is flat with in .0005" , adjust axis if needed to bring the axis with in tolerance.


4

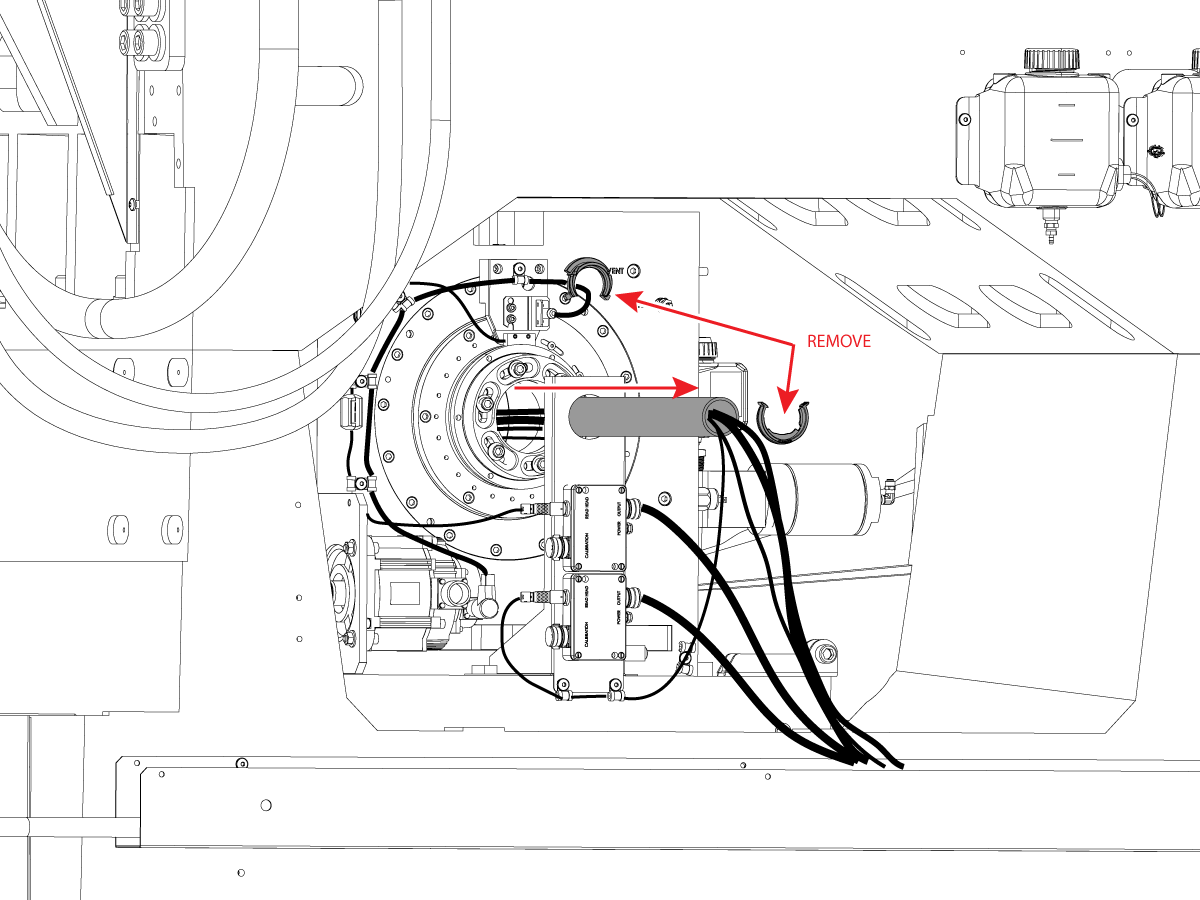
From the rear of the machine, carefully pull the C-axis wiring from the center of the B-axis rotary.

Unplug the C-axis read head cable from the C-axis interpolation box. 


5

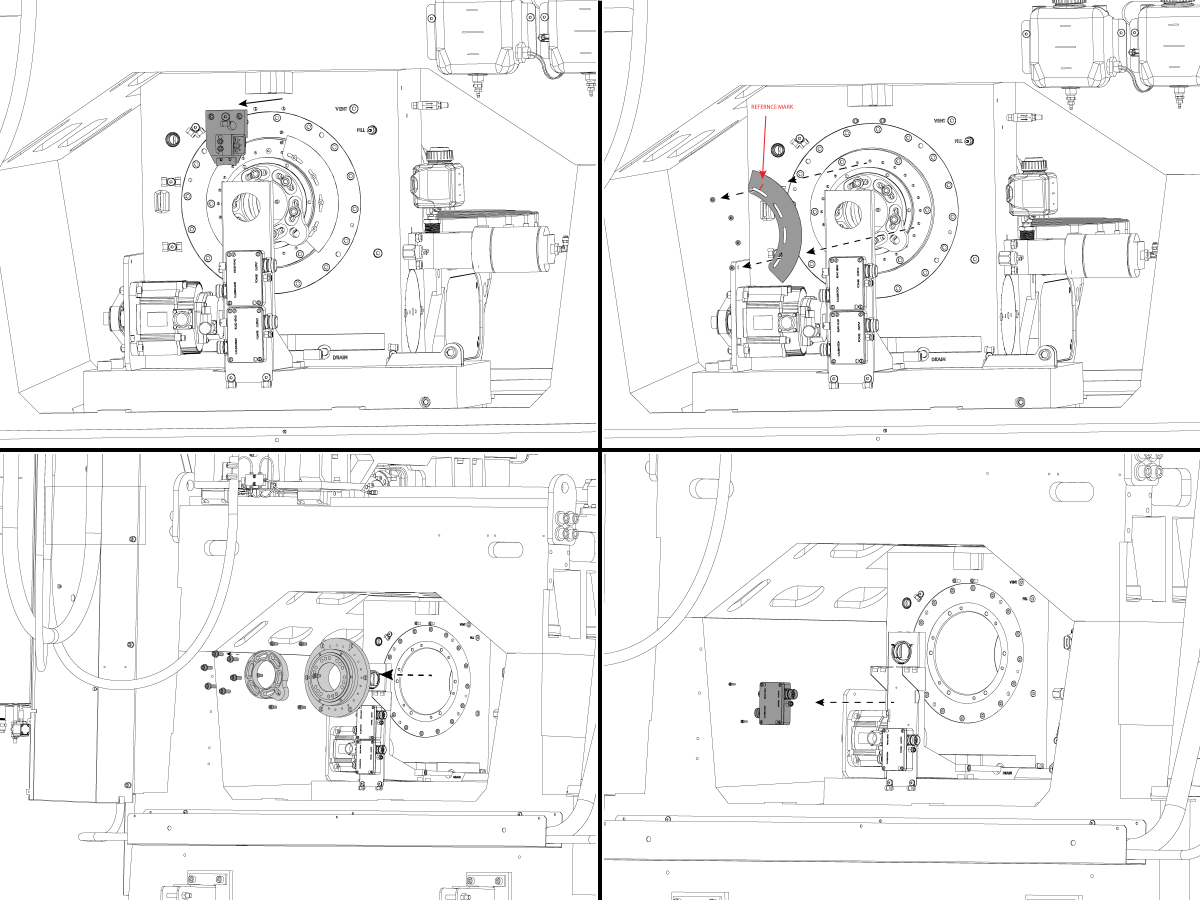
Power off the machine and unplug the B-axis home switch from the motor cable and B-axis Scale Read head from the interpolation.

  • Place a reference mark on the Home Switch Flag Bracket before removing.
  •  Remove the B-axis Read head bracket 
  • Counter balance mount ring and B-axis scale mount adapter plate.
  • Remove the B axis interpolation box from the conduit bracket.


6

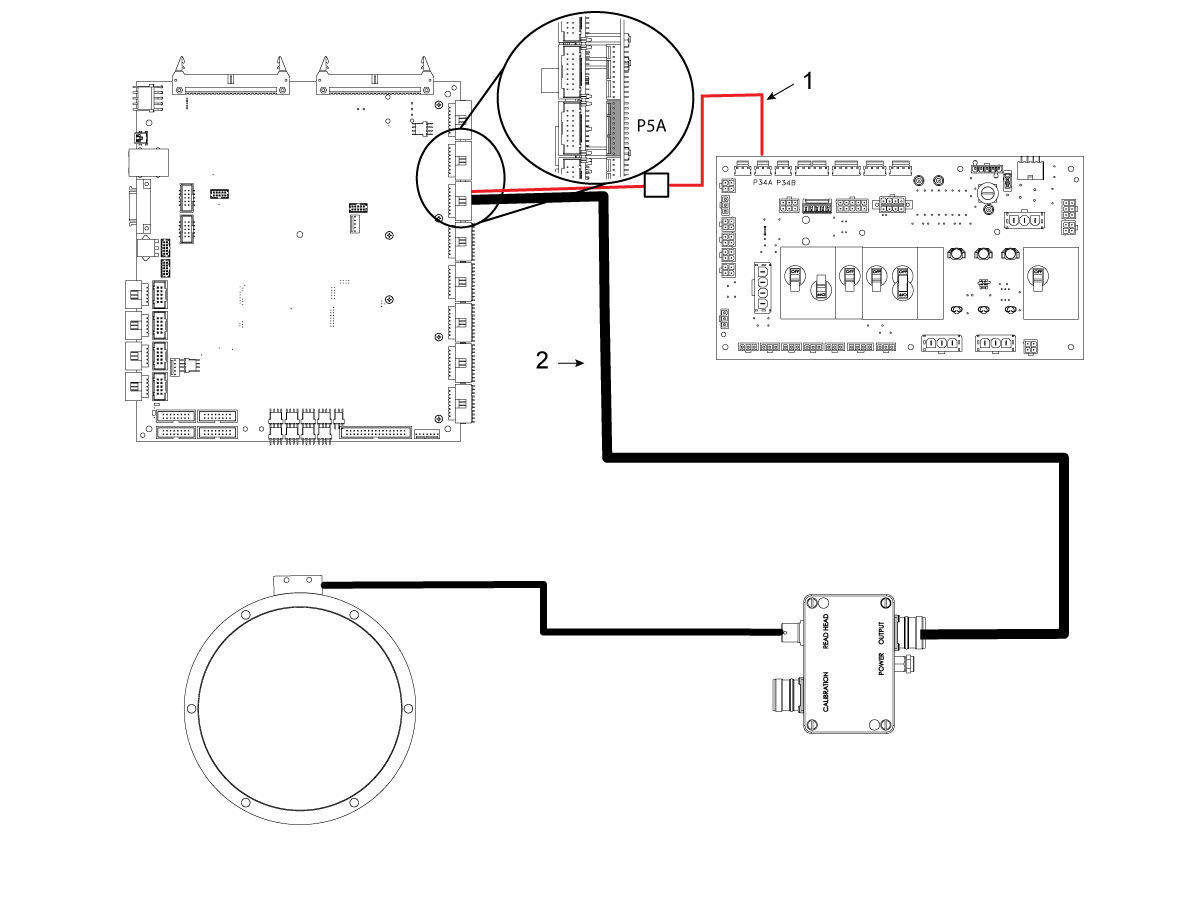
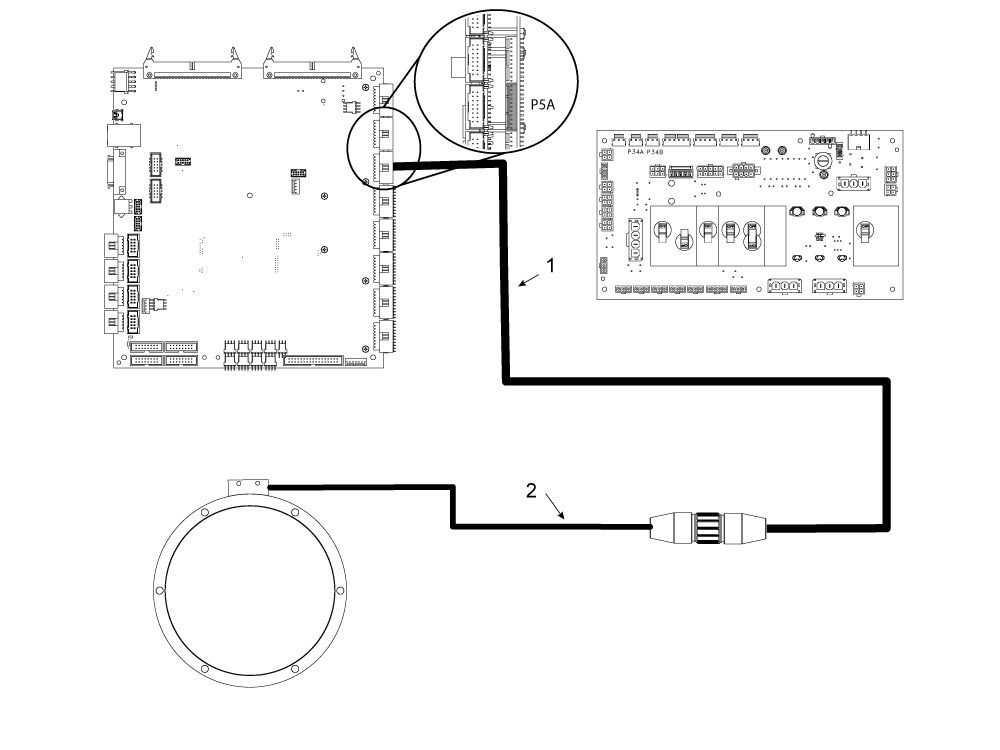
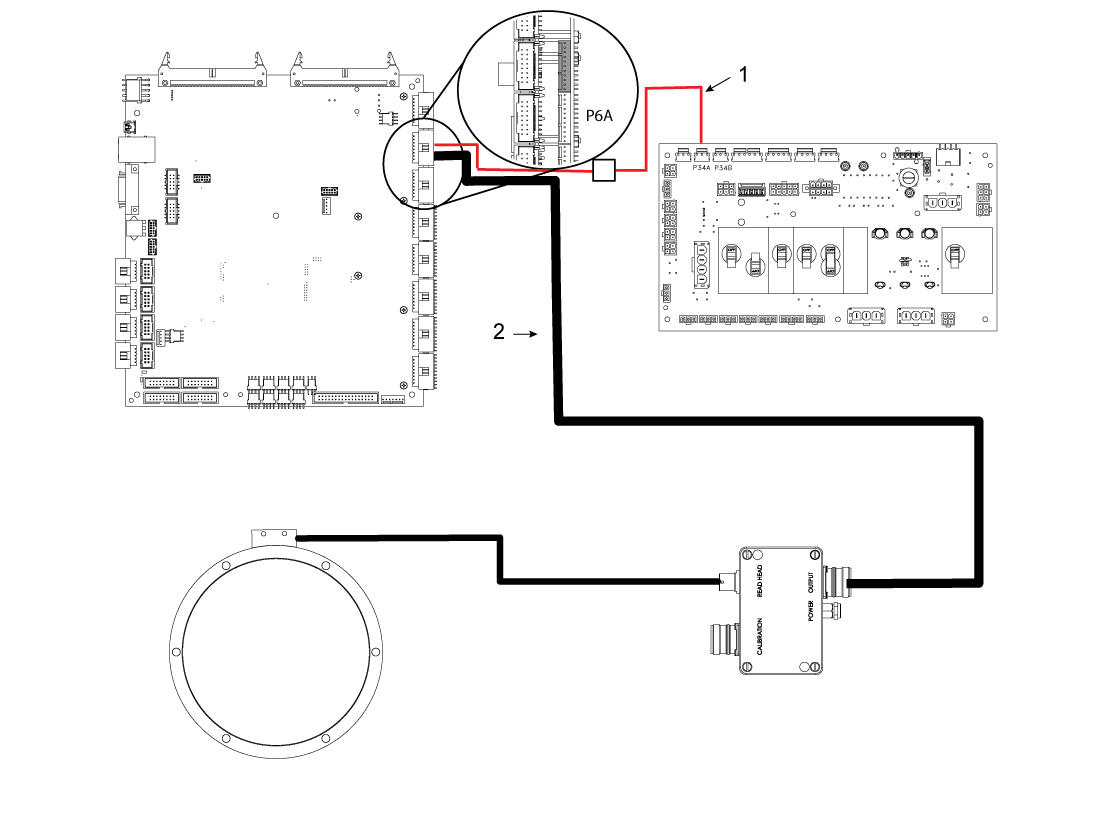
Disconnect cable [1] 33-10060 (12VDC) from P34A / B on the PSUP and [2] 32-10041A (Scale Feedback) cable from P5A on the Maincon Expansion PCB.

With cables disconnect, carefully remove the cables from the electrical cabinet and conduit.


Installation

B Axis

1

Install and connect cable 32-10070 (SCL FEEDBK ) to P5A on Maincon Expansion PCB and route through the conduit to the back of the machine.

NOTE: Cable 32-10070 (SCL FEEDBK ) is labeled [STORM PCB CH12A] for current production , connector is backward compatable for CHC with Exspansion PCB at P5A connector.


2

Temporarily install & position C'Balance Adapter plate and Read Mount onto brake side.

  1. Mark position of  the reference dot on C'Balance Adapter,

       : Markings needs to be position left edge of Read Mount.

  • Remove C'Balance Adapter plate and Read Mount.

3

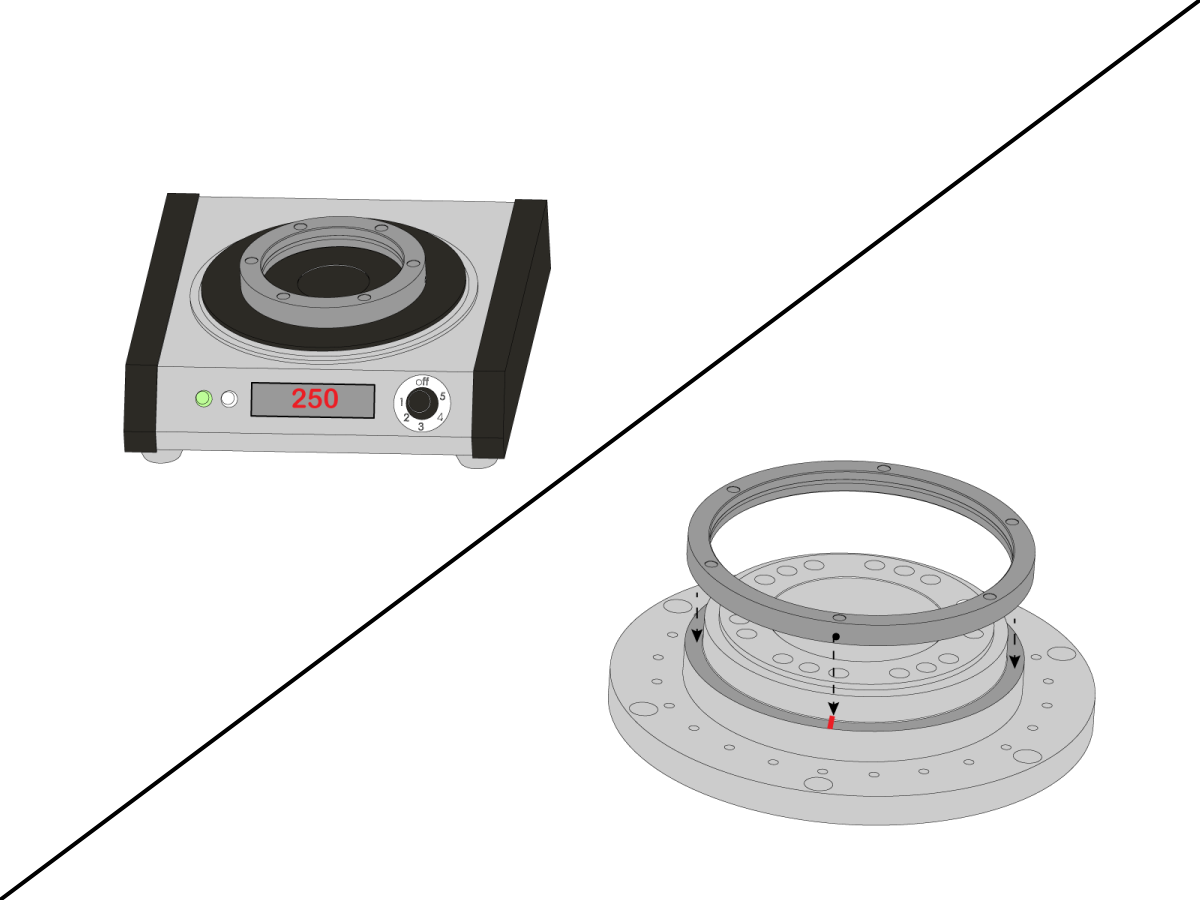
Set hot plate to 210°F (100°C). Heat Ring Scale for 4 minute on hot plate. 

Install Ring Scale on C'Balance Plate locating and orient the position of Ring Scale at reference mark; position with the dot closest to the C'Balance Plate.

Warning: Do Not Exceed 250°F (122°C)

4

Reinstall counter balance plate back onto the rotary unit, only torquing the bolts to 5 ft lbs .

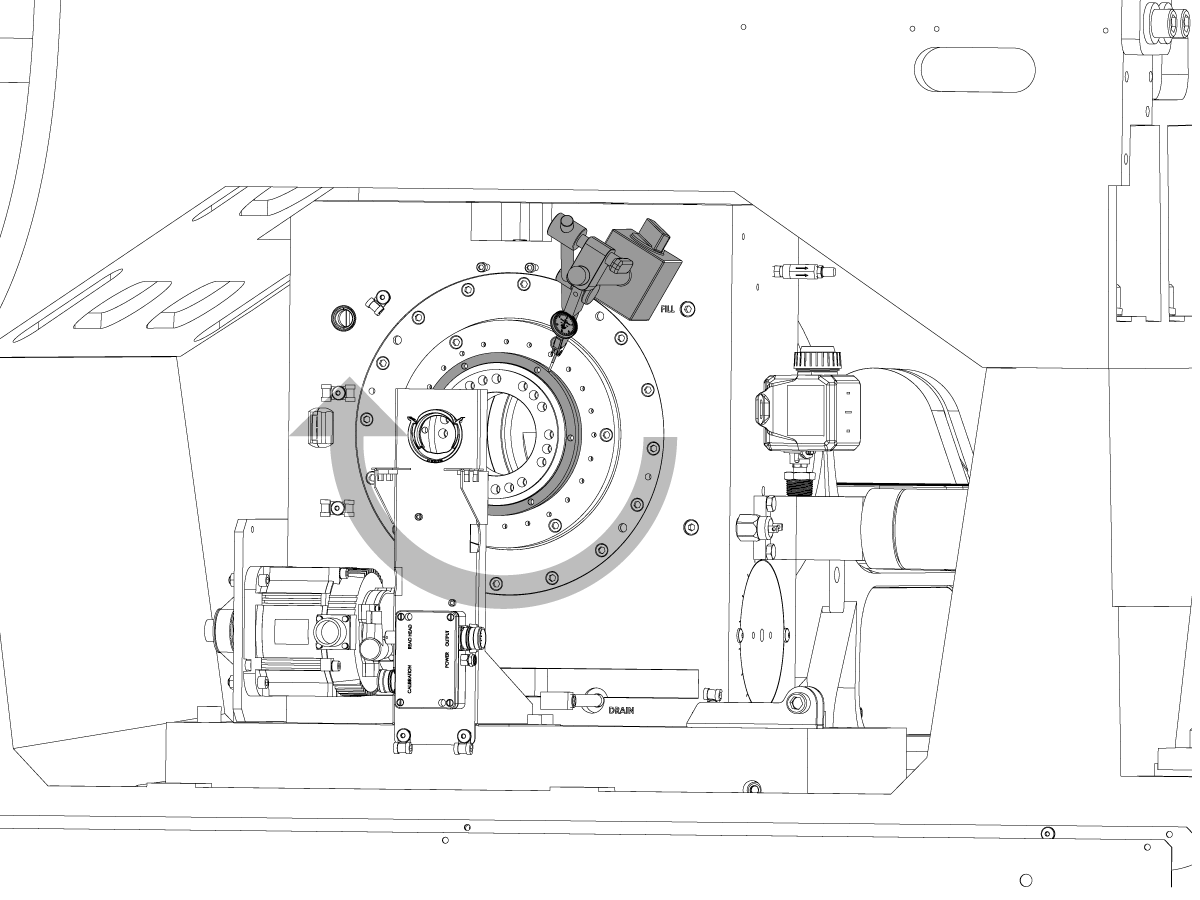
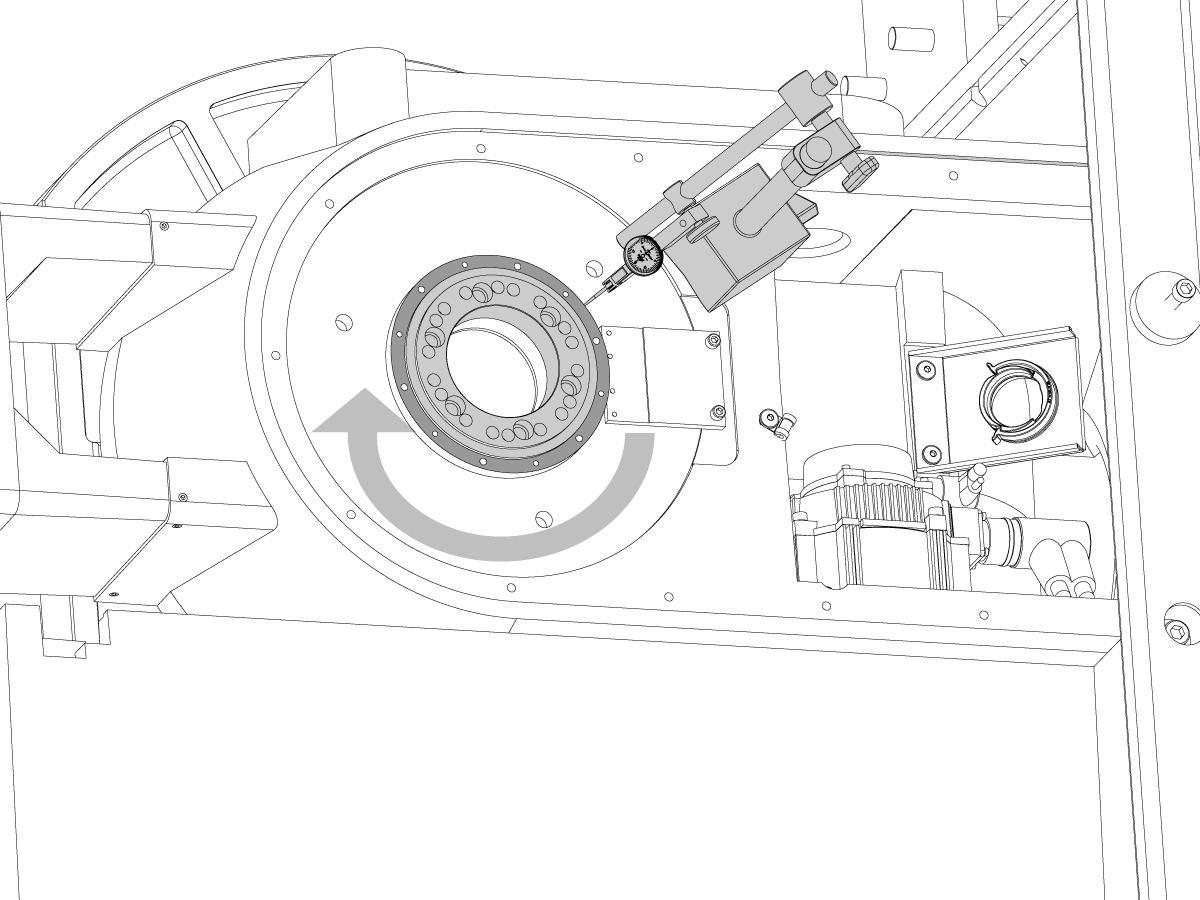
Power the machine on , using Jog With Out Zero to Indicate the outer diameter of the ring scale, concentric within 0.0005" TIR.

Adjust Adapter plate accordingly to achieve concentricity.

  • NOTE: Do not be concern with highspots when within tolerance.

   Torque bolts refer to Haas Fastener Torque Specifications and recheck scale runout.


5

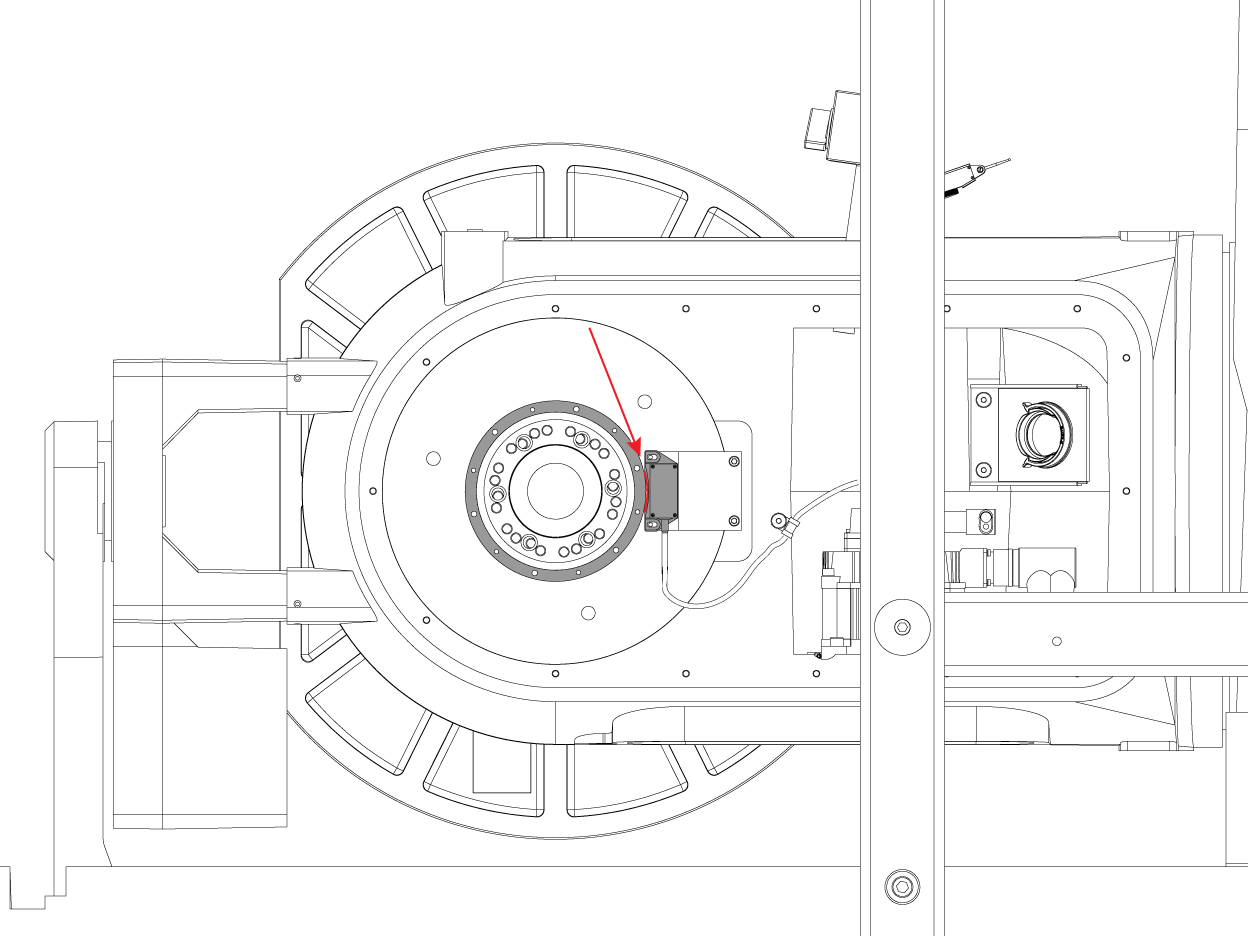
Install Read Mount onto the rotary unit, install the Home switch , read head and Home Flag Bracket

 NOTE: Make sure Read-Head cups scale.

NOTE: Confirm home reference marks from head and scale ring are pointing towards each other.

Check the Reference Dot position on ring scale is at closest position left of the Read-Head. Evenly gap read-head and ring scale ring with 0.006"  shim (provided with kit).

Tighten hardware when read head gap is achieved.

6

Refer to UMC-750 - Gas-Spring Counterbalance - Replacement procedure for installation of the Gas Shock.

Power Off the machine, route the C-axis cables and conduit back through the center of the B-axis rotary and reconnect the motor, home switch, pressure switch and brake airline.

Power on, enable the C-axis and Zero Return the machine to test all machine function.

Note:  Re-set a new tool change offset and update compensation table values for the B-Axis. This will require laser calibration.

Removal

C Axis

1

Note: Disable the scale being replaced, change parameter 270:0 (B axis), 526:0 (C axis) to Zero. 

  • Zero return the C -axis , verify T-slots are parallel to the X-axis palne.
  • Rotate the B axis to 90°, remove the C-axis rotary bottom cover.


2

Place the machine in Emergency Stop and disable the C axis.  Power off the machine to disconnect the C-axis encoder. Remove the Encoder ring mount and Read Head bracket.


3

From the rear of the machine, carefully pull the C-axis Encoder read head from the center of the B-axis rotary.

Unplug the C-axis read head cable and Feed back cable from the C-axis interpolation box.  Remove the interpolation box from the support bracket.


4

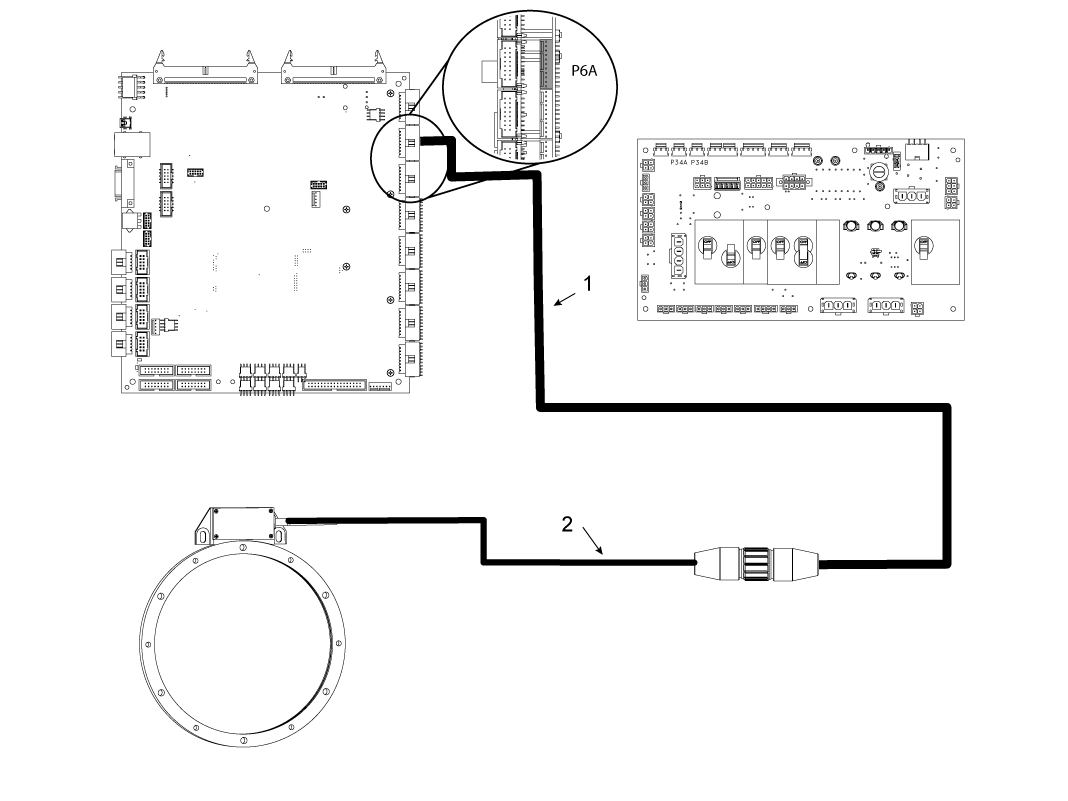
Disconnect cable [1] 33-10060 (12VDC) from P34A / B on the PSUP and [2] 32-10042A (Scale Feedback 5TH) cable from P6A on the Maincon Expansion PCB.

With cables disconnect, carefully remove the cables from the electrical cabinet and conduit.


Installation

C Axis

1

Install and connect cable 33-10071 (SCL FEEDBK ) to P6A on Maincon Expansion PCB and route through the conduit to the back of the machine.

NOTE: Cable 32-10071 (SCL FEEDBK ) is labeled [STORM PCB CH13A] for current production , connector is backward compatable for CHC with Exspansion PCB at P6A connector.


2

Temporarily install & position C'Balance Adapter plate and Read Mount onto brake side.

  • Confirm position of counter balance adapter plate.
  • Install adapter plate and set mounting screws only for positioning.
  • Mark position of read-head on C'Balance plate.
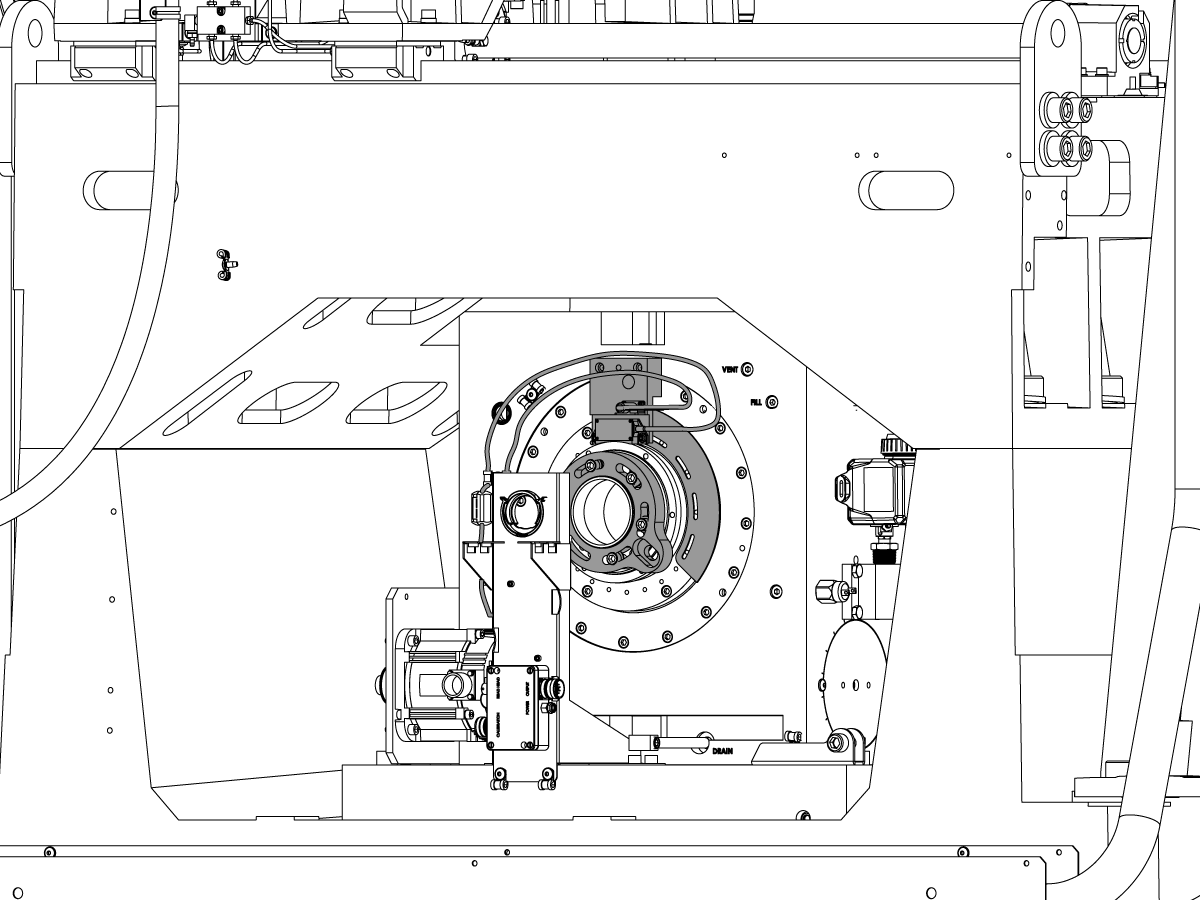
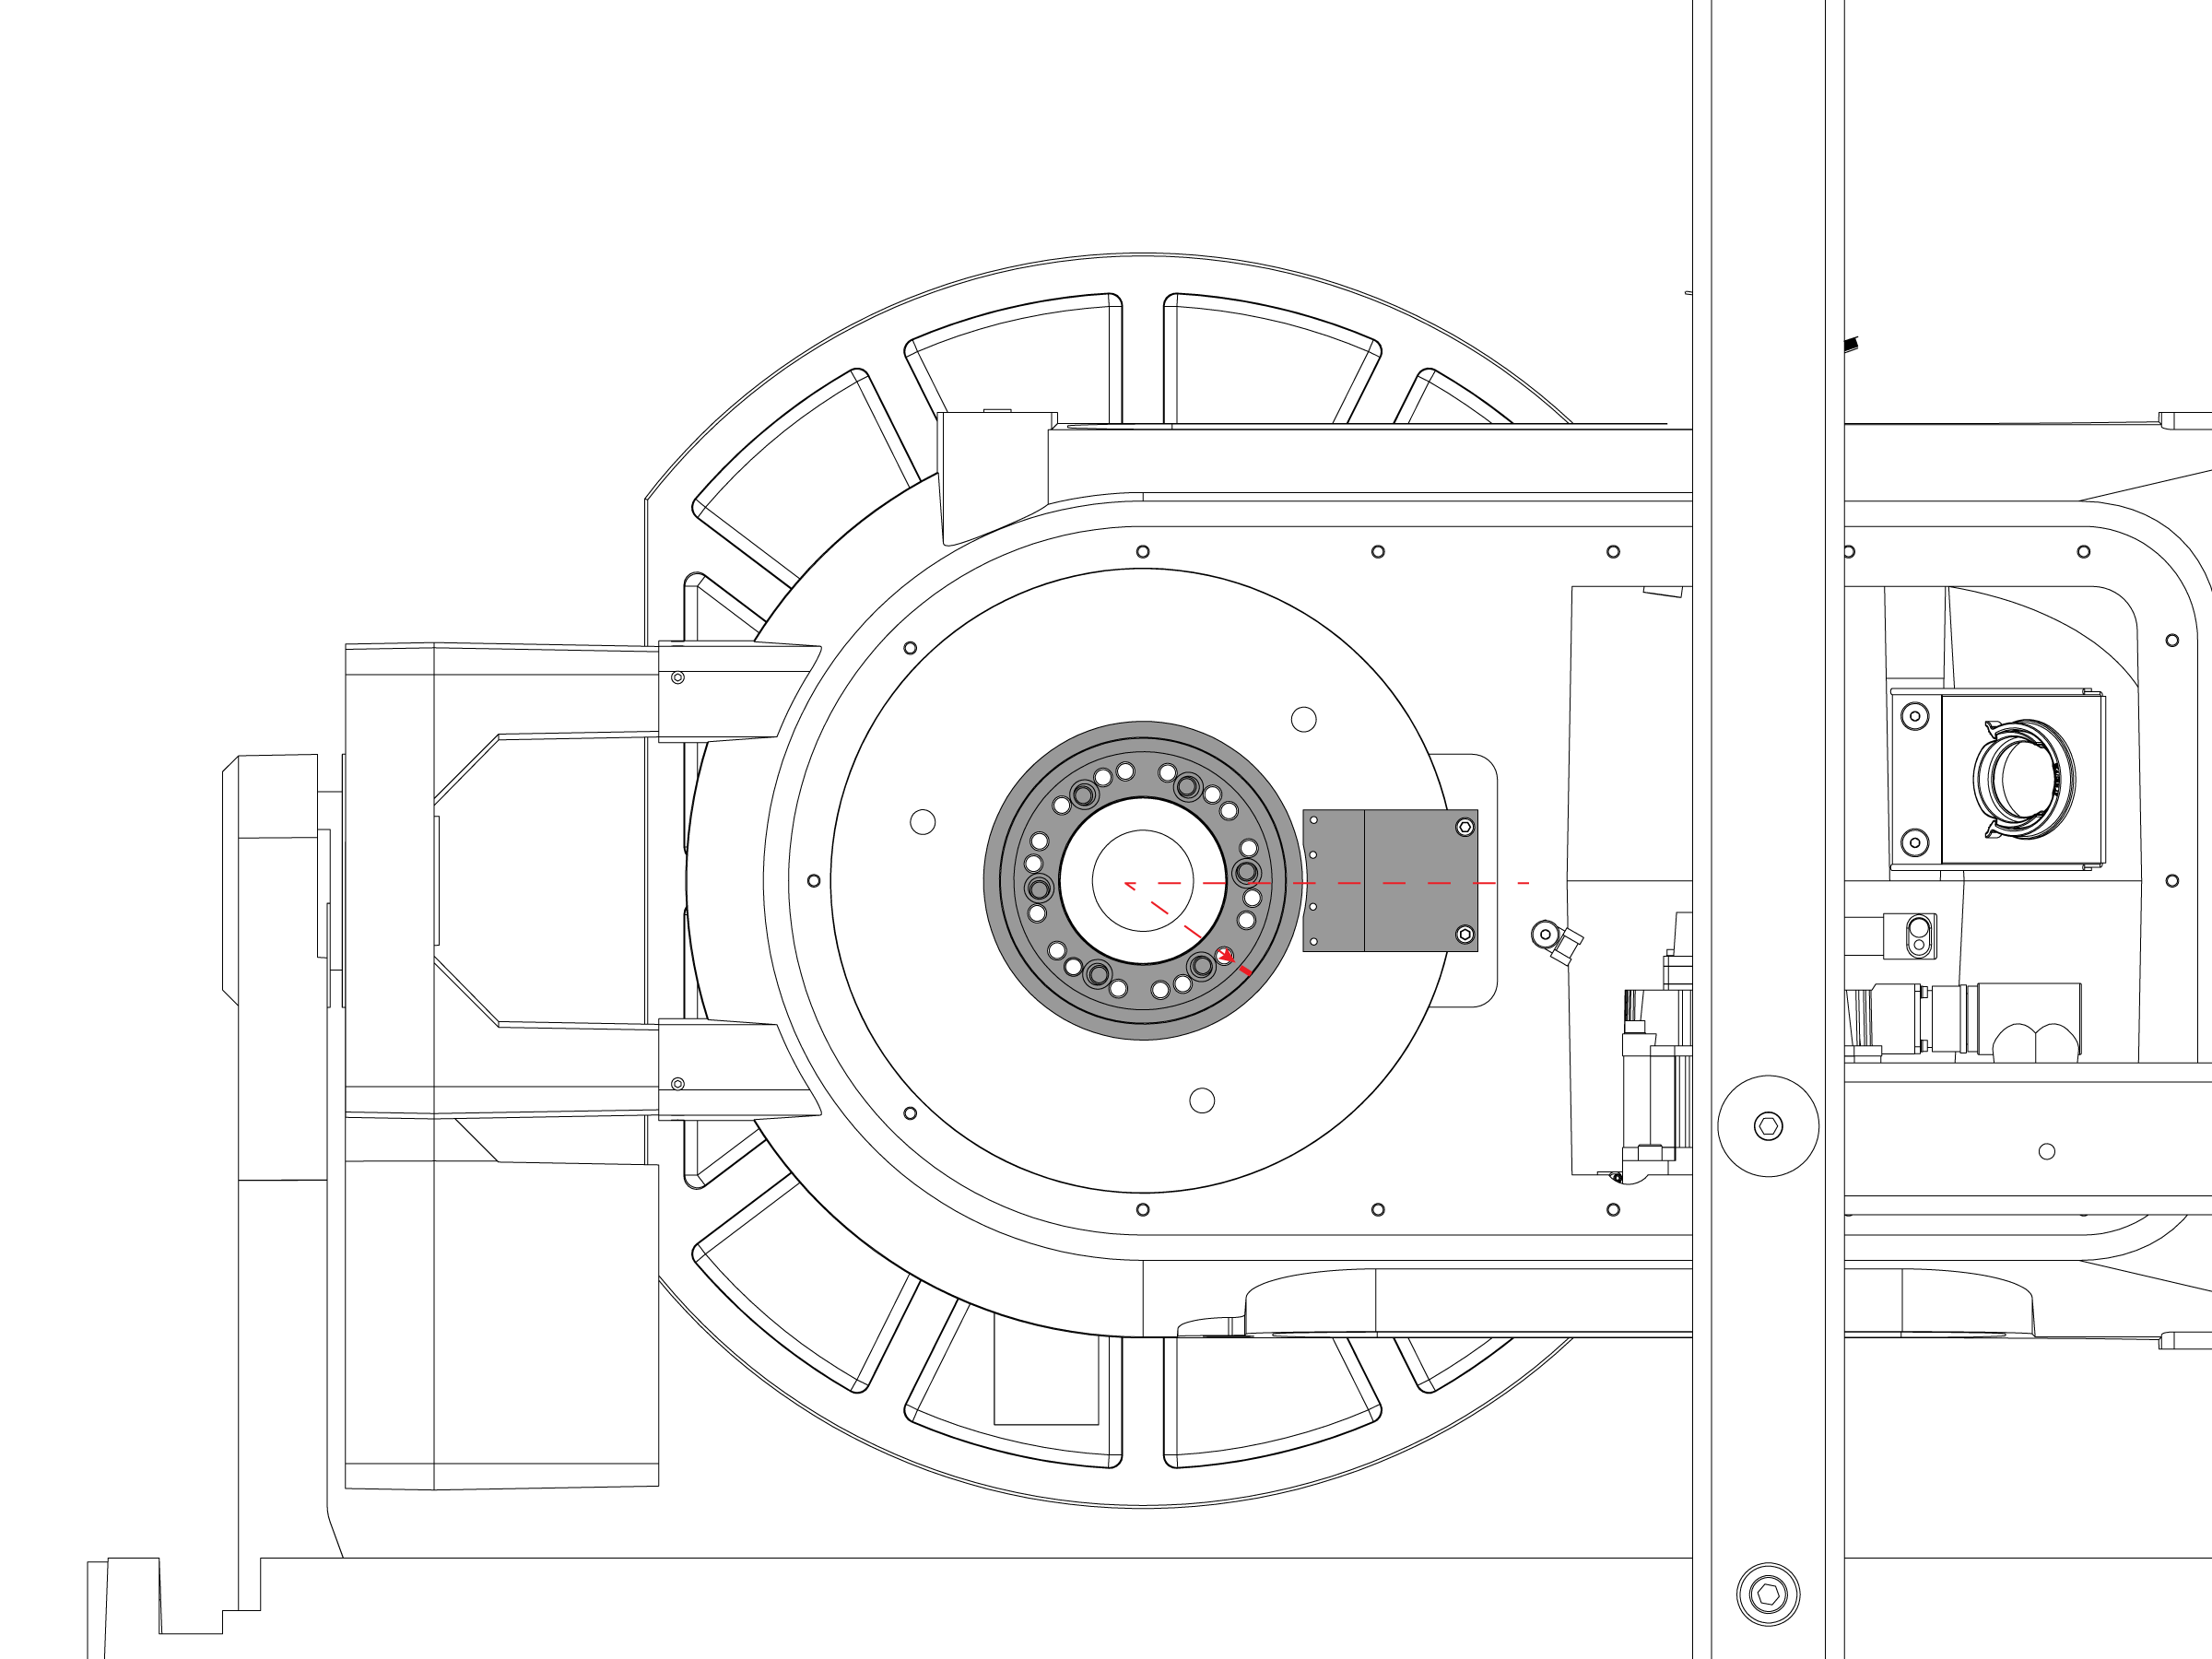
  • Set scale on C'Balance plate and orient scale arrow / dot to the 4 o'clock position. (see image)
  • Mark ring arrow / dot location on C'Balance plate.

NOTE: If ring has a dot instead of an arrow, install it with the dot closest to the brake disc side,.

3

Remove the C'Balance adapter plate . 

Set hot plate to 210°F (120°C). Heat Ring Scale for 4 minute on hot plate. Install ring scale onto C'Balance adapter plate.

Warning: Do Not Exceed 250°F (122°C)

Note: Locate and orient the position of Ring Scale at reference mark.

Allow to cool.


4

Install C'Balance adapter plate assembly., install screws and snug to 5 ft-lbs. Indicate the outer diameter of the ring scale,  concentric within 0.0005" TIR. Adjust Adapter plate accordingly to achieve concentricity.

Note: Do not be concern with highspots when within tolerance.

Torque bolts.  Haas Fastener Torque Specifications

Recheck runout.

5

Install the read head mounting bracket in the shown orientation. Apply a drop of blue thread locker to each of the mounting screws.

Install the read head onto the mounting bracket as shown. Apply a small drop of blue thread locker to each of the mounting screws.

Use the 0.006" shim (provided with calibration kit) to set the gap between the read head and the ring.

Tighten the screws once the gap is evenly achieved. Haas Fastener Torque Specifications

Note: Confirm that the arrow or dot on the ring, is on the left side of the encoder read head. If these have arrows, confirm that these are pointing into each other.

6

Power on the machine, enable the C-axis and Zero Return the machine to test all machine function. With all testing completed install the C-axis cover and rear panels

Note:  Re-set a new tool change offset and update compensation table values for the C-Axis. This will require laser calibration.

FIND DISTRIBUTOR
Feedback
Haas Logo

美元价格不包括关税、报关费用、保险费、增值税及运费。
USD prices DO NOT include customs duty, customs fees, insurance, VAT, or freight.

人民币价格包含关税、报关费用、货运保险和增值税, 但不包括运费。
CNY prices include customs duty, customs fees, insurance, and VAT. DOES NOT include freight.

Haas Delivered Price

This price includes shipping cost, export and import duties, insurance, and any other expenses incurred during shipping to a location in France agreed with you as a buyer. No other mandatory costs can be added to the delivery of a Haas CNC Product.

KEEP UP WITH THE LATEST HAAS TIPS AND TECHNOLOGY...

Sign up now!   

HAAS TOOLING ACCEPTS THE FOLLOWING:

  • Service & Support
  • Owners
  • Request Service
  • Operator Manuals
  • Haas Parts
  • Rotary Repair Request
  • Pre-Install Guides
  • Shopping Tools
  • Build & Price a New Haas
  • Available Inventory
  • The Haas Price List
  • CNCA Financing
  • About Haas
  • Careers
  • Certifications & Safety
  • Contact Us
  • History
  • Terms & Conditions
  • Haas Tooling Terms & Conditions
  • Privacy
  • Warranty
  • Haas Community
  • Haas Certification Program
  • Haas Motorsports
  • Gene Haas Foundation
  • Haas Technical Education Community
  • Events
  • Join the Conversation
  • Facebook
  • Twitter
  • Flickr
  • YouTube
  • LinkedIn
  • Instagram
  • TikTok
© 2022 Haas Automation, Inc – CNC Machine Tools

2800 Sturgis Rd., Oxnard, CA 93030 / Toll Free: 800-331-6746
Phone: 805-278-1800 / Fax: 805-278-2255

Cookie Notice

We use cookies to improve your user experience. Our Cookie Notice describes which cookies we use, why we use them, and how you can find more information about them. Please confirm you consent to us using analytics cookies. If you do not consent, you may still use our website with a reduced user experience.

Manage Settings

Cookie Notice

We use cookies to improve your user experience. Our Cookie Notice describes which cookies we use, why we use them, and how you can find more information about them. Please confirm you consent to us using analytics cookies. If you do not consent, you may still use our website with a reduced user experience.

Functional Cookies

Analytics Cookies