×

Search Results

Web Pages

Images

    • <
    • 1
    • >
  • machines
    • Haas Vertical Mills
      Vertical Mills
      • Vertical Mills
      • VF Series
      • Universal Machines
      • VR Series
      • Pallet-Changing VMCs
      • Mini Mills
      • Mold Machines
      • Drill/ Tap/ Mill Series
      • Toolroom Mills
      • Compact Mills
      • Gantry Series
      • Vertical Mill/Turn
      • Extra-Large VMC
      • Double-Column Mills
      • Desktop Mill
      • Mill Auto Parts Loader
      • Compact Auto Parts Loader
    • Product Image
      Multi-Axis Solutions
      • Multi-Axis Solutions
      • Y-Axis Lathes
      • 5-Axis Mills
    • Haas Lathes
      Lathes
      • Lathes
      • ST Series
      • Dual-Spindle
      • Toolroom Lathes
      • Chucker Lathe
      • Haas Bar Feeder V2
      • Lathe Auto Parts Loader
    • Haas Horizontal Mills
      Horizontal Mills
      • Horizontal Mills
      • 50-Taper
      • 40-Taper
    • Haas Rotaries & Indexers
      Rotaries & Indexers
      • Rotaries & Indexers
      • Rotary Tables
      • Indexers
      • 5-Axis Rotaries
      • Extra-Large Rotaries
    • Product Image
      Automation Systems
      • Automation Systems
      • Robot Systems
      • Automatic Parts Loaders
      • Pallet-Pool Systems
      • Haas Bar Feeder
      • Models
    • QUICK LINKS Special Series  Special Series 
      HAAS CAREERS HAAS CAREERS BUILD & PRICE BUILD & PRICE PRICE LIST PRICE LIST WHAT’S NEW WHAT’S NEW YOUR FIRST CNC YOUR FIRST CNC HAAS SIX PACK HAAS SIX PACK
      SHOPPING TOOLS
      • Build & Price a Haas
      • Price List
      • Available Inventory
      • CNCA Financing
      WANT TO TALK TO SOMEONE?

      A Haas Factory Outlet (HFO) can answer your questions, and walk you through your best options.

      CONTACT YOUR DISTRIBUTOR >
  • Options
    • Product Image
      Spindles
      • Spindles
    • Product Image
      Tool Changers
      • Tool Changers
    • Product Image
      4th- | 5th-Axis
      • 4th- | 5th-Axis
    • Product Image
      Turrets & Live Tooling
      • Turrets & Live Tooling
    • Product Image
      Probing
      • Probing
    • Haas Chip & Coolant Management
      Chip & Coolant Management
      • Chip & Coolant Management
    • The Haas Control
      The Haas Control
      • The Haas Control
    • Product Image
      Product Options
      • Product Options
    • Product Image
      Tooling & Fixturing
      • Tooling & Fixturing
    • Product Image
      Workholding
      • Workholding
    • Product Image
      5-Axis Solutions
      • 5-Axis Solutions
      • 5 Easy Steps to 5-Axis
    • Product Image
      Automation
      • Automation
    • QUICK LINKS Special Series  Special Series 
      HAAS CAREERS HAAS CAREERS BUILD & PRICE BUILD & PRICE PRICE LIST PRICE LIST WHAT’S NEW WHAT’S NEW YOUR FIRST CNC YOUR FIRST CNC HAAS SIX PACK HAAS SIX PACK
      SHOPPING TOOLS
      • Build & Price a Haas
      • Price List
      • Available Inventory
      • CNCA Financing
      WANT TO TALK TO SOMEONE?

      A Haas Factory Outlet (HFO) can answer your questions, and walk you through your best options.

      CONTACT YOUR DISTRIBUTOR >
  • Why Haas
      Discover the Haas Difference
    • Why Haas
    • MyHaas
    • Education Community
    • Industry 4.0
    • Haas Certification
    • Customer Testimonials
  • Service
      Welcome to Haas Service
      SERVICE HOME Operator’s Manuals How-To Procedures Troubleshooting Guides Preventive Maintenance Haas Parts Haas Tooling Videos
  • Videos
  • Haas Tooling
      Mill Toolholding Mill Workholding Milling Lathe Tooling Lathe Toolholding Lathe Workholding ER Collets & Chucks Holemaking Threading Tool Management Tooling Accessories Package Kits Apparel & Accessories Storage & Handling Measuring & Inspection
    • Haas Tooling
    • Mill Toolholding Shop All
      • End Mill Holders
      • Shell Mill Holders
      • Shrink Fit Holders
      • ER Collet Chucks
      • Milling Chucks & Collets
      • Drill Chucks
      • Pull Studs
      • Mill Toolholding Kits
    • Mill Workholding Shop All
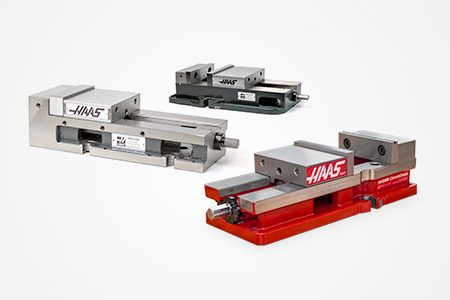
      • Vises
      • Mill Vise Jaws
      • Workholding Accessories
      • Vise Kits
    • Milling Shop All
      • Shell Mill Bodies
      • Milling Inserts
      • End Mills
      • Chamfer Mills & Inserts
      • Indexable End Mill Bodies
      • Ball End Mills
      • Chamfer End Mills
      • Roughing End Mills
      • Indexable Ball End Mills & Inserts
      • Indexable Milling Kits
      • Chamfer Mill Kits
      • Complete Indexable End Mill Kits
      • Dovetail Cutters
      • Indexable Dovetail Cutters
      • Engraving End Mills
      • Burrs
    • Lathe Tooling Shop All
      • Cut-Off Tooling
      • Cut-Off Tooling Kits
      • Turning Inserts
      • Grooving Tools
      • Small ID Grooving & Threading Tools
      • Threading Inserts
      • Threading Toolholders
      • ID Toolholders
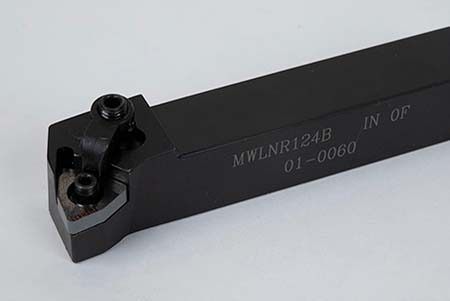
      • OD Toolholders
      • Cermet Turning Inserts
      • CBN Turning Inserts
      • Haas Notch Groove and Thread Inserts
      • Haas Notch Groove and Thread Toolholders
      • Broaching Toolholders
      • Broaching Inserts
    • Lathe Toolholding Shop All
      • TL & CL Toolholding
      • BOT Toolholding
      • BMT Toolholding
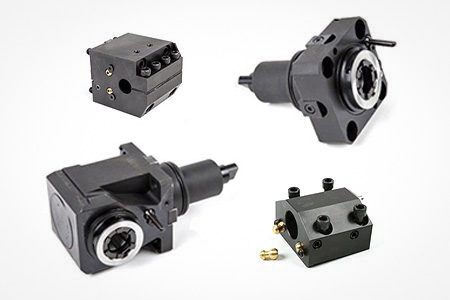
      • Live Toolholding
      • Reduction Sleeves
      • VDI Toolholding
    • Lathe Workholding Shop All
      • Live Centers
      • Spindle Liners
      • Quick-Change Collets
      • Lathe Collet Chucks
      • 5C Collets
      • 5C Collet Sets
    • ER Collets & Chucks Shop All
      • ER Collets
      • ER Sealed Collets
      • Tap Collets
      • ER Collet Sets & Accessories
      • ER Collet Chucks
      • Straight Shank ER Collet Chucks
      • Straight Shank Keyless Drill Chucks
    • Holemaking Shop All
      • Carbide Drills
      • Indexable Drill Bodies
      • Indexable Drill Inserts
      • Modular Drill Bodies
      • Modular Drill Heads
      • Cobalt Drills & Sets
      • Center Drills
      • Reamers
      • Indexable Drilling Kits
      • Spot Drills
    • Threading Shop All
      • Taps
      • Threading Inserts
      • Threading Toolholders
      • Thread Mills
      • Pipe Taps
      • Drill Tap Kits
    • Tool Management Shop All
      • Tool Presetting Machines
      • Shrink Fit Machines
    • Tooling Accessories Shop All
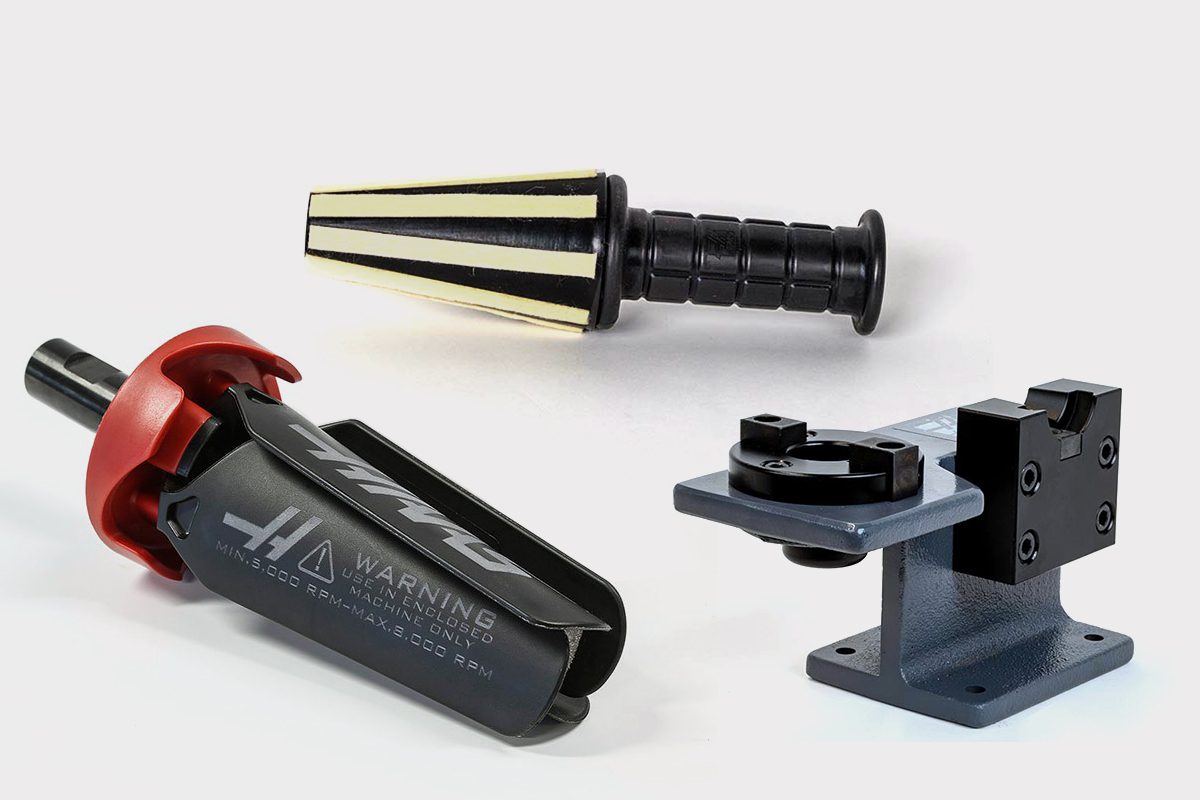
      • Spindle Taper Cleaner
      • Haas Shop Lift
      • Toolholder Fixtures
      • Deburr Wheels
      • CNC Clearing Fans
    • Package Kits Shop All
      • Chip Clearing Fan Kits
      • Cutting Tool Kits
      • Complete Indexable End Mill Kits
      • Cut-Off Tooling Kits
      • Drill Tap Kits
      • Indexable Drilling Kits
      • Indexable Milling Kits
      • Chamfer Mill Kits
      • Mill Toolholding Kits
      • Workholding Kits
      • Vise Kits
    • Apparel & Accessories Shop All
      • Accessories
      • Apparel
    • Storage & Handling Shop All
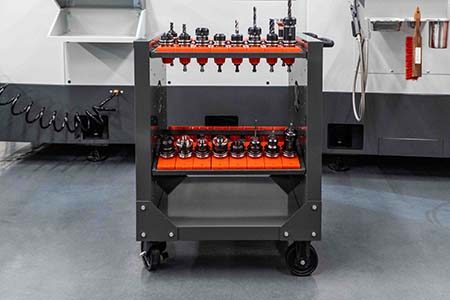
      • Tool Carts
    • Measuring & Inspection Shop All
      • 7-Piece Measuring Kit
      • 3D Sensor Kit, Inch, CT40
      • 3D Sensor Kit, Metric, SK40/DIN
      • 3D Sensor Kit, Metric, BT40
      • 3D Sensor Kit, Inch, HSK63A
      • 3D Sensor Kit, Metric, HSK63A
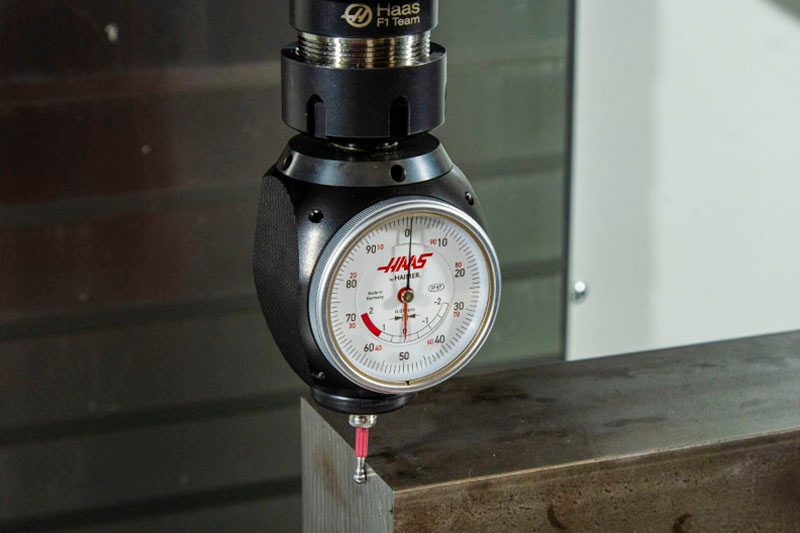
      • 3D Sensor, Inch
      • 3D Sensor, Metric
      • WIPS Stylus, 3-Pack
      • WIPS Replacement Stylus
      • Spindle Test Bar
      • Coolant Refractometer
      • Clamp Force Gauge
    • HAAS TOOLING QUICK LINKS
      NEW PRODUCTS NEW PRODUCTS
      MOST POPULAR MOST POPULAR
      OPEN TERMS OPEN TERMS
      FINANCING FINANCING
      FAQs FAQs
      KITS CREATED FOR YOU KITS CREATED FOR YOU
  • Haas Service Parts
      Automatic Pallet Changer Lathe Turret Tool Changer Chip Management Coolant Counterbalance Electrical Cabinet Enclosure Hydraulics Lubrication Maintenance Pendant Probing Rotary Spindle Tailstock
    • Haas Service Parts
    • Automatic Pallet Changer Shop All
      • HMC - Automatic Pallet Changer
      • VMC - Automatic Pallet Changer
    • Lathe Turret Shop All
      • Lathe - Turret
      • Live Tooling
    • Tool Changer Shop All
      • Side Mount
      • Umbrella
    • Chip Management Shop All
      • Multi Auger
      • Single Auger
    • Coolant Shop All
      • Auxiliary Filter
      • HPC-300 (Lathe)
      • HPC-1000 (Lathe)
      • Oil Skimmer
      • Standard Coolant
      • TSC-300 (Mill)
      • TSC-1000 (Mill)
      • Coolant Refill
      • Loc-Line
    • Counterbalance Shop All
      • Charge & Discharge Hose
    • Electrical Cabinet Shop All
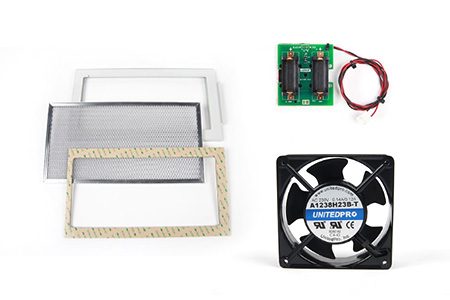
      • Fans
      • Filters
      • Upgrade Kits
    • Enclosure Shop All
      • Accessories
      • Air Nozzle
      • Decals
      • Door Bumpers
      • Lighting
      • Windows, Gaskets, & Weather Strip
      • Chip & Coolant Management
    • Hydraulics Shop All
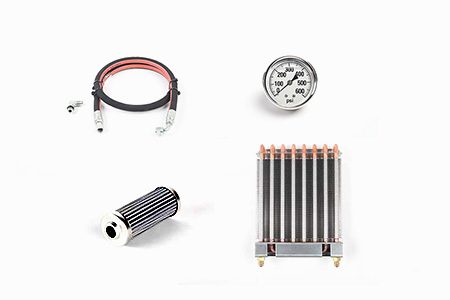
      • Filters
      • Gauges
      • Heat Exchanger
      • Hoses
    • Lubrication Shop All
      • Bijur Mechanical Lubrication
      • Minimum Lubrication
    • Maintenance Shop All
      • Grease, Oil, & Sealants
    • Pendant Shop All
      • Floppy Disk & USB
      • Keypad
      • Keys
      • Lens
      • Gaskets & Seals
    • Probing Shop All
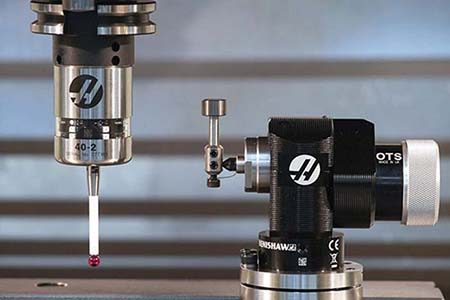
      • Mill Probing
      • Lathe Tool Presetter
    • Rotary Shop All
      • Rotary Gaskets & Seals
    • Spindles Shop All
      • Couplings
      • Gaskets & Seals
      • Spindle Motor Drive
      • Gearbox Drive
      • Tool Release Piston
    • Tailstock Shop All
      • Handles
  • Contact Us

My Cart
MyHaas Welcome,
!
Haas Tooling Guest Order History MyHaas/HaasConnect Sign In Register Haas Tooling My Account Order History Return History MyHaas/HaasConnect Sign Out Welcome, My Machines Latest Activity My Quotes My Account My Users Sign Out
Find A Dealer
  1. Select Language
    1. English
    2. Deutsch
    3. Español - España
    4. Español - Méjico
    5. Français
    6. Italiano
    7. Português
    8. Český
    9. Dansk
    10. Nederlands
    11. Magyar
    12. Polski
    13. Svenska
    14. Русский
    15. Türkçe
    16. 中文
    17. Suomi
    18. Norsk
    19. الإنجليزية
    20. български
    21. Hrvatski
    22. Ελληνικά
    23. Română
    24. Slovenský
    25. Slovenščina
    26. 한국어
    27. 日本語
Search
×

Search Results

Web Pages

Images

    • <
    • 1
    • >

3 - CAN Autodoor - Installation

Autodoor - Service Manual


  • 1 - Autodoor - Introduction
  • 2 - 8M Autodoor - Installation
  • 3 - CAN Autodoor - Installation
  • 4 - Autodoor - LVPS
  • 5 - Autodoor - Door Edge Sensor
  • 6 - Autodoor - Door Track
  • 7 - Autodoor - DC Motor
  • 8 - Autodoor - Maintenance
  • 9 - Autdoor - Troubleshooting

Go To :

  • 3.1 Mill CAN Autodoor
  • 3.2 Lathe CAN Autodoor
  • 3.3 CAN Autoodor Upgrade
Recently Updated

Mill Smart CAN DC Autodoor - Installation


AD0513

Introduction

This procedure will show you how to install the Smart CAN autodoor option on mills. 

Note: If you are upgrading to a Smart CAN Autodoor system do not use this procedure refer to Smart CAN Autodoor Upgrade procedure.

Machine Requirements:

  • Software Version 100.20.000.1200 or higher
  • I/O PCB 34-3490B or higher
  • AD PCB 34-3096, 34-3096A with Firmware Version  1.29 or higher
  • I/O Firmware version 4.09 or higher
  • TC Firmware version 2.06 or higher
  • See sheet metal requirements table below for specific machine details to see if your machine is able to install autodoor. Machines after this date are able to, machines before are not.

 Note:  All the above software and firmware files can be downloaded from the Haas Business Center.

Machines: VF - 1-2 VF - 3-5 VF - 6 or higher DT/DM-1
Dates: April 2019 November 2018 40T March 2020 October 2020
50T  July 2020

Smart CAN Autodoor Kits

Part Number Description Wattage
93-1000473 AUTODOOR FIELD INSTALL KIT VF SM 2020 150
93-1000474 AUTODOOR FIELD INSTALL KIT VF M NYT 2020 150
93-1000475 AUTODOOR FIELD INSTALL KIT VF M YT 2020 150
93-1000588 AUTO DOOR FIELD INSTALL CAN VF-6/8 150
93-1000589 AUTO DOOR FIELD INSTALL CAN VF-7/9 150
93-1000590 AUTO DOOR FIELD INSTALL CAN VF-10/11 150
93-1000491 AUTO DOOR FIELD INSTALL KIT DT/DM-1 150
93-1000698 AUTODOOR FIELD INSTALL KIT VF SM 2021 350
93-1000697 AUTODOOR FIELD INSTALL KIT VF M NYT 2021 350
93-1000696 AUTODOOR FIELD INSTALL KIT VF M YT 2021 350
93-1000695 AUTODOOR FIELD INSTALL KIT DT/DM-1 2021 350
93-1000689 AUTO DOOR FIELD INSTALL CAN VF-6/8 2021 350
93-1000688  AUTO DOOR FIELD INSTALL CAN VF-7/9 2021 350
93-1000687 AUTO DOOR FIELD INSTALL CAN VF-10/11 2021 350

Haas Europe - Smart CAN Autodoor Kits

Part Number Description Wattage
93-1000672 AUTODOOR FIELD INSTALL KIT VF SM 2020 HE 150
93-1000662 AUTODOOR FIELD INSTALL KIT VF M NYT 2020 HE 150
93-1000663 AUTODOOR FIELD INSTALL KIT VF M YT 2020 HE 150
93-1000670 AUTO DOOR FIELD INSTALL CAN VF-6/8 HE 150
93-1000665 AUTO DOOR FIELD INSTALL CAN VF-7/9 HE 150
93-1000671 AUTO DOOR FIELD INSTALL CAN VF-10/11 HE 150
93-1000664 AUTO DOOR FIELD INSTALL KIT DT/DM-1 HE 150
93-1000674 AUTODOOR FIELD INSTALL KIT VF SM 2021 HE 350
93-1000684 AUTODOOR FIELD INSTALL KIT VF M NYT 2021 HE 350
93-1000683 AUTODOOR FIELD INSTALL KIT VF M YT 2021 HE 350
93-1000682 AUTODOOR FIELD INSTALL KIT DT/DM-1 21 HE 350
93-1000676 AUTO DOOR FIELD INSTALL CAN VF-6/8 '21 HE 350
93-1000681 AUTO DOOR FIELD INSTALL CAN VF-7/9 '21 HE 350
93-1000675 AUTO DOOR FIELD INSTALL CAN VF-10/11 21 HE 350

Installation

1

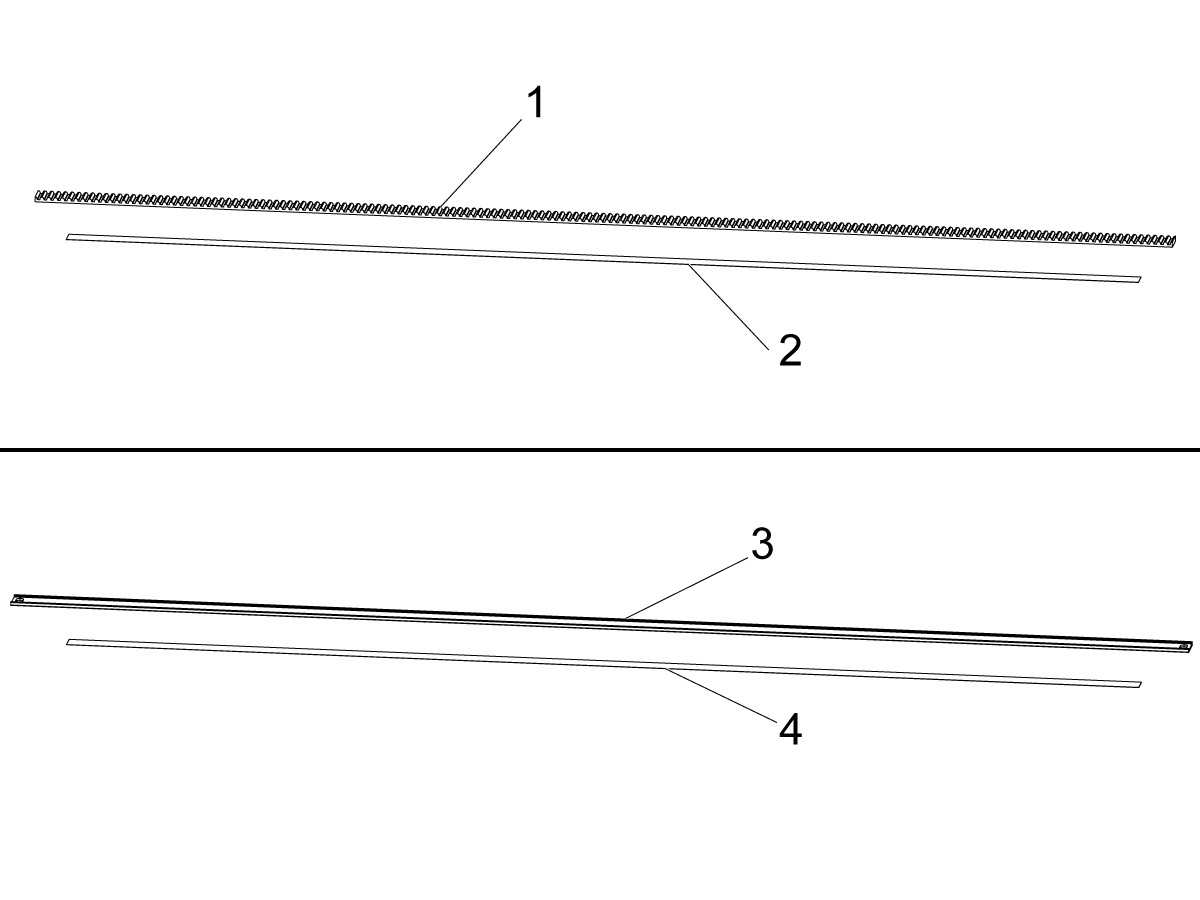
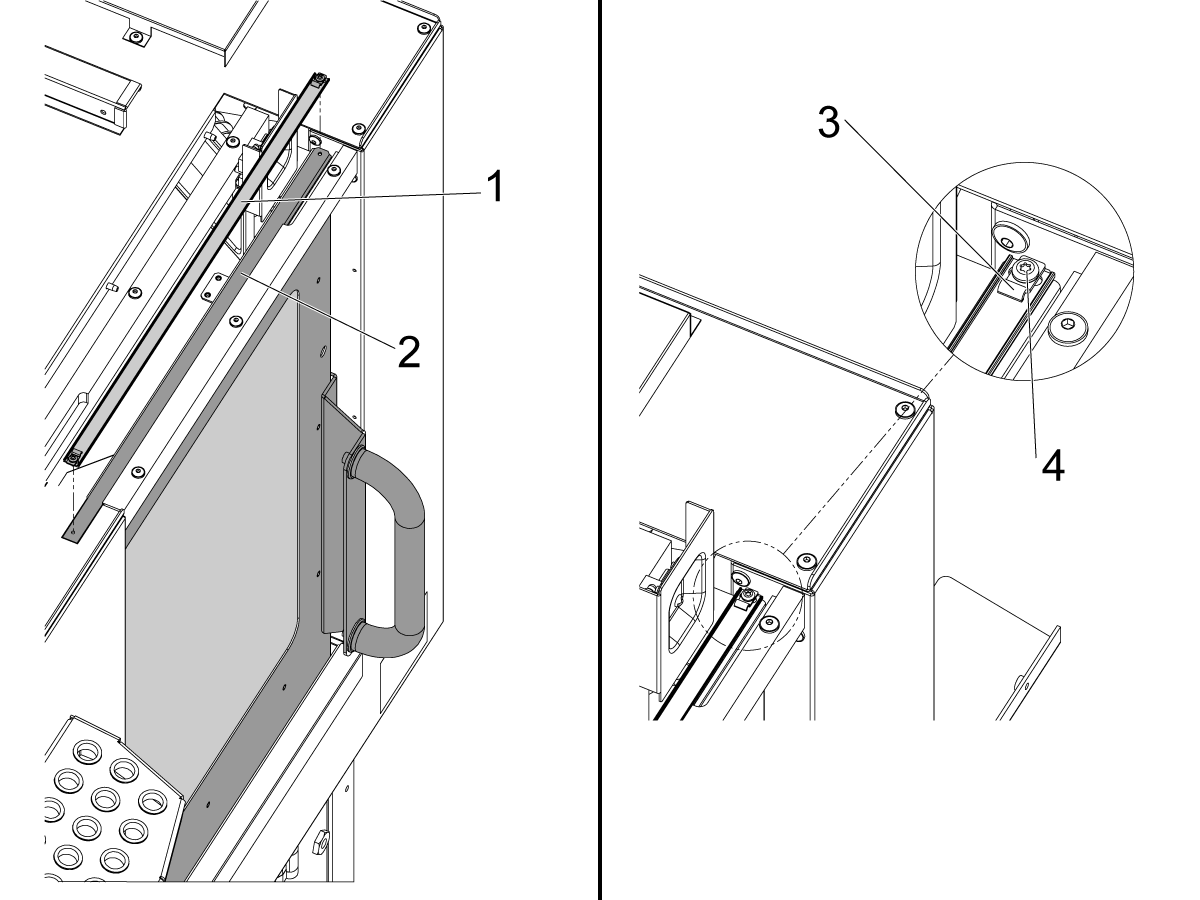
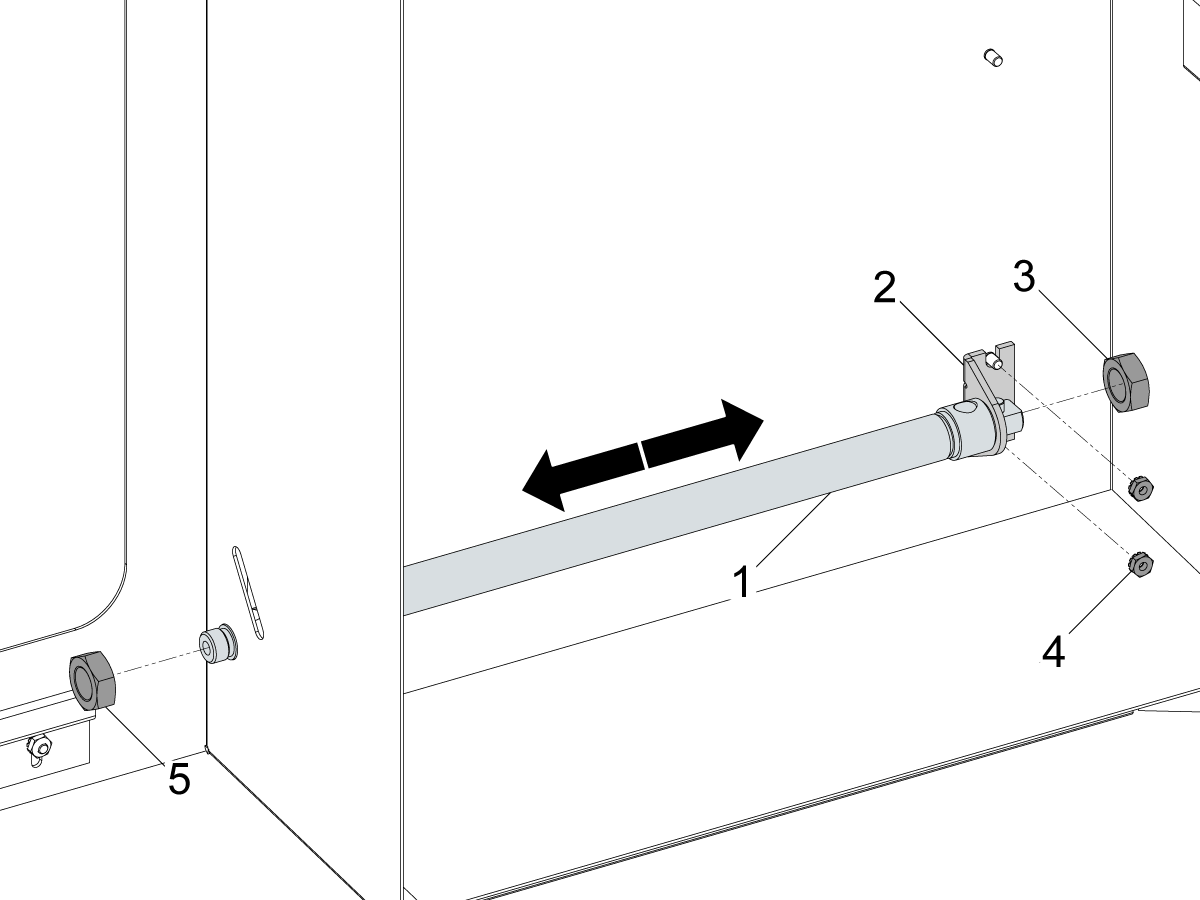
Cut the track [1] and tape [2] to your machine specific length in the table below.

Clean the bottom of the track mount [3] and make sure it is not contaminated. Cut the double sided tape [4] to the length described below, peel off one side of the tape and leave the other intact, and connect the mount [3] and [4] together.


Machine Track [1] (in.) Tape [2] (in.) Tape [4] (in.)
VF-1/2 19.1  19.35 12
VF-3-5 26.4 26.6 12

2

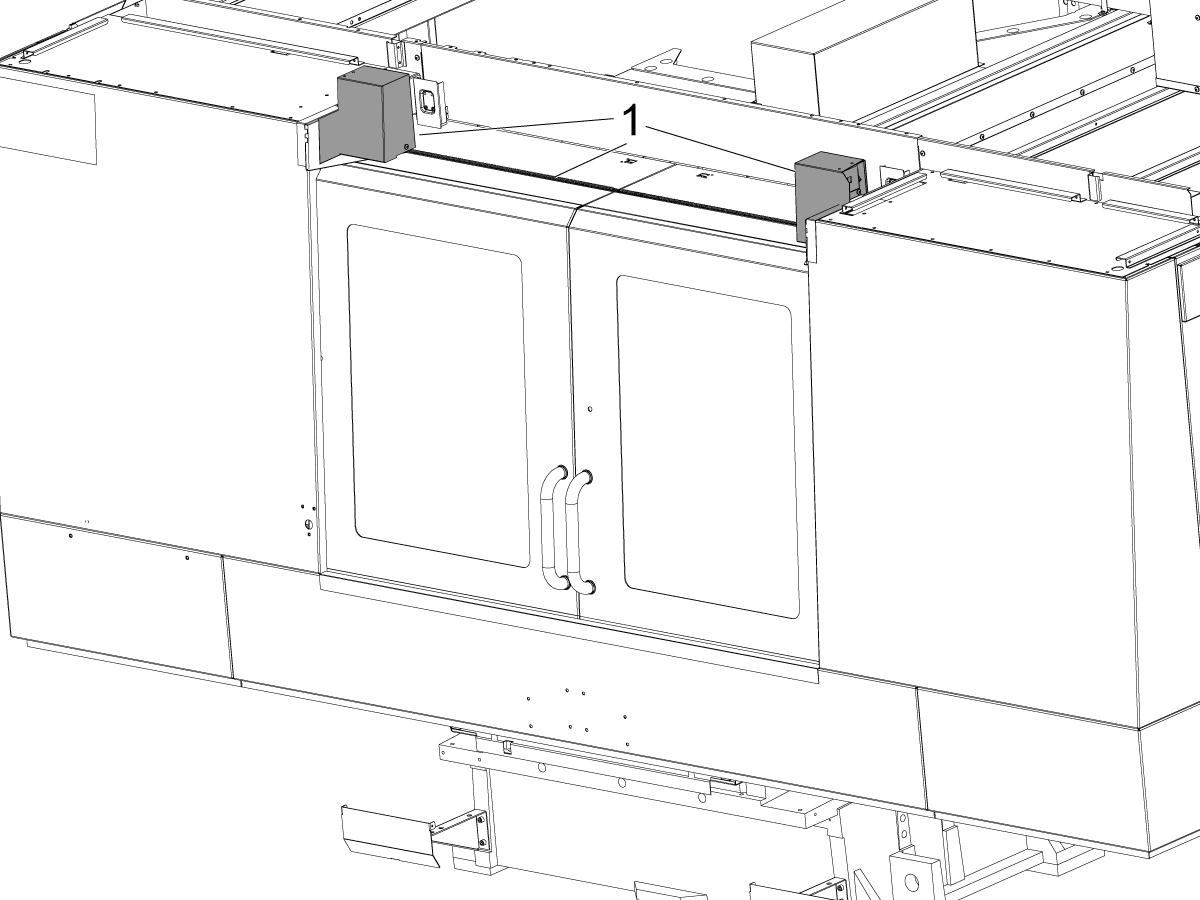
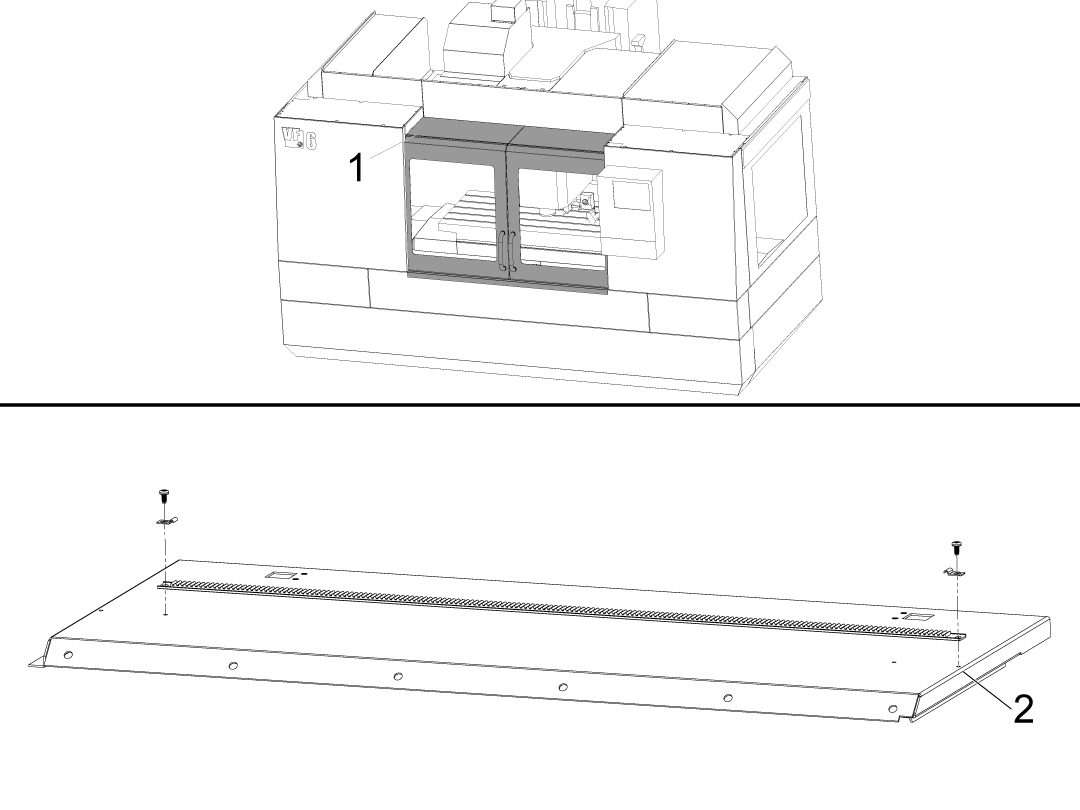
Bolt the track assembly onto the top of the door panels [1] using the PHCS 10-24 SELF TAPPING THREADS.

The process shown is for the left side, the bolt hole used is the closest to the edge where the two doors meet, the bolt hole used here is as shown [2]. For the right it is the inner position hole.

NOTE:  Do not peel off the double sided tape just yet, make sure the track has some play for adjustment.

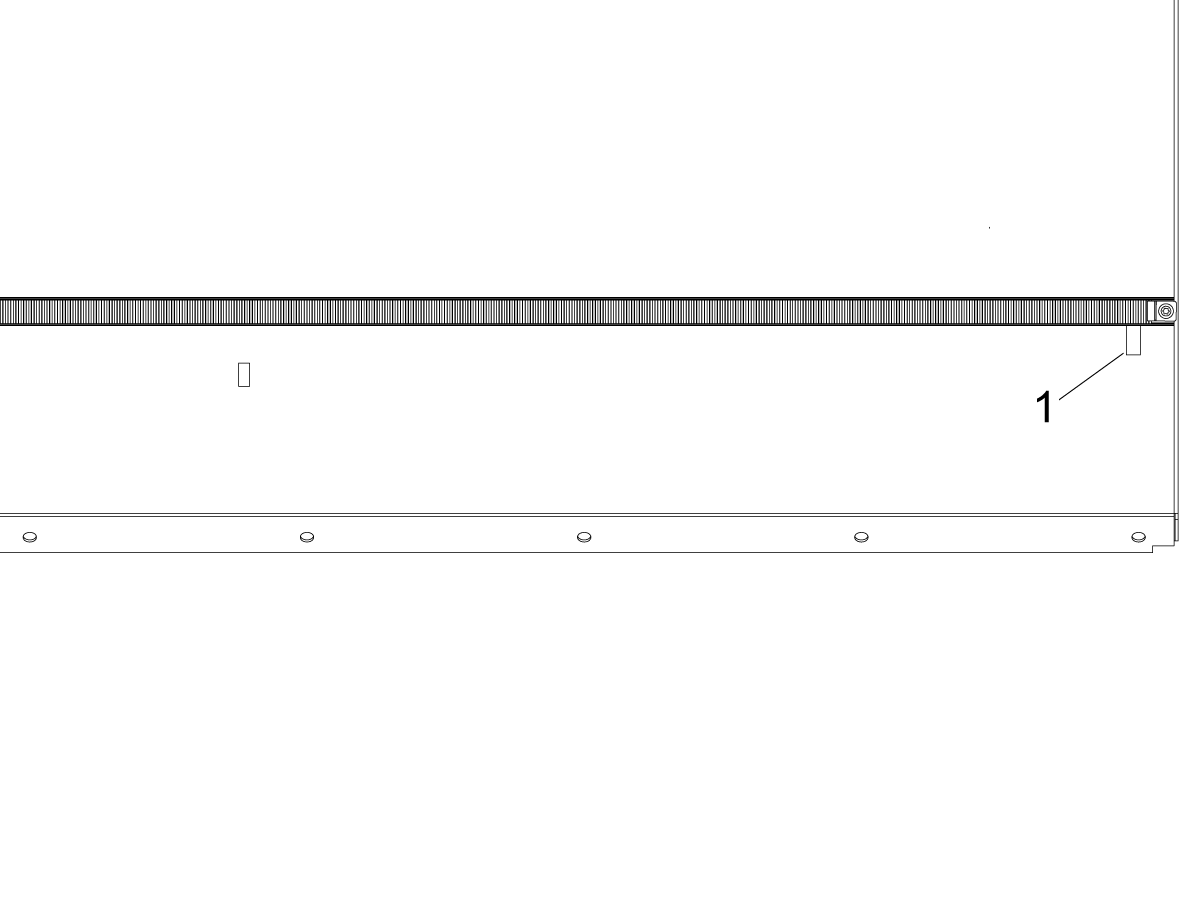
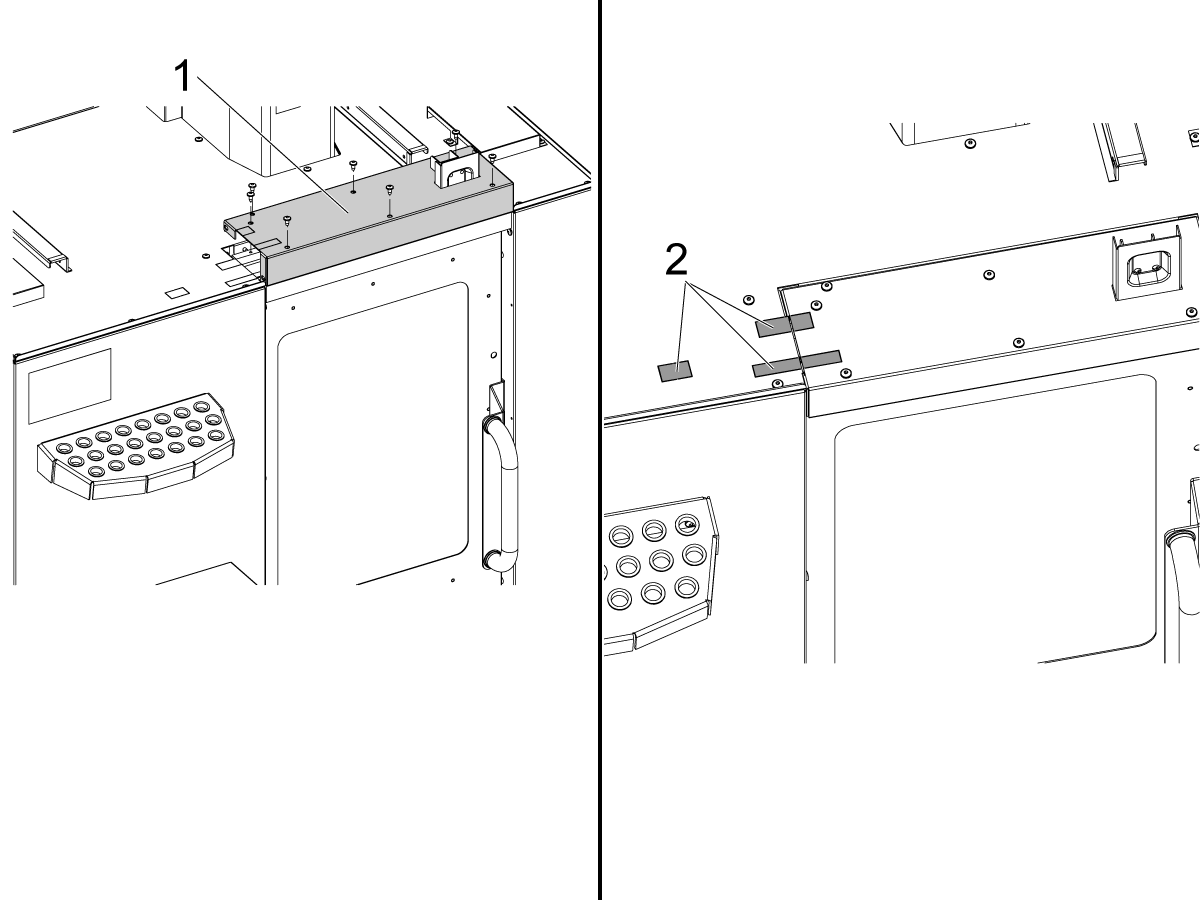
3

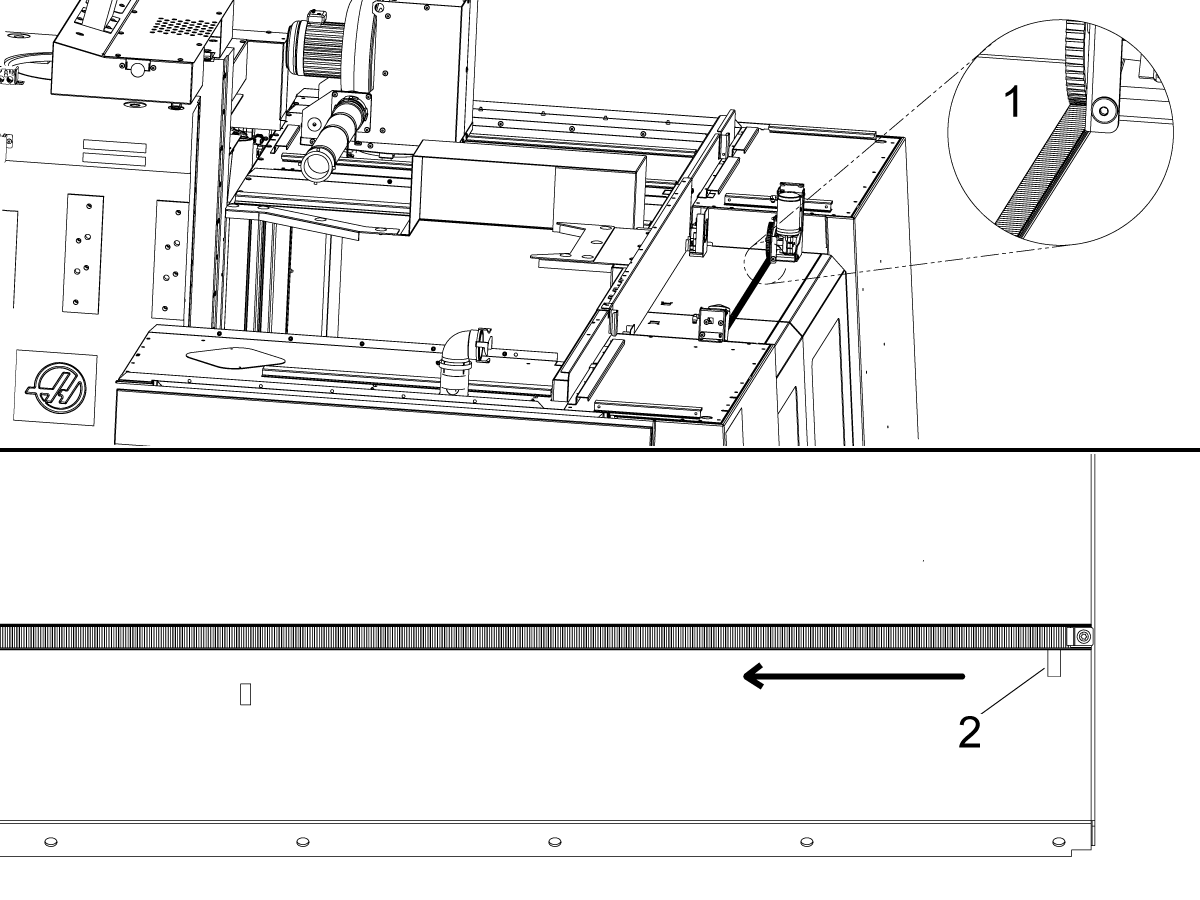
Peel off a bit of the tape [1],  but do not peel off the full amount. This will be peeled off in a later step.

4

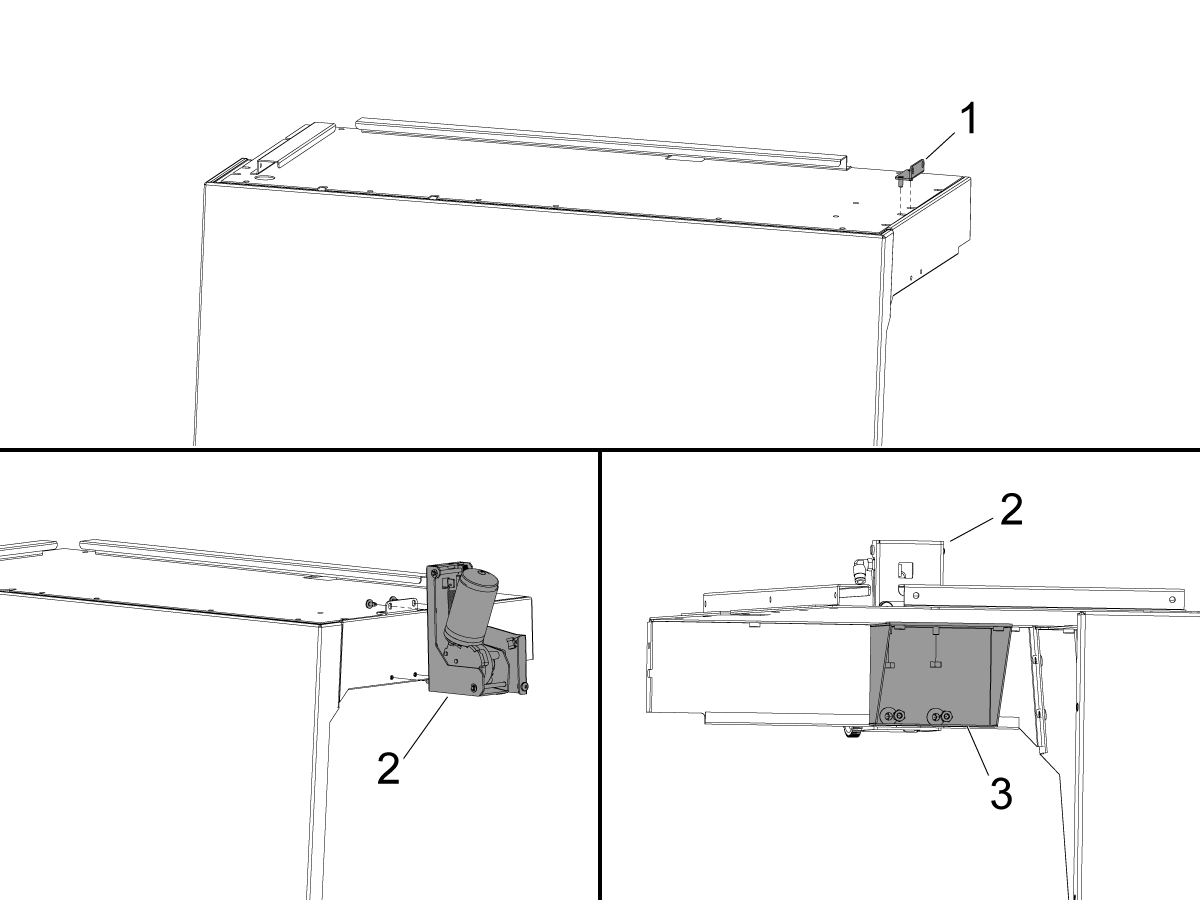
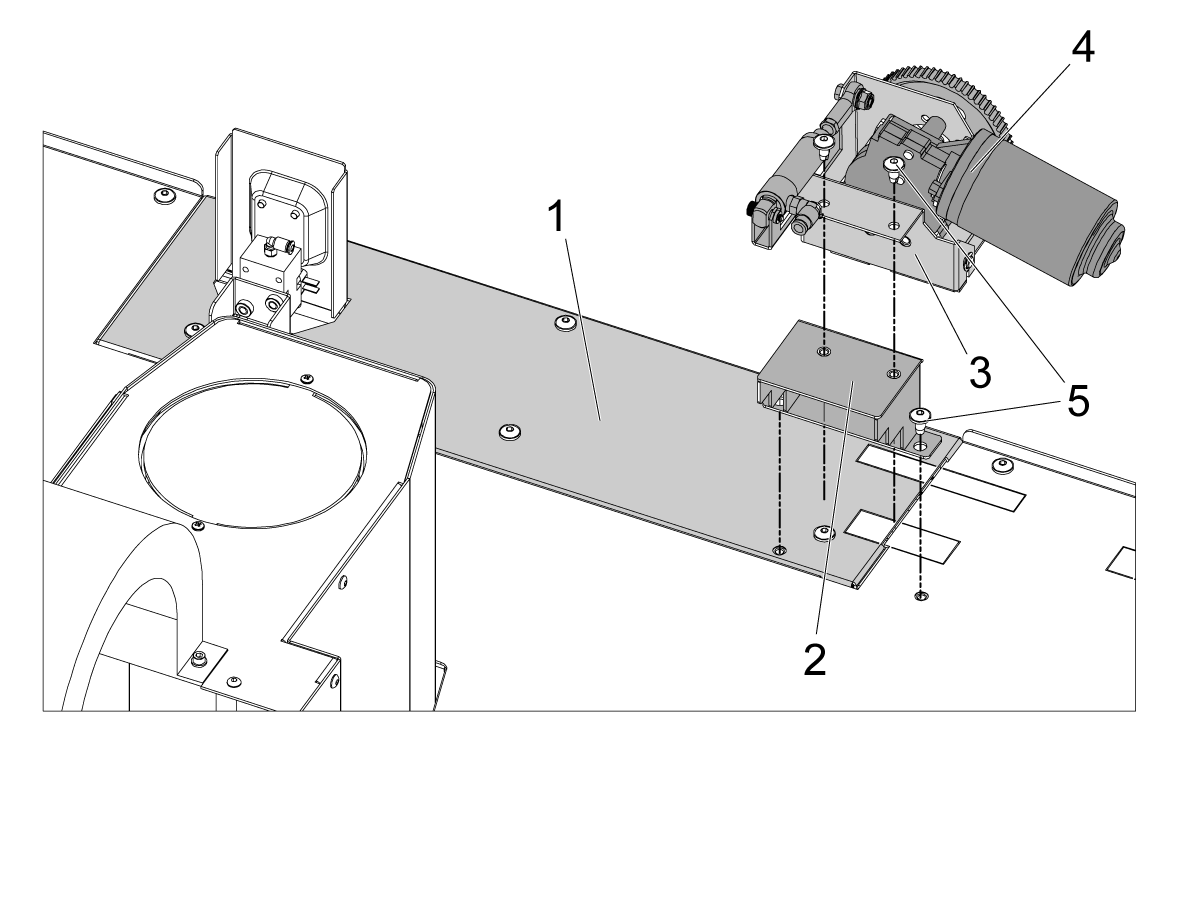
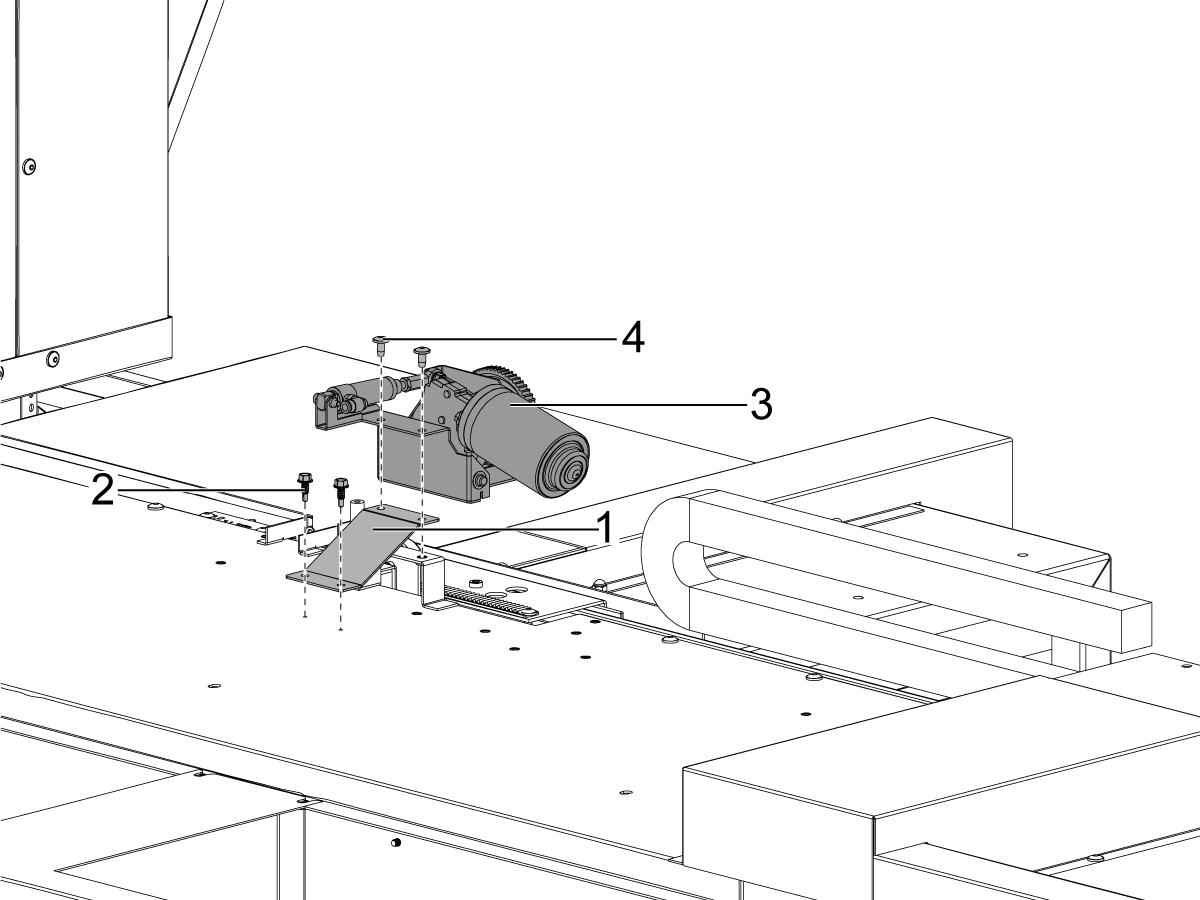
To install the left motor assembly insert the mounting bracket [1] into the mounting holes bolt the motor [2] to the mounting bracket [1] using  FBHCS 1/4-20 bolts. To complete the motor installation mount the stiffener bracket [3] to the inside of the enclosure and attach the 1/4-20 nuts to the mounting bracket [1] and the motor. 

NOTE: The stiffener bracket is only installed on the VF-Large series.

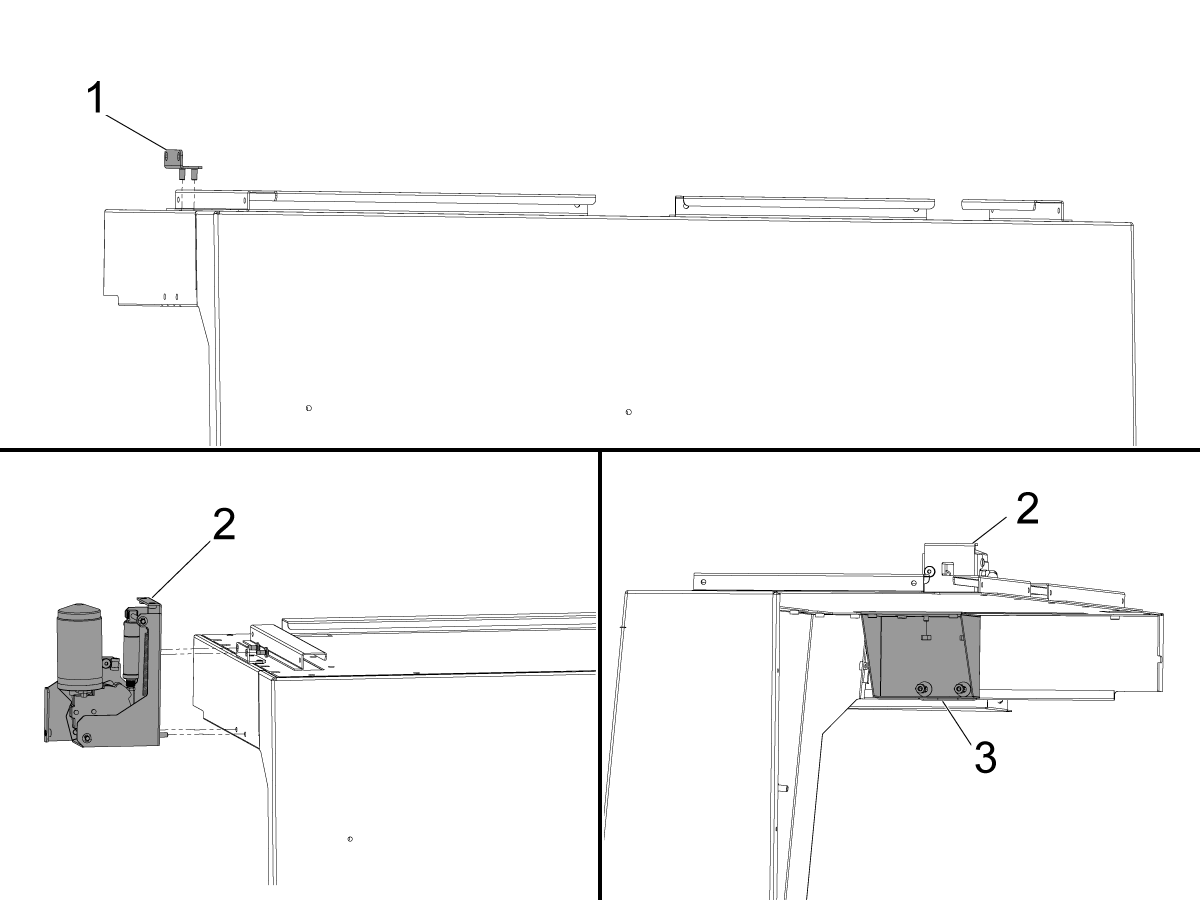
5

To install the right motor assembly repeat step 3.

 NOTE: The stiffener bracket is only installed on the large series VF.

Track alignment and wiring

1

To align the track to the motor it is important for the wheel to have full engagement on the track, DO NOT sacrifice door alignment for track alignment, if you are having issues aligning the track adjust the track itself with the slots in the track clips.

Once the track is aligned peel the tape bit that was left prior and apply pressure as you peel..

2

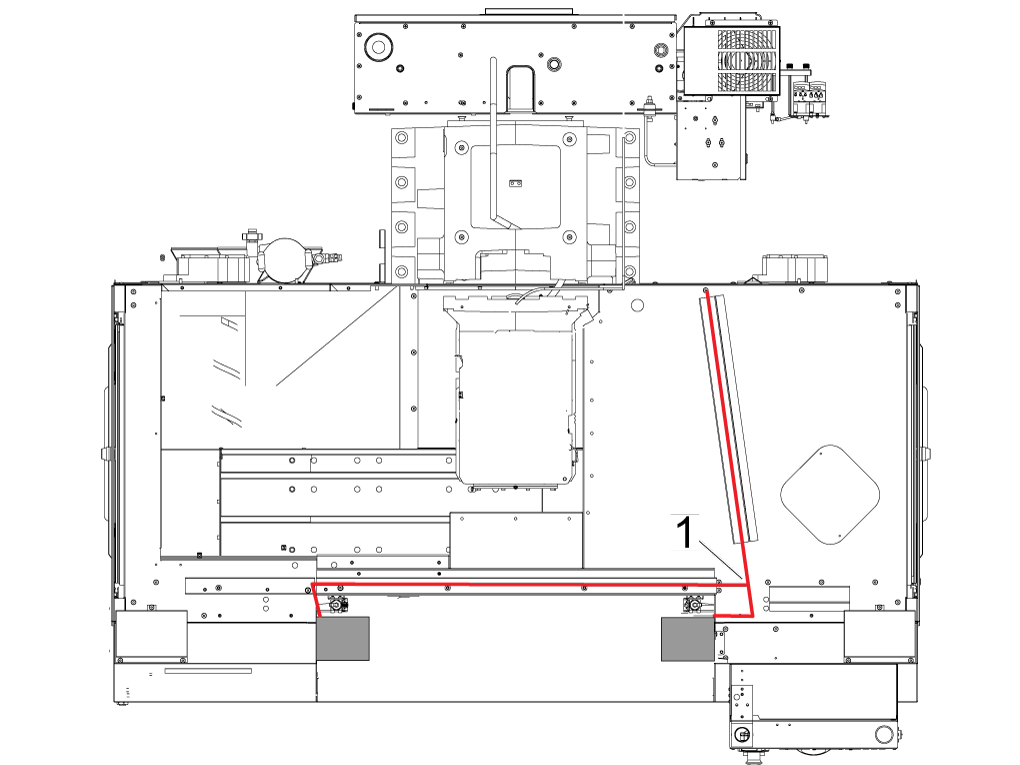
VF-1/2

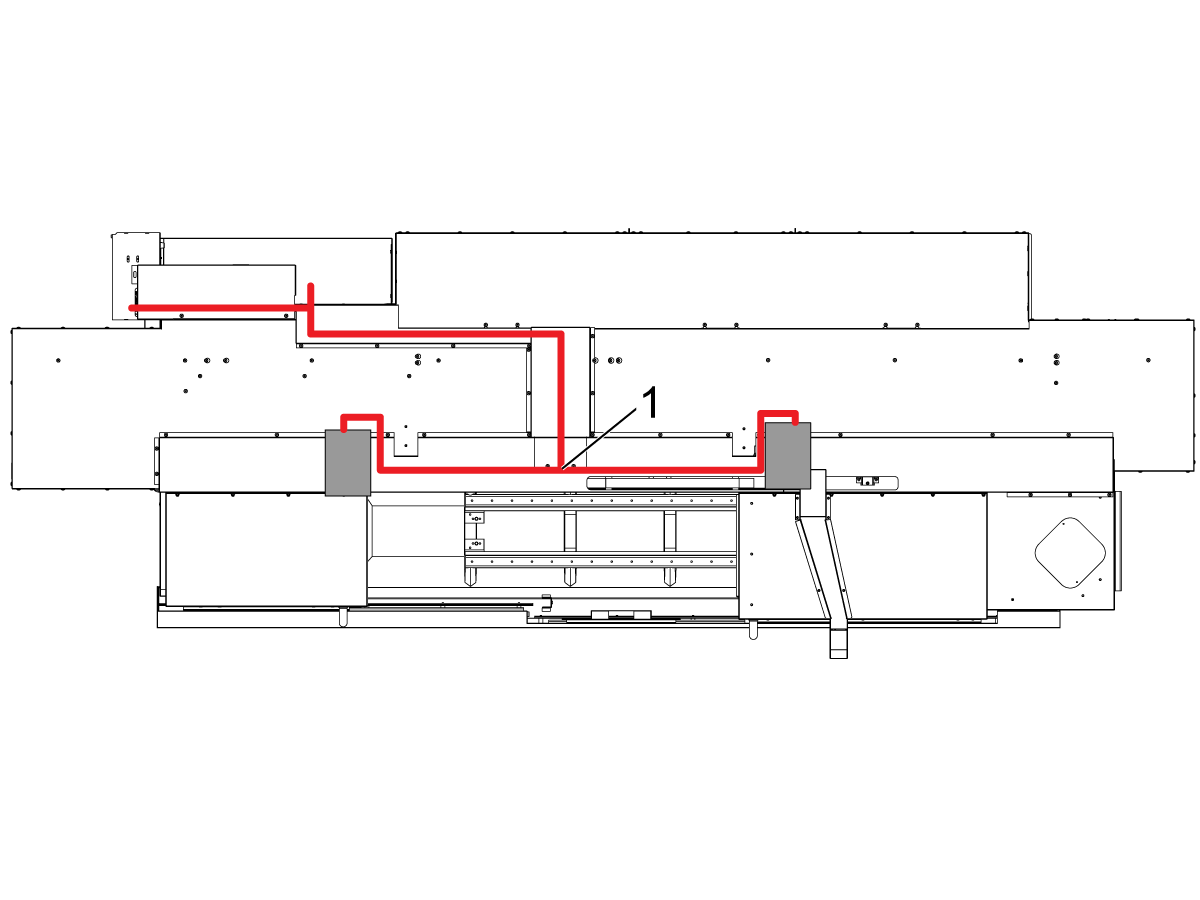
Route the pneumatic hoses as shown, the Tee fitting will connect all 3 hoses at location [1].

3

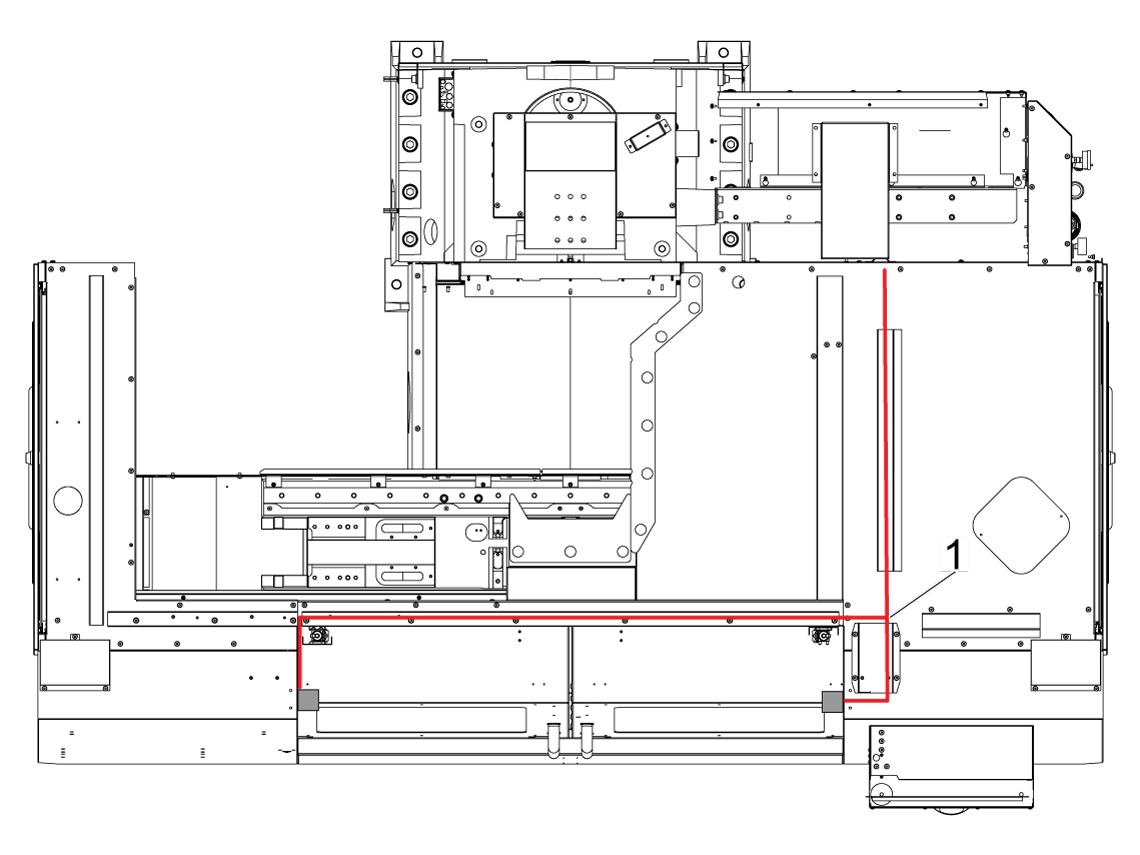
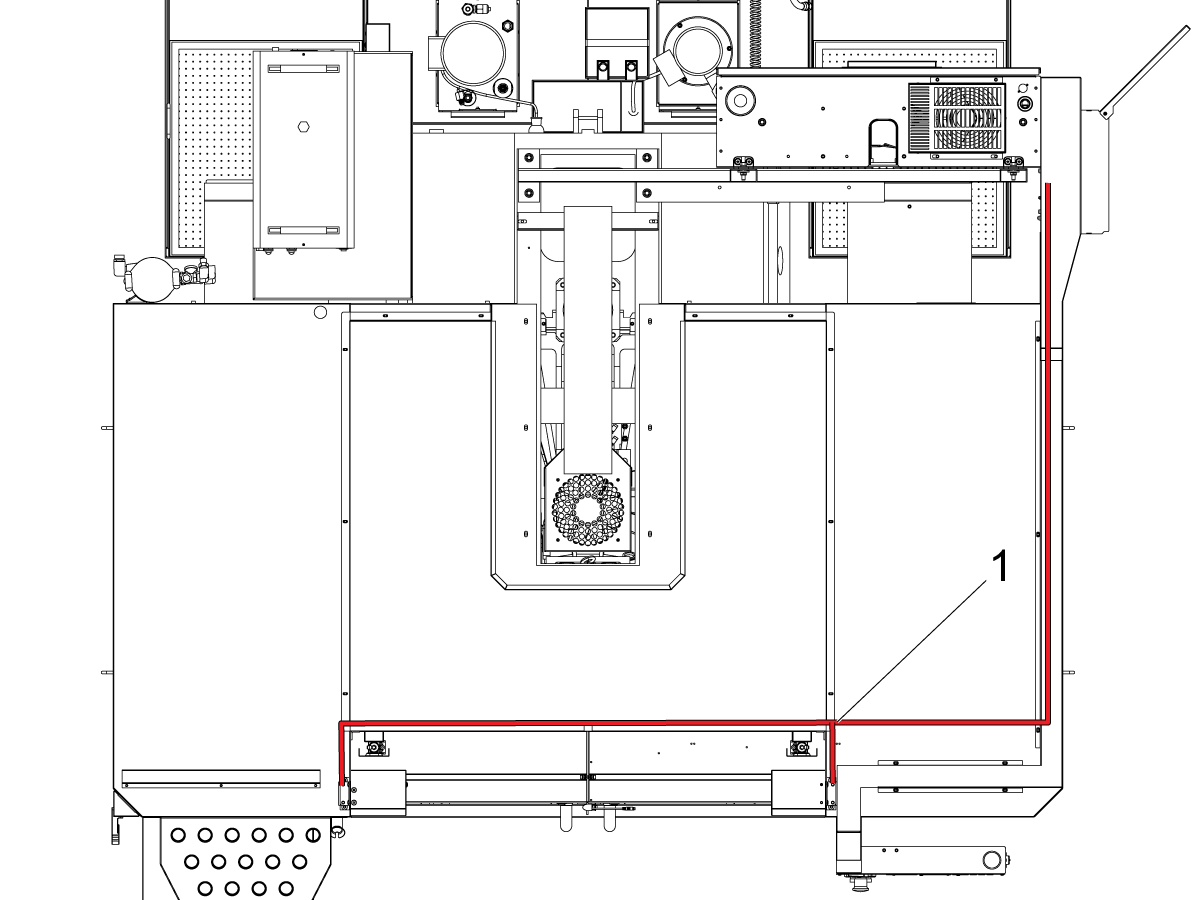
VF-3 to VF-5

Route the pneumatic hoses as shown, the Tee fitting will connect all 3 hoses at location [1].

4

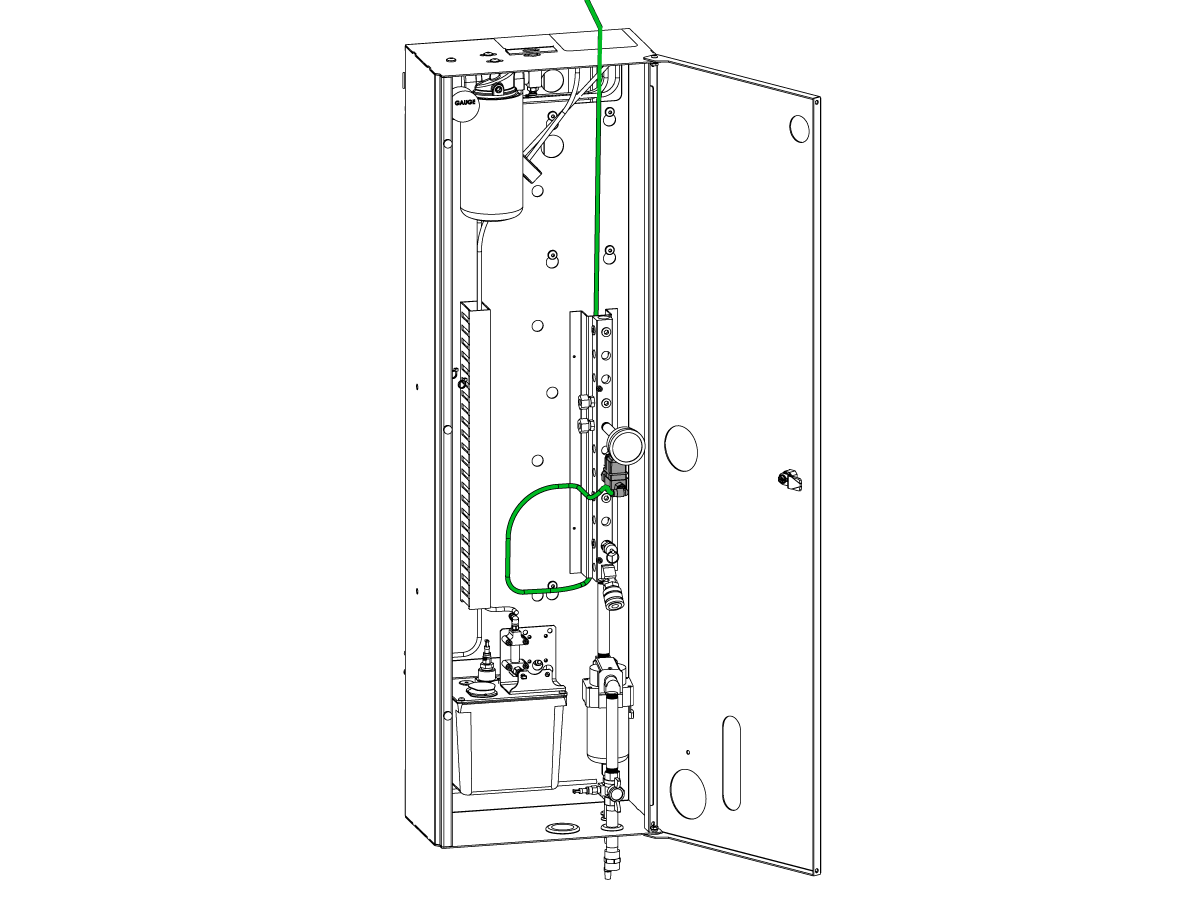
Connect pneumatic hose to solenoid shown, a bare lube panel is used to help easily identify which solenoid to connect to.

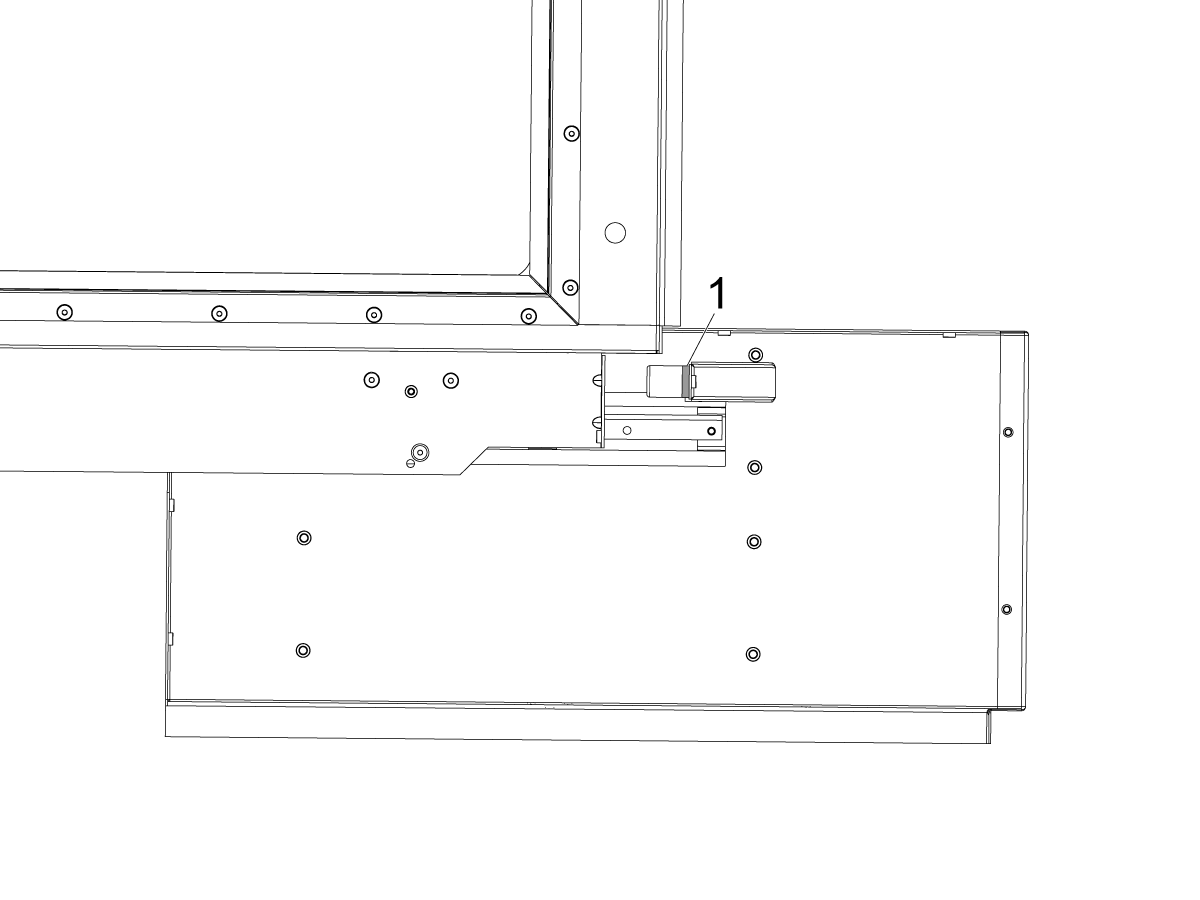
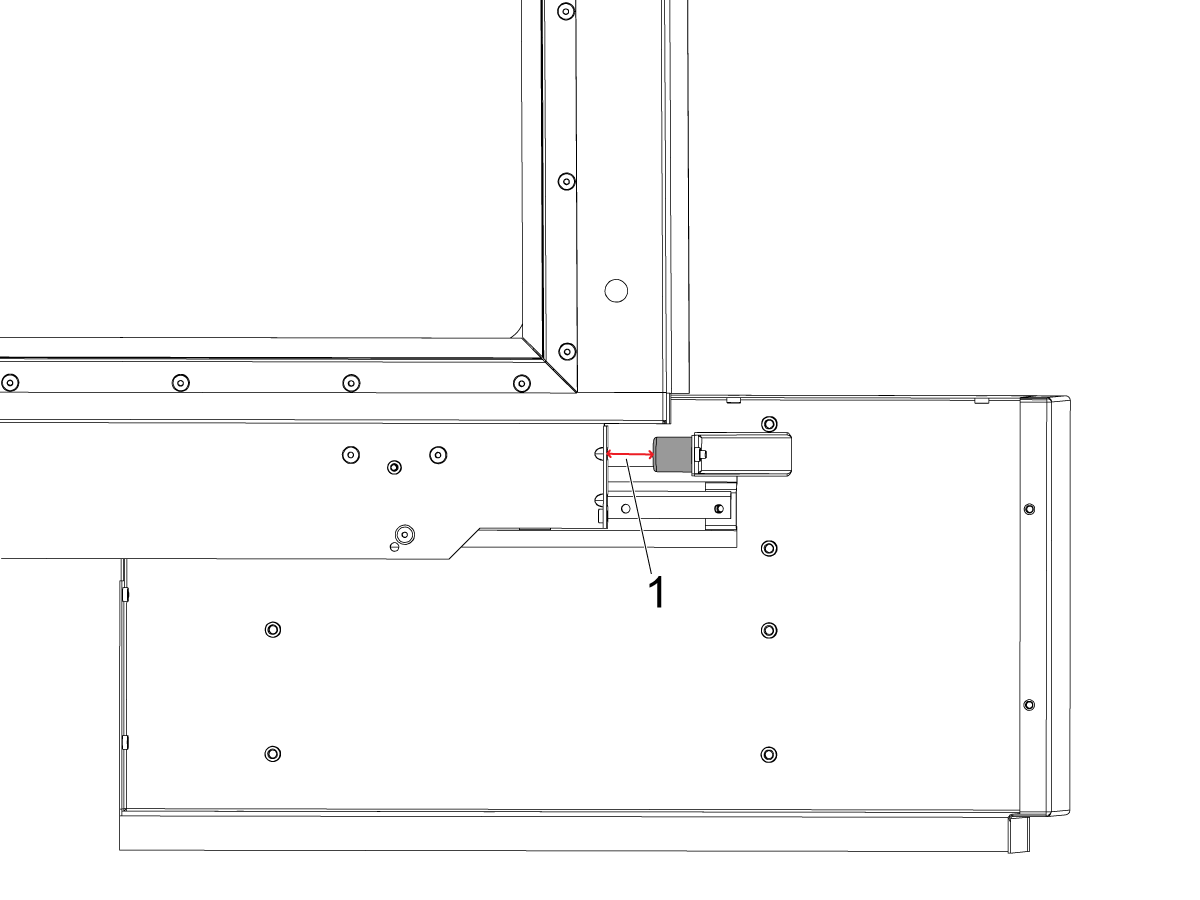
5

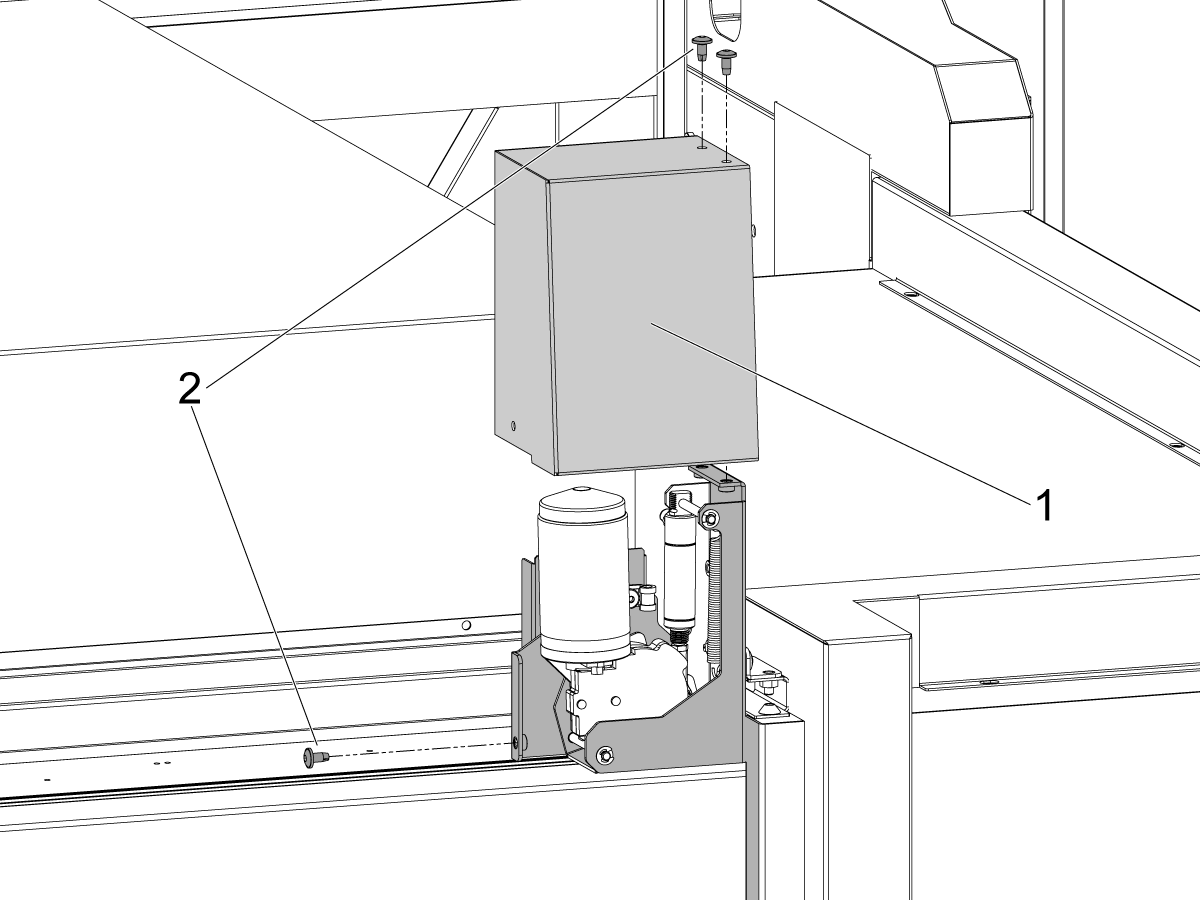
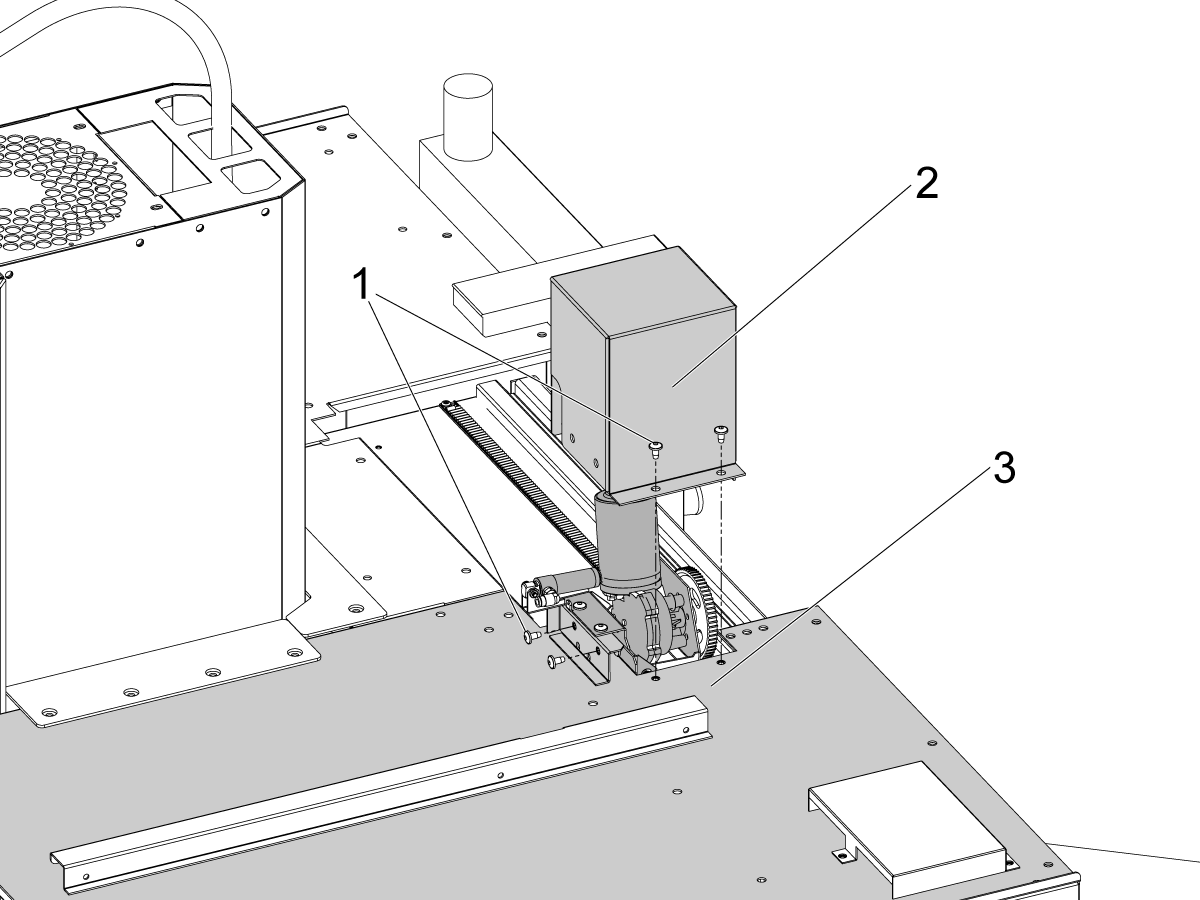
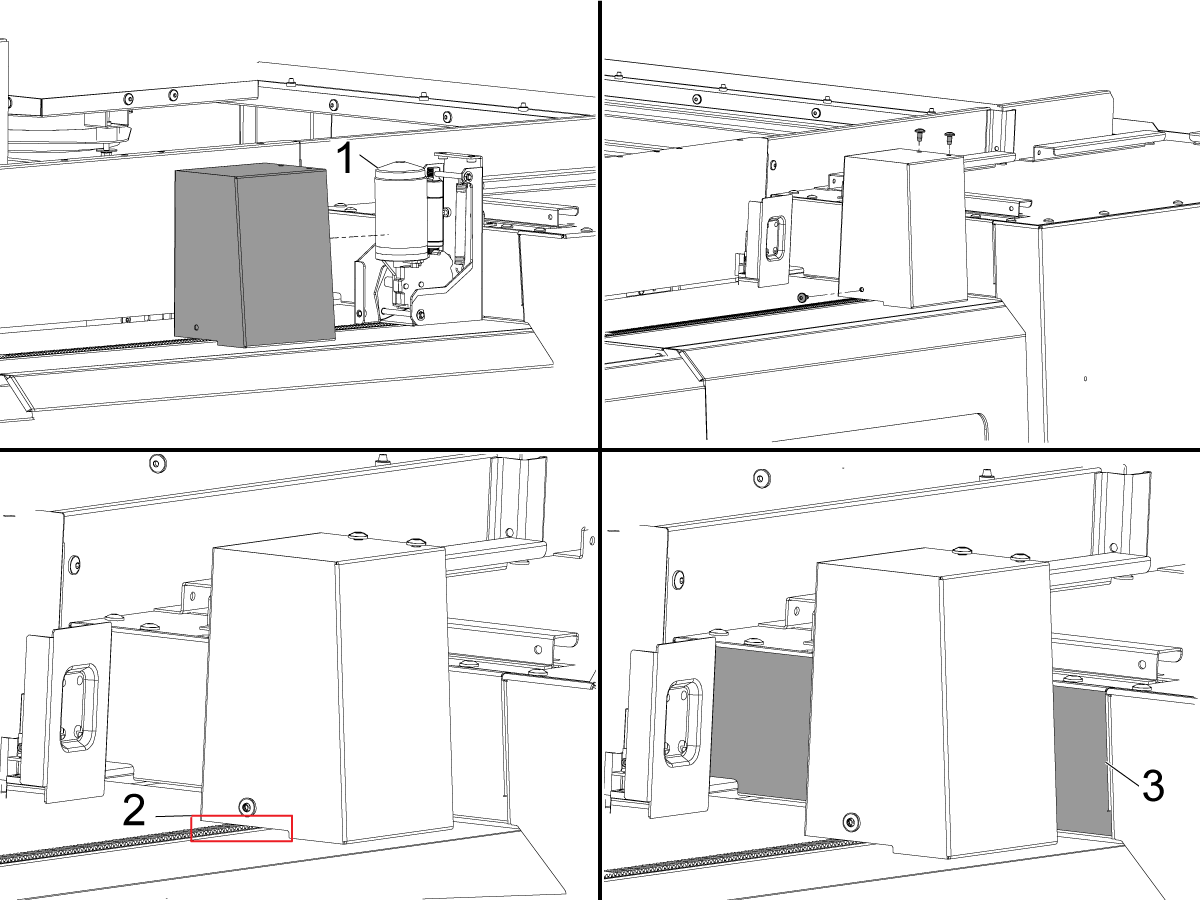
Install the motor cover, apply some tacky grease if possible on the cap [1] of the motor to make the installation easier and bolt the cover using FBHCS 1/4-20. Be sure there is sufficient clearance within the gap [2], if any adjustments are needed do so by untightening the bolts on the panel [3] and adjust. 


NOTE: If you are installing the autodoor on a VF-1/2 and it already has HIL installed, you will need to install the riser plate. Please refer to the riser plate installation section in the HIL installation procedure.

High Intensity Light - Intallation

6

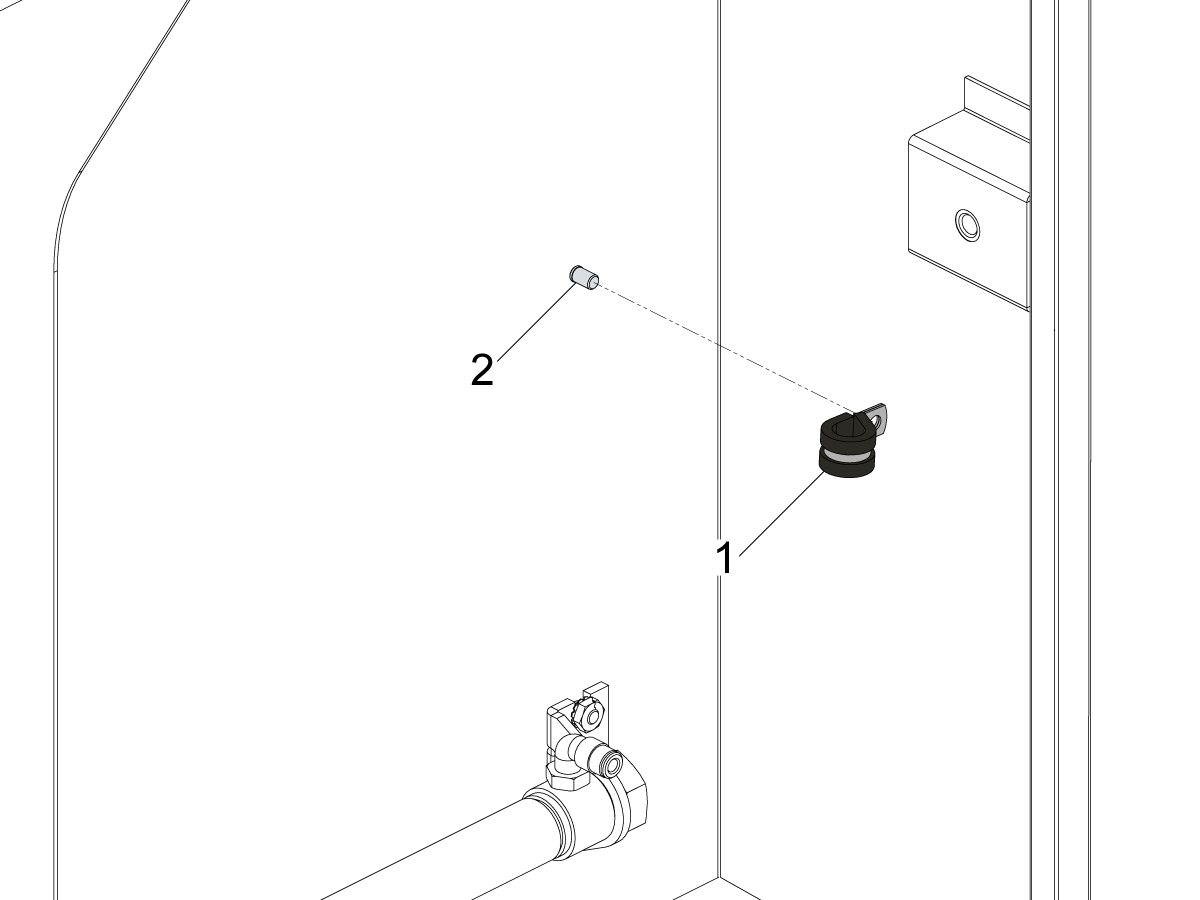
Install the bumper spacer [1].

7

Open the doors and set the bumper gap [1] is between 1-1.5 inches


8

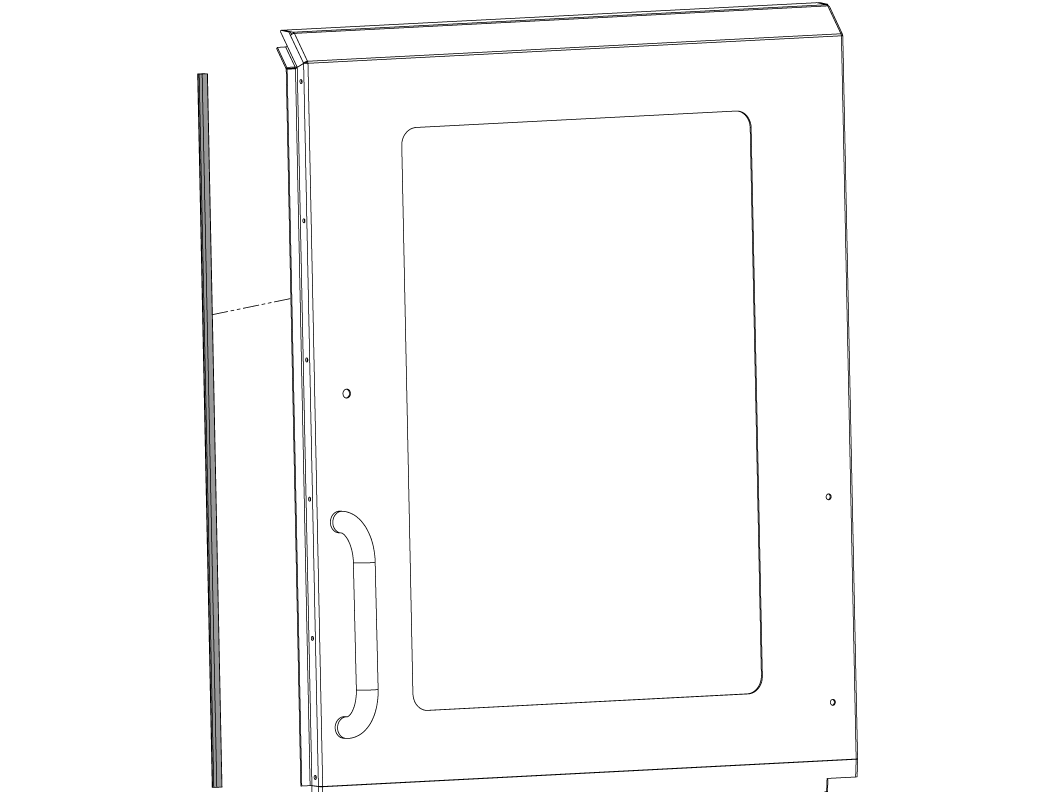
Add a bit of superglue before installing the Trim-Lok, then install to the right door as shown.

Smart CAN Autodoor Power Supply

1

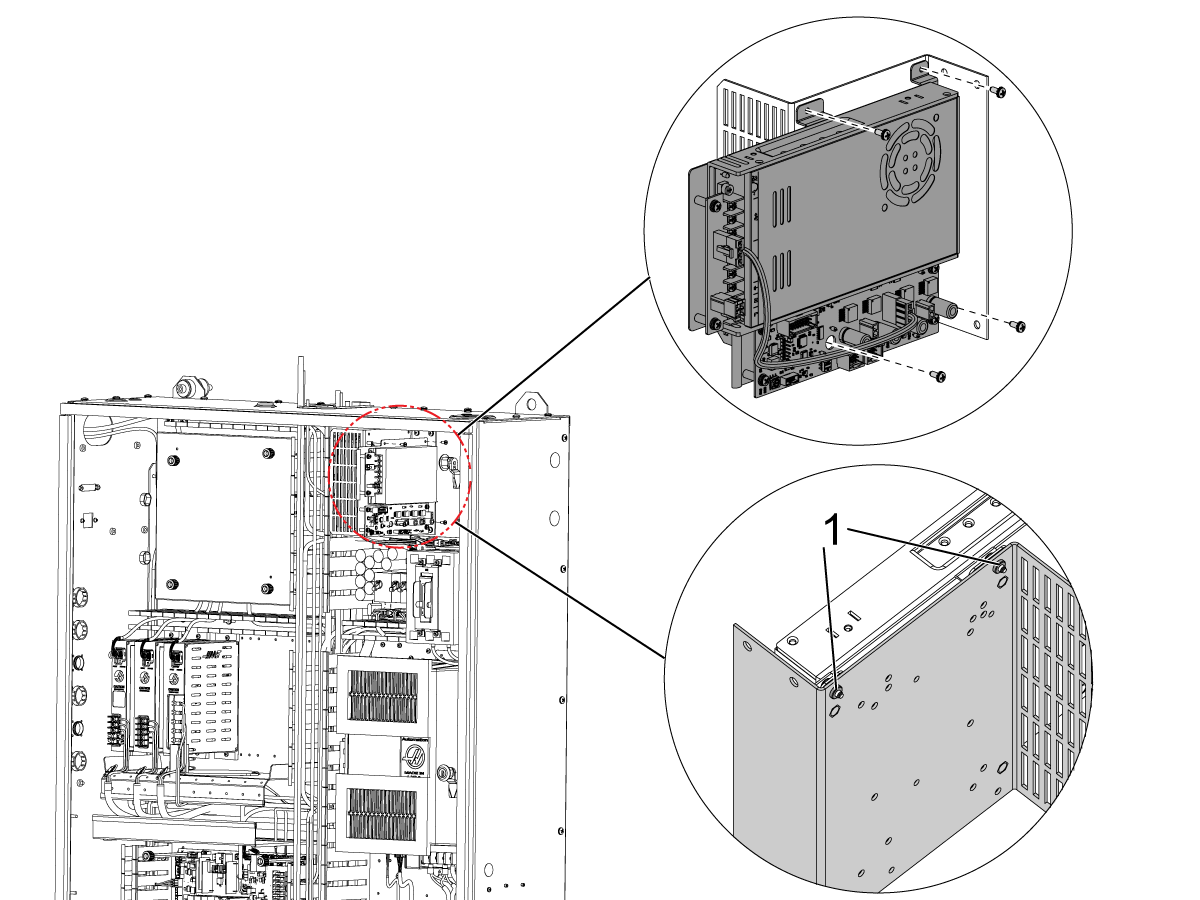
Install the Smart Can Autodoor Power Supply using the provided hardware.

For machines built before July 2021: Use the provided (2) 6-32 nuts on the two holes at the top of the LVPS bracket to install the 350W CAN Autodoor Power Supply.

For machines built after July 2021: The LVPS should have (2) pem nuts [1] on the existing through holes on the top of the LVPS and the 6-32 nuts are not needed to install the 350W CAN Autodoor Power Supply.

Connect the cables to the power supply as shown in the next step.

2

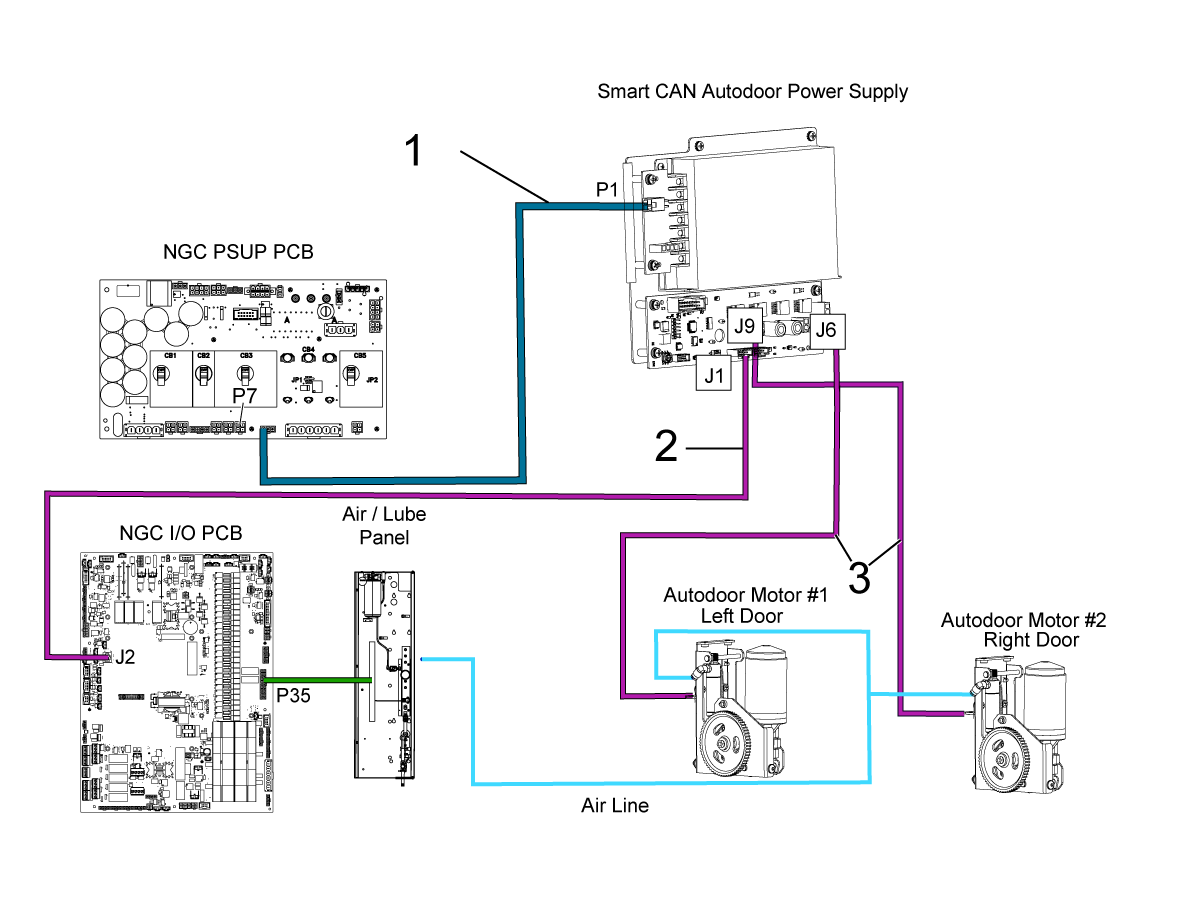
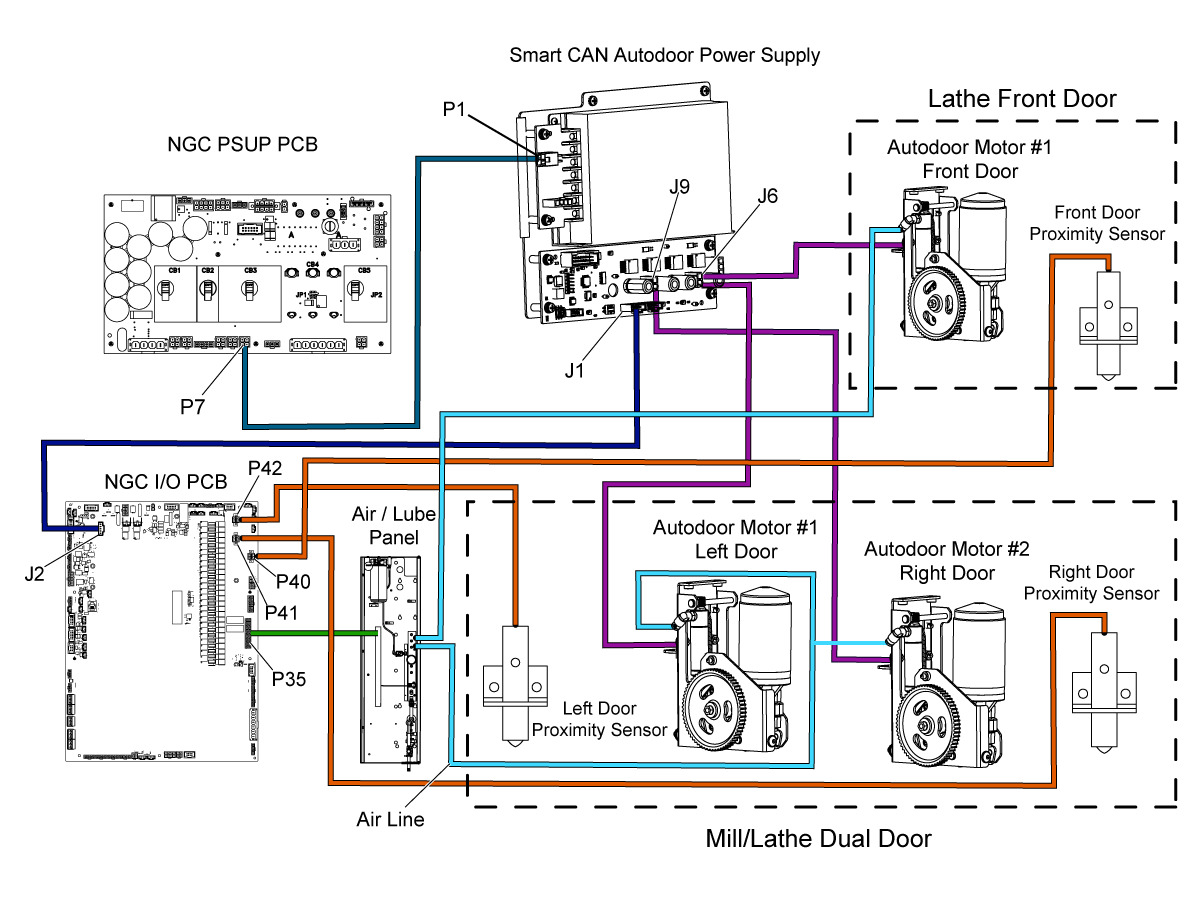
Connect the Smart CAN Autodoor Power Supply using the wiring diagram shown.

Connect the following cables:

  1. P/N 33-3310 Smart CAN Supply (P1) to PSUP PCB (P7)
  2. P/N 33-5310 Smart CAN Supply (J1) to I/O PCB (J2)
  3. The power cable from the Smart Can Supply (J6) to Autodoor Motor #1 and for Mill connect the power cable from (J9) to Motor Autodoor #2.

 Note: Cables P/N 33-3310 and 33-5310 are included in the new power supply.

3

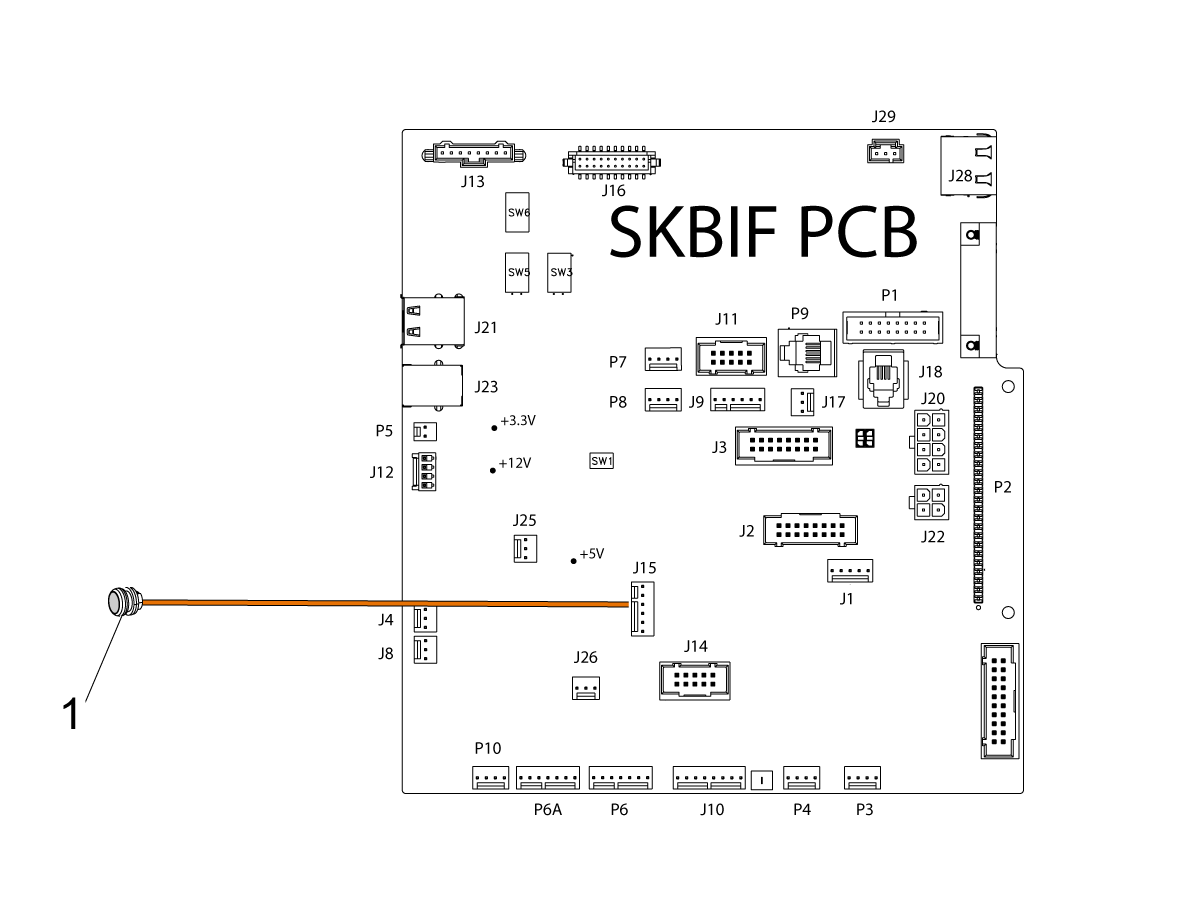
Connect the autodoor button to J15 on the SKBIF PCB.

Parameters and Firmware Updates

1

Turn on the machine.

Verify that any necessary patches have been applied.

Go into Service Mode and set the factory setting 9013.001 CAN NODE 13 ENABLE to TRUE.

Go to the DIAGNOTICS> System tab.  Verify that you have the correct software and firmware versions installed (see introduction section).

Go to Setting 131 AUTO DOOR and set to ON.

Verification

1

Press the Autodoor button on the side of the control pendant and test the autodoor works correctly.

Recently Updated

Lathe Smart CAN DC Autodoor - Installation


AD0566

Introduction

This procedure will show you how to install the Smart CAN autodoor option on lathes. 

Note: If you are upgrading to a Smart CAN Autodoor system do not use this procedure refer to Smart CAN Autodoor Upgrade procedure.

Machine Requirements:

  • Software Version 100.20.000.1200 or higher
  • I/O PCB 34-3490B or higher
  • AD PCB 34-3096, 34-3096A with Firmware Version  1.29 or higher
  • I/O Firmware version 4.09 or higher
  • TC Firmware version 2.06 or higher
  • See sheet metal requirements table below for specific machine details to see if your machine is able to install autodoor. Machines after this date are able to, machines before are not.

 Note:  All the above software and firmware files can be downloaded from the Haas Business Center site.

MACHINES: ST - 10/15 ST - 20/25 ST - 30/35 ST - 20L/25L/20LY/25LY ST - 30L/35L
Dates: August 2019 April 2019  October 2020 August 2019

Smart CAN Autodoor Kits

Part Number Description Wattage
93-1000591 AUTODOOR FIELD INSTALL CAN ST-10/15 150
93-1000592 AUTODOOR FIELD INSTALL CAN ST-20/25/28 150
93-1000593 AUTODOOR FIELD INSTALL CAN ST-30/35 150
93-1000594 AUTODOOR FIELD INSTALL CAN ST-30L/35L 150
93-1000693 AUTO DOOR FIELD INSTALL CAN ST-10/15 2021 350
93-1000692 AUTO DOOR FIELD INSTALL CAN ST-20/25/28 2021 350
93-1000691 AUTO DOOR FIELD INSTALL CAN ST-30/35 2021 350
93-1000686 AUTO DOOR FIELD INSTALL CAN ST-10L/15L 2021 350
93-1000685 AUTODOOR FIELD INSTALL CAN ST-20L/25L 2021 350
93-1000690 AUTO DOOR FIELD INSTALL CAN ST-30L/35L 2021 350

Haas Europe - Smart CAN Autodoor Kits

Part Number Description Wattage
93-1000666 AUTO DOOR FIELD INSTALL CAN ST-10/15 HE 150
93-1000667 AUTO DOOR FIELD INSTALL CAN ST-20 HE 150
93-1000668 AUTO DOOR FIELD INSTALL CAN ST-30/35 HE 150
93-1000669 AUTO DOOR FIELD INSTALL CAN ST30L/35L HE 150
93-1000680 AUTODOOR FIELD INSTALL CAN ST10/15 21 HE 350
93-1000679 AUTODOOR FIELD INSTALL CAN ST-20 '21 HE 350
93-1000678 AUTODOOR FIELD INSTALL CAN ST30/35 21 HE 350
93-1000701 AUTO DOOR FIELD INSTALL ST-10L/15L '21 HE 350
93-1000700 AUTO DOOR FIELD INSTALL CAN ST20L/25L HE 350
93-1000677 AUTO DOOR FIELD INSTALL CAN ST30L/35L 21 HE 350

Installation

1

Cut the track [1] and tape [2] if necessary and tape to track mount [3].

Clean the bottom of the track mount [3] and make sure it is not contaminated. Cut the double sided tape [4] to fit if necessary,  peel off one side of the tape and leave the other intact, and connect the mount [3] and [4] together.


2

Remove the sheet metal brackets [1] shown.

Attach the track assembly and track clips to the studs at the top of the machine using (2x) hex nuts.

3

Peel off a bit of the tape [1],  but do not peel off the full amount. This will be peeled off in a later step.

4

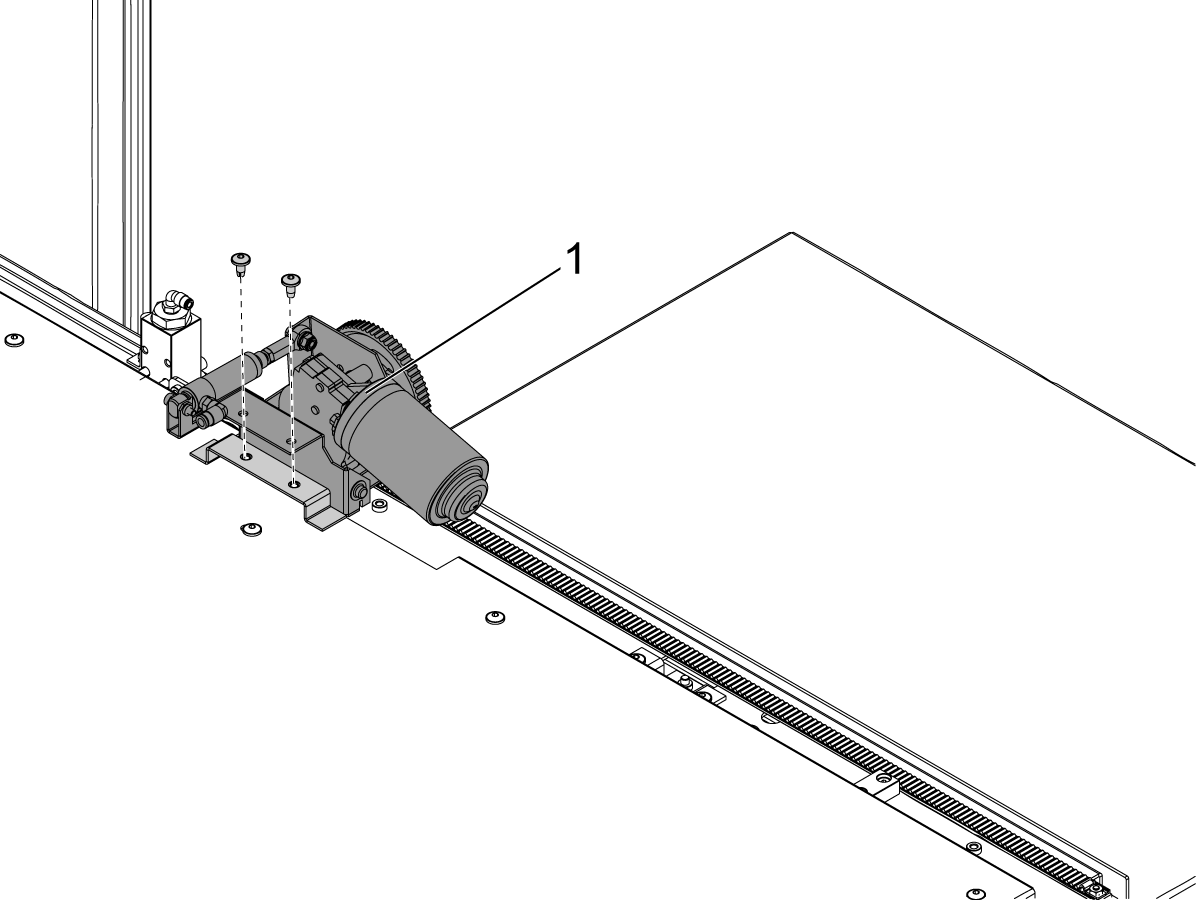
Attach the motor [1] on top as shown using (2x) FBHCS.

For double door machines that are not the ST-30L/35L, attach the right motor the same as the left motor.

5

Follow this step when installing the Autodoor on a ST-30L/35L otherwise skip to the next section.

Attach the right side motor [3] as shown with the stiffener bracket [1].

The stiffener bracket [1] will be attached to the sheet metal using (2x) self-taping screws [2]. 

The motor [3] and other side of the stiffener bracket [2] are attached using (2x) FBHCS [4].

Note: ST-30L/35L machines built after January 2022 may already have a stiffener bracket welded onto the sheet metal, in this case the stiffener bracket in the kit will not need to be used.

Track Alignment and Wiring

1

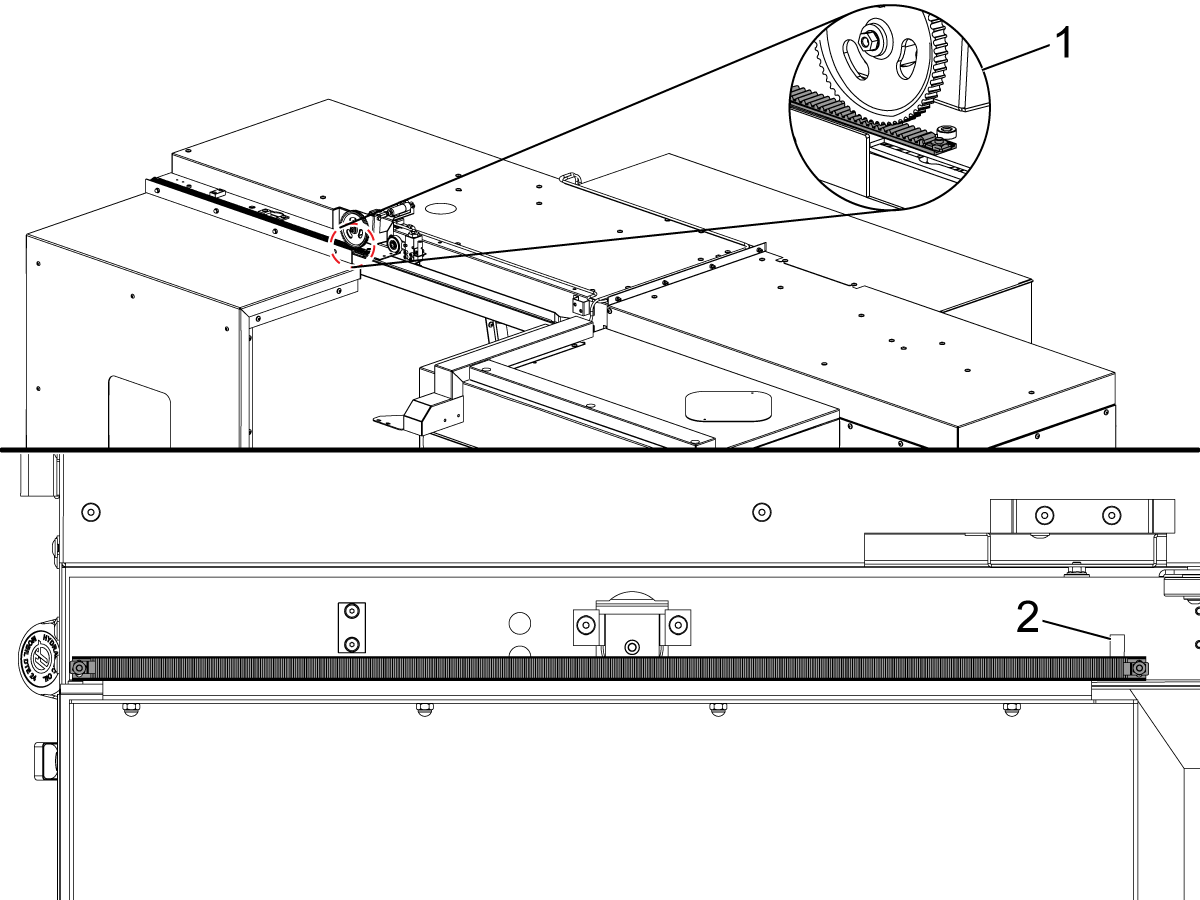
To align the track to the motor it is important for the wheel to have full engagement on the track, DO NOT sacrifice door alignment for track alignment, if you are having issues aligning the track adjust the track itself with the slots in the track clips.

Once the track is aligned peel the tape bit [2] that was left prior and apply pressure as you peel.

2

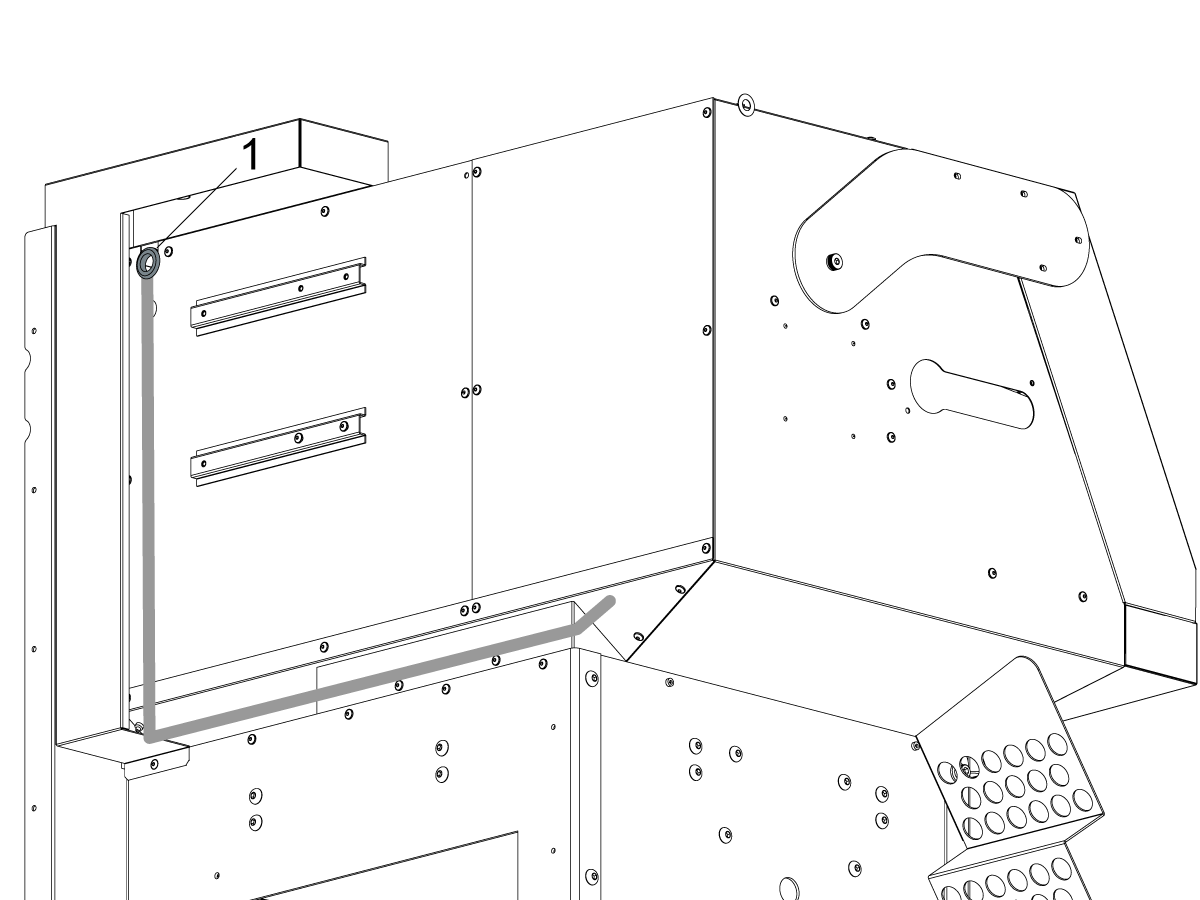
Single Door Machines

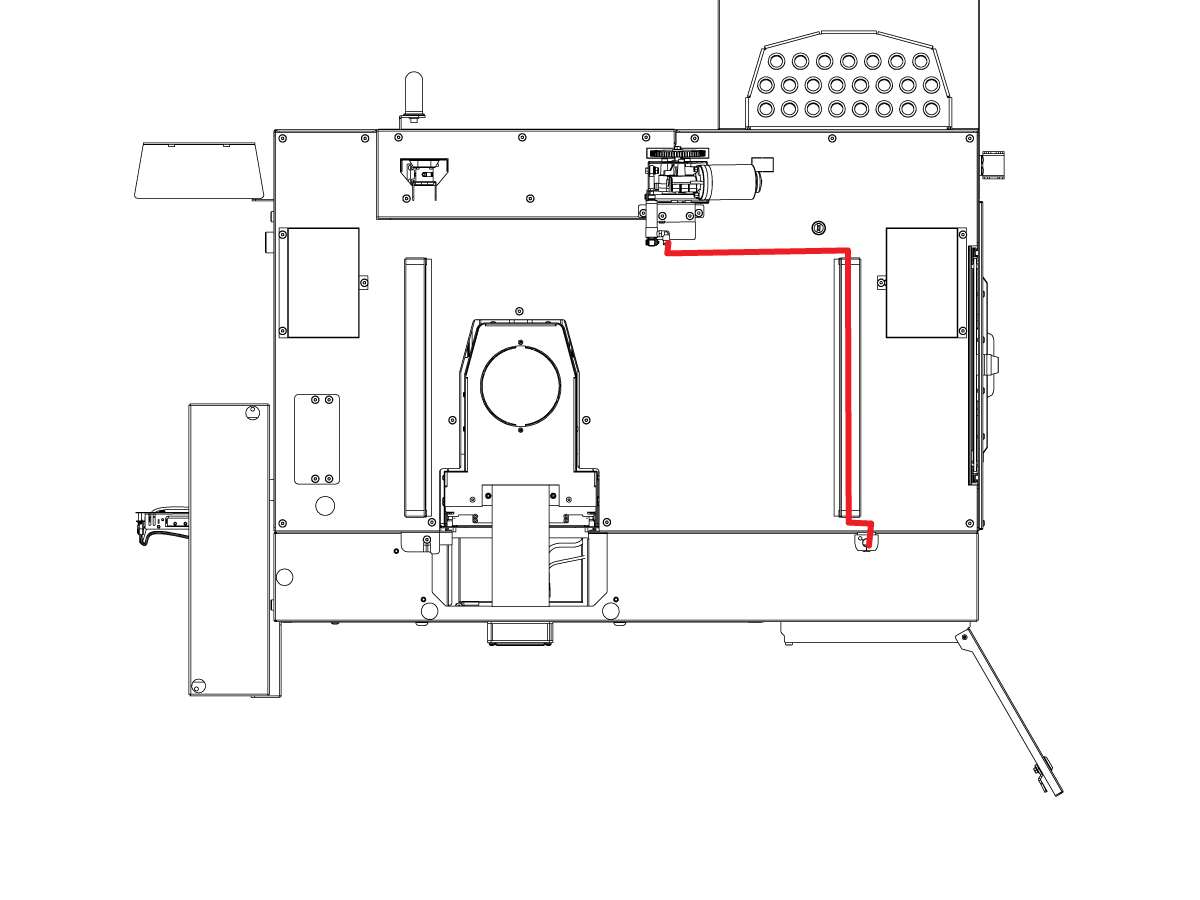
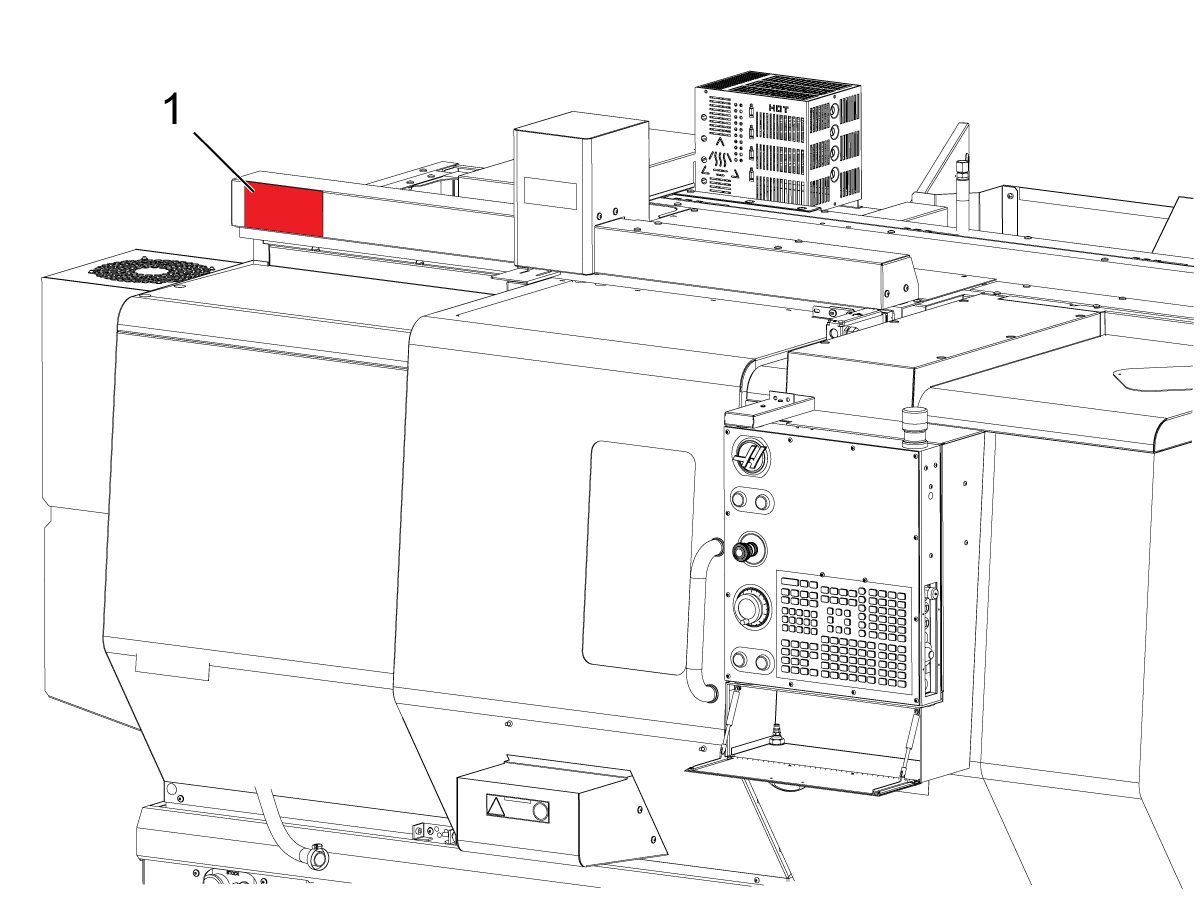
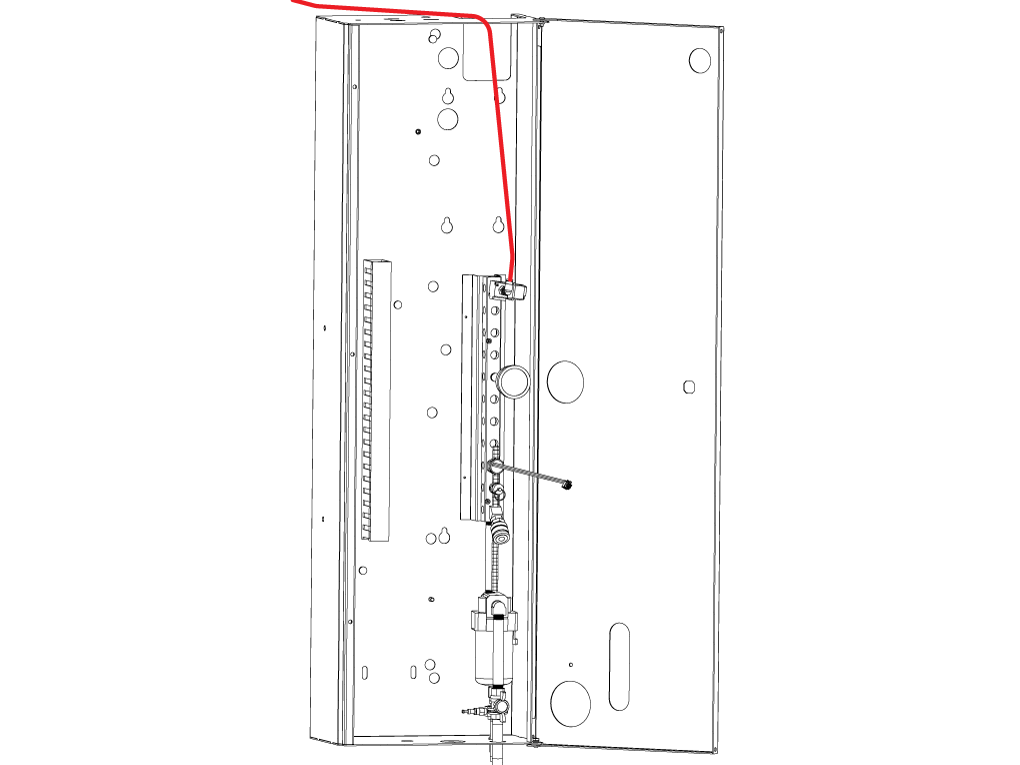
Route the pneumatic hose and the motor cable to the lube panel and electrical cabinet, respectively, as shown [1].

3

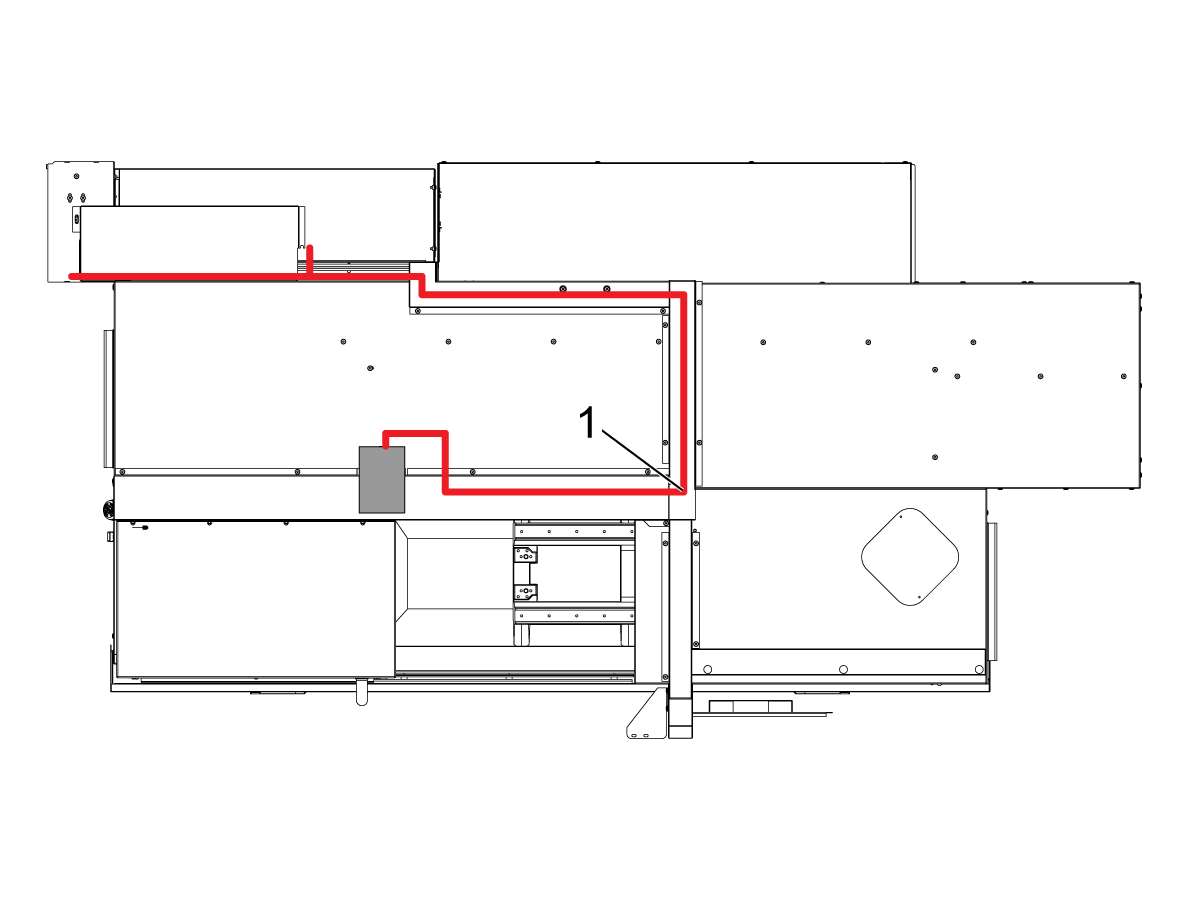
Double Door Machines

Route the pneumatic hose and the motor cable to the lube panel and electrical cabinet, respectively, as shown.

The pneumatic hoses will connect with a Tee fitting at location [1].

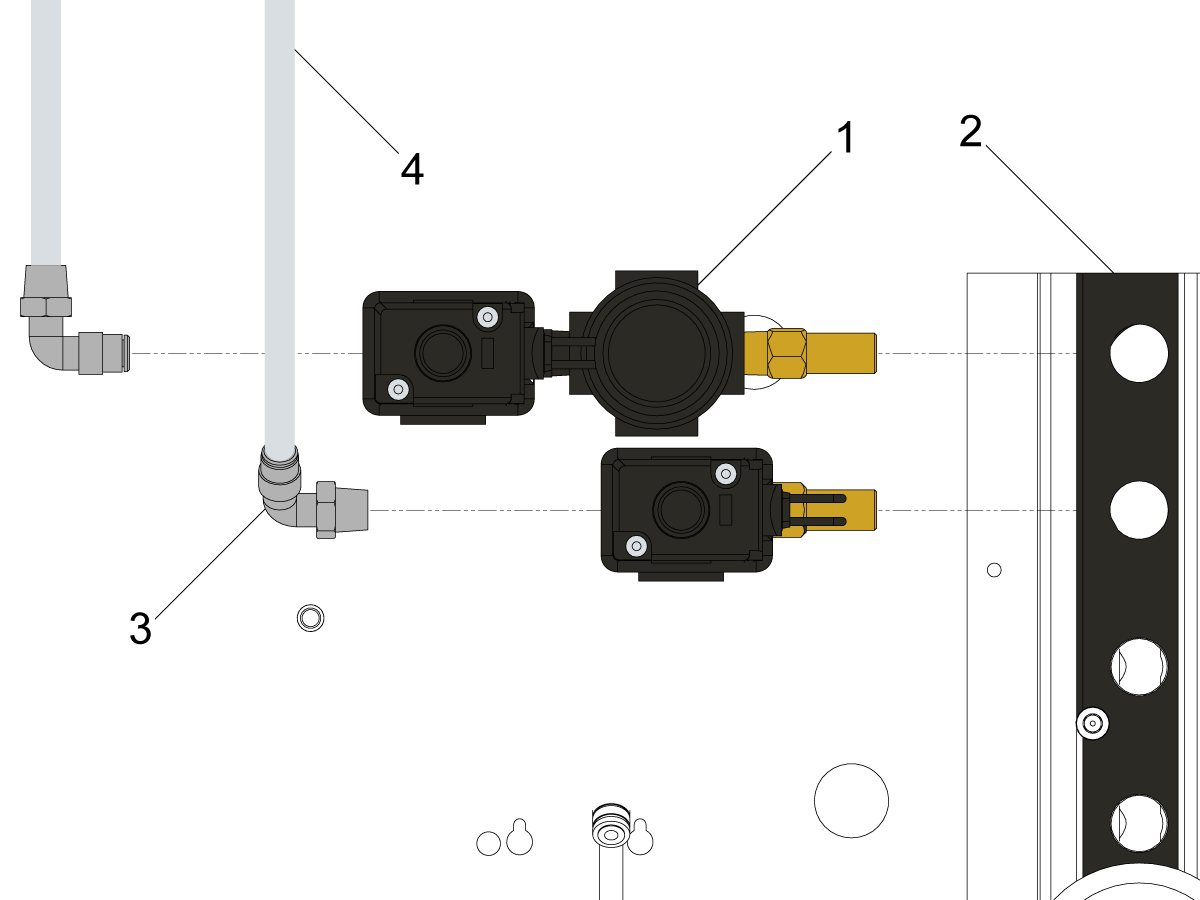
4

Connect pneumatic hose and air solenoid as shown.

Note: A bare lube panel is used to help easily identify which solenoid to connect to.

Smart CAN Autodoor Power Supply

1

Install the Smart Can Autodoor Power Supply using the provided hardware.

For machines built before July 2021: Use the provided (2) 6-32 nuts on the two holes at the top of the LVPS bracket to install the 350W CAN Autodoor Power Supply.

For machines built after July 2021: The LVPS should have (2) pem nuts [1] on the existing through holes on the top of the LVPS and the 6-32 nuts are not needed to install the 350W CAN Autodoor Power Supply.

Connect the cables to the power supply as shown in the next step.

2

Connect the Smart CAN Autodoor Power Supply using the wiring diagram shown.

Connect the following cables:

  1. P/N 33-3310 Smart CAN Supply (P1) to PSUP PCB (P7)
  2. P/N 33-5310 Smart CAN Supply (J1) to I/O PCB (J2)
  3. The power cable from the Smart Can Supply (J6) to Autodoor Motor #1 and for double door machines connect the power cable from (J9) to Motor Autodoor #2.

 Note: Cables P/N 33-3310 and 33-5310 are included in the new power supply.

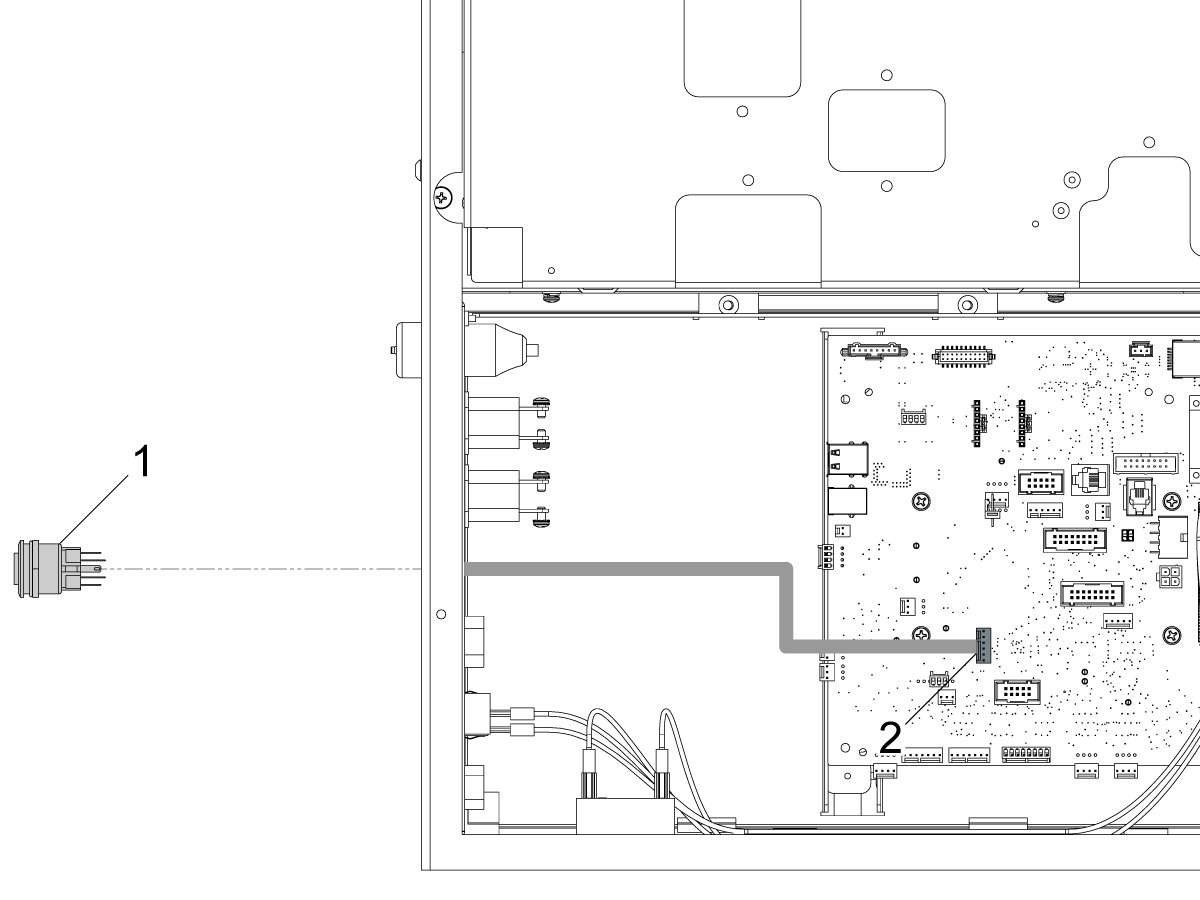
3

Connect the autodoor button to J15 on the SKBIF PCB.

Parameters and Firmware Updates

1

Turn on the machine.

Verify that any necessary patches have been applied.

Go into Service Mode and set the factory setting 9013.001 CAN NODE 13 ENABLE to TRUE.

Go to the DIAGNOTICS> System tab.  Verify that you have the correct software and firmware versions installed (see introduction section).

Go to Setting 131 AUTO DOOR and set to ON.

Verification

1

Press the Autodoor button on the side of the control pendant and test the autodoor works correctly.

Recently Updated

Smart CAN DC Autodoor Upgrade


AD0510

Introduction

This procedure will show you how to upgrade the 8M Autodoor and the original CAN Autodoor system to the Smart CAN Autodoor system.

Machine Requirements:

  • Software Version 100.20.000.1200 or higher
  • I/O PCB 34-3490B or higher
  • AD PCB 34-3096A firmware version 1.29 or higher
  • I/O Firmware version 4.09 or higher
  • TC Firmware version 2.06 or higher

Note:  All the above software and firmware files can be downloaded from the Haas Service portal.

This document applies to the following kits:

8M PCB Autodoor to Smart CAN Autodoor Upgrade Kits:

  • 93-3353 CAN AUTODOOR UPGRADE SINGLE DOOR 2021
  • 93-3352 CAN AUTODOOR UPGRADE DUAL DOOR LATHE '21
  • 93-3351 CAN AUTODOOR UPGRADE DUAL DR VF-S/M '21
  • 93-3350 CAN AUTODOOR UPGRADE DUAL DOOR VF-LG '21

Haas Europe - 8M PCB Autodoor to Smart CAN Autodoor Upgrade Kits:

  • 93-3355 AUTODOOR UPGRADE DUAL DOOR VF-LG CAN HE
  • 93-3359 AUTODOOR UPGRADE DUAL DR VF-S/M CAN HE
  • 93-3357 AUTODOOR UPGRADE SINGLE DOOR CAN HE
  • 93-3358 AUTODOOR UPGRADE DUAL DOOR LATHE CAN HE

Original CAN Autodoor to Smart CAN Autodoor Upgrade Kits:

  • 93-3354 CAN AUTODOOR POWER SUPPLY KIT 2021

Power Supply Removal

1

Set the main circuit breaker to the [OFF] position.

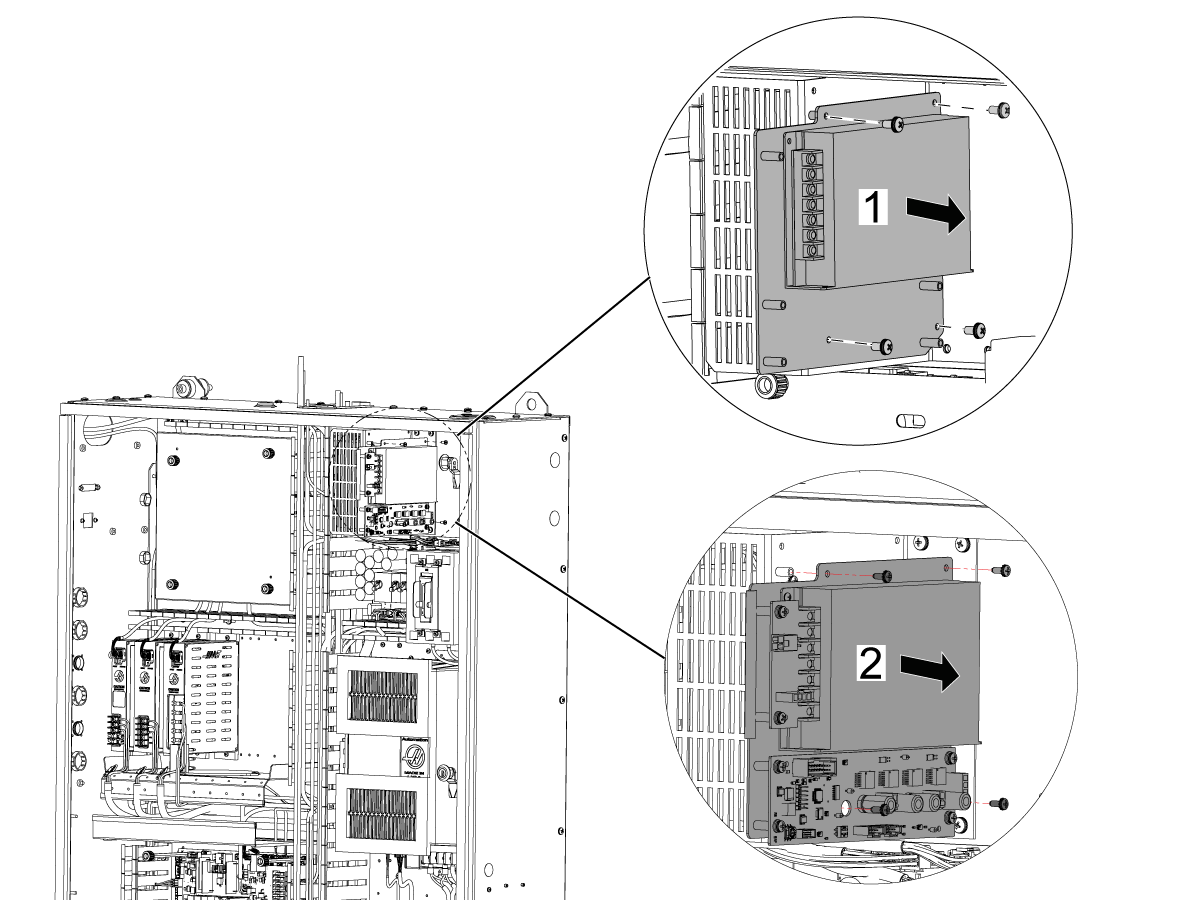
Locate the AD power supply that is located near the main circuit breaker.  The illustration shows the possible Autodoor power supplies.

  1. 8M PCB Autodoor power supply
  2. Original CAN Autodoor power supply

Remove the cables that are connected to the power supply.

Remove the (4) screws from the mounting plate.

Remove the the power supply.

8M Autodoor System Upgrade

1

Note: If the machine has the original CAN Autodoor system skip this step and go to the next section.

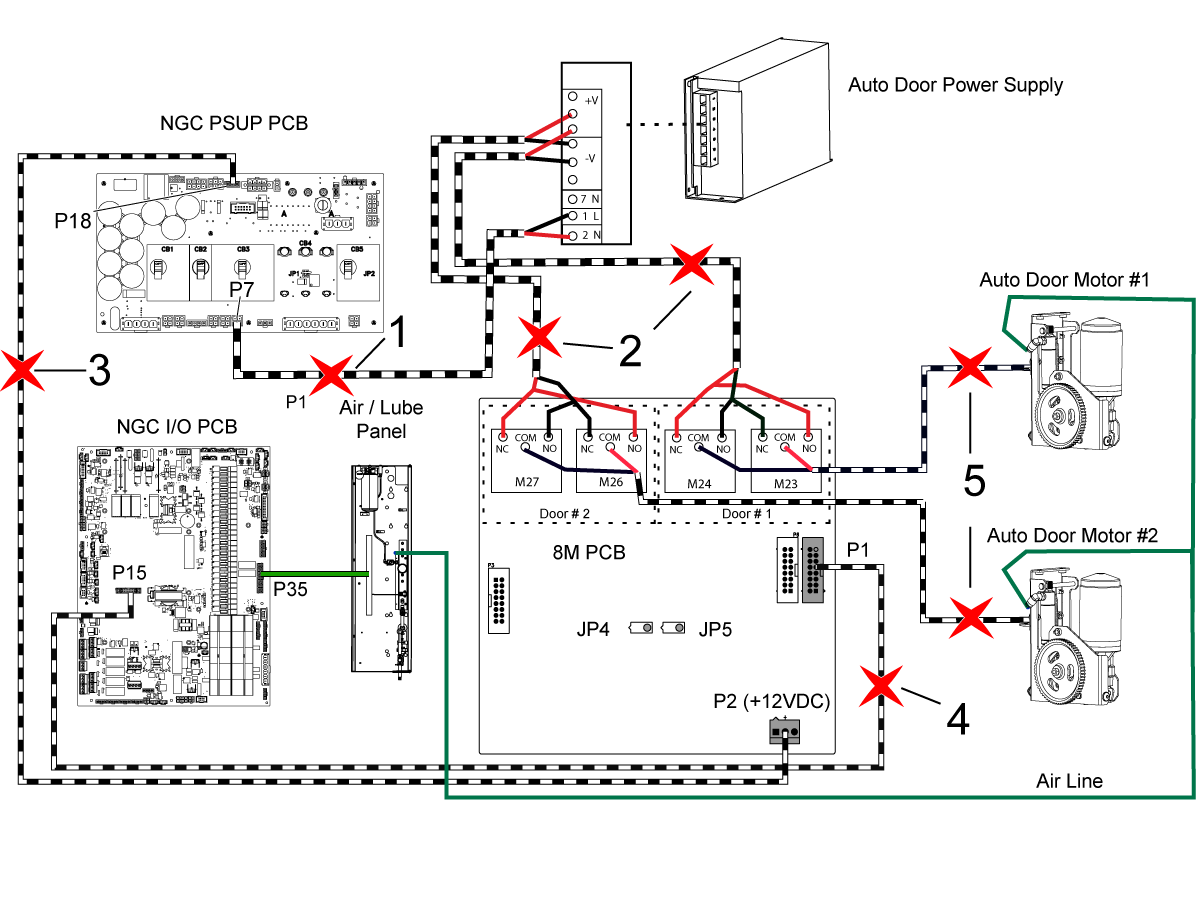
The current 8m Autodoor system wiring diagram is shown.

Remove the following cable connections:

  1. AD Power supply to PSUP PCB (P7).
  2. AD Power supply to 8M PCB Relays.
  3. PSUP PCB (P18) to 8M PCB (P2).
  4. I/O PCB (P15) to 8M PCB (P1).
  5. 8M PCB to Auto Door Motor 1 and 2.

Note:  Do not disconnect the cable from P35 on the I/O PCB to the Air Lube Panel.

Note: Do not disconnect the air line from the Air / Lube Panel to the autodoor air cylinders.

Smart CAN Autodoor Power Supply

1

Install the Smart Can Autodoor Power Supply using the provided hardware.

Refer to the following for the 350W Power Supply Upgrade:

  • For machines built before July 2021, use the provided (2) 6-32 nuts on the two holes at the top of the LVPS bracket to install the 350W CAN Autodoor Power Supply.
  • For machines built after July 2021, the LVPS should have (2) pem nuts [1] on the existing through holes on the top of the LVPS and the 6-32 nuts are not needed to install the 350W CAN Autodoor Power Supply.
  • Connect the cables to the power supply as shown in the next step.

2

Connect the Smart CAN Autodoor Power Supply using the wiring diagram shown.

Connect the following cables:

  1. P/N 33-3310 Smart CAN Supply (P1) to PSUP PCB (P7)
  2. P/N 33-5310 Smart CAN Supply (J1) to I/O PCB (J2)
  3. The power cable from the Smart Can Supply (J6) to Autodoor Motor #1 and for Mill connect the power cable from (J9) to Motor Autodoor #2.

 Note: Cables P/N 33-3310 and 33-5310 are included in the new power supply.

 Note: If kit 93-3354 was ordered and the machine has other CAN systems, cable 33-5310 will not be used. Reference the CAN Lube Panel and Spindle Head - Troubleshooting Guide for the wiring layout of the CAN systems.

Parameters and Firmware Updates

1

Turn on the machine.

Go into Service Mode and set the factory setting 9013.001 CAN NODE 13 ENABLE to TRUE.

Go to the DIAGNOTICS> System tab.  Verify that you have the correct software and firmware versions installed (see introduction section).

Go to Setting 131 AUTO DOOR and set to ON.

Verification

1

Press the Autodoor button on the side of the control pendant and test the autodoor works correctly.

Feedback
FIND DISTRIBUTOR
Feedback
Haas Logo

美元价格不包括关税、报关费用、保险费、增值税及运费。
USD prices DO NOT include customs duty, customs fees, insurance, VAT, or freight.

人民币价格包含关税、报关费用、货运保险和增值税, 但不包括运费。
CNY prices include customs duty, customs fees, insurance, and VAT. DOES NOT include freight.

Haas Delivered Price

This price includes shipping cost, export and import duties, insurance, and any other expenses incurred during shipping to a location in France agreed with you as a buyer. No other mandatory costs can be added to the delivery of a Haas CNC Product.

KEEP UP WITH THE LATEST HAAS TIPS AND TECHNOLOGY...

Sign up now!   

HAAS TOOLING ACCEPTS THE FOLLOWING:

  • Service & Support
  • Owners
  • Request Service
  • Operator Manuals
  • Haas Parts
  • Rotary Repair Request
  • Pre-Install Guides
  • Shopping Tools
  • Build & Price a New Haas
  • Available Inventory
  • The Haas Price List
  • CNCA Financing
  • About Haas
  • Careers
  • Certifications & Safety
  • Contact Us
  • History
  • Terms & Conditions
  • Haas Tooling Terms & Conditions
  • Privacy
  • Warranty
  • Haas Community
  • Haas Certification Program
  • Haas Motorsports
  • Gene Haas Foundation
  • Haas Technical Education Community
  • Events
  • Join the Conversation
  • Facebook
  • Twitter
  • Flickr
  • YouTube
  • LinkedIn
  • Instagram
  • TikTok
© 2022 Haas Automation, Inc – CNC Machine Tools

2800 Sturgis Rd., Oxnard, CA 93030 / Toll Free: 800-331-6746
Phone: 805-278-1800 / Fax: 805-278-2255

Cookie Notice

We use cookies to improve your user experience. Our Cookie Notice describes which cookies we use, why we use them, and how you can find more information about them. Please confirm you consent to us using analytics cookies. If you do not consent, you may still use our website with a reduced user experience.

Manage Settings

Cookie Notice

We use cookies to improve your user experience. Our Cookie Notice describes which cookies we use, why we use them, and how you can find more information about them. Please confirm you consent to us using analytics cookies. If you do not consent, you may still use our website with a reduced user experience.

Functional Cookies

Analytics Cookies