My Haas Welcome,
!
Haas Tooling MyHaas/HaasConnect Sign In Register Haas Tooling MyHaas/HaasConnect Sign Out Welcome, My Machines Latest Activity My Quotes My Account My Users Sign Out
Find Your Distributor
  1. Select Language
    1. English
    2. Deutsch
    3. Español - ES
    4. Español - MX
    5. Français
    6. Italiano
    7. Português
    8. Český
    9. Dansk
    10. Nederlands
    11. Magyar
    12. Polski
    13. Svenska
    14. Türkçe
    15. 中文
    16. Suomi
    17. Norsk
    18. الإنجليزية
    19. български
    20. Hrvatski
    21. Ελληνικά
    22. Română
    23. Slovenský
    24. Slovenščina
    25. 한국어
    26. 日本語
    27. Українська
  • machines Main Menu
    • Vertical Mills
      Vertical Mills
      Vertical Mills View All
      • Vertical Mills
      • VF Series
      • Universal Machines
      • VR Series
      • VP-5 Prismatic
      • Pallet-Changing VMCs
      • Mini Mills
      • Mold Machines
      • High-Speed Drill Centers
      • Drill/Tap/ Mill Series
      • Toolroom Mills
      • Pocket Mill
      • Compact Mills
      • Gantry Series
      • SR Sheet Routers
      • Extra-Large VMC
      • Double-Column Mills
      • 3+2 Positioning Machines
    • Multi-Axis Solutions
      Multi-Axis Solutions
      Multi-Axis Solutions View All
      • Multi-Axis Solutions
      • Y-Axis Lathes
      • 5-Axis Mills
    • Lathes
      Lathes
      Lathes View All
      • Lathes
      • ST Series
      • Dual-Spindle
      • Box Way Series
      • Toolroom Lathes
      • Chucker Lathe
      • Pocket Lathe
      • Haas Bar Feeders
    • Horizontal Mills
      Horizontal Mills
      Horizontal Mills View All
      • Horizontal Mills
      • 50-Taper
      • 40-Taper
    • Rotaries & Indexers
      Rotaries & Indexers
      Rotaries & Indexers View All
      • Rotaries & Indexers
      • Rotary Tables
      • Indexers
      • 5-Axis Rotaries
      • Extra-Large Rotaries
    • Special Series
      Special Series
      Special Series View All
      • Special Series
      • EU_Series_Redirect
    • Automation Systems
      Automation Systems
      Automation Systems View All
      • Automation Systems
      • Mill Automation
      • Lathe Automation
      • Automatic Parts Loaders
      • Automation Models
    • Desktop Machines
      Desktop Machines
      Desktop Machines View All
      • Desktop Machines
      • Desktop Mill
      • Desktop Lathe
      • Control Simulator, Standard
      • Control Simulator, Premium
    • Shop Equipment
      Shop Equipment
      Shop Equipment View All
      • Shop Equipment
      • Knee Mill
      • Haas Manual Lathes
      • Haas Saws
    • Fabrication Machines
      Fabrication Machines
      Fabrication Machines View All
      • Fabrication Machines
      • Laser Cutting Machines
      • CNC Press Brakes
    • QUICK LINKS Special Series  Special Series 
      EU SERIES EU SERIES BUILD & PRICE | PRICE LIST BUILD & PRICE | PRICE LIST In-Stock Machines In-Stock Machines WHAT’S NEW WHAT’S NEW YOUR FIRST CNC YOUR FIRST CNC
      SHOPPING TOOLS
      • Build & Price a Haas
      • Price List
      • Available Inventory
      • CNCA Financing
      WANT TO TALK TO SOMEONE?

      A Haas Factory Outlet (HFO) can answer your questions, and walk you through your best options.

      CONTACT YOUR DISTRIBUTOR >
  • Options Main Menu
    • The Haas Control Value Option Packages
      Value Option Packages
      Value Option Packages View All
      • Value Option Packages
    • Product Image Spindles
      Spindles
      Spindles View All
      • Spindles
    • Product Image Tool Changers
      Tool Changers
      Tool Changers View All
      • Tool Changers
    • Product Image 4th- | 5th-Axis
      4th- | 5th-Axis
      4th- | 5th-Axis View All
      • 4th- | 5th-Axis
    • Product Image Turrets & Live Tooling
      Turrets & Live Tooling
      Turrets & Live Tooling View All
      • Turrets & Live Tooling
    • Product Image Probing
      Probing
      Probing View All
      • Probing
    • Haas Chip & Coolant Management Chip & Coolant Management
      Chip & Coolant Management
      Chip & Coolant Management View All
      • Chip & Coolant Management
    • The Haas Control The Haas Control
      The Haas Control
      The Haas Control View All
      • The Haas Control
    • Product Image Product Options
      Product Options
      Product Options View All
      • Product Options
    • Product Image Tooling & Fixturing
      Tooling & Fixturing
      Tooling & Fixturing View All
      • Tooling & Fixturing
    • Product Image Workholding
      Workholding
      Workholding View All
      • Workholding
    • Product Image 5-Axis Solutions
      5-Axis Solutions
      5-Axis Solutions View All
      • 5-Axis Solutions
      • 5 Easy Steps to 5-Axis
    • QUICK LINKS Special Series  Special Series 
      EU SERIES EU SERIES BUILD & PRICE | PRICE LIST BUILD & PRICE | PRICE LIST In-Stock Machines In-Stock Machines WHAT’S NEW WHAT’S NEW YOUR FIRST CNC YOUR FIRST CNC
      SHOPPING TOOLS
      • Build & Price a Haas
      • Price List
      • Available Inventory
      • CNCA Financing
      WANT TO TALK TO SOMEONE?

      A Haas Factory Outlet (HFO) can answer your questions, and walk you through your best options.

      CONTACT YOUR DISTRIBUTOR >
  • Why Haas Main Menu
      Discover the Haas Difference
    • Why Haas
    • MyHaas
    • Education Community
    • Industry 4.0
    • Haas Certification
    • Customer Testimonials
  • Service Main Menu
      Welcome to Haas Service
      SERVICE HOME Operator’s Manuals How-To Procedures Troubleshooting Guides Preventive Maintenance Haas Parts Haas Tooling Videos
  • Videos Main Menu
  • Main Menu
    • View All
    • View All
    • View All
    • View All
      • HTEC Curriculum Support
      • Haas Value Option Packages (VOP) Journey
    • View All
      • Haas 10 kg Cobot Package
      • Cobot Kits
      • DC-1 Drill Center
      • CNC Sales News
      • Do More With Your Haas
    • View All
    • View All
      • contact-us-test
      • 4 - AUTOMATION SYSTEMS
      • Carousel-V2
      • expert test
      • Demo_Day_Trident-test
      • Link Test
      • image-sale-tag-test
      • article-list-test
      • Haas 25 kg Robot Package
      • test-algolia-page
    • View All
    • View All
    • View All
    • View All
      • calc-test
    • View All
    • QUICK LINKS Special Series  Special Series 
      EU SERIES EU SERIES BUILD & PRICE | PRICE LIST BUILD & PRICE | PRICE LIST In-Stock Machines In-Stock Machines WHAT’S NEW WHAT’S NEW YOUR FIRST CNC YOUR FIRST CNC
      SHOPPING TOOLS
      • Build & Price a Haas
      • Price List
      • Available Inventory
      • CNCA Financing
      WANT TO TALK TO SOMEONE?

      A Haas Factory Outlet (HFO) can answer your questions, and walk you through your best options.

      CONTACT YOUR DISTRIBUTOR >
  • Haas Tooling Main Menu
  • Haas Service Parts Main Menu

My Haas Welcome,
!
Haas Tooling MyHaas/HaasConnect Sign In Register Haas Tooling MyHaas/HaasConnect Sign Out Welcome, My Machines Latest Activity My Quotes My Account My Users Sign Out
Find Your Distributor
  1. Select Language
    1. English
    2. Deutsch
    3. Español - ES
    4. Español - MX
    5. Français
    6. Italiano
    7. Português
    8. Český
    9. Dansk
    10. Nederlands
    11. Magyar
    12. Polski
    13. Svenska
    14. Türkçe
    15. 中文
    16. Suomi
    17. Norsk
    18. الإنجليزية
    19. български
    20. Hrvatski
    21. Ελληνικά
    22. Română
    23. Slovenský
    24. Slovenščina
    25. 한국어
    26. 日本語
    27. Українська
×

Search Results

Web Pages

Images

    • <
    • 1
    • >

3 - Haas Knee Mill - Installation

HKM - Knee Mill - Operators/Service Manual


  • 1 -Haas Knee Mill - Introduction
  • 2 - Haas Knee Mill - Safety
  • 3 - Haas Knee Mill - Installation
  • 4 - Haas Knee Mill - Operation
  • 5 - Haas Knee Mill - Maintenance
  • 6 - Haas Knee Mill - Troubleshooting

Go To :

  • 3.1 Installation

3.1 Installation

Recently Updated

HKM-1 - Installation


Revision D - 02/2026

Introduction

This procedure demonstrates how to unpack and install a Haas Knee Mill. 

Unpacking

1

Remove plastic wrap from knee mill.

Remove paper covers from ways. Remove protective plastic sheets from decals. 

Removal of Rust Inhibitor

1

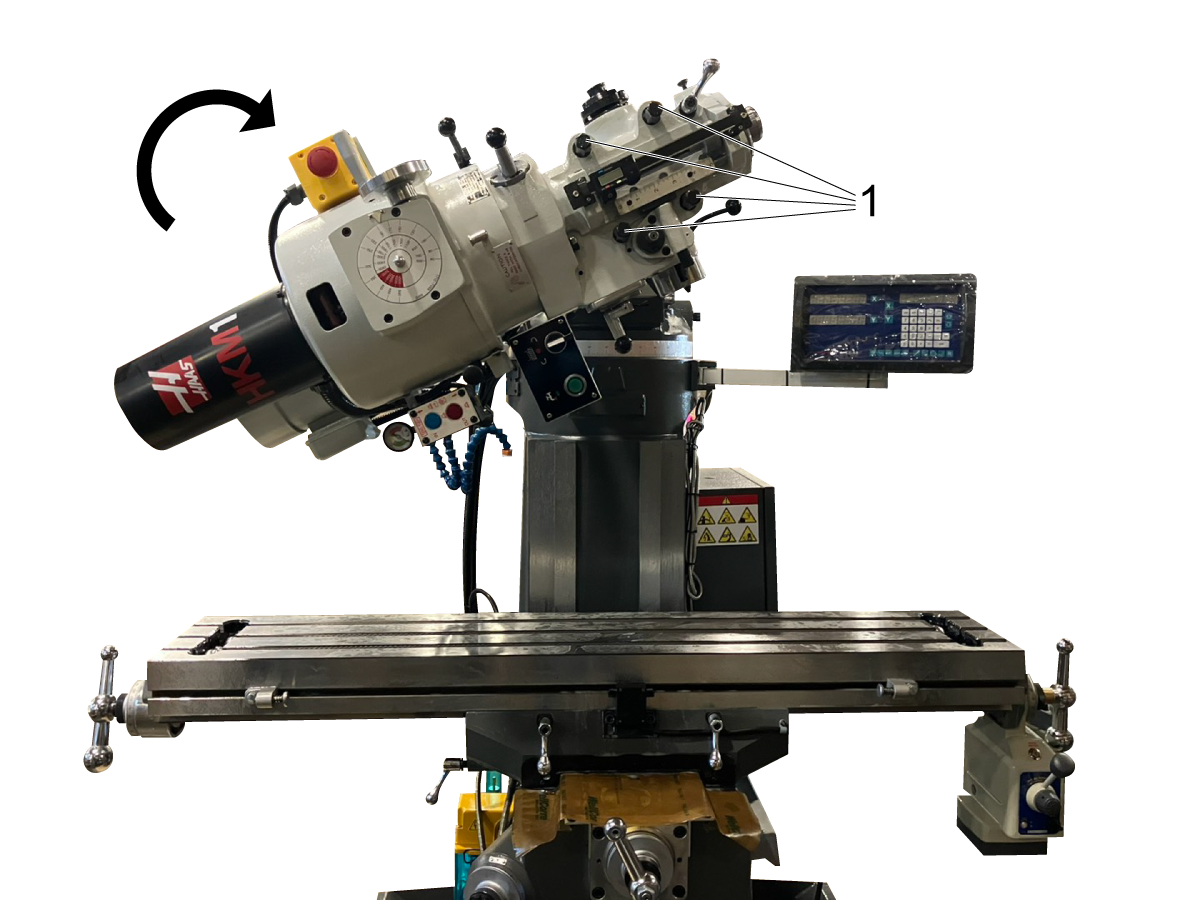
The knee mill is shipped with the head tilted to one side. To bring the head upright, break loose the four bolts [1]. Do not loosen all the way. 

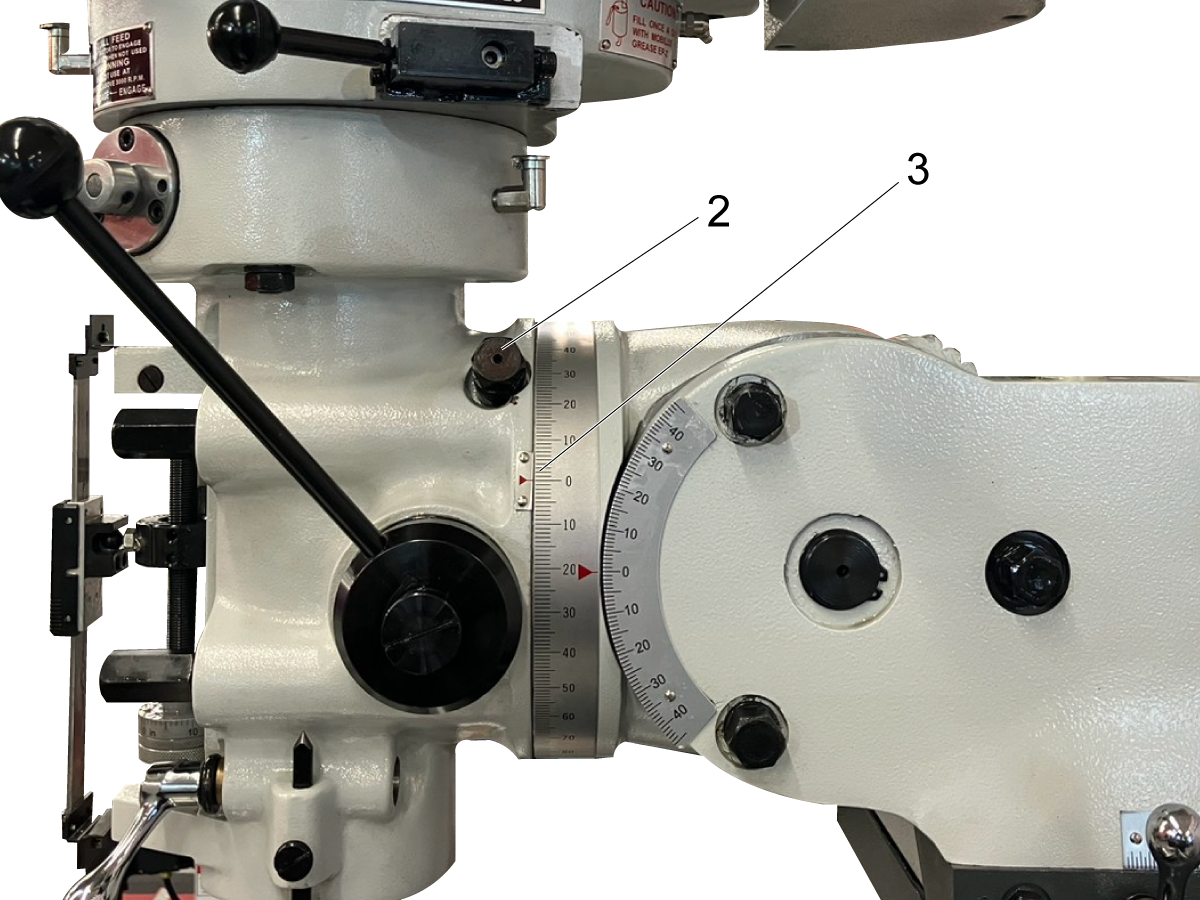
Use the pivot bolt [2] to rotate the head, until the angle indicator [3] reaches zero. 


2

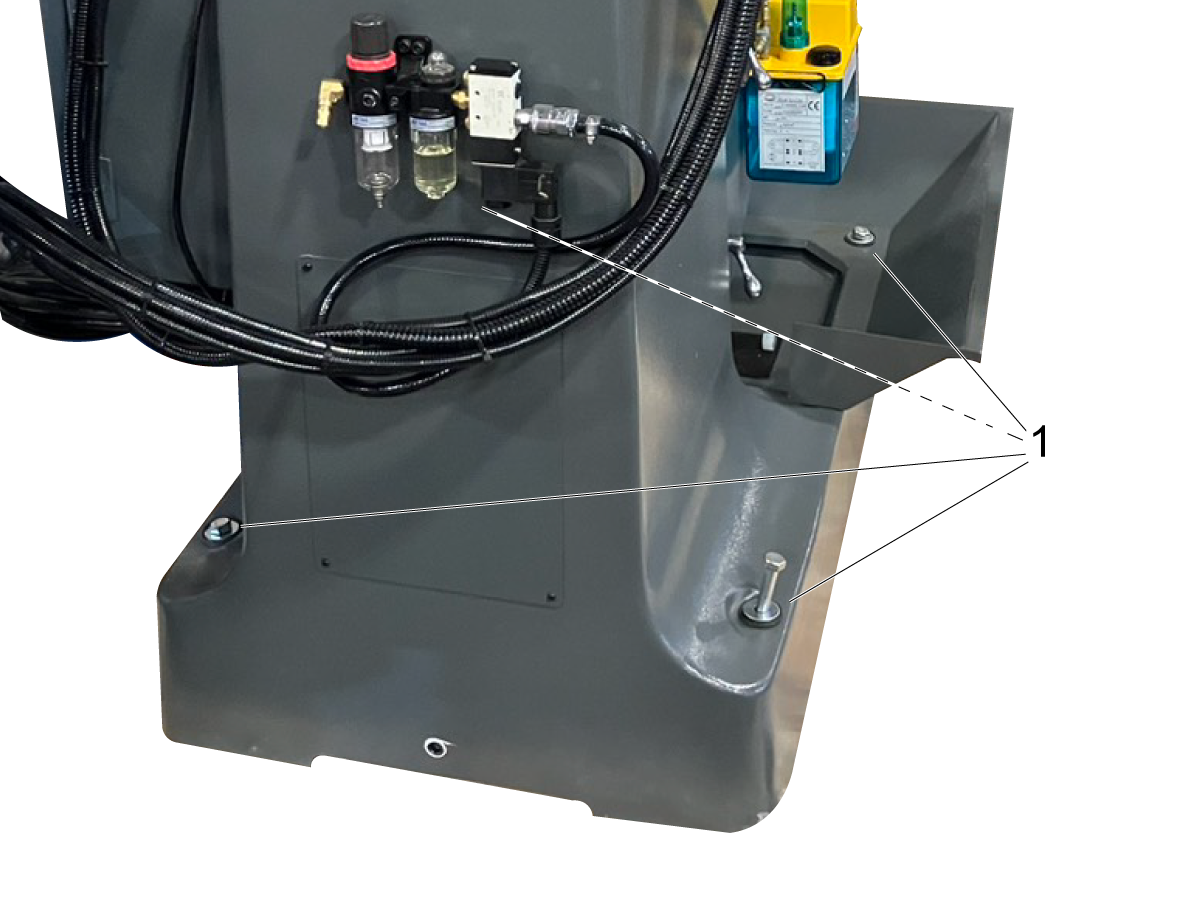
Remove the shipping bolts [1] and replace with leveling bolts [2]. Tighten down leveling bolts until they touch the pallet. 


3

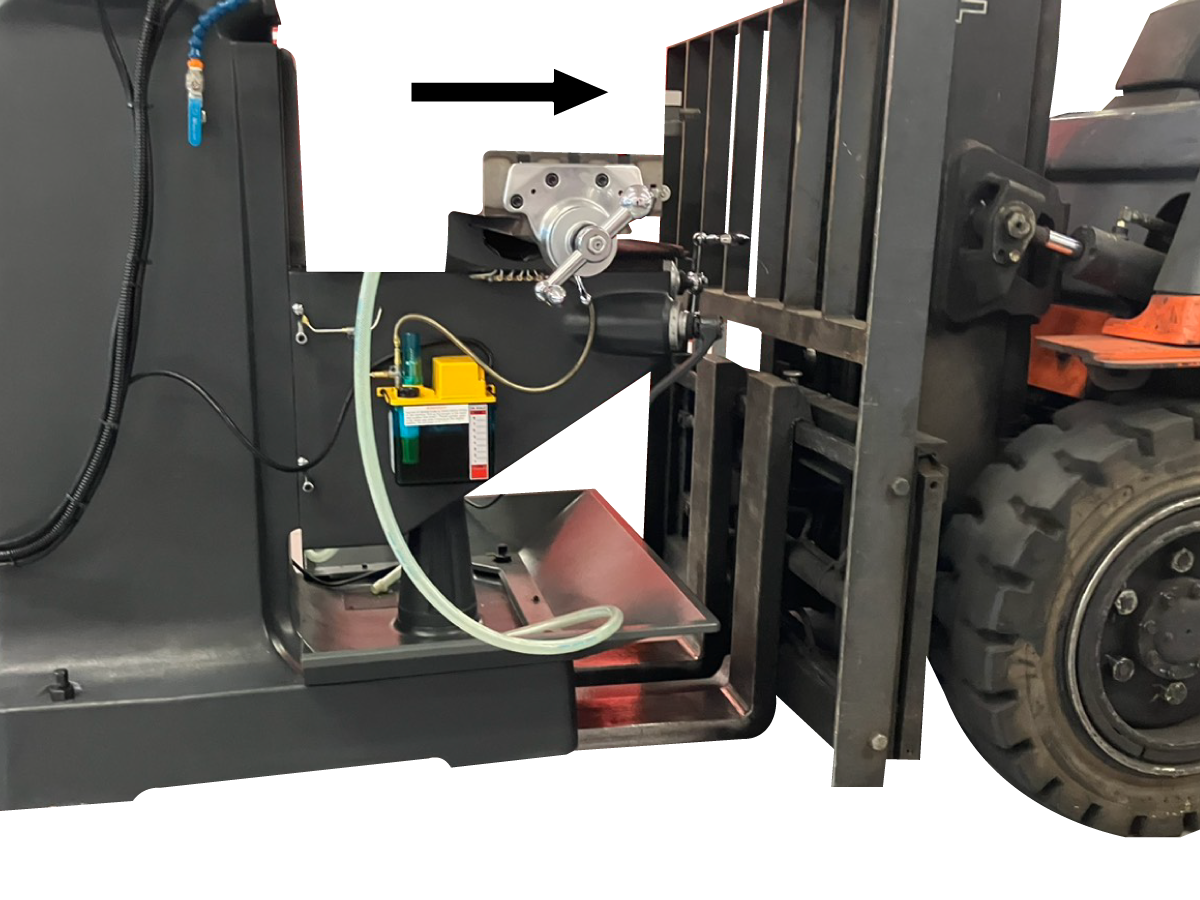
Use forklift to lift knee mill off of pallet. Place forks under knee mill base. Lift knee mill from the front. Moving table and ram head towards the forklift may increase stability. 

Lower knee mill onto leveling pads. 

4

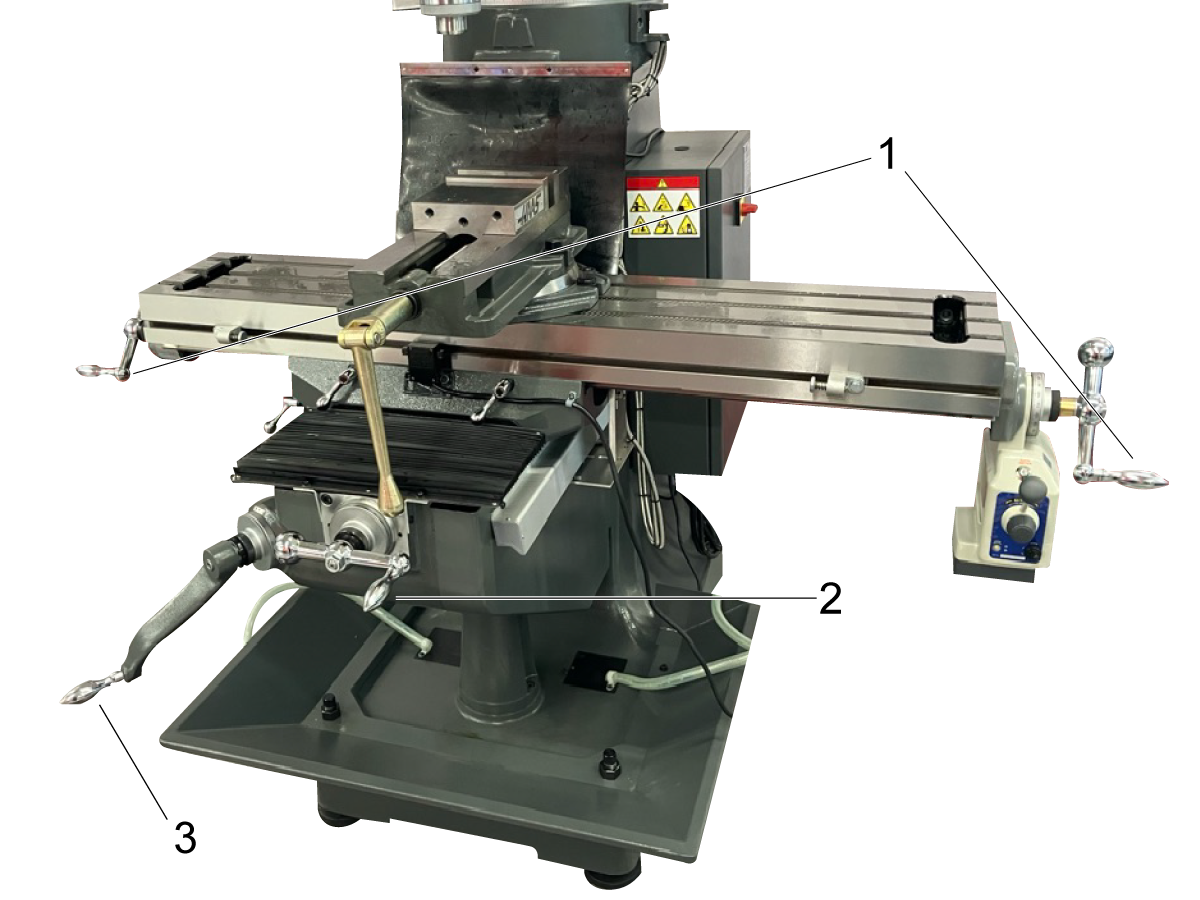
Install handles on the X-axis cranks [1], y-axis cranks [2], and knee crank [3]. Use wrench to tighten. 

Note: The x-axis handles are located in the coolant troughs of the Knee Mill table. Remove the shipping paper from the table to locate them. 


Levelling

1

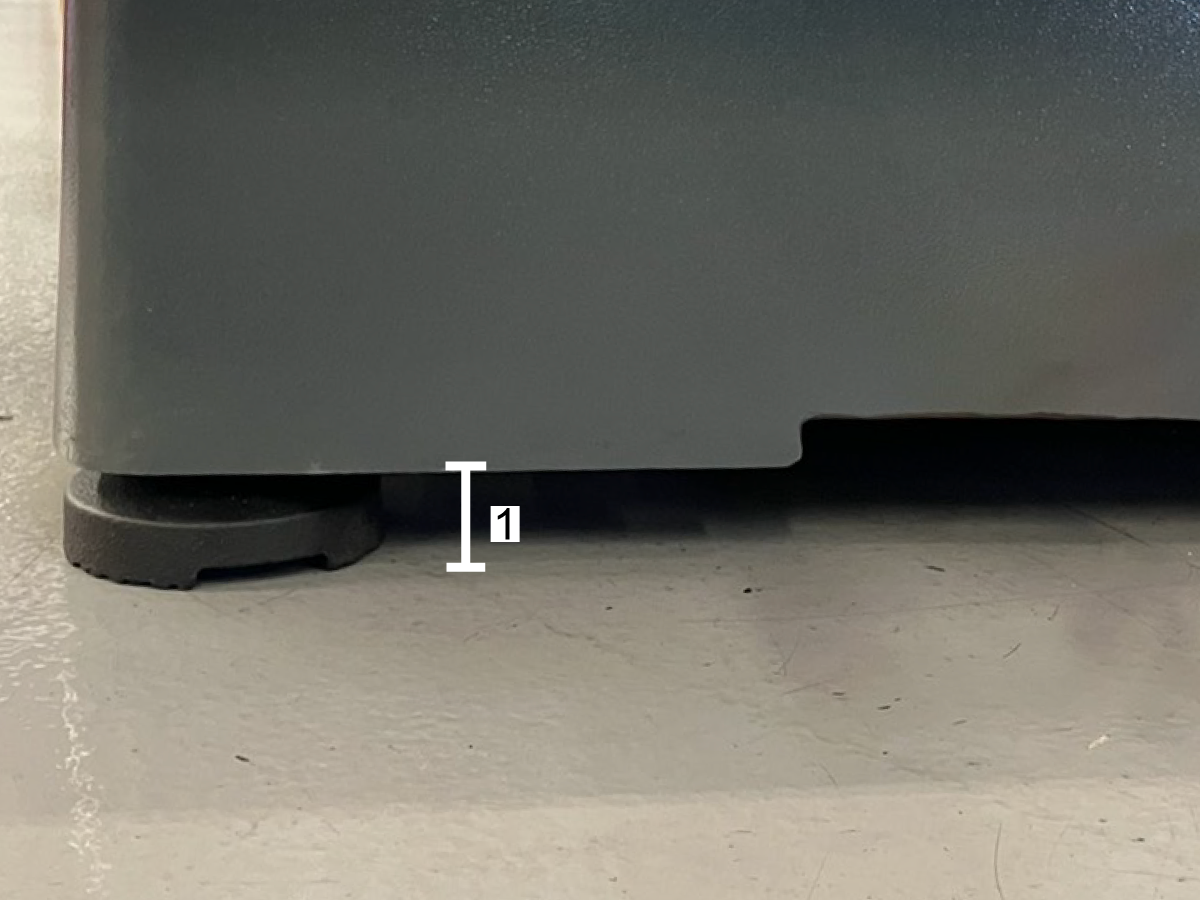
Adjust leveling screw heights until the casting is 1.25 in (32 mm) above the ground [1]. 

2

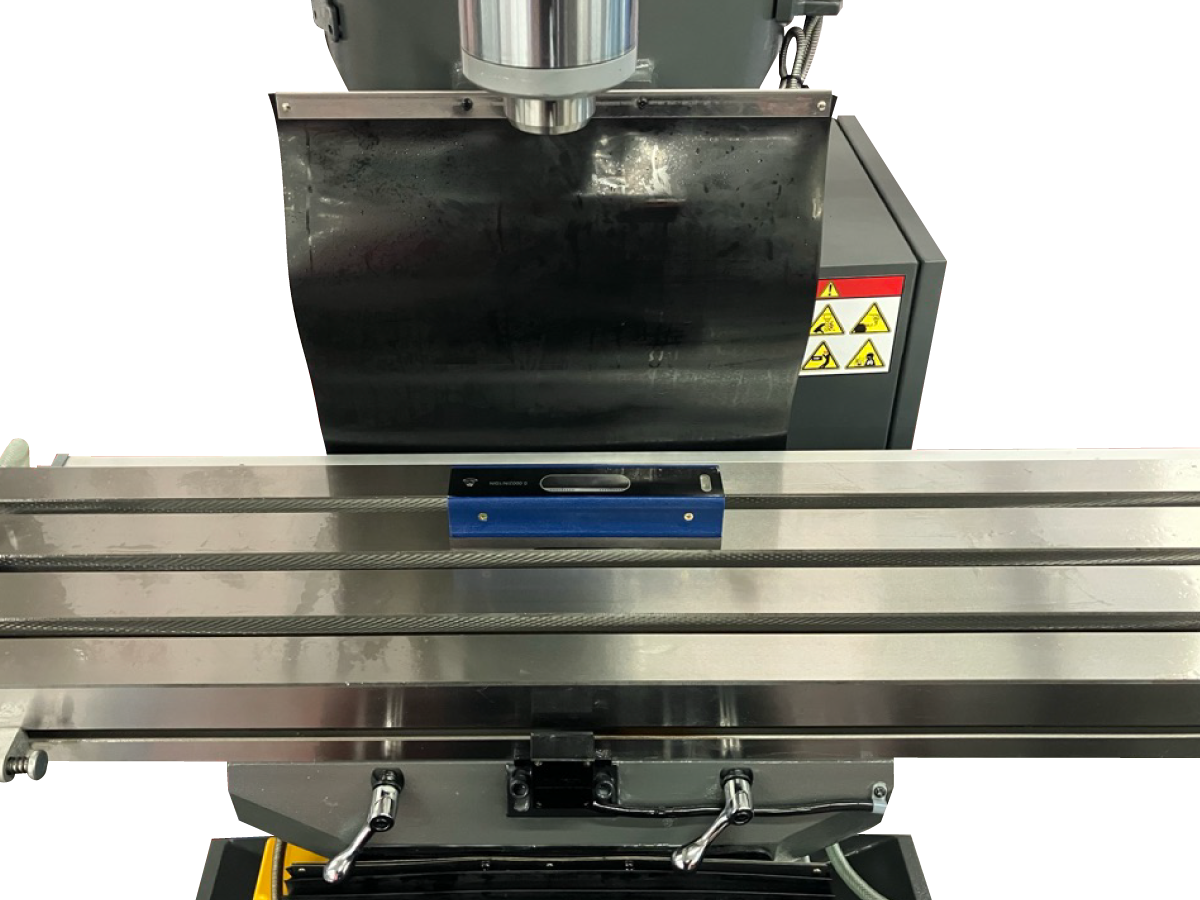
Move the table until it is in the center of travel in the X and Y axes. Place the level parallel to the t-slots. Adjust leveling screws until the bubble is centered. 

3

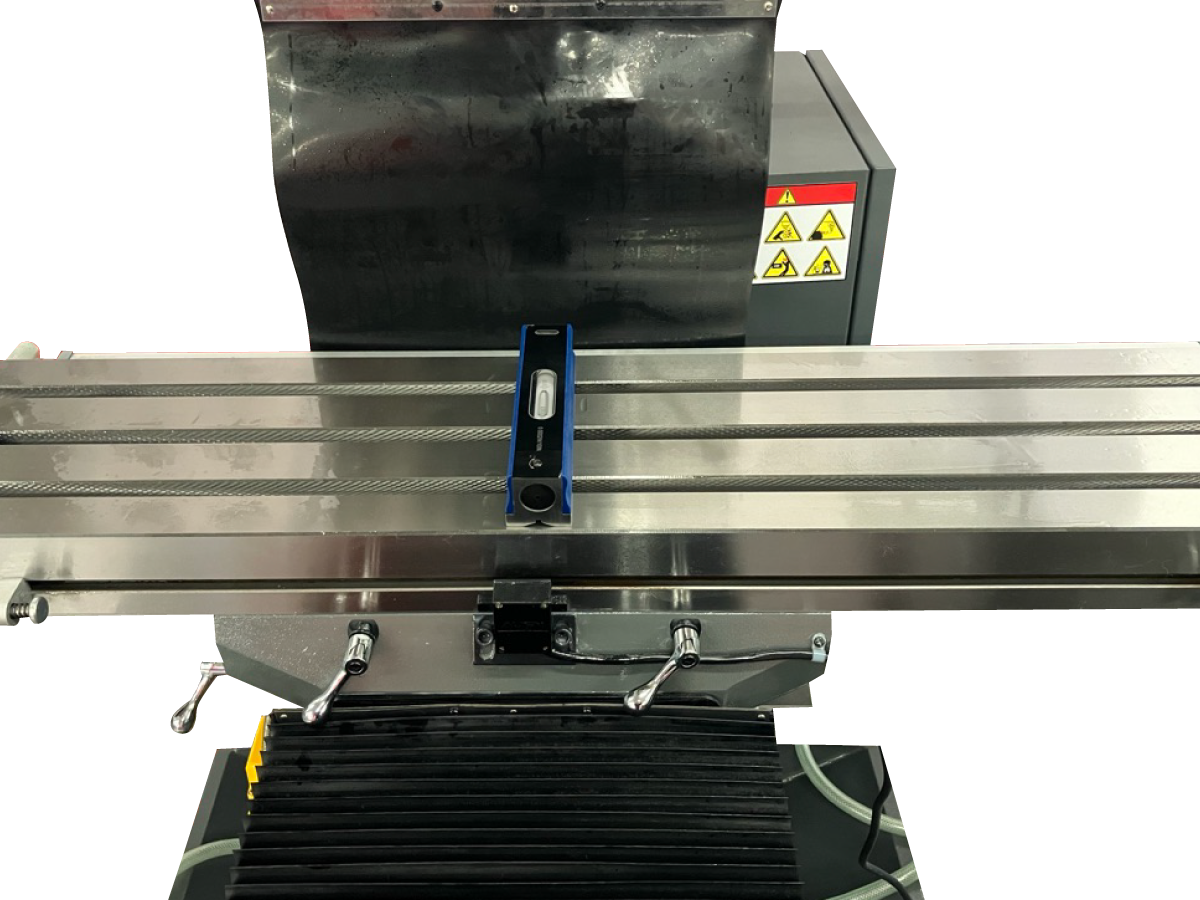
Place the level perpendicular to the t-slots. Adjust the leveling screws until the bubble is centered. Turn the level parallel to the t-slots, and adjust if necessary. Continue adjusting until knee mill is level. 


4

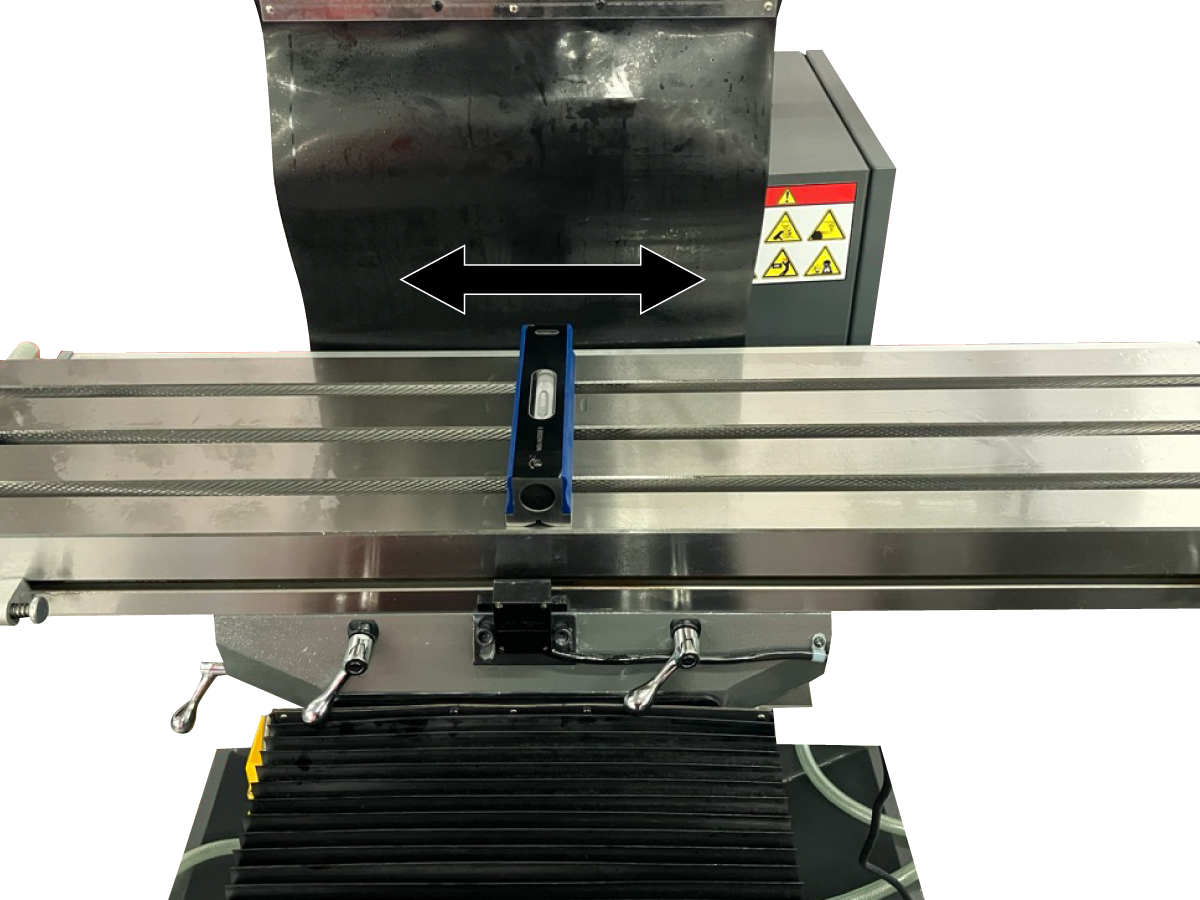
With the level parallel to the t-slots, jog the table through its full y-axis of travel. Note the bubble positioning at each end of travel. Adjust the feet to remove twist from the y-axis. 

5

With the level perpendicular to the t-slots, jog the table through its full x-axis of travel. Note the bubble positioning at each end of travel. Adjust the feet to remove twist from the x-axis.


6

Tighten the lock nuts [1] to fix the level of the casting in place. 

Note: If the lock nut cannot be fully tightened due to the shape of the casting, use the beveled washers included in the install kit. Install beveled washers underneath the lock nuts, then tighten the lock nuts. 

Spindle Sweep

Note: Because the angle of the head can be adjusted, the spindle sweep procedure should be performed whenever the head is re-aligned. 

4

Move the spindle to the center of the area with the smallest error.

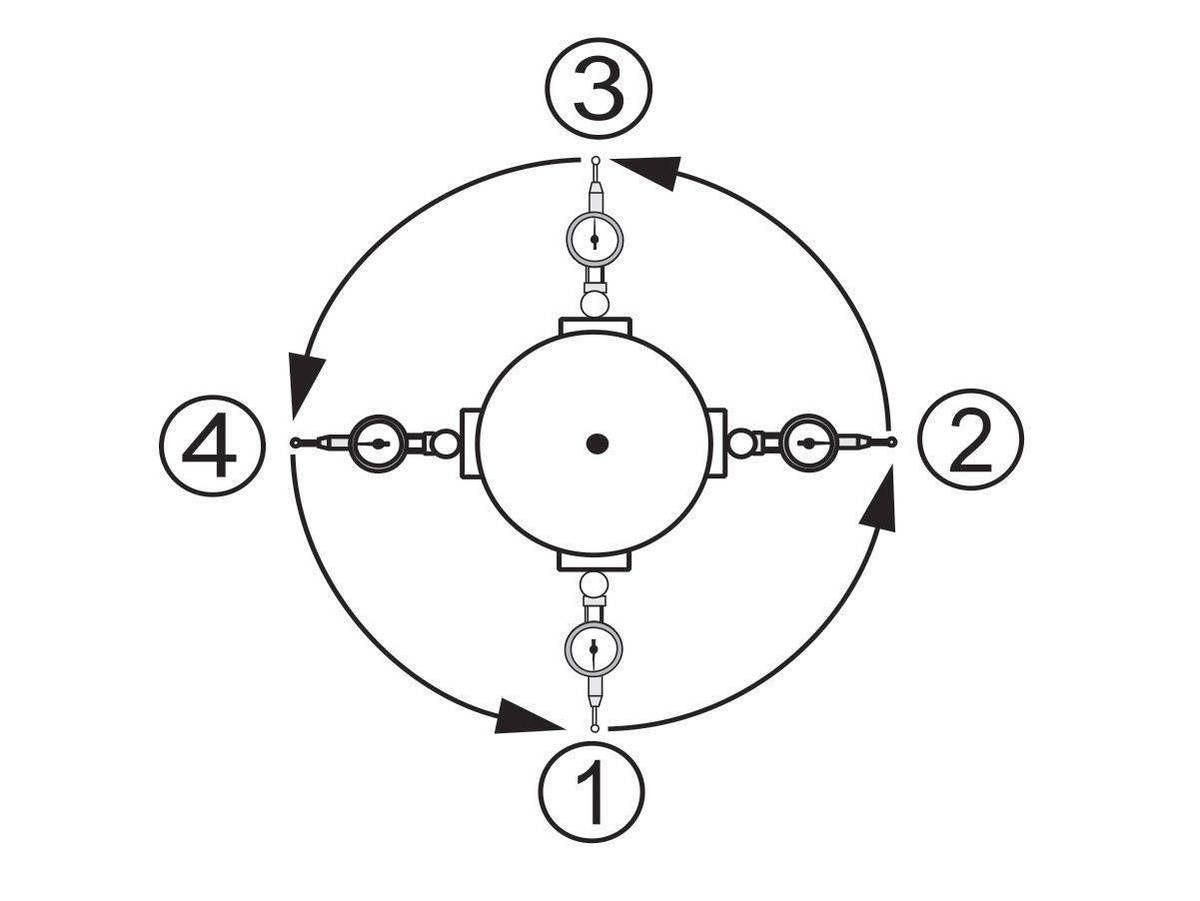
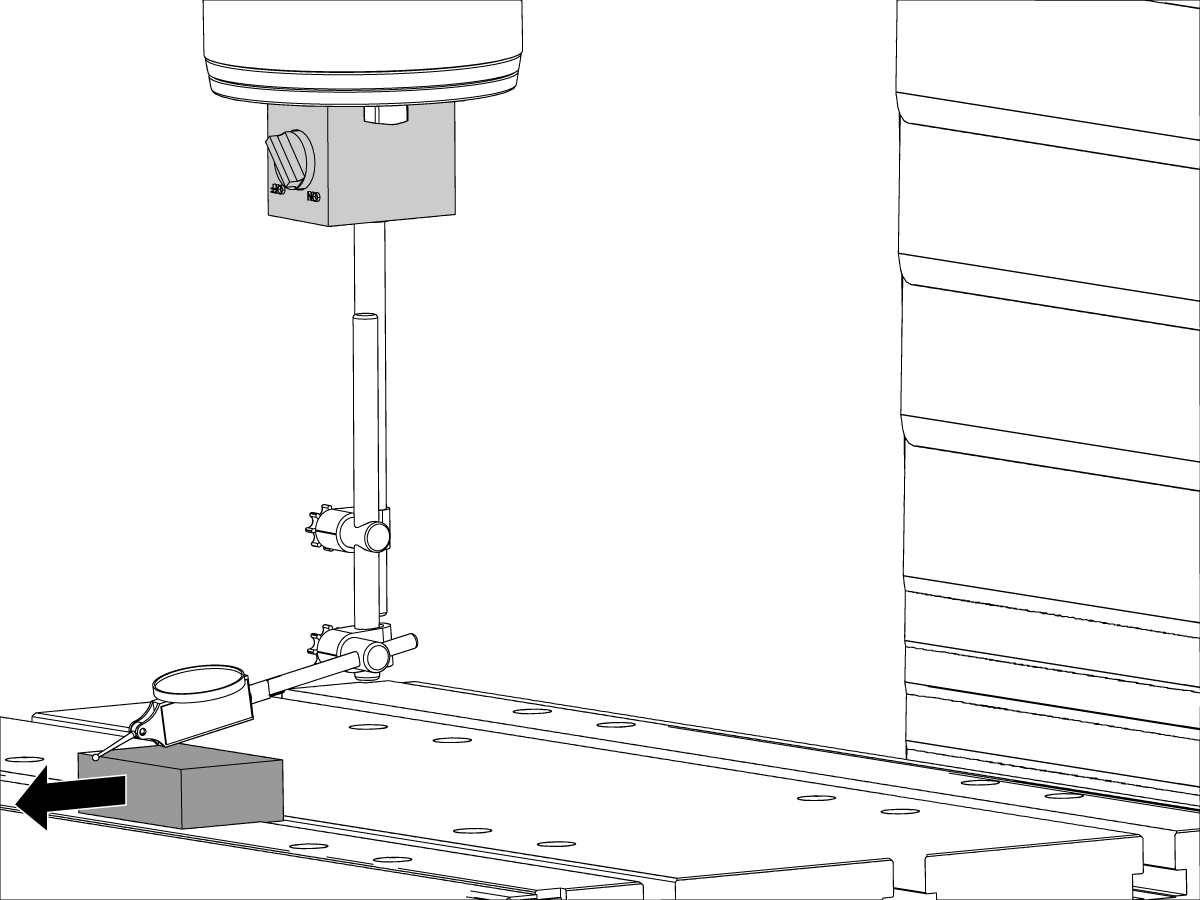
Move the magnetic indicator base onto the spindle nose. Put the stylus 5" (12.7 cm) from the spindle centerline.

 Note: The magnetic indicator base must turn with the spindle.

Move the gauge block under the stylus from the rear of the indicator.

Jog the Z Axis to set the indicator to 0.

1

Move the gauge block under the indicator stylus from the rear of the indicator. Record the value. Repeat at each 90-degree interval.

2

 To adjust the spindle tilt, break loose the three bolts behind the head [1]. Use the adjustment bolt [2] to alter the angle of the head. 

3

 To adjust the spindle tilt, break loose the four bolts on the front of the head [1]. Use the adjustment bolt [2] to alter the angle of the head. 


Component Installation

1

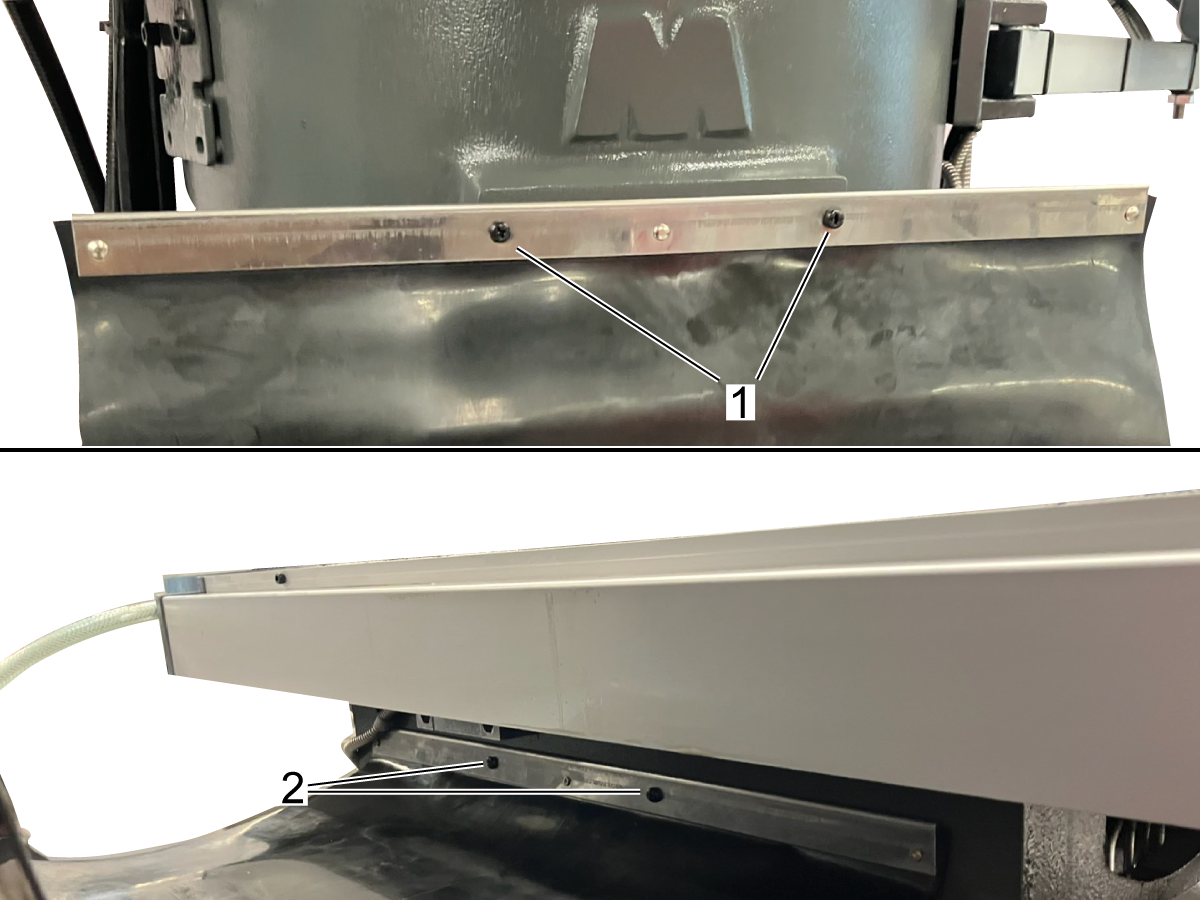
Remove two bolts on the table [1] and the front of the knee [2]. Install the front way cover.

2

Remove two bolts from the column [1] and underneath the table [2]. Install the back way cover. 

3

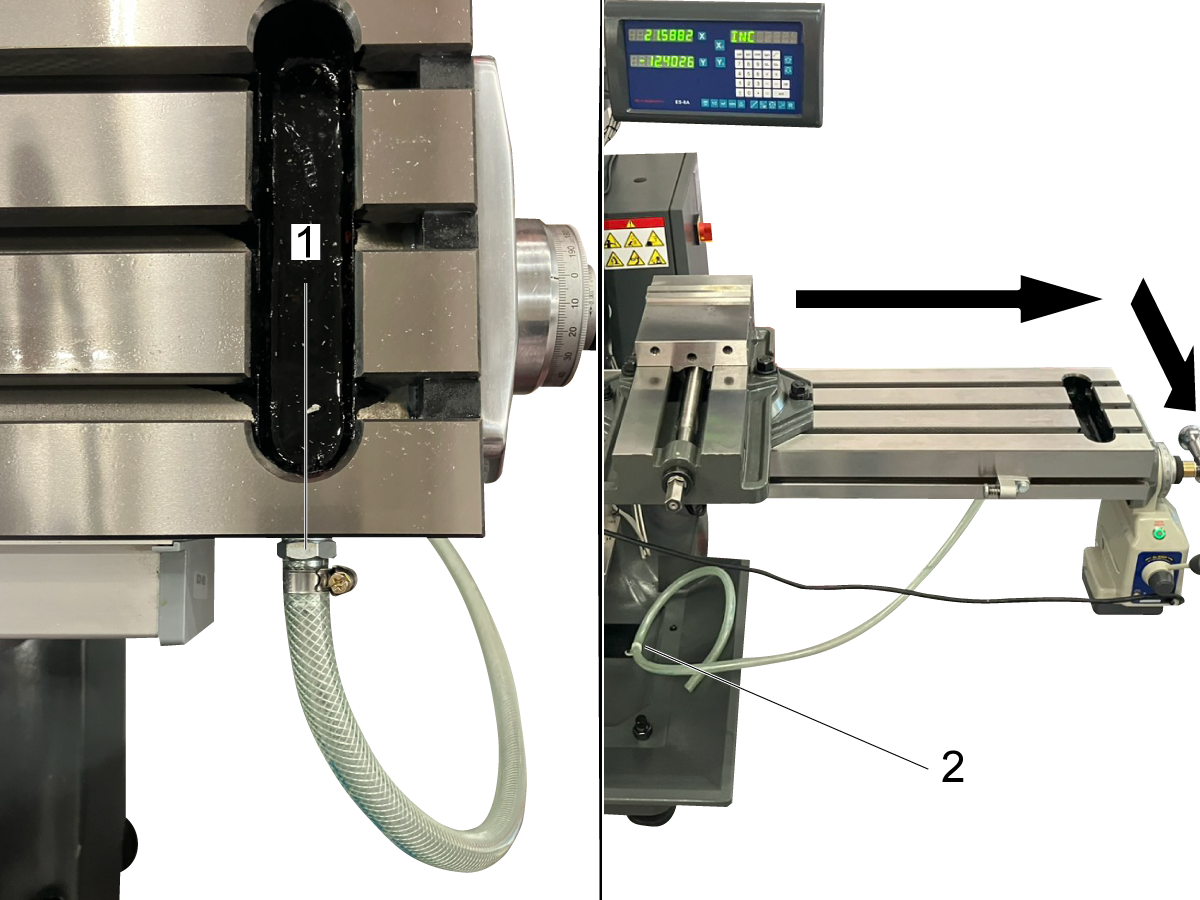
Screw the threaded end of the drain tubes into table [1]. Move the table to the front right corner of travel and secure the right drain tube to the catch tray with the drain tube bracket [2]. 


4

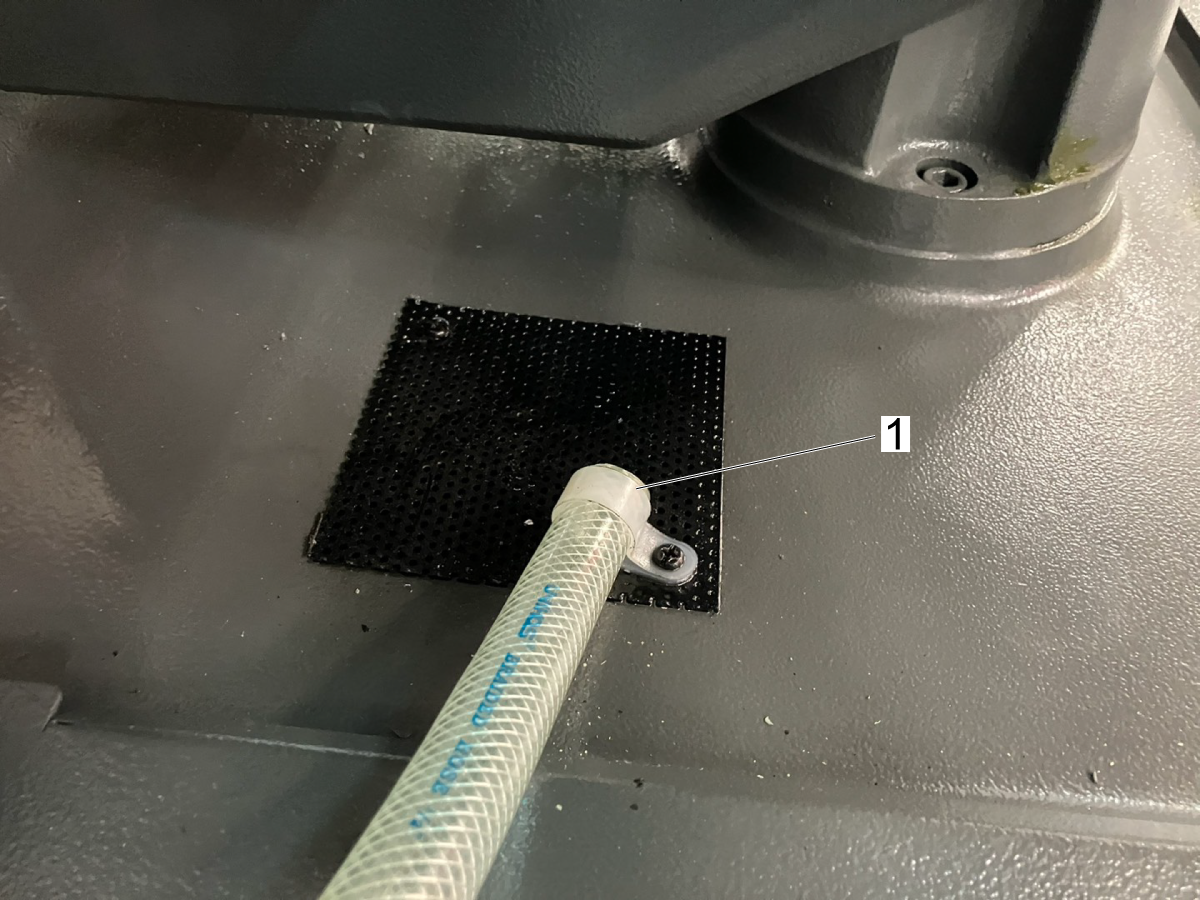
Move the table to the front left corner of travel and repeat with the left drain tube. Ensure that neither tube has looping or excess slack at any position of table movement. Adjust hose positioning as necessary. Trim excess hose [1]. 

5

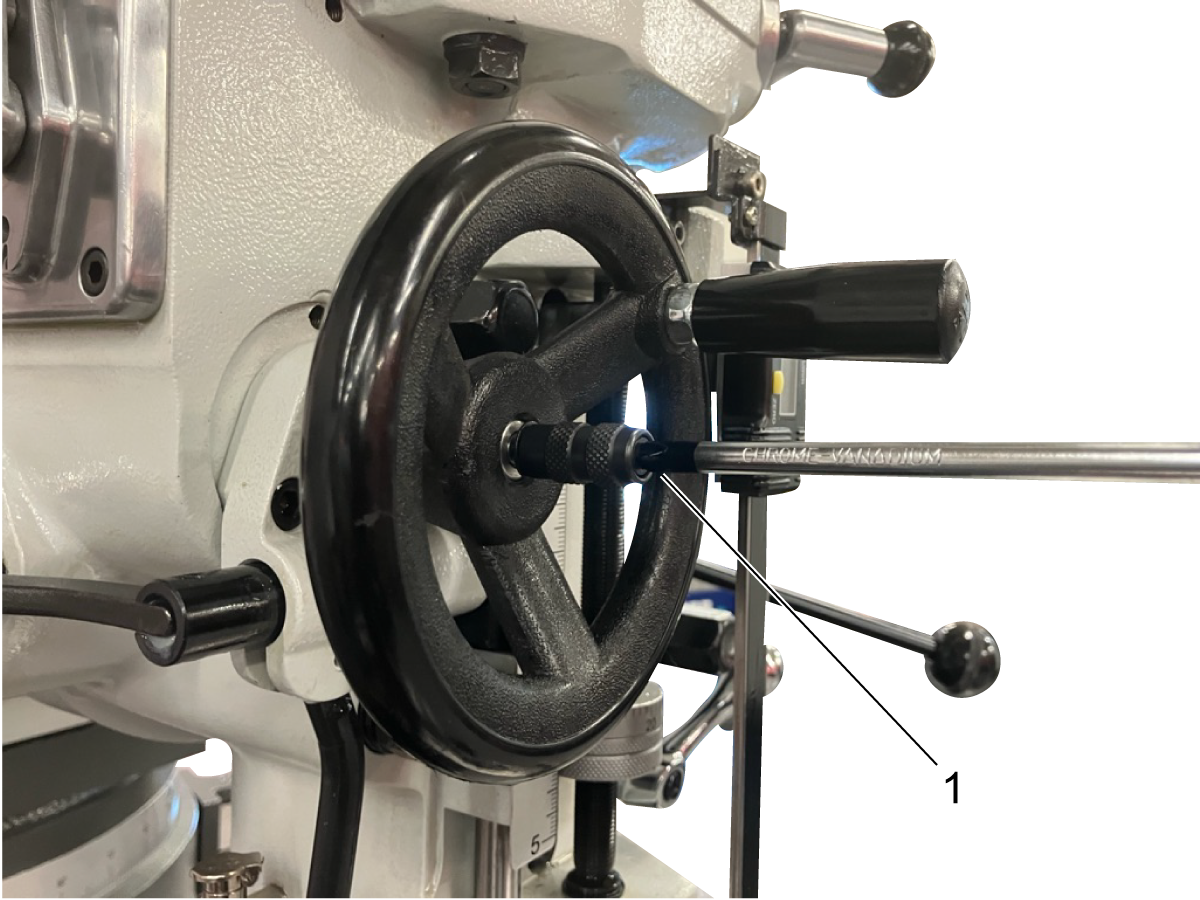
Screw in the feed direction plunger [1]. Use the hand wheel to provide additional leverage. 

Air Connection

1

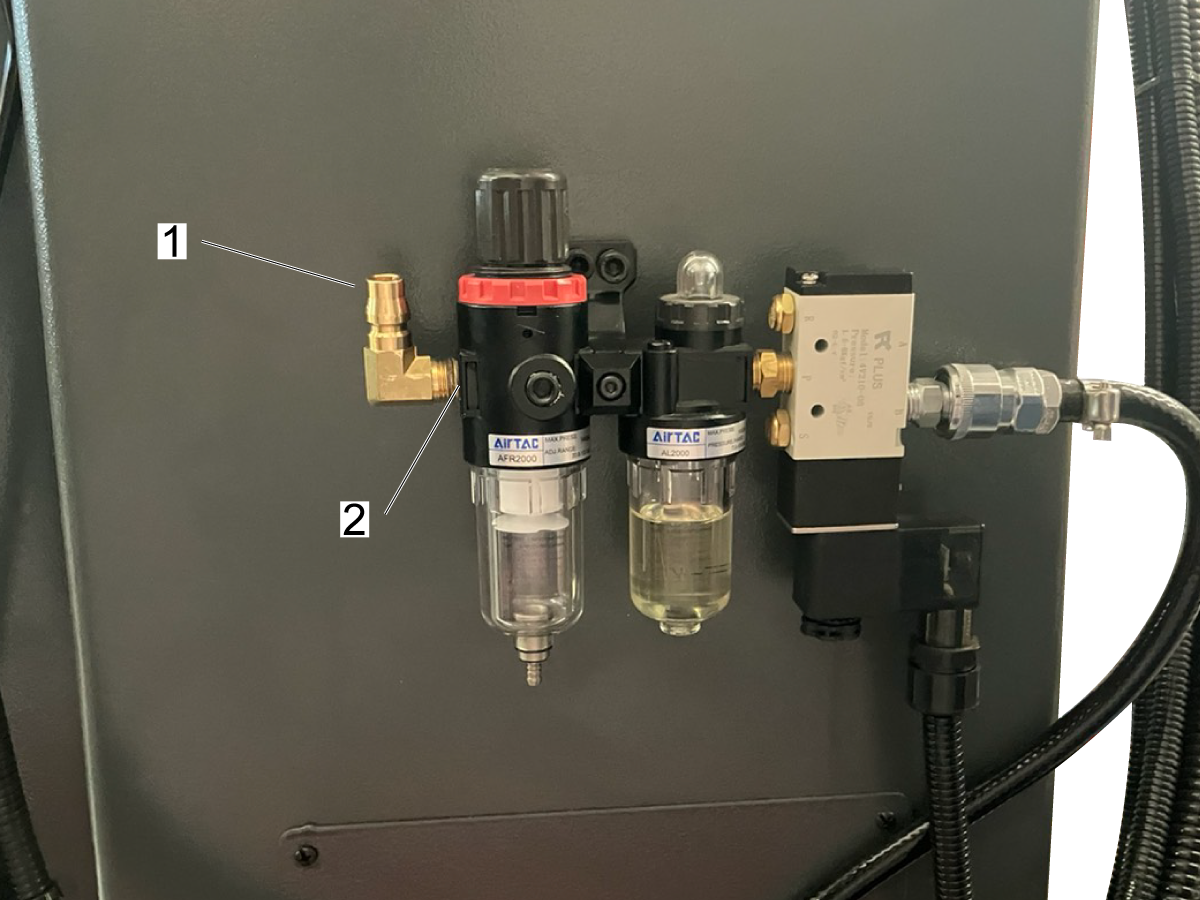
Connect air supply behind the column [1]. The air connection may need to be replaced with a standard quick connect fitting to be compatible with your air supply. The regulator has a 1/4 NPT inlet port [2].

Electrical Installation

1

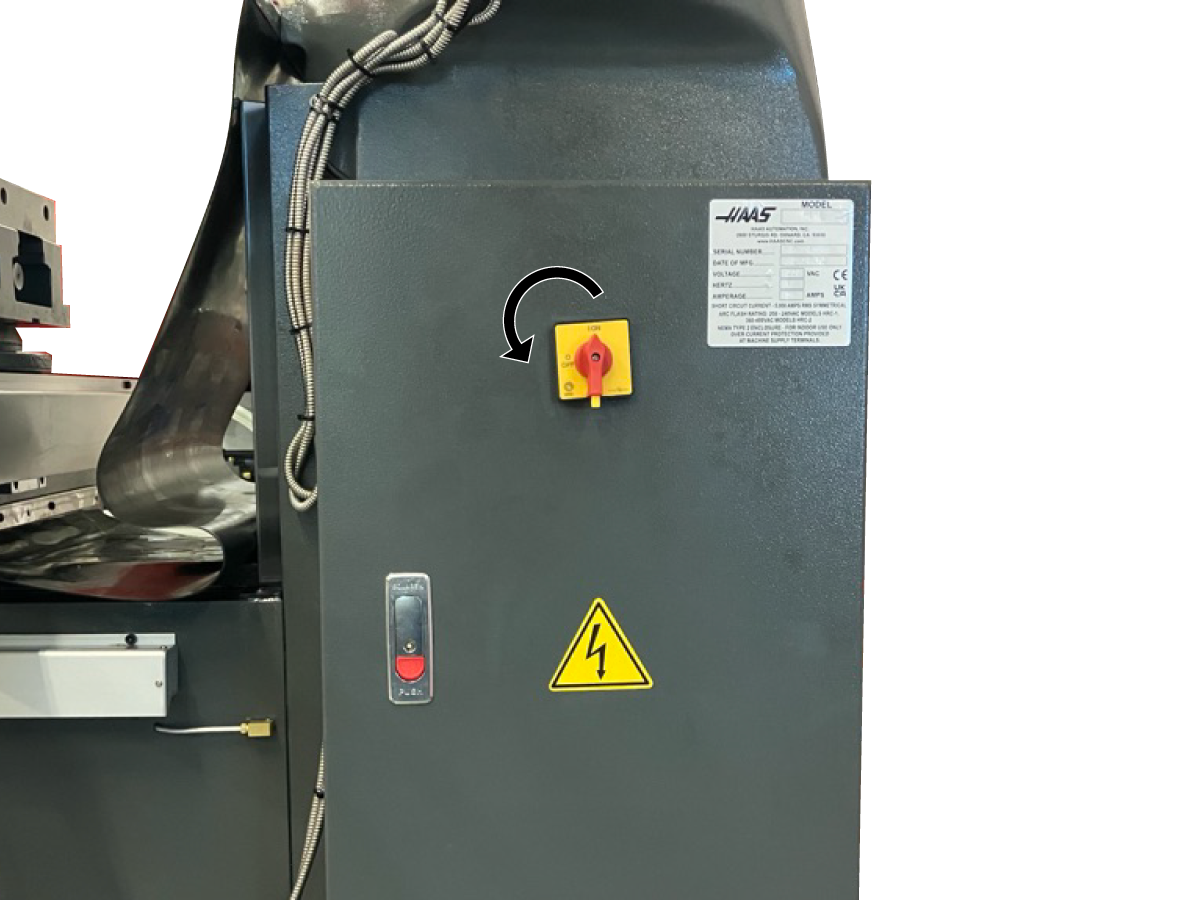
Open the electrical cabinet door. Main breaker must be switched off to open the electrical cabinet. Route the power cables through the bottom of the electrical cabinet. Connect the other end of the power cables to a high voltage plug. 

2

Connect the yellow and green ground cable [1] to ground. 

3

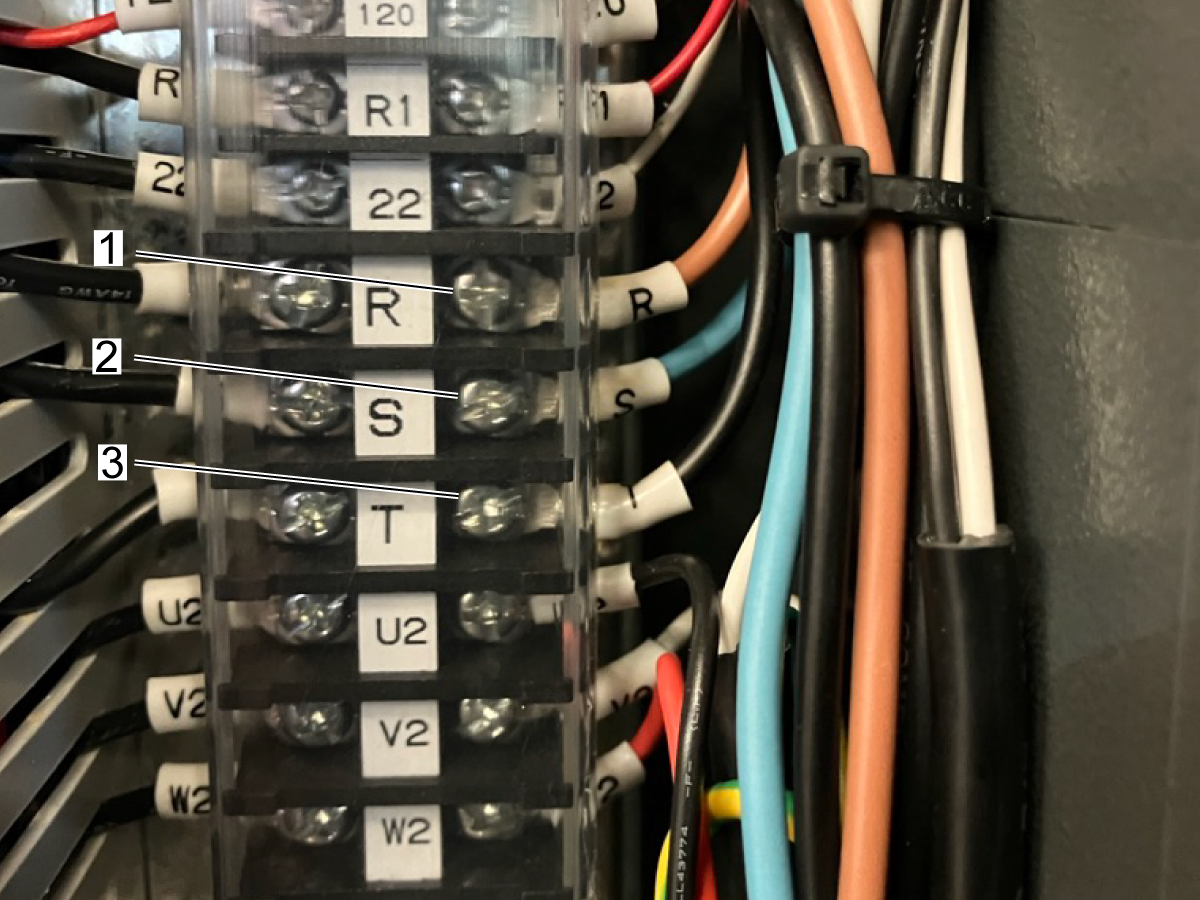
Connect the brown wire labelled R to the port labelled R [1]. Connect the blue wire labelled S to the port labelled S [2]. Connect the black wire labelled T to the port labelled T [3].


4

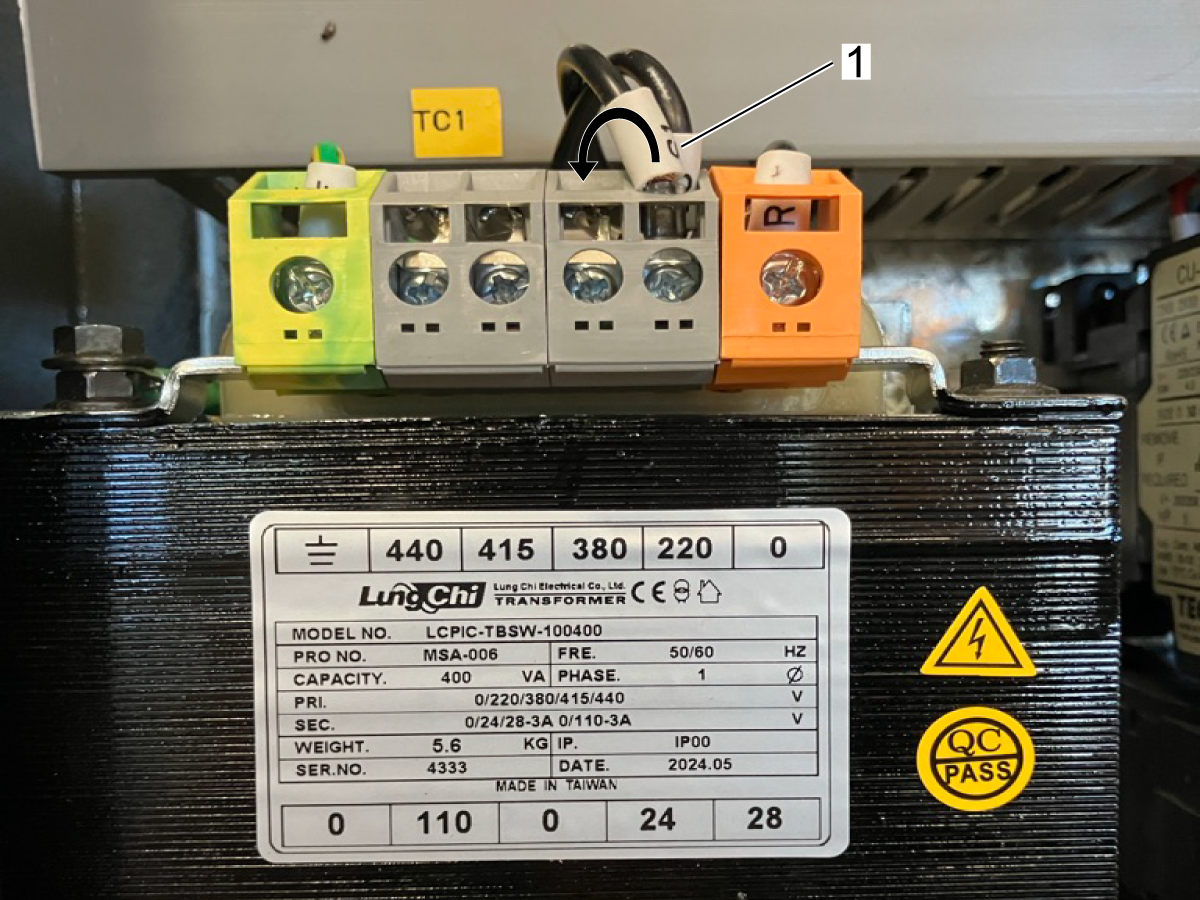
The machine is wired as 220VAC upon arrival. To wire the machine for 380VAC instead, move the black wire labeled S1 to the 380 V connection. 


Attention: Do not connect S1 to the 380 connection if your power source is 220VAC, or vice versa. Doing so will cause permanent damage to the machine. 

Attention: The spindle motor and coolant pump are designed for 220/380V power only. Do not connect S1 to the 415 or 440 connections. Doing so will cause permanent damage to the machine. 

Note: An external transformer is required for 415/440VAC incoming voltage. 


Fill Coolant and Lubrication

Note: Machine does not come with oil or coolant. Oil and coolant must be purchased separately. 

1

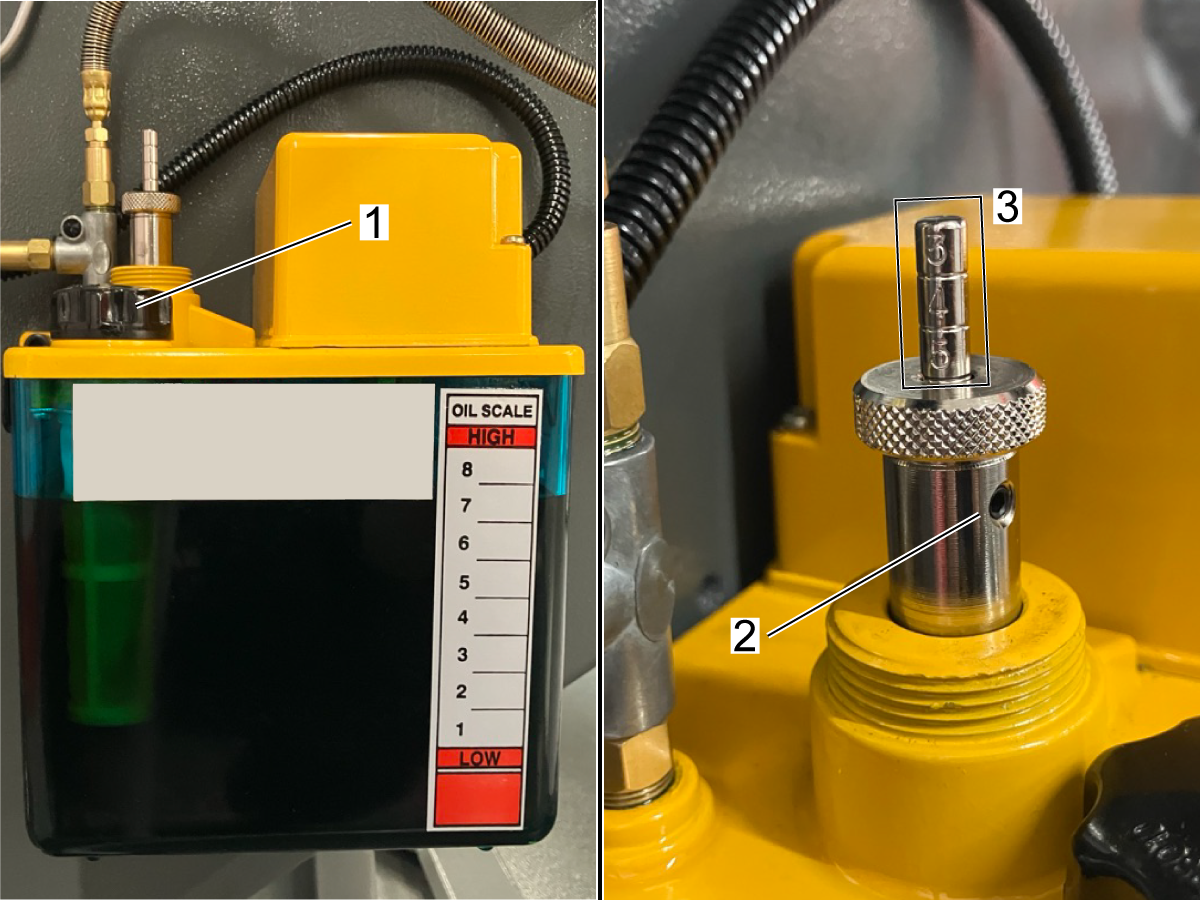
Remove the cap [1] to access lubrication fill port. Pour oil slowly, giving it time to pass through the filter. Fill until oil approaches max fill line. 

Lubrication tank should be filled with 93-4578 SYNTHETIC GEAR/BEARING OIL 1GL/3.78L, or 93-2365 SYNTHETIC GEAR/BEARING OIL 1QT/0.94L, or an ISO VG68 Oil. About 2 quarts is needed to fill the tank.

To modify the discharge volume of lube, loosen the set screw [2]. Turn the nut counterclockwise to decrease volume and clockwise to increase volume. The increments [3] on the post indicate discharge volume.  

2

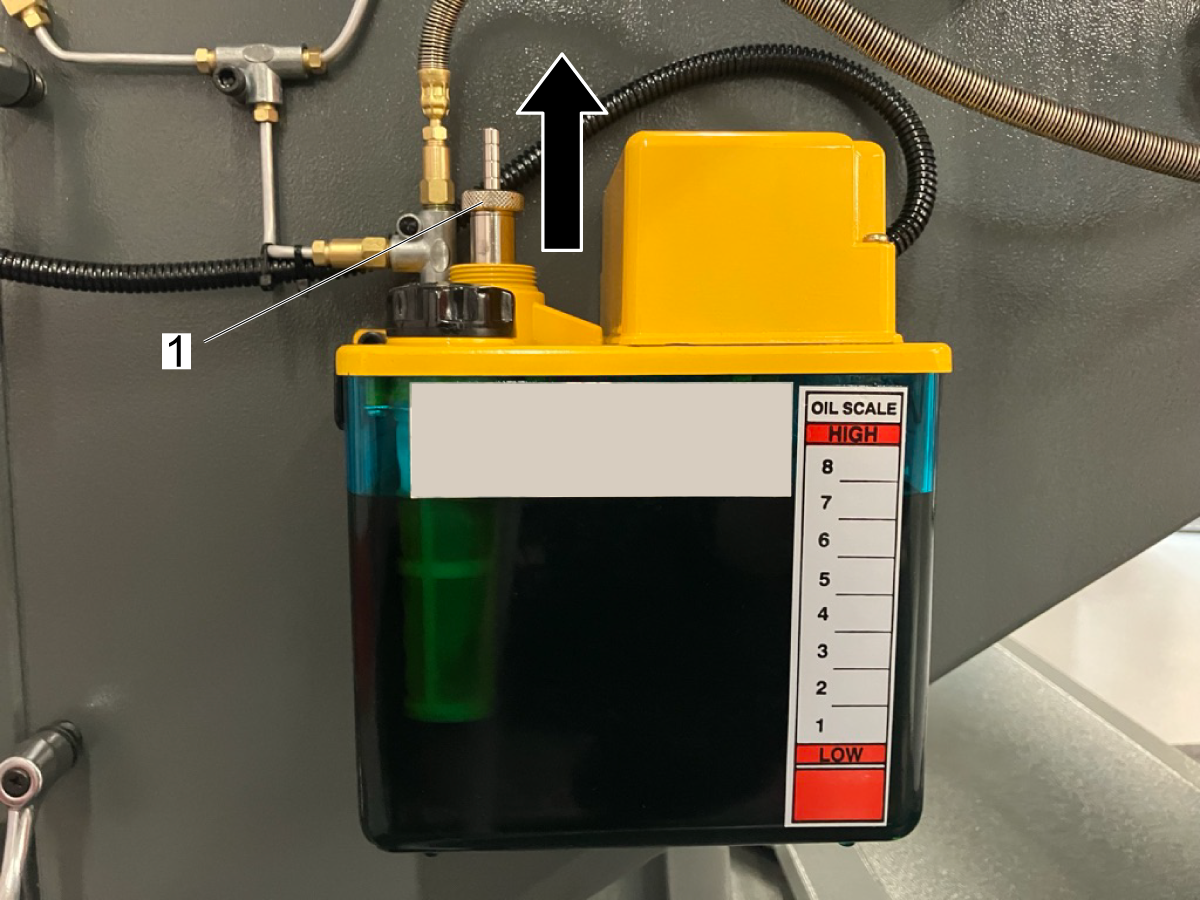
The lubrication system must be manually primed. Pull up on the plunger [1] and release it. Wait until the plunger returns to it's initial position. Pull and release at least twice more. Do not press on the plunger. 


3

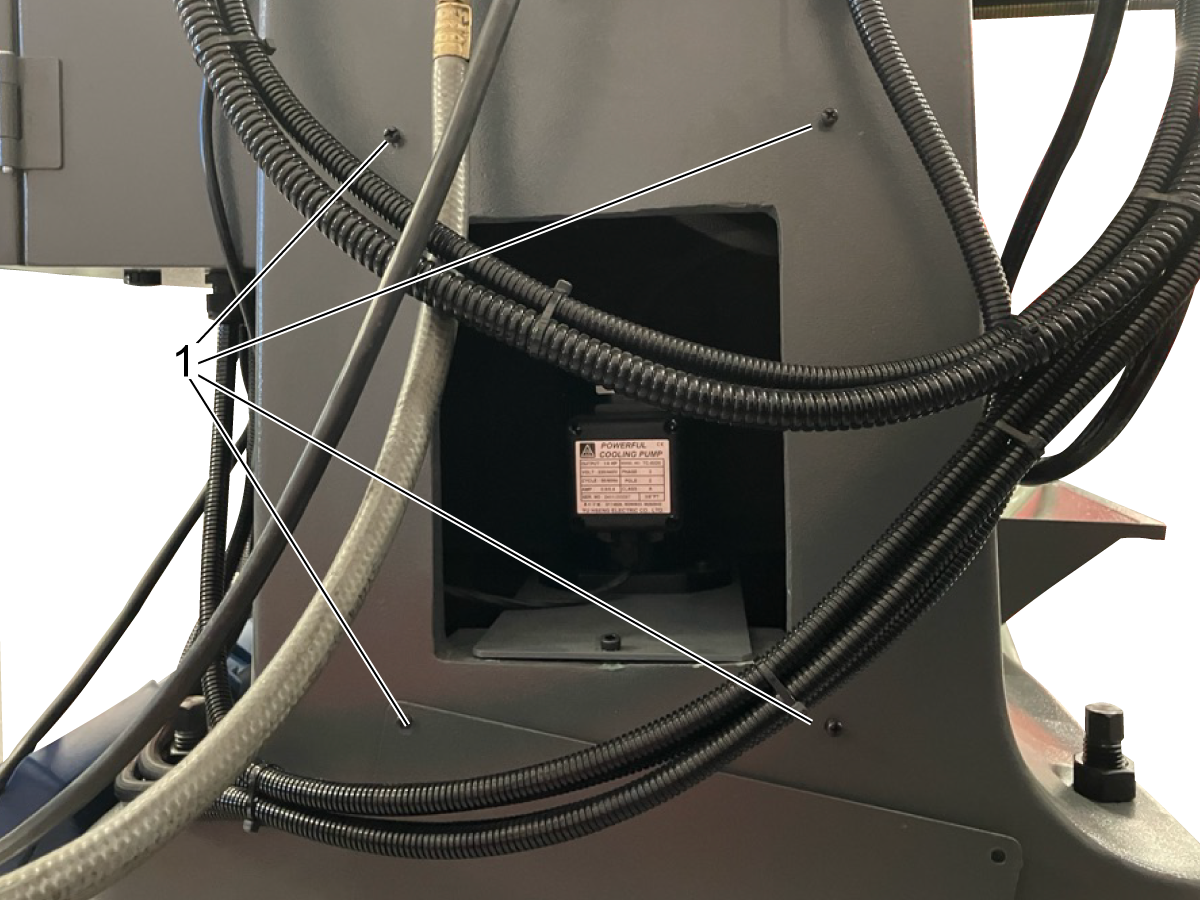
Remove the coolant tank cover from the back of the knee mill column by unscrewing the four bolts [1]. Fill the coolant tank.

Note: Ensure that coolant tank is clean and free of chips before filling coolant. 

For more information about coolant mixing and concentrations, see Coolant - Overview and Coolant -Maintenance .


Note: Be sure to maintain your coolant mixture to keep the coolant concentrate at acceptable levels. Improperly maintained coolant mixtures can allow machine components to rust. Rust damage is not covered by your warranty. Ask your HFO or your coolant dealer if you have questions about the specific coolant you plan to use. 

Verify RPM Placard Alignment

1

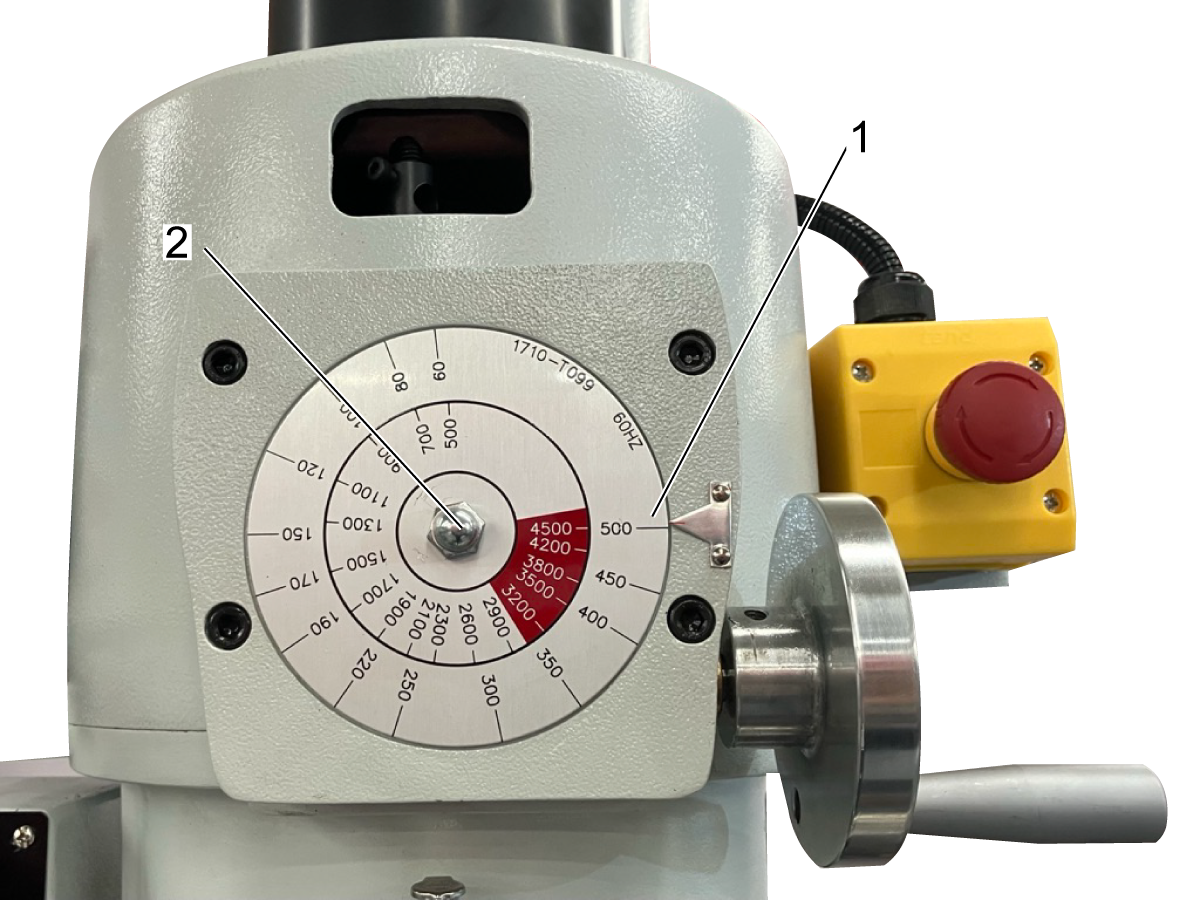
It may be necessary to check that the RPM placard correctly displays the spindle RPM. 

Turn the machine to low gear. Once in low gear, slowly turn up spindle RPM until placard no longer rotates, and turning hand wheel does not increase spindle RPM any further. 

Turn off motor. If the placard does not indicate that the machine is at 500 RPM [1], the placard should be adjusted. 

2

Loosen the bolt [2] on the placard and rotate it until the indicator arrow points to 500 RPM on the low-gear range. Tighten the bolt. 

Verify Hard Stop Location

1

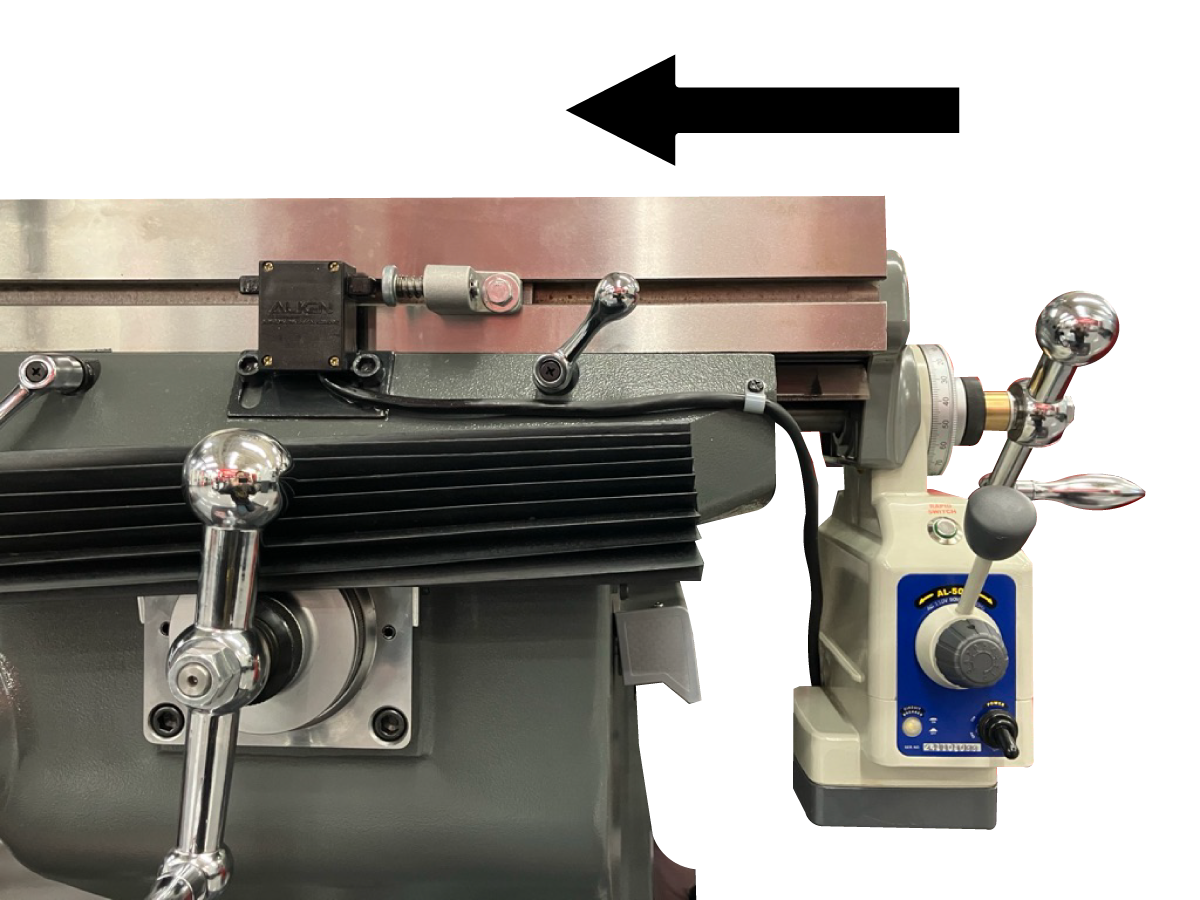
Move the table all the way to the right, stopping before the power table feed hits the table. 

2

Examine the position of the right hard stop. If the hard stop is not in a position to trigger the limit switches, move the hard stop to the correct location. 

Recently Viewed Items

You Have No Recently Viewed Items Yet

Feedback
Haas Logo

Haas Delivered Price

This price includes shipping cost, export and import duties, insurance, and any other expenses incurred during shipping to a location in France agreed with you as a buyer. No other mandatory costs can be added to the delivery of a Haas CNC Product.

KEEP UP WITH THE LATEST HAAS TIPS AND TECHNOLOGY...

Sign up now!   

HAAS TOOLING ACCEPTS THE FOLLOWING:

  • Service & Support
  • Owners
  • Request Service
  • Operator Manuals
  • Haas Parts
  • Rotary Repair Request
  • Pre-Install Guides
  • Shopping Tools
  • Build & Price a New Haas
  • Available Inventory
  • The Haas Price List
  • CNCA Financing
  • About Haas
  • Accessibility Statement
  • DNSH Statement
  • Export Compliance
  • Careers
  • Certifications & Safety
  • Contact Us
  • History
  • Terms & Conditions
  • Haas Tooling Terms & Conditions
  • Privacy
  • Warranty
  • Haas Community
  • Haas Certification Program
  • Haas Motorsports
  • Gene Haas Foundation
  • Haas Technical Education Community
  • Events
  • Join the Conversation
  • Facebook
  • X
  • Flickr
  • YouTube
  • LinkedIn
  • Instagram
  • TikTok
© 2026 Haas Automation, Inc – CNC Machine Tools
This site is protected by reCAPTCHA and the Google Privacy Policy and Terms of Service apply.

2800 Sturgis Rd., Oxnard, CA 93030
Toll Free: (888) 817-4446 / Fax: 805-278-8554