×

Search Results

Web Pages

Images

    • <
    • 1
    • >
  • machines
    • Haas Vertical Mills
      Vertical Mills
      • Vertical Mills
      • VF Series
      • Universal Machines
      • VR Series
      • Pallet-Changing VMCs
      • Mini Mills
      • Mold Machines
      • Drill/ Tap/ Mill Series
      • Toolroom Mills
      • Compact Mills
      • Gantry Series
      • Vertical Mill/Turn
      • Extra-Large VMC
      • Desktop Mill
      • Control Simulator
      • Mill Auto Parts Loader
    • Product Image
      Multi-Axis Solutions
      • Multi-Axis Solutions
      • 5-Axis Mills
      • Y-Axis Lathes
    • Haas Lathes
      Lathes
      • Lathes
      • ST Series
      • Dual-Spindle
      • Toolroom Lathes
      • Chucker Lathe
      • Bar Feeder
      • Lathe Auto Parts Loader
    • Haas Horizontal Mills
      Horizontal Mills
      • Horizontal Mills
      • 50-Taper
      • 40-Taper
    • Haas Rotaries & Indexers
      Rotaries & Indexers
      • Rotaries & Indexers
      • Rotary Tables
      • Indexers
      • 5-Axis Rotaries
      • Extra-Large Rotaries
    • Product Image
      Automation Systems
      • Automation Systems
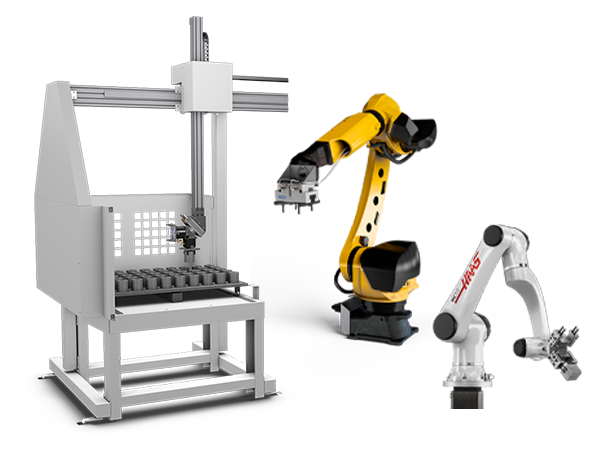
      • Robot Systems
      • Automatic Parts Loaders
      • Pallet Pool Systems
      • Haas Bar Feeder
      • Models
    • QUICK LINKS Special Series  Special Series  PRICE LIST PRICE LIST BUILD & PRICE BUILD & PRICE WHAT’S NEW WHAT’S NEW
      SHOPPING TOOLS
      • Build & Price a Haas
      • Price List
      • Available Inventory
      • CNCA Financing
      WANT TO TALK TO SOMEONE?

      A Haas Factory Outlet (HFO) can answer your questions, and walk you through your best options.

      CONTACT YOUR DISTRIBUTOR >
  • Options
    • Product Image
      Spindles
      • Spindles
    • Product Image
      Tool Changers
      • Tool Changers
    • Product Image
      4th- | 5th-Axis
      • 4th- | 5th-Axis
    • Product Image
      Turrets & Live Tooling
      • Turrets & Live Tooling
    • Product Image
      Probing
      • Probing
    • Haas Chip & Coolant Management
      Chip & Coolant Management
      • Chip & Coolant Management
    • The Haas Control
      The Haas Control
      • The Haas Control
    • Product Image
      Product Options
      • Product Options
    • Product Image
      Tooling & Fixturing
      • Tooling & Fixturing
    • Product Image
      Workholding
      • Workholding
    • Product Image
      5-Axis Solutions
      • 5-Axis Solutions
      • 5 Easy Steps to 5-Axis
    • Product Image
      Automation
      • Automation
    • QUICK LINKS Special Series  Special Series  PRICE LIST PRICE LIST BUILD & PRICE BUILD & PRICE WHAT’S NEW WHAT’S NEW
      SHOPPING TOOLS
      • Build & Price a Haas
      • Price List
      • Available Inventory
      • CNCA Financing
      WANT TO TALK TO SOMEONE?

      A Haas Factory Outlet (HFO) can answer your questions, and walk you through your best options.

      CONTACT YOUR DISTRIBUTOR >
  • Why Haas
      Discover the Haas Difference
      Why Haas MyHaas HTEC Network Industry 4.0 Haas Certification Customer Testimonials
  • Service
    • SEARCH ALARM CODES
      Search
    • Troubleshooting Guides and How-To Procedures
      • Product Image
        Troubleshooting Guides
      • Product Image
        How To Procedures
    • Manuals
      • Product Image
        Operator Manuals
      • Product Image
        Interactive Service Manuals
  • Videos
  • MyHaas – One Place for Everything

    • Compare Quotes
      • Compare Quotes

    • About MyHaas
      • About MyHaas

    • Haas CNC Certification Program
      • Haas CNC Certification Program

    • Haas CNC Certification Program-Redirect
      • Haas CNC Certification Program-Redirect

    • Haas CNC Certification Program
      • Haas CNC Certification Program

    • Haas Learning Resources
      • Haas Learning Resources

    • Haas Global Learning Resources
      • Haas Global Learning Resources
    • QUICK LINKS Special Series  Special Series  PRICE LIST PRICE LIST BUILD & PRICE BUILD & PRICE WHAT’S NEW WHAT’S NEW
      SHOPPING TOOLS
      • Build & Price a Haas
      • Price List
      • Available Inventory
      • CNCA Financing
      WANT TO TALK TO SOMEONE?

      A Haas Factory Outlet (HFO) can answer your questions, and walk you through your best options.

      CONTACT YOUR DISTRIBUTOR >
  • Haas Tooling

      Mill Toolholding

      End Mill Holders
      Shell Mill Holders
      Shrink Fit Holders
      ER Collet Chucks
      Milling Chucks, Collets & Kits
      Drill Chucks
      Pull Studs
      Mill Toolholding Kits

      Mill Workholding

      Vises
      Mill Vise Jaws
      Workholding Accessories

      Milling

      Shell Mill Bodies
      Milling Inserts
      End Mills
      End Mill Kits
      Chamfer Mills & Inserts
      Indexable End Mill Bodies

      HSK Toolholders

      HSK ER Collet Chucks
      HSK Shell Mill Holders

      Lathe Tooling

      Cut-Off Tooling
      Cut-Off Tooling Kits
      Turning Inserts
      Grooving Tools
      Small ID Grooving & Threading Tools
      Threading Inserts
      Threading Toolholding
      ID Toolholding
      OD Toolholding

      Lathe Workholding

      Live Centers

      ER Collet

      ER Collets & Accessories
      ER Collet Kits

      Holemaking

      Carbide Drills
      Indexable Drill Bodies
      Indexable Drill Inserts
      Indexable Drilling Kits
      Modular Drill Bodies
      Modular Drill Heads
      Cobalt Drills & Sets
      Center Drills

      Threading

      Taps
      Threading Inserts
      Threading Toolholders

      Tool Management

      Tool Presetting Machines

      Tooling Accessories

      Spindle Taper Cleaner
      Spindle Test Bars
      Haas Shop Lift

      Tool Kits

      End Mill Kits
      Indexable Drilling Kits
      Indexable Milling Kits
      Mill Toolholding Kits

      Apparel & Accessories

      Accessories
      Apparel

      Part #

      Mill Toolholding Mill Workholding Milling HSK Toolholders Lathe Tooling Lathe Workholding ER Collet Holemaking Threading Tool Management Tooling Accessories Tool Kits Apparel & Accessories
  • Contact Us

My Cart
MyHaas Welcome,
!
Haas Tooling Guest Order History MyHaas/HaasConnect Sign In Register Haas Tooling My Account Order History Return History MyHaas/HaasConnect Sign Out Welcome, My Machines Latest Activity My Quotes My Account My Users Sign Out
Find A Dealer
  1. Select Language
    1. English
    2. Deutsch
    3. Español
    4. Français
    5. Italiano
    6. Português
    7. Česky
    8. Dansk
    9. Nederlands
    10. Magyar
    11. Polski
    12. Svenska
    13. Русский
    14. Türkçe
    15. 中文
    16. Suomi
    17. Norsk
    18. الإنجليزية
    19. Български
    20. Hrvatski
    21. Ελληνικά
    22. Română
    23. Slovenský
    24. Slovenščina
    25. 한국어
    26. 日本語
Search
×

Search Results

Web Pages

Images

    • <
    • 1
    • >

50-Taper - Belt-Drive - TSC-Ready - 300 and 1K PSI - Installation - EC-1600 - VMC - AD0243

Service How To Procedures 50-Taper - Belt-Drive - TSC-Ready - 300 and 1K PSI - Installation - EC-1600 - VMC - AD0243
Recently Updated Last updated: 09/17/2019

50-Taper - Belt-Drive - TSC-Ready - 300 and 1K PSI - Installation - EC-1600 - VMC


AD0243

Applies to machines built from: June, 2012

50-Taper - Belt-Drive - TSC-Ready - 300 and 1K PSI - Installation - EC-1600 - VMC - AD0243

- Jump to Section - 1. Introduction 2. Install Kit 3. Tools Required 4. 50-Taper - Belt-Drive - TSC-Ready - 300 and 1K PSI - Installation - EC-1600 - VMC (12 steps) 5. TSC - 1K PSI - Fan Assembly - Installation (1 step) 6. TSC - 300 and 1K PSI - Pump - Installation (2 steps) 7. TSC - 300 and 1K PSI - Test (2 steps) Back to Top

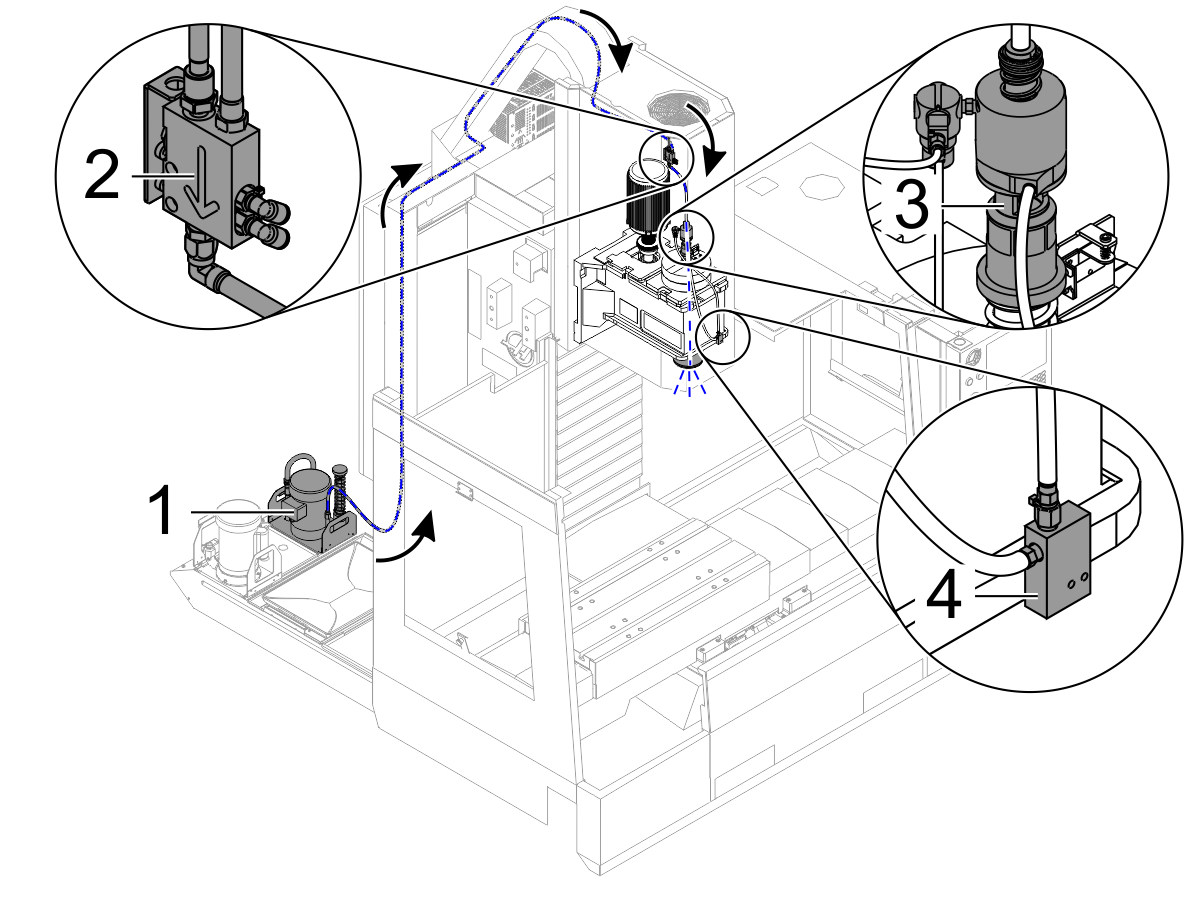
Introduction

  1. TSC Auto-Clean Coolant Pump
  2. Check-Valve Assembly
  3. Bearingless TSC Union Assembly
  4. Vacuum Generator

Install Kit

To select the correct TSC install kit for your machine refer to: Through Spindle Coolant - Field Install Kits

Tools Required

  • 2" wrench
  • 1" deep socket
  • Spindle Lock Tool: T-2080

50-Taper - Belt-Drive - TSC-Ready - 300 and 1K PSI - Installation - EC-1600 - VMC

1

Push [POWER OFF].

Set the main circuit breaker to the OFF position. Lock the main circuit breaker. Use an approved lock with an approved safety tag.

Close the primary air valve. Pull the ring on the bleed valve in the air manifold. Wait until all air pressure is released.

Look at the manifold pressure gauge. Make sure that the air pressure is 0 psi.

2

Remove the covers for the spindle head.

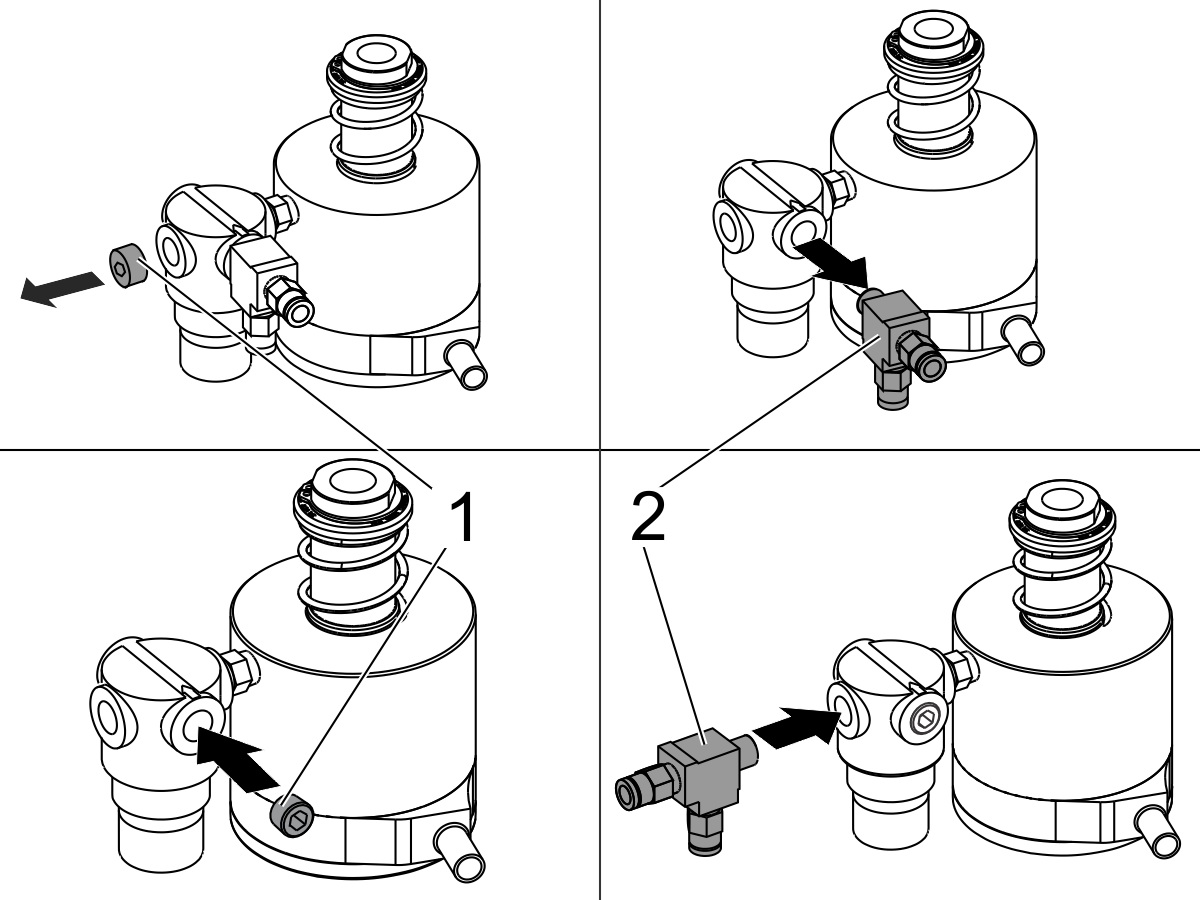
Remove the regulator plug [1].

Remove the fitting assembly [2] from the regulator port that has an arrow (or other mark).

Install the plug [1] into the regulator port.

Install the fitting assembly [2] into the open regulator port.

3

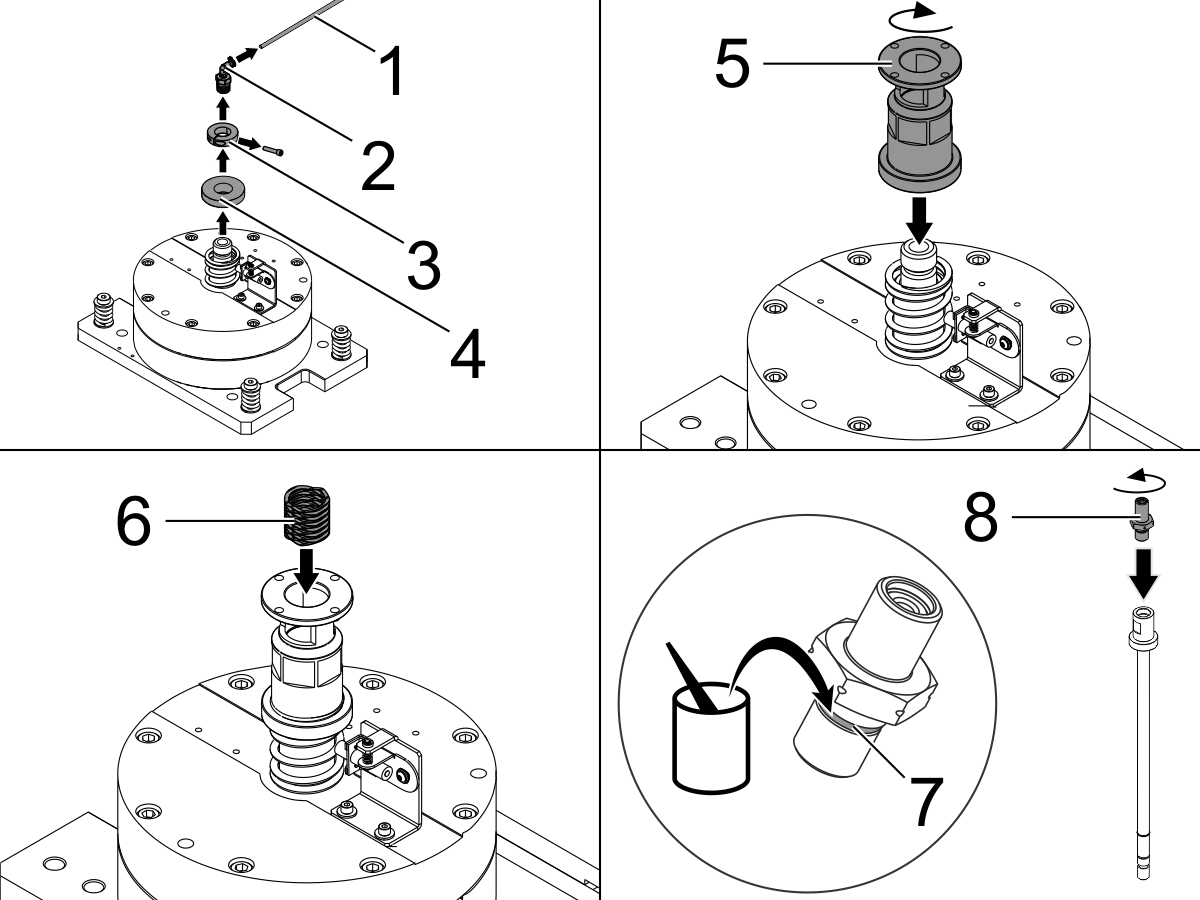
Disconnect the air purge tube [1] from the reducer fitting [2] on the tool-release piston (TRP). Do not discard the tube [1].

Remove the reducer fitting [2].

Remove the lock collar [3].

Remove the spring retainer [4].

Install and tighten the 50-taper TSC adapter [5]. Use a 2" (51 mm) wrench.

Install the wave spring [6].

Apply molybdenum grease to the union shaft o-ring [7]. Assemble the shaft [8] to the extension tube.

 Note: The shaft [8] has left-handed threads.

4

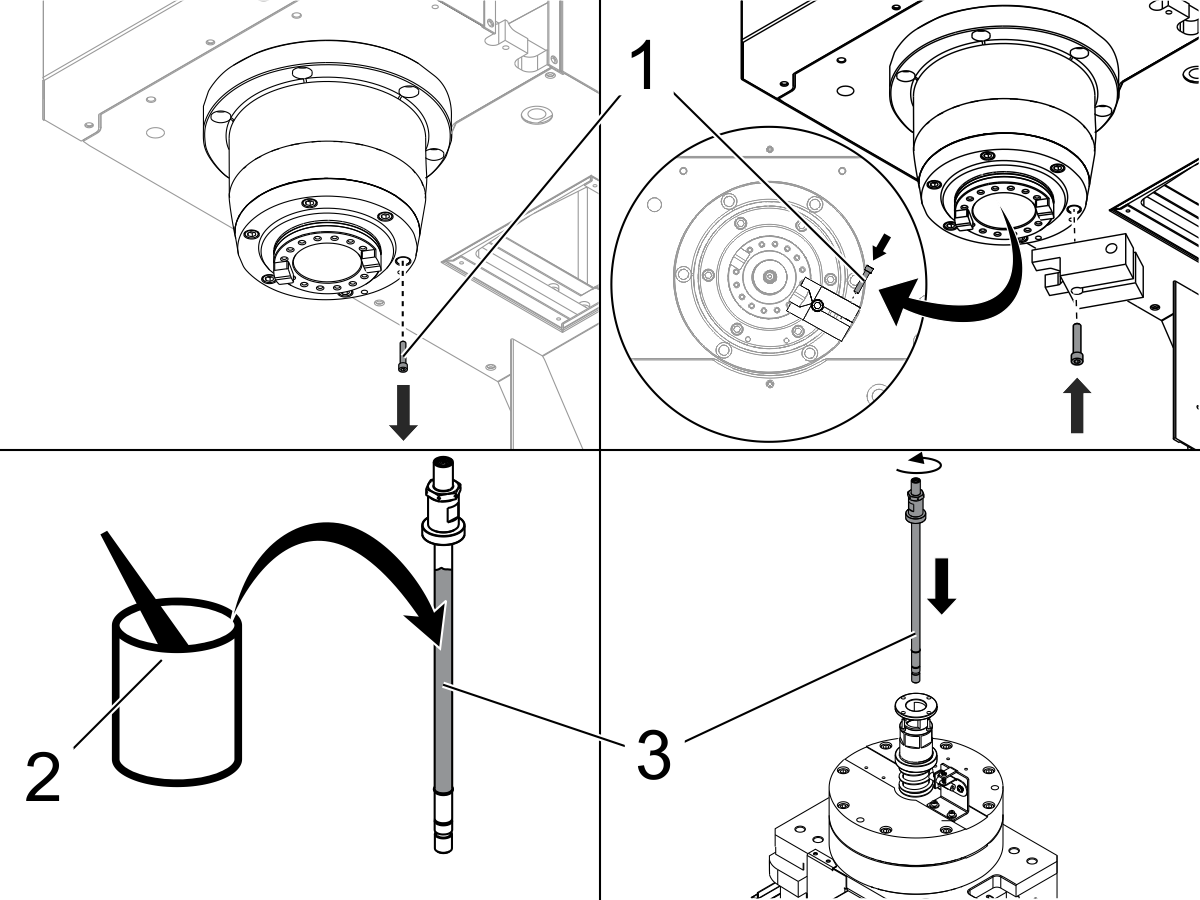
Remove one of the spindle-cap screws [1] for the spindle-locking tool. Align one spindle dog with the empty screw hole.

Install the spindle-locking tool (P/N T-2080). Use a 3/8-16 x 2-1/2" screw.

Apply molybdenum grease [2] to the tube extension shaft and o-ring [3]. Install the tube extension assembly.

5

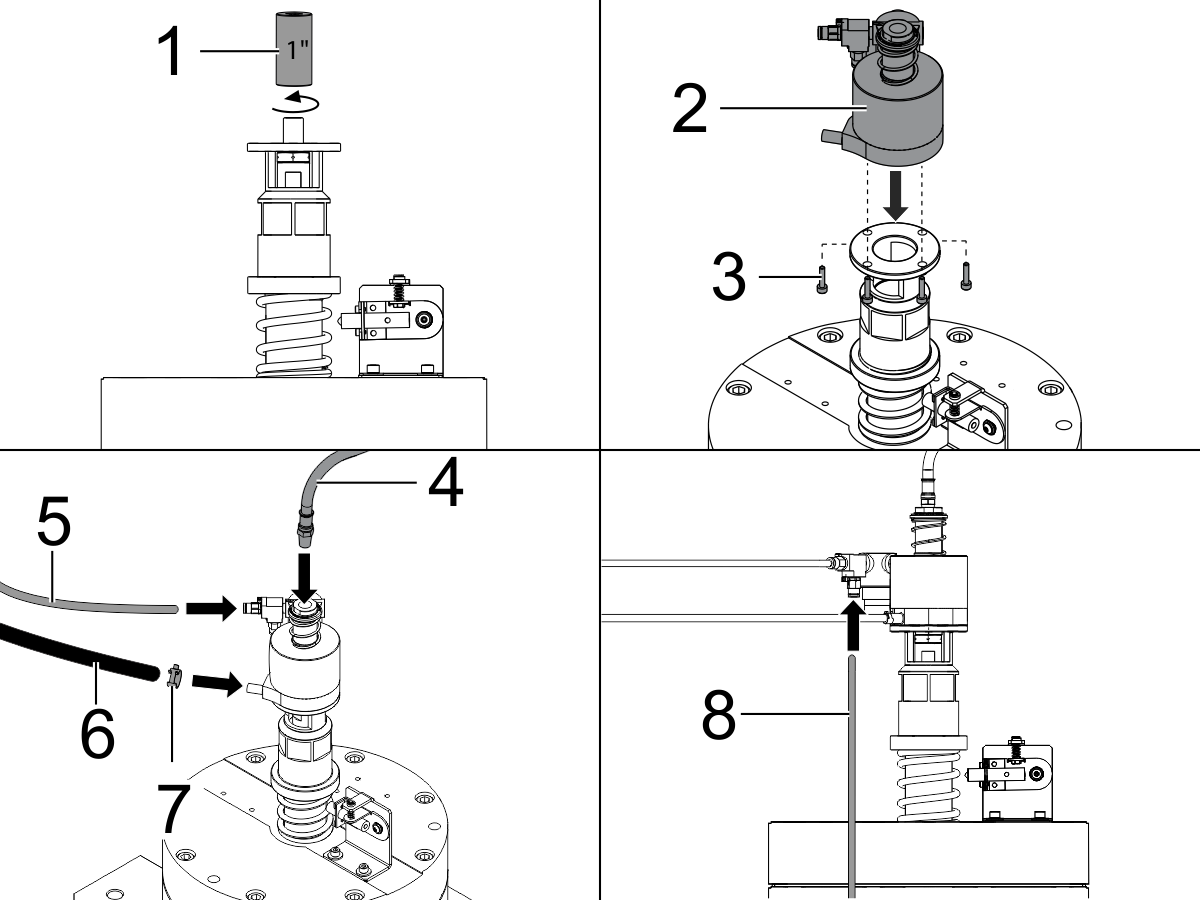
Tighten the tube extension assembly. Use a 1" (25 mm) long socket [1]. Torque the extension tube to 35 ft-lb (47.4 Nm).

 Note: The tube extension assembly has left-handed threads.

Remove the spindle locking tool. Install the spindle-cap screw.

Install the bearingless TSC union [2]. Use the (4) socket-head cap screws (SHCS) [3]. Torque the SHCS. Refer to the Haas Fastener Torque Specifications document. Use the value for steel.

 Note: Turn the union [2] so that the hoses face to the left. This prevents damage to the motor shroud.

Connect the high-pressure braided hose [4] to the bearingless TSC union.

Connect the pressure-supply tube [5] to the push-lock connector on the bearingless TSC union regulator.

 Note: The push-lock connectors have colored cable ties that are the same color as the hose they receive.

Connect the vacuum-drain hose [6] to the bearingless TSC union. Use a hose clamp [7] to hold the hose.

Connect the vacuum-drain tube [8] to the bearingless TSC union.

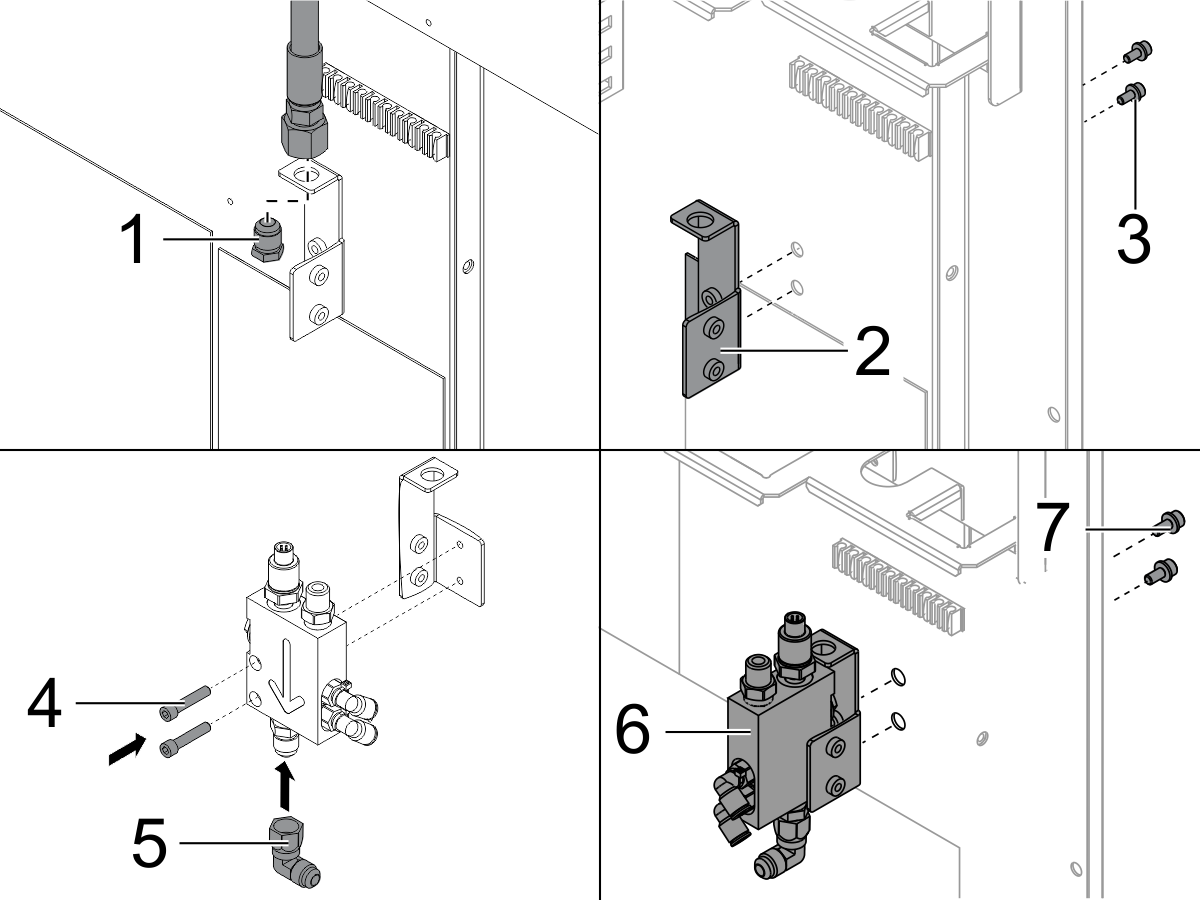
6

Remove and discard the plug [1] from the TSC hose.

Remove the check-valve bracket [2] and the (2) socket-head cap screws [3]. The screws are on the other side of the cover. Attach the 90 degree fitting [5] to the bottom of the check-valve.

Attach the check-valve to the check-valve bracket. Use the (2) 1/4-20 x 1-1/4" socket-head cap screws (SHCS) [4].

Attach the check-valve assembly [6] to the rear spindle-head cover. Use the (2) 10-32" SHCS [7].

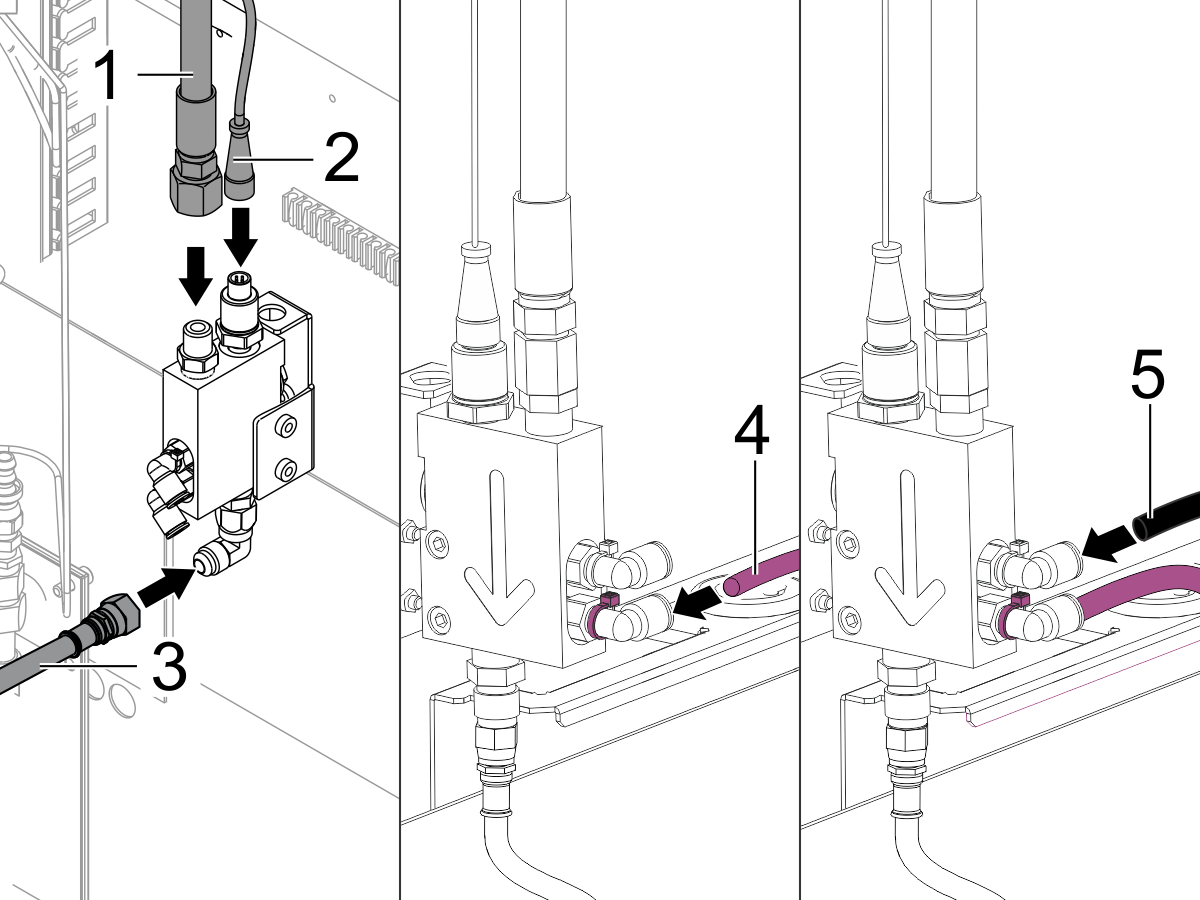
7

Connect the TSC hose [1] to the check-valve assembly.

Connect the pressure-sensor cable [2] to the check-valve assembly.

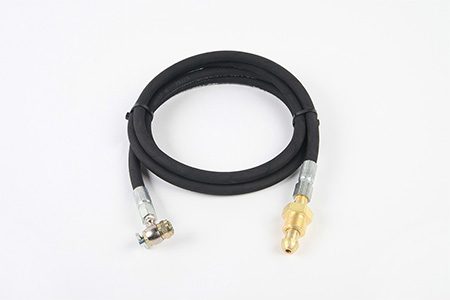
Connect the high-pressure braided hose [3] to the check-valve assembly [3]. The hose [3] is in the service kit.

 Note: If the hose [3] is too short, use the 90 degree fitting (P/N 58-3618) and the 45 degree fitting (P/N 58-3613). Disconnect the hose [3] from the bearingless TSC union. Connect the (2) fittings on top of the bearingless TSC union. Connect the hose [3] to the fitting assembly.

Connect the 1/4" tube [4] for the TSC purge solenoid to the check-valve assembly. The tube [4] is purple.

Connect the air-purge tube [5] to the check-valve assembly. This is the tube [5] that was disconnected from the reducer fitting. The tube [5] is black.

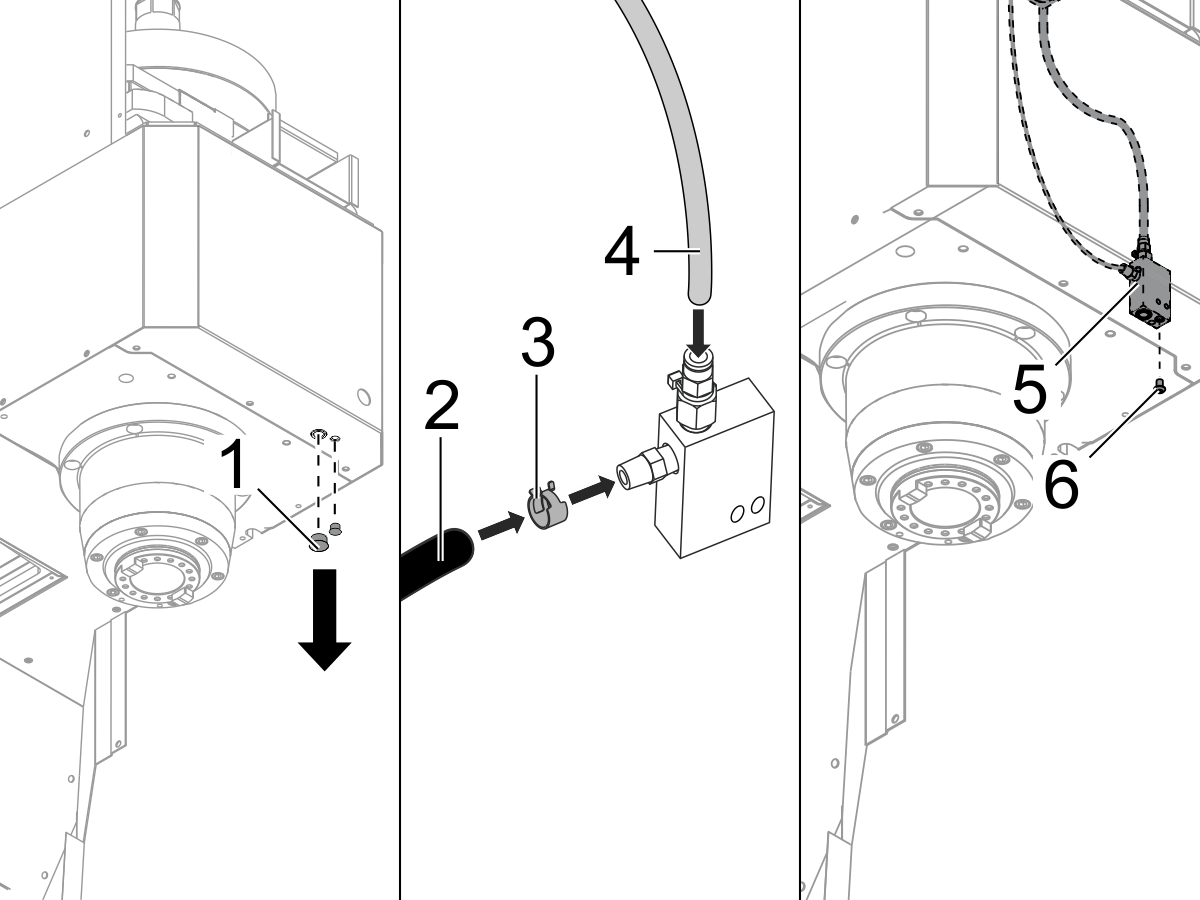
8

If the dome plugs [1] are near the front of the spindle:

Remove the dome plugs [1] from the bottom cover for the spindle. This is where you attach the vacuum generator.

Connect the vacuum-drain hose [2] to the vacuum generator. Use a hose clamp [3].

Connect the vacuum-generator tube [4] to the vacuum generator.

Move the vacuum generator [5] down into the space between the spindle cover.

Attach the vacuum generator [5] to the spindle-head cover. Use a 1/4-20 x 1/2" flanged button-head cap screw (FBHCS) [6].

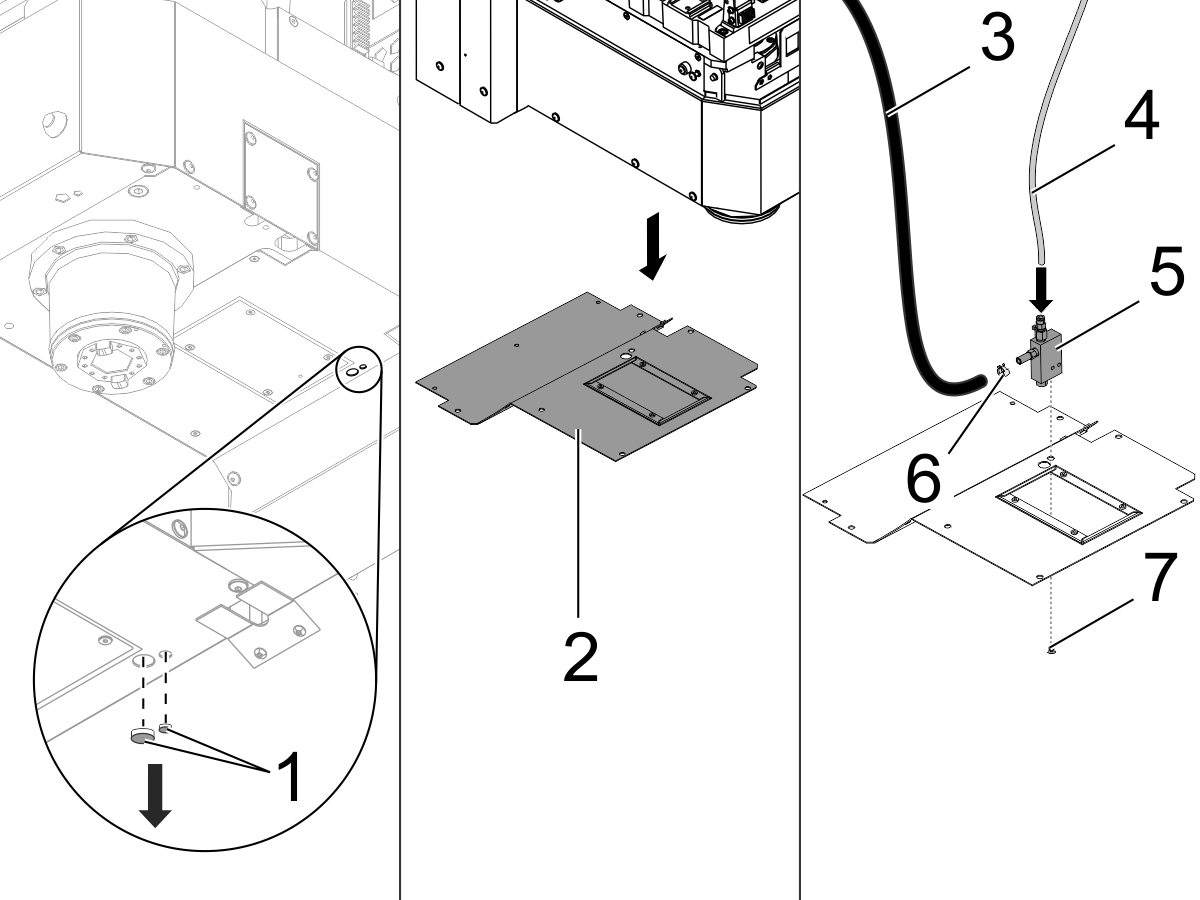
9

If the dome plugs [1] are near the rear of the spindle:

Remove the dome plugs [1] from the bottom spindle-head cover. This is where you install the vacuum generator.

Remove the bottom spindle-head cover [2].

Install the vacuum generator [5] on the bottom spindle-head cover [2]. Use a 1/4-20 x 1/2" FBHCS [7].

Connect the vacuum-drain hose [3] to the vacuum generator [5]. Use a hose clamp [6].

Connect the vacuum-generator tube [4] to the vacuum generator [5].

Install the bottom spindle-head cover [2].

10

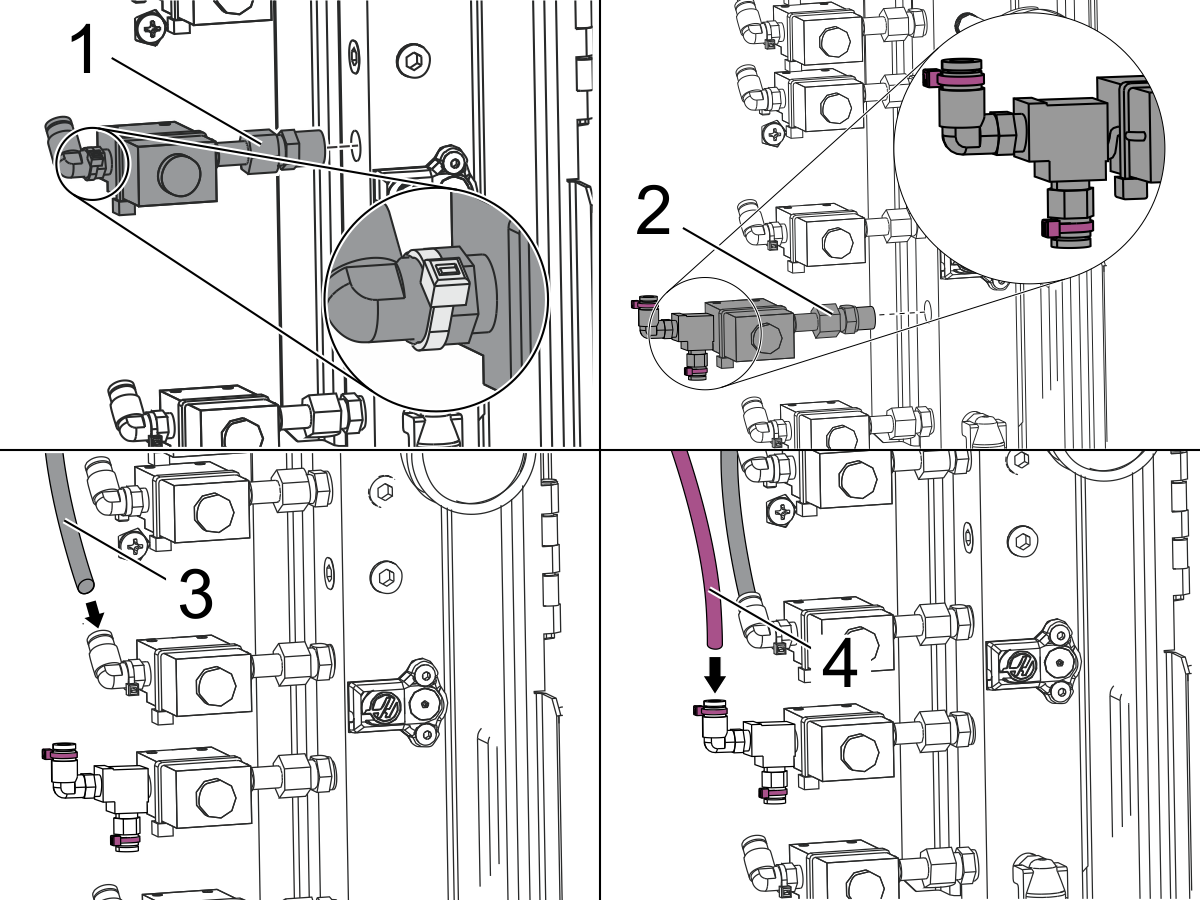
Install the assembly for the TSC-vacuum solenoid [1] in the upper manifold port. The assembly has a gray-cable tie.

Install the assembly for the TSC-purge solenoid [2]. The assembly [2] has purple cable ties.

Find the tube cap on the 1/4" gray tube [3]. Remove and discard the cap.

Trim the tube [3] to the correct length. Connect the tube [3] to the air regulator.

 Caution: Always trim tube ends at a 90-degree angle. This prevents a bad connection. If you cut the tube end at an angle, the tube does not make a good connection. A bad connection causes insufficient air pressure. Insufficient air pressure causes a malfunction.

Remove and discard the cap from the 1/4" TSC purple tube [4]. Trim the tube [4] to the correct length. Connect the tube [4] to the left fitting on the solenoid [2].

11

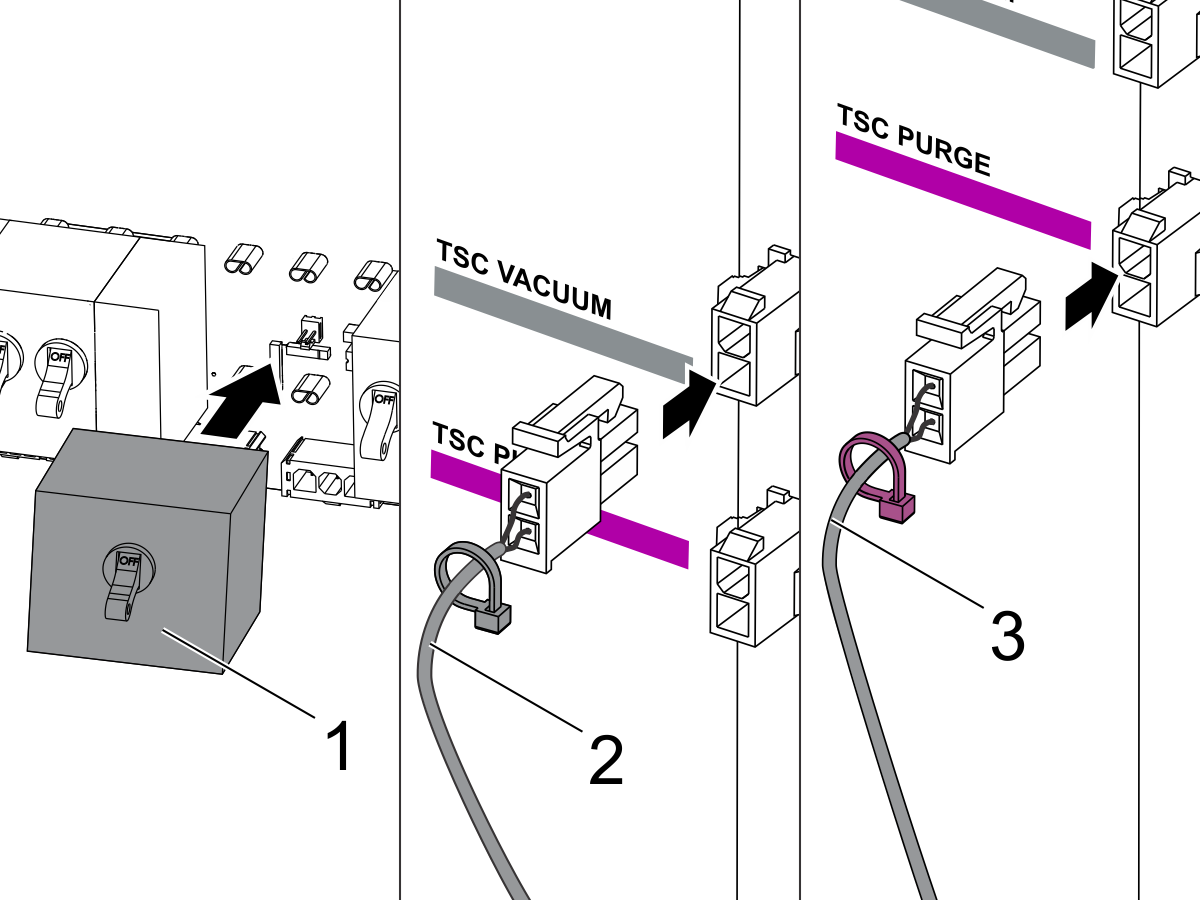
Remove the cover from the power supply (PSUP) PCB. Remove the electrical jumper at CB5 on the PSUP card. Remove the (3) push-on connector covers from position CB5.

Install the circuit breaker [1] at CB5.

Install the cover for the PSUP board. Make sure all breakers are in the ON position.

Connect the gray cable for the vacuum solenoid [2] to the correct connector panel. The connector panel is to the left of the air manifold.

Connect the purple cable for the purge solenoid to the correct connector panel. The connector panel is to the left of the air manifold.

 Caution: Make sure the color on the cable is the same as the color on the label. The decal on the connector panel has a color code and the connection name.

12

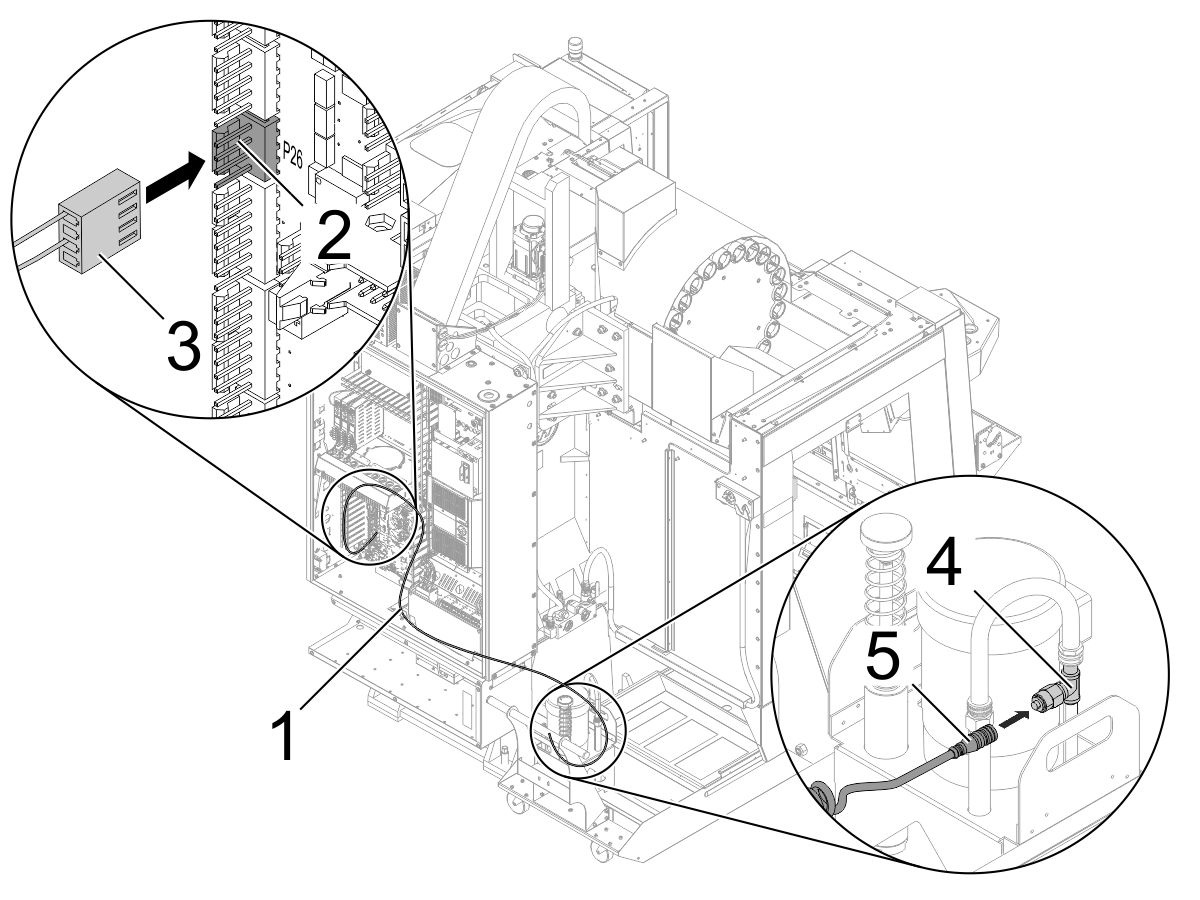
Find the cable [1] for the vacuum sensor.

Find the 4-pin connector [3] on the cable [1].

Find P26 [2] on the I/O PCB.

Connect the 4-pin connector [3] to P26 [2].

Connect the other end [5] of the cable to the vacuum sensor [4].

TSC - 1K PSI - Fan Assembly - Installation

1

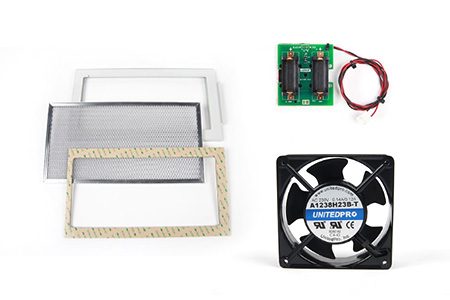
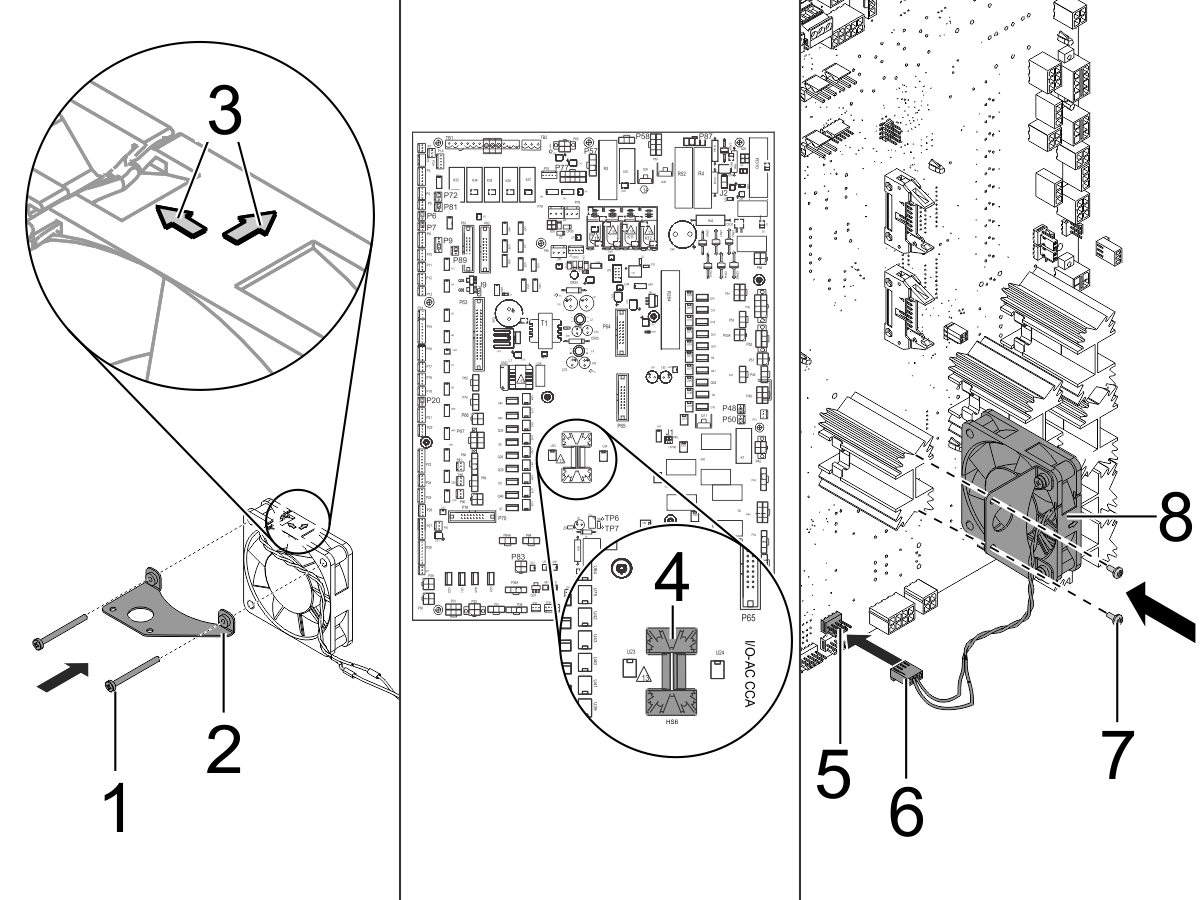
Install the bracket [2] for the fan assembly. Use the (2) 1 x1/4" Phillips pan-head screws [1]. Make sure the arrows [3] on the fan assembly are in the correct position.

Find HS6 [4] on the I/O PCB. Install the fan assembly [8] to HS6 [4]. Use the (2) 1/4" Phillips pan-head screws [7].

Connect the cable [6] for the fan assembly to P37A [5] on the I/O board.

Remove the 33-0930G cable. This cable is connected to P9 and P4 on the PSUP and P44 on the I/O board.

Install the 33-0930H cable to P9 and P4 on the PSUP and P44 on the I/O board.

TSC - 300 and 1K PSI - Pump - Installation

1

Remove the double-wide cover from the coolant tank.

Install the single-wide cover adjacent to the standard coolant pump.

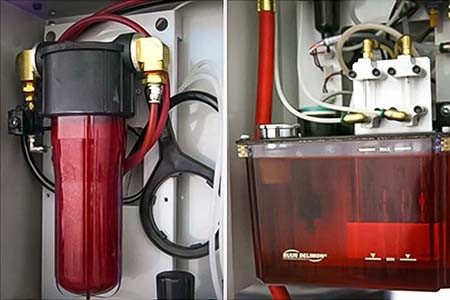
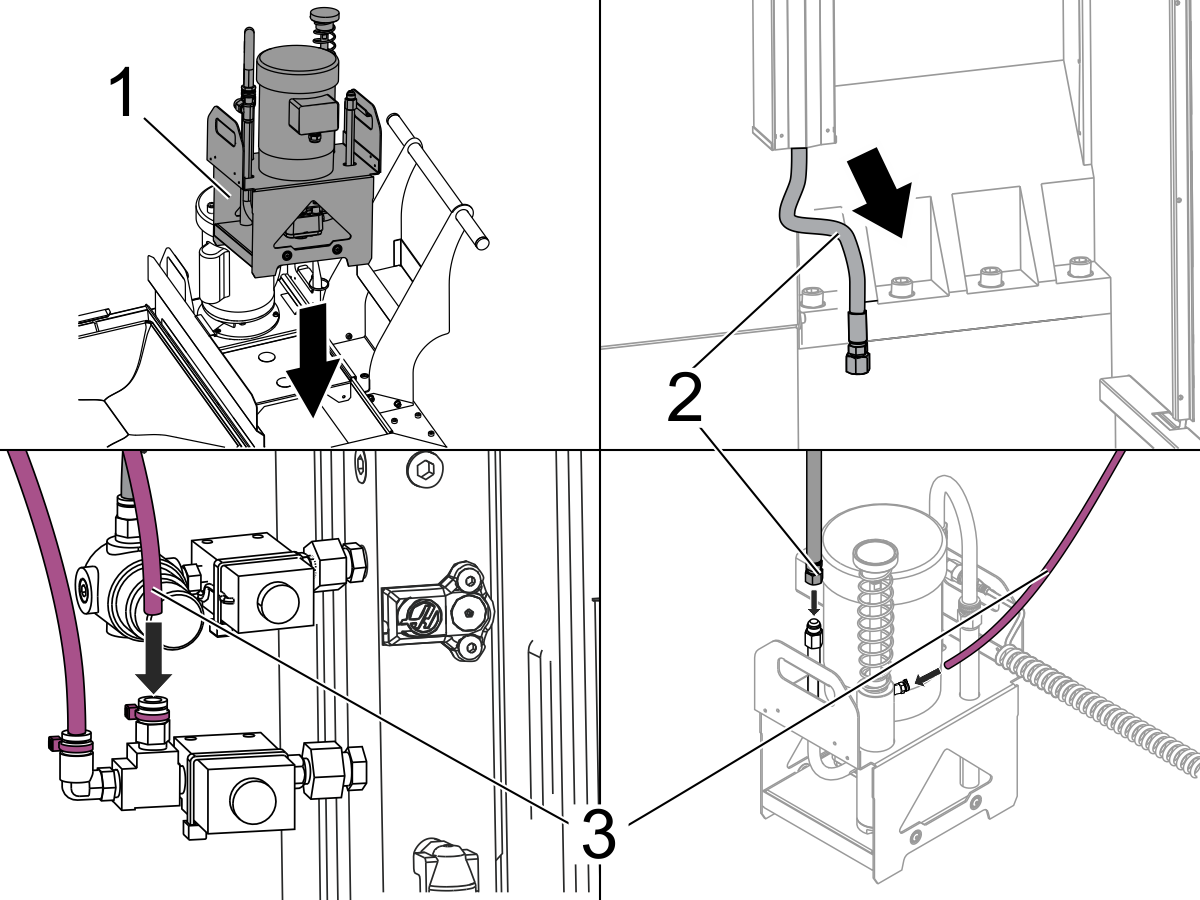
Install the TSC-coolant pump [1] adjacent to the single-wide cover.

Pull the end of the TSC hose [2] out of the storage bracket. The storage bracket is near the left side of the column casting.

Connect the TSC hose [2].

Connect the 1/4" coolant-pump tube [3] to the bottom fitting of the assembly for the TSC-purge solenoid. The tube is purple.

Connect the 1/4" coolant-pump tube [3].

Connect the power cable for the TSC pump to the coolant receptacle bracket.

2

After you install the Through-Spindle Coolant option, you must change some parameters. Use the Parameter Checker program. Use menu option 7. Select the TSC option. Refer to the Parameter Checker Program.

Change the values of these parameters:

  • Parameter 149 — Pre-Charge Delay
  • *Parameter 209 bit 24 — TSC Enable
  • Parameter 235 — TSC Piston Seat
  • Parameter 238 — TSC Max Spindle RPM
  • Parameter 278 bit 5 — TSC Purge Enable
  • Parameter 608 — TSC Pressure Switch Type
  • **Parameter 1279 — Enable Bearingless TSC Union (Relay No.)
  • ***Parameter 1386 — Coolant Filter Sensor

*You must have an unlock code for this parameter. Refer to Option Code Activation.

**For machines with Bearingless TSC-Union only.

***For machines with the Auto-Clean Coolant-Pump.

TSC - 300 and 1K PSI - Test

1

Operate this code in MDI mode:

M59 P1148 ;

G04 P5.0 ;

M69 P1148 ;

G04 P2.0 ;

M99 ;

P1148 is for inline spindles.

For HS machines, use P1124 and not P1148.

For belt-drive spindles, use P1120 and not P1148.

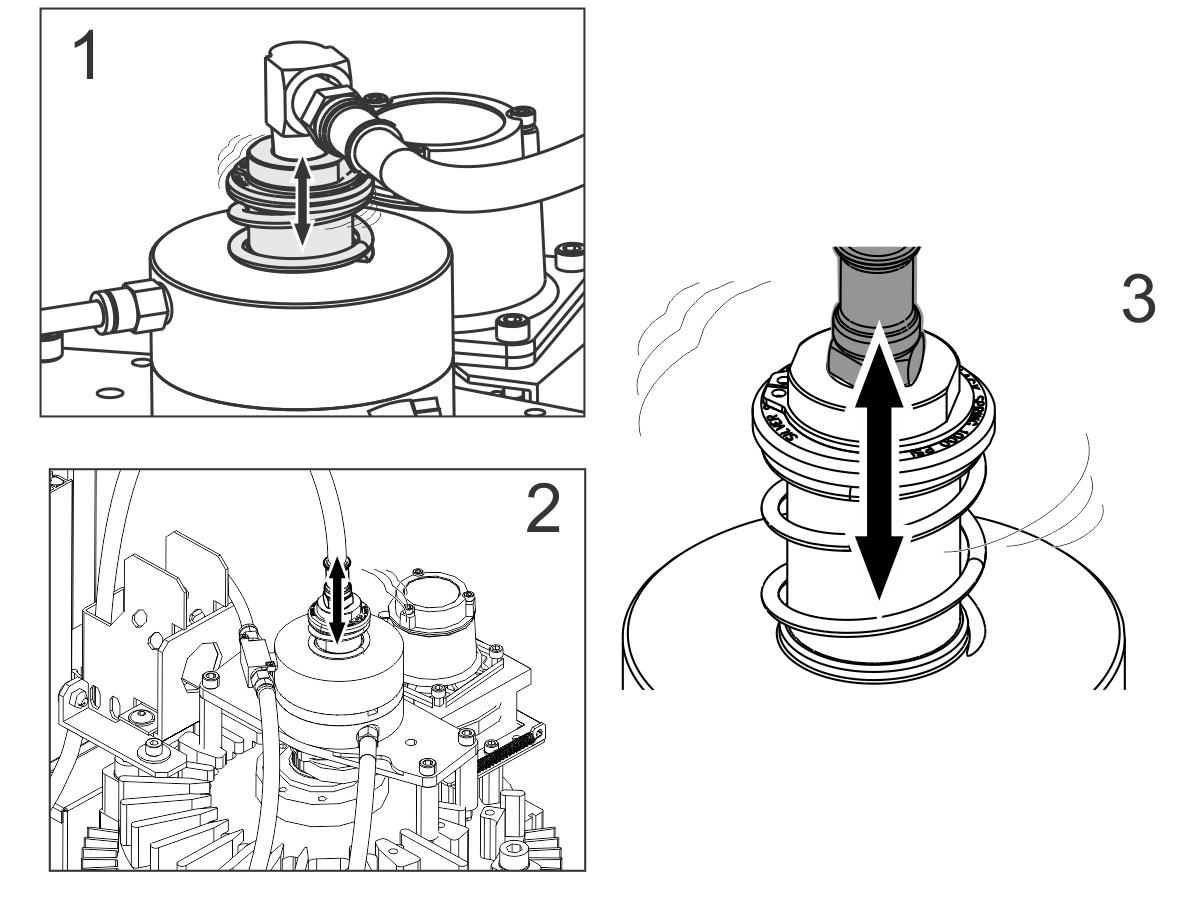
If the machine has a bearingless union, the union moves up and down at 7-second intervals. The up and down movement is small.

The illustration shows the up and down movements for these machines:

  1. 40-Taper
  2. 40-Taper (CALM)
  3. 50-Taper

2

Push [RESET].

Push [AUX CLNT] to activate the TSC.

Inspect the TSC hoses for leaks.

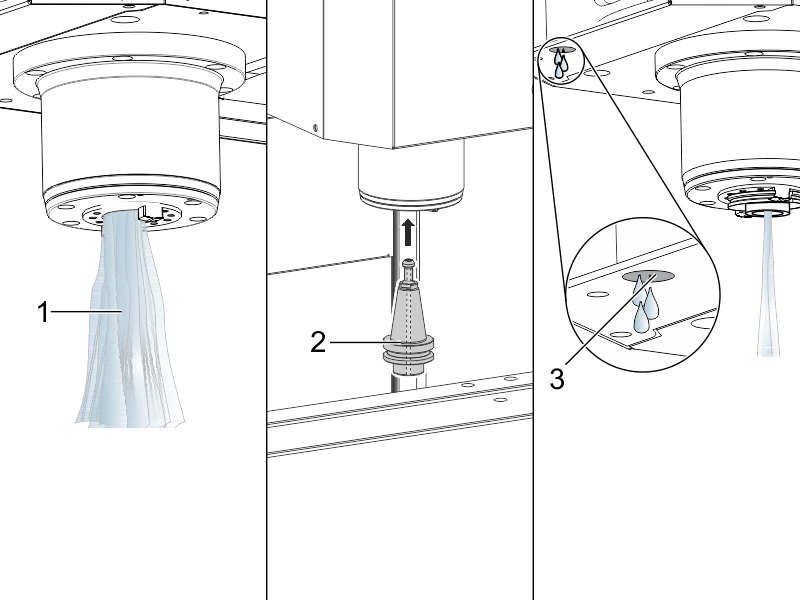
Correct operation is as follows:

  1. Coolant [1] flows correctly from the spindle.
  2. A few drops flow from the vacuum-generator hose [3].

Push [RESET].

Put a TSC toolholder [2] in the spindle.

Push [AUX CLNT] to start the TSC.

Correct operation is as follows:

  1. Coolant flows correctly from the spindle [1].
  2. A few drops flow from the vacuum-generator hose [3].

Examine the TSC hoses for leaks.

Push [RESET].

FIND DISTRIBUTOR
Haas Logo

美元价格不包括关税、报关费用、保险费、增值税及运费。
USD prices DO NOT include customs duty, customs fees, insurance, VAT, or freight.

人民币价格包含关税、报关费用、货运保险和增值税, 但不包括运费。
CNY prices include customs duty, customs fees, insurance, and VAT. DOES NOT include freight.

Haas Delivered Price

This price includes shipping cost, export and import duties, insurance, and any other expenses incurred during shipping to a location in France agreed with you as a buyer. No other mandatory costs can be added to the delivery of a Haas CNC Product.

KEEP UP WITH THE LATEST HAAS TIPS AND TECHNOLOGY...

Sign up now!   

HAAS TOOLING ACCEPTS THE FOLLOWING:

  • Service & Support
  • Owners
  • Request Service
  • Operator Manuals
  • Haas Parts
  • Rotary Repair Request
  • Shopping Tools
  • Build & Price a New Haas
  • Available Inventory
  • The Haas Price List
  • CNCA Financing
  • About Haas
  • Careers
  • Certifications & Safety
  • Contact Us
  • History
  • Terms & Conditions
  • Haas Tooling Terms & Conditions
  • Privacy
  • Warranty
  • Haas Community
  • Haas Certification Program
  • Haas Motorsports
  • Gene Haas Foundation
  • HTEC Network
  • Events
  • Join the Conversation
  • Facebook
  • Twitter
  • Flickr
  • YouTube
  • LinkedIn
  • Instagram
© 2021 Haas Automation, Inc – CNC Machine Tools

2800 Sturgis Rd., Oxnard, CA 93030 / Toll Free: 800-331-6746
Phone: 805-278-1800 / Fax: 805-278-2255

Cookie Notice

We use cookies to improve your user experience. Our Cookie Notice describes which cookies we use, why we use them, and how you can find more information about them. Please confirm you consent to us using analytics cookies. If you do not consent, you may still use our website with a reduced user experience.

Manage Settings

Cookie Notice

We use cookies to improve your user experience. Our Cookie Notice describes which cookies we use, why we use them, and how you can find more information about them. Please confirm you consent to us using analytics cookies. If you do not consent, you may still use our website with a reduced user experience.

Functional Cookies

Analytics Cookies