MyHaas Welcome,
!
Haas Tooling Guest Order History MyHaas/HaasConnect Sign In Register Haas Tooling My Account Order History Return History MyHaas/HaasConnect Sign Out Welcome, My Machines Latest Activity My Quotes My Account My Users Sign Out
Find Your Distributor
  1. Select Language
    1. English
    2. Deutsch
    3. Español - España
    4. Español - México
    5. Français
    6. Italiano
    7. Português
    8. Český
    9. Dansk
    10. Nederlands
    11. Magyar
    12. Polski
    13. Svenska
    14. Türkçe
    15. 中文
    16. Suomi
    17. Norsk
    18. الإنجليزية
    19. български
    20. Hrvatski
    21. Ελληνικά
    22. Română
    23. Slovenský
    24. Slovenščina
    25. 한국어
    26. 日本語
    27. Українська
  • machines Main Menu
    • Haas Vertical Mills Vertical Mills
      Vertical Mills
      Vertical Mills View All
      • Vertical Mills
      • VF Series
      • Universal Machines
      • VR Series
      • VP-5 Prismatic
      • Pallet-Changing VMCs
      • Mini Mills
      • Mold Machines
      • High-Speed Drill Centers
      • Drill/Tap/ Mill Series
      • Toolroom Mills
      • Compact Mills
      • Gantry Series
      • SR Sheet Routers
      • Extra-Large VMC
      • Double-Column Mills
      • Control Simulator
      • Mill Automatic Parts Loader
      • VMC/UMC Side-Loading Automatic Parts Loader
      • Compact Automatic Parts Loader
    • Product Image Multi-Axis Solutions
      Multi-Axis Solutions
      Multi-Axis Solutions View All
      • Multi-Axis Solutions
      • Y-Axis Lathes
      • 5-Axis Mills
    • Haas Lathes Lathes
      Lathes
      Lathes View All
      • Lathes
      • ST Series
      • Dual-Spindle
      • Box Way Series
      • Toolroom Lathes
      • Chucker Lathe
      • Haas Bar Feeder V2
      • Lathe Automatic Parts Loader
    • Haas Horizontal Mills Horizontal Mills
      Horizontal Mills
      Horizontal Mills View All
      • Horizontal Mills
      • 50-Taper
      • 40-Taper
    • Haas Rotaries & Indexers Rotaries & Indexers
      Rotaries & Indexers
      Rotaries & Indexers View All
      • Rotaries & Indexers
      • Rotary Tables
      • Indexers
      • 5-Axis Rotaries
      • Extra-Large Rotaries
    • Special Series
      Special Series
      Special Series View All
      • Special Series
      • EU_Series_Redirect
    • Product Image Automation Systems
      Automation Systems
      Automation Systems View All
      • Automation Systems
      • Mill Automation
      • Lathe Automation
      • Automation Models
    • Haas Drill Centers Desktop Machines
      Desktop Machines
      Desktop Machines View All
      • Desktop Machines
      • Desktop Mill
      • Desktop Lathe
    • Haas Shop Equipment Shop Equipment
      Shop Equipment
      Shop Equipment View All
      • Shop Equipment
      • Bandsaw
      • Knee Mill
      • Surface Grinder, 2550
      • Surface Grinder, 3063
      • Laser Cutting Machine
    • QUICK LINKS Special Series  Special Series 
      EU SERIES EU SERIES BUILD & PRICE | PRICE LIST BUILD & PRICE | PRICE LIST In-Stock Machines In-Stock Machines WHAT’S NEW WHAT’S NEW YOUR FIRST CNC YOUR FIRST CNC
      SHOPPING TOOLS
      • Build & Price a Haas
      • Price List
      • Available Inventory
      • CNCA Financing
      WANT TO TALK TO SOMEONE?

      A Haas Factory Outlet (HFO) can answer your questions, and walk you through your best options.

      CONTACT YOUR DISTRIBUTOR >
  • Options Main Menu
    • Product Image Spindles
      Spindles
      Spindles View All
      • Spindles
    • Product Image Tool Changers
      Tool Changers
      Tool Changers View All
      • Tool Changers
    • Product Image 4th- | 5th-Axis
      4th- | 5th-Axis
      4th- | 5th-Axis View All
      • 4th- | 5th-Axis
    • Product Image Turrets & Live Tooling
      Turrets & Live Tooling
      Turrets & Live Tooling View All
      • Turrets & Live Tooling
    • Product Image Probing
      Probing
      Probing View All
      • Probing
    • Haas Chip & Coolant Management Chip & Coolant Management
      Chip & Coolant Management
      Chip & Coolant Management View All
      • Chip & Coolant Management
    • The Haas Control The Haas Control
      The Haas Control
      The Haas Control View All
      • The Haas Control
    • Product Image Product Options
      Product Options
      Product Options View All
      • Product Options
    • Product Image Tooling & Fixturing
      Tooling & Fixturing
      Tooling & Fixturing View All
      • Tooling & Fixturing
    • Product Image Workholding
      Workholding
      Workholding View All
      • Workholding
    • Product Image 5-Axis Solutions
      5-Axis Solutions
      5-Axis Solutions View All
      • 5-Axis Solutions
      • 5 Easy Steps to 5-Axis
    • QUICK LINKS Special Series  Special Series 
      EU SERIES EU SERIES BUILD & PRICE | PRICE LIST BUILD & PRICE | PRICE LIST In-Stock Machines In-Stock Machines WHAT’S NEW WHAT’S NEW YOUR FIRST CNC YOUR FIRST CNC
      SHOPPING TOOLS
      • Build & Price a Haas
      • Price List
      • Available Inventory
      • CNCA Financing
      WANT TO TALK TO SOMEONE?

      A Haas Factory Outlet (HFO) can answer your questions, and walk you through your best options.

      CONTACT YOUR DISTRIBUTOR >
  • Why Haas Main Menu
      Discover the Haas Difference
    • Why Haas
    • MyHaas
    • Education Community
    • Industry 4.0
    • Haas Certification
    • Customer Testimonials
  • Service Main Menu
      Welcome to Haas Service
      SERVICE HOME Operator’s Manuals How-To Procedures Troubleshooting Guides Preventive Maintenance Haas Parts Haas Tooling Videos
  • Videos Main Menu
  • Main Menu
    • View All
    • View All
      • Fiber Laser
    • View All
    • View All
      • HTEC Curriculum Support
    • View All
      • Haas 10 kg Cobot Package
      • Cobot Kits
    • View All
    • View All
      • 4 - AUTOMATION SYSTEMS
      • Mill Toolholding
      • Carousel-V2
    • View All
    • View All
    • View All
      • VF-4SS
    • View All
    • QUICK LINKS Special Series  Special Series 
      EU SERIES EU SERIES BUILD & PRICE | PRICE LIST BUILD & PRICE | PRICE LIST In-Stock Machines In-Stock Machines WHAT’S NEW WHAT’S NEW YOUR FIRST CNC YOUR FIRST CNC
      SHOPPING TOOLS
      • Build & Price a Haas
      • Price List
      • Available Inventory
      • CNCA Financing
      WANT TO TALK TO SOMEONE?

      A Haas Factory Outlet (HFO) can answer your questions, and walk you through your best options.

      CONTACT YOUR DISTRIBUTOR >
  • Haas Tooling Main Menu
      Automation Accessories Shop Support Mill Toolholding Mill Cutting Tools Boring Systems Mill Workholding Lathe Toolholding Lathe Cutting Tools Lathe Workholding Package Kits ER Collets & Chucks Holemaking Threading Broaching Tombstones & Kits Manual Chucks For Milling Deburring & Abrasives Tool Presetter & Heat Shrinkers Storage & Handling Machine Maintenance Tooling Accessories Apparel & Accessories Measuring & Inspection Winner's Circle Winner's Circle Clearance Today's Hot Deals
    • Haas Tooling
    • Winner's Circle
      Winner's Circle Shop All
      • WINNERS_CIRCLE-1Y
    • Winner's Circle
      Winner's Circle Shop All
      • WC-1Y-EU
    • Today’s Hot Deals
      Today’s Hot Deals Shop All
      • Mill Toolholding
      • Mill Tooling
      • Measuring & Inspection
      • Boring Systems
      • Mill Workholding
      • Shell Mill Kits
      • Lathe Toolholding
      • Lathe Tooling
      • Lathe Workholding
      • ER Collets & Chucks
      • Holemaking
      • Threading
      • Broaching
      • Tool Storage
      • Apparel & Accessories
    • Clearance
      Clearance Shop All
    • Measuring & Inspection
      Measuring & Inspection Shop All
      • Probe Kits & Accessories
      • Edge & Center Finders
      • Comparative Measuring Gauges
      • Height Gauges
      • Calipers
      • Threaded Plug & Ring Gauges
      • Gauge Blocks
      • Pin Gauges
      • Drop Indicators
      • Dial Test Indicators
      • Bore Gauges
      • Indicator Accessories
      • V Blocks
      • Setup Blocks
      • Depth Measuring
      • Micrometers
      • Micrometer Accessories
      • Micrometer Kits
      • Bore Gauge Kits
      • Starter Kits
      • Indicator Kits
      • Caliper Kits
      • Toolholder Check Station
      • Height Setters
      • Coordinate Measuring Machines
    • Automation Accessories
      Automation Accessories Shop All
      • Cobot Kits
      • Cobot Kits
      • Protective Barriers
      • Grippers
      • Robot Cell Accessories
    • Shop Support
      Shop Support Shop All
      • Air Compressors
      • Laser Marking Machines
      • Bandsaw Blades
      • Bandsaw Accessories
      • Surface Grinding Wheels
      • Shop Equipment Accessories
    • Mill Toolholding
      Mill Toolholding Shop All
      • End Mill Holders
      • Shell Mill Holders
      • Shrink Fit Holders
      • ER Collet Chucks
      • Milling Chucks & Collets
      • NC Drilling Chucks
      • Pull Studs / Retention Knobs
      • Rotary Tool Holder & Tool Chuck Kits
      • Hydraulic Milling Chucks & Collets
      • Toolholder Attachments & Wrenches
      • Mill Broaching Holders
    • Mill Tooling
      Mill Tooling Shop All
      • Shell Mill Bodies
      • Milling Inserts
      • End Mills
      • Chamfer Mills & Inserts
      • Indexable End Mill Bodies
      • Ball End Mills
      • Chamfer End Mills
      • Roughing End Mills
      • Indexable Ball End Mills & Inserts
      • Shell Mill Kits
      • Chamfer Mill Kits
      • Indexable End Mill Kits
      • Dovetail Cutters
      • Indexable Dovetail Cutters
      • Engraving End Mills
      • Rotary Burrs / Die Grinding Bits
      • Keyseat Cutters
      • Corner Rounding End Mills
      • Slot Mill Bodies
      • CNC Router Bits For Wood
    • Boring Systems
      Boring Systems Shop All
      • Boring Heads & Cartridges
      • Boring Holders & Extensions
    • Mill Workholding
      Mill Workholding Shop All
      • Fixed-Jaw Vises
      • Self-Centering Vises
      • Adapter Plates
      • Vise Jaws
      • Vise Mounts & Fixtures
      • Vise Kits
      • Vise Parallels
      • Rotary Vise Kits
      • Fixture Clamps & Rails
      • Automated Workholding Kits
      • Tooling Fixture Subplates
      • Toolmakers' Vises
      • Clamp Force Gauges
      • Collet Fixtures
      • Angle Plates
    • Lathe Toolholding
      Lathe Toolholding Shop All
      • TL & CL Static Turning Holders
      • BOT Static Turning Holders
      • BMT Static Turning Holders
      • Live / Driven Turning Holders
      • Turning Holder Reduction Sleeves / Bushings
      • VDI Static Turning Holders
      • Turning Holder Accessories
    • Lathe Tooling
      Lathe Tooling Shop All
      • Cut-Off Tool Blocks & Blades
      • Cut-Off Tooling Kits
      • Turning Inserts
      • Grooving & Cut-Off Tools
      • Internal (ID) Grooving & Threading Tools
      • Threading Inserts
      • Threading Tools
      • Boring Bars / Internal (ID) Turning Tools
      • External (OD) Turning Tools
      • Cermet Turning Inserts
      • CBN Turning Inserts
      • Haas Notch Grooving & Threading Inserts
      • Haas Notch Grooving & Threading Tools
      • Micro Turning Tools
      • Desktop Lathe Tools
    • Lathe Workholding
      Lathe Workholding Shop All
      • Live Centers
      • Spindle Reduction Sleeves / Liners
      • Quick-Change Collets
      • Quick-Change Collet Chucks
      • 5C Collets
      • 5C Collet Sets
      • Lathe Jaw Boring Rings
      • Lathe Jaws
      • Bar Pullers
      • Scroll Chucks
      • Guide Pins
      • Collet Accessories
    • Package Kits
      Package Kits Shop All
      • Chip Clearing Fan Kits
      • Cutting Tool Kits
      • Indexable End Mill Kits
      • Cut-Off Tool Block & Blade Kits
      • Drill & Tap Kits
      • Indexable Drilling Kits
      • Shell Mill Kits
      • Chamfer Mill Kits
      • Rotary Tool Holder & Tool Chuck Kits
      • Lathe Starter Kits
      • Workholding Kits
      • Rotary Vise Kits
      • Vise Kits
      • 3-Jaw Chuck Kits for Mills
      • Tombstone Kits
      • Reduction Sleeve Kits
      • Automated Workholding Kits
      • Measuring & Inspection Kits
      • Starter Kits
      • Bore Gauge Kits
      • Caliper Kits
      • Indicator Kits
      • Micrometer Kits
    • ER Collets & Chucks
      ER Collets & Chucks Shop All
      • ER Straight-Bore Collets
      • ER Sealed Collets
      • ER Tap Collets
      • ER Collet Sets & Accessories
      • ER Collet Chucks
      • Straight Shank ER Collet Chucks
      • Straight Shank Keyless NC Drilling Chucks
    • Holemaking
      Holemaking Shop All
      • Carbide Drills
      • Indexable Drill Bodies
      • Indexable Drill Inserts
      • Modular Drill Bodies
      • Modular Drill Heads
      • Cobalt Drills & Sets
      • Center Drills
      • Reamers
      • Indexable Drilling Kits
      • Spot Drills
      • Spade Drill Bodies
      • Spade Drill Inserts
      • Countersinks
    • Threading
      Threading Shop All
      • Taps
      • Threading Inserts
      • Threading Tools
      • Thread Mills
      • Pipe Taps
      • Drill Tap Kits
    • Broaching
      Broaching Shop All
      • Broaching Tools
      • Broaching Inserts
    • Tombstones
      Tombstones Shop All
      • Tombstones
      • Tombstone Kits
      • Vise Cluster Towers
    • Manual Chucks For Milling
      Manual Chucks For Milling Shop All
      • 3-Jaw Chucks & Mounts for Mills
    • Deburring & Abrasives
      Deburring & Abrasives Shop All
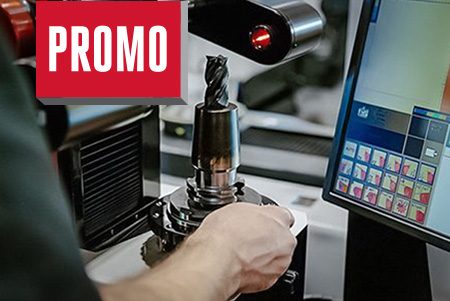
      • Abrasive Pads
      • Deburr Tools
      • Deburr Wheels
      • Abrasive Sheets & Rolls
      • Sharpening / Lapping Stones
    • Tool Presetter & Heat Shrinkers
      Tool Presetter & Heat Shrinkers Shop All
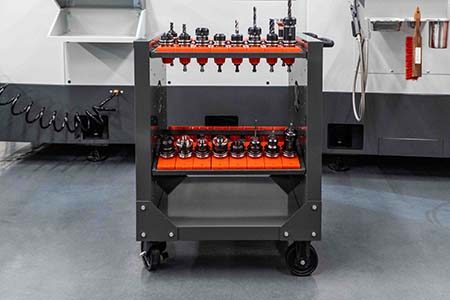
      • Tool Presetting Machines
      • Shrink Fit Machines
    • Tool Storage
      Tool Storage Shop All
      • Tool Carts
      • Tool Tray
      • Tool Bags
    • Machine Maintenance
      Machine Maintenance Shop All
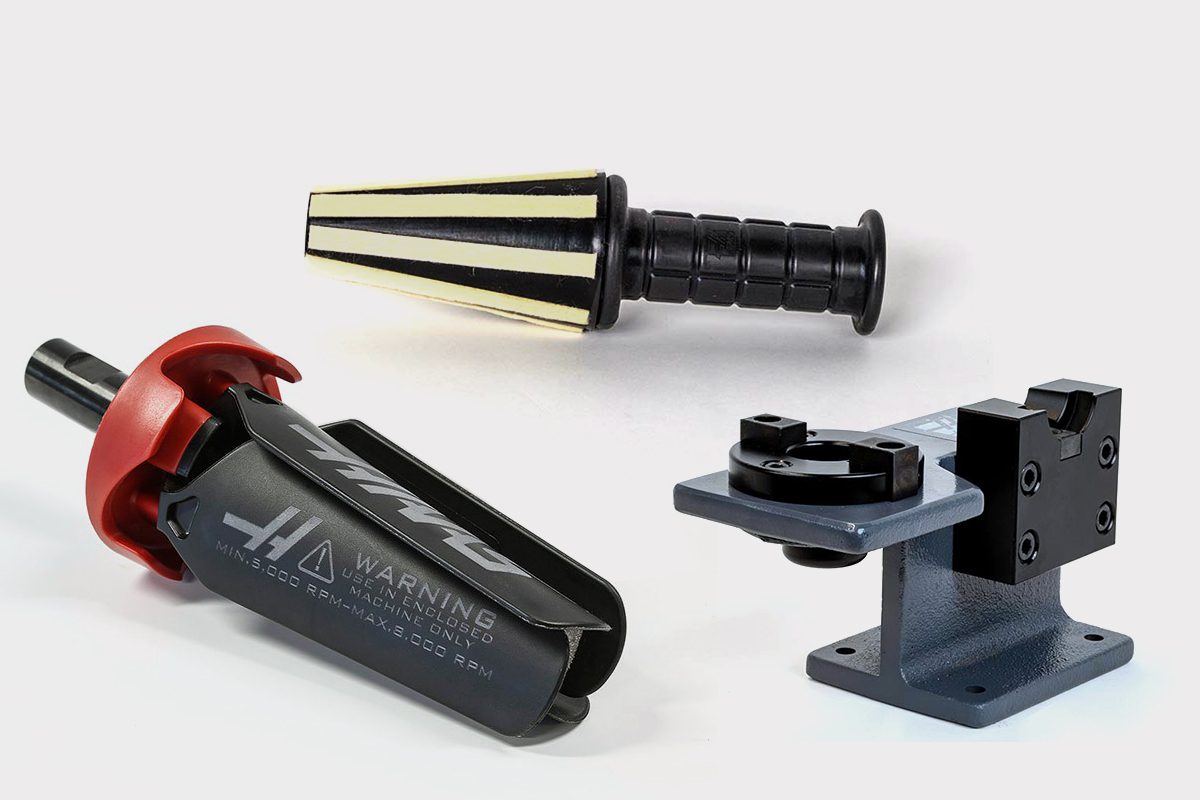
      • Spindle Test Bars
      • Levels
      • Refractometers
      • Machine Additives & Supplies
      • Machine Accessories
      • Machine Maintenance Kits
    • Tooling Accessories
      Tooling Accessories Shop All
      • Spindle & Toolholder Taper Cleaners
      • Haas Shop Lift
      • Toolholder Fixtures
      • CNC Chip Clearing Fans
      • Hammers & Mallets
      • Anti-Fatigue Mats
      • Layout Tools
      • Wrenches
      • Magnetic Tools
      • Torque Screwdrivers
      • Hand Cutting Tools
      • Shop Stools
      • Lifting Magnets
      • Safety Apparel
      • Cutting Tool Sharpeners
    • Apparel & Accessories
      Apparel & Accessories Shop All
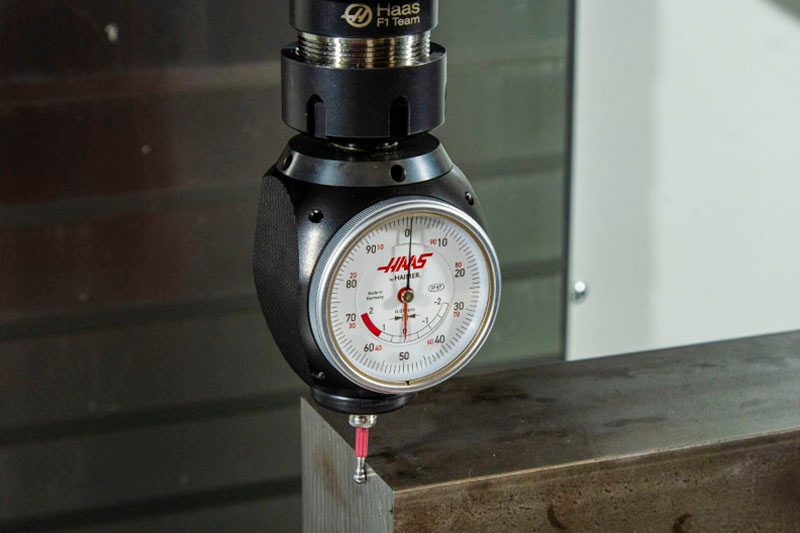
      • Accessories
      • Apparel
    • HAAS TOOLING QUICK LINKS
      NEW PRODUCTS NEW PRODUCTS NEW PRODUCTS NEW PRODUCTS
      MOST POPULAR MOST POPULAR
      TOOLING PROMOS TOOLING PROMOS
      FINANCING & OPEN TERMS FINANCING & OPEN TERMS PAY BY INVOICE PAY BY INVOICE
      FAQs FAQs
      KITS CREATED FOR YOU KITS CREATED FOR YOU
  • Haas Service Parts Main Menu
      Automatic Pallet Changer Lathe Turret Tool Changer Chip Management Coolant Counterbalance Electrical Cabinet Enclosure Hydraulics Lubrication Maintenance Pendant Probing Rotary Spindle Tailstock
    • Haas Service Parts
    • Automatic Pallet Changer
      Automatic Pallet Changer Shop All
      • HMC - Automatic Pallet Changer
      • VMC - Automatic Pallet Changer
    • Lathe Turret
      Lathe Turret Shop All
      • Lathe - Turret
      • Live Tooling
    • Tool Changer
      Tool Changer Shop All
      • Side Mount
      • Umbrella
    • Chip Management
      Chip Management Shop All
      • Multi Auger
      • Single Auger
    • Coolant
      Coolant Shop All
      • Auxiliary Filter
      • HPC-300 (Lathe)
      • HPC-1000 (Lathe)
      • Oil Skimmer
      • Standard Coolant
      • TSC-300 (Mill)
      • TSC-1000 (Mill)
      • Coolant Refill
      • Loc-Line
    • Counterbalance
      Counterbalance Shop All
      • Charge & Discharge Hose
    • Electrical Cabinet
      Electrical Cabinet Shop All
      • Fans
      • Filters
      • Upgrade Kits
    • Enclosure
      Enclosure Shop All
      • Accessories
      • Air Nozzle
      • Decals
      • Door Bumpers
      • Lighting
      • Windows, Gaskets, & Weather Strip
      • Chip & Coolant Management
    • Hydraulics
      Hydraulics Shop All
      • Filters
      • Gauges
      • Heat Exchanger
      • Hoses
    • Lubrication
      Lubrication Shop All
      • Bijur Mechanical Lubrication
      • Minimum Lubrication
    • Maintenance
      Maintenance Shop All
      • Grease, Oil, & Sealants
    • Pendant
      Pendant Shop All
      • Floppy Disk & USB
      • Keypad
      • Keys
      • Lens
      • Gaskets & Seals
    • Probing
      Probing Shop All
      • Mill Probing
      • Lathe Tool Presetter
    • Rotary
      Rotary Shop All
      • Rotary Gaskets & Seals
    • Spindles
      Spindles Shop All
      • Couplings
      • Gaskets & Seals
      • Spindle Motor Drive
      • Gearbox Drive
      • Tool Release Piston
    • Tailstock
      Tailstock Shop All
      • Handles
×

Search Results

Web Pages

Images

    • <
    • 1
    • >
MyHaas Welcome,
!
Haas Tooling Guest Order History MyHaas/HaasConnect Sign In Register Haas Tooling My Account Order History Return History MyHaas/HaasConnect Sign Out Welcome, My Machines Latest Activity My Quotes My Account My Users Sign Out
Find Your Distributor
  1. Select Language
    1. English
    2. Deutsch
    3. Español - España
    4. Español - México
    5. Français
    6. Italiano
    7. Português
    8. Český
    9. Dansk
    10. Nederlands
    11. Magyar
    12. Polski
    13. Svenska
    14. Türkçe
    15. 中文
    16. Suomi
    17. Norsk
    18. الإنجليزية
    19. български
    20. Hrvatski
    21. Ελληνικά
    22. Română
    23. Slovenský
    24. Slovenščina
    25. 한국어
    26. 日本語
    27. Українська
×

Search Results

Web Pages

Images

    • <
    • 1
    • >

8 - Rotary - Troubleshooting

Rotary - Service Manual


  • 1 - Rotary - Introduction
  • 2 - Rotary - CNC Installation
  • 3 - Rotary - CNC Removal
  • 4 -Rotary - SCOL - Installation
  • 5 - Rotary - Operation
  • 6 - Rotary - Maintenance
  • 7 - Rotary - Workholding
  • 8 - Rotary - Troubleshooting

Go To :

  • 8.1 Rotary - Troubleshooting - NGC
  • 8.2 Rotary - Troubleshooting - CHC
  • 8.3 Rotary - Trunnions with Scales - Compatibility Solution
  • 8.4 Rotary Servo Control Box - Troubleshooting

8.1 Rotary - Troubleshooting - NGC

Recently Updated

Rotary - Troubleshooting Guide - NGC


Revision A - 4/2025

Symptom Table

Do not perform any type of maintenance on the rotarty if it is under warranty, contact your Haas Factory Outlet for further assistance.

Download and fill out the Rotary Inspection Report Checklist below before replacing any parts.

Rotary Inspection Report Checklist
Symptom Possible Cause Corrective Action
Alarm 5.108, 6.108 or 7.108 A, B or C AXIS SERVO OVERLOAD The feeds and speeds are too high for the work.  Decrease the feeds and speeds. 
The cutting tool is not sharp or is damaged.  Install a new device or a new tool insert. 
There is a mechanical blockage in the axis of travel.  Make sure the axis has a clear path of travel. 
There is an internal mechanical obstruction in the rotary unit.  Test the rotary unit. 
The brake solenoid for the rotary unit has an electrical fault.  Troubleshoot the brake solenoid. 
The servo amplifier has a problem Troubleshoot the servo amplifier. 
Alarm 5.103, 6.103, 7.103 A, B or C AXIS SERVO ERROR TOO LARGE The air brake did not disengage.  Remove the air from the rotary and see if the unit will rotate without an alarm.  
The connection to the encoder or power is faulty.  Check the encoder and power cable connections to the motor. 
The machined part has inaccurate features.  There is lost motion or backlash in the rotary.  Do the rotary backlash test. 
The feeds and speeds are too high for the work.  Decrease the feeds and speeds. 
The trunnion's tilt (A) axis does not find a home.
The home sensor or cable is faulty. 

Jog the tilt axis from the positive travel limit to the negative travel limit. Make sure the A HOME SWITCH bit changes (on the Diagnostics INPUT 2 screen). If the bit does not change, replace the home switch.

This can be done in the field. This cannot be done on TR110 units.

Note: The A HOME SWITCH change cannot be seen on machines with software version 18.16A or higher.

Caution: If the A axis (tilt) moves more than 20 degrees past the home position,

Push [EMERGENCY STOP]

The tilt (A) axis does not home to a horizontal position.
The tool change offset parameter has not been set.  Set the rotary platter flatness: Refer to the Rotary - TR/TRT/T5C - Platter Flatness - Adjustment procedure.
Starting in software version 100.19.000.1120 when using P11, P12, and P13 parameters for T5C/Trunnions. There is an excessive rotation when the unit is commanded to zero return.    The parameter *.161 AXIS HOME SWITCH ACTIVE HIGH is incorrectly set to TRUE. Go to the Haas Service Portal and download the latest configuration files.  Update the rotary configuration files refer to the Update Rotary Configuration Files - NGC procedure. 

Alarm 5.423, 6.423 or 7.423 A, B or C AXIS SECONDARY ENCODER POSITION MISMATCH

Alarm 5.9944, 6.9944 or 7.9944 A, B or C AXIS SECONDARY ENCODER Z FAULT

Alarm 5.9945, 6.9945 or 7.9945 A, B or C AXIS SECONDARY ENCODER Z CHANNEL MISSING

Alarm 5.9946, 6.9946 or 7.9946 A, B or C AXIS SECONDARY ENCODER CABLE FAULT


The rotary scale or scale cable is faulty.  Check the rotary scale cable. 

Alarm 175 GROUND FAULT DETECTED

Alarm 552 TRIPPED CIRCUIT BREAKER


There is a short to ground in the axis motor cable.  Test the axis motor cable for short. 
There is a short to ground in the axis motor.  Test the axis motor for short.
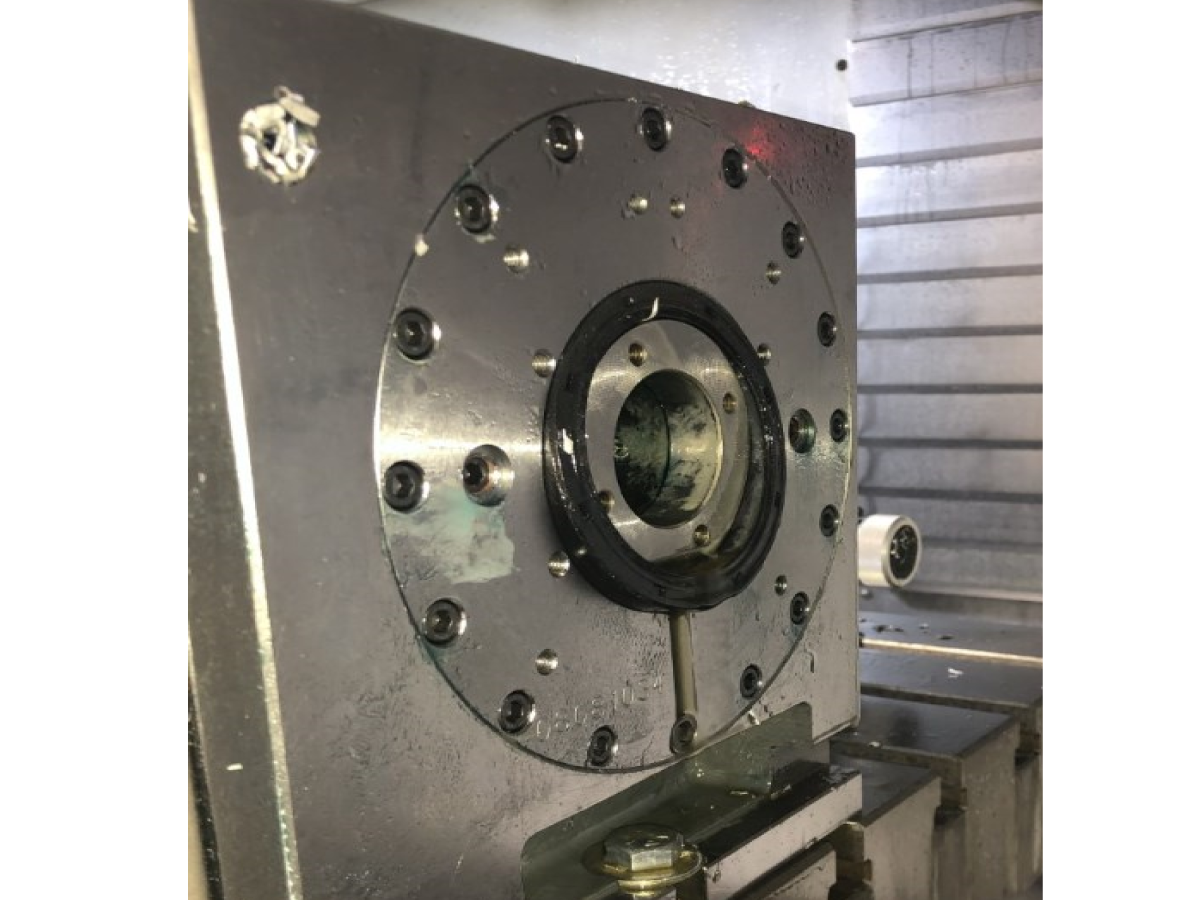
HRC rear seal is popping out.  The oil level is too high.  Drain oil until the correct level is reached; use sight glass to identify if oil is filled to the top of the glass. 
Internal pressure is unable to escape 

NOTE: ONLY DO THIS ONCE THE OIL LEVEL HAS BEEN VERIFIED, AND THE SEAL CONTINUES TO POP OUT.

Replace two of the break fasteners with modified fasteners. See "Rear seal popping out" section below for further instructions. 

Alarm 5.9918, 6.9918 or 7.9918 A, B or C AXIS SERIAL ENCODER INTERNAL DATA ERROR

Alarm 5.9922, 6.9922 or 7.9922 A, B or C AXIS MOTION CHANNEL FAULT DETECTED

Alarm 5.9923, 6.9923 or 7.9923 A, B or C AXIS SOFTWARE DETECTED ENCODER FAULT

Alarm 5.9930, 6.9930 or 7.9930 A, B or C AXIS SERIAL ENCODER POOR COMMUNICATION

Alarm 5.9959, 6.9959 or 7.9959 A, B or C AXIS SERIAL ENCODER DISCONNECT

Alarm 5.9948, 6.9948 or 7.9948 A, B or C AXIS SECONDARY ENCODER SERIAL FAULT

Alarm 5.9949, 6.9949 or 7.9949 A, B or C AXIS SOFTWARE DETECTED SECONDARY ENCODER FAULT

Alarm 5.9950, 6.9950 or 7.9950 A, B or C AXIS SOFTWARE DETECTED SECONDARY ENCODER FAULT

Alarm 5.9951, 6.9951 or 7.9951 A, B or C AXIS SECONDARY ENCODER SERIAL COMMUNICATION FAULT

Alarm 5.9960, 6.9960 or 7.9960 A, B or C AXIS SECONDARY SERIAL ENCODER CABLE FAULT


The  software is outdated. 

Alarm is obsolete 

New alarm for encoder faults updated in software. Update to latest version 100.21.000.1130 or Higher;

Added Alarms 9719 and 9720 for Encoder Fault Detection on Mocon Primary and Secondary Axis.

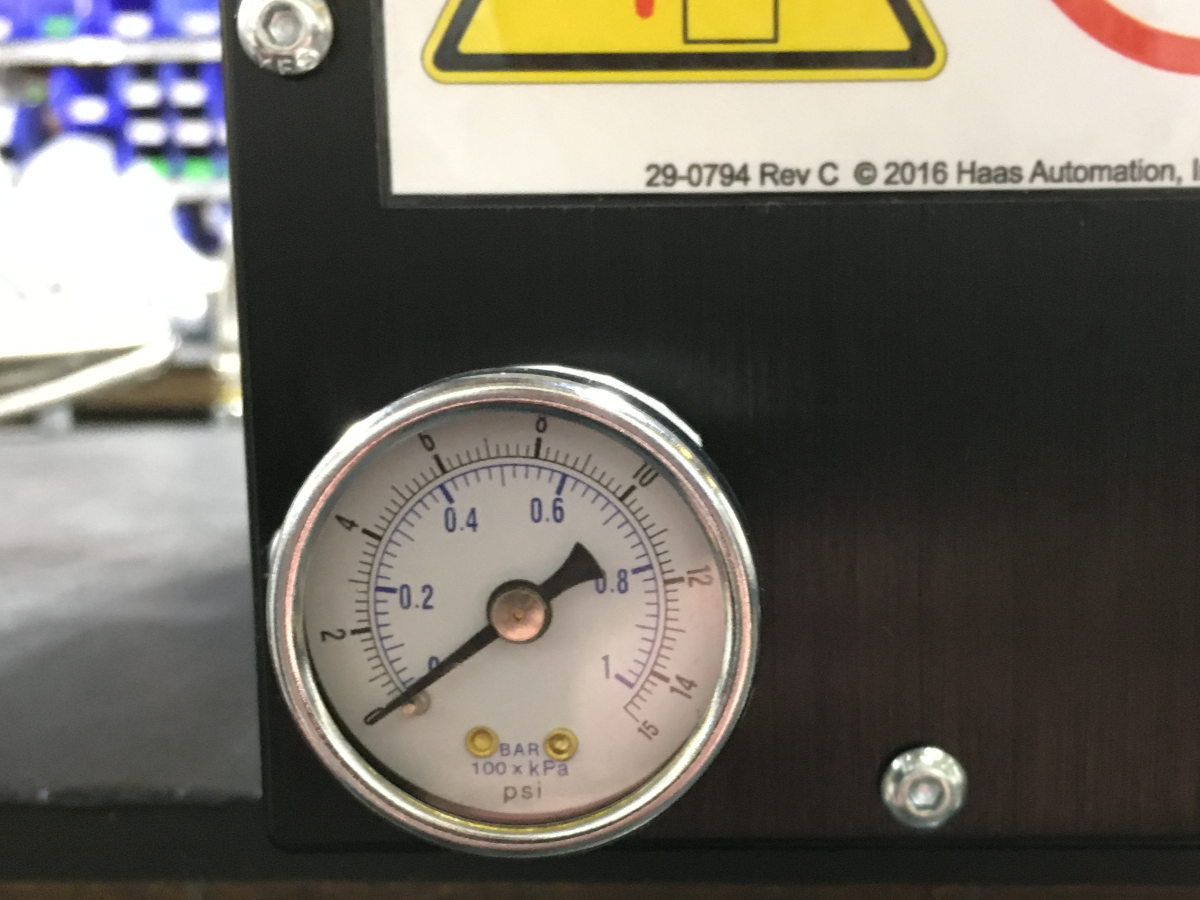
Air leak/hissing sound coming from the motor enclosure. Motor enclosure ballooning out. Excessive bubbles are leaking between the side plate and the motor enclosure. Oil is leaking from behind the platter.  The pressure switch may have failed and is leaking.  Install a 0-15 PSI pressure gauge on the enclosure cover. Do not actuate the rotary brake. Check the fittings, airlines, and pressure switch for a leak if the gauge reads any pressure. If the pressure switch is the source of the leak, replace the pressure switch and reseal the cover when reinstalling.
HRT160SS & HRT210SS Brake Booster assemblies are leaking air from the brake.  There is an excessive amount of pressure build up in the reservoir. 

A change to the brake booster manifold was made to address this issue. Return the rotary unit to the factory for the brake booster upgrade. 

Refer to the HRT160SS/210SS Manifold Identification section to see if the A version of the manifold is already on the brake booster assembly.

Note: This does not apply to HRT310SS. 

HRT160SS & HRT210SS Brake Booster assemblies are blowing out the reservoir feed lines 
Custom rotary configuration file generated with Custom Rotary Configuration Setup does not load properly.  All of the XML objects in the configuration files need to have the tag "<name>[contents]</name>". It is possible for this tag not to be correctly generated.  Open the XML file in a text editing program and check that each XML object has the necessary tag. If The tag is missing, remove the XML object. 

Alarm 5.4003, 6.4003, 7.4003 ROTARY BRAKE RELEASE FAILURE

Alarm 5.4004, 6.4004, 7.4004 A-AXIS AXIS MOTION OCCURRED WHILE THE ROTARY BRAKE WAS ENGAGED

Faulty solenoid.  Test the solenoid. 
Pressure switch failure. 

Test the pressure switch to see if it is working. 

Test details are in the section "Rotary Pressure Switch Testing" below this table.

Note: When replacing a pressure switch on an HRTSS, the brake must be bleed before use. AD0600 - HRT160SS, HRT210SS, and HRT310SS Brake Bleed - Instructions 

Air pressure builds up in the rotary housing because the exhaust is clogged.  Remove the exhaust cap and clean it of debris. 
Oil leaks under the platter, rotary, or trunnion.  The shop’s air compressor is turned off at night, and air pressure builds up slowly after being turned on in the morning. This could cause O-rings not to sit correctly.  Add a ball valve and gauge to the airline going to the rotary. Close the valve before the compressor gets turned off, and open the ball valve after the compressor has been turned ON and the air pressure is higher than 85 psi. 
Positive pressure builds up inside the enclosure.  Follow this page's instructions in the "Leaking Pressure Switch" section below. 
Bad brake O-ring or bad platter O-ring.  Replace bad O-rings. Contact your local HFO for repair options. 
Metal chips can damage the platter and brake O-rings if they get under the platter or break. Compressed air can push chips under the brake plate and the platter.  Do not use an air hose to clean rotaries around the platter. Instead, use a brush to remove chips around the platter before using coolant or air to clean up the rest of the chips. 
Air pressure inside the enclosures for tilt or rotary.  Open enclosure/enclosures and activate and release the brake multiple times while inspecting fittings, air lines, pressure switches, etc., for air leaks. Fix the air leaks if any are found. 
Positive air pressure in the enclosure. Refer to the TRT 160 and TRT 210 Breather Hole Identification section below.
Noise when the unit is moving.  Incorrect parameters NGC clear rotary models, cycle power and reselect the rotary model. 
The weight of the fixture and part might exceed the limit of the rotary.  Remove the fixture and part to see if the noise is the same..
no ferrites on the encoder and power cables.  Add ferrites to the encoder and power cable, and ensure the ferrite is not placed around the chassis ground cable. 
The unit crashed.  Contact HFO for repair options. 
Alarm 4011, 5.4011, 6.4011, 7.4011 ROTARY BRAKE ENGAGEMENT FAILURE Air not connected.  Check the air connection
Air in the brake. 

Bleed the brake.

For HRT160SS/HRT210SS/HRT310SS refer to HRT160SS, HRT210SS, and HRT310SS Brake Bleed - Instructions.  

Pressure switch failure.  Check the pressure switch. Refer to the Faulty Pressure Switch Identification below. 
Faulty solenoid.  Test the solenoid. 
Damaged brake booster seals. 

Use the bleed tool kit to check for pressure. 

Note: This only applies to the HRT160SS, HRT210SS, and HRT310SS

The air cylinder is seized. 

Contact your HFO for repair options. 

Note: This only applies to the HRT160SS, HRT210SS, and HRT310SS

Alarm 9961 INVALID OR MISSING ROTARY FILE is generated after the software update. 
Updated software to a version that does not include reverse rotary files while a reverse rotary file was enabled. 

Follow the Reverse Rotary Direction Setup - NGC procedure to install and activate reverse rotary files. 
Machine with a TR/TRT unit set to an A/C configuration. The Y axis will position to the wrong side of the rotary centerline during DWO or TCPC operation.  Incorrect parameters.  Update the machine to the latest Software and latest Configuration files from HBC. A patch will no longer be required; this has now been fixed in the Configuration files. 

Axis is commanded to move but does not move, and the brake is known to be released. 

Drive belt Loose or damaged. 

Verify the tension of the drive belt and tighten it if necessary. If damaged, contact your HFO for repair options.  

Pulleys loose or damaged. 

Inspect the Pulleys. If damaged, contact your HFO for repair options. 
The motor is not operating.  Contact your HFO for repair options—positioning
Positioning or accuracy errors Machine level and geometry out of tolerance.   Have an HFO inspect the machine level and geometry and fill out a machine inspection report. Then, contact your HFO for repair options. 
Loose or worn belt  Check the condition and tension of the drive belt on HRT, TR, and TRT units. 
Loose or worn pulleys Check the condition of the pulleys. Check that the pulleys are not slipping. 
The brake solenoid is not working correctly.  Check that the brake solenoid for HRT, TR, and TRT units is working correctly. 
Mechanical backlash is too high. 

Measure the mechanical Backlash or have an HFO inspect the rotary.

Measure mechanical backlash at least every 90 degrees for HA5C and HRT at 0 deg, +- 90 deg for the tilt axis of TR and TRT units. If the unit is out of tolerance, contact your HFO for repair options. 

Instructions to measure backlash can be found at 6.6 Rotary Backlash. 

Incorrect parameters enabled.  Make sure the correct set of parameters is in the machine. Then, make an error report and send it to Haas service. 
The rotary has crashed.  Contact your HFO for repair options. 

Alarm 5.9719, 6.9719, 7.9719  A, B or C AXIS PRIMARY ENCODER SERIAL FAULT

Alarm Subcode (0x1) Encoder Data Fault = (Alarm 9918 SERIAL ENCODER INTERNAL DATA ERROR)

Encoder signals are affected by noise from high power cables.

(Faulty servo motor encoder.)

Refer to Serial Data Communication Faults / Electrical Noise section below.

(Check the servo motor for coolant contamination.)

Alarm 5.9719, 6.9719, 7.9719  A, B or C AXIS PRIMARY ENCODER SERIAL FAULT

Alarm Subcode (0x2) Encoder Internal Axis Fault 1 = (Alarm 9922 MOTION CHANNEL FAULT DETECTED)

(The motion channel has reported an internal fault of a type that is not recognized by the control)  Cycle power to the machine, If the issue persists, take an error report (Shift F3) and email to Haas Service

Alarm 5.9719, 6.9719, 7.9719  A, B or C AXIS PRIMARY ENCODER SERIAL FAULT

Alarm Subcode (0x3) Encoder Internal Axis Fault 2 = (Alarm 9923 SOFTWARE DETECTED ENCODER FAULT)

 (Software has reportrd an internal fault of a type that is not recognized by the control.)

 Cycle powe to the machine. If the issue persists, take an error report (Shift F3) and email to Haas Service

Alarm 5.9719, 6.9719, 7.9719  A, B or C AXIS PRIMARY ENCODER SERIAL FAULT

Alarm Subcode (0x4) Encoder CRC Fault = (Alarm 9930 SERIAL ENCODER POOR COMMUNICATION)

 (Encoder signals are affected by noise from high power cables.)

 (Refer to Serial Data Communication Faults / Electrical Noise section below.)

Alarm 5.9719, 6.9719, 7.9719  A, B or C AXIS PRIMARY ENCODER SERIAL FAULT

Alarm Subcode (0x5) Encoder Cable Fault = (Alarm 9959 SERIAL ENCODER DISCONNECT)

 (Cables are not connected correctly or encoder is faulty.)

 (Inspect the cables and connectors. Refer to the Main Processor/Encoder Cable section below.)

Alarm 5.9720, 6.9720, 7.9720 A, B or C AXIS SECONDARY ENCODER SERIAL FAULT.

Alarm Subcode (0x1) Encoder Data Fault = (Alarm 9948 SECONDARY ENCODER INTERNAL DATA ERROR)

Scale signals are affected by noise from high power cables.

(Faulty Linear Scale, Configuration File issue; incorrect motor type or incorrect Scale type.)

Refer to Serial Data Communication Faults / Electrical Noise section below.

(Check Scale Encoder for coolant contamination.)

Alarm 5.9720, 6.9720, 7.9720 A, B or C AXIS SECONDARY ENCODER SERIAL FAULT

.Alarm Subcode (0x2) Encoder Internal Axis Fault 1 = (Alarm 9949 SOFTWARE DETECTED SECONDARY ENCODER FAULT)

(The motion channel has reported an internal fault of a type that is not recognized by the control)

 Cycle power to the machine. If the issue persists, take an error report (Shift F3) and email Haas Service

Alarm 5.9720, 6.9720, 7.9720 A, B or C AXIS SECONDARY ENCODER SERIAL FAULT

Alarm Subcode (0x3) Encoder Internal Axis Fault 2 = (Alarm 9950 SOFTWARE DETECTED SECONDARY ENCODER FAULT)

 (Software has reported an internal fault of a type that is not recognized by the control.)


Cycle power to the machine. If the issue persists, take an error report (Shift F3) and email to Haas Service

Alarm 5.9720, 6.9720, 7.9720 A, B or C AXIS SECONDARY ENCODER SERIAL FAULT

Alarm Subcode (0x4) Encoder CRC Fault = (Alarm 9951 SECONDARY ENCODER SERIAL COMMUNICATION FAULT)

(Liner Scale signals are affected by noise from high power cables.)

(Refer to Serial Data Communication Faults / Electrical Noise section below.)

Alarm 5.9720, 6.9720, 7.9720 A, B or C AXIS SECONDARY ENCODER SERIAL FAULT

Alarm Subcode (0x5) Encoder Cable Fault = (Alarm 9960 SECONDARY SERIAL ENCODER CABLE FAULT)

(Cables are not connected correctly or Linear scale is faulty.)

(Inspect the cables and connectors. Refer to the Main Processor/Encoder Cable section below.)
Alarm 5.993, 6.993, 7.993 A, B or C AXIS AMPLIFIER SHORT CIRCUIT Coolant or liquid intrustion. Inspect the motor for short circuit condition and determine the cause. If it is found to be coolant related, replace the enclosure gasket on the servo motor housing or apply RTV sealant to holes.
Note: Be sure the RTV sealant has enough time to cure before coolant may come in contact with the rotary.

Rotary Pressure Switch testing

Test 1: Exercise the brake a few times. The pressure switch can get jammed if it is not used for a while (example: overnight). 

Test 2: Press [Diagnostics], then navigate to the Diagnostics -> MOCON tab and find "CH 4 [A] axis brake air pressure". Ensure the switch is reading the proper state of the brake and that it changes when it is actuated. 

Note: The "CH 4 [A] axis brake air pressure" input does not work correctly on some machines for software versions 100.22.000.1000 to 100.23.000.1112. Update to the latest version of the software to resolve this issue. 

Test 3: Press [Diagnostics], then navigate to the Diagnostics -> MOCON tab and find "CH 4 [A] axis brake air pressure". Disconnect the rotary's airline and observe the bit "CH 4 [A] axis brake air pressure". If the pressure sensor changes, then the solenoid is sticking; if the sensor doesn't change, then the switch is sticking.

Note: The channel number you will need to observe will depend on what axis is having the issue. CH4 is for the 4th axis, and CH5 is for the fifth axis.  

Test 4: A continuity test needs to be done on the pressure switch. When the brake is engaged, there should be continuity. When it’s disengaged, there should not be continuity.

Test 5: Determine if the issue follows the pressure switch. Follow these instructions. 

  1. Uniquely mark, remove, and electrically disconnect the failing pressure switch.
  2. Uniquely mark, remove, and electrically disconnect the good pressure switch.
  3. Install the failing pressure switch in place of the good pressure switch and electrically connect the switch.
  4. Install the good pressure switch in place of the failed pressure switch and electrically connect the switch.
  5. See if the alarm follows the suspected failed component.

Step 4 can either be done by switching the axis of the pressure switch if it's on a dual axis rotary or moving the switch to a different rotary if it is on a single axis rotary. 

HSG-A 01-18-2023

Program

Possible Cause: The feeds and speeds are too high for the work.

Corrective Action:

Decrease the feeds and speeds of the active program to decrease the machine load.

Tooling

Possible Cause: The cutting tool is not sharp or is damaged.

Corrective Action:

Examine the cutting tool for damage. Install a new tool or insert if the cutting tool is damaged or is not sharp.

Axis Obstruction

Possible Cause: There is a mechanical blockage in the axis of travel.

Corrective Action:

Make sure the axis has a clear path of travel. Tools, part fixtures, or workpieces that are too large can crash into the machine enclosure.

Mechanical Obstruction

Possible Cause: There is an internal mechanical obstruction in the rotary unit.

Corrective Action:

Disconnect the air supply to the rotary unit. Press [ZERO RETURN], press the rotary axis letter, Press [SINGL], and jog the axis. If an alarm is generated, remove the necessary enclosure covers to access the faulty axis. Rotate the axis motor drive pulley by hand. There is an internal mechanical bind if the axis cannot be rotated by hand. The rotary unit needs to be serviced. For instructions on where to find a rotary repair facility and how to send your rotary unit, go to Rotary Repair on our website.

Brake Solenoid

Possible Cause: The brake solenoid for the rotary unit has an electrical fault.

Corrective Action:

Make sure the air supply is connected to the rotary unit. In MDI mode, push the rotary axis letter. Push [HAND JOG], and you should hear air go out from the rotary unit. For solenoid test instructions, refer to Solenoid - Troubleshooting Guide.

Electrical Short

Possible Cause: There is a short to ground in the axis motor cable.

Corrective Action:

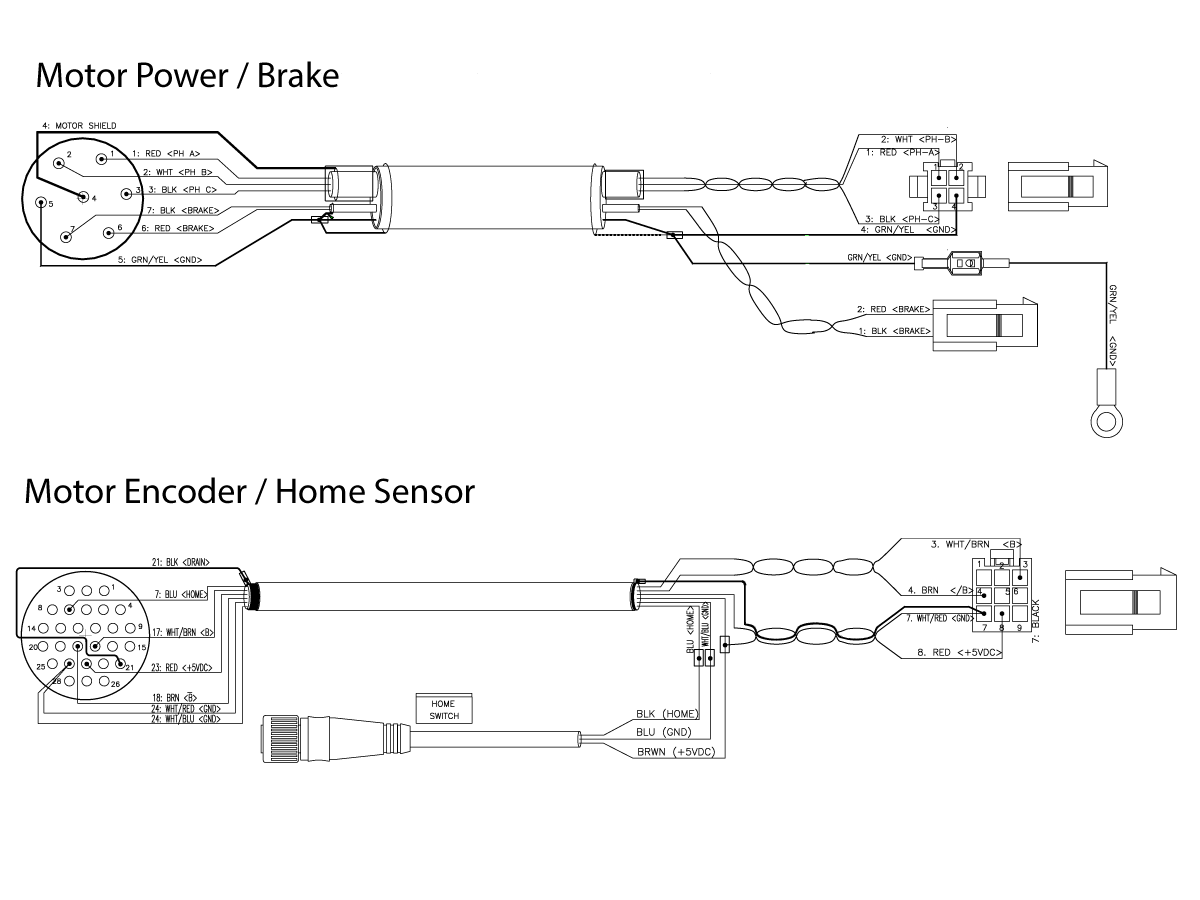
Inspect the rotary cables for wear or damage. Refer to the electrical diagram below.

Servo Amplifier

Possible Cause: The servo amplifier has a problem.

Corrective Action:

For servo amplifier troubleshooting instructions, refer to Servo Amplifier - Troubleshooting Guide.

Backlash

Possible Cause: There is lost motion or backlash in the rotary.

Corrective Action:

Test for backlash. For backlash test instructions, refer to HA5C Indexer - Backlash Test or Rotary Tables - Backlash Test.

Proximity Sensor

Possible Cause: The home proximity sensor is faulty.

Corrective Action:

For proximity sensor troubleshooting instructions, refer to Proximity Sensor - Troubleshooting Guide.

TRT70 Servo Errors

Possible Cause:

There is an O-ring inside the TRT70's 5th axis head that can cause the following symptoms:

  • Servo Humming
  • Servo Error Alarms
  • Accuracy Issues

Corrective Action: 

The O-ring has been removed on current production rotaries, but previous models will need to have it removed in the field. A plug bolt may need to be added, 40-1631 & 49-4101.

Go to the TRT70 O-ring Removal procedure for details.

Rotary Scale

Possible Cause: The rotary scale or rotary scale cable is faulty.

Corrective Action:

Make sure the cables are connected correctly.

Inspect the rotary scale cables for wear or damage. 

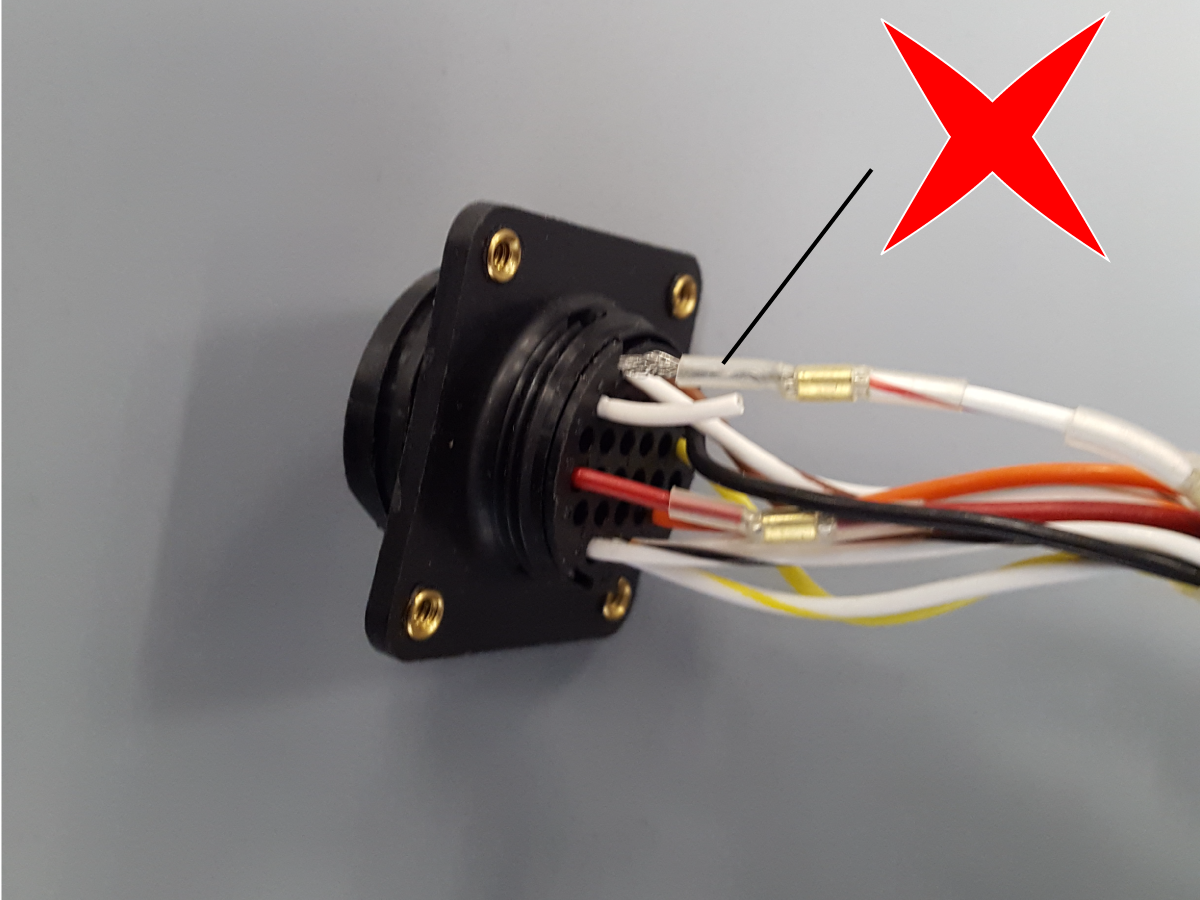
Inspect the internal rotary scale cable interface cable, and slightly pull on the wires to ensure they have a good crimp.  If the cables are connected correctly and not damaged, and the alarm persists, the rotary unit must be serviced.

For instructions on where to find a rotary repair facility and how to send your rotary unit, go to the Haas Rotary Repair Center page.

HRT450 Brake Bleeding

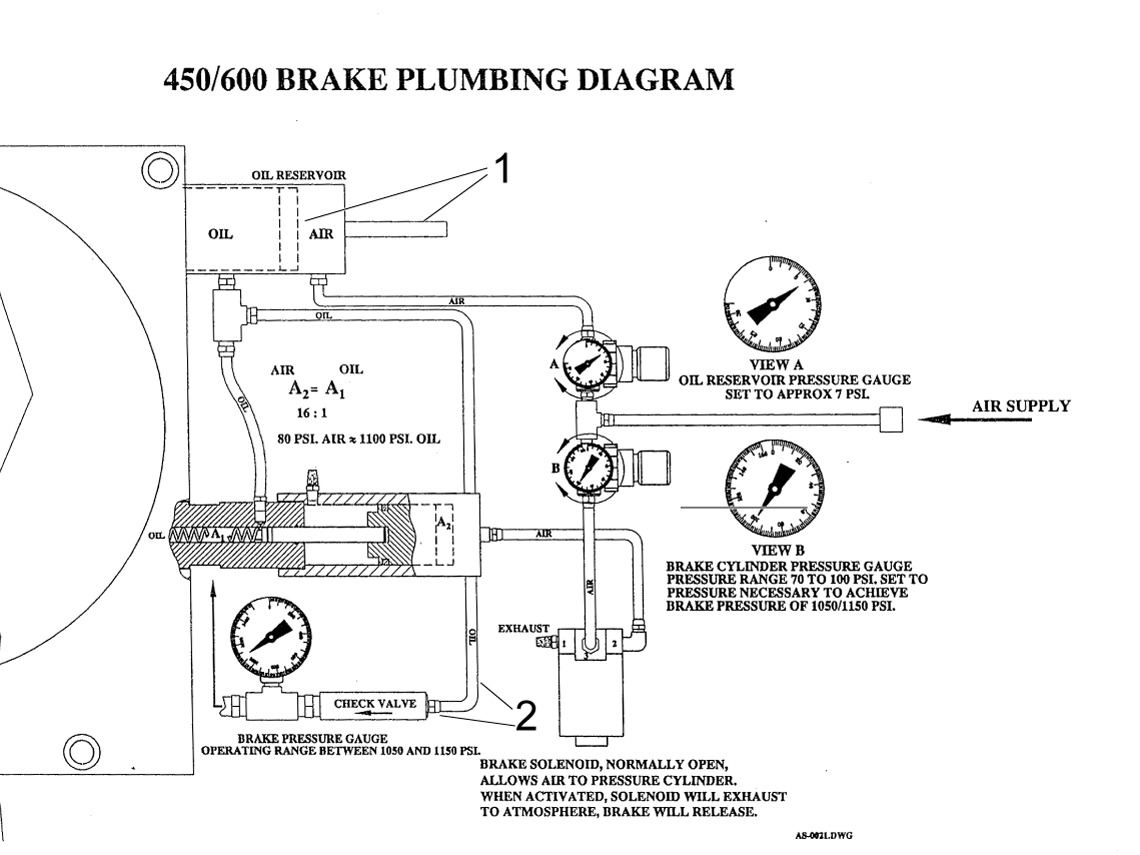
A fully extended rod indicates a full reservoir [1]

After bleeding, the rod will stick out slightly less. 

Disconnect one of the oil lines and dip the tube in oil. Push and pull the rod to fill the reservoir. Reconnect the line and perform the bleeding procedure.

Disconnect the oil line [2] and insert a tube into a hydraulic fluid container when filling the reservoir.

1

Bleeding Procedure

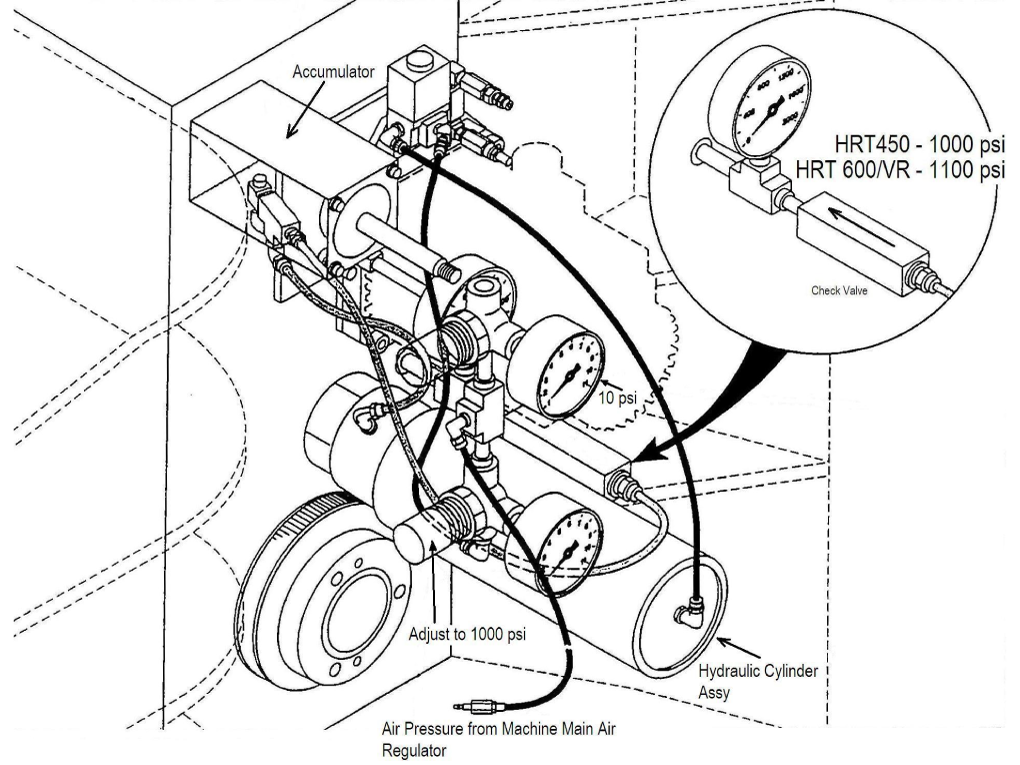
  1. Set regulator A to the max
  2. Set regulator B to zero 
  3. Loosen the top air bleed plug [1] until the air is out. 
    NOTE: Use bleed plug [2] if the top plug is not accessible.
  4. Set regulator B to 80 PSI 
  5. Set regulator A to 7 PSI

Check the main gauge. It should be 0 PSI when unclamped and 1000 PSI when clamped.

2

Use the image on the left for additional reference.

HRC Units - Rear Seal Popping Out

Do not perform any type of maintenance on the rotarty if it is under warranty, contact your Haas Factory Outlet for further assistance.

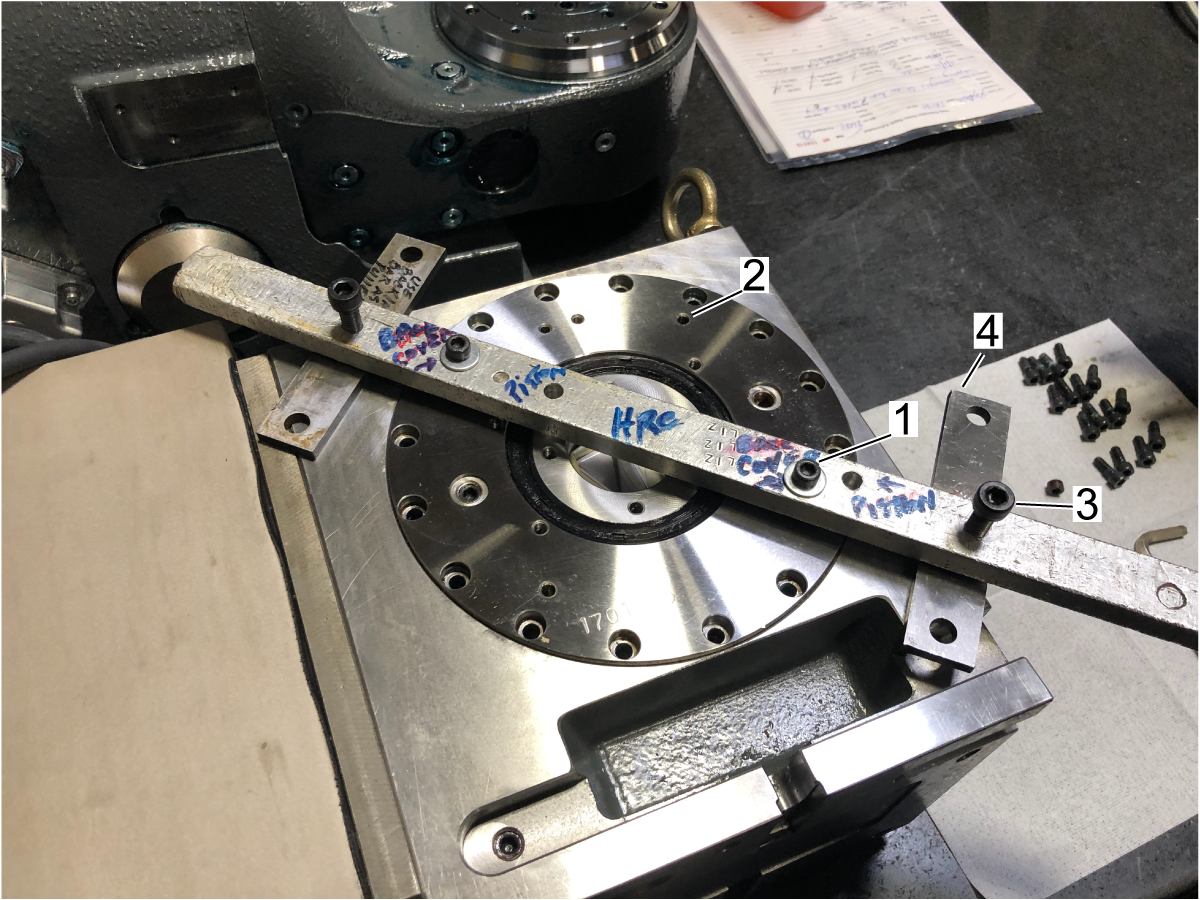
This section will explain what to do if the rear seal keeps popping out. 

NOTE:  This should only be done if the oil level has been verified and the seal is still popping out. 

1

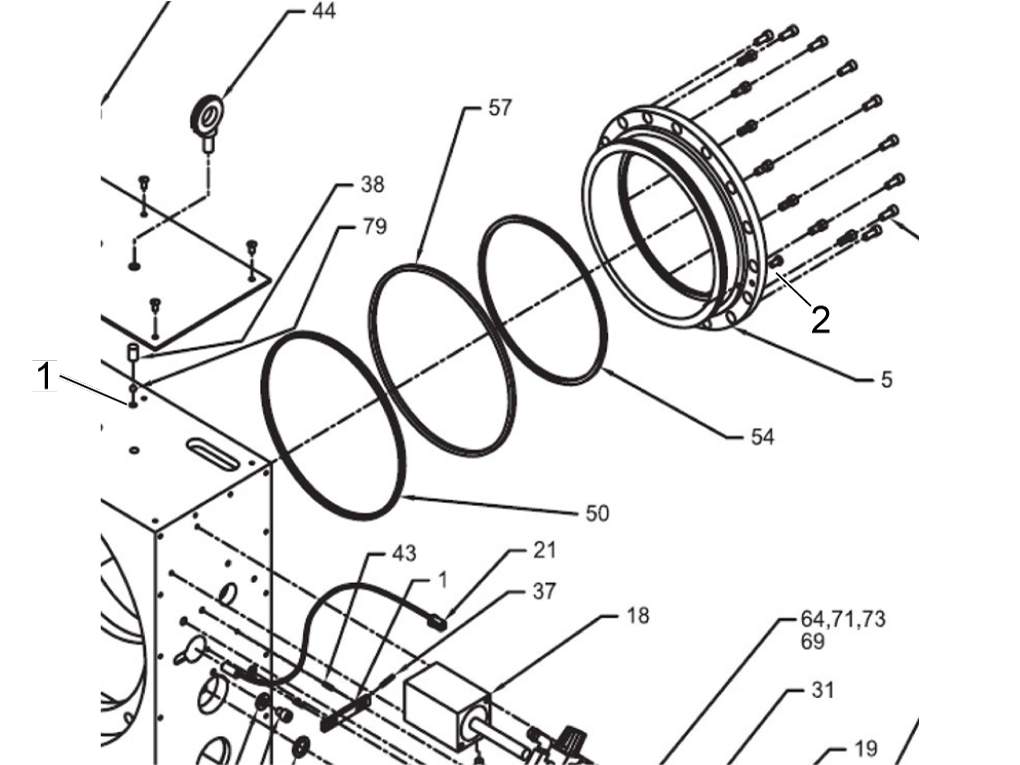
Before starting, a fixture needs to be fabricated, the fixture will have two through holes [1] to be threaded to the back of the brake cap and two threaded holes [2] on the outer section that will act like a jack and be placed on a plate [3], so it will not damage the rotary casting


An example of this is shown.

2

Remove the air supply to the table.

Place the rotary on its platter face and remove the rear M5 brake bolts.

Use the fixture made to thread to the back of the brake cap and remove it [1].

The threaded holes should be the ones denoted [2] and should be across from each other.

Using the other bolts on the threaded holes [3] as jacks, turn the bolts on each side evenly, so the plate comes off.

Make sure to use place plates of some sort [4] to prevent damage to the rotary.

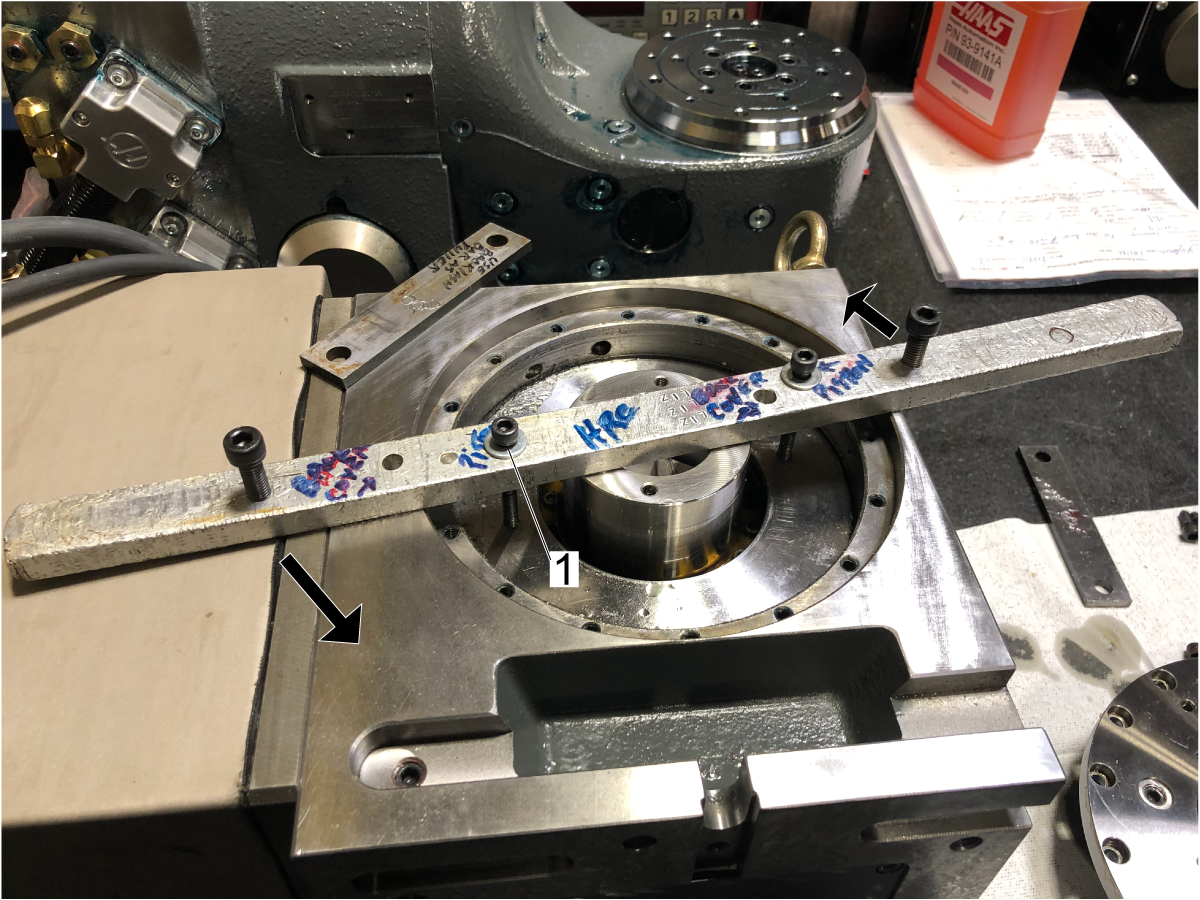
3

Using the same fixture, pull out the brake piston.

NOTE: Longer bolts will be needed to reach the brake piston [1]. Ensure the jack bolts are in the position indicated by the arrows to have leverage. Make sure plates are under the bolts to avoid damage to the rotary.

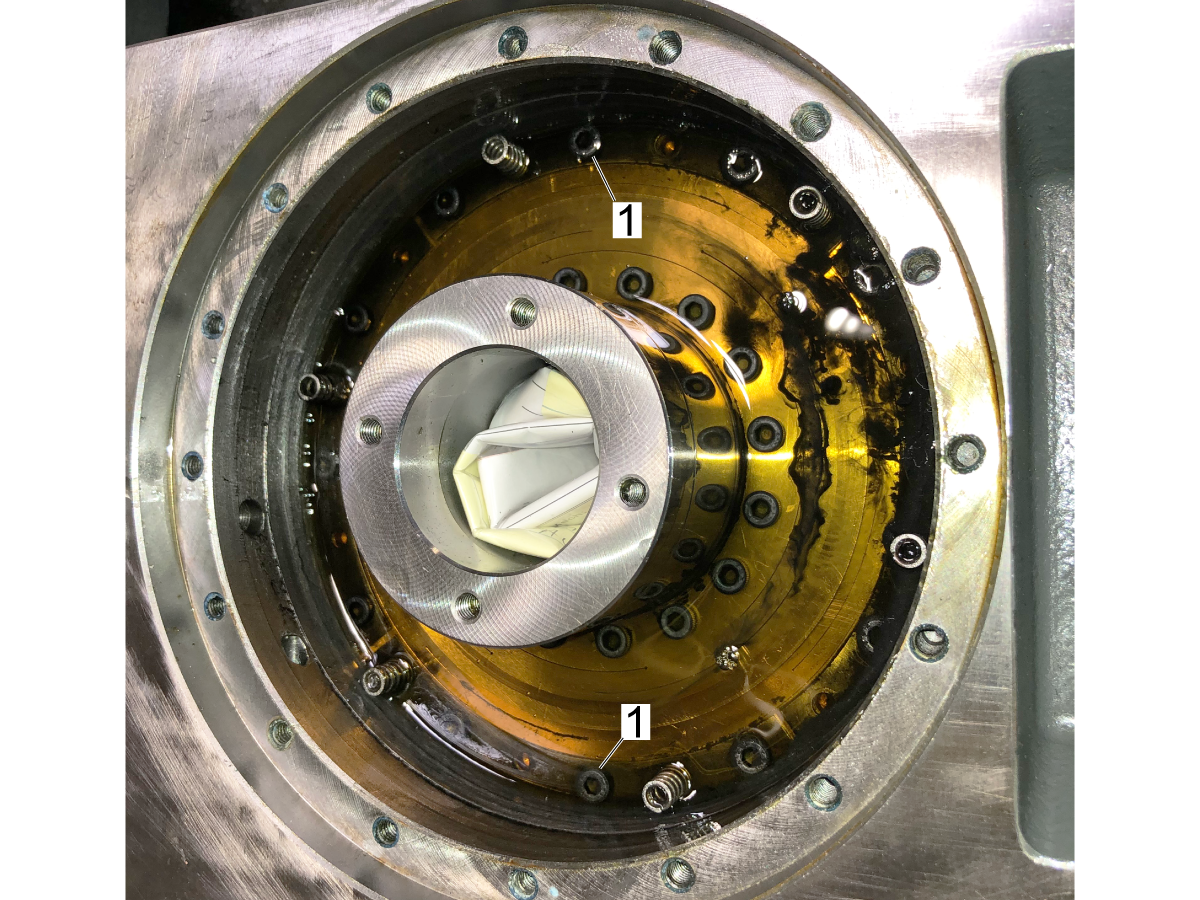
4

Remove the two M5 brake fasteners 180 degrees apart [1] and replace them with the modified fasteners. 

The modified fasteners have a through hole to relieve pressure under the rear brake seal. These have no part number and will need to be made.

HRT160SS/210SS Manifold Identification

The dimple [1] indicates the brake booster manifold is an A version. 

Note: This does not apply to HRT310SS. 

Leaking Pressure Switch

Install a 0-15 PSI pressure gauge on the enclosure cover. Do not actuate the rotary brake. Check the fittings, airlines, and pressure switch for a leak if the gauge reads any pressure. If the pressure switch is the source of the leak, replace the pressure switch and reseal the cover when reinstalling.

Electrical Diagrams

SIGMA-5 Cable Diagram

Serial Data Communication Faults / Electrical Noise

Sigma-5 servo motors, non-contact encoders output serial data signal to the control. If the serial data signal is missing or becomes unreliable the control will generate a serial data communication error. Electrical noise can cause the serial data signal from the encoder to become unreliable and cause false alarms. Follow the troubleshooting guide below to help eliminate the noise in the system.

  1. Incorrect machine grounding. Make sure the ground wire size is correct. Also the ground wire should run all the way back to the electrical panel.
  2. Noise from other equipment. Make sure the machine does not share it's electrical service with another machine.
  3. Loose encoder data connectors at PCB or at the motor encoder, can cause the serial data to become unreliable. Refer to the Main Processor / Encoder Cable section.
  4. Loose ground or high voltage power connectors will induce noise into the system.
    • electrical cabinet check for loose connection at all the ground and high voltage power terminals (vector drive, wye-delta contactors, transformer..etc).
    • pendant check for loose terminal connectors.
    • spindle head check for loose ground and motor power terminals.
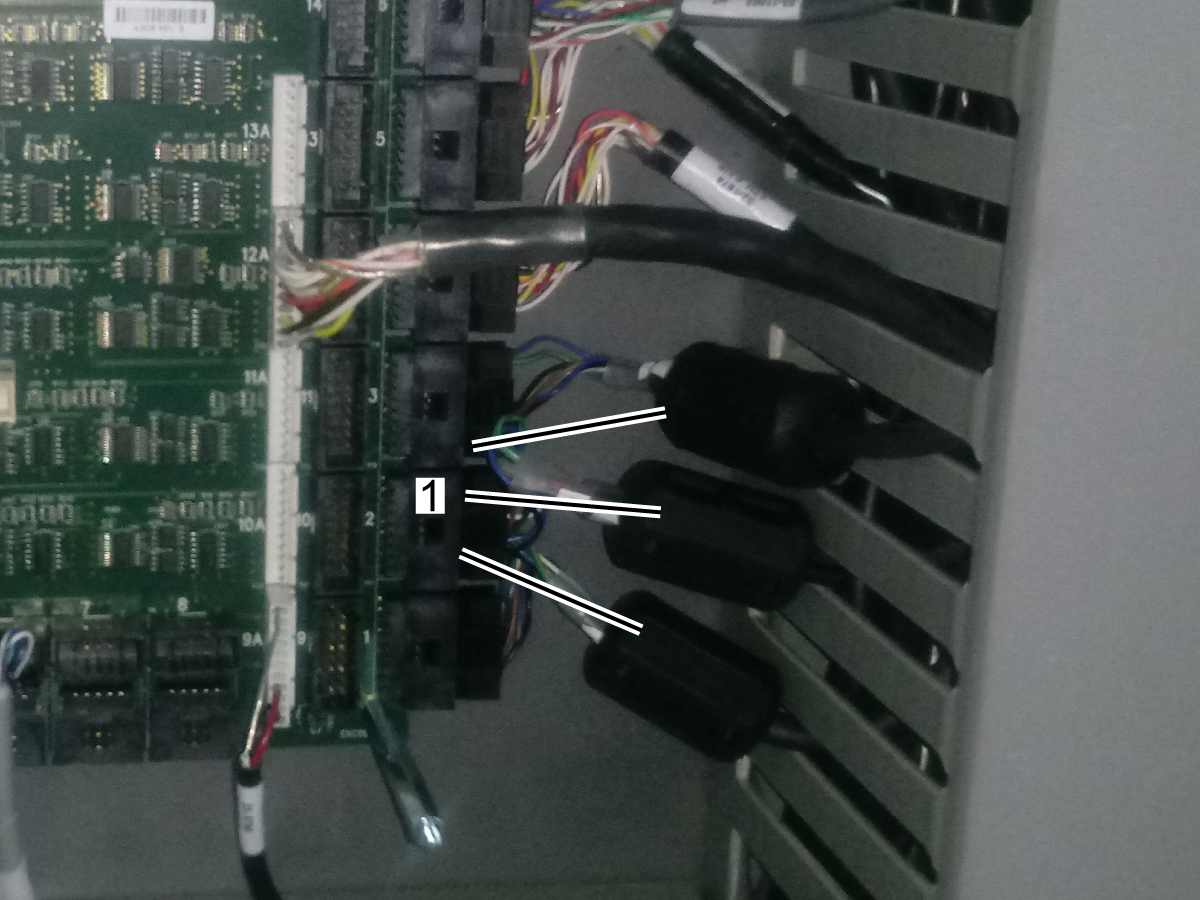
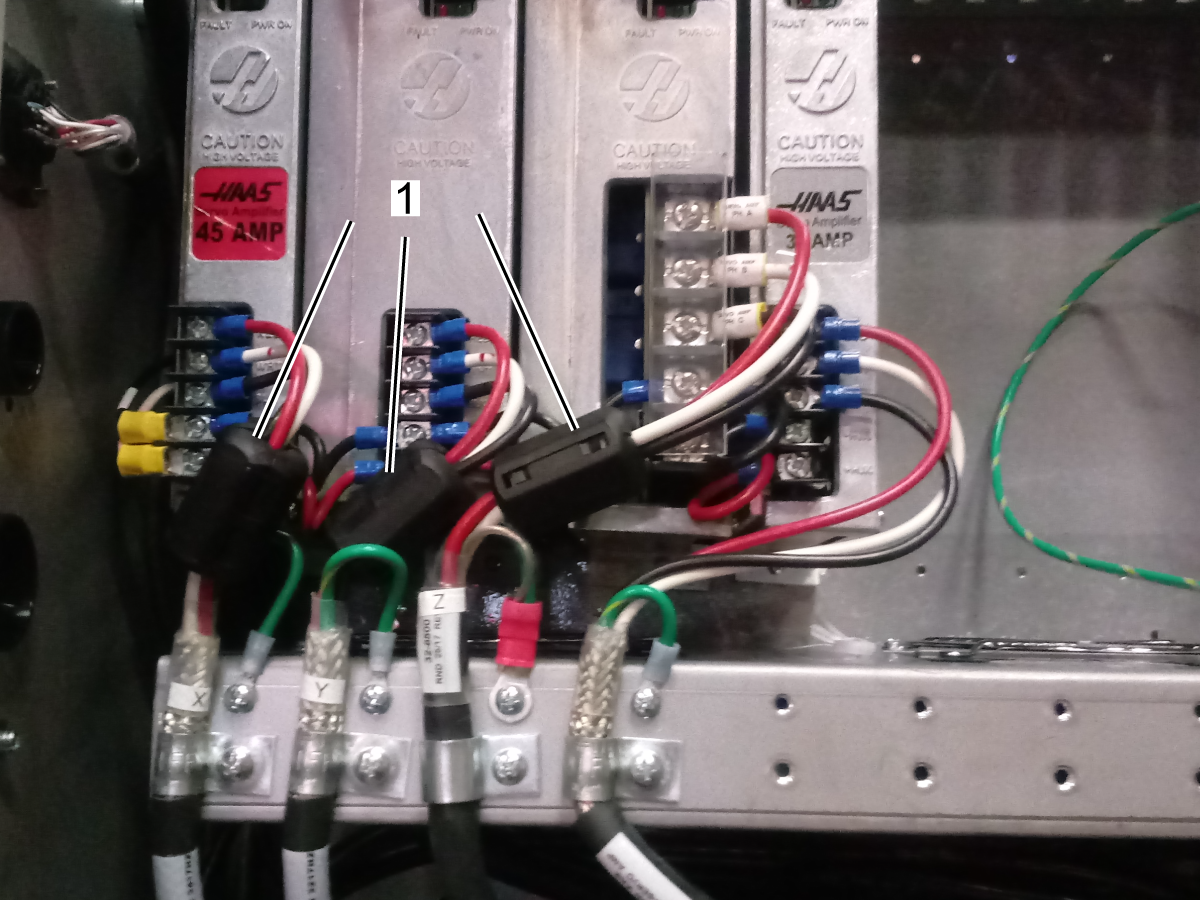
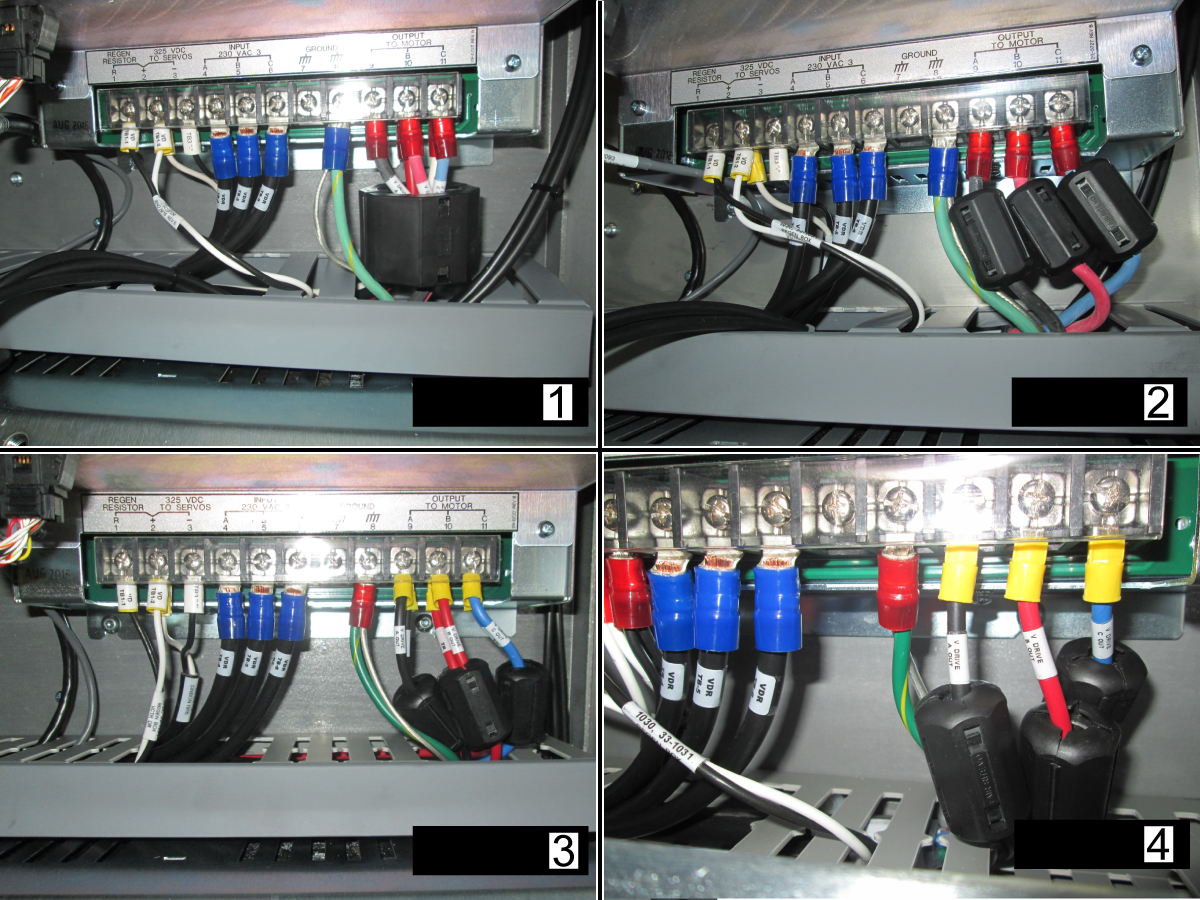
  5. The ferrite filters suppress high frequency noise produced by the amplifiers and vector drive, when servos are on. Make sure they are installed in:
    • Encoder data cables. Make sure there is a ferrite filter P/N 64 1252 installed in all the encoder data cables.
    • Axis motor power cables. Make sure there is a ferrite filter P/N 64-1252 installed in X, Y, Z axis motor power cables [1].
    • Spindle motor cables. Make sure there is a ferrite filter installed in the motor output of the vector drive.

      For a 40HP vector with 6 wire leads [1] use ferrite P/N 64-1254.

      For a 40HP vector with 3 wire leads [2] use ferrite P/N 64-1252.

      For a 20HP vector drive with 6 or 3 wire leads [3, 4] use ferrite P/N 64-1252.

  6. Cable routing. Make sure that the encoder cable is separated from high power spindle/axis/pump cables.

Maincon PCB / Encoder Cable

Corrective Action:

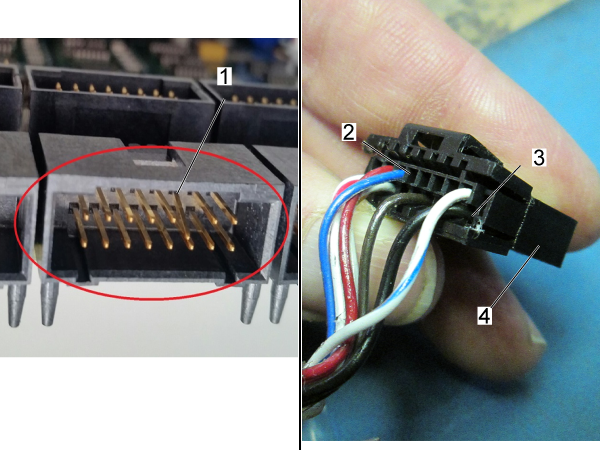
Examine the connector [1] on the Maincon. Make sure it is not damaged.

Examine the cable. Look for signs of damage or stiffness. The connector [4] has two housings [2,3] for the cable pins.

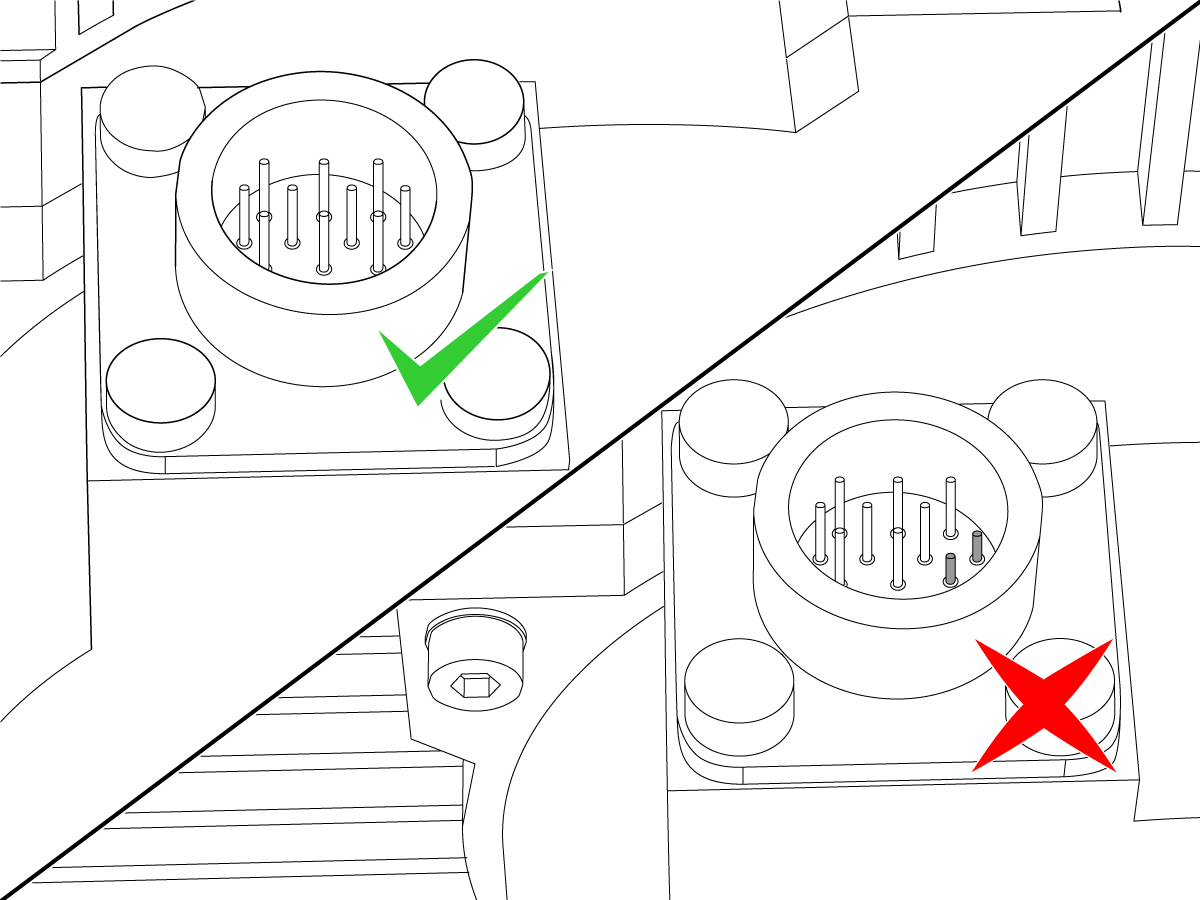
If the pins have been pushed into the motor, you must replace the motor and cable together.

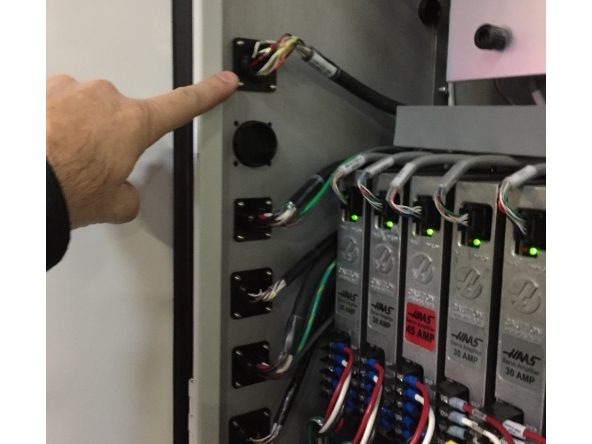
Make sure the cable is firmly connected at both ends. Reseat both connections. Make sure the cable is installed in the correct connector at the Maincon or MOCON PCB.

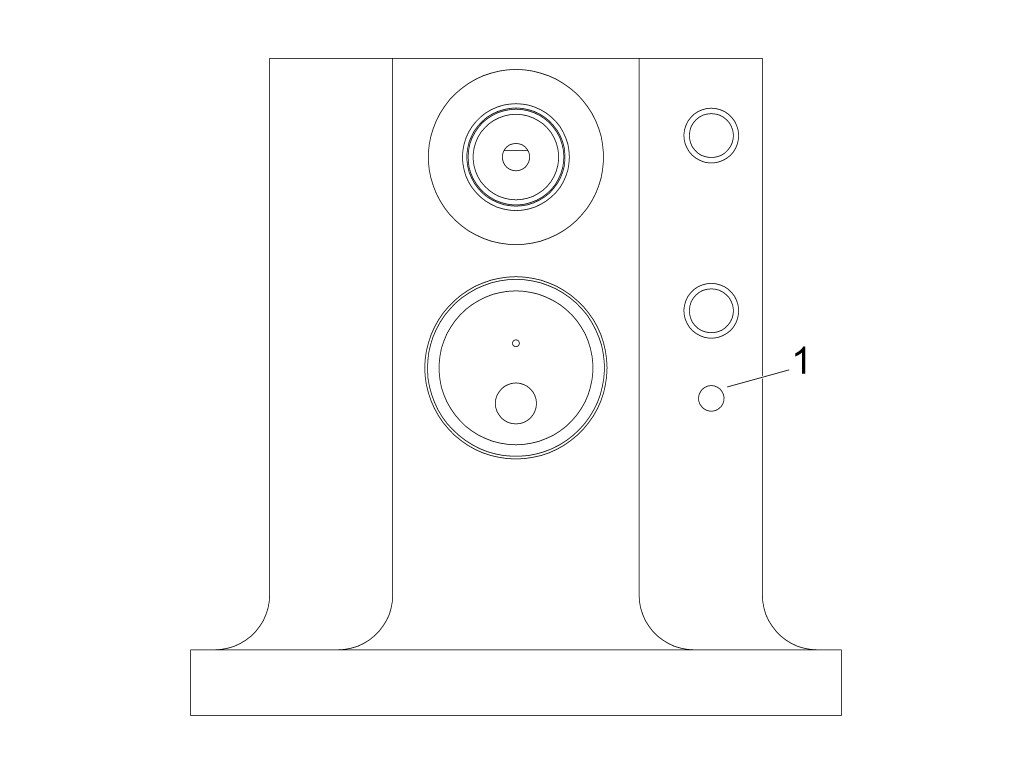
TRT 160 and TRT 210 Breather Hole Identification

Corrective Action:

If the unit is a TRT 160 or TRT 210, ensure the breather hole on the bottom of the tilt axis casting is 0.25" in diameter. If the breather hole is smaller, it needs to be drilled to correct size.

Note: The dimple [1] indicates the location of the breather hole on a TRT 160 or TRT 210.  

Faulty Pressure Switch Identification

Possible Cause: Potential leak detected inside the enclosure. Alarm 4011 has been triggered. 

Corrective Action: If the front rubber plug is missing, it is a clear indication that the pressure switch has failed and must be replaced. 


Note: If the pressure switch is replaced on an HRTSS, the brake must  be bled. For brake bleed instructions, refer to HRTSS Brake Bleed Instructions. 

8.2 Rotary - Troubleshooting - CHC

Symptom Table

Do not perform any type of maintenance on the rotarty if it is under warranty, contact your Haas Factory Outlet for further assistance.

Download and fill out the Rotary Inspection Report Checklist below before replacing any parts.

Rotary Inspection Report Checklist
Symptom Possible Cause Corrective Action

Alarm 106 A SERVO ERROR TOO LARGE

Alarm 111 A SERVO OVERLOAD

Alarm 164 A AXIS DRIVE FAULT

Alarm 187 B SERVO ERROR TOO LARGE

Alarm 188 B SERVO OVERLOAD

Alarm 193 B AXIS DRIVE FAULT


The feeds and speeds are too high for the work. Decrease the feeds and speeds.
The cutting tool is not sharp or is damaged. Install a new tool or a new tool insert.
There is a mechanical blockage in the axis of travel. Make sure the axis has a clear path of travel.
There is an internal mechanical obstruction in the rotary unit. Test the rotary unit.
The brake solenoid for the rotary unit has an electrical fault. Troubleshoot the brake solenoid.
The air exhaust is clogged. Remove the exhaust and inspect it.
The servo amplifier has a problem Troubleshoot the servo amplifier.
The machined part has inaccurate features There is lost motion or backlash in the rotary. Do the rotary backlash test.
The feeds and speeds are too high for the work. Decrease the feeds and speeds.
The tilt (A) axis of the trunnion does not find home.
The home sensor or cable is faulty.

Jog the tilt axis from the positive travel limit to the negative travel limit. Make sure the A HOME SWITCH bit changes (on the Diagnostics INPUT 2 screen). If the bit does not change, replace the home switch.

This can be done in the field This cannot be done on TR110 units.

Note: The A HOME SWITCH change cannot be seen on machines with software version 18.16A or higher.

Caution: If the A axis (tilt) moves more than 20 degrees past the home position,

Push [EMERGENCY STOP]

The tilt (A) axis does not home to a horizontal position.
The tool change offset parameter has not been set. Set the rotary platter flatness: Refer to the Rotary - TR/TRT/T5C - Platter Flatness - Adjustment procedure.
The tilt (A) axis does not home to a horizontal position consistently. The parameters 1115, 1116, and 1122 are not set correctly.

On a machine with a rotary scale, when you install version M18.18A or higher to improve zero-return consistency: Be sure to set parameters 1115, 1116, and 1122 correctly, as follows:

UMC-750:
Parameter 1116 (B Axis) = 5
Parameter 1122 (C Axis) = 5

TR-Series Rotaries with Scales:
Parameter 1115 (A Axis) =  4

Note: On machines that do not have rotary scales, set parameter 1115 to 0. TR-series rotary products that do not have a P2 or P4 on the name tag do not have rotary scales.

After you change parameters 1116, 1122, 1115:

  • When the rotary searches for zero, it may travel farther than it did before. This is normal.
  •  You must adjust the tool-change offset parameters (Parameter 212 for A Axis, Parameter 213 for B Axis, Parameter 523 for C Axis). Reference: Rotary - TR/TRT/T5C - Installation procedure

Alarm 426 A AXIS SECONDARY ENCODER POSITION MISMATCH

Alarm 558 B AXIS SECONDARY ENCODER POSITION MISMATCH

Alarm 559 C AXIS SECONDARY ENCODER POSITION MISMATCH


The rotary scale or scale cable is faulty.

Check the rotary scale cable.


  • For ES-5 models - Rotary Scale service parts are no longer available. Refer to the following corrective action: 
  1. Turn off the scale feature
  2. Use without scales.  Verify worm backlash is set to factory specifications for best accuracies. 
  3. If worm backlash is worn out beyond adjustment, a table rebuild would be recommended.
  4. Laser comp the 4th axis                                                                         


Alarm 175 GROUND FAULT DETECTED


Alarm 185 A CABLE FAULT

Alarm 195 B CABLE FAULT

Alarm 552 TRIPPED CIRCUIT BREAKER


There is a short to ground in the axis motor cable. Test the axis motor cable for short.
There is a short to ground in the axis motor. Test the axis motor for short.
HRC rear seal is popping out  Oil level is too high. Drain oil until the correct level is reached, use sight glas to identify if oil is filled to the top of the glass.
Internal pressure is unable to escape 

 NOTE: ONLY DO THIS ONCE THE OIL LEVEL HAS BEEN VERIFIED AND THE SEAL CONTINUES TO POP OUT.

Replace two of the break fasteners with modified fasteners see "Rear seal popping out" section below for further instructions.

Alarm 138 A-axis Overheat  The rotary product has an air pressure sensor.  The updated P12 and P15 rotary products were intended to run on NGC machines.   Note:  There were some P3 rotary products that were built with the air pressure sensor.

To run these units on a Classic Haas Control see Air Pressure Sensor section.
Oil leaks under the platter, rotary, or trunnion.  The shop’s air compressor is turned off at night, and air pressure builds up slowly after being turned on in the morning. This could cause O-rings not to sit correctly.  Add a ball valve and gauge to the airline going to the rotary. Close the valve before the compressor gets turned off, and open the ball valve after the compressor has been turned ON and the air pressure is higher than 85 psi. 
Positive pressure builds up inside the enclosure.  Follow this page's instructions in the "Leaking Pressure Switch" section below. 
Bad brake O-ring or bad platter O-ring. 
Replace bad O-rings. Contact your local HFO for repair options. 
Metal chips can damage the platter and brake O-rings if they get under the platter or break. Compressed air can push chips under the brake plate and the platter.  Do not use an air hose to clean rotaries around the platter. Instead, use a brush to remove chips around the platter before using coolant or air to clean up the rest of the chips. 
Air pressure inside the enclosures for tilt or rotary.  Open enclosure/enclosures and activate and release the brake multiple times while inspecting fittings, air lines, pressure switches, etc., for air leaks. Fix the air leaks if any are found. 
Positive air pressure in the enclosure.  Refer to the TRT 160 and TRT 210 Breather Hole Identification section below. 
Positioning or accuracy errors Machine level and geometry out of tolerance.   Have an HFO inspect the machine level and geometry and fill out a machine inspection report. Then, contact your HFO for repair options. 
Loose or worn belt 
Check the condition and tension of the drive belt on HRT, TR, and TRT units. 
Loose or worn pulleys Check the condition of the pulleys. Check that the pulleys are not slipping. 
The brake solenoid is not working correctly.  Check that the brake solenoid for HRT, TR, and TRT units is working correctly. 
Mechanical backlash is too high. 

Measure the mechanical Backlash or have an HFO inspect the rotary.

Measure mechanical backlash at least every 90 degrees for HA5C and HRT at 0 deg, +- 90 deg for the tilt axis of TR and TRT units. If the unit is out of tolerance, contact your HFO for repair options. 

Incorrect parameters enabled.  Make sure the correct set of parameters is in the machine. Then, make an error report and send it to Haas service. 
The rotary has crashed.  Contact your HFO for repair options. 

Axis Obstruction

Possible Cause: There is a mechanical blockage in the axis of travel.

Corrective Action:

Make sure the axis has a clear path of travel. Tools, part fixtures, or work pieces that are too large can crash into the machine enclosure.

Air Pressure Sensor

The P12 and P15 rotary units were intended to run on NGC machines, if  the unit is connected to a Classic Haas Control the control will generate overheat alarms.

Note:  There was some P3 rotary products that were built with the air pressure sensor.


If you want to run the unit it on a Classic Haas Control machine the following needs to be done:

Get the correct CHC parameters, contact your local (Haas Factory Outlet).

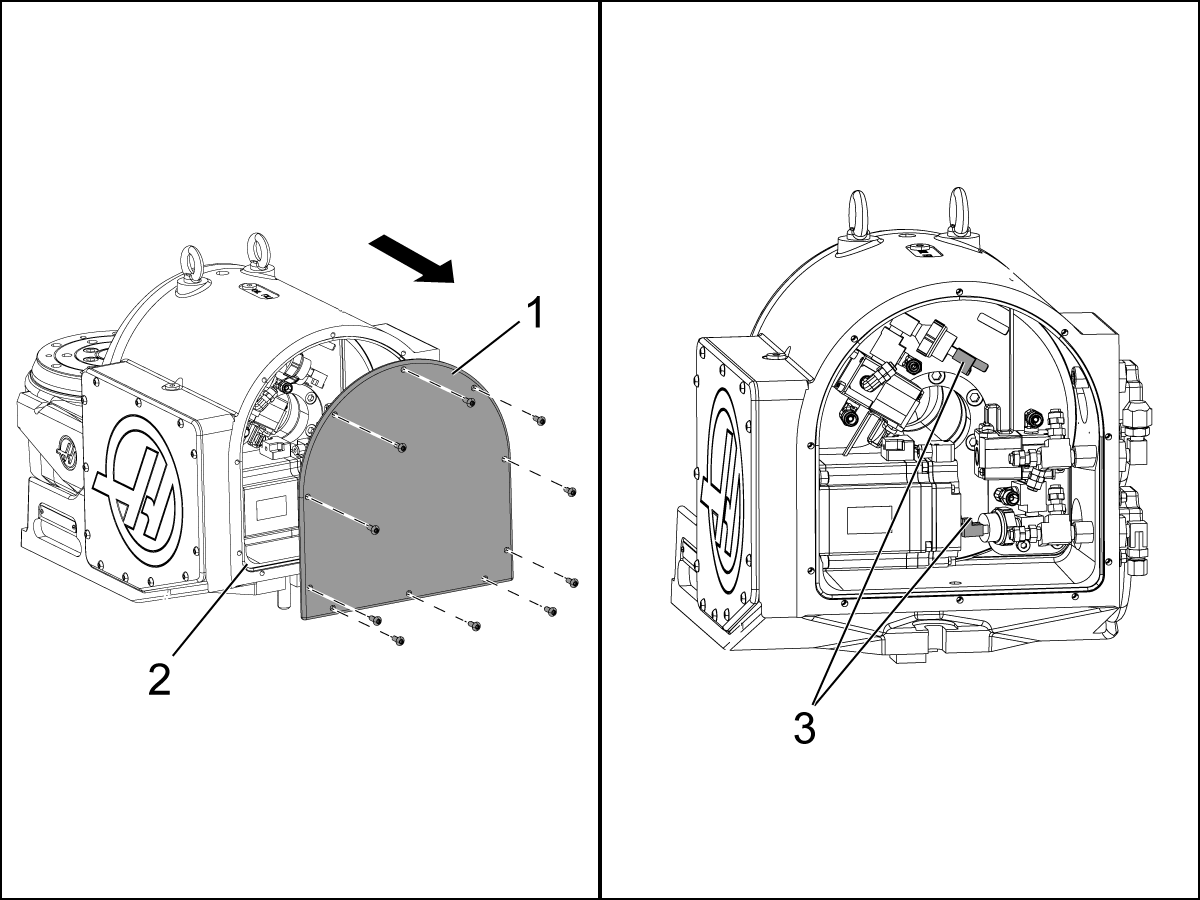
  • Disconnect the air pressure sensors.  This will prevent the overheat alarms to be generated.
  • Power off the machine.
  • Remove the motor enclosure cover [1].
  • Disconnect the air pressure sensors [3] shown in the illustration.
  • Test the operation.
  • Install the enclosure cover. Make sure the o-ring [2] is not pinched
  •  IMPORTANT:  The sensors will need to be connected when the rotary is used on a NGC machine.
  • TR160-P15 The rotary axis zero return position needs to be checked at power on. 
  • Due to the ratio of this unit the rotary axis will find the zero position in two positions.
  • The work around is to zero return the rotary axis and permanently identify the zero position with engraved arrows or two lines. 
    If the marks do not line up during the zero return process (usually off by 3.8 degrees) jog the platter at least 45 degrees in the same direction the unit homed in and then perform another zero return.  The platter will now be in the proper zero position.

Program

Possible Cause: The feeds and speeds are too high for the work.

Corrective Action:

Decrease the feeds and speeds of the active program to decrease the machine load.

Tooling

Possible Cause: The cutting tool is not sharp or is damaged.

Corrective Action:

Examine the cutting tool for damage. Install a new tool or a new tool insert if the cutting tool is damaged or is not sharp.

Mechanical Obstruction

Possible Cause: There is an internal mechanical obstruction in the rotary unit.

Corrective Action:

Disconnect the air supply to rotary unit. Press [ZERO RETURN], press the rotary axis letter, Press [SINGL], and jog the axis. If an alarm is generated, remove the necessary enclosure covers to get access to the faulty axis. Rotate the axis motor drive pulley by hand. If the axis cannot be rotated by hand, there is internal mechanical bind. The rotary unit needs to be serviced. For instructions on where to find a rotary repair facility and how to send your rotary unit, go to Rotary Repair on our website.

Brake Solenoid

Possible Cause: The brake solenoid for the rotary unit has an electrical fault.

Corrective Action:

Make sure the air supply is connected to the rotary unit. In MDI mode, push the rotary axis letter. Push [HAND JOG], you should hear air go out from the rotary unit. For solenoid test instructions, refer to Solenoid - Troubleshooting Guide.

Servo Amplifier

Possible Cause: The servo amplifier has a problem.

Corrective Action:

For servo amplifier troubleshooting instructions, refer to Servo Amplifier - Troubleshooting Guide.

Backlash

Possible Cause: There is lost motion or backlash in the rotary.

Corrective Action:

Test for backlash. For backlash test instructions, refer to HA5C Indexer - Backlash Test or Rotary Tables - Backlash Test.

Proximity Sensor

Possible Cause: The home proximity sensor is faulty.

Corrective Action:

For proximity sensor troubleshooting instructions, refer to Proximity Sensor - Troubleshooting Guide.

Rotary Scale

Possible Cause: The rotary scale or rotary scale cable is faulty.

Corrective Action:

Make sure the cables are connected correctly.

Inspect the rotary scale cables for wear or damage. 

Inspect the internal rotary scale cable interface cable, slightly pull on the wires to make sure they have a good crimp.  If the cables are connected correctly and not damaged, and the alarm persists, the rotary unit needs to be serviced.

For instructions on where to find a rotary repair facility and how to send your rotary unit, go to Haas Rotary Repair Center page.

Electrical Short

Possible Cause: There is a short to ground in the axis motor cable.

Corrective Action:

Inspect the rotary cables for wear or damage, refer to electrical diagram below.

HRC Units - Rear Seal Popping Out

Do not perform any type of maintenance on the rotarty if it is under warranty, contact your Haas Factory Outlet for further assistance.

This section will explain what to do if the rear seal keeps popping out. 

NOTE:  This should only be done if the oil level has been verified and the seal is still popping out. 

1

Before starting, a fixture needs to be fabricated, the fixture will have two through holes [1] to be threaded to the back of the brake cap and two threaded holes [2] on the outer section that will act like a jack and be placed on a plate [3], so it will not damage the rotary casting


An example of this is shown.

2

Remove the air supply to the table.

Place the rotary on its platter face and remove the rear M5 brake bolts.

Use the fixture made to thread to the back of the brake cap and remove it [1].

The threaded holes should be the ones denoted [2] and should be across from each other.

Using the other bolts on the threaded holes [3] as jacks, turn the bolts on each side evenly, so the plate comes off.

Make sure to use place plates of some sort [4] to prevent damage to the rotary.

3

Using the same fixture, pull out the brake piston.

NOTE: Longer bolts will be needed to reach the brake piston [1]. Ensure the jack bolts are in the position indicated by the arrows to have leverage. Make sure plates are under the bolts to avoid damage to the rotary.

4

Remove the two M5 brake fasteners 180 degrees apart [1] and replace them with the modified fasteners. 

The modified fasteners have a through hole to relieve pressure under the rear brake seal. These have no part number and will need to be made.

HRT450 Brake Bleeding

A fully extended rod indicates a full reservoir [1]

After bleeding, the rod will stick out slightly less. 

Disconnect one of the oil lines and dip the tube in oil. Push and pull the rod to fill the reservoir. Reconnect the line and perform the bleeding procedure.

Disconnect the oil line [2] and insert a tube into a hydraulic fluid container when filling the reservoir.

1

Bleeding Procedure

  1. Set regulator A to the max
  2. Set regulator B to zero 
  3. Loosen the top air bleed plug [1] until the air is out. 
    NOTE: Use bleed plug [2] if the top plug is not accessible.
  4. Set regulator B to 80 PSI 
  5. Set regulator A to 7 PSI

Check the main gauge. It should be 0 PSI when unclamped and 1000 PSI when clamped.

2

Use the image on the left for additional reference.

Electrical Diagrams

8.3 Rotary - Trunnions With Scales - Compatibility Solution

Recently Updated

Rotary - Trunnions with Scales - Compatibility Solution


AD0366

Introduction

Identify the type of scale in your trunnion:

  • Trunnions built from 2011 (when scales were introduced) to September 2016 use a scale that requires 12VDC power
  • Trunnions built from October 2016 to mid-January 2017 require 5VDC power.
  • Trunnions built after mid-January 2017 work with either 5VDC or 12VDC power. These can be identified by the gray connector on the scale cable.

Applicable to the following kits:

  • 93-2683: CABLE KIT 5/12VDC ROTARY SCALE FEEDBACK TO 12VDC CONTROL

Compatibility Solution

1

Identify the voltage supplied by the I/O PCB:

Look at the label on the cable that connects the scale connector to the I/O PCB.

All Classic Haas Control (CHC) machines with the 32-10049 cable are configured for trunnions with 5VDC scales. Install the 32-10053 (not included in the kit 92-2863) to configure the machine for 12VDC scales.

NGC machines with the 32-10053 cable are configures fro trunnions with 12VDC scales.

2

Solution:

The best solution is to configure the machine and the trunnion with 12VDC power. This maintains compatibility with the past, current, and future equipment.

All CHC machines are configured for 12VDC.

If the NGC machine is configured fro 5VDC, install the 32-10053 cable ( not included in kit 93-2683) to configure it for 12VDC.

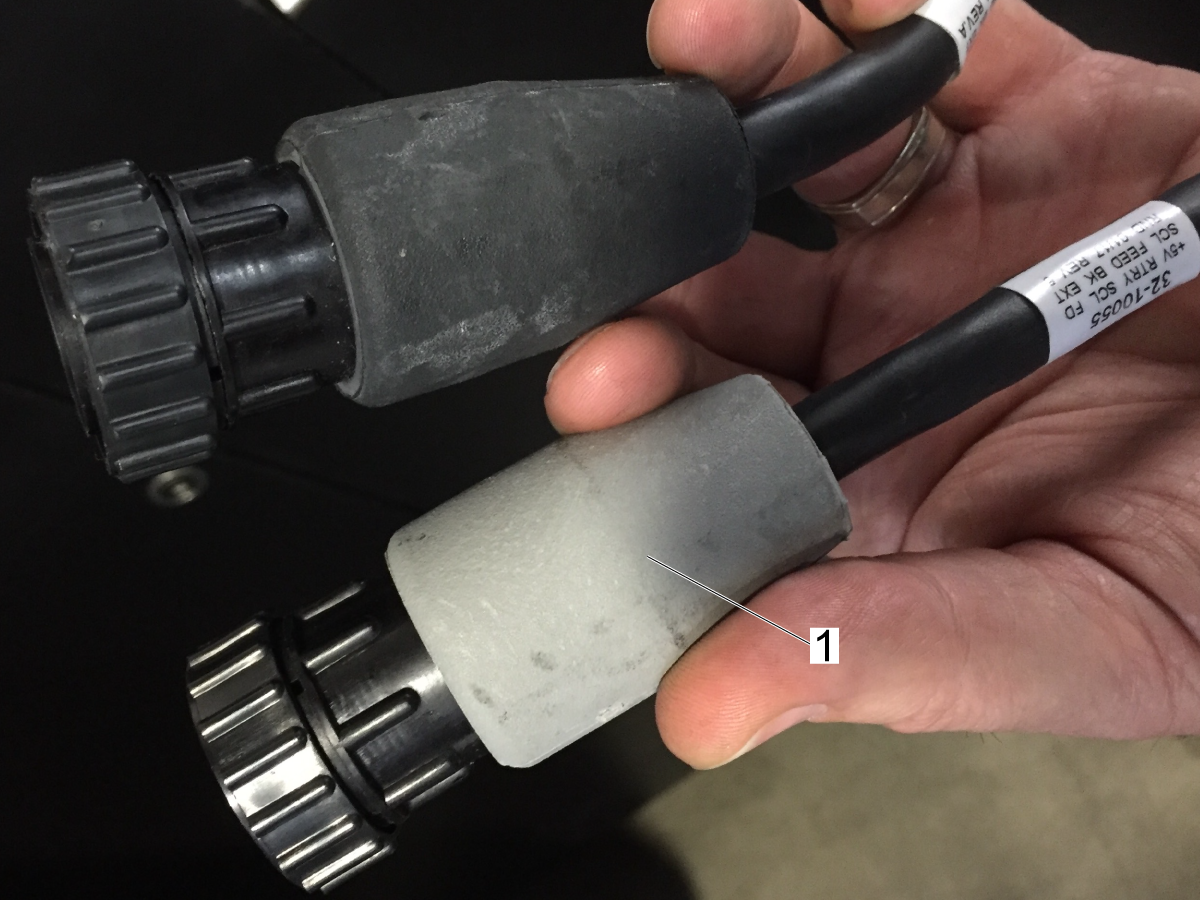
Any trunnion can be made compatible with a 12VDC machine by installing the 32-10055 rotary cable. the 32-10055 cable can be identified by the grey connector [1] on the scale cable.

3

Do this step if the trunnion has a 12VDC scale installed.

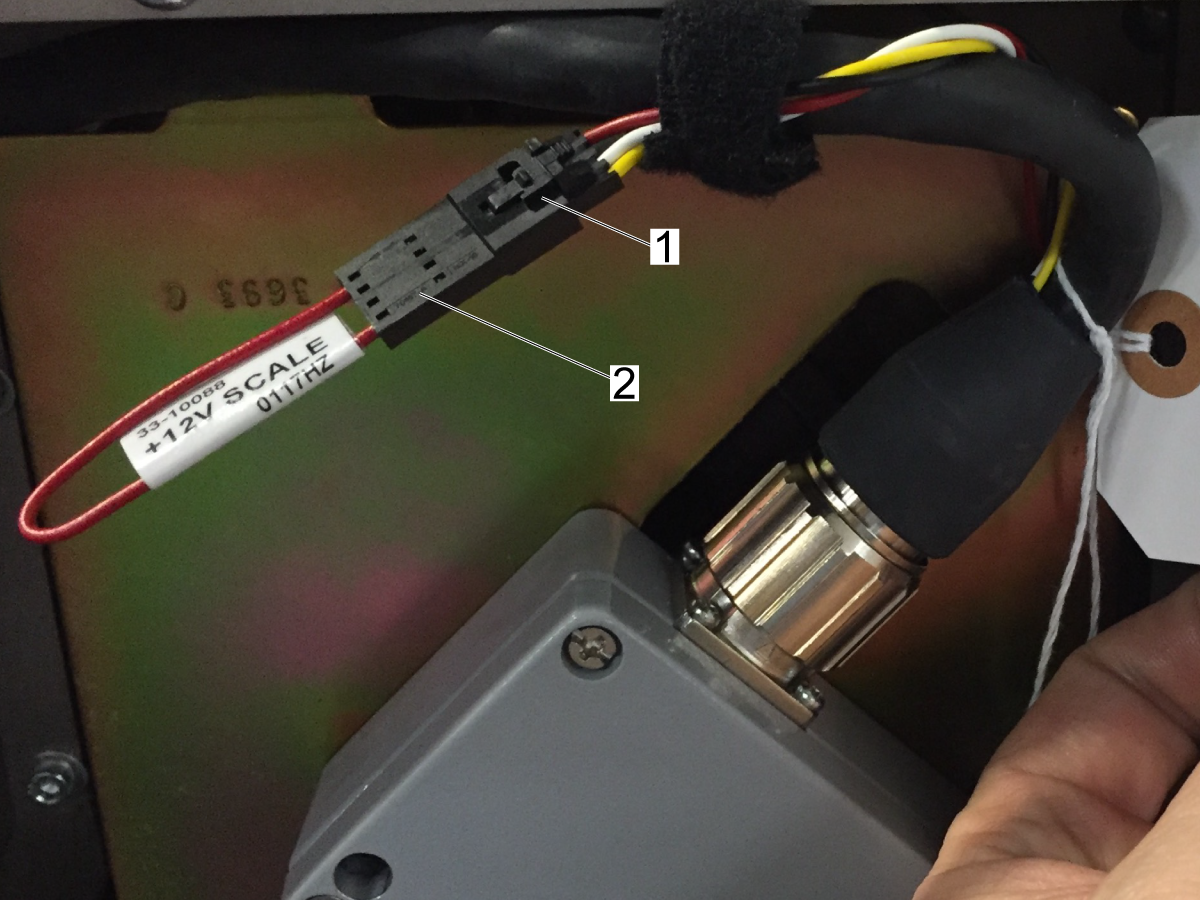
The 32-10055 cable has a flying connector [1] inside of the rotary enclosure. Plug the 33-10088 jumper [2] to the flying connector as shown.

4

Do this step if the trunnion has a 5VDC scale installed.

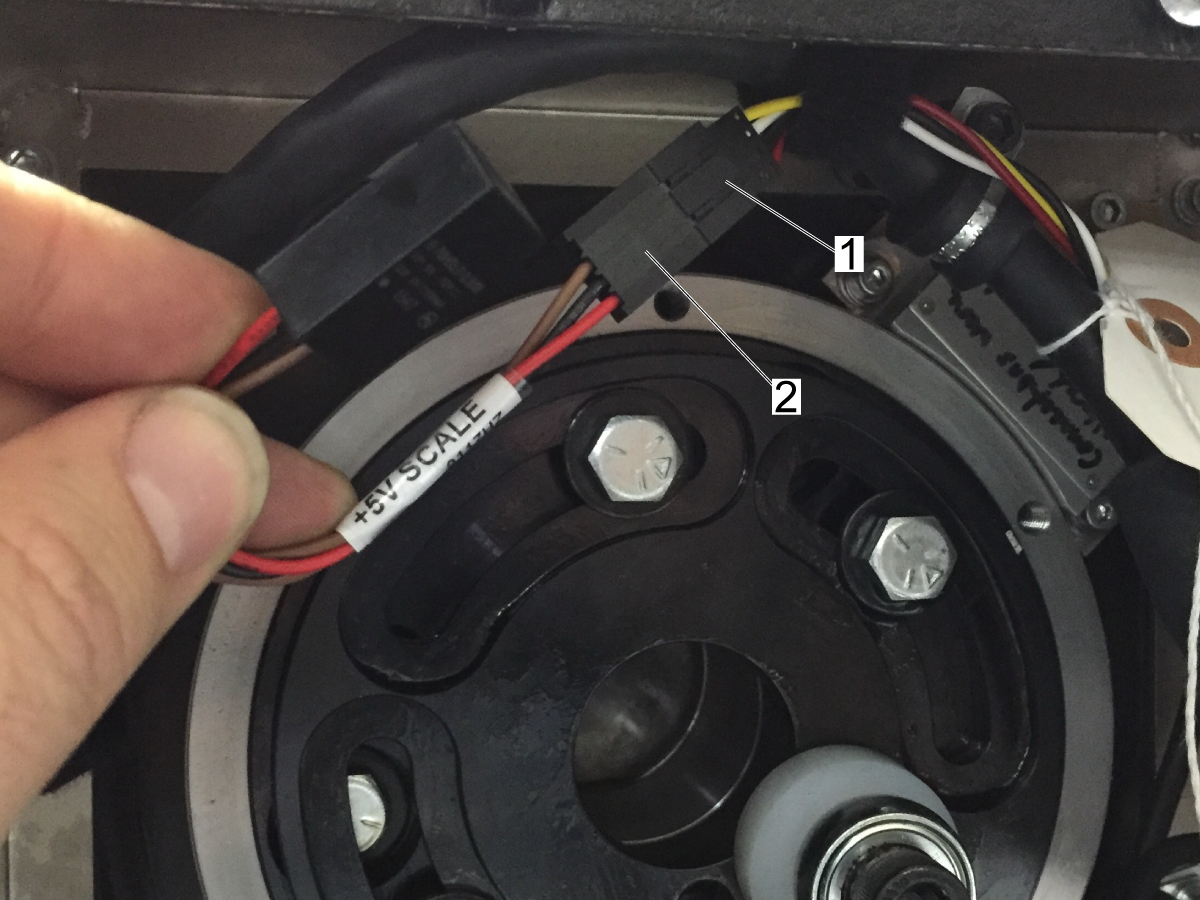
The 32-10055 able has a flying connector [1] inside of the rotary enclosure. Plug in the 32-10057 voltage reducer [2] to the flying connector as shown. The trunnion can now be plugged into any 12VDC configured machine.

8.4 Rotary Servo Control Box - Troubleshooting

Introduction

When used with any CNC machining center, the control performs as a semi-4th axis, activated by a single M-code.

You can program the control to rotate the rotary spindle in either direction, in step sizes from 0.001° to 999.999°.

There can be up to 99 different steps in memory, and each step can be repeated (or looped) up to 999 times.

Non-volatile memory retains programs, even when the power is turned off, and you can store up to 10 separate programs. 

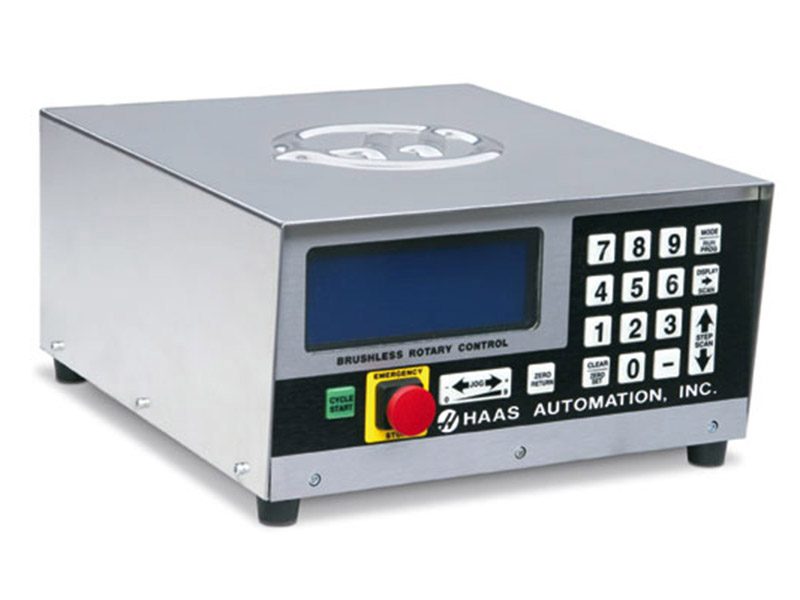
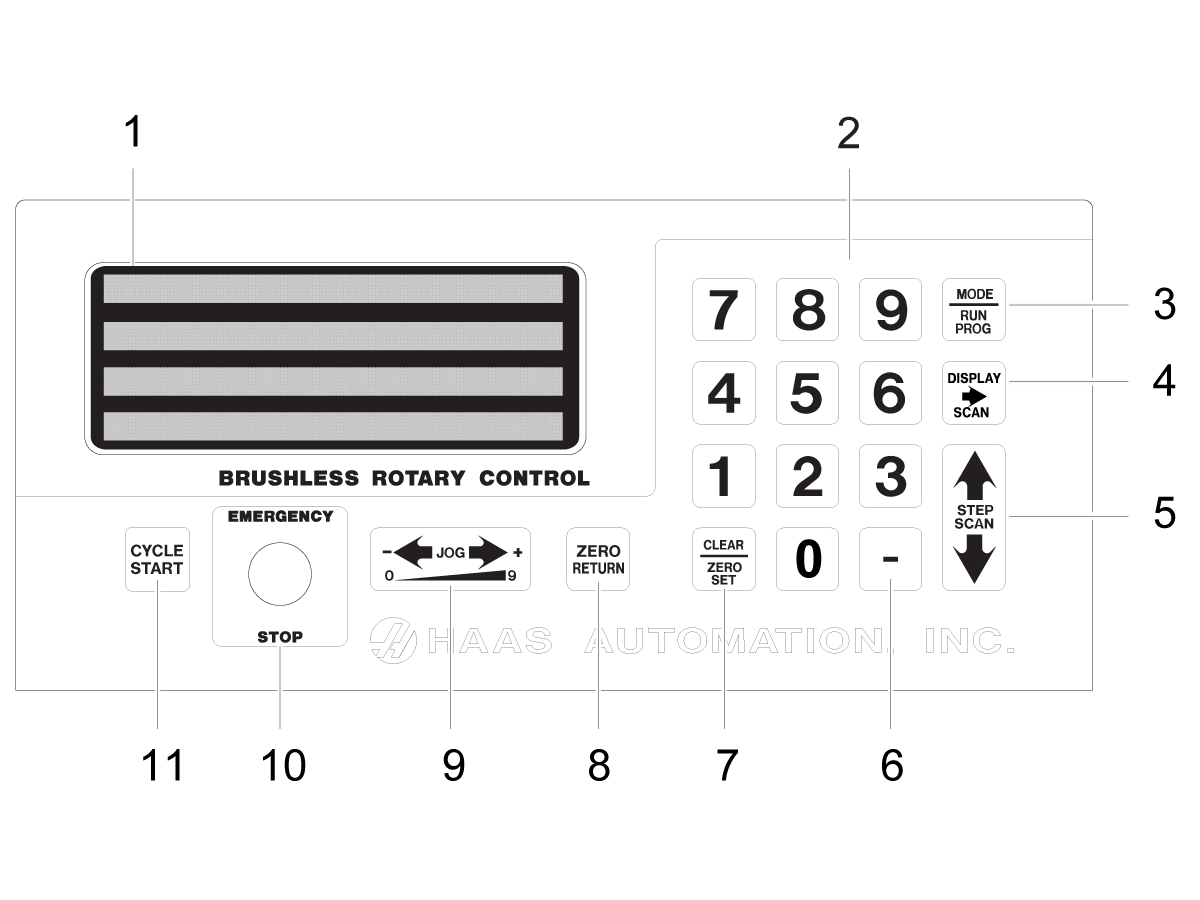
Servo Control - Front Panel

Note: For replacement keypads order service kit
93-4411.
 
  1. Display – 4-lines show current data.

  2. 0 - 9 - Data entry keys and jog speed selection.

  3. MODE/RUN PROG – Switches from Run mode to Program mode (with blinking display).

  4. DISPLAY SCAN – Scans display to show either the screen with Position, Step Angle, Feed Rate, Loop Counts, G Code, and status line, or position and status line in RUN mode. It scans left/right in Program mode.

  5. STEP SCAN – Scans step numbers from 1 through 99 in Run mode. It scans up/down in Program mode.

  6. - (Minus) - Selects negative step values or Prog/Upload/Download functions. Feed Rate Override (50, 75 or 100%).

  7. CLEAR/ZERO SET – Clears the entered data, resets program to 0, or defines the present servo position as Home.

8. ZERO RETURN – Causes the servo to return to the Home position, search for mechanical Home, delete a step, or move forward to the mechanical offset.

9. Load meter – Indicates (%) of spindle load. A high load indicates excessive load or workpiece support misalignment. Hi-Load or Hi Curr alarms occur if not corrected. Damage to the motor or table may result if excessive loads continue. Refer to the "Troubleshooting" section, starting on page , for more information.

JOG– Causes the servo to move in either the forward + or backward - direction at a rate defined by the last numeric key pressed.

10. EMERGENCY STOP – Turns off the servo when on and aborts the step in progress.

11. CYCLE START – Begins a step, stops a continued operation, inserts a step, or turns the servo on.

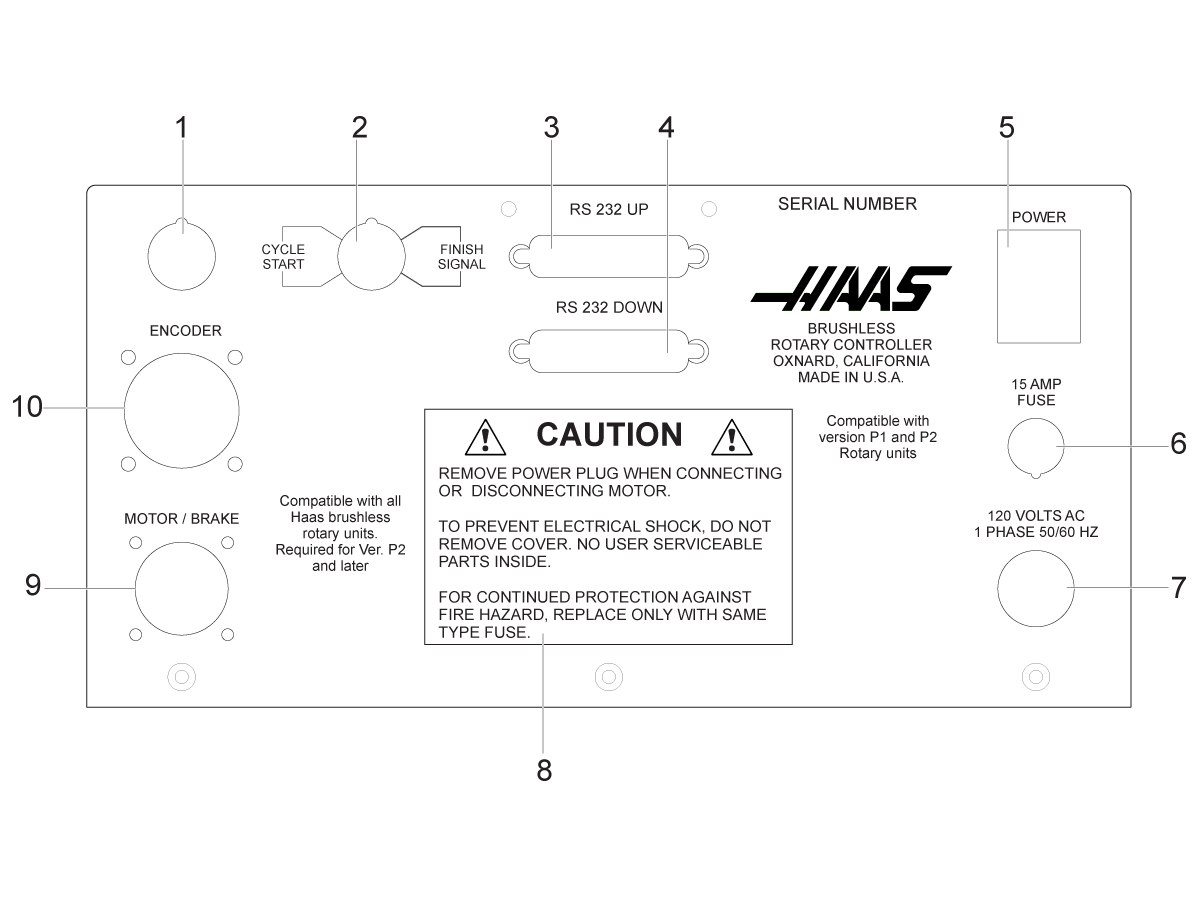
Servo Control - Rear Panel

  1. Unused access
  2. Remote input with Cycle Start and Finish Signal connections/Pin DIN connector for CNC interface cable.
  3. RS-232 Up Connector
  4. RS-232 Down Connector
  5. Power Switch
  6. 15 Amp Fuse
  7. 120VAC 1-phase 50/60 Hz power cord
  8. Caution label
  9. Motor / Brake Socket
  10. Encoder Socket

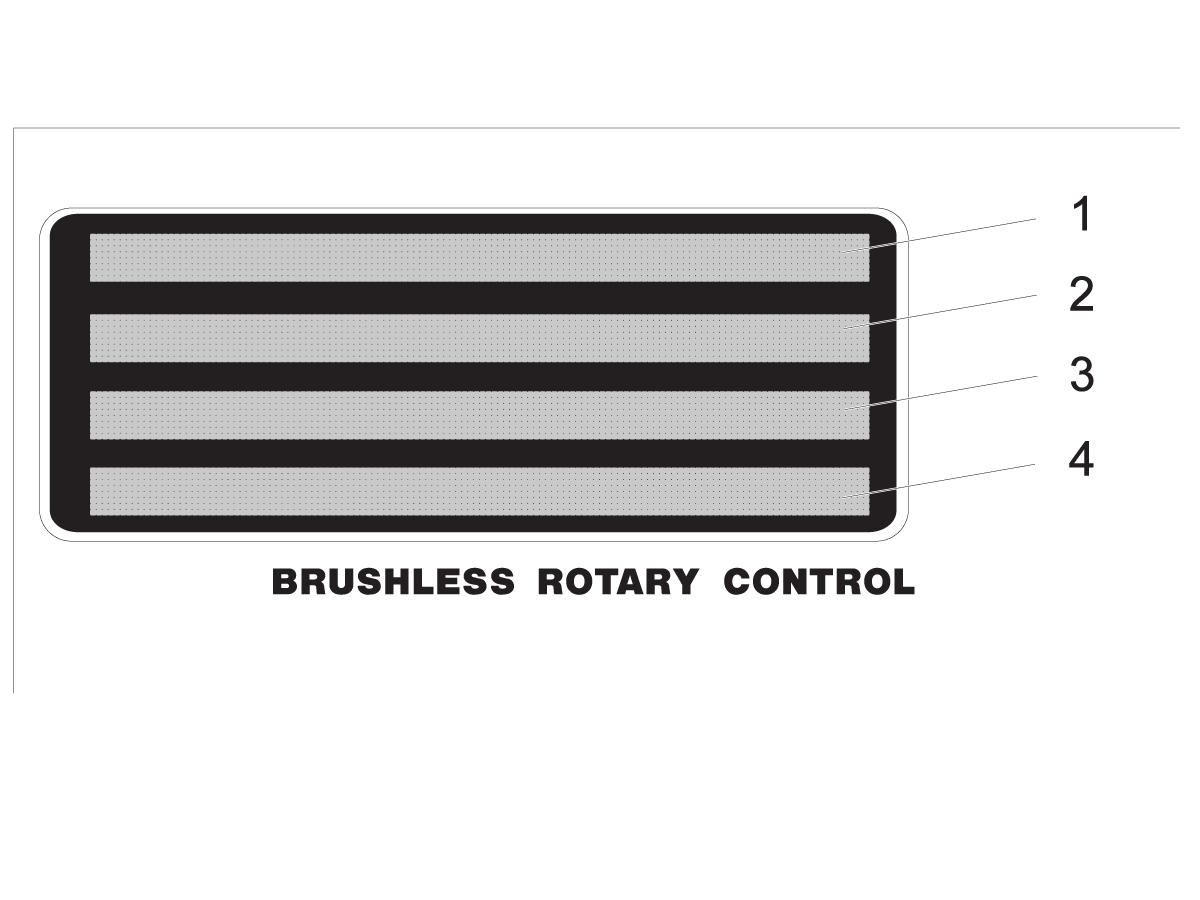
Servo Control - Display

The display shows the program and mode for the rotary unit. The display consists of 4 lines with up to 80 characters per line. Data displayed includes:

  • Position (Spindle)
  • Step Size (Angle)
  • Feed Rate
  • Loop Count
  • G-Code
  • Current Step Number (Step numbers 1 to 99 are available)
  • Any Start-Up Errors or Alarms

The display highlights a single step of the program on display line 2. Press DISPLAY SCAN right arrow to scan sideways and see all the information for a single step, loops from left to right at the end of the row. Press STEP SCAN up arrow to display the previous step; press STEP SCAN down arrow to display the next step. You can scan to anywhere in the program with these keys. If a new number is entered in that position, the number is stored when scanned to another position or returned to Run mode.

Every step (or block) contains several pieces of information that are necessary for the program and are displayed simultaneously. The data is preceded by a letter(s) to indicate what type of information is displayed.

Each time you press the DISPLAY SCAN right arrow, the display cycles to the next register; that is, Position - Step Size - Feed Rate - Loop Count - G-Code - Position - etc. In Run mode, the DISPLAY SCAN right arrow button selects among any of these five displays. In Program mode, all of these but the Position may be displayed.

  1. The first line displays current spindle position (POS), followed by the G-Code display (G) then the loop count display (L).
  2. The second and third lines display the step number (N) followed by the step size, then the feed rate (F).The left three characters on the second or third line contain the step number from 1 to 99. They cannot be changed with the numeric keys and are selected by using the STEP SCAN arrow buttons.
  3. See item 2.
  4. The fourth line is the control status line. It provides three control operations: RUN, STOP, ALARM. These operations are followed by the percentage of load, and the last status of the air brake.

Power On - Error Codes

A set of self tests are run when the control is turned on and the results may indicate a control fault. These are displayed on the Alarm: 4th line.

NOTE:  Intermittent low voltage errors or power failures may be the result of inadequate power to the controller. Use short, heavy-duty extension cords. Make sure that the supplied power is a minimum of 15 amps at the plug.

ERROR Code  Probable Cuase  Corrective Action
Blank front panel Program CRC failure  Bad RAM, or cycle power if bad ROM to RAM program transfer. 
E0 EProm EPROM CRC error Internal EPROM chip on the main pcb has failed.  Contact your local Haas Factory Outlet.
Frt Pnel Short Front panel switch closed or shorted The control sense buttons or switches made during power on.  Check the buttons on the keypad and make sure they are not pushed in.
Remote Short Remote Start switch closed and enabled, or remote CNC input shorted. Remove the remote start cable and cycle power, if alarm goes away the cable or remote device has a short.
RAM Fault Memory fault Contact your local Haas Factory Outlet.
Stored Prg Flt Stored program fault (low battery) The internal battery is low.  Contact your local Haas Factory Outlet.
Power Failure Power failure interrupt (low line voltage) Check your incoming voltage.
Enc Chip Bad Encoder chip bad Contact your local Haas Factory Outlet.
Interrupt Flt Timer/interrupt fault Contact your local Haas Factory Outlet.
1khz Missing Clock generation logic failure (1 kHz signal missing) Contact your local Haas Factory Outlet.
Scal Cmp Lrge Exceeding maximum allowed rotary scales compensation. (HRT210SC only) Verify the parameters for the unit.
0 Margin Small (Zero margin too small) Distance between the home switch and the final motor position, after seeking home, is either less than 1/8 or greater than 7/8 of a motor revolution.  This alarm occurs while homing the rotary table. Parameter 45, for the A Axis, or Parameter 91, for the B Axis, must be set properly. Use the default value (0) for the axis parameter (45 or 91), and add 1/2 of a motor revolution. 1/2 motor revolution is calculated by taking the value in Parameter 28 for the A Axis, or Parameter 74 for the B Axis, and dividing by 2. Enter this value for parameter 45 or 91, and re-home the rotary table.
Enc Type Flt Detected motor type is different from the one specified by Parameter 60.  Contact your local Haas Factory Outlet.
Mot Detect Flt No motor detected at power-up or during control initialization. Check that the motor cables are connected to the control box.
C Init lt 4 Battery missing or dead Missing battery: Open the control box and place battery in battery holder.

Dead battery: Open the control box if an auxiliary battery board is present replace batteries.

If one is not present remove the battery soldered to the control board and install auxiliary battery board 93-32-4307, batteries not included with this part. 

Servo Off - Error Codes

Any time the servo (motor) is turned off, a reason code is displayed on the Alarm: 4th line, along with the following codes.

An A or B may precede the code for TRT units. This is the reference to the axis that caused the fault.

ERROR Code  Probable Cuase  Corrective Action
Por On Power just applied. This is a normal message at power on.
Servo Err Lrge The air brake did not disengaged. Remove the air from the rotary and see if the unit will now rotate without an alarm.  
The connection to the encoder or power is faulty. Check the encoder and power cable connections to the motor.
E-Stop Emergency stop on The Emergency stop button is active.  Pull the Emergency stop button and press Cycle Start.
Servo Overload The cutting tool is not sharp or is damaged. Install a new tool or a new tool insert.
There is a mechanical blockage in the axis of travel. Make sure the axis has a clear path of travel.
There is an internal mechanical obstruction in the rotary unit. Test the rotary unit.
The brake solenoid for the rotary unit has an electrical fault. Troubleshoot the brake solenoid.
RS-232 Problem Remote RS-232 commanded off Check the RS-232 cable to PC,  
Encoder Fault Z channel fault (bad encoder or cable) Test the axis motor cable for short.
Scale Z Fault Rotary scale Z channel fault (bad rotary scale encoder or cable) HRT210SC only Check the rotary scale cable.
Z Encod Missing Z channel missing (bad encoder or cable) Test the axis motor cable for short.
Scale Z Missing Rotary scale Z channel missing (bad rotary scale encoder or cable) (HRT210SC only) Check the rotary scale cable.
Regen Overheat High line voltage Check the incoming voltage to the servo control box.
Cable Fault Break detected in encoder cable wiring Test the axis motor cable for short.
Electrical noise has been detected when using Rotary controllers manufactured after April 2017 with one of the family cables 32-1990A, 32-1990B, or 32-1990C.

Order Service Kit 93-4980 Control Box Noise Reduction Kit. 

Remove the current encoder cable labled 36-4092A and replace with 36-4092B.

Remove the current Motor Brake Cable labeled 36-4193 and replace with 36-4193A.


Pwr Up Phase Er Power up phase error Test the axis motor cable for short.
Drive Fault An over current or drive fault. Test the axis motor cable for short.
Enc Trans Flt Encoder transition fault had been detected. Test the axis motor cable for short.
Indr Not Up Platter not fully up (HRT320FB only). Can be caused by low air pressure. Check the air connection to the HRT unit.

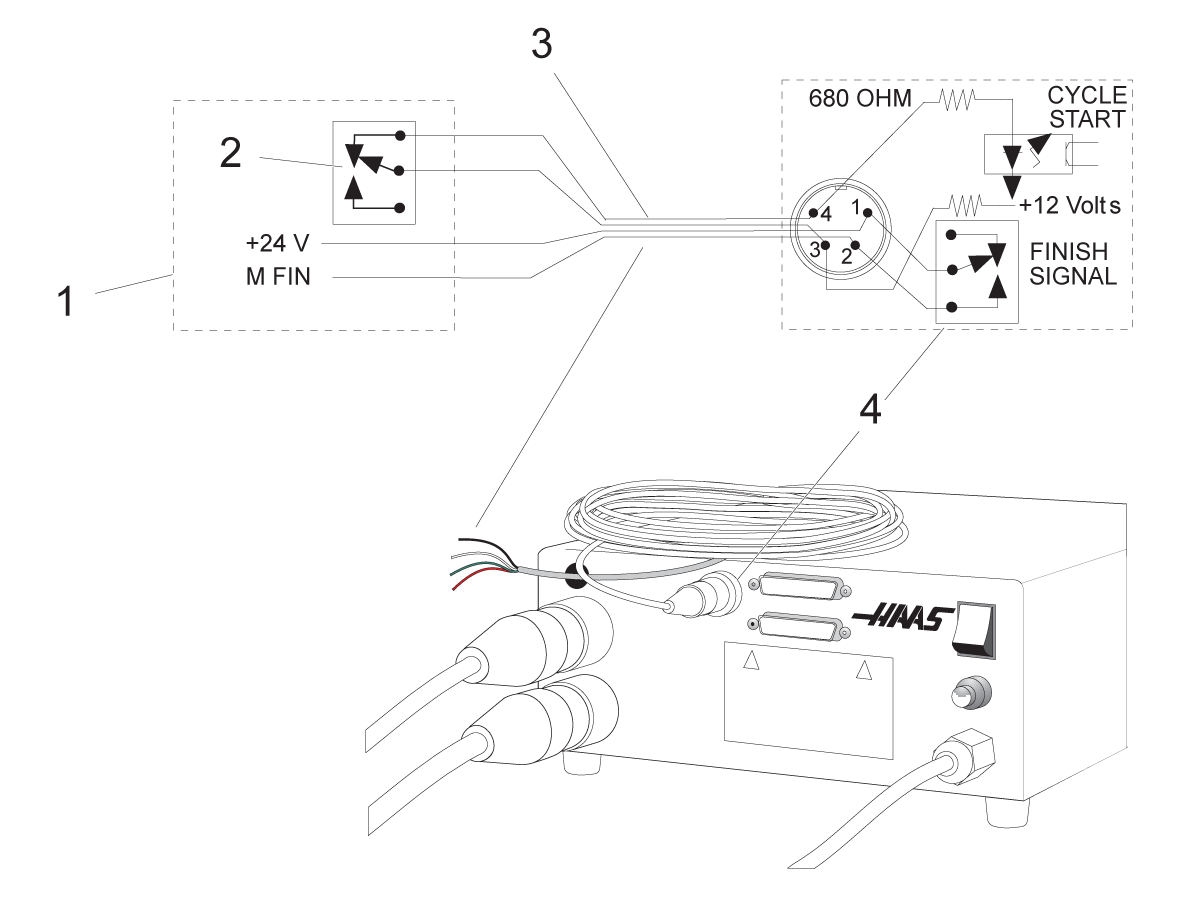
Remote Input Troubleshooting

Servo Control Relay:

[1] CNC Mill Internal,

[2] M Function Relay,

[3] CNC Interface Cable,

[4] Servo Control Internal

Troubleshooting a Working Interface on a CNC

If there are problems, try to isolate the problem by checking the Servo Control and the mill separately. There are only two signals and each one can be checked separately from the other. If the rotary unit stops indexing because of an interface problem, follow these simple checks:

  • Check the Servo Control remote input alone
  • Check the CNC cable interface alone
  • Check the Servo Control and the mill together

Check Servo Control Remote Input Alone

To check the Servo Control remote input:

  1. Disconnect the remote cable from the back of the controller.
  2. Set the control to index a single step of 90°�.
  3. Connect a continuity tester or a voltmeter (a digital meter may not be fast enough to sample the brief pulse) set for low ohms across pins 1 and 2; they are marked on the rear of the control as FINISH SIGNAL.
  4. It must show an open circuit, otherwise check relay Parameter 1 (should be 1) and Parameter 2 (should be 0). The relay must show an open circuit with the control turned off, otherwise the relay is defective.
  5. Use a jumper wire to short pins 3 and 4 together, they are marked on the rear of the control as CYCLE START.
  6. The unit must index, and at the end of the index, the voltmeter should deflect briefly toward low ohms or continuity. If this works as described, the problem is NOT in the rotary control, but may be the interface cable or mill.

Check The CNC Cable Interface Alone

To check the CNC cable interface:

Check the signals from the CNC using your voltmeter.

NOTE: The pin orientation is reversed.

Execute an M function from the mill to rotate.

The mill beacon light should come on (green) and stay on.

Use the meter and check continuity across the CYCLE START pins 3 and 4. Try not to short the test leads and pins against the shield of the male plug.

note: Some mills may have a +12 to +24 volt signal on pin 4 to activate a rotary unit. Check if there is voltage between pin 4 and the ground, if the continuity test fails, this is also a valid CYCLE START signal. If there is voltage present on Pin 4, a Haas interface box must be used (Part # IB). Contact your dealer if there are questions on how to use the interface box.

To check the CYCLE FINISH signal, use a voltmeter test probe to short together pins 1 and 2 on the mill cable.

The mill beacon light should turn off.

Result: 

If the above tests pass, there is a valid signals coming from the mill.

Check Servo Control And Mill Together

To check the Servo Control and mill:

1. Reset the mill by pressing RESET or turn it off by pressing POWER OFF.

2. Connect the remote cable, then turn both the Servo Control and mill on.

Once connected, the rotary unit should remain idle. If the rotary unit moves, the CYCLE START signal from the mill is shorted.

3. If it remains idle, execute or MDI an M function from the mill to index.

Do not index from the program unless using single-block. If the rotary unit does not move, the mill is not outputting a signal or there is a break in the cable.

If the Servo Control indexes properly, ensure that the mill beacon light goes out at the end of the index. If the light does not go out, the CYCLE FINISH signal is not returning to the mill. This could be an open wire in the remote cable, or a problem in cables that connect to the CNC.

4.  If the unit works only in single block, but not in the Run mode, there may be a timing problem involving two M functions, or a simultaneous milling problem. Review the section on simultaneous milling. If there are two M functions, separate them with a dwell of ¼ second.

Recently Viewed Items

You Have No Recently Viewed Items Yet

Feedback
Haas Logo

美元价格不包括关税、报关费用、保险费、增值税及运费。
USD prices DO NOT include customs duty, customs fees, insurance, VAT, or freight.

人民币价格包含关税、报关费用、货运保险和增值税, 但不包括运费。
CNY prices include customs duty, customs fees, insurance, and VAT. DOES NOT include freight.

Haas Delivered Price

This price includes shipping cost, export and import duties, insurance, and any other expenses incurred during shipping to a location in France agreed with you as a buyer. No other mandatory costs can be added to the delivery of a Haas CNC Product.

KEEP UP WITH THE LATEST HAAS TIPS AND TECHNOLOGY...

Sign up now!   

HAAS TOOLING ACCEPTS THE FOLLOWING:

  • Service & Support
  • Owners
  • Request Service
  • Operator Manuals
  • Haas Parts
  • Rotary Repair Request
  • Pre-Install Guides
  • Shopping Tools
  • Build & Price a New Haas
  • Available Inventory
  • The Haas Price List
  • CNCA Financing
  • About Haas
  • DNSH Statement
  • Careers
  • Certifications & Safety
  • Contact Us
  • History
  • Terms & Conditions
  • Haas Tooling Terms & Conditions
  • Privacy
  • Warranty
  • Haas Community
  • Haas Certification Program
  • Haas Motorsports
  • Gene Haas Foundation
  • Haas Technical Education Community
  • Events
  • Join the Conversation
  • Facebook
  • X
  • Flickr
  • YouTube
  • LinkedIn
  • Instagram
  • TikTok
© 2025 Haas Automation, Inc – CNC Machine Tools

This site is protected by reCAPTCHA and the Google Privacy Policy and Terms of Service apply.

2800 Sturgis Rd., Oxnard, CA 93030
Toll Free: (888) 817-4446 / Fax: 805-278-8554