MyHaas Welcome,
!
Haas Tooling Guest Order History MyHaas/HaasConnect Sign In Register Haas Tooling My Account Order History Return History MyHaas/HaasConnect Sign Out Welcome, My Machines Latest Activity My Quotes My Account My Users Sign Out
Find Your Distributor
  1. Select Language
    1. English
    2. Deutsch
    3. Español - España
    4. Español - Méjico
    5. Français
    6. Italiano
    7. Português
    8. Český
    9. Dansk
    10. Nederlands
    11. Magyar
    12. Polski
    13. Svenska
    14. Русский
    15. Türkçe
    16. 中文
    17. Suomi
    18. Norsk
    19. الإنجليزية
    20. български
    21. Hrvatski
    22. Ελληνικά
    23. Română
    24. Slovenský
    25. Slovenščina
    26. 한국어
    27. 日本語
Search
  • machines Main Menu
    • Haas Vertical Mills Vertical Mills
      Vertical Mills
      Vertical Mills View All
      • Vertical Mills
      • VF Series
      • Universal Machines
      • VR Series
      • Pallet-Changing VMCs
      • Mini Mills
      • Mold Machines
      • Drill/ Tap/ Mill Series
      • Toolroom Mills
      • Compact Mills
      • Gantry Series
      • Extra-Large VMC
      • Desktop Mill
      • Mill Automatic Parts Loader
      • Compact Automatic Parts Loader
    • Product Image Multi-Axis Solutions
      Multi-Axis Solutions
      Multi-Axis Solutions View All
      • Multi-Axis Solutions
      • Y-Axis Lathes
      • 5-Axis Mills
    • Haas Lathes Lathes
      Lathes
      Lathes View All
      • Lathes
      • ST Series
      • Dual-Spindle
      • Toolroom Lathes
      • Chucker Lathe
      • Haas Bar Feeder V2
      • Lathe Automatic Parts Loader
    • Haas Horizontal Mills Horizontal Mills
      Horizontal Mills
      Horizontal Mills View All
      • Horizontal Mills
      • 50-Taper
      • 40-Taper
    • Haas Rotaries & Indexers Rotaries & Indexers
      Rotaries & Indexers
      Rotaries & Indexers View All
      • Rotaries & Indexers
      • Rotary Tables
      • Indexers
      • 5-Axis Rotaries
      • Extra-Large Rotaries
    • Product Image Automation Systems
      Automation Systems
      Automation Systems View All
      • Automation Systems
      • Robot Packages
      • Automatic Parts Loaders
      • Pallet-Pool Systems
      • Haas Bar Feeder
      • Models
    • QUICK LINKS Special Series  Special Series 
      HAAS CAREERS HAAS CAREERS BUILD & PRICE BUILD & PRICE PRICE LIST PRICE LIST WHAT’S NEW WHAT’S NEW YOUR FIRST CNC YOUR FIRST CNC HAAS SIX PACK HAAS SIX PACK
      SHOPPING TOOLS
      • Build & Price a Haas
      • Price List
      • Available Inventory
      • CNCA Financing
      WANT TO TALK TO SOMEONE?

      A Haas Factory Outlet (HFO) can answer your questions, and walk you through your best options.

      CONTACT YOUR DISTRIBUTOR >
  • Options Main Menu
    • Product Image Spindles
      Spindles
      Spindles View All
      • Spindles
    • Product Image Tool Changers
      Tool Changers
      Tool Changers View All
      • Tool Changers
    • Product Image 4th- | 5th-Axis
      4th- | 5th-Axis
      4th- | 5th-Axis View All
      • 4th- | 5th-Axis
    • Product Image Turrets & Live Tooling
      Turrets & Live Tooling
      Turrets & Live Tooling View All
      • Turrets & Live Tooling
    • Product Image Probing
      Probing
      Probing View All
      • Probing
    • Haas Chip & Coolant Management Chip & Coolant Management
      Chip & Coolant Management
      Chip & Coolant Management View All
      • Chip & Coolant Management
    • The Haas Control The Haas Control
      The Haas Control
      The Haas Control View All
      • The Haas Control
    • Product Image Product Options
      Product Options
      Product Options View All
      • Product Options
    • Product Image Tooling & Fixturing
      Tooling & Fixturing
      Tooling & Fixturing View All
      • Tooling & Fixturing
    • Product Image Workholding
      Workholding
      Workholding View All
      • Workholding
    • Product Image 5-Axis Solutions
      5-Axis Solutions
      5-Axis Solutions View All
      • 5-Axis Solutions
      • 5 Easy Steps to 5-Axis
    • Product Image Automation
      Automation
      Automation View All
      • Automation
    • QUICK LINKS Special Series  Special Series 
      HAAS CAREERS HAAS CAREERS BUILD & PRICE BUILD & PRICE PRICE LIST PRICE LIST WHAT’S NEW WHAT’S NEW YOUR FIRST CNC YOUR FIRST CNC HAAS SIX PACK HAAS SIX PACK
      SHOPPING TOOLS
      • Build & Price a Haas
      • Price List
      • Available Inventory
      • CNCA Financing
      WANT TO TALK TO SOMEONE?

      A Haas Factory Outlet (HFO) can answer your questions, and walk you through your best options.

      CONTACT YOUR DISTRIBUTOR >
  • Why Haas Main Menu
      Discover the Haas Difference
    • Why Haas
    • MyHaas
    • Education Community
    • Industry 4.0
    • Haas Certification
    • Customer Testimonials
  • Service Main Menu
      Welcome to Haas Service
      SERVICE HOME Operator’s Manuals How-To Procedures Troubleshooting Guides Preventive Maintenance Haas Parts Haas Tooling Videos
  • Videos Main Menu
  • Main Menu
    • View All
      • 5% off + saving on Automation
    • View All
      • VF-2SS
    • View All
    • View All
      • About Haas
    • View All
    • View All
      • 5% off + saving on Automation
    • View All
    • 08-1760
      08-1760
      08-1760 View All
      • 08-1760
    • View All
      • 05-0258
      • 08-1760
      • 08-1760
      • 08-1761
    • View All
    • View All
    • QUICK LINKS Special Series  Special Series 
      HAAS CAREERS HAAS CAREERS BUILD & PRICE BUILD & PRICE PRICE LIST PRICE LIST WHAT’S NEW WHAT’S NEW YOUR FIRST CNC YOUR FIRST CNC HAAS SIX PACK HAAS SIX PACK
      SHOPPING TOOLS
      • Build & Price a Haas
      • Price List
      • Available Inventory
      • CNCA Financing
      WANT TO TALK TO SOMEONE?

      A Haas Factory Outlet (HFO) can answer your questions, and walk you through your best options.

      CONTACT YOUR DISTRIBUTOR >
  • Haas Tooling Main Menu
      Mill Toolholding Mill Workholding Milling Lathe Tooling Lathe Toolholding Lathe Workholding ER Collets & Chucks Holemaking Threading Broaching Tool Management Tooling Accessories Abrasives Package Kits Apparel & Accessories Storage & Handling Measuring & Inspection
    • Haas Tooling
    • Mill Toolholding
      Mill Toolholding Shop All
      • End Mill Holders
      • Shell Mill Holders
      • Shrink Fit Holders
      • ER Collet Chucks
      • Milling Chucks & Collets
      • Drill Chucks
      • Pull Studs
      • Mill Toolholding Kits
      • Hydraulic Milling Chucks & Collets
    • Mill Workholding
      Mill Workholding Shop All
      • Fixed Jaw Vises
      • Self-Centering Vises
      • Adapter Plates
      • Mill Vise Jaws
      • Workholding Accessories
      • Vise Kits
      • Vise Parallels
      • HA5C Chucks
      • Rotary Vise Kits
      • Mill 3-Jaw Chucks & Mounts
    • Milling
      Milling Shop All
      • Shell Mill Bodies
      • Milling Inserts
      • End Mills
      • Chamfer Mills & Inserts
      • Indexable End Mill Bodies
      • Ball End Mills
      • Chamfer End Mills
      • Roughing End Mills
      • Indexable Ball End Mills & Inserts
      • Shell Mill Kits
      • Chamfer Mill Kits
      • Indexable End Mill Kits
      • Dovetail Cutters
      • Indexable Dovetail Cutters
      • Engraving End Mills
      • Burrs
      • Keyseat Cutters
      • Corner Rounding End Mills
    • Lathe Tooling
      Lathe Tooling Shop All
      • Cut-Off Tooling
      • Cut-Off Tooling Kits
      • Turning Inserts
      • Grooving Tools
      • Small ID Grooving & Threading Tools
      • Threading Inserts
      • Threading Toolholders
      • ID Toolholders
      • OD Toolholders
      • Cermet Turning Inserts
      • CBN Turning Inserts
      • Haas Notch Groove and Thread Inserts
      • Haas Notch Groove and Thread Toolholders
    • Lathe Toolholding
      Lathe Toolholding Shop All
      • TL & CL Toolholding
      • BOT Toolholding
      • BMT Toolholding
      • Live Toolholding
      • Reduction Sleeves
      • VDI Toolholding
    • Lathe Workholding
      Lathe Workholding Shop All
      • Live Centers
      • Spindle Liners
      • Quick-Change Collets
      • Lathe Collet Chucks
      • 5C Collets
      • 5C Collet Sets
      • Lathe Boring Rings
      • Lathe Jaws
    • ER Collets & Chucks
      ER Collets & Chucks Shop All
      • ER Collets
      • ER Sealed Collets
      • ER Tap Collets
      • ER Collet Sets & Accessories
      • ER Collet Chucks
      • Straight Shank ER Collet Chucks
      • Straight Shank Keyless Drill Chucks
    • Holemaking
      Holemaking Shop All
      • Carbide Drills
      • Indexable Drill Bodies
      • Indexable Drill Inserts
      • Modular Drill Bodies
      • Modular Drill Heads
      • Cobalt Drills & Sets
      • Center Drills
      • Reamers
      • Indexable Drilling Kits
      • Spot Drills
      • Spade Drill Bodies
      • Spade Drill Inserts
      • Countersinks
    • Threading
      Threading Shop All
      • Taps
      • Threading Inserts
      • Threading Toolholders
      • Thread Mills
      • Pipe Taps
      • Drill Tap Kits
    • Broaching
      Broaching Shop All
      • Broaching Toolholders
      • Broaching Inserts
    • Tool Management
      Tool Management Shop All
      • Tool Presetting Machines
      • Shrink Fit Machines
    • Tooling Accessories
      Tooling Accessories Shop All
      • Spindle Taper Cleaner
      • Haas Shop Lift
      • Toolholder Fixtures
      • CNC Clearing Fans
    • Abrasives
      Abrasives Shop All
      • Abrasive Pads
      • Deburr Tools
      • Deburr Wheels
    • Package Kits
      Package Kits Shop All
      • Chip Clearing Fan Kits
      • Cutting Tool Kits
      • Indexable End Mill Kits
      • Cut-Off Tooling Kits
      • Drill Tap Kits
      • Indexable Drilling Kits
      • Shell Mill Kits
      • Chamfer Mill Kits
      • Mill Toolholding Kits
      • Lathe Tooling Kits
      • Workholding Kits
      • Rotary Vise Kits
      • Vise Kits
      • Mill 3-Jaw Chuck Kits
      • Reduction Sleeve Kits
    • Storage & Handling
      Storage & Handling Shop All
      • Tool Carts
    • Measuring & Inspection
      Measuring & Inspection Shop All
      • 7-Piece Measuring Kit
      • WIPS Stylus, 3-Pack
      • WIPS Replacement Stylus
      • Spindle Test Bar
      • Coolant Refractometer
      • Clamp Force Gauge
    • Apparel & Accessories
      Apparel & Accessories Shop All
      • Accessories
      • Apparel
    • HAAS TOOLING QUICK LINKS
      NEW PRODUCTS NEW PRODUCTS
      MOST POPULAR MOST POPULAR
      TOOLING PROMOS TOOLING PROMOS
      FINANCING & OPEN TERMS FINANCING & OPEN TERMS
      FAQs FAQs
      KITS CREATED FOR YOU KITS CREATED FOR YOU
  • Haas Service Parts Main Menu
      Automatic Pallet Changer Lathe Turret Tool Changer Chip Management Coolant Counterbalance Electrical Cabinet Enclosure Hydraulics Lubrication Maintenance Pendant Probing Rotary Spindle Tailstock
    • Haas Service Parts
    • Automatic Pallet Changer
      Automatic Pallet Changer Shop All
      • HMC - Automatic Pallet Changer
      • VMC - Automatic Pallet Changer
    • Lathe Turret
      Lathe Turret Shop All
      • Lathe - Turret
      • Live Tooling
    • Tool Changer
      Tool Changer Shop All
      • Side Mount
      • Umbrella
    • Chip Management
      Chip Management Shop All
      • Multi Auger
      • Single Auger
    • Coolant
      Coolant Shop All
      • Auxiliary Filter
      • HPC-300 (Lathe)
      • HPC-1000 (Lathe)
      • Oil Skimmer
      • Standard Coolant
      • TSC-300 (Mill)
      • TSC-1000 (Mill)
      • Coolant Refill
      • Loc-Line
    • Counterbalance
      Counterbalance Shop All
      • Charge & Discharge Hose
    • Electrical Cabinet
      Electrical Cabinet Shop All
      • Fans
      • Filters
      • Upgrade Kits
    • Enclosure
      Enclosure Shop All
      • Accessories
      • Air Nozzle
      • Decals
      • Door Bumpers
      • Lighting
      • Windows, Gaskets, & Weather Strip
      • Chip & Coolant Management
    • Hydraulics
      Hydraulics Shop All
      • Filters
      • Gauges
      • Heat Exchanger
      • Hoses
    • Lubrication
      Lubrication Shop All
      • Bijur Mechanical Lubrication
      • Minimum Lubrication
    • Maintenance
      Maintenance Shop All
      • Grease, Oil, & Sealants
    • Pendant
      Pendant Shop All
      • Floppy Disk & USB
      • Keypad
      • Keys
      • Lens
      • Gaskets & Seals
    • Probing
      Probing Shop All
      • Mill Probing
      • Lathe Tool Presetter
    • Rotary
      Rotary Shop All
      • Rotary Gaskets & Seals
    • Spindles
      Spindles Shop All
      • Couplings
      • Gaskets & Seals
      • Spindle Motor Drive
      • Gearbox Drive
      • Tool Release Piston
    • Tailstock
      Tailstock Shop All
      • Handles
  • Contact Us

×

Search Results

Web Pages

Images

    • <
    • 1
    • >
MyHaas Welcome,
!
Haas Tooling Guest Order History MyHaas/HaasConnect Sign In Register Haas Tooling My Account Order History Return History MyHaas/HaasConnect Sign Out Welcome, My Machines Latest Activity My Quotes My Account My Users Sign Out
Find Your Distributor
  1. Select Language
    1. English
    2. Deutsch
    3. Español - España
    4. Español - Méjico
    5. Français
    6. Italiano
    7. Português
    8. Český
    9. Dansk
    10. Nederlands
    11. Magyar
    12. Polski
    13. Svenska
    14. Русский
    15. Türkçe
    16. 中文
    17. Suomi
    18. Norsk
    19. الإنجليزية
    20. български
    21. Hrvatski
    22. Ελληνικά
    23. Română
    24. Slovenský
    25. Slovenščina
    26. 한국어
    27. 日本語
Search
×

Search Results

Web Pages

Images

    • <
    • 1
    • >

Robot Integration Aid - NGC

Service Home Robot Integration Aid - NGC
Recently Updated Last updated: 02/18/2021

Robot Integration Aid - NGC


Applies to machines built from Jan 2015

Robot Integration Aid - NGC

- Jump to Section - Back to Top

Introduction

This document is intended to aid in the integration of a robot on a machine with the Next Generation Control (NGC). Haas Service and Applications personnel can help to make sure that the CNC machine operates correctly. Haas personnel are not responsible for robot configuration or robot cell setup. Always consult with robot integrators to help with your robot application.

 Danger: Some service procedures can be dangerous or life-threatening. DO NOT attempt a procedure that you do not fully understand. If you have any doubts about doing a procedure contact your Haas Factory Outlet (HFO) and schedule a service visit.

Machine Requirements

  • The machine must have NGC software version 100.16.000.1030 or higher.
  • P/N: 93-MFININ This is the internal M-Fin function cable.
  • P/N: CNC This is a 15' external M-Fin function cable. For a 30' cable order P/N: CNC30.
  • P/N: 93-1157 8M option. This kit adds 8 additional M-codes user relays to the NGC control.

    Note: If the machine is equipped with a non-servo autodoor option it will already have the 8M PCB option installed. A Mill with a non-servo autodoor uses 4 out of the 8 available user relays for operation. A Lathe with a non-servo autodoor uses 2 out of the 8 available user relays for operation. If more user relays are needed a secondary 8M PCB can be installed, refer to 8M Option - Installation.

  • P/N: 93-2889 User relays and Terminal Plug connector kit.  Order this kit if your machine has I/O PCB P/N 34-3490B installed.
  • Probe option
  • Autodoor option, or a device to open the door.

Robot Cell

Robot Location:

  • Select an area for the robot cell. 
  • Make a drawing of the equipment positions on the floor. A 3 ft (1 m) space on all sides of each CNC machine is recommended for usual maintenance access.

This illustration shows a typical robot cell. The CNC machines are located in a half-circle configuration with the robot in the center.

 Note: Robots are made to turn 0 - 360 degrees. Robots cannot turn through the zero (0 degrees) mark. Think about this when you design the robot cell. Put the zero (0 degrees) position in an area that the robot does not travel to.


  • A - CNC Machine A
  • B - CNC Machine B
  • C - CNC Machine C
  • D - Robot
  • E - Completed Parts
  • F - Un-finished Parts
  • G - Optional Station 1
  • H - Optional Station 2

 Capacity

  • Be sure to select a robot with sufficient capacity for the size and weight of the un-finished part.

Chip Removal

  • Many machines have a conveyor or auger that puts chips in a receptacle. If the receptacle is inside of the robot cell, you must have a procedure to remove these chips.

Gaurding:

  • You must install a permanent structure to keep personnel out of the robot cell. This structure is very important. 
  • You must install physical and electronic locks on the structure entrance.

 Note:  Give access to the keys for the physical locks only to authorized personnel. The electronic lock must send a signal to stop the robot when the structure door opens.

Grippers

  • The robot arm has a standard mounting point for a gripper. 
  • The grippers are usually made to hold a specific un-finished part. Make sure that the gripper can move the un-finished part as it changes through the machining process.

Material Movement and Optional Stations

  • Include areas where the robot can pick up un-finished parts and put completed parts. Some applications require a place to put a partially completed part, possibly to change its position or to wait for a CNC machine. Typically, this is a strong stand. 
  • Make sure that the stands do not interfere with the robot’s movement as it works in other areas of the cell.

Tool Life

  • Think about the length of time a tool is used when you operate a robot cell. 
  • Time must be scheduled to examine and replace tools. Use the Haas Advanced Tool Management to increase the time between tool maintenance. This function allows for backup tools. This function is standard on Haas mills and lathes.

Workholding: Mills: 

  • The customer must supply the workholding fixture and sensors. 

 Note: Pneumatic fixtures are recommended for pressures below 150 psi (10.3 bar). 

Workholding: Lathes

  • The customer must supply the workholding sensors. 
  • Chuck sensors can be installed in the coolant collector. The "clamped" sensor must activate when the chuck is fully closed. The "unclamped" sensor must activate when the chuck is fully open. When the chuck holds an un-finished part, neither sensor will be active.

Robot Integration Example

This illustration shows a Robot installed on the right side of a VMC.

  • The robot loads the raw material through the right side window. 
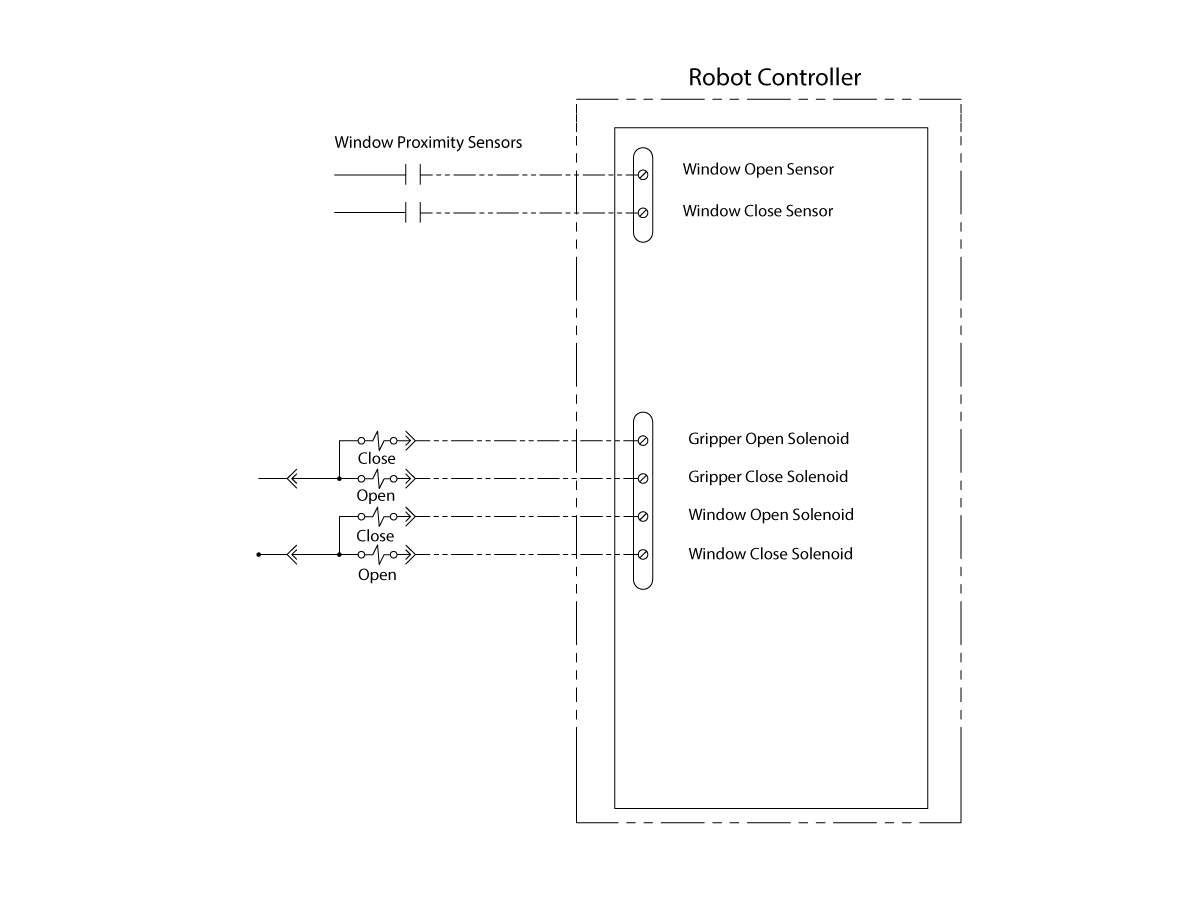
  • The side window is being open/closed by an air cylinder [1] . The robot control the operation of the air cylinder . 
  • There is an open and close proximity sensors mounted on the side window.  The robot monitors the condition of the window sensors. 
  • There is a pneumatic vise [3] mounted on the table. The machine controls the operation of the vise.

Note: This robot setup does not have a cell safe signal as the side window status is not being monitored by the Haas control. 

  1. Window Open / Close, Air Cylinder
  2. Robot Arm
  3. Pneumatic vise
  4. Side Window
  5. Robot Cage
  6. Haas VMC

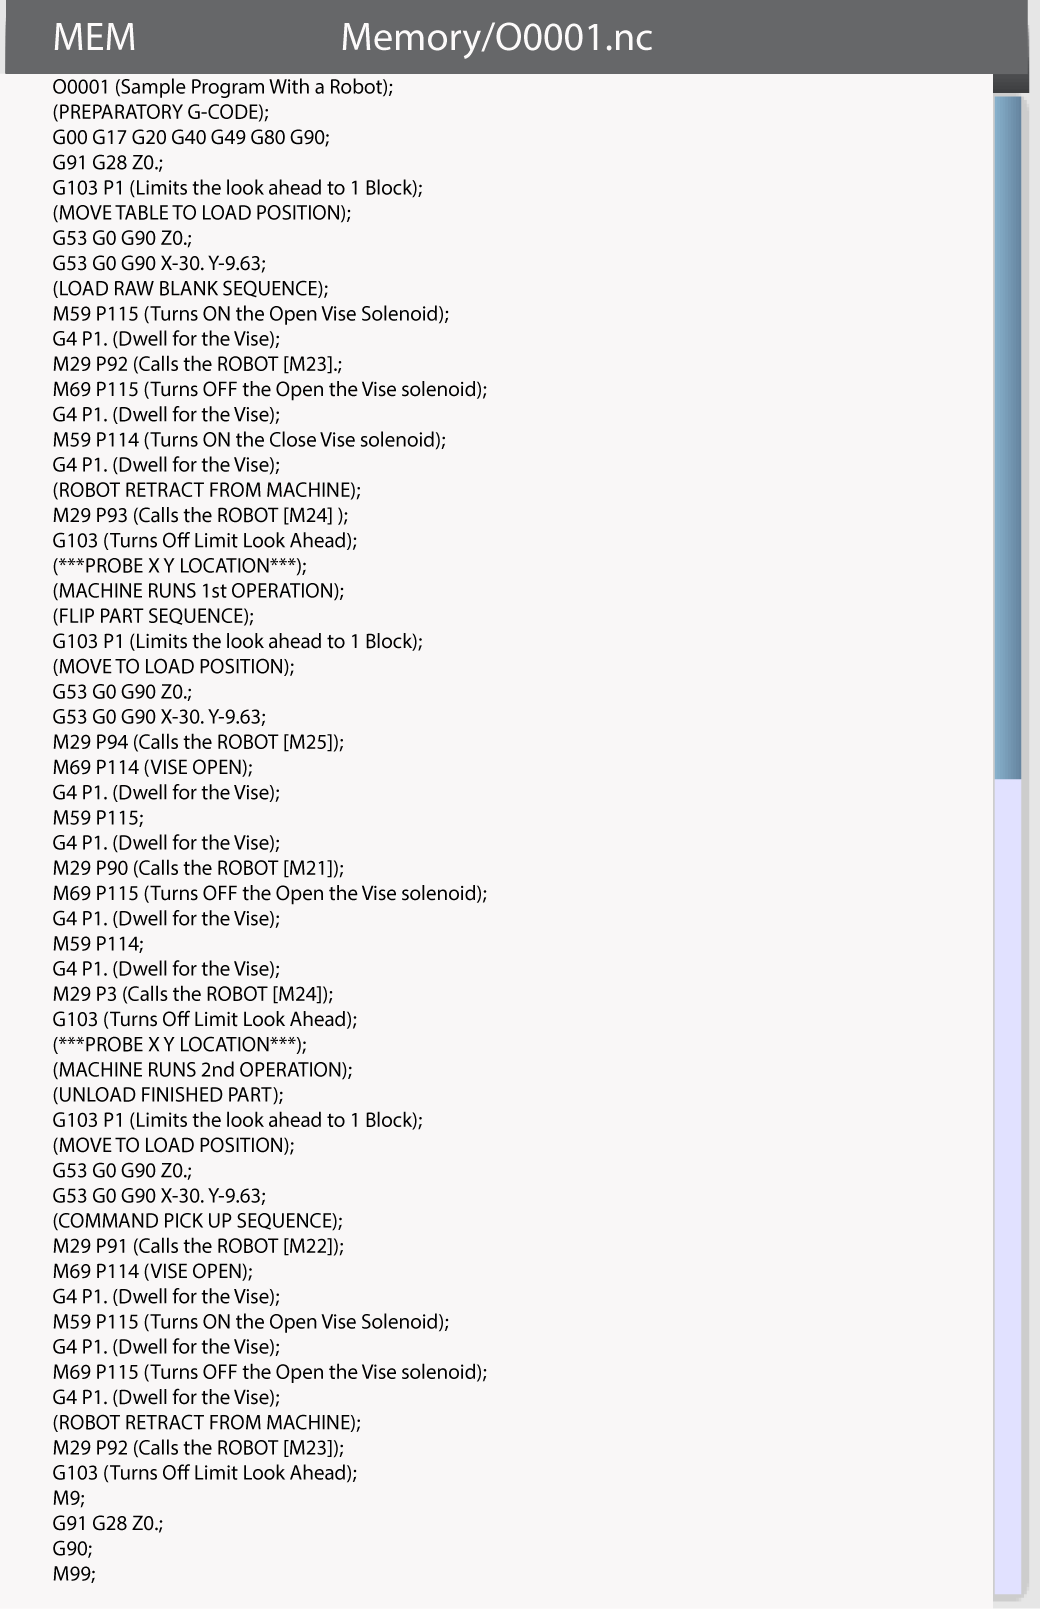
This G-code program shows the handshaking sequence between the Haas Control and the Robot.

  • CNC: Preparatory G-Code
  • CNC: Move table to the load position
  • CNC: Open the vise and wait for the vise to fully open
  • CNC: Call the robot. (M23 Load blank sequence)
  • Robot: Open the window, and wait for window to be fully open.
  • Robot: Arm loads the raw material into the vise. Sends M-Fin Signal to CNC.
  • CNC: Close the vise and wait for the vise to fully close.
  • CNC: Call the Robot. (M24 Retract from machine)
  • Robot: Arm retracts from the machine.
  • Robot: Closes the window. Sends M-Fin Signal to CNC.
  • CNC: Probes X and Y location.
  • CNC: Runs the 1st operation.
  • CNC: First operation is done. Call the Robot. (M25 Flip part sequence)
  • Robot: Open the window, and wait for window to be fully open.
  • Robot: Grabs the part. Sends M-Fin Signal to CNC.
  • CNC: Open the vise and wait for the vise to fully open
  • CNC: Call the Robot. (M21 Flip the part)
  • Robot: Arm Flips the part. Sends M-Fin Signal to CNC.
  • CNC: Close the vise and wait for the vise to fully close.
  • CNC: Call the Robot. (M24 Retract from machine).
  • Robot: Arm retracts from the machine.
  • Robot: Closes the window. Sends M-Fin Signal to CNC.
  • CNC: Probes X and Y location.
  • CNC: Runs the 2nd operation.
  • CNC: Done with 2nd operation. Move the table to the load position
  • CNC: Call the Robot. (M22 Remove Finish Part Sequence)
  • Robot: Open the window, and wait for window to be fully open.
  • Robot: Grabs the part. Sends M-Fin Signal to CNC.
  • CNC: Open the vise and wait for the vise to fully open
  • CNC: Call the Robot. (M23 Retract from machine)
  • Robot: Arm retracts part from the machine. Sends M-Fin Signal to CNC.
  • CNC: Program end, repeat program.

Note: The wiring diagrams shown below were used for the Robot integration example listed above and may not work with your application.

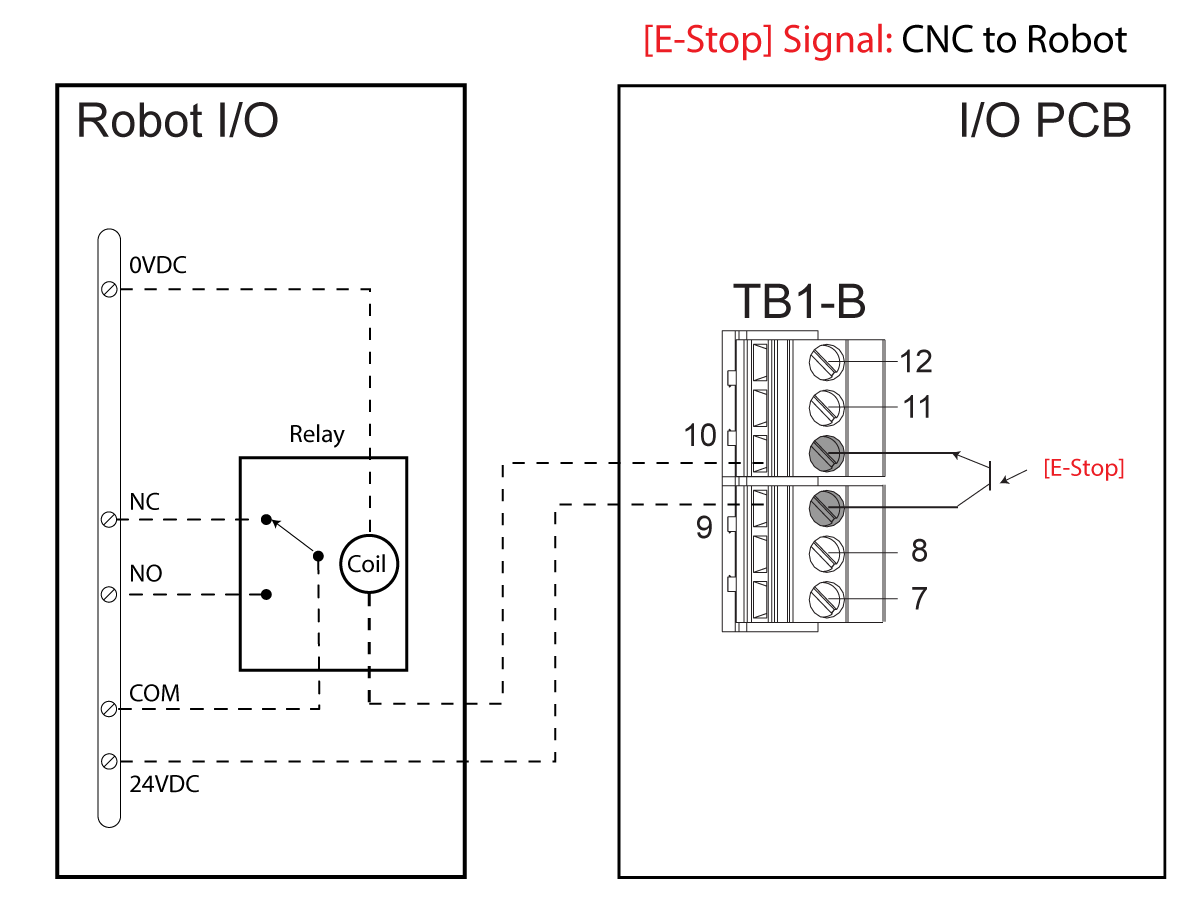
  • Emergency Stop Circuit
  • Clamp / Unclamp Solenoid
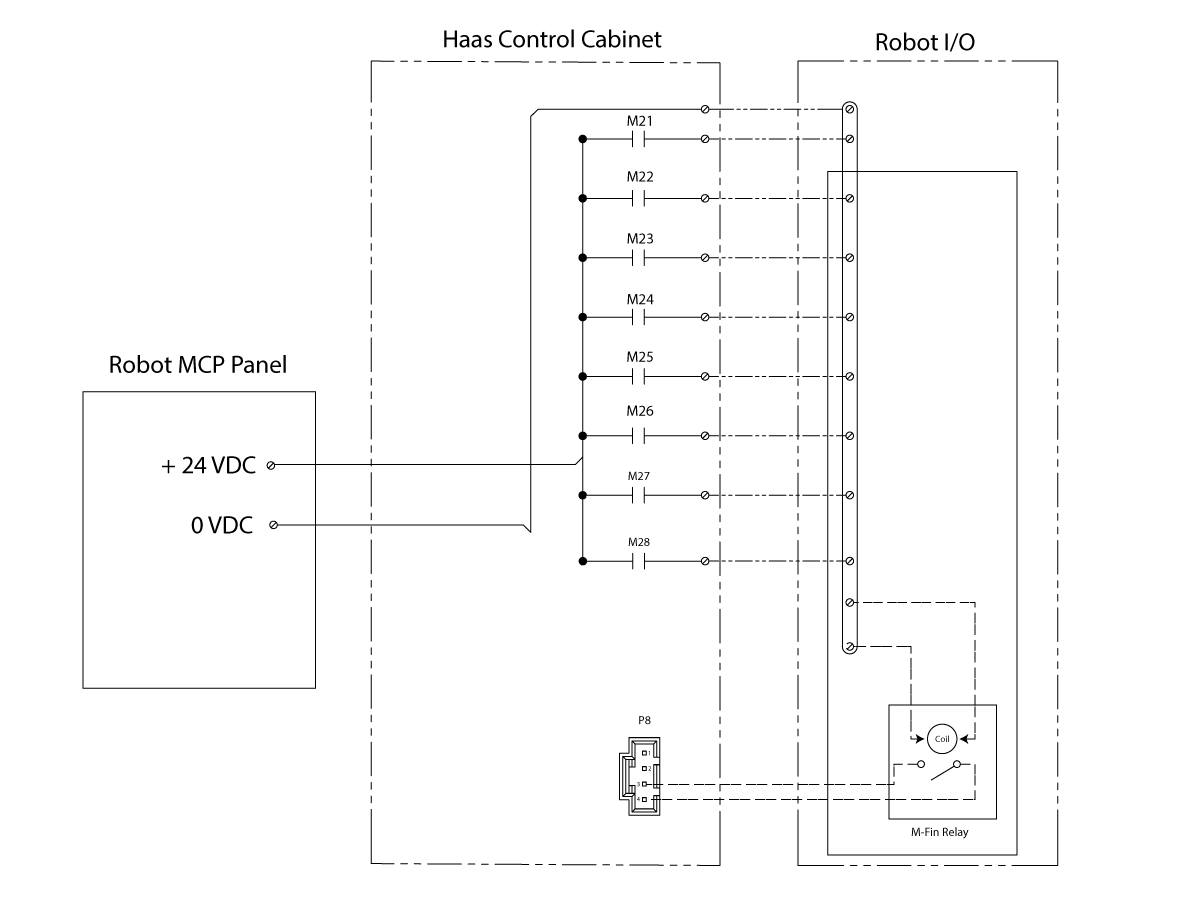
  • M-Fin Signal Relay
  • 8M PCB wiring
  • Air Cylinder Solenoid
  • Gripper Solenoid
  • Window Sensors

Robot E-stop Connection

[E-Stop] Signal: CNC to Robot
 
There is two methods for sending an [E-stop] signal from the machine to the robot safety circuit. 
 
Method 1:  (recommended)
 
Use TB1-B terminals 9 and 10 to wire in a auxiliary relay to signal the robot safety circuit (see illustration).  The Haas CNC will switch the relay ON/OFF  when any of the [E-stop] buttons are activated or deactivated.  The relay output NO, NC contacts can then be connected to the Robot safety circuit.
 
  • External voltage is required to drive the relay coil.  
  • External voltage range 0V to 60VDC is allowed.
  • The load should not draw more than 30mA.

Note:  Haas recommends using this method as it involves minimum integration with the machine.

Method 2:  (Legacy)

Install extra NC or NO contactor to the back of each [E-stop] button in the machine.  Then wire the contactors in a daisy chain and feed the signal to the robot.  When the [E-stop] button is pressed the signal from the contactors will be sent to the robot safety circuit.

You can order these contactos from your local Haas distribuitor.

  • P/N 61-0046A Normally open contactor.
  • P/N 61-0047A Normally closed contactor.

Note:  There is no remote [E-Stop] reset signal available.  Once the machine is in a [E-stop] state, the only way to reset is to physically pull the [E-stop] button and then press the [Reset] button twice.

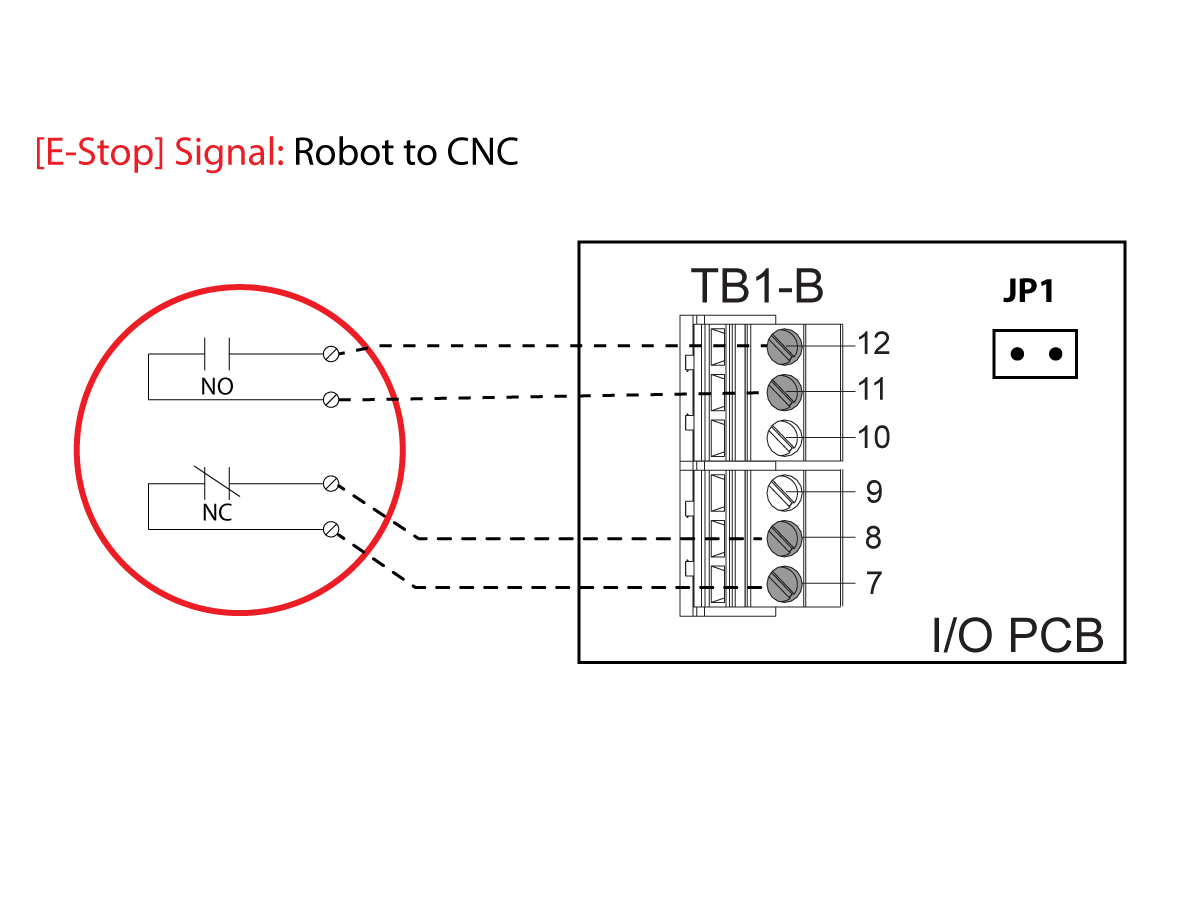
[E-stop] Signal: Robot to CNC

Use TB1-B terminals 7, 8, 11 and 12 to connect the robot [E-stop].  

Remove JP1 from the I/O PCB.

  • Connect [E-STOP] NC contact to TB-1B terminals 7 and 8.
  • Connect [E-STOP] NO contact to TB-1B terminals 11 and 12.

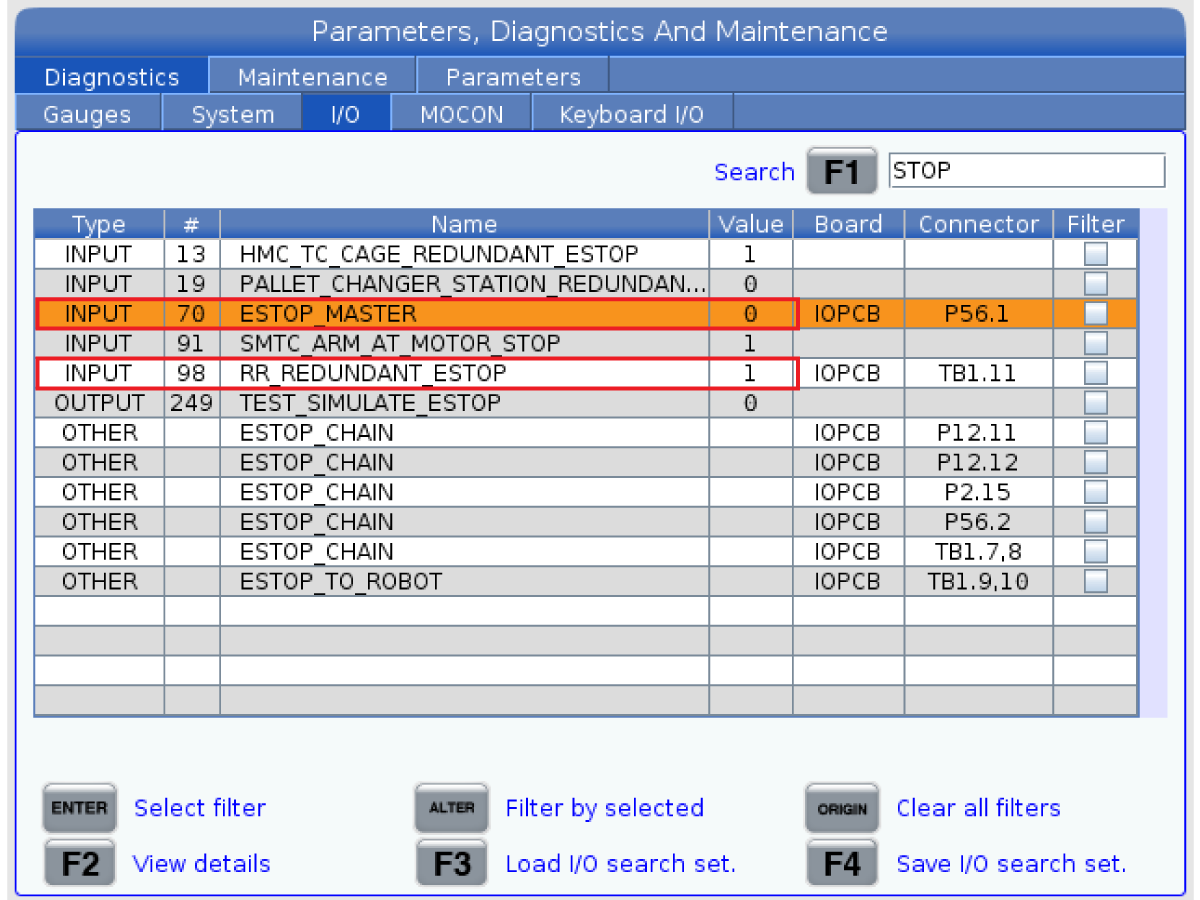
To view the status of the Robot to CNC [E-Stop] inputs:

  1. Press the DIAGNOSTIC button and go to the I/O tab.
  2. Type keyword "STOP" and press the F1 button.
  3. Find inputs 70 ESTOP MASTER and 98 RR_REDUNDANT_ESTOP.
  4. Press the switch and make sure the input bits toggle from 0 to 1 and vice versa.

     Note: The control will display E-STOP (4) icon when the auxiliary E-stop button is pressed.

Cell Safe Methods

The Cell Safe feature allows a program to continue running while the door is open in order to accommodate the use of the machine within a robot cell. Robot integrators are responsible for ensuring a safe cell enclosure. The presence of a robot cell is verified by detection of a signal which is sent from the robot cell to the control in one of two methods. Either or both can be used.

Note:  On a VMC only the front doors are being monitored by the control, the side windows status are not being monitored.  The side windows have a mechanical lock  that can be locked with a key.  

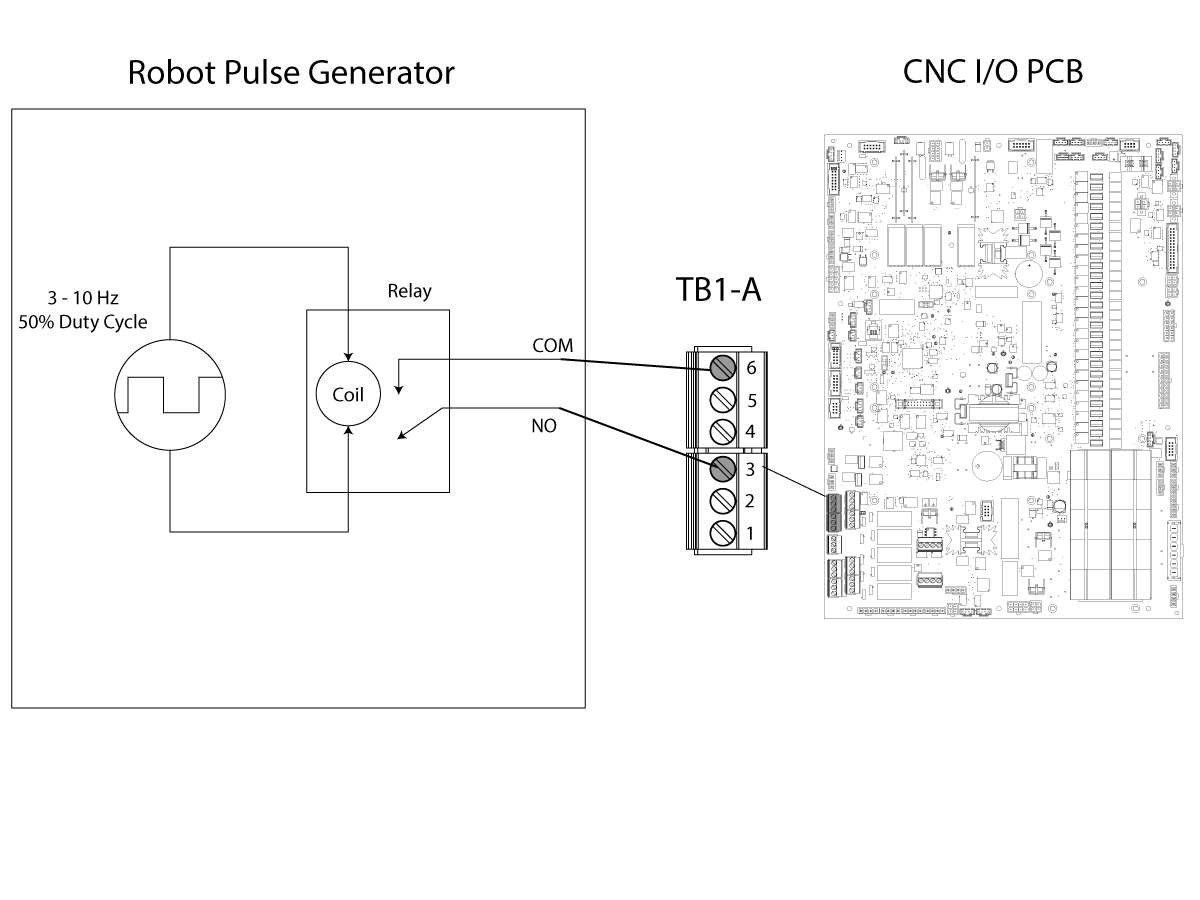
Method 1: Cell Safe Input Pulse

The robot sends a pulse signal to the CNC control.

  • The machine monitors the cell safe input for the discrete pulse.
  • This pulse can be created by triggering a relay with a square wave (3-10 hertz @ 50% duty cycle).
  • The (NO or NC) contacts of the relay can then be connected to I/O PCB TB1-A at terminals 3 & 6.

    Note: Damage to the I/O PCB will occur if external voltage is applied to these input terminals.

To view the status of cell safe input pulse:

  1. Press the DIAGNOSTIC button.
  2. Go into the I/O tab.
  3. Type in CELL.
  4. Press the F1 button.

When the pulse if being received by the control the input #103 CELL_SAFE value will toggle from 0 to 1.

Method 2: Macro Variable Timer

For the second method the robot writes a value in program macro variable #3196 by Ethernet.

This variable can be read at any time but it can only be set by Ethernet, not a g-code program. It has a range of 0-5000 milliseconds. The timer will count down from this value. When it reaches zero, the cell is no longer considered safe. In order to maintain continuity of cell safe, this variable should be reset before its counter reaches zero.

Note: The second method may be better for use with a deadman switch, or in the robot’s teach mode.

For more information on how to write to machine variables refer to Machine Data Collection - NGC.

The machine monitors both signal methods for the presence of a cell safe signal when there is a program running. This feature does not need to be enabled or disabled. If a door is opened when a cell safe signal is present, the active program will continue while the door is open. When there is a valid cell safe signal and the door is open, the spindle speed is limited. The maximum spindle speed is the value of Setting 292, Door Open Spindle Speed Limit. If the door is opened while the spindle speed is above this speed, the spindle will decelerate to the speed limit.

If a door is opened and the cell is NOT safe, the machine will go into a door hold—axis motion stops and the spindle speed is limited.

M-Codes Relays

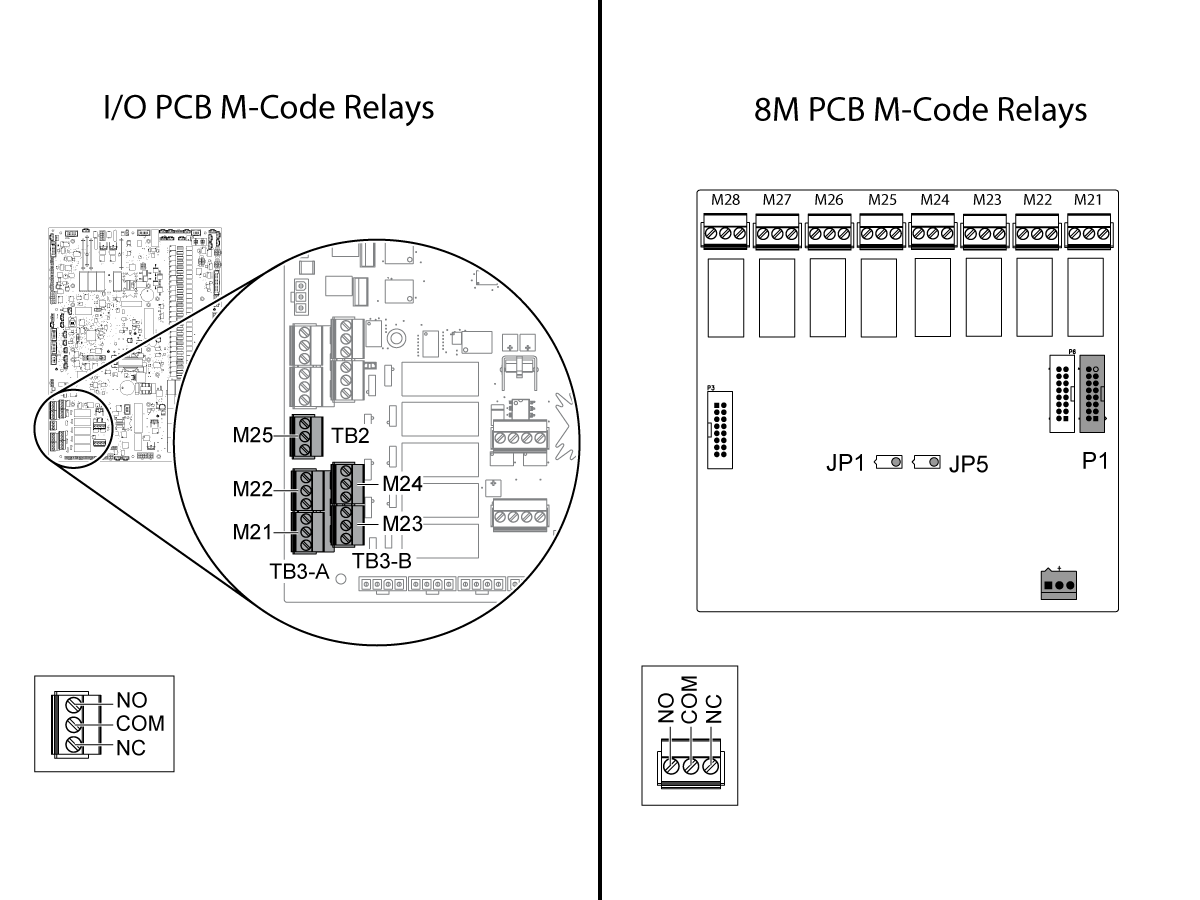
The NGC I/O PCB has (5) user relay outputs. The 8M option has (8) user relay outputs.

These relays can be operated in two methods.

Method 1: On / Off

The M59 Pnnn (ON) and M69 Pnnn (OFF) codes can be used to activate probes, auxiliary pumps, clamping devices, etc. Connect these devices to the terminal strip for the individual relay. These relay contacts are isolated from all of the other circuits and can switch up to 120 V ac at 3.0 A. The relays are Single Pole Double Throw (SPDT).

Note: Pressing the RESET button turns off any activated M-code relay.

Method 2: Turn on and Wait for M-Fin Signal

The  M29 Pnnn (Mills) and M129 Pnnn (Lathes) codes are use to call a robot to perform a task.  When the Haas control executes these codes it will turn on a relay and wait for the robot to complete the task.  The robot will complete the task and then send a M-FIN signal to the Haas control.  When the Haas control receives the M-Fin signal it will turn off the relay and continue with the program.

Note: Pressing the RESET button stops any operation waiting for a relay-activated accessory to finish.

User M-Codes Relay Functions Codes Table

This table has the address codes for the 5 User relays on the I/O PCB and two 8M option PCB's installed.  If more M-codes are needed refer to 8M Installation procedure.

User Relay Location Turn On Turn Off Turn On and Wait for M-FIN Signal
I/O PCB M21 TB3A: 1,2,3 M59 P114 M69 P114 Mills: M29 P114 , Lathes: M129 P114
I/O PCB M22 TB3A: 4,5,6 M59 P115 M69 P115 Mills: M29 P115 , Lathes: M129 P115
I/O PCB M23 TB3B: 7,8,9 N/A - Haas Robot Pkg Only N/A - Haas Robot Pkg Only N/A - Haas Robot Pkg Only
I/O PCB M24 TB3B: 10,11,12 N/A - Haas Robot Pkg Only N/A - Haas Robot Pkg Only N/A - Haas Robot Pkg Only
I/O PCB M25 TB2: 1,2,3 M59 P112 M69 P112 Mills: M29 P112 , Lathes: M129 P112
8M PCB #1 (JP1 and JP5) M21 M59 P90 M69 P90 Mills: M29 P90 , Lathes: M129 P90
8M PCB #1 (JP1 and JP5) M22 M59 P91 M69 P91 Mills: M29 P91 , Lathes: M129 P91
8M PCB #1 (JP1 and JP5) M23
M59 P92 M69 P92 Mills: M29 P92 , Lathes: M129 P92
8M PCB #1 (JP1 and JP5) M24
M59 P93 M69 P93 Mills: M29 P93 , Lathes: M129 P93
8M PCB #1 (JP1 and JP5) M25
M59 P94 M69 P94 Mills: M29 P94 , Lathes: M129 P94
8M PCB #1 (JP1 and JP5) M26
M59 P95 M69 P95 Mills: M29 P95 , Lathes: M129 P95
8M PCB #1 (JP1 and JP5) M27
M59 P96 M69 P96 Mills: M29 P96 , Lathes: M129 P96
8M PCB #1 (JP1 and JP5) M28
M59 P97 M69 P97 Mills: M29 P97 , Lathes: M129 P97
8M PCB #2 (JP2 and JP5) M21 M59 P103 M69 P103 Mills: M29 P103 , Lathes: M129 P103
8M PCB #2 (JP2 and JP5) M22
M59 P104 M69 P104 Mills: M29 P104 , Lathes: M129 P104
8M PCB #2 (JP2 and JP5) M23
M59 P105 M69 P105 Mills: M29 P105 , Lathes: M129 P105
8M PCB #2 (JP2 and JP5) M24
M59 P106 M69 P106 Mills: M29 P106 , Lathes: M129 P106
8M PCB #2 (JP2 and JP5) M25
M59 P107 M69 P107 Mills: M29 P107 , Lathes: M129 P107
8M PCB #2 (JP2 and JP5) M26
M59 P108 M69 P108 Mills: M29 P108 , Lathes: M129 P108
8M PCB #2 (JP2 and JP5) M27
M59 P109 M69 P109 Mills: M29 P109 , Lathes: M129 P109
8M PCB #2 (JP2 and JP5) M28
M59 P110 M69 P110 Mills: M29 P110 , Lathes: M129 P110

8M PCB Reset Behavior

As of software version 100.19.000.1400 the M-code relay reset behavior has changed.

When an alarm occurs or [RESET] or [EMERGENCY STOP] is pressed, some relays will turn off, while others will stay on.

Use the following table to determine if a specific relay will turn off:

Command Used to Turn on Relay M-Code Relay Bank Will turn off with [RESET], [E-STOP], or Alarm

M21-M29 (Mill)

Any

YES

M121-M129 (Lathe)

Any

YES

M51-M59 or macro

Built-In M21-M26 Relays

YES

M51-M59 or macro

Bank 1 (JP1)

YES¹

M51-M59 or macro

Bank 2 (JP2) without APL installed

YES

M51-M59 or macro

Bank 2 (JP3) with APL installed

NO²

M51-M59 or macro

Bank 3 (JP3)

NO

M51-M59 or macro

Bank 4 (JP4) without Autodoor installed

NO

M51-M59 or macro

Bank 4 (JP4) with Autodoor installed, but not enabled

YES

M51-M59 or macro

Bank 4 (JP4) with Autodoor installed and enabled

NO²

NOTES:
  1. Behavior of bank 1 (JP1) changes when the “Status Relays” feature is enabled. (Factory Setting 315.26)
  2. Some factory options, such as Autodoor and APL, use relays from bank 2 and bank 4 when enabled. If these options are installed on your machine, the used relays may or may not turn off upon reset.

M-Fin Signal

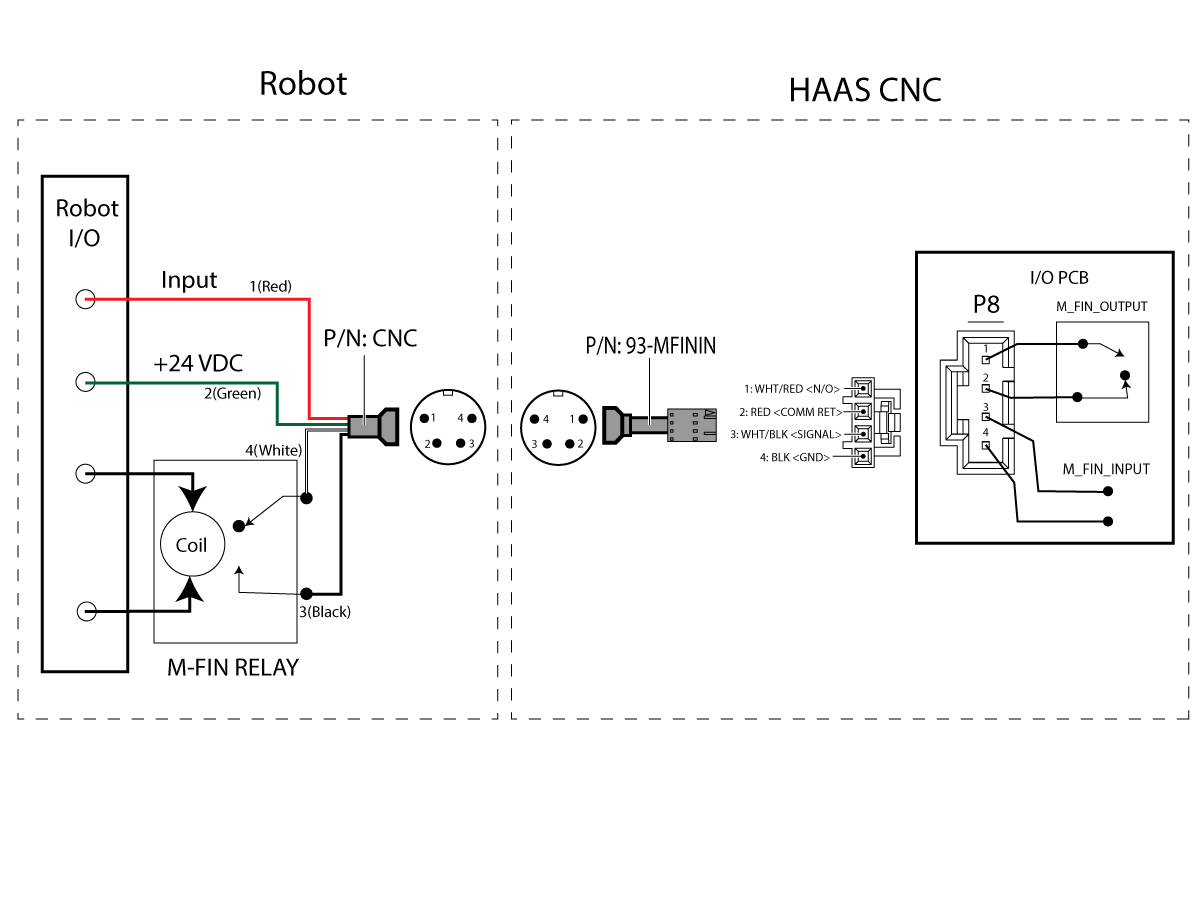
The M-Fin function can be setup by installing the intenal wire harness P/N: 93-MFININ , and using the M-Fin cable P/N:CNC to interface with the robot.

M-Fin Input: The M-Fin signal input is necessary when using the M29 Pxxxx M-codes. The pins 3, 4 are used for this input.

Important: Use a relay to activate this input (see illustration). Do not apply voltage to this input. When a M-Fin signal is sensed the diagnostic #18 M_FIN_INPUT bit will toggle.

M-Fin Output: This is a normally open relay built into the I/O PCB. The pins 1,2 are used for this relay. This relay can be activated with a M59 P4 or deactivated with a M69 P4.

Robot Door Sensors

On Haas machines, it is recommended that the control pendant and door open sensors are installed. These sensors will provide an input to the robot that can be used to determine if it is safe to operate. Any proximity sensor can be used for these applications. The control pendant proximity sensor is used to confirm that the pendant is in a safe position for robot operation. The door open sensors confirm the autodoors are completely open and it is safe to enter the machine.

If your machine has 2 doors, such as in a VMC, you can install 2 sensors, one for each door, and then have to separate inputs or wire them in series as shown below so that both must be energized to send a signal.

External sensors can either be directly wired to the robot, or can be wired to an interface used for communication with the robot.

Setting 276 - Fixture Clamp Input Number

This setting specifies the input number to monitor for workholding fixture clamping.

The machine will generate alarm 180 FIXTURE NOT CLAMPED:

  • If you command the spindle to start while the fixture clamp input indicates that the workholding is not clamped.
  • if the fixture clamp input signal changes while the spindle is turning.

Note: This feature only monitors the sensor during Feed motion. It will not monitor the sensor during a rapid motion or handle jog.

The illustration shows an auxiliary pressure switch integration. The ground is connected to Terminal 6. Terminal 5 is input #97 WORK_HOLD_CLAMP. For this example, Setting 276 is set to 97.

Note: The Work Hold Clamp Input should be trigger by a NC or NO air sensor.  No voltage should be connected to this input,  because there is already a 12v power supply, the sensor will act as a switch to trigger the input.

User Inputs

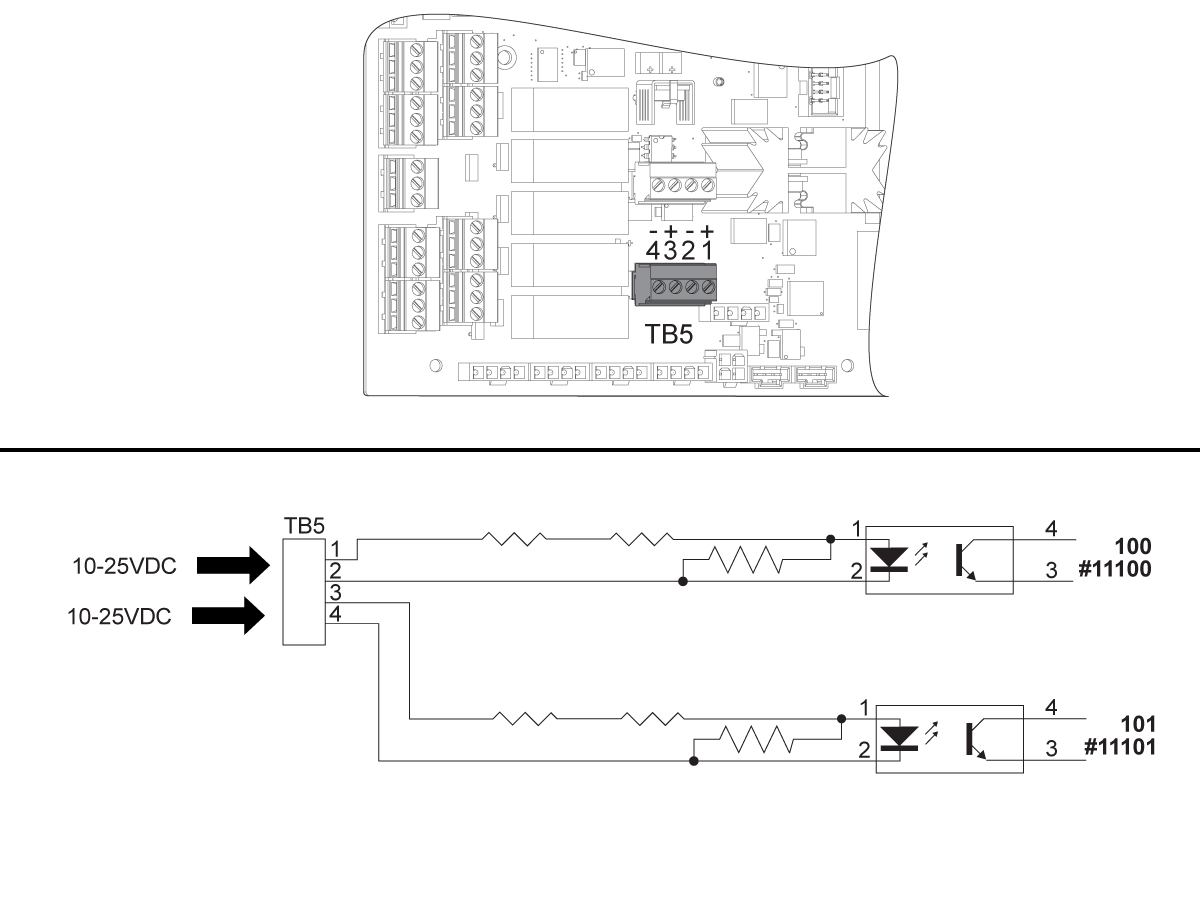
User Inputs on the I/O PCB

The I/O PCB includes a set of (2) available inputs (100 (#11100) and 101 (#11101)) at TB5.

Note: Devices connected to these inputs must have their own power supply.

When a device applies 10-25 VDC between Pins 1 and 2, the input 100 bit (Macro #11100) changes from 1 to 0.

When a device applies 10-25 VDC between pins 3 and 4, the input 101 (Macro #11101) bit changes from 1 to 0.

References

  • Machine Data Collection - NGC
  • 8M Option - Installation
FIND DISTRIBUTOR
Feedback
Haas Logo

美元价格不包括关税、报关费用、保险费、增值税及运费。
USD prices DO NOT include customs duty, customs fees, insurance, VAT, or freight.

人民币价格包含关税、报关费用、货运保险和增值税, 但不包括运费。
CNY prices include customs duty, customs fees, insurance, and VAT. DOES NOT include freight.

Haas Delivered Price

This price includes shipping cost, export and import duties, insurance, and any other expenses incurred during shipping to a location in France agreed with you as a buyer. No other mandatory costs can be added to the delivery of a Haas CNC Product.

KEEP UP WITH THE LATEST HAAS TIPS AND TECHNOLOGY...

Sign up now!   

HAAS TOOLING ACCEPTS THE FOLLOWING:

  • Service & Support
  • Owners
  • Request Service
  • Operator Manuals
  • Haas Parts
  • Rotary Repair Request
  • Pre-Install Guides
  • Shopping Tools
  • Build & Price a New Haas
  • Available Inventory
  • The Haas Price List
  • CNCA Financing
  • About Haas
  • Careers
  • Certifications & Safety
  • Contact Us
  • History
  • Terms & Conditions
  • Haas Tooling Terms & Conditions
  • Privacy
  • Warranty
  • Haas Community
  • Haas Certification Program
  • Haas Motorsports
  • Gene Haas Foundation
  • Haas Technical Education Community
  • Events
  • Join the Conversation
  • Facebook
  • Twitter
  • Flickr
  • YouTube
  • LinkedIn
  • Instagram
  • TikTok
© 2023 Haas Automation, Inc – CNC Machine Tools

This site is protected by reCAPTCHA and the Google Privacy Policy and Terms of Service apply.


2800 Sturgis Rd., Oxnard, CA 93030 / Toll Free: 800-331-6746
Phone: 805-278-1800 / Fax: 805-278-2255

Cookie Notice

We use cookies to improve your user experience. Our Cookie Notice describes which cookies we use, why we use them, and how you can find more information about them. Please confirm you consent to us using analytics cookies. If you do not consent, you may still use our website with a reduced user experience.

Manage Settings

Cookie Notice

We use cookies to improve your user experience. Our Cookie Notice describes which cookies we use, why we use them, and how you can find more information about them. Please confirm you consent to us using analytics cookies. If you do not consent, you may still use our website with a reduced user experience.

Functional Cookies

Analytics Cookies