MyHaas Welcome,
!
Haas Tooling Guest Order History MyHaas/HaasConnect Sign In Register Haas Tooling My Account Order History Return History MyHaas/HaasConnect Sign Out Welcome, My Machines Latest Activity My Quotes My Account My Users Sign Out
Find Your Distributor
  1. Select Language
    1. English
    2. Deutsch
    3. Español - España
    4. Español - México
    5. Français
    6. Italiano
    7. Português
    8. Český
    9. Dansk
    10. Nederlands
    11. Magyar
    12. Polski
    13. Svenska
    14. Türkçe
    15. 中文
    16. Suomi
    17. Norsk
    18. الإنجليزية
    19. български
    20. Hrvatski
    21. Ελληνικά
    22. Română
    23. Slovenský
    24. Slovenščina
    25. 한국어
    26. 日本語
    27. Українська
  • machines Main Menu
    • Haas Vertical Mills Vertical Mills
      Vertical Mills
      Vertical Mills View All
      • Vertical Mills
      • VF Series
      • Universal Machines
      • VR Series
      • VP-5 Prismatic
      • Pallet-Changing VMCs
      • Mini Mills
      • Mold Machines
      • High-Speed Drill Centers
      • Drill/Tap/ Mill Series
      • Toolroom Mills
      • Compact Mills
      • Gantry Series
      • SR Sheet Routers
      • Extra-Large VMC
      • Double-Column Mills
      • Control Simulator
      • Mill Automatic Parts Loader
      • VMC/UMC Side-Loading Automatic Parts Loader
      • Compact Automatic Parts Loader
    • Product Image Multi-Axis Solutions
      Multi-Axis Solutions
      Multi-Axis Solutions View All
      • Multi-Axis Solutions
      • Y-Axis Lathes
      • 5-Axis Mills
    • Haas Lathes Lathes
      Lathes
      Lathes View All
      • Lathes
      • ST Series
      • Dual-Spindle
      • Box Way Series
      • Toolroom Lathes
      • Chucker Lathe
      • Haas Bar Feeder V2
      • Lathe Automatic Parts Loader
    • Haas Horizontal Mills Horizontal Mills
      Horizontal Mills
      Horizontal Mills View All
      • Horizontal Mills
      • 50-Taper
      • 40-Taper
    • Haas Rotaries & Indexers Rotaries & Indexers
      Rotaries & Indexers
      Rotaries & Indexers View All
      • Rotaries & Indexers
      • Rotary Tables
      • Indexers
      • 5-Axis Rotaries
      • Extra-Large Rotaries
    • Special Series
      Special Series
      Special Series View All
      • Special Series
      • EU_Series_Redirect
    • Product Image Automation Systems
      Automation Systems
      Automation Systems View All
      • Automation Systems
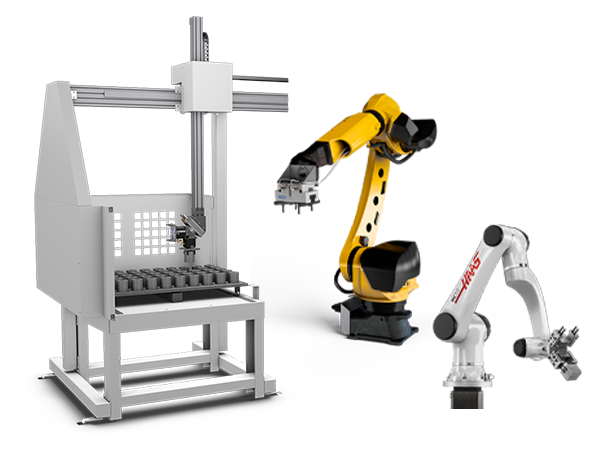
      • Mill Automation
      • Lathe Automation
      • Automation Models
    • Haas Drill Centers Desktop Machines
      Desktop Machines
      Desktop Machines View All
      • Desktop Machines
      • Desktop Mill
      • Desktop Lathe
    • Haas Shop Equipment Shop Equipment
      Shop Equipment
      Shop Equipment View All
      • Shop Equipment
      • Bandsaw
      • Knee Mill
      • Surface Grinder, 2550
      • Surface Grinder, 3063
      • Laser Cutting Machine
    • QUICK LINKS Special Series  Special Series 
      EU SERIES EU SERIES BUILD & PRICE | PRICE LIST BUILD & PRICE | PRICE LIST In-Stock Machines In-Stock Machines WHAT’S NEW WHAT’S NEW YOUR FIRST CNC YOUR FIRST CNC
      SHOPPING TOOLS
      • Build & Price a Haas
      • Price List
      • Available Inventory
      • CNCA Financing
      WANT TO TALK TO SOMEONE?

      A Haas Factory Outlet (HFO) can answer your questions, and walk you through your best options.

      CONTACT YOUR DISTRIBUTOR >
  • Options Main Menu
    • Product Image Spindles
      Spindles
      Spindles View All
      • Spindles
    • Product Image Tool Changers
      Tool Changers
      Tool Changers View All
      • Tool Changers
    • Product Image 4th- | 5th-Axis
      4th- | 5th-Axis
      4th- | 5th-Axis View All
      • 4th- | 5th-Axis
    • Product Image Turrets & Live Tooling
      Turrets & Live Tooling
      Turrets & Live Tooling View All
      • Turrets & Live Tooling
    • Product Image Probing
      Probing
      Probing View All
      • Probing
    • Haas Chip & Coolant Management Chip & Coolant Management
      Chip & Coolant Management
      Chip & Coolant Management View All
      • Chip & Coolant Management
    • The Haas Control The Haas Control
      The Haas Control
      The Haas Control View All
      • The Haas Control
    • Product Image Product Options
      Product Options
      Product Options View All
      • Product Options
    • Product Image Tooling & Fixturing
      Tooling & Fixturing
      Tooling & Fixturing View All
      • Tooling & Fixturing
    • Product Image Workholding
      Workholding
      Workholding View All
      • Workholding
    • Product Image 5-Axis Solutions
      5-Axis Solutions
      5-Axis Solutions View All
      • 5-Axis Solutions
      • 5 Easy Steps to 5-Axis
    • QUICK LINKS Special Series  Special Series 
      EU SERIES EU SERIES BUILD & PRICE | PRICE LIST BUILD & PRICE | PRICE LIST In-Stock Machines In-Stock Machines WHAT’S NEW WHAT’S NEW YOUR FIRST CNC YOUR FIRST CNC
      SHOPPING TOOLS
      • Build & Price a Haas
      • Price List
      • Available Inventory
      • CNCA Financing
      WANT TO TALK TO SOMEONE?

      A Haas Factory Outlet (HFO) can answer your questions, and walk you through your best options.

      CONTACT YOUR DISTRIBUTOR >
  • Why Haas Main Menu
      Discover the Haas Difference
    • Why Haas
    • MyHaas
    • Education Community
    • Industry 4.0
    • Haas Certification
    • Customer Testimonials
  • Service Main Menu
      Welcome to Haas Service
      SERVICE HOME Operator’s Manuals How-To Procedures Troubleshooting Guides Preventive Maintenance Haas Parts Haas Tooling Videos
  • Videos Main Menu
  • Main Menu
    • View All
    • View All
      • Fiber Laser
    • View All
    • View All
      • HTEC Curriculum Support
    • View All
      • Haas 10 kg Cobot Package
      • Cobot Kits
    • View All
    • View All
      • 4 - AUTOMATION SYSTEMS
      • Mill Toolholding
      • Carousel-V2
    • View All
    • View All
    • View All
      • VF-4SS
    • View All
    • QUICK LINKS Special Series  Special Series 
      EU SERIES EU SERIES BUILD & PRICE | PRICE LIST BUILD & PRICE | PRICE LIST In-Stock Machines In-Stock Machines WHAT’S NEW WHAT’S NEW YOUR FIRST CNC YOUR FIRST CNC
      SHOPPING TOOLS
      • Build & Price a Haas
      • Price List
      • Available Inventory
      • CNCA Financing
      WANT TO TALK TO SOMEONE?

      A Haas Factory Outlet (HFO) can answer your questions, and walk you through your best options.

      CONTACT YOUR DISTRIBUTOR >
  • Haas Tooling Main Menu
      Automation Accessories Shop Support Mill Toolholding Mill Cutting Tools Boring Systems Mill Workholding Lathe Toolholding Lathe Cutting Tools Lathe Workholding Package Kits ER Collets & Chucks Holemaking Threading Broaching Tombstones & Kits Manual Chucks For Milling Deburring & Abrasives Tool Presetter & Heat Shrinkers Storage & Handling Machine Maintenance Tooling Accessories Apparel & Accessories Measuring & Inspection Winner's Circle Winner's Circle Clearance Today's Hot Deals
    • Haas Tooling
    • Winner's Circle
      Winner's Circle Shop All
      • WINNERS_CIRCLE-1Y
    • Winner's Circle
      Winner's Circle Shop All
      • WC-1Y-EU
    • Today’s Hot Deals
      Today’s Hot Deals Shop All
      • Mill Toolholding
      • Mill Tooling
      • Measuring & Inspection
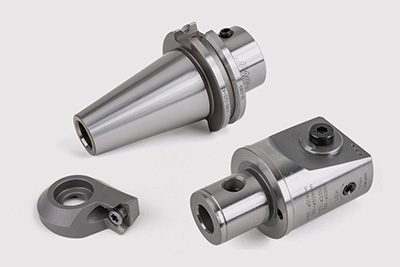
      • Boring Systems
      • Mill Workholding
      • Shell Mill Kits
      • Lathe Toolholding
      • Lathe Tooling
      • Lathe Workholding
      • ER Collets & Chucks
      • Holemaking
      • Threading
      • Broaching
      • Tool Storage
      • Apparel & Accessories
    • Clearance
      Clearance Shop All
    • Measuring & Inspection
      Measuring & Inspection Shop All
      • Probe Kits & Accessories
      • Edge & Center Finders
      • Comparative Measuring Gauges
      • Height Gauges
      • Calipers
      • Threaded Plug & Ring Gauges
      • Gauge Blocks
      • Pin Gauges
      • Drop Indicators
      • Dial Test Indicators
      • Bore Gauges
      • Indicator Accessories
      • V Blocks
      • Setup Blocks
      • Depth Measuring
      • Micrometers
      • Micrometer Accessories
      • Micrometer Kits
      • Bore Gauge Kits
      • Starter Kits
      • Indicator Kits
      • Caliper Kits
      • Toolholder Check Station
      • Height Setters
      • Coordinate Measuring Machines
    • Automation Accessories
      Automation Accessories Shop All
      • Cobot Kits
      • Cobot Kits
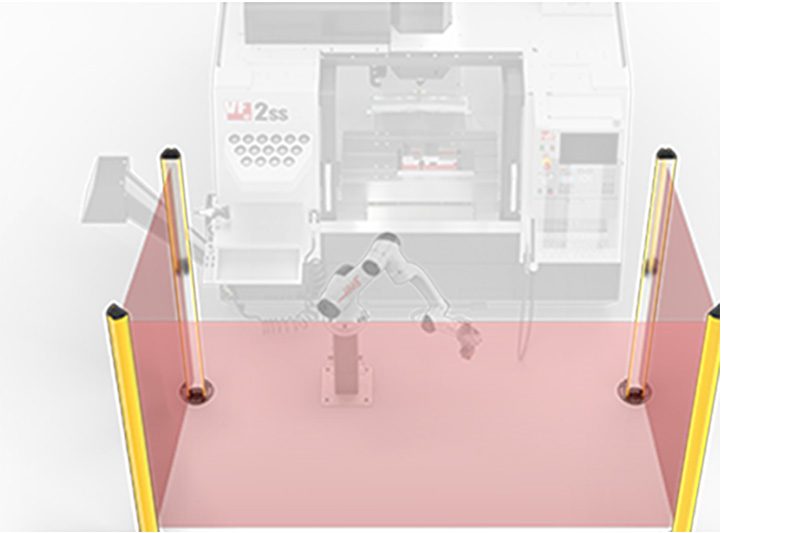
      • Protective Barriers
      • Grippers
      • Robot Cell Accessories
    • Shop Support
      Shop Support Shop All
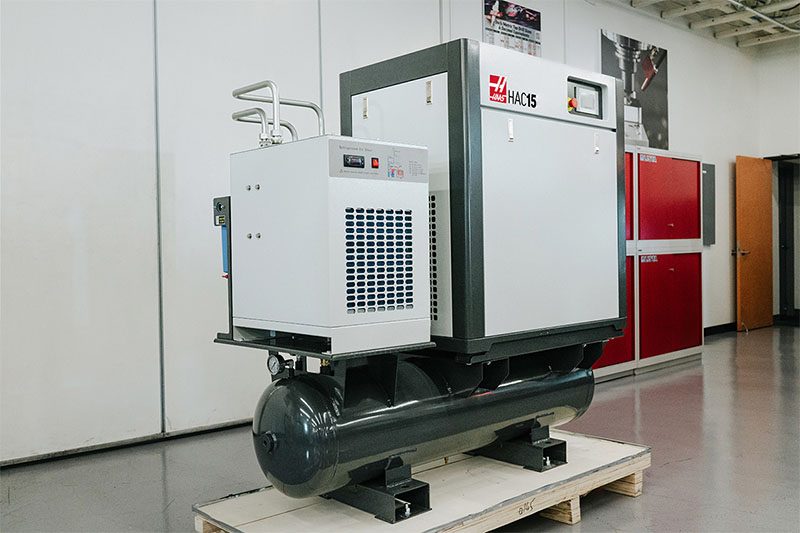
      • Air Compressors
      • Laser Marking Machines
      • Bandsaw Blades
      • Bandsaw Accessories
      • Surface Grinding Wheels
      • Shop Equipment Accessories
    • Mill Toolholding
      Mill Toolholding Shop All
      • End Mill Holders
      • Shell Mill Holders
      • Shrink Fit Holders
      • ER Collet Chucks
      • Milling Chucks & Collets
      • NC Drilling Chucks
      • Pull Studs / Retention Knobs
      • Rotary Tool Holder & Tool Chuck Kits
      • Hydraulic Milling Chucks & Collets
      • Toolholder Attachments & Wrenches
      • Mill Broaching Holders
    • Mill Tooling
      Mill Tooling Shop All
      • Shell Mill Bodies
      • Milling Inserts
      • End Mills
      • Chamfer Mills & Inserts
      • Indexable End Mill Bodies
      • Ball End Mills
      • Chamfer End Mills
      • Roughing End Mills
      • Indexable Ball End Mills & Inserts
      • Shell Mill Kits
      • Chamfer Mill Kits
      • Indexable End Mill Kits
      • Dovetail Cutters
      • Indexable Dovetail Cutters
      • Engraving End Mills
      • Rotary Burrs / Die Grinding Bits
      • Keyseat Cutters
      • Corner Rounding End Mills
      • Slot Mill Bodies
      • CNC Router Bits For Wood
    • Boring Systems
      Boring Systems Shop All
      • Boring Heads & Cartridges
      • Boring Holders & Extensions
    • Mill Workholding
      Mill Workholding Shop All
      • Fixed-Jaw Vises
      • Self-Centering Vises
      • Adapter Plates
      • Vise Jaws
      • Vise Mounts & Fixtures
      • Vise Kits
      • Vise Parallels
      • Rotary Vise Kits
      • Fixture Clamps & Rails
      • Automated Workholding Kits
      • Tooling Fixture Subplates
      • Toolmakers' Vises
      • Clamp Force Gauges
      • Collet Fixtures
      • Angle Plates
    • Lathe Toolholding
      Lathe Toolholding Shop All
      • TL & CL Static Turning Holders
      • BOT Static Turning Holders
      • BMT Static Turning Holders
      • Live / Driven Turning Holders
      • Turning Holder Reduction Sleeves / Bushings
      • VDI Static Turning Holders
      • Turning Holder Accessories
    • Lathe Tooling
      Lathe Tooling Shop All
      • Cut-Off Tool Blocks & Blades
      • Cut-Off Tooling Kits
      • Turning Inserts
      • Grooving & Cut-Off Tools
      • Internal (ID) Grooving & Threading Tools
      • Threading Inserts
      • Threading Tools
      • Boring Bars / Internal (ID) Turning Tools
      • External (OD) Turning Tools
      • Cermet Turning Inserts
      • CBN Turning Inserts
      • Haas Notch Grooving & Threading Inserts
      • Haas Notch Grooving & Threading Tools
      • Micro Turning Tools
      • Desktop Lathe Tools
    • Lathe Workholding
      Lathe Workholding Shop All
      • Live Centers
      • Spindle Reduction Sleeves / Liners
      • Quick-Change Collets
      • Quick-Change Collet Chucks
      • 5C Collets
      • 5C Collet Sets
      • Lathe Jaw Boring Rings
      • Lathe Jaws
      • Bar Pullers
      • Scroll Chucks
      • Guide Pins
      • Collet Accessories
    • Package Kits
      Package Kits Shop All
      • Chip Clearing Fan Kits
      • Cutting Tool Kits
      • Indexable End Mill Kits
      • Cut-Off Tool Block & Blade Kits
      • Drill & Tap Kits
      • Indexable Drilling Kits
      • Shell Mill Kits
      • Chamfer Mill Kits
      • Rotary Tool Holder & Tool Chuck Kits
      • Lathe Starter Kits
      • Workholding Kits
      • Rotary Vise Kits
      • Vise Kits
      • 3-Jaw Chuck Kits for Mills
      • Tombstone Kits
      • Reduction Sleeve Kits
      • Automated Workholding Kits
      • Measuring & Inspection Kits
      • Starter Kits
      • Bore Gauge Kits
      • Caliper Kits
      • Indicator Kits
      • Micrometer Kits
    • ER Collets & Chucks
      ER Collets & Chucks Shop All
      • ER Straight-Bore Collets
      • ER Sealed Collets
      • ER Tap Collets
      • ER Collet Sets & Accessories
      • ER Collet Chucks
      • Straight Shank ER Collet Chucks
      • Straight Shank Keyless NC Drilling Chucks
    • Holemaking
      Holemaking Shop All
      • Carbide Drills
      • Indexable Drill Bodies
      • Indexable Drill Inserts
      • Modular Drill Bodies
      • Modular Drill Heads
      • Cobalt Drills & Sets
      • Center Drills
      • Reamers
      • Indexable Drilling Kits
      • Spot Drills
      • Spade Drill Bodies
      • Spade Drill Inserts
      • Countersinks
    • Threading
      Threading Shop All
      • Taps
      • Threading Inserts
      • Threading Tools
      • Thread Mills
      • Pipe Taps
      • Drill Tap Kits
    • Broaching
      Broaching Shop All
      • Broaching Tools
      • Broaching Inserts
    • Tombstones
      Tombstones Shop All
      • Tombstones
      • Tombstone Kits
      • Vise Cluster Towers
    • Manual Chucks For Milling
      Manual Chucks For Milling Shop All
      • 3-Jaw Chucks & Mounts for Mills
    • Deburring & Abrasives
      Deburring & Abrasives Shop All
      • Abrasive Pads
      • Deburr Tools
      • Deburr Wheels
      • Abrasive Sheets & Rolls
      • Sharpening / Lapping Stones
    • Tool Presetter & Heat Shrinkers
      Tool Presetter & Heat Shrinkers Shop All
      • Tool Presetting Machines
      • Shrink Fit Machines
    • Tool Storage
      Tool Storage Shop All
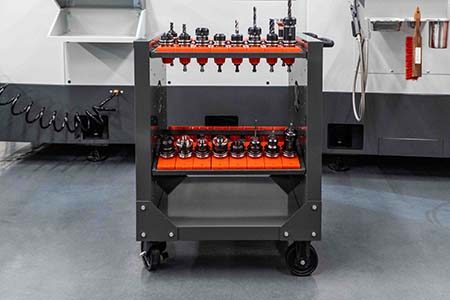
      • Tool Carts
      • Tool Tray
      • Tool Bags
    • Machine Maintenance
      Machine Maintenance Shop All
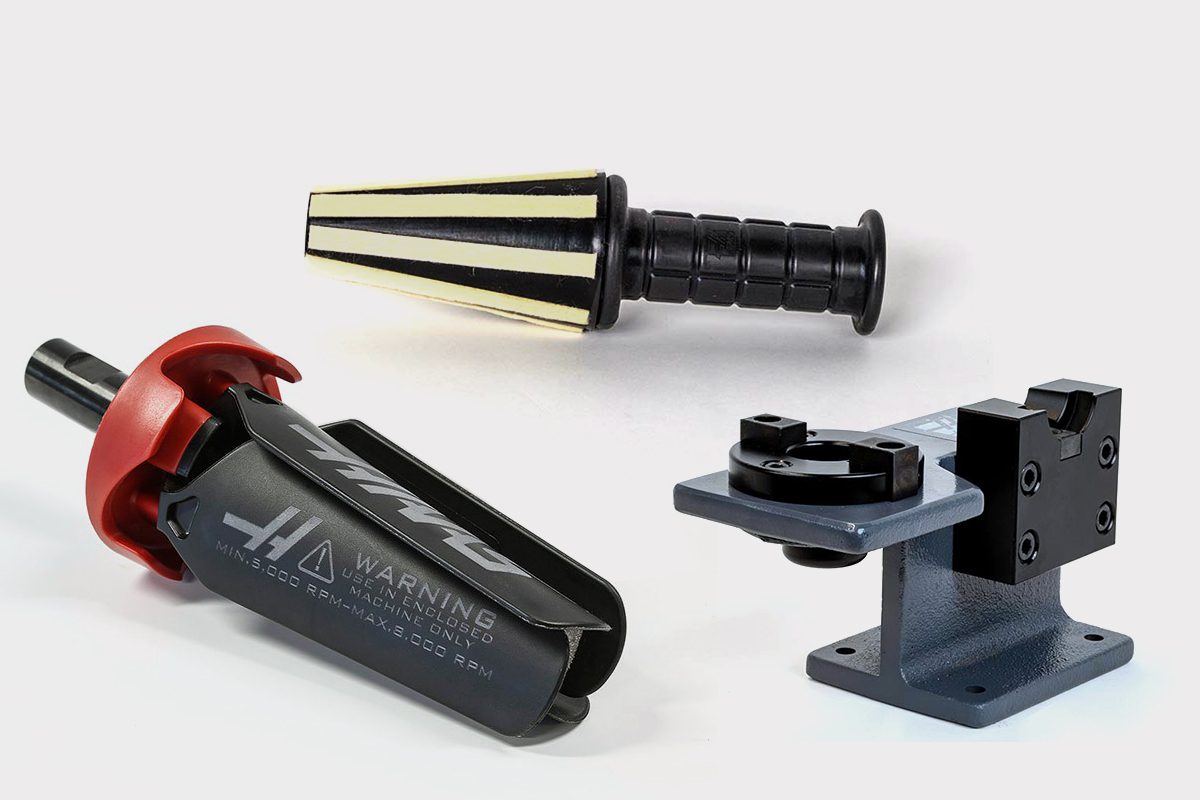
      • Spindle Test Bars
      • Levels
      • Refractometers
      • Machine Additives & Supplies
      • Machine Accessories
      • Machine Maintenance Kits
    • Tooling Accessories
      Tooling Accessories Shop All

      • Spindle & Toolholder Taper Cleaners
      • Haas Shop Lift
      • Toolholder Fixtures
      • CNC Chip Clearing Fans
      • Hammers & Mallets
      • Anti-Fatigue Mats
      • Layout Tools
      • Wrenches
      • Magnetic Tools
      • Torque Screwdrivers
      • Hand Cutting Tools
      • Shop Stools
      • Lifting Magnets
      • Safety Apparel
      • Cutting Tool Sharpeners
    • Apparel & Accessories
      Apparel & Accessories Shop All
      • Accessories
      • Apparel
    • HAAS TOOLING QUICK LINKS
      NEW PRODUCTS NEW PRODUCTS NEW PRODUCTS NEW PRODUCTS
      MOST POPULAR MOST POPULAR
      TOOLING PROMOS TOOLING PROMOS
      FINANCING & OPEN TERMS FINANCING & OPEN TERMS PAY BY INVOICE PAY BY INVOICE
      FAQs FAQs
      KITS CREATED FOR YOU KITS CREATED FOR YOU
  • Haas Service Parts Main Menu
      Automatic Pallet Changer Lathe Turret Tool Changer Chip Management Coolant Counterbalance Electrical Cabinet Enclosure Hydraulics Lubrication Maintenance Pendant Probing Rotary Spindle Tailstock
    • Haas Service Parts
    • Automatic Pallet Changer
      Automatic Pallet Changer Shop All
      • HMC - Automatic Pallet Changer
      • VMC - Automatic Pallet Changer
    • Lathe Turret
      Lathe Turret Shop All
      • Lathe - Turret
      • Live Tooling
    • Tool Changer
      Tool Changer Shop All
      • Side Mount
      • Umbrella
    • Chip Management
      Chip Management Shop All
      • Multi Auger
      • Single Auger
    • Coolant
      Coolant Shop All
      • Auxiliary Filter
      • HPC-300 (Lathe)
      • HPC-1000 (Lathe)
      • Oil Skimmer
      • Standard Coolant
      • TSC-300 (Mill)
      • TSC-1000 (Mill)
      • Coolant Refill
      • Loc-Line
    • Counterbalance
      Counterbalance Shop All
      • Charge & Discharge Hose
    • Electrical Cabinet
      Electrical Cabinet Shop All
      • Fans
      • Filters
      • Upgrade Kits
    • Enclosure
      Enclosure Shop All
      • Accessories
      • Air Nozzle
      • Decals
      • Door Bumpers
      • Lighting
      • Windows, Gaskets, & Weather Strip
      • Chip & Coolant Management
    • Hydraulics
      Hydraulics Shop All
      • Filters
      • Gauges
      • Heat Exchanger
      • Hoses
    • Lubrication
      Lubrication Shop All
      • Bijur Mechanical Lubrication
      • Minimum Lubrication
    • Maintenance
      Maintenance Shop All
      • Grease, Oil, & Sealants
    • Pendant
      Pendant Shop All
      • Floppy Disk & USB
      • Keypad
      • Keys
      • Lens
      • Gaskets & Seals
    • Probing
      Probing Shop All
      • Mill Probing
      • Lathe Tool Presetter
    • Rotary
      Rotary Shop All
      • Rotary Gaskets & Seals
    • Spindles
      Spindles Shop All
      • Couplings
      • Gaskets & Seals
      • Spindle Motor Drive
      • Gearbox Drive
      • Tool Release Piston
    • Tailstock
      Tailstock Shop All
      • Handles
×

Search Results

Web Pages

Images

    • <
    • 1
    • >
MyHaas Welcome,
!
Haas Tooling Guest Order History MyHaas/HaasConnect Sign In Register Haas Tooling My Account Order History Return History MyHaas/HaasConnect Sign Out Welcome, My Machines Latest Activity My Quotes My Account My Users Sign Out
Find Your Distributor
  1. Select Language
    1. English
    2. Deutsch
    3. Español - España
    4. Español - México
    5. Français
    6. Italiano
    7. Português
    8. Český
    9. Dansk
    10. Nederlands
    11. Magyar
    12. Polski
    13. Svenska
    14. Türkçe
    15. 中文
    16. Suomi
    17. Norsk
    18. الإنجليزية
    19. български
    20. Hrvatski
    21. Ελληνικά
    22. Română
    23. Slovenský
    24. Slovenščina
    25. 한국어
    26. 日本語
    27. Українська
×

Search Results

Web Pages

Images

    • <
    • 1
    • >

5 - Programmable Coolant

Chip Removal and Coolant - Service Manual


  • 1 - Chip and Coolant - Introduction
  • 2 - Auxiliary Coolant Filter
  • 3 - Standard Flood Coolant
  • 4 - Oil Skimmer
  • 5 - Programmable Coolant
  • 6 - Chip Auger
  • 7 - Coolant Chiller
  • 8 - Chip Conveyor - UMC
  • 9 - Chip Conveyor - Lathe
  • 10 - Coolant Refill
  • 11 - High Pressure Flood Coolant
  • 12 - Through-Spindle Coolant
  • 13 - Through-Tool Air Blast
  • 14 - Haas Chip Lift
  • 15 - Mist Condenser
  • 16 - Coolant Level Float Sensor
  • 17 - Mini Conveyor
  • 18 - Coolant VFD
  • 19 - Coolant Sanitizer
  • 20 - Chip Separator
  • 21 - Chip Tray Strainer

Go To :

  • 5.1 P-COOL Overview
  • 5.2 P-COOL - Operation
  • 5.3 P-COOL - Replacement
  • 5.4 P-COOL - Field Installation - VMC, MM/SMM, TM, and DT/DM
  • 5.5 P-COOL - Field Installation - UMC
  • 5.6 P-COOL - Troubleshooting

5.1 P-Cool Overview

Introduction

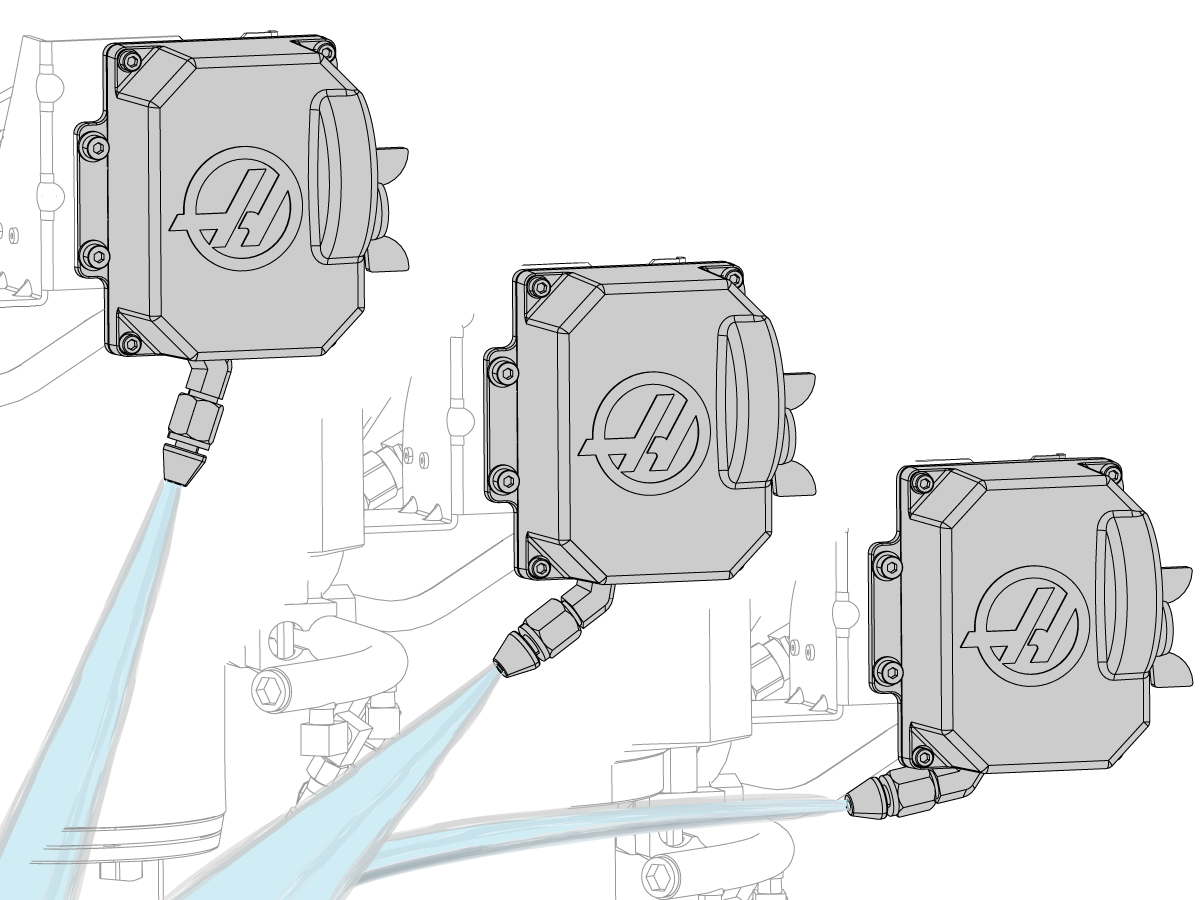
The Programmable Coolant Nozzle is a multi-position nozzle that automatically directs coolant precisely at the cutting tool.

The position of the nozzle is controlled via the program, and set specifically for each tool length – saving operator time by eliminating constant adjustments. 

Warning: Do not back drive the nozzle either by hand or when making coolant connection. 

5.2 P-COOL - Operation

Recently Updated

P-COOL - Operation


Applies to machines built from: January, 1992

Introduction

1

This procedure tells you how to find the best Programmable Coolant (PCOOL) spigot position for each tool. The PCOOL spigot adjusts its position when the program calls a tool offset.

 Caution: Do not move the PCOOL spigot by hand. This causes damage to the motor. Use only control commands.

Software Required:

  • Mill Software Version 4.19 or higher
  • Next Generation Control

Positioning

1

Set the ball valve to the PCOOL position.

 Note: This step is necessary only when you have a ball valve control to change between conventional coolant (lock lines or coolant ring) or PCOOL.

Valve placement and style can be different from the illustration.

2

Next Generation Control 

Press [OFFSET] until the TOOL OFFSET tableappears on the display.

Command the first tool into the spindle.

3

Classic Haas Control

Press [OFFSET] until the TOOL OFFSET table [1] appears on the display.

Command the first tool into the spindle.

4

Press [COOLANT] to start the coolant flow.

Press [CLNT UP] or [CLNT DOWN] to change the position of the spigot.

 Note: Continue to the next step after you find a good position, where the coolant sprays on the tool tip.

5

Next Generation Control

Press [COOLANT] to stop the coolant flow.

Record the value next to Coolant Position [1] at the bottom of the TOOL OFFSET table.

6

Classic Haas Control

Press [COOLANT] to stop the coolant flow.

Record the value next to CLNT POS [1] at the bottom of the TOOL OFFSET table.

7

Next Generation Control

Highlight the tool offset you want to adjust.

Select the COOLANT POSITION column.

Type the coolant position number that you recorded in step 4.

Press [F1] to enter the value into the COOLANT POSITION column.

 Note: The PCOOL spigot adjusts to the position in the COOLANT POSITION column when the program calls a tool offset.

8

Classic Haas Control

Highlight the tool offset you want to adjust.

Select the COOLANT POSITION column [1].

Type the coolant position number that you recorded in step 4.

Press [F1] to enter the value into the COOLANT POSITION column.

 Note: The PCOOL spigot adjusts to the position in the COOLANT POSITION column when the program calls a tool offset.

Other Positioning Methods

You can also use these methods of changing the position of the coolant spigot.

  1. Coolant Position System Variables
    • You can specify the coolant positions for tools 1 through 200. The systems variables you will use are 3401 through 3600.
    • Example: #3401=15 sets the coolant position for Tool 1 to position 15.
    • The machine must have Macros enabled.
  2. Coolant Position in the Program Blocks
    • You can adjust the spigot in a program block with an M34 or M35 command.
    • The M35 command moves the spigot one position up.
    • The M34 command moves the spigot one position down.

5.3 P-COOL - Replacement

Recently Updated

P-COOL - Replacement


AD0302

Applies to machines built from January 1992

Introduction

This procedure tells you how to replace a Programmable Coolant (P-Cool) assembly on an HMC or VMC machine. The procedure shows the replacement on a VMC machine. The steps are similar on an HMC machine.

These instructions apply to kit

  • PN: 93-1475B, P-COOL INSTALLATION KIT 2022 (machines made May 2022 and later)

Minimum software requirements for a machine with a Classic Haas Control:

  • Older software versions do not allow 34 positions for the pcool. Versions M11.17 through M11.21 only allow 14 positions. While the pcool will function, it will be restricted to 14 positions (14° of motion). Software upgrade to M11.22 or higher is required for these machines. No other restrictions on other versions of software.

Machines with a Classic Haas Control Hardware requirements for first time installation:

  • 25-7850A  BRACKET PCOOL VF1-11/40TPCOOL
  • 25-8164    COVER CABLE PCOOL VF1-11 250/PLT
  • 52-0026A    HOSE  STRAIGHT SWIVEL PCOOL NPT 3/8M

Machine requirements

  • Machines made after 2005 will need a new mounting braket. 
  • Machines made after 2006 may need new M12 Cable. 

For these machines:

  • DT, MM, SMM, EC, ES, GR, VR

You must order an M12 cable [1] that has a strain-relief fitting [2]. Use P/N 32-0356.

The cable included in the kit does not have a strain relief.

Electrical Schematic

Replacement

1

Disconnect the P-Cool hose from the valve [1] attached to the P-Cool manifold.

Disconnect the M12 cable [2] from the connector [3] on the used P-Cool assembly.

If the M12 cable has a strain relief, remove the cable bracket [4] from the spindle head cover.

Remove the (2) screws [5] that hold the used P-Cool assembly. Remove the used P-Cool assembly.

Install the new P-COOL ASSEMBLY [A]. Use the same (2) screws [5]. Connect the hose from the new P-Cool assembly to the valve [1] attached to the P-Cool manifold.

2

Remove the spindle head cover.

Connect the new M12 CABLE [B] to the receptacle on the P-COOL ASSEMBLY [A].

Put the cable up the side of the spindle head casting. Make sure the cable goes into the opening [3] at the bottom of the spindle.

Disconnect the used M12 cable [1] from the connector bracket [2].

 Note: On HMC machines, the connector bracket is near the back of the Y-Axis column. Remove the Y-Axis way covers for better access to the connector bracket.

Connect the new M12 CABLE [B] to the connector bracket.

3

Install the spindle head cover. Do not let the M12 CABLE [B] get caught between the cover and other objects.

If the M12 cable has a strain relief, put the cable and strain relief through the bracket [1]. Attach the bracket to the spindle head cover.

To replace the standard nozzle [2] with the long NOZZLE [C], do these steps:

  • Remove the fitting and nozzle [3] from the P-Cool assembly.
  • Install the long NOZZLE [C] into the FITTING [D].
  • Install the fitting into the P-Cool assembly.

Verification

1

Turn on the machine.

For a Machine with a Classic Haas Control First Time Installation:

  • Go into DEBUG mode and set parameter 206 SPIGOT POSITIONS 34.

For a Machine with a Next Generation Control First Time Installation:

  • Login to the HAAS SERVICE PORTAL.
  • Download the PCOOL option configuration patch files.
  • Load the option configuration patch file to the control.  Refer to the NEXT GENERATION CONTROL - CONFIGURATION FILE - DOWNLOAD/LOAD procedure.

Test the option:

Push [CLNT UP]. Push [CLNT DOWN].

The P-Cool nozzle moves up and down.

Make sure the P-Cool system operates correctly.

5.4 P-COOL - Field Installation - VMC, MM/SMM, TM, and DT/DM

Recently Updated

P-COOL - Field Installation - VMC, MM/SMM, TM, and DT/DM


AD0197

Applies to machines built from: January, 2000

Introduction

Do this procedure for a Mini Mill or Super Mini Mill. This procedure tells you how to install a programmable coolant (PCOOL) system. 

Machine Compatibility

Mini Mills (MM) and Super Mini Mills (SMM) built in 2015 and after have these features:

  • Cable 200 is installed at the factory. You do not need to install the cable from the kit.
  • A flood coolant ring is installed at the factory. You do not need the modular-hose (Loc-Line) nozzle in the kit.

On Mini Mills and Super Mini Mills built before 2015, you must install these items from the kit:

  • Cable 200
  • The modular-hose (Loc-Line) nozzle assembly

The Coolant ring part of this procedure also works for VMCs with a coolant ring. 

Document Applies to these Parts

    Current Machines:

PN: 93-1000249 - INSTALLATION KIT, P-COOL MM/TM

93-1000966 - PCOOL KIT 40T LRG VF 2023

93-1000967 - PCOOL KIT 40T SML/MED VF 2023

93-1000970 - PCOOL KIT DT/DM 2023 (Applies for July 2014 and later. Earlier machines may need a bracket.)

Tools Required:

  • Power Drill
  • 3/8" (10mm) bit
  • Hacksaw
  • Metal File

Machine requirements

  • Pre-2006 machines will require cable and bracket 
  • Machines made after 2006 machines may require a cable. 

Templates

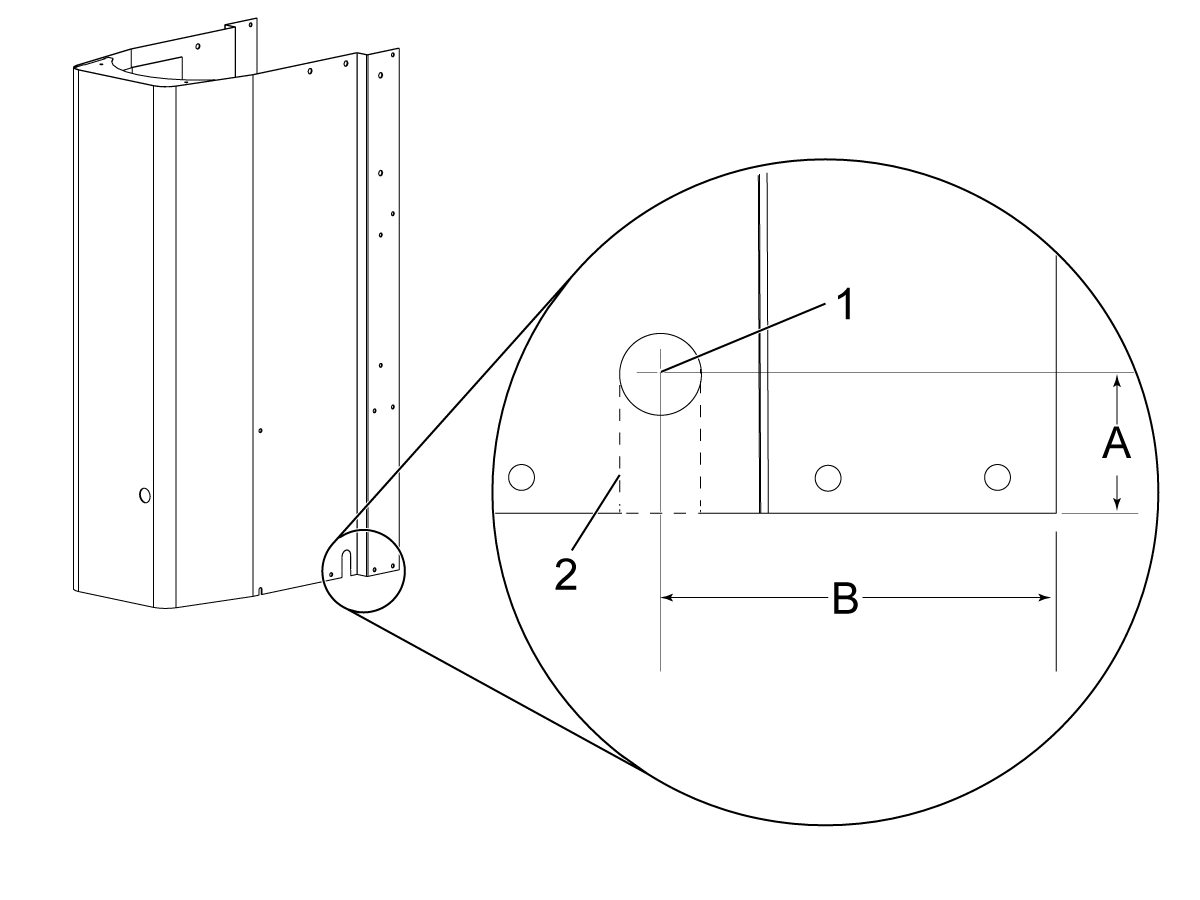
1

Some spindle head covers do not have the necessary slot to install the cable. For these machines, use this template.

Remove the spindle head cover.

On the side of the head cover, measure the dimensions [A] from the bottom edge of the cover and [B] from the back edge of the cover.

  • A - 1.25" (32 mm)
  • B - 3.63" (92 mm)

Put a mark [1] at the intersection of [A] and [B].

Drill a Ø0.375" (10 mm) hole at the mark [1].

Use the hacksaw to make (2) cuts [2] between the bottom edge of the spindle head cover and the hole to create the slot.

Use a file to make the edges of the slot smooth.

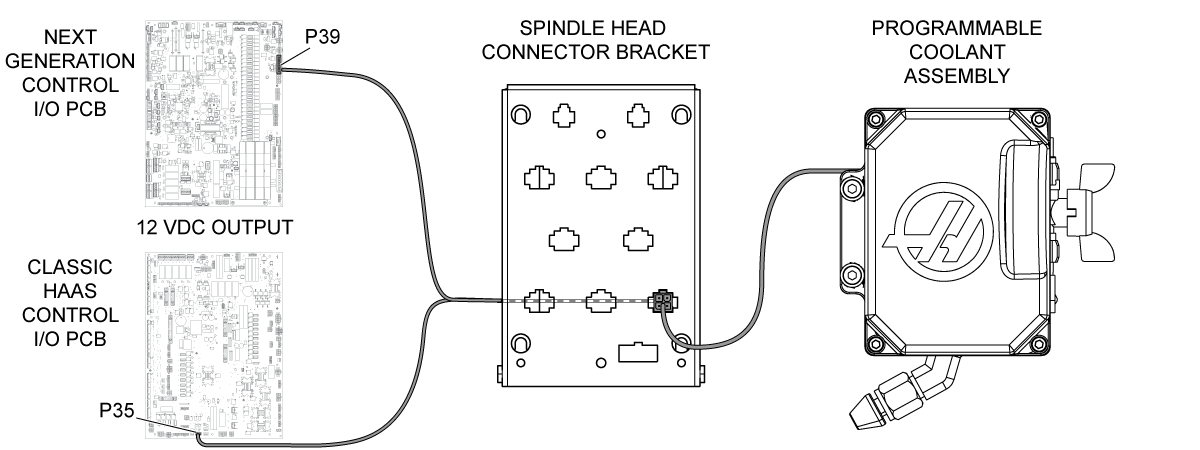
Electrical Schematic

Modular - Hose Nozzle - Installation

Do this procedure on a Mini Mill or Super Mini Mill that was made before 2015. These machines have a modular hose (Loc-Line). This procedure tells you how to install a programmable coolant (PCOOL) system.

1

Set the main circuit breaker to the OFF position.

Push [POWER OFF].

Lock the main circuit breaker. Use an approved lock with an approved safety tag.

2

Remove the head cover.

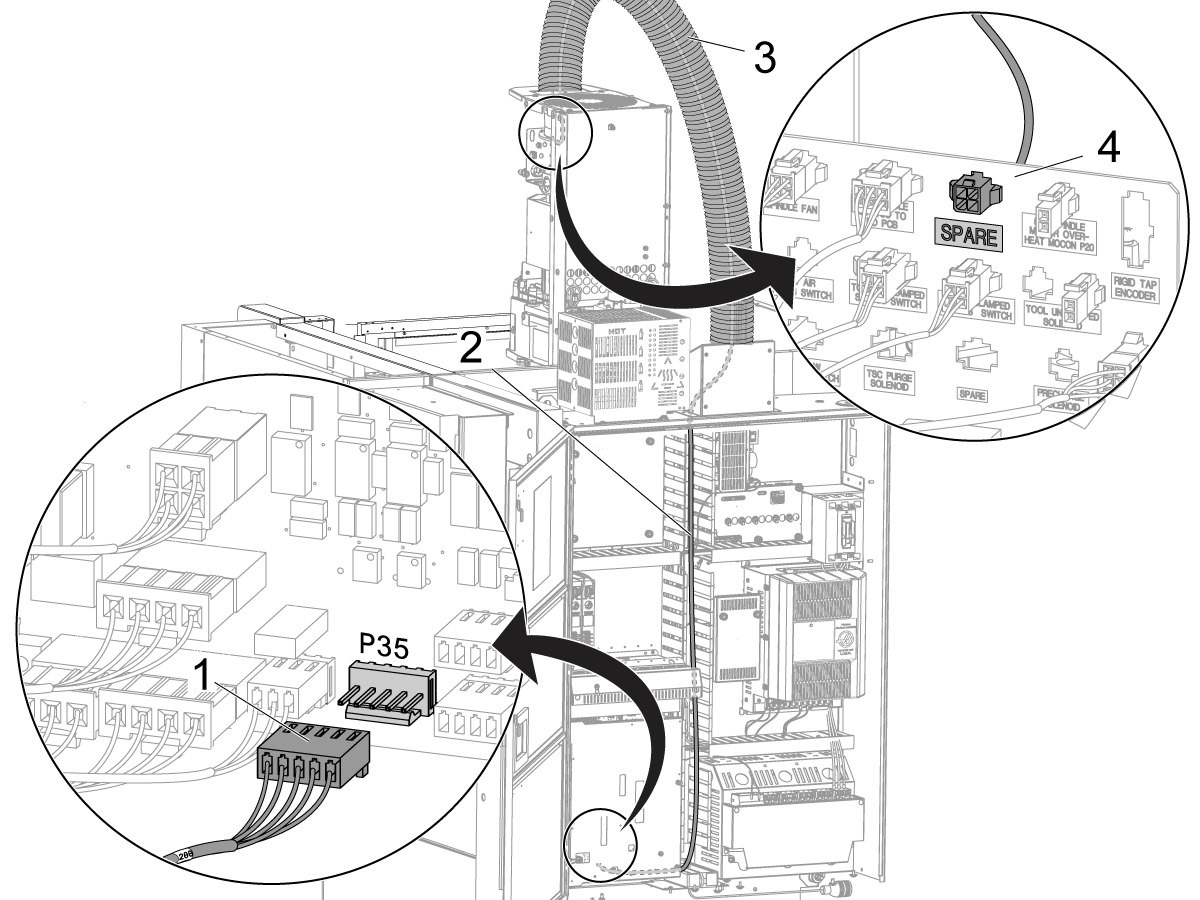
Find cable 200 in the installation kit.

To install the cable, do these steps:

  • Open the control cabinet. Find the I/O PCB.
  • Connect the cable [1] to P35 on the I/O PCB.
  • Put the cable into the cable manager [2].
  • Put the cable through the cable carrier [3].
  • Examine the connector bracket [4] at the top of the spindle.
  • Find an open hole that has the label "SPARE."
  • Push the connector on the cable through the hole.

3

Remove the modular-hose assembly [2] from the spindle head casting.

Install these parts for the P-Cool assembly:

  • tee fitting [1]
  • modular-hose assembly [2]
  • adapter [3]
  • P-Cool hose assembly [4]
  • P-Cool assembly [5]

4

Find the PCOOL cable [1] in the installation kit.

Put the cable into the bracket [3] for the pipe fitting. You must turn the cable to put it through the bracket.

Connect the cable to the PCOOL unit [4].

Put a cable clamp [2] onto the cable. Attach the cable clamp to the spindle casting as shown.

Find the connector [5] on the other end of the cable.

Find the receptacle [6] on the connector panel at the top of the spindle.

Connect the cable to the receptacle.

5

If the spindle head cover [1] has a plug [2] at the right rear corner, remove it before you install the cover.

Install the spindle head cover.

Attach the pipe bracket [4] to the spindle head cover.

The PCOOL cable has a special fitting [3] to prevent damage. Make sure the fitting is tight.

Note: Machines made before August 2002 possibly do not have the plug in the spindle head cover. Refer to the "Introduction" for instructions on how to modify the spindle head cover.

Flood Coolant Ring - Installation

This procedure is for Mini Mills, Super Mini Mills, or VMCs that have a flood coolant ring.  This procedure tells you how to install a programmable coolant (PCOOL) system.

1

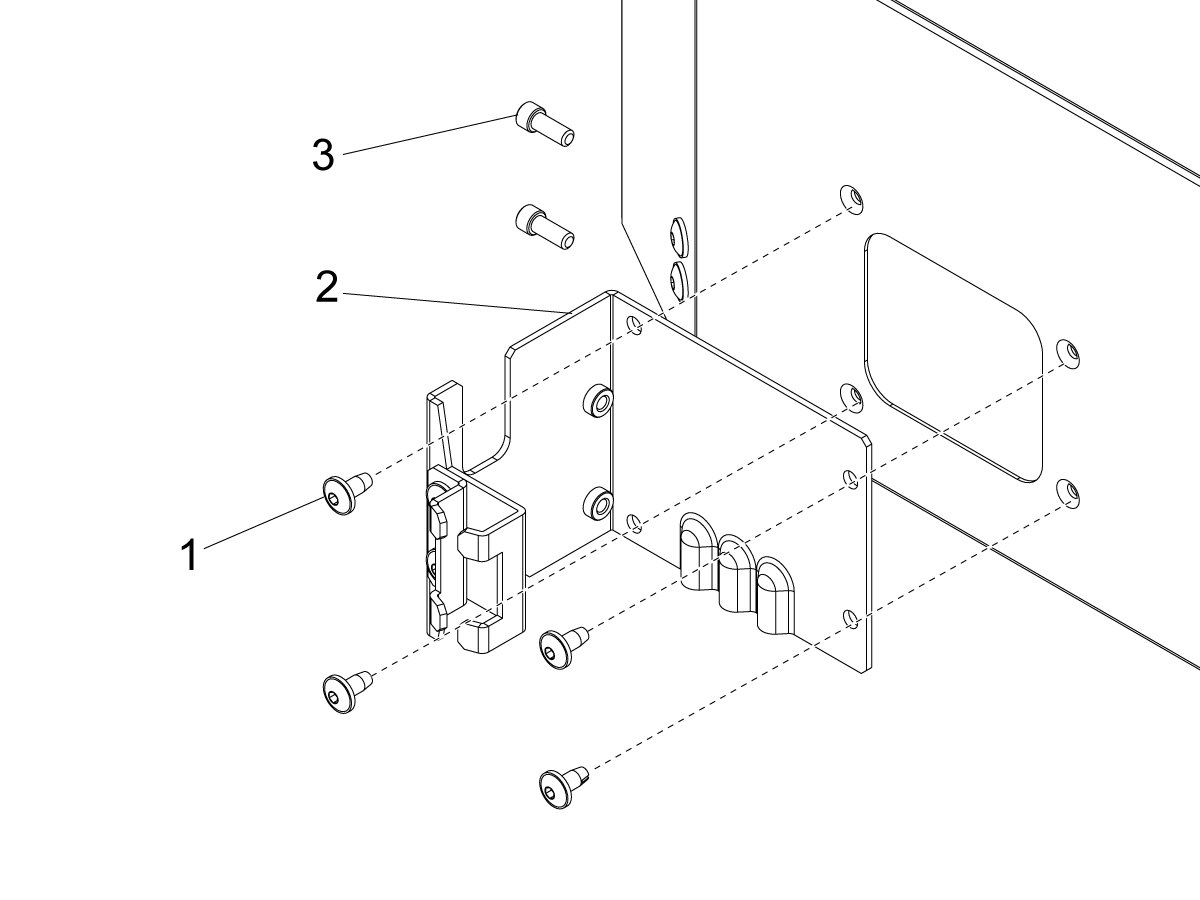
VMC Bracket

This bracket is installed on all machines made after 2005 by default. This will need to be installed on machines made before 2005. 

[1] These four screws will attach the bracket to the spindle housing of the machine.

[2] This bracket is where the Pcool unit is attached to the rest of the machine.

[3] These two screws attach the Pcool unit. 

2

Mini Mill and DM/DT Bracket

Remove the modular-hose assembly [2] from the spindle head casting.

Install these parts for the P-Cool assembly:

  • tee fitting [1]
  • modular-hose assembly [2]
  • adapter [3]
  • P-Cool hose assembly [4]
  • P-Cool assembly [5]

3

Set the main circuit breaker to the OFF position.

Push [POWER OFF].

Lock the main circuit breaker. Use an approved lock with an approved safety tag.

4

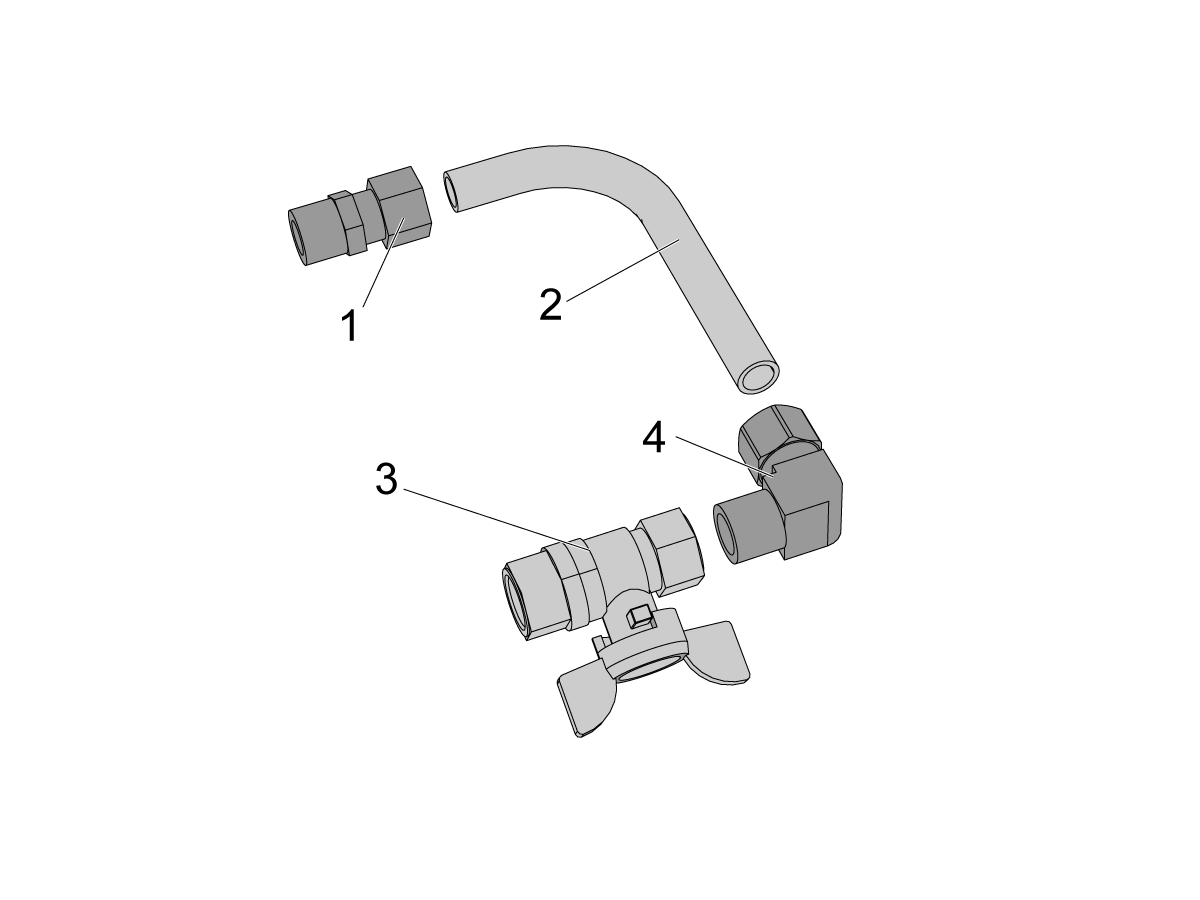
Assemble the return assembly for the flood coolant ring. Do these steps:

  • Connect a straight compression fitting [1] to the return tube [2].
  • Connect a 90-degree compression fitting [4] to the return tube.
  • Connect an inline valve [3] to the fitting.

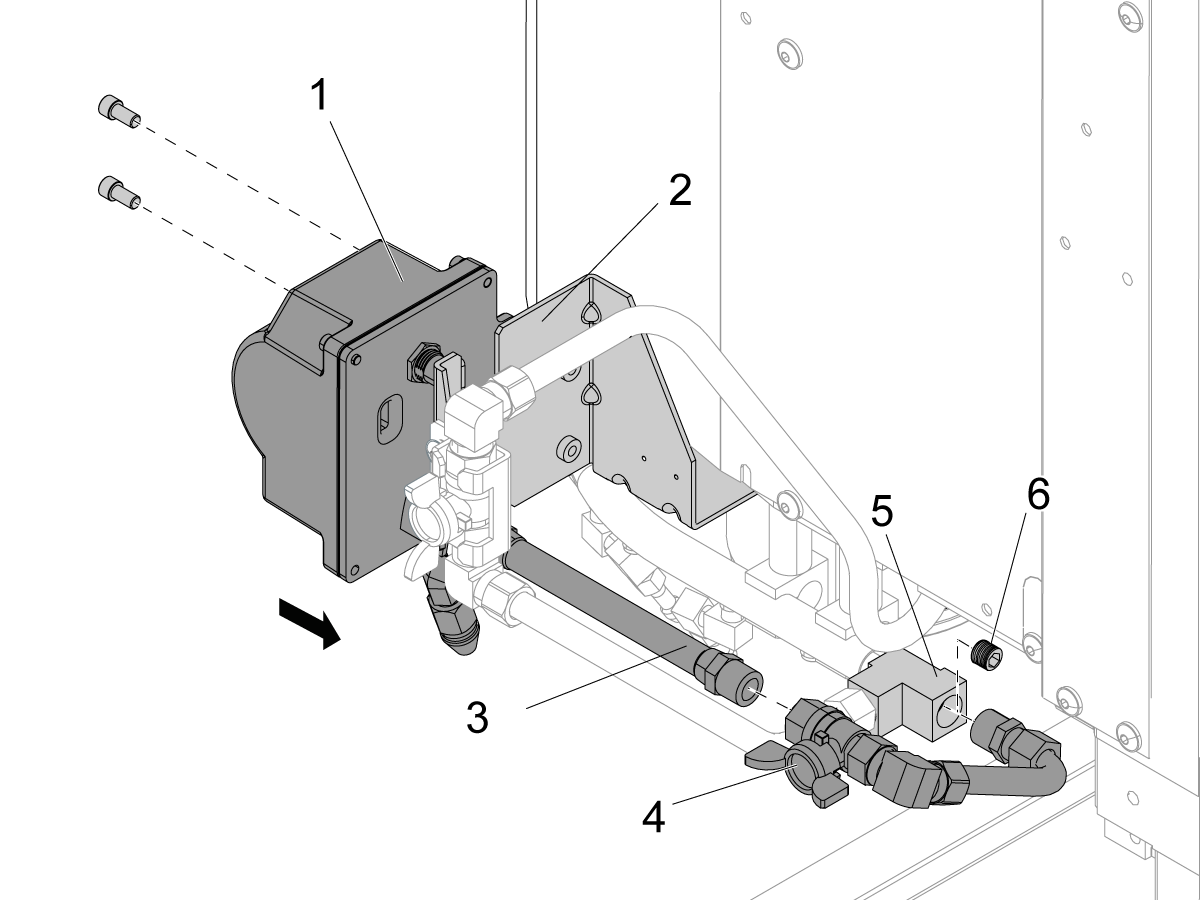
5

Remove the plug [6] from the manifold [5] for the flood coolant.

Connect the return assembly [4] to the manifold.

Connect the PCOOL unit [1] to the PCOOL bracket [2].

Connect the hose [3] for the P-Cool to the return assembly [4].

Warning: When connecting [3] and [4], be sure not to over torque the barb at the other end of the house, as this will damage the internal components of the Pcool. If it is necessary to tighten that barb, torque should not exceed 15 ft-lbs, and the spigot should be held with a wrench. 

6

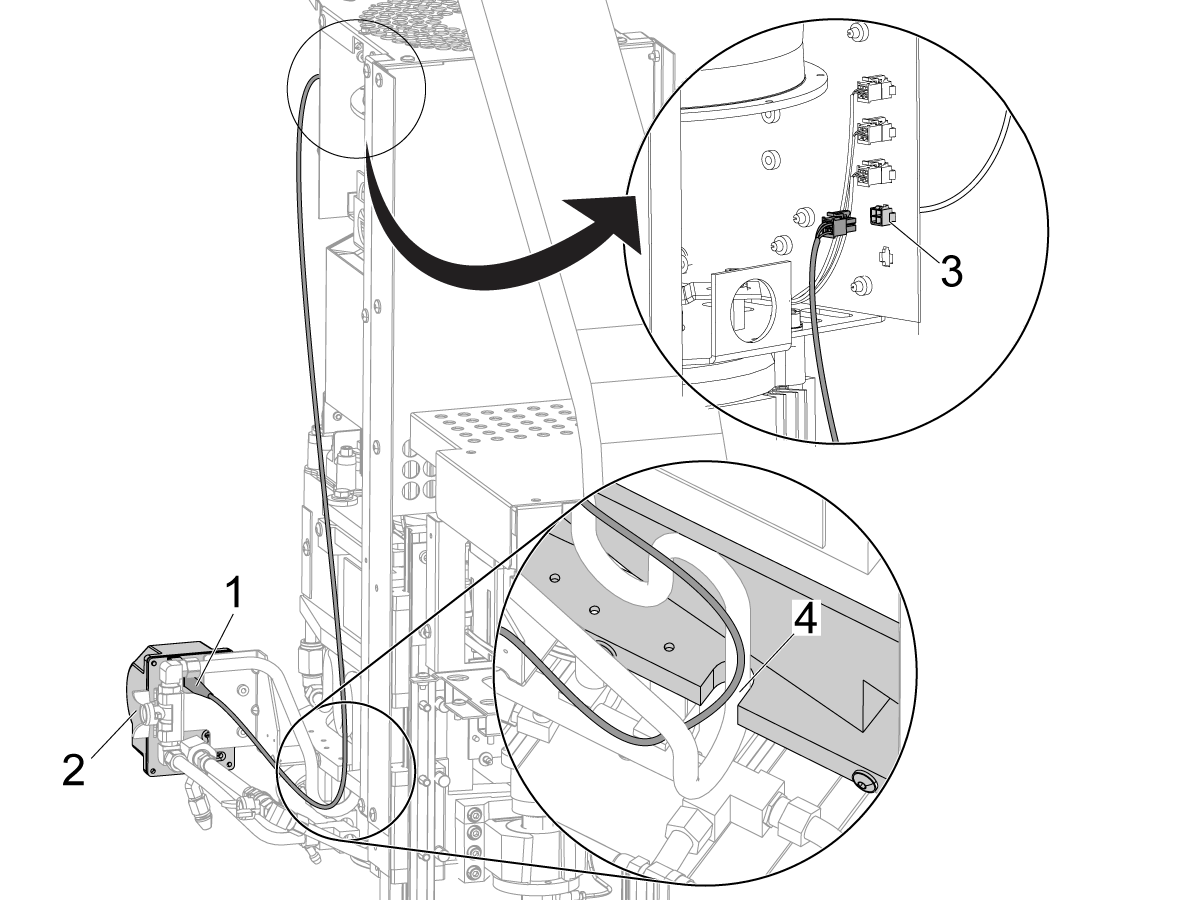
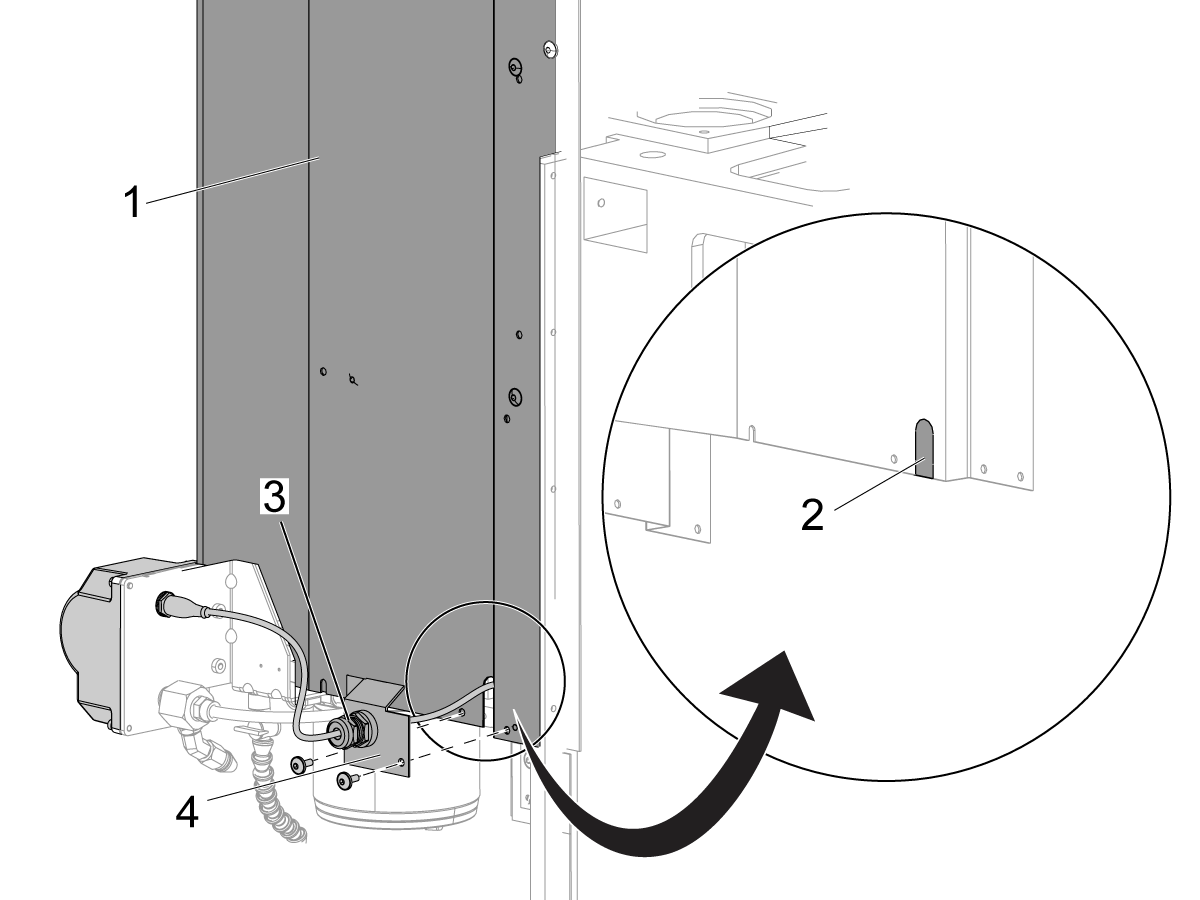
Remove the spindle head cover.

Connect the PCOOL cable [1] to the PCOOL unit [2].

Put the cable through the slot [4] in the spindle head casting.

Connect the cable to the open connector [3] on the connector bracket for the spindle head.

Install the spindle head cover.

PCOOL - Test

This procedure tells you how to make sure a programmable coolant (PCOOL) system operates correctly.

1

Classic Haas Control:

Set the main circuit breaker to the ON position.

Push [POWER ON].

Push [EMERGENCY STOP].

Change Setting 7, PARAMETER LOCK, to OFF.

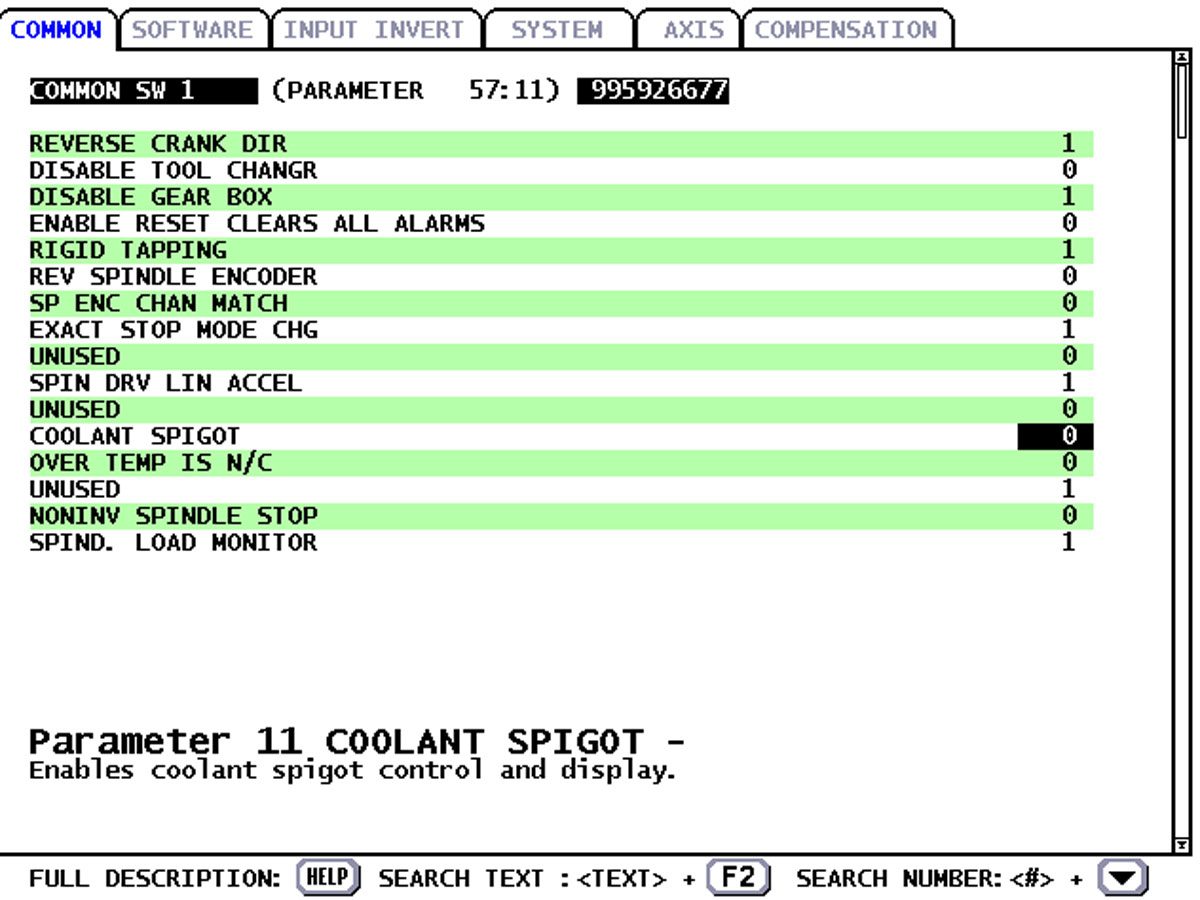
Change Parameter 57:11, COOLANT SPIGOT, to 1

2

Next Generation Control:

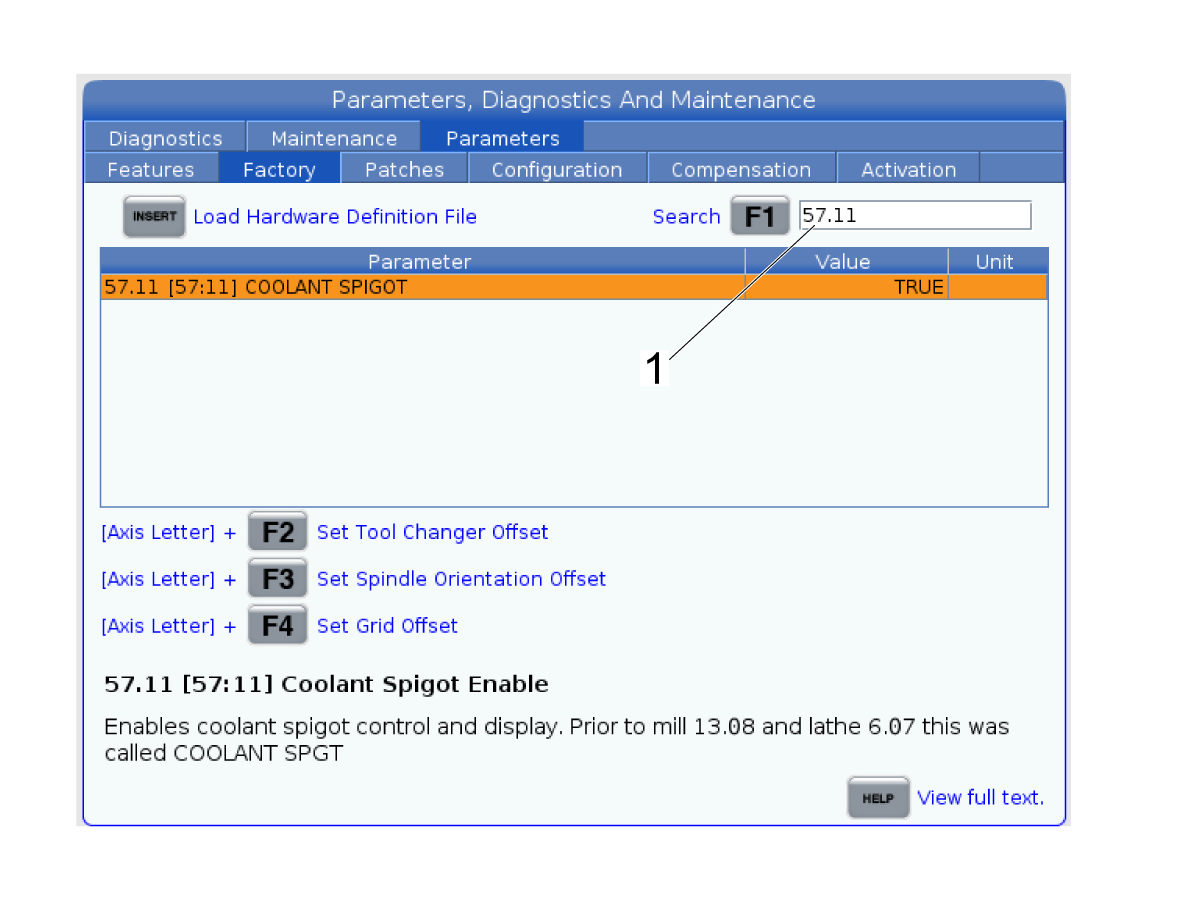
Verify P-Cool Spigot is Enabled

  • Go into Service Mode
  • Navigate to the Factory Parameters page
  • Verify parameter 57.11 is set to TRUE [1]
  • If it is FALSE, set the setting to TRUE [1]

3

Release the [EMERGENCY STOP].

Push [RESET] to clear each alarm.

Push [CLNT UP] and then [CLNT DOWN].

The PCOOL nozzle moves up and down.

5.5 P-COOL - Field Installation - UMC

Recently Updated

P-COOL - Installation - UMC-Series-NGC


AD0588

Introduction

This procedure tells you how to install the Programmable Coolant Nozzle (PCOOL) on a UMC Series.

This document applies to:

  • 93-1000969 - PCOOL KIT UMC-500/750 REBOOT/1000/GM-2
  • 93-1000968 - PCOOL KIT UMC-750 PRE REBOOT 2023 (for pre reboot UCM-750)

Use the UMC-750 Machine Version - Identification page to verify which UMC model you own. 

  You should not do mechanical or electrical machine repairs or service procedures unless you are qualified and knowledgeable about the processes.

   Only authorized personnel with the proper training and certification should do this repair procedure.

   All information herein is provided as a courtesy for Haas machine owners for reference and illustrative purposes only. Haas Automation cannot be held responsible for repairs you perform. Only those services and repairs that are provided by authorized Haas Factory Outlet distributors are guaranteed.

Installation

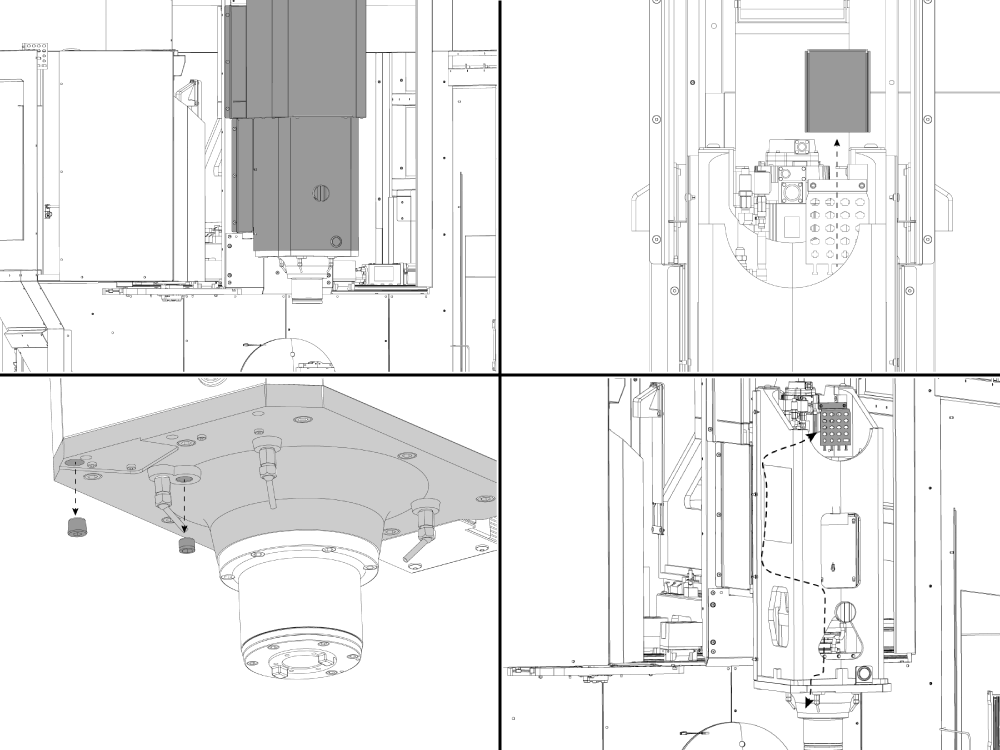
1

The images show parts of the machine isolated. Do not remove parts unless the instructions tell you to.

Remove the upper spindle head covers.

Remove the Junction Box Z Cover

Remove the two plugs from the Spindle Mount Casting

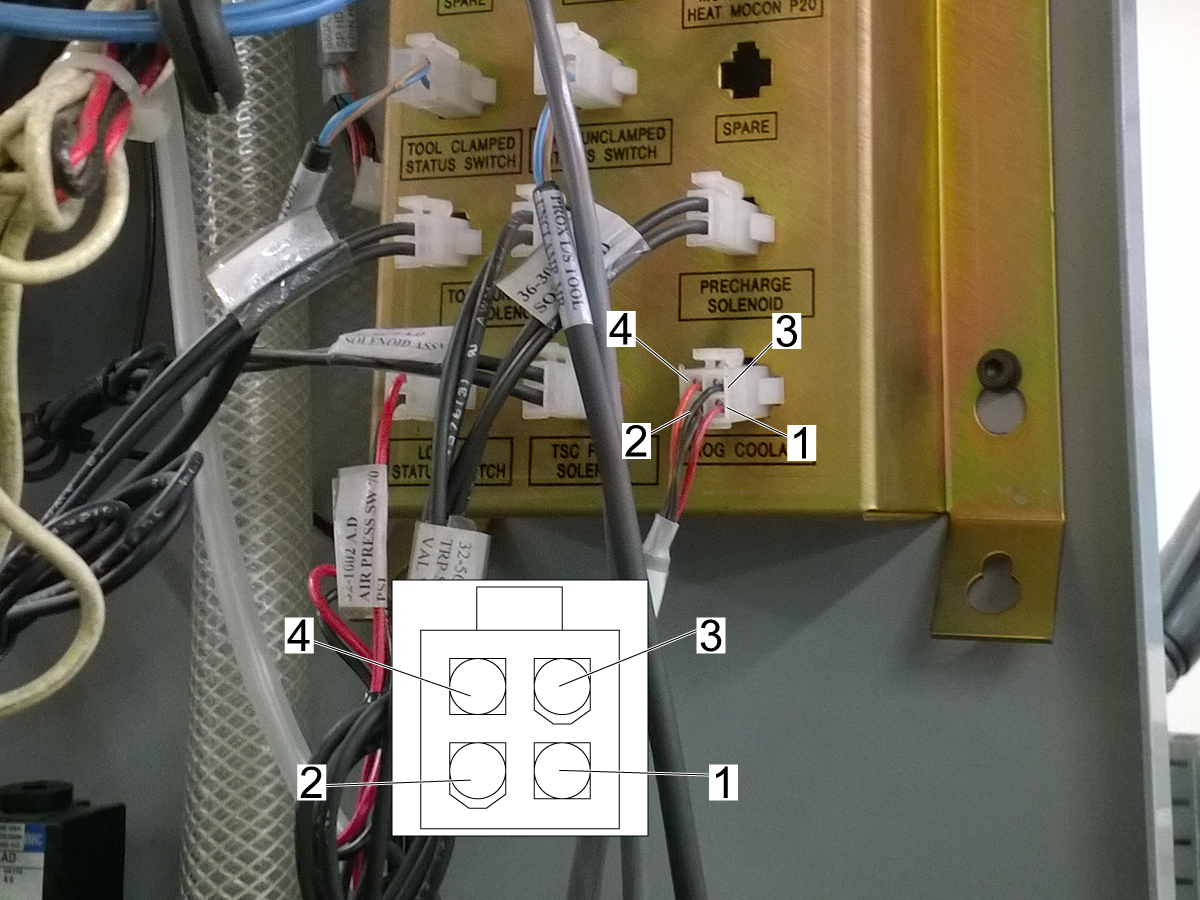
Route the PCool cable (32-0356) through the head casting to the Junction Box labeled PROG. COOLANT

2

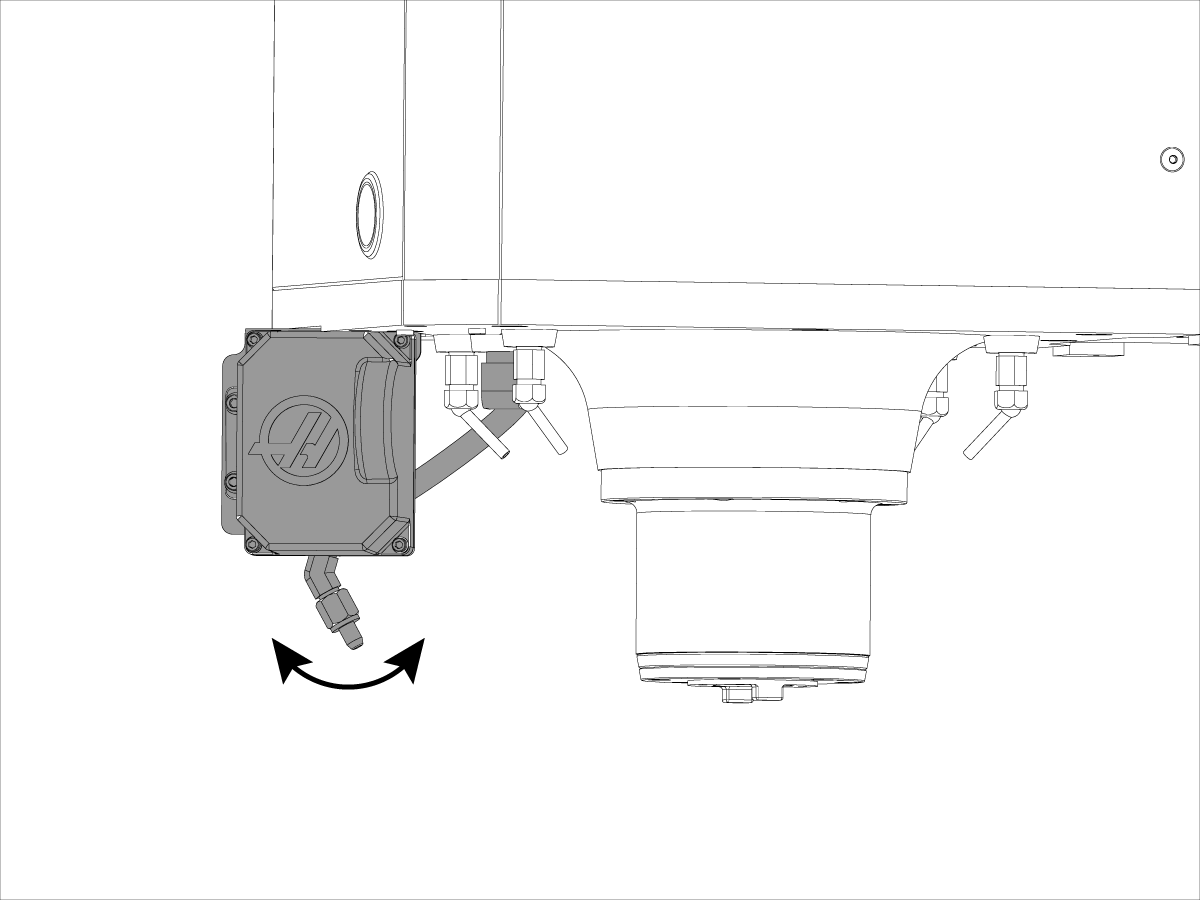
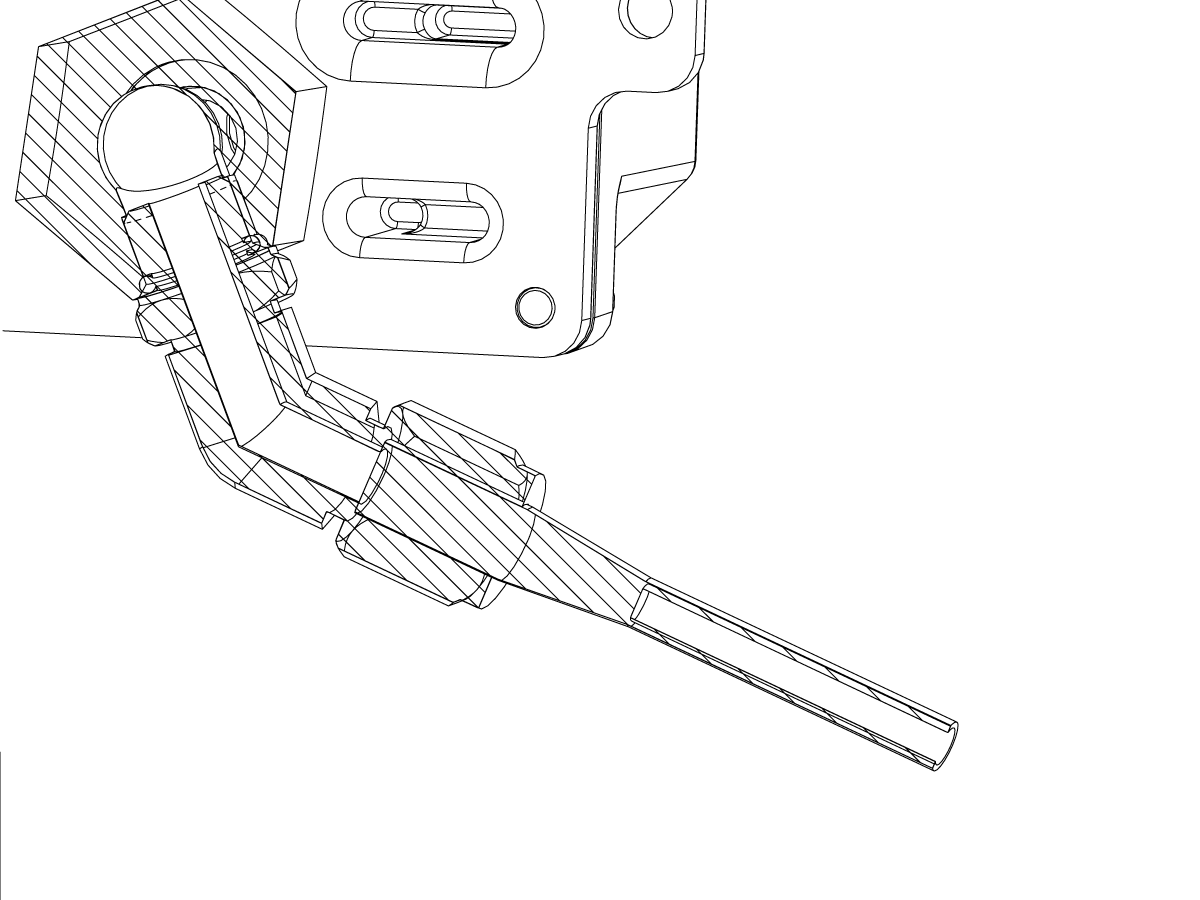
  • Install the coolant tube [1] to the casting with the 90 degree elbow fitting [2],
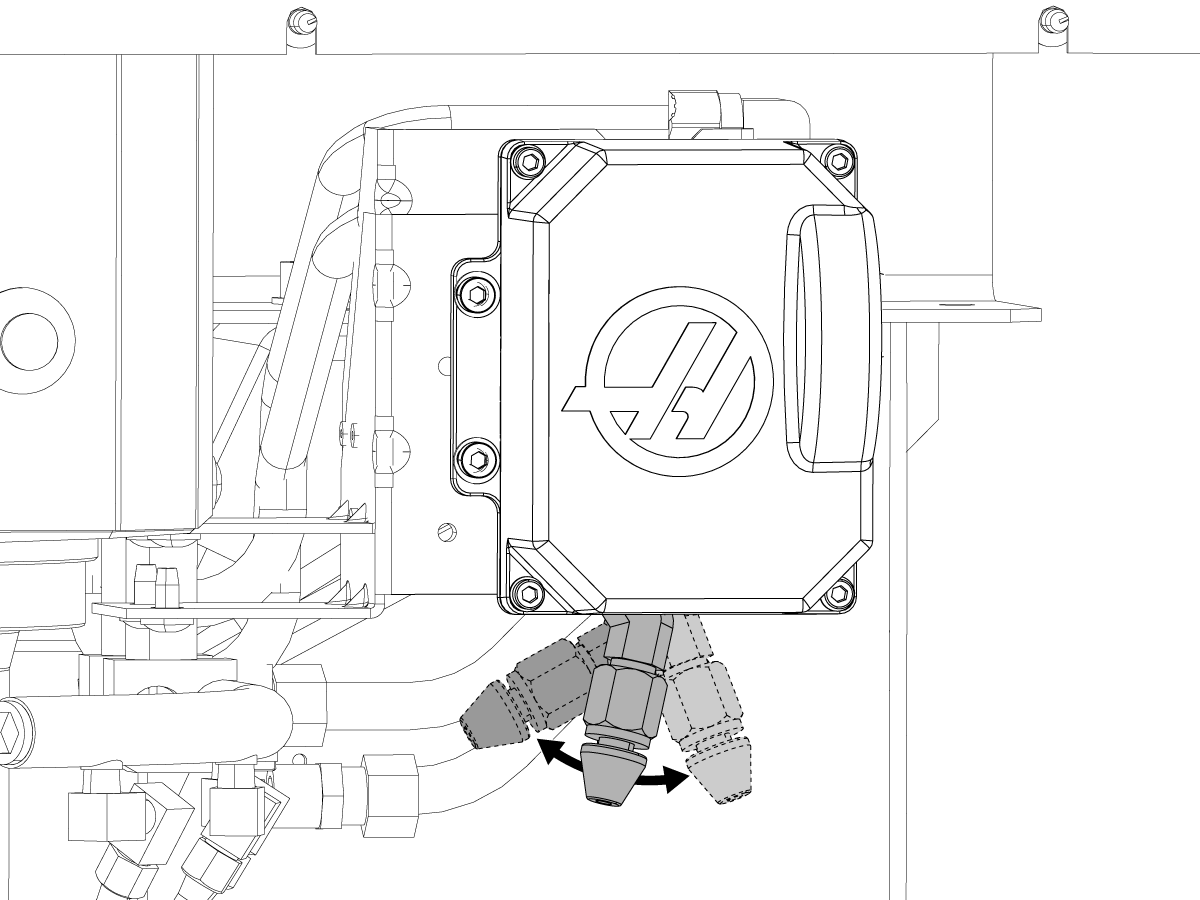
  • Loosen the lock nut [3] and rotate the P-Cool nozzle to the correct position [4].
  • Install the coolant tube with the fittings from the casting to the P-COOL unit.
  • Tighten all fittings so the P-COOL assembly does not leak.


IMPORTANT: LOOSEN UP THE TWO MOUNTING BOLTS TO ALLEVIATE STRESS ON THE SYSTEM, ONCE STRESS IS ALLEVIATED RE-TIGHTEN THE MOUNTING BOLTS.

3

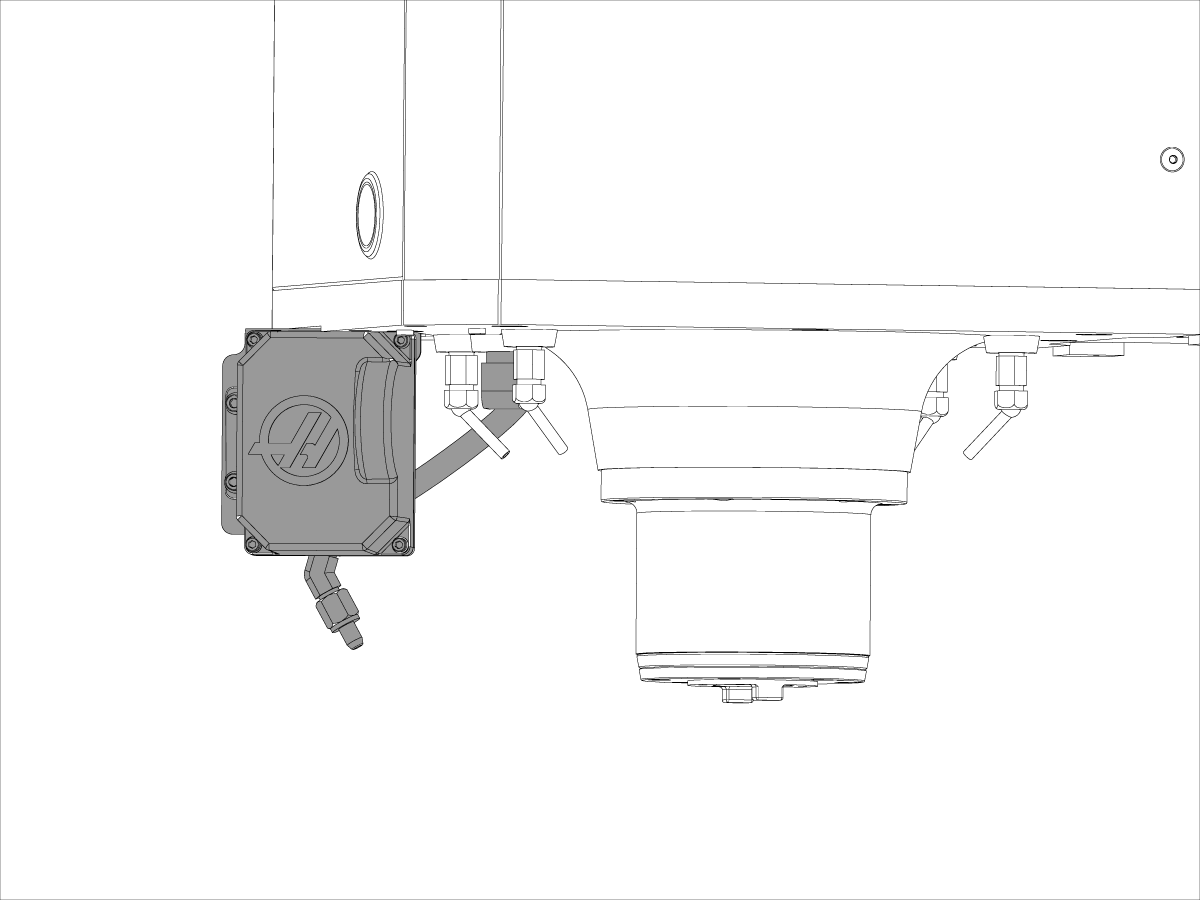
  • Install P-COOL ASSY to the P-COOL sheet metal bracket.
  • Install the P-COOL unit to the casting.

NOTE: Be sure to route the cable through the cutout in the sheet metal bracket and up to the junction bracket.

4

Verify P-Cool Spigot is Enabled

  • Go into Service Mode
  • Navigate to the Factory Parameters page
  • Verify parameter 57.11 is set to TRUE
  • If it is FALSE, set the setting to TRUE

Test

1

Press [RESET] to clear each alarm.

Press [CLNT UP] and then [CLNT DOWN].

The PCOOL nozzle moves up and down.

For more information on how to position the spigot use the Programmable Coolant (PCOOL) - Spigot Positioning procedure.

5.6 P-COOL - Troubleshooting

Recently Updated

P-COOL - Troubleshooting Guide


Introduction

The Programmable Coolant Nozzle is a multi-position nozzle that automatically directs coolant precisely at the cutting tool.

Symptom Table

Symptom Possible Cause Corrective Action
Alarm 196 COOLANT SPIGOT FAILURE The P-COOL could not obtain the commanded position in the allotted time.  Make sure there are external reasons for the nozzle to move slowly. Check for drag in the swivel fitting. 
There is no voltage to the P-COOL.  Measure the power to the P-COOL.
The P-COOL. moves up and down without stopping.  Make sure the cabling is undamaged, and the connector pins are sealed properly. 
There is low coolant flow from the nozzle.  Chips have clogged the P-COOL nozzle or the filters.  Remove chips from the P-COOL nozzle and the filters. 
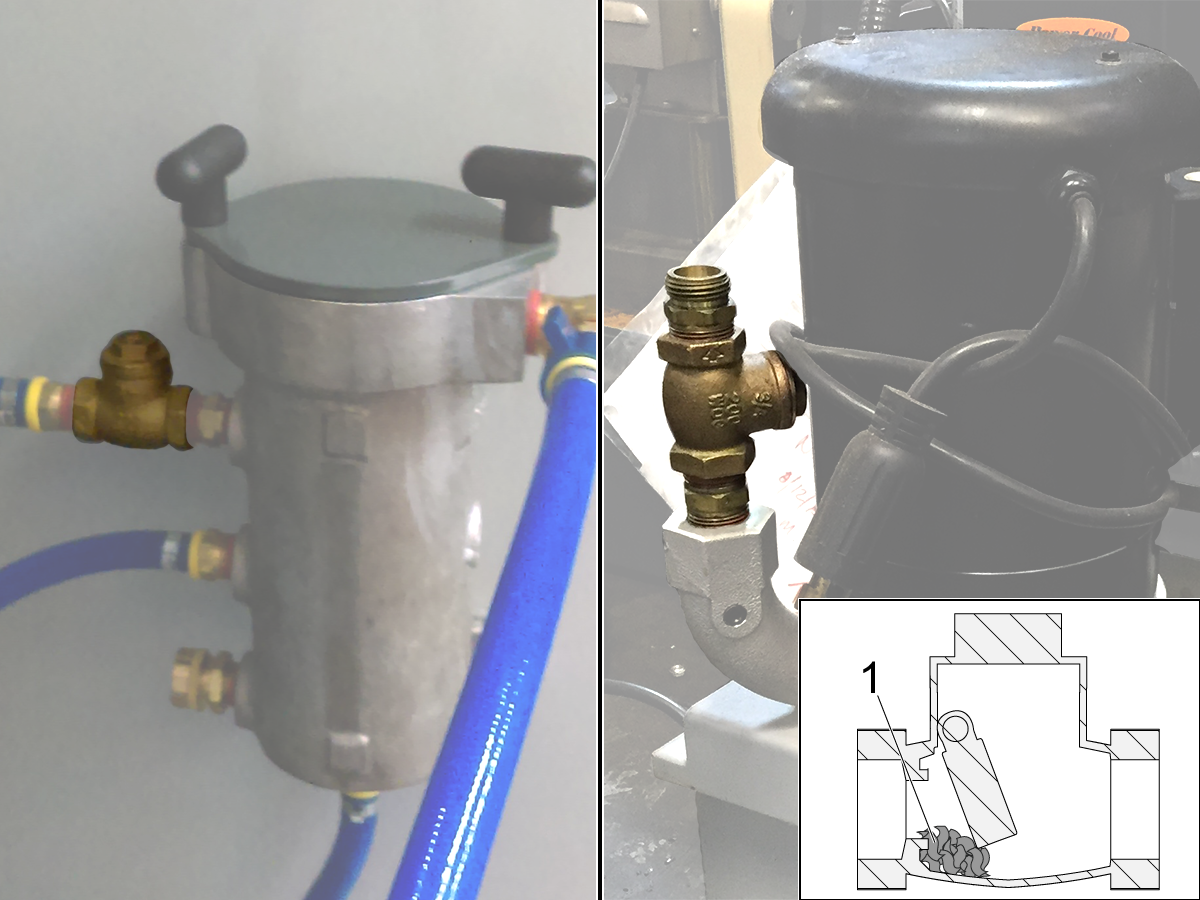
Chips have clogged the check valve or the coolant hoses.  Remove chips from the check valve and coolant hoses.
HMC Mills: The PCOOL spigot moves in the opposite direction.  Parameter 209.09 SPIGOT KEY INVERT is not set correctly.   Make sure that Parameter 209.09 is set correctly.  This parameter inverts the direction the spigot moves when the CLNT UP / CLNT DOWN buttons are pressed. 
P-COOL will not position correctly or skips positions. The switch inside the P-COOL that tracks the P-COOL's position is damaged and does not count correctly. 

Use M34/M35 to move the spigot up and down in 1 position increments. A 0.05 second dwell will be needed with each movement.

HSG-A 4-4-2023

Alarm 9806 SHORT CIRCUIT Short circuit on P-Cool Cable or P-Cool Motor.

Do a visual inspection of the cable assembly for any cable cut, pinch or damage that could cause the cable to fail. Then do a continuity test of both ends of the cable assembly. 

IMPORTANT: If the cabe is not damaged and passes the continuity tests, an error report MUST be taken and added to the machine history for troubleshooting the motor. If an error report is not taken there is a risk of warranty being rejected.

P-COOL Spigot Failure

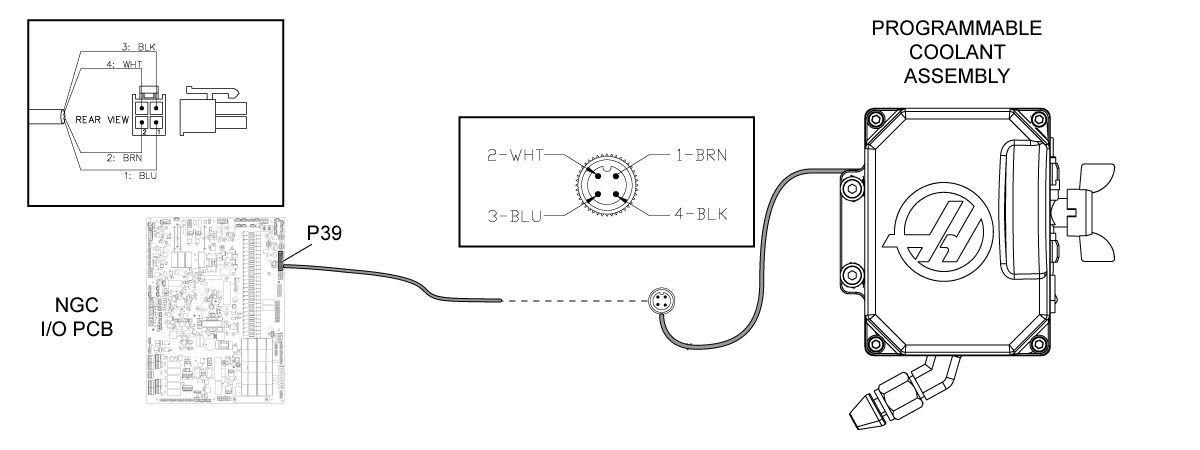
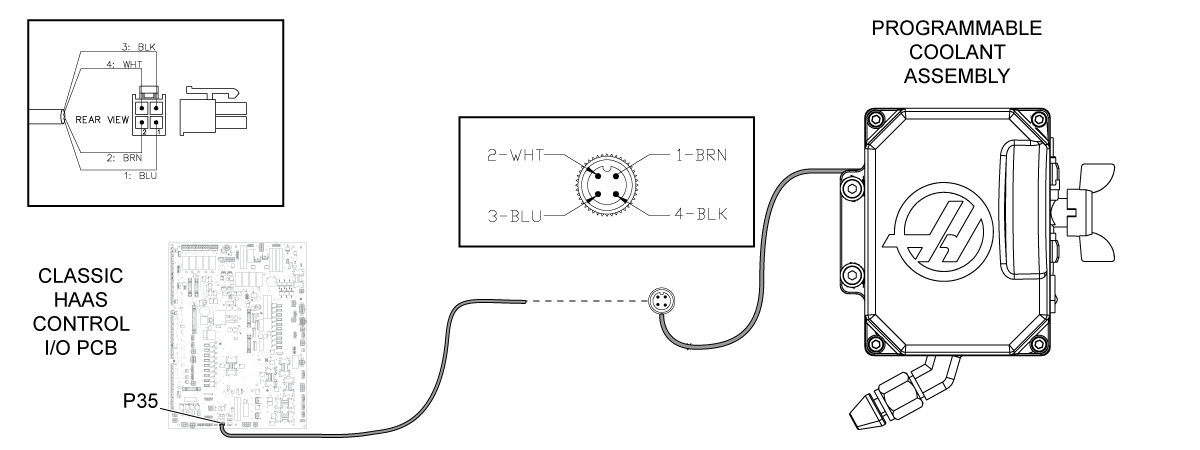
Make sure the connectors for the P-COOL cable that connects through the connector bracket at the spindle head, and to P35 on the I/O PCB, are not contaminated and are properly seated. Check for damage to the cable. Run the program for 12 seconds. If the program is not working, reset the machine.

Run this program in MDI mode:

M34;
G04 P1. ;
M35;
G04 P1. ;
M99 ;

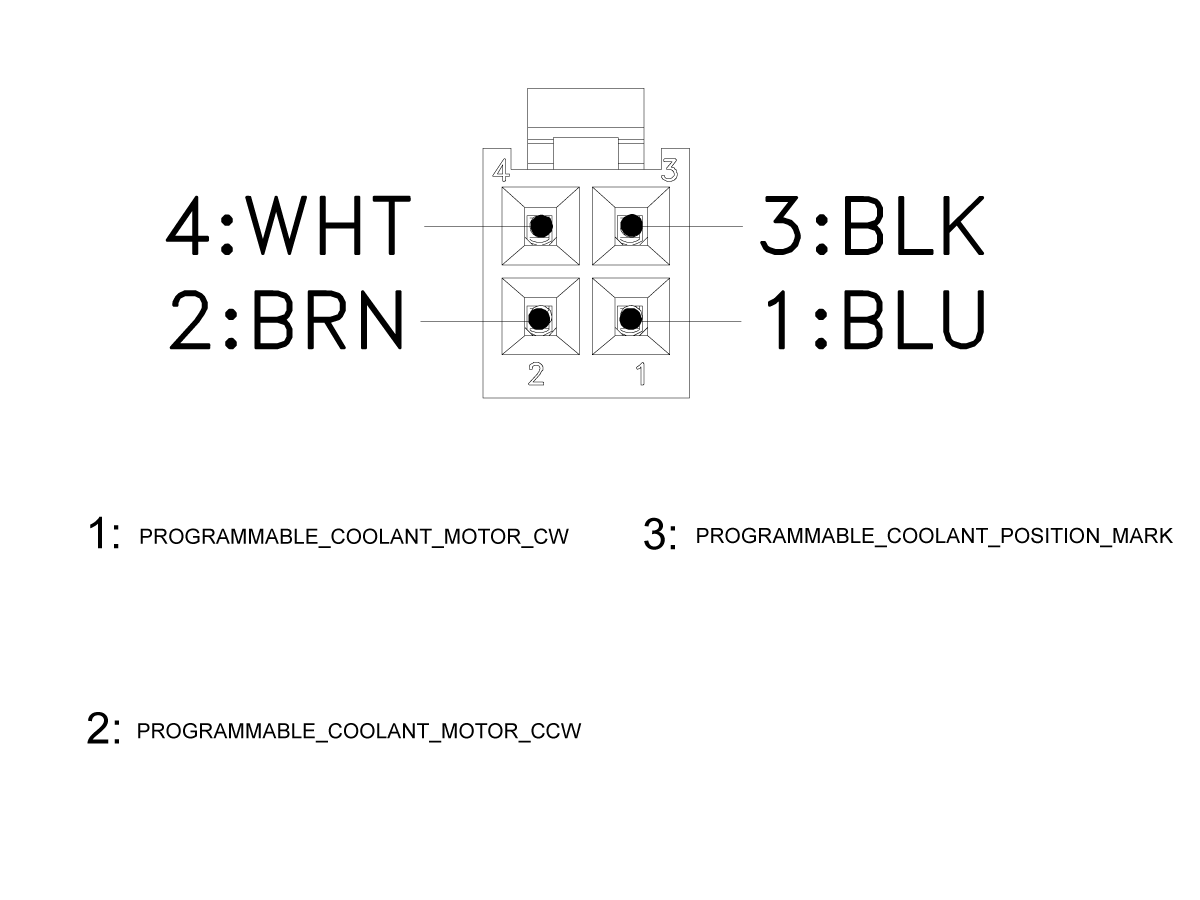
Find the connection for the P-COOL on the spindle-head connector bracket. While the program runs, use a multimeter with needle-tip probes touse a multimeter with needle-tip probes to measure the voltage across pins 1 and 2. The voltage must measure 12 VDC. Do not measure the voltage with the cable disconnected.

If there is voltage, check for continuity in the cable between the P-COOL and the connector bracket. If there is no continuity, the cable is at fault. If there is continuity, the P-COOL assembly is at fault.

If there is no voltage, refer to:

  • Next Generation Control - I/O PCB - Troubleshooting Guide
  • Classic Haas Control - I/O PCB - Troubleshooting Guide

Clogged Spigot, Filter and/or Check Valve

Make sure the ball valve for the coolant loop on the spindle head is fully open.

Remove any chips that are stuck in the P-COOL nozzle.

Clean or replace the filter element. Check the area around the coolant pump intake for chips.

  1. Auxiliary Filter - The bag filters in the Auxiliary Filter tanks need to be cleaned or replaced. The Auxiliary Filter is an option. Your machine might not have this option.
  2. Standard Filter - The Standard Filters need to be cleaned. Remove chips from the basket filter in the coolant tank.

Remove the coolant check-valve. Check it for blockage [1]. Make sure the trap door opens and closes freely. If the trap door does not close, coolant flows back into the tank. This delays the flow of coolant by a few seconds.

Disconnect both ends of the coolant hoses. Remove any kinks. In the opposite direction of the coolant flow, blow air through the hoses to remove any chips. If you find chips in the hoses, check the coolant nozzles and washdown hoses for chip buildup. Connect the coolant hoses.

Refer to the Standard Coolant - Tank - Maintenance procedure.

Electrical Diagram

Recently Viewed Items

You Have No Recently Viewed Items Yet

Feedback
Haas Logo

美元价格不包括关税、报关费用、保险费、增值税及运费。
USD prices DO NOT include customs duty, customs fees, insurance, VAT, or freight.

人民币价格包含关税、报关费用、货运保险和增值税, 但不包括运费。
CNY prices include customs duty, customs fees, insurance, and VAT. DOES NOT include freight.

Haas Delivered Price

This price includes shipping cost, export and import duties, insurance, and any other expenses incurred during shipping to a location in France agreed with you as a buyer. No other mandatory costs can be added to the delivery of a Haas CNC Product.

KEEP UP WITH THE LATEST HAAS TIPS AND TECHNOLOGY...

Sign up now!   

HAAS TOOLING ACCEPTS THE FOLLOWING:

  • Service & Support
  • Owners
  • Request Service
  • Operator Manuals
  • Haas Parts
  • Rotary Repair Request
  • Pre-Install Guides
  • Shopping Tools
  • Build & Price a New Haas
  • Available Inventory
  • The Haas Price List
  • CNCA Financing
  • About Haas
  • DNSH Statement
  • Careers
  • Certifications & Safety
  • Contact Us
  • History
  • Terms & Conditions
  • Haas Tooling Terms & Conditions
  • Privacy
  • Warranty
  • Haas Community
  • Haas Certification Program
  • Haas Motorsports
  • Gene Haas Foundation
  • Haas Technical Education Community
  • Events
  • Join the Conversation
  • Facebook
  • X
  • Flickr
  • YouTube
  • LinkedIn
  • Instagram
  • TikTok
© 2025 Haas Automation, Inc – CNC Machine Tools

This site is protected by reCAPTCHA and the Google Privacy Policy and Terms of Service apply.

2800 Sturgis Rd., Oxnard, CA 93030
Toll Free: (888) 817-4446 / Fax: 805-278-8554